

Page 1
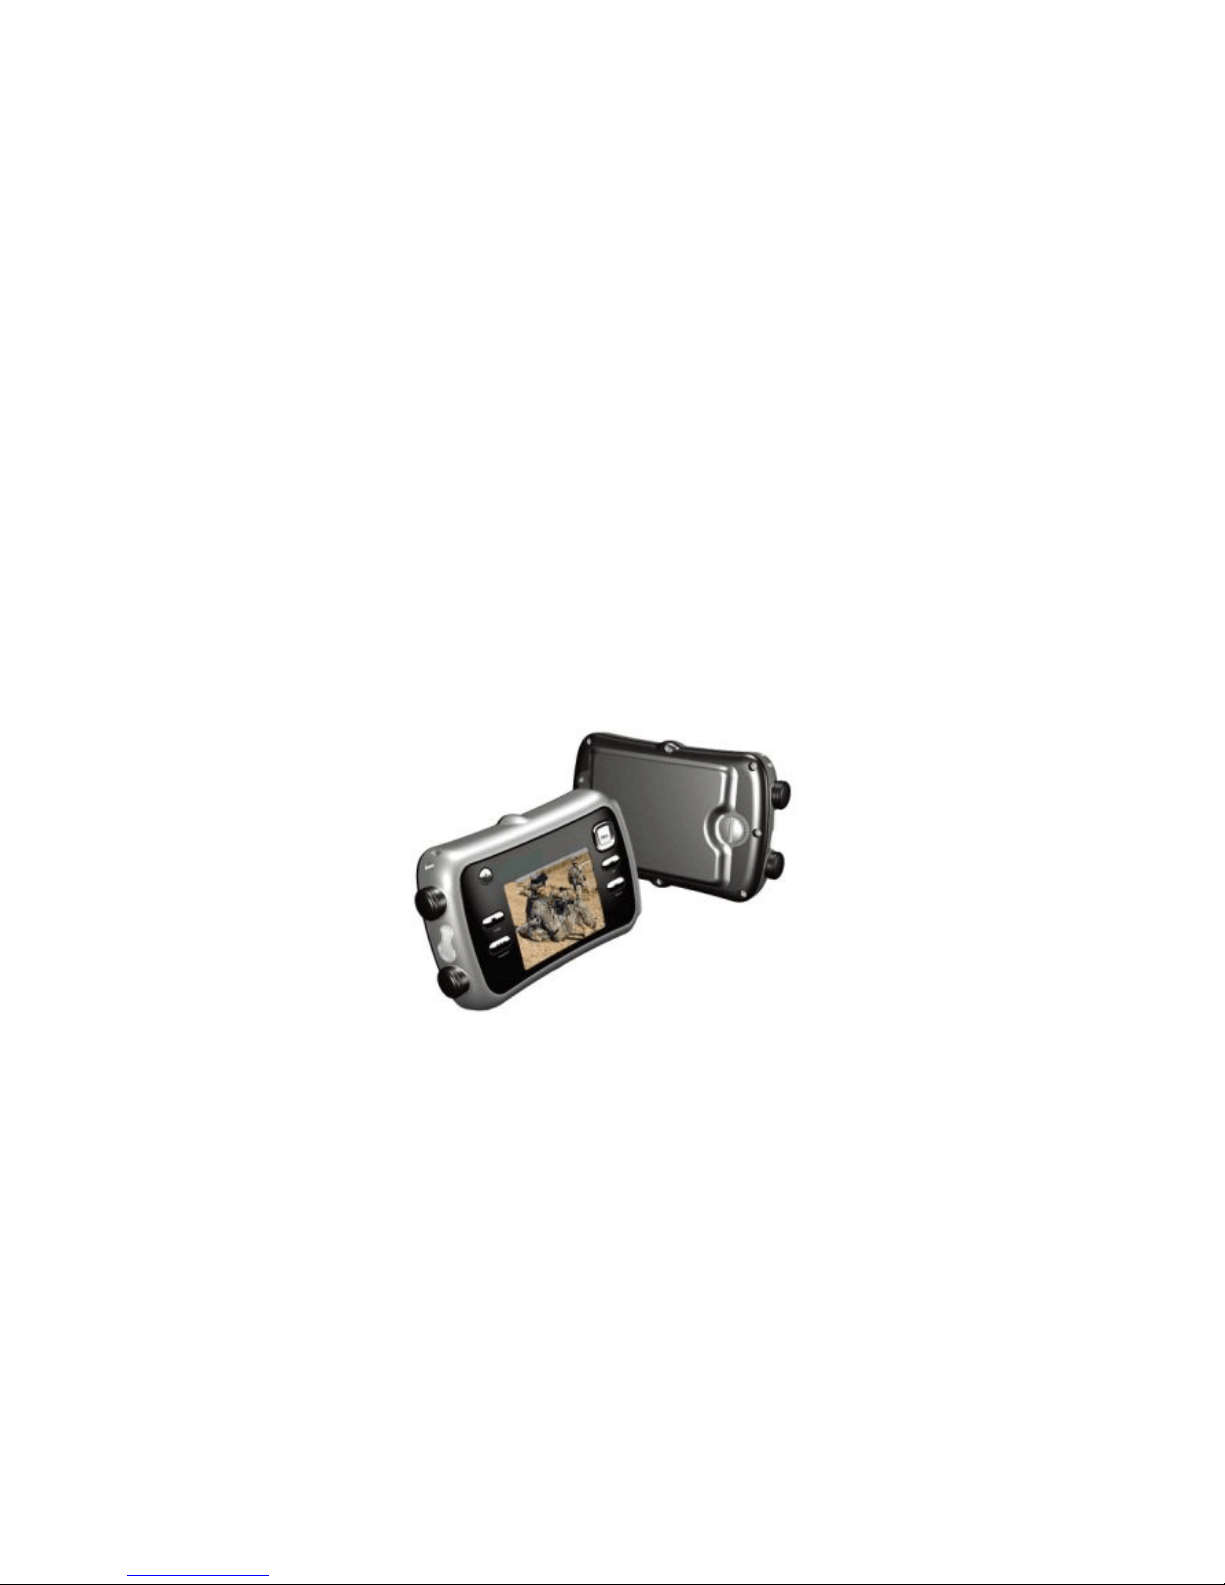
Rugged Body-Worn µDVR
Users Manual
Version 03
Page 2

DISCLAIMER
Trademark Information
Other names and products may be trademarks or registered trademarks of their respective owners.
Product Information
Product design and specifications are subject to change without notice. This includes primary product
specifications, software, software drivers, and user’s manual. This User Manual is a general reference
guide for the product.
The product and accessories that come with your digital video camera may be different from those
described in this manual. This is due to the fact that different retailers often specify slightly different
product inclusions and accessories to suit their market requirements, customer demographics, and
geographical preferences. Products very often vary between retailers especially with accessories such
as batteries, chargers, memory cards, cables, carrying cases/pouches, and language support.
Occasionally a retailer will specify a unique product color, appearance, and internal memory capacity.
Contact your dealer for precise product definition and included accessories.
The illustrations in this manual are for the purpose of explanation and may differ from the actual
design of your digital video camera.
The manufacturer assumes no liability for any errors or discrepancies in this user manual.
For user manual and driver updates, refer to our website or contact your dealer.
SAFETY PRECAUTIONS
Read and understand all Warnings and Cautions before using this pro d uct.
Warnings:
TO REDUCE THE RISK OF FIRE OR ELECTRIC SHOCK, DO NOT EXPOSE THIS
PRODUCT TO RAIN OR MOISTURE.
The connection of a non-shielded equipment interface cable to this equipment will
invalidate the FCC Certification or Declaration of this device and may cause interference
levels which exceed the limits established by the FCC for this equipment. It is the
responsibility of the user to obtain and use a shielded equipment interface cable with this
device. If this equipment has more than one interface connector, do not leave cables
connected to unused interfaces. Changes or modifications not expressly approved by the
manufacturer could void the user’s authority to operate the equipment.
Page 3

If recharging operation fails to complete even when a specified recharging time has elapsed,
immediately stop further recharging. Otherwise, acid leakage, overheating, smoke emission, bursting
and/or ignition can occur.
Do not put the battery pack into a microwave oven or pressurized container. Rapid heating or disrupted
sealing can lead to acid leakage, overheating, smoke emission, bursting and/or ignition.
If the battery leaks or gives off a bad odor, remove it from any exposed flame. Otherwise, the leaking
electrolyte may catch fire, and the battery pack may emit smoke, burst or ignite.
If the battery pack gives off an odor, generates heat, becomes discolored or deformed, or in any way
appears abnormal during use, recharging or storage, immediately remove it from the equipment or
battery pack charger and stop using it. Otherwise, the problematic battery pack can develop acid
leakage, overheating, smoke, emission, bursting and/or ignition.
Cautions:
Do not expose the battery pack to intense sunlight or hot temperatures such as in a car in hot weather.
Otherwise, acid leakage, overheating and/or smoke emission can occur. Also, its guaranteed
performance will be lose and/or its service life will be shortened.
The battery pack incorporates built-in safety devices. Do not use it in a location where high levels of
static electricity may be present. Otherwise, the safety devices can be damaged, possibly leading to
acid leakage, overheating, smoke emission, bursting and/or ignition.
The guaranteed recharging temperature range is 0 to 45°C. A recharging operation outside this
temperature range can lead to acid leakage and/or overheating of the battery pack, and may cause
damage to it.
If electrolyte leaking from the battery pack contacts your skin or clothing, immediately wash it away
with running water. Otherwise, eye injury or skin inflammation can occur.
Store the battery pack in a location where children cannot reach it. Also, make sure that sure that a
child does not take out the battery pack from the battery pack charger or equipment.
If you find rust, a bad odor, overheating and/or other irregularities when using the battery pack for the
first time, return it your supplier or vendor.
To reduce risk of fire or burns:
1. Do not attempt to open, disassemble, or service the battery pack.
2. Do not crush, puncture, short external contacts, or dispose of in fire or water.
3. Replace only with the battery pack designated for this product.
WARNING: Handling the cord on this product or cords associated with accessories sold with this
product, will expose you to lead, a chemical known to the State of California to cause birth defects or
other reproductive harm.
Wash hands after handling.
Page 4

TABLE OF CONTENT
1. Outlook of µDVR.............................................. ..... ... ..... ..... ... ..... ...... .. ...... ..... ... ..... ..... ... .....................2
2. Specifications.......................................................... .............................................................................3
3. Features................................................................................................................................................4
3.1 Buttons on µDVR ..................................................... ..... ...... ..... ... ..... ..... ... ..... ...... ..... ... .... ..............4
3.2 Vi deo Audio Input.................................. .............. .......... .............. ............. ........... ..........................5
3.3 Vi deo Audio Output..................................................... ............. ............. ........... ............. ................6
3.4 Menu UI............................................ ... .......................................................... ................................6
3.5 LED Light.............................................. ... ........................................................ ............................. 6
3.6 LCD Display................................................ .......................................................... ........................6
3.7 Remote Controller.................. ...... ..... ... ..... ... ..... ..... ... ..... ... ..... ...... .. ...... .. ...... ..... ... ..... ... ..................6
4. Functions................................. ... ..........................................................................................................8
4.1 Screen Display..................... .. ........................................................... .............................................8
4.2 Recording.......................................................... ..... ... ..... ... ..... ...... .. ...... ..... ... ..... ..... ... .....................9
4.3 Snapshot.................................................... ...................................................................................10
4.4 Playback.................................................... ........................................................... ........................10
4.5 Vi deo Loss ................................................... ............. ........... ............. ............. ........... ...................10
4.6 Motion Detect.............................. .. .............................................................................................. 10
4.7 Storage.........................................................................................................................................10
4.8 Time and Date........................................... ............. .............. ............. ........... ............. ...................11
4.9 Video file format..........................................................................................................................11
4.10 Player Software.......................................... ........................................................ .. ......................11
4.11 Default Setting................... .......................................................... ... ...........................................11
5. µDVR Main Menu............................................. .......................................................... ......................12
5.1 Main Menu............................................. ........................................................... ...........................12
5.2 Play Video....................................................................................................................................12
5.2.1 Play Pause.............................................................................................................................13
5.2.2 Play Fast Forward.................................................................................................................14
5.2.3 Play Back Forward................................................................................................................14
5.3 Play Picture............................................... ...................................................................................14
5.4 Camera Setting............................................... ... ..... ...... .. ...... ..... ... ..... ..... ...... .. ...... ..... ... ................15
5.5 Record Setting ............................................. ..... ... ..... ..... ...... .. ...... ..... ... ..... ..... ... ..... ...... ................15
5.5.1 V ide o/Audio............................................ ........ ........... ........ ........... ........ .......... .......... ............16
5.5.2 Snapshot................................................................................................................................16
5.5.3 V ide o Loss............................................ ........ .......... ........... ........ ........... ........ .......... ..............17
Page 5

1
5.5.4 Motion Detection..................................................................................................................17
5.5.5 Pre/Post Alarm......................................................................................................................18
5.6 System setting........................................................................................................... ...................18
5.6.1 TV 5.6.2 LCD Sleep 5.6.3 LED 5.6.4 Beep .........................................................................18
5.6.6 DATE/TIME........................................................................................... ... ...........................19
5.6.7 Storage..................................................................................................................................19
5.6.8 Default Setting.............................................................. .. ......................................................21
6. USB Function ............................................................ ..... ... ..... ..... ... ..... ... ..... ...... .. ...... .. ......................22
7. Trouble Shooting . .............................................................................................................................23
Page 6
2
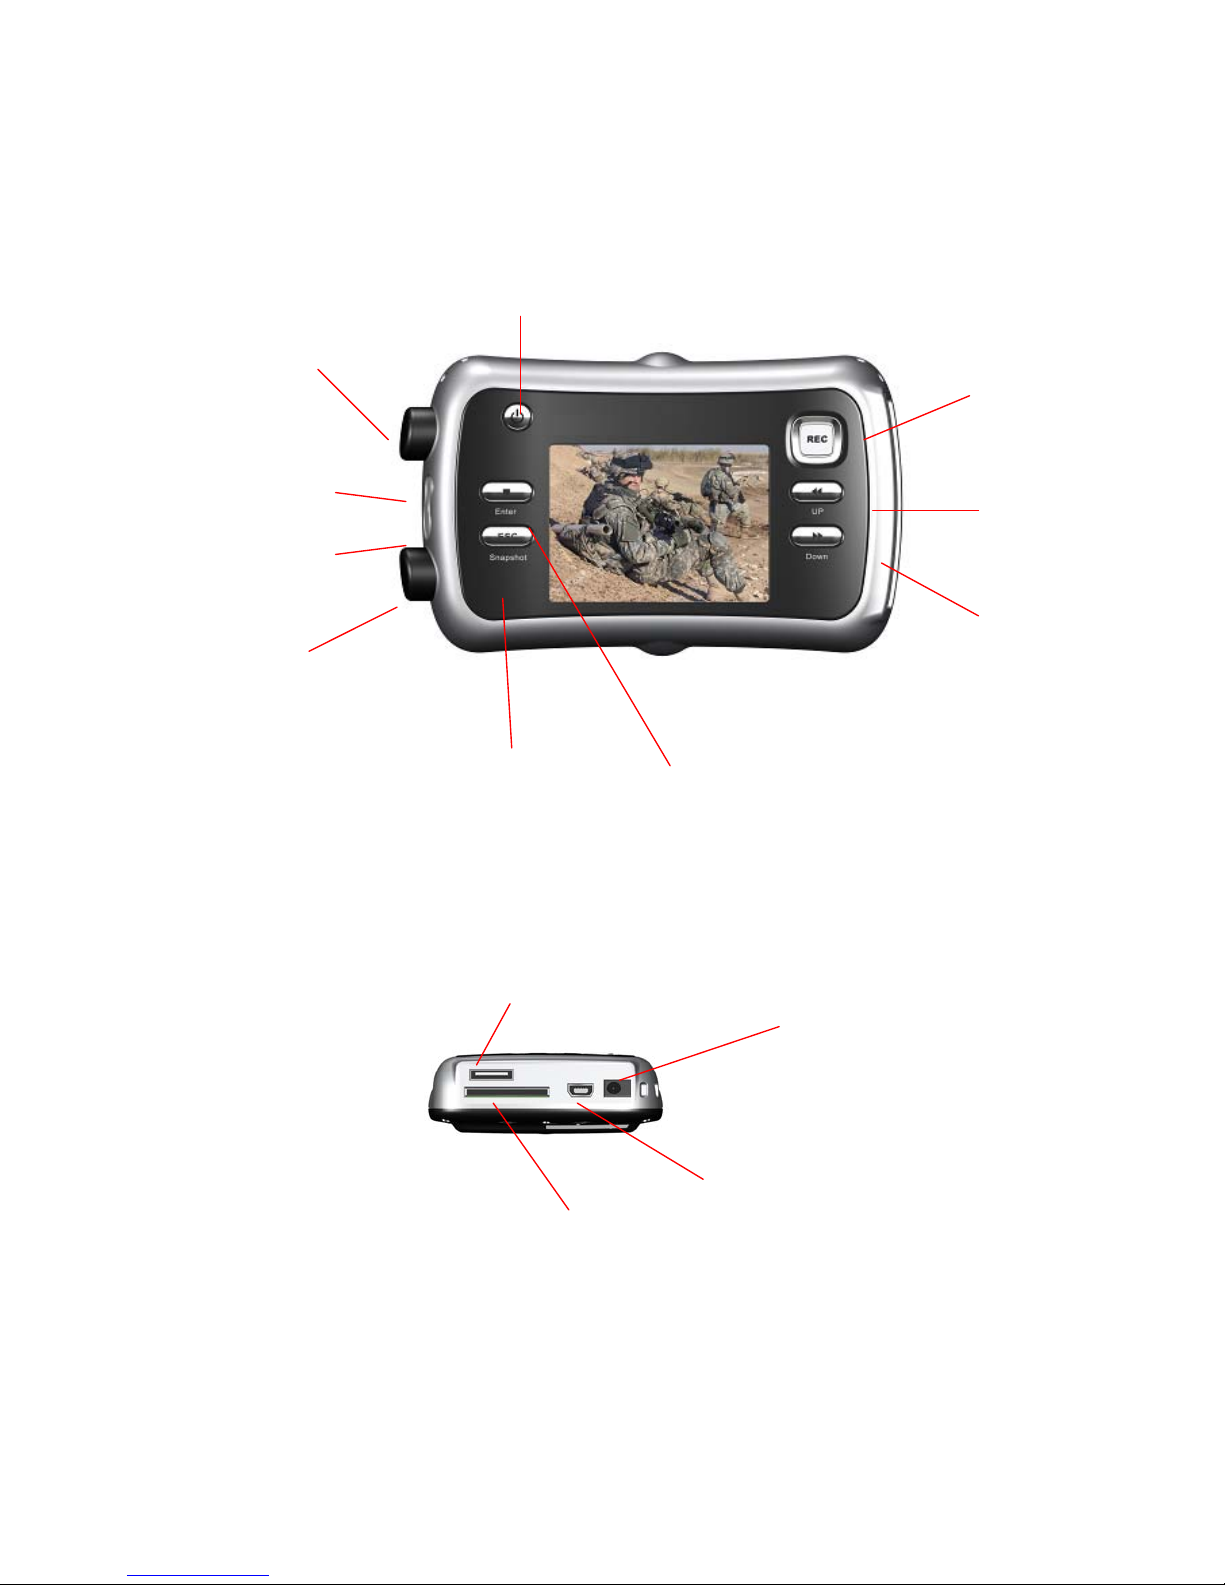
1. Outlook of µDVR
Record
Up & FF
Down & FB
Enter & Stop
ESC & Snapshot
Power
Audio/Video In &
Camera Power
Audio/
Video Out
LED Indicator
5V DC Input
USB Port
(Port is disabled when using
SD-HC card)
RS-232 Extendable port
SD Card Slot
IR Receiver for the
Remote Control ler
Page 7

3
2. Specifications
Item Description
Audio/Video & Power 3 in 1 jack:
1 Video In (NTSC/PAL auto select)
1 Audio In (Mono)
1 5V power output for Camera (12V optional)
Audio/Video output 1 Video Out (NTSC/PAL manual select)
1 Audio Out (Mono)
USB port 1 mini USB port (USB 2.0)
Storage Media SD/SD-HC Card (Up to 8G for SD-HC card)
Power Li-ion (3.7V @1.4/2.4 Ahr) battery (for up to 4.5Hr recording),
external DC jack
Video Display Real time
Recording resolution 640X480 (VGA) / 640X240 (HVGA)
@30/25/20/15/10/5 fps (.mov files)
Compression Apple Quicktime Compatible MPEG4
Playback By date time and event
UI On-Screen Display (OSD) menu
Timer Real Time Clock powered by the internal rechargeable battery
Event Trigger Pre / Post Motion Detect
Dimension and Weight 101 x 67 x 26 mm, 168g (batte ry excl u ded )
Operating Temperature -10 ~60
∘C
Watchdog Built in hardware watchdog
PC Software iRegalia Media Inc. iMxTM
* Design and specifications are subject to change without notice.
Page 8
4
3. Features
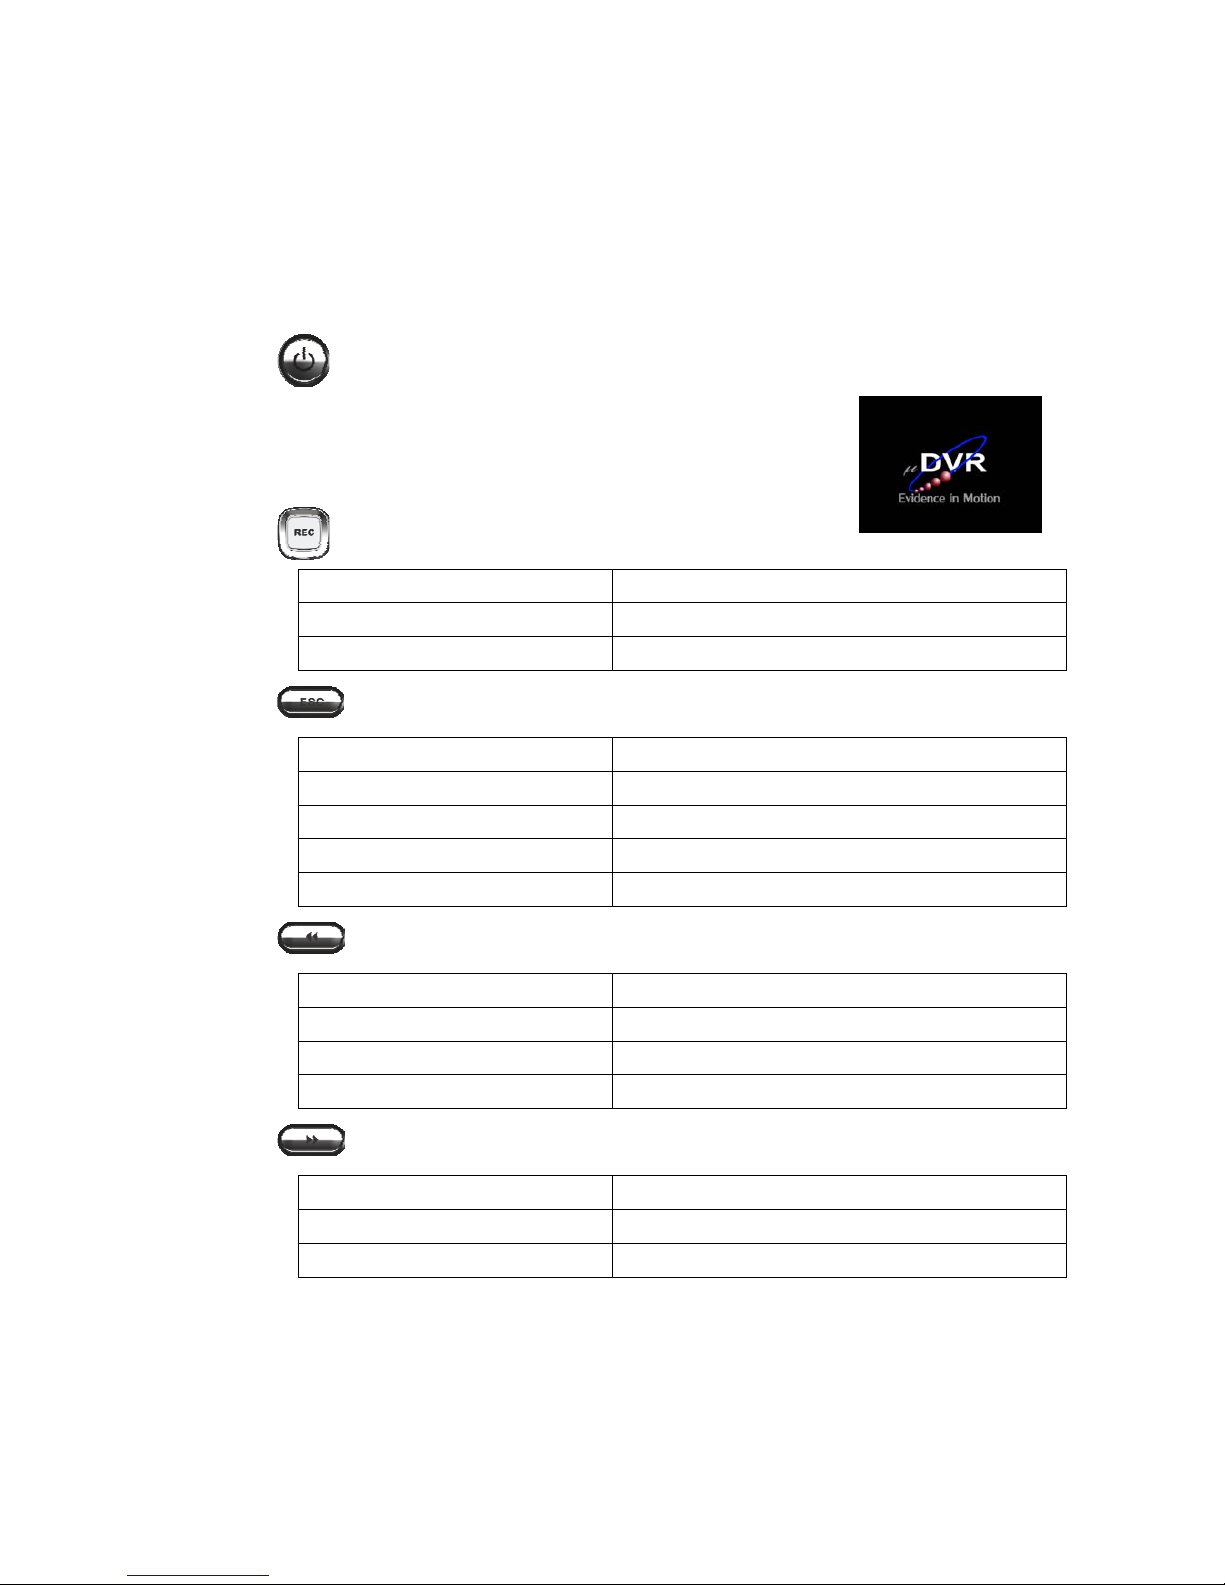
3.1 Buttons on µDVR
POWER Button: Power ON/OFF ( Press and hold the power button for 3 seconds
until the LED indicator lights red and the screen appears.
To turn off the power, press and hold the power button again.
REC Button :
Condition Action
In Preview Mode Start recording
In Play Mode Adjust volume up
Snapshot _Button :
Condition Action
In Preview Mode Take a snapshot
In Play Mode Decrease volume
In Rec. Mode Stop recording
In Menu As an ESC button
UP Button :
Condition Action
In Preview Mode Play the last recorded movie
In Play Mode Toggle as FF
In Menu Mode An “up” key
DOWN Button :
Condition Action
In Play Mode Toggling as FB
In Menu Mode A “down” key
Page 9
5
ENTER Button :
Condition Action
In Preview Mode Enter Menu pages
In Play Mode Stop playing back last movie
PLAY with Menu select Stop playing back selected movie
In Menu Mode Confirm to select
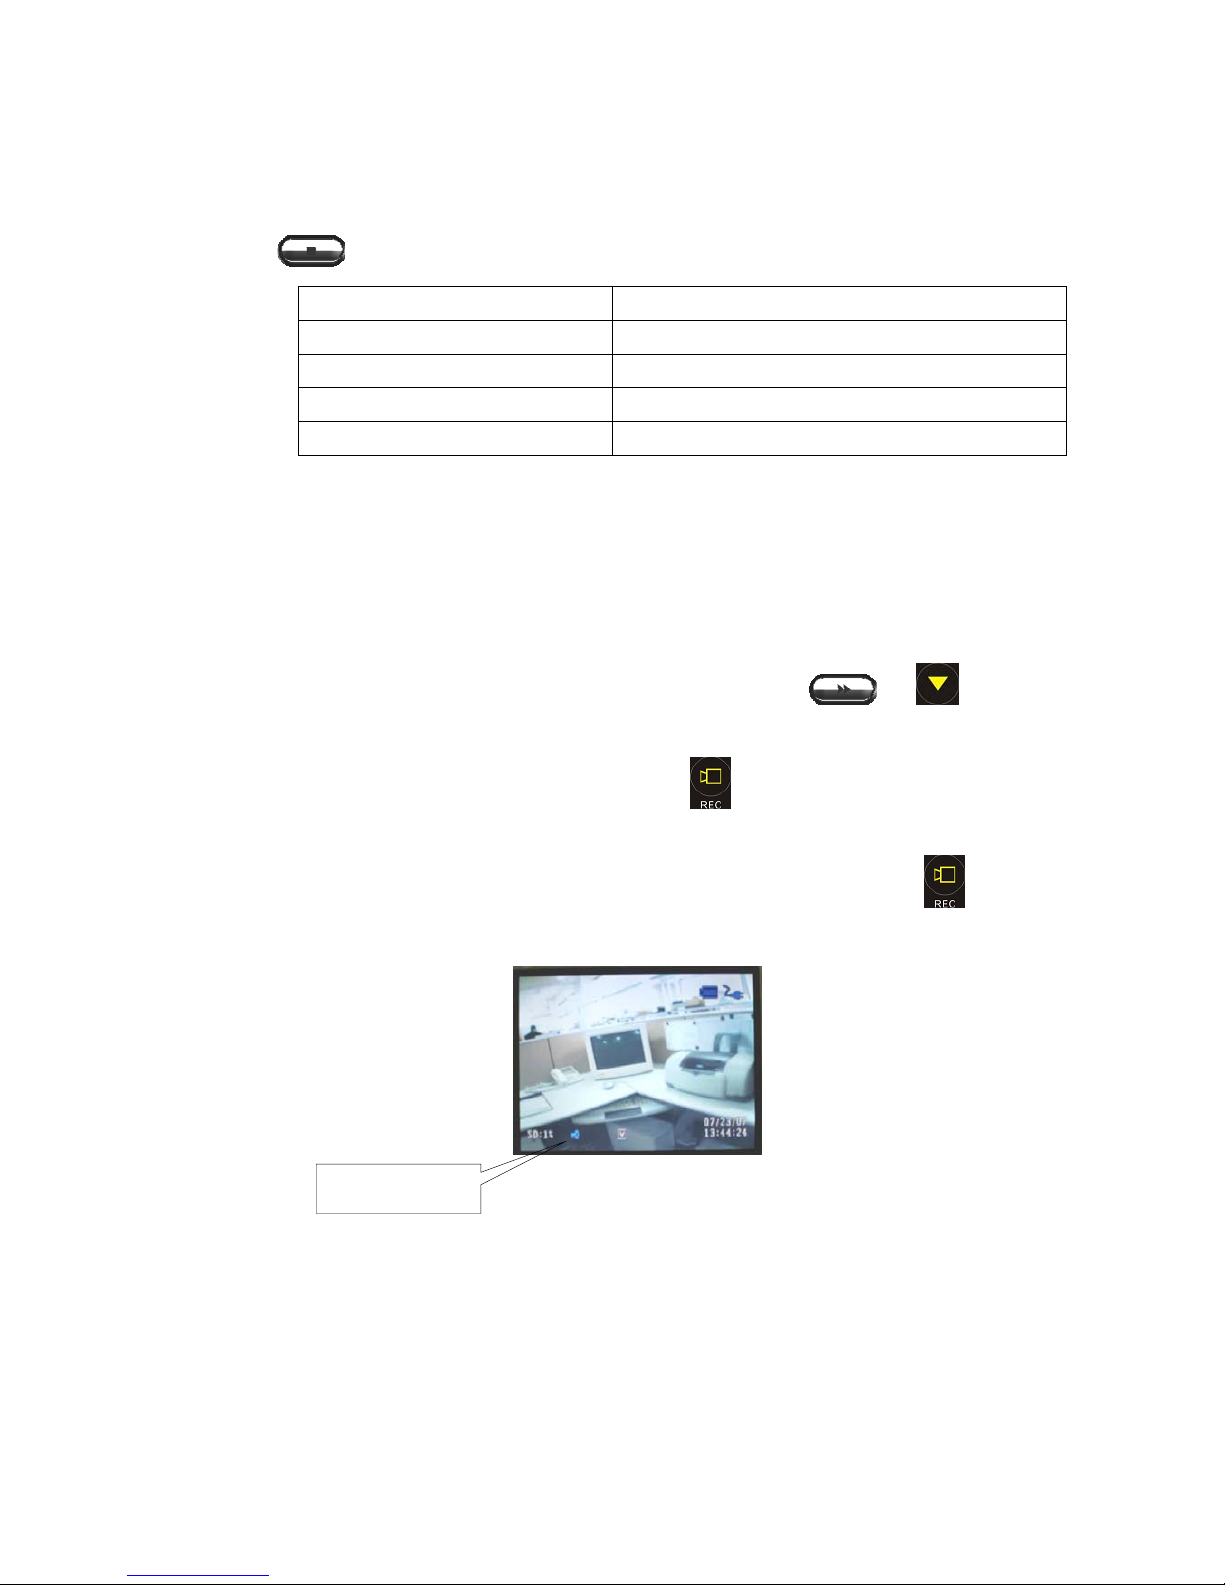
Lock Button : To activate the button LOCK/UNLOCK function
In preview mode and pre-alarm, press DOWN, then UP, then ENTER to active
LOCK/UNLOCK function. When the buttons LOCK is active, there will be an icon of
key showing at the left bottom on the scre en
Lock Button function does not affect the IR operation.
When the button lock function is enabled, the or
on the
optional remote controller)
Button in Preview mode or the
button in Pre-Alarm mode can still
have function; the rest of the buttons do not.
If the Lock function is enabled under Pre-Alarm mode, the
button an
still trigger Post Alarm and access in Post-Alarm mode.
3.2 Video Audio Input
1 Video Channel
1 Audio Channel
Lock Icon
Page 10

6
3.3 Video Audio Output
Selectable NTSC/PAL out pu t
L/R line input and output or 1 Microphone input an d p u t.
3.4 Menu UI
OSD (On Screen Display ) menu presentation
Up, Down, Enter, ESC operation button
3.5 LED Light
Red LED
a. Solid red – µDVR unit is recording
b. Blinking red -- (2 seconds on, 2 seconds off, …) when stop recording
Green LED
a. Solid green – Indicate the system is good operation state.
b. Blinking green (1 second on, 1 second off, …) when running out of storage
space
c. fast flashing (1/2 second on, 1/2 second off, …) when system is in
malfunctions
Yellow LED
a. Solid yellow – Charging the battery
b. Blinking yellow – Errors in charging function
3.6 LCD Display
2.5” TFT LCD
Configurable with 0, 30, 60, 120 seconds setting for powering down LCD, when
no activity on the menu or buttons. ‘0’ setting means the LCD display power
saving feature is disabled. Doing so, please be aware that the unit battery life will
be dramatically reduced.
When system is power on, press LCD_KEY on IR remote controller can turn
on/off the LCD
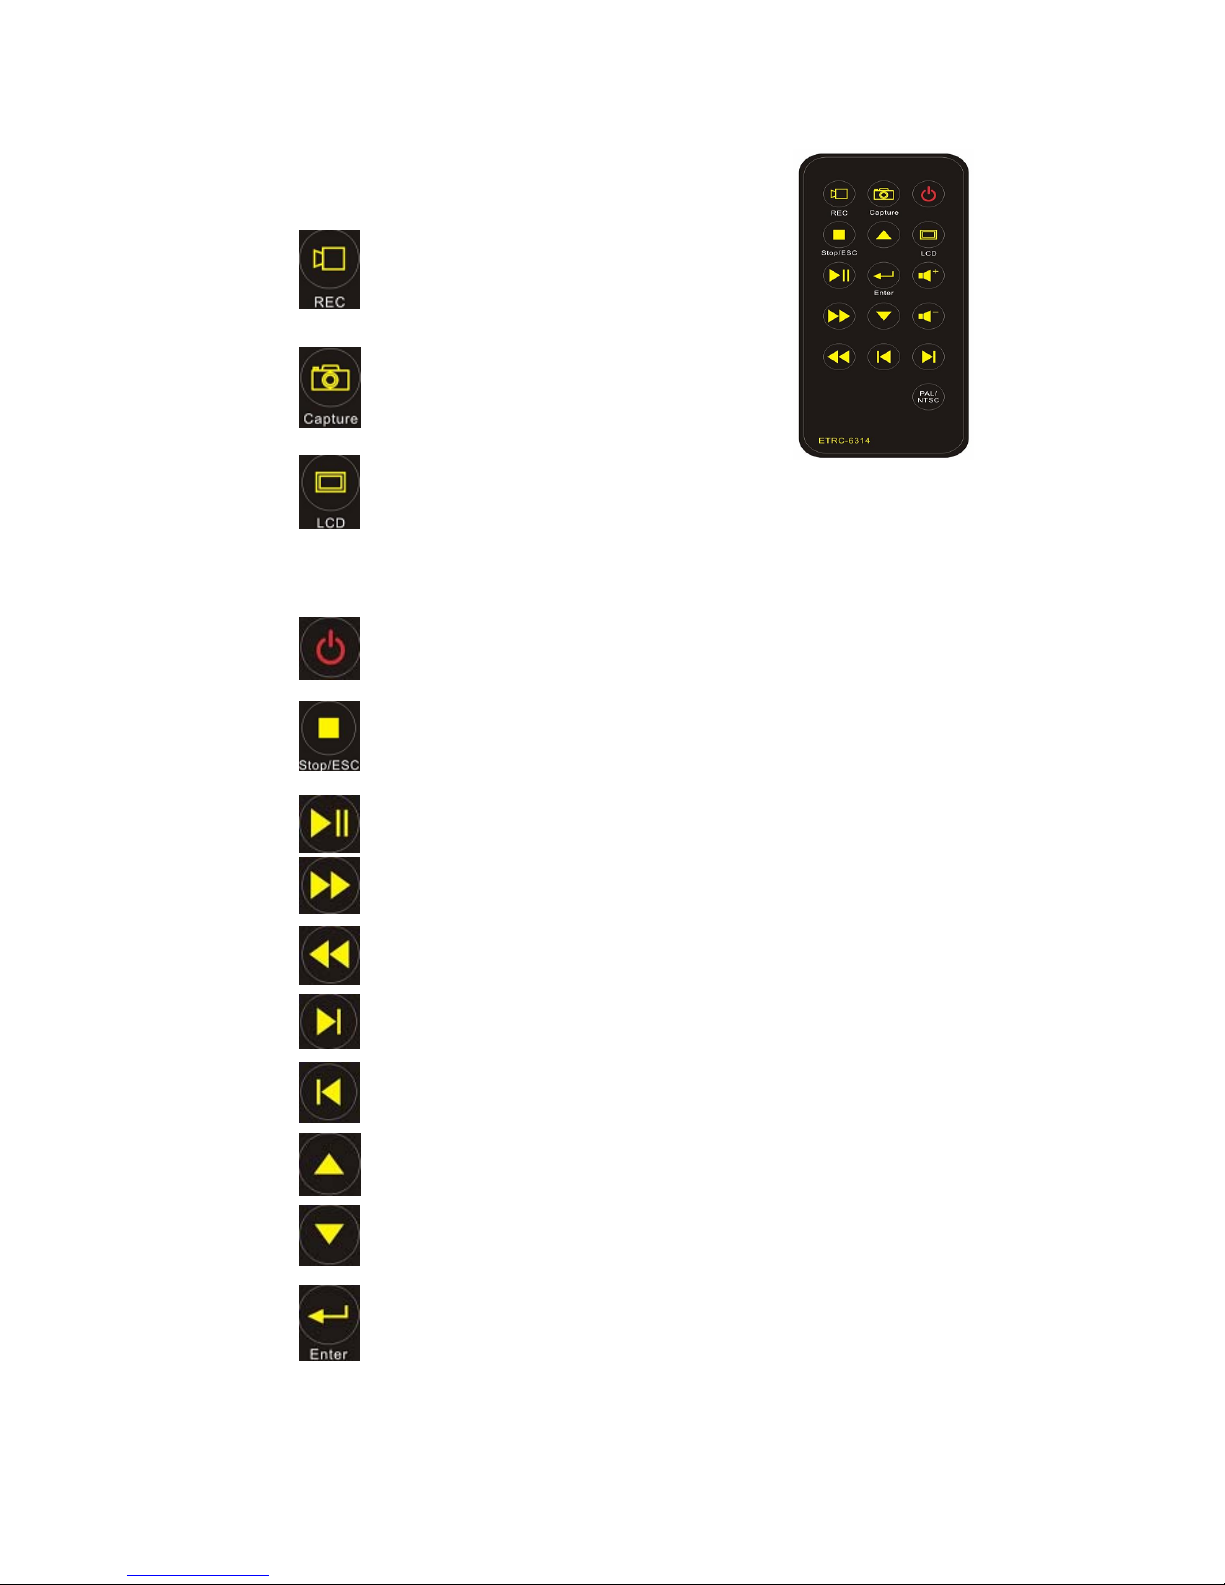
3.7 Remote Controller
The remote controller is an optional accessory. Please contact the dealer if you need one.
Page 11
7
Record
Snapshot
When turning the system on, press the LCD button can set the
LCD on/off
Power On/Off
Stop/ESC (Stop playing Video or Recording, ESC = Escape)
Play back or pause the last V i de o clip
Fast Forward. (Speed by X2、X4、X8、X16 )
Back Forward. (Speed by X2、X4、X8、X16)
Play the video back frame by frame
Play the video back frame by back frame
Cursor Multi Button (Up)
Cursor Multi Button (Down)
Enter to confirm your command.
Page 12
8
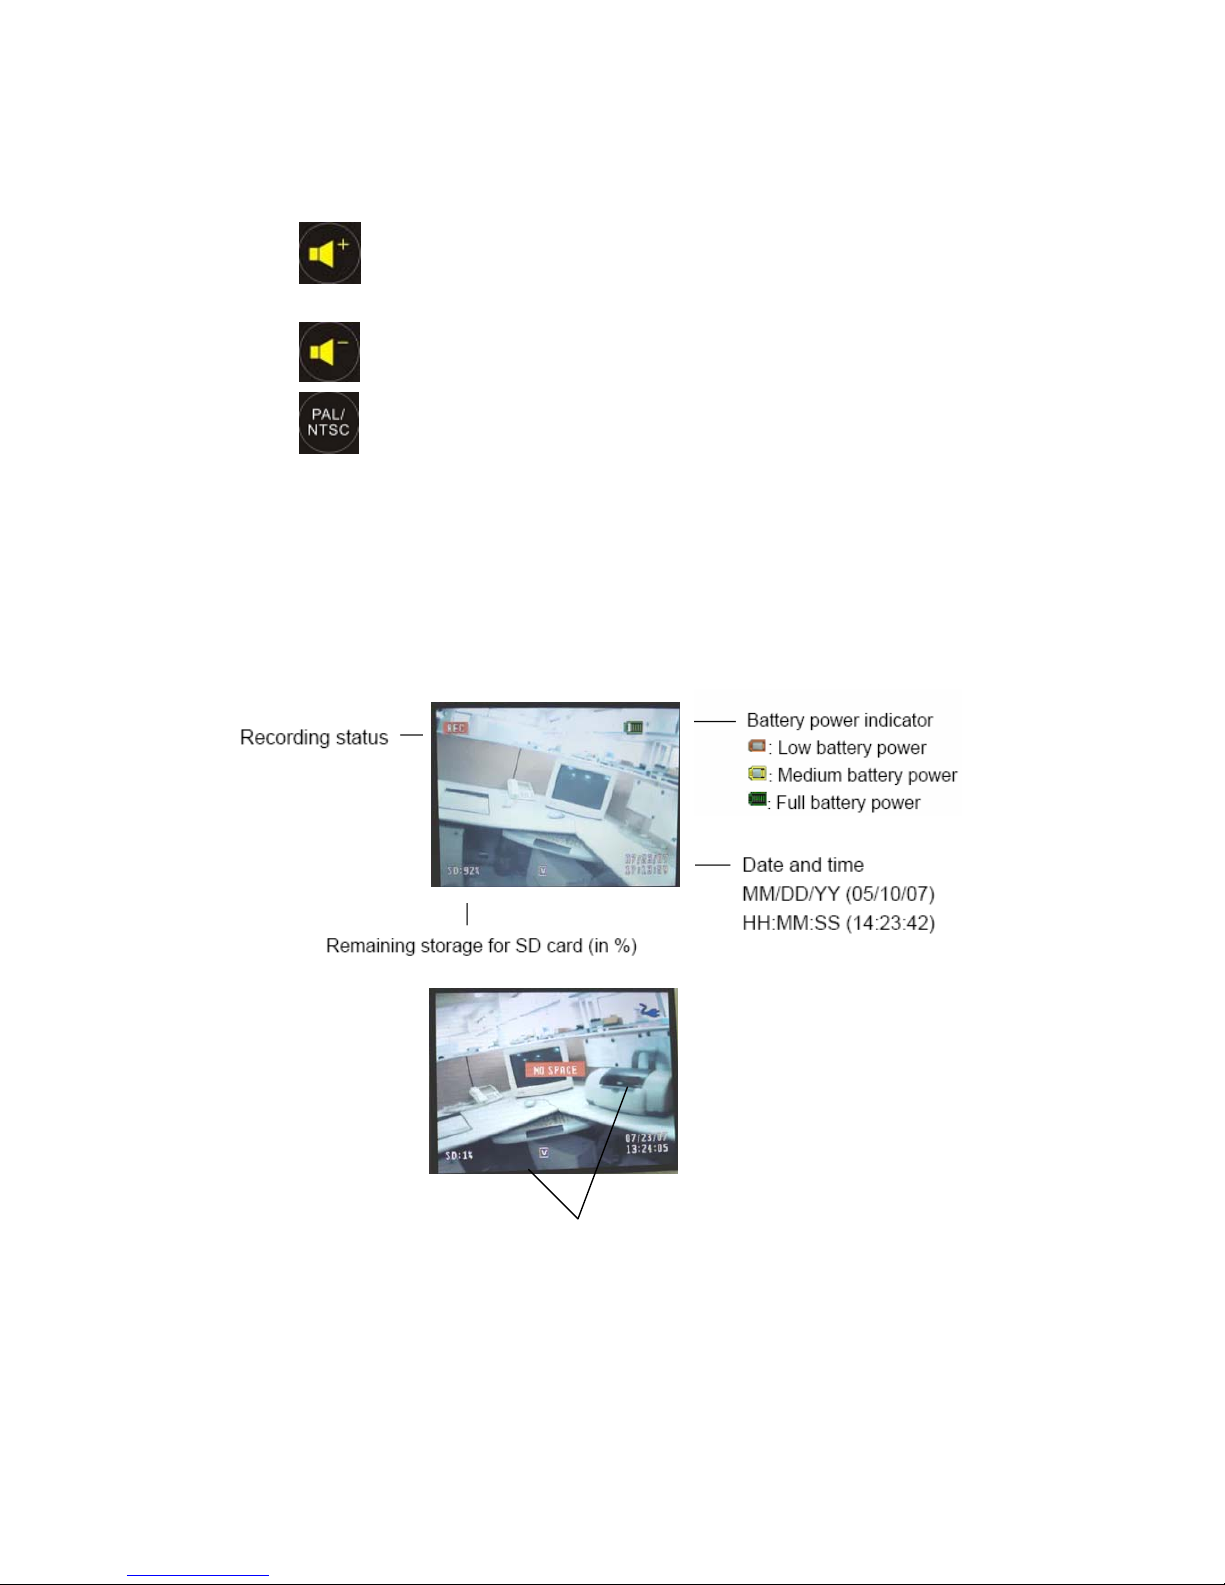
Press to Volume Up while playing back the video clips.
(Volume +)
Volume Down when play
PAL/ NTSC switch.
Be sure to plug the AC adaptor in the Elite mini DVR before you use the RC to power
on
4. Functions
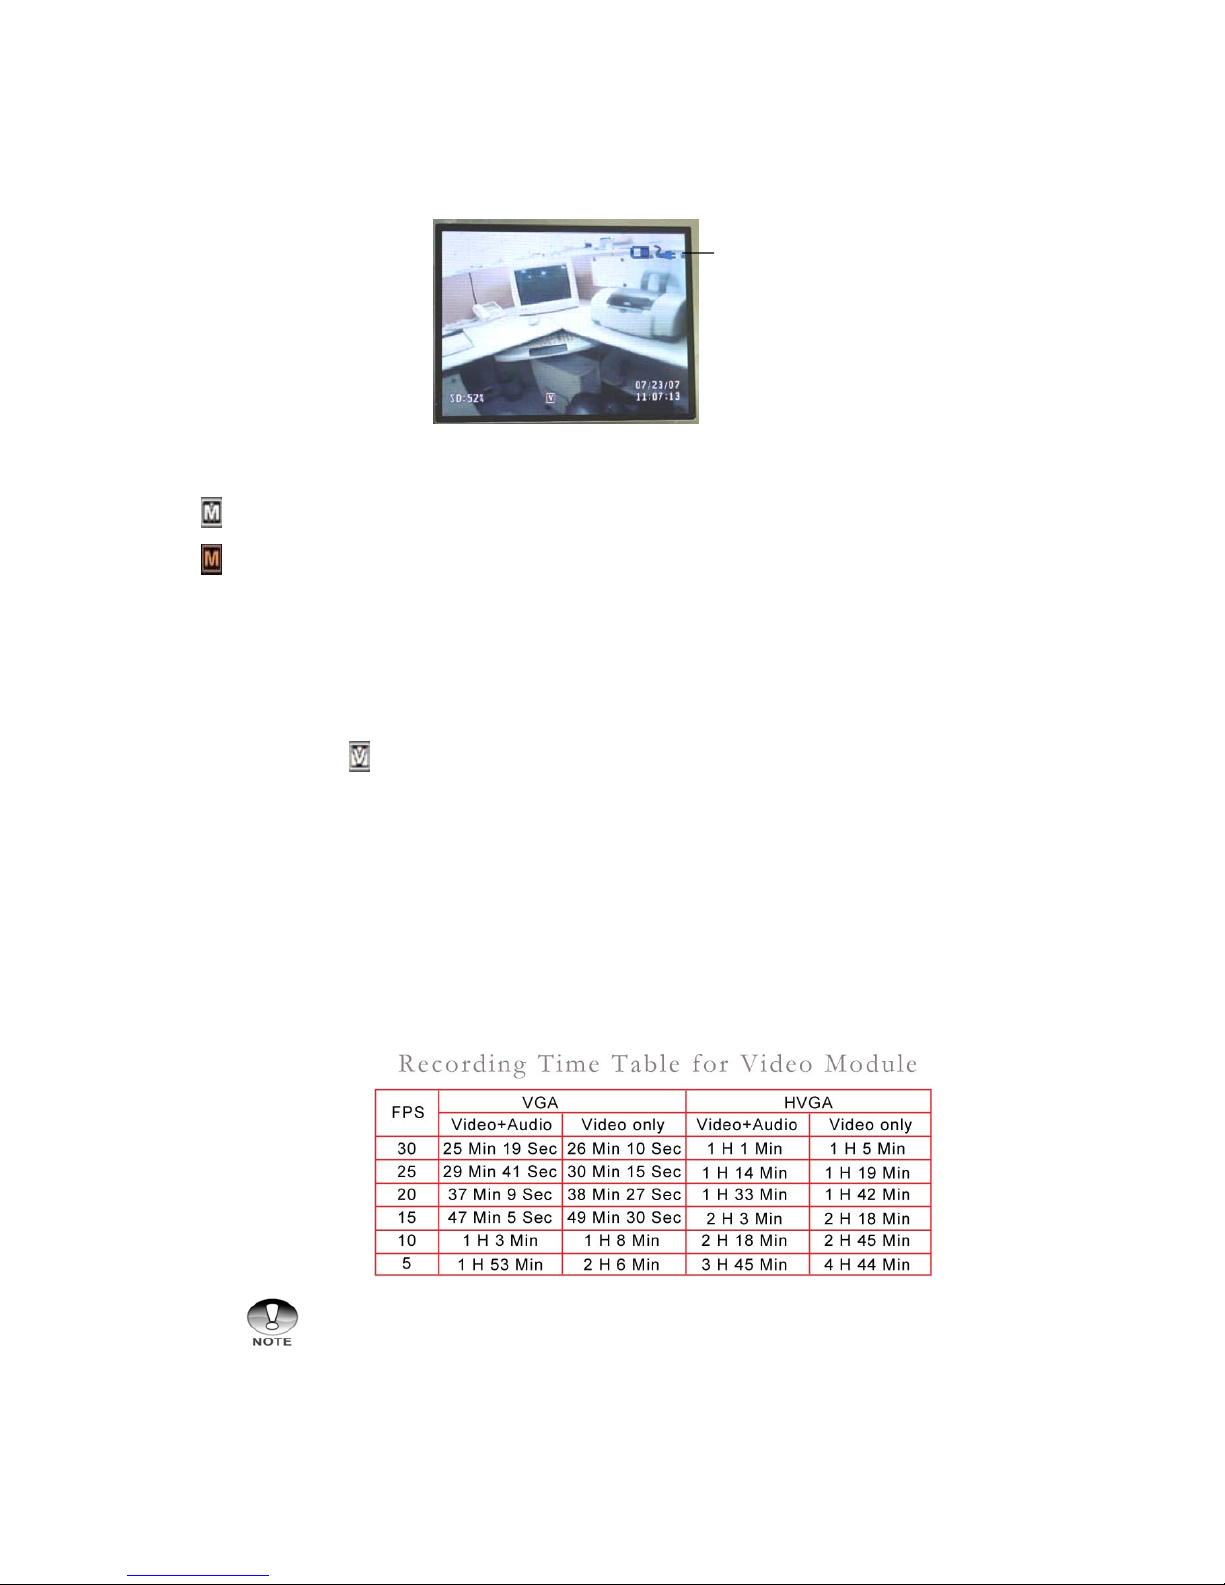
4.1 Screen Display
SD is running out of storage space
(when over write mode is disabled)
Page 13
9
Motion Detect
The white-color icon indicates the function is enable.
The red-color icon indicates the function is disable which have following condition has been
occurred:
1. Video Loss function is enabling.
2. Recording
3. Did not insert SD card.
Video Loss B The white-color icon indicates the function is enable.
4.2 Recording
V ideo Compression: MPEG4. Audio Compression: IMA ADPCM
Resolution: VGA, HVGA
FPS: 30, 25, 20, 15, 10, 5
Choose with or without Audio for recording
Content Storage Path: \Year\Month\Day\Hour-Minute-Second
Support continue recording after video loss
Recording time is calculated base on the µDVR is loaded with1GB SD card
Indicates ACDC Adapter is
recharging the battery
Page 14

10
4.3 Snapshot
Content Storage Path: \JPEG\YYMMDD\
File Naming
a. the 1
st
picture in ss second Î hhmmss.JPG
b. the rem a in ing pictures in ss second Î hhmmssxx.JPG
selectable to sticker on time and date to the picture
4.4 Playback
PAUSE, FF (x2/x4/x8/x16), FB (x2/x4/x8/x16), STEP_F, STEP_B, with remote
controller
FF (x2/x4/x8/x16), FB (x2/x4/x8/x16) with buttons
Volume contro l
4.5 Video Loss
The unit displays “VIDEO LOSS” while detecting video source lost
Menu selectable to enable/disable on ‘stop recording’ a t 5 seconds after detecting video
loss
Press Rec. button will re-enable the recording if ‘stop recording’ got enabled
The contents of recording taken while video loss will contain ‘VIDEO LOSS’ text
4.6 Motion Detect
Motion detection can be enabled/disabled by system settings in the main menu
The record duration after motion trigge ring, an d the tri gger se ns iti vit y are both
programmable
Detecting motion and active recording until no further motion is detected for 10 seconds
4.7 Storage
µDVR records audio and video to inserted SD/SD-HC card in the SD slot
When using SD-HC card, the USB port in the µDVR will be disabled
Support SD-HC card up to 8GB capacity
The SD card low-storage-space warning displa y is programmable. µDVR warns with the
remaining space goes down to 15%, 10% or 5%
The µDVR system setting are stored in the onboard memory, not on the SD/SD-HC card.
System settings will not altered by changing different SD/SD-HC cards
Page 15

11
The µDVR does not support individual file deletion in order to maintain the evidence
collection integrity
System default settings stored in the on-board memory
4.8 Time and Date
There are three (3) time/date format programmable in the µDVR system: YY/MM/DD,
DD/MM/YY or MM/DD/YY
4.9 Video file format
Apple QuickTime compatible .mov video format
4.10 Player Software
iMx software downloadable at:
http://www.irmsecurity.com/support.htm
4.11 Default Setting
Camera Setup
a. Brightness: 50
b. Contrast : 50
c. Color: 50
Always format the new SD/SD-HC card before using it. Refer to section
in the manual titled “Formatting an SD memory card” for further
details.
To prevent valuable data from being accidentally erased from an SD
card, you can slide the write protect tab (on the sid e of the SD memory
card) to “LOCK”.
To save, edit, or erase data on an SD memory card, you must unlock the
card.
When inserting or removing the SD memory card, turn OFF the
recorder beforehand, or the stored data could be lost. The file saved in
the SD memory card could be corrupted or deleted or “write” function
of the SD memory card could be disabled.
Do not insert any object other than the SD memory card into the SD
memory card slot, or the recorder could be damaged.
Page 16
12
d. Hue: 50
FPS: 30
Resolution: HVGA
Audio: OFF
Motion Detect: OFF
Motion Sensitivity: 5
Date Print: ON
TV: NTSC
LCD Sleep: 30
LED: ON
Beep: OFF
Language: English
Date Format: MM/DD/YY
Device: SD CARD
Warn Low: 15%
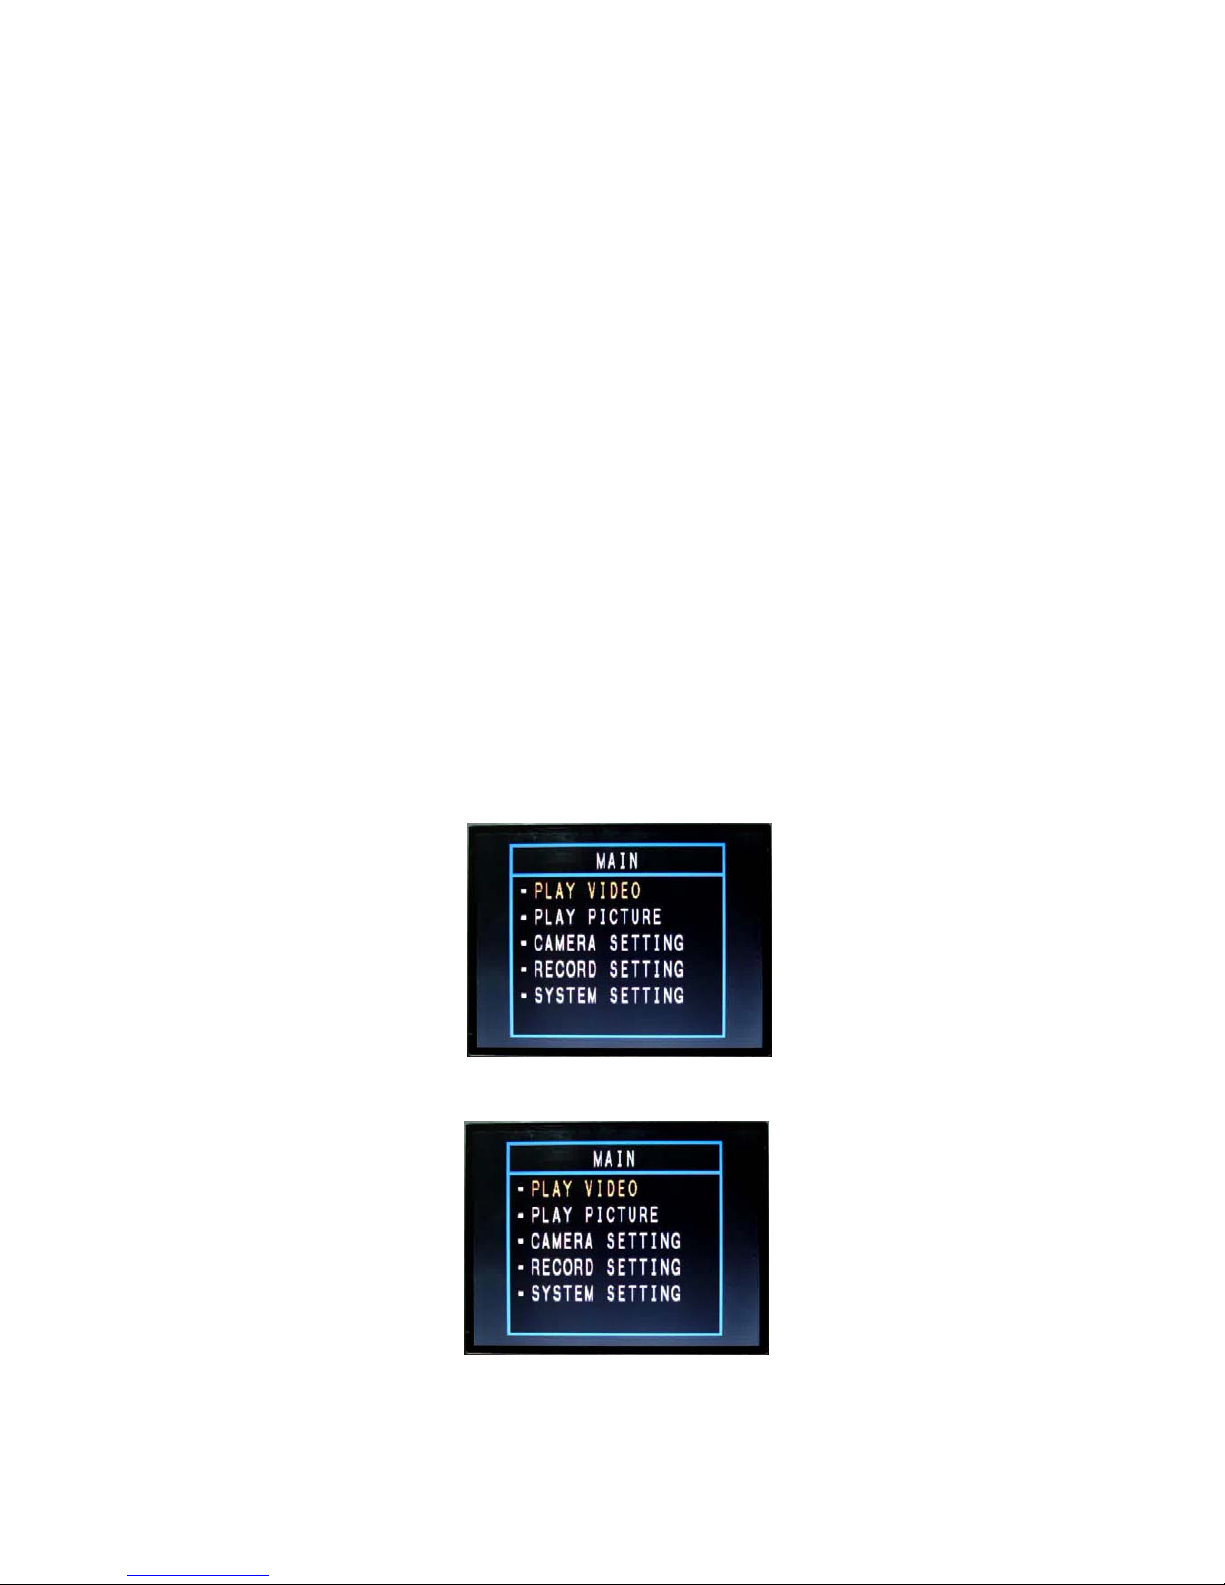
5. µDVR Main Menu
5.1 Main Menu
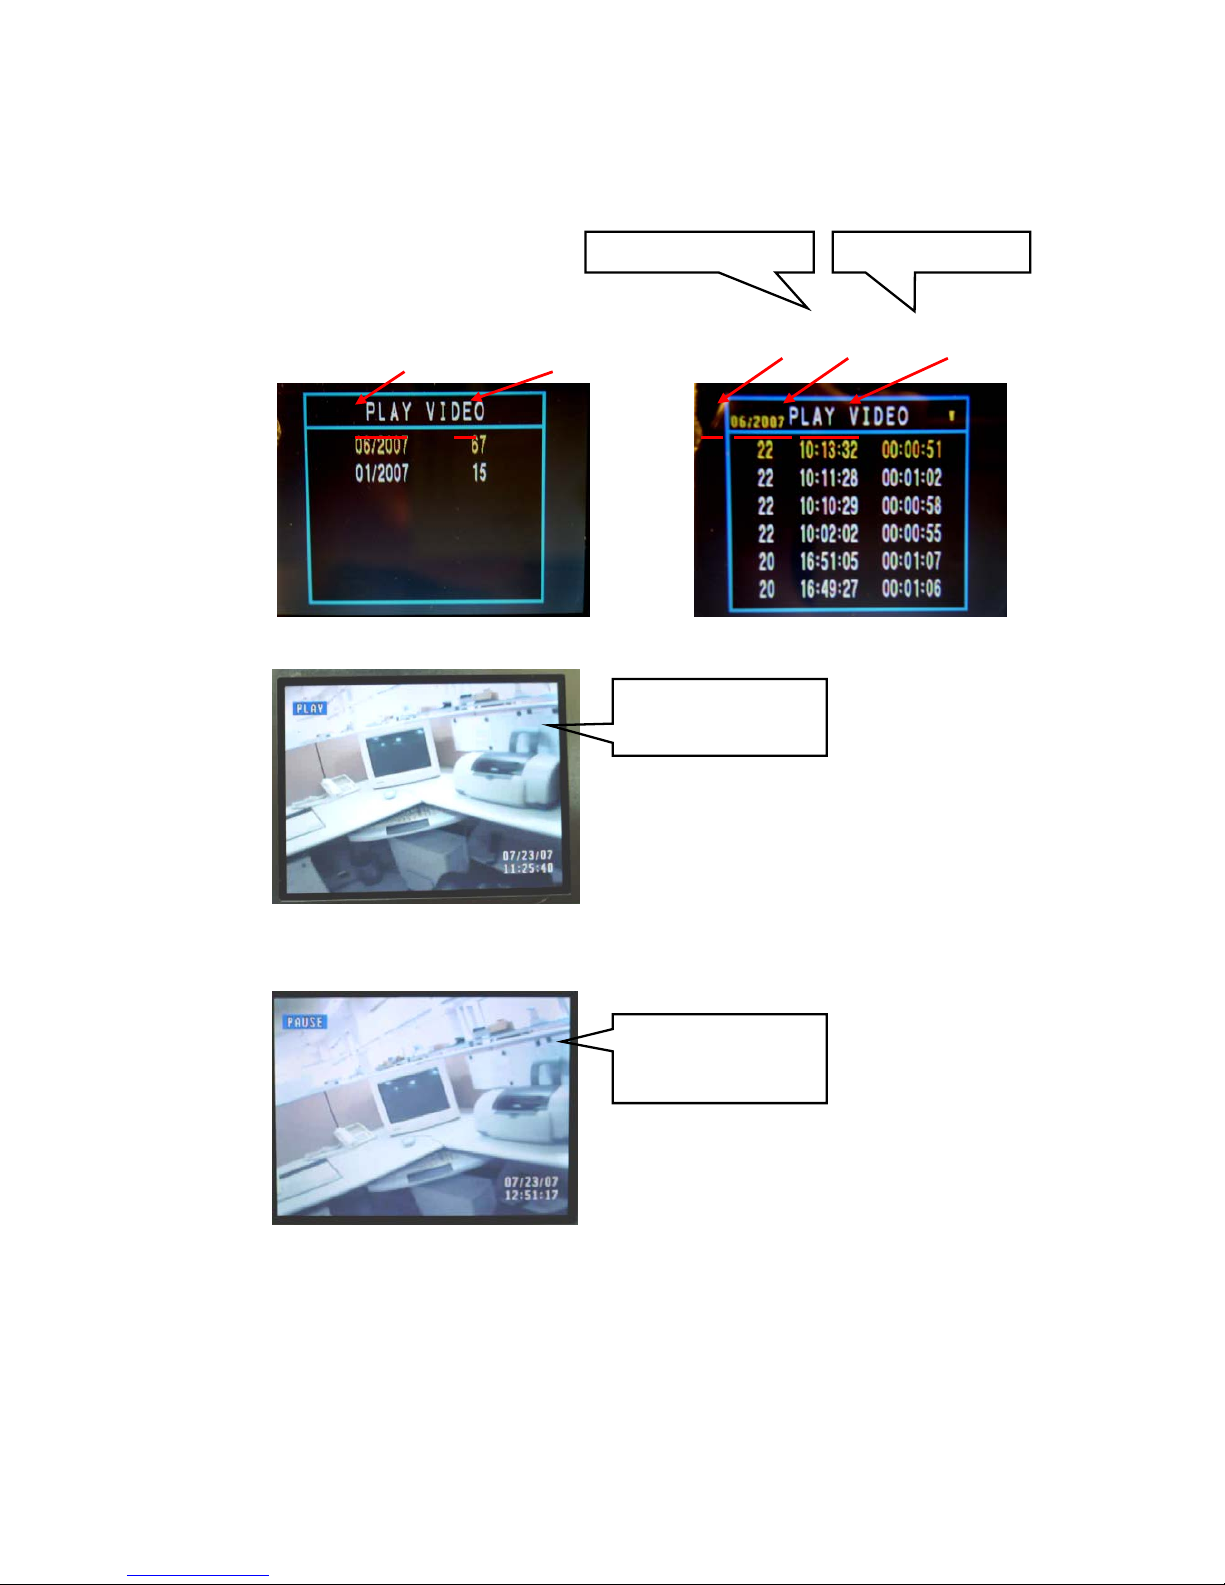
5.2 Play Video
Page 17
13
Month List(MM/YYYY Total_Record) Record List(Day hh:mm:ss hh:mm:ss)
5.2.1 Play Pause
Record starting time Duration
Video clip from
PLAY
Video clip for
PAUSE
Page 18
14
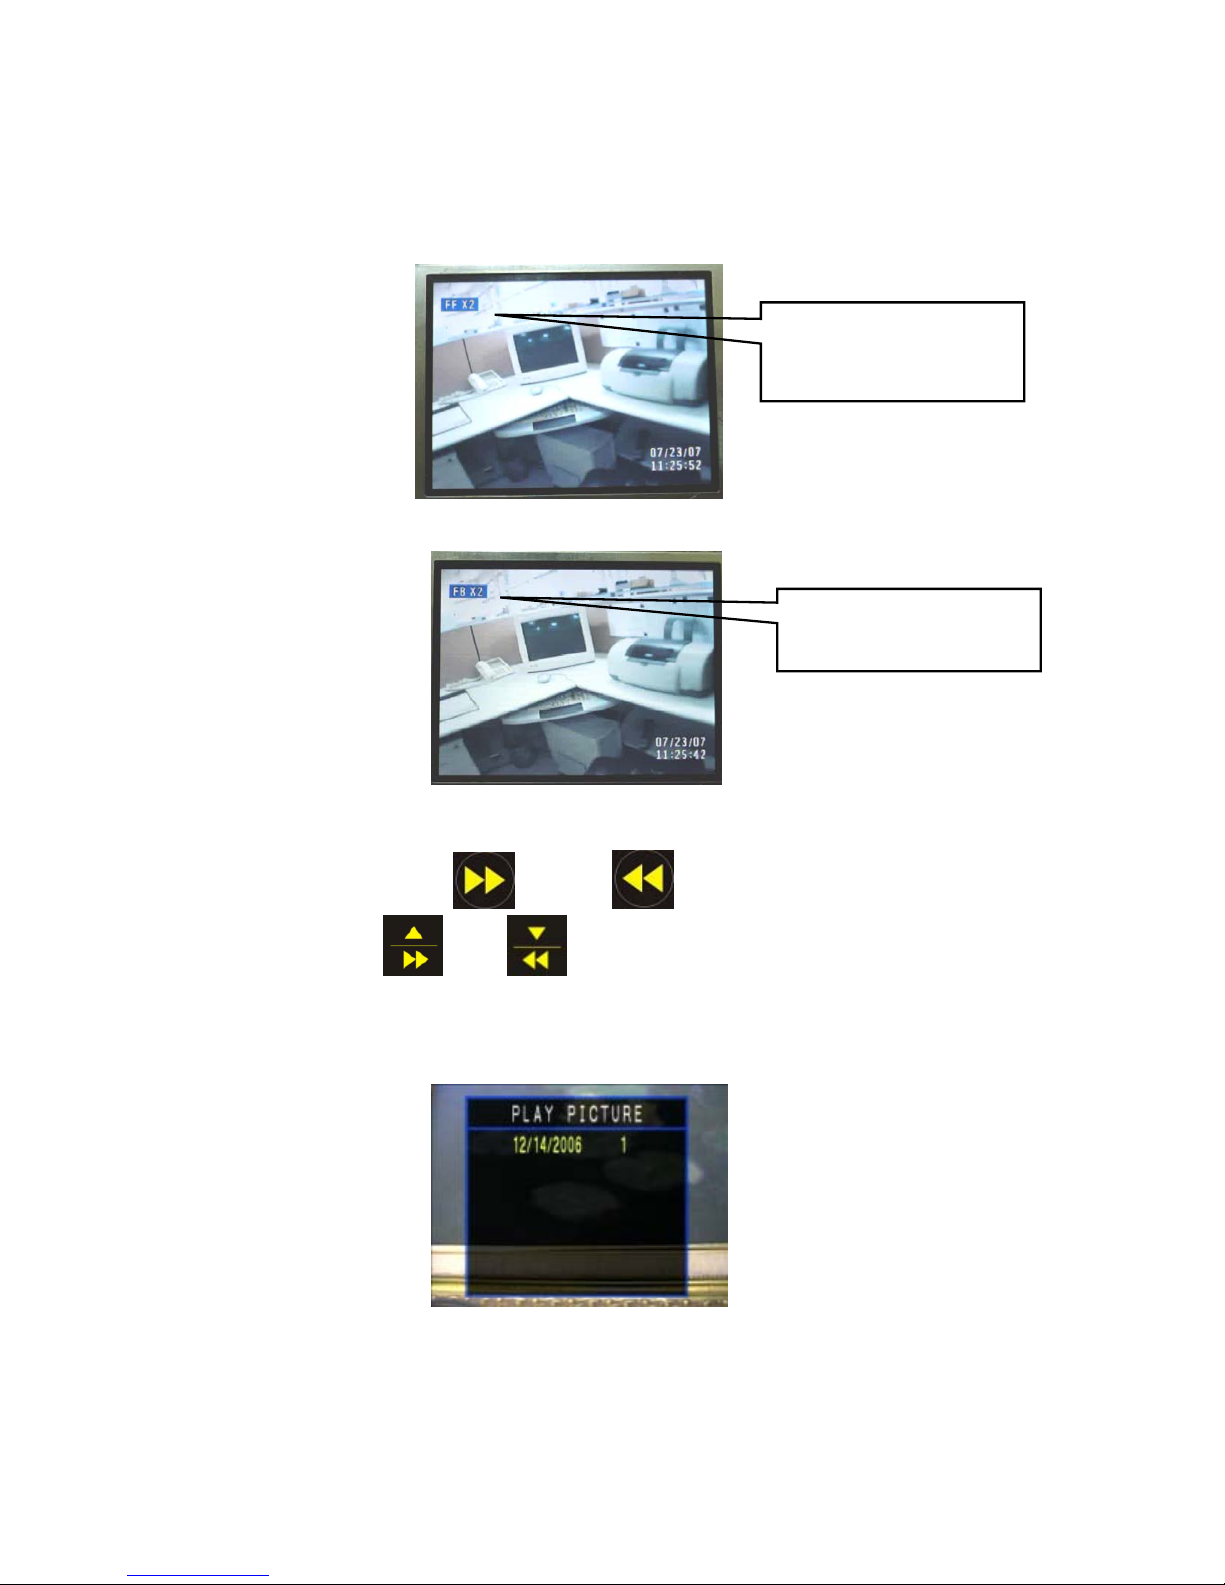
5.2.2 Play Fast Forward
5.2.3 Play Back Forward
There is two different ways can be op erated above functions:
1. Used buttons STEP_F
, STEP_B , with remote controller
2. Press buttons
and on system.
5.3 Play Picture
Day List (MM/DD/YYYY Total _Picture)
Video clip for FB
(x2/x4/x8/x16)
Video clip for, FF
(x2/x4/x8/x16)
Page 19
15
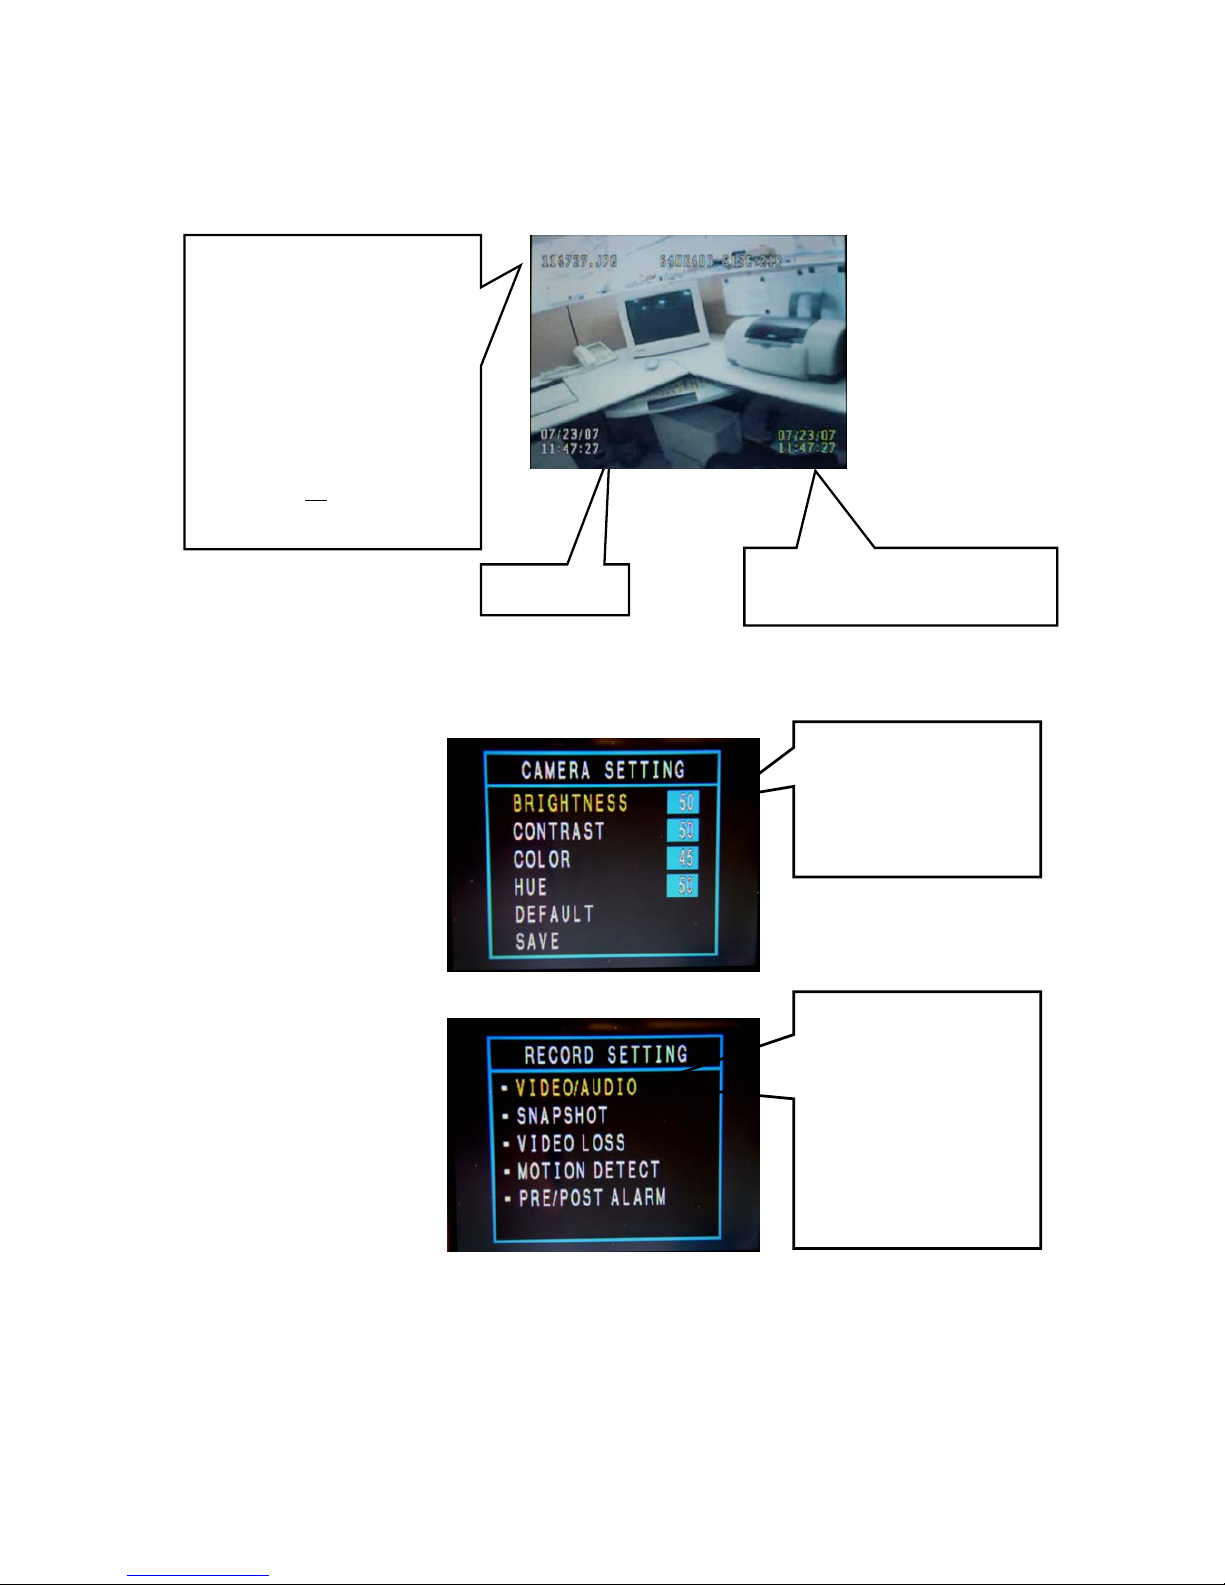
5.4 Camera Setting
d
5.5 Record Setting
Selectable to stamp time & date
oo the picture
Time & date
Content Storage Pat h:
\JPEG\YYMMDD\
File Naming:
A. the 1
st
picture in ss second
-- hhmmss.JPG
B. the remaining pictures in
ss second —
hhmmssxx
.JPG
BRIGHTNESS:0~100
CONTRAST:0~100
COLOR:0~100
HUE:0~100
FPS:30/25/20/15/10/5
RESOLUTION:VGA/H
VGA
AUDIO:ON/OFF
MOTION:ON/OFF
VIDEO LOSS: ON/OFF
DATE PRINT:ON/OFF
Page 20
16
z Choose with or without Audio for recording
z Content Storage Path:
\Year\Month\Day\Hour-Minute-Second
z Support continue recording after power loss
z Support HVGA (640 x 240) and VGA (640 x 480) quality
recording;
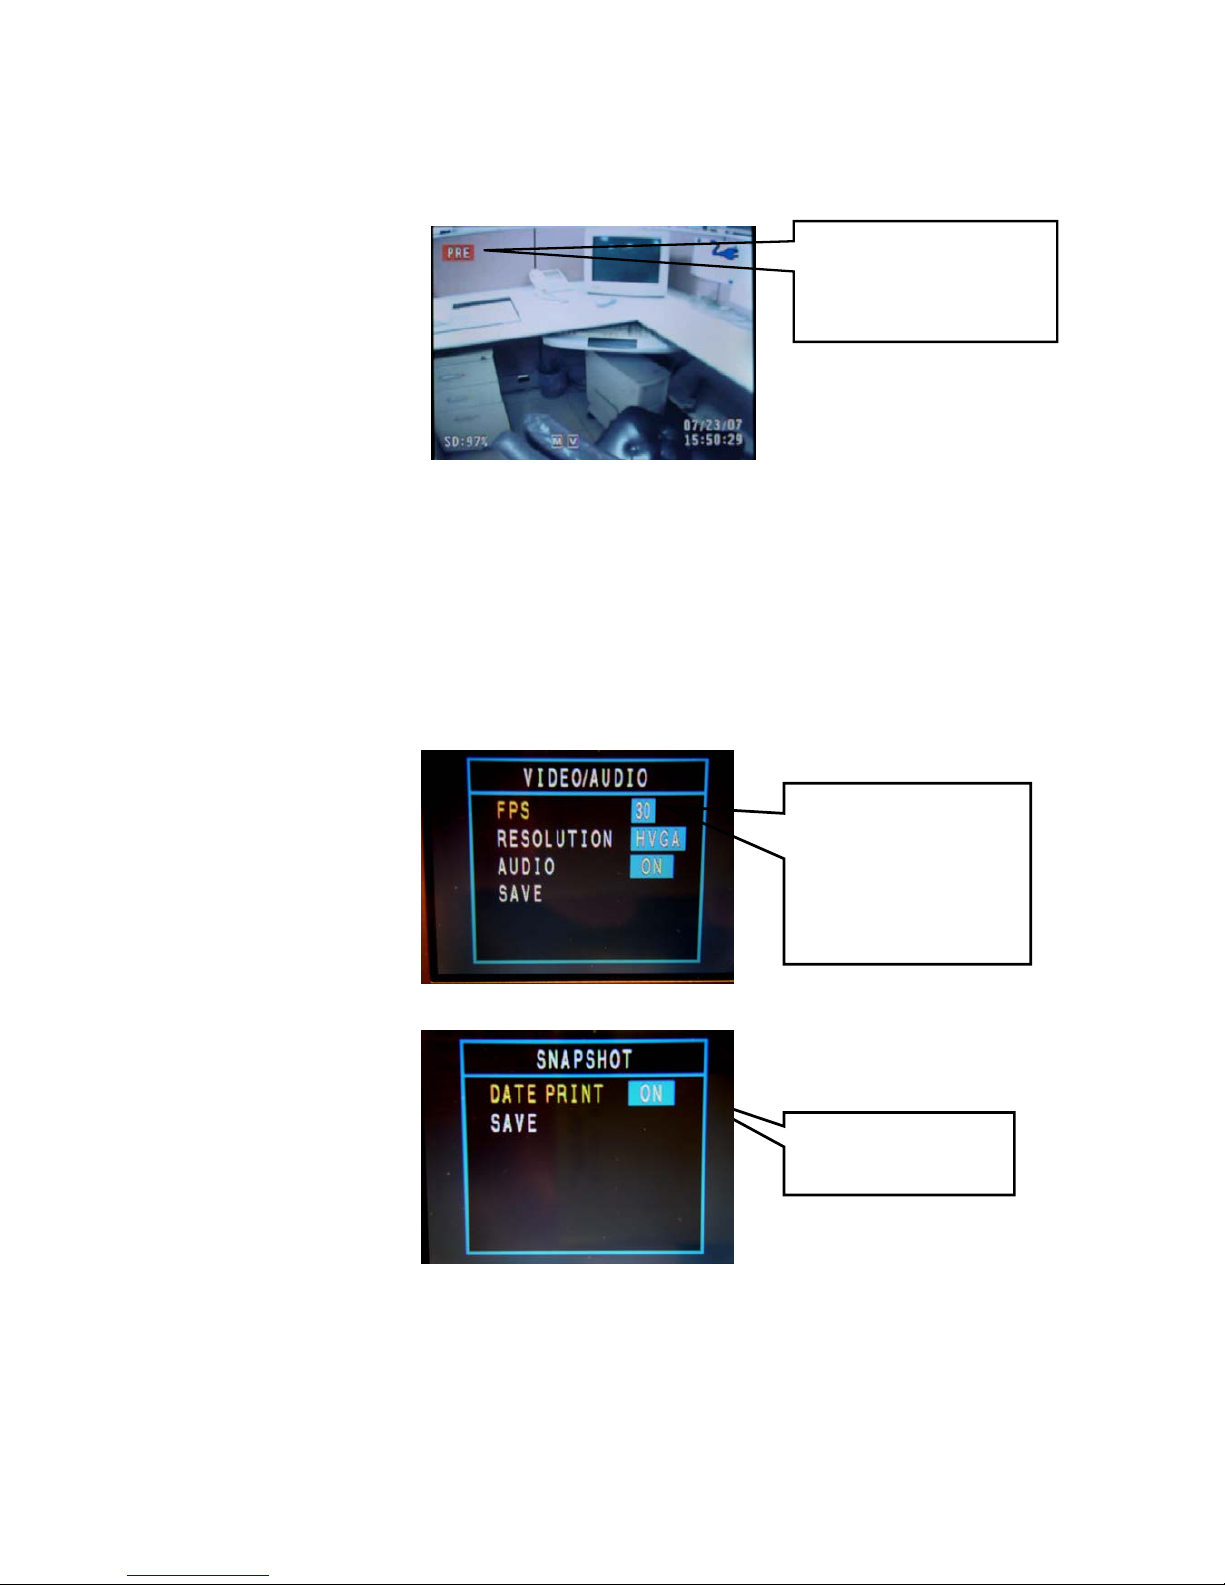
5.5.1 Video/Audi o
5.5.2 Snapshot
z Content Storage Path: \JPEG\YYMMDD\
DATE PRINT:
ON/OFF
Video clip from REC Pre
Alarm Record
FPS: 30/25/20/15/10/5
RESOLUTION:
VGA/HVGA
AUDIO: ON/OFF
Page 21
17
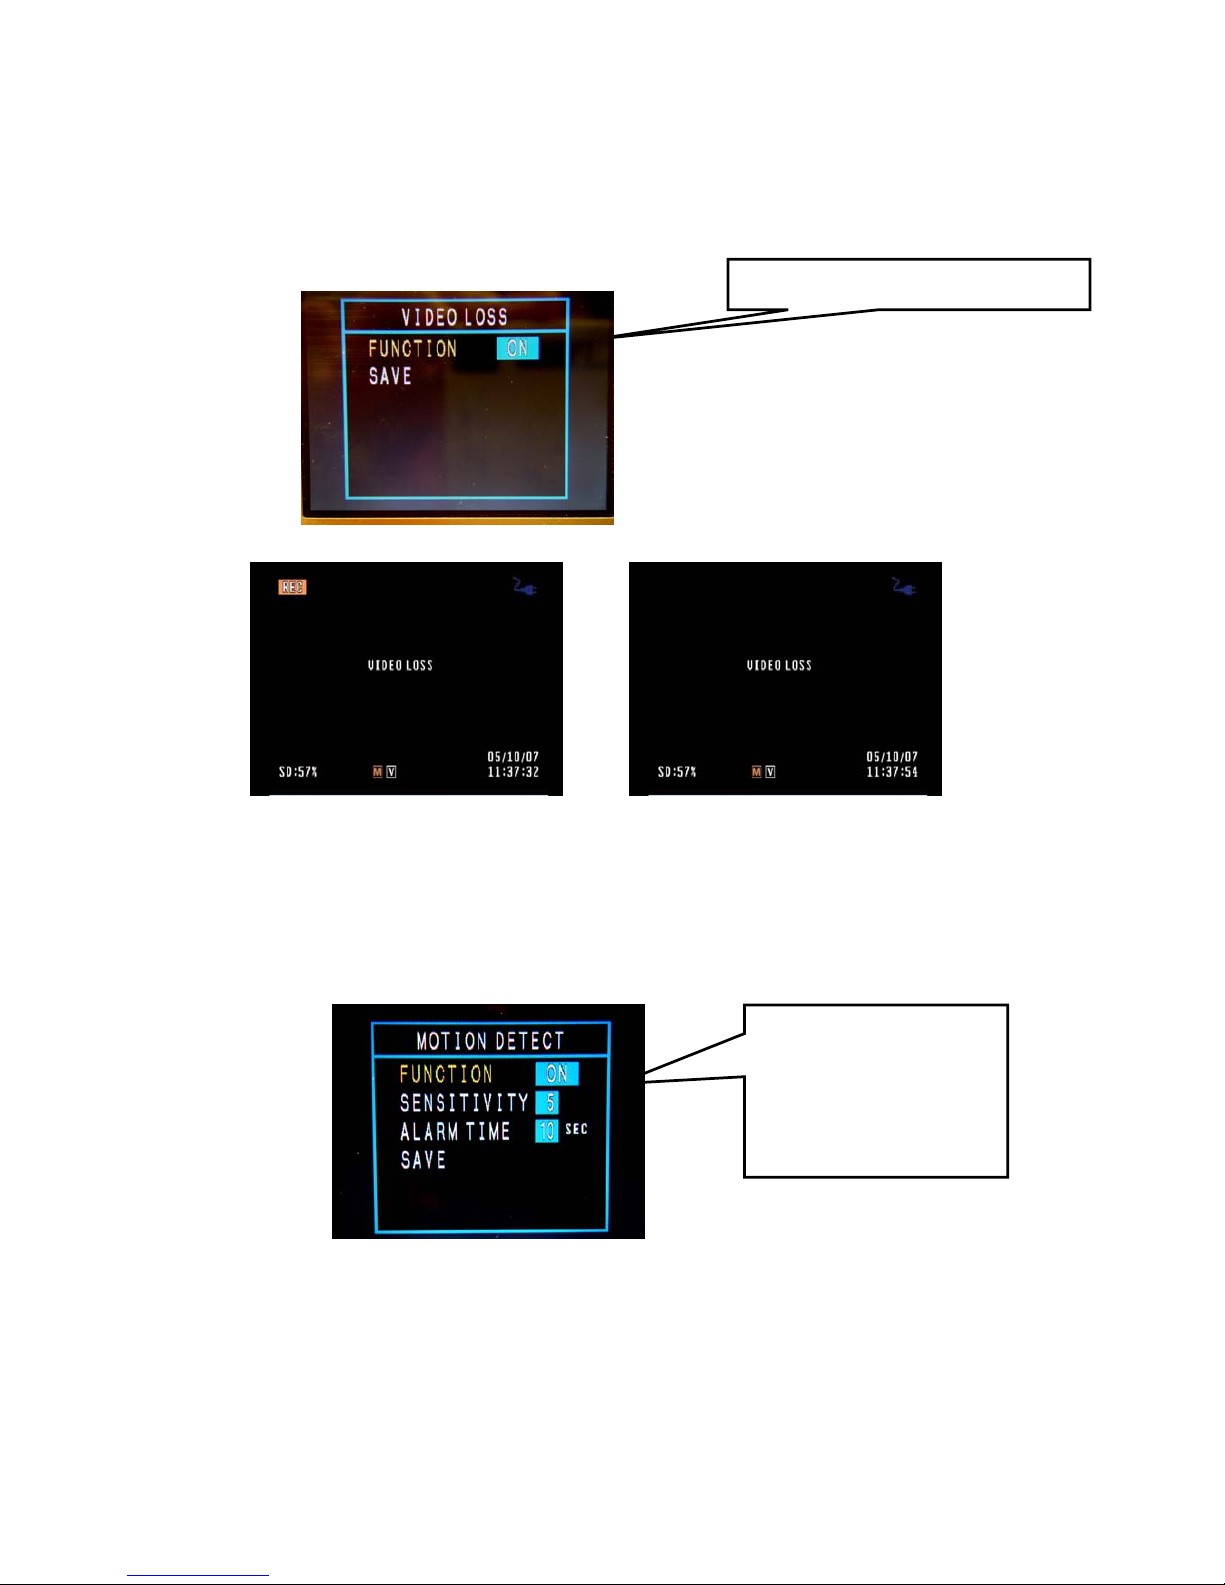
5.5.3 Video Loss
z Will display “VIDEO LOSS” while detecting video source lost
z Menu selectable to enable/disable on ‘stop recording’ at 5 seconds after
detecting video loss
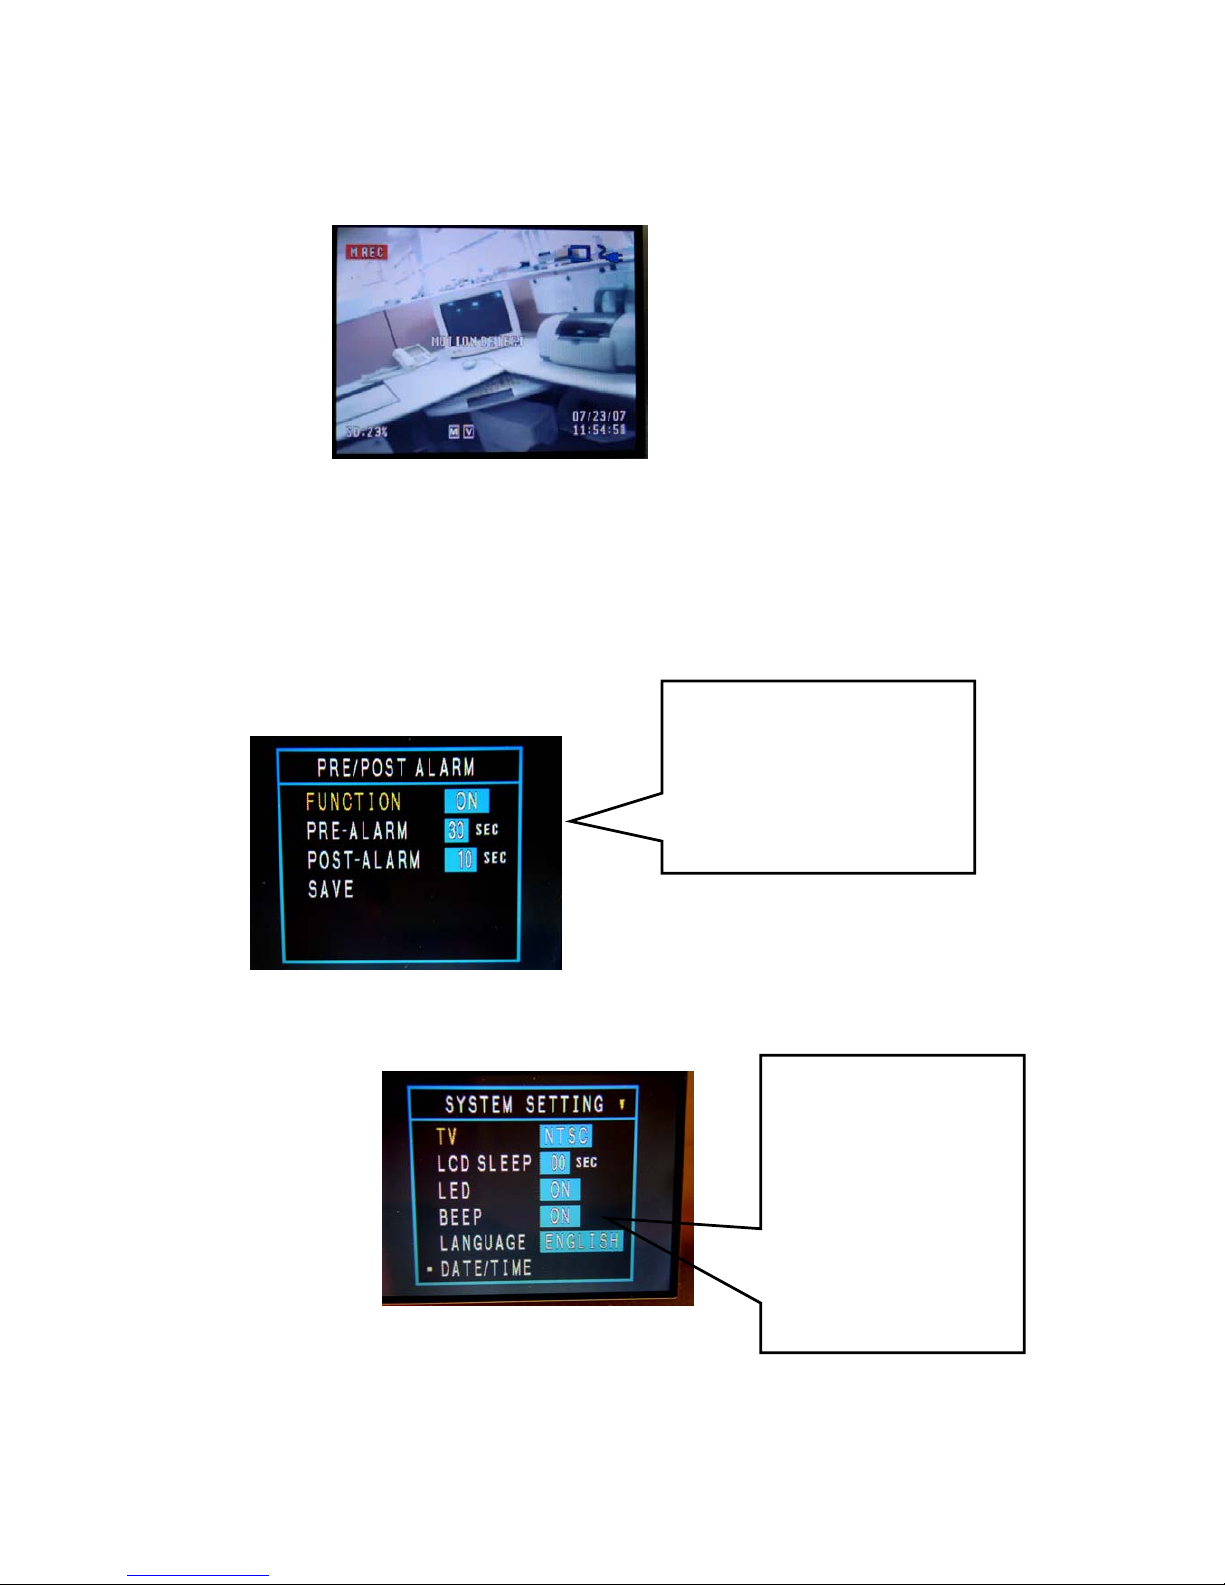
5.5.4 Motion Detection
FUNCTION: ON/OFF
FUNCTION: ON/OFF
SENSITIVITY: 1-10
ALARM TIME: 10-60
SEC
Page 22
18
z The function is selectable via menu
z The record duration after triggering, and the trigger sensitivity is selectable via
menu
z Detecting motion and active recording until scene stalling for 10 seconds
z Back to back trigger is support with record duration extended
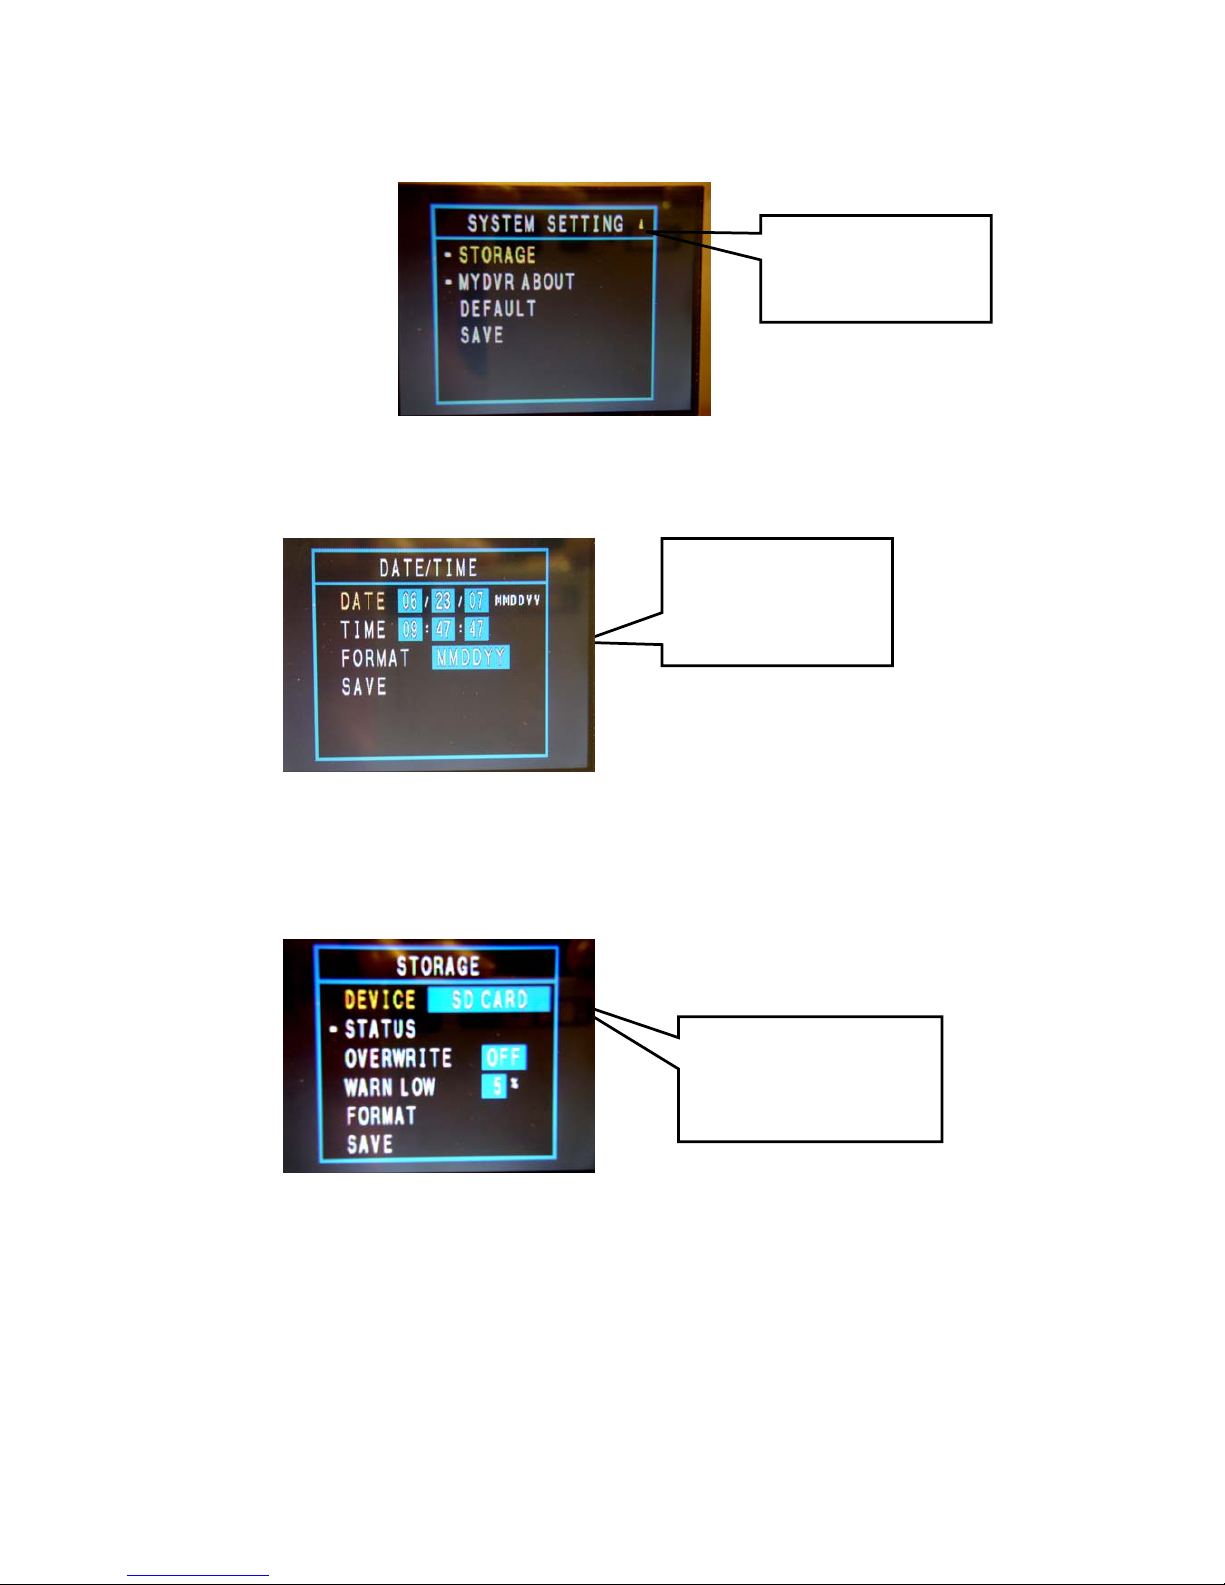
5.5.5 Pre/Post Alarm
5.6 System setting
5.6.1 TV
5.6.2 LCD Sleep
5.6.3 LED
5.6.4 Beep
5.6.5 Language
FUNCTION: ON/OFF
Pre-Alarm: 30 or 60 Sec
Post-Alarm: 60 Sec
ALARM TIME: 10-120
TV:NTSC/PAL
LCD
SLEEP:00/30/60/120
LED:ON/OFF
BEEP:ON/OFF
LANGUAGE: ENGLISH
DATE/TIME: Three
formats
Page 23
19
5.6.6 DATE/TIME
z
z
z Configurable in three formats: YY/MM/DD, DD/MM/YY and MM/DD/YY
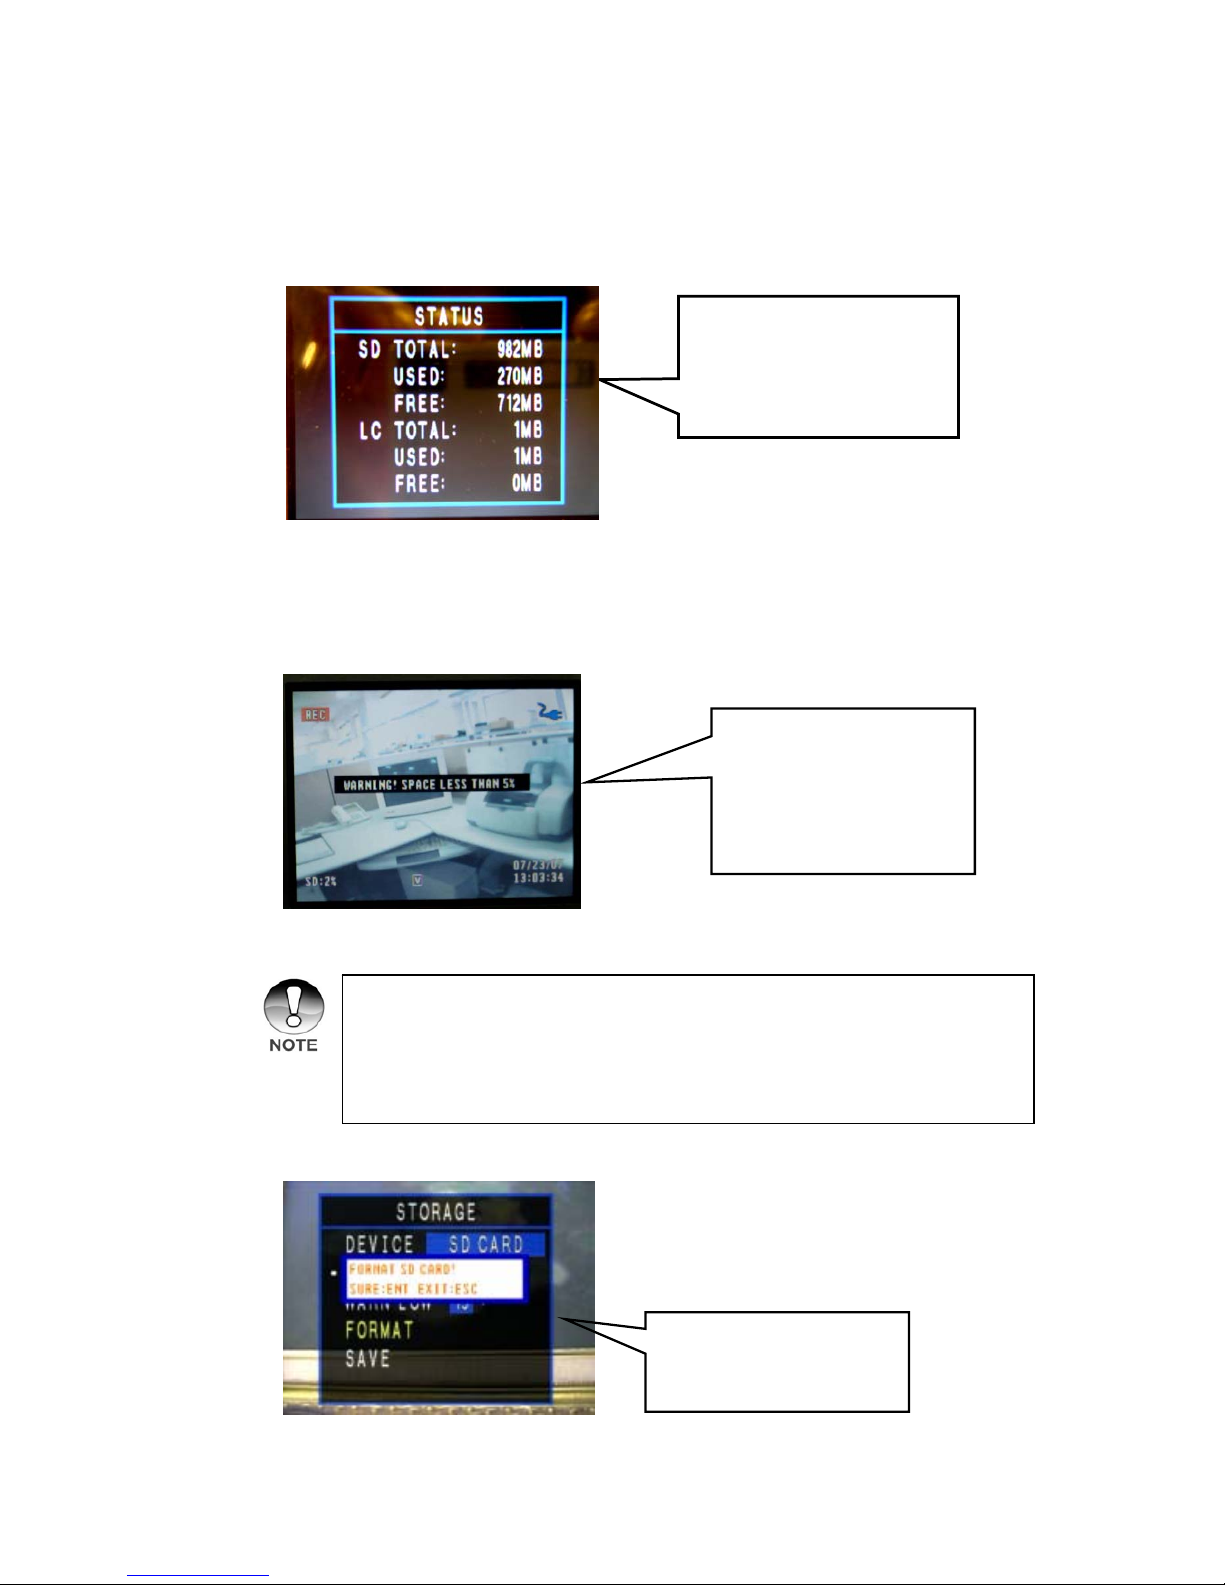
5.6.7 Storage
5.6.7.1 Device
DEVICE: SD CARD
WARN LOW:15/10/5
OVERWRITE: ON/ OFF
FORMAT:
MMDDYY/DDMMY
Y/YYMMDD
STORAGE: SD card
DEFAULT:
Page 24
20
5.6.7.2 Status
5.6.7.3 W ar ning Low
5.6.7.4 FORMAT
Users can program three low storage warnings from 5%, 10% or
15% of the overall SD/SD-HC card
The warning is disabled when the µDVR is set to recycled
recording
The low storage warning
shows when the available
storage equals to the
preset warning percent age
Shows memory status, the
free and used
space
SD/SD-HC card format
tools of the µDVR
Page 25
21
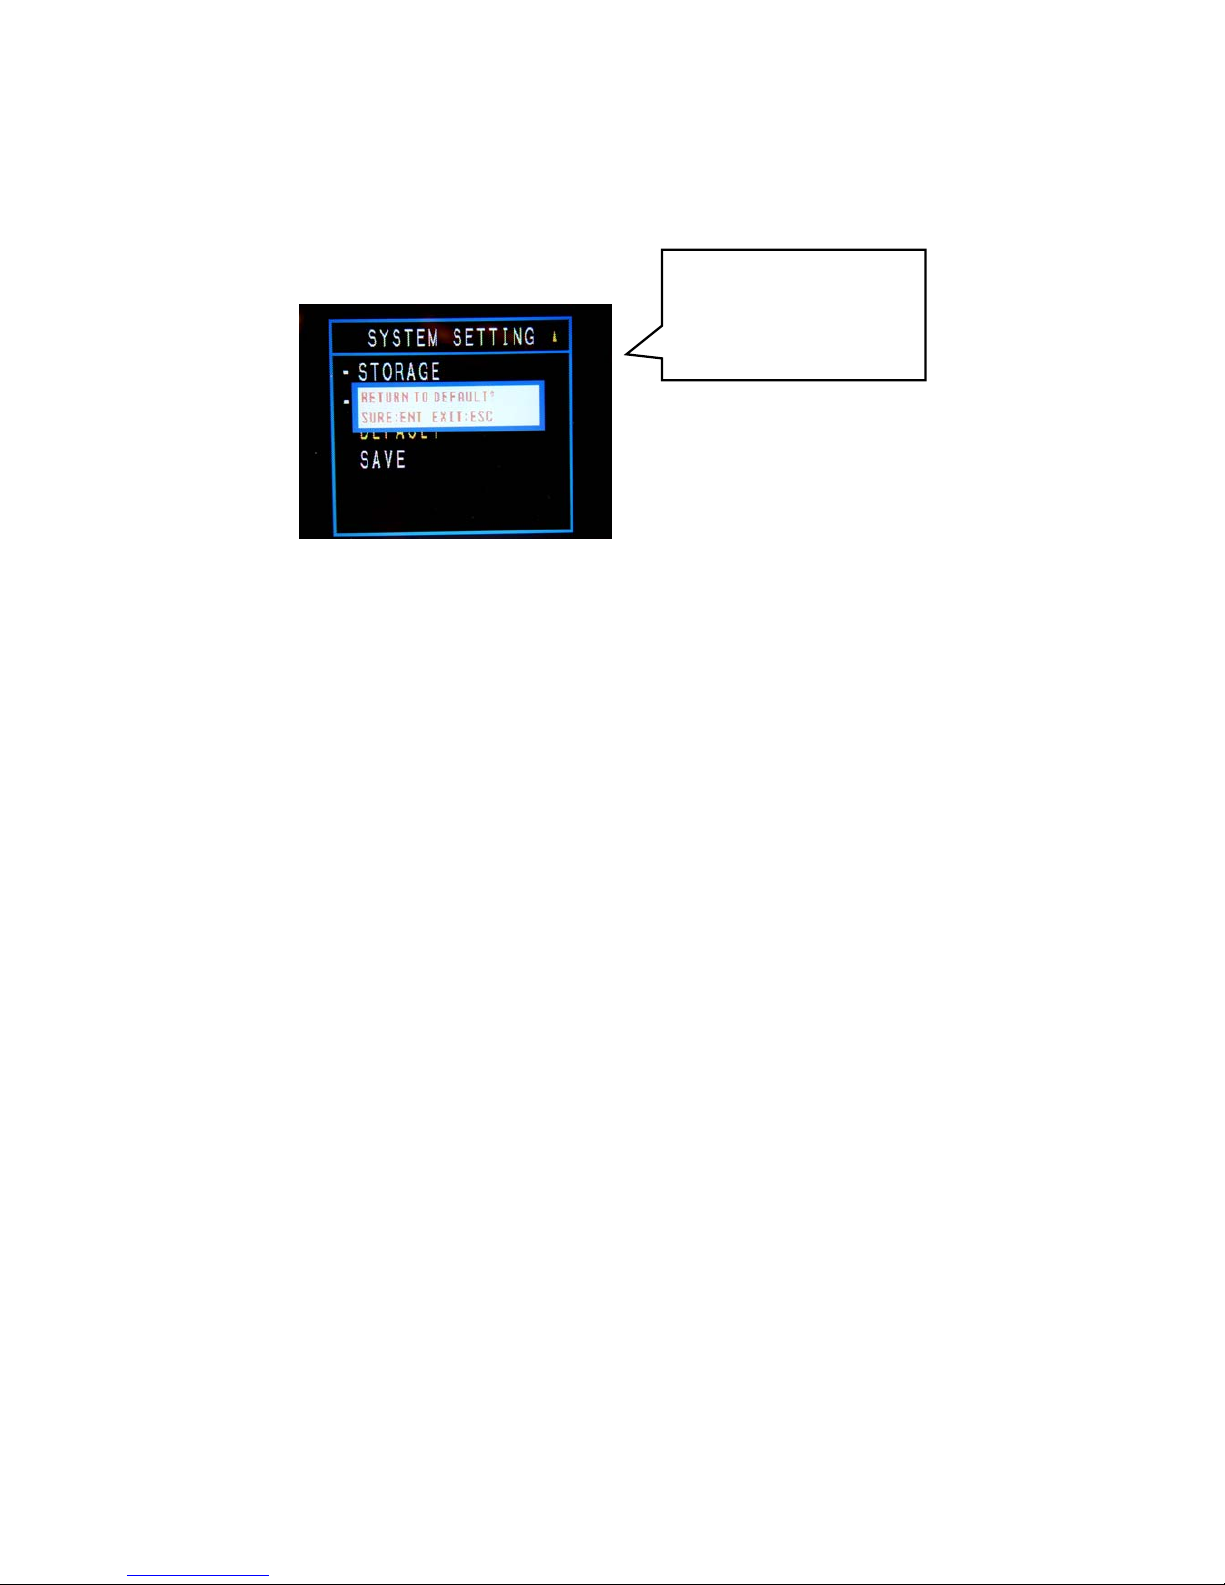
5.6.8 Default Setting
Followings are the factory default settings:
z Camera Setup
a. Brightness: 50
b. Contrast: 50
c Color: 50
d. Hue: 50
z FPS: 30
z Resolution: VGA
z Audio: OFF
z Motion Detect : OFF
z Motion Sensiti vity: 5
z Date Print: ON
z TV: NTSC
z LCD Sleep: 30
z LED: ON
z Beep: OFF
z Language: English
z Date Format: MM/DD/YY
z Device: SD CARD
z Warn Low: 15%
Change the settings back
to the manufacturer’s
default
Page 26
22
6. USB Function
Connecting the USB cable to the µDVR
1. While all of the Windows based operating system does not directly recognize the Linux file
system which is the main file sy stem o f the µDV R, the iMx software will automatically install the
EXT2 file module when running the installation. The EXT2 file module enab les your Windows
based system to recognize all the medi a in Linux file system.
2. To backup data from DVR to PC via USB cable, connect the USB cable to µDVR. When
attempting to attach the USB cable, please stop any operation and return the µDVR to preview
status.
3. When the USB cable is connected to µDVR, the screen will light blue and shows “USB
ATTACH.” The screen will not return to normal display until the USB cable is disconnected.
4. Connect the µDVR to PC or Notebook via USB cable. Go to “My Computer” to check that
whether you can find out “new Local Disk”. If not, follow the procedures below to operate:
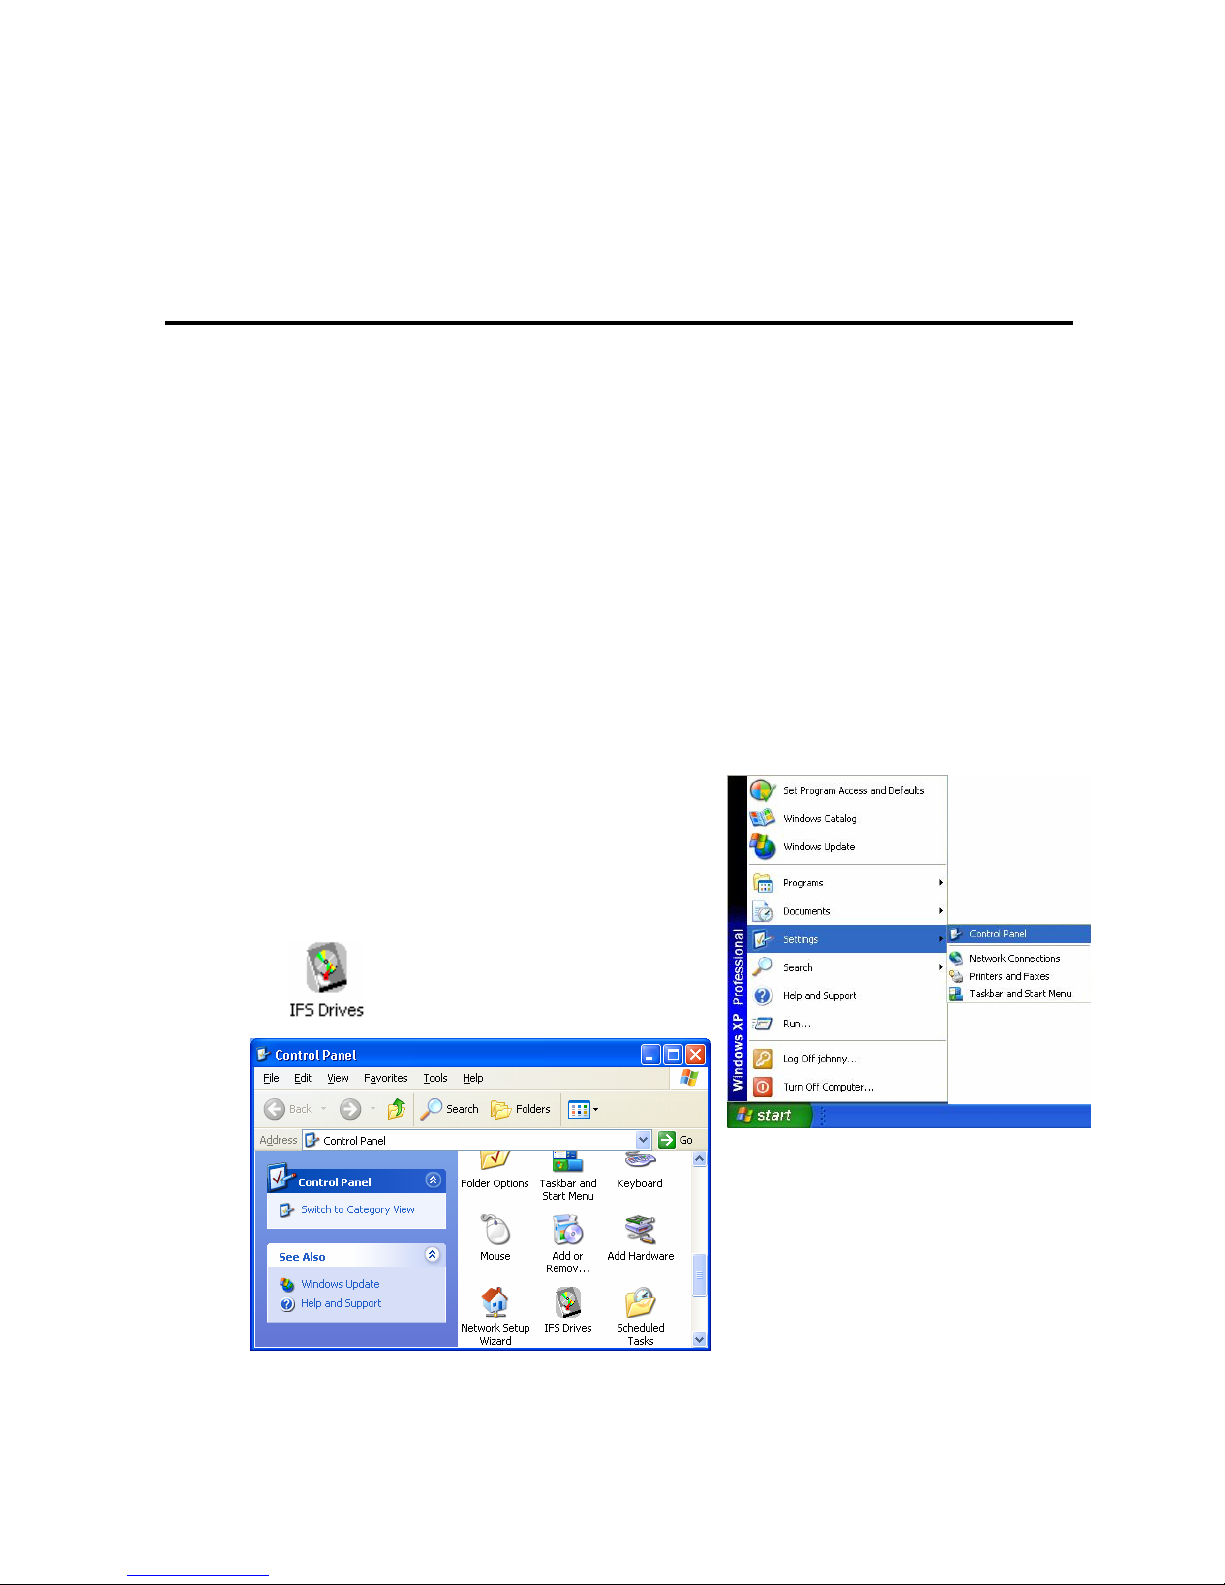
(1) Go to [Start]Æ [Settings]Æ [Control Panel].
(2) Click .
Page 27
23
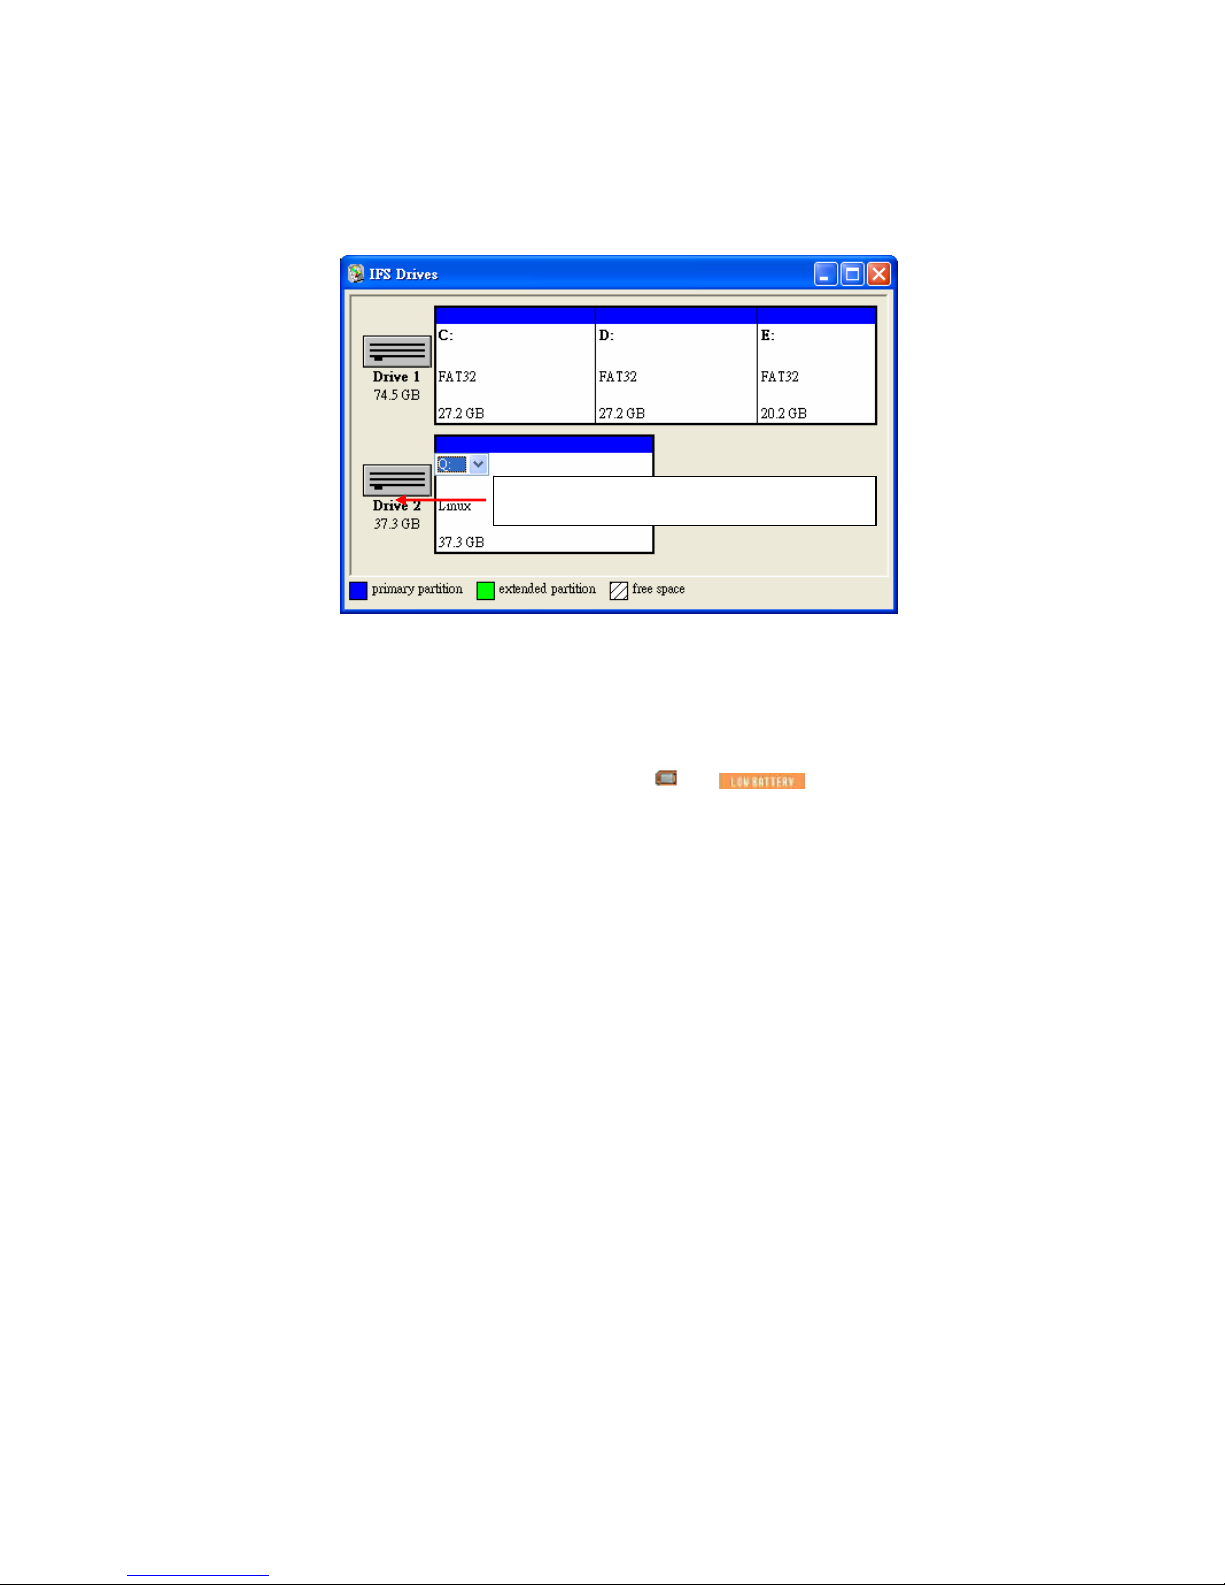
(3) Select one free device as the Local disk for µDVR, for example, a Local Disk (Q:).
7. Trouble Shooting
Q 1: Why I can not turn on the Micro DVR?
A 1: The possible reason is because of Weak batteries (
or appears in the display), or
the AC power adapter is disconnected.
We recommend that you use the AC power adapter to fully charge the batt ery, or properly
connect the AC power adapter.
Q 2: I found no display appears in the LCD monitor when the power of Elite mini DVR is on.
A 2: The possible reasons are as following below.
- Weak batteries
- The AV cable has plugged in the Elite mini DVR.
- The function of LCD button on the RC has not been activated.
- The LCD SLEEP in SYSTEM SETTING menu is not properly set.
We recommend that you adopt the following solutions to resolve the problems.
- Use the AC power adapter to fully charge the battery.
- Unplug the AV cable and then confirm the LCD monitor.
- Press the LCD button on the RC to turn on the LCD.
- Set the LCD SLEEP to 00.
Q 3: Why the video clip cannot be played back?
Select the free device for µDVR
Page 28

24
A 3: It may be because you did not insert the SD memory card. We recommend that you insert the SD
memory card with recorded video clips.
Q 4: Why the video clip looks too bright or too dark ?
A 4: It may be because you did not properly set the BRIGHTNESS in the CAMERA SETTING menu.
We recommend that you adjust the desired setting of the BR IGHTNESS.
 Loading...