

Page 1

Advanced Micro DVR
User Manual
Product: MDVR18
Please read this manual before using your recorder, and always follow the
instructions for safety and proper use. Save this manual for future reference.
LE_MDVR18_RM
Page 2
ii
www.supercircuits.com
CAUTION
Operate this recorder only in environments where the temperature and humidity is within
the recommended range. Operation in extreme temperatures or humidity levels may cause
electric shock and shorten the life of the product.
Avoid use in direct sunlight or within strong magnetic elds.
CAUTION
Severe vibration may damage the hard disc or other components inside the unit, especially
during recording.
Data stored in the device may be corrupted by excessive impact, lightning, power surges,
etc. Warranty does not cover damage caused by the conditions mentioned above. Back up
the data in the device properly.
CAUTION
Do not apply excessive pressure onto the device. It may become damaged.
LEGAL NOTICE
Supercircuits products are designed to meet safety and performance standards with the use of specic
Supercircuits authorized accessories. Supercircuits disclaims liability associated with the use of nonSupercircuits authorized accessories.
The recording, transmission, or broadcast of any person’s voice without their consent or a court order is
strictly prohibited by law.
Supercircuits makes no representations concerning the legality of certain product applications such as
the making, transmission, or recording of video and/or audio signals of others without their knowledge
and/or consent. We encourage you to check and comply with all applicable local, state, and federal laws
and regulations before engaging in any form of surveillance or any transmission of radio frequencies.
Other trademarks and trade names may be used in this document to refer to either the entities claiming
the marks and names or their products. Supercircuits, Inc. disclaims any proprietary interest in
trademarks and trade names other than its own.
No part of this document may be reproduced or distributed in any form or by any means without the
express written permission of Supercircuits, Inc.
© 2010 Supercircuits, Inc. All rights reser ved.
11000 N. Mopac Expressway, Building 300, Austin, TX 78759
Sales/Support: 1.800.335.9777 | Fax: 1.866.267.9777
Page 3

iiiAdvanced Micro DVR User Manual
Table of Contents
SECTION 1 Features . . . . . . . . . . . . . . . . . . . . . . . . . . . . . . . . . . . . . . . . . . . . . . . . . . . . . . . 1
1.1 DVR Controls . . . . . . . . . . . . . . . . . . . . . . . . . . . . . . . . . . . . . . . . . . . . . . . 1
1.2 Remote Control . . . . . . . . . . . . . . . . . . . . . . . . . . . . . . . . . . . . . . . . . . . . . 2
1.3 Wire control . . . . . . . . . . . . . . . . . . . . . . . . . . . . . . . . . . . . . . . . . . . . . . . . 3
1.4 What’s in the box . . . . . . . . . . . . . . . . . . . . . . . . . . . . . . . . . . . . . . . . . . . . 3
1.5 Accessories . . . . . . . . . . . . . . . . . . . . . . . . . . . . . . . . . . . . . . . . . . . . . . . . 4
SECTION 2 Connecting DVR System Components . . . . . . . . . . . . . . . . . . . . . . . . . . . . . . . . 5
2.1 DVR connection to a camera . . . . . . . . . . . . . . . . . . . . . . . . . . . . . . . . . . . 5
2.2 DVR connection to a monitor . . . . . . . . . . . . . . . . . . . . . . . . . . . . . . . . . . . 5
2.3 DVR connection to a PC . . . . . . . . . . . . . . . . . . . . . . . . . . . . . . . . . . . . . . . 6
2.4 DVR connection to a wire control . . . . . . . . . . . . . . . . . . . . . . . . . . . . . . . 7
2.4.1 Wire control switch and cables assembly . . . . . . . . . . . . . . . . . . . . . 7
2.5 Installing the DVR battery . . . . . . . . . . . . . . . . . . . . . . . . . . . . . . . . . . . . . 7
2.5.1 Charging the battery . . . . . . . . . . . . . . . . . . . . . . . . . . . . . . . . . . . . . 8
2.6 Using an SD card . . . . . . . . . . . . . . . . . . . . . . . . . . . . . . . . . . . . . . . . . . . . 8
SECTION 3 Operation . . . . . . . . . . . . . . . . . . . . . . . . . . . . . . . . . . . . . . . . . . . . . . . . . . . . . . 9
3.1 Turn ON/OFF the DVR. . . . . . . . . . . . . . . . . . . . . . . . . . . . . . . . . . . . . . . . . 9
3.2 DVR Main Menu function modes . . . . . . . . . . . . . . . . . . . . . . . . . . . . . . . . 9
3.2.1 Navigating menus . . . . . . . . . . . . . . . . . . . . . . . . . . . . . . . . . . . . . . 10
3.2.2 Setup . . . . . . . . . . . . . . . . . . . . . . . . . . . . . . . . . . . . . . . . . . . . . . . . 10
3.2.3 Adjust volume . . . . . . . . . . . . . . . . . . . . . . . . . . . . . . . . . . . . . . . . . 12
3.2.4 REC button . . . . . . . . . . . . . . . . . . . . . . . . . . . . . . . . . . . . . . . . . . . . 13
SECTION 4 Setting Functions . . . . . . . . . . . . . . . . . . . . . . . . . . . . . . . . . . . . . . . . . . . . . . . 14
4.1 Program Setting parameter definitions . . . . . . . . . . . . . . . . . . . . . . . . . . 15
SECTION 5 Video Playback . . . . . . . . . . . . . . . . . . . . . . . . . . . . . . . . . . . . . . . . . . . . . . . . . 19
5.1 Play a video file . . . . . . . . . . . . . . . . . . . . . . . . . . . . . . . . . . . . . . . . . . . . 19
5.2 Fast playback . . . . . . . . . . . . . . . . . . . . . . . . . . . . . . . . . . . . . . . . . . . . . . 19
5.3 Pause playback . . . . . . . . . . . . . . . . . . . . . . . . . . . . . . . . . . . . . . . . . . . . 20
5.4 Slow motion playback . . . . . . . . . . . . . . . . . . . . . . . . . . . . . . . . . . . . . . . 20
5.5 Exit playback mode . . . . . . . . . . . . . . . . . . . . . . . . . . . . . . . . . . . . . . . . . 20
5.6 Capture image during playback . . . . . . . . . . . . . . . . . . . . . . . . . . . . . . . . 21
SECTION 6 Video Playback Settings . . . . . . . . . . . . . . . . . . . . . . . . . . . . . . . . . . . . . . . . . . 22
6.1 During video playback . . . . . . . . . . . . . . . . . . . . . . . . . . . . . . . . . . . . . . . 22
6.2 In the file list . . . . . . . . . . . . . . . . . . . . . . . . . . . . . . . . . . . . . . . . . . . . . . 22
SECTION 7 Audio Playback . . . . . . . . . . . . . . . . . . . . . . . . . . . . . . . . . . . . . . . . . . . . . . . . 23
7.1 Play an audio file . . . . . . . . . . . . . . . . . . . . . . . . . . . . . . . . . . . . . . . . . . . 23
Page 4

iv
www.supercircuits.com
7.2 Fast playback . . . . . . . . . . . . . . . . . . . . . . . . . . . . . . . . . . . . . . . . . . . . . . 23
7.3 Reverse playback . . . . . . . . . . . . . . . . . . . . . . . . . . . . . . . . . . . . . . . . . . . 24
7.4 Pause playback . . . . . . . . . . . . . . . . . . . . . . . . . . . . . . . . . . . . . . . . . . . . 24
7.5 Stop playback . . . . . . . . . . . . . . . . . . . . . . . . . . . . . . . . . . . . . . . . . . . . . 25
SECTION 8 Audio File Settings . . . . . . . . . . . . . . . . . . . . . . . . . . . . . . . . . . . . . . . . . . . . . . 26
8.1 During audio playback . . . . . . . . . . . . . . . . . . . . . . . . . . . . . . . . . . . . . . . 26
8.2 In the file list . . . . . . . . . . . . . . . . . . . . . . . . . . . . . . . . . . . . . . . . . . . . . . 26
SECTION 9 Photo Browsing . . . . . . . . . . . . . . . . . . . . . . . . . . . . . . . . . . . . . . . . . . . . . . . . 27
9.1 Opening a photo . . . . . . . . . . . . . . . . . . . . . . . . . . . . . . . . . . . . . . . . . . . . 27
9.2 Browse photos . . . . . . . . . . . . . . . . . . . . . . . . . . . . . . . . . . . . . . . . . . . . . 27
9.3 Photo zoom . . . . . . . . . . . . . . . . . . . . . . . . . . . . . . . . . . . . . . . . . . . . . . . 28
SECTION 10 Slide Show + Audio . . . . . . . . . . . . . . . . . . . . . . . . . . . . . . . . . . . . . . . . . . . . . 29
SECTION 11 Photo Editing . . . . . . . . . . . . . . . . . . . . . . . . . . . . . . . . . . . . . . . . . . . . . . . . . . 30
11.1 While browsing photos . . . . . . . . . . . . . . . . . . . . . . . . . . . . . . . . . . . . . . 30
11.2 In the file list . . . . . . . . . . . . . . . . . . . . . . . . . . . . . . . . . . . . . . . . . . . . . . 30
SECTION 12 Record . . . . . . . . . . . . . . . . . . . . . . . . . . . . . . . . . . . . . . . . . . . . . . . . . . . . . . . 31
12.1 Audio Line In REC . . . . . . . . . . . . . . . . . . . . . . . . . . . . . . . . . . . . . . . . . . 31
12.2 Video Line In REC . . . . . . . . . . . . . . . . . . . . . . . . . . . . . . . . . . . . . . . . . . 32
SECTION 13 Specifications . . . . . . . . . . . . . . . . . . . . . . . . . . . . . . . . . . . . . . . . . . . . . . . . . . 34
Page 5
1Advanced Micro DVR User Manual
SECTION 1: FEATURES
SECTION 1
Features
The MDVR18 advanced micro digital video recorder is ideally suited for concealment in objects or as
a covert body-worn DVR. It records audio and video, with video resolutions up to 720 x 480 @ 30 fps
and a sequential coded stamp overlay on each frame. You can-off load video evidence to an SD card, to
PC via USB, or playback video on the unit itself. It comes with two lithium ion batteries, cables, carrying
case, remote control, power supply, headphones, easy to use instructions and a 1 year warranty.
Features include:
• Manual, scheduled, auto, and motion triggered recording modes
• MPEG4 compression at resolutions up to 720 x 480 @ 30 fps
• High quality 2.5” LCD display for immediate review of captured video
• Vibration alert when the battery charge is low
• Dual output power supply – DC5V, DC12V (through wire control)
• Easy to conceal, measuring 3.7” x 2.16” x 0.98”
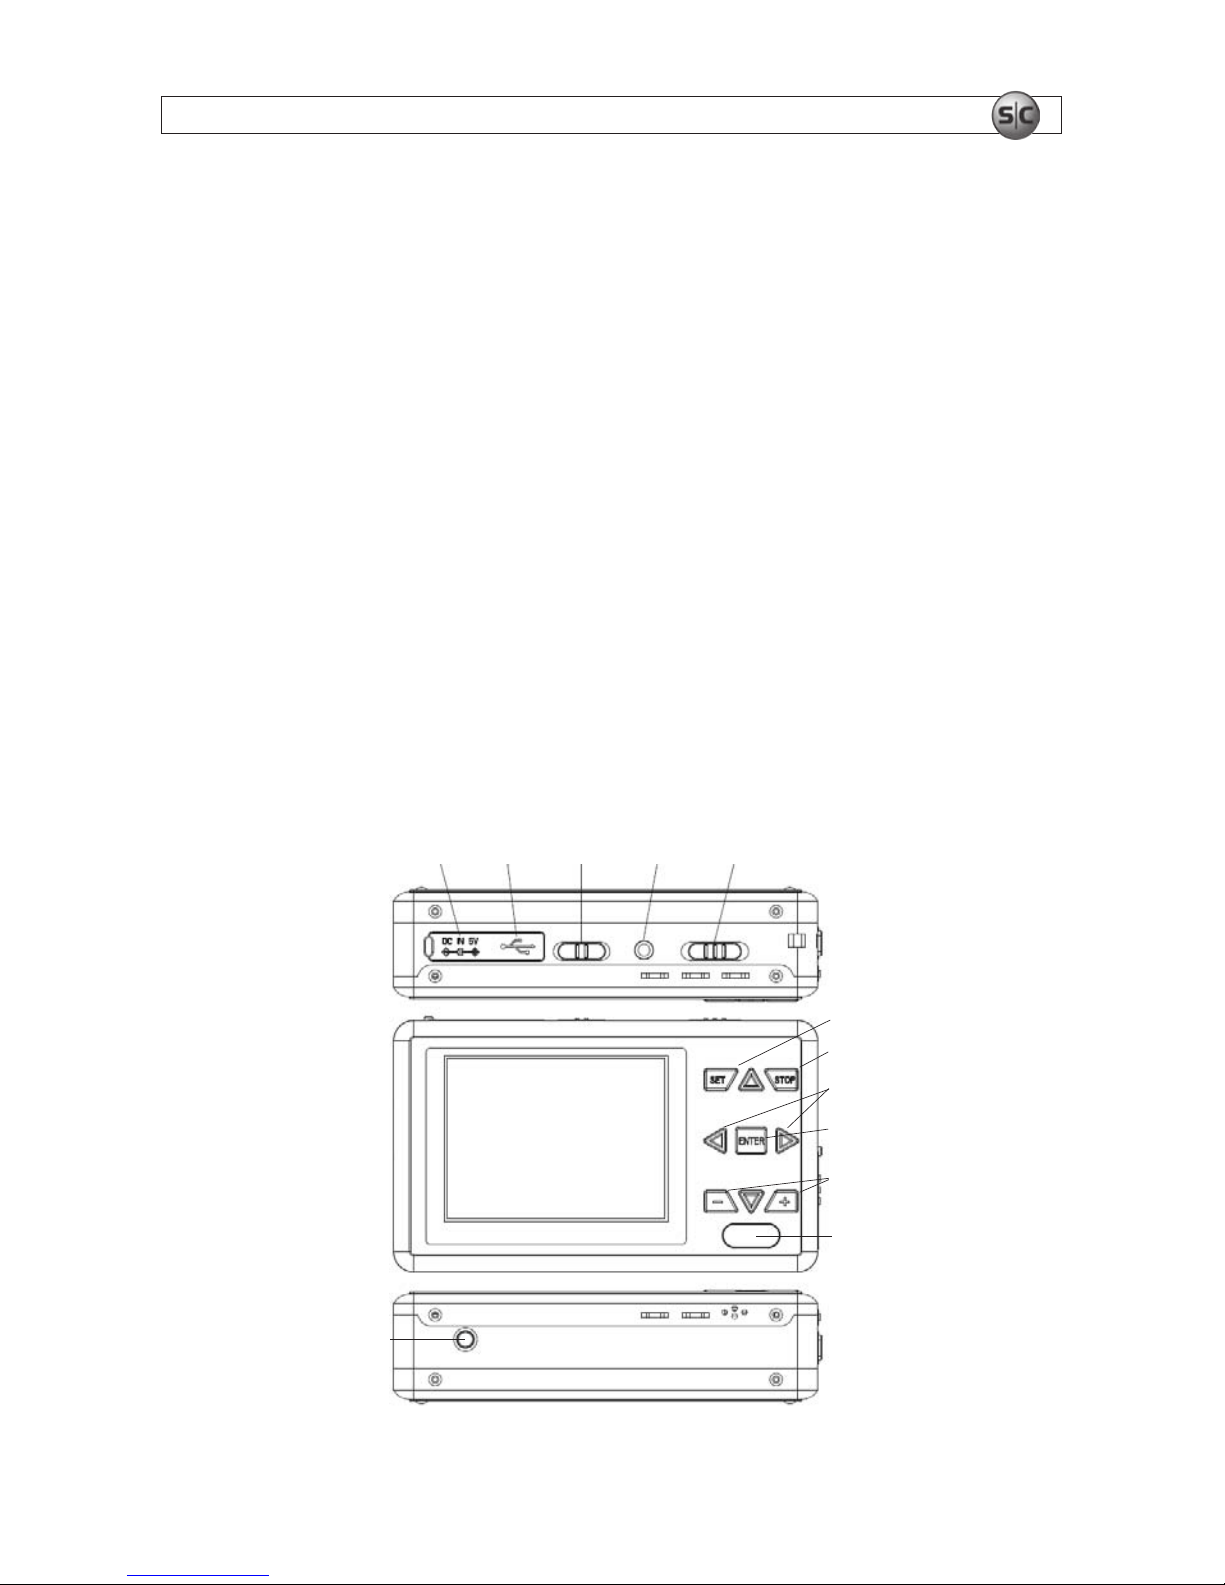
1.1 DVR Controls
OFF/TV/LCD SwitchDC 5V In Jack
USB
Port
A/V Out
Port
Vibration
On/Off
Switch*
IR Sensor
Increase +/-
ENTER
Button
STOP
Navigation
Buttons
SETUP
Reset
Switch
Page 6
2
www.supercircuits.com
SECTION 1: FEATURES
* WIth the Vibration Switch ON, the unit will produce vibration alerts during:
• Power on – the DVR will produce a vibration alert for 2 seconds and the power status LED will be
blue.
• Record – the DVR will produce two 0.5 second vibration alerts
• Low power alert – When low battery power is sensed, the DVR will produce ve 0.5 second
vibration alerts. Also, an empty battery icon will appear on the display and any video/audio le
being recorded will be saved.
• Power off – the DVR will produce ve 0.5 second vibration alerts. Also, the power status LED will
be off.
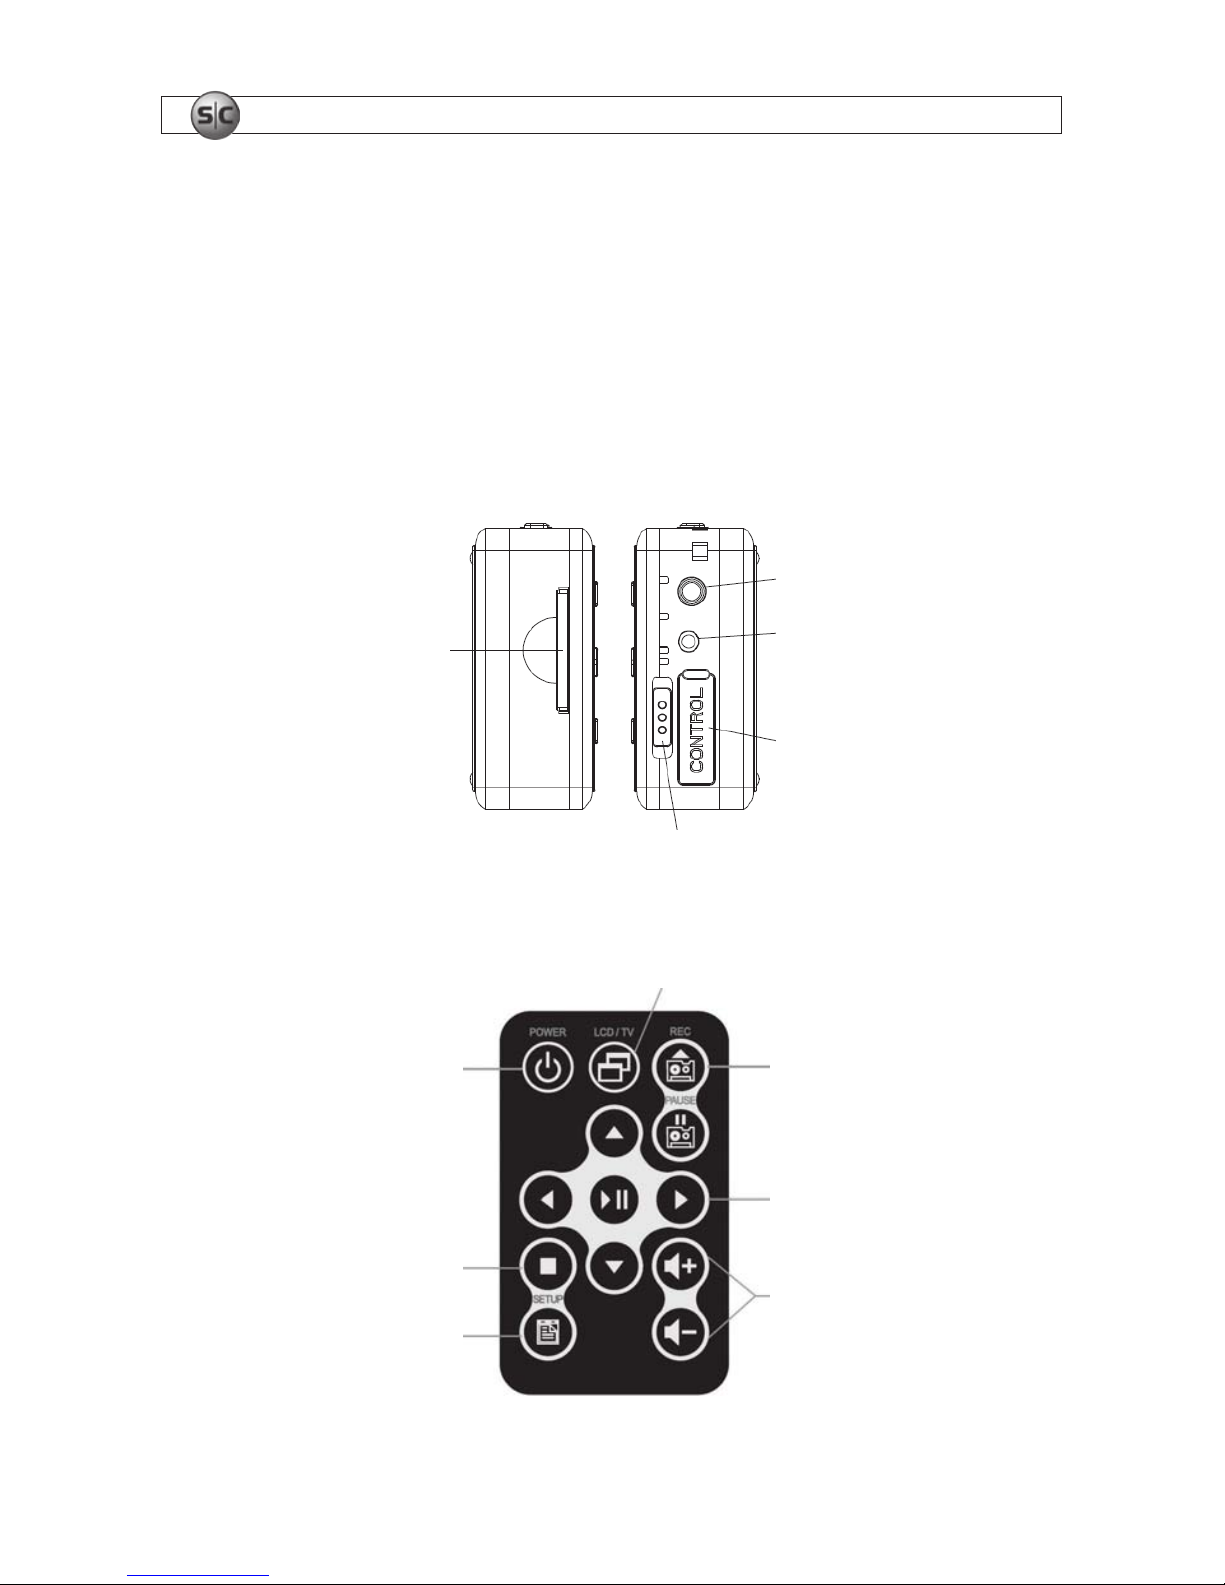
A/V IN /
DC12V Out
Jack
SD Card
Slot
A/V IN /
DC5V Out
Jack
Wired /
RF Wireless
Remote
Control Port
Power On/Off/Record
1.2 Remote Control
Power
Button
LCD/TV Switch
Record
Button
Navigation
and
Pause/Play
Buttons
Volume
Controls
ESC/Stop
Setup
Button
Page 7

3Advanced Micro DVR User Manual
SECTION 1: FEATURES
1.3 Wire control
Switch**
A/V In
DC 12V Out
Wire Control Port Pwr/Rec LEDs
A/V In / DC 12V Out Jack
** The wire control includes a single switch for powering on/off the DVR and starting/stopping a
recording.
• Power Off – Slide the switch to Off to power off the device.
• Power On – Slide the switch to On to power on the device.
• Record – Slide the switch to Rec to record.
1.4 What’s in the box
Your DVR includes:
• MDVR18 recorder unit
• Earbud style earphone
• A/V cable to monitor – 2.5 mm TRRS Y-cable to 3 RCA male
• A/V cable – stereo Y-cable mini-male (2) to 2 RCA female
• A/V/power cable to camera– 3.5 mm TRRS (3 conductor) to 2 RCA female and power connector
• DC 5V power adapter/charger with power jack adapter
• Li-ion batteries (2)
Page 8

4
www.supercircuits.com
SECTION 1: FEATURES
• Documentation CD
• USB cable with type A and mini-B plugs
• Remote control
• Pouch
• Wire control (remote power on) switch with control cable
1.5 Accessories
Page 9
5Advanced Micro DVR User Manual
SECTION 2: CONNECTING DVR SYSTEM COMPONENTS
SECTION 2
Connecting DVR System Components
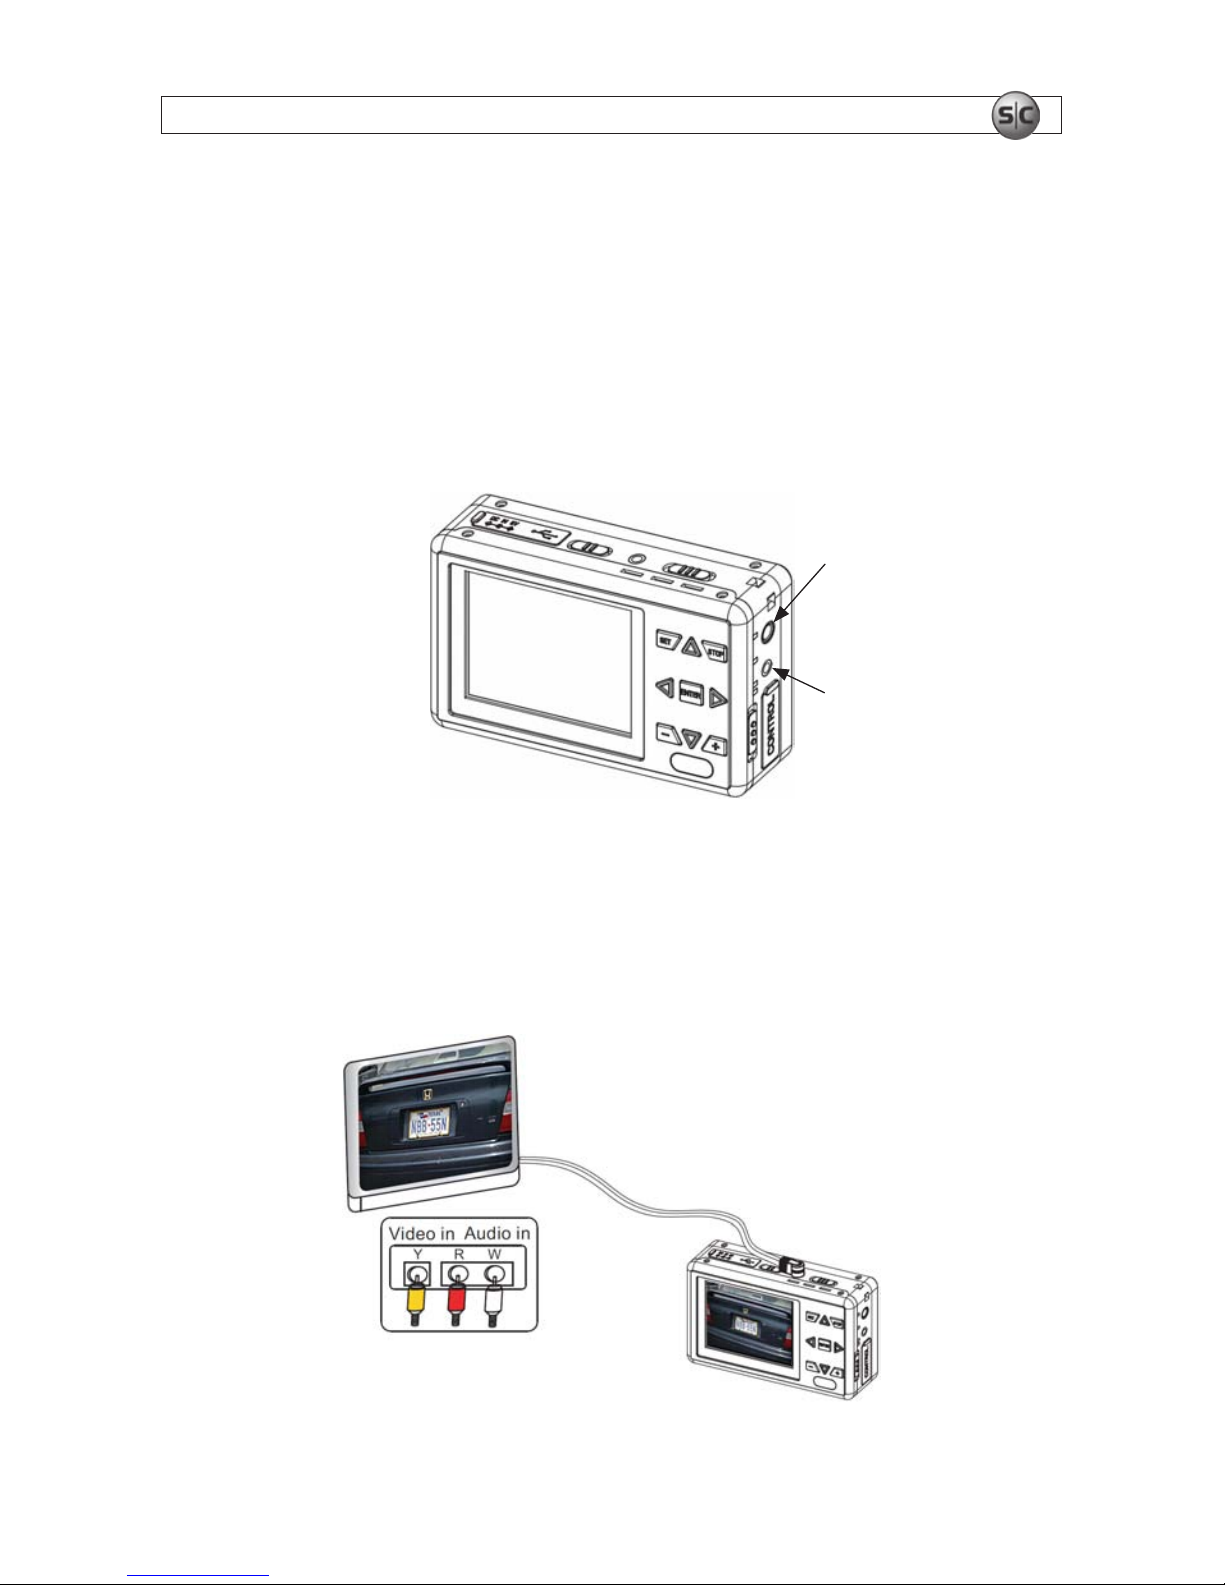
2.1 DVR connection to a camera
To connect the DVR to a camera, plug the A/V power cable into camera, and then plug the cable minijack into the A/V IN/DC5V Out or A/V IN /DC12V Out connector (whichever applies) on the side
of the DVR.
A/V IN/DC5V Out
A/V IN /DC12V Out
2.2 DVR connection to a monitor
To connect the DVR to a monitor or TV, plug the A/V cable 3 RCA connectors into the monitor audio in
left (white), audio in right (red) and video in (yellow) connectors, and then plug the cable mini-jack into
the
A/V Out port on the DVR. Video output is enabled in the conguration menus.
Page 10
6
www.supercircuits.com
SECTION 2: CONNECTING DVR SYSTEM COMPONENTS
2.3 DVR connection to a PC
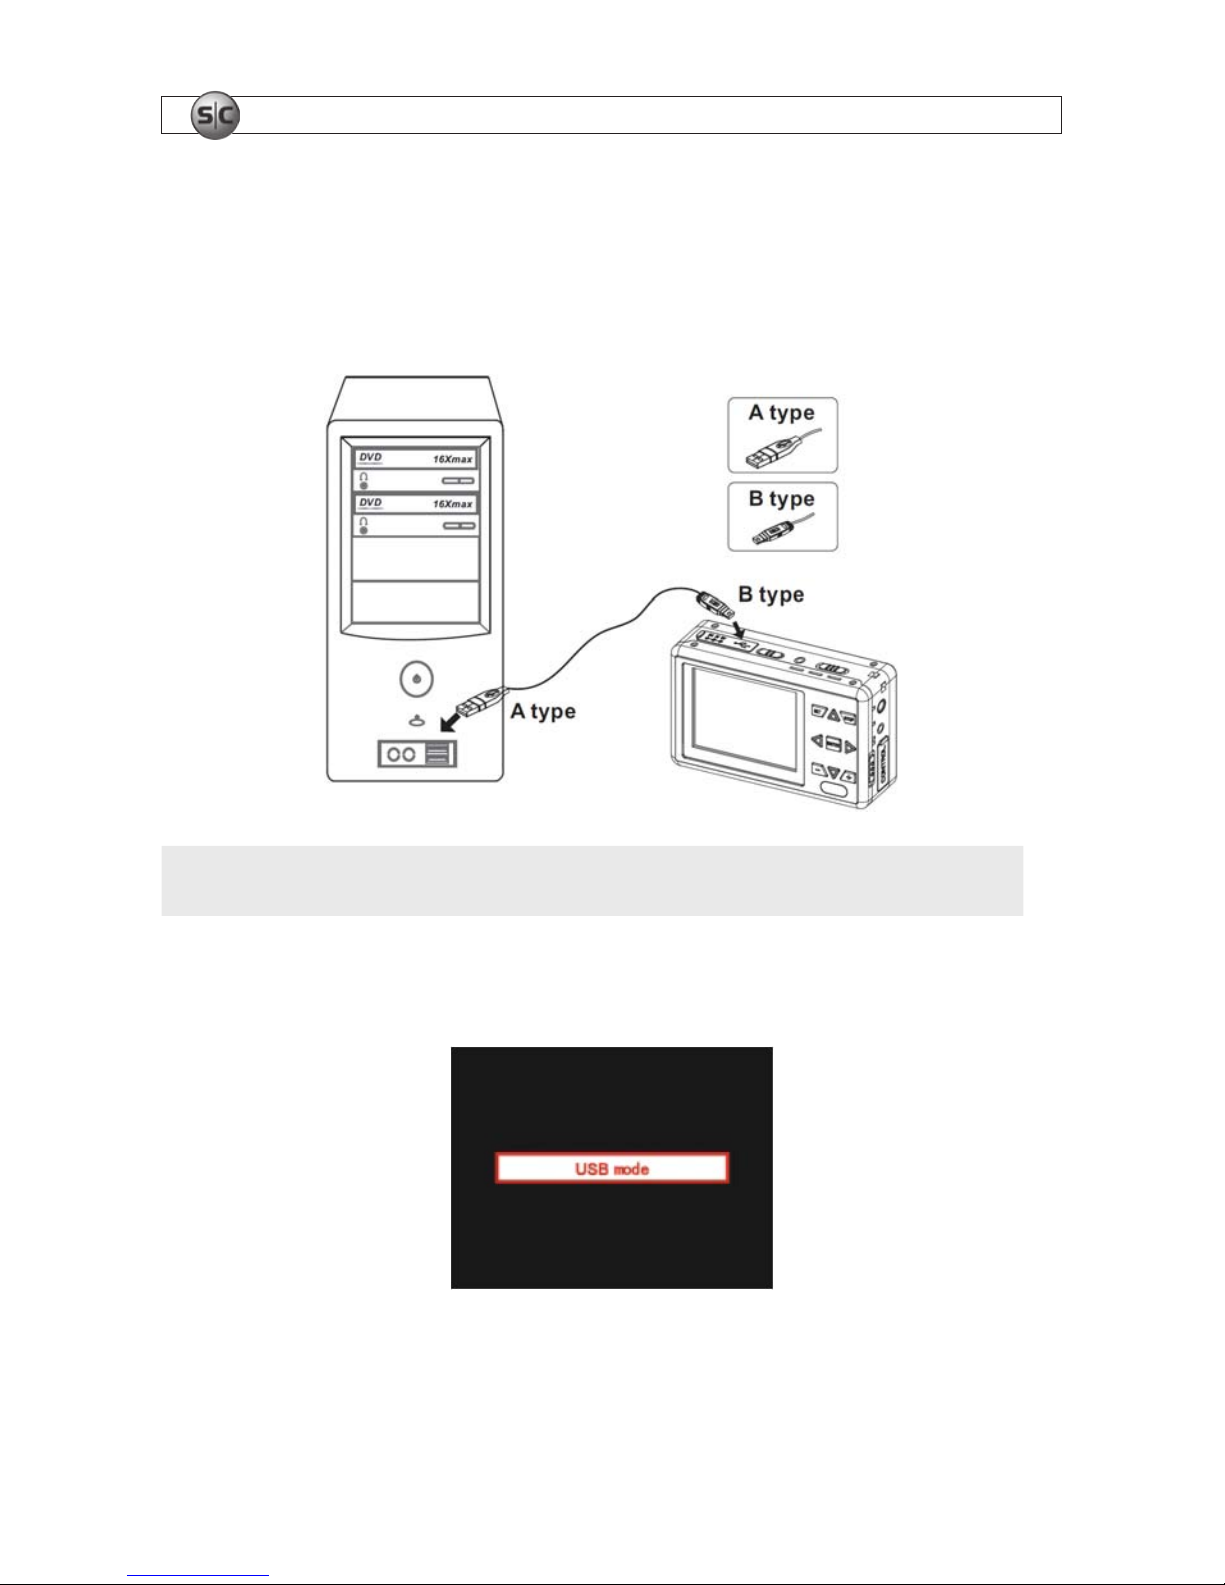
To connect the DVR to a PC, plug the USB A-type connector into the PC, then plug the USB mini-B
connector into the USB port on the DVR. The PC connection can be used for transferring les to and from
the DVR and defragmenting the DVR HDD through a Windows operating system.
NOTE
When it is necessary to reformat the MDVR18 hard drive, reformat only in FAT32 format.
When the USB connection between the DVR and PC is established, the message USB mode will appear
on the DVR screen for 5 seconds.
Page 11
7Advanced Micro DVR User Manual
SECTION 2: CONNECTING DVR SYSTEM COMPONENTS
2.4 DVR connection to a wire control
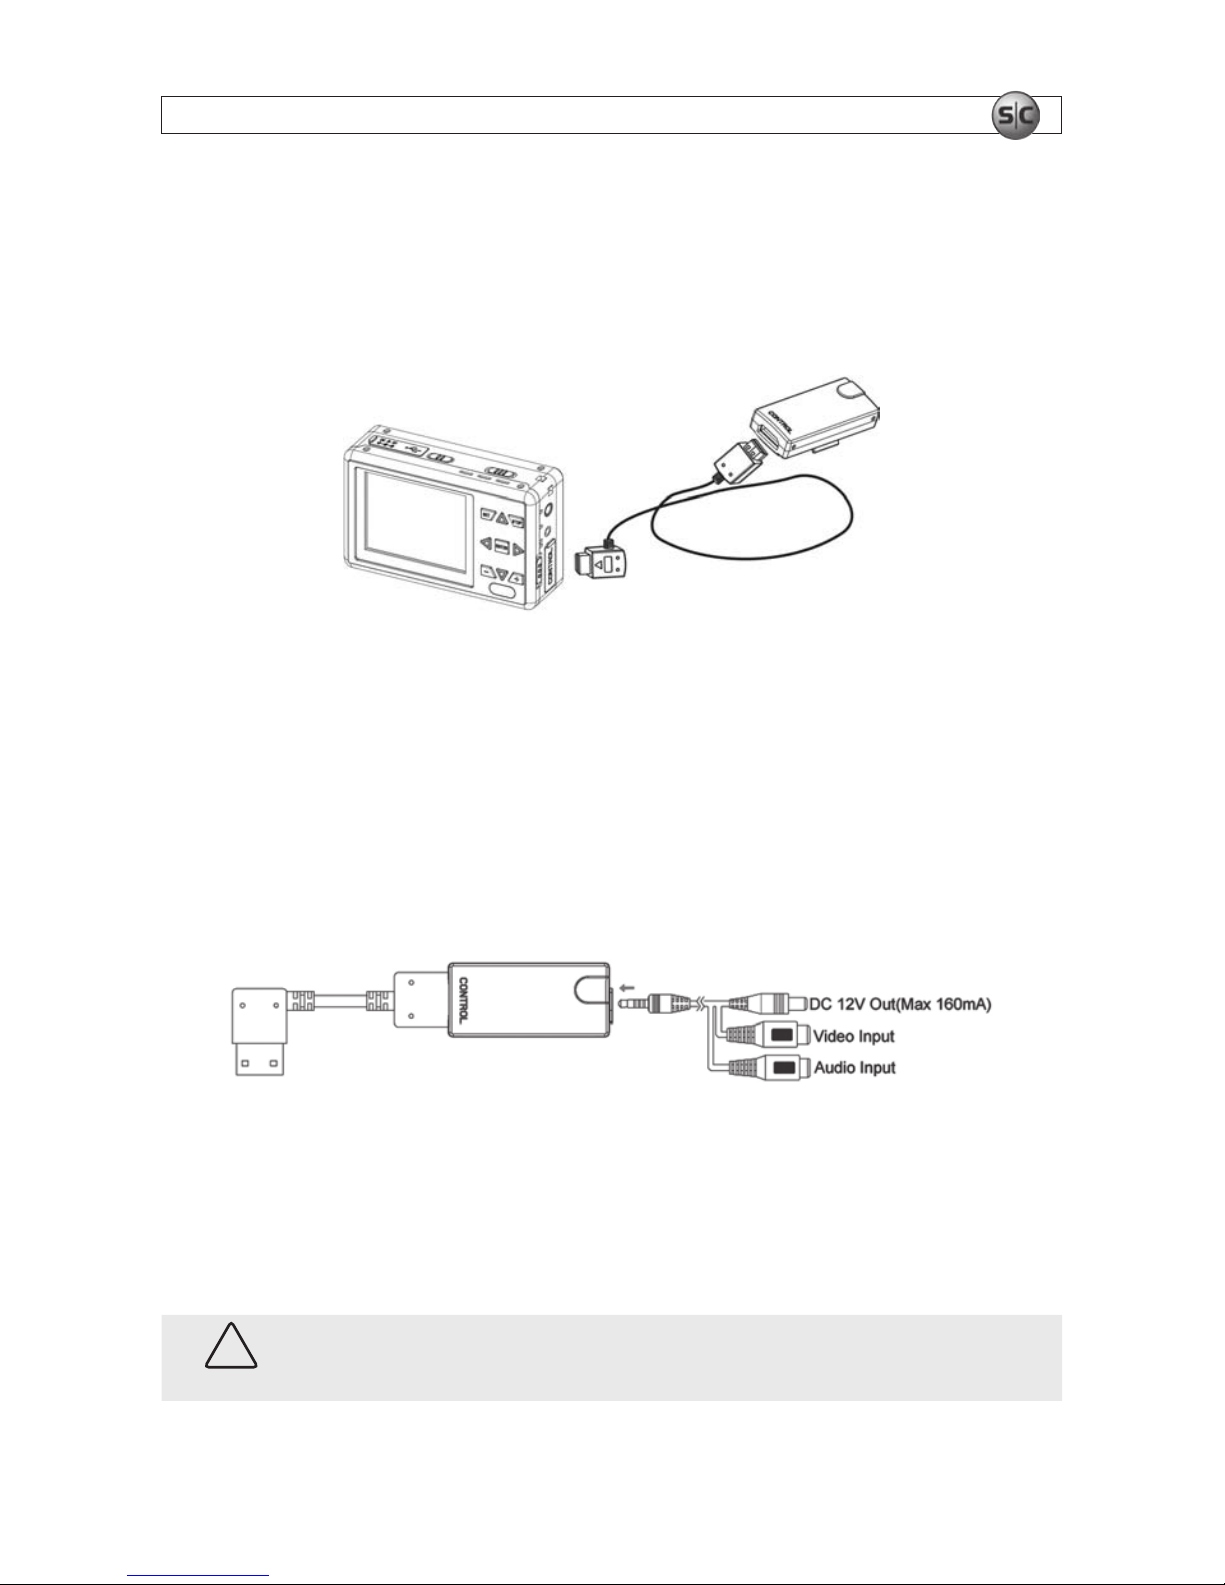
To connect the DVR to a wire control, plug the wire control cable into the wire control port on the DVR,
and then plug the cable into the wire control. Note that the wire control includes a port to which a
12VDC camera can be attached.
When the wire control cable is plugged into the recorder, the buttons on the recorder are disabled. Use
wire control switch to power on and power off the system, and to record.
2.4.1 Wire control switch and cables assembly
The wire control and cables, with the A/V power cable provided, can be used to connect a camera to the
DVR and provide power to it. See the following illustration.
A/V and Power
Connectors to
Camera
2.5 Installing the DVR battery
To install the battery in the DVR:
1. Remove the battery compartment cover on the back of the DVR.
CAUTION
When installing the battery in the MDVR18, ensure that the three contacts on the battery
align with the pins in the battery compartment. Improper installation can damage the unit.
Page 12
8
www.supercircuits.com
SECTION 2: CONNECTING DVR SYSTEM COMPONENTS
3. Align the golden contacts of the battery supplied with the corresponding connectors in the battery
compartment, then slide the battery into place.
4. Replace the battery compartment cover.
2.5.1 Charging the battery
Before using the DVR for the rst time, charge the battery for 12 continuous hours.
When the battery needs recharging, the DVR will vibrate and the display will show an empty battery icon.
To charge the battery:
1. Plug the power adapter into the DC IN jack on the side of the MDVR18, then plug it into an AC
outlet. When the battery is charging, the Pwr LED will be orange.
2. When the Pwr LED extinguishes, the battery is fully charged. Disconnect the power adapter
promptly.
2.6 Using an SD card
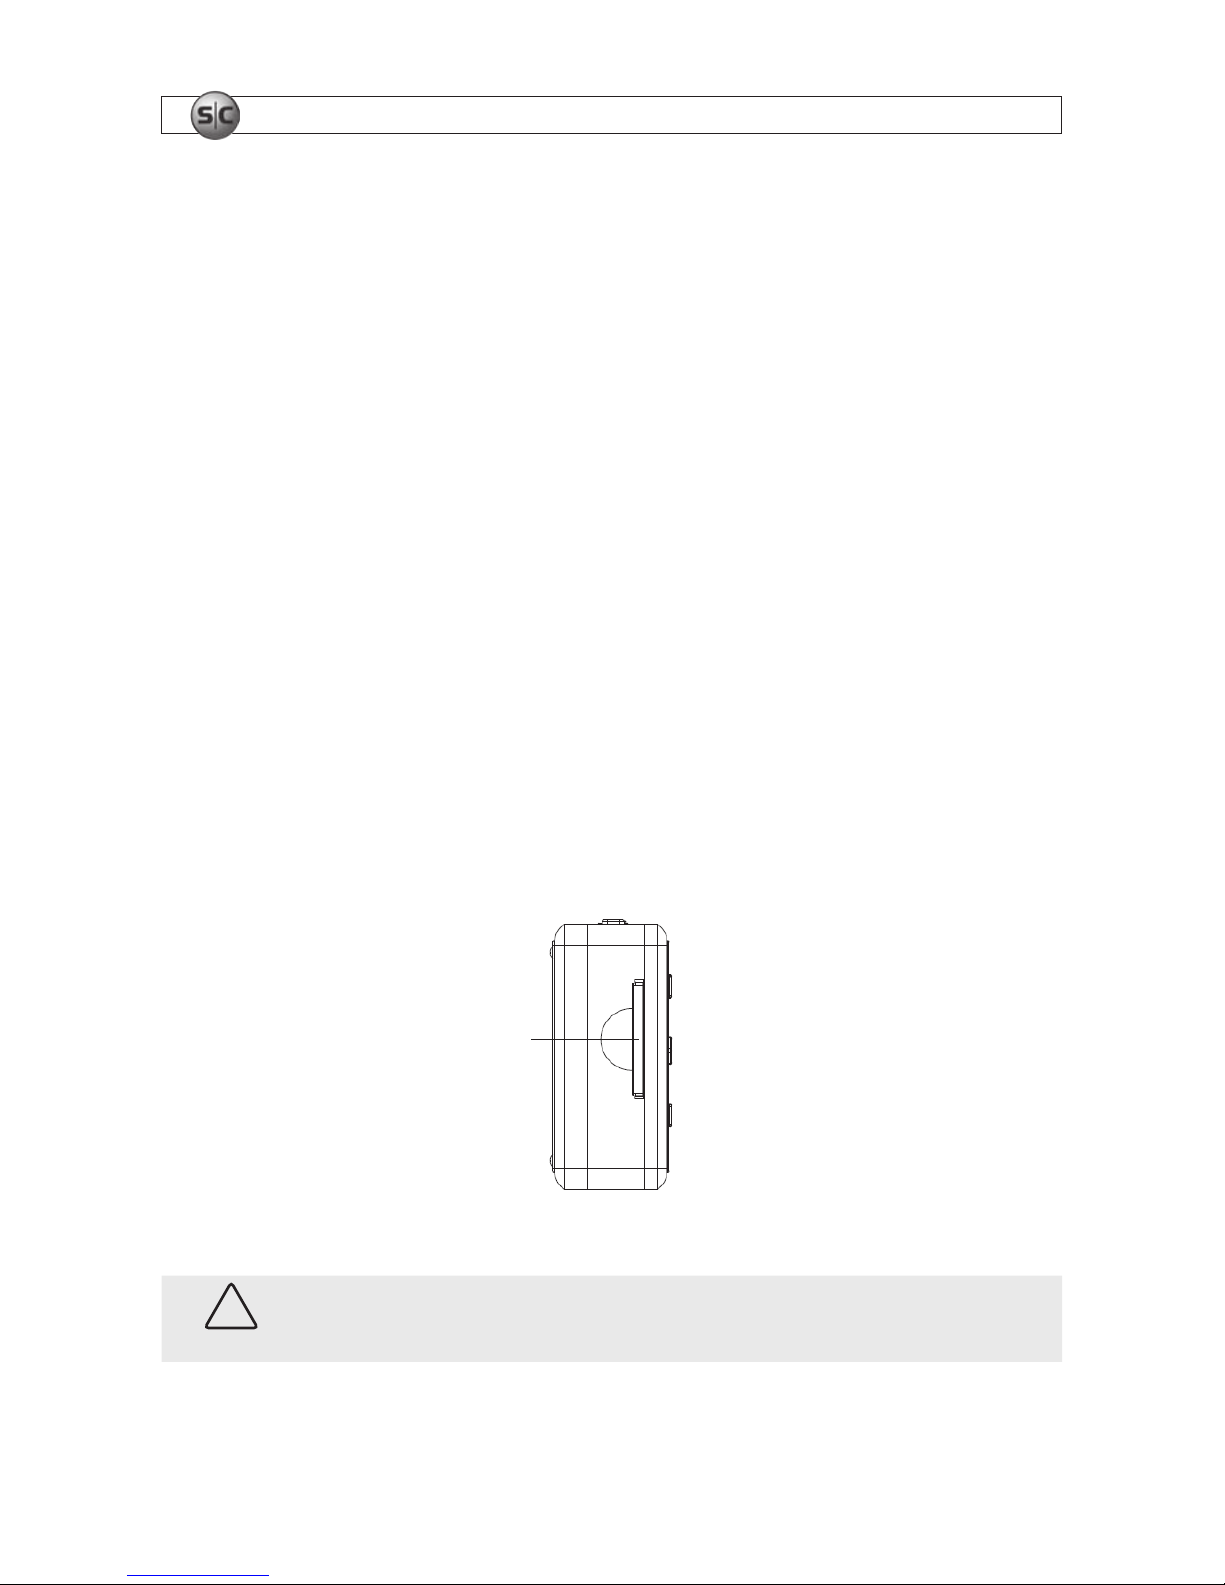
SD cards provide removable storage for video, audio, and log les. The SD card is enabled through the
Storage Medium option in the setup menus. See the Operations section for more information.
SD Card Slot
Left side of the DVR
CAUTION
The SD card should slide smoothly into the card slot. Forcing the card into the slot can
damage the card and the DVR. Make sure it is installed properly.
Page 13
9Advanced Micro DVR User Manual
SECTION 3: OPERATION
SECTION 3
Operation
NOTE
Depending on the software version level of your DVR, the screens may appear different from
those shown below.
3.1 Turn ON/OFF the DVR
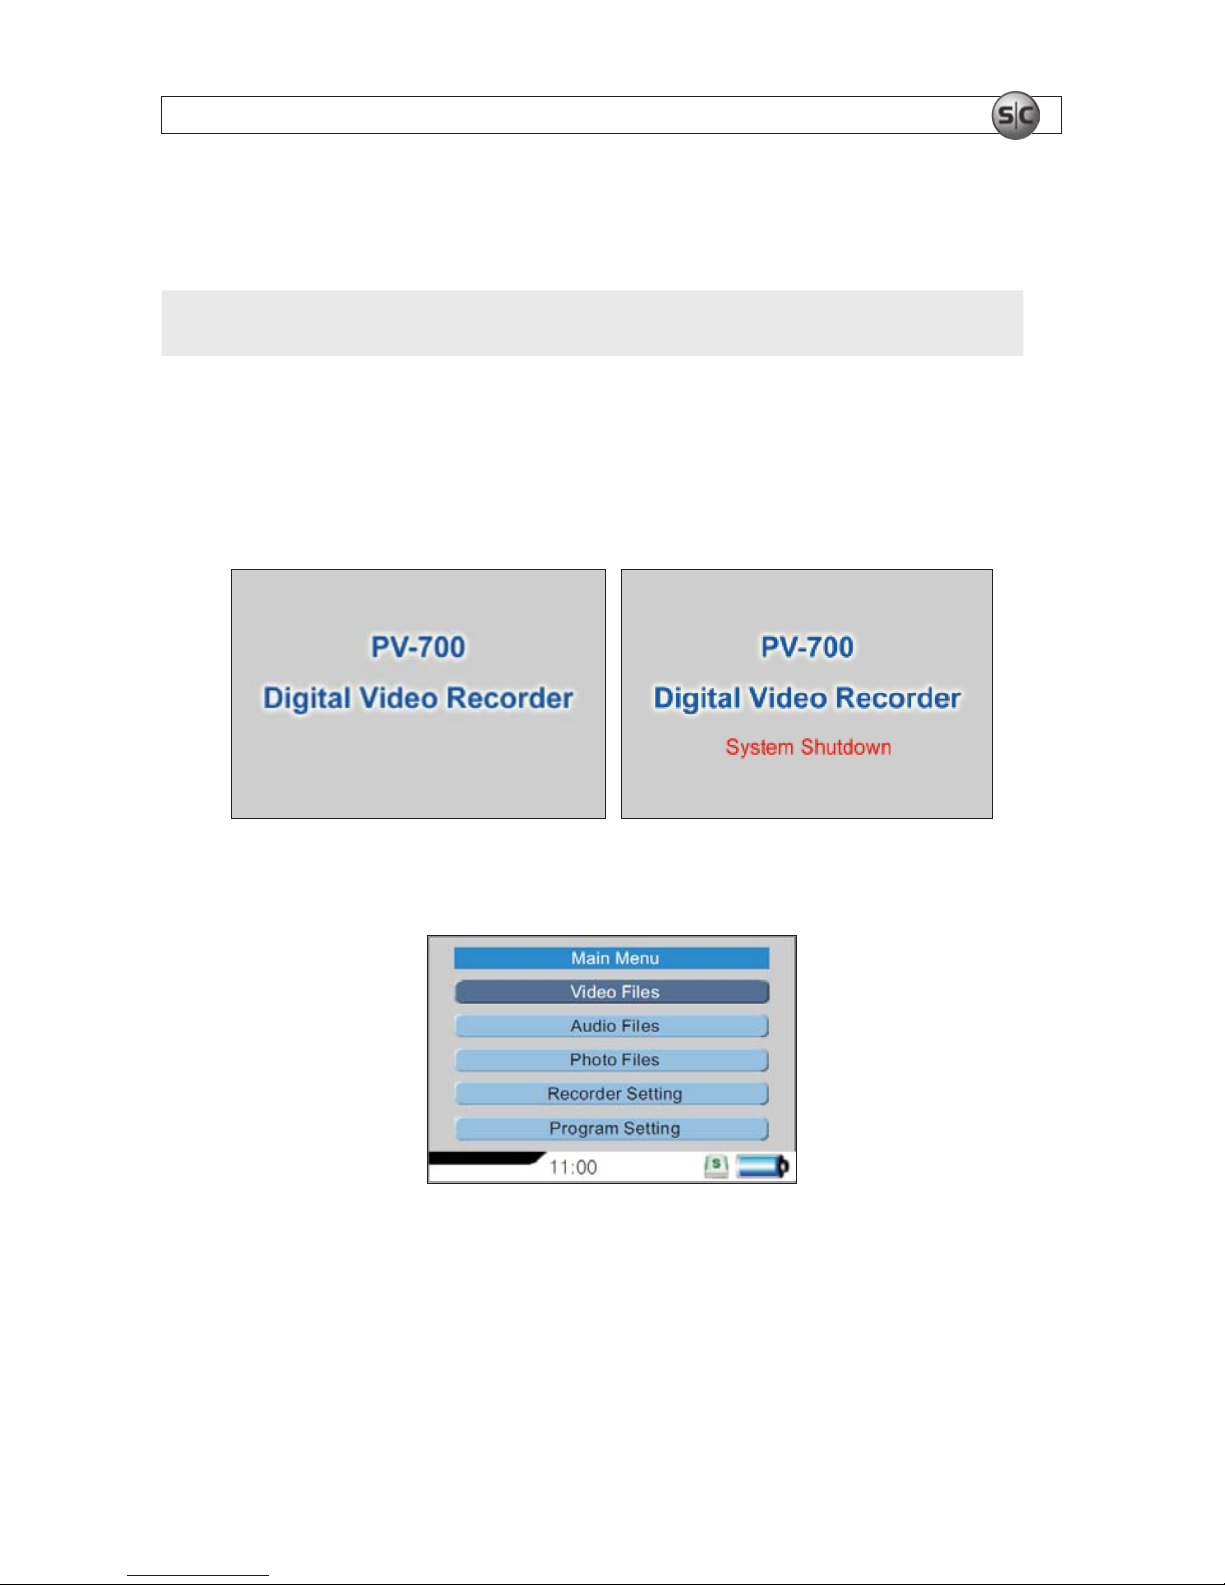
• Turn ON: Press the Power ON/OFF button on the DVR or remote control to power on the DVR.
• Turn OFF: Press the Power ON/OFF button again to power off the DVR. A system shutdown
message will appear.
3.2 DVR Main Menu function modes
Main Menu function modes include:
• Video Files: Browse and playback video with audio recordings
• Audio Files: Browse and playback audio recordings
• Photo Files: Browse images and pictures
• Recorder Settings: Specify recording schedules, triggering, resolution, and external video sources
Page 14
10
www.supercircuits.com
SECTION 3: OPERATION
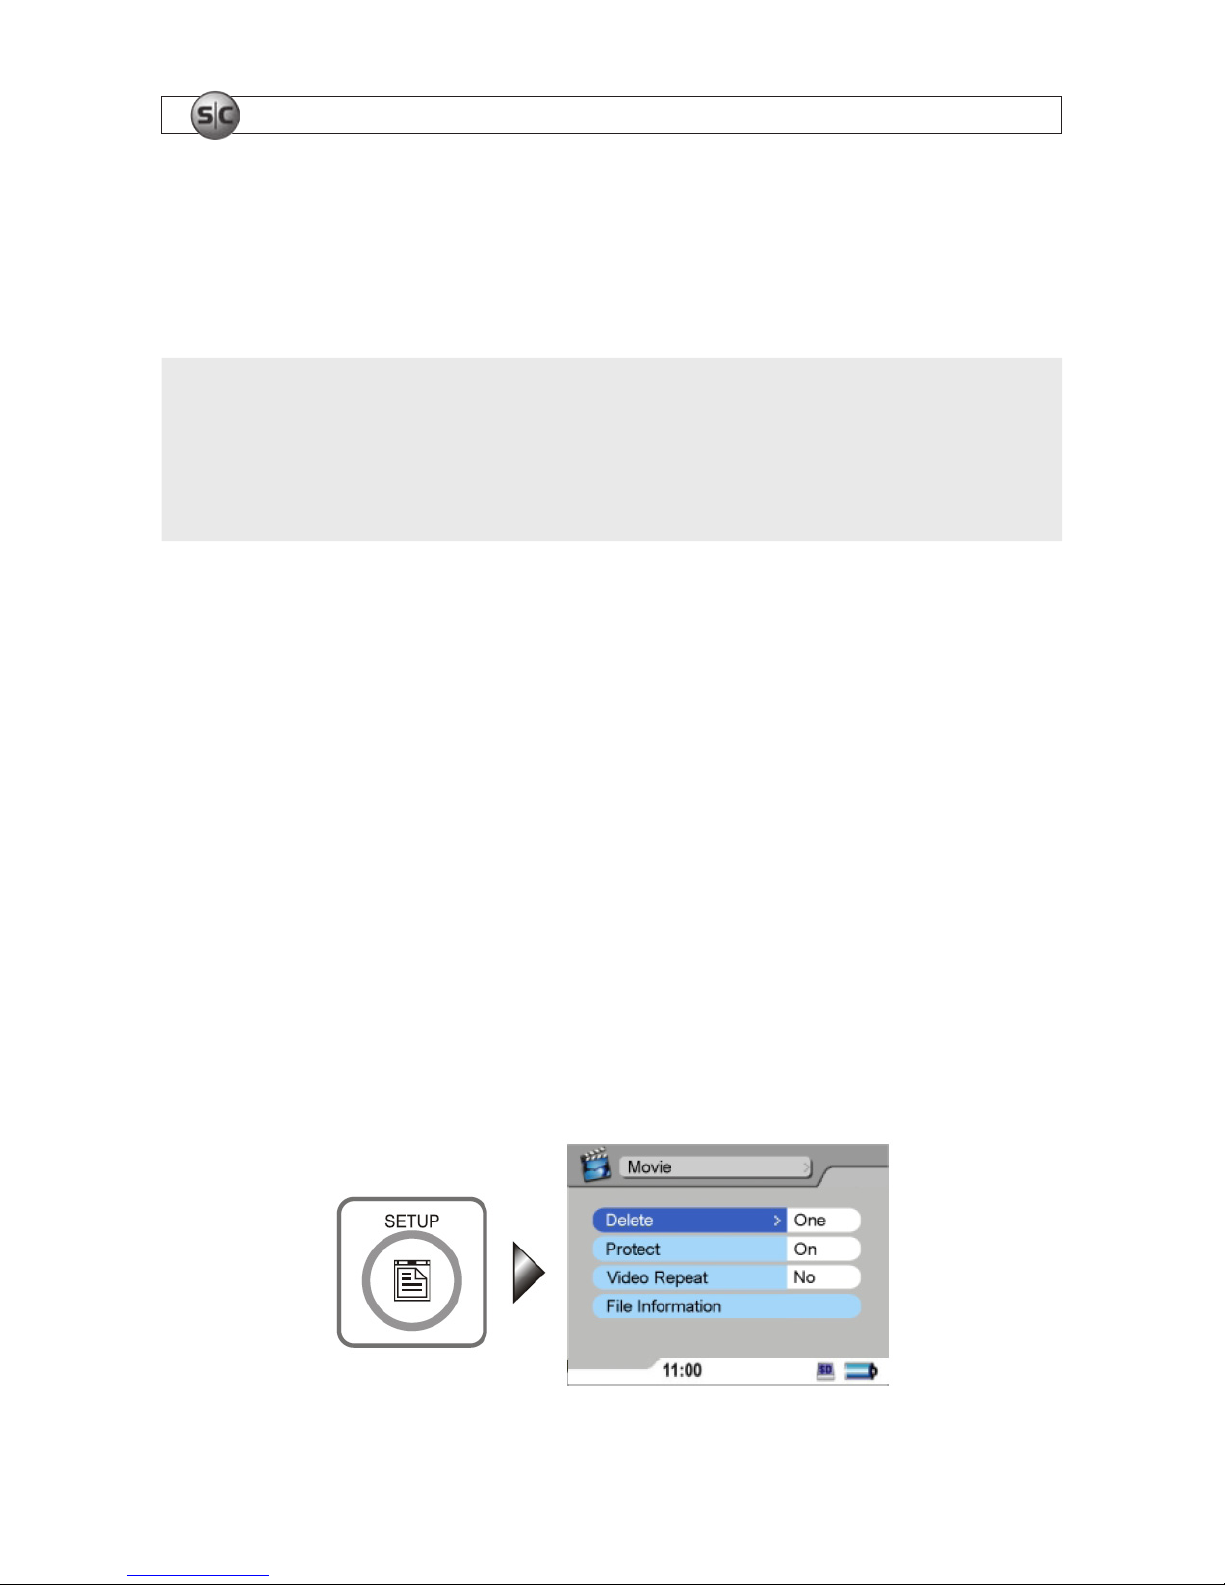
• Program Setting: Function settings
3.2.1 Navigating menus
After powering on the DVR, the Main Menu screen will appear.
NOTE
Throughout this document, menu navigation is performed with the p, q, t, and u arrows on
the DVR and remote control. For simplicity, the direction arrows and the term “navigation
keys” refer to the same buttons.
Pressing Enter on the DVR and pressing the u
; key on the remote control perform the
same function. In this document both are represented by the symbol u
;.
To open the main menu – Press SET UP on the DVR, or the SETUP button on remote control.
To enter submenu – Press u
; to enter the submenu.
To highlight item in the submenu – Use navigation keys to move to the item you want to select.
To conrm the setting – Press u
; to conrm the change of a setting.
To not save change and return to main menu or exit SETUP – Press STOP on the DVR or g on
remote control.
To switch to Video mode, Image and various standby modes – Press SET UP, or press SETUP on
remote control, to edit setting.
3.2.2 Setup
1. While in Video, Audio, Image, and other standby modes, press SETUP to edit settings.
Page 15
11Advanced Micro DVR User Manual
SECTION 3: OPERATION
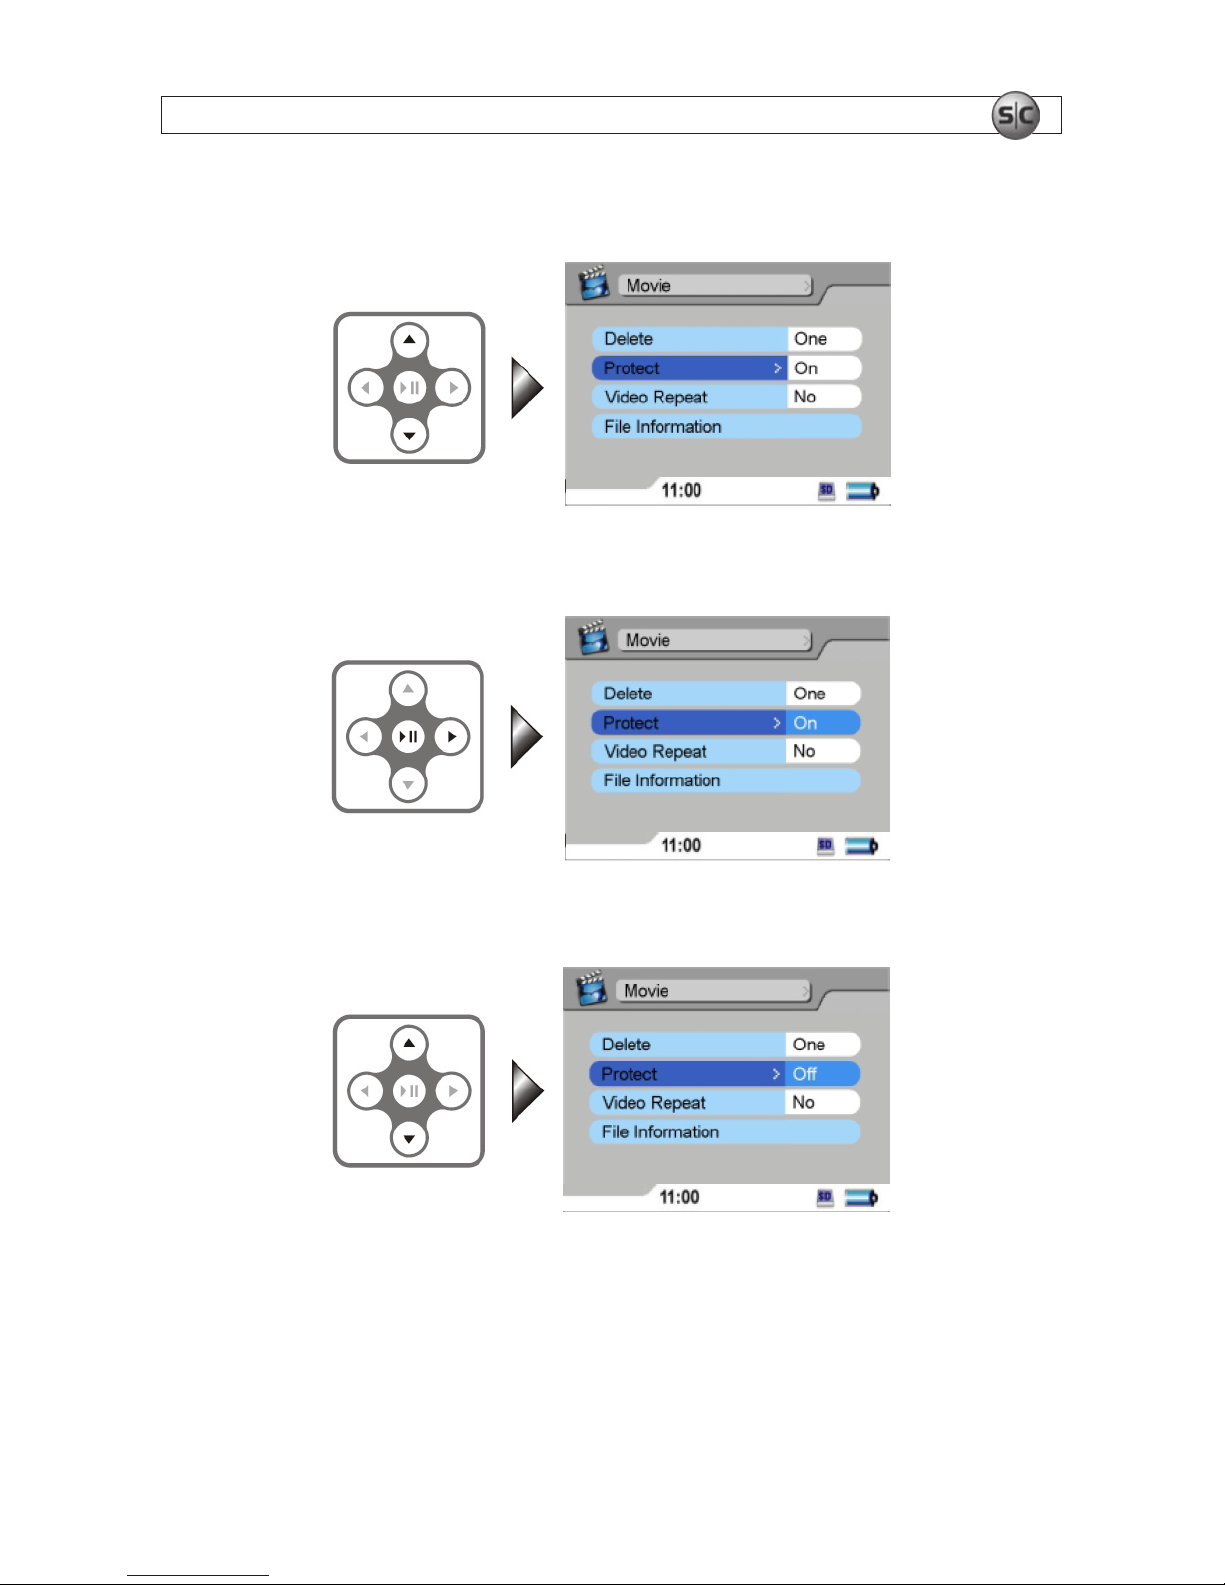
2. Use the q and p keys to highlight an item in the menu.
3. Press the u or u; key to enter the submenu.
4. Use the q and p keys to select the item in the submenu you want to select.
5. Press u; to conrm your selection.
Page 16
12
www.supercircuits.com
SECTION 3: OPERATION
12
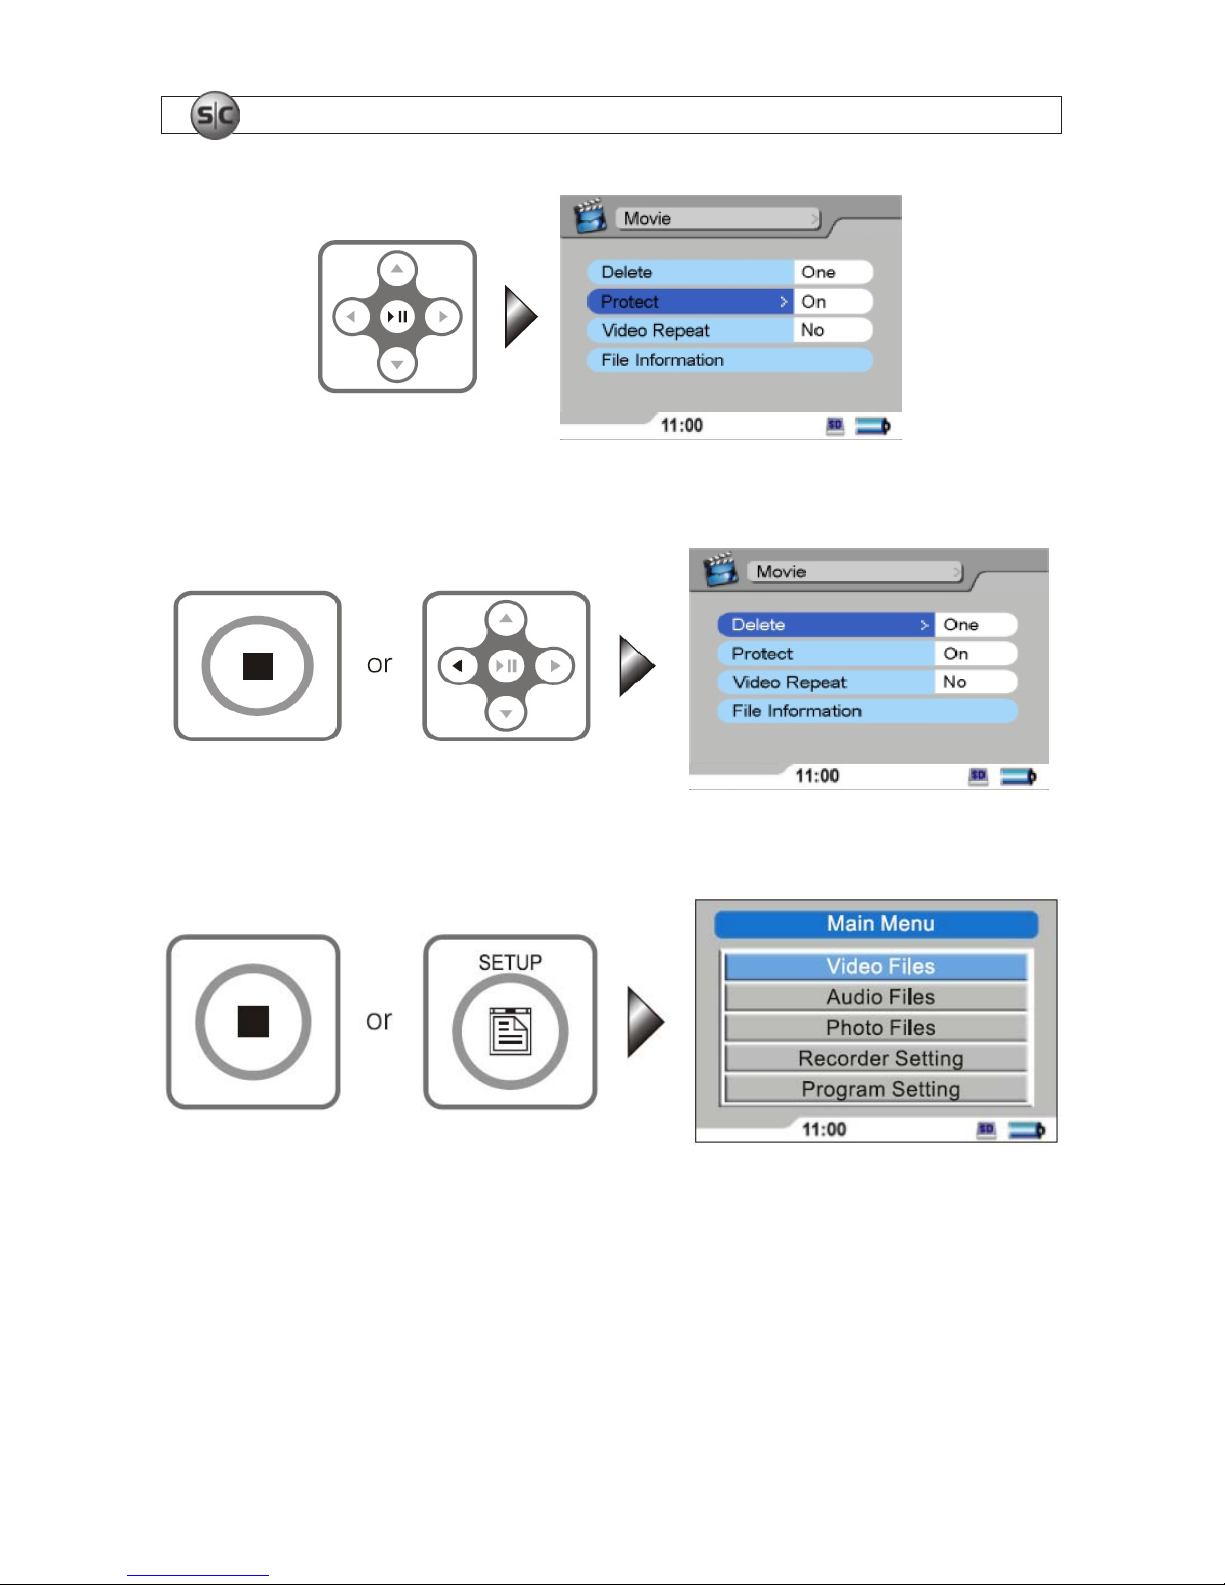
6. To return to the previous menu, press t or g .
7. To exit Setup, press the SETUP, or press g after returning to the previous menu.
3.2.3 Adjust volume
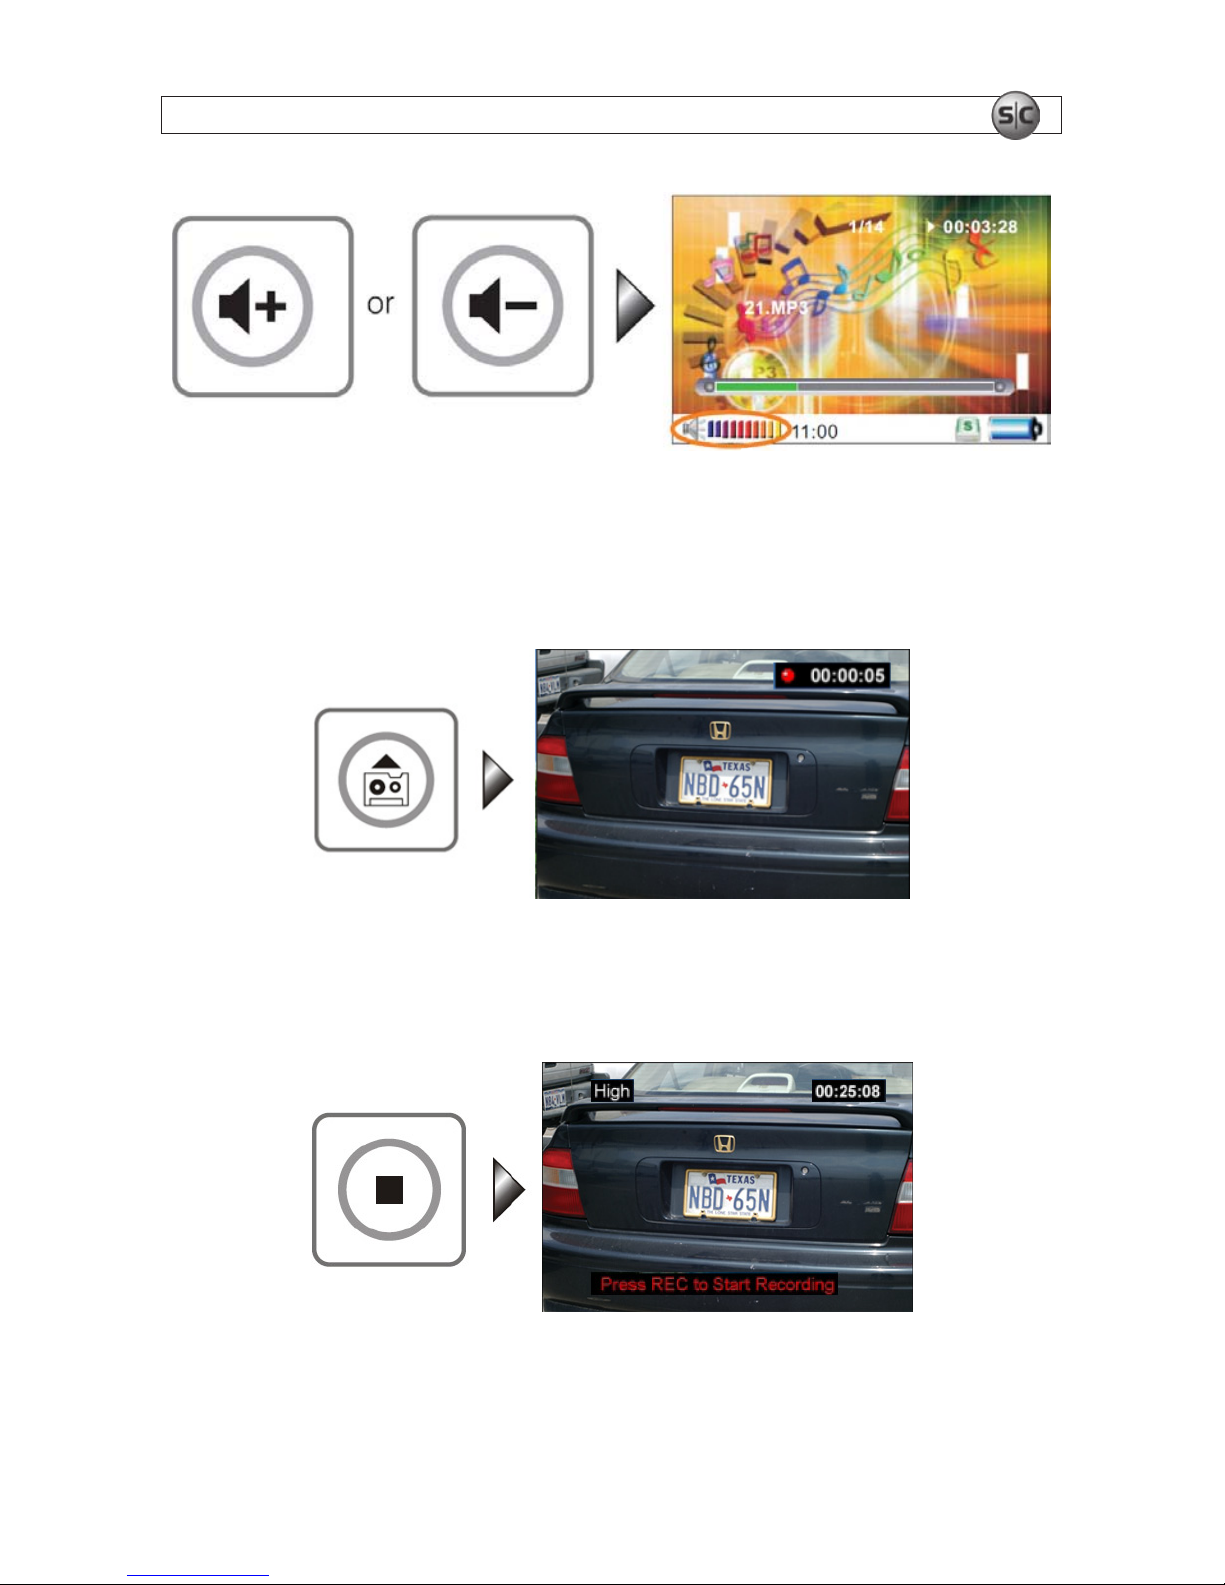
While playing video, audio, or slide+audio, you can adjust the volume with the volume adjust buttons.
These buttons are located to the right of the LCD display on the DVR, and on the remote control.
Page 17
13Advanced Micro DVR User Manual
SECTION 3: OPERATION
13
Volume Level
3.2.4 REC button
1. When the DVR is at the Main Menu, start recording immediately by pressing the REC button.
2. To stop recording, press STOP. The DVR will return to the Main Menu.
Page 18
14
www.supercircuits.com
SECTION 4: SETTING FUNCTIONS
14
SECTION 4
Setting Functions
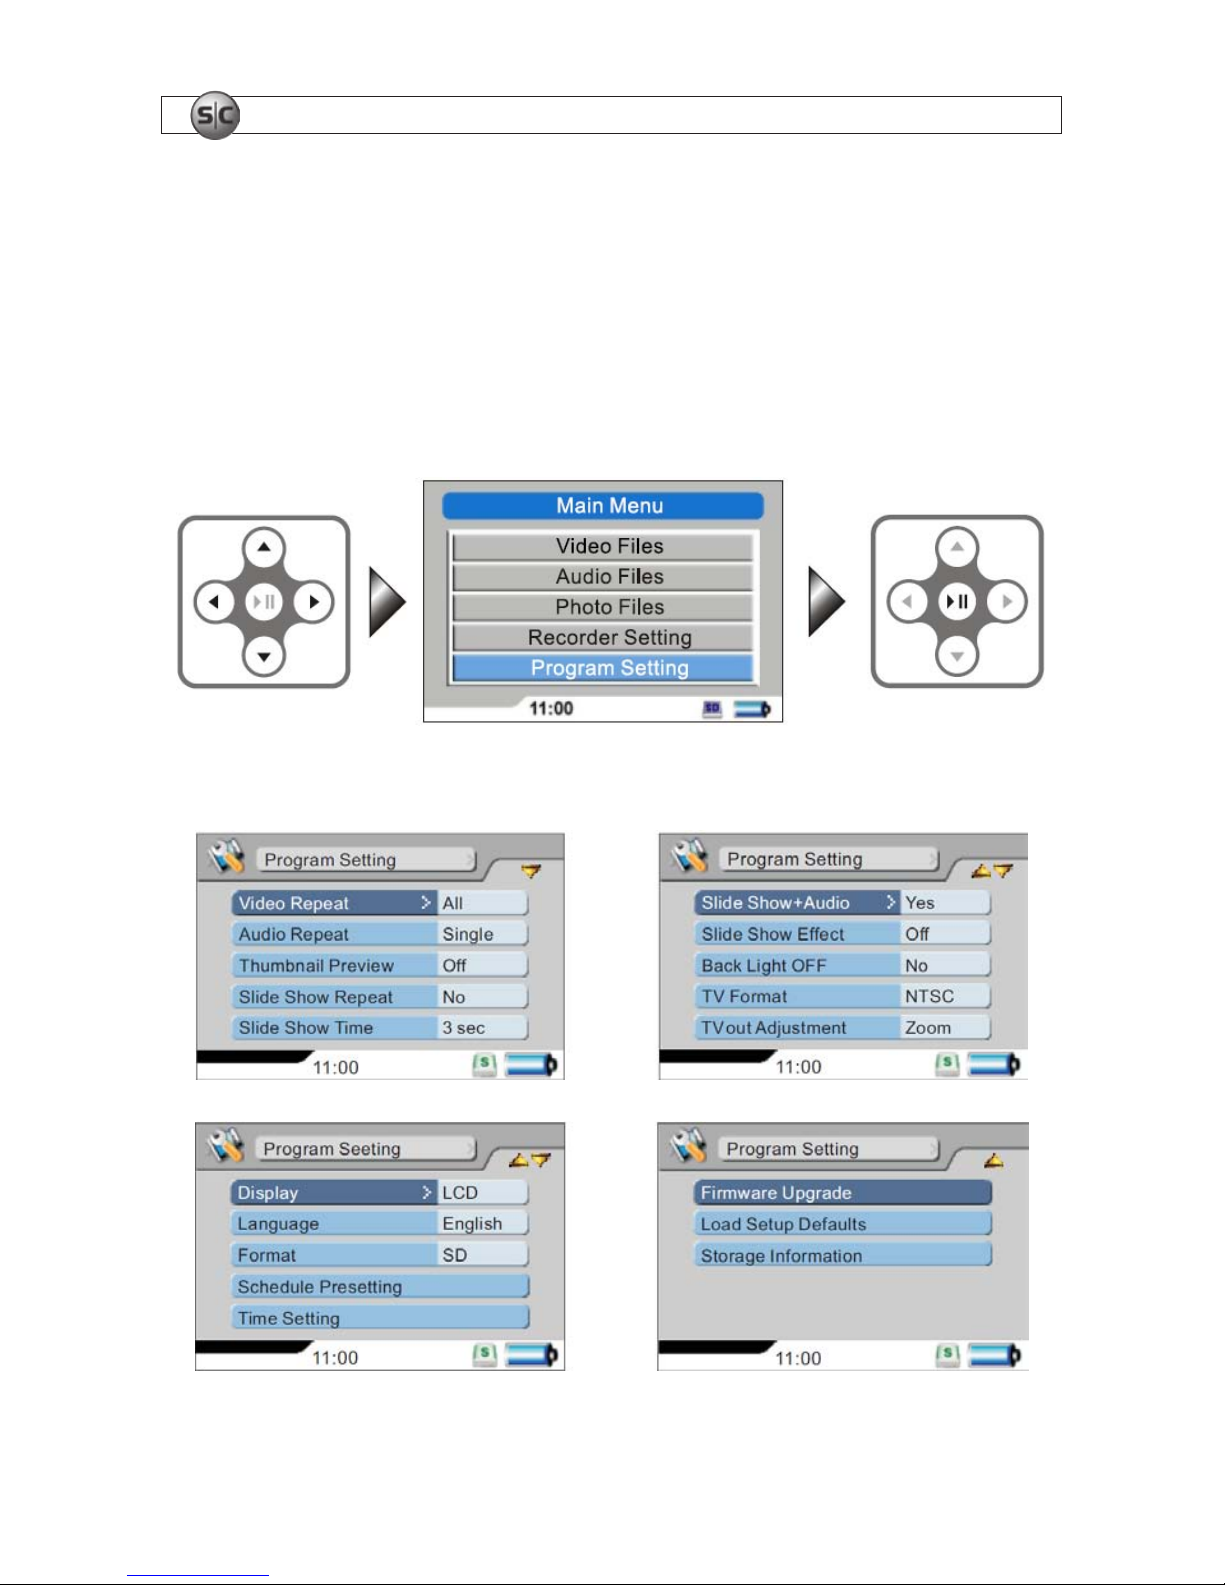
The Main Menu screen provides two functions for setting up the conguration of your DVR: Recorder
Settings and Program Settings. Navigation and option selection in these menus is performed with the
navigation keys, u, q, p, and t. Conrm the option you select by pressing the u
; key.
1. Use the navigation keys and the u; key to open the Program Settings function menu.
2. The Program Settings menu includes four screens.
Page 19
15Advanced Micro DVR User Manual
SECTION 4: SETTING FUNCTIONS
15
4.1 Program Setting parameter denitions
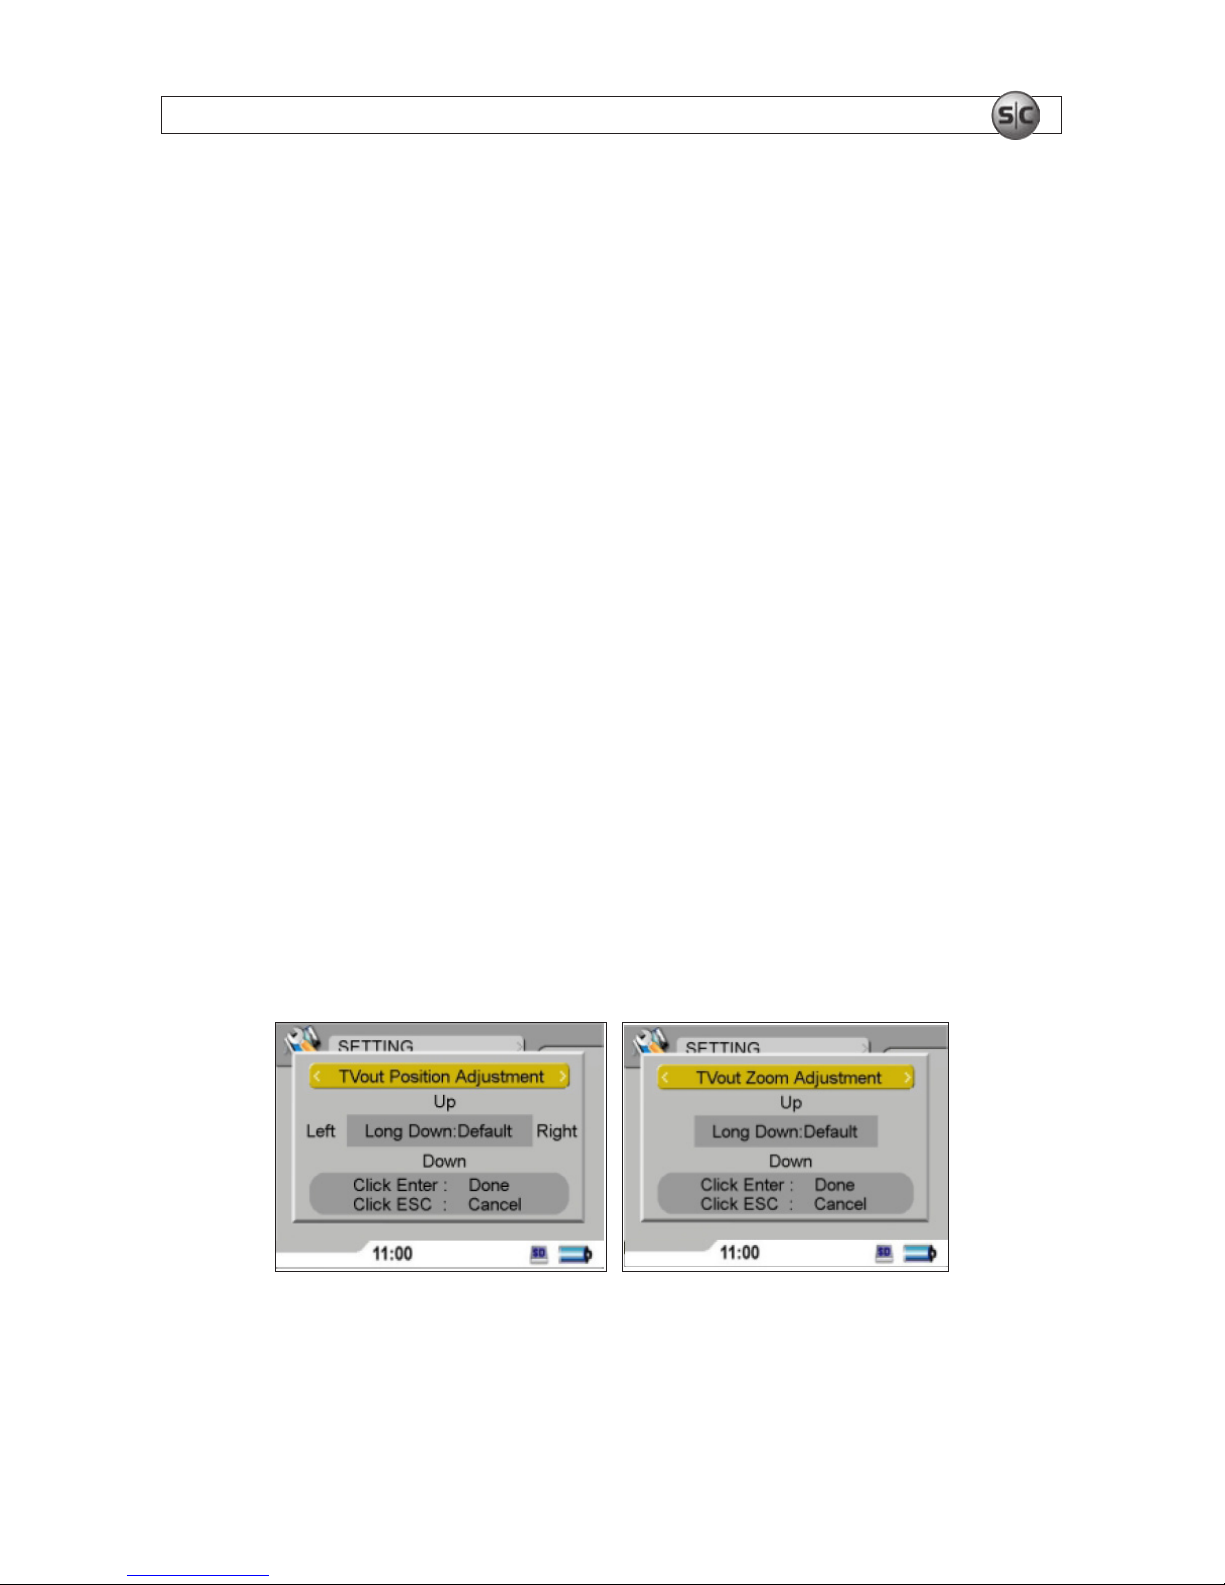
Video Repeat – Allows you to repeat the playback of a selected Single video le or All video les, or
stop after the playback of video les.
Audio Repeat – Allows you to repeat the playback of a selected Single audio le or All audio les, or
stop after the playback of audio les.
Thumbnail Preview – Turn thumbnail preview ON or OFF.
Slide Show Repeat – Play a slideshow once or play repeatedly.
Slide Show Time – Sets the pause duration on each image in a slide show to 3, 5, 7, or 10 seconds.
Slide Show + Audio – Select this option to play audio tracks during a slide show.
Slide Show Effect – Set to ON or OFF.
Back Light OFF – Use this option to set the time delay to turn off the back light: 30 seconds, 1 minute,
3 minutes, or never turn off.
TV Format – Set to NTSC or PAL.
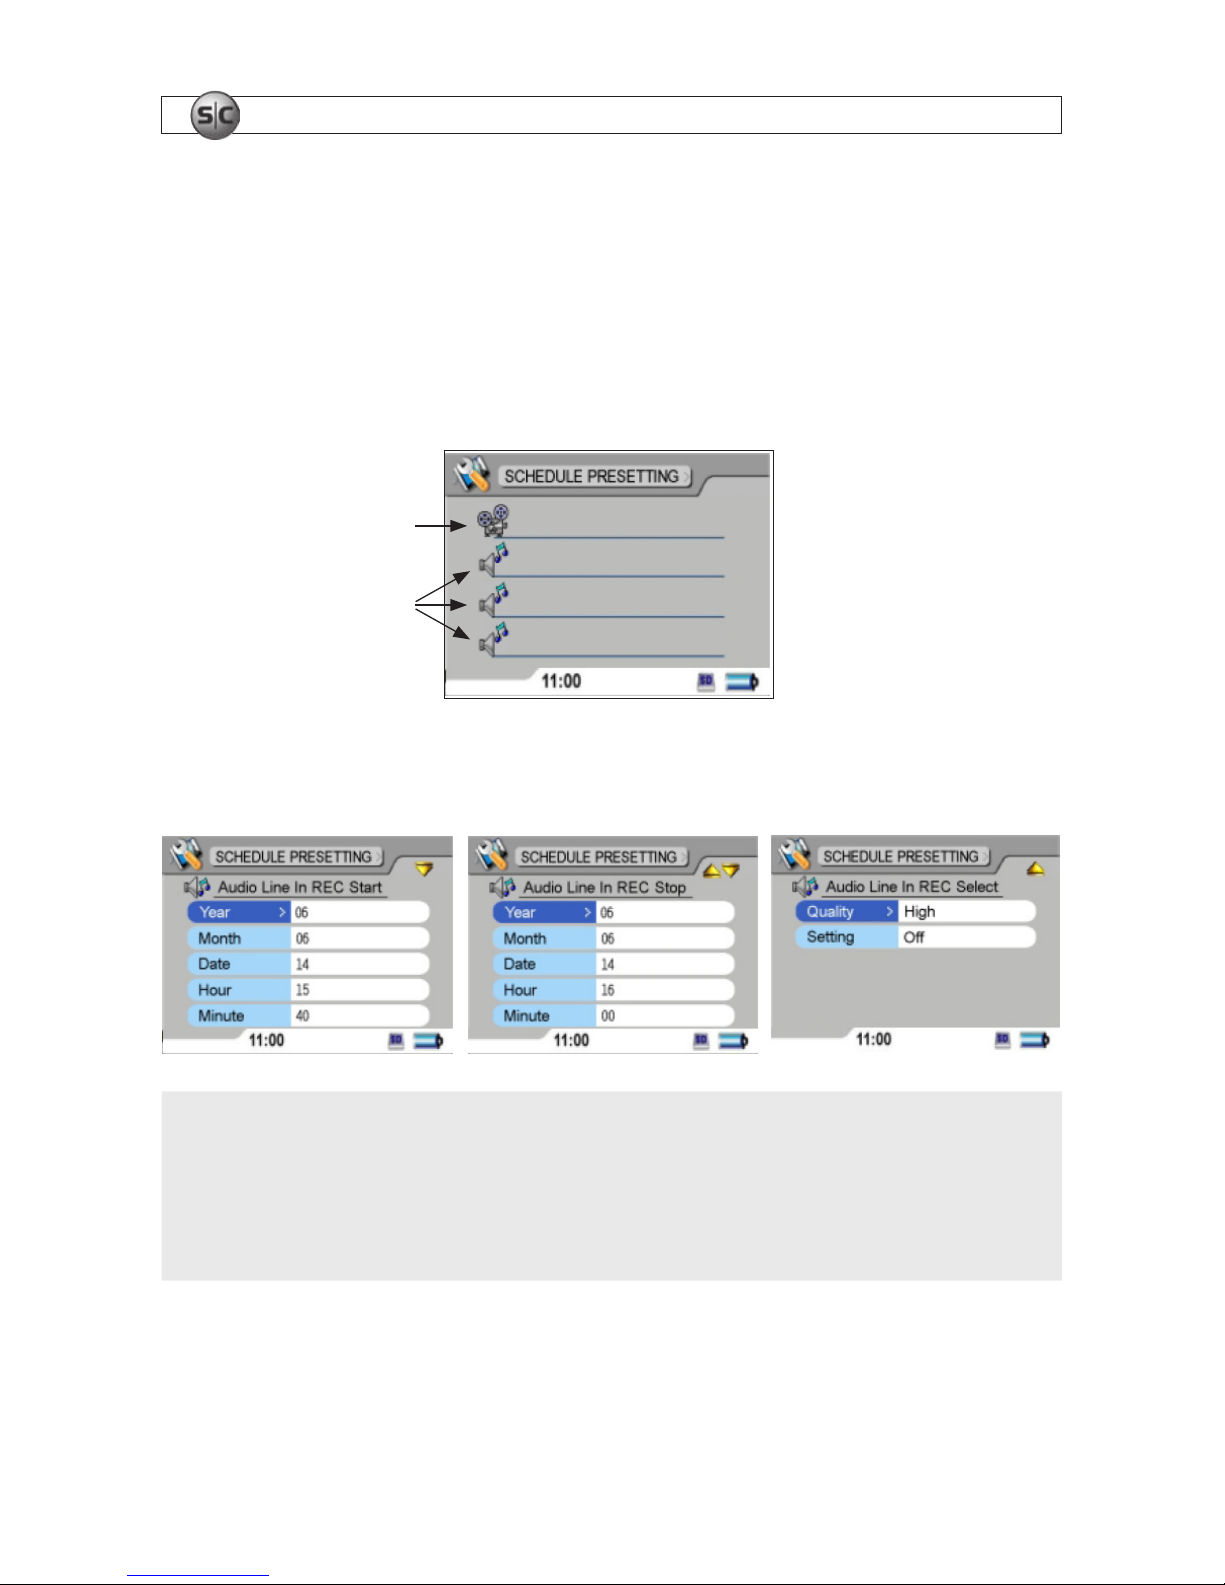
TVout Adjustment – Use this option to make Position or Zoom adjustments:
• TVout Position Adjustment – Use the u, q, p, and t keys to adjust the position of the image
on the screen.
• TVout Zoom Adjustment – Use the q or p keys to set the default (down) or zoom in (up).
Display Selection – Select TV or LCD.
Page 20
16
www.supercircuits.com
SECTION 4: SETTING FUNCTIONS
16
Language – Choose a language for the on-screen displays.
Format – Use this option to format the SD card. Formatting the SD card erases all les on the card.
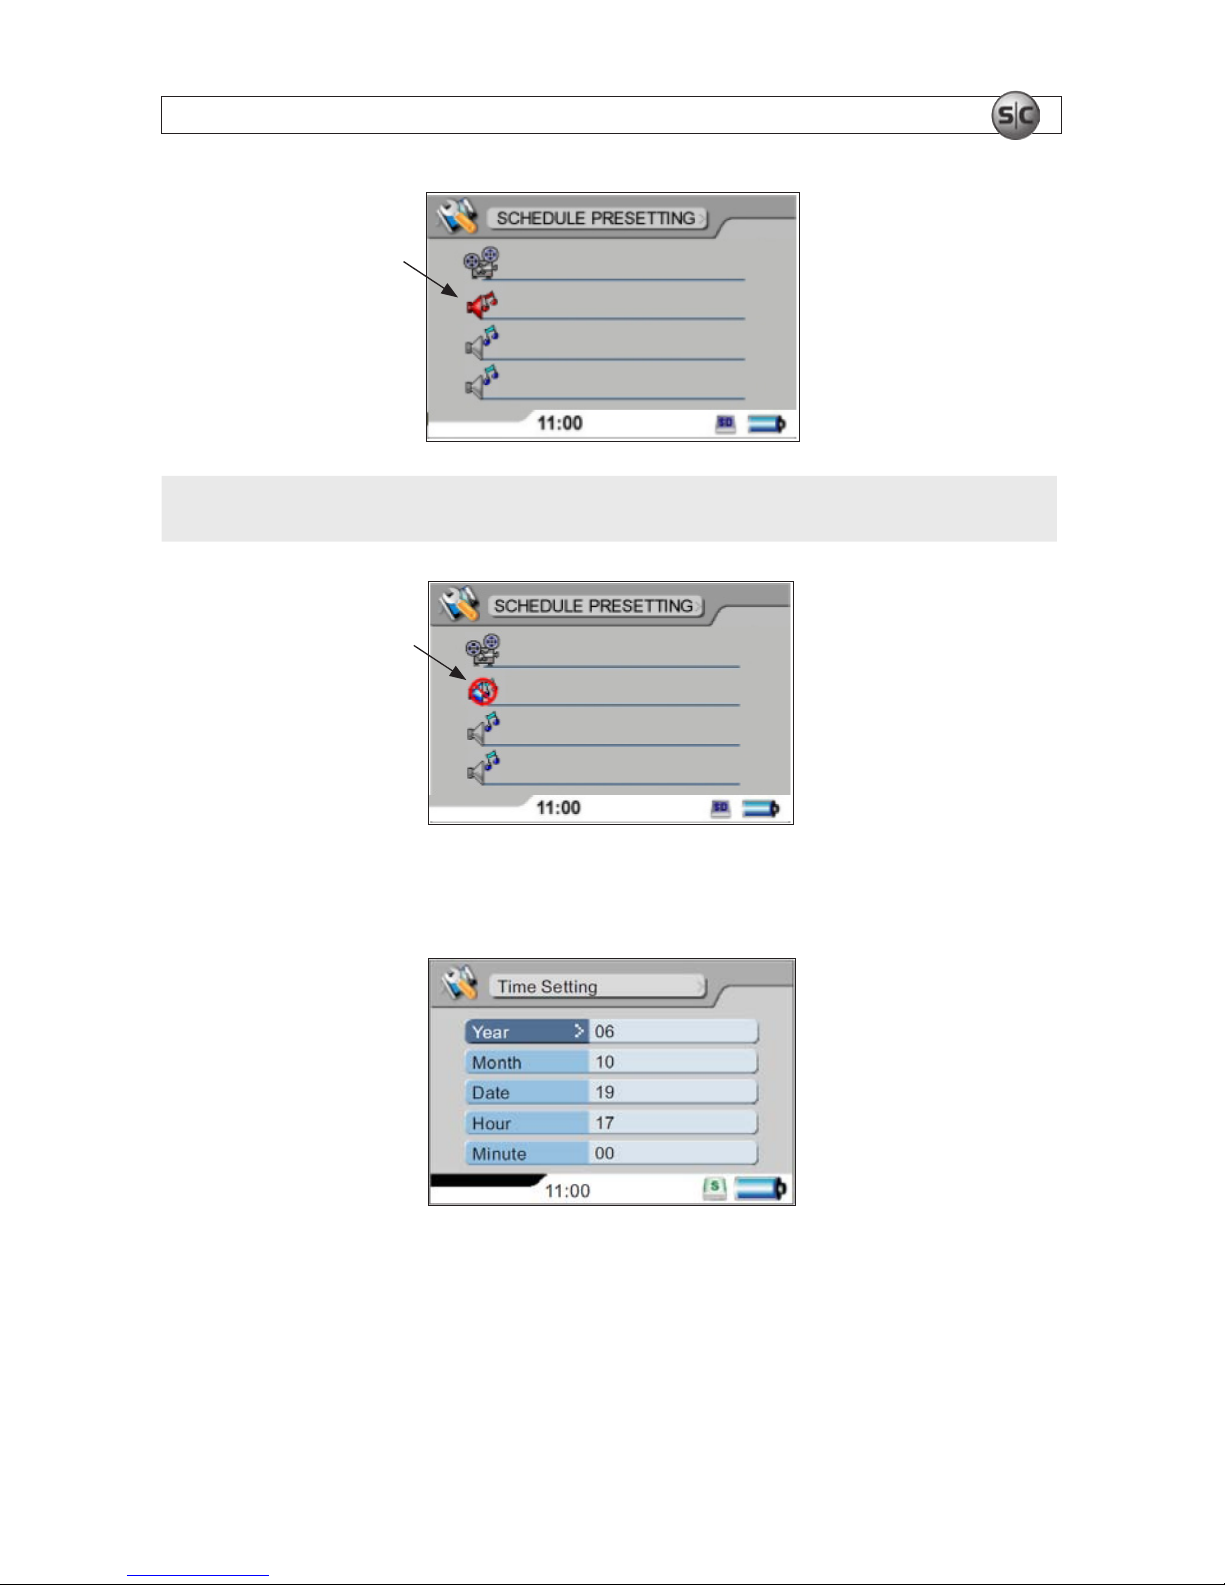
Schedule Presetting – Use these submenus to preset a recording schedule:
• Press the t keys and u to select the items for recording, then press the u; key to conrm your
selection.
External Audio
Recording
External Video
Recording
• To set recording start and end times, refer to the Operations section for a description of how to use
the navigation keys to make these selections.
NOTE
• The Setting parameter must be ON for a recording to occur.
• If the unit is powered off when it is scheduled to record, it will power itself on, record during the
preset schedule, then power itself off.
• Recorded les are stored in the “MyRecord” folder under Video/Audio.
• If there is a conict in the recording time setting, or if le storage space is insufcient, a red
“forbidden” icon appears, warning that the recording will not be made with the current settings.
Page 21
17Advanced Micro DVR User Manual
SECTION 4: SETTING FUNCTIONS
17
Recording
Forbidden
Icon
NOTE
If a recording was interrupted for any reason (low battery, insufcient space, etc.) a red
interrupt icon appears to indicate that the recording failed.
Recording
Interrupted
Icon
Time Setting – For setting the clock in the DVR, refer to the Operations section for a description of how
to use the navigation keys to make these selections.
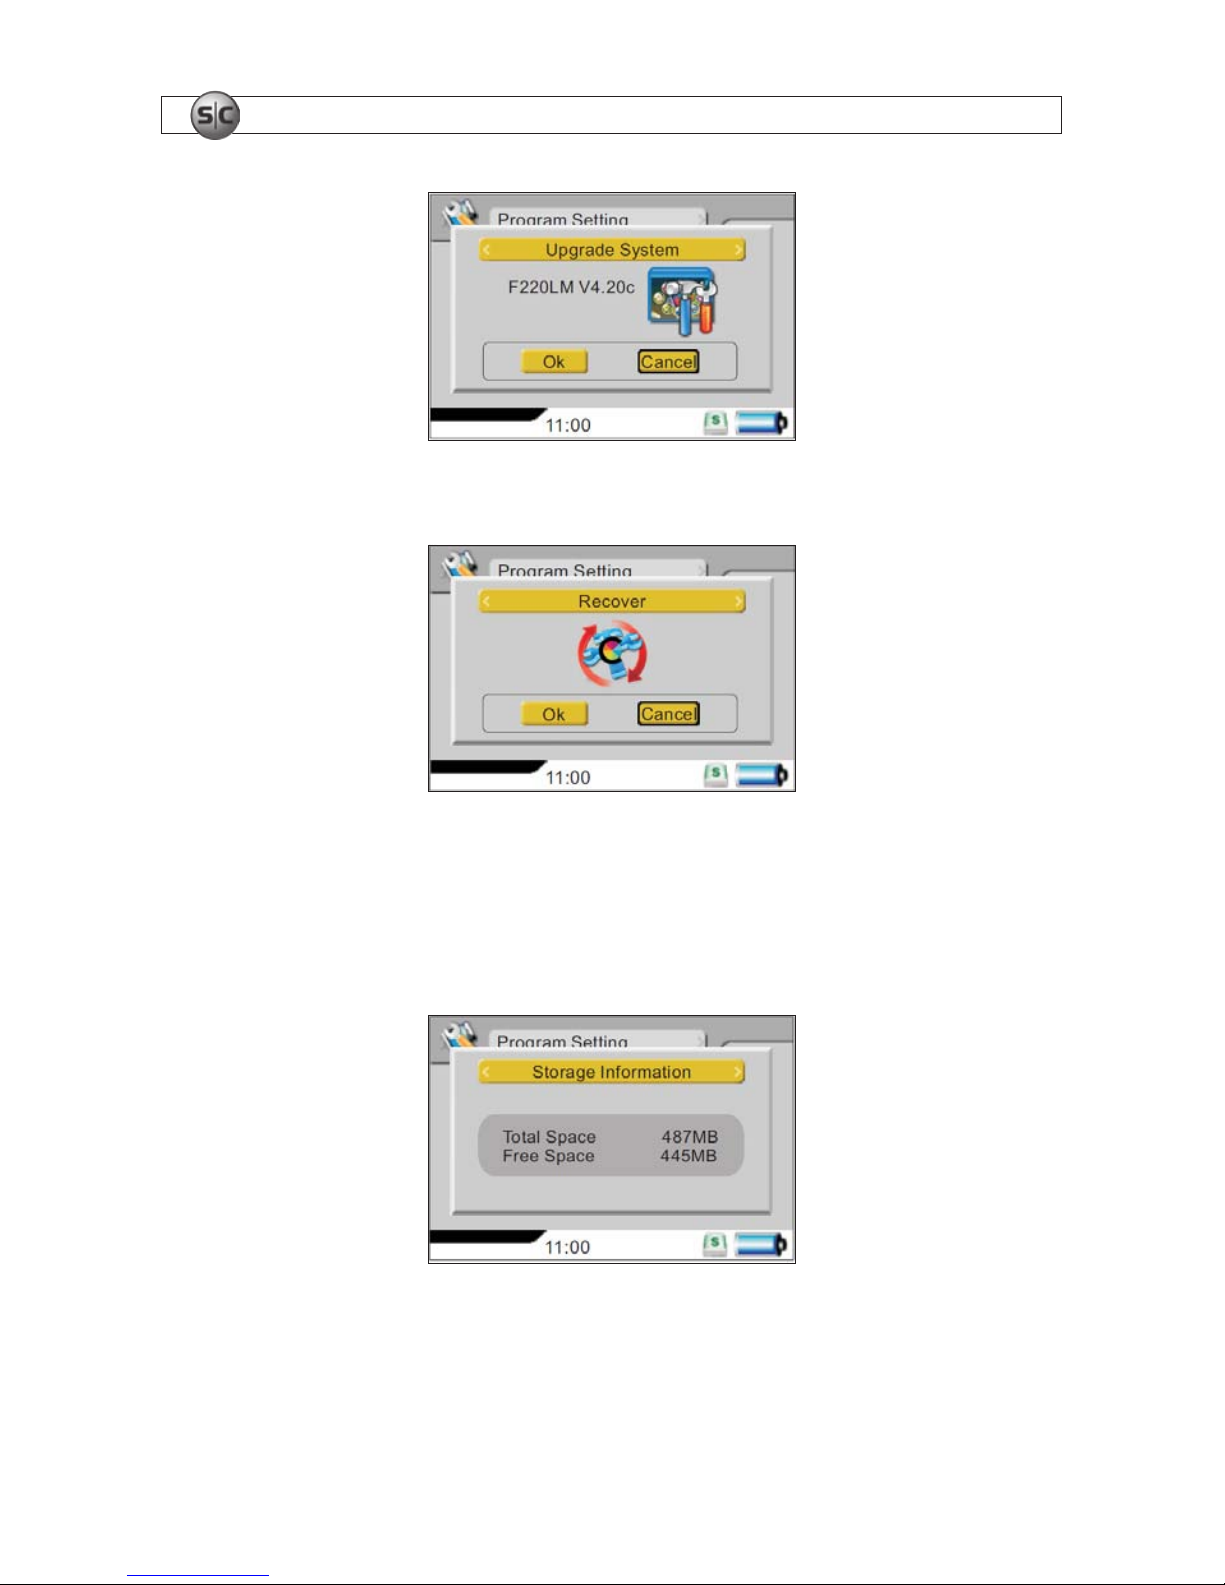
Firmware Upgrade – Firmware upgrades are performed by copying rmware to an SD card, inserting
it into the SD card slot, then pressing Enter when prompted. After the rmware is installed, the DVR will
reboot. If the message “Update Error” appears, the upgrade process failed. Failures may be caused by
an incomplete rmware le, or the SD card. If a failure occurs, try reloading the rmware on the card, or
use an SD card made by Toshiba, SanDisk
®
, or Panasonic®.
Page 22
18
www.supercircuits.com
SECTION 4: SETTING FUNCTIONS
18
Load setup Defaults – Select Ok to reset all settings to their default value.
Storage – Select SD (for the SD memory card) or HD (internal hard drive) for the location of recorded
les. For SD storage, the SD card must be installed in the DVR.
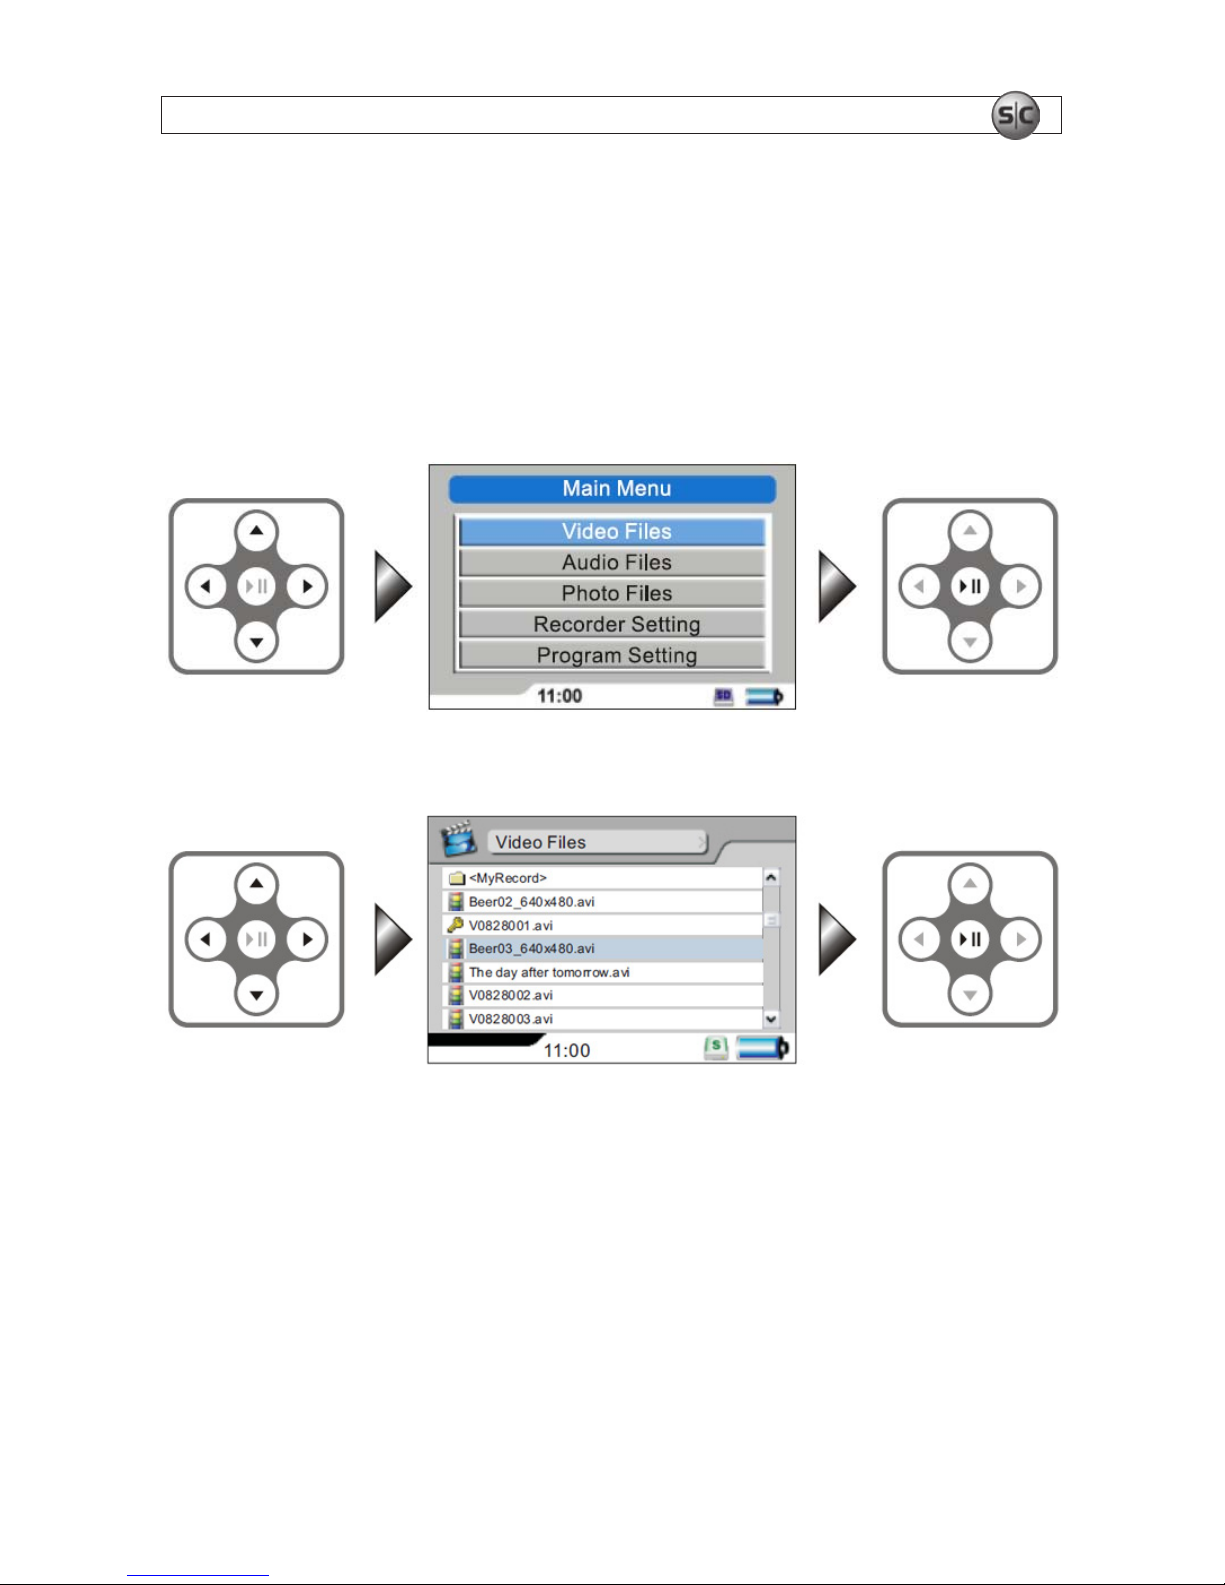
Storage Information – Selecting Storage Information displays the total capacity and free space of the
device to which recorded les will be saved.
Page 23
19Advanced Micro DVR User Manual
SECTION 5: VIDEO PLAYBACK
19
SECTION 5
Video Playback
5.1 Play a video le
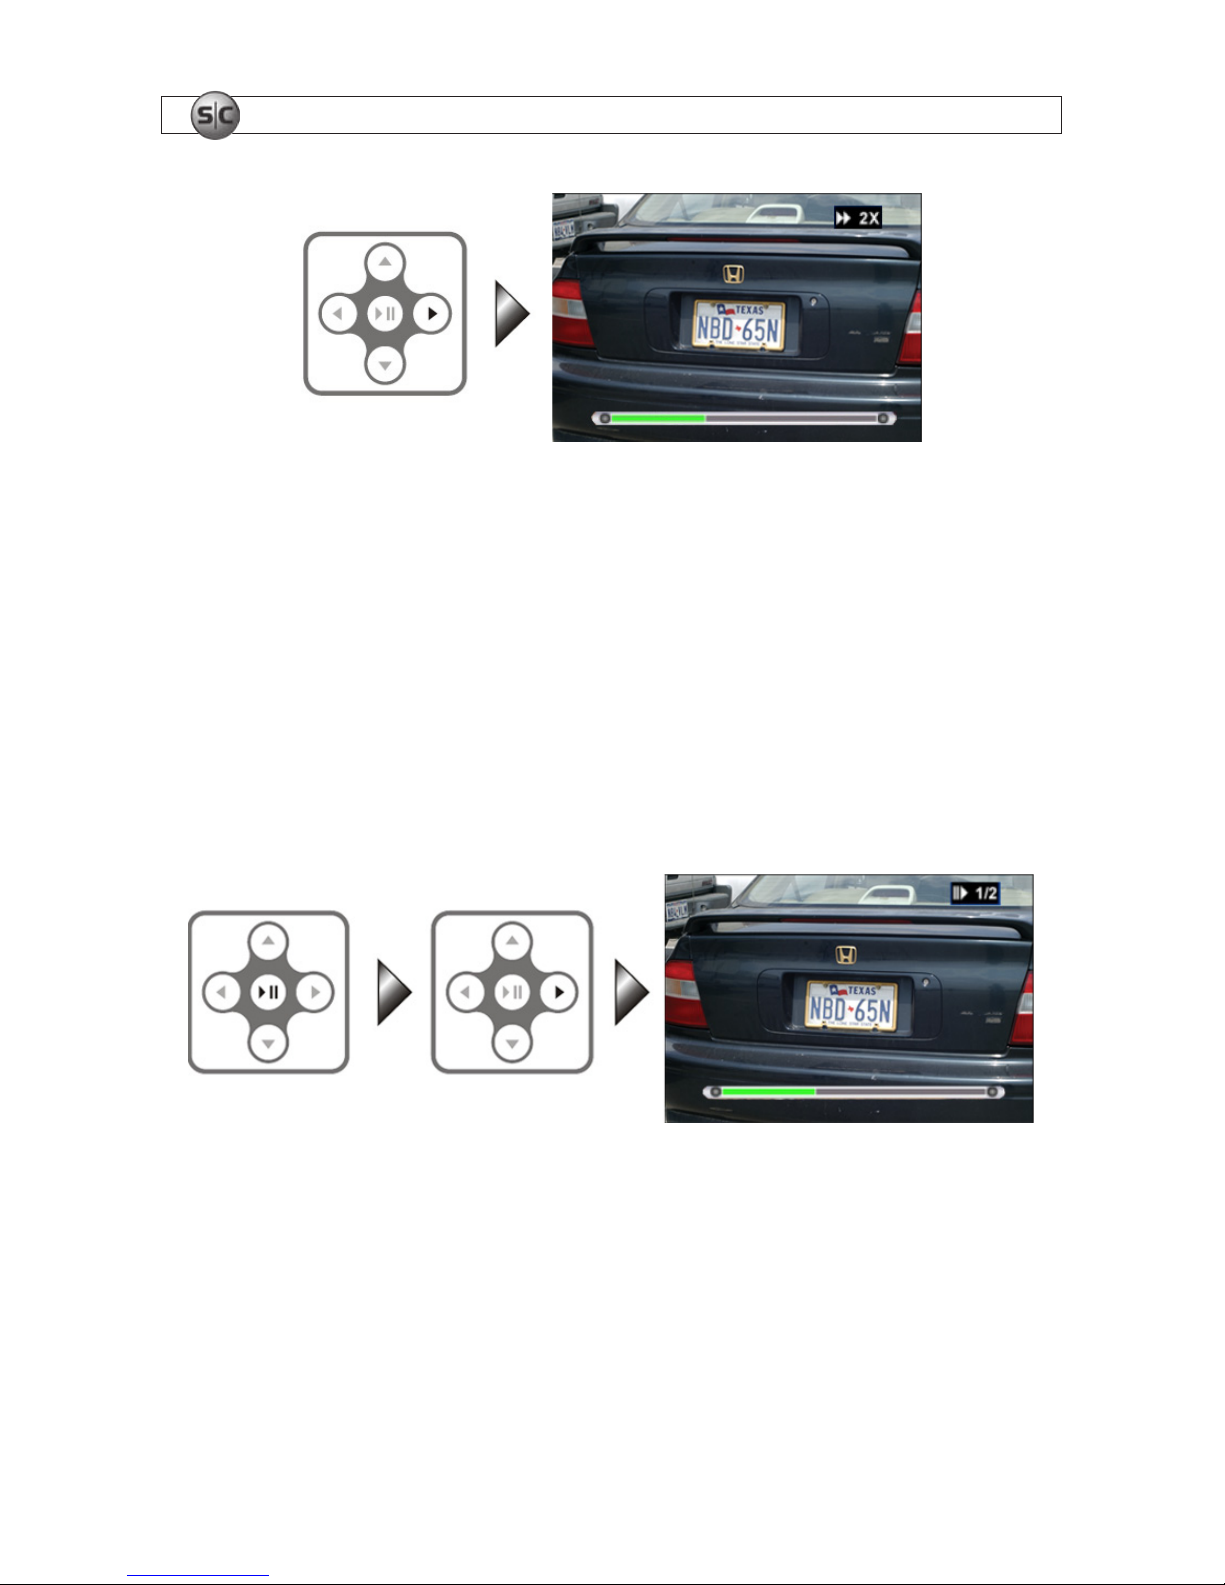
In the Main Menu, use the navigation keys to select Video Files, then press the u; key to conrm your
selection.
In the File List screen, use the q and p keys to highlight the le you want to play, then press u;.
Select File Play Selected File
5.2 Fast playback
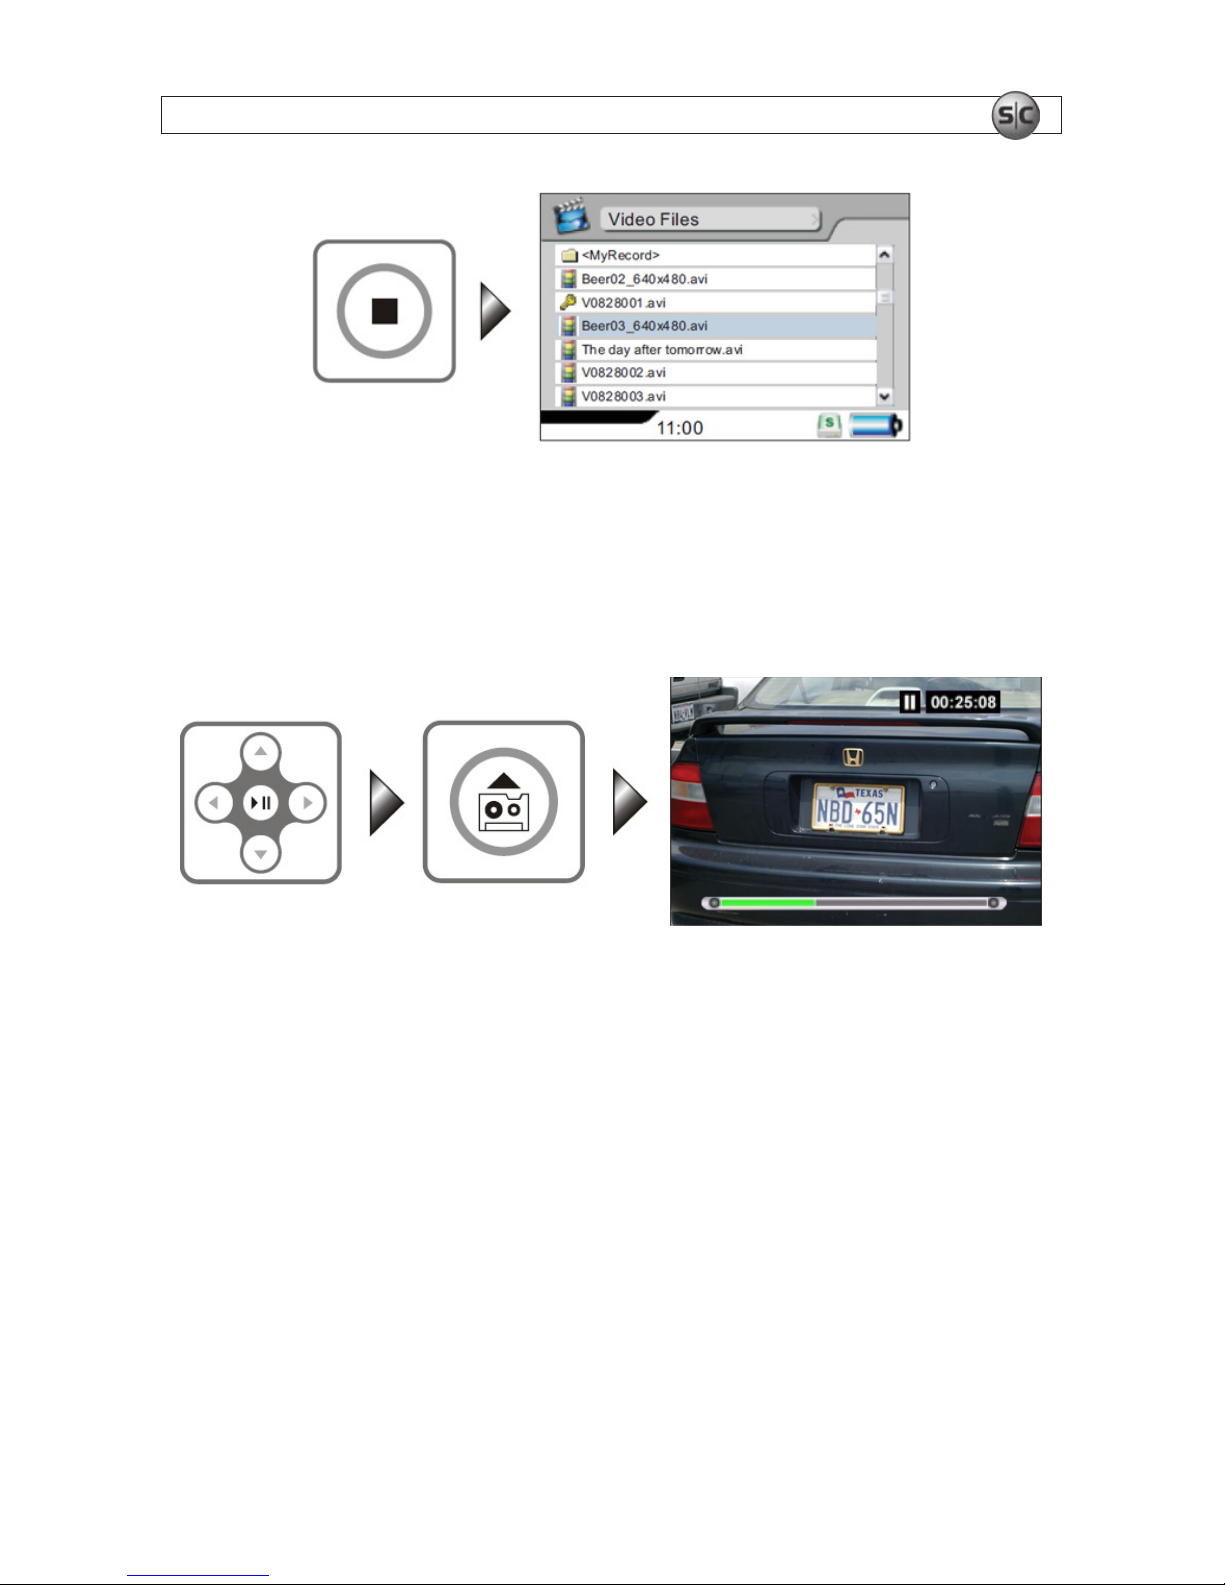
To double (2X) the playback speed, press the u key during normal playback. Press the u; key to
return to normal playback speed.
Page 24
20
www.supercircuits.com
SECTION 5: VIDEO PLAYBACK
To playback at 4X speed, press u during playback at 2X speed. Similarly, to playback video at 8X speed,
press u during playback at 4X speed. Press u
; to return to normal speed.
5.3 Pause playback
To pause video playback at normal speed, press u;.
5.4 Slow motion playback
To slow video playback to 1/2 speed, press u; to pause the player, then press u. To return to normal
speed, press u
;.
To playback at 1/4 speed, press u during playback at 1/2 speed. Similarly, to playback video at 1/8
speed, press u during playback at 1/4 speed. Press u
; to return to normal speed.
5.5 Exit playback mode
To stop playing the le and return to the le list, press the g key.
Page 25
21Advanced Micro DVR User Manual
SECTION 5: VIDEO PLAYBACK
5.6 Capture image during playback
To capture an image while video is playing, press u; to pause the video, then press REC. You can
capture up to 30 images while playing back a video, and up to 999 images in one day. To return to
normal playback when the video is paused, press u
; again.
Image les are stored in the “MyRecord” folder under “photo mode” with the lename format
V<mmddsss> where <mmdd> is the month and day, and <sss> is an index number, 000 – 999, For
example, a le named V0629020 is the 21st image captured on June 29.
If the number of les captured during the playback of a video exceeds 30, the message ABOVE
RECORDING LIMITED TO 30 FILES appears. If you try to capture more than 1000 images during any
one day, the message ABOVE RECORDING LIMITED TO 999 FILES appears.
Page 26
22
www.supercircuits.com
SECTION 6: VIDEO PLAYBACK SETTINGS
SECTION 6
Video Playback Settings
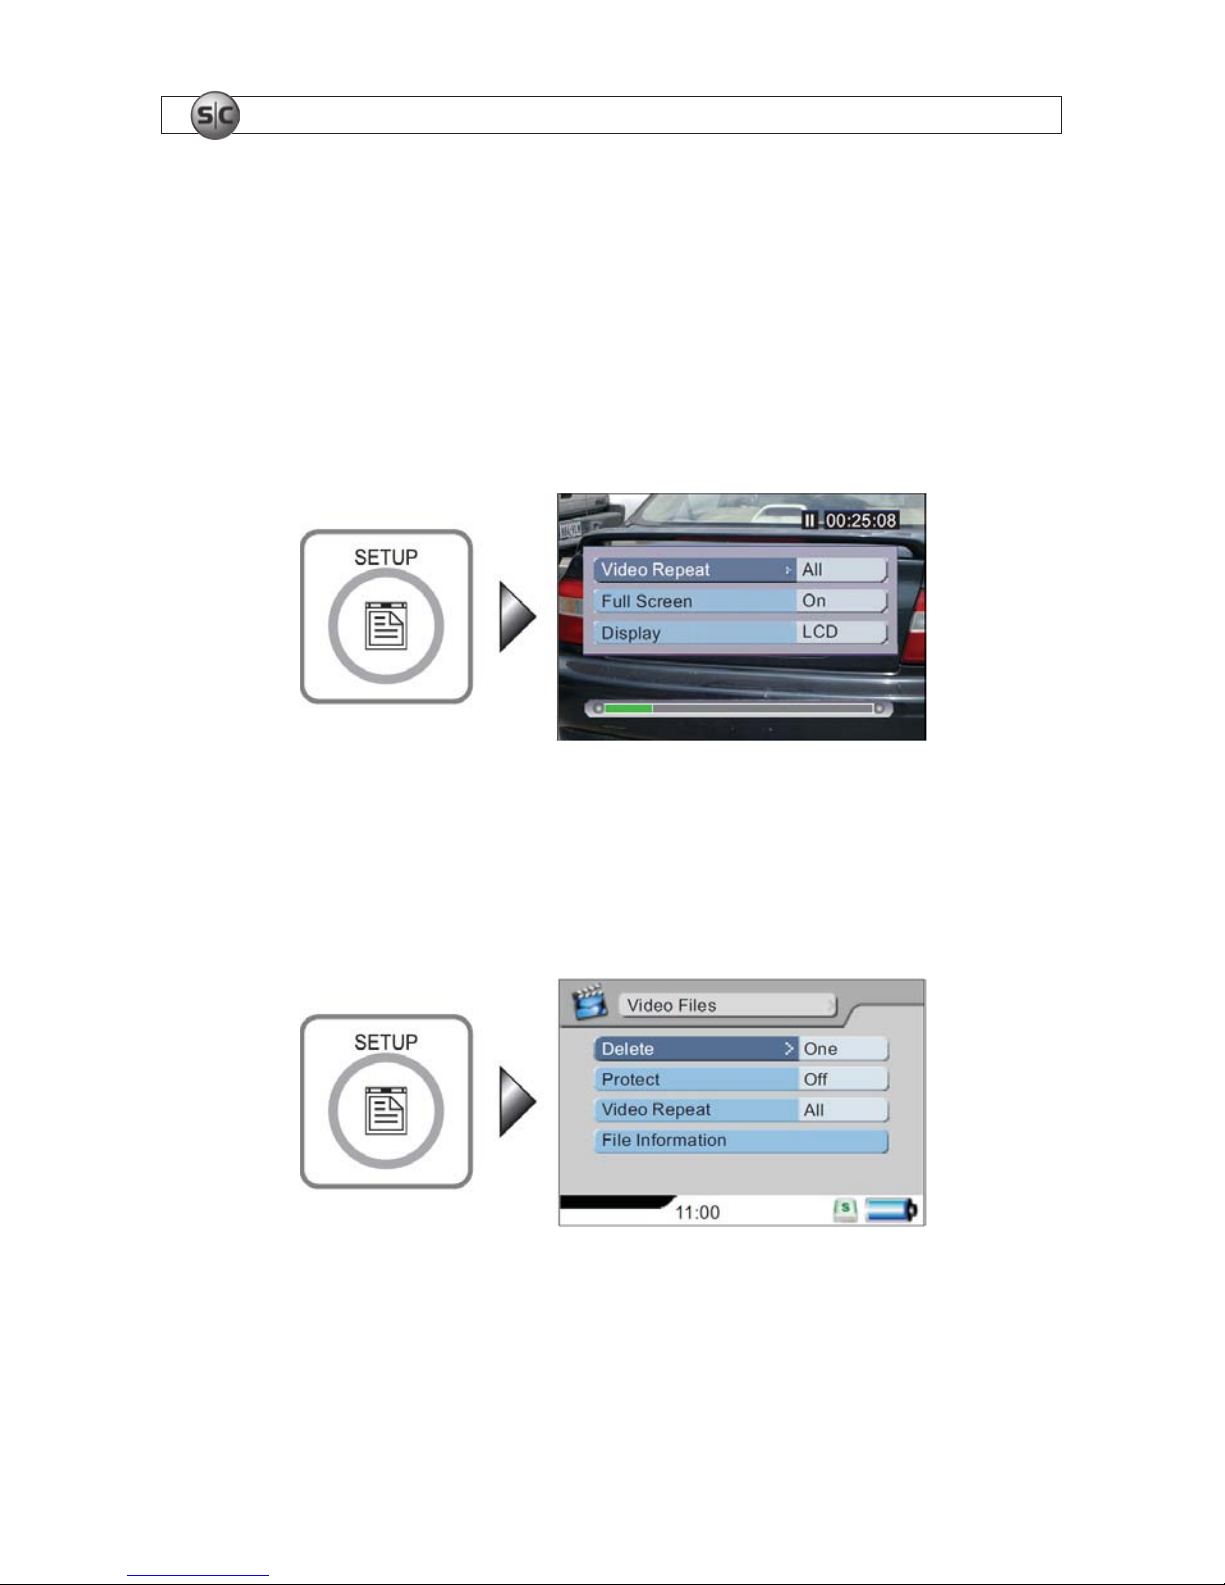
6.1 During video playback
To change the video conguration options during video playback, press SETUP. An options menu will
appear. Use the navigation keys and the u
; key to change the option settings. Refer to the Operations
section for a description of how to change these selections.
6.2 In the le list
To change the conguration options while in the le list screen, press SETUP. An options menu will
appear. Use the navigation keys and the u
; key to change the option settings. Refer to the Operations
section for a description of how to change these selections.
Page 27
23Advanced Micro DVR User Manual
SECTION 7: AUDIO PLAYBACK
SECTION 7
Audio Playback
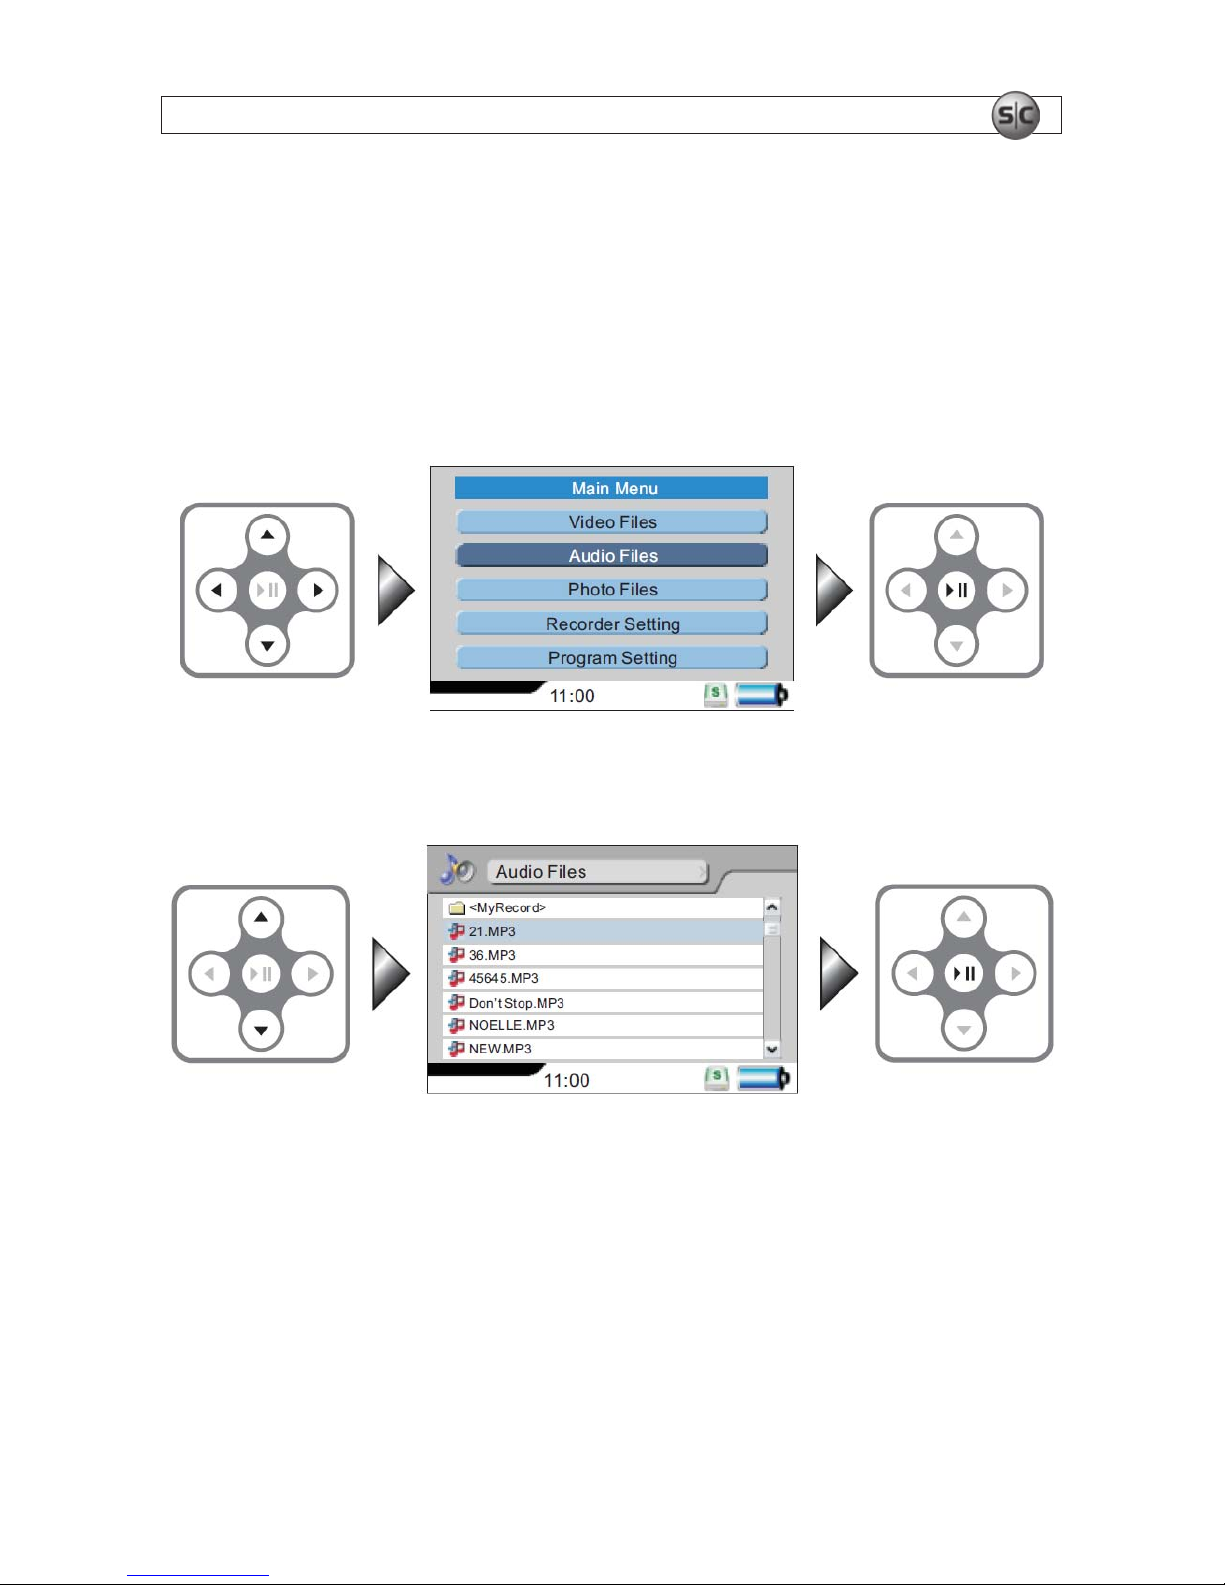
7.1 Play an audio le
In the Main Menu, use the navigation keys to select Audio Files, then press u; to conrm your
selection.
In the File List screen, use the q and p keys to highlight the le you want to play, then press u;.
Press g to stop and return to the previous screen.
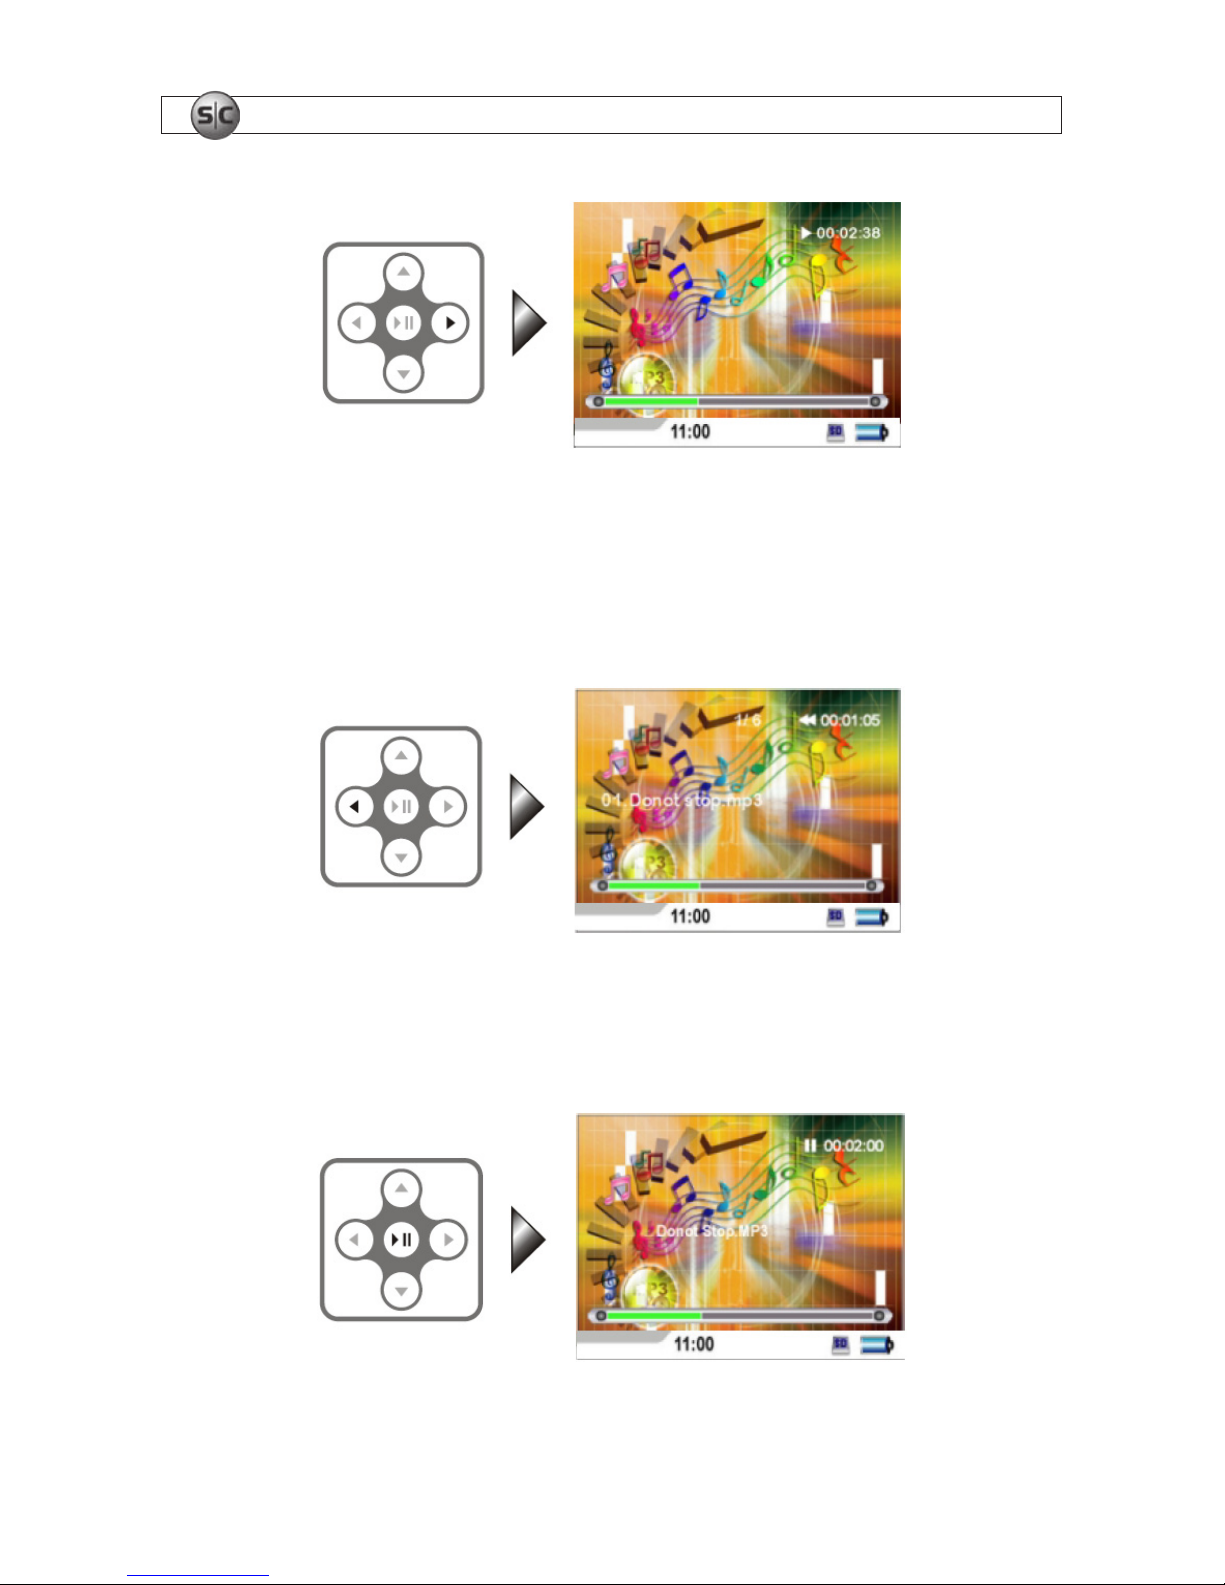
7.2 Fast playback
During playback of an audio le, press u to increase the playback speed. Press the u; key to return to
normal playback speed.
Page 28
24
www.supercircuits.com
SECTION 7: AUDIO PLAYBACK
7.3 Reverse playback
During playback of an audio le, press the t key to move to an earlier time in the le. The elapsed time
counter will decrement during reverse playback. Press the u
; key to stop at that spot and resume
normal playback.
7.4 Pause playback
To pause playback of an audio le, press u;. Press the u; key again to resume playback.
Page 29
25Advanced Micro DVR User Manual
SECTION 7: AUDIO PLAYBACK
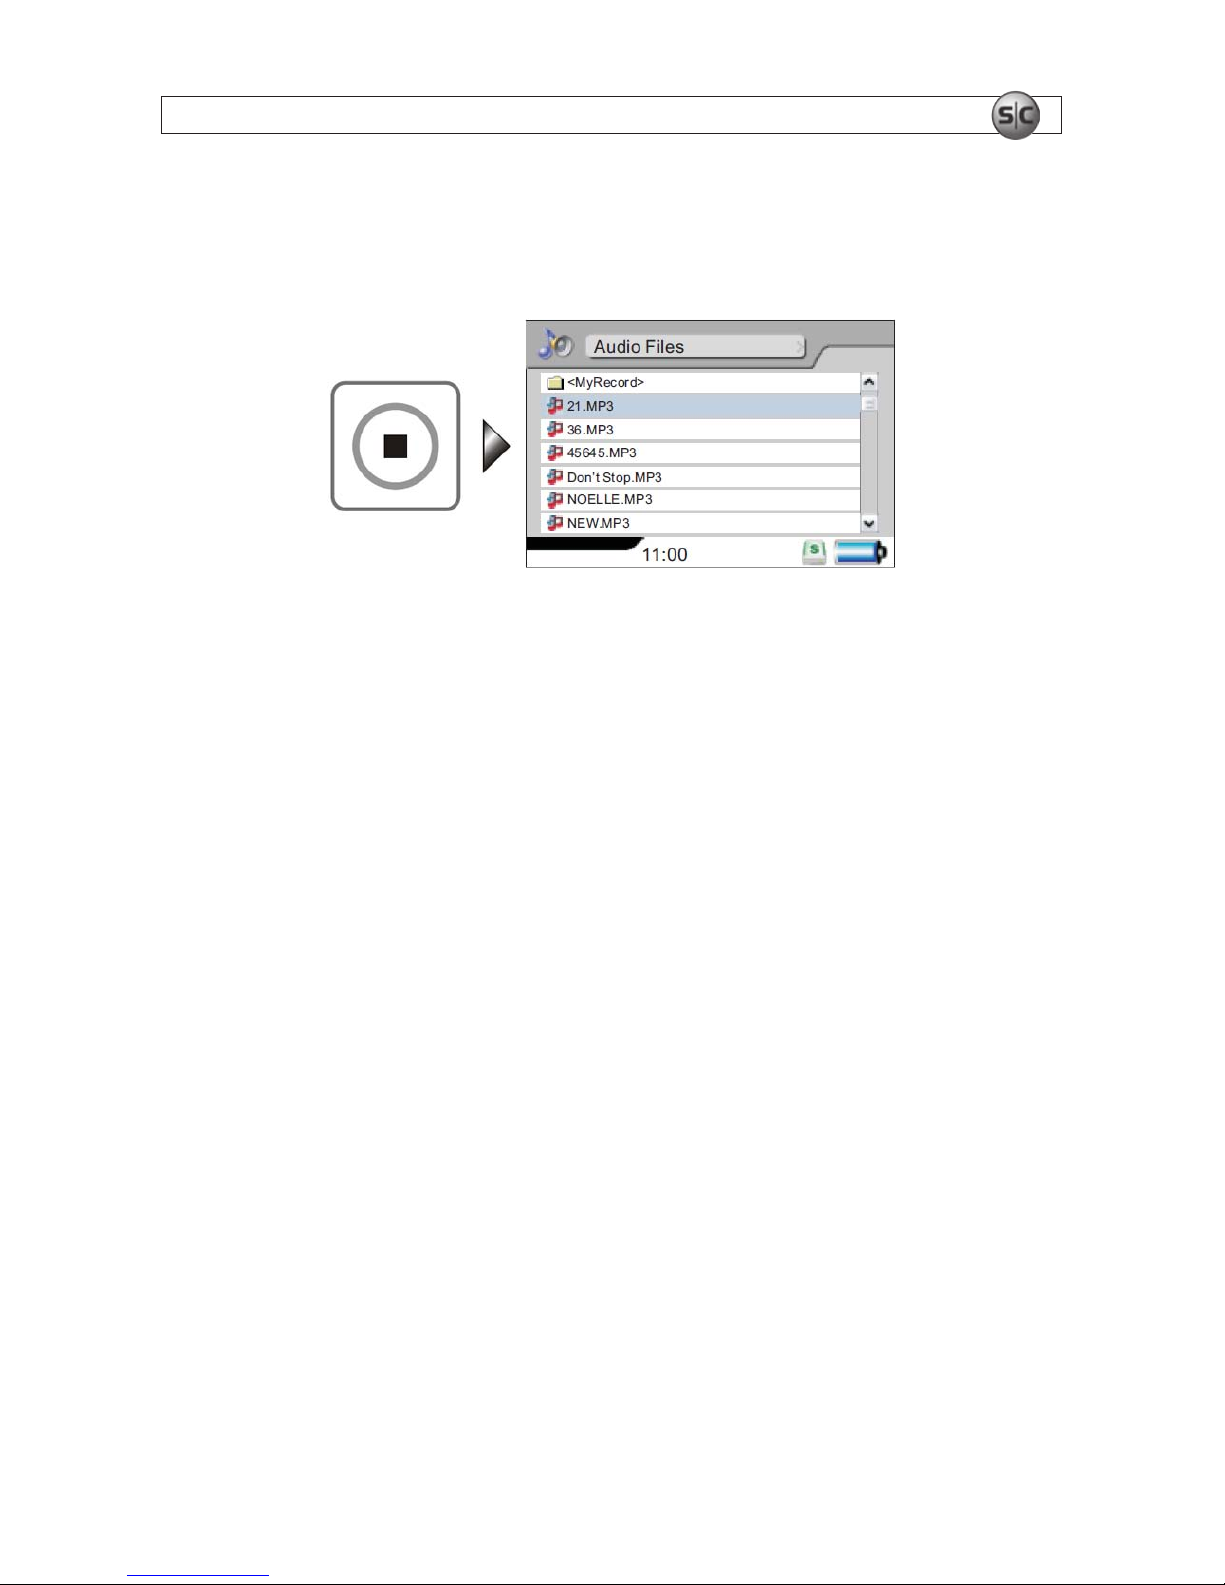
7.5 Stop playback
Press g to stop playback of the audio le and return to the le list.
Page 30
26
www.supercircuits.com
SECTION 8: AUDIO FILE SETTINGS
SECTION 8
Audio File Settings
8.1 During audio playback
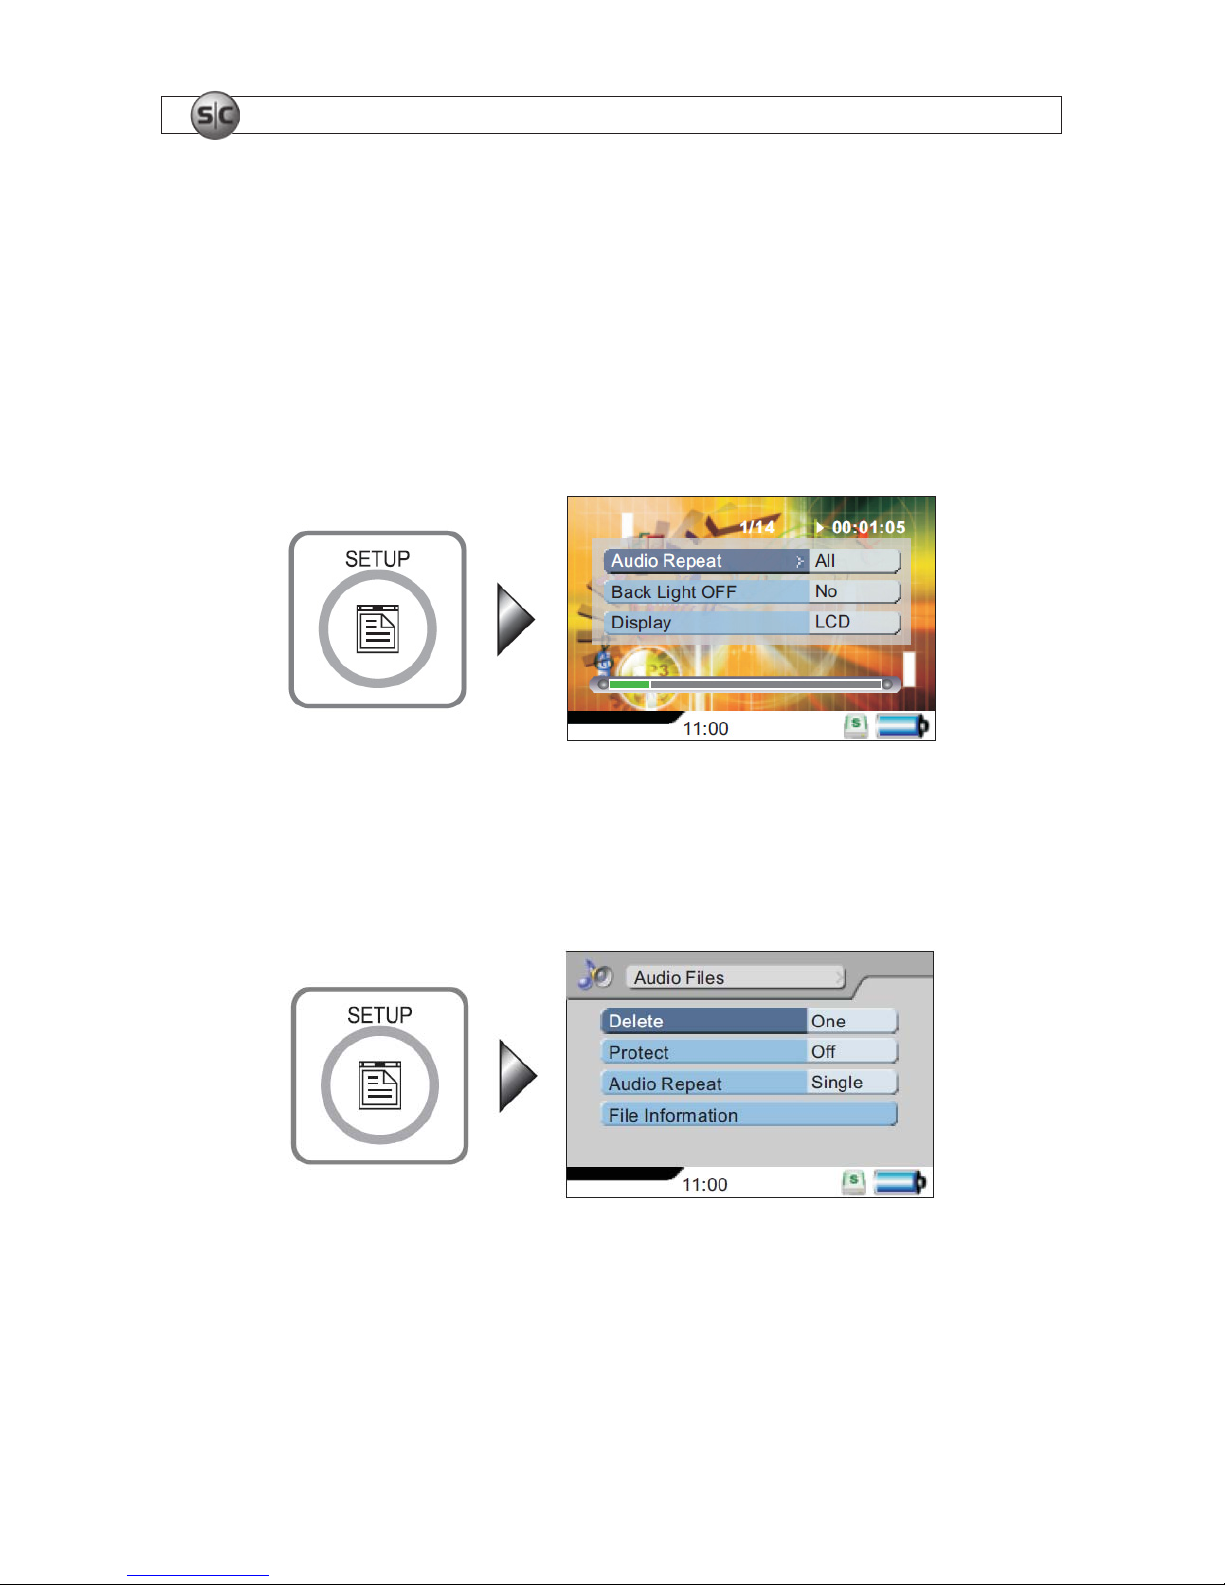
To change the audio conguration options during audio playback, press SETUP. Use the navigation keys
and the u
; key to change the option settings. Refer to the Operations section for a description of how
to change these selections.
8.2 In the le list
To change the conguration options while in the le list screen, press SETUP. Use the navigation keys
and the u
; key to change the options settings.
Page 31
27Advanced Micro DVR User Manual
SECTION 9: PHOTO BROWSING
SECTION 9
Photo Browsing
9.1 Opening a photo
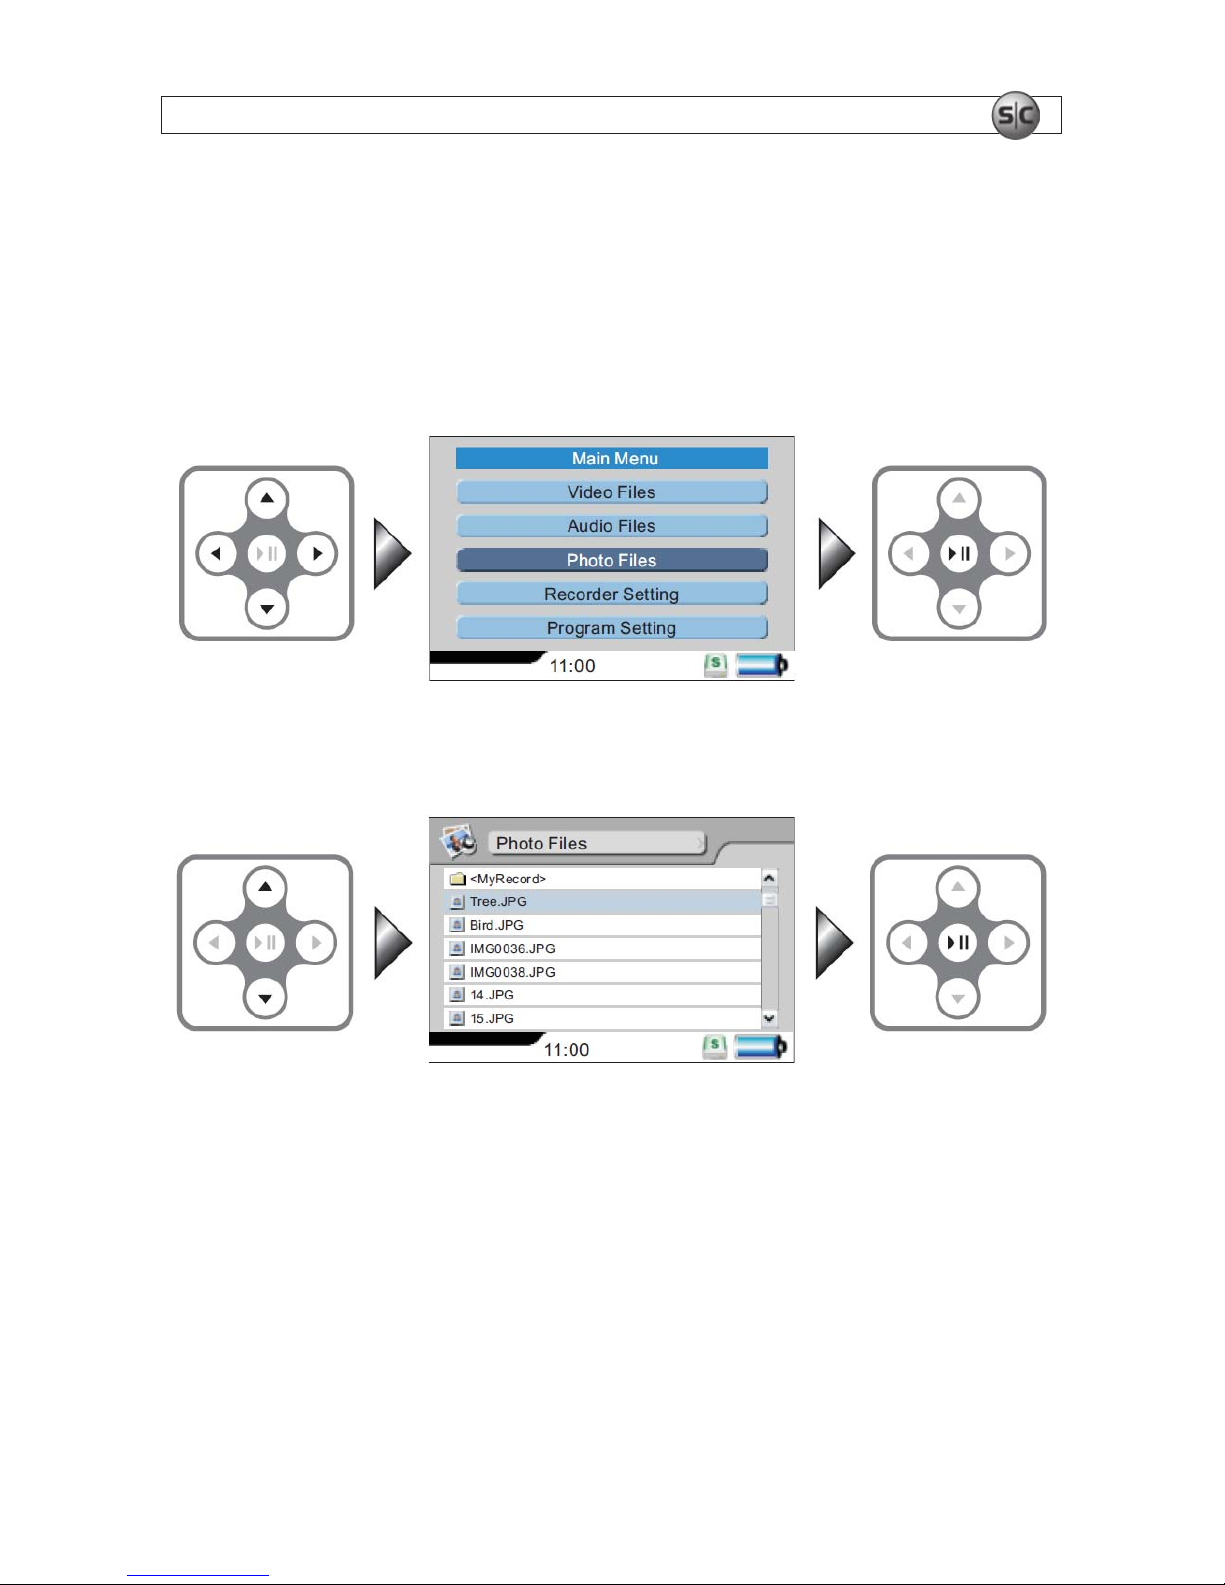
1. In the Main Menu, use the navigation keys to select Photo Files, then press u;.
2. In the File List screen, use the q and p keys to highlight the le you want to display, then press
u
; to display the photo. Press g to return to the previous screen.
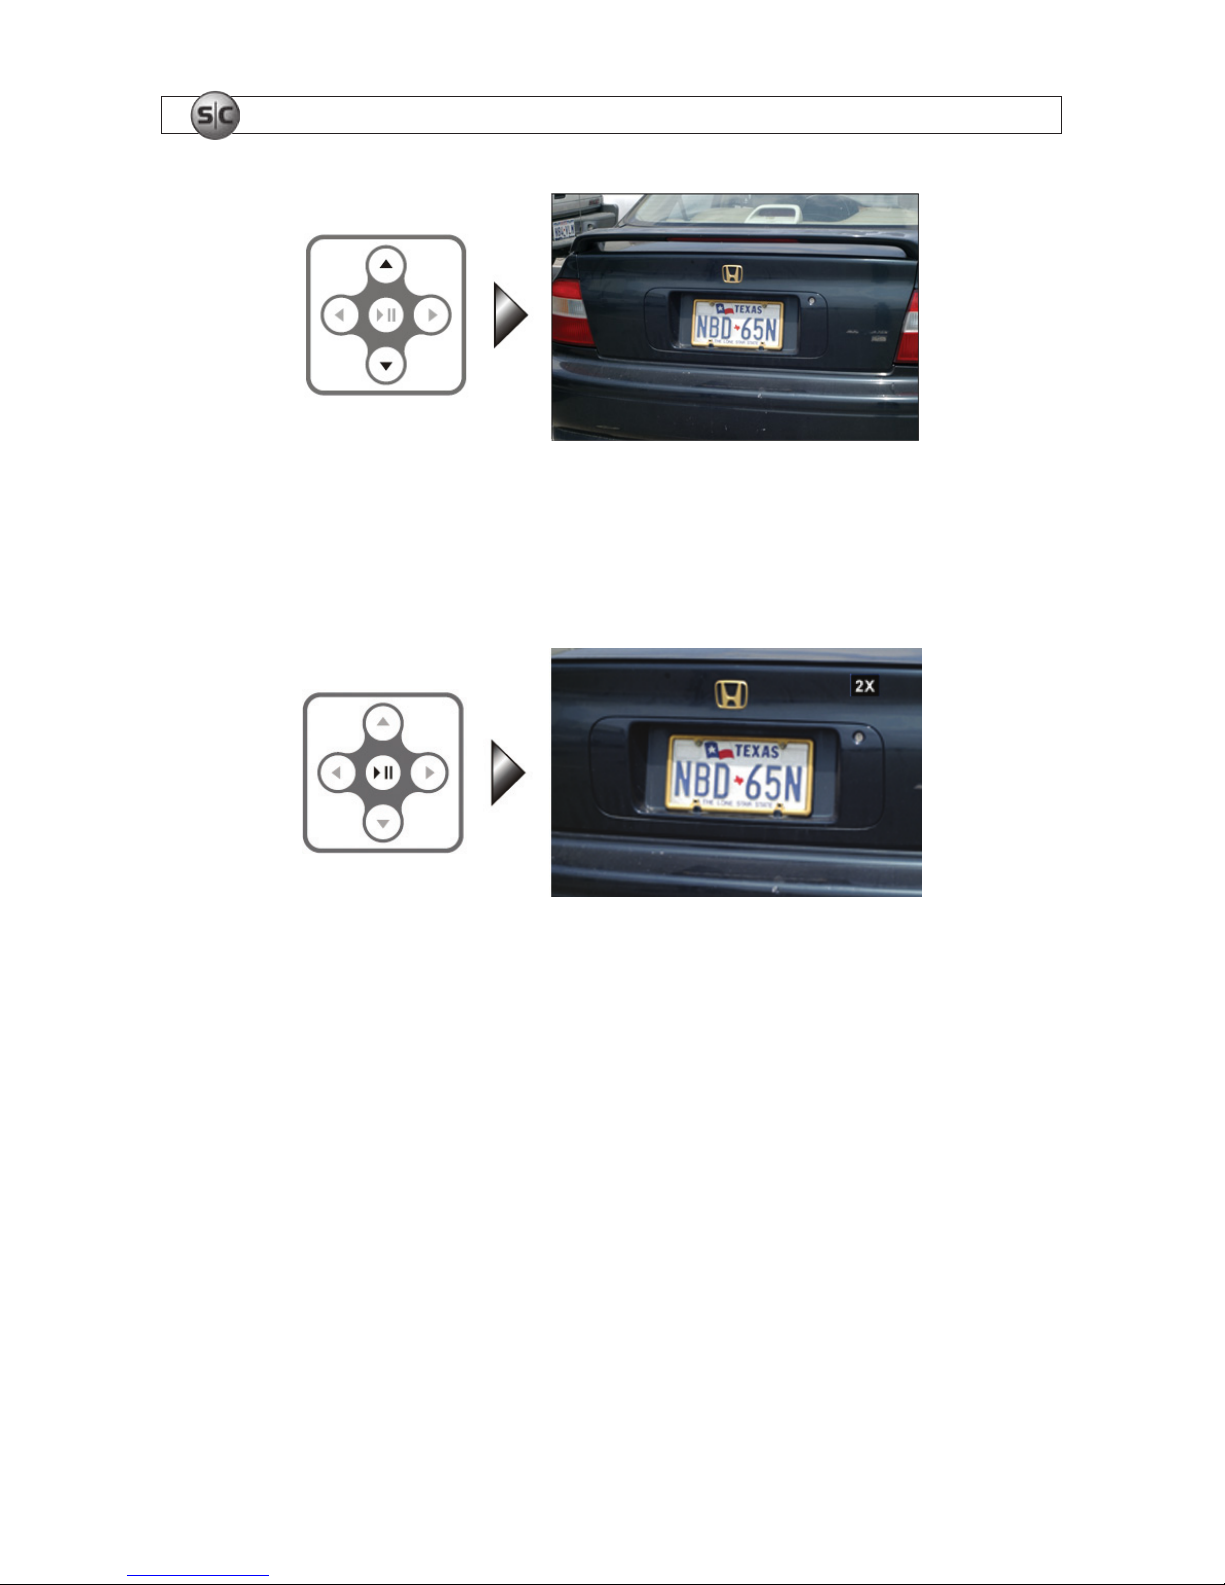
9.2 Browse photos
To browse photos in the le list while viewing a photo, press the p / q keys to open the next / previous
photo in the list.
Page 32
28
www.supercircuits.com
SECTION 9: PHOTO BROWSING
9.3 Photo zoom
To zoom in on the photo you are viewing by 2X, press u;. When the photo is enlarged, use the p, q,
t, and u keys to view a different portion of the photo.
To zoom from 2X to 4X, press u; again.
Page 33
29Advanced Micro DVR User Manual
SECTION 10: SLIDE SHOW + AUDIO
SECTION 10
Slide Show + Audio
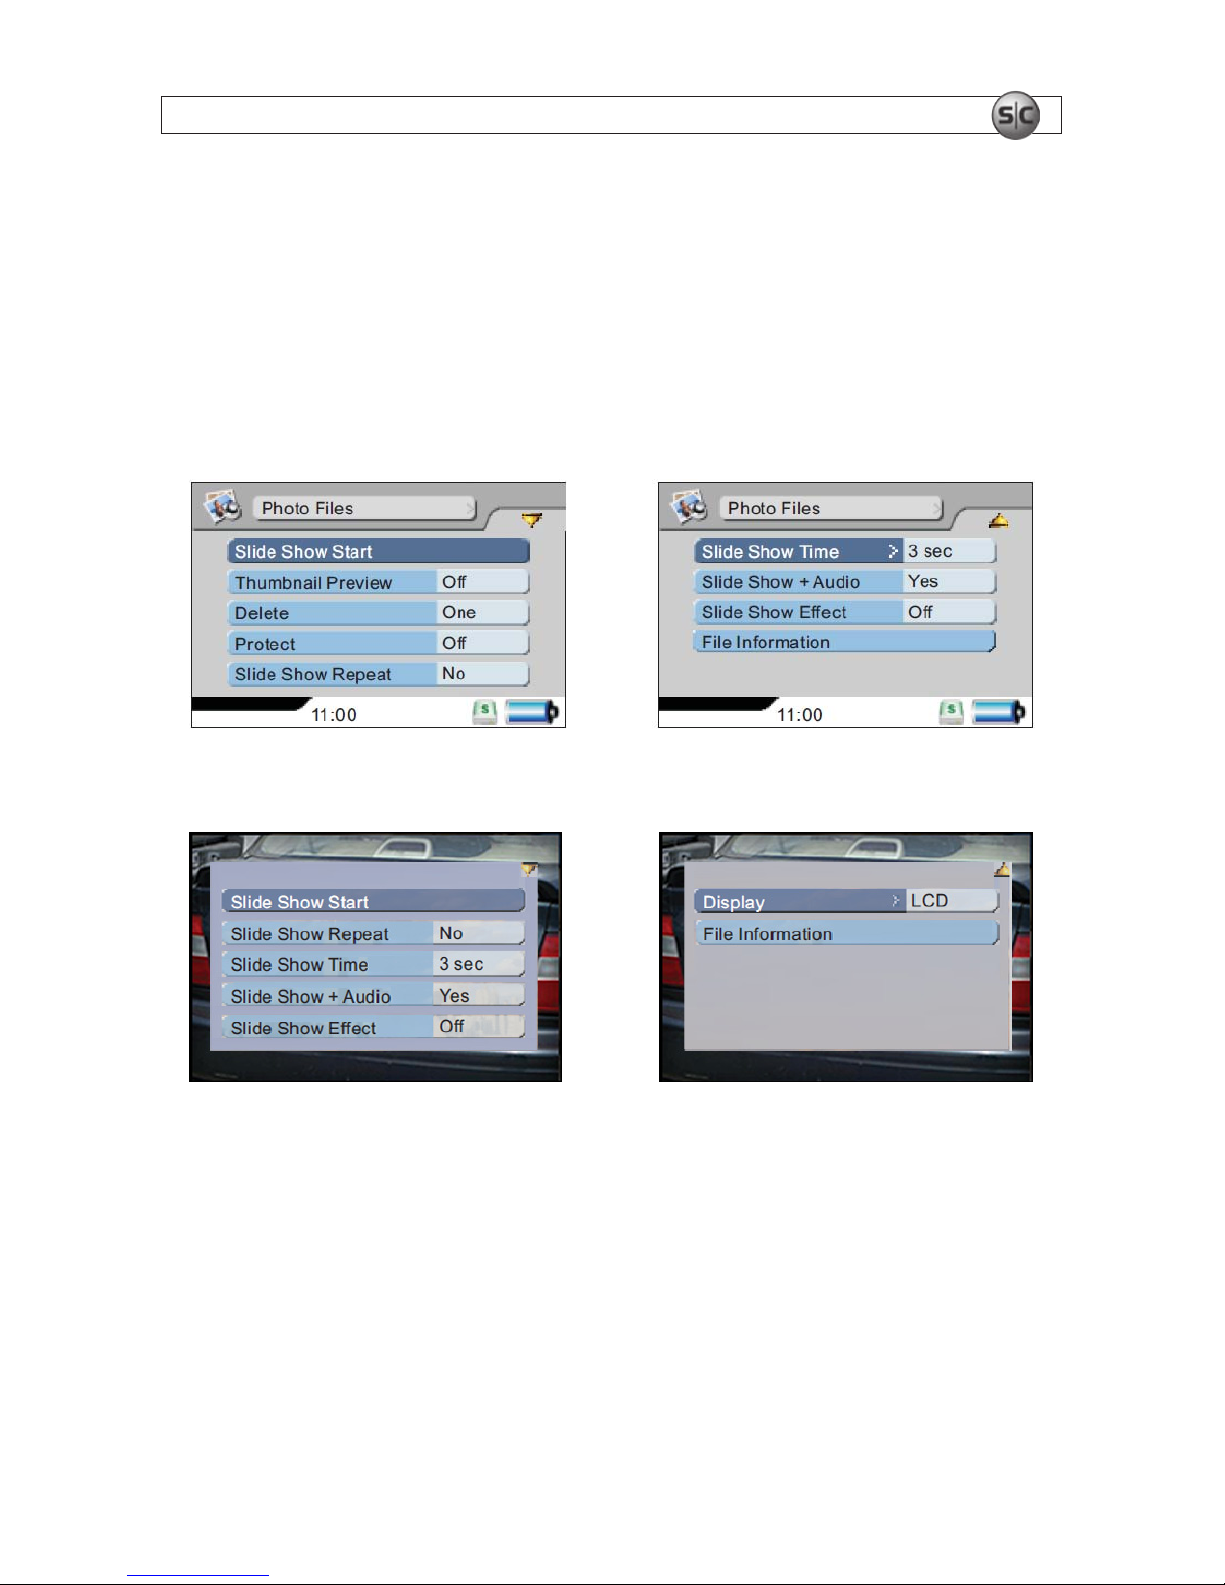
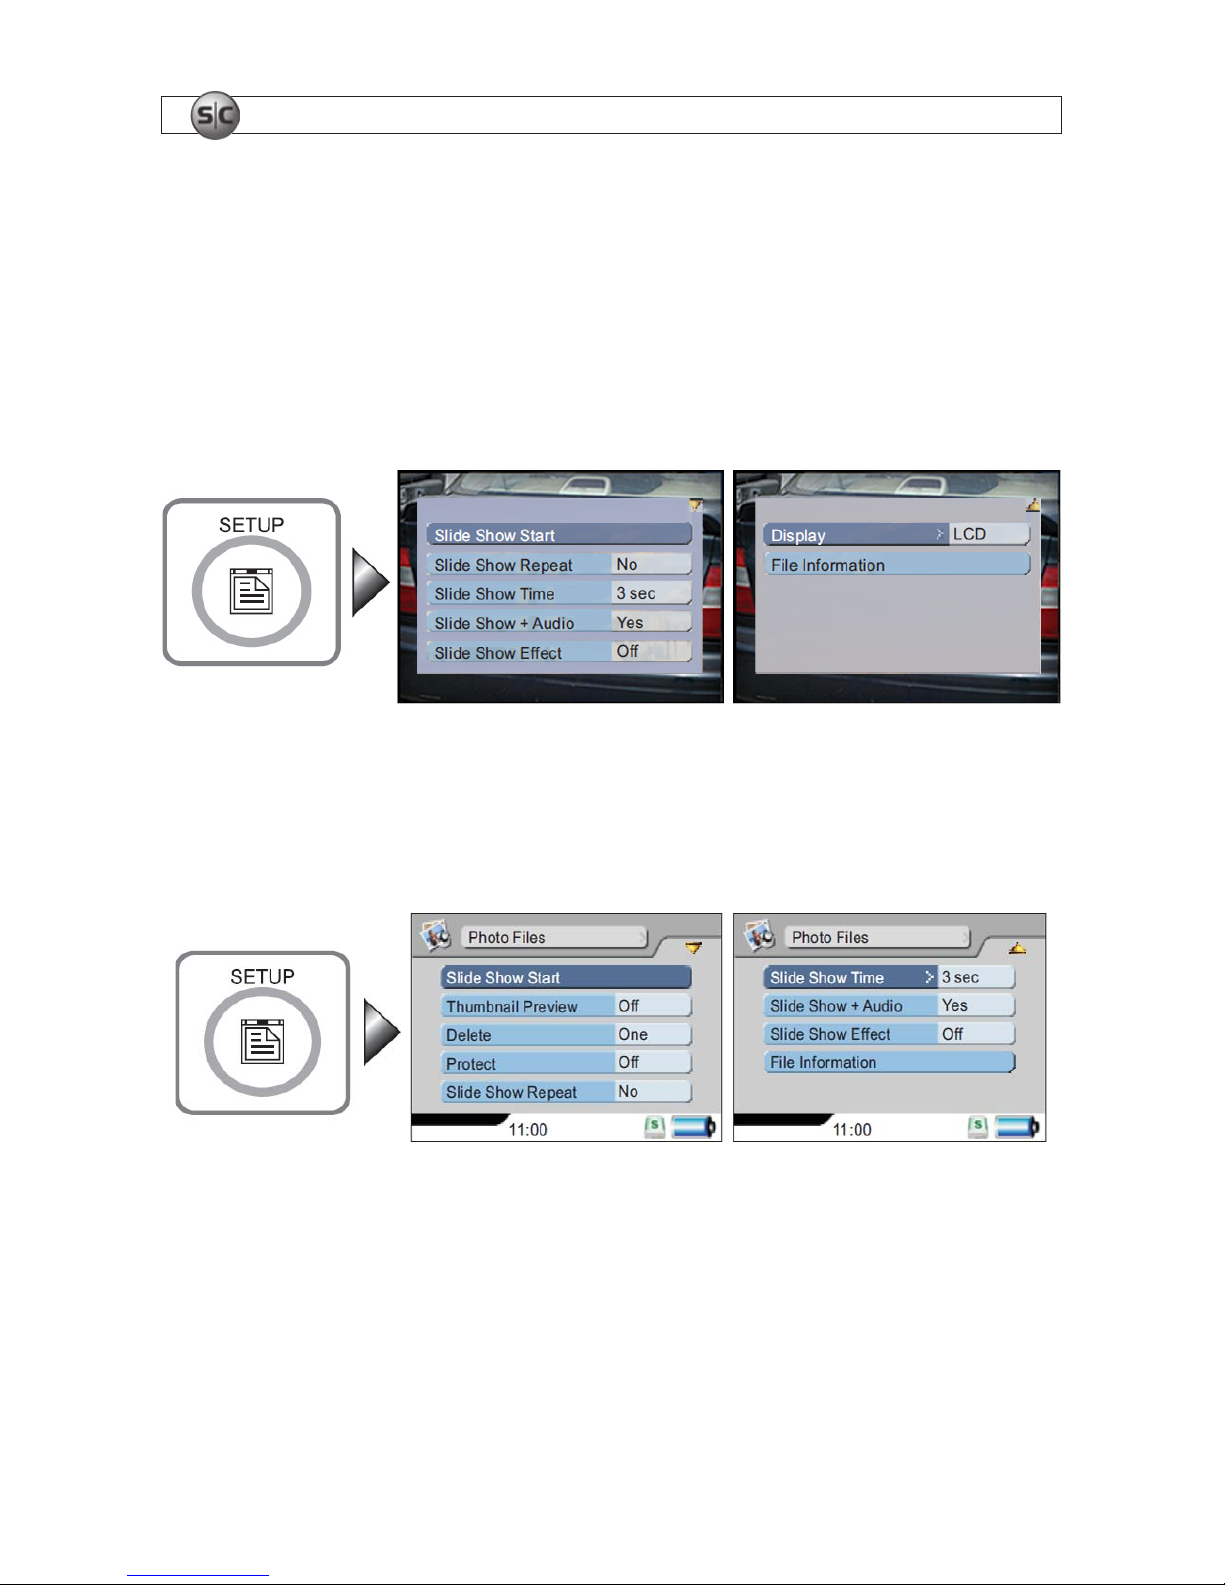
With the le list screen open or while browsing images, press SETUP to change the conguration
settings. Highlight Start Slide Show, then press u
; to start a Slide Show + Audio. To use this feature,
image les and audio les must be stored in the same folder.
Selecting SETUP in the le list screen:
Selecting SETUP while browsing images:
To pause a slide show – Press u; or g .
To resume the slide show – Press the u
; key.
To stop a slide show – Press the u
; key to pause the slide show, and then press g .
Page 34
30
www.supercircuits.com
SECTION 11: PHOTO EDITING
SECTION 11
Photo Editing
11.1 While browsing photos
To change the photo conguration options while viewing photos, press SETUP. Use the navigation keys
and the u
; key to change the option settings.
11.2 In the le list
To change the conguration options while in the le list screen, press SETUP. Use the navigation keys
and the u
; key to change the option settings.
Page 35
31Advanced Micro DVR User Manual
SECTION 12: RECORD
SECTION 12
Record
Recorded video les are saved in the MyRecord/MOVIE folder. Recorded Audio les are saved in the
MyRecord/MUSIC folder. A folder can contain up to 999 les.
NOTE
• Video les can be up to 2 hours in length.
• Audio les can be up to 3 hours in length.
• If there is a conict in the recording time setting, or if le storage space is insufcient, a red
forbidden icon appears, warning that the recording will not be made with the current settings.
12.1 Audio Line In REC
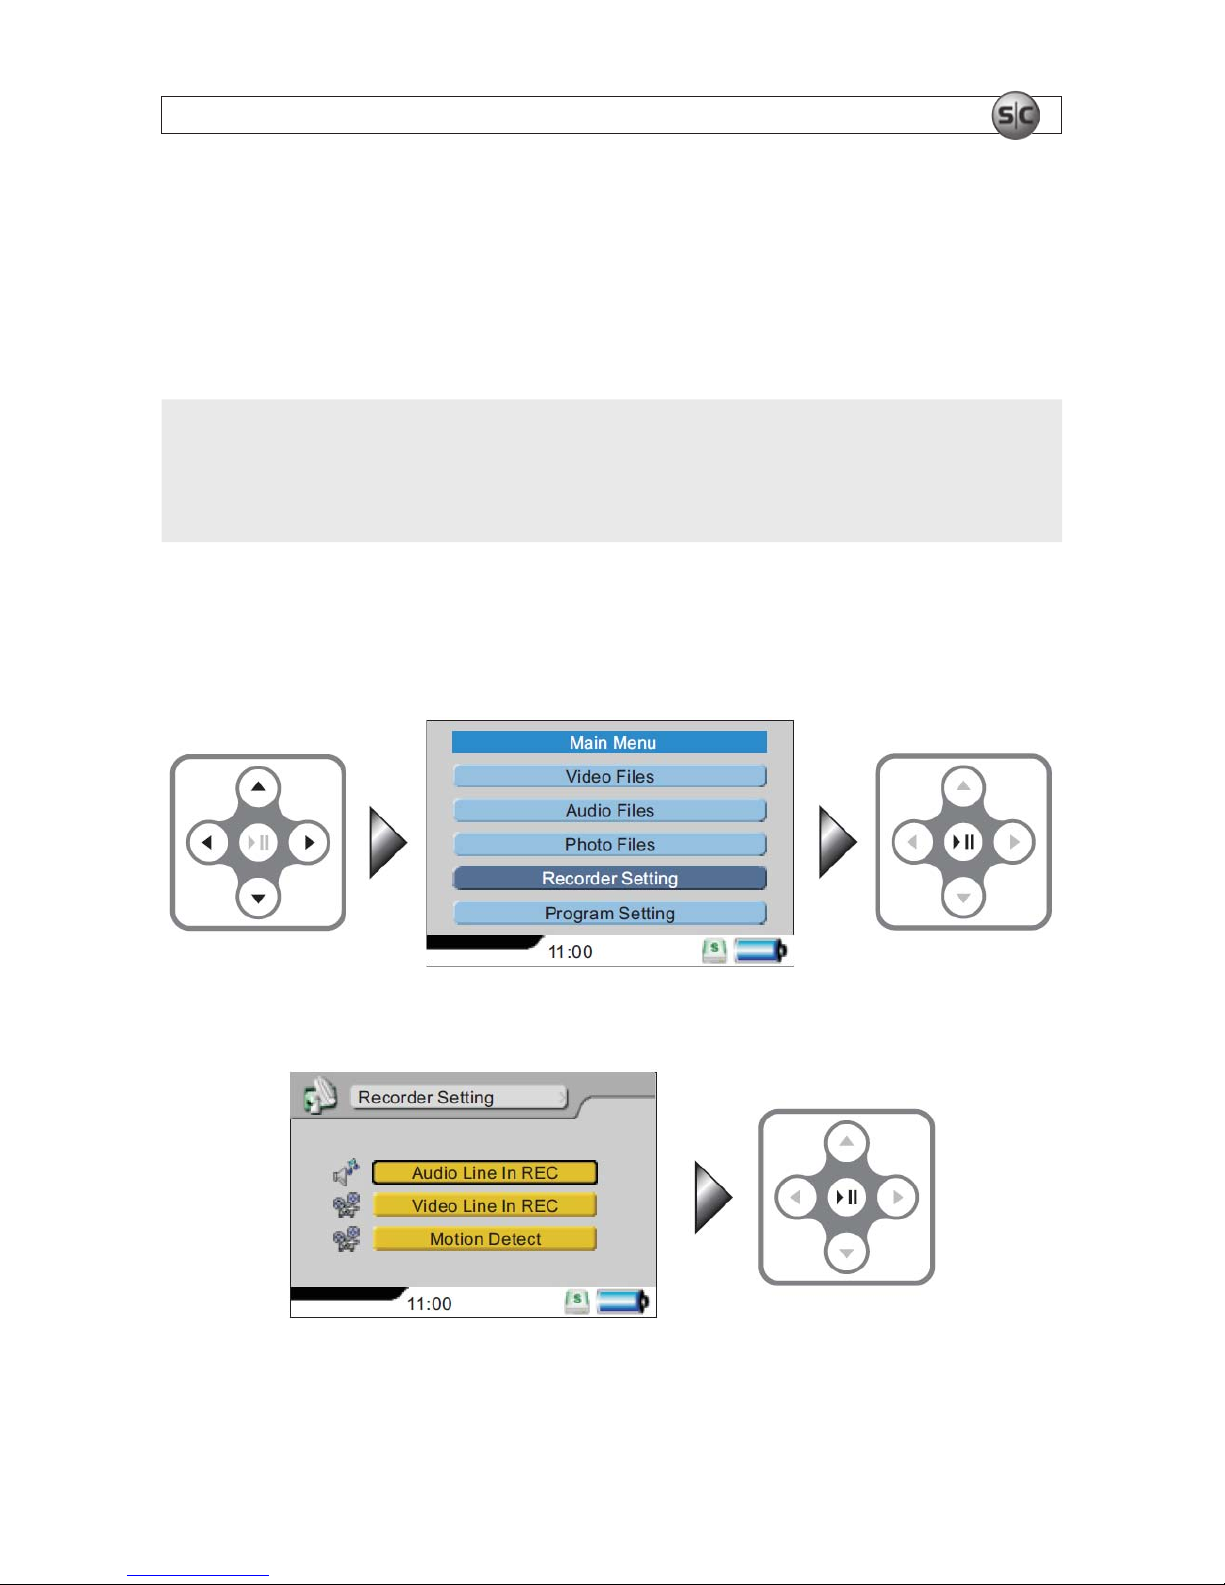
1. In the Main Menu, use the navigation keys to select Recorder Settings, then press u;.
2. Select AUDIO LINE IN REC and then press u;.
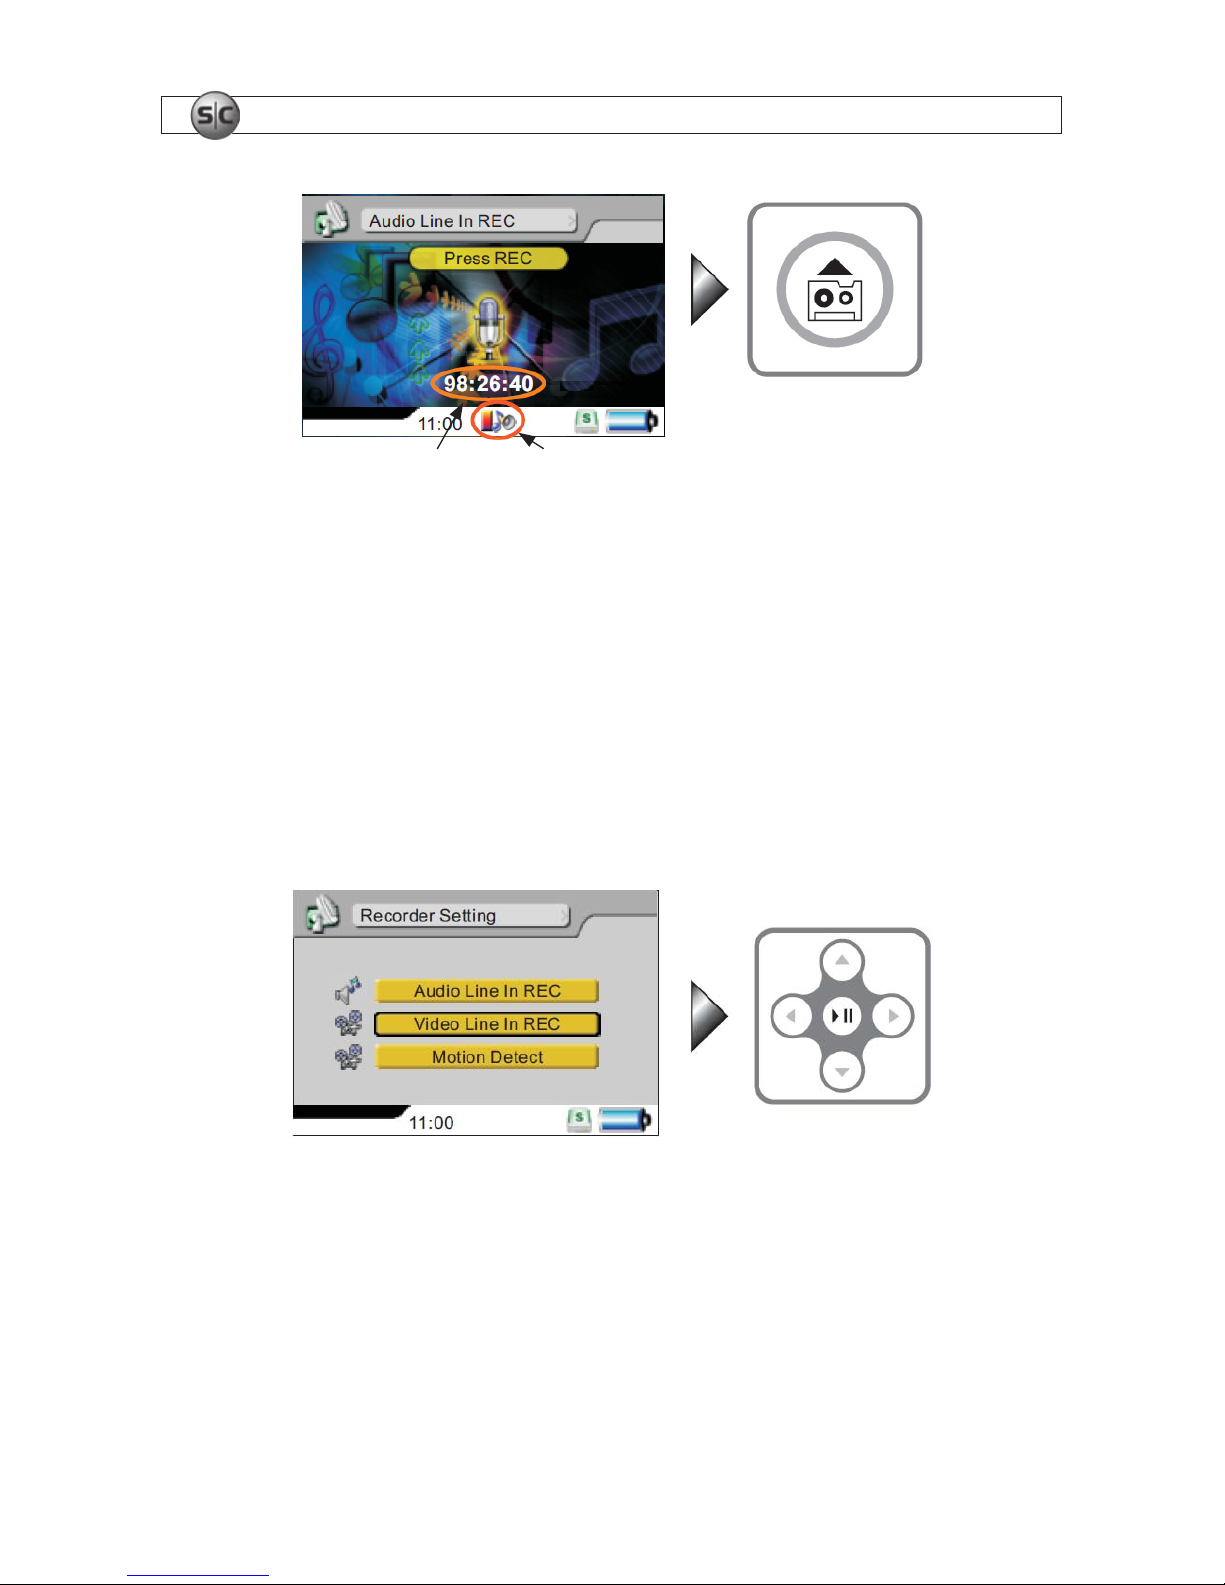
3. Press the REC button to start recording. The le recorded will be stored in the “MyRecord” folder.
Page 36
32
www.supercircuits.com
SECTION 12: RECORD
Elapsed time Volume Level Indicator
Pause recording – Press u; to pause recording.
Cancel pause – Press REC to resume recording. Audio recorded after the pause is stored in the
same le.
Stop recording – Press g or REC to stop recording and go to standby mode.
12.2 Video Line In REC
1. To setup your recorder for video line-in recording, go to the Main Menu, use the navigation buttons
to select Recorder Setting, press u
;, select Video Line In REC, then press u; again.
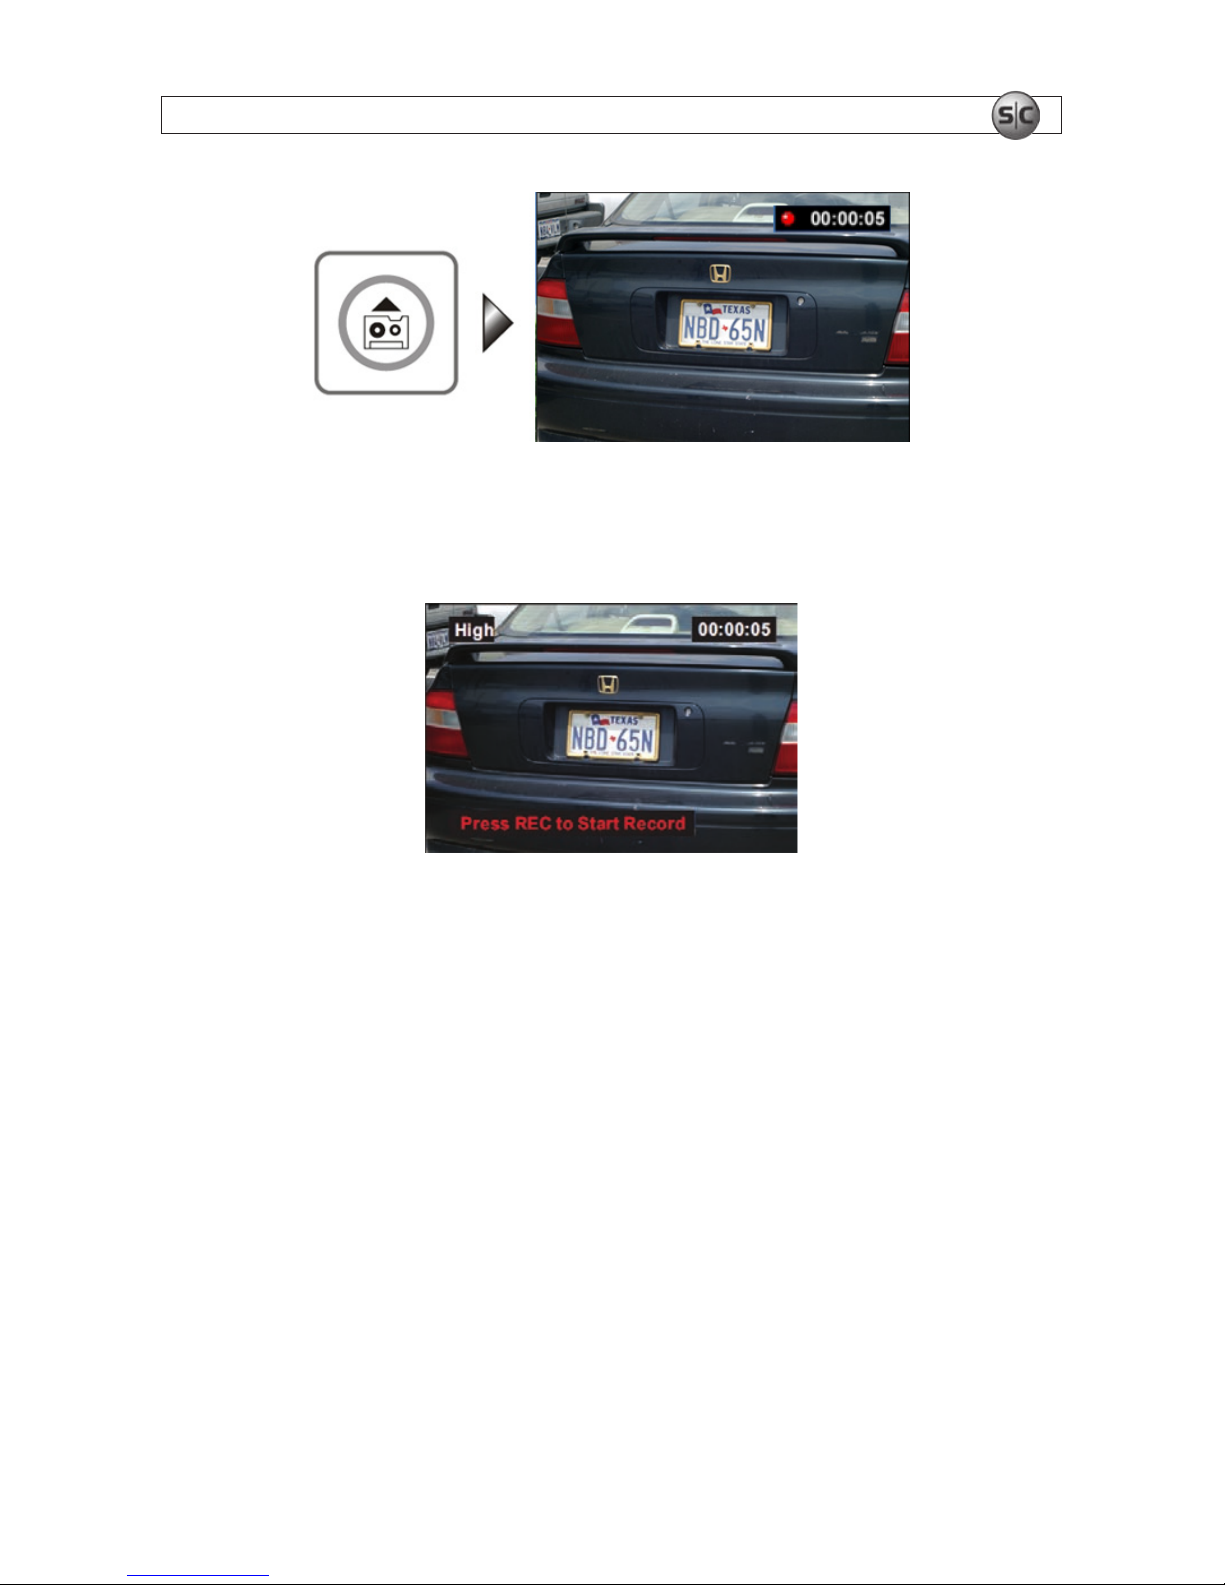
2. To start recording when at the Main Menu, press REC on the DVR or remote control, or slide the
switch on the wire control to REC.
Page 37
33Advanced Micro DVR User Manual
SECTION 12: RECORD
After pressing u;, the system is in record standby mode and the message Press REC to start
Record will appear for 5 seconds. If REC is not pressed while the message is present, press REC
to return to standby mode, then press REC again to start recording.
Stop recording – Press g , or press REC to stop recording and return to standby mode.
Page 38
34
www.supercircuits.com
SECTION 13: SPECIFICATIONS
SECTION 13
Specications
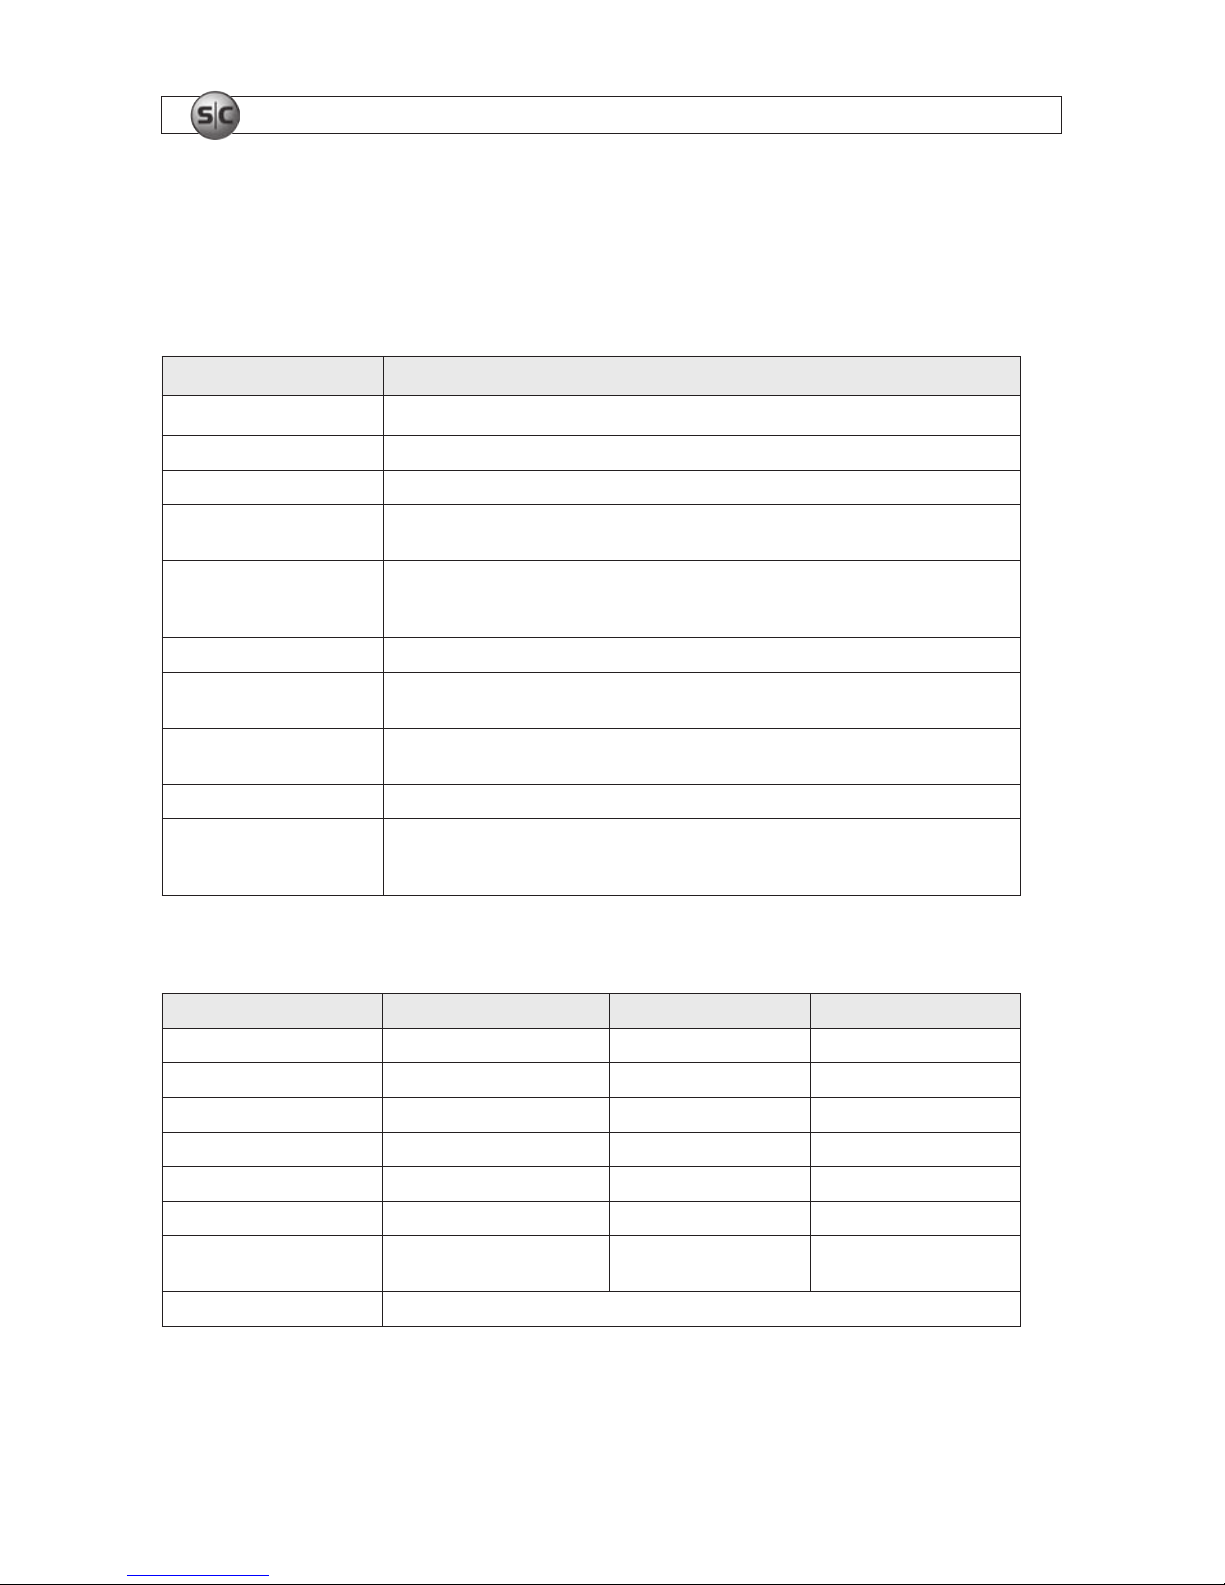
Table 1. General specications
Item Specication
Display 2.3” 480 x 234 TFT LCD with LED backlight
A/V Out A/V output through 3.5 mm jack
DC 5V In DC 5V input through 1.7 mm power connector
A/V In / DC Out
A/V In / DC 5 V output through 2.5 mm jack
A/V In / DC 12 V output through 3.5 mm jack
LED indicators
Power On/Off LED – on: blue, charging: orange.
A/V recording – recording in progress: red
A/C in: yellow
Storage device SD card (up to 16 GB)
Power system
Rechargeable/exchangeable Lithium Ion battery, 3.7 V 1800 mAh
Power supply 100 ~ 240 V, 50 ~ 60 AC
Dimensions / Weight
3.72 x 2.20 x 0.96 in (94.5 x 56 x 24.4 mm)
3.53 oz (100 g) without battery, 4.97 oz (140.8 g) with battery
Computer interface USB 2.0 mini-B connector
Computer system
requirements
Operating System: Microsoft
®
Windows® 2000, XP
CPU: Intel Pentium III 800 MHz or faster
Hardware accessories: USB 2.0 port, Mouse, CD-ROM, display resolution 1024 x 768
Table 2. Supported video le formats*
File Format Resolution (< 720 x 480) Bit Rate (< 5 Mbps) Frame Rate (< 30 fps)
AVI (DivX 4/5.0) Yes Yes Yes
AVI (DivX 2/3) No No No
MPEG1 (DAT, MPG-VCD) No No No
ASF No No No
RM No No No
WMV No No No
VOB (DVD without copy
protection)
No No No
MJPEG (AVI) a-law, u-law
* Yes indicates that it can be played by the MDVR18. No indicates that the format cannot be played directly, and cannot be converted
to another format.
Page 39
35Advanced Micro DVR User Manual
SECTION 13: SPECIFICATIONS
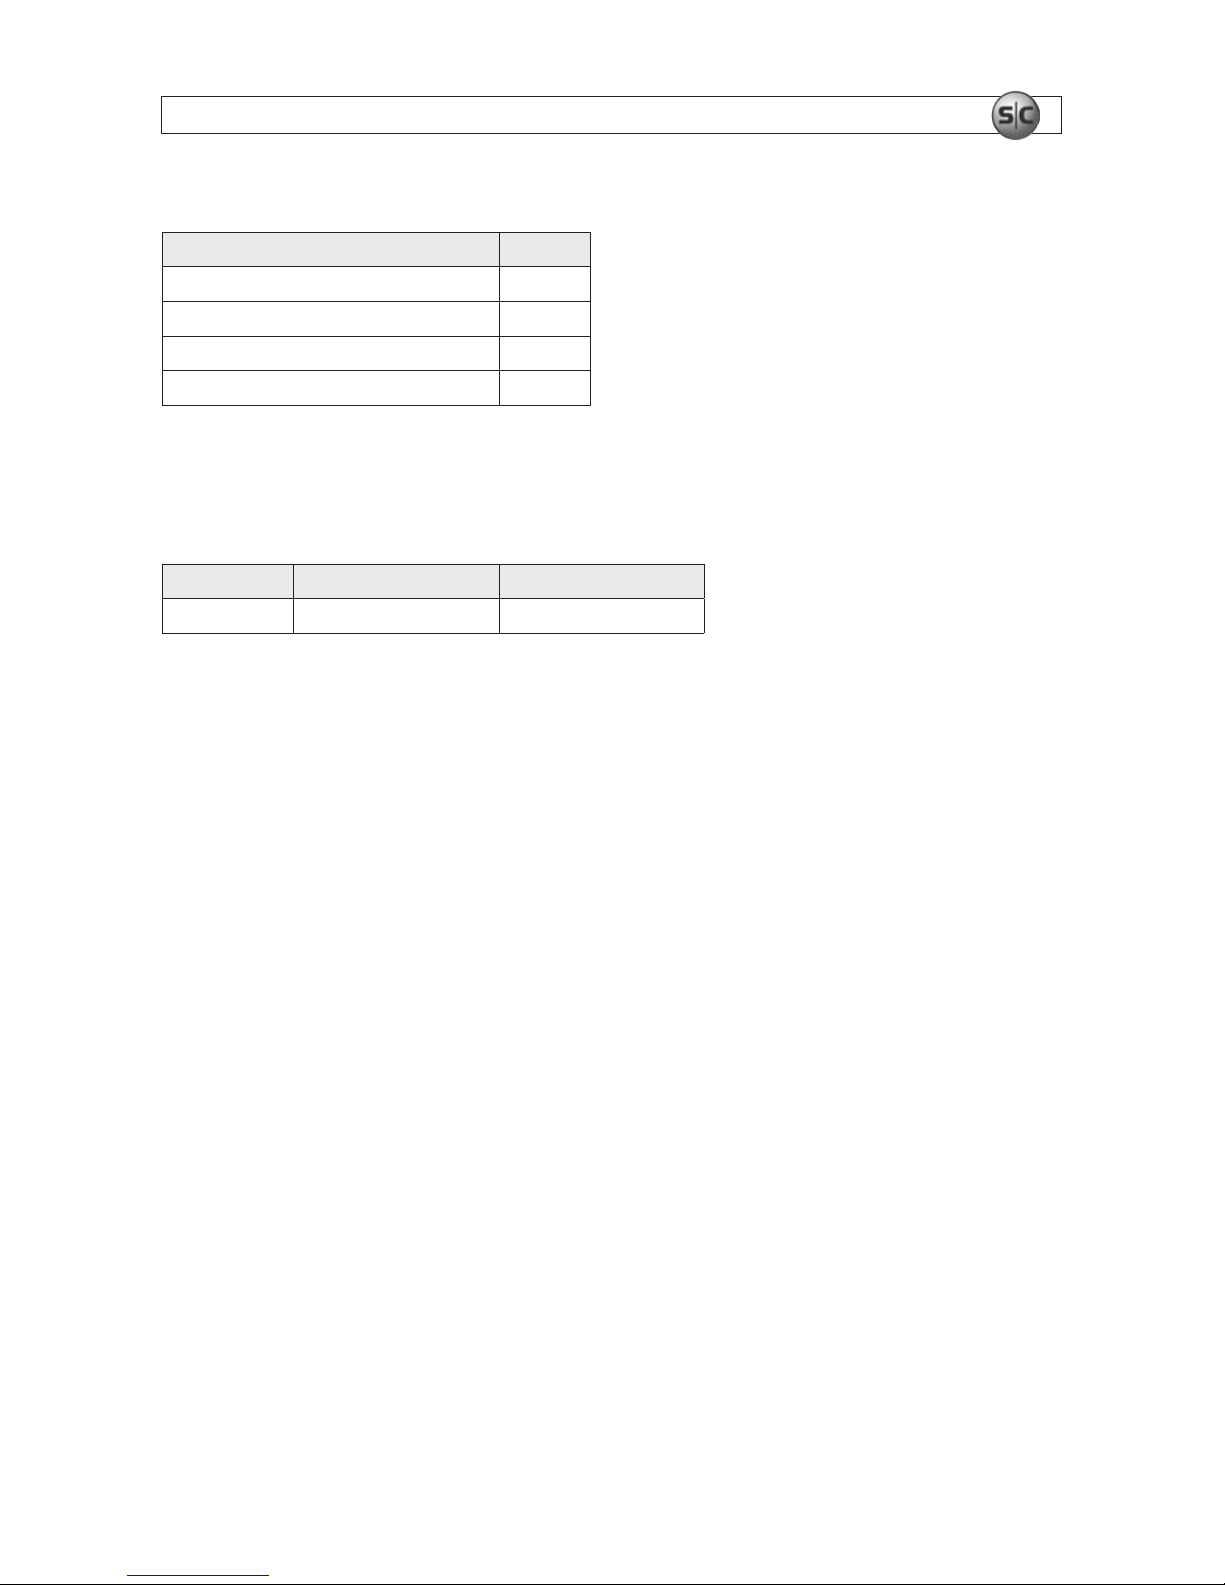
Table 3. Supported audio le formats
File Format
MPEG1 layer 3 version 1.2/2.5 stereo Yes
MPEG1 layer 3 version 1.2/2.5 joint stereo Yes
WMA (64 ~ 320 kbps) Yes
WAV Yes
Video les support WMA and WAV audio formats only.
Table 4. Supported image le formats
File Format Baseline encoding Progressive encoding
JPG Lower than 4096 x 4096 Lower than 1024 x 1024
 Loading...