

Page 1
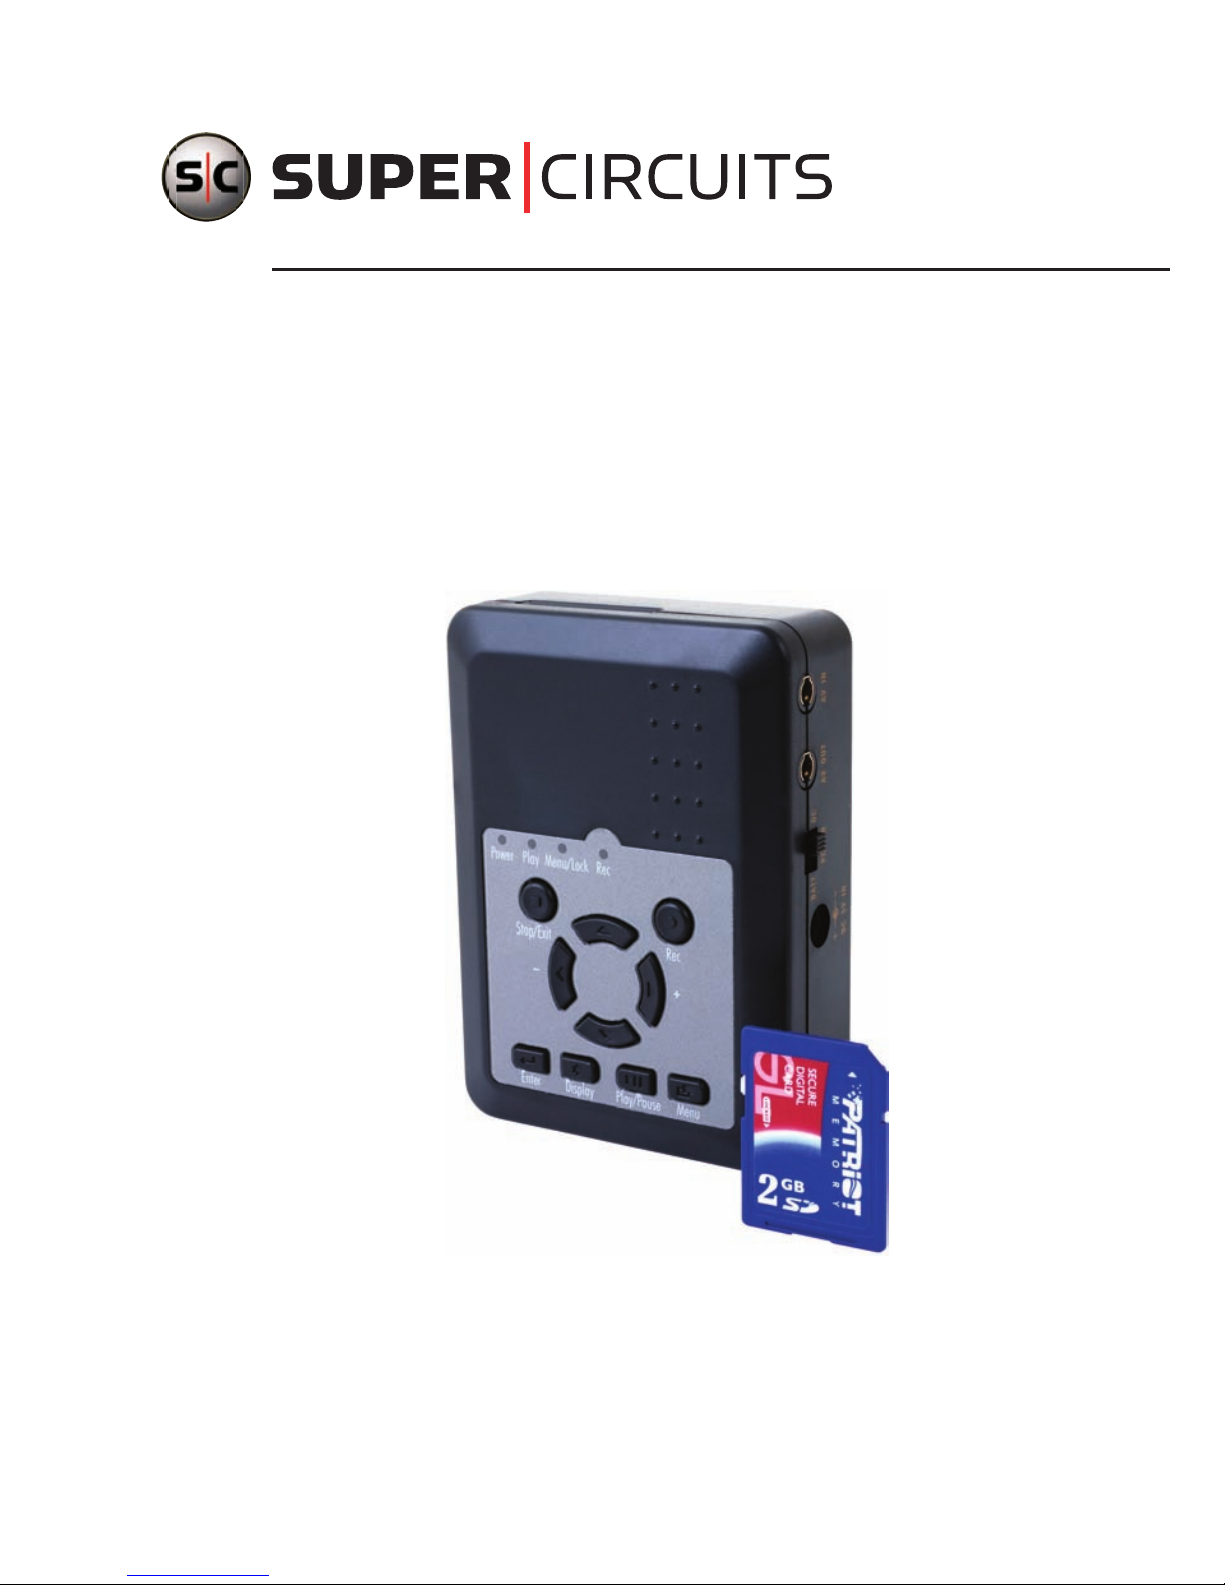
Mini Security Recorder
User Manual
Product: MDVR14
Please read this manual before using your recorder, and always follow the
instructions for safety and proper use. Save this manual for future reference.
LE_MDVR14_RM
Page 2
ii
www.supercircuits.com
CAUTION
Operate this recorder only in environments where the temperature is within the recommended
range, 41°F ~ 113°F. Operation in extreme temperatures or humidity may cause electric shock
and shorten the life of the product.
CAUTION
Do not drop the product or subject it to strong shocks. And never expose the product to long
periods of strong light. Otherwise, malfunctions may occur.
CAUTION
Do not spill liquid of any kind on the product. If it gets wet, wipe it dry immediately. Alcohol
and other beverages can contain minerals that corrode the electronic components.
LEGAL NOTICE
Supercircuits products are designed to meet safety and performance standards with the use of specic
Supercircuits authorized accessories. Supercircuits disclaims liability associated with the use of nonSupercircuits authorized accessories.
The recording, transmission, or broadcast of any person’s voice without their consent or a court order is
strictly prohibited by law.
Supercircuits makes no representations concerning the legality of certain product applications such as
the making, transmission, or recording of video and/or audio signals of others without their knowledge
and/or consent. We encourage you to check and comply with all applicable local, state, and federal laws
and regulations before engaging in any form of surveillance or any transmission of radio frequencies.
Other trademarks and trade names may be used in this document to refer to either the entities claiming
the marks and names or their products. Supercircuits, Inc. disclaims any proprietary interest in
trademarks and trade names other than its own.
No part of this document may be reproduced or distributed in any form or by any means without the
express written permission of Supercircuits, Inc.
© 2010 Supercircuits, Inc. All rights reserved.
11000 N. Mopac Expressway, Building 300, Austin, TX 78759
Sales/Support: 1.800.335.9777 | Fax: 1.866.267.9777
Page 3

iiiMini Security Recorder User Manual
Table of Contents
SECTION 1 Features . . . . . . . . . . . . . . . . . . . . . . . . . . . . . . . . . . . . . . . . . . . . . . . . . . . . . . . 1
1.1 System Configuration . . . . . . . . . . . . . . . . . . . . . . . . . . . . . . . . . . . . . . . . 1
1.2 Front panel buttons and indicators . . . . . . . . . . . . . . . . . . . . . . . . . . . . . . . 2
1.3 Side panel components . . . . . . . . . . . . . . . . . . . . . . . . . . . . . . . . . . . . . . . 3
1.4 SD card slot . . . . . . . . . . . . . . . . . . . . . . . . . . . . . . . . . . . . . . . . . . . . . . . . 3
SECTION 2 Installation and Setup . . . . . . . . . . . . . . . . . . . . . . . . . . . . . . . . . . . . . . . . . . . . 4
2.1 What’s in the box . . . . . . . . . . . . . . . . . . . . . . . . . . . . . . . . . . . . . . . . . . . . 4
2.2 What you need . . . . . . . . . . . . . . . . . . . . . . . . . . . . . . . . . . . . . . . . . . . . . . 4
2.3 Installation and power on . . . . . . . . . . . . . . . . . . . . . . . . . . . . . . . . . . . . . . 4
2.4 Configuration menus . . . . . . . . . . . . . . . . . . . . . . . . . . . . . . . . . . . . . . . . . 5
SECTION 3 Operation . . . . . . . . . . . . . . . . . . . . . . . . . . . . . . . . . . . . . . . . . . . . . . . . . . . . . 16
3.1 Live mode . . . . . . . . . . . . . . . . . . . . . . . . . . . . . . . . . . . . . . . . . . . . . . . . 16
3.2 Record mode . . . . . . . . . . . . . . . . . . . . . . . . . . . . . . . . . . . . . . . . . . . . . . 17
3.3 Playback mode . . . . . . . . . . . . . . . . . . . . . . . . . . . . . . . . . . . . . . . . . . . . . 18
3.4 Playback using a PC . . . . . . . . . . . . . . . . . . . . . . . . . . . . . . . . . . . . . . . . . 20
3.5 SC card maintenance . . . . . . . . . . . . . . . . . . . . . . . . . . . . . . . . . . . . . . . . 21
3.6 Firmware updates . . . . . . . . . . . . . . . . . . . . . . . . . . . . . . . . . . . . . . . . . . 22
SECTION 4 Specifications . . . . . . . . . . . . . . . . . . . . . . . . . . . . . . . . . . . . . . . . . . . . . . . . . . 23
Page 4
1Mini Security Recorder User Manual
SECTION 1
Features
The MDVR14 is a solid-state audio and video digital video recorder in a cigarette-size package. It is an
ideal recording device for covert concealment in objects. Features include:
• Support for 1 video channel and 1 audio channel for recording and playback
• Audio and video data recorded directly to an SD card
• Audio and video data are recorded in ASF le format, playable with popular media players
• Record time is about 5 hours for 352 x 240 @ 30 fps with a 1 GB SD card.
• Supports manual, motion detection, and schedule recording modes with independent video size,
quality, and frame rate. Motion detection recording supports multiple detection blocks and motion
trigger levels.
• Supports key-lock functions
• Video loss detection
• Contains MPEG4-SP video and G.726 audio codecs
• Use with a DC power adaptor, or nickel metal hydride (NiMH) or alkaline batteries
1.1 System Conguration
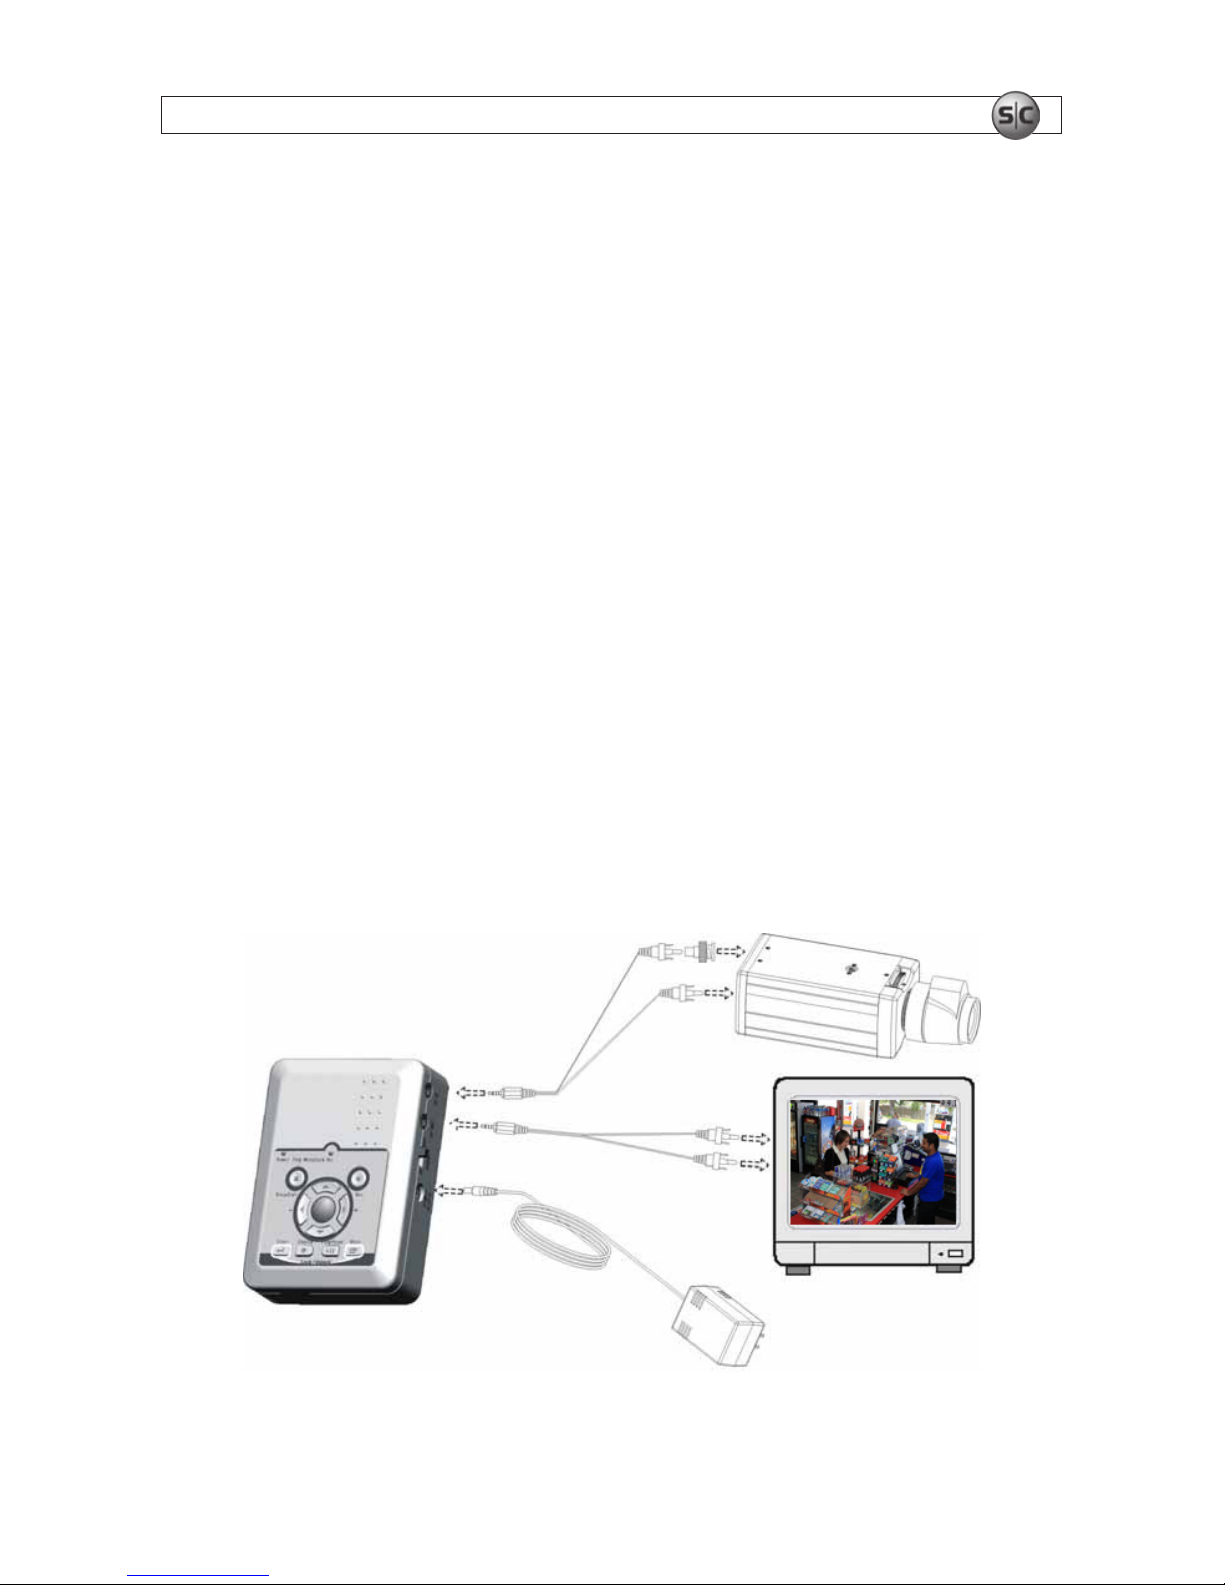
The MDVR14 connects video from a CCTV camera to a monitor, and can be triggered in several different
ways to record video and audio to an SD card. A basic system consists of the MDVR14 with a camera,
monitor, power adapter (or batteries), and interconnecting cables.
SECTION 1: FEATURES
Page 5
2
www.supercircuits.com
1.2 Front panel buttons and indicators
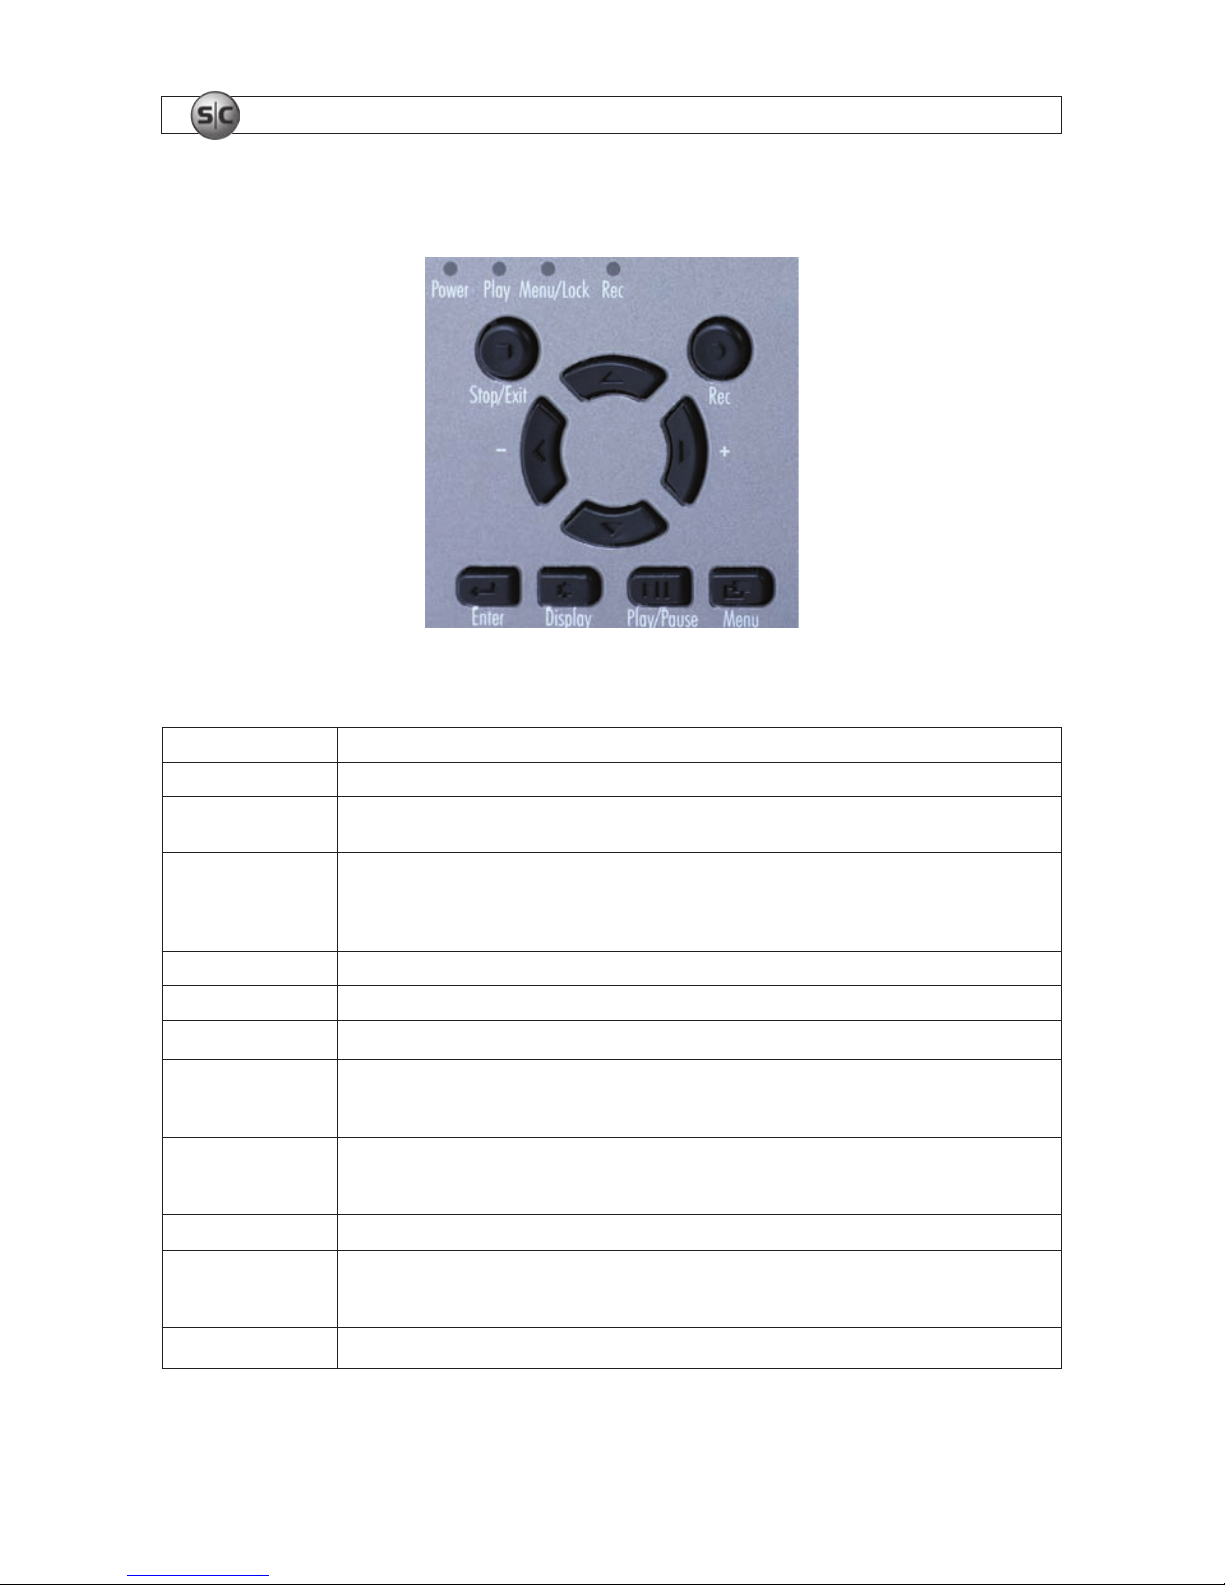
Table 1. Front panel keys and indicators
Power LED The unit is powered on.
Play LED The unit is in Play mode.
Menu/Lock LED
LED is lit when the key lock function is ON. Press Menu and Enter together to switch the key lock
function ON and OFF.
Rec LED
When the SD card is writing data during recording, the Rec indicator ashes slowly. When the SD card
is switched to “read only”, the recording function is disabled and the Rec indicator ashes quickly.
If attempting to record when an SD card is not inserted, is full, damaged, or locked (in read-only mode)
the Play LED, Menu/Lock LED, and Rec LED ash quickly. Press Enter to clear the indication.
Stop/Exit button Stop recording or playback and exit menu.
Rec button Press to start manual recording.
p and q buttons
Move cursor up and down in menus or increment/decrement the value of conguration options.
t / – and u / +
buttons
During Playback – press to fast rewind and fast forward. Press repeatedly to speed back or forward
During pause – press to step back or step forward one frame at a time.
Menu mode – press to change selected option
8 Enter button
Menu – press to enter a submenu
Press to release a warning indication.
During monitoring or playback, pressed with the Menu button to switch key lock function ON or OFF.
V Display button
Display Status line ON /OFF
}; Play/Pause
button
During Monitoring – press for playback
During Playback – press for pause
During Pause – press for playback
2 Menu button
Press to enter menu setup mode.
SECTION 1: FEATURES
Page 6
3Mini Security Recorder User Manual
SECTION 1: FEATURES
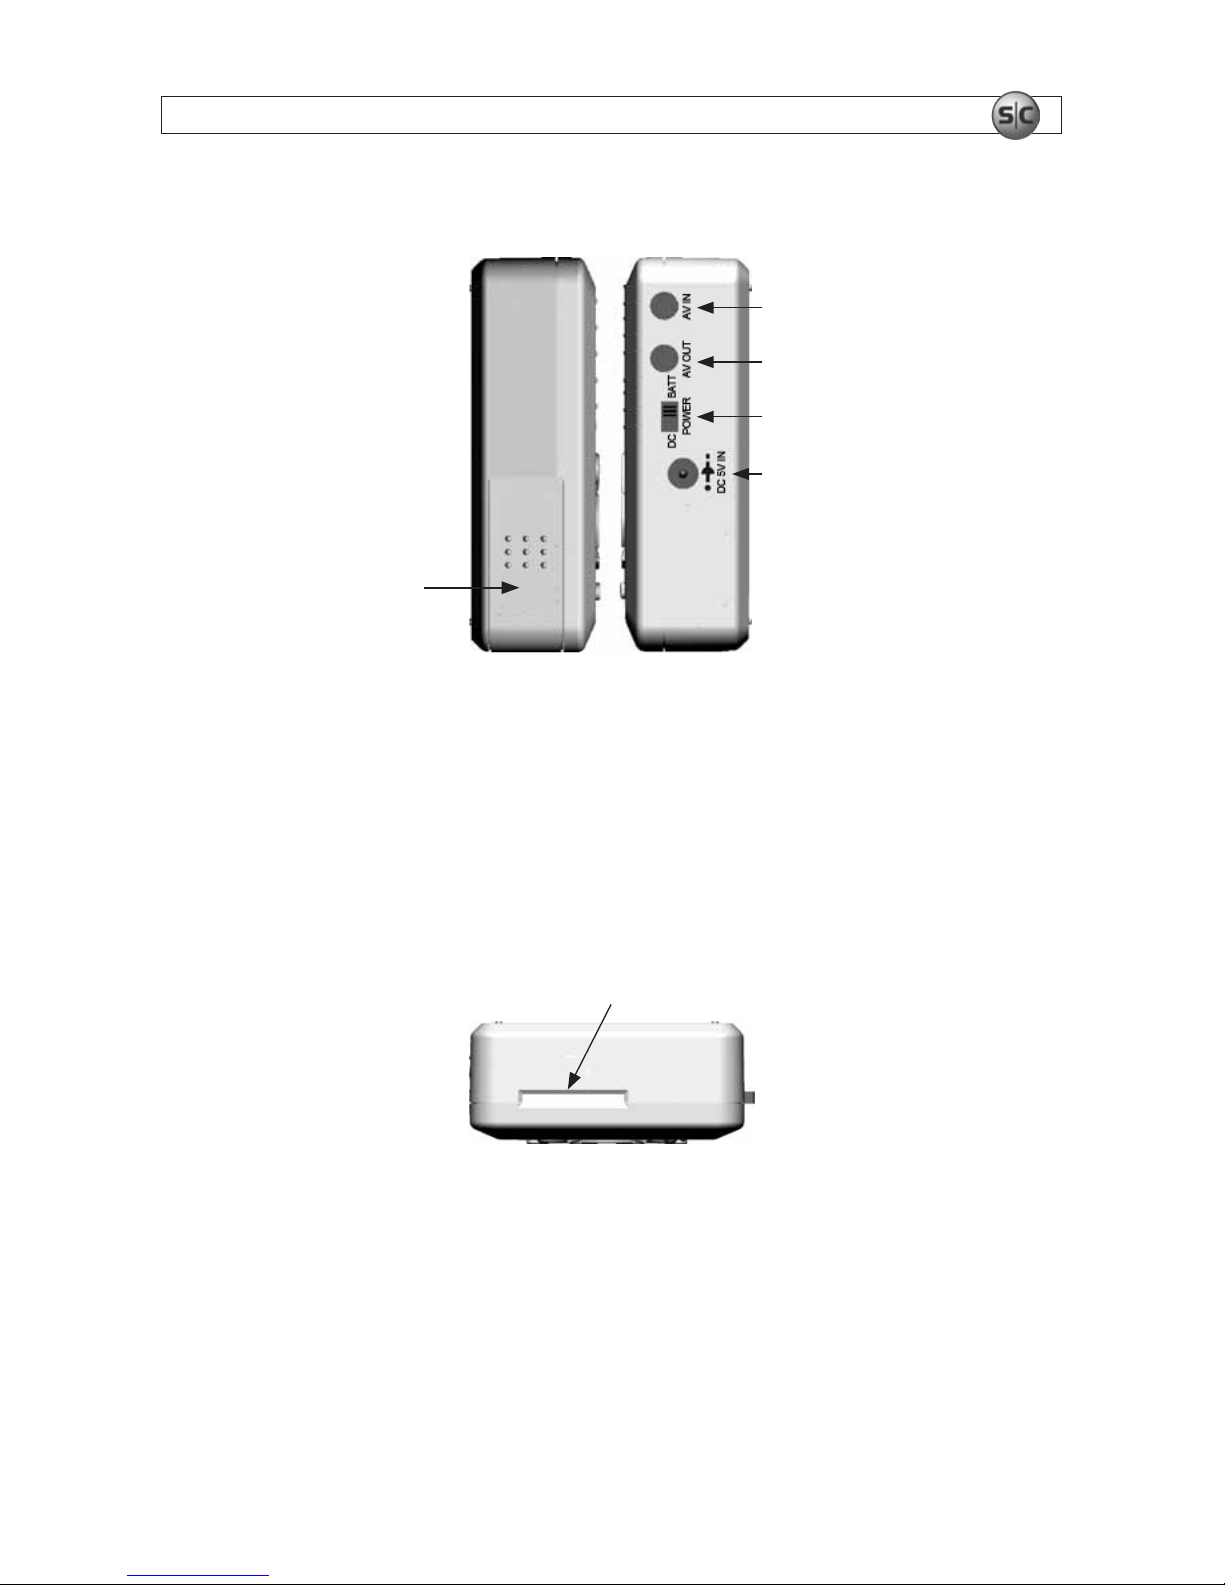
1.3 Side panel components
AV IN
Battery
Compartment
DC/BATT
Switch
AV OUT
DC 5V IN
Adapter
Input
The AV IN and AV OUT jacks require cables with a stereo mini-plug.
The DC 5V IN jack is used with the DC power adapter. When using a power adapter set the DC/BATT
switch to DC.
1.4 SD card slot
The SD card slot is located at the top of the recorder. An SD card is required for recording.
SD Card Slot
Page 7

4
www.supercircuits.com
SECTION 2: INSTALLATION AND SETUP
SECTION 2
Installation and Setup
2.1 What’s in the box
Your recorder includes the following:
• Mini DVR recorder
• A/V cables (2)
• DC power adapter
• User manual (this document)
• Quick installation guide
2.2 What you need
To install the recorder, you will need:
• CCTV camera
• Video monitor with audio (if audio is used)
• SD memory card ≥ 256 MB for recording
• 2 AA batteries, nickel metal hydride (Ni-MH rechargeable) or alkaline, if powering the recorder with
batteries
2.3 Installation and power on
1. Insert a standard SD card with a capacity of 256 MB or larger into the card slot on the top of the
recorder. Push the card in until it locks into place.
2. Plug an A/V cable (provided) into the AV OUT jack on the DVR, then attach it to an A/V monitor.
When plugging the cable into the monitor, connect the yellow RCA connector into the video input,
and the white RCA connector to the audio input.
3. Plug an A/V cable (provided) into the AV IN connector on the recorder, then attach it to a CCTV
camera.
When plugging the cable into the camera, connect the yellow RCA connector to the video output,
and the white RCA connector to the audio output. An (RCA to BNC) adapter may be required to
attach the camera video output to the cable.
Page 8
5Mini Security Recorder User Manual
SECTION 2: INSTALLATION AND SETUP
4. Attach the power source to the DVR:
If you are powering the recorder with the DC power adapter:
a. Plug the DC power adapter into the DC 5V IN connector on the side of the recorder, then plug
the adapter into a 120 V AC outlet.
b. Set the DC/BATT switch to DC.
If powering the recorder with batteries:
a. Open the battery compartment on the side of the DVR and install 2 AA batteries in the
orientation indicated. Close the battery cover.
b. Set the POWER switch to BATT.
5. Power on the camera and the A/V monitor.
5. After the recorder initializes, it enters live monitoring mode. If the recorder was congured to record
at that time, it enters recording mode.
NOTE
During power-on, the system auto-detects its peripherals and tests the SD card for le
errors. During SD card testing, the Rec LED ashes. When an image le error is detected,
the system automatically attempts to repair the problem.
NOTE
If the SD card is not inserted during power up, or the card has a serious problem, the Play,
Menu, and Rec indicators will ash. If a card was installed, try reformatting the card to
resolve the problem.
CAUTION
Do not remove the SD card while the recorder is booting. It may destroy the data stored
on the card.
2.4 Conguration menus
NOTE
Depending on the rmware version loaded into your DVR, the screens may appear different from
those shown below.
Page 9
6
www.supercircuits.com
SECTION 2: INSTALLATION AND SETUP
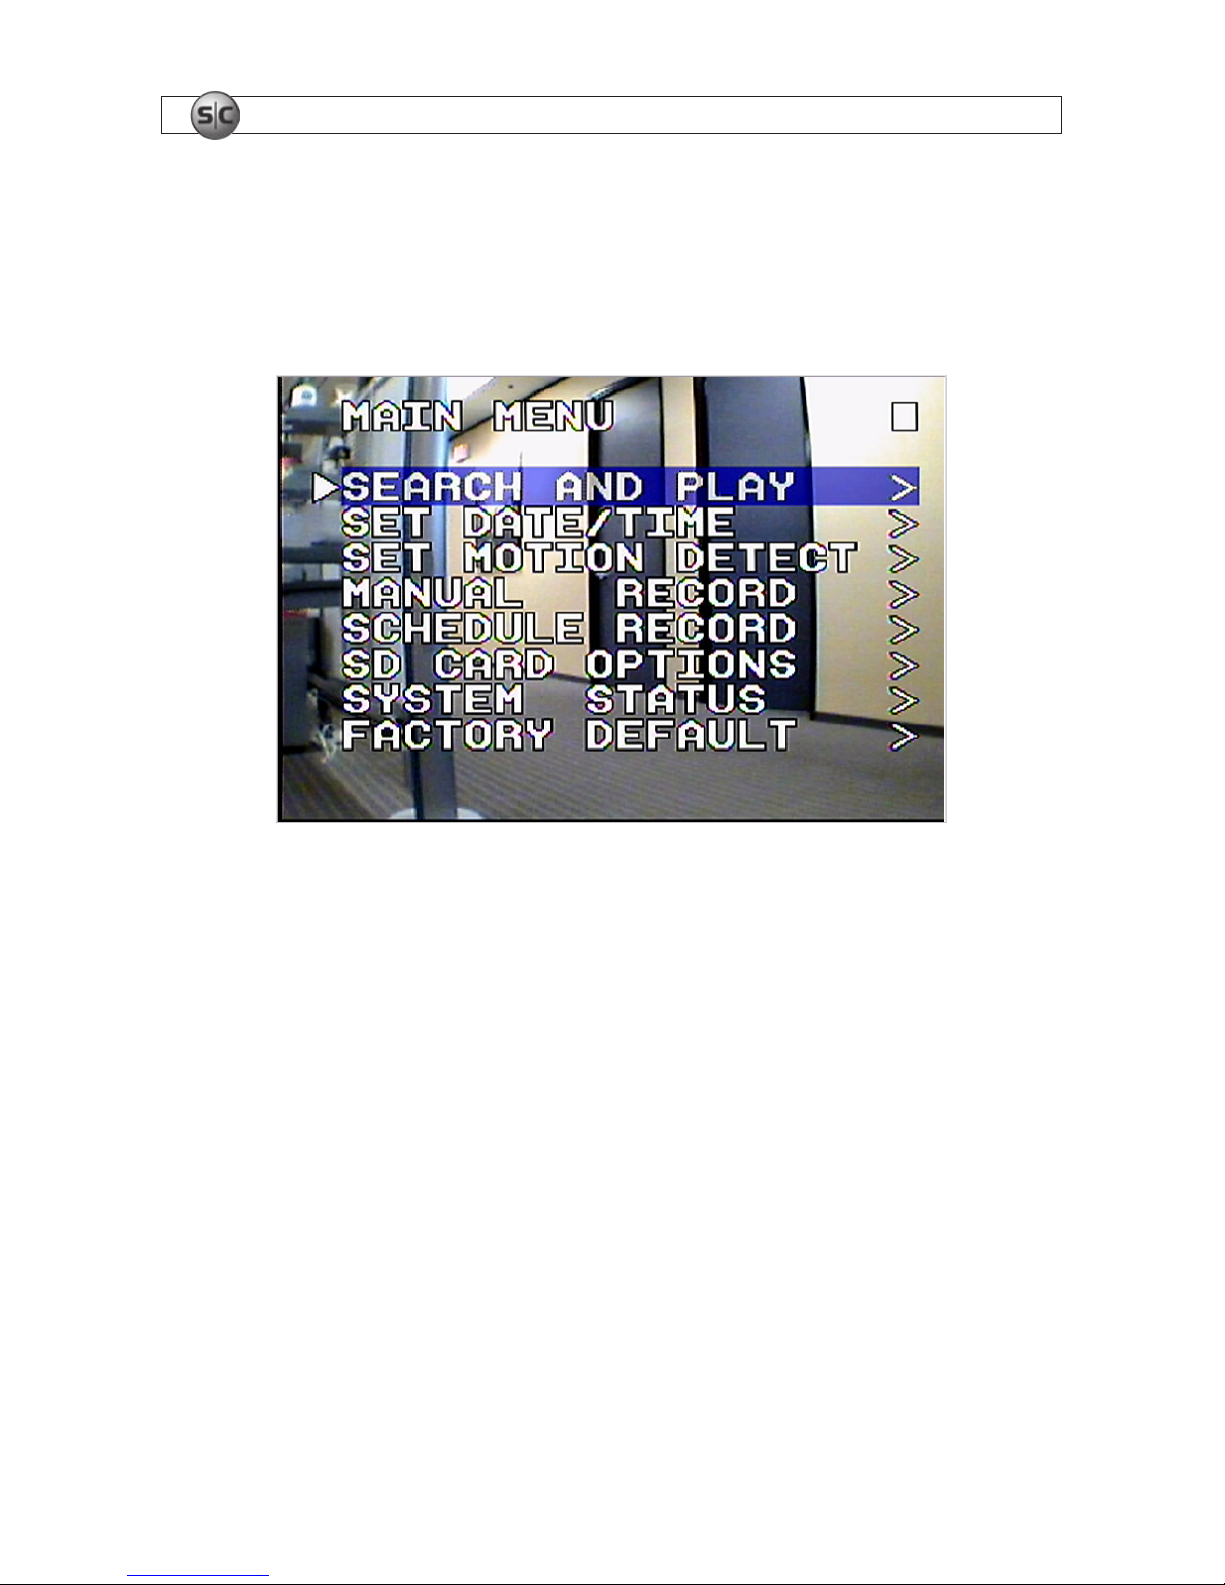
2.4.1 MAIN MENU
When in Live (camera monitoring) mode, press the Menu button to open the MAIN MENU screen.
From the MAIN MENU screen, you can access submenus to congure the date and time settings, video
recording quality, setup automated, and other functions.
You can navigate through and setup the conguration of the DVR using the controls on the DVR front
panel as follows:
Press p and q to move the highlight (select) bar up or down, or increment or decrement the value
of a numeric conguration option.
Press t and u to select a non-numeric conguration option. For example, when selecting the
video quality with which to record, use these keys to choose between Low, Medium, or High.
Press Menu or Enter to open a submenu.
Press Stop/Exit to move to the previous menu from a submenu. Pressing Stop/Exit when in the
MAIN MENU goes to Live Mode.
Refer to Table 1 for the function and use of other front panel controls.
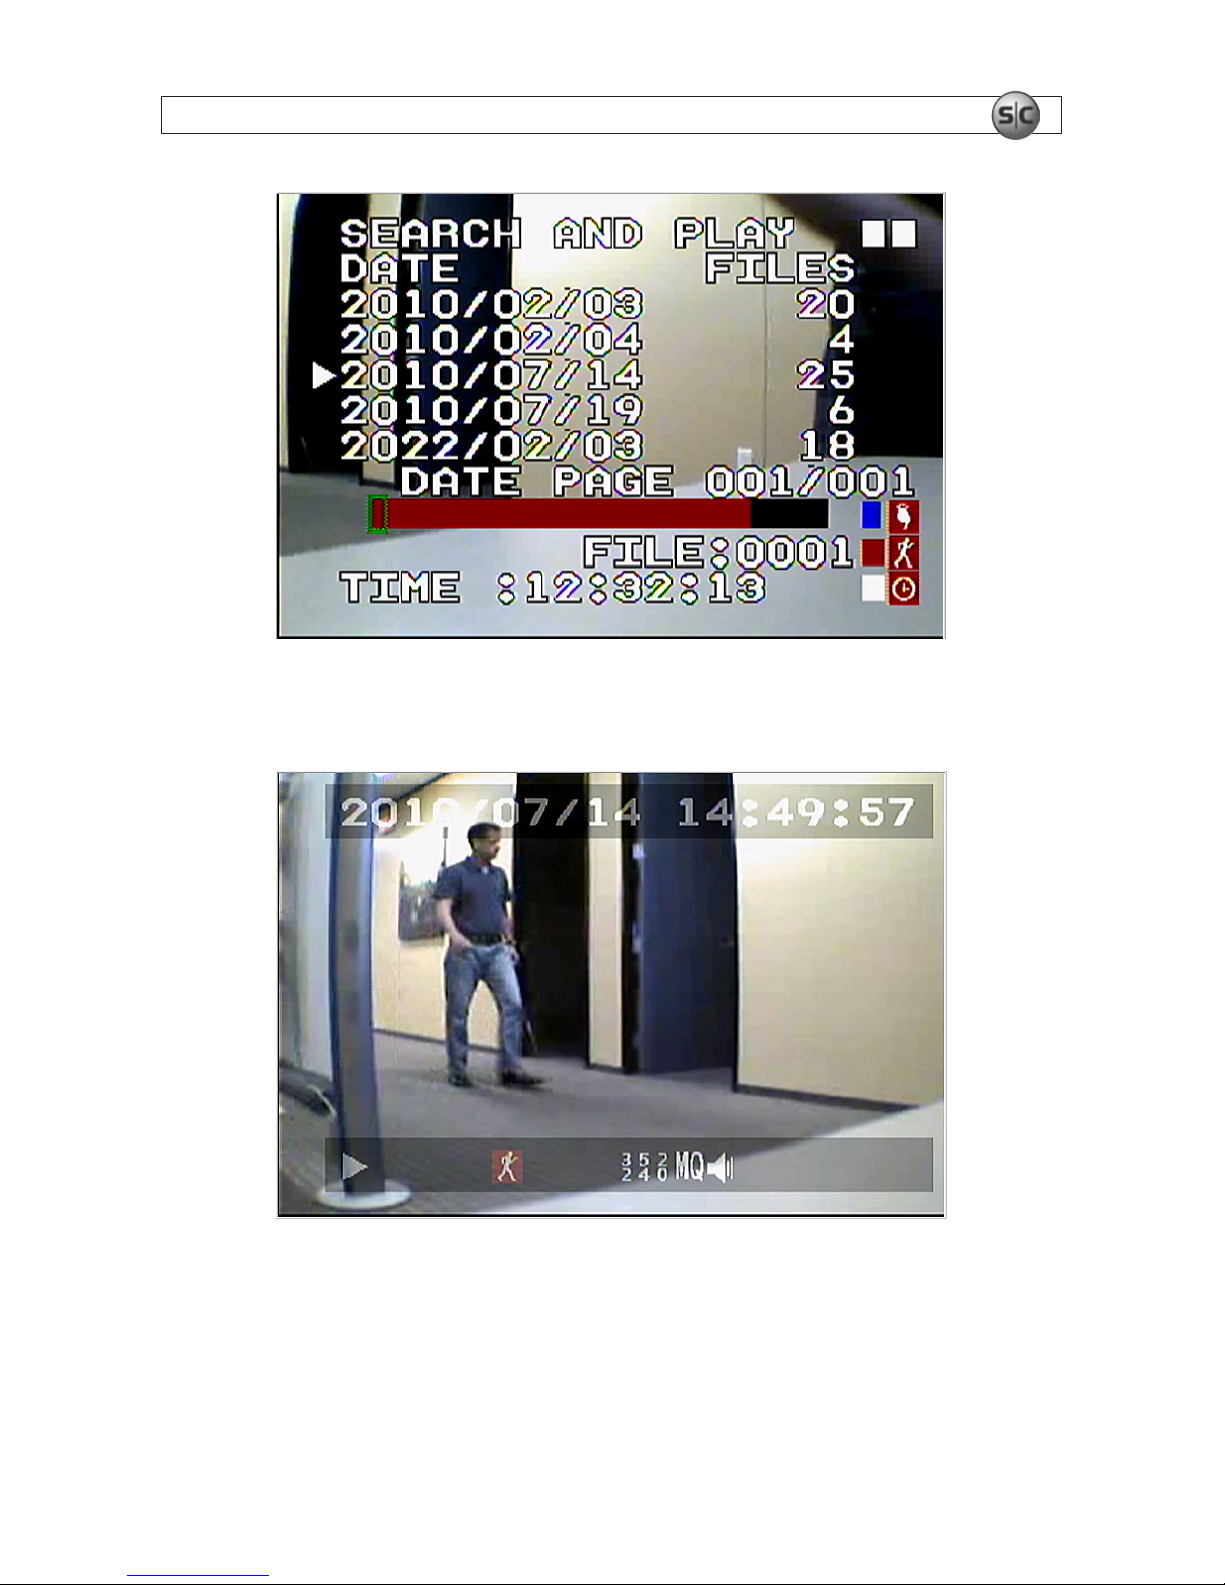
2.4.2 Search and Play
The SEARCH AND PLAY screen provides one way to view recordings saved on the SD card. The
background shown on this screen is an image from the recording selected. Use the q and p keys to
select the date a recording was saved; use the q and p keys to choose the le recorded on that day.
Page 10
7Mini Security Recorder User Manual
SECTION 2: INSTALLATION AND SETUP
After selecting the le to watch, press Enter. To stop playing the recording and return to the SEARCH
AND PLAY screen, press Stop/Exit.
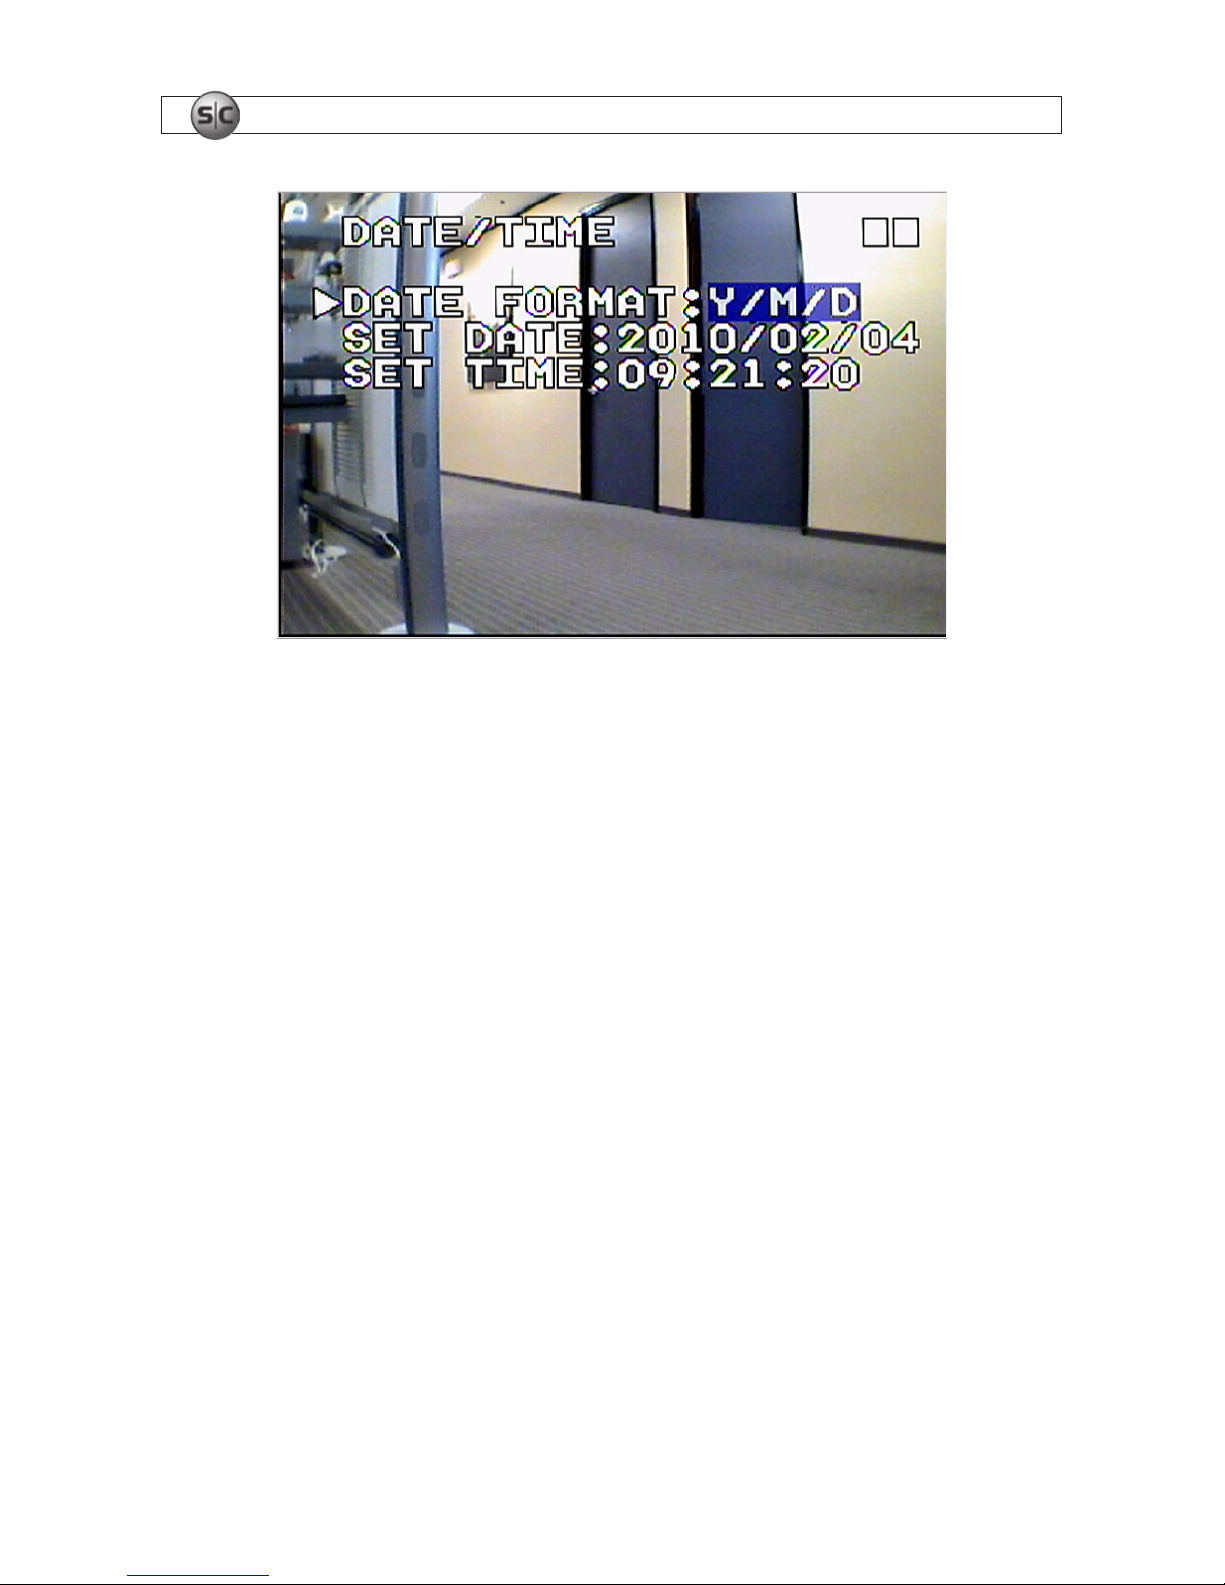
2.4.3 Set Date/Time
Setting the date and time in the DVR is essential for recording video with an meaningful timestamp.
Timestamp detail is used to identify saved video les.
Page 11
8
www.supercircuits.com
SECTION 2: INSTALLATION AND SETUP
In the DATE FORMAT eld, select either Y/M/D, M/D/Y, or D/M/Y.
The SET DATE format reects the DATE format option chosen.
The SET TIME eld is in the format hh : mm : ss, where hh is 00 ~ 23 hours.
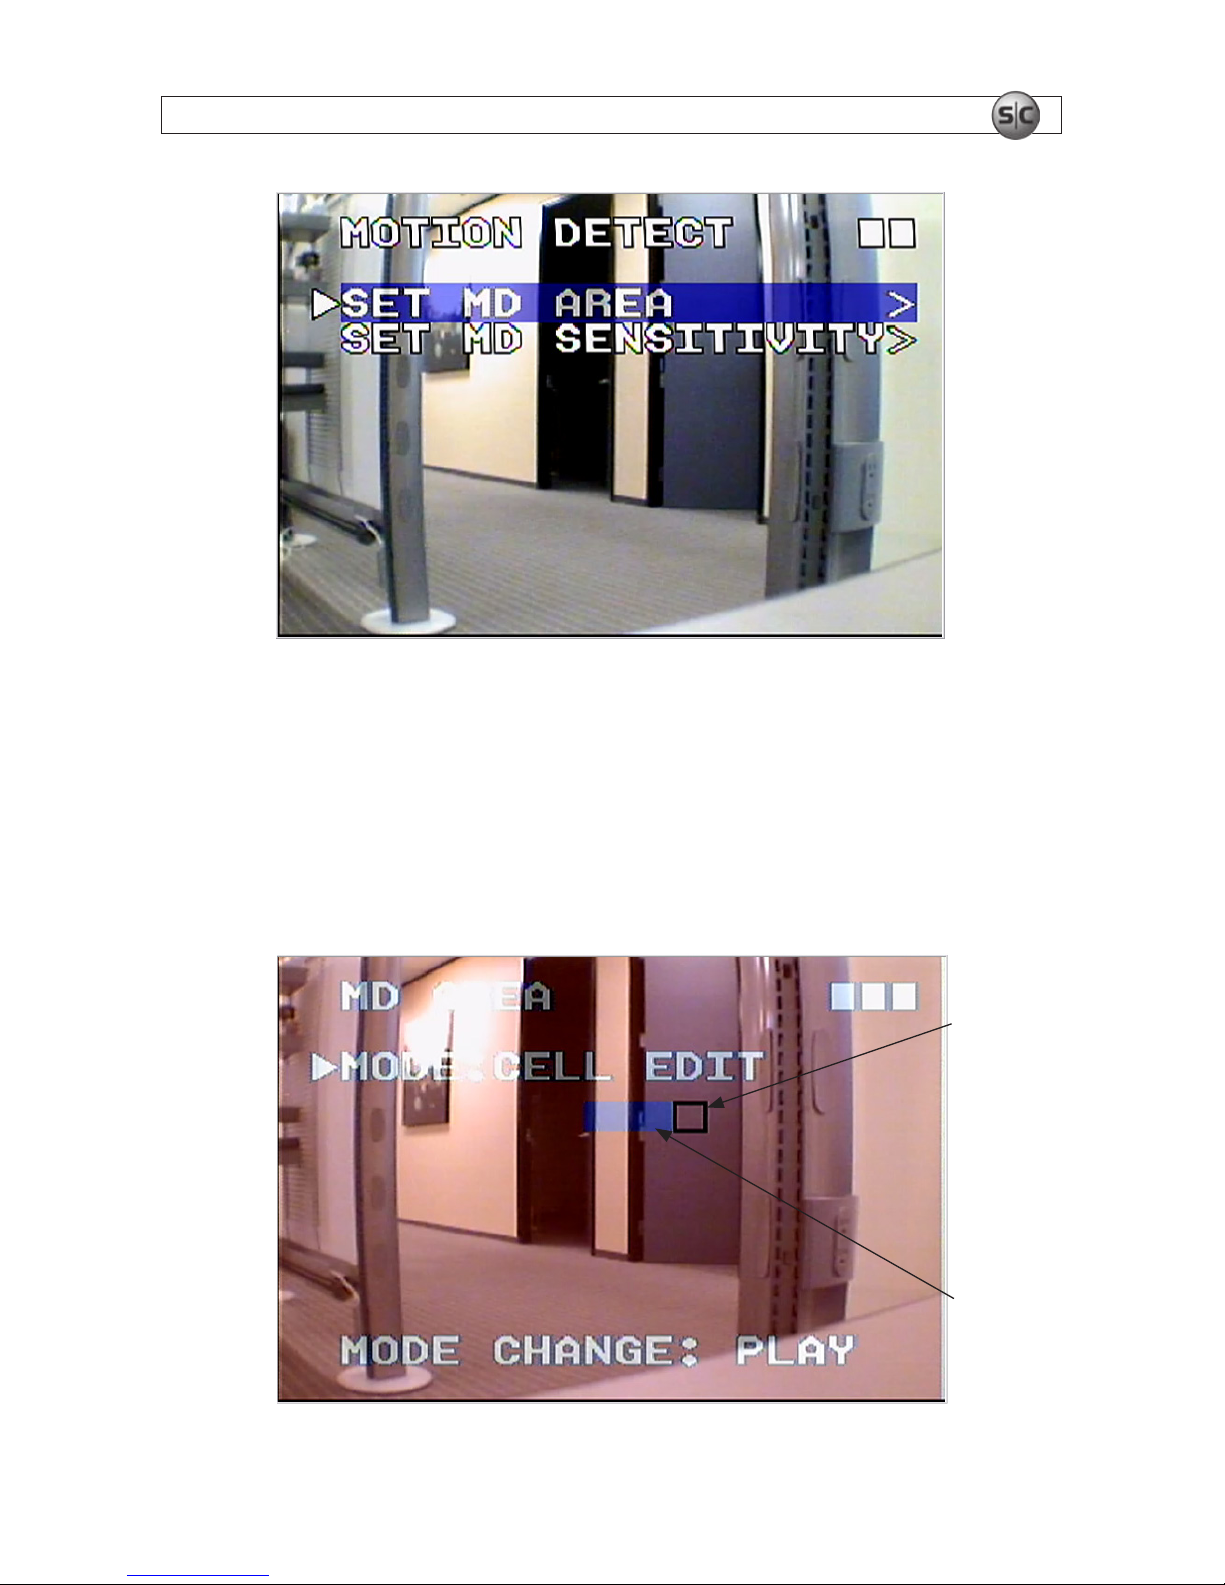
2.4.4 Set Motion Detect
The MOTION DETECT screen includes links to two submenus, one to dene where motion will be
detected (SET MD AREA), and the other to set the motion detection sensitivity.
Page 12
9Mini Security Recorder User Manual
SECTION 2: INSTALLATION AND SETUP
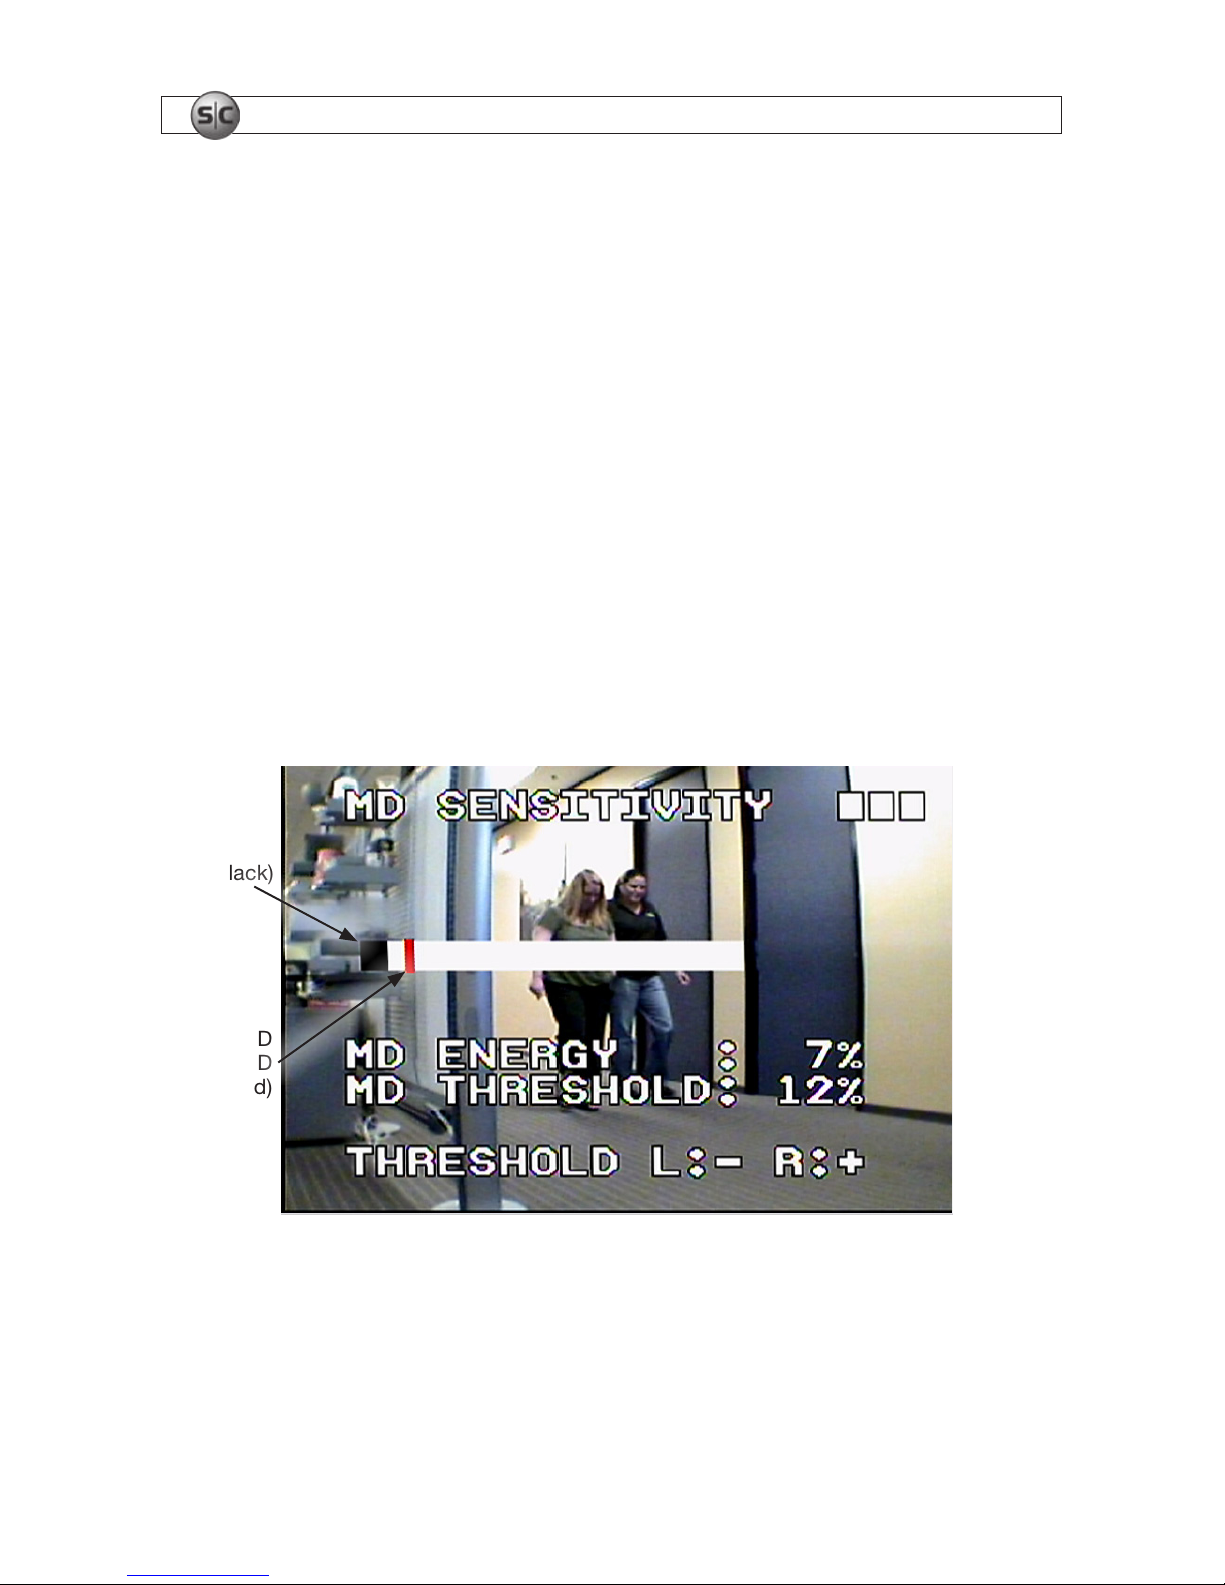
MD AREA
The MD AREA screen is divided into a 22 x 15 array of cells, each of which can be enabled or disabled
to sense for motion. Two or more cells can form a block, which can be added or deleted and enabled or
disabled for motion detection.
Initially, the MD AREA screen is congured to enable motion detection in every cell. Cells enabled for
motion detection appear with a reddish tint. Cells where motion detection is disabled are tinted blue.
Deselected
Cells
Cursor
Position
Page 13
10
www.supercircuits.com
SECTION 2: INSTALLATION AND SETUP
On the MD AREA screen, press Play/Pause to select a mode for enabling or disabling cells to monitor
for motion. A pop-up menu will open:
CELL EDIT – for enabling/disabling motion detection in one cell at a time.
DEL BLOCK – disables a block that was previously congured for motion detection.
DEL ALL – disables all cells for motion detection.
ADD BLOCK – enables a block for motion detection
ADD ALL – enables motion detection in all cells
Use the p, q, u, and t buttons to select a cell, and press Enter to select or deselect the cell for
monitoring.
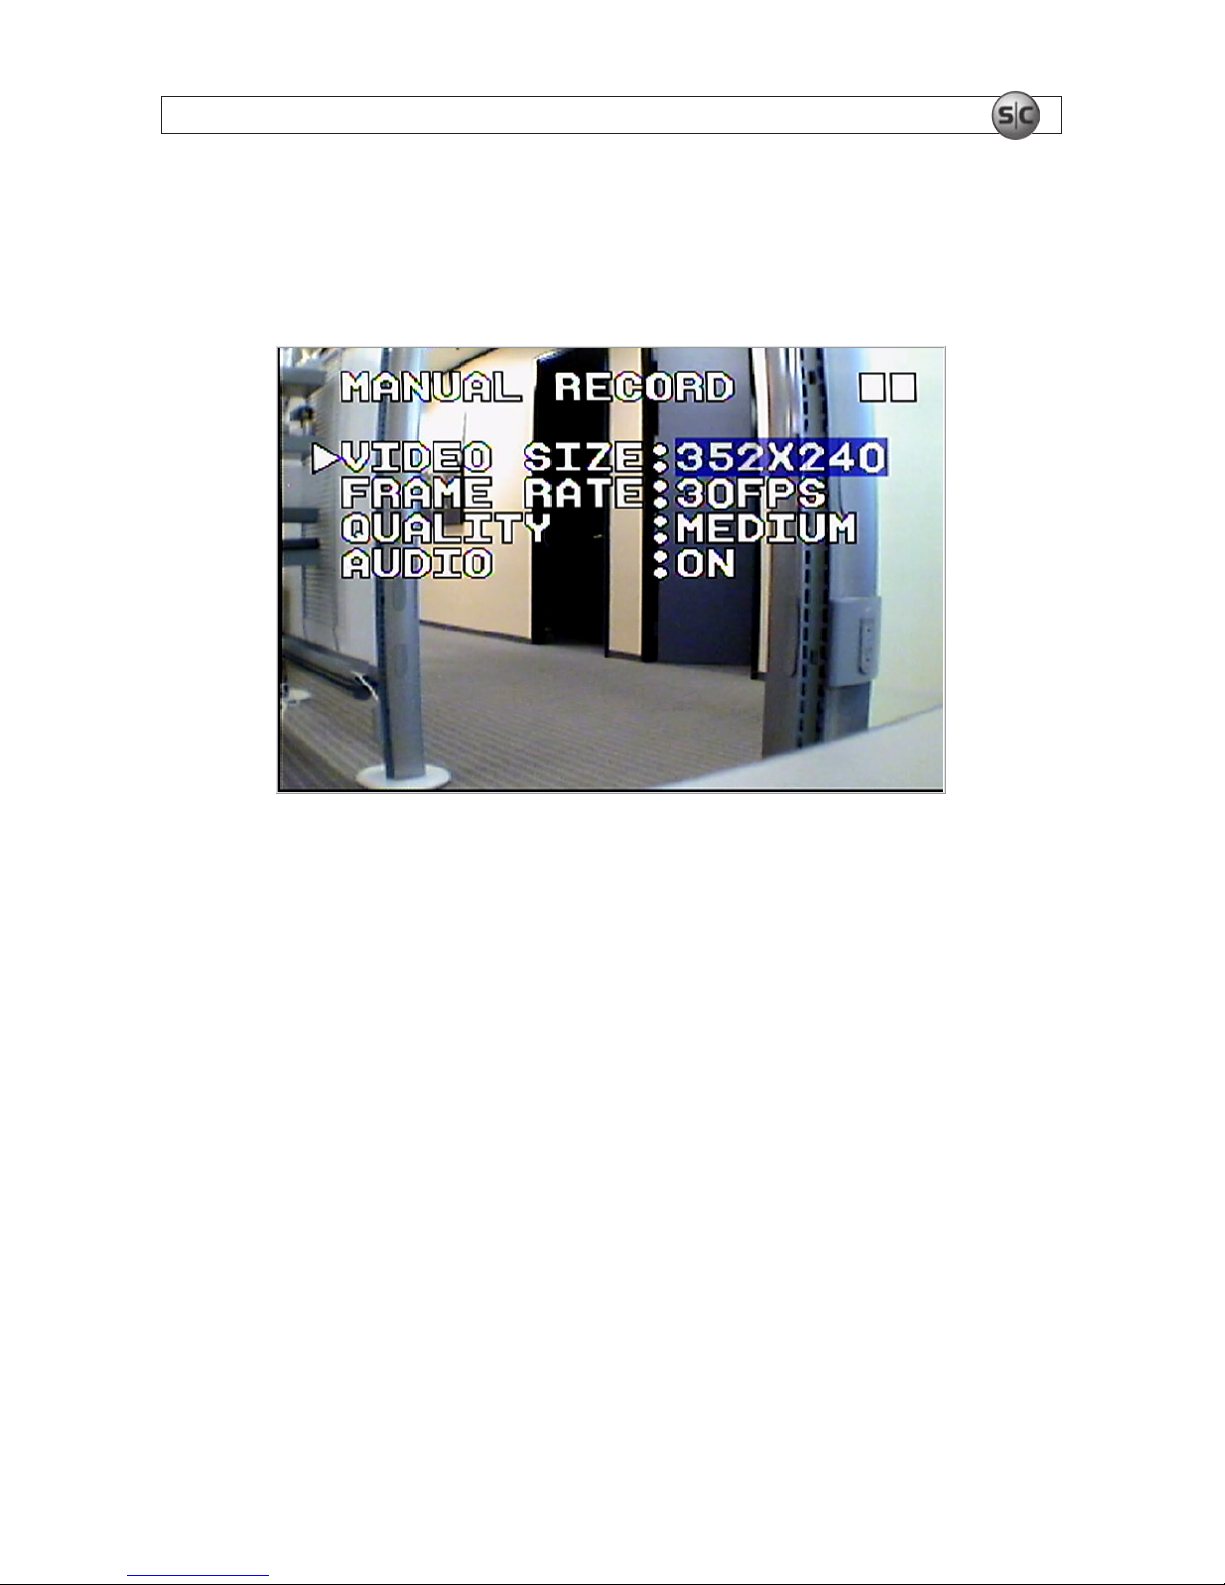
MD SENSITIVITY
The MD SENSITIVITY screen allows you to adjust the energy threshold at which recording is triggered
when motion is detected within the cells enabled for motion detection. Using this feature, you to setup
the DVR to ignore small objects moving through the cell eld (low MD ENERGY level), and detect and
record when large objects are moving there.
MD ENERGY
Level (Black)
MD
THRESHOLD
Marker (Red)
On the MD SENSITIVITY screen, the MD ENERGY value is a measure of how much motion is detected.
The MD THRESHOLD is adjusted using the u (+) and t (–) keys. Recording is triggered when the MD
ENERGY level exceeds the MD THRESHOLD.
Page 14
11Mini Security Recorder User Manual
SECTION 2: INSTALLATION AND SETUP
2.4.5 Manual Record
The MANUAL RECORD menu is used to preset the record options implemented when recording is
initiated by pressing the Rec (record) button.
The VIDEO SIZE option determines the maximum FRAME RATE. For:
VIDEO SIZE = 352 x 240, FRAME RATE (max) = 30 FPS
VIDEO SIZE = 704 x 240, FRAME RATE (max) = 24 FPS
VIDEO SIZE = 704 x 480, FRAME RATE (max) = 12 FPS
Image QUALITY is selectable as LOW (LQ), MEDIUM (MQ) and HIGH (HQ).
AUDIO can be either ON or OFF.
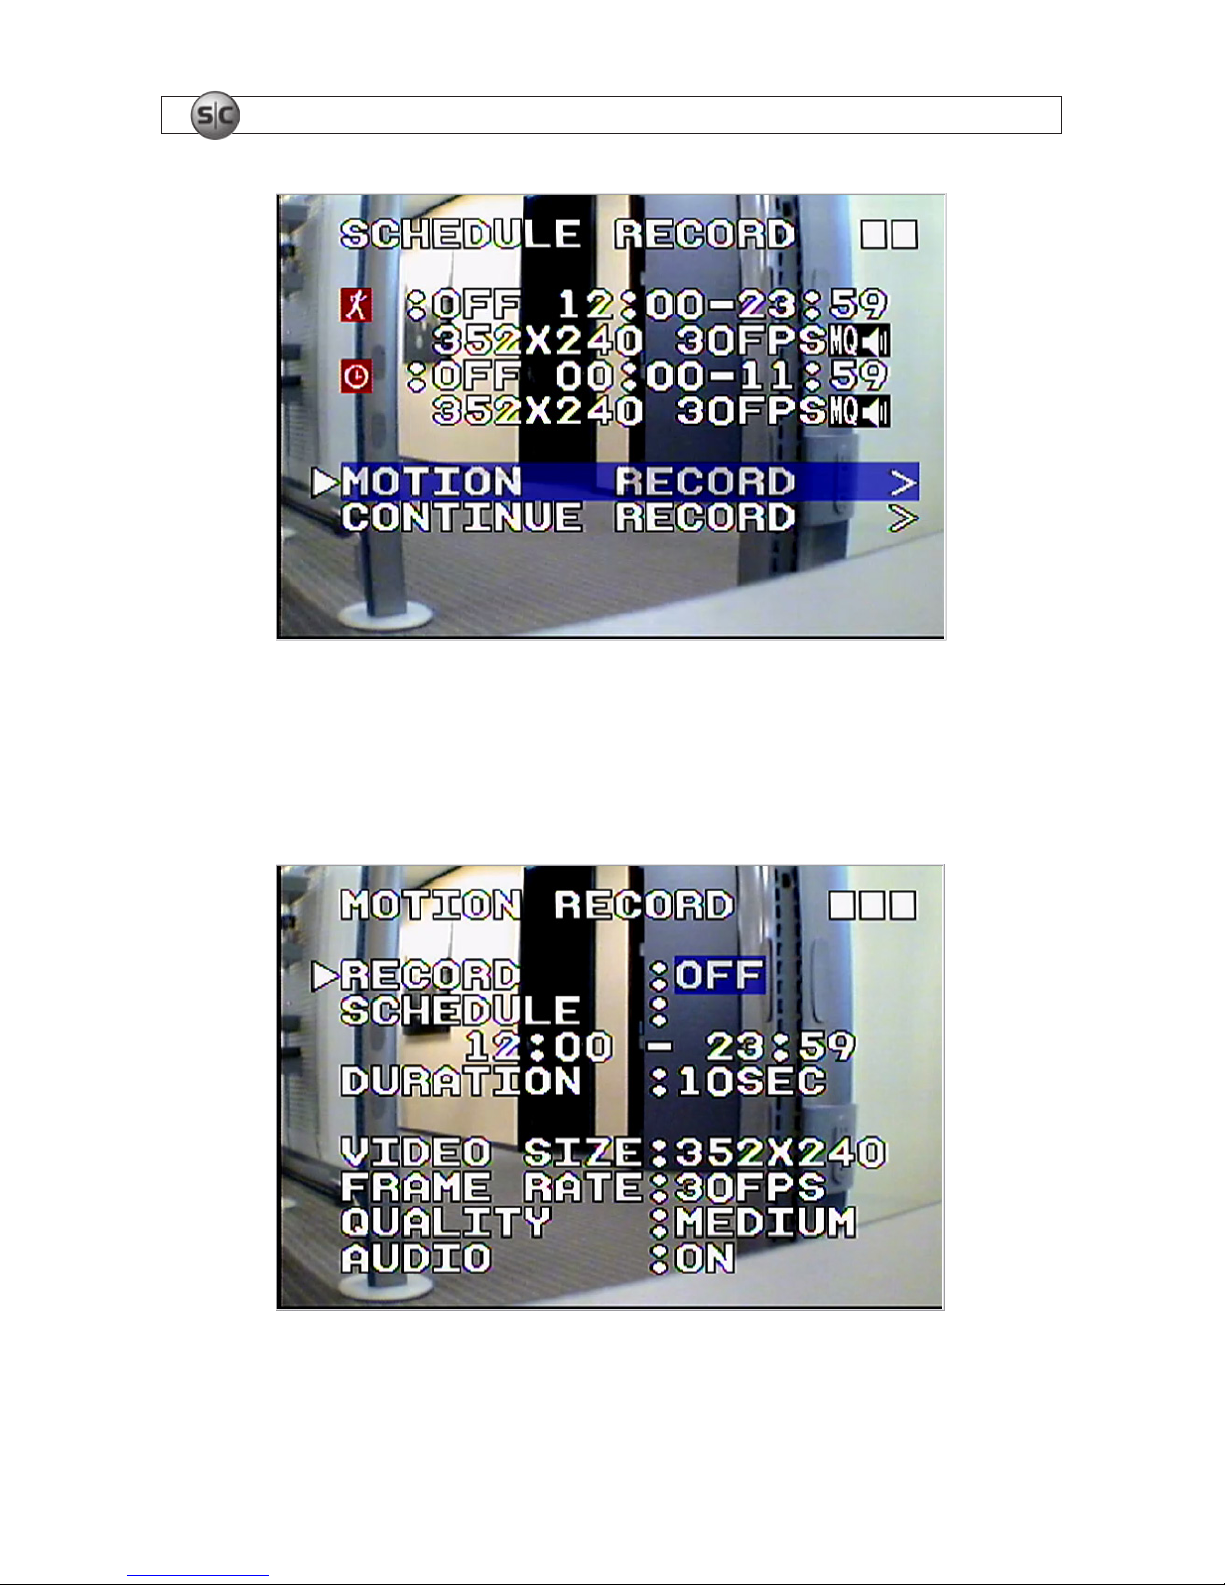
2.4.6 Schedule Record
SCHEDULE RECORD offers the same recording settings as MANUAL RECORD, plus the option to
automatically record when motion is detected (MOTION RECORD), or during a specic time of day
(CONTINUE RECORD).
Page 15
12
www.supercircuits.com
SECTION 2: INSTALLATION AND SETUP
MOTION RECORD
On the MOTION RECORD screen you can specify the daily time span during which motion is monitored
(SCHEDULE), the duration of each recording and recording parameters. If motion is detected for more
than the DURATION setting, another video clip is recorded.
For MOTION RECORD to occur, the RECORD parameter must be ON and the MD ENERGY level must
exceed the MD THRESHOLD value congured on the MD SENSITIVITY screen.
Page 16
13Mini Security Recorder User Manual
SECTION 2: INSTALLATION AND SETUP
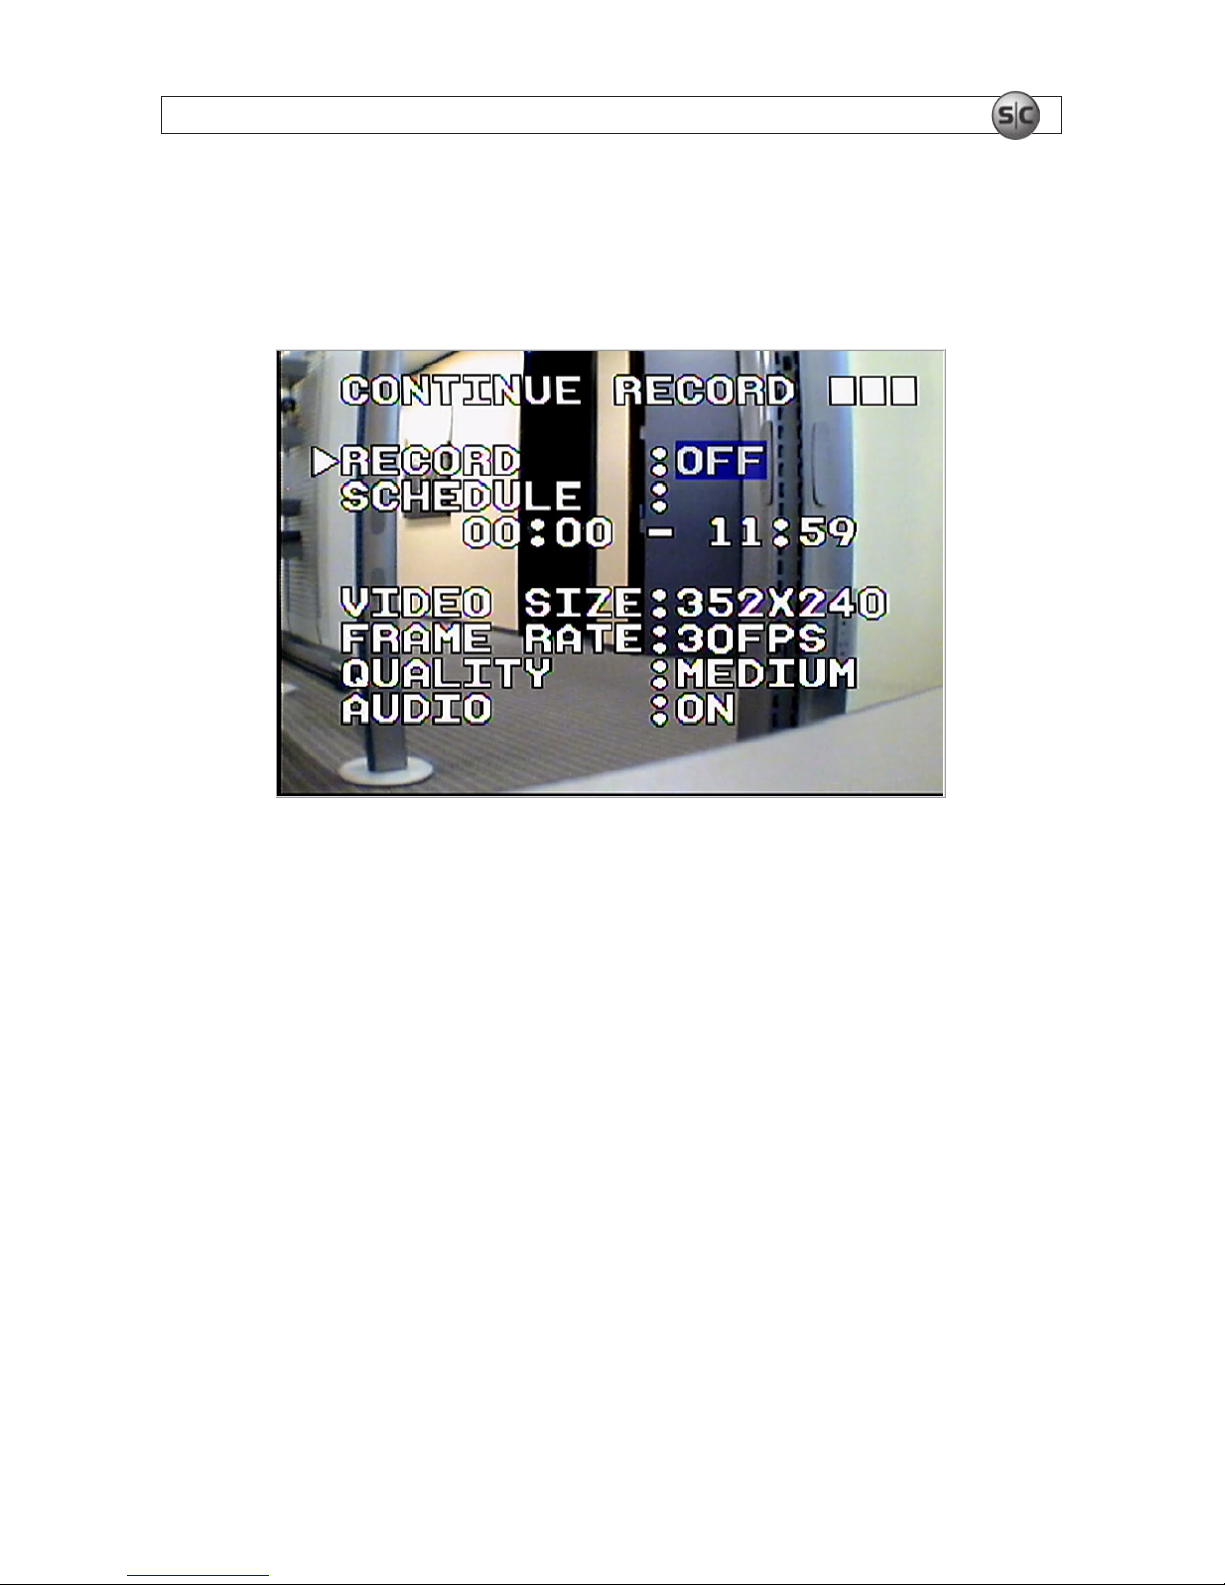
CONTINUE RECORD
CONTINUE RECORD (continuous recording) occurs during the SCHEDULE time when the RECORD
parameter is ON.
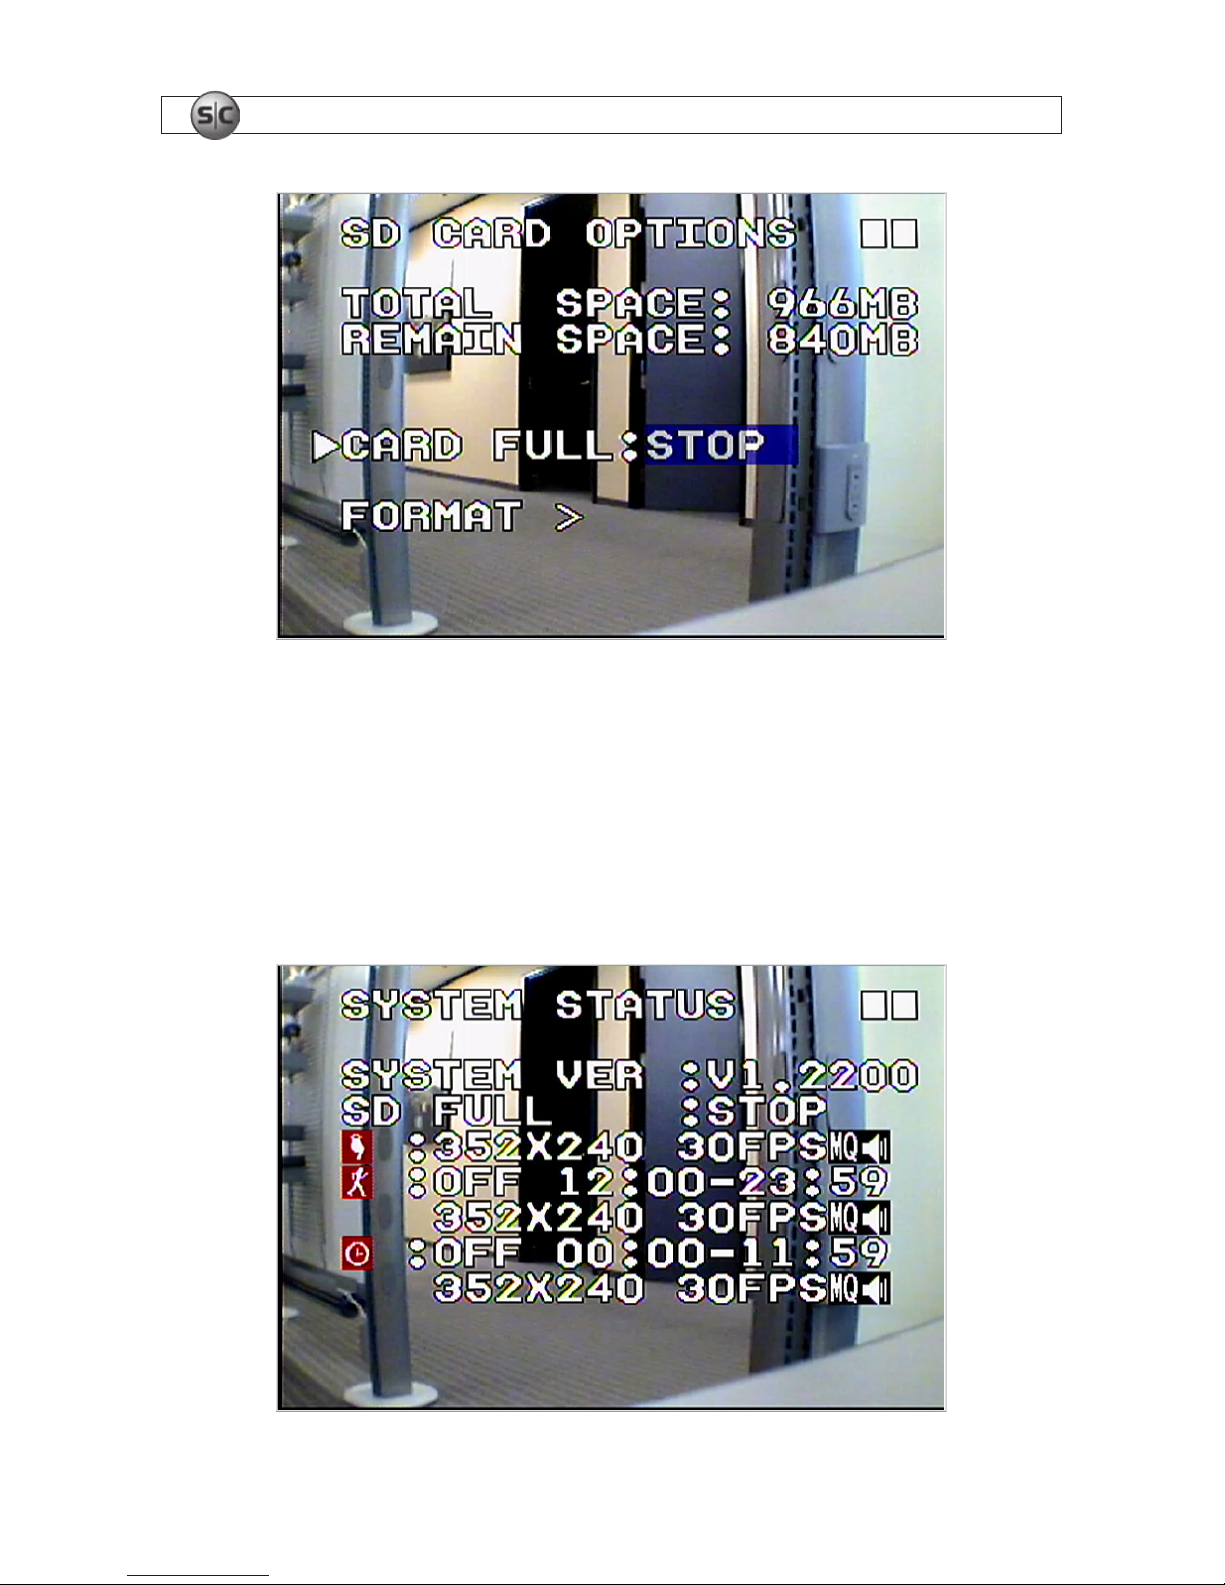
2.4.7 SD Card Options
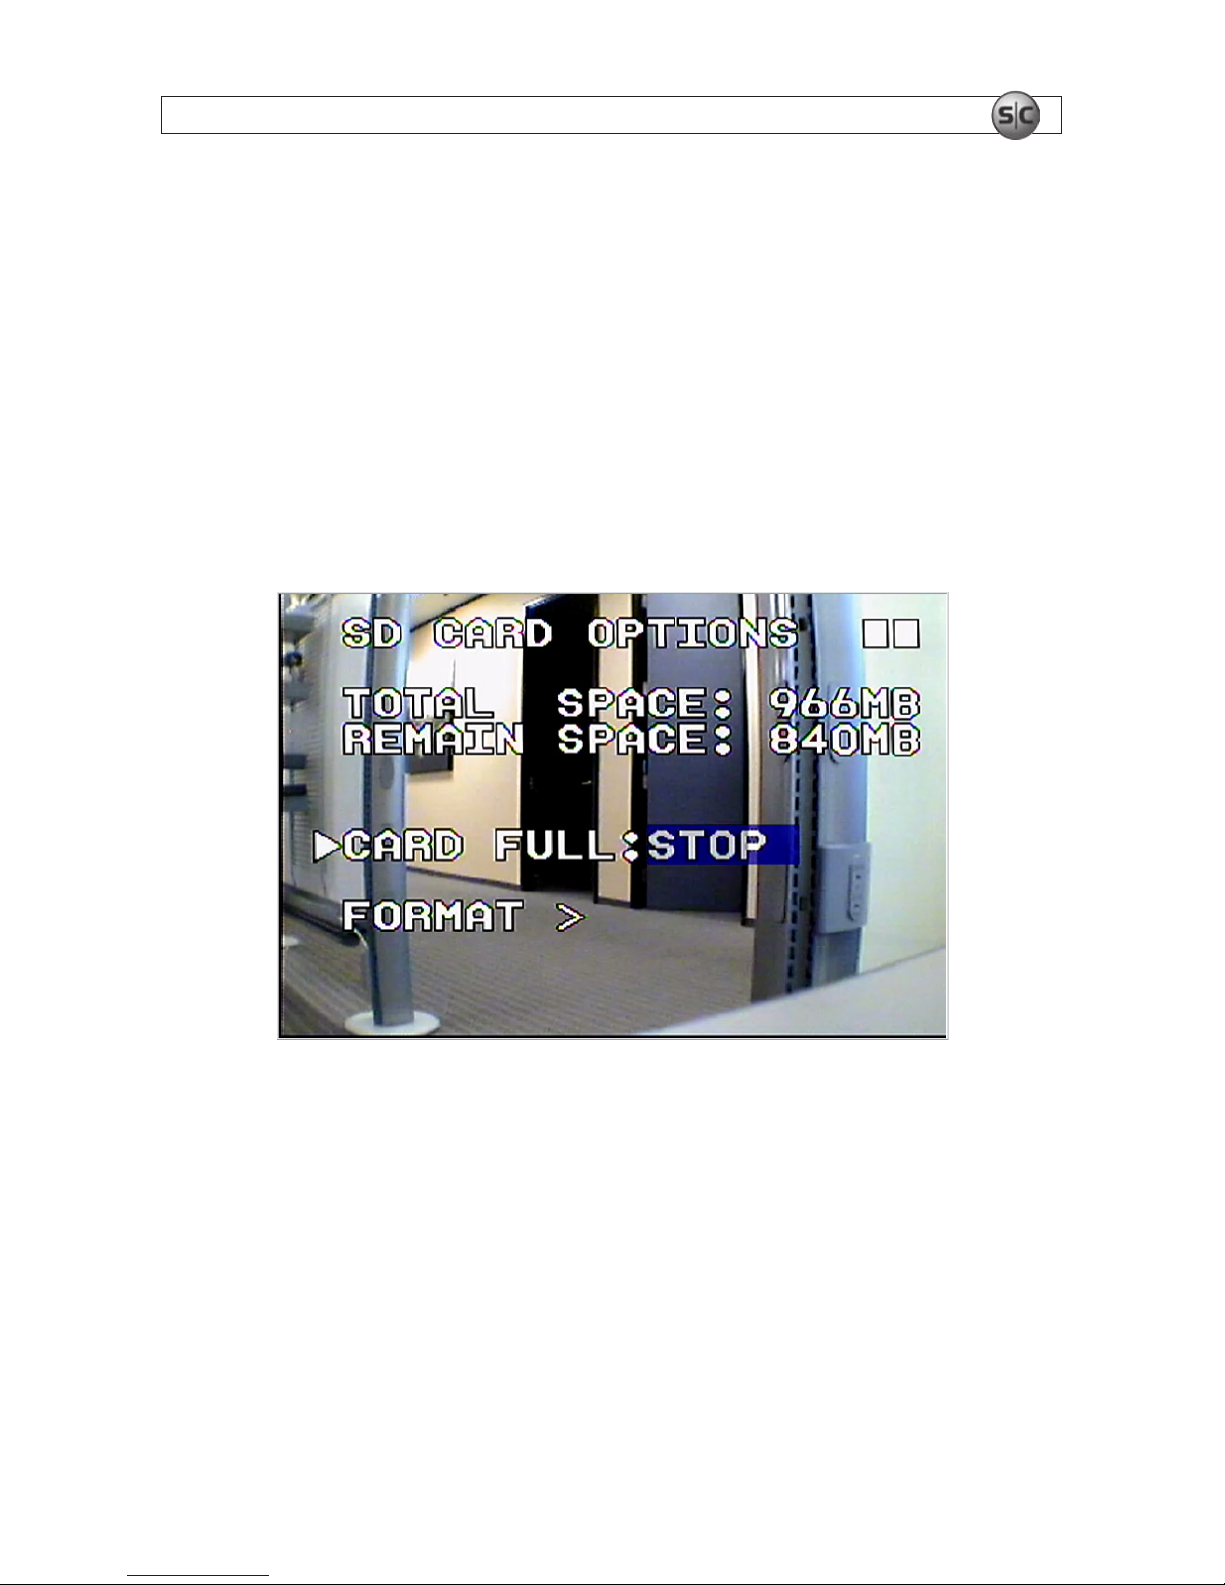
The SD CARD OPTIONS screen displays the capacity of the card, provides options to rewrite the card
when full, and format the card. When:
SD FULL : LOOP – When SD card storage capacity is full, the DVR will overwrite the oldest video
les (auto repeating continuous recordings) with the current recording.
SD FULL : STOP – When SD card is full, it will stop recording.
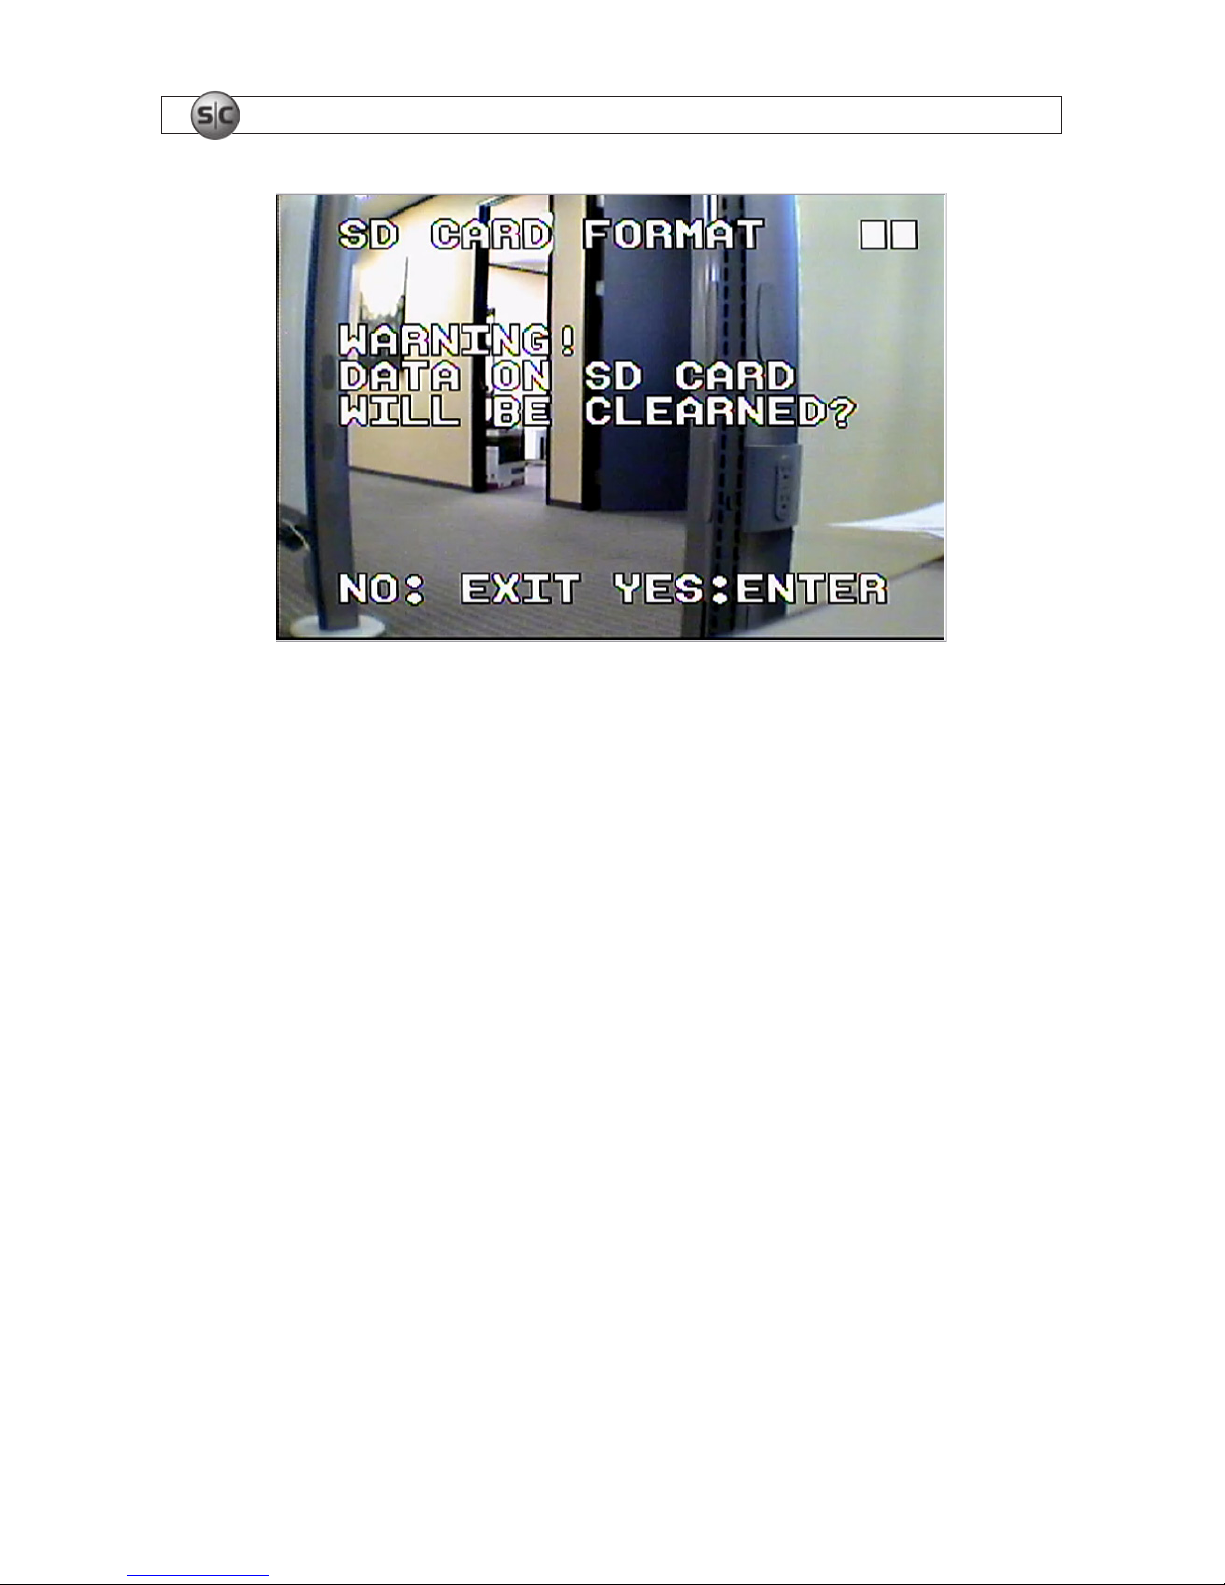
FORMAT – Formatting removes all data from the card and creates the director DVMPG4 under the
root directory.
Page 17
14
www.supercircuits.com
SECTION 2: INSTALLATION AND SETUP
14
The duration of video recorded on the SD card depends on the card capacity, video size, quality, frame
rate, and audio settings.
2.4.8 System Status
The SYSTEM STATUS screen displays the version of the rmware loaded in the DVR, the recorder
settings for MANUAL, SCHEDULED, and MOTION recordings, and the rewrite setting of the SD care. No
congurable options exist on this screen. Press Stop/Exit to return to the MAIN MENU.
Page 18
15Mini Security Recorder User Manual
SECTION 2: INSTALLATION AND SETUP
15
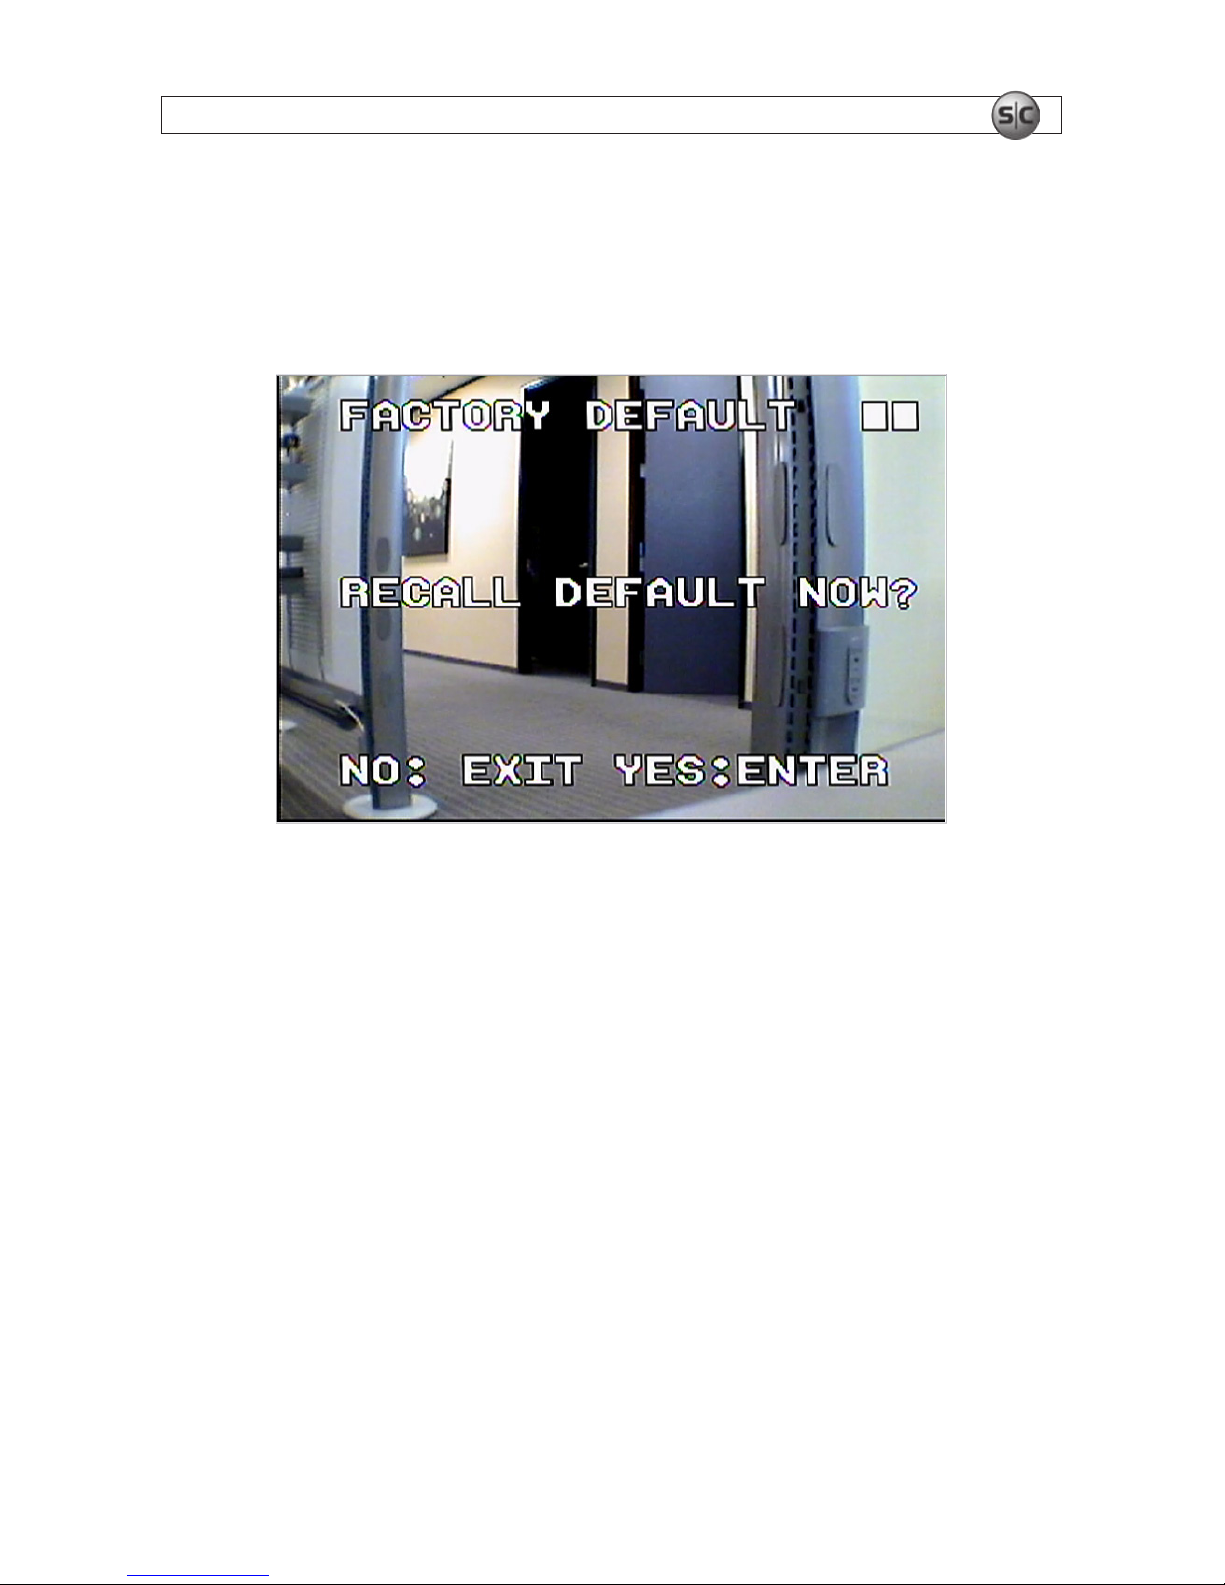
2.4.9 Factory Default
The Factory Default option resets all conguration settings to the factory default values, except for the
DATE/TIME setting. At this screen, press Enter to reset the conguration values. Press Stop/Exit to
return to the MAIN MENU.
Page 19
16
www.supercircuits.com
SECTION 3: OPERATION
16
SECTION 3
Operation
NOTE
Depending on the software version level of your DVR, the screens may appear different from those
shown below.
3.1 Live mode
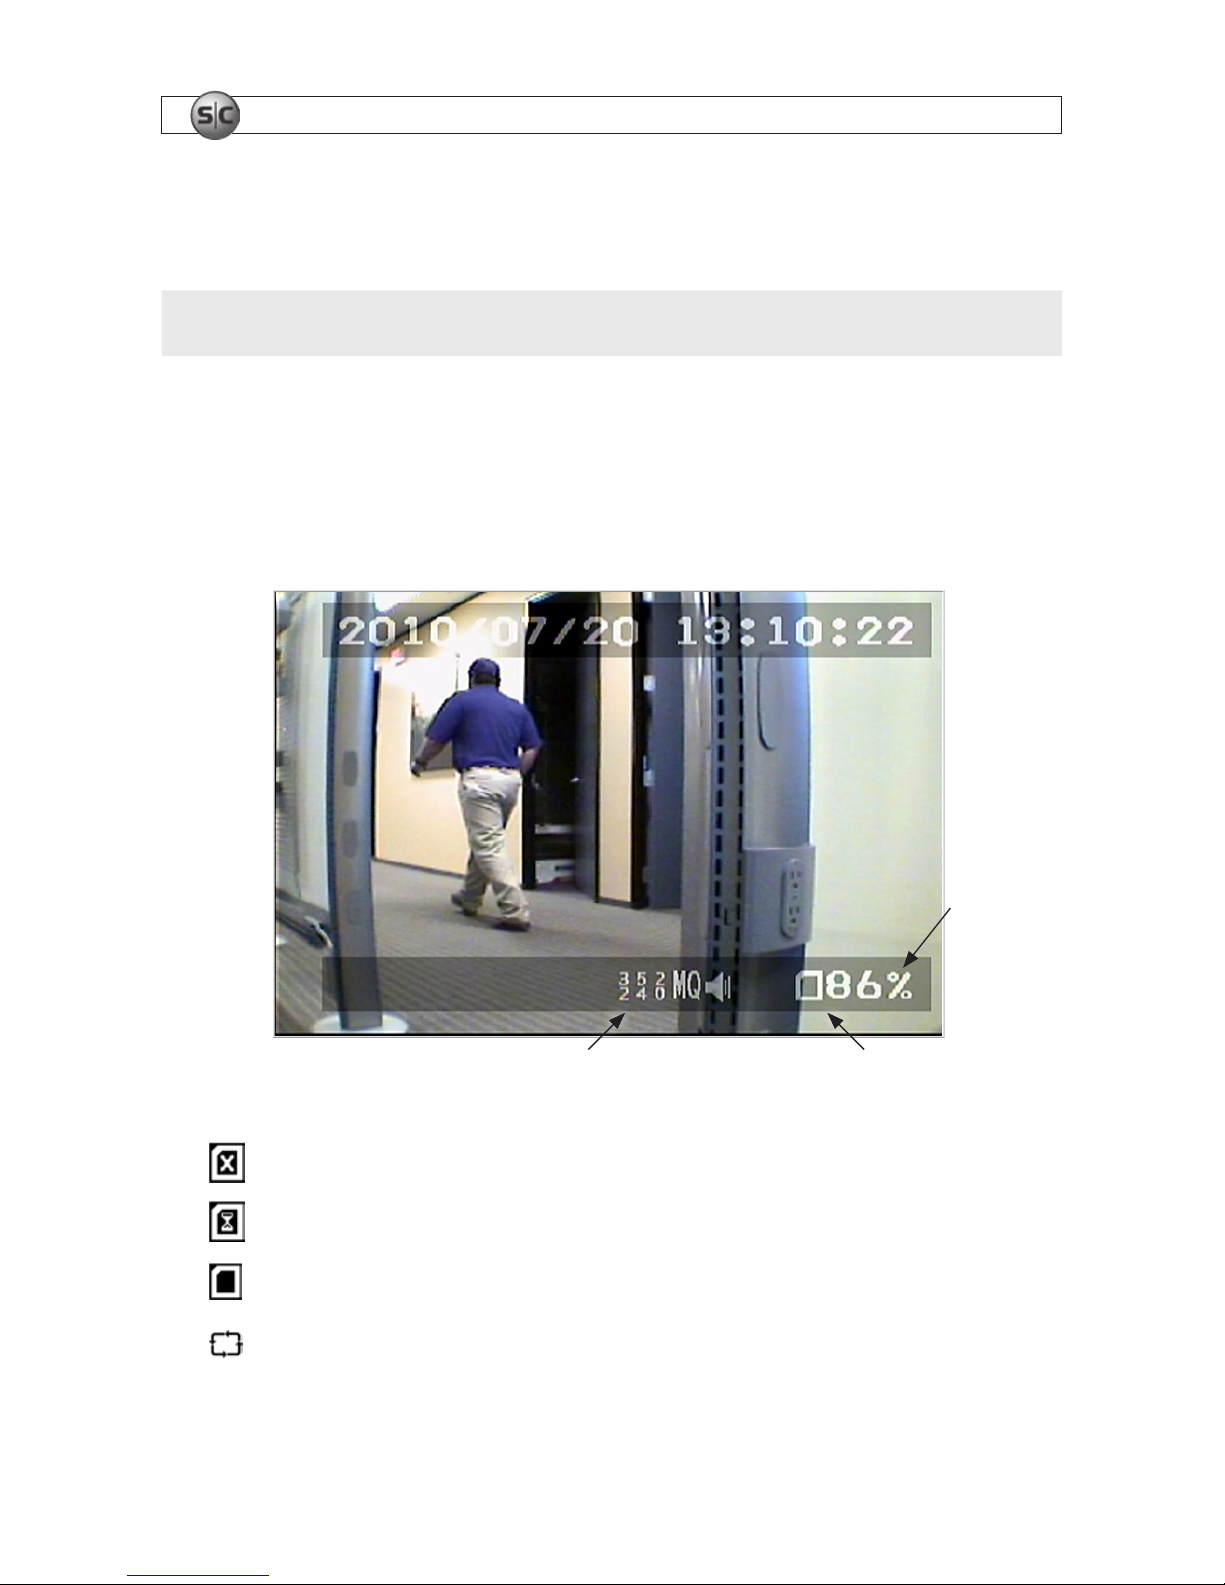
During Live mode, video from the camera is displayed on the A /V monitor using the audio and video
settings congured in the MANUAL RECORD menu. These settings, and the SD card status, are
indicated at the bottom of the screen.
SD Card Status IconManual Record Settings
SD
Card
Free
Space
The SD card status icons are dened as:
– SD card is missing
– SD card is testing les
– SD card is functioning normally
– SD card is full and overwriting les.
Page 20
17Mini Security Recorder User Manual
SECTION 3: OPERATION
17
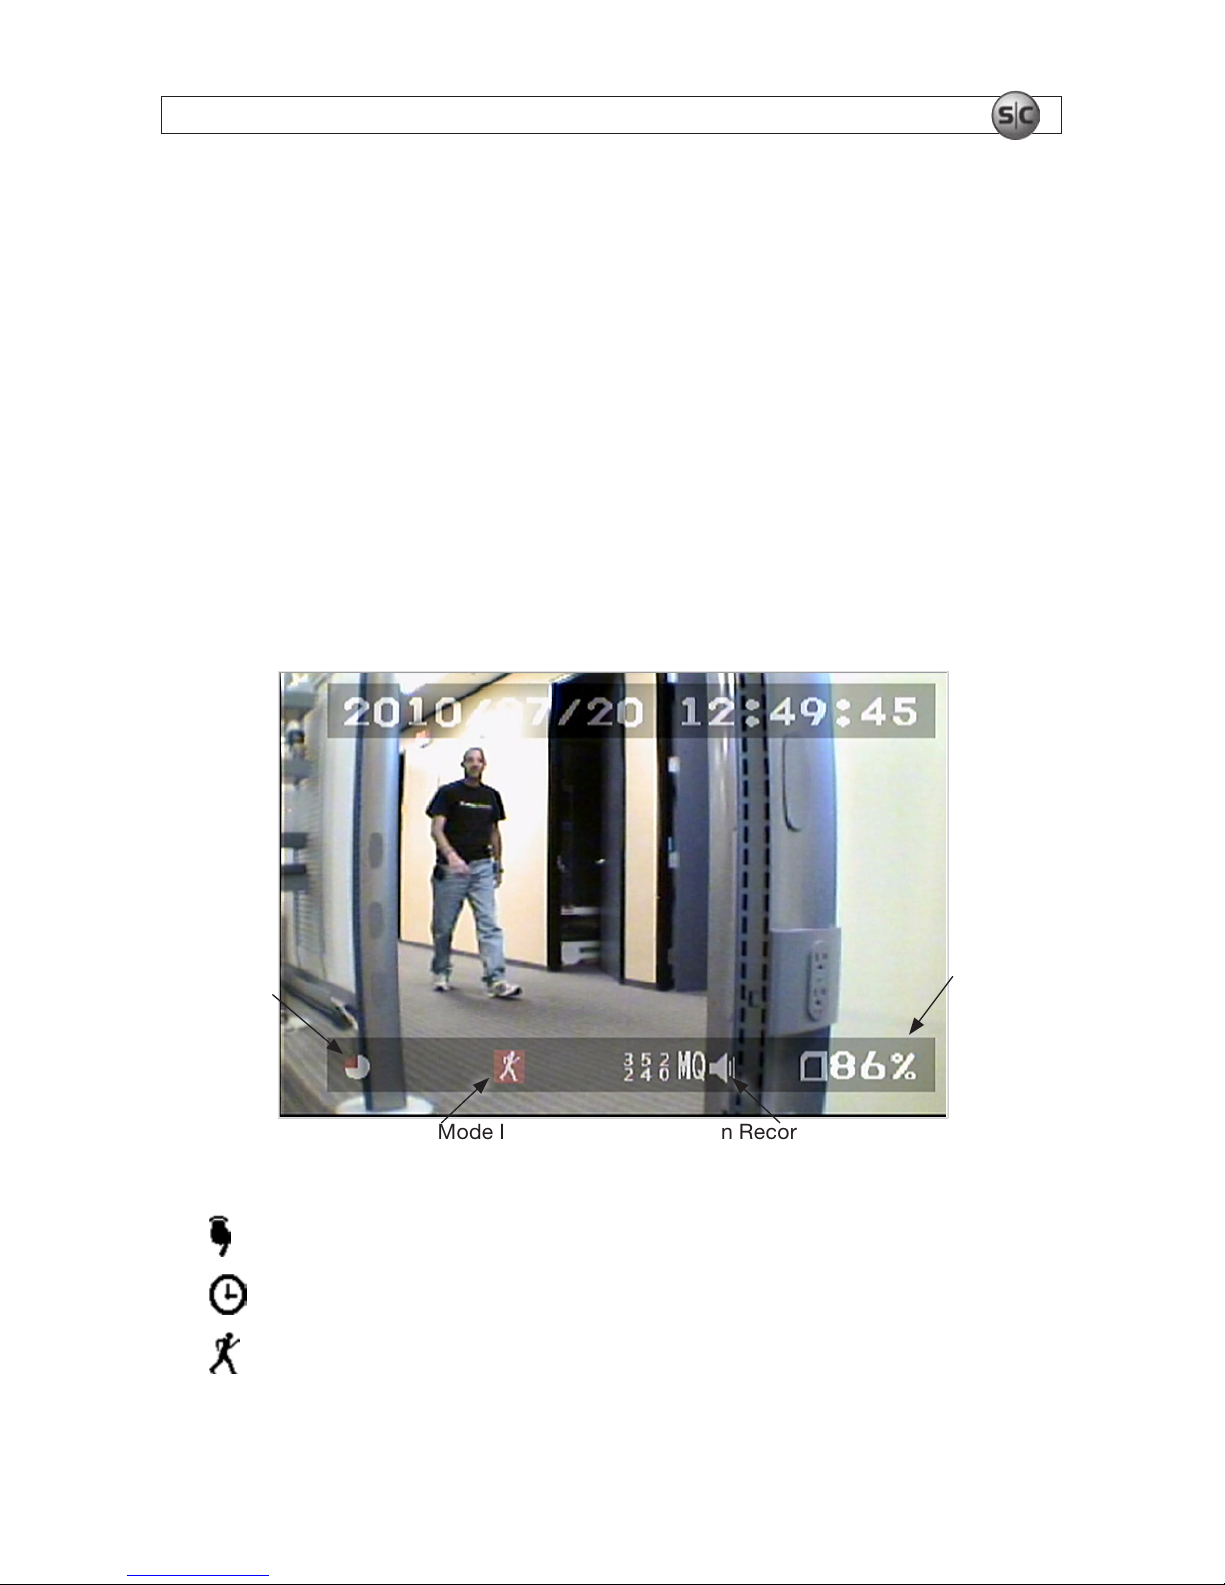
3.2 Record mode
Recording can be initiated in three ways:
• Manual record – Pressing the Rec button initiates recording at any time. Video size, frame rate,
quality, and audio settings are congured on the MANUAL RECORD menu. Pressing Stop/Exit
stops manual recording.
• Motion detect record – Motion detect recording occurs when motion is detected during a preset
time frame. The time frame (schedule), duration of each recording, video size, frame rate, quality
and audio enable are congured on the SCHEDULE RECORD, MOTION DETECT submenu. The
RECORD option in the submenu must be ON to enable motion detect recording to occur.
• Continuous record – Continuous recording occurs through out a preset time frame. The time
frame (schedule), video size, frame rate, quality and audio enable are congured on the SCHEDULE
RECORD, CONTINUE RECORD submenu. The RECORD option in the submenu must be ON to
enable continuous recording to occur.
Motion Record SettingsRecord Mode Icon
SD Card
Free Space
Recording
In Progress
The record mode icons are dened as:
– Manual record mode in progress
– Scheduled record mode in progress
– Motion detection record mode is enabled.
Page 21
18
www.supercircuits.com
SECTION 3: OPERATION
18
When multiple record modes are enabled, recording occurs according to the priority:
1. Manual Record
2. Motion detection record
3. Continuous record
Video les are saved on the SD card.
CAUTION
Do not remove the SD card while the recorder is booting or recording. It may destroy the
data stored on the card.
Power loss during recording will cause an incomplete video record and may cause errors.
When video loss occurs during recording, the DVR stops recording and saves the le. When
the video signal is regained, recording resumes.
3.3 Playback mode
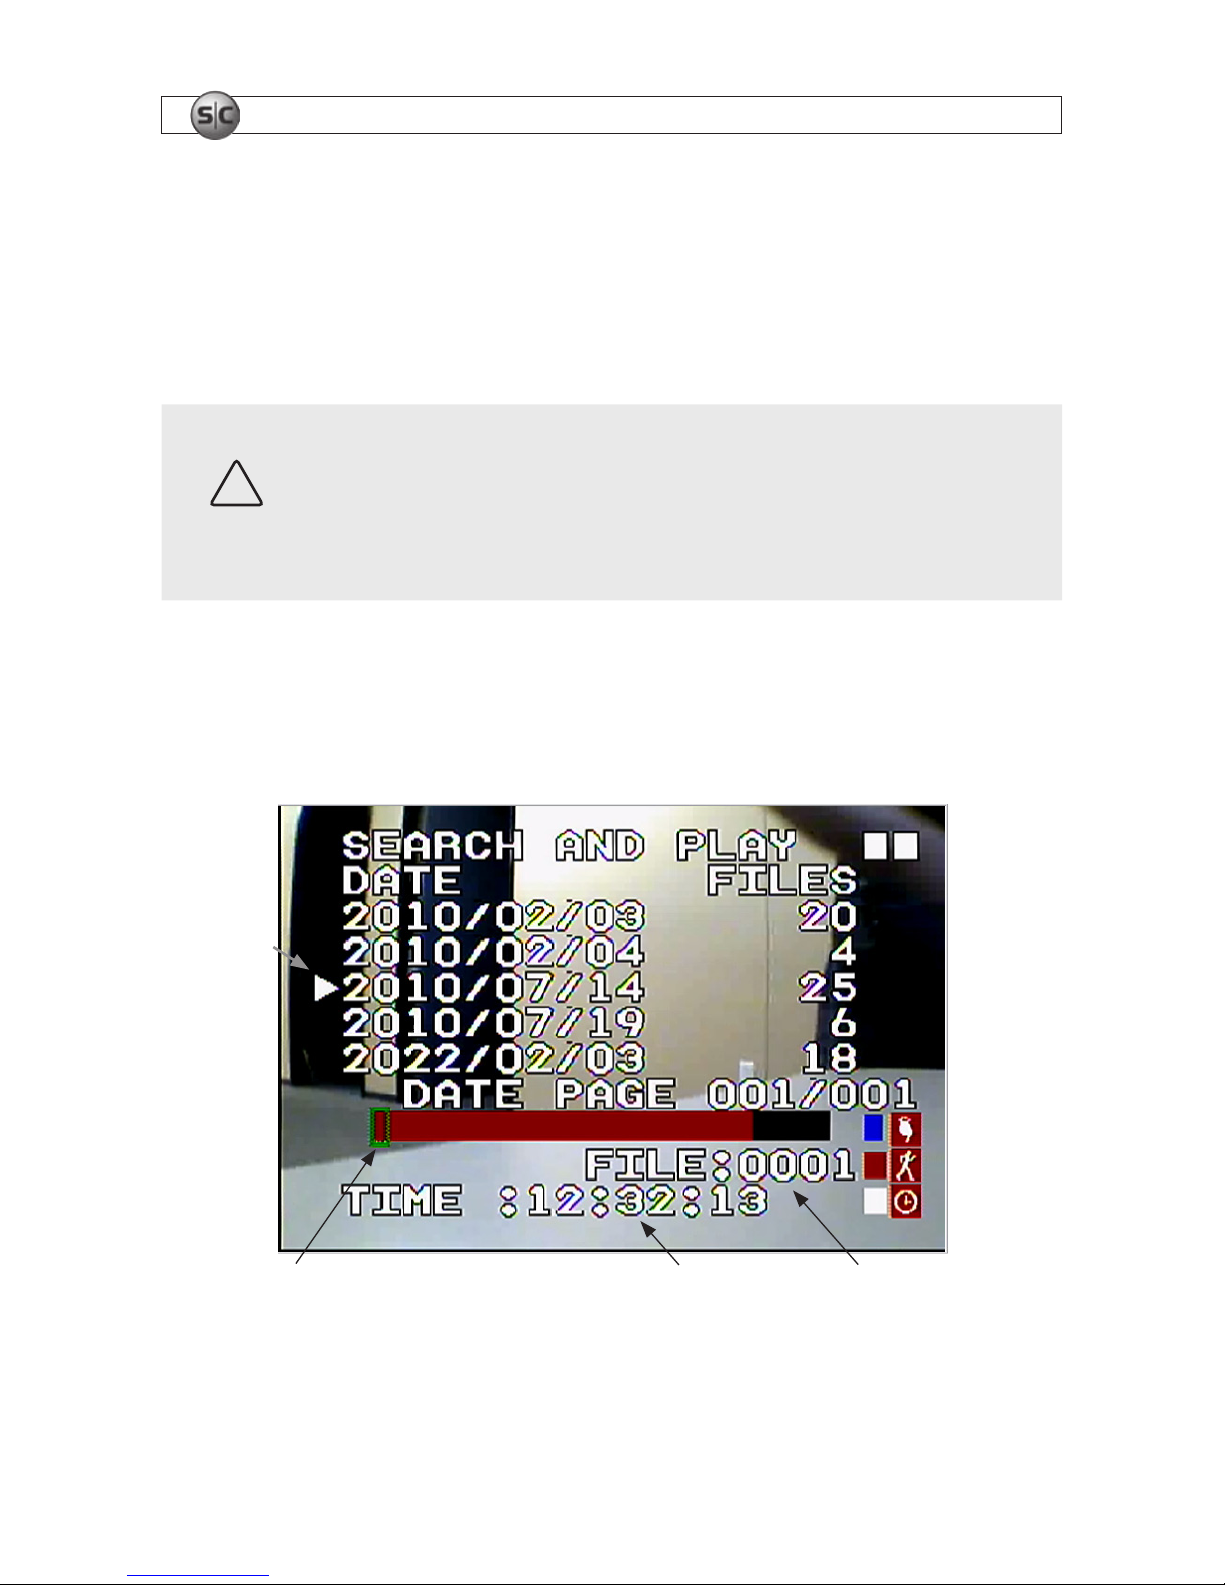
Files can be played back continuously or individually. To nd recordings, press Menu and enter the
SEARCH AND PLAY submenu.
File Pointer
Date
Pointer
Start Time of File File Number
The SEARCH AND PLAY screen shows the dates when recordings exist, the number of les that exist
on that date, and a time line of les recorded on that day, color coded by recording type (blue for manual
Page 22
19Mini Security Recorder User Manual
SECTION 3: OPERATION
19
recordings, red for motion recordings, and white for scheduled recordings). The screen background
shows the rst frame of the recording under the le pointer.
To play recordings, do the following:
• Select date – Use the q and p buttons to move the date pointer on the left to the date of the
recording you want to play.
• Select le – use the u and t buttons to move to the le pointer to the le you want to play. The
le number is shown in the FILE eld, and the start time of the recording is shown in the TIME eld.
Also, the cursor (rectangle) on the time bar covers the le position in the string of les recorded on
that date. It also covers a color coded block indicating the recording type.
• Play the le – Press Play/Pause to start and pause playback. Recordings will play consecutively
until stopped. Press Stop/Exit to stop playback. Additional le play controls include:
— Fast forward and fast rewind – while a le is playing, press u u (press twice) or t t
repeatedly to move forward or back at 2x, 4x, 8x, 16x, or 32x normal speed. Press
Play/Pause to return to normal speed.
— Skip frame – while playback is paused, press u or t to move to the next or previous frame
of the recording.
— Skip le – while playback is stopped, press u or t to move to the next or previous le
recorded on that day.
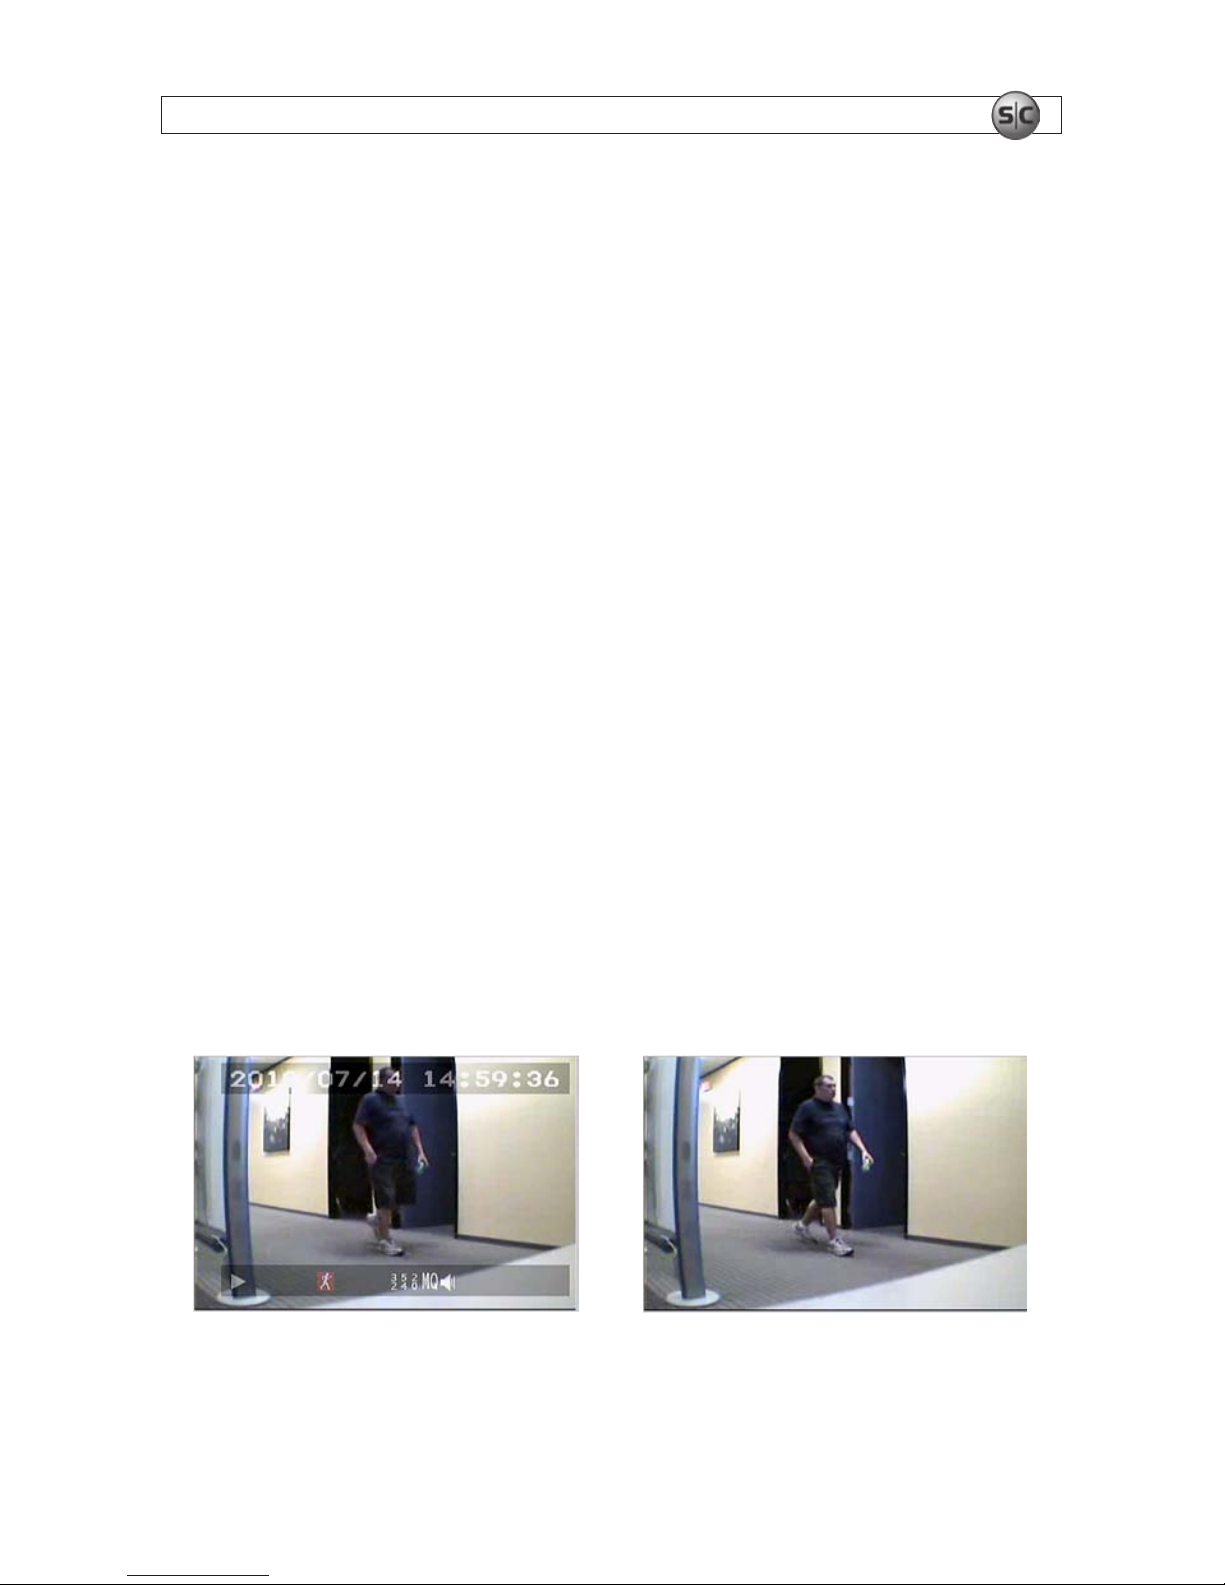
— Clear screen data – Press Display to enable or disable on-screen data. When data is
cleared from the screen, only the video image is shown.
Playback With Data Playback Without Data
Page 23
20
www.supercircuits.com
SECTION 3: OPERATION
20
3.4 Playback using a PC
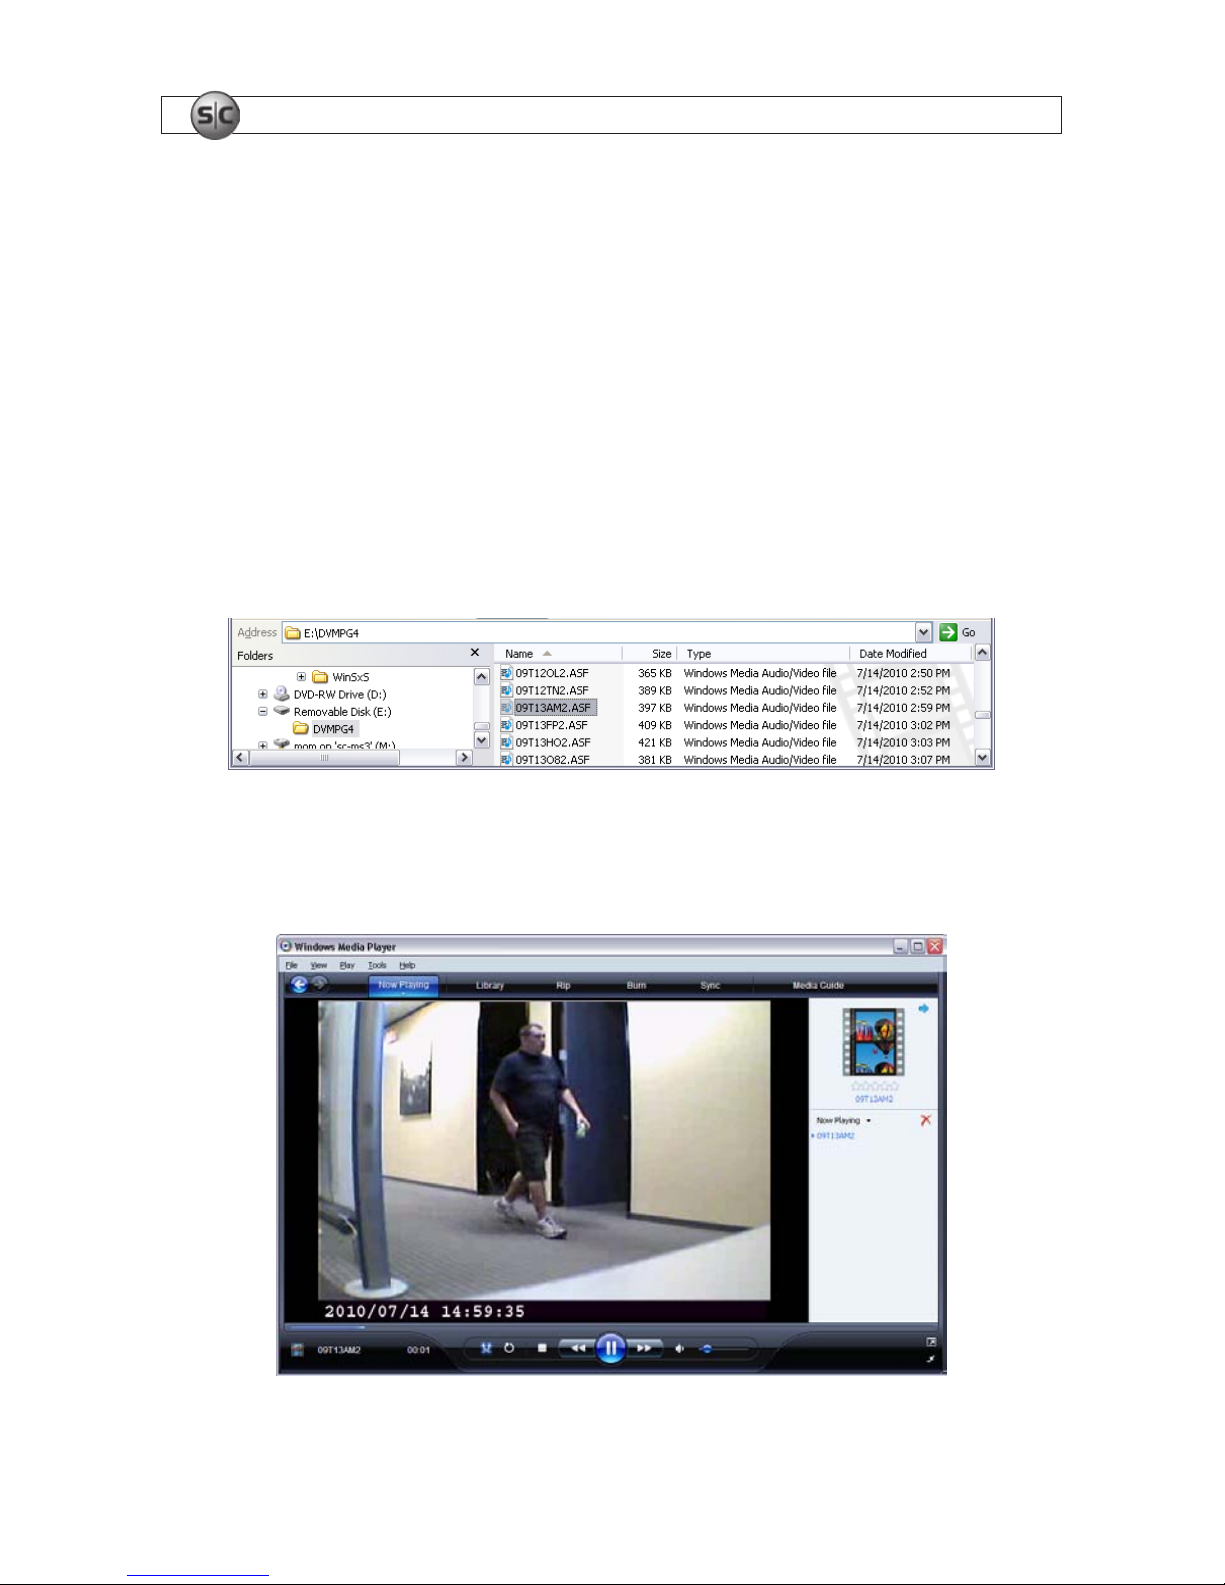
Recordings on the SD card are saved in ASF format and can be played on a Windows PC using Window
Media Player, DivX player, or other ASF le player. Playing ASF les may require a codec such as the
Sharp B.726 Audio (45). This codec can be downloaded from the internet. To play recordings using
Windows Media Player in Windows XP:
1. Power off the MDVR14, then remove the SD card.
2. Insert the card into an adapter on your PC and open a le window to show the contents of the card.
3. On the card, nd the DVMPG4 folder and open it. Locate the le you want to watch using the Date
Modied detail.
4. Open Media Player, then click the File drop down menu.
5. Browse to the le you want to watch and open it.
Page 24
21Mini Security Recorder User Manual
SECTION 3: OPERATION
21
3.5 SC card maintenance
The MDVR14 can write and read SD cards with a FAT16 or FAT32 le system. No other formats are
supported. To format a card using the MDVR14:
1. Power off the MDVR14.
2. Insert the SD card into the card slot.
3. After the DVR initializes, press MENU.
4. Use the q and p buttons to highlight SD CARD OPTIONS, then press Enter.
5. Press q to highlight FORMAT, then press Enter.
Page 25
22
www.supercircuits.com
SECTION 3: OPERATION
6. Press Enter again to format the card. Allow the process to complete before continuing.
3.6 Firmware updates
If a rmware update is needed, contact Supercircuits support for recommendations and procedures.
Page 26
23Mini Security Recorder User Manual
SECTION 4: SPECIFICATIONS
SECTION 4
Specications
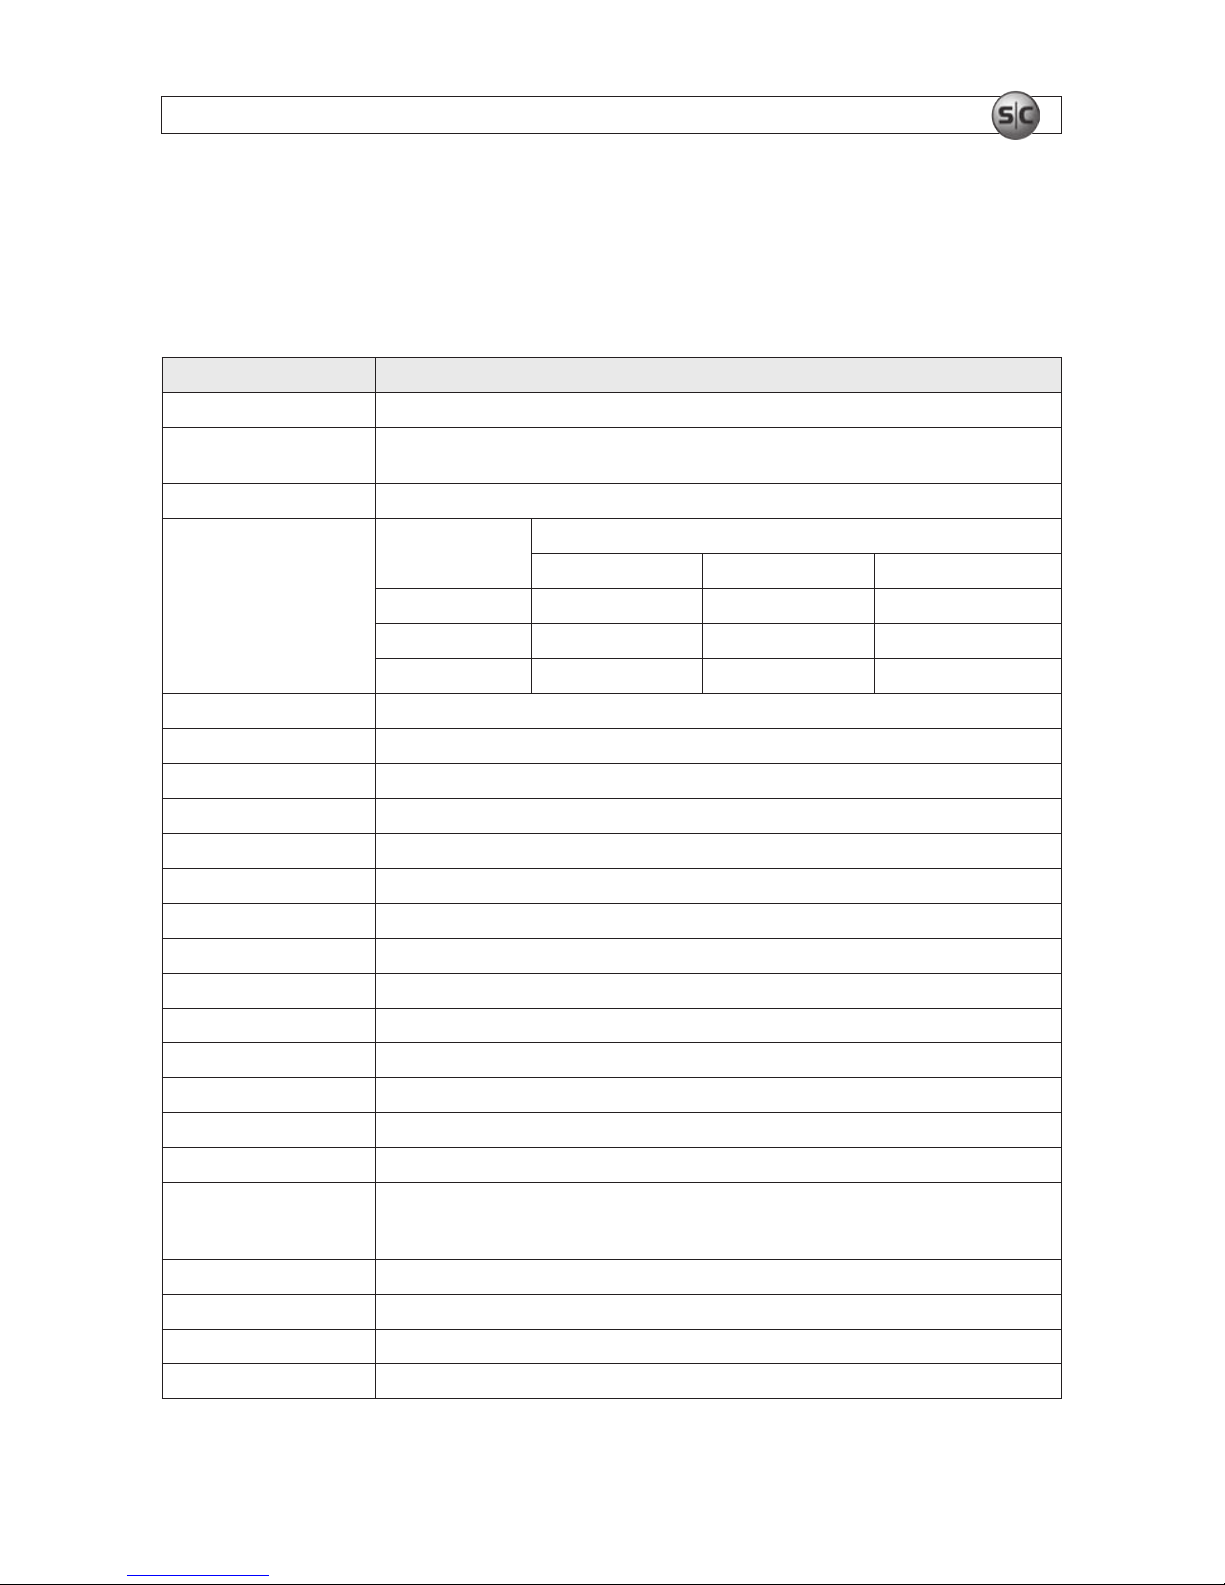
Table 2. Specications
Attribute Specication
Video Codec MPEG4-SP ASF le format
Video Record Frame Rate
1, 2, … , Maximum fps selectable
Maximum: 30 fps @ 352 x 240; 24 fps @ 704 x 240; 12 fps @ 704 x 480
Record Quality Low / Medium / High
Video Record Time
(with 1 GB SD card)
Frame Rate @ Resolution
30 fps @ 352 x 240 24 fps @ 704 x 240 12 fps @ 704 x 480
Low Quality 400 minutes 240 minutes 240 minutes
Medium Quality 300 minutes 150 minutes 150 minutes
High Quality 150 minutes 75 minutes 75 minutes
Recording Date/Time Overlay with Video Images in ASF File
Video Input 1 channel composite video Line In
Video Output 1 channel composite video Line Out
Audio Sampling Rate 44.1 KHz
Audio Codec G.726 / 32 kbps
Audio Input 1 channel audio Line In
Audio Output 1 channel audio Line Out
Storage Media SD card (FAT16 or FAT32 format)
Recording Modes Manual / Schedule Motion Detection / Schedule Continuous
Motion Detection Settings Adjust zone/sensitivity
Event Search Function Property and rst image of selected le is displayed
Playback Function Play/Fast Forward/Fast Rewind/Pause/Step Forward/Step Backward
Playback Speed x1/ x2/ x4/ x8/ x16/ x32
Power Supply DC 5V ± 10% 1A / 2 x AA (rechargeable Ni-MH or alkaline battery)
Battery Duration*
2 x AA Ni-MH: 180 min
2 x AA Alkaline: 100 min
*These estimates vary widely for different brands, charging, and temperature condition.
Weight 89 g (without battery and SD card)
Size 2.56” ( W ) x 3.54” (H) x 1.14” mm (D)
Operating Environment 41°F ~ 113°F (5°C ~ 45°C) at a Relative Humidity 30% ~ 80%
Storage Environment 32°F ~ 122°F (0°C ~ 50°C) at a Relative Humidity 30% ~ 90%
 Loading...