

Page 1
LCD Monitor
User Manual
Products: LCD17-5, LCD19-5, LCD19W-7, LCD22W-7
Please read this manual before using your monitor, and always follow instructions
for proper use. Please save this manual for future reference.
LCD17-19-19W-22W_DM
3/8/11
Page 2
ii
www.supercircuits.com
WARNING
Risk of electric shock. Do not open.
To reduce the risk of electric shock, do not
remove cover (or back). No user serviceable
parts inside. Refer servicing to qualied
service personnel.
WARNING
!
This monitor is equipped with a power plug with ground. Use only with a grounded electrical outlet. Always follow the
instructions in the installation guide when applying power. Fire and equipment damage can occur if power is applied
incorrectly.
CAUTION
Operate this monitor only in environments where the temperature and humidity is within the recommended range.
Operation outside the recommended range may cause electric shock and shorten the life of the product.
CAUTION
The slots on the back of the monitor are provided for ventilation. Do not cover these slots or obstruct the airow around or
through the enclosure.
CAUTION
Do not place the monitor in locations where liquids can be splashed on it.
Avoid touching or scratching the LCD screen.
CAUTION
Disconnect the power cord and all other cables from this monitor if the following conditions exist:
• The power cord is frayed or damaged
• The machine has been dropped or the enclosure is damaged
• When the monitor doesn’t function normally
• If liquid has been spilled into the interior of monitor
Refer repair to qualied service personnel.
Page 3

iiiLCD Monitor User Manual
LEGAL NOTICE
Supercircuits products are designed to meet safety and performance standards with the use of specic
Supercircuits authorized accessories. Supercircuits disclaims liability associated with the use of non-Supercircuits
authorized accessories.
The recording, transmission, or broadcast of any person’s voice without their consent or a court order is strictly
prohibited by law.
Supercircuits makes no representations concerning the legality of certain product applications such as the
making, transmission, or recording of video and/or audio signals of others without their knowledge and/or
consent. We encourage you to check and comply with all applicable local, state, and federal laws and regulations
before engaging in any form of surveillance or any transmission of radio frequencies.
Other trademarks and trade names may be used in this document to refer to either the entities claiming the marks
and names or their products. Supercircuits, Inc. disclaims any proprietary interest in trademarks and trade names
other than its own.
No part of this document may be reproduced or distributed in any form or by any means without the express written
permission of Supercircuits, Inc.
© 2010, 2011 Supercircuits, Inc. All rights reserved.
11000 N. Mopac Expressway, Building 300, Austin, TX 78759
Sales/Support: 1.800.335.9777 | Fax: 1.866.267.9777
Page 4

iv
www.supercircuits.com
TABLE OF CONTENTS
Table of Contents
SECTION 1 Introduction . . . . . . . . . . . . . . . . . . . . . . . . . . . . . . . . . . . . . . . . . . . . . . . . . . . . . . . . . . . . . . . . . . . . . . . 1
1.1 What’s in the box . . . . . . . . . . . . . . . . . . . . . . . . . . . . . . . . . . . . . . . . . . . . . . . . . . . . . . . . . . . . . . . . . . . .1
SECTION 2 Installation and Setup . . . . . . . . . . . . . . . . . . . . . . . . . . . . . . . . . . . . . . . . . . . . . . . . . . . . . . . . . . . . . . . 2
SECTION 3 Basic Operation . . . . . . . . . . . . . . . . . . . . . . . . . . . . . . . . . . . . . . . . . . . . . . . . . . . . . . . . . . . . . . . . . . . . . 6
3.1 Using the remote control . . . . . . . . . . . . . . . . . . . . . . . . . . . . . . . . . . . . . . . . . . . . . . . . . . . . . . . . . . . . . .6
3.2 Power . . . . . . . . . . . . . . . . . . . . . . . . . . . . . . . . . . . . . . . . . . . . . . . . . . . . . . . . . . . . . . . . . . . . . . . . . . . . . .7
3.3 Selecting an input source . . . . . . . . . . . . . . . . . . . . . . . . . . . . . . . . . . . . . . . . . . . . . . . . . . . . . . . . . . . . .8
3.4 Working with on-screen menus . . . . . . . . . . . . . . . . . . . . . . . . . . . . . . . . . . . . . . . . . . . . . . . . . . . . . . . .8
SECTION 4 Specications . . . . . . . . . . . . . . . . . . . . . . . . . . . . . . . . . . . . . . . . . . . . . . . . . . . . . . . . . . . . . . . . . . . . . 15
SECTION 5 Troubleshooting . . . . . . . . . . . . . . . . . . . . . . . . . . . . . . . . . . . . . . . . . . . . . . . . . . . . . . . . . . . . . . . . . . . 17
Page 5

1LCD Monitor User Manual
SECTION 1: INTRODUCTION
SECTION 1
Introduction
This video monitor has a rugged metal construction and displays sharp and brilliant video by utilizing an active TFT LCD matrix. The
high contrast ratio generates sharp, crisp lines and images. Also, the fast response time gives superior clarity for moving images,
eliminating “ghosting”. Key features include:
• Built-in BNC, RCA, HDMI, S-Video and VGA inputs
• Built-in audio speakers
• High resolution: 1680 x 1050 (LCD22W-7), 1440 x 900 (LCD19W-7), 1280 x 1024 (LCD19-5 and LCD17-5) pixel display
• Remote control
1.1 What’s in the box
Your monitor includes the following:
• LCD monitor and base
• User manual (this document)
• Power cord
• 6’ VGA cable
• Audio cable with stereo mini-jack connectors
• Remote control
Page 6
2
www.supercircuits.com
SECTION 2: INSTALLATION AND SETUP
SECTION 2
Installation and Setup
To install the monitor:
1. Remove the components from the packaging and inspect them for damage. If the monitor is damaged in any way, return it
to your supplier for replacement.
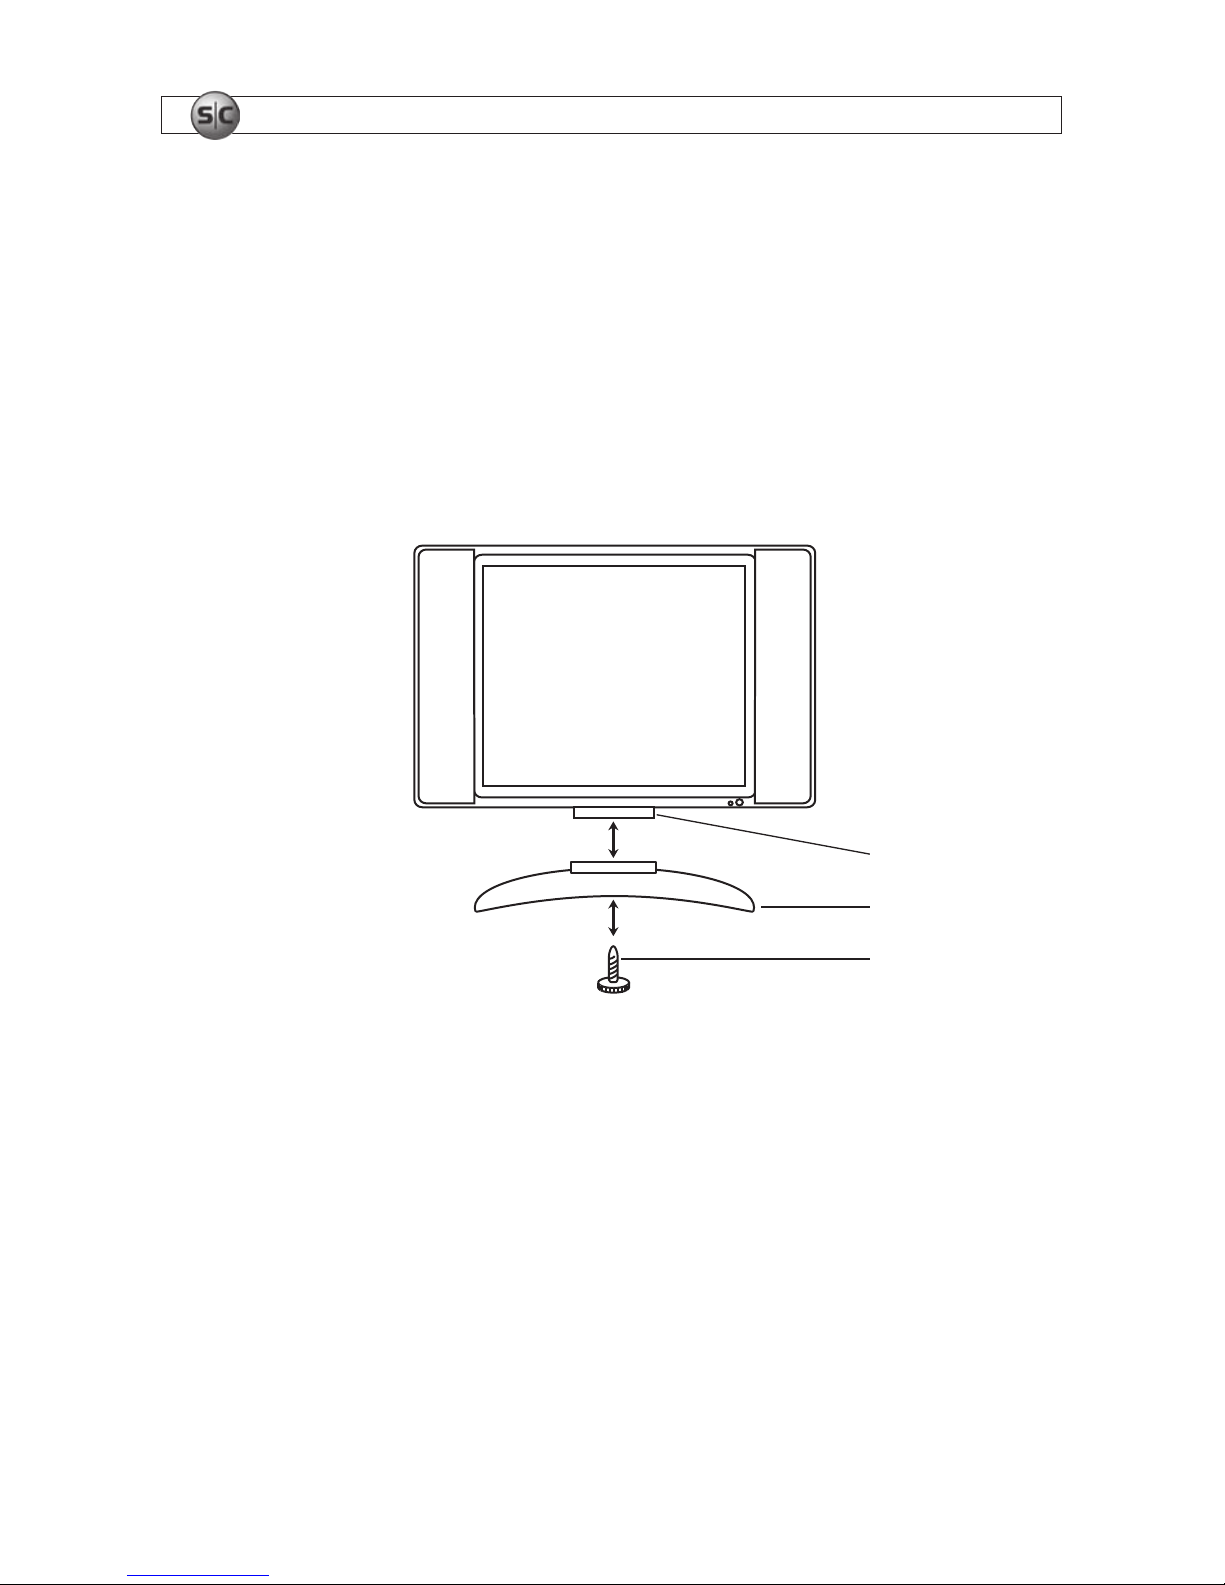
2. Find the monitor assembly and base. Use the screw provided to attach the base to the monitor support bracket. The screw
may be attached to the underside of the monitor support bracket or in the base.
Base
Bracket
Screw
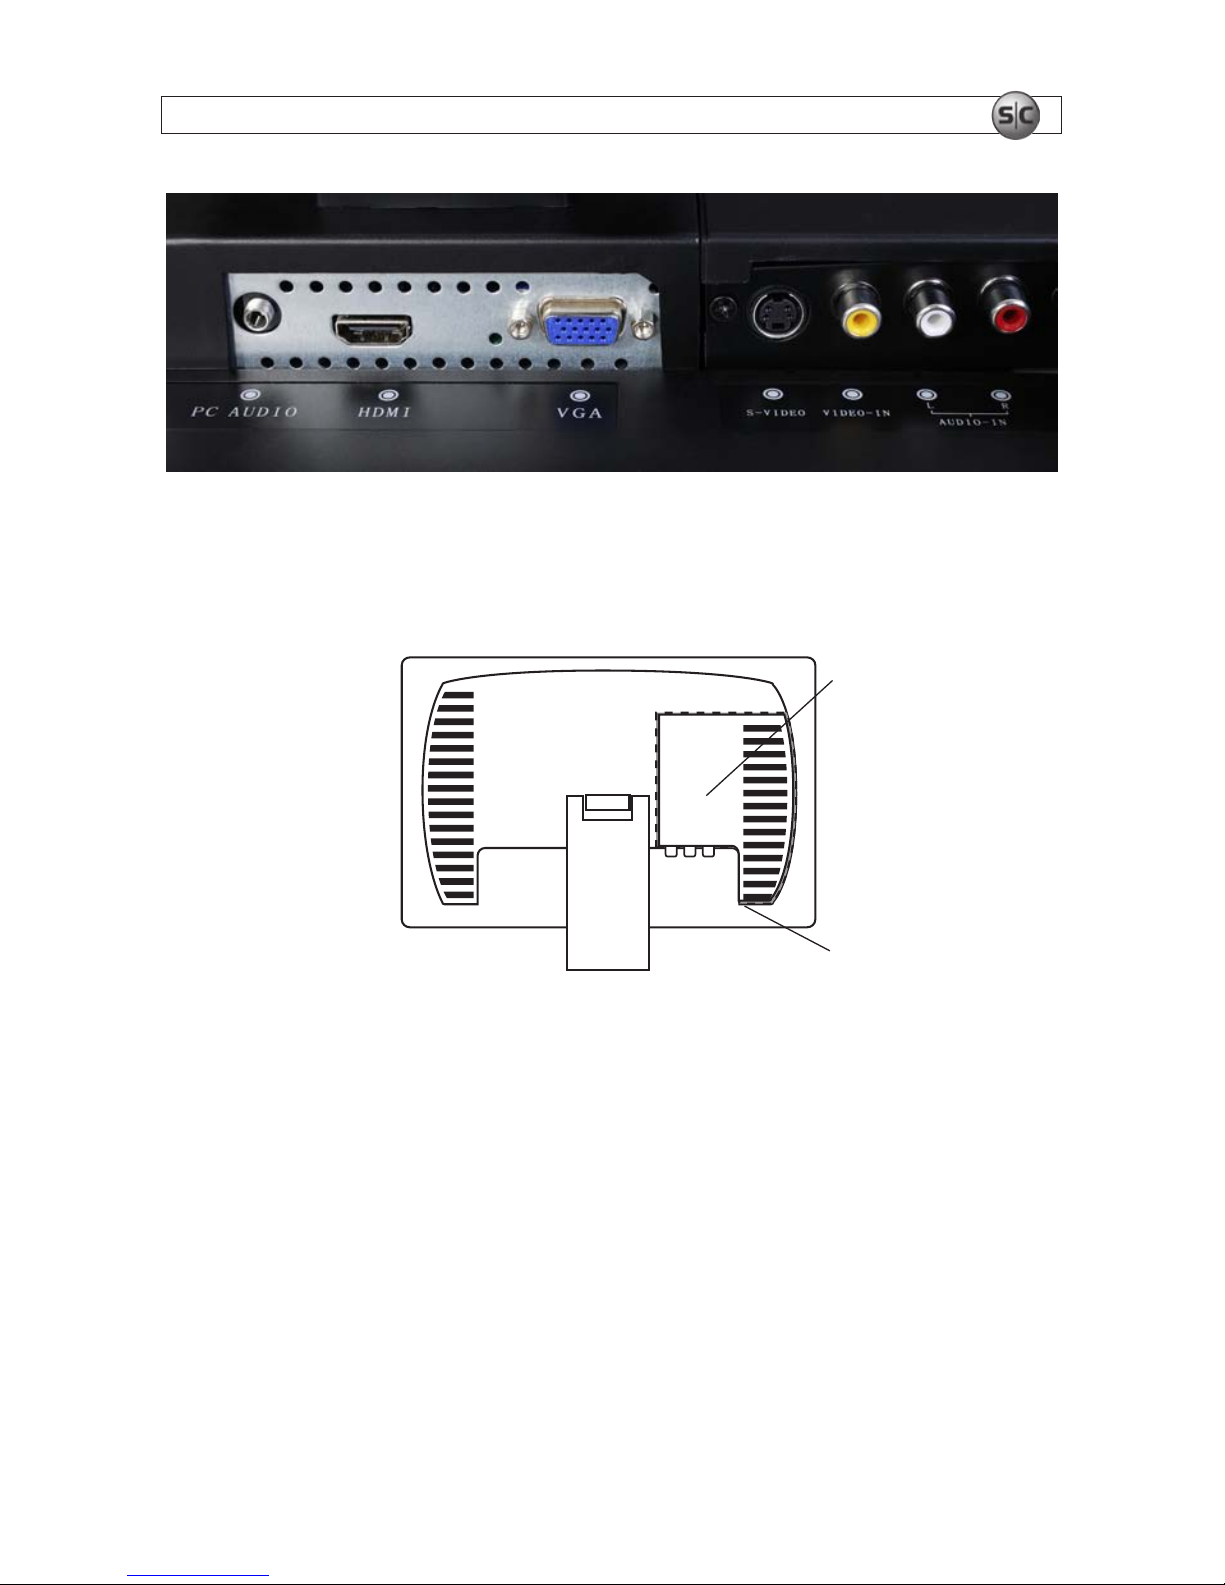
3. Connect your video source to the monitor input that provides the best video quality. This monitor connects directly to ve
types of video interfaces: HDMI, VGA, S-Video, composite video (RCA), and BNC. The HDMI, VGA, S-video, and composite
video connectors are located on the lower back side of the monitor.
Page 7
3LCD Monitor User Manual
SECTION 2: INSTALLATION AND SETUP
Inputs on the lower back side of monitor
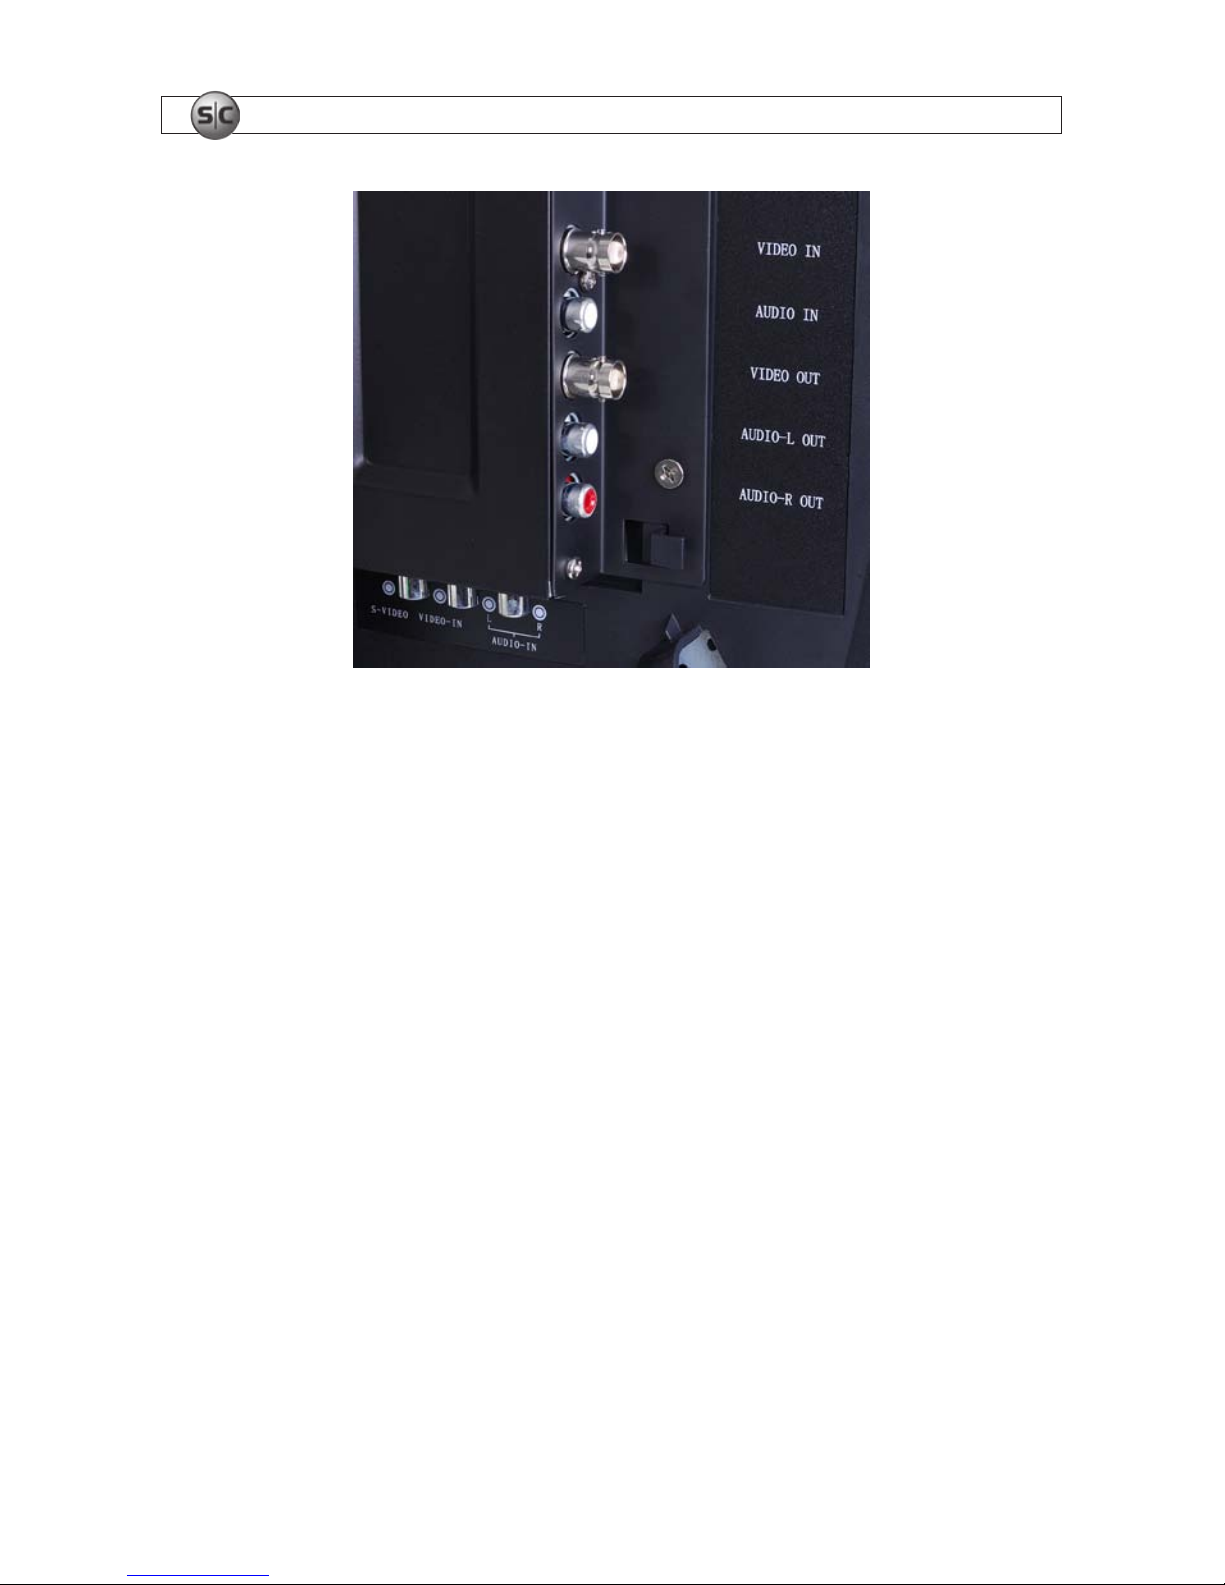
BNC connectors are located on the back left side of the monitor underneath the back cover. Remove the cover by carefully
pulling the lower edge of the cover away from the monitor.
Back
cover
Pull away here
to remove cover
Monitor back cover
Removing the cover opens access to the BNC input and output connectors and their associated audio jacks.
Page 8
4
www.supercircuits.com
SECTION 2: INSTALLATION AND SETUP
Inputs on the back left side of the monitor
4. If necessary, congure the video source (DVR, PC, etc) to enable video (and audio) to the video output you are using.
5. Connect the audio output from the video source to the audio connector(s) associated with the monitor video input port you
are using.
6. If needed, connect the monitor video output (BNC) and audio output (RCA) to a video input device. (See photo above.)
7. Connect the power cable to the monitor , then plug it into a grounded power outlet.
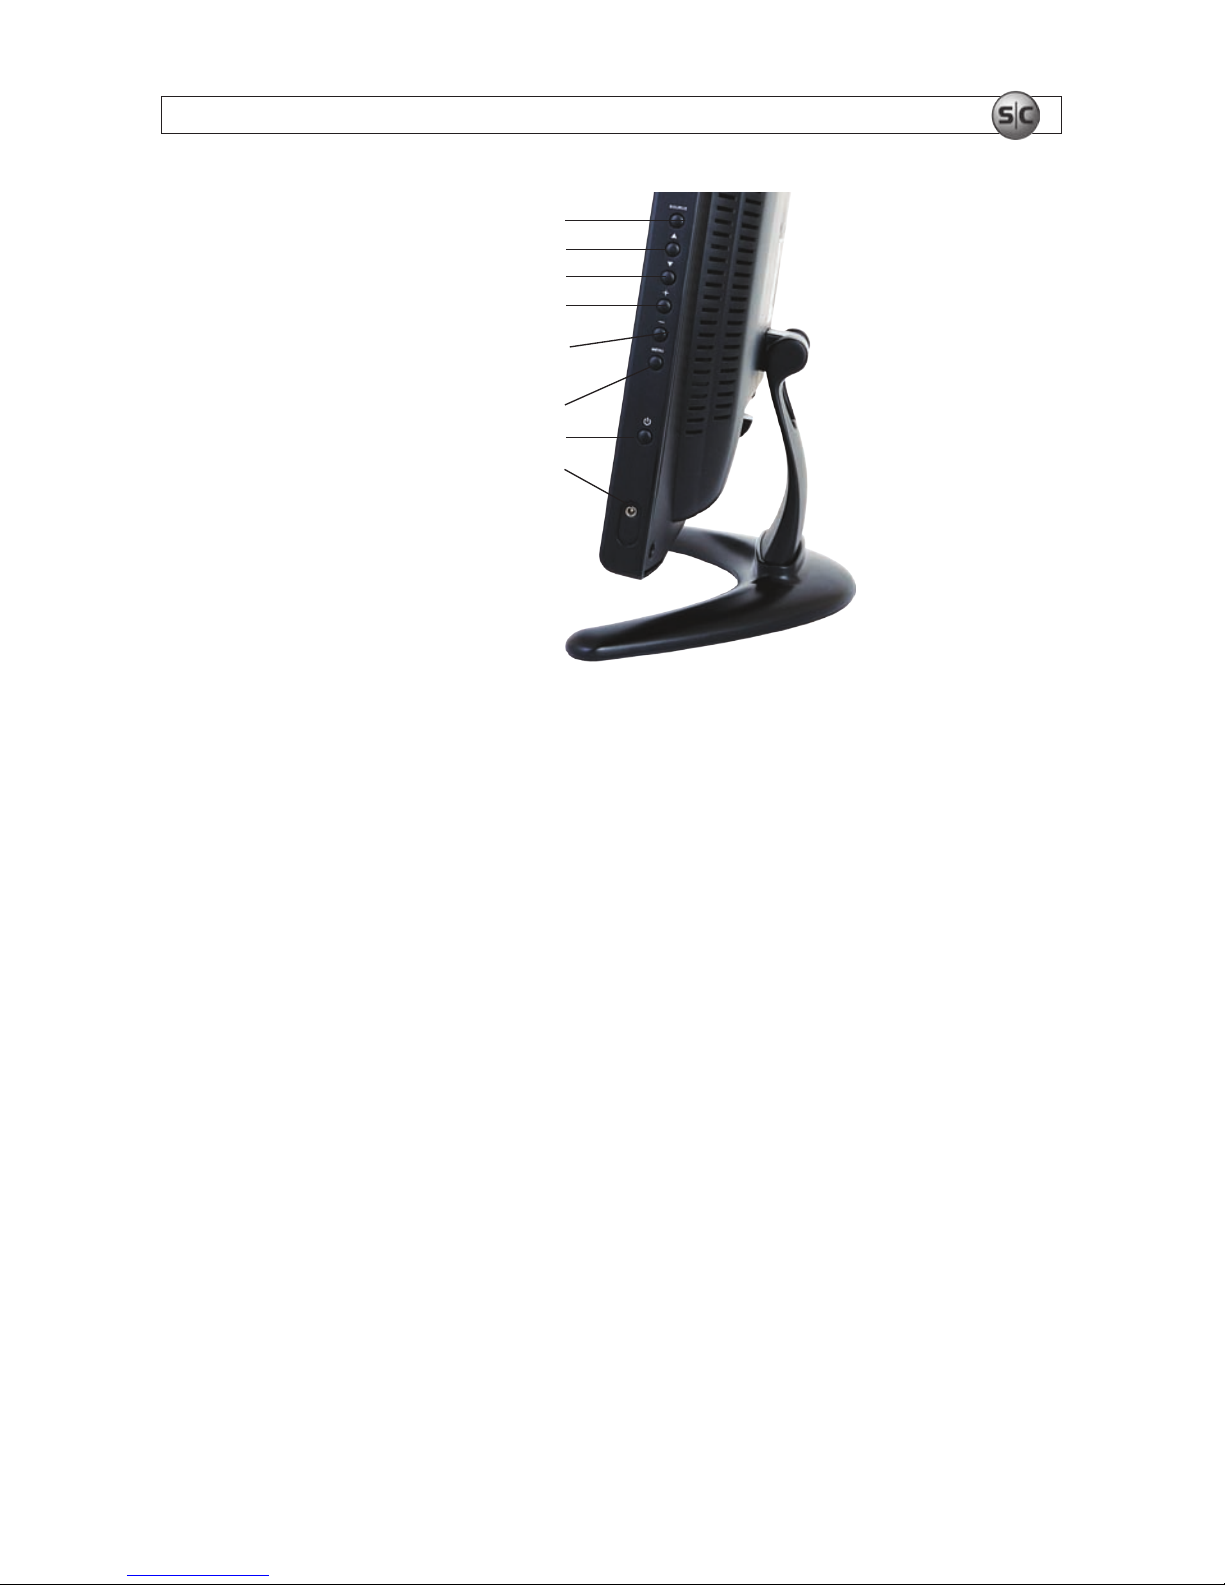
8. Press the POWER button to power on the monitor. The POWER button is located in the control panel on the right side of the
monitor.
Page 9
5LCD Monitor User Manual
SECTION 2: INSTALLATION AND SETUP
SOURCE
Move up in menu
Move down in menu
Move right in menu
or volume up
Move left in menu
or volume down
MENU (open/close)
Power
Audio output
(on some models,
on the left side)
Control panel
9. Congure the monitor for the video input source you are using. Refer to Section 3: Basic Operation for more information.
Page 10
6
www.supercircuits.com
SECTION 3: BASIC OPERATION
SECTION 3
Basic Operation
3.1 Using the remote control
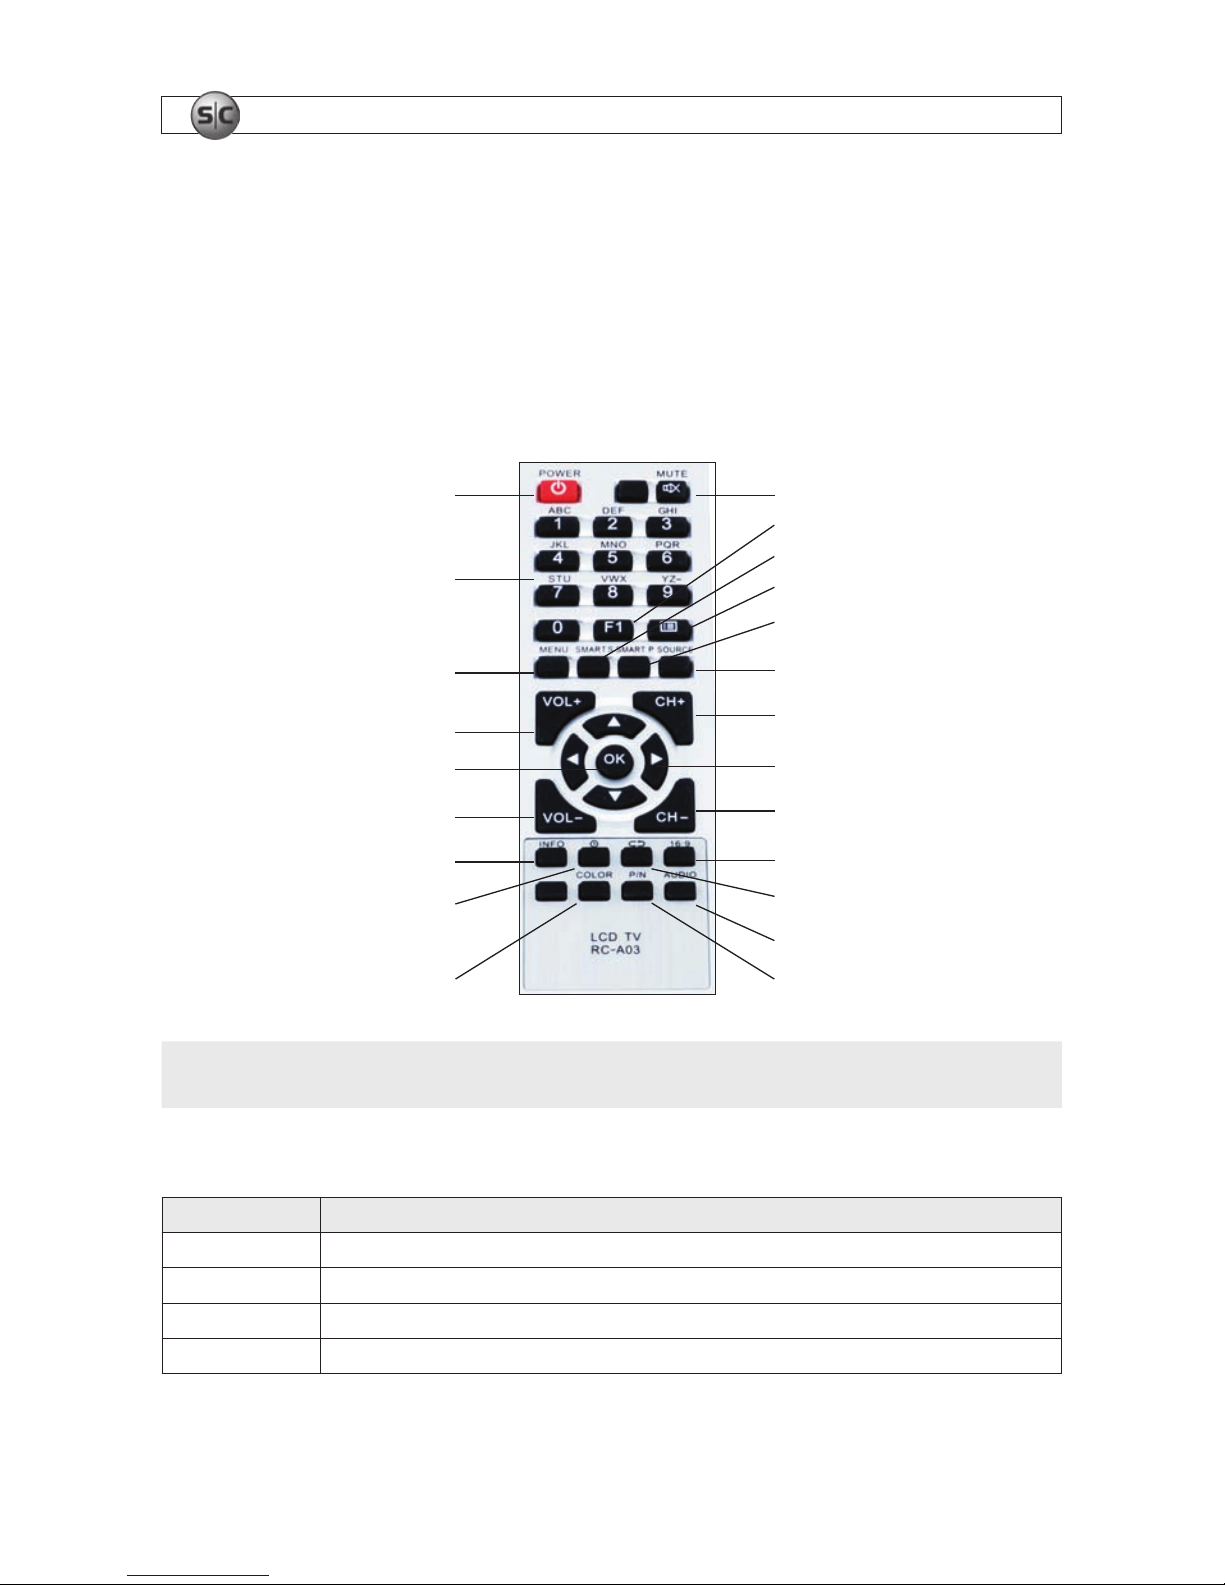
Monitor functions that can be performed on the control panel can also be done with the remote control. The buttons on the remote
control are described below.
Power
Mute
Numeric
buttons
MENU
Smart S
F1
Smart P
SOURCE
Volume up
Volume down
Cursor
buttons
Program list
Channel +
Channel –
OK
16:9
Return
Timer
Info
Color
P/N
Audio
NOTE
The function of buttons on the remote control depend on the display source selected. For instance, if the video input source
selected is PC, the monitor will ignore the numeric buttons and other buttons unrelated to that input source.
Table 1. Remote control button functions
Button Function
Power Turn on or st andby
Info Display s ystem infor mation
Mute Silence au dio
Timer Time se tting but ton
Page 11
7LCD Monitor User Manual
SECTION 3: BASIC OPERATION
Button Function
Numeric but tons
(0 – 9)
Enter number buttons
Program list Scan or s et program lis t
F1 Not use d.
Cursor Up or down cursor but ton: function select; lef t or right cursor button: a dd or reduce
OK Conrm s election
CH
+/–
Add or delete channel number
VOL
+/– Sound volume up (+) or down (–) but tons
Menu Display menu
Source Display source selection menu
SMART S Intellig ent sound mode s election
SMART P Intelligent video mode selec tion. Selec t from PERSONAL, SOFT, ADVANCED, or STANDARD preset video image adjustments
Retur n Retur n to previous channel
Smart image Intellig ent image mode selec t
16:9 Switch betwe en Full, ZOOM, ZOOM2, NORMAL, or PANOR AMA
info Retur n to previous channel
Timer Set sleep timer to 15, 30, 45, or 60 minutes
Color Select color tone: NORMAL, WARM, COOL
P/N Not use d
3.2 Power
3.2.1 Power On
The monitor can be powered on in two ways:
• Press the button on the on the monitor control panel.
• Press the Power button on the remote control.
3.2.2 Standby mode
When the monitor is not in use, press the Power button on the remote control to put the monitor in standby mode. When the
monitor is in standby, the front panel power LED is red.
Page 12
8
www.supercircuits.com
SECTION 3: BASIC OPERATION
NOTE
The monitor will change to standby mode if it is powered on and there is no signal input for 5 minutes, or when the preset time
to turn o is reached.
3.3 Selecting an input source
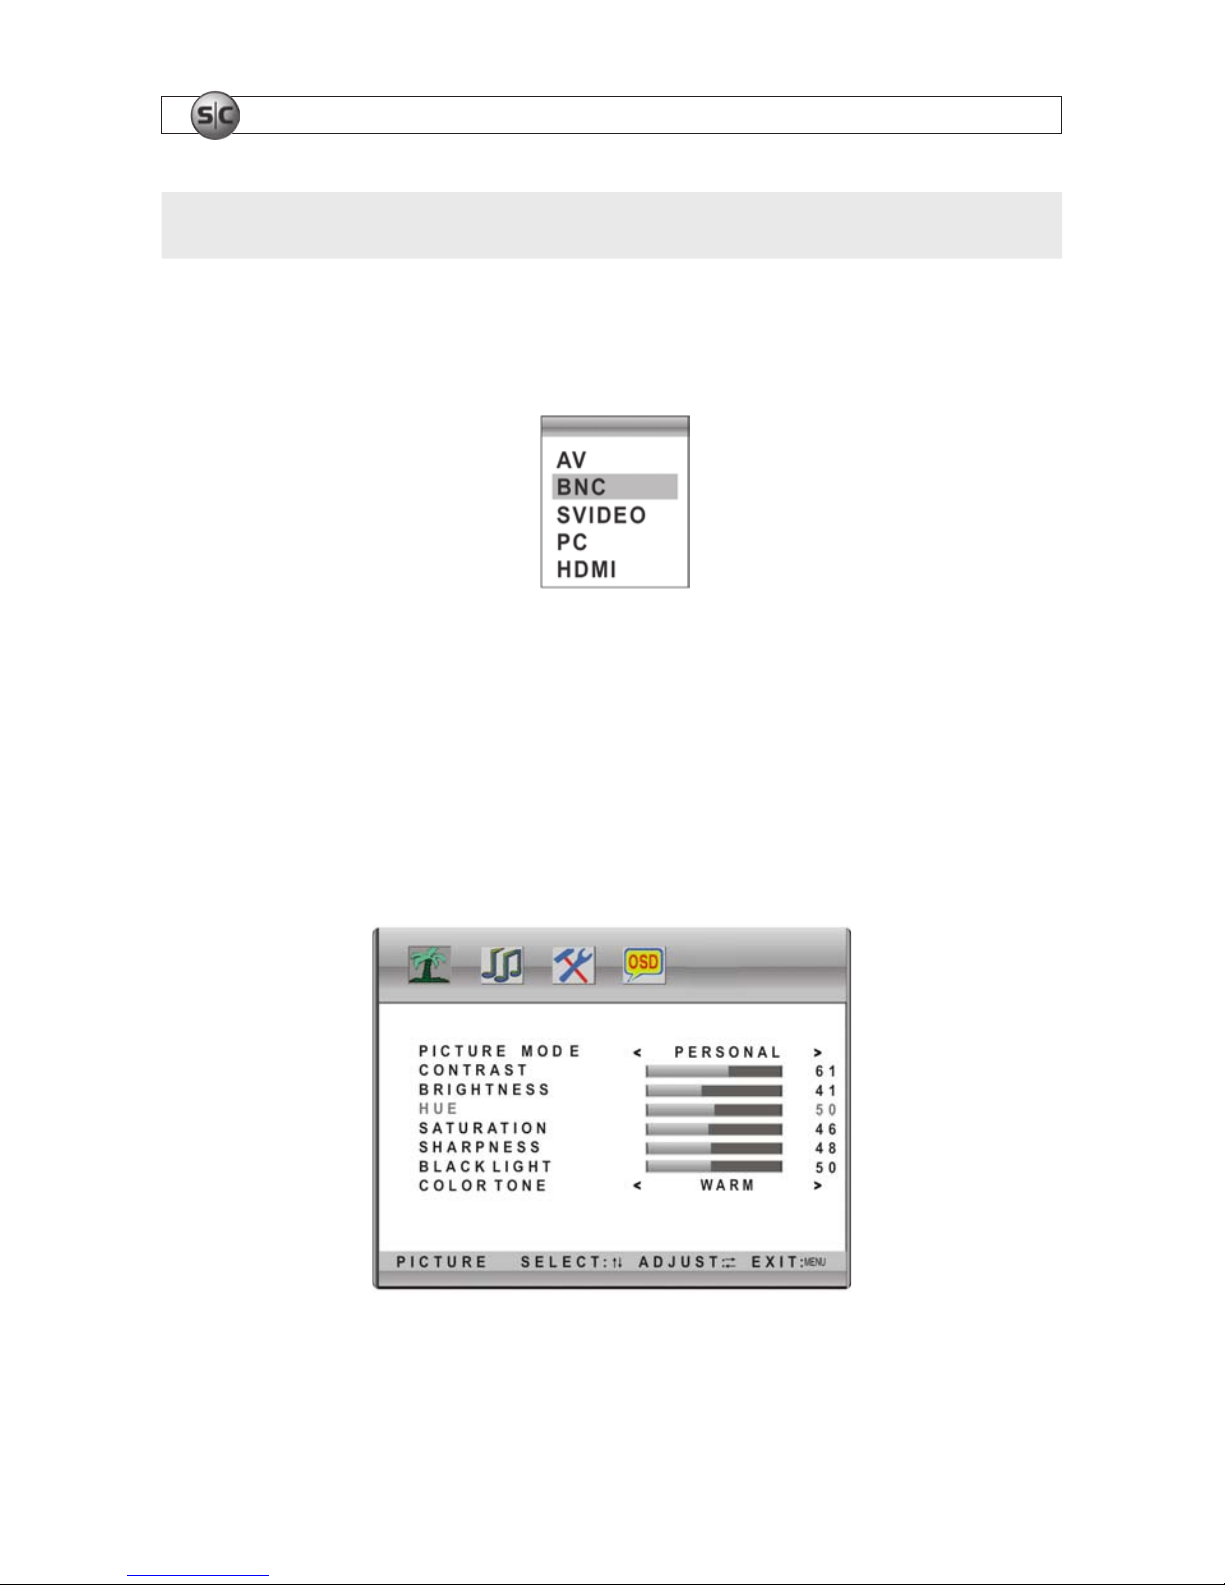
Press SOURCE on either the remote control or the monitor to open the INPUT SOURCE pop-up window.
Then press the up, , or down, , cursor keys on remote control or on the monitor to select the video input interface. Input
interfaces are AV (RCA, composite video input), BNC, S-VIDEO, PC (VGA input), and HDMI. Press the OK button on the remote
control or MENU button on the control panel to switch to the highlighted video input. An on-screen conrmation will appear.
3.4 Working with on-screen menus
Press MENU on the remote control or on the monitor control panel to open the monitor conguration menus. Initially, the monitor
displays the PICTURE menu screen. Options listed on the menu screens may dier from those shown herein depending on the
selected video source.
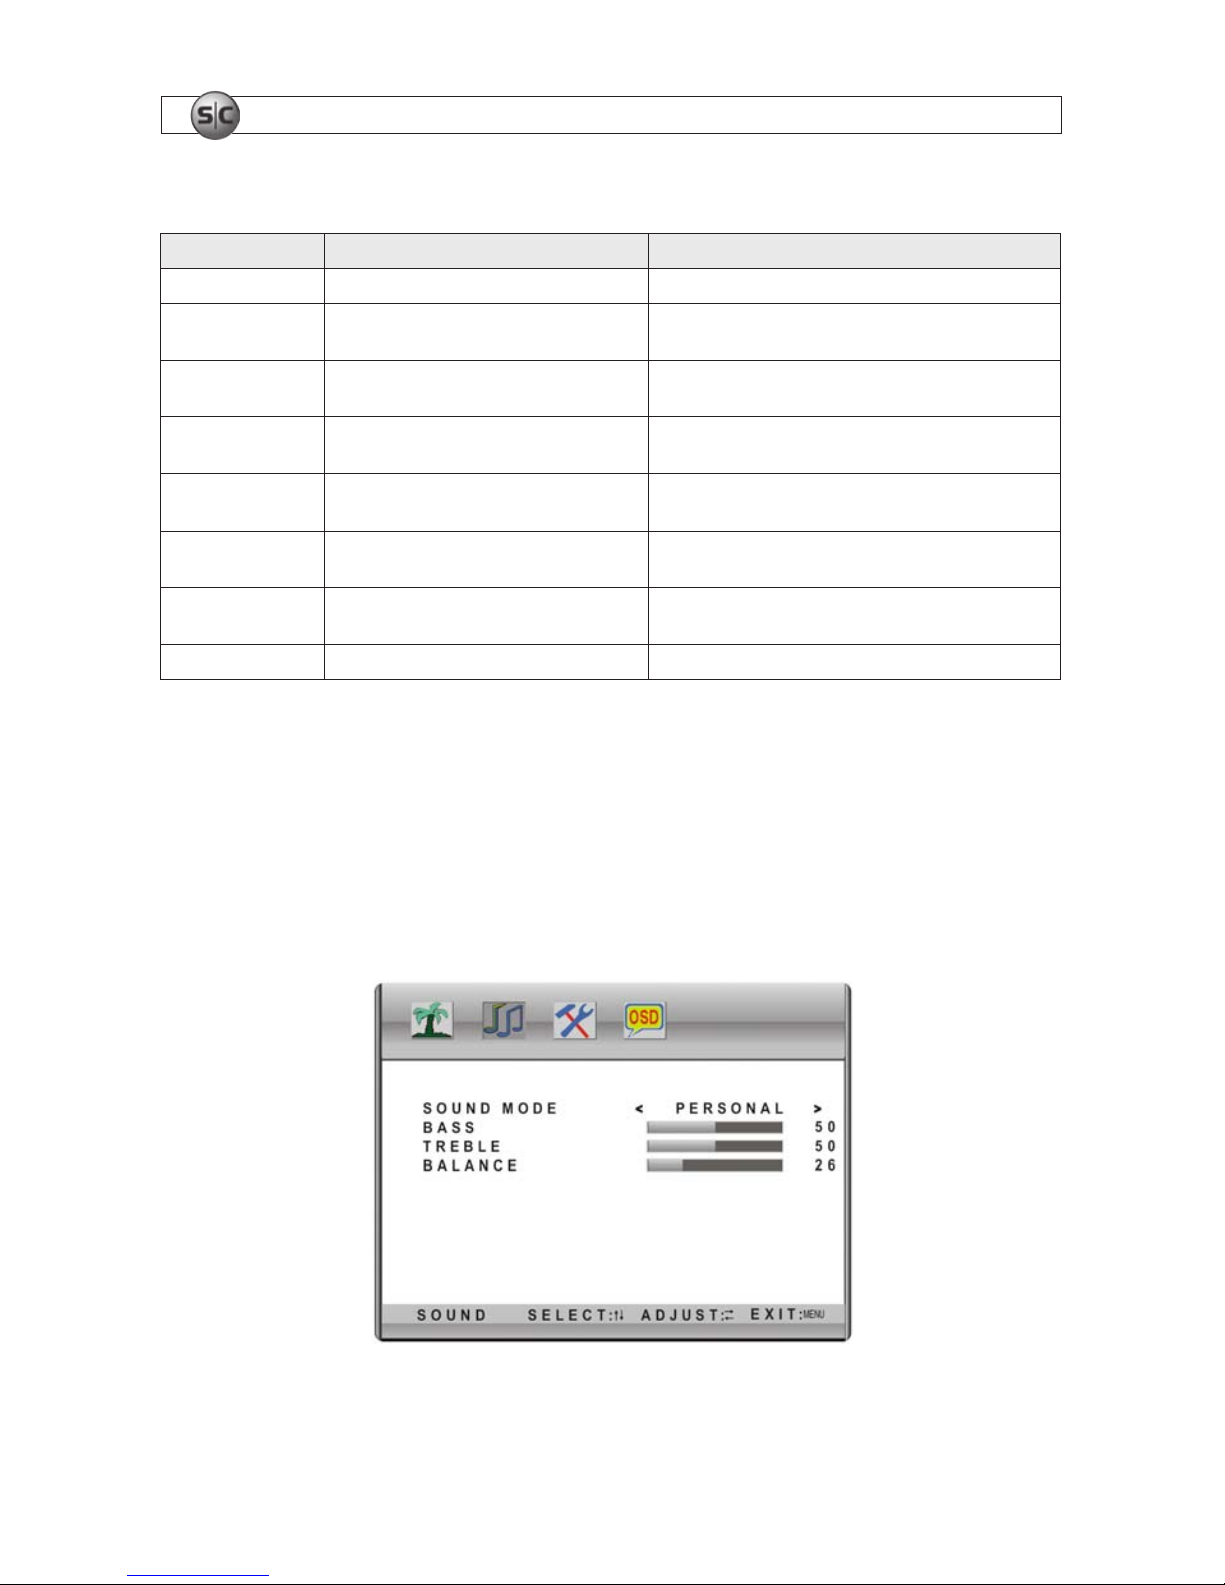
PICTURE menu
Page 13

9LCD Monitor User Manual
SECTION 3: BASIC OPERATION
1. Press the left, t, or right, u, cursor keys on the remote control, or the + or – buttons on the monitor control panel to
select one of four menu screens: PICTURE, SOUND, ADVANCED, or SYSTEM.
2. Press the down, , cursor keys on the remote control or the – button on the monitor control panel to change settings on
the menu screen you selected, press MENU again to close the menu screen.
3.4.1 PICTURE menu
Use the PICTURE menu to adjust the image contrast, brightness, and other attributes of the image displayed on the screen. One of
four modes can be selected: PERSONAL, which allows you to set image attributes individually, and SOFT, DYNAMIC and STANDARD,
which provide factory preset attributes levels. Additionally, in each of the four modes the attribute COLOR TONE can be set to COOL,
NORMAL or WARM color temperatures.
To adjust the image attributes, do the following:
1. Press MENU on the remote control or on the monitor control panel. The monitor will display the PICTURE menu screen.
2. Press the down, , cursor key on the remote control or monitor to select PICTURE MODE options. When an option is
selected, it is highlighted.
3. With PICTURE MODE selected, press the left, t, or right, u, cursor keys on the remote control, or the + or – buttons on the
monitor control panel to select one of four picture modes: PERSONAL, STANDARD, DYNAMIC, or SOFT. As you step through
the preset menus, the picture changes to reect the attribute set by the mode selected. Choose the picture mode that best
satises your needs.
— If you select STANDARD, DYNAMIC, or SOFT, you can change only the COLOR TONE option.
— If you select PERSONAL, you can set the CONTRAST, BRIGHTNESS, HUE, SATURATION, SHARPNESS, BLACKLIGHT, and
COLOR TONE individually.
NOTE
On systems displaying NTSC video, the HUE option is not available.
4. Press the up, , or down, , cursor keys on the remote control or on the monitor control panel to select the attribute you
want to adjust. After selecting the attribute, use the left, t, or right, u, cursor keys on the remote control or the + or –
buttons on the monitor control panel to change the setting of the attribute. Repeat this step for the other attribute(s) you
want to change.
5. Press MENU again to save your settings and exit menu mode.
Page 14
10
www.supercircuits.com
SECTION 3: BASIC OPERATION
Table 2. PICTURE menu option summary
Option Function Descript ion
PICTURE MODE Selec t picture mode STANDARD, DYNAMIC, SOF T, or PERSONAL
CONTRAST Adjust t he image contrast
Increasing the value increases cont rast;
decreasing the value d ecreases contras t (0-100)
BRIGHTNESS Adjust b rightness and black ness the image
Increasing the value increases bri ghtness;
decreasing the value d ecreases br ightness (0-100)
HUE Adjust the hue of the image
Increasing the value increases green;
decreasing the value increases purple (0 -100)
SATURATION Adjust the color satu ration of the image
Increasing the value increases colo r saturation;
decreasing the value d ecreases color sat uration (0-100)
SHARPNE SS Adjust t he sharpness of the ima ge
Increasing the value increases denitio n;
decreasing the value d ecreases de nition (0-100)
BLACKLIGHT Adjus t the black light of the imag e
Increasing the value increases blac k light;
decreasing the value d ecreases black light (0-100)
COLOR TONE Adjust the co lor tone of the image NORMAL, WARM, COOL color temper atures
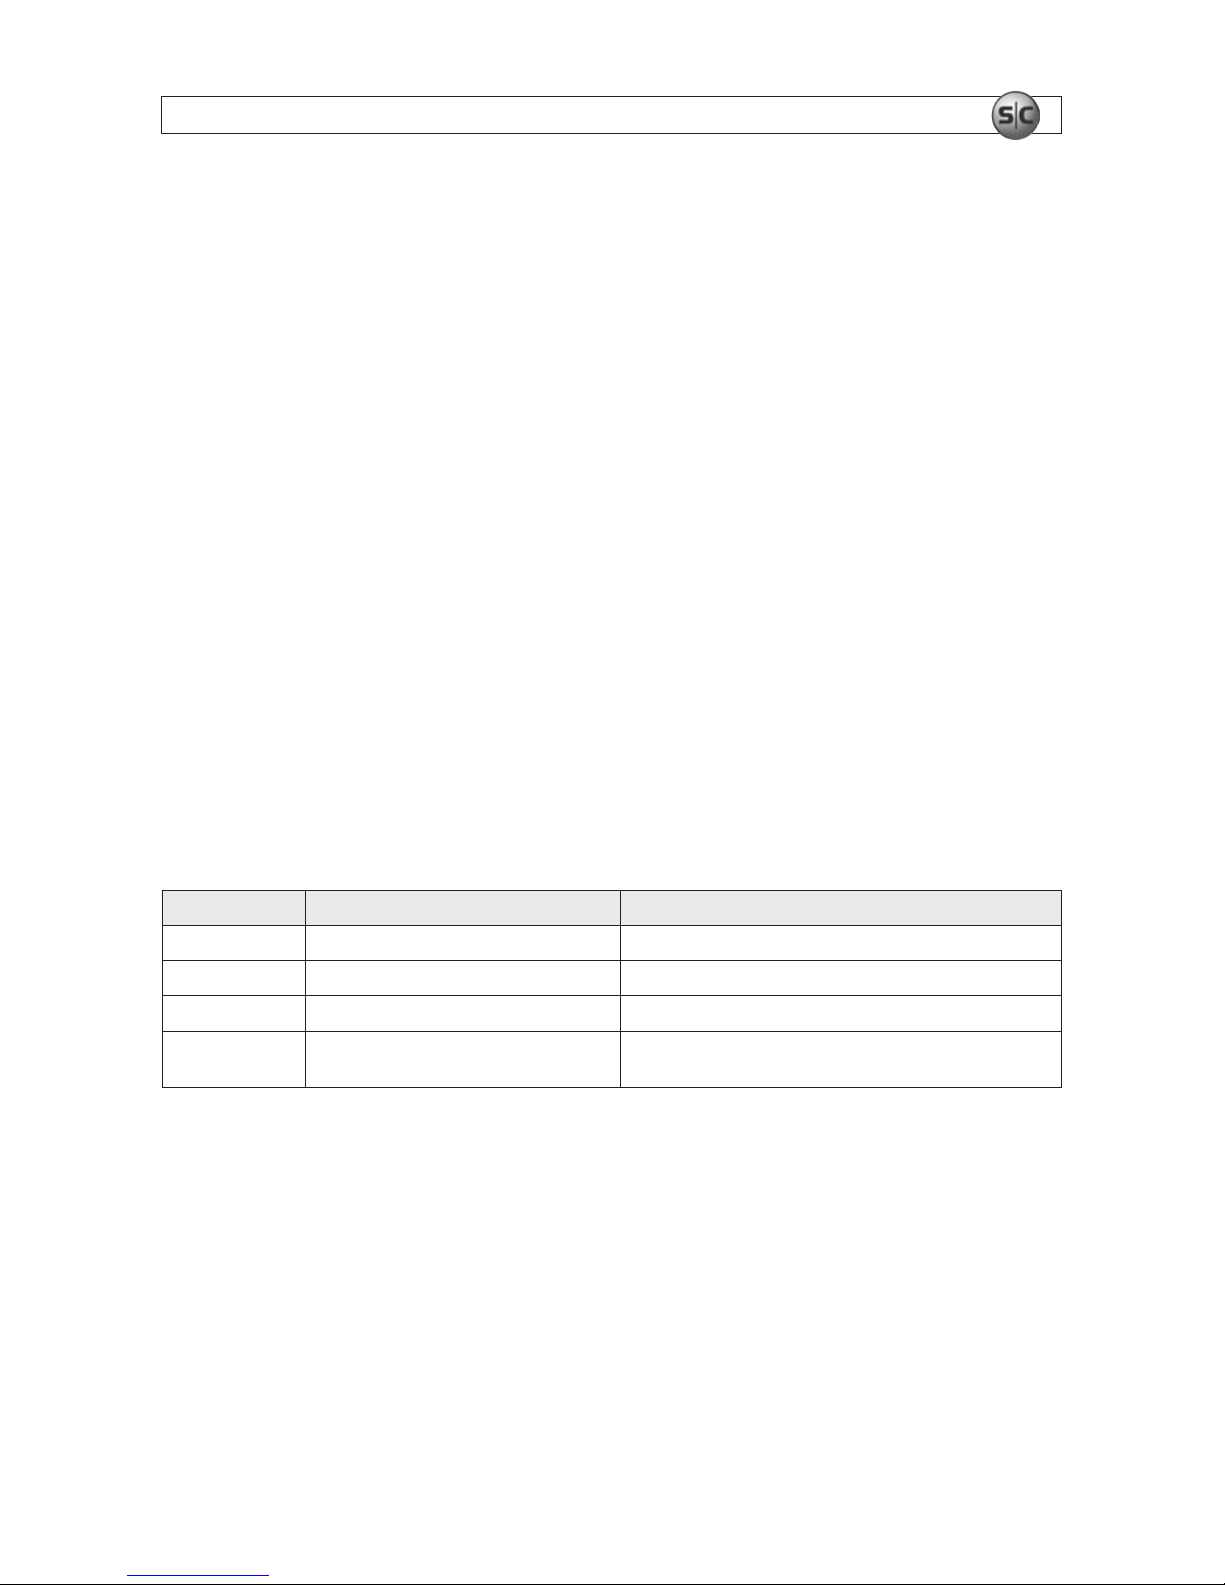
3.4.2 SOUND menu
Use the SOUND menu to adjust the audio bass, treble, and balance. One of four sound modes can be selected: PERSONAL mode,
which allows you to set bass, treble and balance, and STANDARD, NEWS, and MUSIC modes that have xed levels for bass and
treble, but allow you to set the balance.
Volume is not adjusted within a menu. Use the VOL+ and VOL– buttons on the remote control and the + and – buttons on the
monitor control panel to adjust the volume level.
SOUND menu
Page 15
11LCD Monitor User Manual
SECTION 3: BASIC OPERATION
To modify the sound parameters, do the following:
1. Press MENU on the remote control or on the monitor control panel. The monitor will display the PICTURE menu screen.
2. Press the right, u, cursor key on the remote control or the + button on the monitor once to open the SOUND menu.
3. Press the down, , cursor key on the remote control or the monitor to select the SOUND MODE. When an option is selected,
it is highlighted.
4. With SOUND MODE selected, press the left, t, or right, u, cursor keys on the remote control or the + or – buttons on the
monitor to select one of four sound modes, PERSONAL, MUSIC, NEWS, or STANDARD. As you step through the preset menus
the sound tonal quality and balance change to reect the mode settings. Choose the sound mode that best satises your
needs.
5. Press up, , or down, , cursor keys or the remote control or the monitor control panel to select a sound attribute you
want to adjust. After selecting the attribute, use the left, t, or right, u, cursor keys on the remote control or the + or –
buttons on the monitor control panel to change the setting of the attribute. Repeat this step for other options you want to
change.
6. Press the MENU button again to save your settings and exit the menu mode.
Table 3. SOUND menu option summary
Option Function Descript ion
SOUND MO DE Selec t audio sound aec t mode PERSO NAL, STANDARD, NEWS, or MUSIC modes
BASS Adjust bass level Increasing value increases b ass; decreasing value decreases bass (0 -100)
TREBL E Adjust t reble level Increasing value increases treble; decreasing value decreases t reble (0-100)
BALANCE
Adjust t he balance bet ween left and right channel
volume.
Increasing value decrease s left volume; decreasing value decreas es right
volume (0 -100)
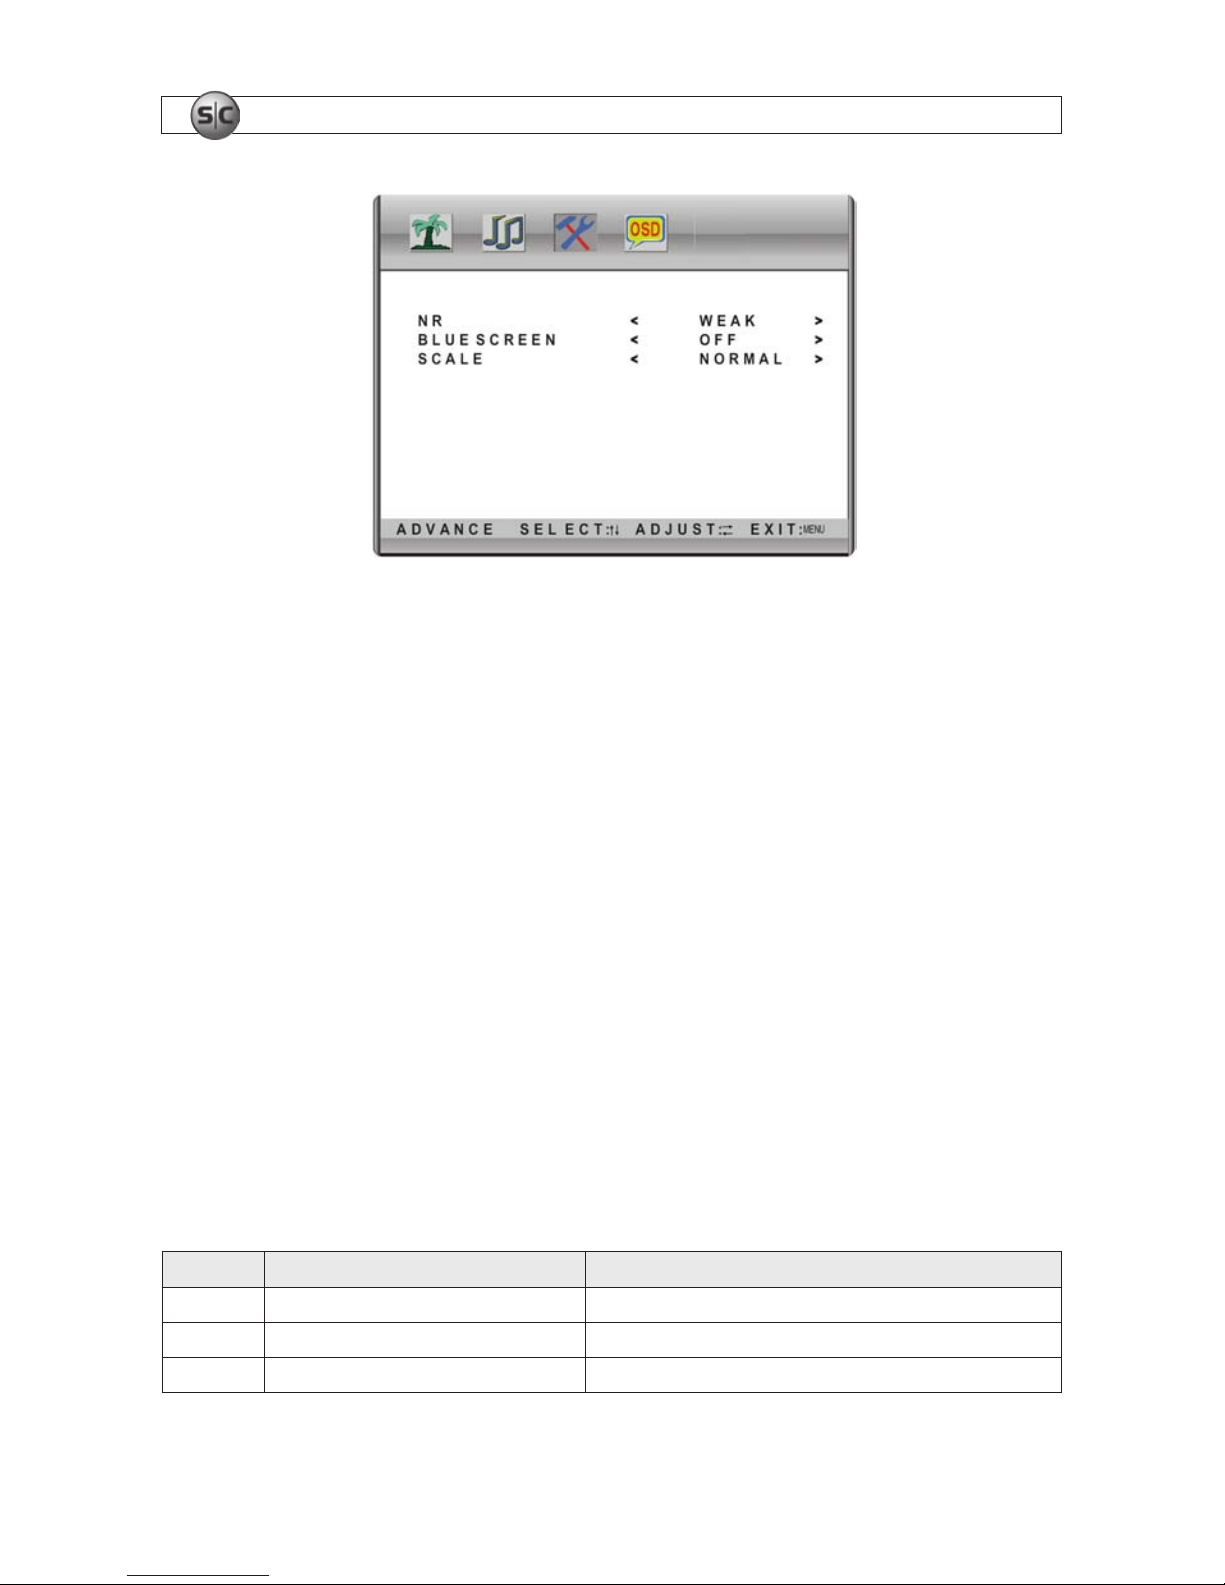
3.4.3 ADVANCE menu
Use the ADVANCE menu to set noise reduction (NR) level, screen background, and zoom/aspect ratio. This menu is not available
when the input source is PC (VGA) or HDMI.
Page 16
12
www.supercircuits.com
SECTION 3: BASIC OPERATION
12
www.supercircuits.com
ADVANCE menu
To adjust the ADVANCE parameters, do the following:
1. Press MENU on the remote control or on the monitor control panel. The monitor will display the PICTURE menu screen.
2. Press the right, u, cursor key on the remote control or the + button on the monitor twice to open the ADVANCE menu.
3. Press the down, , cursor key on the remote control or the monitor control panel to select the NR option. When an option is
selected, it is highlighted.
4. With NR selected, press the left, t, or right, u, cursor keys on the remote control or the + or – buttons on the monitor to
select either WEAK, STRONG, or OFF. As you step through dierent levels the display changes to reect the NR level selected.
5. Press the up, , or down, , cursor keys or the remote control or the monitor control panel to select another option. After
selecting the option, use the left, t, or right, u, cursor keys on the remote control or the + or – buttons on the monitor
control panel to change the setting. Repeat this step for other settings you want to change.
6. Press MENU again to save your settings and exit the menu mode.
Table 4. ADVANCE menu option summary
Option Function Descript ion
NR Adjust noise reduc tion WEAK, MIDDLE, STRONG, or OFF modes
BLUE SCREEN Set “no signal” / b ackground screen to blue or black Blue ON or OFF
SCALE Adjust the picture scale and a spect ratio FULL, ZOOM, ZOOM2, NORMAL, or PANOR AMA (not used with all input sources)
Page 17
13LCD Monitor User Manual
SECTION 3: BASIC OPERATION
13LCD Monitor User Manual
3.4.4 SYSTEM menu
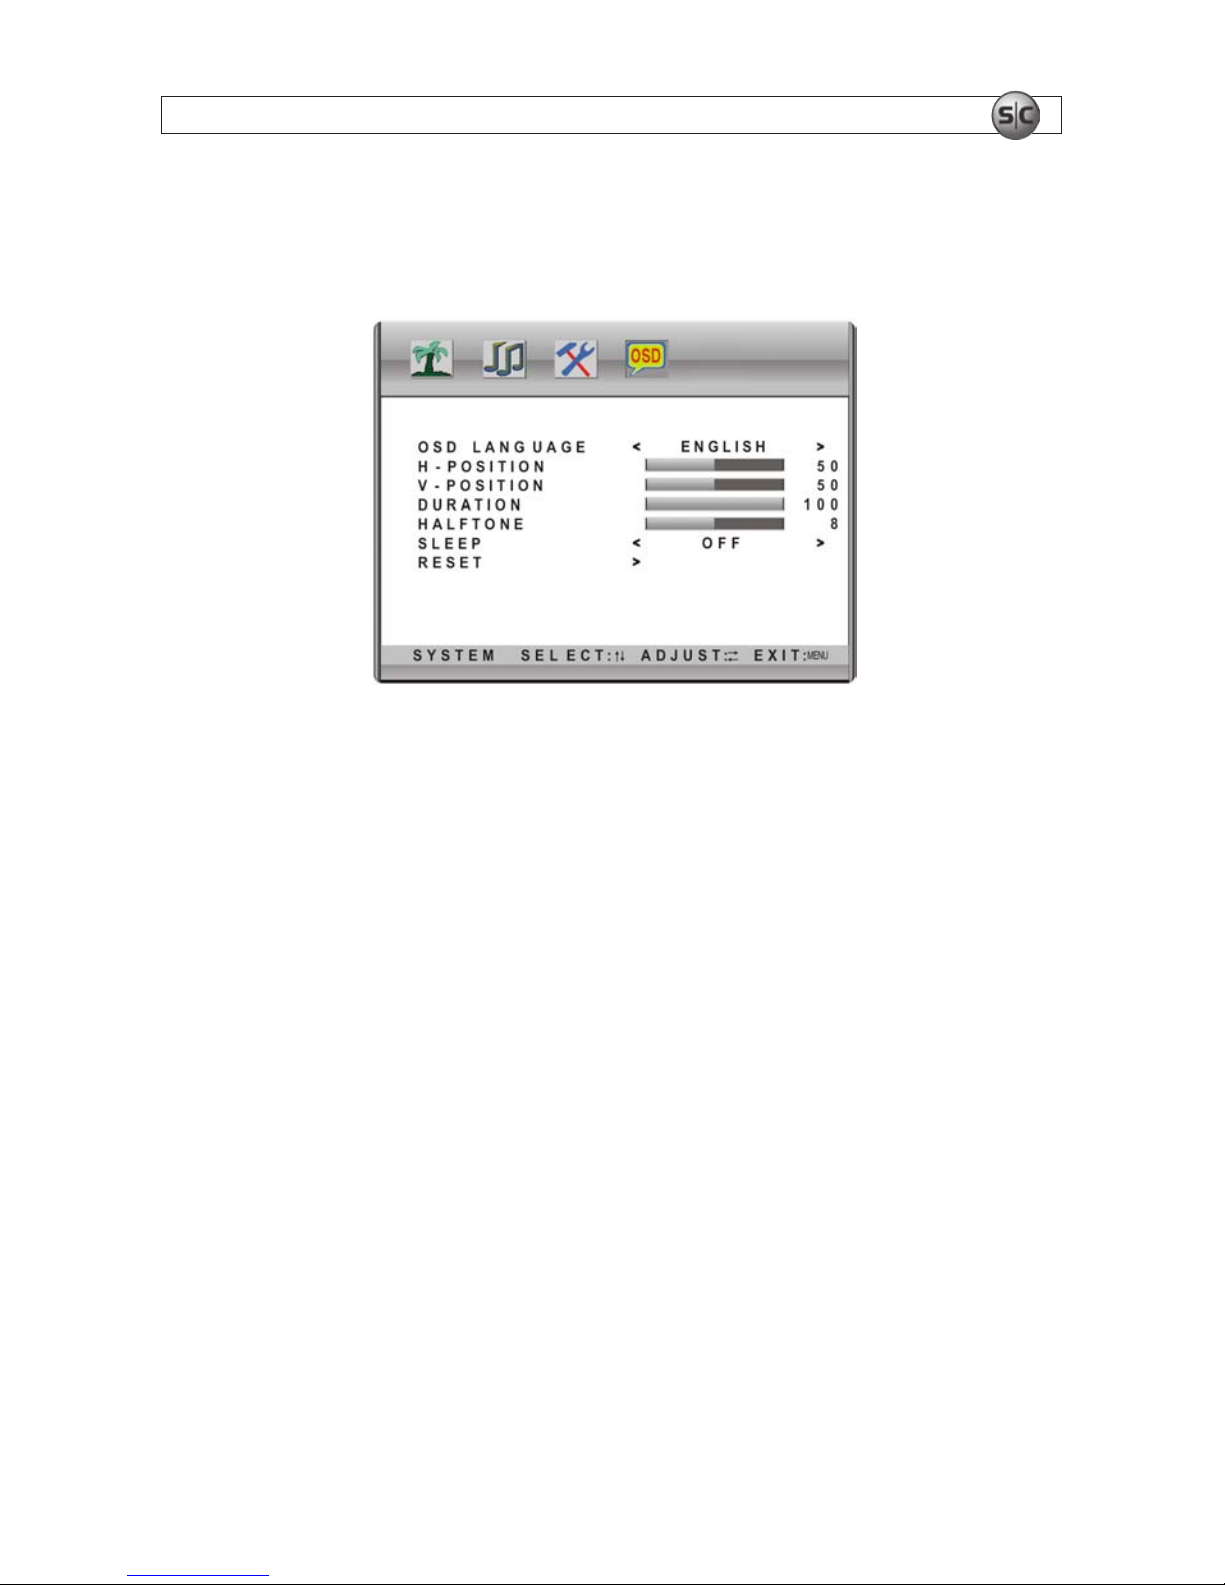
Use the SYSTEM menu to setup the attributes of the menu display and to reset the monitor settings to the factory default values.
SYSTEM menu
To adjust the SYSTEM parameters, do the following:
1. Press MENU on the remote control or on the monitor. The monitor will display the PICTURE menu screen.
2. Press the left, t, cursor key on the remote control or the – button on the monitor control panel to open the SYSTEM menu.
3. Press the down, , cursor key on the remote control or the monitor to select the OSD LANGUAGE option. When an option is
selected it is highlighted.
4. With OSD LANGUAGE selected, press the left, t, or right, u cursor keys on the remote control or the + or – buttons on
the monitor control panel to select one of several menu languages. As you click through the dierent languages, the menu
language changes to reect the selection.
5. Press up, , or down, , cursor keys on the remote control or on the monitor to select another option. After selecting the
option, use the left, t, or right, u, cursor keys on the remote control or the + or – buttons on the monitor to change the
setting. Repeat this step for other options you want to change.
6. Press MENU again to save your settings and exit the menu mode.
Page 18
14
www.supercircuits.com
SECTION 3: BASIC OPERATION
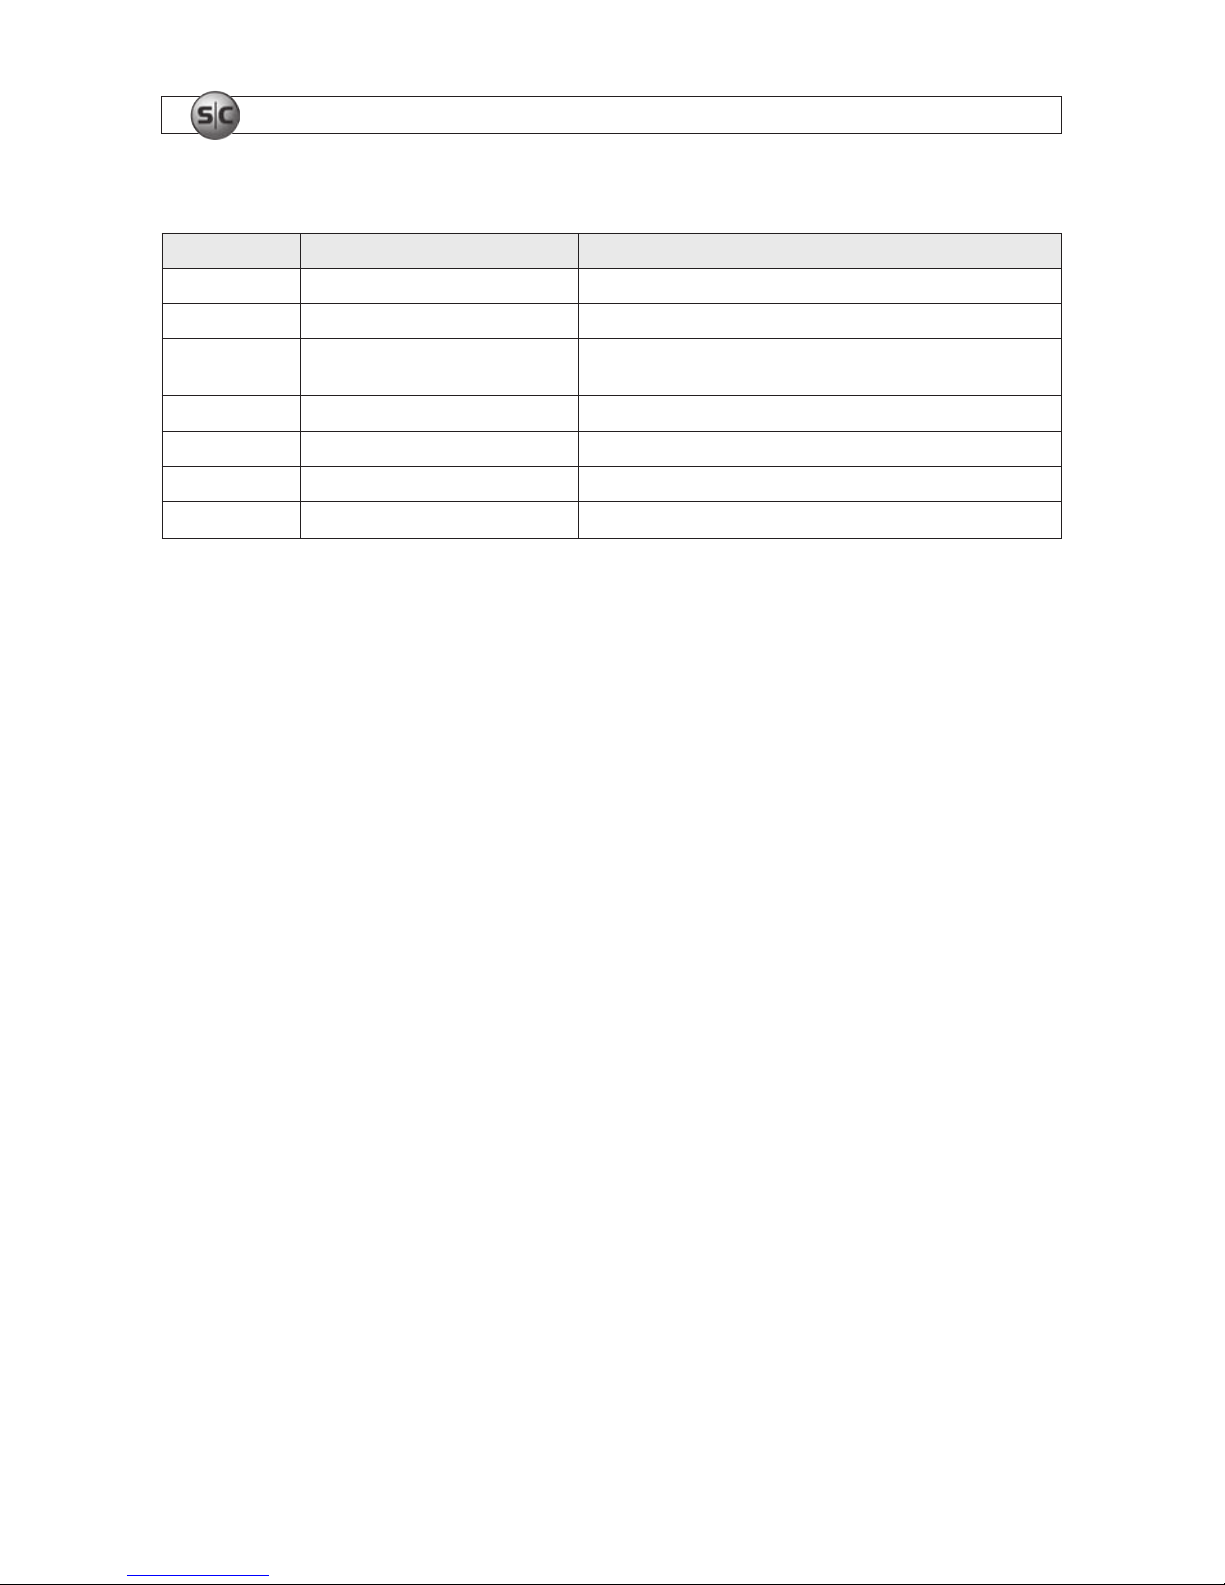
Table 5. SYSTEM menu option summary
Option Function Descript ion
OSD LANGUAGE Selec t menu language Selec t menu language – E nglish, French, Chines e, Turk ish, etc.
H-POSITION Adjust h orizontal po sition of menu display Increasing value, menu moves right; de creasing value, menu moves lef t (0-100)
V-POSIT ION Adjus t vertical position of menu display Increasing value, menu move down; d ecreasing value, menu move up (0-100)
DURATION Set duration of menu Increasing the value lengthens the duration of menu display (0 – 100)
HALFTONE Adjust screen half tone level Increasing value increase s halftone; decreasing value dec reases half tone (0-8)
SLEEP Set sleep timer Options are OFF, 15, 30, 45, 60 (minutes)
RESE T Reset menu settings to factory default
Page 19
15LCD Monitor User Manual
SECTION 4: SPECIFICATIONS
SECTION 4
Specications
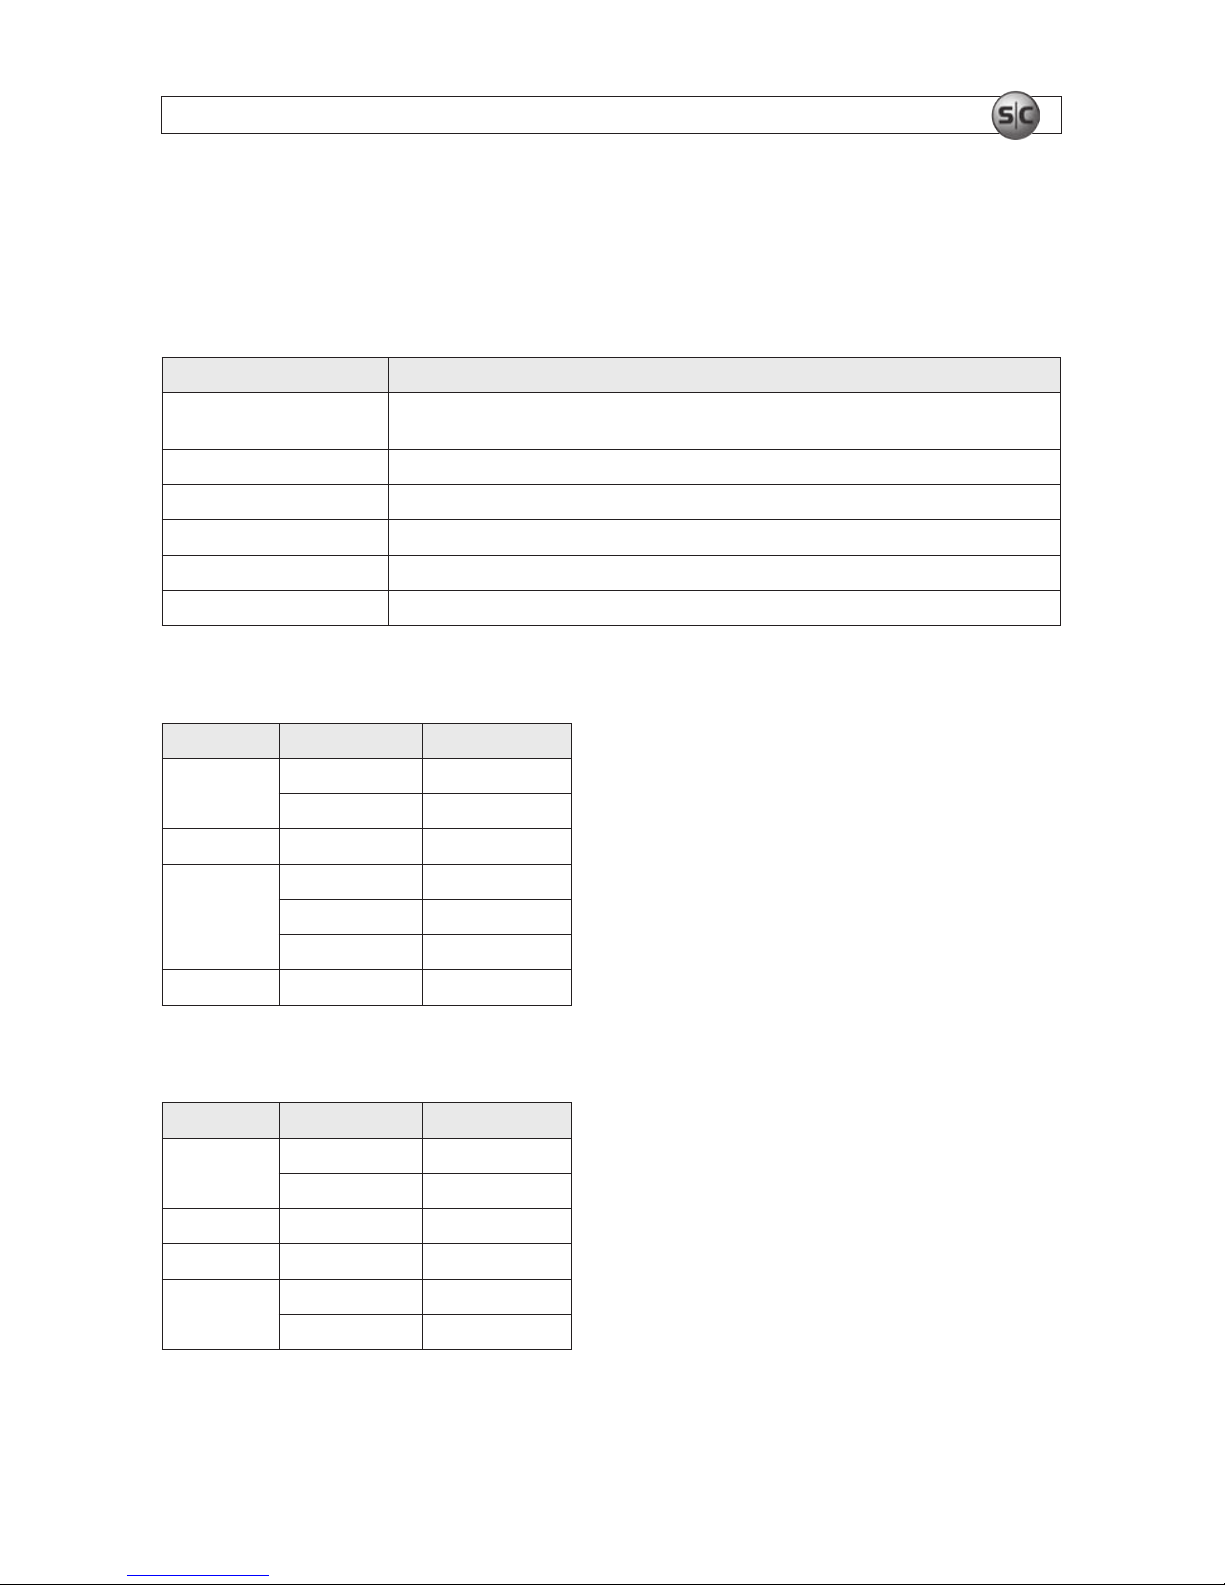
Table 6. Video interface specications*
Inter face Specication
HDMI (optional)
Video signal: 108 0p, 1080i, 720p, 576p, 576i, 480p, 480i
Audio: LPCM 48KHz, 4 4.1KHz, 32KH z, 24-bit, 20-bit, 16-bit
VGA DB-15, 75 Ω, 0.5 ~ 0.7 Vp-p, H.V: TTL level (suppor t mode, refer to VGA input mode)
S-Video Input Y: 75Ω 1 Vp-p, C: 75Ω 0.286 Vp-p
BNC/C VBS Input/Ou tput Y: 75Ω, 1 Vp-p
Audio Input/Output 20 KΩ, 0.5 Vp-p
Earphone 16 ~ 300 Ω, 100 mW + 100 mW
Table 7. PC (VGA) input resolutions: LCD17-5, LCD19-5 monitors*
Mode Resolution Refresh (Hz)
VGA
720
400 70
640
480 60
SVGA 800
600 60
XGA
1024
768 60
1280
960 60
1152
864 75
SXGA 1280
1024 6 0**
Table 8. PC (VGA) input resolutions: LCD19W-7 monitor*
Mode Resolution Refresh (Hz)
VGA
720
400 70
640
480 60
SVGA 800
600 60
XGA 1024
768 60
WXGA
1280
768 60
1440
900 60**
Page 20
16
www.supercircuits.com
SECTION 4: SPECIFICATIONS
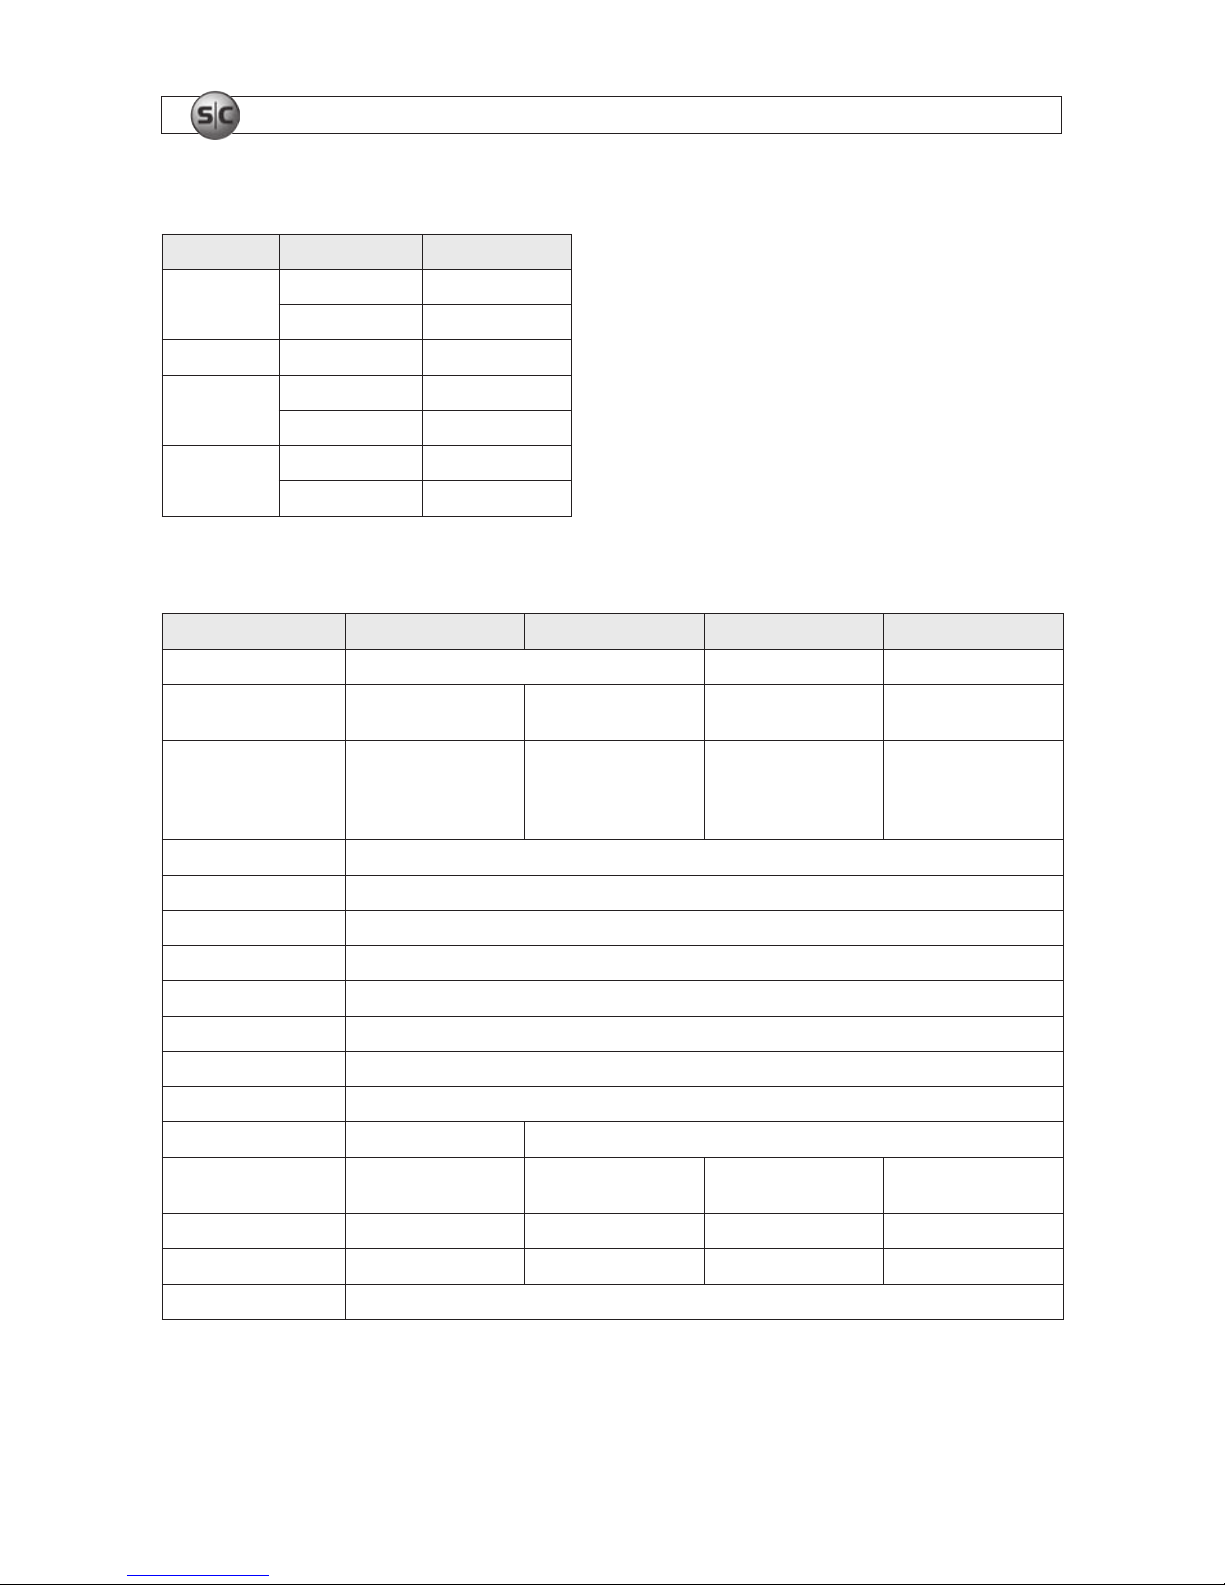
Table 9. PC (VGA) input resolutions: LCD22W-7 monitor*
Mode Resolution Refresh (Hz)
VGA
720
400 70
640
480 60
SVGA 800
600 56, 60
XGA
1024
768 60
1280
960 60
SXGA
1280
1024 60
1680
1050 60**
Table 10. General specications*
Item LCD17-5 LCD19-5 LCD19W-7 LCD22W-7
Resolution (maximum) 1280 x 1024 @ 60 Hz 1440 x 9 00 @ 60 Hz 1680 x 1050 @ 60 Hz
Pixel pitch 0.264 x 0.264 mm 0.294 x 0.2 94 mm
0.2835 x 0.2835 mm, or
0.285 x 0.285 mm
0.282 x 0.282 mm
Active area
13.30 x 10.64 in
(337.92 x 270.3 4 mm)
14.82 x 11.85 in
(376.32 x 301.06 mm)
16.07 x 10.05 in
(408.24 x 255.15 mm) or
16.16 x 10.10 in
(410.4 x 256.5 mm)
18.65 x 11.66 in
(473.76 x 296.10 mm)
Colors 16.7 M
Surf ace Anti- glare
Audio volume 3 W + 3 W
Air pressure 86 kPa ~ 104 kPa
Temperature (oper ating) 41°F ~ 104°F (5°C ~ 40°C)
Temperature (storage) -4°F ~ 131°F (-20°C ~ 55°C)
Humidity (operating) 10% ~ 85%
Humidity (storage) 5% ~ 95%
Power consumption*** 40 W (on), < 2 W (standby) < 45 W (on), < 2 W (standby)
Size (L x W x H)
19.5 x 5.4 x 2.4 in
(496 x 390 x 62 mm)
20.1 x 16.9 x 2.76 in
(510 x 430 x 70 mm)
20.47 x 14.84 x 2.99 in
(520 x 377 x 76 mm)
23.11 x 16.3 4 x 3.03 in
(587 x 415 x 77 mm)
Net Weight 13.23 lbs (6.0 Kg) 15.43 lbs (7.0 Kg) 14.33 lbs (6.5Kg) 15.43 lbs (7.0 Kg)
Gross Weight 16.54 lbs (7.5 Kg) 19.84 lbs (9.0 Kg) 17.64 lbs (8.0 Kg) 19.84 lbs (9.0 Kg)
Remote co ntrol range < 26.2 ft (< 8 m) ± 30°
* These specicat ions are subject to change without notice.
**Recommended mode
*** Power supply complies wit h EPA st andards and is compatible wit h the VESADPMS s tandard.
Page 21
17LCD Monitor User Manual
SECTION 5: TROUBLESHOOTING
SECTION 5
Troubleshooting
Q My monitor has no image or sound. How can I x this problem?
A It may be that the power source is bad, or the power connections are loose. Check the power cord to make sure it is
connected. Also, try to power on the monitor using both the button on the monitor and the button on the remote control.
Q The monitor display is black and white (no color). Why?
A The color saturation setting of the monitor may be too low. Use the PICTURE menu to increase the saturation level setting.
Q I have a picture on the monitor but no sound. Is there an adjustment?
A Yes, the volume setting may be too low. Also, check the connections from the audio source to the monitor.
Q With a computer connected to the monitor, there is no display. Additionally, the LED is
blinking. Why?
A The cable from between the computer and the monitor may be loose or bad. Check the cable connections, or replace the
cable.
Q Why does the remote control only work when it is close to the monitor?
A The receiver sensor on the front of the monitor may be covered or the batteries in the remote control may be weak. Ensure
that the IR receiver on the monitor is clean and not blocked. Also, replace the batteries in the remote control with new ones.
Q When I use the monitor with my computer why is the display faint?
A The display settings of the monitor may be incorrect or the display mode is incorrect. Use the auto-adjustment function in
the menu. Set the monitor to the optimal display setting.
Q Why is the display small when I use the monitor with my computer?
A The monitor conguration menu settings are incorrect. Open the SYSTEM menu and use the auto adjustment function. Set
the monitor to the optimal display setting.
Q My monitor makes noise when I turn it o. Is this normal?
A Yes. This is usually caused by an electrical release in the monitor circuitry.
Q The image on my monitor is poor and unstable. What causes this to happen?
A Room lighting, static electricity, and other external factors can disturb the image or cause it to be unstable. Try shutting o
the monitor and disconnecting it from its power source for two minutes. Then reconnect it and power it on again.
CAUTION
Don’t let your monitor display the same pattern continuously. If a high contrast picture remains on the screen for a long
time, the image may “burn” into the display, which usually dissipates after the monitor is shut o. In extreme conditions, a
remnant of the prior image may remain on the display.
 Loading...