

Page 1
Enter
V
<
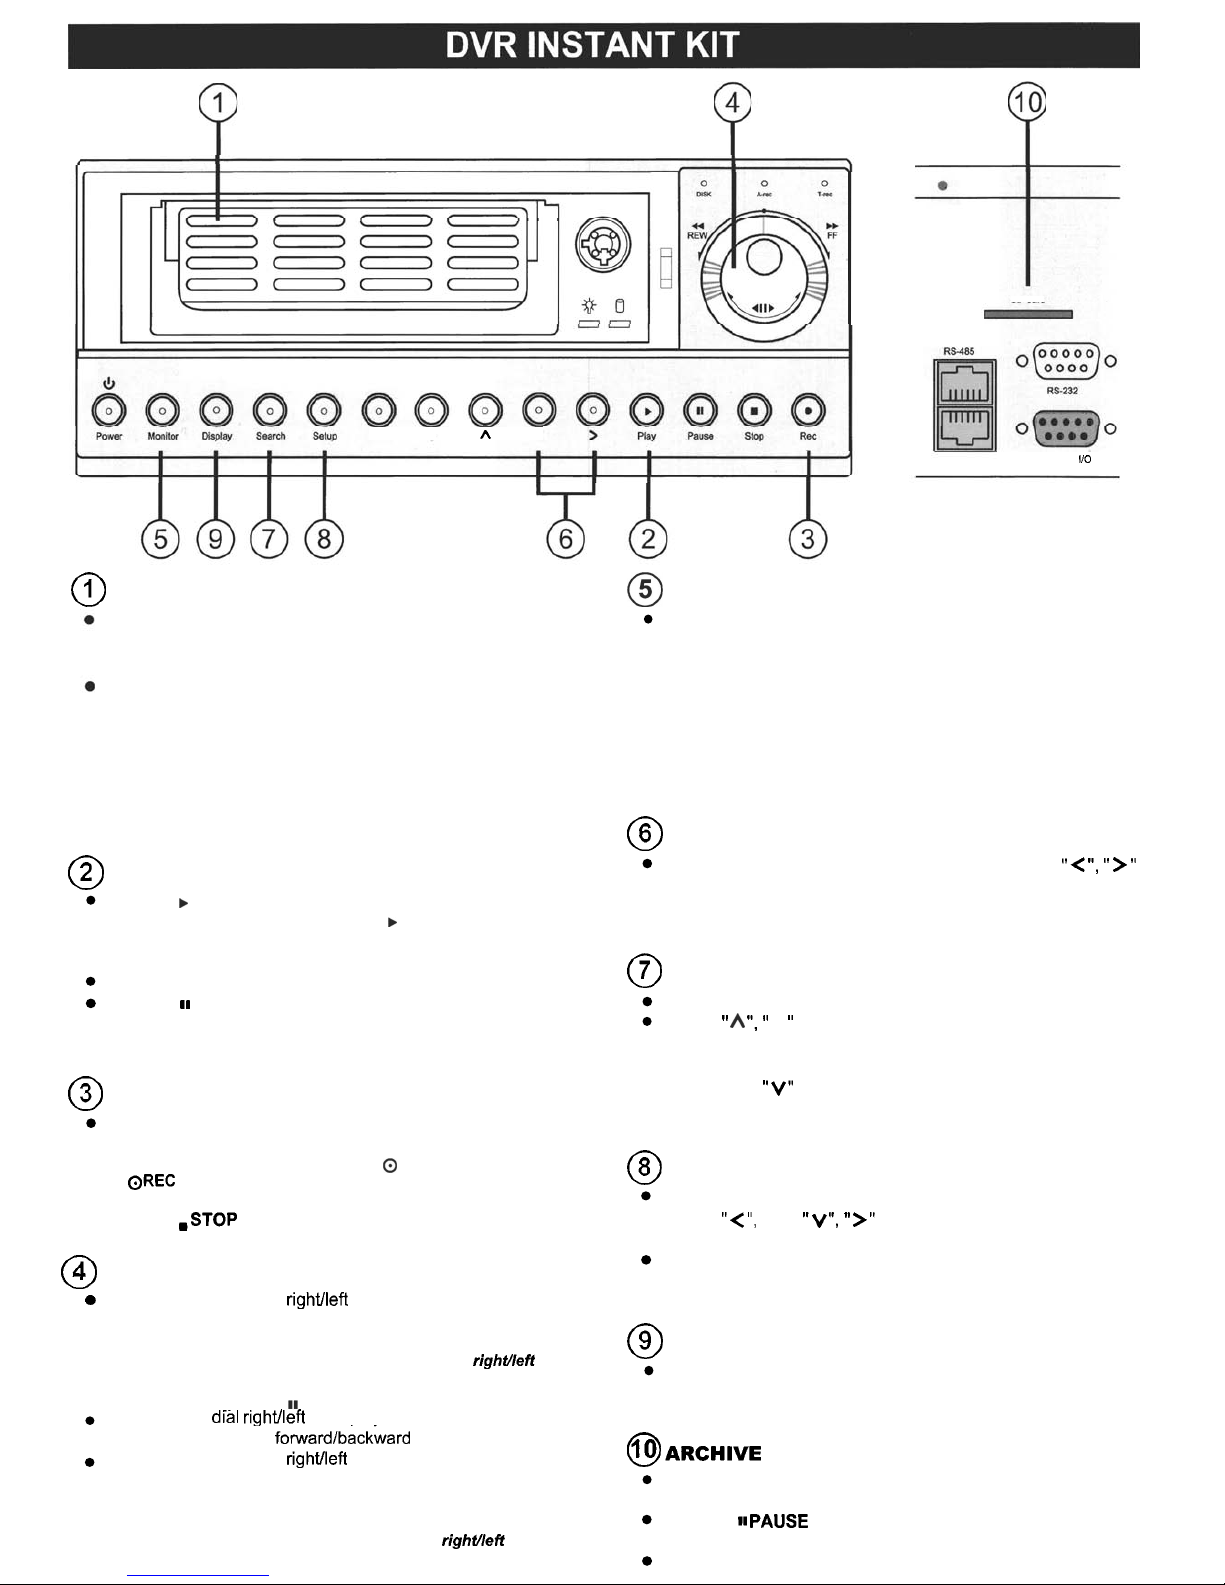
HARD DISK DRIVE COMPARTMENT
To remove hard disk drive compartment, turn the hard disk
lock to the down position. Lift the hard disk drive compartment
handle and pull the hard disk drive compartment out.
To insert the hard disk drive compartment, turn the hard disk
lock to the down position. Lift the hard disk drive compartment
handle and insert the hard disk drive compartment. To power
on the hard disk drive, turn the hard disk lock to the left
position.
Green light indicates the hard disk drive is storing or
retrieving data. Red light signals the hard disk is reaching
capacity.
PLAYBACK
Press the
PLAY
button to playback last recorded video.
The monitor will display a flashing
PLAY
message and
the
.
PLAY
button will light up indicating the unit is in
playback status
Press the
.STOP
button to stop playback at any time.
Press the
PAUSE
button during playback to freeze the
display. During the freeze, press this to display one framelfield
of a picture at a time in the forward direction.
MANUAL RECORDING
In live display, press the
OREC
button to begin recording
video onto a hard disk with the corresponding settings.
The monitor will display a flashing
REC
message and the
button will light up indicating the unit is in recording
status.
.Press the
button to stop recording at any time.
JOG/SHUTTLE DIAL FASTISLOW PLAYBACK
Turn the
SHUTTLE
dial righvleft to view recorded video at a
faster rate in the forwardlbackward direction. Release the
SHUTTLE
dial to return to normal speed.
Each subsequent turn of the shuttle dial to the righffleft
increases the rate at 2X, 4X, 8X,16X, 30Xand IOOX
During the freeze l press
PAUSE
button):
Turn the
JOG
picture at a time in the
Turn the
SHUTTLE
dial rightheft to view recorded video at a
slower rate in the forwardlbackward direction. Release the
SHUTTLE
dial and then press the
.
PLAY
button to return to
the normal speed of playback.
Each subsequent turn of the shuffle to the righvleft
decreases the rate at 1/2X, 1/4X, 1/8X and 1/16X
DISPLAY MODE SWITCH
SD
Card
ALARM
rear
view
When connected to a multiplexer, press the
MONITOR
button
to switch between the multiplexer decoded video and the encoded
video to be displayed. When the button light is on it indicates the
unit is displaying the decoded video. In this mode, the unit doesn't
display the OSD message of the unit on the screen. However, it
doesn't affect the unit's OSD message, which is recorded into hard
disk drive. When the button light is
off
it indicates the unit is
displaying encoded video (The image switch swiftly).
KEYLOCK OPERATION
For
Key
Lock
operation, simultaneously press the
buttons once (at least 3 seconds) to lock the unit; to release
Key
Lock,
simultaneously press these two buttons again.
SEARCH RECORDED VIDEO
Press the
SEARCH
button to enter the search mode.
Use the
V
button to select
FULL LIST, ALARM
LIST,
TIME SEARCH, THUMBNAIL
or
SD CARD
and press
the
ENTER
button.
Use the
"A"
,
to select the specific recorded video and
press the
ENTER
button
MENU SETUP
Press the
SETUP
button to enter the setup menu.
Use the
"A"
,
buttons to navigate through
menus. Press again to exit the setup mode.
Press the
ENTER
button to enter the selected menu and
save the settings.
SYSTEM INFORMATION
Press the
DISPLAY
button to display the system operation
status on the screen.
INTO
S
D
C
A
R
D
Insert a SD card into the SD slot. Start playback of recorded
video.
Press the
button during playback to freeze the
desired image.
Press the
ENTER
button to save the image.
Page 2
\
GROUND
I
I
I
SWITCH
OUT
--_--
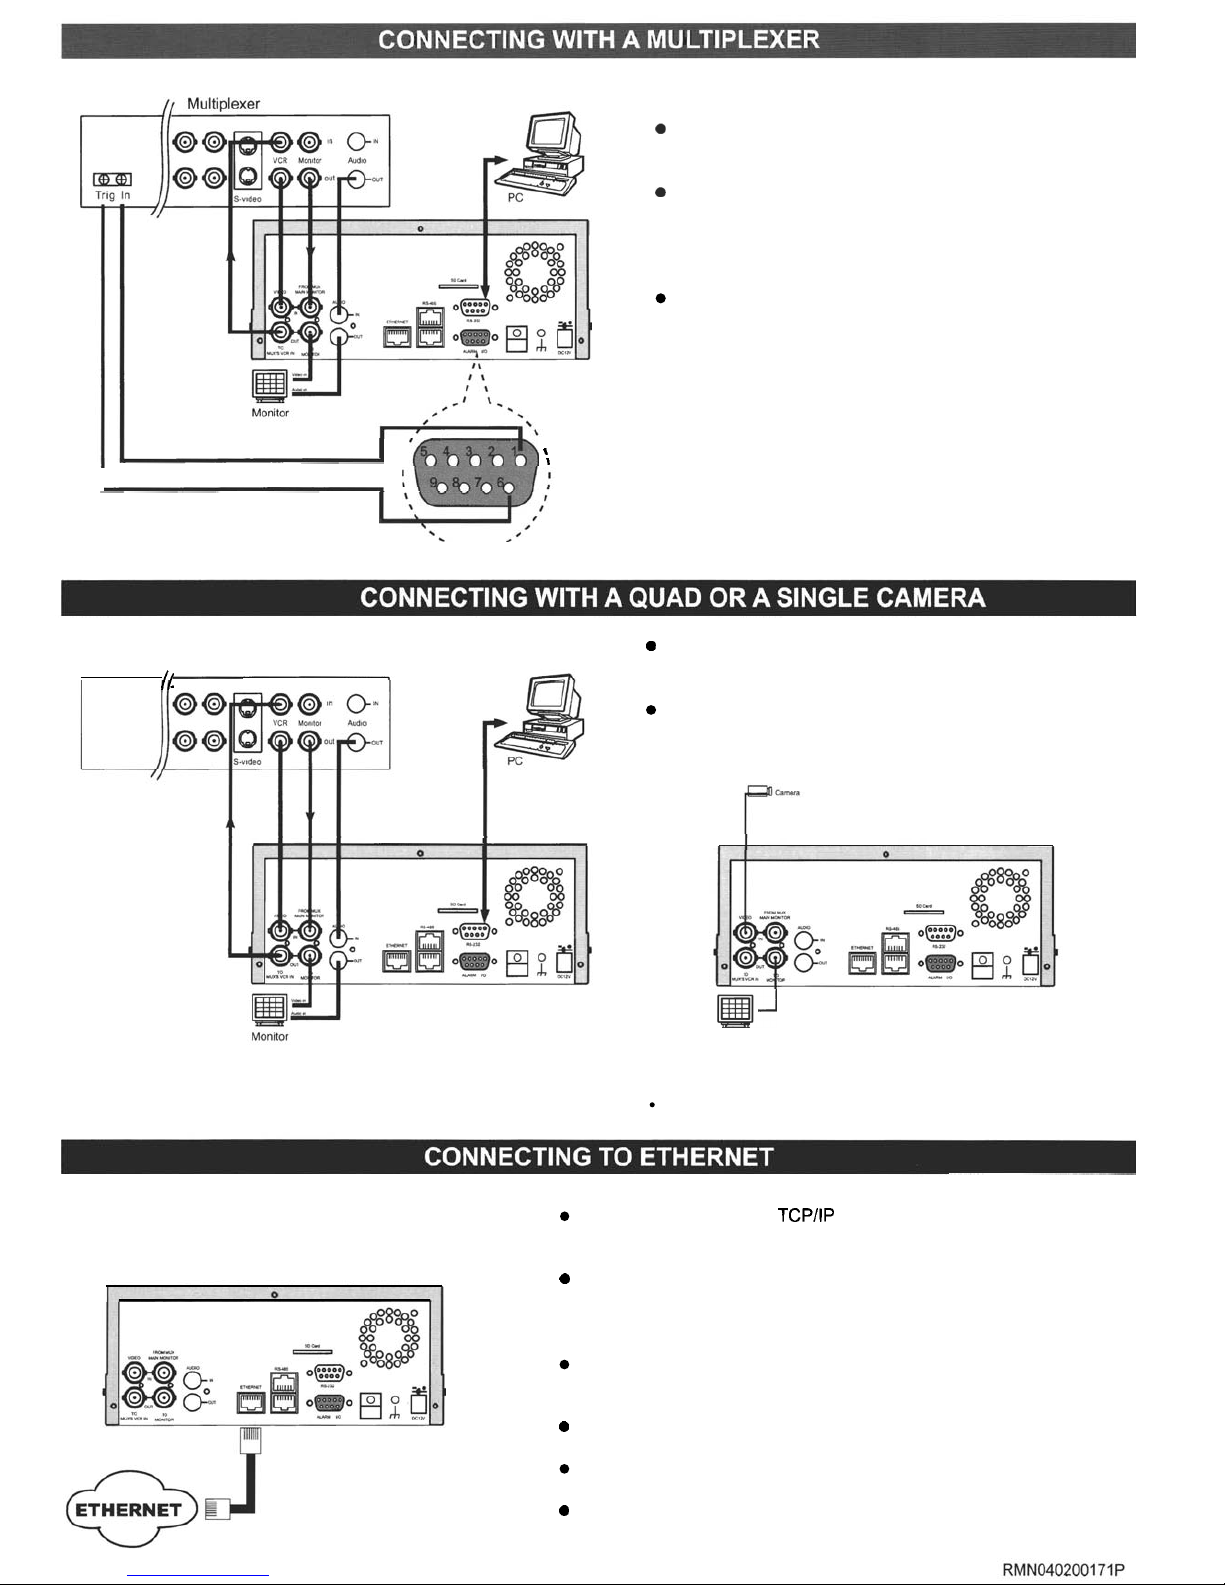
Set the MULTIPLEXER option to
ON
on the REC Setting
page in the setup menu.
Configure the connected multiplexer recording mode
to match programmed recording speed of DVR if the
SWITCH OUT terminal of the DVR is not connected
to the multiplexer's trigger contact.
Audio function can only be activated in the following
refresh rate (NTSC/PAL):
20(17), 12(10), 5.5(5.5),
2.4(2.9), 1.22(1.52), 0.71 (0.88) fieldslsec
*
ETHERNET port is for network model only.
,
QUAD
Set the MULTIPLEXER option to
OFF
on the REC Setting
page in the setup menu.
Audio function can only be activated in the following refresh
rate (NTSCIPAL):
20(17), 12(10), 5.5(5.5), 2.4(2.9), 1.22(1.52),
0.71 (0.88) fieldslsec
(
CONNECT WlTH A QUAD
)
Monitor
(
CONNECT WlTH A SINGLE CAMERA
)
ETHERNET port is for network model only.
*
This function is for network model only.
Connect the DVR to your TCPllP network with a 1011 00m base
Ethernet data cable (Standard RJ
-
45).
You don't need to set an IP address for the DVR if the LAN which
the unit is connected to has a DHCP server. Otherwise, assign an
IP address for the DVR through
COMM
SETTING page.
Set the NET ENABLE to
ON
on the
COMM
SETTING page in the
setup menu.
Install the Network Viewer to your computer.
Open the Network Viewer from the Start menu of your computer.
Enter the IP address and password.
 Loading...