

Super Circuits BLK-IPE101 Quick Installation Manual
®
H.264 Network Video Encoder
Quick Installation Guide
This document guides you through the basic steps to install and congure your IP
encoder. For detailed instructions, refer to the User Manual.
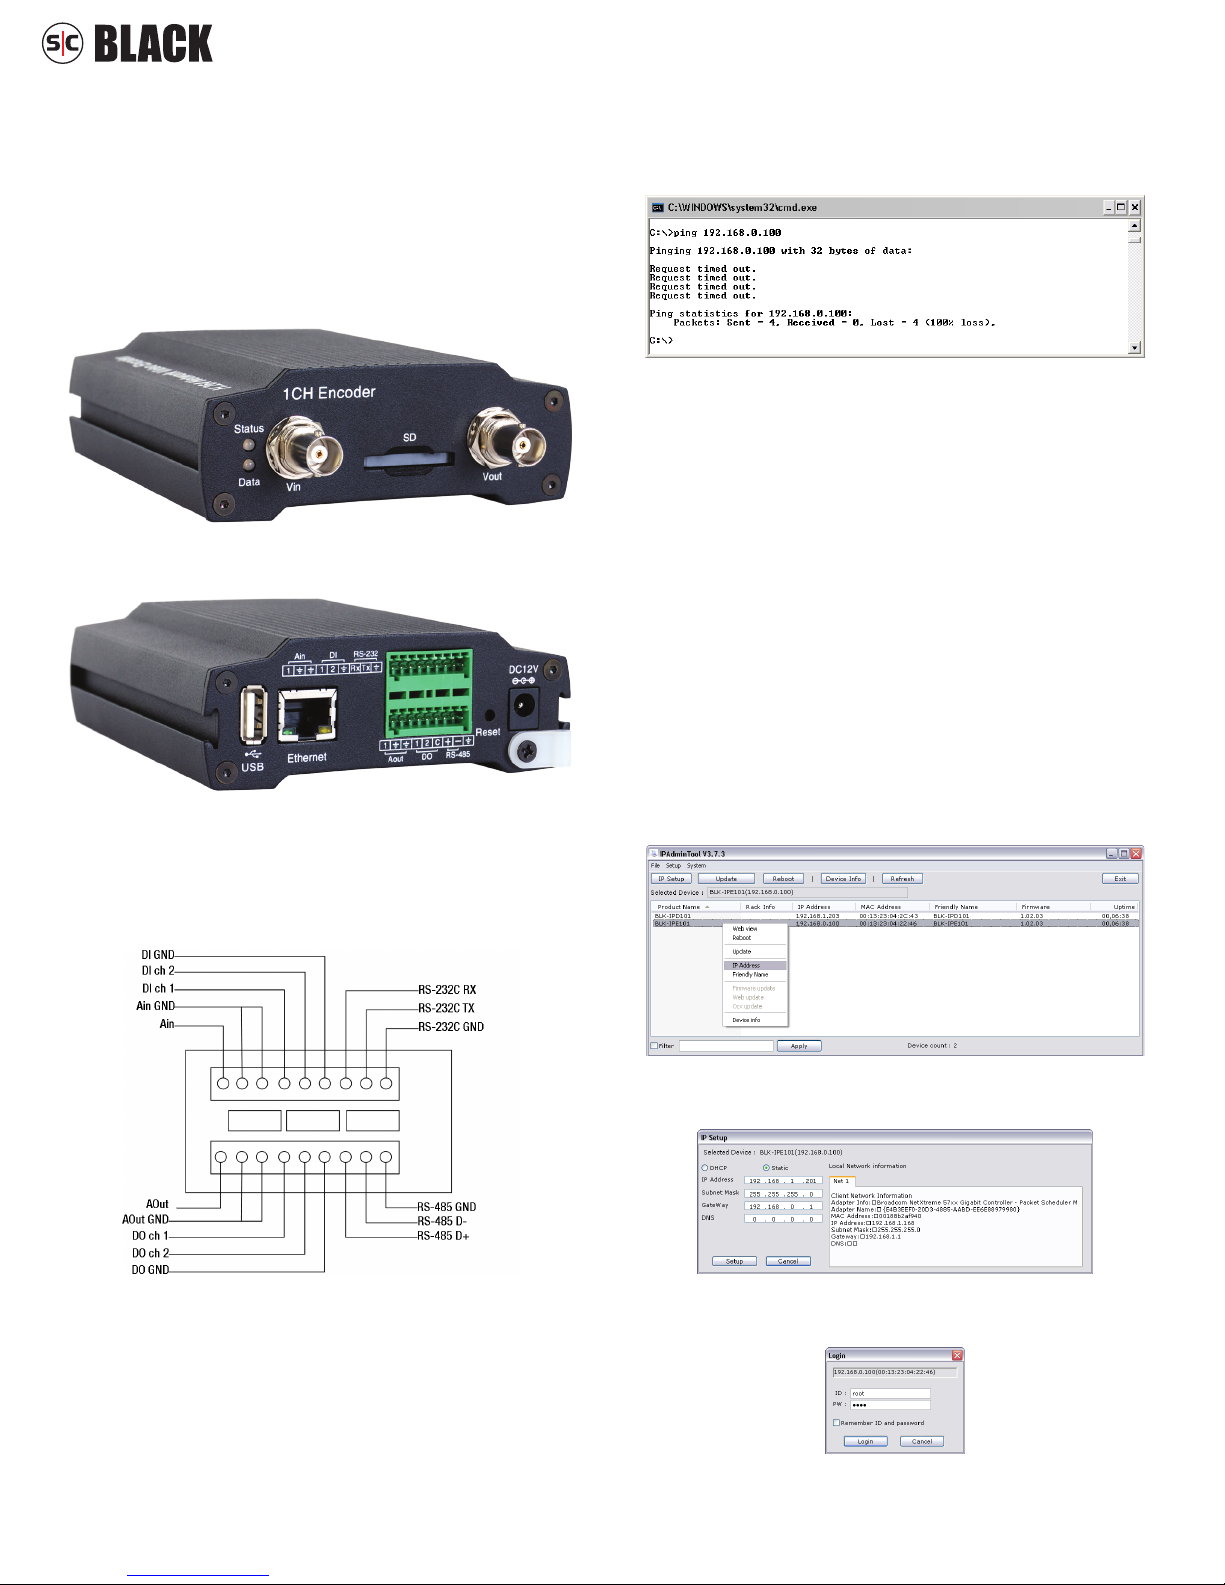
Step 1. Install the encoder
Mount the encoder in a secure location using the hardware installation kit provided.
The kit includes mounting brackets that slip onto the sides of the encoder.
Connect an analog signal source (camera video) to the Vin BNC connector on the
front of the encoder.
Before connecting your encoder to a LAN, verify that the IP address is not already
in use. At a Microsoft Windows computer attached to the L AN subnet where the
encoder will be connected, open a Command Prompt window and enter:
ping 192.168.0.100
The “Request timed out” response indicates that the IP address is not in use and the
encoder can be attached to the network without causing errors.
Step 3. Connect the encoder to the L AN a nd power it on
Attach the network LAN cable to the RJ-45 connector on the encoder backpanel.
If the encoder is not powered through the Ethernet (PoE), attach the DC12V adapter
to the power connector on the encoder and plug the power adapter into a power
source.
Step 4. Congure encoder set tings with IPAdmin Tool
IPAdmin Tool is software provided on the CD with your encoder. To install the tool:
Connections to the encoder for audio in and out (microphone and speaker), D/I
sensor, alarm, video out BNC, RS-232C, and RS-485 control are made through two
9-pin terminal blocks.
Attach peripheral devices to the terminal blocks as shown below. For detailed
interface specications, refer to the user manual.
• Create a directory on your windows system for the IPAdmin Tool les.
• Copy the les IPAdminTool.exe and IPAdminTool.dll from the CD provided to the
directory.
Start the IPAdmin Tool by double-clicking IPAdminTool.exe. This software will
discover all SCBlack devices attached to the LAN. Right click on the entry for your
encoder and select IP Address.
In the IP Setup window, enter the new network settings for the encoder. Click SETUP.
In this example, the IP address was changed to 192.168.1.201.
Attach the video stream from your analog camera to the encoder Vin BNC connector.
Step 2. Check L AN for encoder I P address compatibility
SCBlack IP encoders are factory congured with a static IP address, subnet mask,
and gateway setting:
IP address: 192.168.0.100
Subnet mask: 255.255.255.0
Gateway: 192.168.0.1
www.sc-black.com
1
Answer Yes to the conrmation window. When the Login window opens, enter the ID
and PW. The default settings are root and pass. Click Login.
In the IPAdmin Tool main window, click Refresh and verify that the encoder IP
address changed.
BLK-IPE101_PQ

Step 5. Initial encoder setup
To view video images from the encoder, at a computer attached to the LAN where the
encoder is installed, open Microsoft© Internet Explorer and go to:
http://<IP address of the encoder>
In this example, the IP address is 192.168.1.201. Enter: http://192.168.1.201
If prompted to install ActiveX controls such as AxAll.cab (publisher Cap Co), AxPTZ,
or AxNVC, follow screen prompts to install the software.
Go to Basic Conguration > Date & Time.
On the Date & Time screen, set the Time Zone, Method, and Time Synchronization
options. Click Apply.
After logging into your encoder, if you cannot see live video from the encoder and
the message: “Can not Create XMLDOMDocument Install MSXML4.0” appears,
download and install the MS XML 4.0 library. This library can be found at:
http://www.microsoft.com/downloads/details.aspx?familyid=3144B72B-B4F246DA-B4B6-C5D7485F2B42&displaylang=en
After the encoder view screen appears, click SETUP and enter the default User name
and Password, root and pass.
In the SETUP window, go to Basic Conguration > Users.
Go to Video & Audio > Video-in.
On the Video Input Setting screen, click the PREVIEW button to open a window
showing the video stream from the camera.
Adjust the Brightness, Contrast, Hue, Saturation, and Sharpness to perfect the video
image. After changing parameters, click Apply.
Click VIEW to exit SETUP mode and return to the web viewing screen.
In the User list, click root to highlight it, and then click Modify. Enter a new
password and click OK. In the Users screen, click Apply, and then click OK to restart
the server.
www.sc-black.com
2
© 2010 Supercircuits, Inc. All rights reserve d.
 Loading...