

Page 1
ARX-6 VHF Audio Receiver/Recorder
3. Screw the fu se socket cover with the fuse back onto the fuse socket.
Quick Setup Guide
The ARX-6 is a powerful VHF b and audio surveillance receiver/recorder for monitoring in-progress
investigations or recording evidence. The audio transmitter is not included. ARX-6 features include:
• One-button re cording to SD card media (2GB SD card installed) or USB ash drive
• Internal battery for up to 12 hours of operation
• Receives and records 1 of 16 preset VHF channels
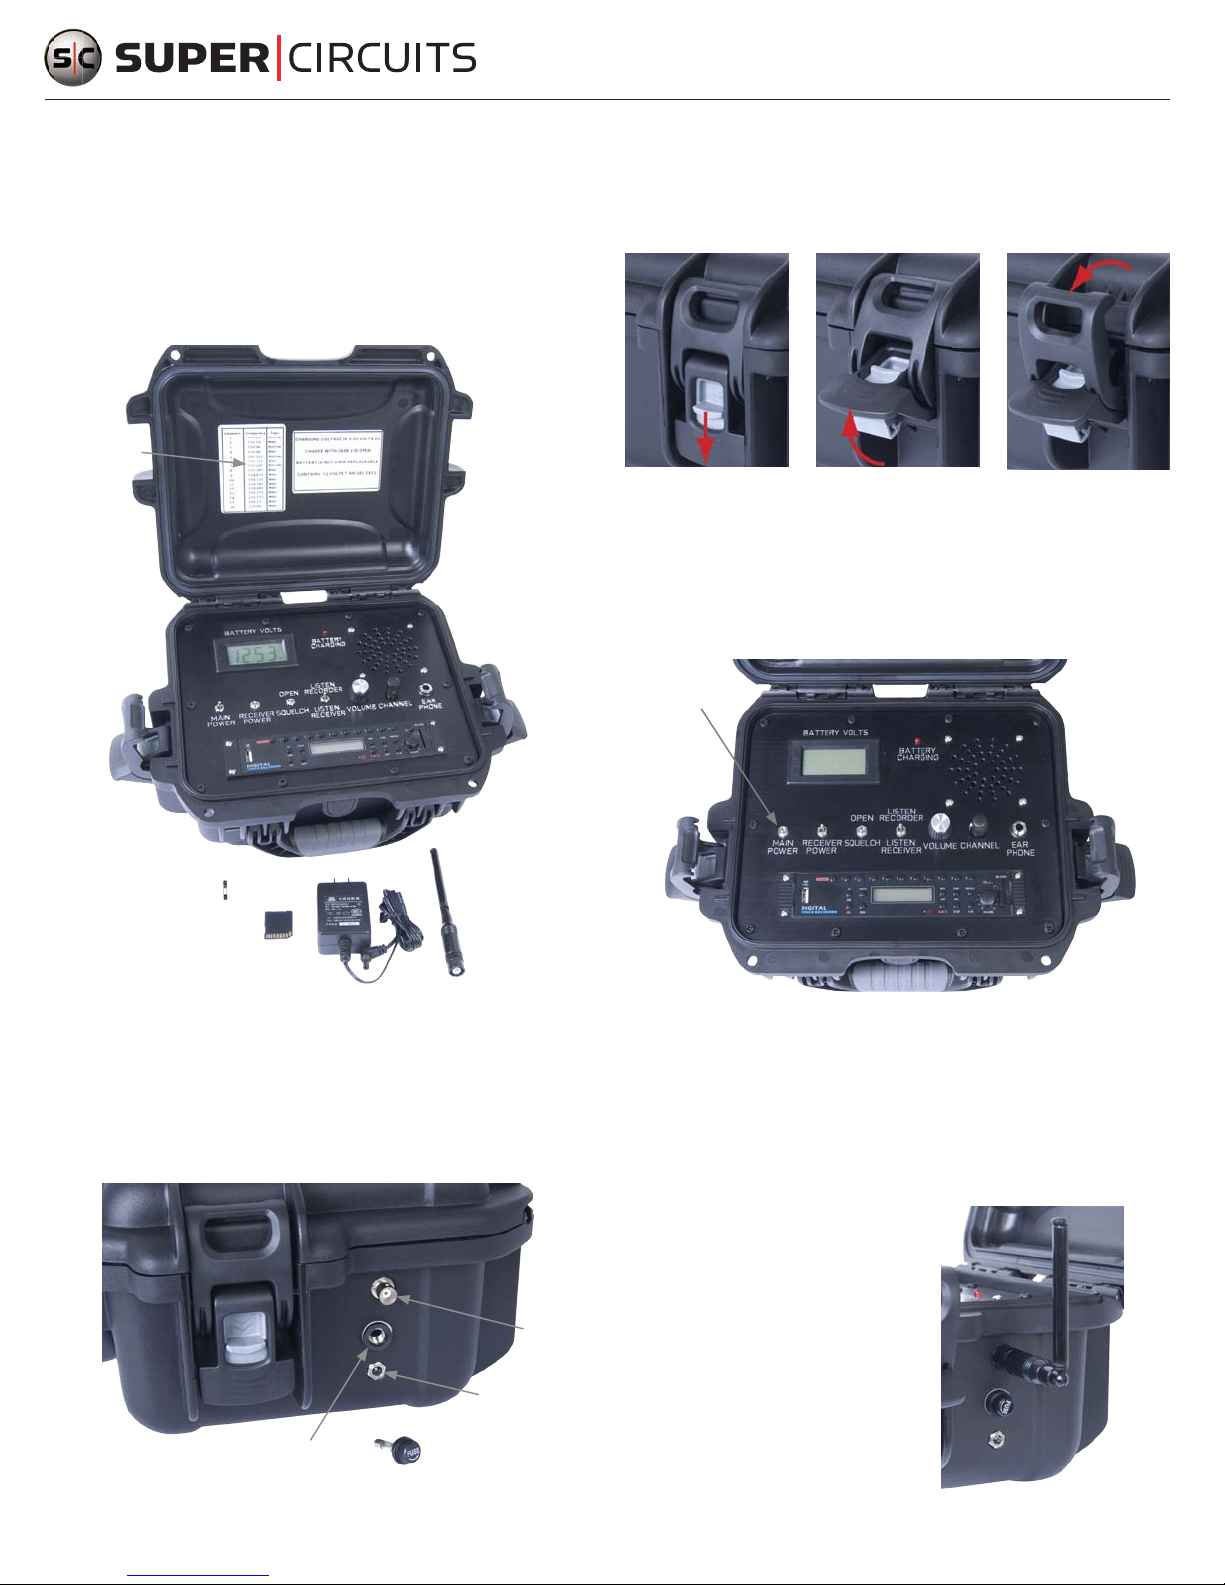
Deck
cover
Channel/
frequency
chart
ARX-6 deck
4. To unlatch the ARX-6 cover:
a. Push and hold down the locking t ab (1).
1
2 3
b. Flip out the bottom of the latch (2).
c. Le t the top of the latch fall away from the cover (3).
d. Open the other latch the same way, then open the cover.
5. On the ARX-6 de ck, toggle the main power switch to o (toward t he MAIN POWER label).
MAIN POWER
switch
Cover latch (2)
Fuse
Antenna
SD card
Power
adapter
ARX-6 components
Step 1. Charging the ARX-6
Charge the ARX-6 before use. It may take up to 8 hours to fully charge the unit. A f ully charged ARX-6 will
provide about 12 hours of use.
1. Unscrew the f use socket cover located on the right side of the case.
Antenna
connector
Power adapter
plug
6. Plug the power adapter into the power adapter plug on the right side of the case (below the f use
socket), then plug the power adapter into a standard 120 Vac outlet. The BATTERY CHARGING
indicator on the de ck will light.
7. Allow the ARX-6 unit to charge fully. When the bat tery is fully charged, the voltage indication is at
about 12.90 Vdc.
8. After charging the ARX-6, disconnect the p ower adapter.
Step 2. Connect the antenna
Connect the antenna to the BNC connec tor on the
right side of the case above the fuse socket. Adjust
the antenna so that it is vertical.
Fuse socket
2. Insert the fuse provided into the fuse socket cover (see above).
1
www.supercircuits.com LE_ARX-6_RQ
Fuse in fuse
socket cover
1/9/13
Page 2
Step 3. Basic usage
7. Readjust the VOLUME level as needed.
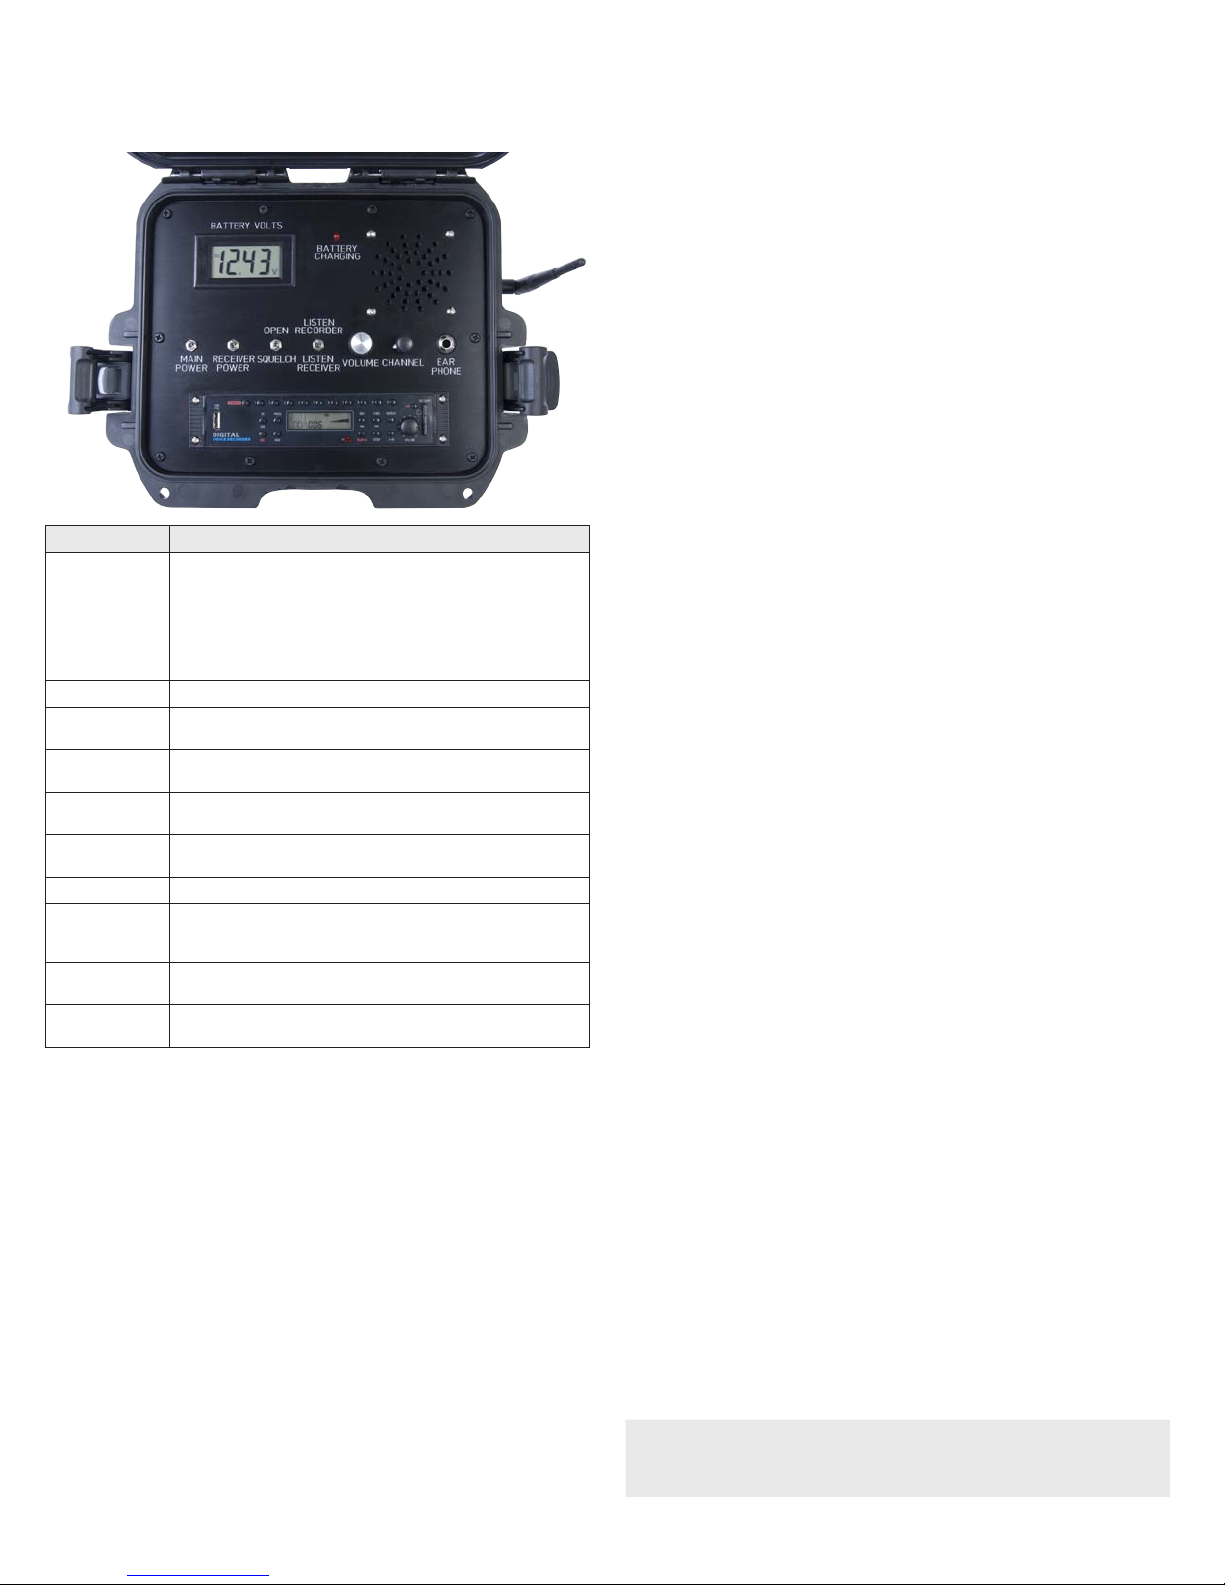
Switches and indicators on the ARX-6 deck
Switch / In dicator Funct ion
Indicate s the internal b attery vol tage output . Normal oper ational range: > 12.0 0 Vdc
When the b attery volt age drops belo w 12.00 Vdc, recharg e the unit.
BATTERY VOLTS
BATTERY CHA RGING LE D illuminates whe n the batter y is charging.
MAIN POWER
RECEIVE R POWER
SQUELCH
LISTEN
VOLUME Adjust s the audio volume l evel.
CHANNEL
EAR PHON E
DIGITAL VOICE
RECORDER m odule
The bat tery capaci ty is estim ated by the volta ge level:
12.9 Vdc @ 100% capa city
12.6 Vdc @ 80% capa city
12.3 Vdc @ 50% cap acity
12.0 Vdc @ 20% capa city
Enables p ower to the recei ver and the recor der. The receiver an d recorder are po wered on separately. NOTE : Before apply ing MAIN POWER, s et the SQUELCH s witch to “SQUELCH ” (down).
When the s witch is up, power is a pplied to the re ceiver elect ronics. NOTE : When listenin g to
recordi ngs, switch o th e receiver to sav e battery po wer.
Controls t he squelch fea ture. When swi tched to OPEN (up), the feat ure is disable d. NOTE: Befo re
applyin g MAIN POWER, set t he SQUELCH swi tch to “SQUELCH” (dow n).
Selec ts the audio so urce. Set to LISTE N RECORDER to play back recordin gs. Set to LIST EN RECEIVER
to hear live au dio from the rem ote audio trans mitter.
16-posi tion switch to s elect recei ver channels 1 thr ough 16. When a die rent channel is se lected,
an audible m essage is playe d announcing th e current chann el. Channel fre quencies are s hown on
a label insi de the deck cover.
Headset o r external s peaker plug for us e with a stand ard monaural 1/4” phono j ack. When a jack
is plugge d in, the internal s peaker is disabl ed.
See “APPENDI X A Recorder modu le usage” on pag e 3.
Listening to transmitted audio
8. Set the SQUELCH switch up or down to produce the best sound quality.
Recording audio
With the ARX- 6 setup to listen to transmitte d audio as described above, do the following:
1. Verify that an SD card or USB ash drive is ins talled in the recorder module, and sucient space is
available in the media to re cord. NOTE: The recorder uses approximately 1MB of storage space for
each minute of recording (MP3 format).
2. Press (brie y) the POWER button on the recorder module to power it on. The recorder display will
illuminate.
3. Press the SD - USB but ton to select the media you want to record to. The media t ype selected will
appear on the recorder display.
4. Press the REC but ton. A large “REC” indicator will appear on the lower line of the recorder display.
5. Press the PLAY/R button to begin recording. A small “REC” will appear on the upper line of the
recorder display, and the media type where the recording is saved will ash.
6. Press the STOP button to stop recording. To resume recording, press the REC bu tton again, then
press the PLAY/R button.
7. To power o the recorder, briey pre ss the recorder POWER button.
Listening to recordings
When recordings are made, they are assigne d a recording number that appears on the display during
recording. Recordings are addressed by recording number, then played.
1. With the ARX- 6 charged and powered o, set the SQUELCH switch to SQUELCH (down).
2. Set the MAIN POWER switch up. A battery voltage indication will app ear on the voltage display.
Wait for the voltage displayed to stabilize, then verif y that the battery voltage is within the
operational range. If the voltage is too low, recharge the unit before continuing.
3. Set the RECEIVER POWER s witch down (receiver o) to conser ve battery power.
4. Set the LISTEN switch to LISTEN RECORDER (up).
5. Press (brie y) the POWER button on the recorder module to power it on. The recorder display will
illuminate.
To listen to audio from a remote VHF t ransmitter with the ARX- 6, do the following:
1. With the ARX- 6 charged and powered o, set the SQUELCH switch to SQUELCH (down).
2. Set the MAIN POWER switch up. A battery voltage indication will app ear on the voltage display.
Wait for the voltage displayed to stabilize, then verif y that the battery voltage is within the
operational range. If the voltage is too low, recharge the unit before continuing.
3. Set the RECEIVER POWER s witch up (receiver power on).
4. Set the LISTEN switch to LISTEN RECEIVER (down).
5. Set the VOLUME control k nob to point up (mid-range volume level).
6. Set the CHANNEL switch to the frequency of the VHF transmitter you want to listen to. A label
showing each channel f requency is provided inside the deck cover. When you switch to a dierent
frequenc y, an audible message is played indicating the current channel number.
www.supercircuits.com
2
6. Press the SD - USB but ton to select the media with the recording you want to play. The type media
selected will appear on the recorder display.
7. Set the VOLUME knob on the recorder to a mid-point (up, 12 o’clock posit ion).
8. Press the numerical buttons (0 ~ 9) on the recorder to addres s the recording number you want to
play. For instance, to choos e track number 14, press 1, then 4. The number “14” will appear on the
display.
9. Press the PLAY/R button play the recording. Pre ss STOP to end playback.
10. Adjust the VOLUME control knob to produce the best sound level.
NOTE
Recordings are saved on the s torage media (SD card or USB ash drive) in MP3 format. These
recordings can be transferred to and p layed on any MP3 compatible player.
© 2013 Supercircuits, Inc. All rights reser ved.
Page 3
APPENDIX A Recorder module usage
Features
• Records directly to USB s torage device or SD card
• Recording format is MP3
• Compatible with up to a 16GB USB storage device or SD card (SDHC compatible)
• Adjustable recording qualit y, choice of 128 Kbps or 192 Kbps with 44.1 KHz sampling rate
• Easily playback of recorded tracks s tored on a USB storage device or SD card
• Direc t delete function when playing a single le
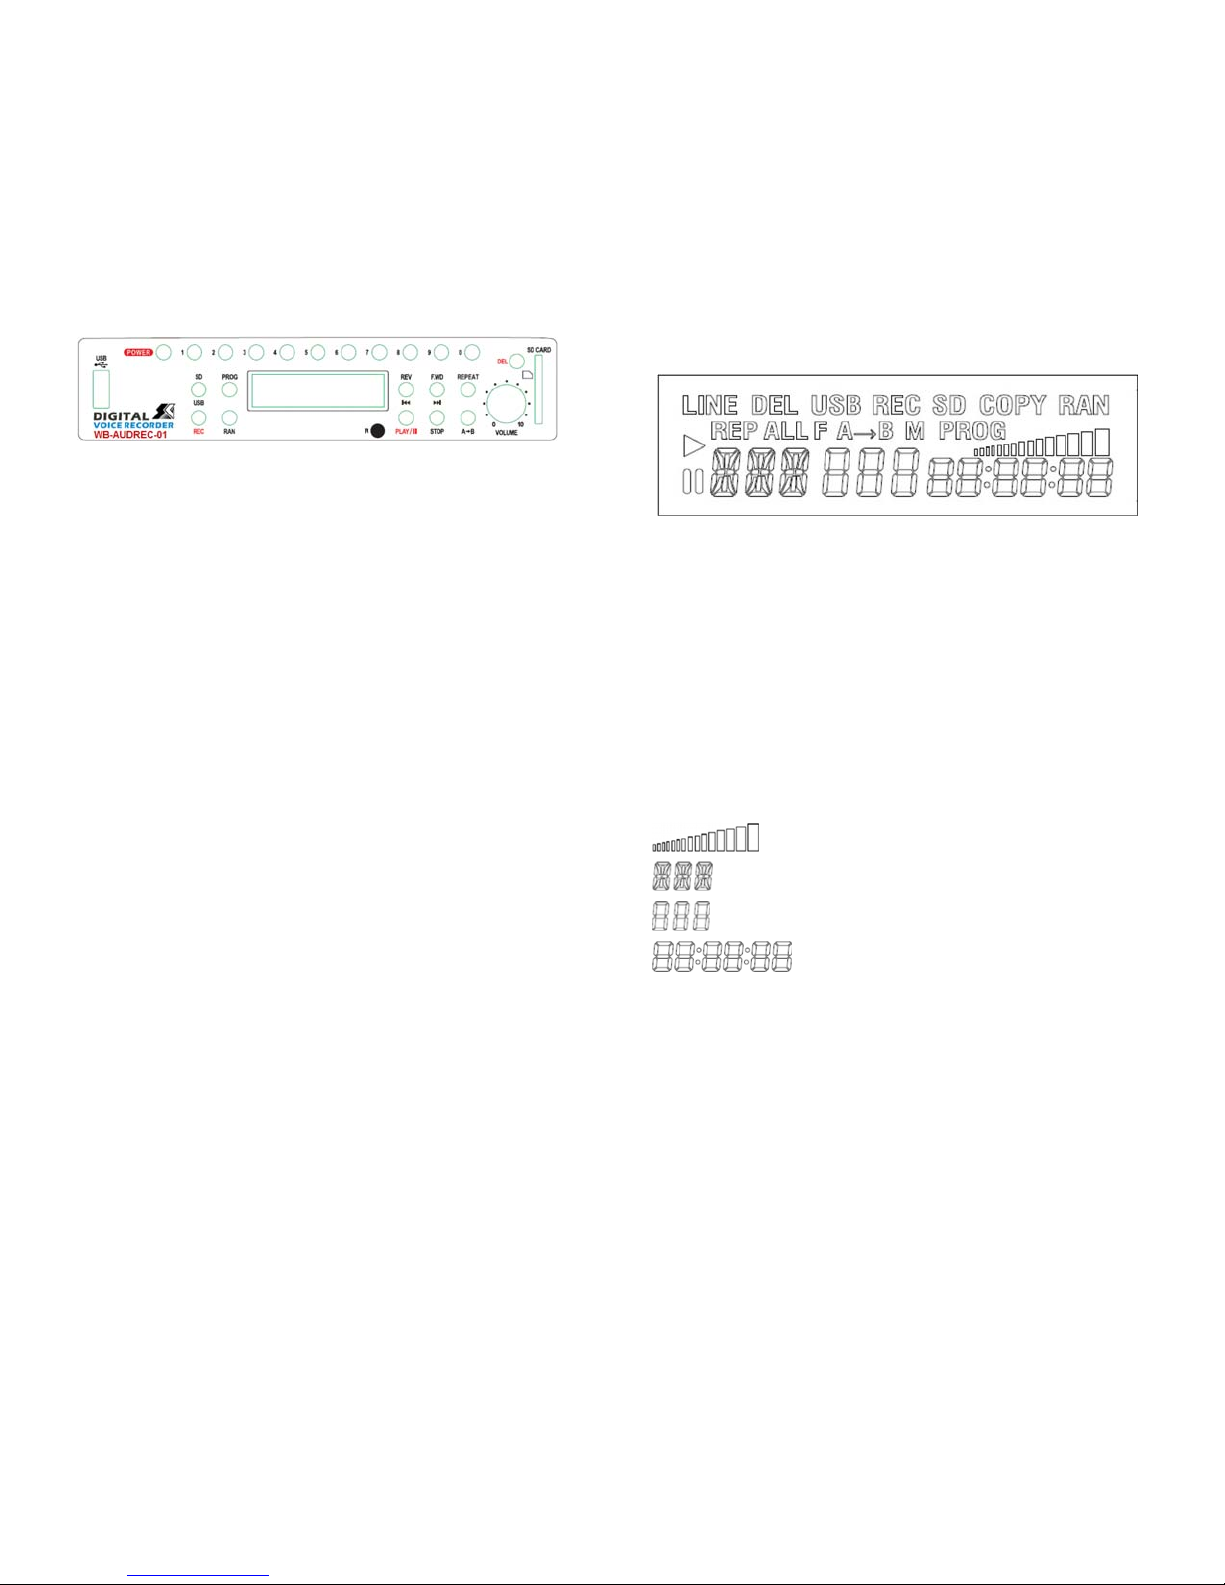
Operation and func tion of the use of panel description
The function of buttons and indicator s on the recorder operator panel are de scribed below.
• POWER: Switching power on / o
• VOLUME: Volume control k nob
• USB socket : Insert a USB storage device
• SD CARD socket: Inser t SD card
• 0~9 Number keys: Use to select the track to play.
• USB/SD: Switching b etween USB or SD mode
• RAN: Play in random order and recording sound qualit y adjustment.
- Play in random order: Press once to play in a random order.
- Recording qualit y adjustment: Press RAN bu tton for more than 3 seconds to choose the recording
quality. Press REW or F. FWD to selec t 128 Kbps or 192 Kbps
Recording
• REC: Recording func tion key
— When USB and SD card are both in the device:
- Press the REC bu tton. LCD display ashes to indicate where it will be recorded, USB or SD.
- Use USB / SD button to select the option to record to the USB or SD card.
- Press REC again to start record, LCD start s to ashing indicated that it is recording
- Press STOP but ton to stop recording.
— When only single USB or SD Card in the device:
- Press REC to begin re cording, LCD starts to ash indicating that it is recording
- Press the STOP button to stop recording.
— Recorded tracks are saved in the last folder of USB or SD card with REC f older. The track
number in the REC folder will star t from “ REC 001 “, and increase se quentially. To Play
recorded tracks, press PLAY / II under REC folder.
— Delete cur rent playing track, can be operate d while in STOP mode or during PLAY
mode. Press DEL bu tton, LCD displays ash DEL FILE, then press DEL to conrm the deletion.
LCD display will show DEL END.
— Delete all the les: In STOP or PLAY mode
Press the STOP button
Press DEL key for more than 5 seconds
LCD display shows “DEL ALL”. To conrm the delete of all the les, press DEL again.
To cancel delete function, wait for LCD stop s ashing, then cancel the delete func tion.
LCD Display
Messages on the recorder LCD display are shown in the following graphic. When illuminate d, these
messages f unction as described below.
• LINE: Line in audio source
• DEL: Dele te function
• u : Play mode
• ; : Pause mode
• REP: Playing the single track repeatedly
• REP ALL: Playing all tracks repeatedly
• RAN: Playing t racks in random order
• PROG: When op erating a programmed func tion
• M: Mute function
• A4 B: When repeat playing a specic section
• USB: When using USB
• SD: When using SD card
• REC: When recording
• : Indicates the audio level
• : In MP3 mode, displays the folder number
• : Displays the current playing track .
• : Displays track time in minutes and seconds
• A1 B: Section Repeat Play
— Press once to start playing the b eginning of a memory le.
— Press again to stop at t he end of memory area. The device repeat s to play memory area.
— Press it again to sto p playing. LCD display A1 B will disappear.
USB / SD File Player
• PLAY / II: Play and pause. Pre ss to play, press again to pause.
• STOP: Pre ss to stop playing
• USB / SD: Select to use US or SD Card
• RAN: Pre ss once to play in a random order, press again to cancel random play
— REPEAT: Repeat function, (operates on playback mode)
— Press once, LCD screen displays “REP”, will repeatedly playback currently playing t rack.
— Press twice, LCD screen displays “REP F”, will repeat the entire folder is currently being played.
— Press twice, LCD screen displays “REP ALL”, will be repeated play all track s.
— Press 3 times, cancel repeat playback f unction. The LCD display REP will disappear.
• PROG: Program memory f unction. NOT applicable for sur veillance voice recording.
• 9 REV: Backwards. Pre ss to rewind last track. Press for 3 seconds to f ast rewind the track
• : FWD: Forward. Press to forward to next track. Press for 3 seconds to fast for ward the track
• IR sensor : NOT applicable for sur veillance voice recording.
• DEL: Dele te single / folder / all les.
www.supercircuits.com
3
© 2013 Supercircuits, Inc. All rights reser ved.
 Loading...