

Page 1
Page 2
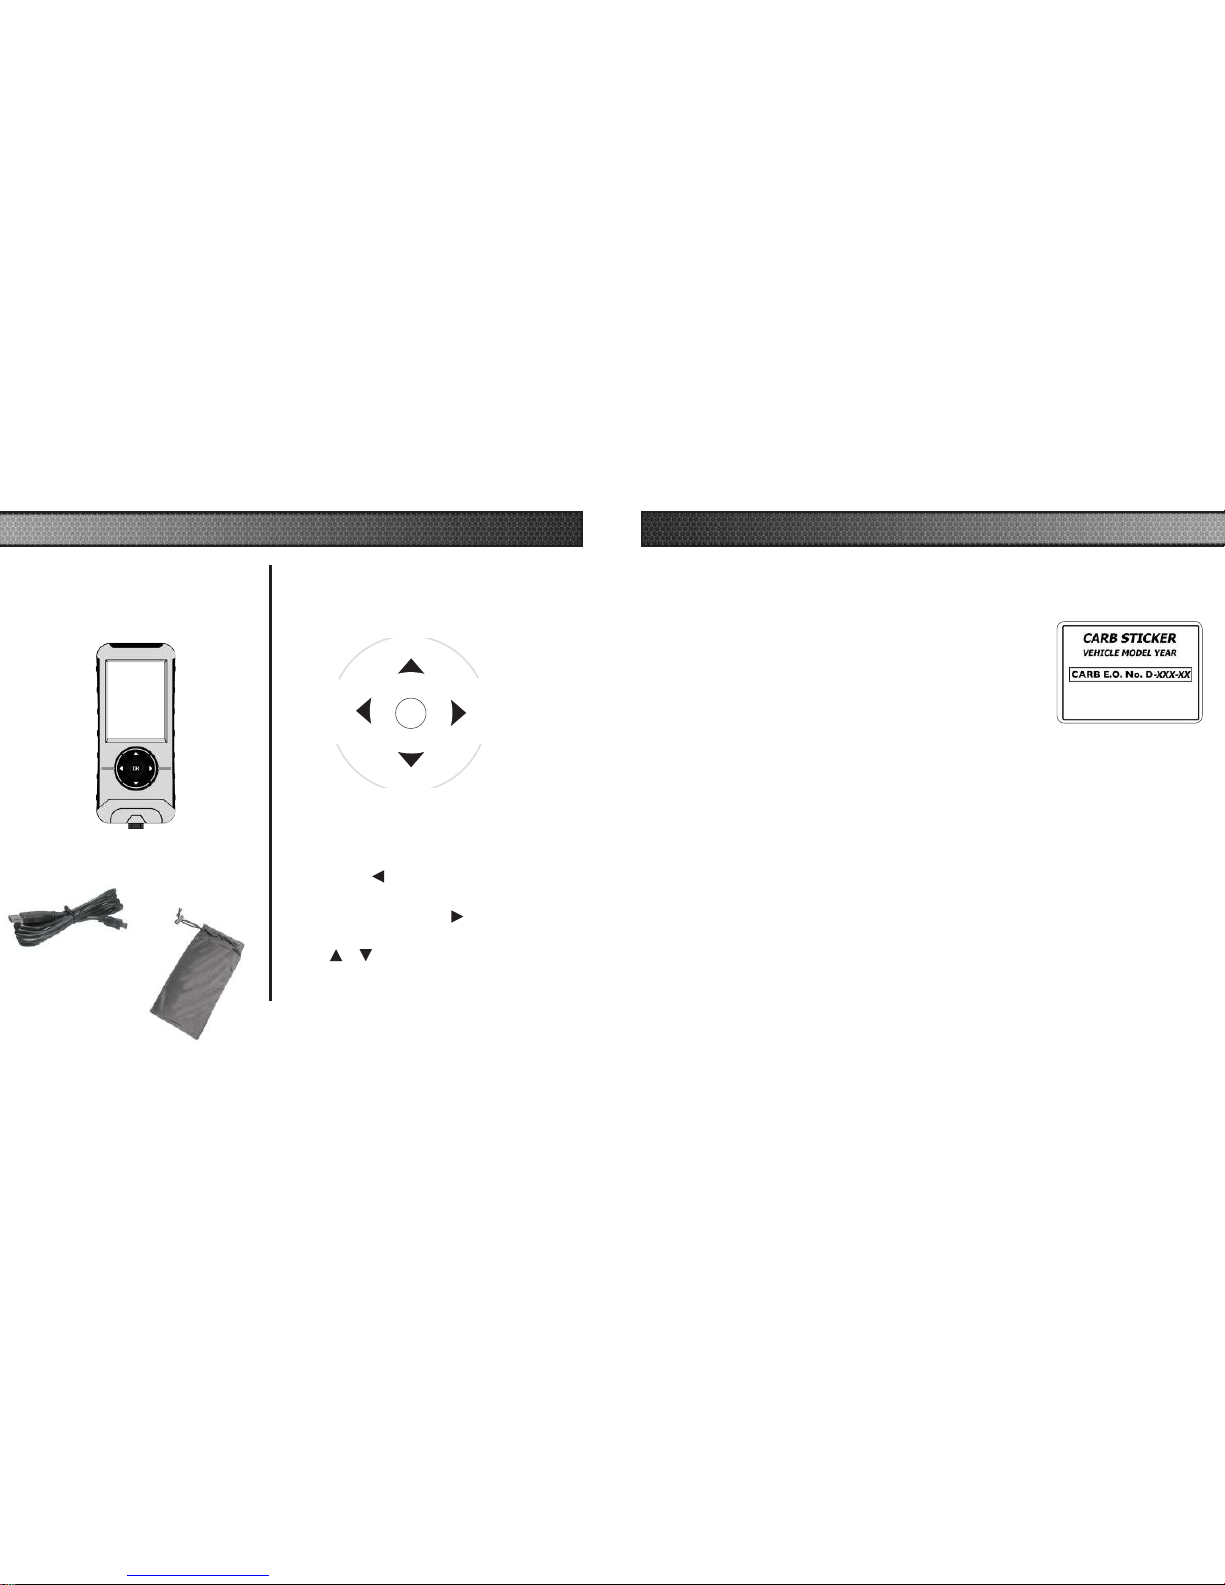
LIST OF COMPONENTS
DISPLAY DEVICE
BUTTON FUNCTIONALITY
NAVIGATING TIPS:
• To move back to the previous menu,
press the button.
• To move forward to the next menu, you
can press either OK or
button to
enter the highlighted option.
• The & buttons are used to select
menu options, as well as adjust values for
certain features.
Up_Increase
Right
Next
Forward
Left
Back
Exit
Down_Decrease
OK
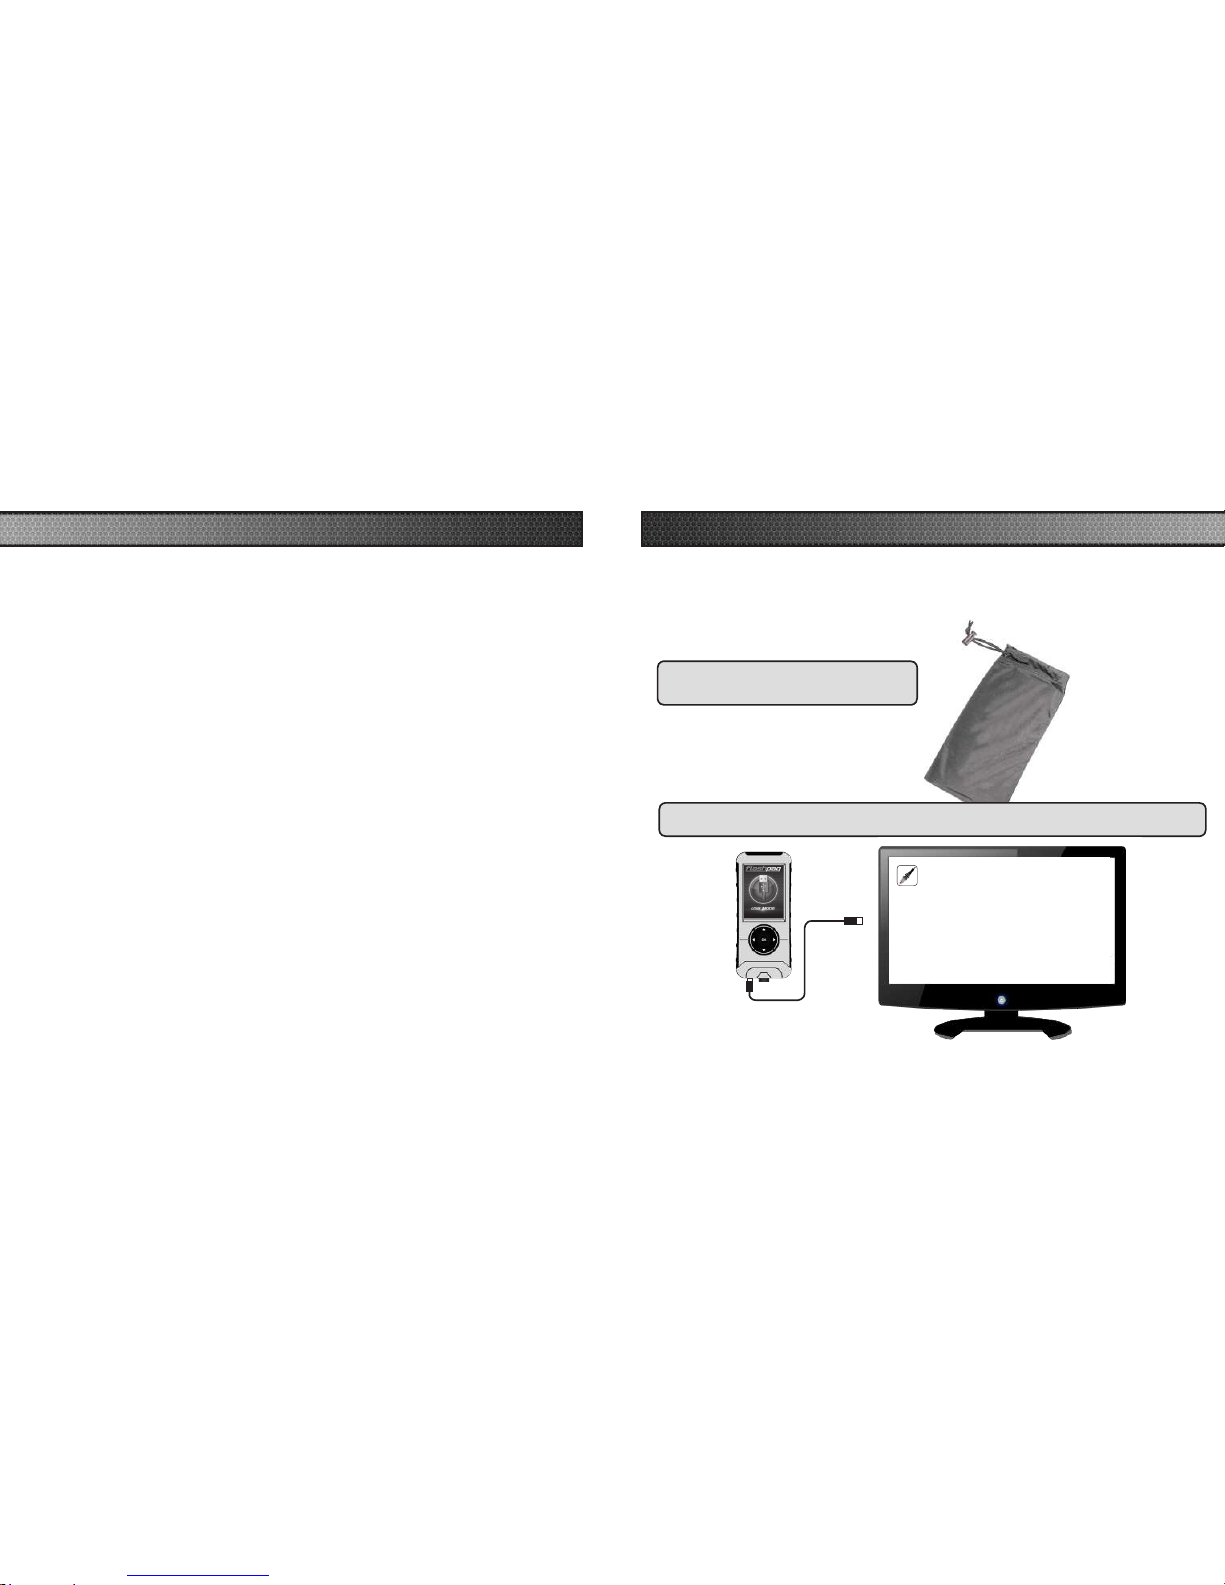
USB CABLE
PROTECTIVE
BAG
BEFORE YOU BEGIN CARB/EPA COMPLIANCE
NOTE: The stickers included in some products apply to products
that have received CARB exemption for emissions compliance.
This product may meet the emissions compliance
requirements of the California Air Resources Board
and Federal Environmental Protection Agency. If so,
it is legal for sale and use on pollution-controlled
vehicles operated on public streets and highways.
The device must be installed and operated
according to the instructions provided in this user’s manual. Included with
these compliant products is a sticker (similar to the one pictured above)
for you to keep in your vehicle. You can either adhere it somewhere on
the vehicle (e.g., the inside end of driver’s door) or simply store it in your
glove box. The purpose of these stickers is to inform anyone who may
have questions regarding the use of your Superchips product and how
it affects emissions.
Page 3
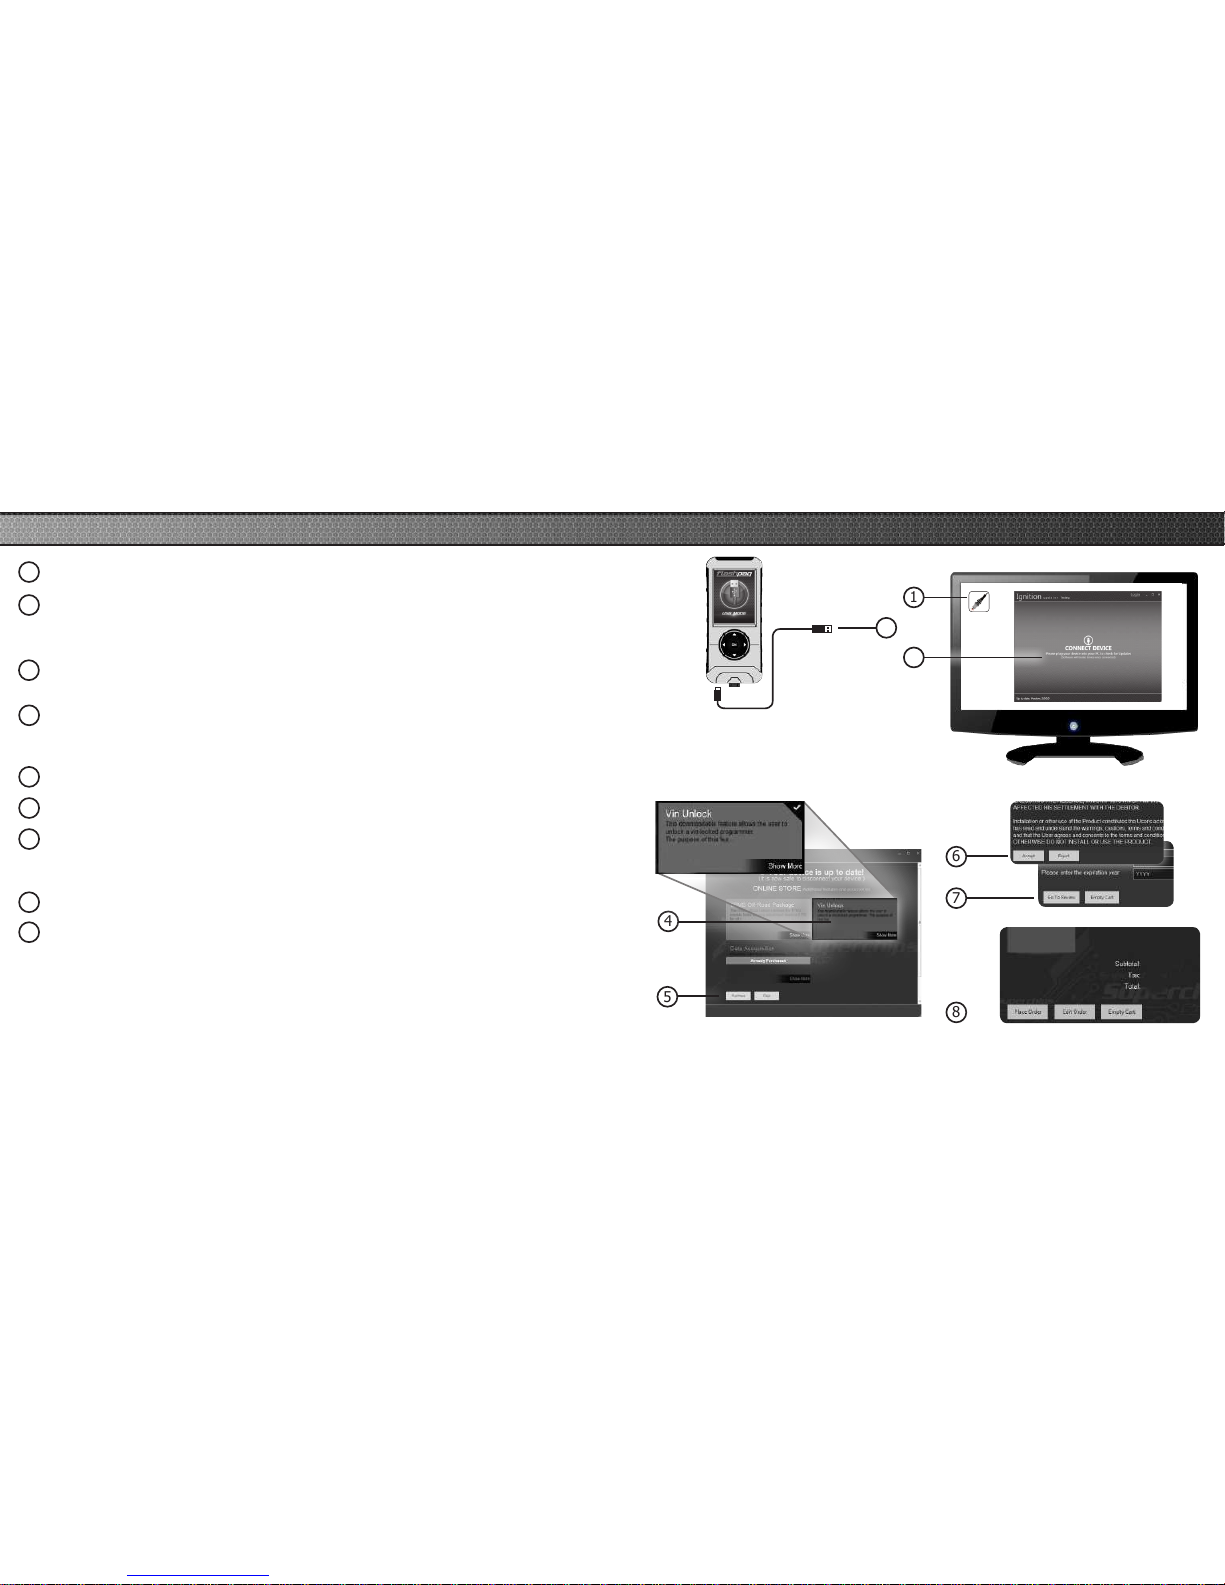
1 Double-click the Ignition Icon located on your computer’s desktop.
2 Connect your device to the computer using the supplied USB cable.
(Ignition will automatically search for updates related to your device.)
3 Click the Update button.
4 Click on any or all of the available options.
(A check mark will appear in the upper right corner.)
5 Click the Purchase button.
6 If required, read and Accept the disclaimer.
7 Fill in the required information and click Go to Review.
(Here you can check the information you lled in before submitting the order.)
8 Click the Place Order button to complete your order.
9 If a purchase was made, follow steps 1-3 above to complete the update.
1
2
4
5
3
6
7
8
NOTICE: Do not unplug the USB while
the device is being updated. Once the
update is complete, you will be informed
that it is safe to disconnect.
PRODUCT UPDATES USING IGNITION
Ignition
Page 4

STEP 1 - Plug the device into the OBDII port.
(The device will automatically power-on once it has
been connected.)
NOTICE
Do not remove or bump the OBD-II connector during any
programming sequence. If you do, the vehicle may not start.
Do not program your vehicle while parked in unsafe locations
including heavy trafc or places without cell phone service
and the internet (if possible).
Quick Tune = Changes the power level of your vehicle using the most
popular features and settings.
NOTE: Not all features are available on every make, model, and
engine.
WARNING
11
QUICK TUNE
STEP 2 - Enter
the Tuning Menu
by pressing OK.
STEP 3 - Turn
the ignition on,
but do not start
the engine.
STEP 4 - Follow
the on-screen
instructions.
STEP 6 - Select a
tuning level.
Loading your
Vehicle
Application...
Please Wait
STEP 5 - Allow
the device to save
your stock les.
Stock Files are Saved
Successfully!
Press OK to continue
Select Tuning
Page 1 of 1
Performance
Tow
87 Octane
Mileage XS SAVE
Stock w/ Options
STEP 7 - Push left
arrow to close out
of custom options.
STEP 8 - Install
the “Tune” File by
pressing OK.
STEP 8 - Turn the
Ignition Off. Press
OK to continue.
Page 5
KEY:
x= Towing is not recommended for this tune .
S= Octane Requirements vary for gas vehicles. Follow recommended guidelines
on the device.
$= Tow rated up to Superchips recommended tow limits. See limits for your vehicle
displayed by the Flashpaq during the programming process.
0= Tow rated up to OEM max towing recommendation.
Availability of specific tunes may vary based on your vehicle’s make and model:
xSPerformance - Designed for maximum engine and transmission performance.
---------------------------------------------------------------------------------------------------------------------------------
x87 Performance - Designed for non-towing applications and requires the use
of 87 octane gas for best results.
---------------------------------------------------------------------------------------------------------------------------------
x91 Performance - Designed for premium horsepower, torque, and driveability.
The tune is calibrated for 2WD, 4WD-HI, and 4WD-LO. Requires 91 octane gas
for best results.
---------------------------------------------------------------------------------------------------------------------------------
x93 Performance - Designed for maximum horsepower, torque, and driveability.
The tune is calibrated for 2WD, 4WD-HI, and 4WD-LO. Requires 93 octane gas
for best results.
---------------------------------------------------------------------------------------------------------------------------------
x87 Octane - Designed to allow you to run 87 octane regardless of the
manufacturer’s recommendation.
---------------------------------------------------------------------------------------------------------------------------------
S$Light Load Tow - Optimizes engine and transmission performance for mid-
weight range towing applications
---------------------------------------------------------------------------------------------------------------------------------
0Heavy Load Tow - Requires the use of 91 octane gas or better and is used for
optimized engine and transmission performance for heavy towing applications.
---------------------------------------------------------------------------------------------------------------------------------
Towing - Requires the use of 91 octane gas or better and is used for optimized
towing up to the OEM recommended towing limits. This tune is safe to use in 4WDHI or 4WD-LO and is available for all Jeeps covered by Superchips.
NOTE: If a towing tune is not available, use 87 Tune with 91 Octane fuel.
Crawling Tune - Is a Superchips exclusive tune offering low throttle response
and high low-end torque designed for precision low-speed maneuvers. This tune is
currently only available for JK Jeep models.
----------------------------------------------------------------------------------------------------------------------------------
xExtreme - This is an aggressive tune used for maximum horsepower, torque,
and driveability.
----------------------------------------------------------------------------------------------------------------------------------
Mileage XS - Requires 87 octane gas and is used for fuel mileage gains. The tune
is calibrated for 2WD, 4WD-HI, and 4WD-LO uses.
----------------------------------------------------------------------------------------------------------------------------------
Stock - Returns vehicle to factory stock. Removed all Superchips tuning from your
vehicle. It is recommended that you calibrate your vehicle back to stock prior to
taking it in for service or maintenance.
TIP FOR JEEP OWNERS:
Your Flashpaq will work with the following:
• Short or normal tube headers
• Snorkels
• Aftermarket cat back exhaust and cold air intake kits
For optimum Jeep performance, Superchips does NOT recommend the following:
• Long tune headers
• Over-bored or stroked engines
12
13
TUNING LEVELS EXPLAINED
Page 6
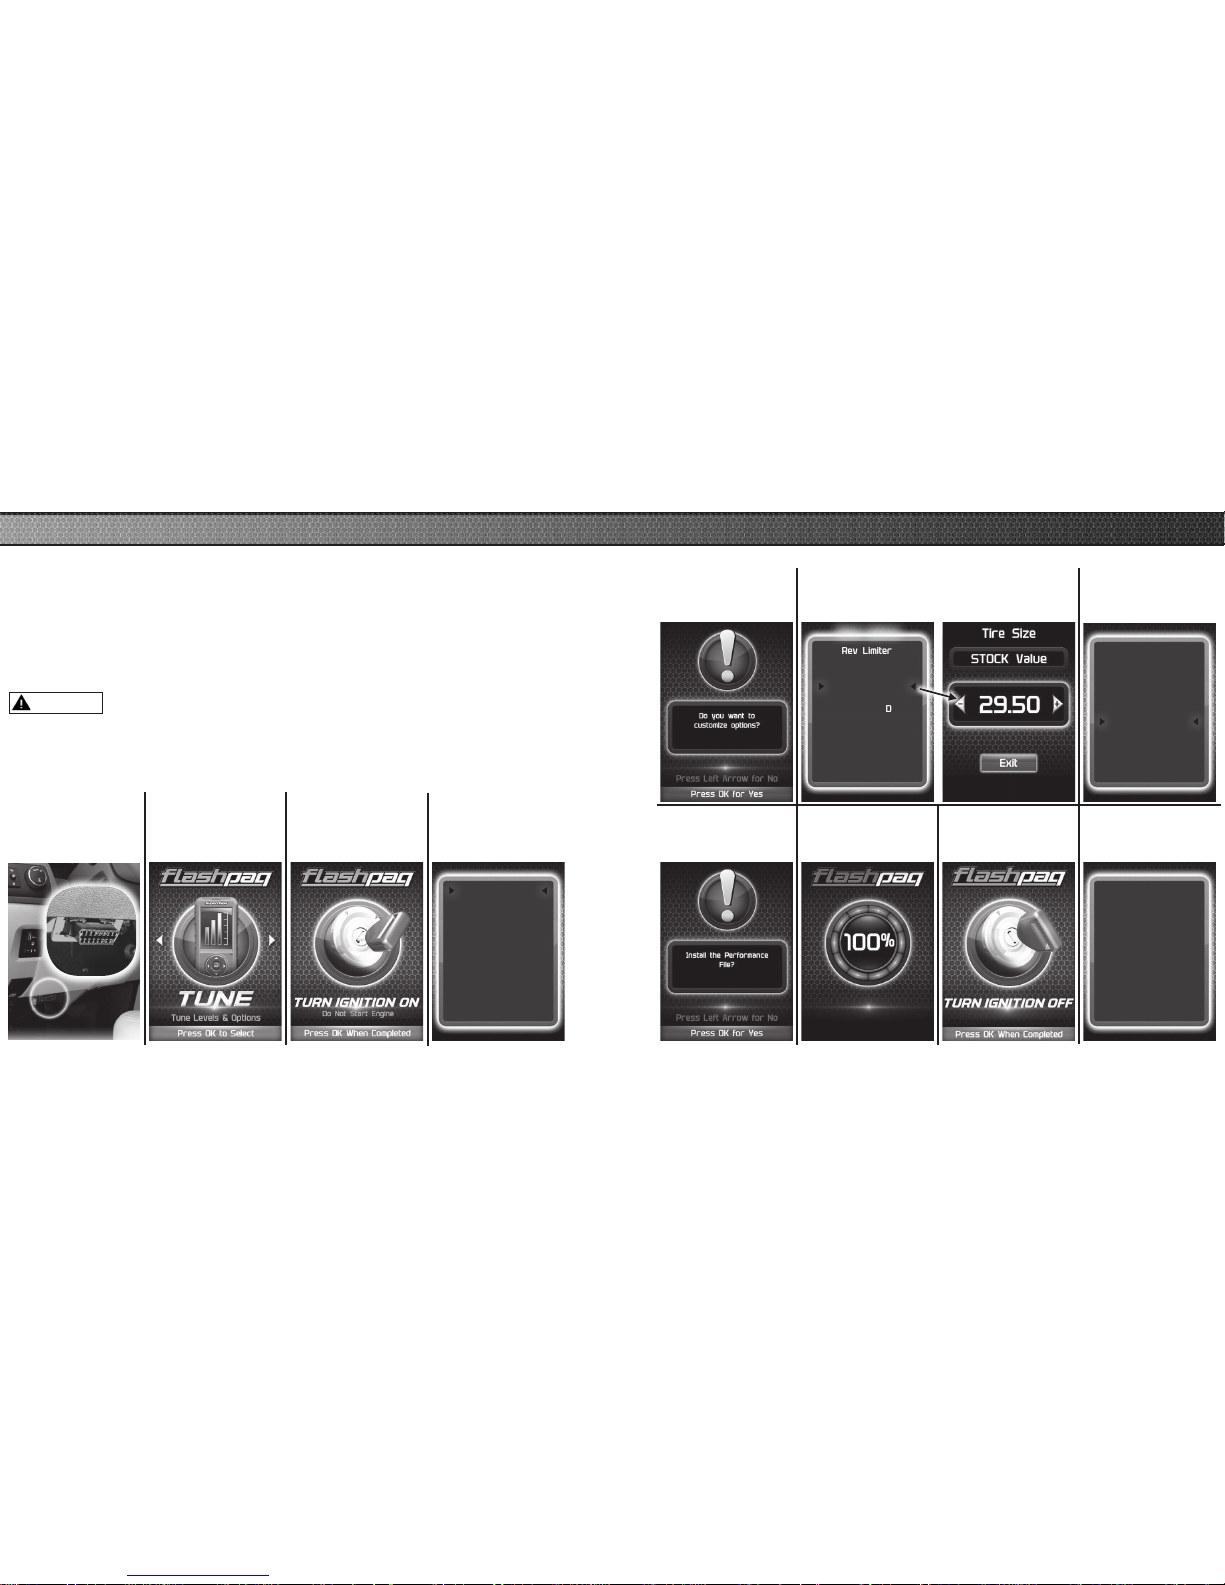
Change the power level of your vehicle using custom options and settings.
NOTE: Not all features are available on every make, model, and engine.
NOTICE:
Do not remove or bump the OBD-II connector during any programming
sequence. If you do, the vehicle may not start.
Do not program your vehicle while parked in unsafe locations
including heavy trafc or places without cell phone service.
STEP 2 - Enter
the Tuning Menu
by pressing OK.
STEP 3 - Follow
the on-screen
instructions.
STEP 4 - Select a
tuning level.
Select Tuning
Performance
Tow
87 Octane
Mileage XS SAVE
Stock w/ Options
STEP 5 - Press
OK to customize
options.
STEP 6 - Select and adjust the
custom option according to your
specic requirements.
STEP 1 - Plug
the device into
the OBDII port.
Rev Limiter
Speed Limiter
Gear Ratio
Tire Size
Fan Temp
AFM / DOD
Continue
Select Options
STEP 7 - Select
Continue when
done modifying.
Rev Limiter
Speed Limiter
Gear Ratio
Tire Size
Fan Temp
AFM / DOD
Continue
Installing Engine
Performance Tuning
is now Installed
Press OK to Continue
STEP 8 - Press
OK to install the
le.
STEP 9 - Allow
the le to be
installed.
STEP 10 - Turn
the ignition Off.
STEP 11 - Press
OK to return to
the main menu.
WARNING
14
15
ADVANCED TUNING OPTIONS
Page 7
i The vehicle must have appropriate speed rated tires.
i Do not exceed proper operating conditions.
i Obey all trafc laws.
i For use only on a controlled track. Never exceed legal limits on public
roadways.
---------------------------------------------------------------------------------------------------------------------------------
Rev Limiter - Adjusts engine rev limiter by increments or xed values.
i Do not exceed proper operating conditions.
-------------------------------------------------------------------------------------------------------------
Tire Size - This feature has been moved to the “Vehicle Functions” menu, under
Additional Features.
Axle (Gear) Ratio - Corrects the speedometer, odometer and automatic
transmission shift points for rear end gear changes.
i Confirm aftermarket parts are installed before adjusting this option.
------------------------------------------------------------------------------------------------------------------------------------
Automatic Transmission Shift Points - Adjusts transmission shift points for
optimized driveability and operation.
---------------------------------------------------------------------------------------------------------------------------------
Automatic Transmission Shift Pressure - Adjust transmission shift pressure in
PSI to allow for a more aggressive shifts.
---------------------------------------------------------------------------------------------------------------------------------
Cooling Fan - Adjusts fan turn ON temperature.
---------------------------------------------------------------------------------------------------------------------------------
Manual Transmission Skip Shift - Enables or disables Computer Aided Gear
Selection (CAGS) for manual transmissions.
---------------------------------------------------------------------------------------------------------------------------------
Spark Advance Set - Reduces the spark timing.
---------------------------------------------------------------------------------------------------------------------------------
MDS Disable - Enables or disables the factory Multi- Displacement System.
NOTE: On 13-14 Hemi Trucks, the dash light will continue to illuminate even
when the feature is actually disabled.
---------------------------------------------------------------------------------------------------------------------------------
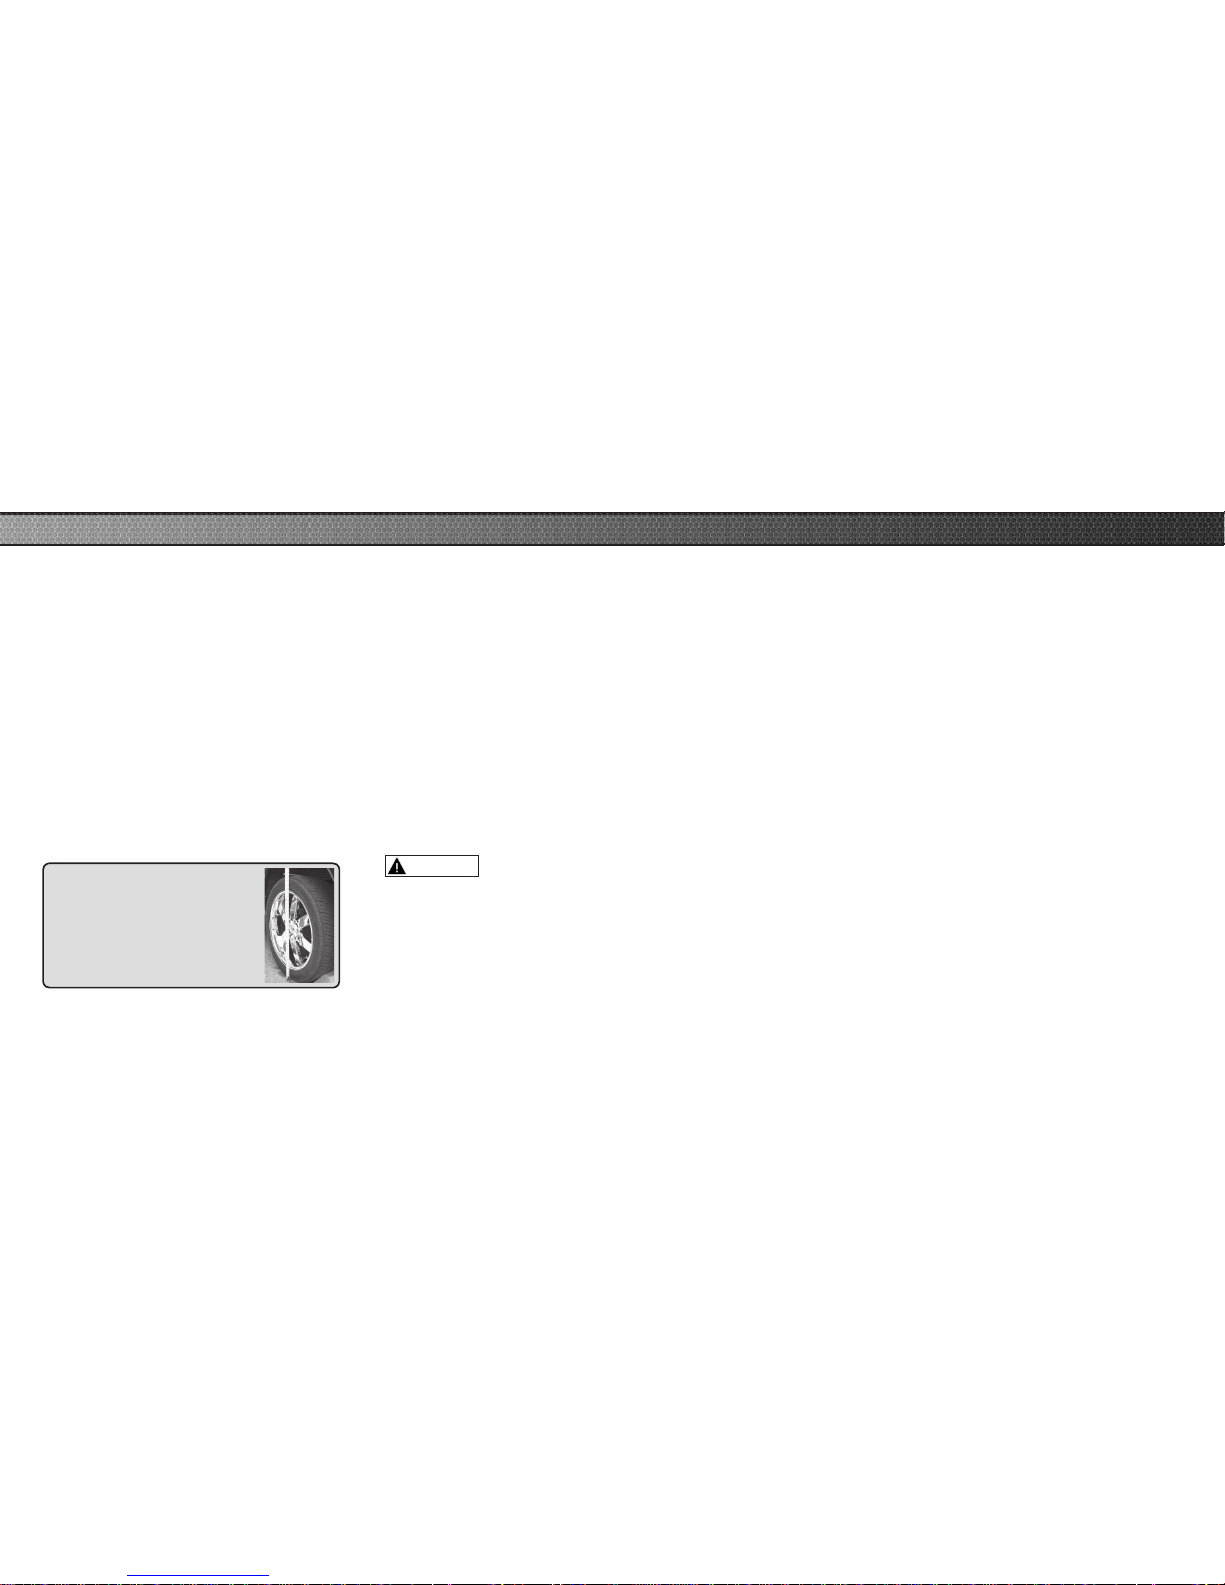
TIP FOR MEASURING TIRE SIZE:
Measure from the ground to the top
of your tire. Place a ruler or at level
item on the top of your tire to measure
accurately. Measure in 1/4 inch
increments rounding up.
Increasing the height of
your vehicle raises the
center of gravity and can
affect stability and control.
Use caution on turns and
when making steering
corrections.
ADVANCED TUNING OPTIONS EXPLAINED
WARNING
Availability of specic options may vary based on your
vehicle’s make and model:
---------------------------------------------------------------------------------------------------------------------------------
Speed Limiter - Adjusts the top speed limiter by increments or xed values.al
Page 8
Questions and Answers
Q: Can my Flashpaq program more than one vehicle at a time?
A: No, only after you return your rst vehicle back to factory stock.
-----------------------------------------------------------------------------
Q: Does Superchips support custom tuning?
A: Not at this time.
-----------------------------------------------------------------------------
Q: What aftermarket accessories will my Flashpaq work with?
A: Flashpaq programmers are engineered to work with the following
parts right out of the box: throttle body spacers, shorty headers, cat-back
exhaust system, and cold air intake kits. Compatibility may vary by make
and model.
-----------------------------------------------------------------------------
Q: How do I change my vehicle’s calibration?
A: Refer to the TUNING sections of this guide for detailed instructions.
NOTICE:
Before taking your vehicle into a service center, return your vehicle to stock.
The service center might reprogram your vehicle with an updated program
without your knowledge. If you do not use this device to return your vehicle
to factory stock and your vehicle is reprogrammed by the service center, the
programmer will no longer be able to program your vehicle.
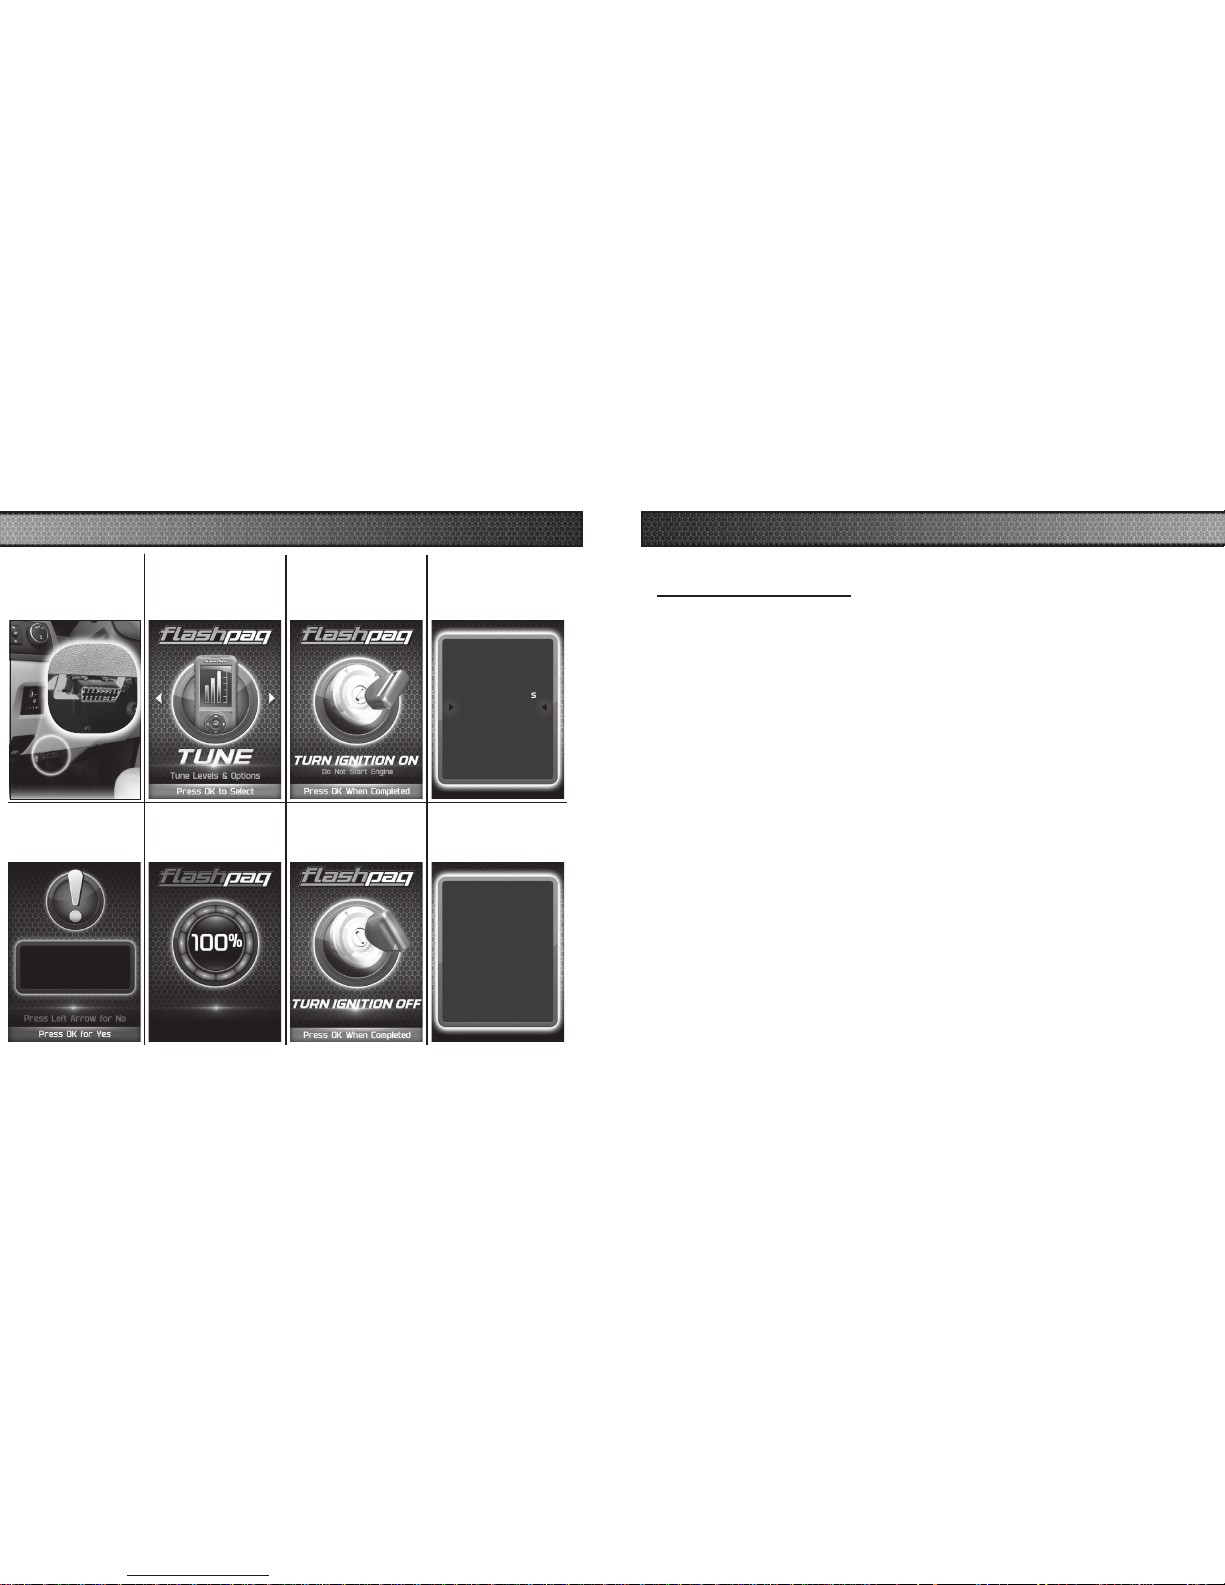
STEP 1 - Plug
the device into
the OBDII port.
Installing Engine
STEP 6 - Allow
the stock settings
to be re-installed.
Install the Stock File?
18
19
RETURNING YOUR VEHICLE TO STOCK
COMMON TUNING QUESTIONS
STEP 2 - Enter
the Tuning Menu
by pressing OK.
STEP 3 - Turn
the ignition on,
but do not start
the engine.
STEP 4 - Select
the Stock option
from the list.
Select Tuning
Performance
Tow
87 Octane
Mileage XS SAVE
Stock w/ Options
Stock
STEP 5 - Install
the Stock File by
pressing OK.
STEP 7 - Turn the
Ignition Off. Press
OK to continue.
STEP 8 - Press
OK to return to
the main menu.
Select Tuning
Vehicle was Returned to
Stock Successfully
Press OK to continue
Page 9
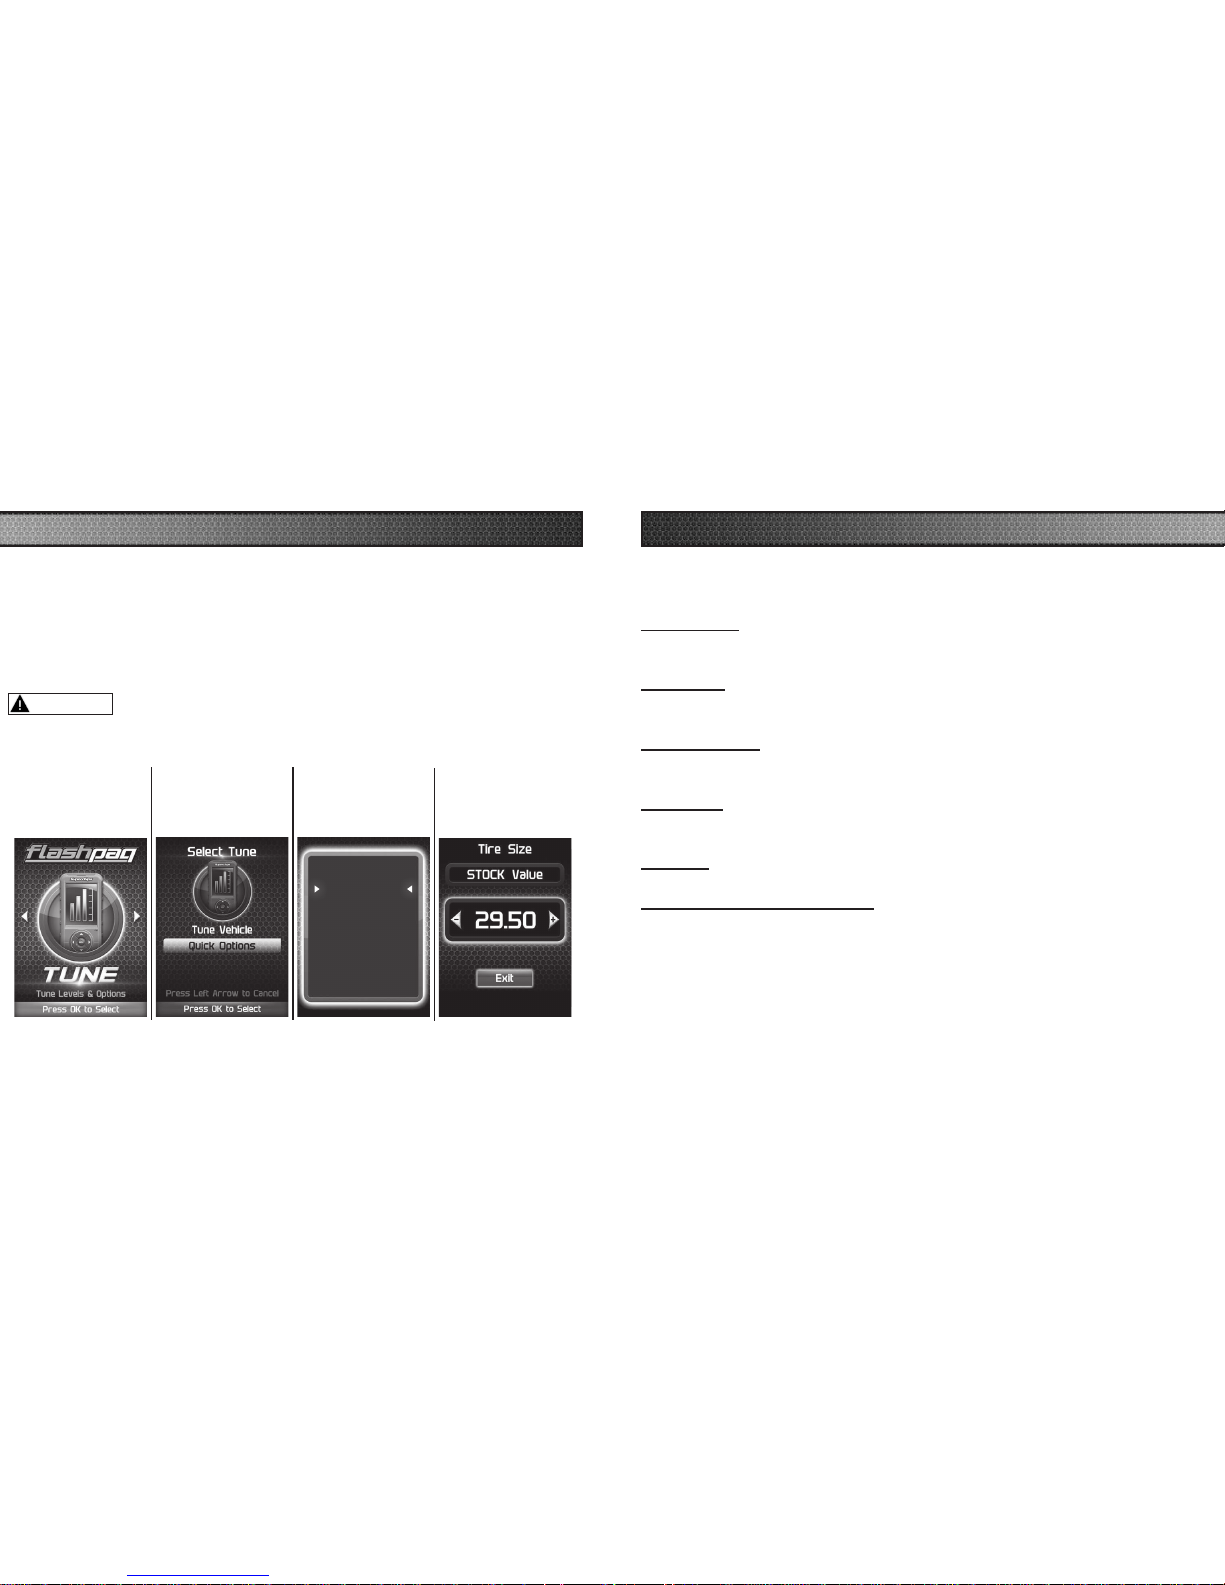
For specic Dodge vehicles, the option to modify various features
using Quick Options is available.
WARNING
NOTICE:
Do not remove or bump the OBD-II connector while changing Quick option
settings. If you do, the vehicle may not start.
Do not make adjustments to your vehicle while parked in unsafe locations
including heavy trafc or places without cell phone service.
STEP 1 - Enter
the Tuning Menu
by pressing OK.
STEP 3 - Select
an option from
the list.
Select Tuning
T Case Lo
Engine Idle
Tire Size
Gear Ratio
Spark Adv.
Mobile Desoot
Exit
STEP 2 - Select
Quick Options.
Quick Options
STEP 4 - Modify
each setting
according to your
specic needs.
Select Tuning
Fog Light w/ Highs Cutoff
Engine Idle: This feature allows the user to increase the engine Idle RPM
momentarily.
Gear Ratio: This feature allows you to adjust the gear ratio after they have
been modied.
Mobile Desoot: For diesel engines with particulate lters, use this feature to
activate a regeneration cycle.
Spark Adv: This feature gives the option to retard the timing down a min. of 6
degrees.
Tire Size: This feature allows you modify the programmed Tire Height.
Transfer Case LO Adjustment: Allows you to adjust the transfer case settings
while in 4-LO.
The availability of the following features depends on the year & model of
your vehicle.
QUICK OPTIONS QUICK OPTIONS EXPLAINED
Page 10
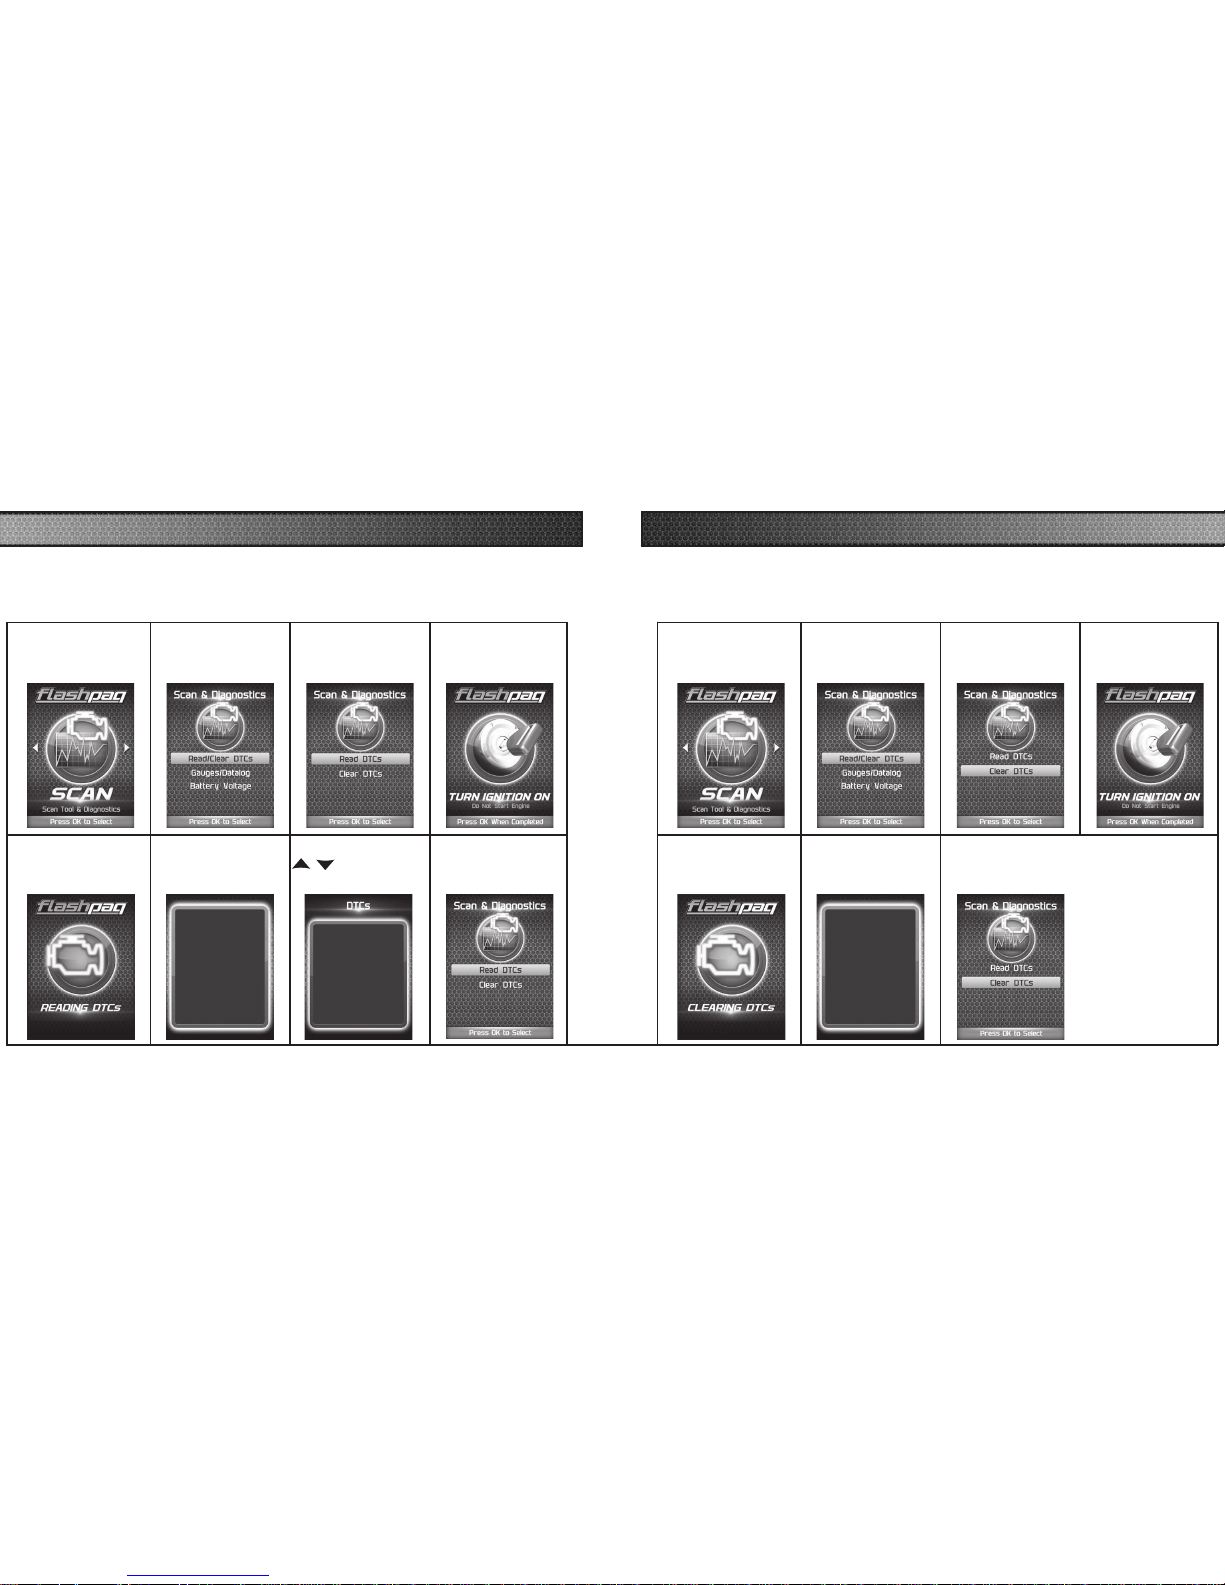
READ DTC
This feature allows you to troubleshoot issues that your vehicle may be experiencing. Most
vehicles will illuminate the in-dash check engine light. A Diagnostic Trouble Code (DTC) arises
when a vehicle’s computer detects a sensor failure or a parameter outside of specic range.
CLEAR DTC
This feature allows you to clear the DTC and turns off the check engine light.
NOTE: If a DTC persists, this could indicate a vehicle malfunction. We recommend seeking a
qualied professional in resolving the issue. Program the vehicle back to stock prior to service.
STEP 1 - Enter the
Scan Menu.
STEP 2 - Select
Read/Clear DTCs.
STEP 3 - Select
Read DTCs.
STEP 4 - If asked,
turn ignition on,
but do not start.
STEP 5 - Allow the
device to search for
DTCs.
STEP 6 - Read and
follow the on-screen
instructions.
Pressing UP or DOWN
will cycle through the
DTCs
Pressing OK or LEFT
will exit
Press OK to Continue
STEP 7 - Push the
/ arrows to
view each DTC.
DTC - 1of2
P0090
Fuel Pres Reg Ctrl Circ
STEP 8 - Press OK
to return to the
DTC menu.
STEP 1 - Enter the
Scan Menu.
STEP 2 - Select
Read/Clear DTCs.
STEP 3 - Select
Clear DTCs.
STEP 4 - If asked,
turn ignition on,
but do not start.
STEP 5 - Allow the
device to search for
DTCs to clear.
STEP 6 - Read and
follow the on-screen
instructions.
Vehicle DTCs
Successfully Cleared
Press OK to Continue
STEP 8 - Press OK to return to the DTC
menu.
Page 11
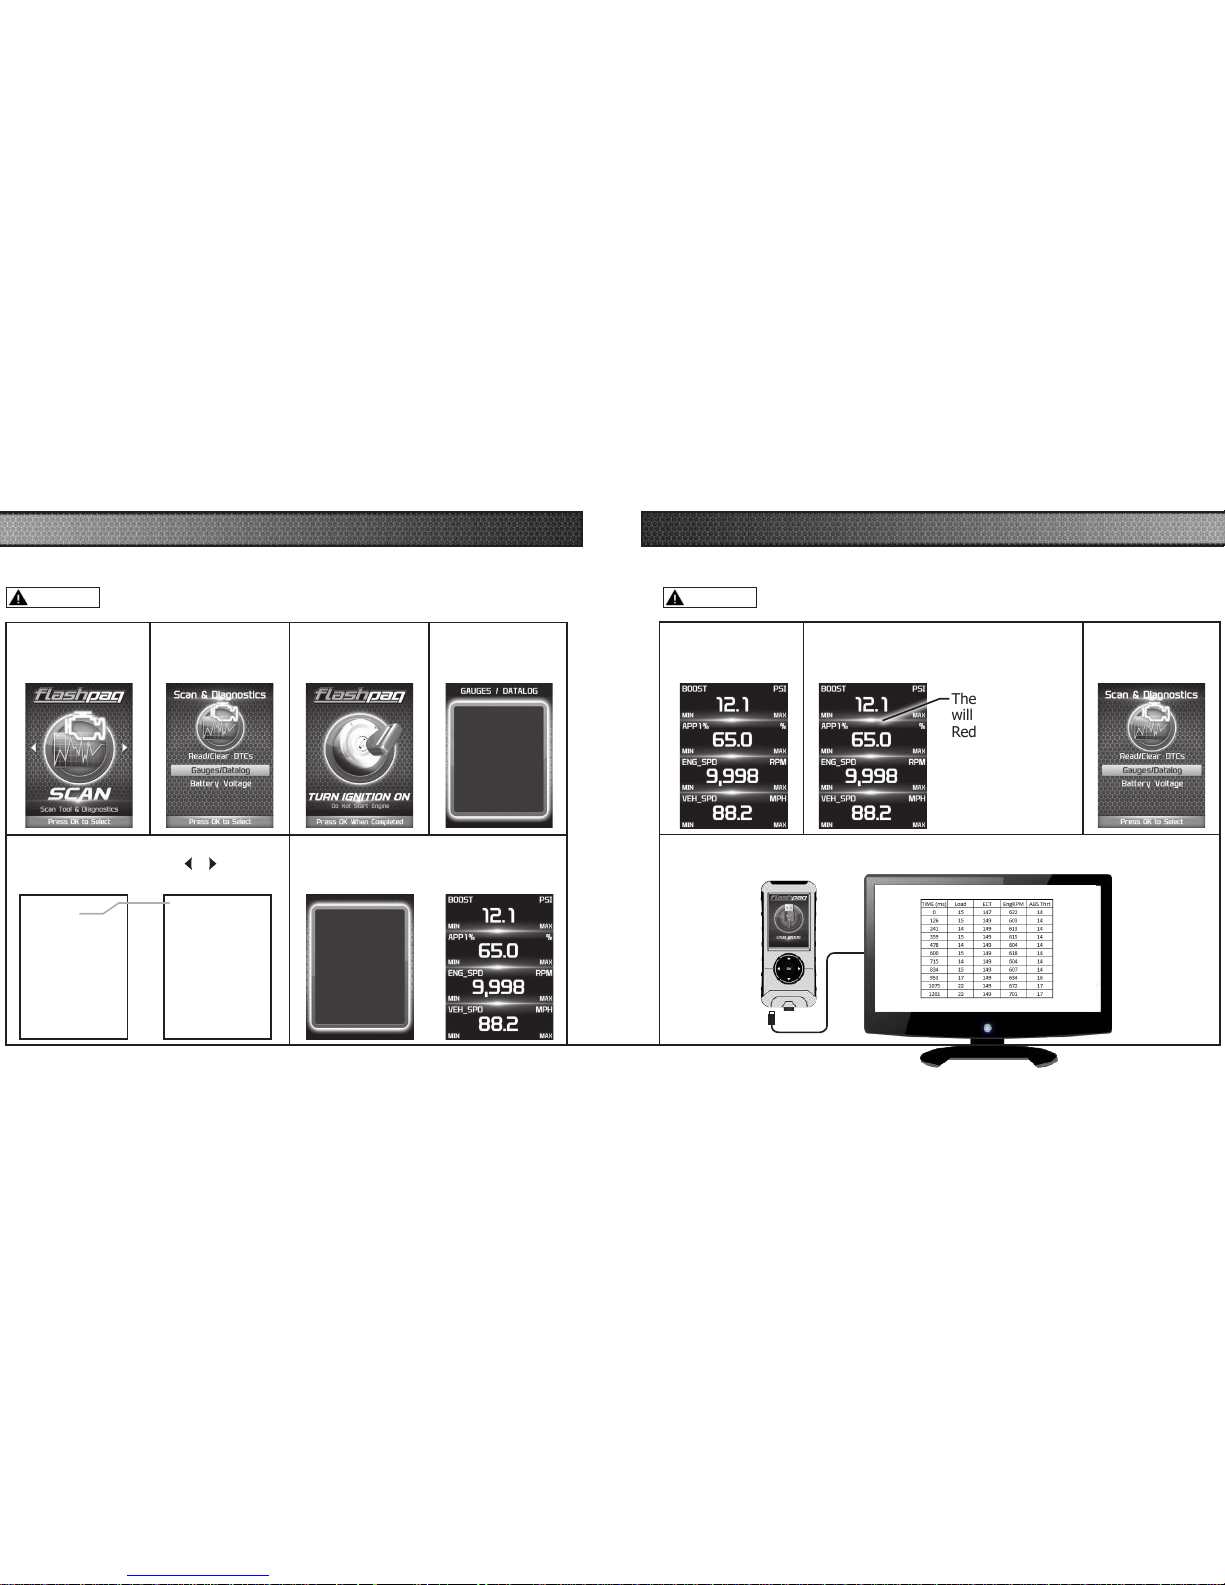
If you would like to view Parameter IDs (PIDs) specic to your vehicle, following these
instructions to learn how to view them using your Flashpaq device.
Do not exceed legal speed limits on public roadways.
VIEWING GAUGES
STEP 1 - Enter the
Scan Menu.
STEP 2 - Select
Gauges/Datalog.
STEP 3 - If asked,
turn ignition on,
but do not start.
STEP 4 - Follow
the on-screen
instructions.
STEP 5 - Select a PID Group, then select
a total of 4 PIDs. Use the
/ arrows to
switch between screens. OK to select.
While viewing gauges,
press OK to start
Datalogging
Press OK again to stop
Datalogging
Press OK to continue
STEP 6 - Follow the on-screen
instructions. Note the RED highlights.
See DataLogging for more information.
Select 4 PIDs within the
following menu
Press OK to continue...
PID Groups 1/1
Engine Misc
Fuel Trim/Press
Time/Distance
Oxygen Sensors
Misc Non-Engine
Egr/Evap
Catalyst Temp
Throttle Detail
DATA LOGGING
STEP 1 - Refer to
the previous section
and follow the steps.
STEP 2 - Press the OK button to begin
recording the PID data. Press the OK
button again, to stop the recording.
The separator lines
will change from
Red to Green,
which indicates
that the device is
actively recording
(datalogging).
STEP 3 - Press the
left arrow to return
to the menu.
Data logging allows you to record specic vehicle information while driving. Follow these
instructions to nd out how to datalog, and how it may be helpful to your particular needs.
Do not exceed legal speed limits on public roadways.
The information will be stored on the device and may be retrieved using a
computer. For more information continue to the next section.
Engine Misc 1/1
Calc Eng Load
Engine Coolant Temp
Manifold Abs Pressure
Engine RPM
Spark Advance
Intake Air Temperature
Mass Air Flow
Abs Throttle Position
WARNING WARNING
Page 12
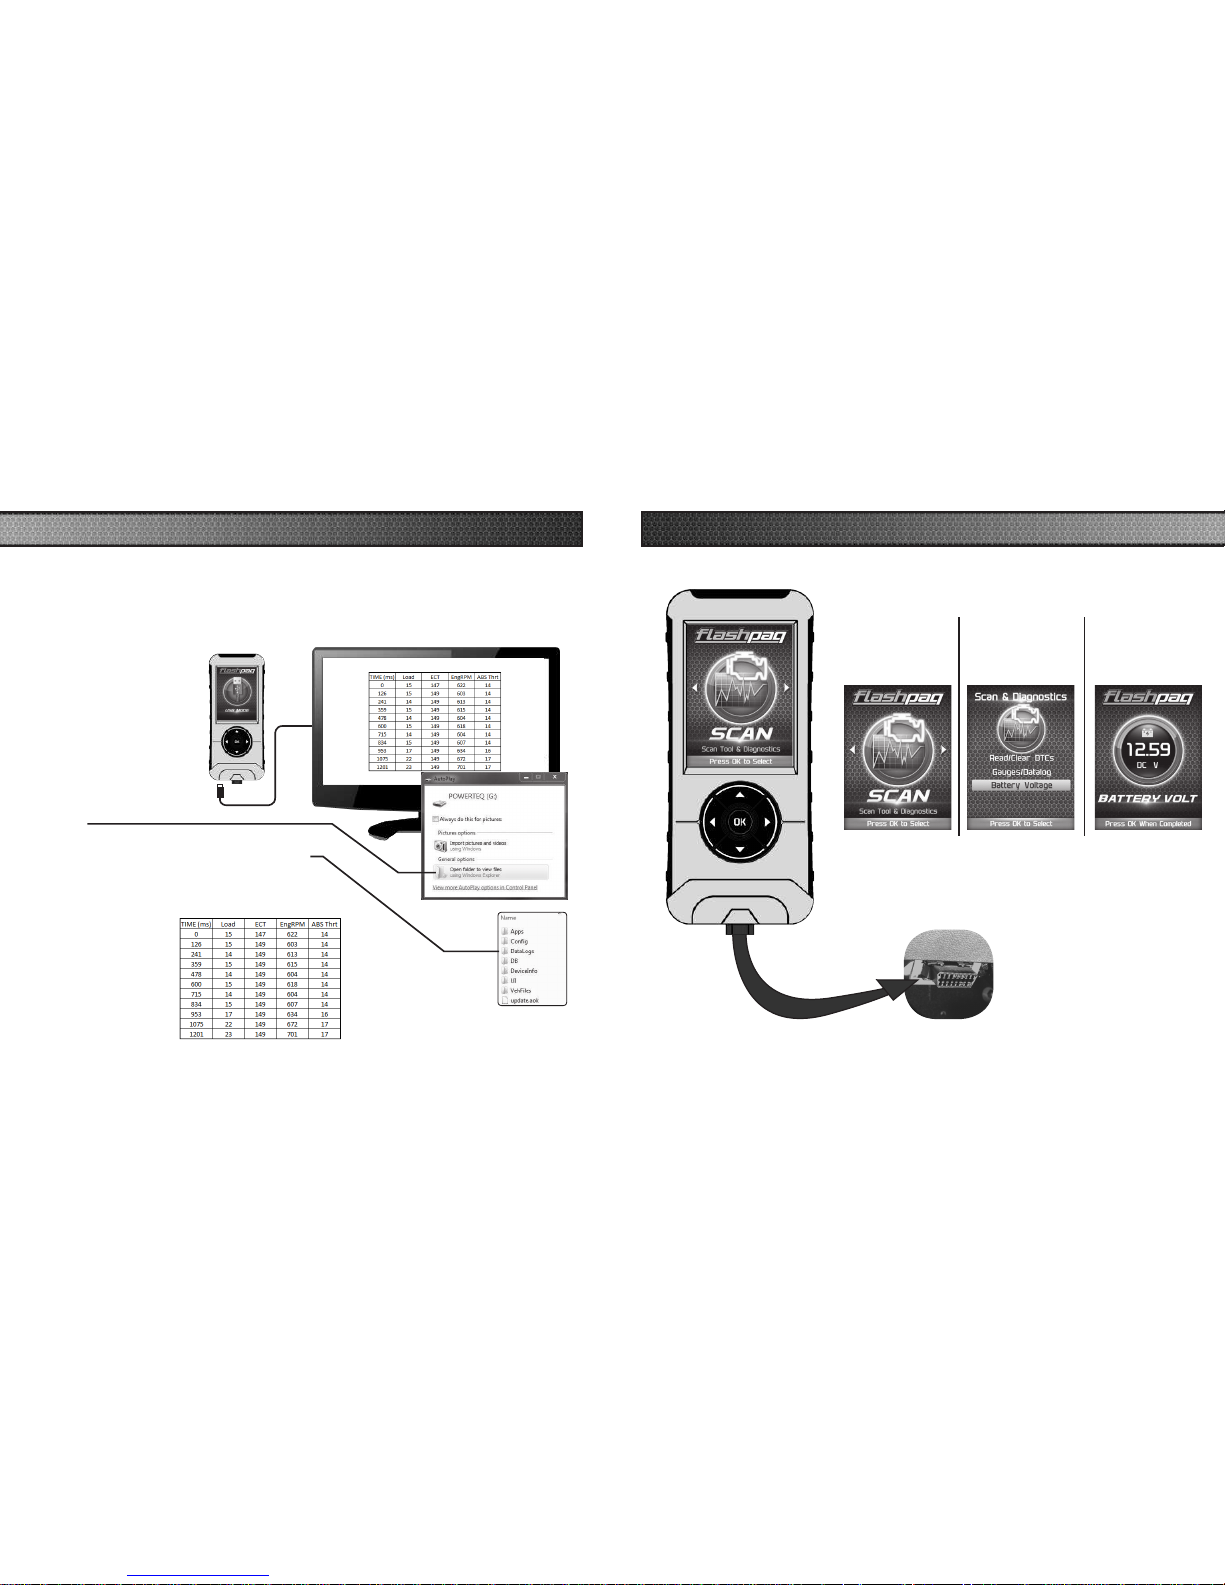
BATTERY VOLTAGE
STEP 1 - Plug the device into the OBDII port.
STEP 2 - Enter
the Scan Menu.
STEP 3 - Select
the Battery
Voltage option.
STEP 4 - Press
OK to return
to the previous
screen.
DATA LOGGING RETRIEVAL
STEP 1 - Remove the device from the vehicle OBDII port.
STEP 2 - Using the USB
cable provided, connect the
device to your computer.
STEP 3 - The device will
enter USB Mode, and allow
your computer to open it’s
les.
STEP 4 - Open the folder to
view les.
STEP 5 - Open the folder named DataLogs.
STEP 6 - Copy the Excel le to your computer
desktop, then open it. A le will open that looks
similar to the following:
To learn more about how Data Logging results can be extracted from the device,
please follow these instructions:
Page 13
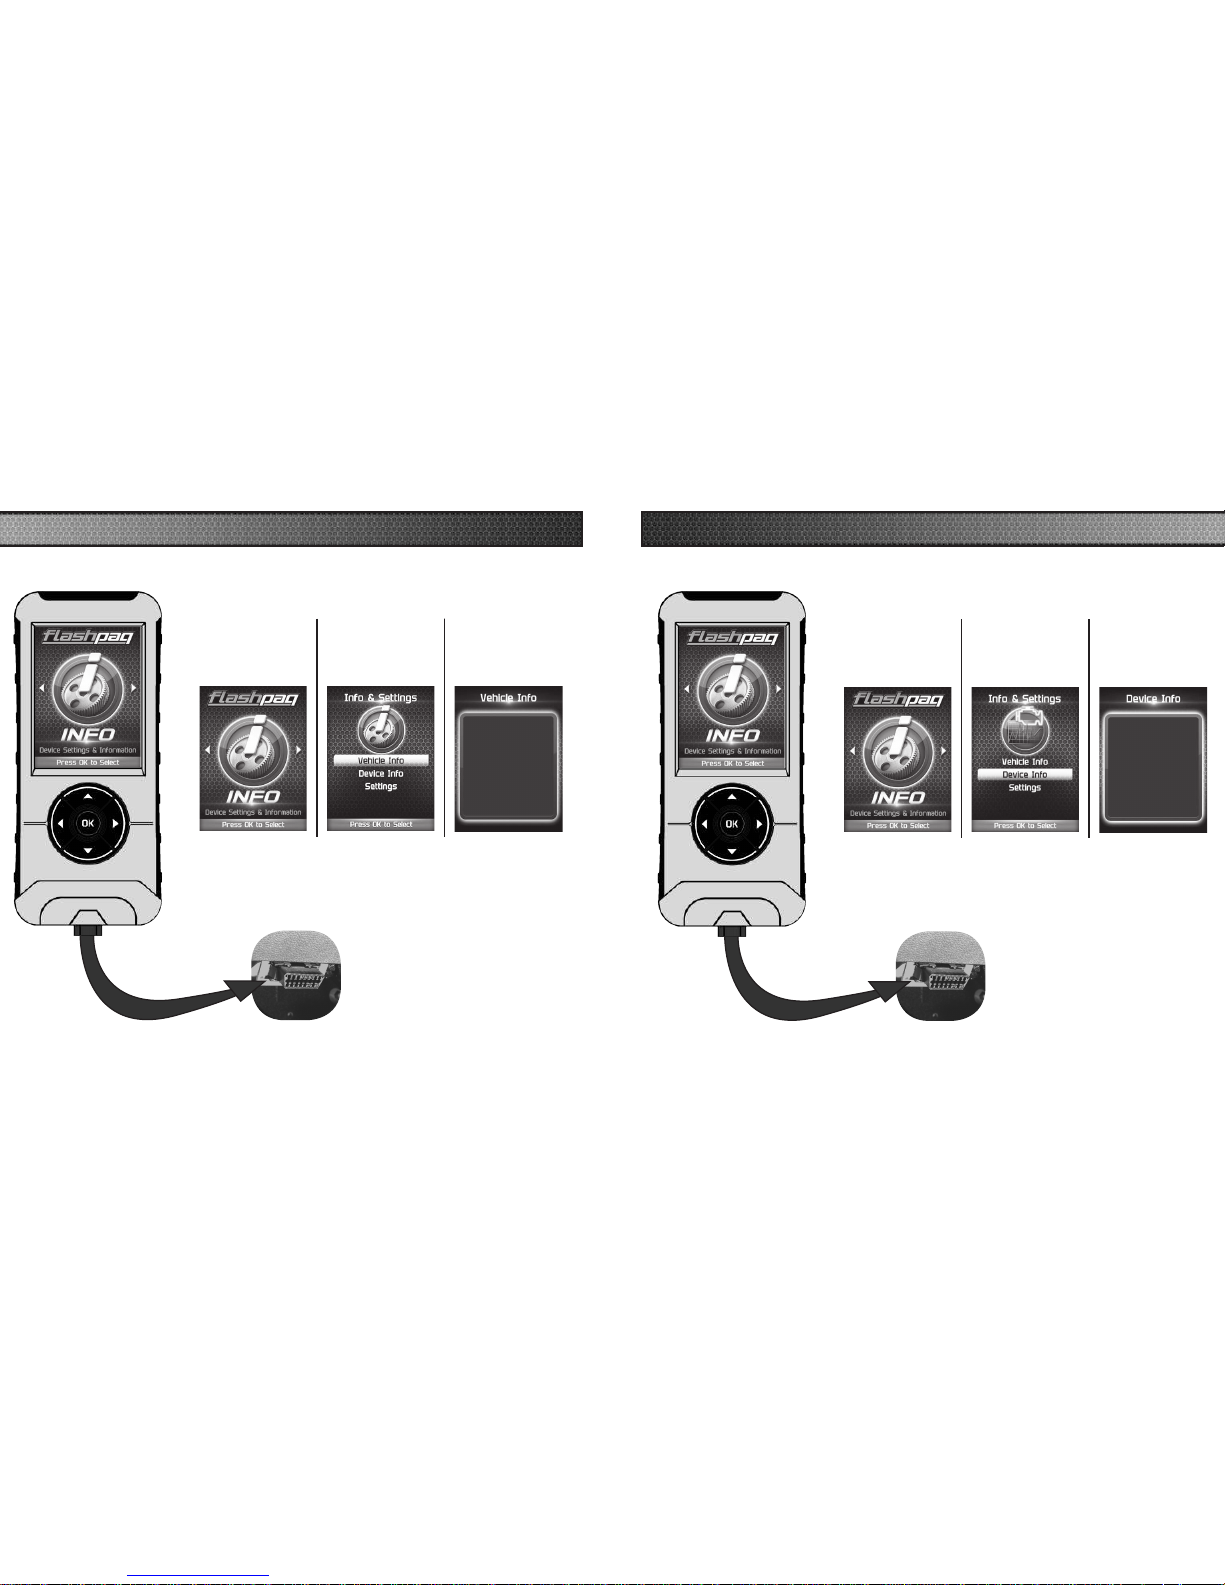
STEP 1 - Plug the device into the OBDII port.
VEHICLE INFO
STEP 2 - Enter
the Info Menu.
TUNING LEVEL
Stock
VIN
#################
Vehicle Files
########
STEP 3 - Select
the ID Vehicle
option.
STEP 4 - Press
OK to return
to the previous
screen.
DEVICE INFO
STEP 1 - Plug the device into the OBDII port.
STEP 2 - Enter
the Info Menu.
SKU:#########
APP: XX_XX_XX
?
APP Ver: 2
IAP Ver: 1
VID Ver: 1
DB Ver: 2085
SN: #########
Status: Stock
STEP 3 - Select
the Device Info
option.
STEP 4 - Press
OK to return
to the previous
screen.
Page 14

I left Flashpaq tuning in my vehicle and went to my dealer
for service, now my Flashpaq will not work?
PThe dealership likely updated your vehicle’s calibrations,
and saved over the tuning. The Flashpaq does not
recognize the new iles in your vehicle.
----------------------------------------------------------------------------
My programmer did not complete programming and went
into recovery mode?
PFlashpaq programmers are designed with ‘Recovery Mode’
which means if, for any reason, the programming process
does not nish, the programmer will automatically program
your vehicle back to the factory stock settings.
It is necessary to follow the screen prompts, possibly
requiring several ‘Ignition On’ and ‘Ignition Off’ sequences.
When recovery is complete your vehicle is at factory stock.
My Flashpaq does not power up when plugged into the OBDII port?
PYour vehicle’s OBDII port is powered through a fuse the
fuse may be blown. (In most vehicles, this is the same fuse
shared by the cigarette lighter)
PTry the Flashpaq on another vehicle to make sure it powers
up. If it does, then the wiring on the vehicle you are trying to
program may be the issue (See your dealer for service).
----------------------------------------------------------------------------
My Flashpaq Says: “Non-Stock File Detected...”
PYour vehicle may have been programmed by another
device. Use that device to set your vehicle back to stock
before using the Flashpaq.
----------------------------------------------------------------------------
When reading the vehicle’s trouble codes (DTCs), I received
a P1000 error code?
P
P1000 is a DTC that sometimes appears after a vehicle is
programmed or the battery cables are unplugged from the
battery. It will automatically clear after several drive cycles.
It cannot be removed using the ‘DTC Clear’ function.
TROUBLE SHOOTING
Page 15
You are now able to start your vehicle normally
. You
may now attempt to program your vehicle again. In the
event that recovery is unsuccessful or fails to complete the
programming cycle, a status message will display on the
programmer.
NOTICE: It is NOT recommended to store your programmer in your
vehicle in extreme heat, direct sunlight or extreme cold (temperatures
near or below freezing). These conditions can cause malfunction or
damage to the programmer.
TIP: When you are not using your device,
place it in its protective bag. This will keep the
display from getting scratched.
TIP: Prior to using your device after a long period of non-use, use Ignition to update. This will ensure
that your device is up-to-date and contains all of the latest les and functionality.
Ignition
32
TROUBLE SHOOTING CONT’D
STORAGE AND MAINTENANCE
Page 16
SAFETY GUIDELINES
Throughout this User Manual you will see important messages regarding
your safety or the protection of your vehicle. These messages are
designated by the words WARNING, CAUTION, or NOTICE.
A WARNING indicates a hazardous situation which, if not avoided, will
result in death or serious injury.
A CAUTION indicates a hazardous situation which, if not avoided, could
result in minor or moderate injury.
NOTICE
A NOTICE indicates a condition that could cause damage to the product or
your vehicle.
The Superchips Product you have purchased is a high-performance
product. As such, it does present some risks of which you should be fully
aware. Do not use this product until you have carefully read the following
safety information and the Owner Agreement.
WARNING
CAUTION
Before using device, read and understand the user manual, including these additional
safety instructions. Failure to do so could result in DEATH or SERIOUS INJURY.
• Do not exceed legal speed limits on public roadways. Violating trafc laws is dangerous and
could result in injury or vehicle damage or both.
• Use any enhanced speed capabilities of this product only in closed circuit, legally sanctioned
racing environments expressly for this purpose. Violating trafc laws is dangerous and could
result in injury or vehicle damage or both.
Do not operate the device while driving. Distracted driving could result in trafc accidents,
death or serious injury, and/or damage to your vehicle.
• Always perform all adjustments or changes while stopped. Changing a setting while driving
can interfere with your attention to roadway conditions and could result in injury or vehicle
damage or both.
• Do not stack products. “Stacking” performance-enhancing devices or other improper
installation can cause power train failure on the road. Other products may have features
incompatible with your Superchips device. Follow all installation and operating instructions.
• Some modications may affect other parts of your vehicle. For example, if you remove/
adjust the speed limiter in your vehicle, be sure your tires and other components are rated
for the increased speeds they will have to withstand. Not doing so can lead to loss of
vehicle control. Modify the speed limiter only for use in closed circuit, legally sanctioned
racing environments, not for use on public roadways.
WARNING
SAFETY WARNING & CAUTION
Check out the performance chips and programmers we offer.
 Loading...