

Page 1
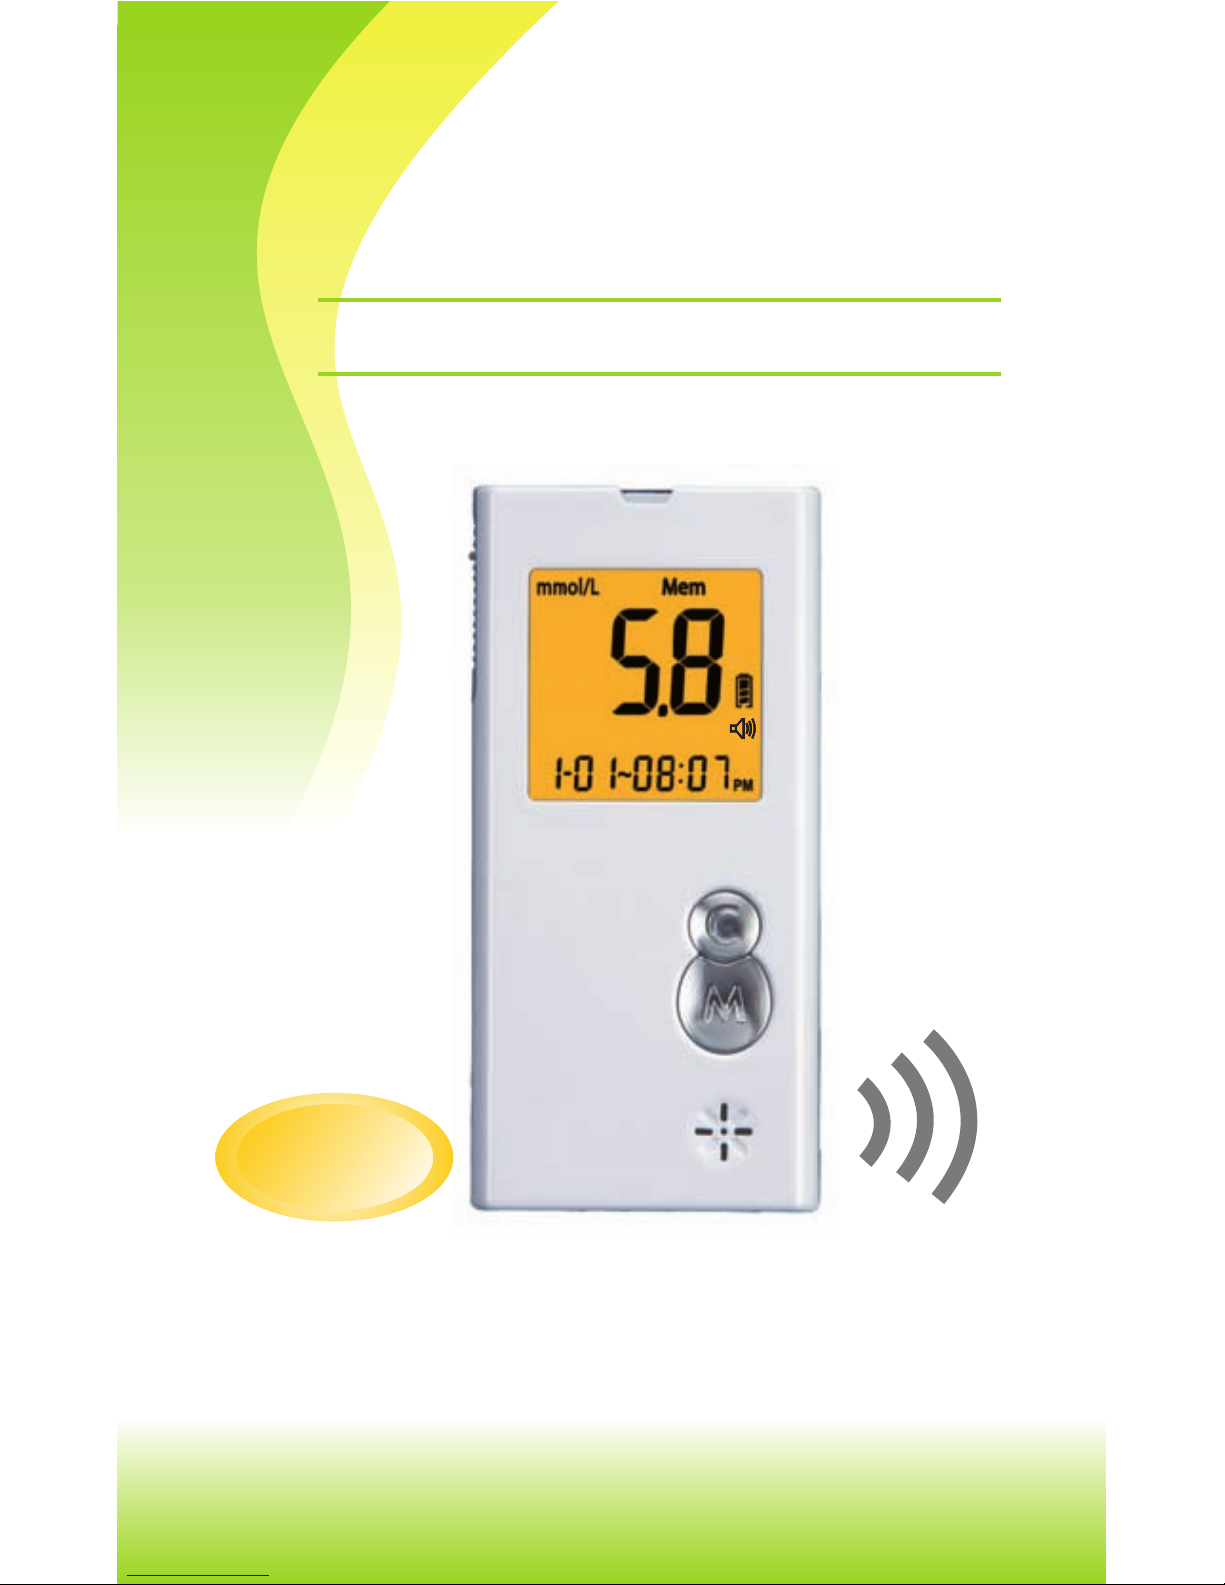
USER GUIDE
62 77 AP-M01A2
Blood Glucose Monitoring System
Model:6277
No Coding
Required
SuperCheck2
SuperCheck2
Rev.d at e:06/2011
Page 2
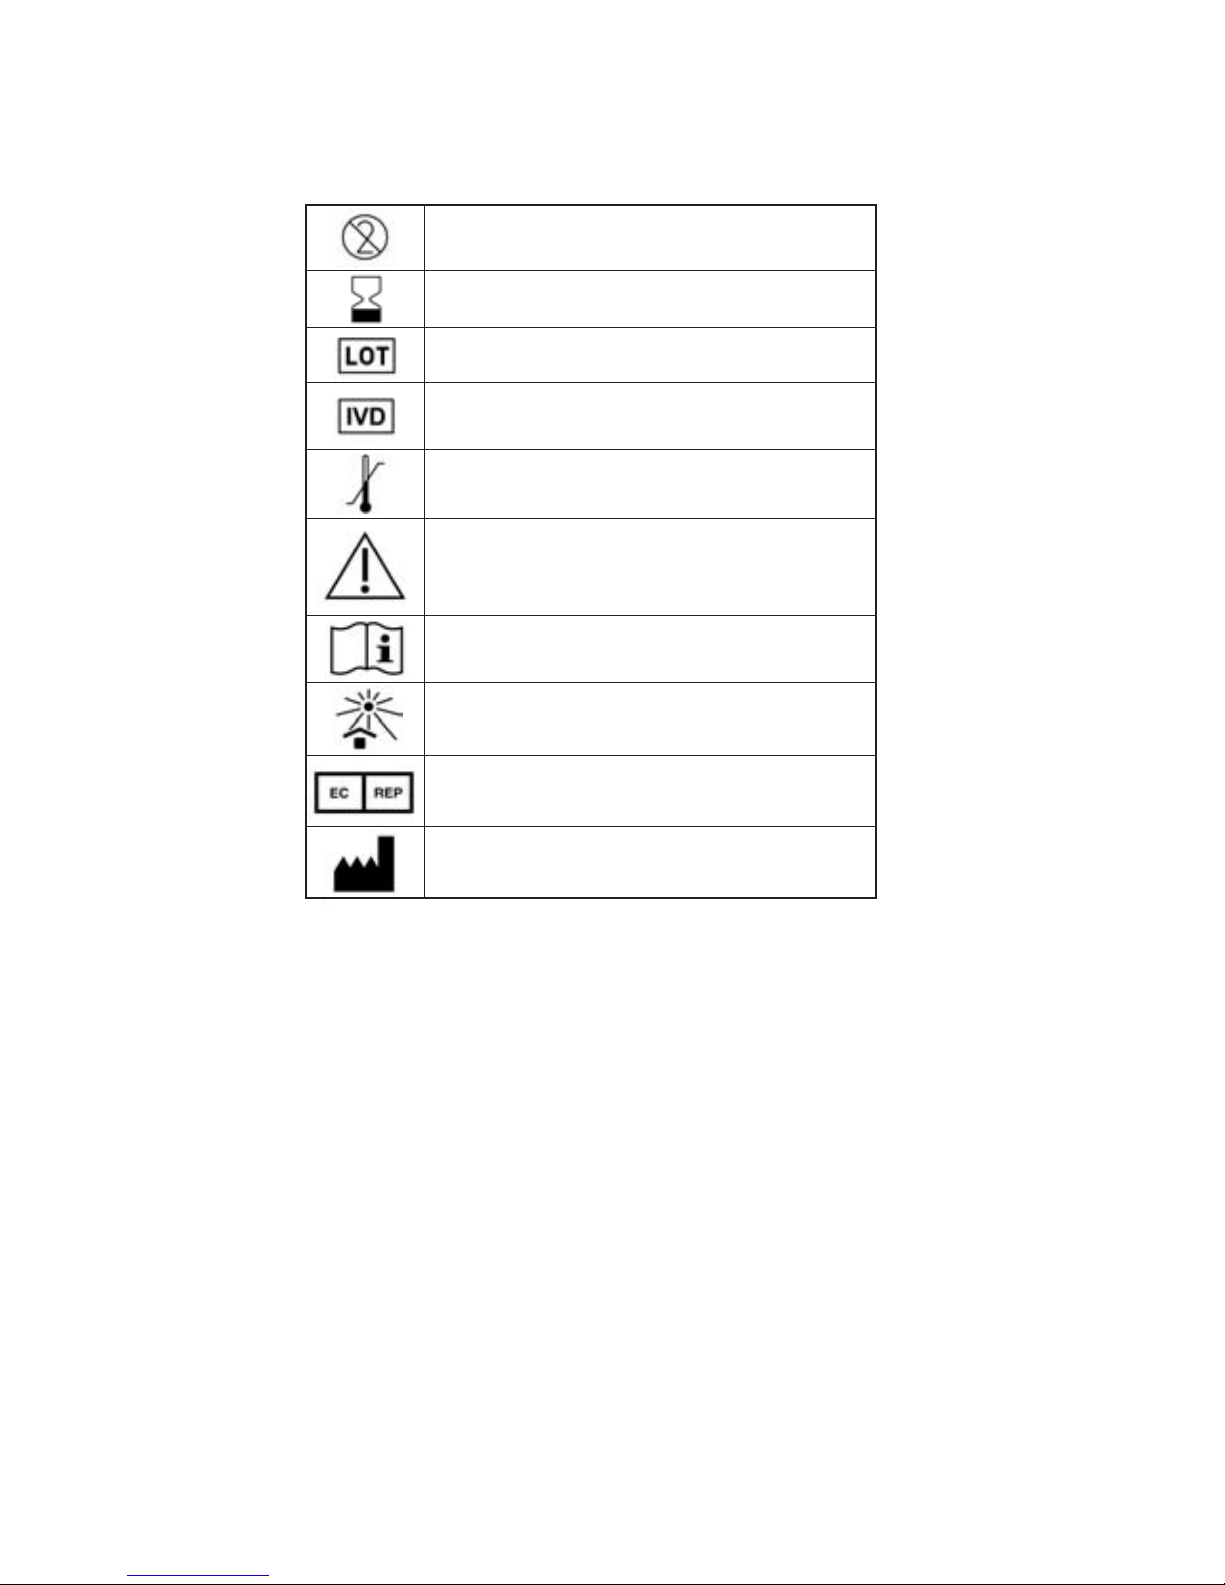
Explanation of symbols:
Important Notice to Reader of this Manual
This manual is written for the Btm SuperCheck2 meter:
model 6277 Voice Meter . The Btm SuperCheck2
Model 6277 contains a speaking function that provides
audible messages to help the user for using the meter
and hearing the test results. In the manual you will
read many audible sentences, which is only for the
model 6277. If you don't want to hear any sentences
from meter, please refer the section 8: Settings, and
you can adjust the meter to “Voice Off”.
Caution (refer to accompanying documents).
Please refer to safety-related notes in the
manual accompanying this instrument.
Consult instructions for use.
Keep away from sunlight.
O
86 F
O
30 C
O
46 F
O
8 C
Authorised representive in the
european community.
Manufacturer
Do not reuse
Use by / Expiry date
Lot number
In vitro diagnostic medical device.
Temperature limitation
Page 3

1. Contents
Section Topic Page
1. Table of Contents
2. Introduction
3. Appearance and Key Functions of the meter
4. Alternate Site Testing
5. Safety Information
6. Quick Testing Instructions
Date/Time/Alarm/
Memory Deletion /Voice volume)
9
Preparing for Testing
7. Installing the Battery
8. Settings (
.Running a Control Solution Test
Blood Testing
10.Running a Blood Glucose Test
11.Recalling the Memory and Viewing the Average
12.Expected Values
13.Transmitting Results
Maintenance
14.Maintenance of Your System
15.Troubleshooting
16.Customer Service
17.Limitations
Important Additional Information
18. Specifications
19. Ordering Supplies
20. Warranty Information
1
1
2-3
4
5-8
9
10
11
12-16
17-18
19-21
22-23
24
24
25
26-27
28
29
30
30
31
NOTE: For information about the name of the manufacturer of
the lancing device and the lancets, please refer to the package
inserts that came with your starter kits.
Page 4

2
2. Introduction to the System
Intended Use / Indications for Use
The Btm SuperCheck2 Blood Glucose Monitoring System is intended
for use in the quantitative measurement of glucose in fresh capillary
whole blood from the finger and the forearm. It is intended for use as
an aid by either a healthcare professional or a patient diagnosed with
diabetes mellitus for monitoring their blood glucose levels when self
testing. The Btm SuperCheck2 Blood Glucose Monitoring
System is not intended for the diagnosis of or screening for
diabetes mellitus, nor for use with neonates.
The alternative site testing (forearm) in this system can only be used
during steady-state blood glucose conditions.
Contents of the System
This User Guide has been prepared to describe the proper use
of the Btm SuperCheck2 Blood Glucose Monitoring System.
Please read this User Guide carefully including the package
inserts before testing. The system is available as either a meter
or as a complete starter kit. If you have a meter only you can
purchase any additional spares from your system provider.
Page 5

The Btm SuperCheck 2 Blood Glucose Monitoring System contains
the following items:
1.SuperCheck2 Glucose Meter with 2 AAA batteries
2.User Guide
3.Log Book
4.Carrying Case
5.SuperCheck2 Glucose Test Strips
6.SuperCheck2 Control Solution (Medium)
7.Sterile Lancets
8.Lancing Device
9.Package Inserts for Test Strips, Control Solution,
and Lancets/Lancing Device
"A single level control solution (Medium) is provided in the
"Starter Kit,". You may purchase any control solutions that you
need from your system provider."
The Btm SuperCheck2 Glucose Meter uses Btm SuperCheck2
Glucose Test Strips. Neither the meter nor the test strips will work when
used with any other brand of glucose products.
3
Page 6
4
3. Appearance and Key functions
of the meter
The principle of the method
When glucose reacts with the reagents on the test strips, an electrical current
is produced, which is proportional to the glucose concentration in the blood sample.
The glucose concentration is calculated by the meter and based on the current measured.
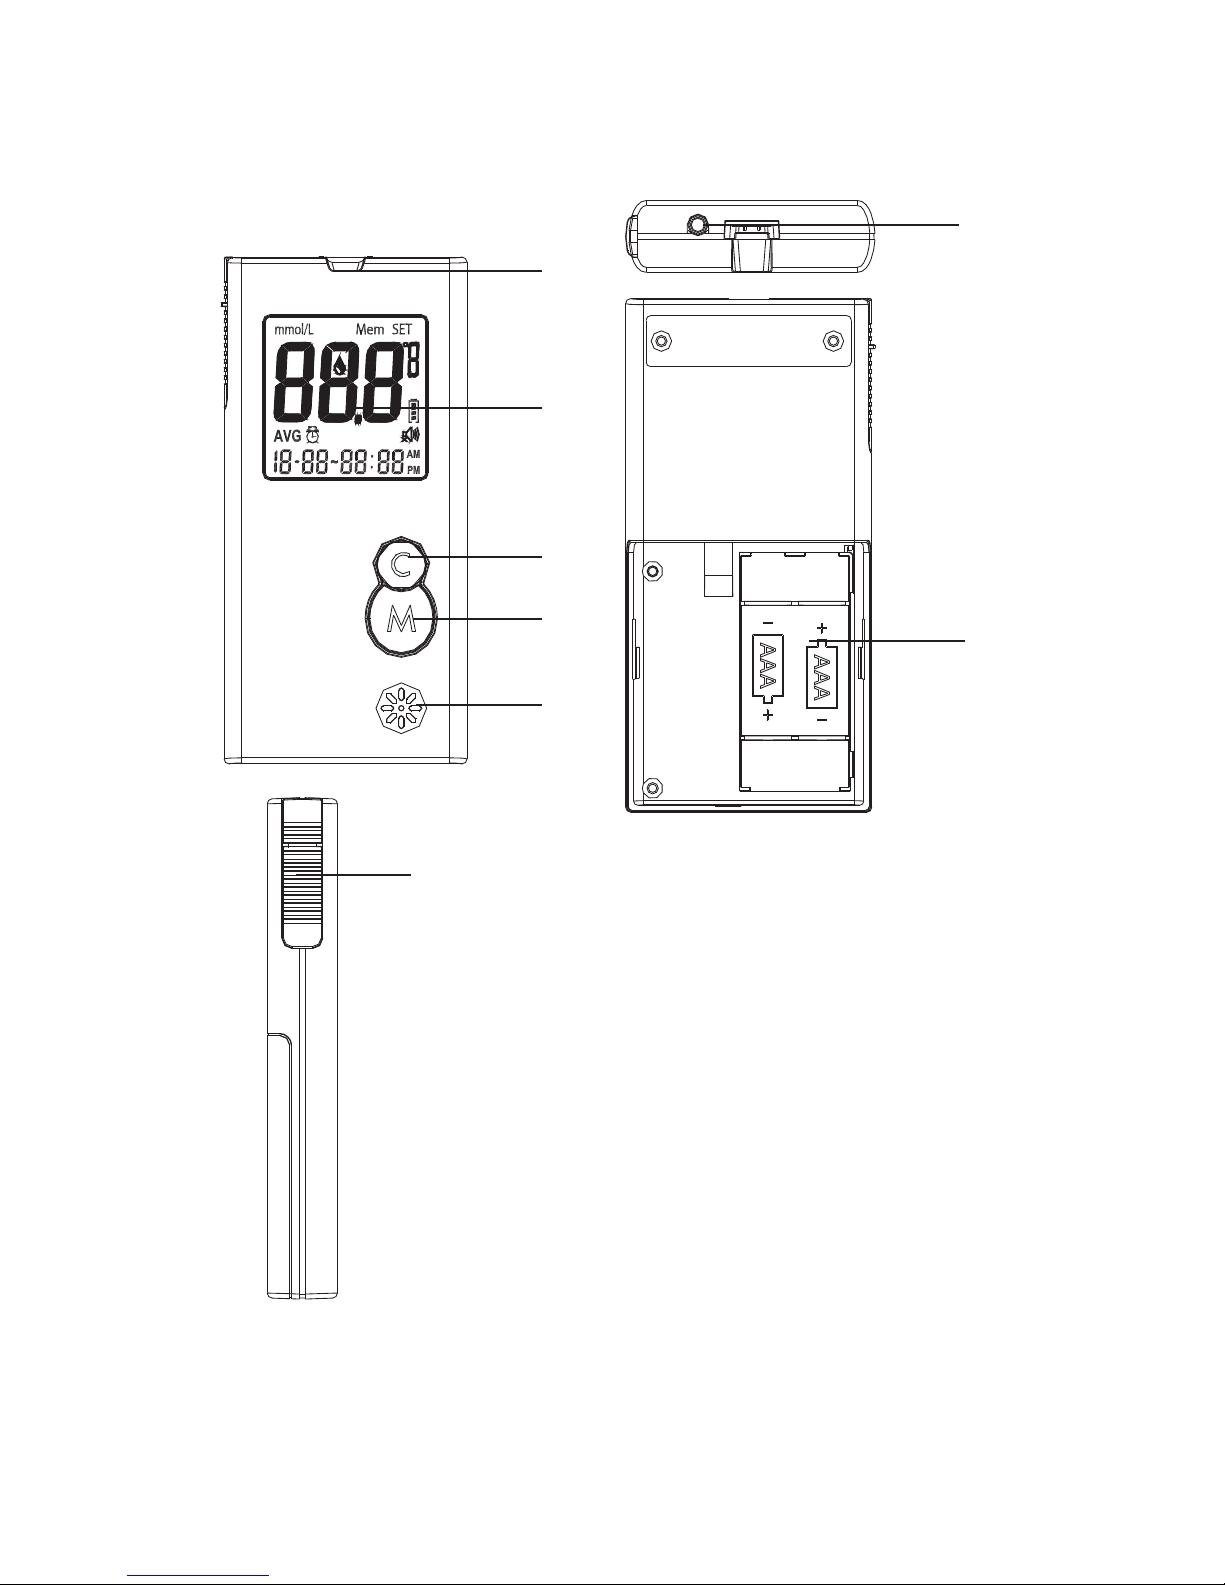
1.Test strip slot - When the strip is inserted into the
slot, the meter will automatically turn on.
2. LCD Display - Guide you through the test using
symbols and simple messages.
3. M Key - Power ON/OFF, also for memory recalling
mode, please refer to manual for detailed function
description.
4. C Key - Setting mode, please refer to manual for
detailed function description.
5. Speaker - Where voice comes out.
6. RS232 port - Cable connection and data transmitting.
7. Battery Compartment - Where batteries are
located.
8. Ejector - Remove used strip.
(1)
(2)
(3)
(4)
(5)
(6)
(7)
(8)
*If your meter has the back light feature, this will come on automatically
during every operation to help user readability and to assist with the
smooth operation of your meter .
Page 7

5
4. Alternate Site Testing (AST)
What is AST?
AST is the sampling from anatomical sites (parts of the body)
other than the fingertip (i.e. forearm) to check the blood
glucose levels. This system allows you to test on the forearm
with the equivalent results to fingertip testing.
There are important limitations to AST. Please consult your
healthcare professional before you use AST.
What is the advantage ?
Some patients may encounter discomfort when taking a blood
sample from the fingertip as the finger tips have a high
concentration of nerve endings. Other body sites do not have
as many nerve endings, so you will not feel as much pain as at
the fingertip.
When to use AST ?
Medication, stress, illness, food and exercise can affect blood
glucose levels. Capillary whole blood at the fingertip can reflect
test changes faster than capillary blood at other sites of body. If
you test your blood glucose level during or immediately after
a meal, physical exercise or stressful events, take the other
sites of the body blood sample from your fingertip instead of
from other sites.
Use AST only:
1. 2 hours or more after taking insulin;
2. 2 hours or more after a meal;
3. 2 hours or more after exercise.
Do not use AST if you are pregnant, or if you are aware that
your glucose level is not as stable as usual, or if you think
you have hypoglycemia (low blood sugar) or hyperglycemia
(high blood sugar).
Do not use AST if you think your blood glucose is low and if
your AST results do not match the way you feel.
Page 8
6
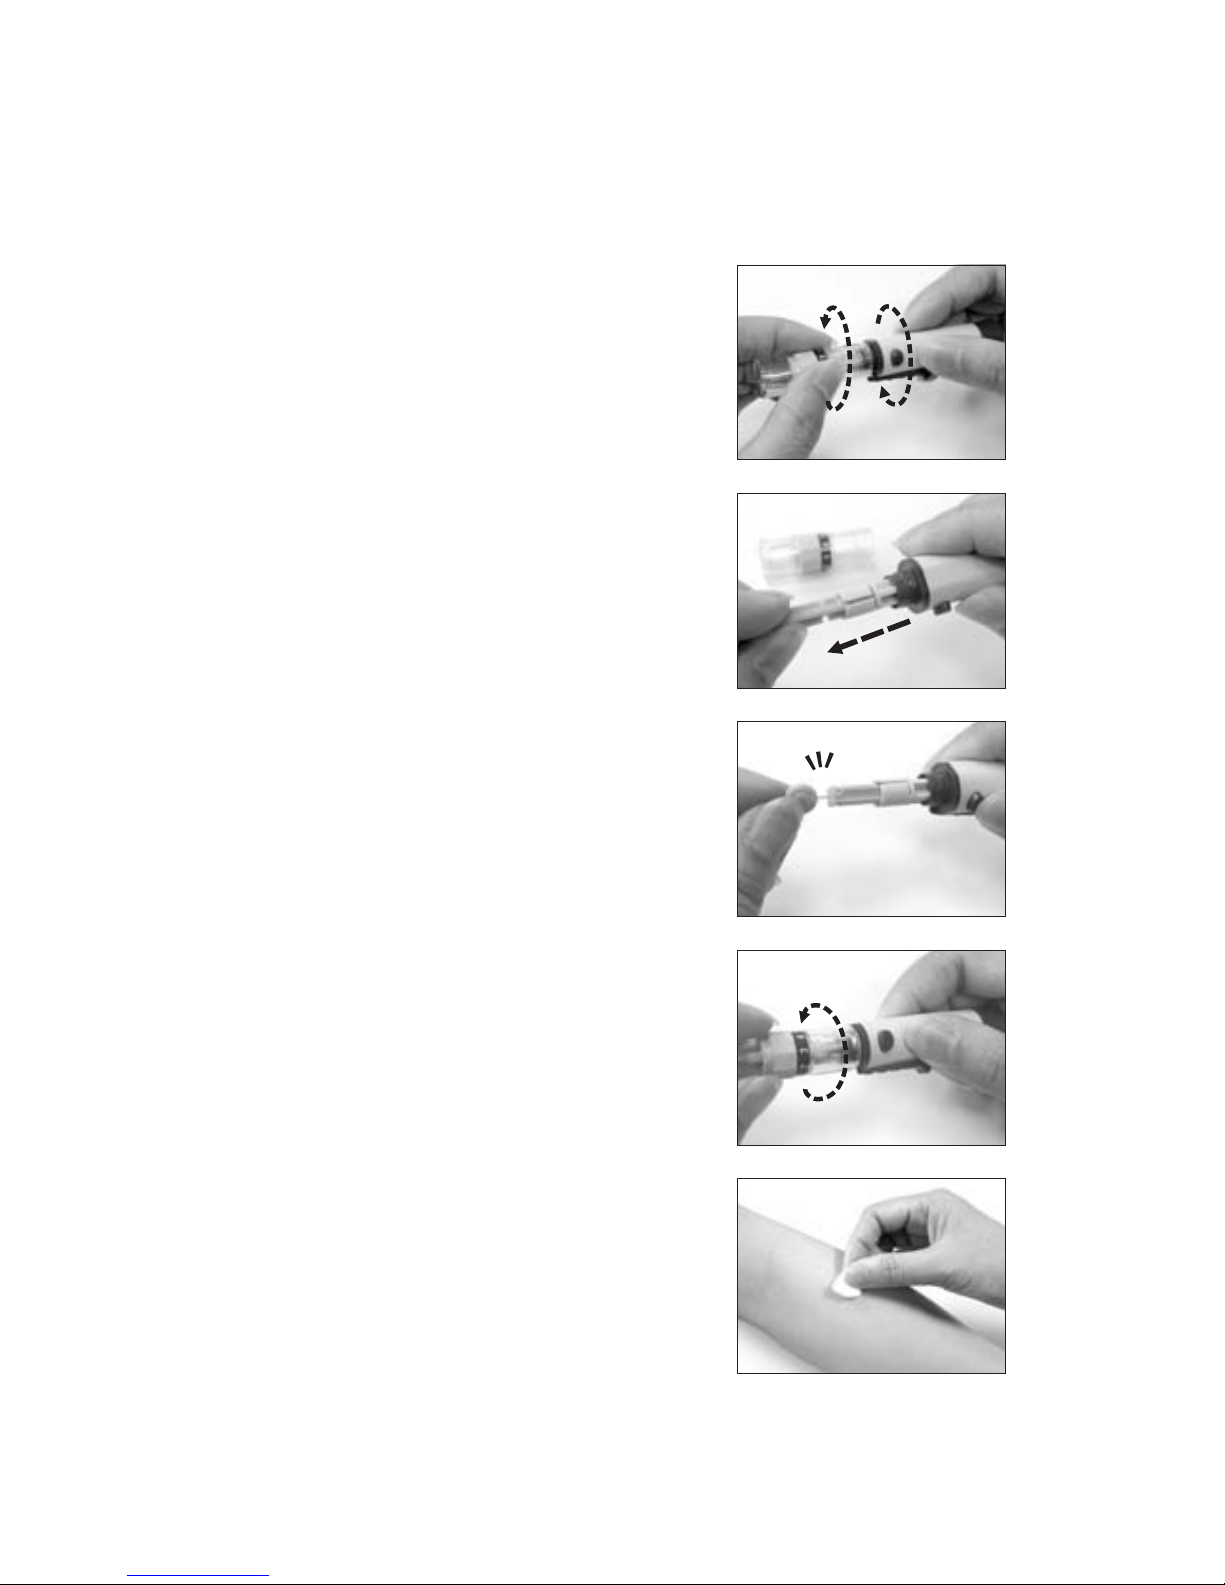
1.Please unscrew the lancing device
by turning the end cap counter
clockwise. A clear cap will come
with the package of a meter kit or
a lancing device. The clear cap on
the lancing device will make it easy
for you to get a drop of blood for
AST.
2.Insert a new lancet firmly into the
lancet holder.
3.Twist off the protective top of the
lancet.
4.Close the end cap of the lancing
device and grasp the lancing device
as shown. Slide into locking position.
If necessary, please set the lancing
device for a deeper puncture.
5.Select a soft, fleshy area on your
forearm that is clean and dry, away
from bone and free of visible veins
and hair.
1
2
3
4
5
Testing Procedure for AST
Page 9
7
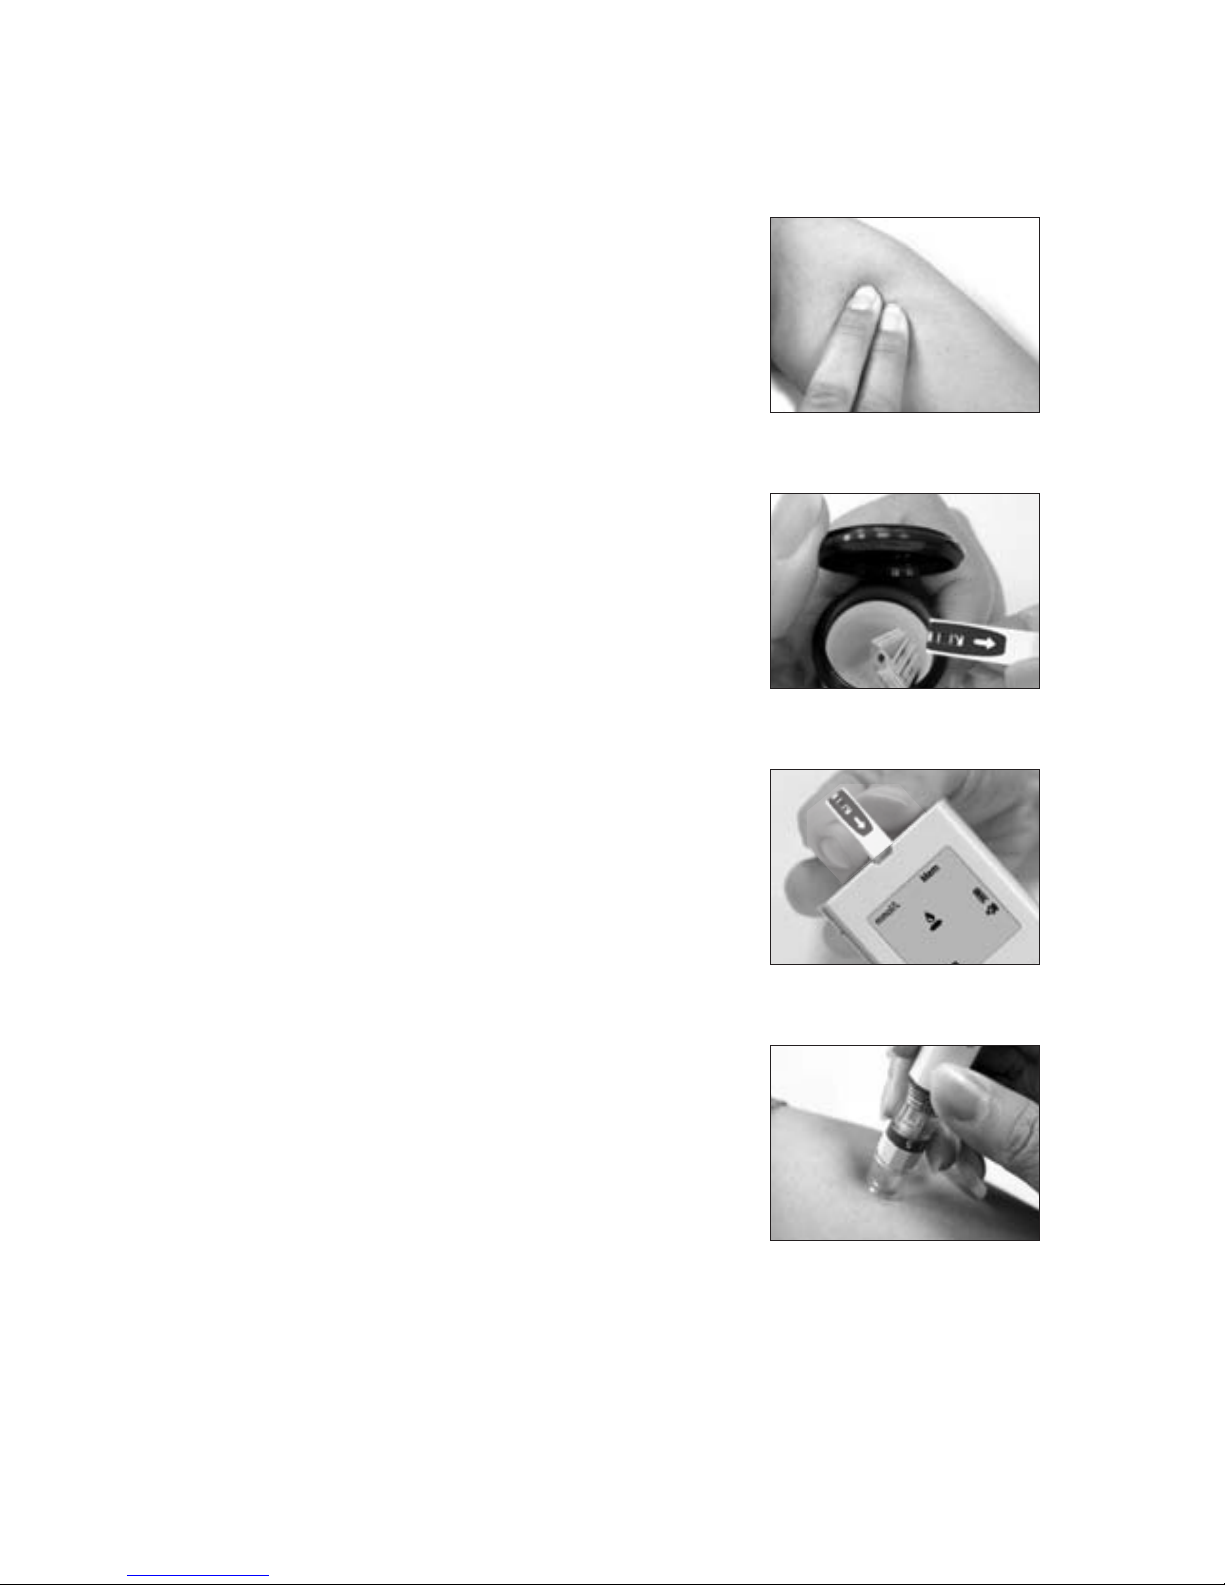
6.Massage the selected area gently
to increase blood flow to the
puncture site. Clean the test location
with an alcohol wipe or with soap
and water
.
7.Open the test strip vial. Take one
test strip out of the vial and quickly
cover the vial to keep air out.
8.Insert a test strip into the meter
while the meter is off. The meter
will turn on automatically, and you
will hear: “Hello, the Meter is
ready.” A blinking blood icon will be
displayed on the screen. You will
hear “Apply blood now.” If no
action is taken in 2 minutes, the
meter will turn off automatically.
You will hear: “Goodbye.”
9.Press and hold the loaded lancing
device against the forearm for a few
seconds, then press and release the
button.
6
7
8
9
Page 10
8
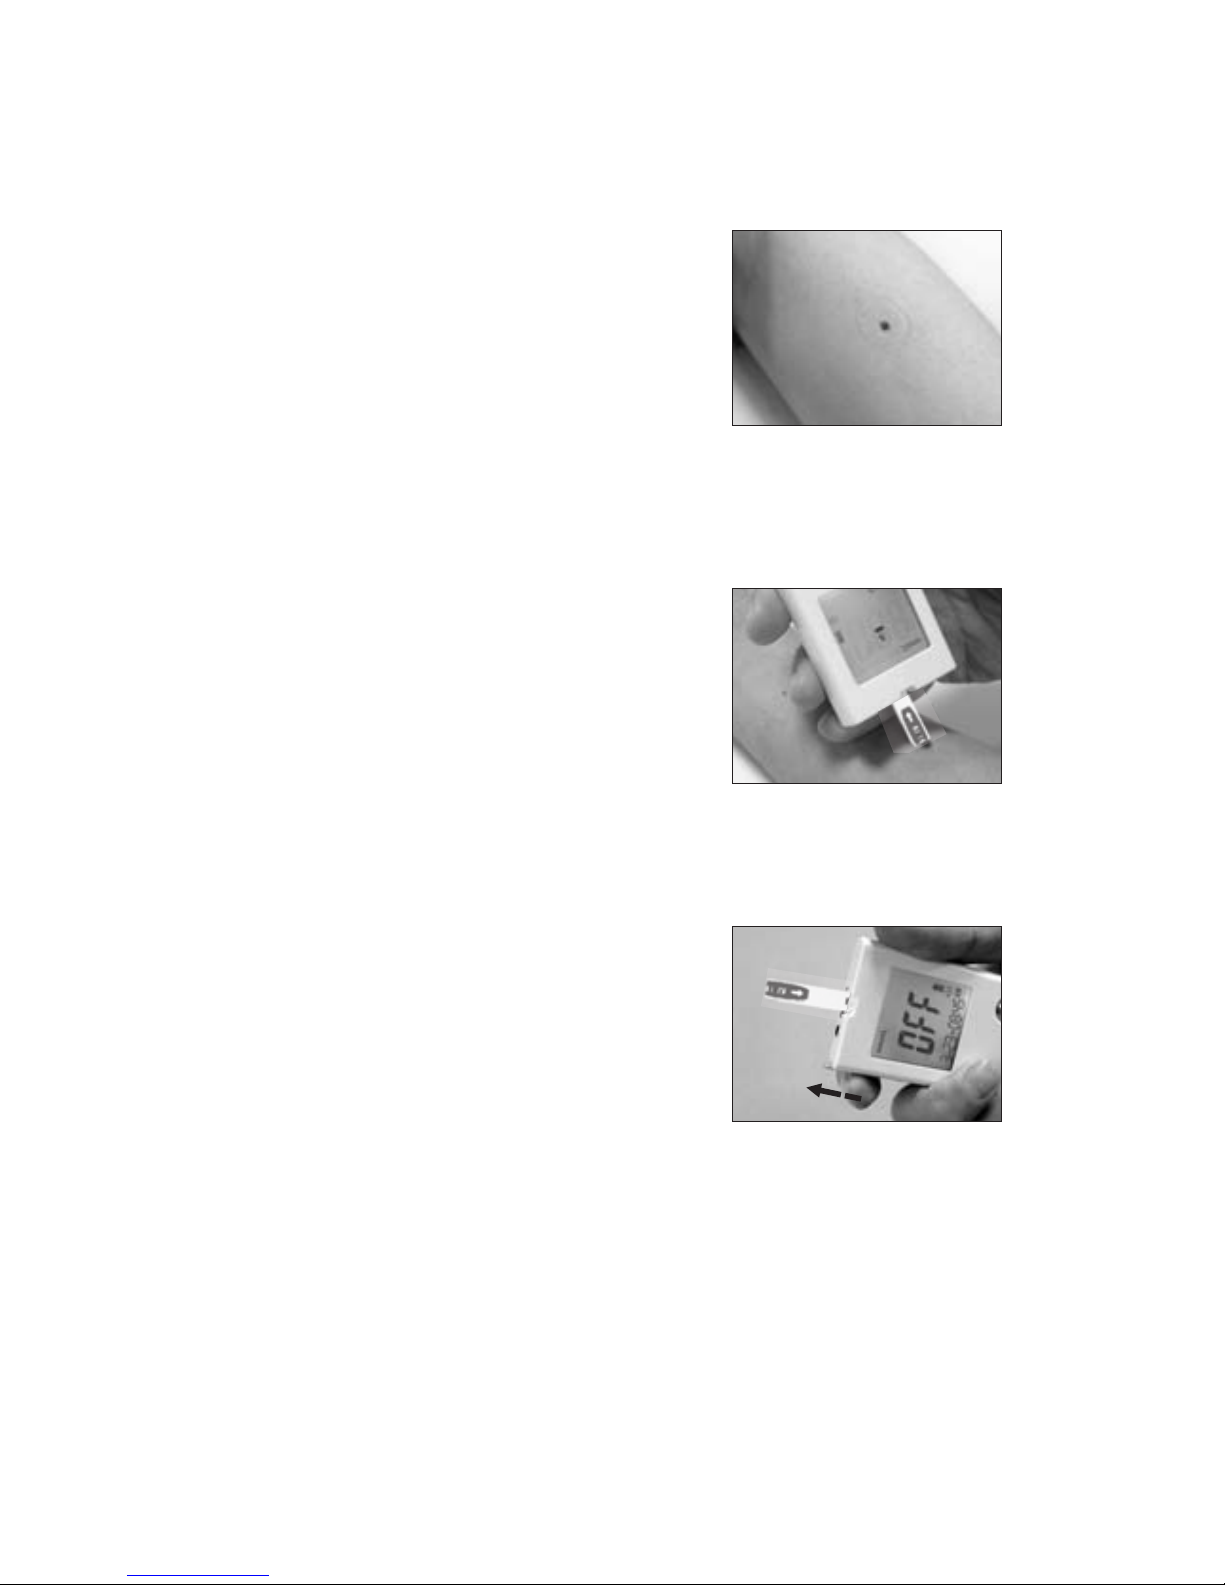
10
11
12
10. Wait for a few seconds until the
blood drop forms. Make sure you
have sufficient blood to fill the
small window of the test strip. For
individuals who experience
difficulty in getting sufficient blood
for a test, it may be helpful to rub the
puncture site a little longer before
using the lancing device.
11. Apply your blood to the front
edge (the tip) of the test strip, and
the meter will start counting down
for 6 seconds then display the test
results on the screen. You will hear:
“Testing in process.” and “The
glucose level is number/unit. ”
12. Remove the used strip by hand
or by pushing the ejector button. The
meter will turn off automatically,
and you will hear: “Goodbye”, and
the LCD screen will display “OFF”.
Page 11

9
5. Safety Information
Please use this device only for the intended use described
in this user guide.
Before using this system to test your blood glucose
please read the instructions carefully and practice the test
when you first use this system. Do a quality check on
the system following the instructions and consult
with your healthcare professionals for questions or
problems.
Be aware of the safety of young children or handicapped
persons near you when you conduct a glucose test using
this system.
Please keep the test strip vial away from children. The
test strips and vial cap can present a choking hazard.
Please be cautious when removing the lancet. Take the
lancet out carefully. Always place the protective cap
back on the exposed tip or (if using a twist lancet)
place the cap on a hard surface and push the exposed tip
into the protective cap and discard of properly.
Never try to disassemble the meter in any circumstance.
If your meter is not working properly, or if you need the
Technical Support, please contact your local distributor
for help.
Page 12
10
6. Quick Testing Instructions
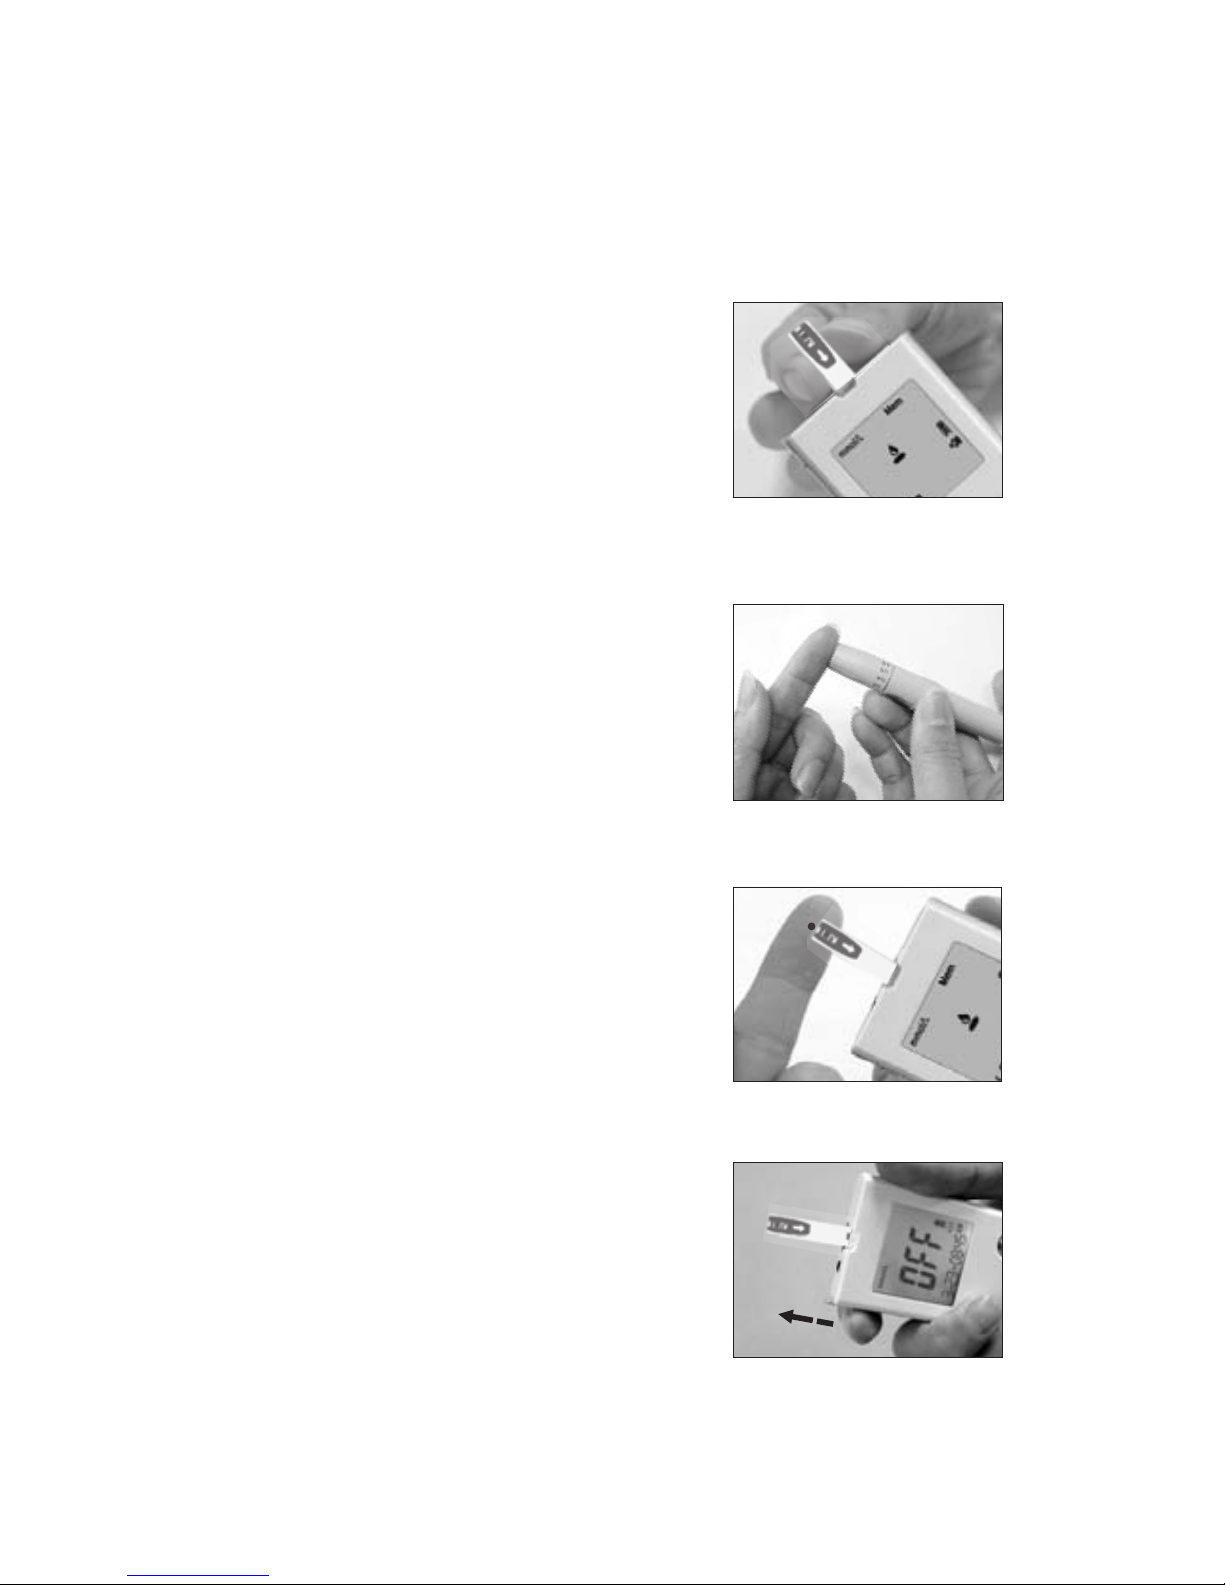
1.With the meter turned off, insert
a new test strip into the meter, and
you will hear: “Hello, the Meter is
ready.” A blinking blood icon will
be displayed on the screen. You will
hear “Apply blood now.”
2.Lance the finger and let a blood
drop form.
3.Apply the blood drop to the front
edge of the test strip when the blood
drop icon is still blinking on the
meter. Wait for 6 seconds, and the
meter will display the test result.
You will hear: “Testing in process.”
and “The glucose level is
number/unit.”
4.Remove the used strips by hand or
by pushing the ejector and the meter
will power off with a display of
“OFF” on the screen. You will hear:
“Goodbye.”
(For detailed instructions start on page 18 for Control
Solutions and page for Blood Testing.)
20
1
2
3
4
Page 13
7. Installing the battery
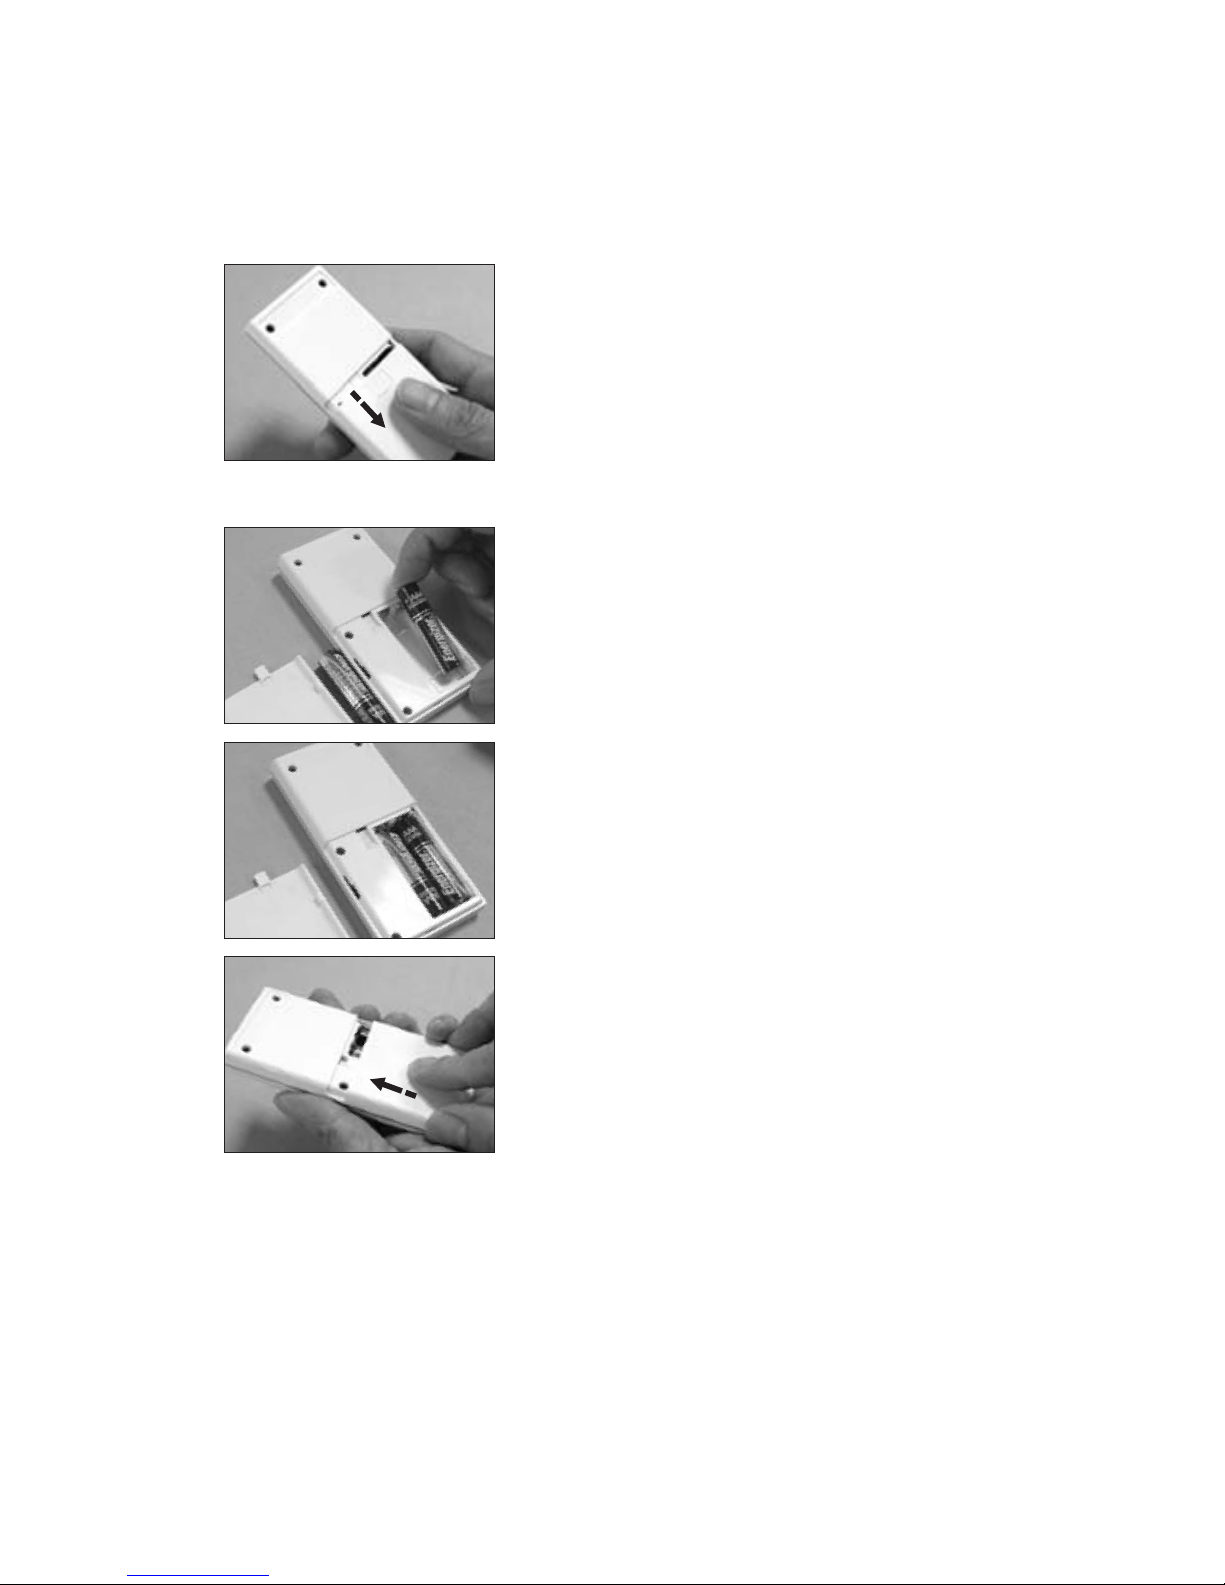
1.Turn off the meter by pressing the
“M” button and hold for 2 seconds
before replacing the batteries.
Slide down the battery cover on
the back of the meter by pushing
the cover in the direction of the
arrow and put the cover aside.
2.Remove the two used batteries.
3.Insert 2 new batteries with
correct +/- direction.
(Battery: AAA 1.5V 2 Alkaline 24A LR03)
4.Put the battery cover back in
place by pushing the cover in the
opposite direction of the arrow to
close the cover into position.
11
Note:
1.It is suggested that batteries need to be
replaced when the battery icon appears
empty. If you keep using the meter, the
battery icon will start flashing and an error
message E_3 will appear on the screen.
2.Note that replacing the battery will not
reset the stored testing results.
3.You need to reset the time and date after
the batteries are replaced.
4.If there is any unexpected symbol on the
display, please follow the above procedure
to replace the batteries again.
5.Please dispose of batteries according
to your local ordinances.
1
2
3
4
Page 14
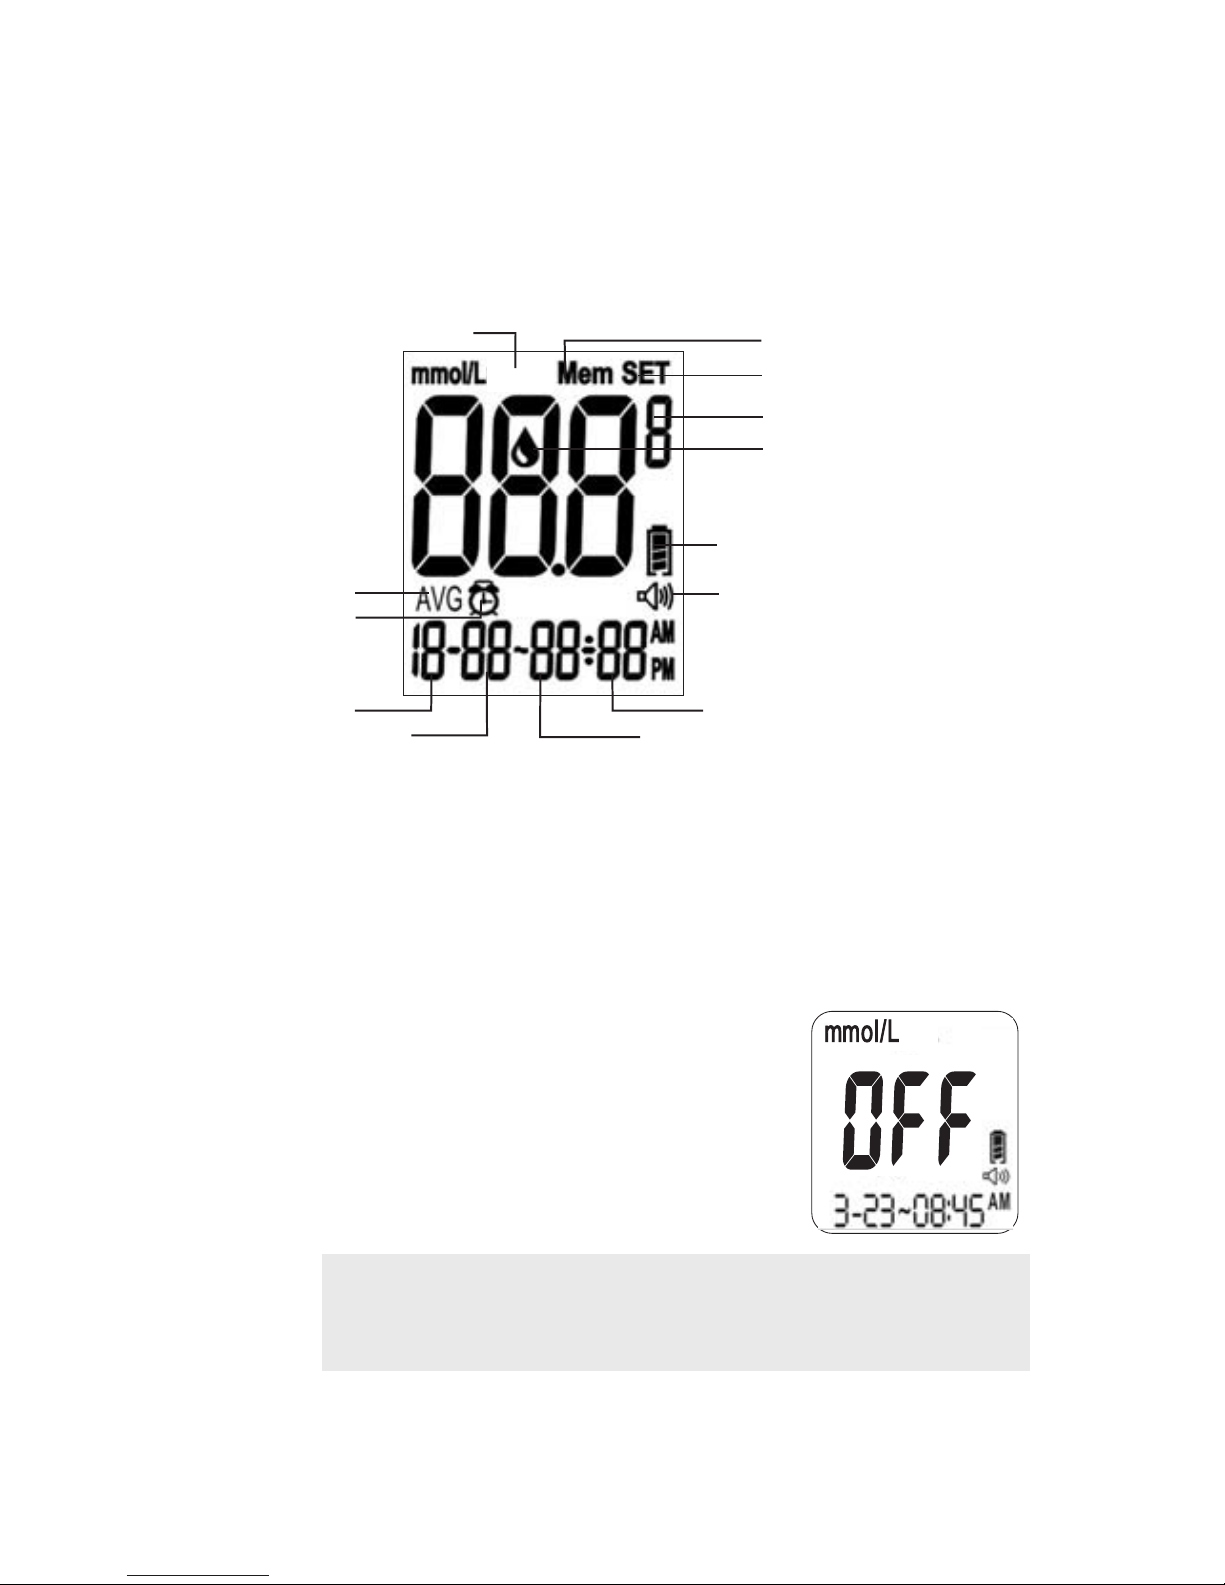
8.Settings ( Date / Time / Alarm /
Memory Deletion / Voice Volume)
1.Appears with the test result or in mmol/L.
2.Appears when you recall the memory.
3.Appears when you are in setting mode.
4.Appears for control solution test flag (c).
5.Indicates the meter is ready to take the blood sample when it flashes.
6.Indicates the battery status.
7.Indicates if audio function is on or off.
8.Indicates current displayed result is an average.
9.Appears when alarm is on.
10.Month
11.Day
12.Hour
13.Minute
(1)Measurement Units
(6)Battery Symbol
(3)Setting
(2)Memory
(10)Month
(11)Day
(12)Hour
(13)Minute
The LCD scr een will show as below:
(4)Test flag
(5)Blood drop icon
(7)Voice Symbol
(Speaker icon)
(8)Day Average
(9)Alarm
Reminder
12
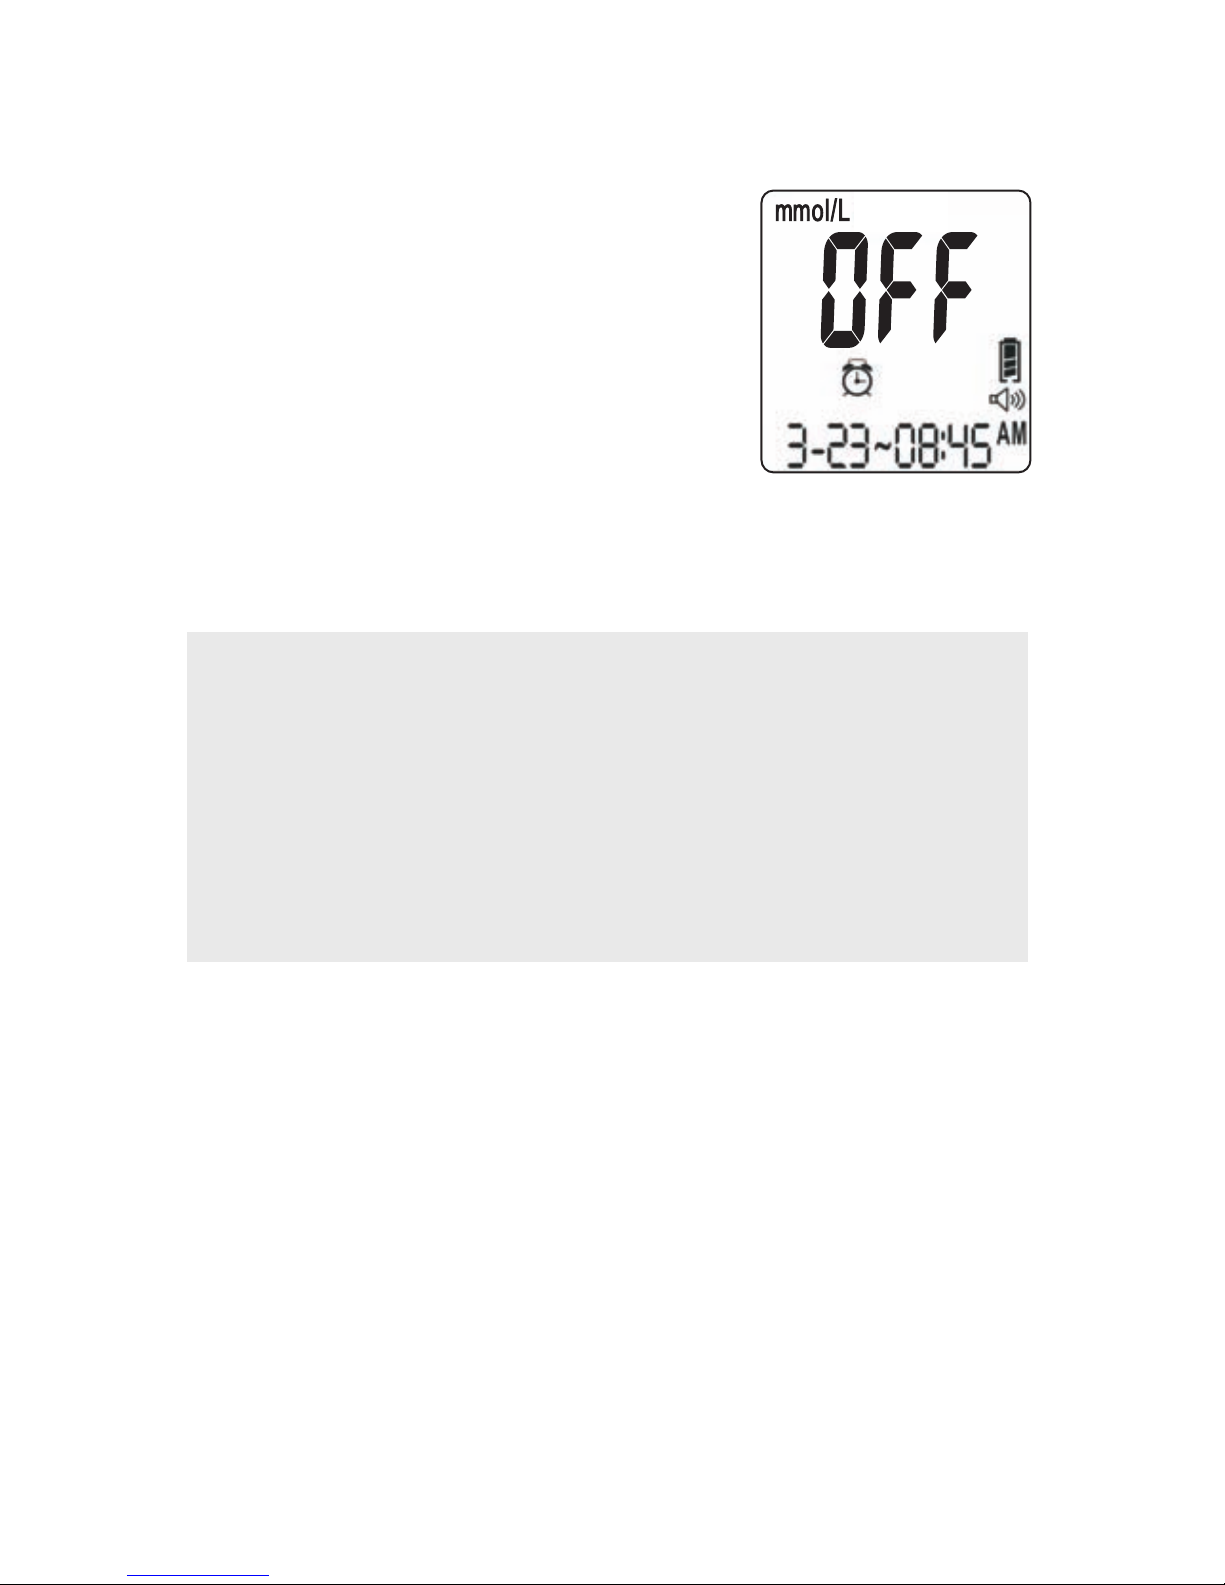
The LCD screen for Power Off - When the meter is off, the date, time,
measurement unit, battery icon and “OFF” will be still on the screen. If the
voice is on or the alarm reminder is on, the speaker icon and the alarm icon
will be displayed as well.
Page 15
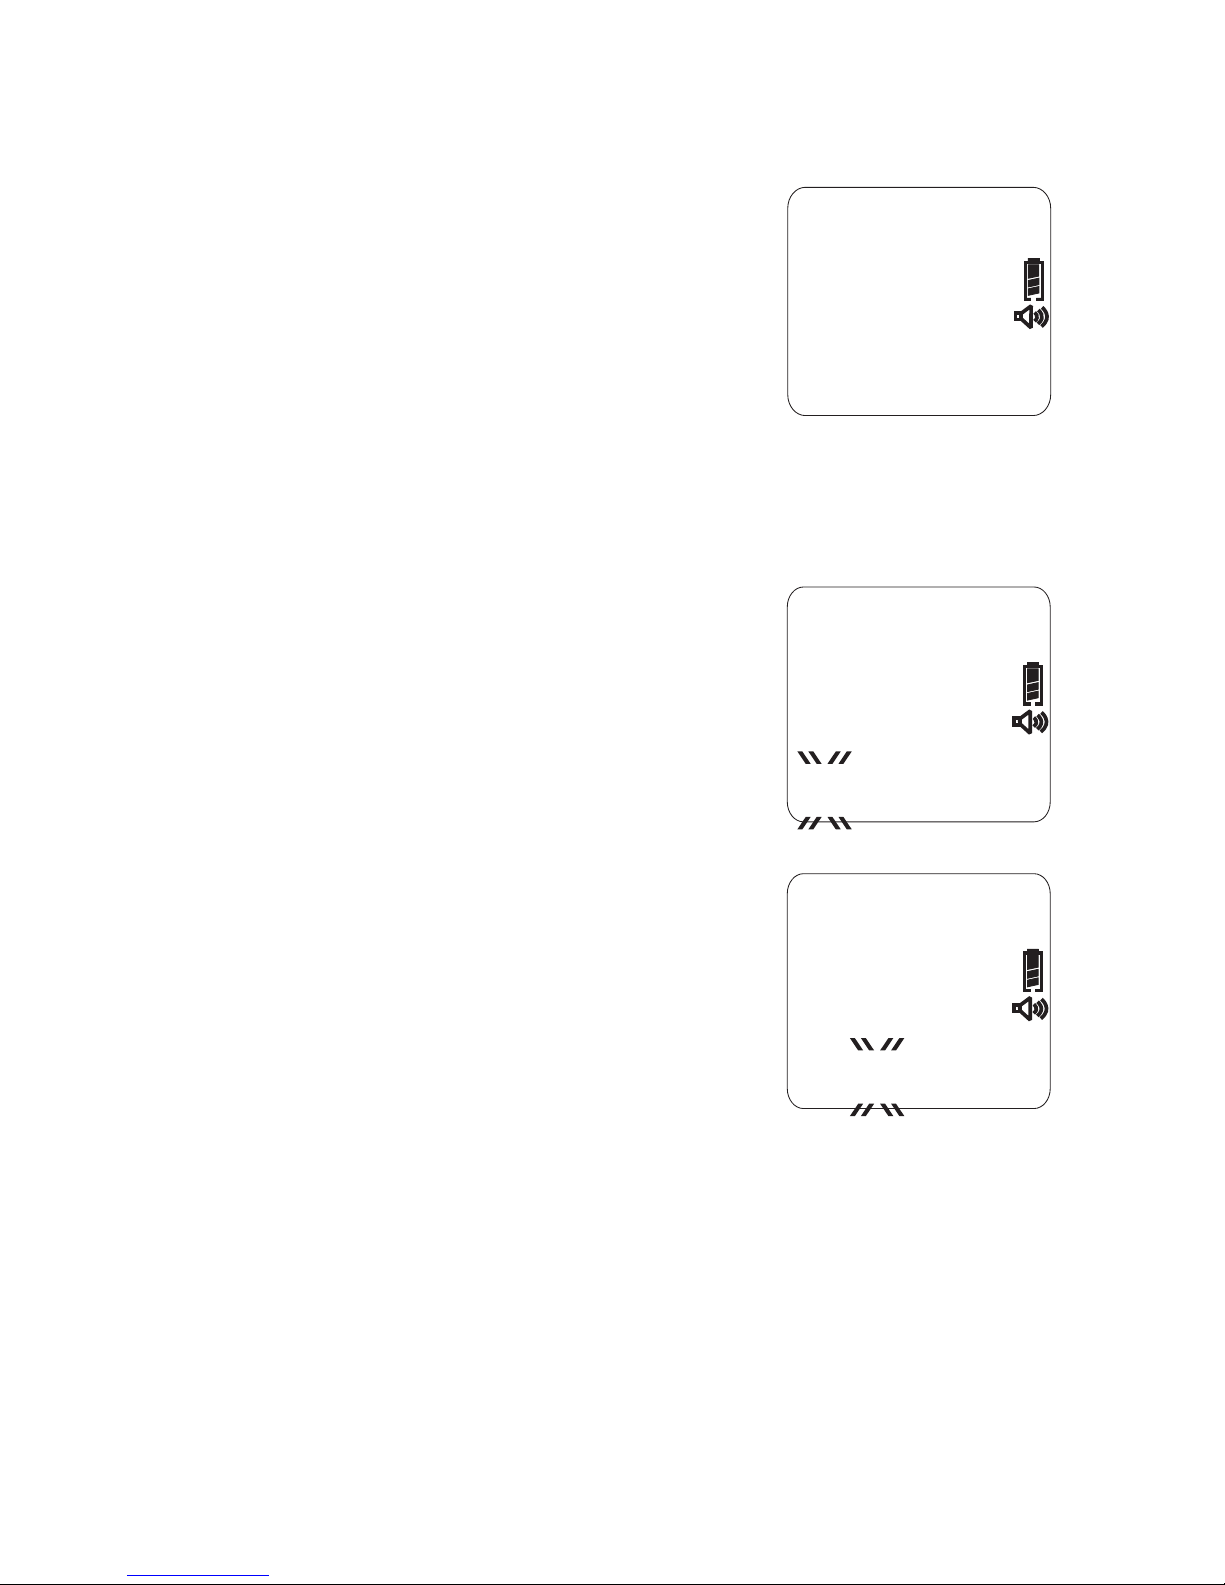
1.
2.
3.
Set the Year - Press C key to adjust the year
until the desired year is displayed and then
press the M key to confirm the year setting.
When pressing the C key, the year will be
adjusted in the range of 2009 to 2029. After
the year setting is confirmed, you will see the
month segment flashing on the screen.
(Each time you press the C key to adjust the
year, you will hear: “The year is 20xx.” If
year 09 is selected, and you will hear: “The
year is 2009.”)
Set the Month - Press C key to adjust the month
until the desired month is displayed and then
press the M key to confirm the month setting.
You will then see the day segment is flashing
on the screen. (Each time you press the C key
to adjust the Month, you will hear: “The
month is xxx.” If December is selected, and
you will hear: “The month is December.”)
Set the Day - Press C key to adjust the day
until the desired day appears and then press
the M key to confirm the day setting. You will
then see the hour segment is flashing on the
LCD screen. (Each time you press the C key to
adjust the day, you will hear: “The day is xxx.”
th
If 18 is selected, and you will hear: “The day
is the eighteenth.”)
1
2
3
13
:
1-01~01 01
AM
SETSET
:
12-01~0101
AM
SETSET
:
12-18~0101
AM
SETSET
Page 16
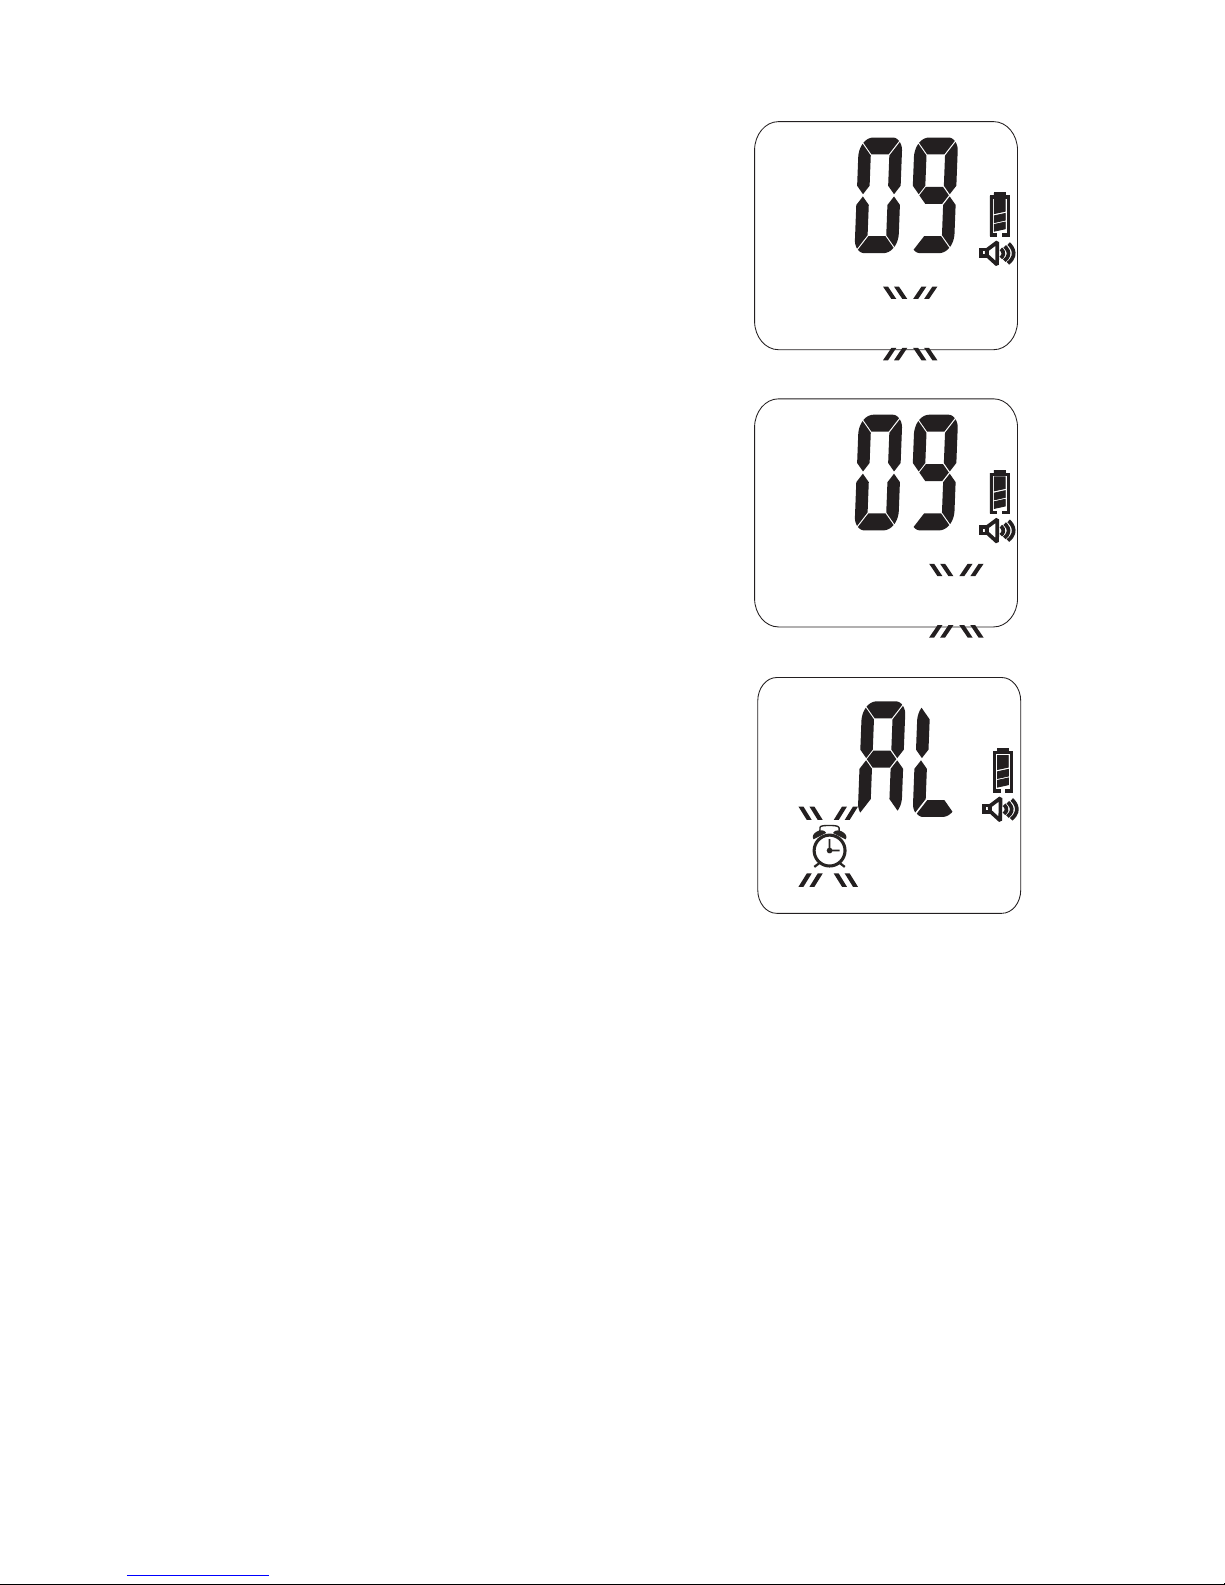
Set the Hour - Press C key to adjust the hour
until the desired hour appears on the screen
and then press the M key to confirm the
setting. You will then see the minute segment is
flashing on the screen. (Each time you press
the C key to adjust the Hour, you will hear:
“The hour is xxx.” If 11 pm is selected, and
you will hear: “The hour is eleven PM.”)
Set the Minute - Press C key to adjust the
minute until the desired minute appears on the
screen and then press the M key to confirm the
setting. You will then see an “AL” displayed on
the screen center. (Each time you press the C key
to adjust the Minute, and you will hear: “The
minute is xxx.” If 25 minute is selected, and
you will hear: “The minute is twenty five.”)
5.
6.
Set the Alarm Reminder - Press C key to toggle
between the alarm reminder setting or
no-setting mode. (If setting alarm is selected,
and you will hear: “Ready to set Alarm
Reminder.”) If you see the LCD display a
small flashing icon of alarm clock in the
lower left corner with a time segment display,
it means that you are in the alarm setting mode.
If you see only AL without the icon of the small
alarm clock, it means that you are not in the
alarm setting mode. Press M key to confirm the
alarm setting mode. If you select the alarm setting mode, alarm
clock icon will stop flashing and the hour of the time segment will
start flashing. You will hear: “Ready to set Alarm Reminder.”
Press C key until the desired alarm hour appears and then press M key
to confirm the hour setting. ( If 8 AM is selected, and you will hear:
“The hour is eight AM.”) Then the minute segment will start flashing.
Press C key until the desired minute appears on the screen and then
press M key to confirm the minute setting. (If 25 minute is selected,
and you will hear: “The minute is twenty five.”) You will see the
measuring unit flashing on the upper left corner of the LCD display.
(Each time you press C key to adjust the hour, and you will hear:
“The hour is xx x.” Each time you press the C key to adjust the minute,
and you will hear: “The minute is xx x.” At the end of this process,
and you will hear: “Alarm Reminder Set.”)
14
5
:
12-18~1101
PM
SETSET
6
:
12-18~11
25
PM
SETSET
:
25
08
AM
SETSET
4
4.
Page 17
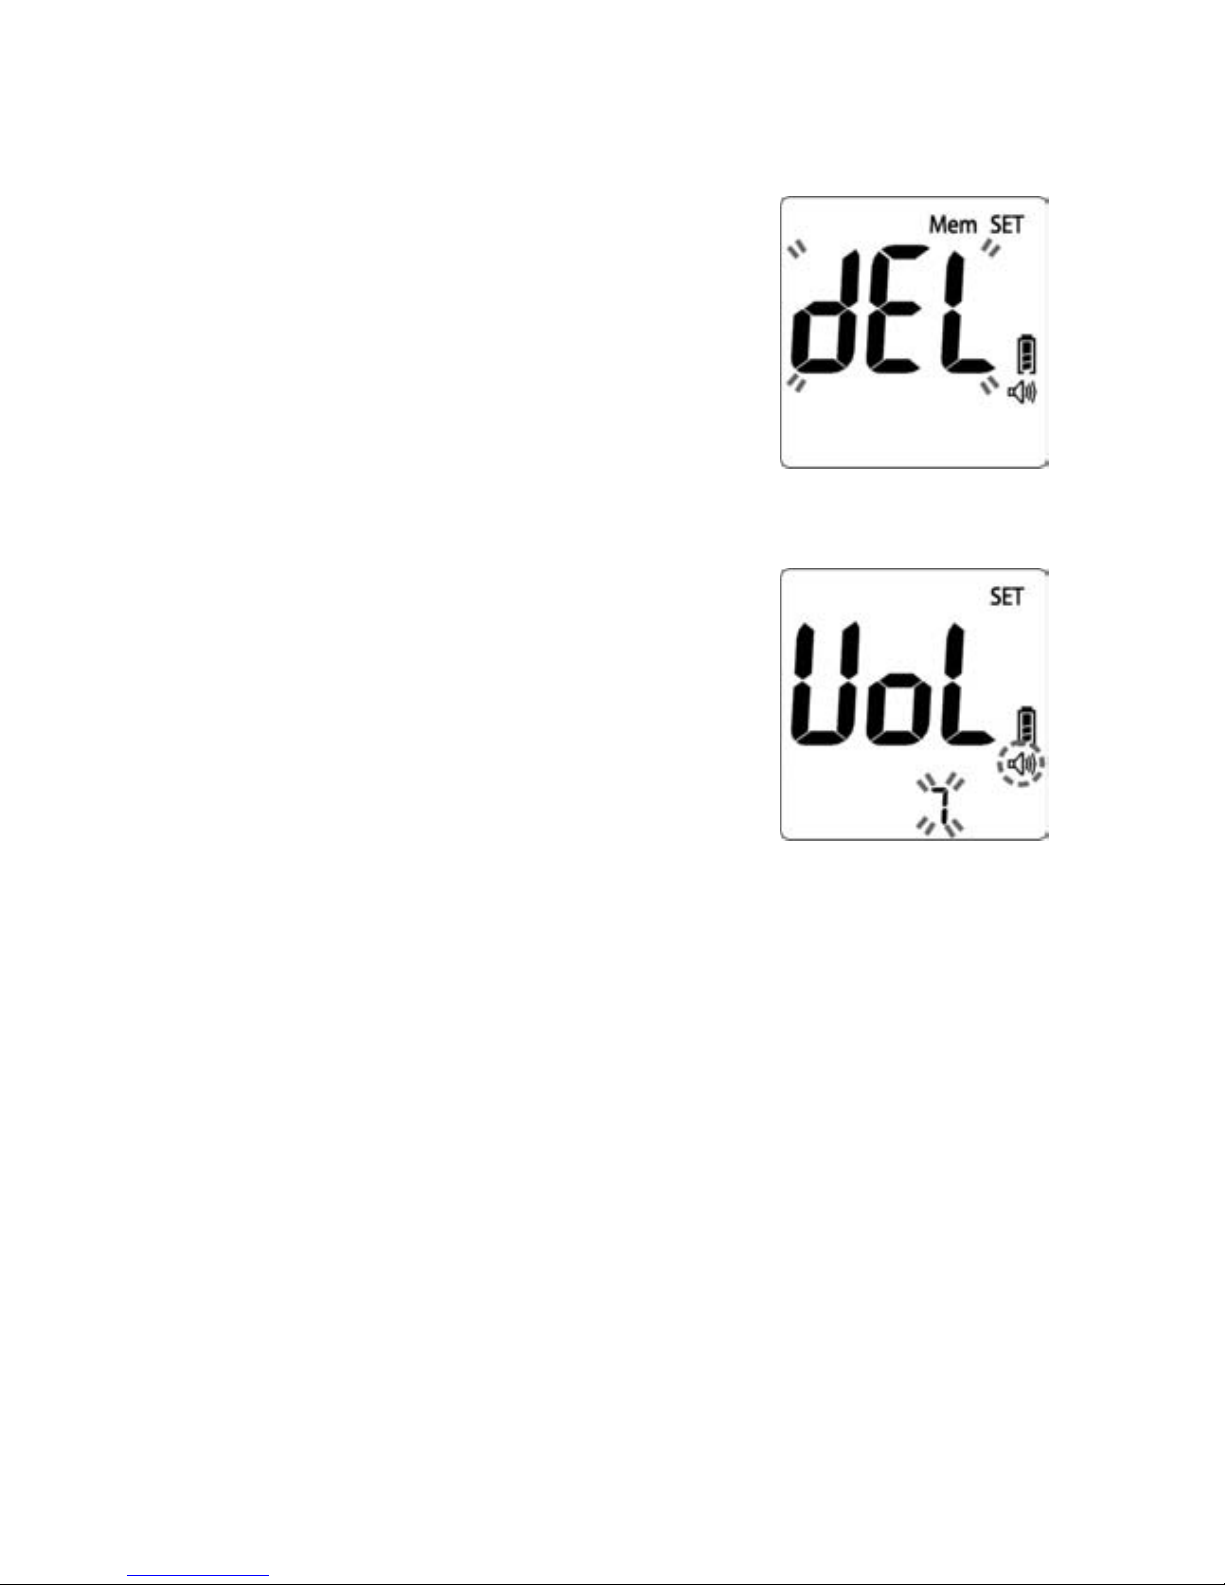
Delete Memory - Press C key to toggle
between a flashing “dEL” for memory
deletion or a non-flashing “dEL”. If you
want to delete all memory, press M key while
the “dEL” is flashing. If you do not want to
delete all memory, press M key when the
“dEL” is not flashing. Once the M key is
pressed, the LCD display will move to the
setting of voice volume setting mode. You
will see the display of “VoL” in the center of
screen. (When the “dEL” is flashing on the
screen, and you will hear: “Ready to delete
memory records.”)
7.
8.
Set the Voice Volume - Press C key to toggle
between the selection of speaking mode and
non-speaking mode. If you want to turn off
the speaker, press M key when the screen
does not show the small speaker icon. You
will hear: “Voice Off.” If you see a small
speaker icon appears below the battery icon
on the right side of LCD screen, you can
press M key to turn on the speaker. Then you
will see the existing voice volume level at
the lower right corner of the screen. There
are 7 levels of voice volume. You can press C key to adjust the voice
level and then press the M key to confirm the setting. (There will be
a “beep” sound to indicate the level of voice volume adjusted.)
The meter will turn off automatically after 2 seconds with a display
of “OFF”, and you will hear: “Goodbye.”
8
15
7
Page 18
Note:
1.When you change the date and time backward, you will not
change the test results in the meter memory.
2.You need to move through the language, year, month, day, hour,
minutes, alarm, measurement unit, dEL, and VoL to save the
meter settings and turn off the meter.
3.The average readings in the meter memory are calculated from
the results obtained during the 7, 14, 28, 60, and 90 calendar
days preceding the current date and time settings.
Power off Screen- When the meter is off, the
time, date, measurement unit, and battery icon
will be still on the screen as Figure 11. If the
alarm reminder has been set or the voice has
been turned on, then the alarm or the speaker
icon will appear on the power off screen as
well. The LCD screen will display “OFF”.
9.
16
9
Page 19
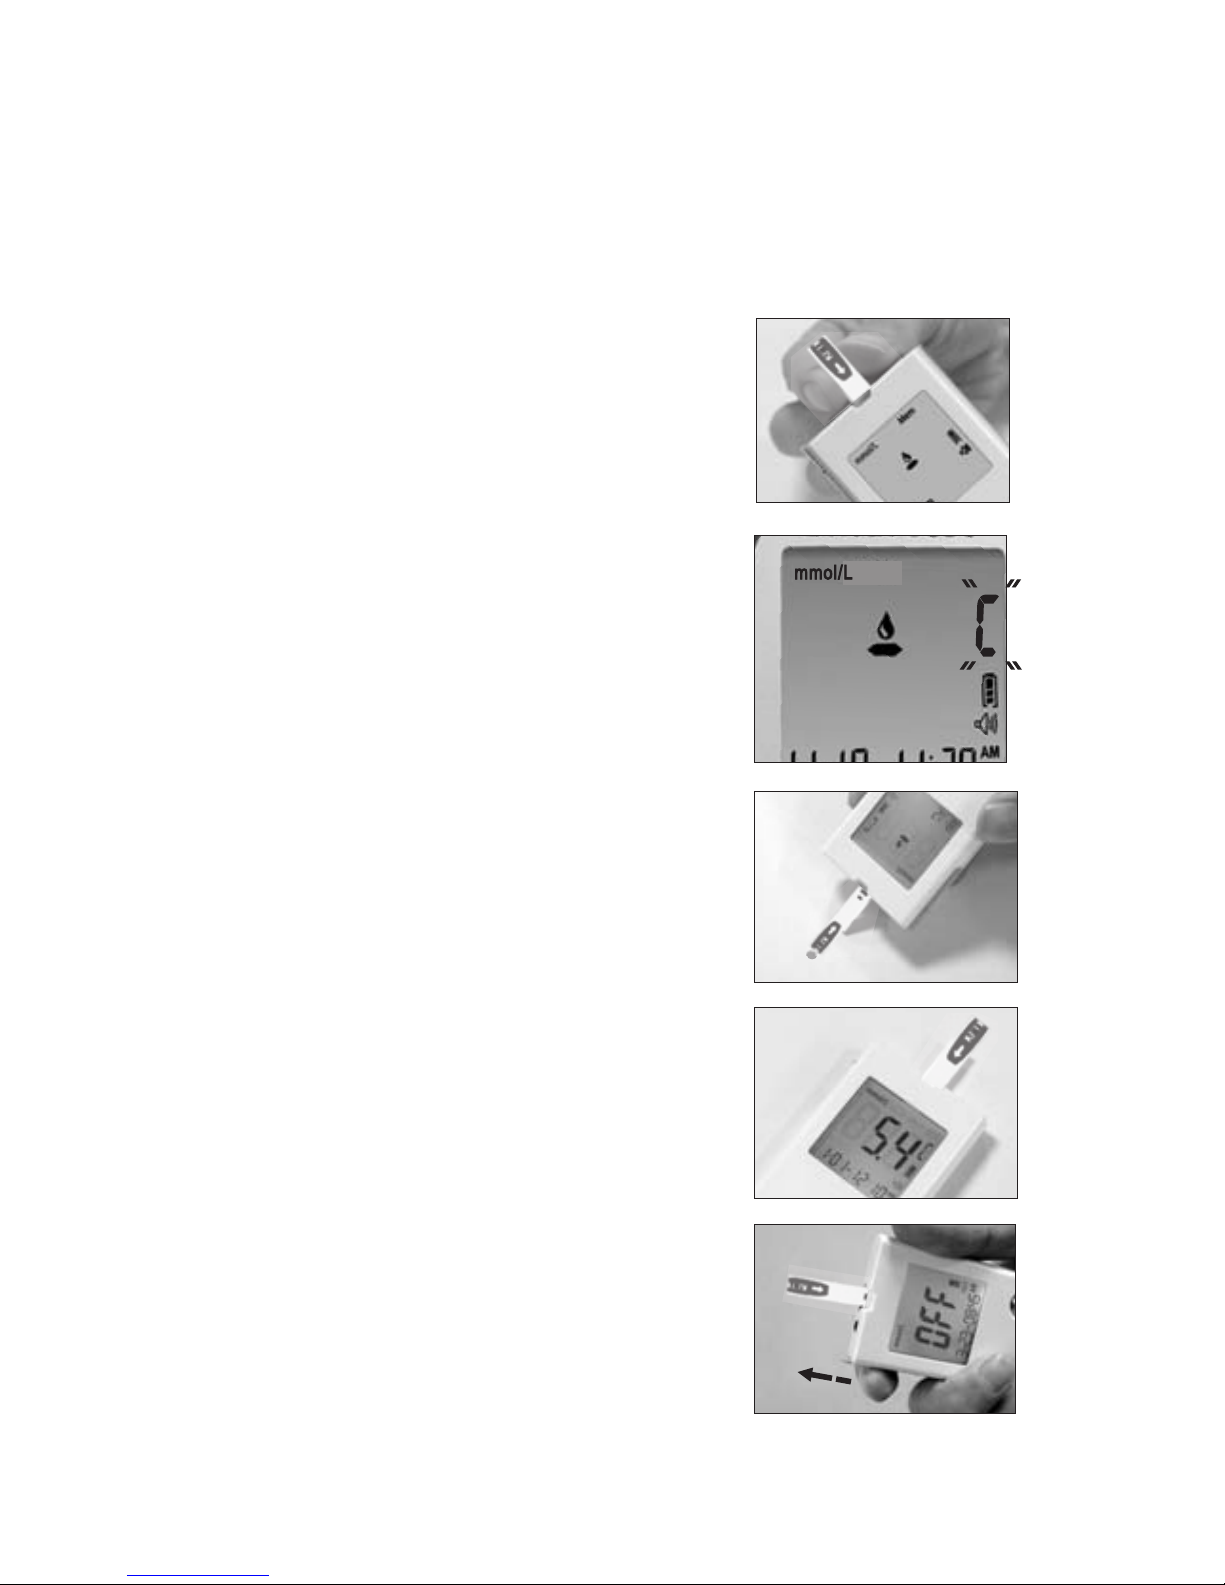
9.Running a Control Solution Test
IMPORTANT:
Always make sure you press C key for Control Solution test,
otherwise the control solution test result will be stored in the
memory, and affect your“AVG”results.
2.Press the C key, and the meter will
display a letter “C” on the upper right
corner of screen, indicating the control
test mode. You will hear: “Apply Control
Solution now.” The test result will not be
stored in the memory.
3.Squeeze a small amount of Control
Solution on a flat surface and apply to
the front edge of the test strip, and you
will hear: “Testing in process.”
4.Wait for 6 seconds, and the meter will
display the result. You will hear: “The
glucose level is number/unit.”
5.Remove the used strips by hand or by
pushing the ejector and the meter will
power off with a display of “OFF” on the
screen. You will hear: “Goodbye.”
1.Insert a strip into the meter, and you
will hear: “Hello, the Meter is ready.”
A blinking blood icon will be displayed
on the screen. You will hear: “Apply
blood now.”
1
2
3
4
5
17
Page 20

IMPORTANT!!!
1.You must press the C key to distinguish the control solution
test from the blood glucose test. Do not perform the blood
test in Control Solution mode.(If you perform the blood
test in Control Solution mode, the test result will not be
stored in the memory. )
2. Use only Btm SuperCheck2 Control Solution with Btm
SuperCheck2 Glucose Meter.
3.Btm SuperCheck2 Control Solutions are used to check that
the meter and the test strips are working together as a
system and that you are performing the test correctly.
4.Btm SuperCheck2 Control Solution contains a known amount
of glucose that reacts with test strips. The Medium and
High level Control Solution are intended to check the
monitoring system in different measurement ranges.
5.Shake the vial, discard the first drop of control solution, and
wipe off the dispenser tip to ensure a good sample and an
accurate result.
6.Use only for 3 months after first opening. Record the open
date on the Control Solution vial. Discard after 3 months.
7. Compare your Control Solution test results with the expected
range printed on the test strip vial label. If your glucose
control results fall outside the expected range; repeat the
test. Results that repeatedly fall outside the expected
range may indicate:
(1 ) You may not be doing the test correctly; repeat the test, by shaking
the control solution vial well and carefully following instructions.
Please make sure the test is done within the temperature range.
(2)The Control Solution is expired or contaminated.
(3)The test strips are damaged or outdated.
(4 ) You may have applied the Control Solution before the blood drop
appears on the screen. This will cause incorrect glucose measurement.
(5)Meter malfunction.
18
Page 21
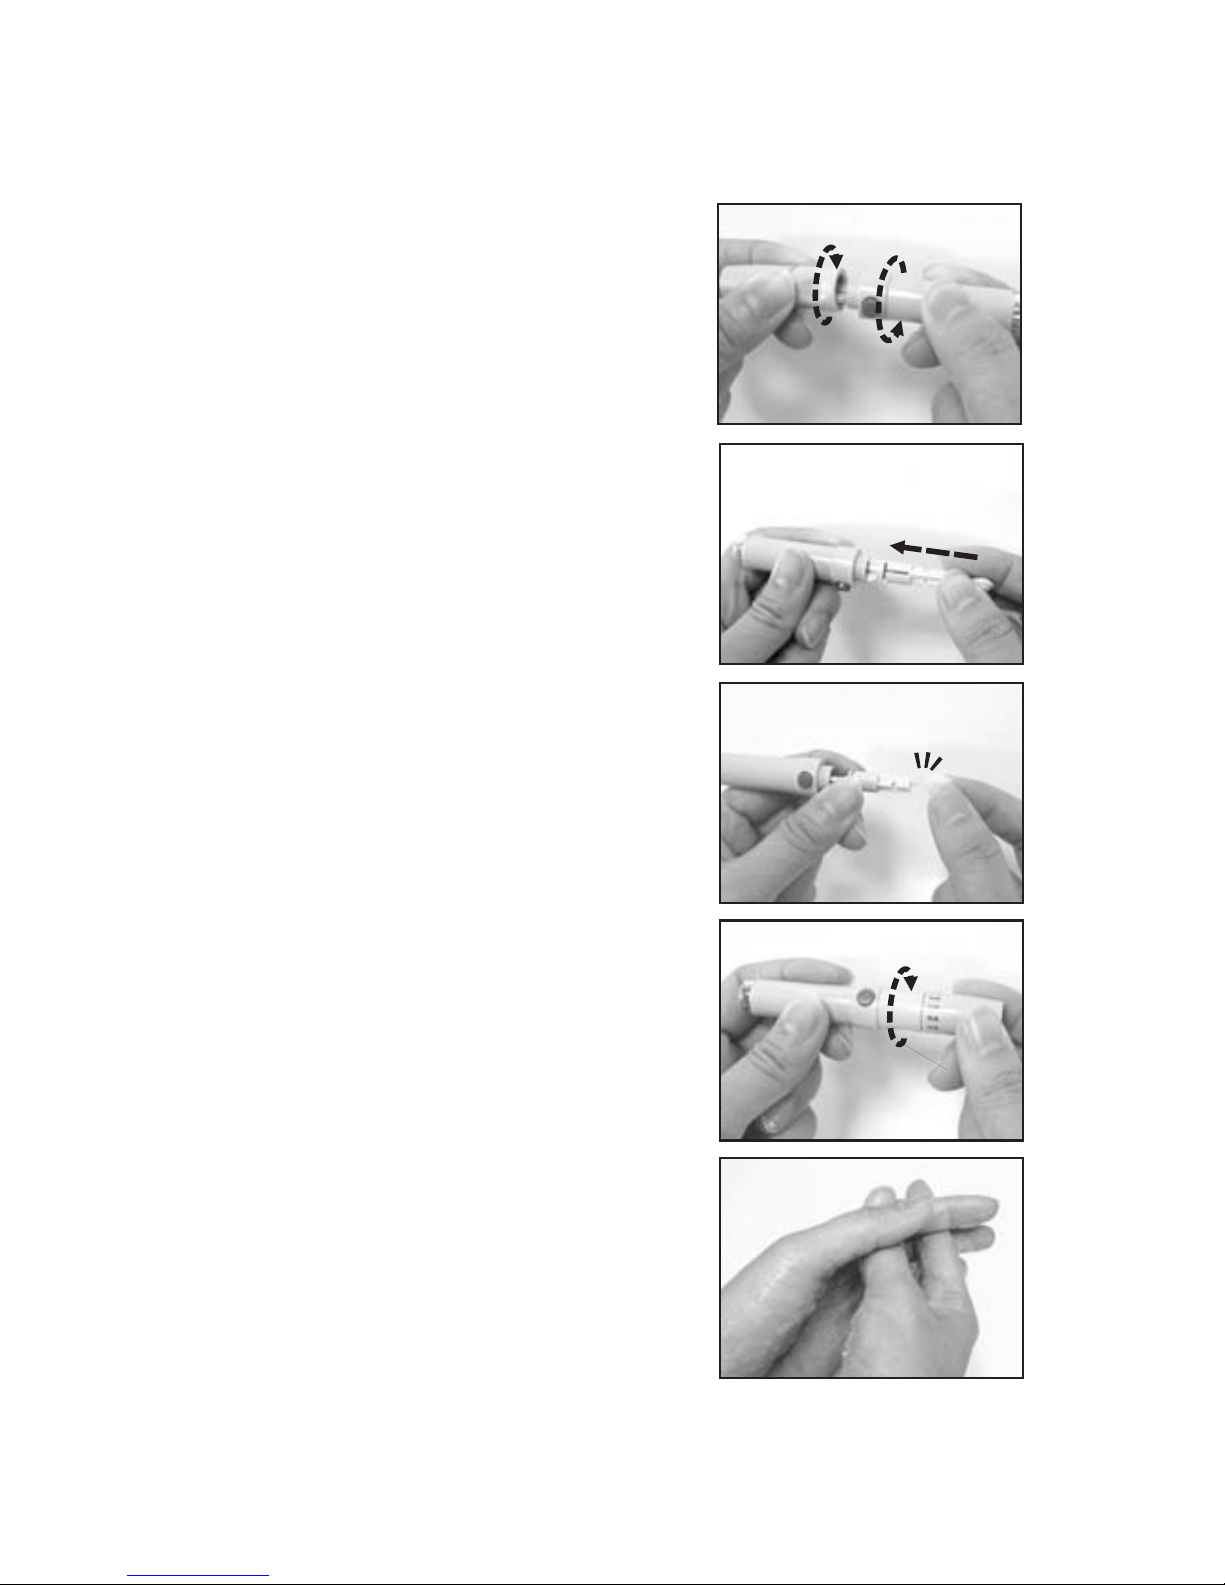
10. Running a Blood Glucose Test
1.Please unscrew the lancing device
by turning the end cap counter
clockwise.
2.Insert a new lancet firmly into the
lancet holder.
3.Twist off the protective tip of the
lancet.
4.Close the end cap of the lancing
device as shown. Slide into locking
position.
5.Wash your hands in warm, soapy
water. Be sure to rinse and dry well.
1
2
3
4
5
19
Page 22
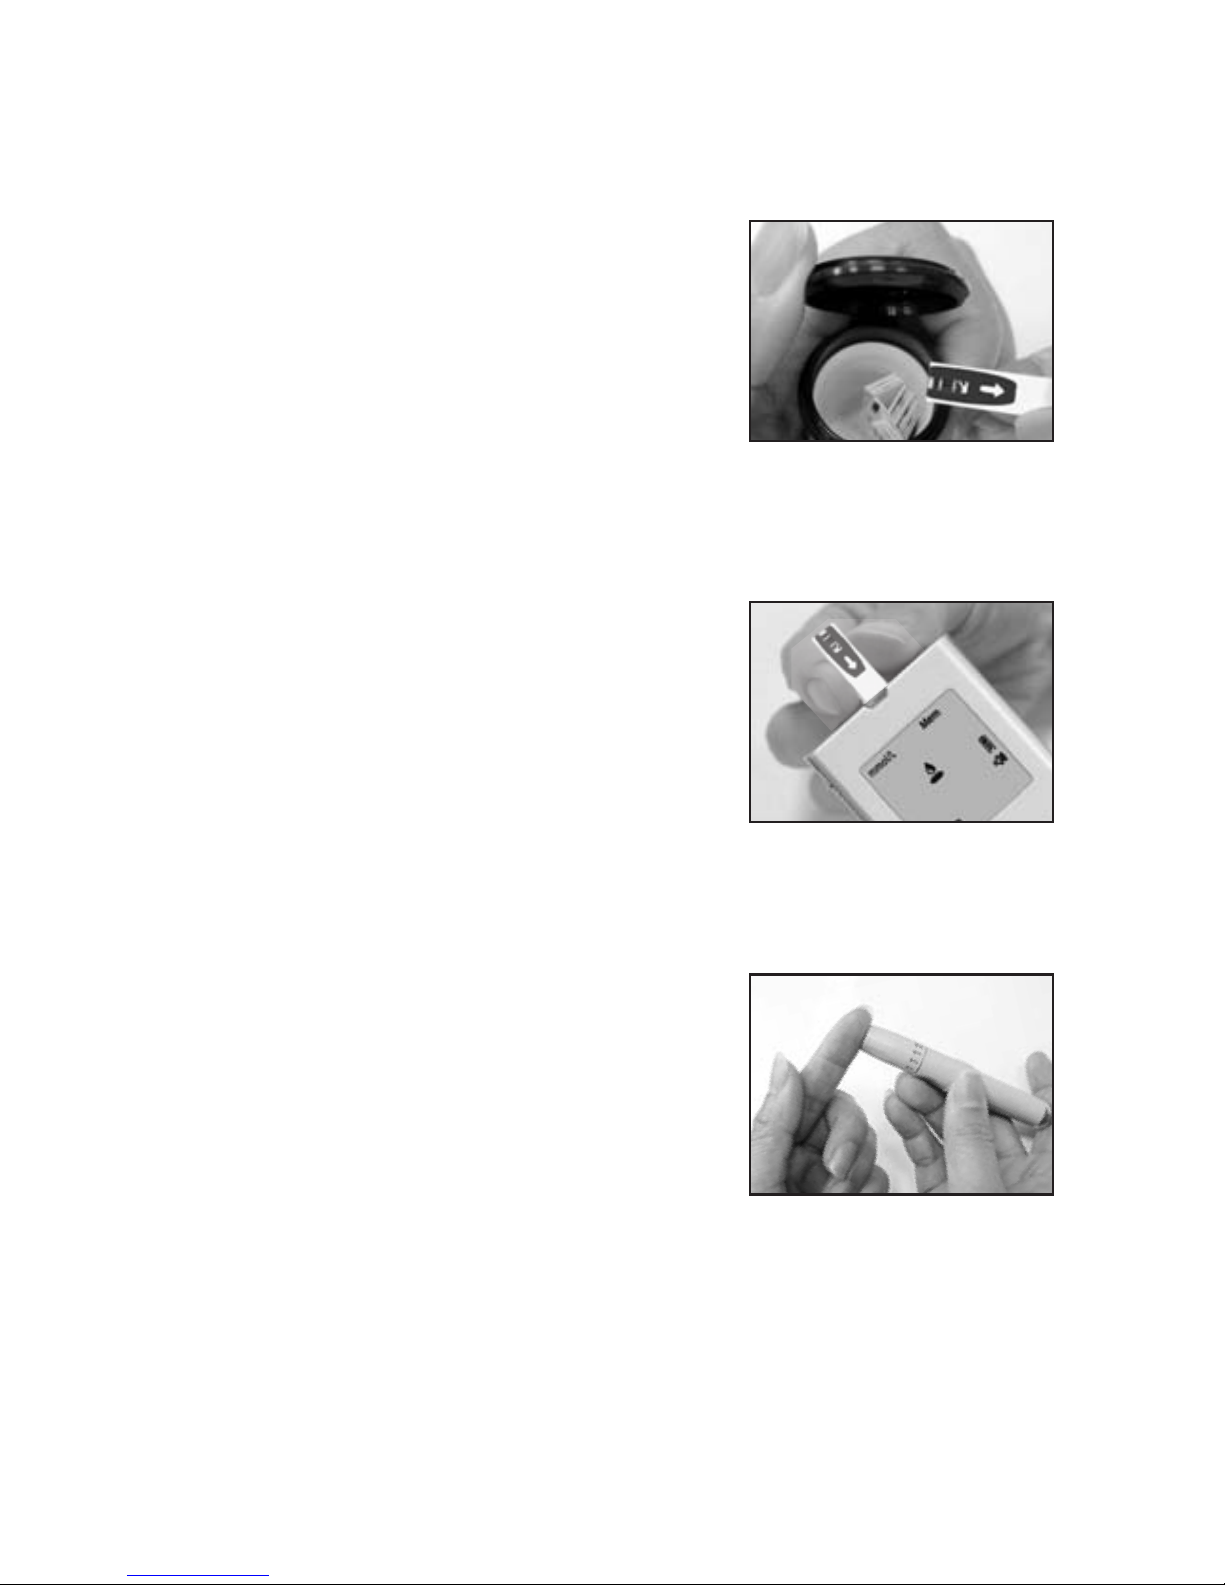
6.Open the test strip vial. Take one
new test strip out of the vial and
recap the vial quickly and firmly.
7.While the meter is off, insert a new
test strip into the meter's strip slot
with the contact bars facing upwards.
The meter will turn on with a full
screen display,and you will hear:
“Hello, the meter is ready.” A
blinking blood iconwill be displayed
on the screen. You will hear: “Apply
blood now.” If no action is taken in
2 minutes, the meter will turn off
automatically. You will hear:
“Goodbye.”
8.Use the adjustable lancing device
or the disposable lancet to take a
blood sample from the fingertip and
let it form a small round blood drop.
To avoid body fluid contamination,
it is recommended that you do not
use the first blood drop for glucose
testing.
6
7
8
20
Page 23
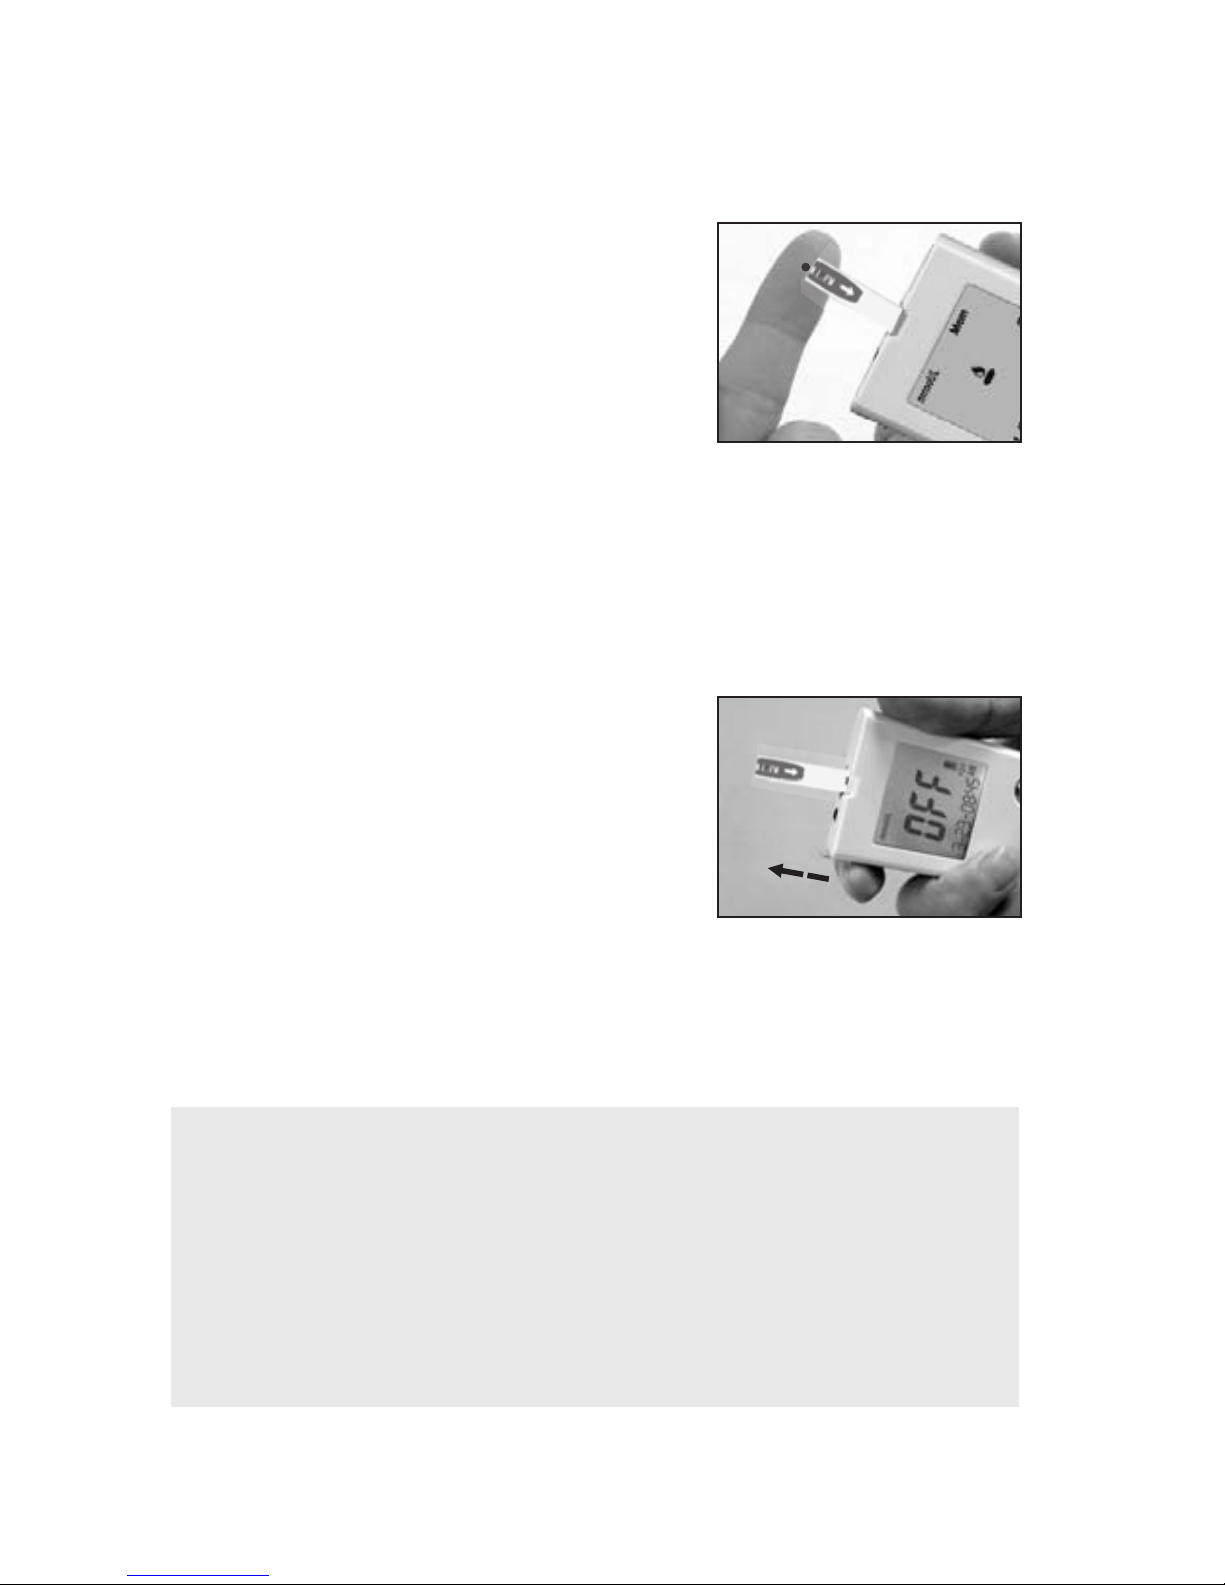
9.Apply a small blood drop to the
front edge of the test strip, and the
blood should be pulled into the
confirmation window before
the meter begins to count down.
Do not push your finger against the
test strip or try to apply a smeared
blood sample. You will hear:
“Testing in process.”
10.The meter will start counting
down for 6 seconds and your test
result will be displayed on the
screen. Remove the used test strip
by hand or by pushing the ejector
button. The meter will turn off and
the test result is stored automatically.You will hear: “The glucose level is
number/unit.” and “Goodbye.” when meter turns off.
Important:
1. Never reuse a test strip An “E_5” error
message will be displayed in the center of screen if a
used strip is inserted into the meter. (You will hear:
“The strip is wet or used.”)
2. Discard the test strip and lancet immediately in a
puncture-proof container with a lid after use .
or a lancet.
9
10
21
Page 24

11. Recalling the Memory and
Viewing the Average
Your blood sample test result will be automatically stored in
the meter's memory. The meter can store up to 500 of the most
recent test results. You can also view the average of test results
for various periods of 7, 14, 28, 60 and 90 days. The control
solution test results will not be stored in the memory.
(Note: Please make sure that you press C key when you
run a Control Solution test, so that the control test result
will not be added to the memory.)
A. Using the Meter Memory
1.With meter off, press M key to turn on the meter. After
a brief full screen display, and you will hear “Recalling
the memory” the meter will display the total number of
test data stored in memory. Then the screen will display
“001” as the sequential number of the most recent test
result in memory. The memorized test data will be
displayed next. If there is no memorized result in the
meter, “---” is displayed and you will hear: “Zero memory.”
The meter will turn off after 60 seconds if no action is taken.
(When the meter displays the first memorized data, you will
hear: “The glucose level is number/unit.”)
2.The meter will audibly read out the last 10 stored test
results with date. The screen will display each of the
memorized test data in sequence. Press M and C key to
review your test results in the memory forwards and
backwards.
3.To turn off the meter, press the M key for 2 seconds, or the
meter will turn off automatically after 60 seconds if no
activity, and you will hear: “Goodbye.”
B. Recalling the Test Results from the Meter Memory
22
Page 25

1. To display the average (AVG) test result, please turn the meter
off. Press C and M keys at the same time and hold for about 2
seconds, wait for the AVG to be displayed on the screen, then
release the two buttons. The meter will be in the average mode
with “AVG” font displayed.
2.When the “AVG” is flashing at the lower left corner of the
screen, the number 7 will be displayed under AVG and the
average of the last 7 days test results will be displayed in the
center of the screen. The number of tests completed in the last 7 days
will also be displayed in the lower right hand corner of the screen.
If you want to see the average of 14, 28, 60 and 90 days, keep
pressing the M key to move the LCD display forward from 7
day average to 90 day average. The average display will move
from 90 days backward to 7 days if you continue to press C
key. You will hear: “The average for 7 day is number/unit.”
3.Press the M key and hold for only 2 seconds to exit the recall
mode and turn off the meter, or the meter will automatically
power off after 60 seconds. You will hear: “Goodbye.”
4.When “---” is displayed, showing that there are no test results
in the memory. You will hear: “Zero memory.”
Calculations:
The 7 days average is the average of the last 7 day test results.
The 14 days average is the average of last 14 day test results.
The 28 days average is the average of last 28 day test results.
The 60 days average is the average of last 60 day test results.
The 90 days average is the average of last 90 day test results.
Note:
1.HI/LO results are not stored in the memory.
2.Do not insert the strip into the meter when you want to recall
the test results.
C. Viewing the Average (AVG) of Test Data in Memory
23
Page 26

13. Transmitting Results
1.With the meter off, hold the M and C keys down at the same
time for 5 seconds until “PC” is displayed. You will hear:
“Ready to transmit data.”
2.Press the C key to start transmitting. The meter will display
a flashing “PC” during the transmission process. When the
“PC” on the screen stops flashing, it indicates the transmission
is completed. The meter will be power off if no action is taken
in 60 seconds or M key is pressed for 2 seconds. You will hear:
“Goodbye.”
12.Expected Values 1Reference
BTM SuperCheck2 meter gives plasma equivalent results.
Before eating < 5.6 mmol/L
Two hours after meals < 7.8 mmol/L
Blood glucose levels normally will vary from time to time
depending on food intake, medication dosages, health, stress or
exercise. Consult your physician or healthcare professional for
the target glucose value appropriate for you.
Expected plasma blood glucose values for normal, nondiabetic
adults are as follows.
Note:
"Btm SuperCheck2 Glucose Meter allows you to transfer the test
results stored in its memory to your personal computer. However,
you will need to order software and a Data Download Cable separately
from your distributor."
The software and its data download procedure will come as a CD
in the download cable box. You can also check with your distributor
for the software download option. The meter still keeps the results
in the memory after transmitting.
24
Page 27

Please, treat this meter with proper care, and keep it in
good condition.
1.Store your meter in the protective case, in a clean dry place
at 46~86℉( 8~30℃).
2.Always clean your meter after use. Wipe and clean
the surface of the meter with a soft cloth that has been
slightly dampened with mild detergent.
3.Please handle with care and do not drop the meter.
4.If this meter is used by healthcare professional infection
control policies should be strictly followed.
5.The meter has a shelf-life of 2 years.
14. Maintenance of your system
We suggest you should periodically compare the test system
to another test system which is well maintained and monitored
by a healthcare provider .
25
Page 28

15.Troubleshooting :
Error messages:
E_1:The temperature is too low.
E_2:The temperature is too high.
E_3: Battery Low.
E_4: Memory damaged.
E_5: The strip is wet or used.
E_6:Error in meter or strip.
E_7:The blood sample is not sufficient.
HI :The glucose level is too high.
LO:The glucose level is too low.
The following is a summary of all the Error Messages. These
messages help to identify certain problems,but do not
appear in all cases when a problem has occurred.
Improper use may cause an inaccurate result without
producing an error message or a symbol.In the event
of a problem,refer to the information in the table
under Solution.
26
Page 29

27
Problem Possible Cause Solution
Repeat the test after the
meter and strip are placed in
a warmer environment and
allow the meter to warm up
for a while before retesting.
Test again following the user
guide for correct glucose
measurement process. If you
see HI again, please call your
medical doctor for advice
immediately.
Repeat the test after the
meter and strip are placed in
a cooler environment and
allow the meter to cool down
for a period before retesting.
Please replace the two AAA
batteries.
Please check the test strip to
see if it is damaged or used.
In either case, please discard
the strip and repeat the test
using a new strip.
Repeat the test with a new
test strip. If E_6 continues
to show up on screen, please
call a customer service
representative.
The meter can perform the
glucose measuring without
storing the test results into
the meter's memory. Please
write down the test results
into the data logger before
you call a customer service
representative.
Test again following the user
guide for correct glucose
measurement process. If you
see LO again, please call your
medical doctor for advice
immediately.
The meter is operating
in an ambient
temperature below
10 ℃ or 50℉ which is
the lowest range of
operating temperature.
(1)
The meter displays
an E_1 error
message.
(2)
The meter displays
an E_2 error
message.
The test result is
lower than the
measuring range
of 1.1 mmol/L.
(3) The meter displays
an E_3 error message.
(5)
The meter displays
an E_5 error
message.
(6)
The meter displays
an E_6 error
message.
(8)
The meter displays
HI on screen.
(9)
The meter displays
LO on the screen.
The meter is operating
in an ambient
temperature above
40 ℃ or 104℉ which is
the cap of operating
temperature.
The battery is too low
to operate the meter.
1.If you apply the
sample before blood
drop icon appears on
the screen.
2.The inserted test strip
has been wet or used.
The meter is not
working properly,
either because of a
defective meter or
a defective strip.
The memory chip
of the meter could
be damaged or
malfunctioning.
The test result is
higher than the
measuring range
of 33.3 mmol/L.
(4)
The meter displays
an E_4 error
message.
Please re-test by inserting a
new test strip ensuring an
adequate amount of blood
comes into contact with the
test strip.
(7)
The meter displays
an E_7 error
message.
The blood sample is
not sufficient .
Page 30

16.Customer Ser vice
If you need assistance with your Btm SuperCheck2
Glucose Monitoring System, please contact:
Distributed By
Apollo Medical Technologies Ltd
Tele:01636831201
Email:[email protected]
Website:www.apollomedicaltechnologies.com
For questions related to your health condition,
please call your doctor or healthcare professional.
28
Page 31

17.Limitations
1.No Neonatal use
Do not use for neonatal blood glucose testing.
2.Hematocrit range
Hematocrit in the range of 32~60% has been shown not to affect the
glucose results. If you do not know your hematocrit level, consult
your healthcare professional.
3.Hemoglobin range
Hemoglobin levels of 0.078 mmol/L did not interfere with blood
glucose test results.
4.Elevated Cholesterol and Triglycerides
Cholesterol levels up to 12.9 mmol/L and Triglycerides up to 33.1
mmol/L has been shown not to affect glucose results.
5.Medications
Interference was observed for therapeutic levels of L-DOPA.
No interference was shown for uric acid, acetaminophen, ascorbic
acid and ibuprofen in normal therapeutic levels. However, higher
concentrations in blood may cause incorrect results:
Uric acid: > 0.65 mmol/L; acetaminophen: >0.41mmol/L ;
ascorbic acid: >0.26 mmol/L; ibuprofen: >1.82 mmol/L.
6.The test strips may be used at altitudes up to 5,280 feet (1,609 m )
without an effect on test results.
7.Persons suffering from severe dehydration should not be tested
using a capillary whole blood sample.
8.Test results below 3.9 mmol/L indicate low blood glucose
(hypoglycemia). Test results greater than 13.3 mmol/L indicate
high blood glucose (hyperglycemia). If you get results below 3.9
mmol/L or above 13.3 mmol/L, repeat the test, and if the results
are still below 3.9 mmol/L or above 13.3 mmol/L , please consult
2
your healthcare professional immediately .
9.Inaccurate results may occur for individuals experiencing a
hyperglycemic-hyperosmolar state, with or without ketosis.
Critically ill patients should not be tested with a blood glucose
meter.
29
Page 32

18.Specifications
Test: Glucose
Sample: Whole Blood
Principle of the test method: Amperometric, glucose oxidase
Test sites: Fingertip, forearm
Measurement time: 6 seconds
Code required:No code device
Measurement Range: 1.1~33.3mmol/L.
Batteries: 2 x AAA 1.5 V Alkaline 24A LR03
Operating Temperature: 10~40℃(50-104℉)
Humidity: 20~80% RH
Width: 48 mm
Length: 99 mm
Thickness: 14 mm
Weight: ~72g
Memory: 500 measurement results with date and time
Auto power off after 2 minutes without action when a
strip is inserted, or 60 seconds if there is no strip inserted.
19.Ordering Supplies
To order supplies, please contact the Manufacturer :
Distributed By
Apollo Medical Technologies Ltd
Tele:01636831201
Email:[email protected]
Website:www.apollomedicaltechnologies.com
Traceability of glucose monitoring system: The accuracy of
Btm SuperCheck2 Blood Glucose System was assessed by
comparing blood results obtained by patients with those
obtained using a YSI Model 2300 Glucose Analyzer, which
is calibrated by YSI calibrator solution, refer to NIST SRM
(standard reference material) # 917A Clinical Dextrose.
The device has certified to meet the following standard:
98/79/EC, EN60601-1 + EN 60601-1-1
ISO 15197
(P.S. Please refer to the package insert that came with your
test strips, and you will also find information on how the
system works and on the performance characteristic reference.)
30
Page 33

20.War ranty Information
Your Btm SuperCheck2 Glucose Meter is warranted
to be free of defects in materials and workmanship for
one year from the date of the original purchase.
This warranty does not cover device failure due to
owner misuse or negligence, or normal wear and tear.
If you have a question about your Btm SuperCheck2
Glucose Meter or this warranty, please contact:
Biotest Medical Corporation
No.3-2, Chien-kuo Rd., TEPZ Tantzu, Taichung 427,
Taiwan, R.O.C.
E-mail: [email protected]
Reference:
1.American Diabetes Association: Diabetes Care, January 2007,
volume 30 (Suppl. 1) S42-S47.
2.American Diabetes Association-Diabetes Forecast
website information :
http://www.forecast. diabetes.org/diabetes-101/hyperglycemia
http://www.forecast.diabetes.org/diabetes-101/ hypoglycemia
31
Page 34
BiotesT Medical Corporation
No. 3-2,Chien-kuo Road,TEPZ Tantzu,
427 Taichung, Taiwan ROC.
Tel : 886-4-25326668
Fax: 886-4-25326528
0537
Obelis s.a.
Bd. Général Wahis, 53
1030 Brussels,
Belgium
Tel:+32.2.732.59.54
Fax:+32.2.732.60.03
E-mail: [email protected]
 Loading...