

Page 1
Superior Performance
Unbeatable Pricing
Pride in Workmanship
Energy Efficient
Rugged Construction
MANUAL
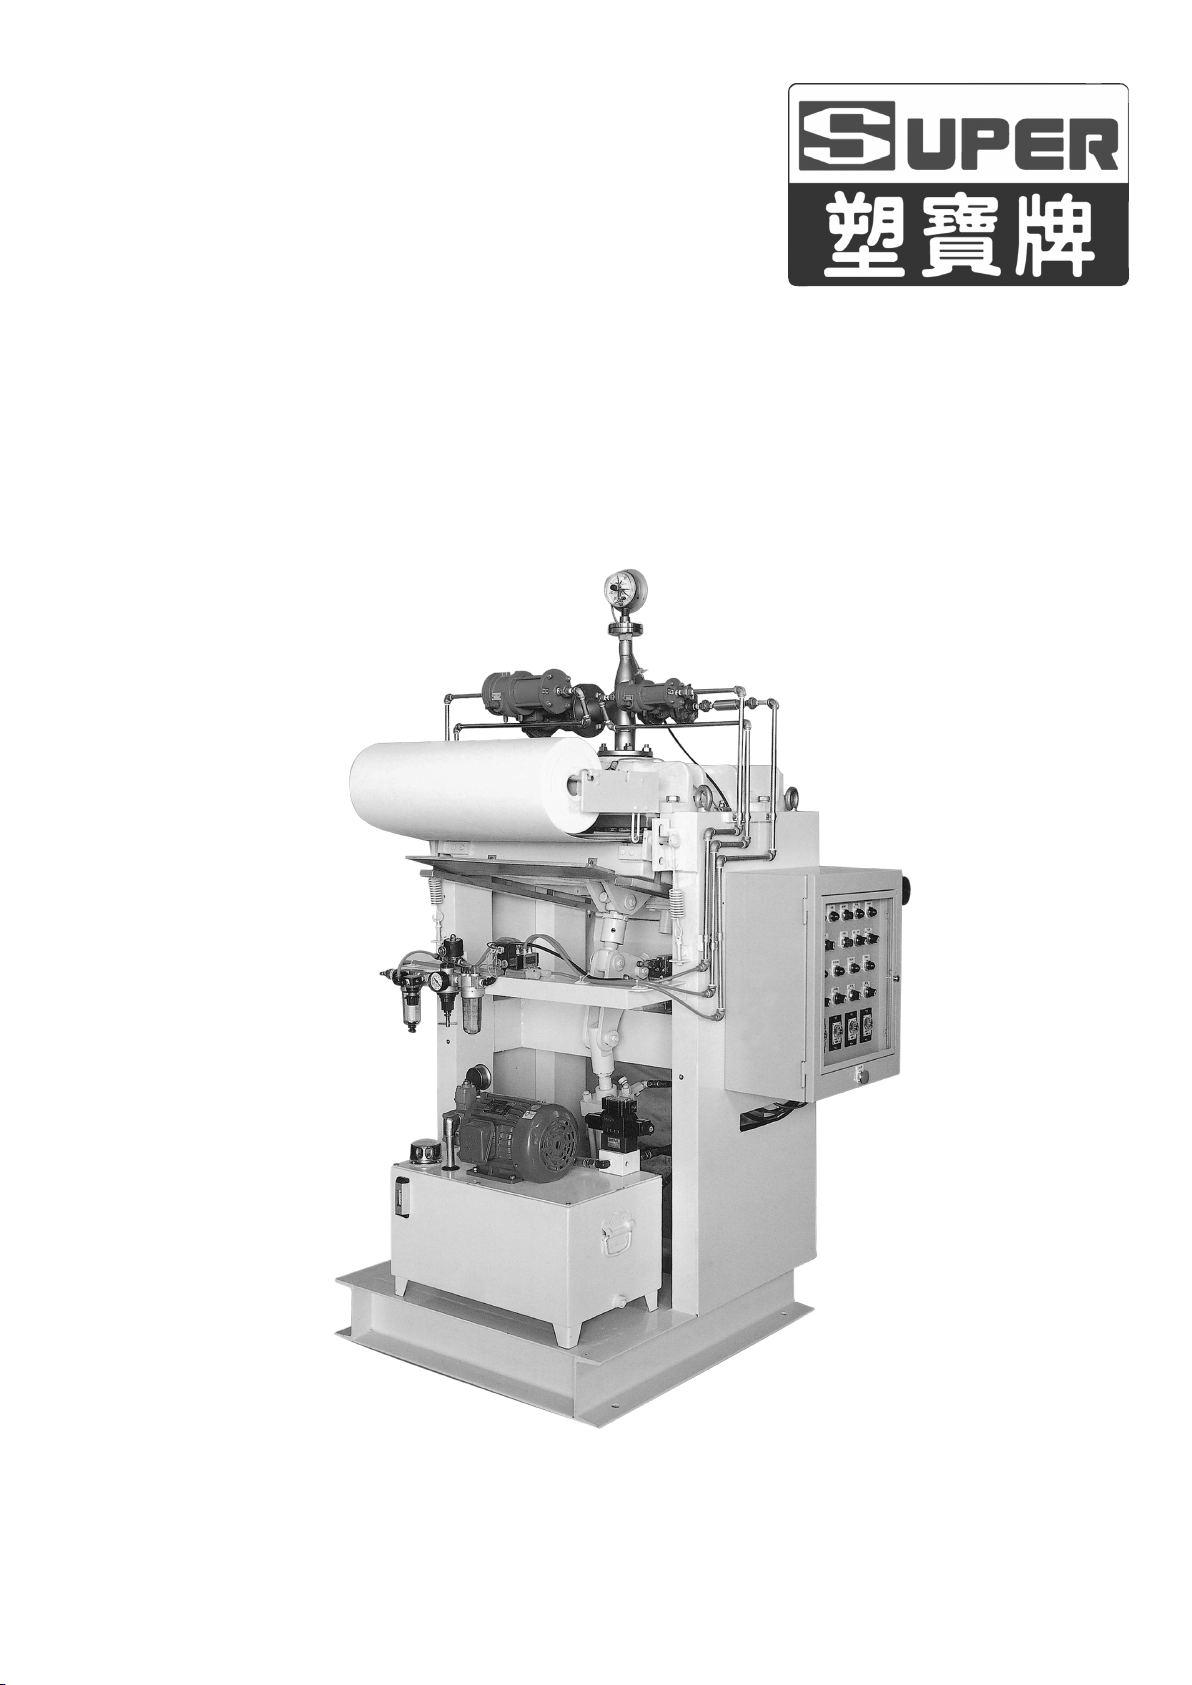
AUTOMATIC DEWATERING ST-60N
SUPER GIANT ENTERPRISE CO., LTD.
E-mail:[email protected]
Website:http://www.superpump.tw
Page 2

INDEX
1. Instruction
Feature................................................................................................. 2
Application............................................................................................ 2
2. Specication & Dimension................................................................... 3
3. Parts List.............................................................................................. 4
4. Operation Procedure............................................................................ 5
5. Controll Box Layout...............................................................................6
Controller Wiring ..................................................................................7
Hydraulic Circuit....................................................................................8
Air Circuit...............................................................................................9
6. Installation
Cautions..............................................................................................10
Examples.............................................................................................11
Air Compressor and Air Dryer Wiring.................................................12
Control Panel.....................................................................................13
7. Operation
Prior to Automatic running...................................................................14
Automatic running...............................................................................14
Prior to manual running.......................................................................15
Un-sucient cake dewatering and capacity........................................16
8. Trouble shooting.................................................................................17
9. Maintenance.......................................................................................18
10. Appendix
A. Inspection List............................................................................19
B. How to replace the paper roll.....................................................20
Page 3
Automatic Dewatering Filter
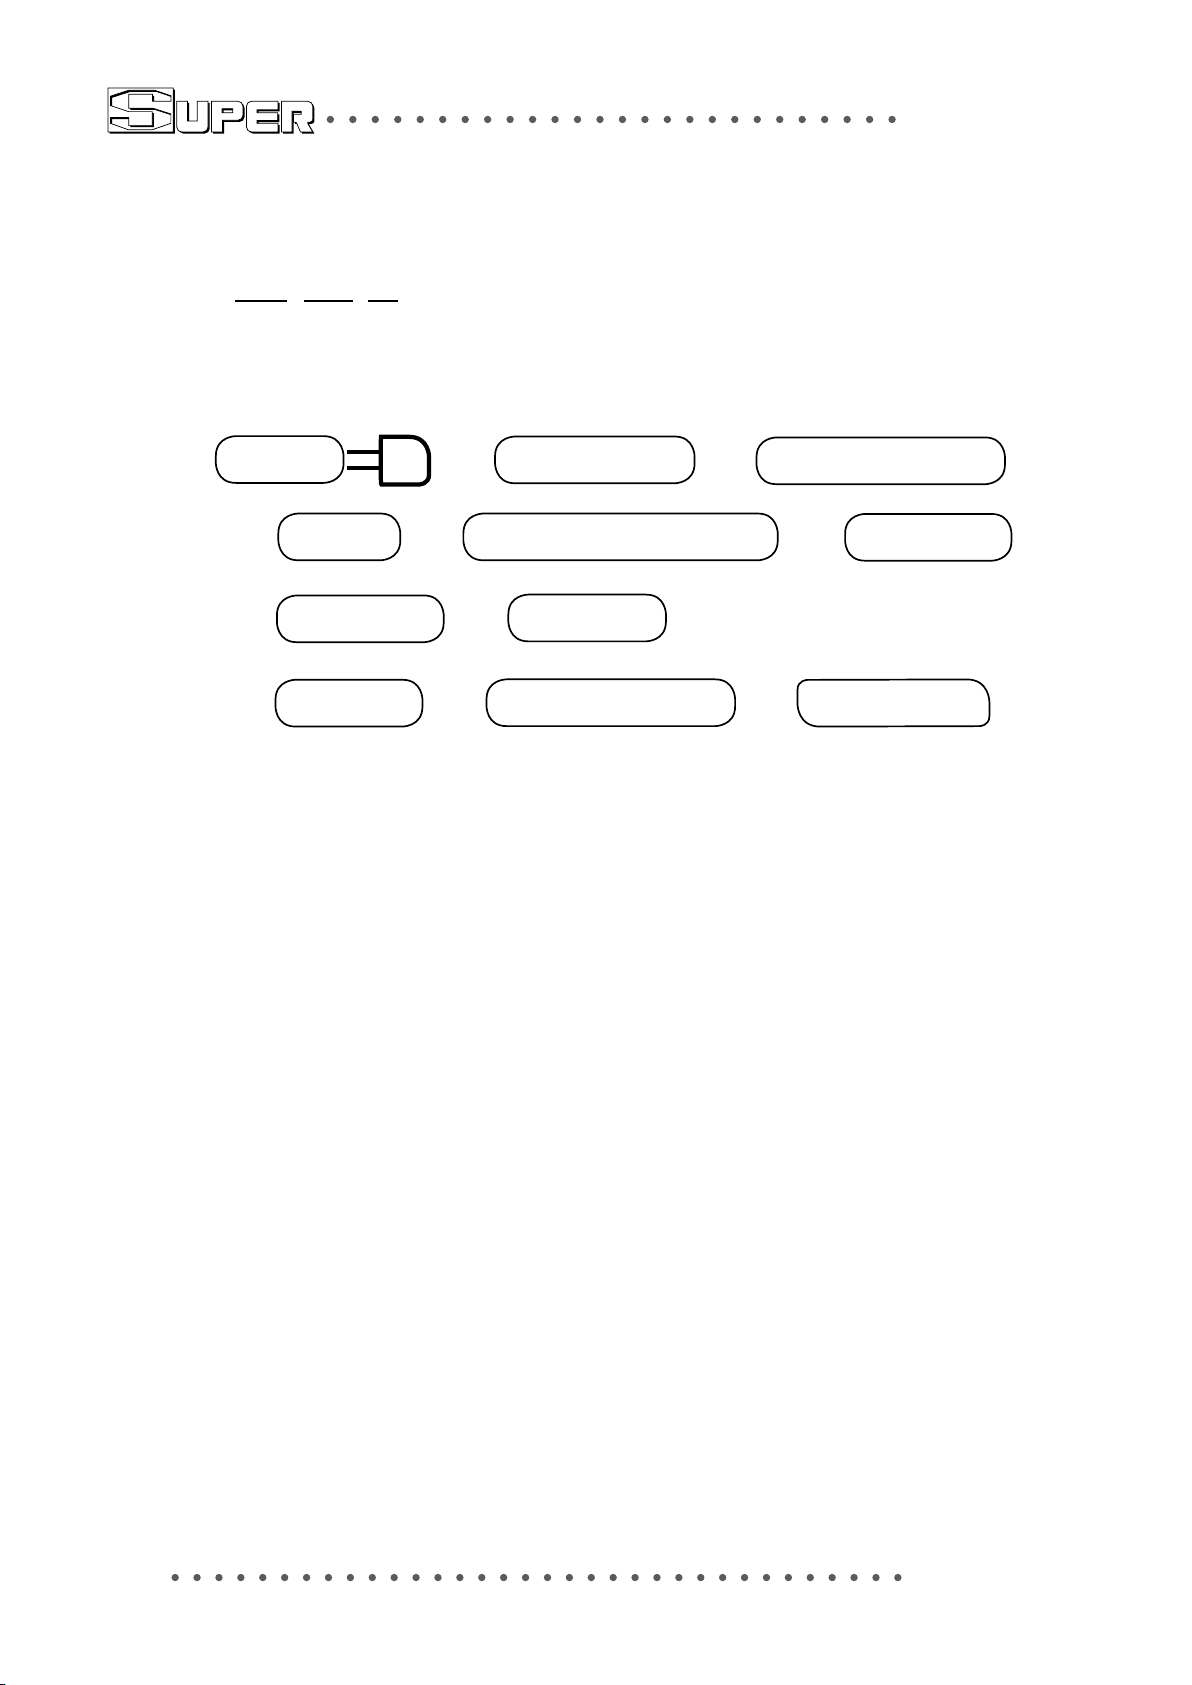
ST- 60 N
(1) (2) (3)
Power on
plate up
feeding start
dewatering on
( 1 ) ST- Style
( 2 ) 60-lter plate area(60cmX60cm)
( 3 ) N-Rubber material (NBR)
paper in position
chamber sealed
feeding stop
stop dewatering
hydraulic motor start
roll out cake
pump start
Feature :
1.This machine do the dewatering by air and polution free.
2.Programmable PLC control.
3.No need for sun drying, dewatering by air, fast and polution free.
4.Fully automatic control by setting the timer.
5.Can make cake up to 3.5~4cm for normal slurry and 1.5~3cm for thin viscos
slurry.
6.It will take longer time for thin viscos slurry dewatering.
7.The paper lter area is 0.36m2.
8. Use ne paper to get better ltration.
Application :
1.This machine has triple functions: A: Filteration B: Cake forming C:
Dewatering.
2. Suitable for powder filtration for various surface finishing acid, alkaline,
solvent, oil, settled sludge, phosphoric acid and waste water, actiated carbon,
2
grinding liquid.
Page 4
Dimension
Specication
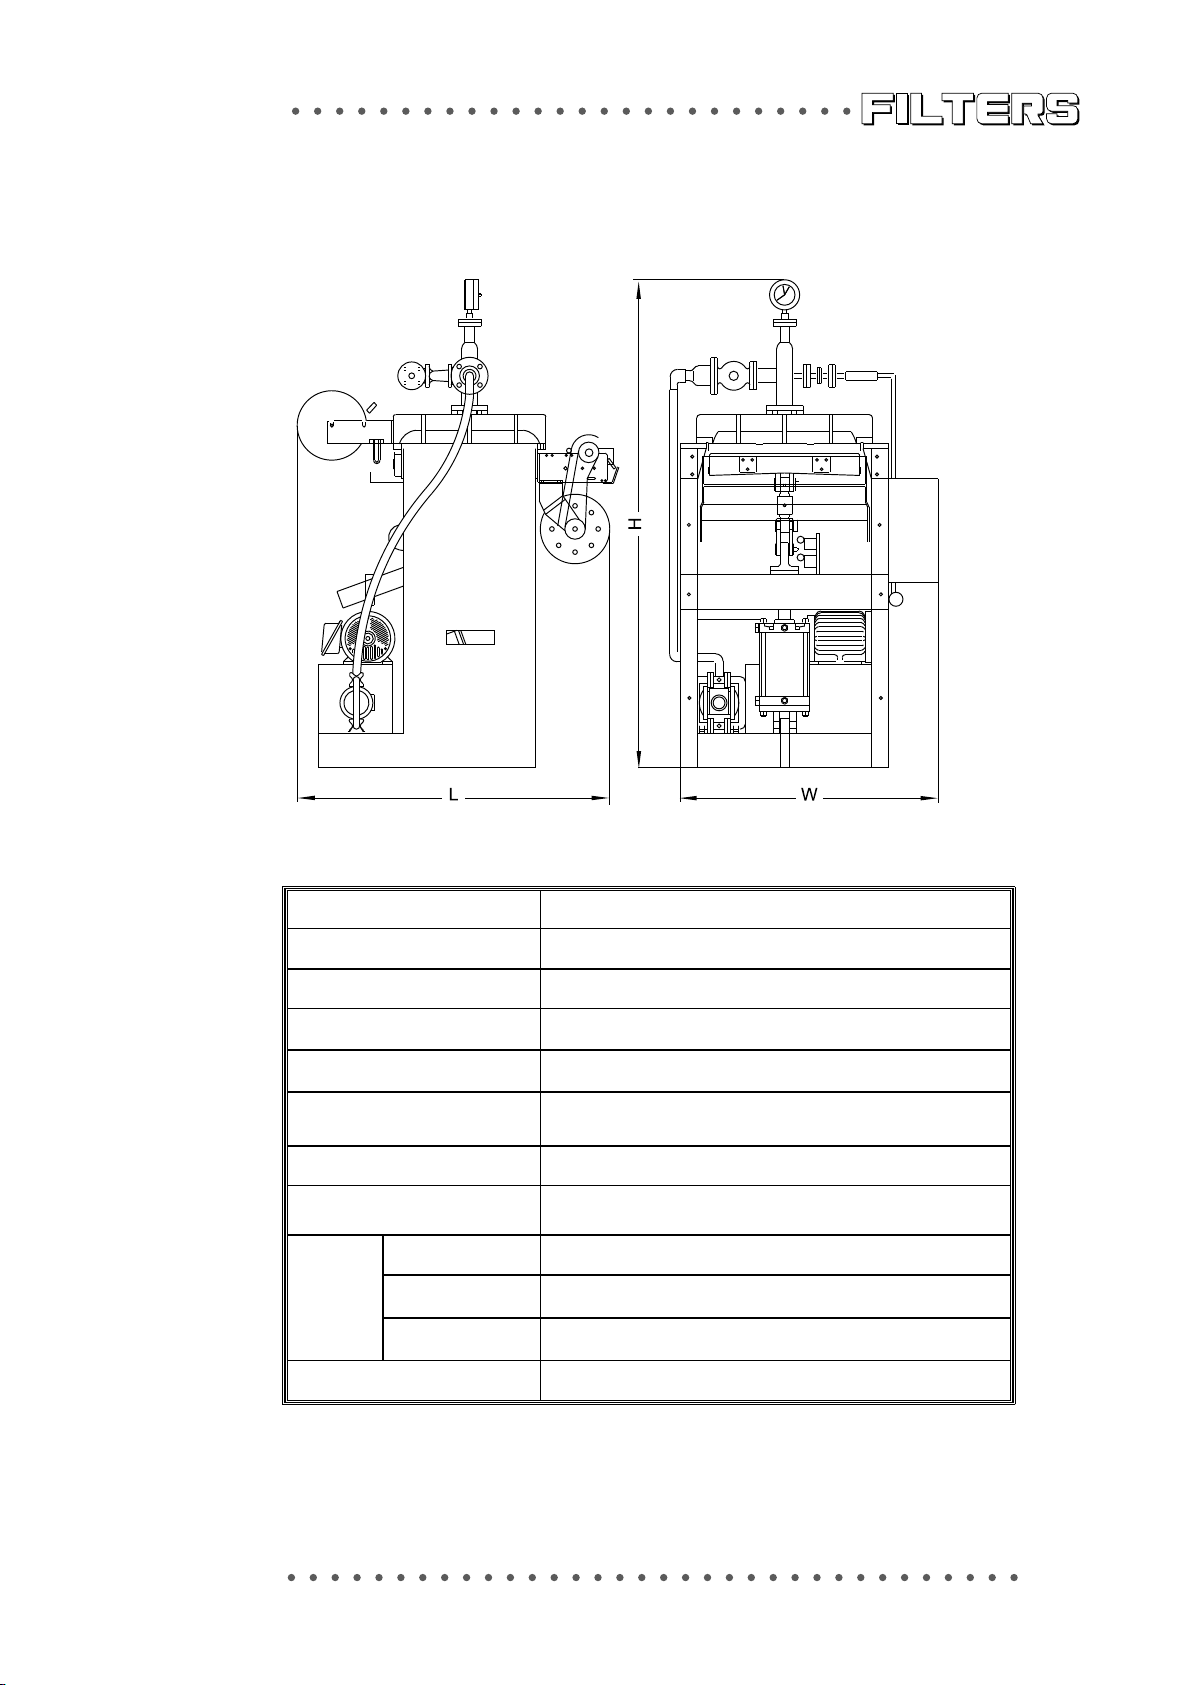
Style ST-60N
Filteration area 0.36m
Paper size 66cm × 50m
Hydraulic motor 2 HP
Air compressor 2 HP
Air operated double
diaphragm pump
Paper mesh 200 ~ 300(75~48μm)
3Ø,
Power
Dimension
L 1350 mm
W 1180 mm
H 2150 mm
Weigth 1100 kg
220V / 380V / 400V / 415V, As per
2
1” Outlet
customer.
3
Page 5
Parts List
4
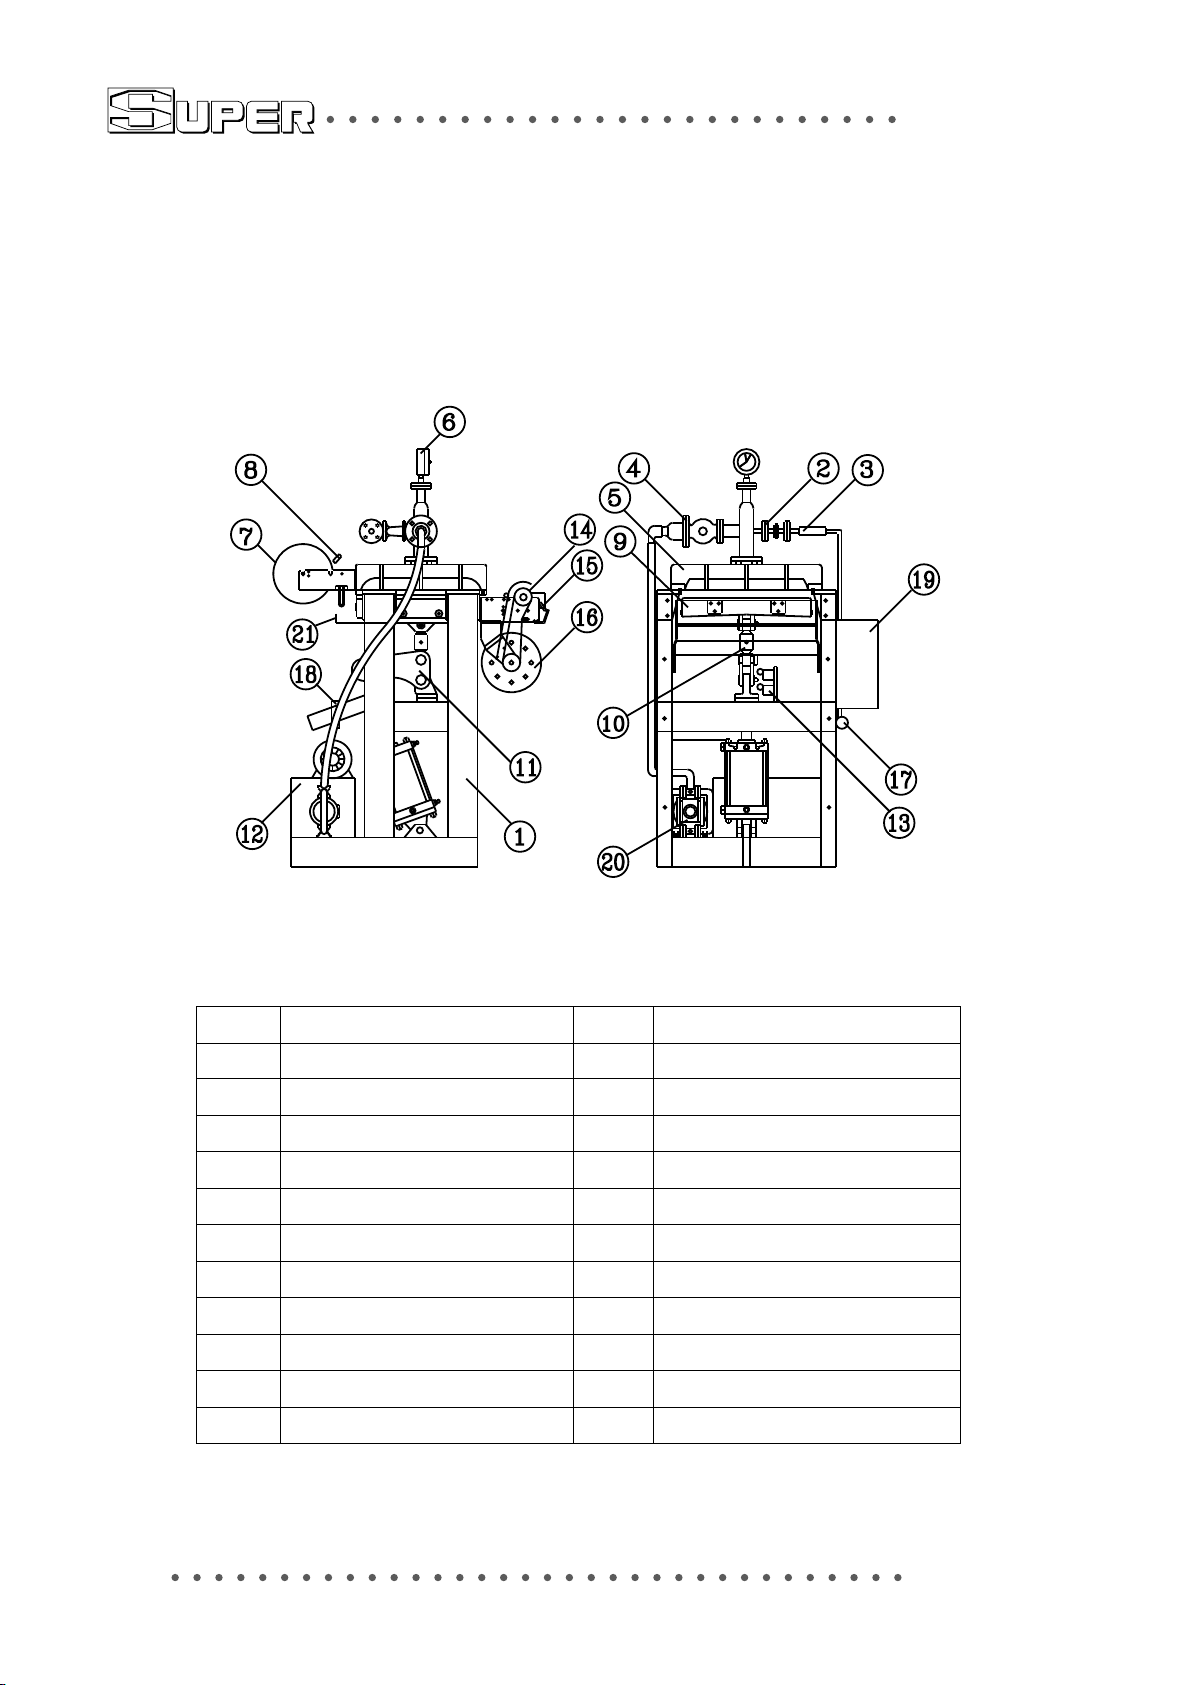
NO Description NO Description
1 Frame 12 Hydraulic system
2 Dewatering valve 13 Limit switch
3 Dewatering check valve 14 Paper roller motor
4 Feeding valve 15 Paper collection rack
5 Upper cover 16 Paper roller
6 Pressure gauge 17 FRL set
7 Paper rack 18 Air system solenoid valve
8 Photoelectric switch 19 Control box
9 Moving plate 20 Feeding AODD pump
10 Paper rack 21 Water Collection plate
11 Rotate arm
Page 6
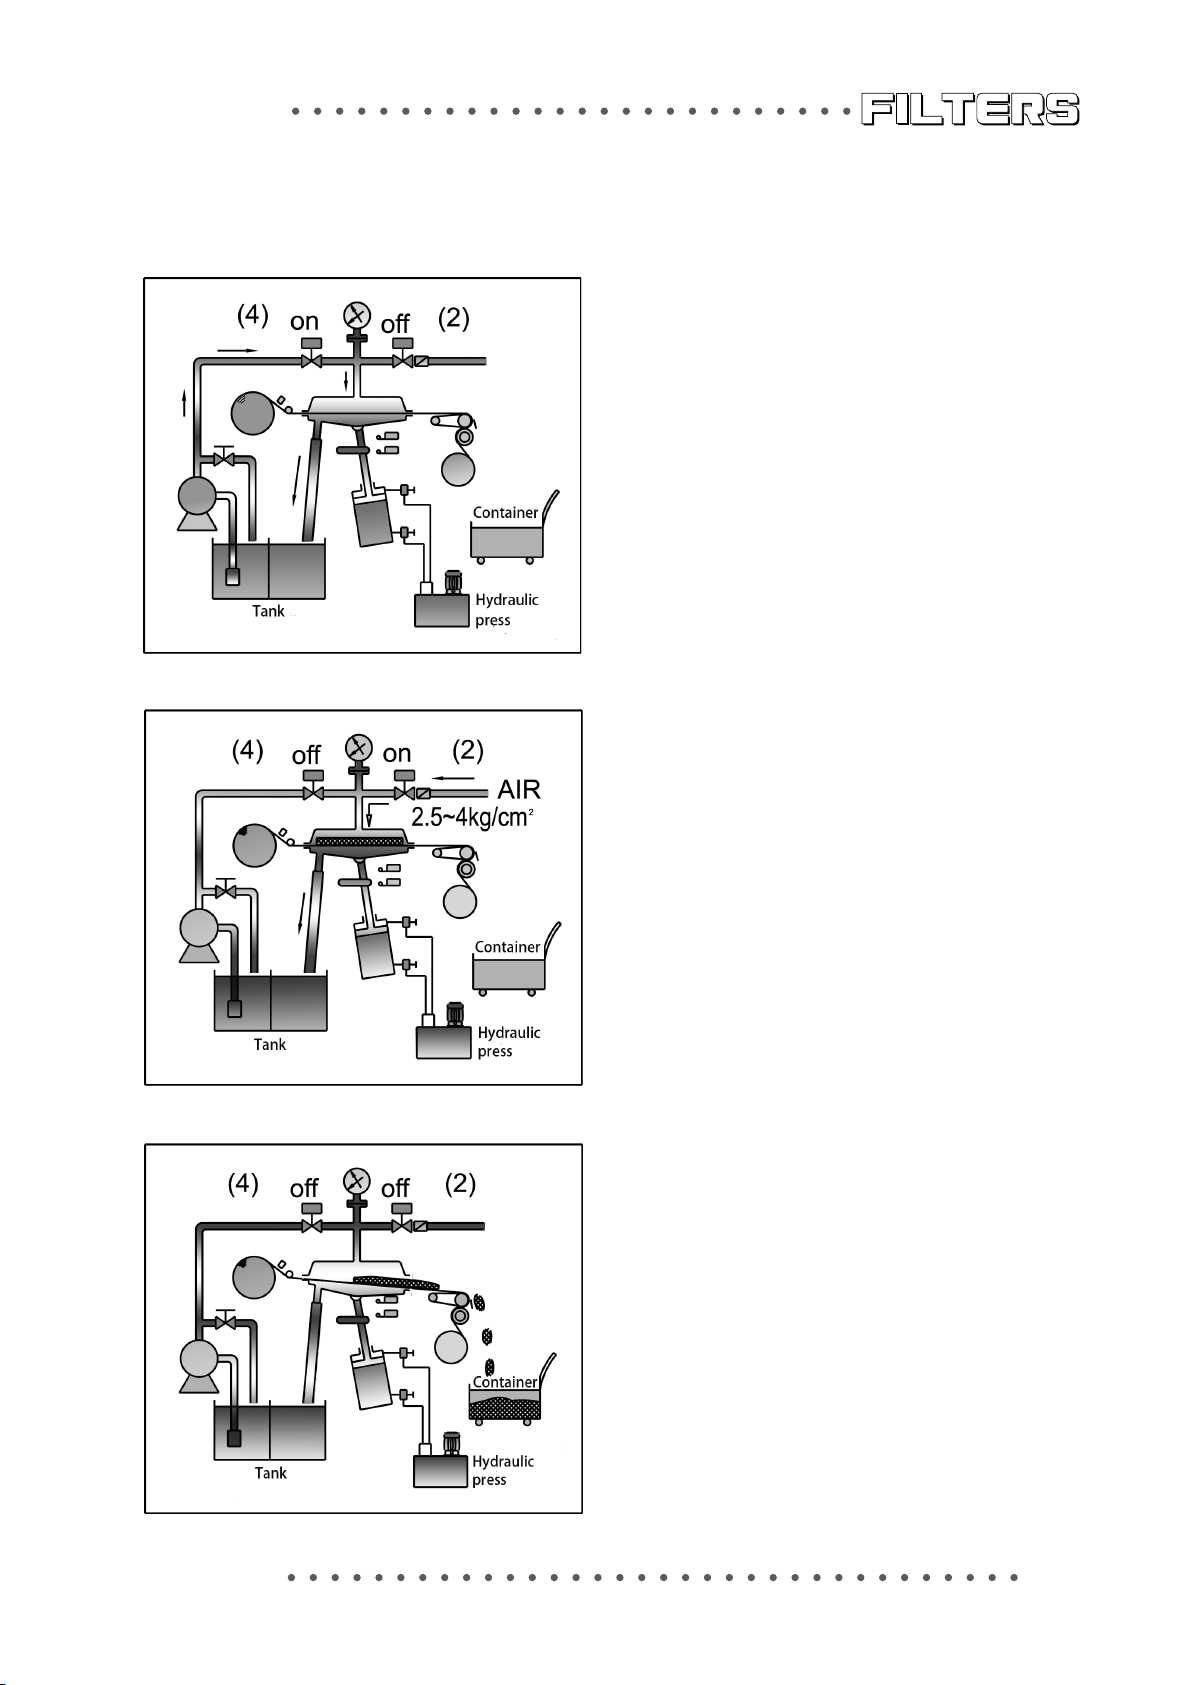
Operation Procedure
Feeding
When the feeding pump is running,
the feeding valve is opened and the
dewatering valve is closed.
The ltration liquid goes back goes
back to the tank.
Dewatering
When dewatering starts, the
feeding valve is closed and the
dewatering valve is opened.
The air goes in, and the liquid is
squeezed out.
Drain out cake
The dried cake is drained
out and falls into the container
after the dewatering is nished.
5
Page 7
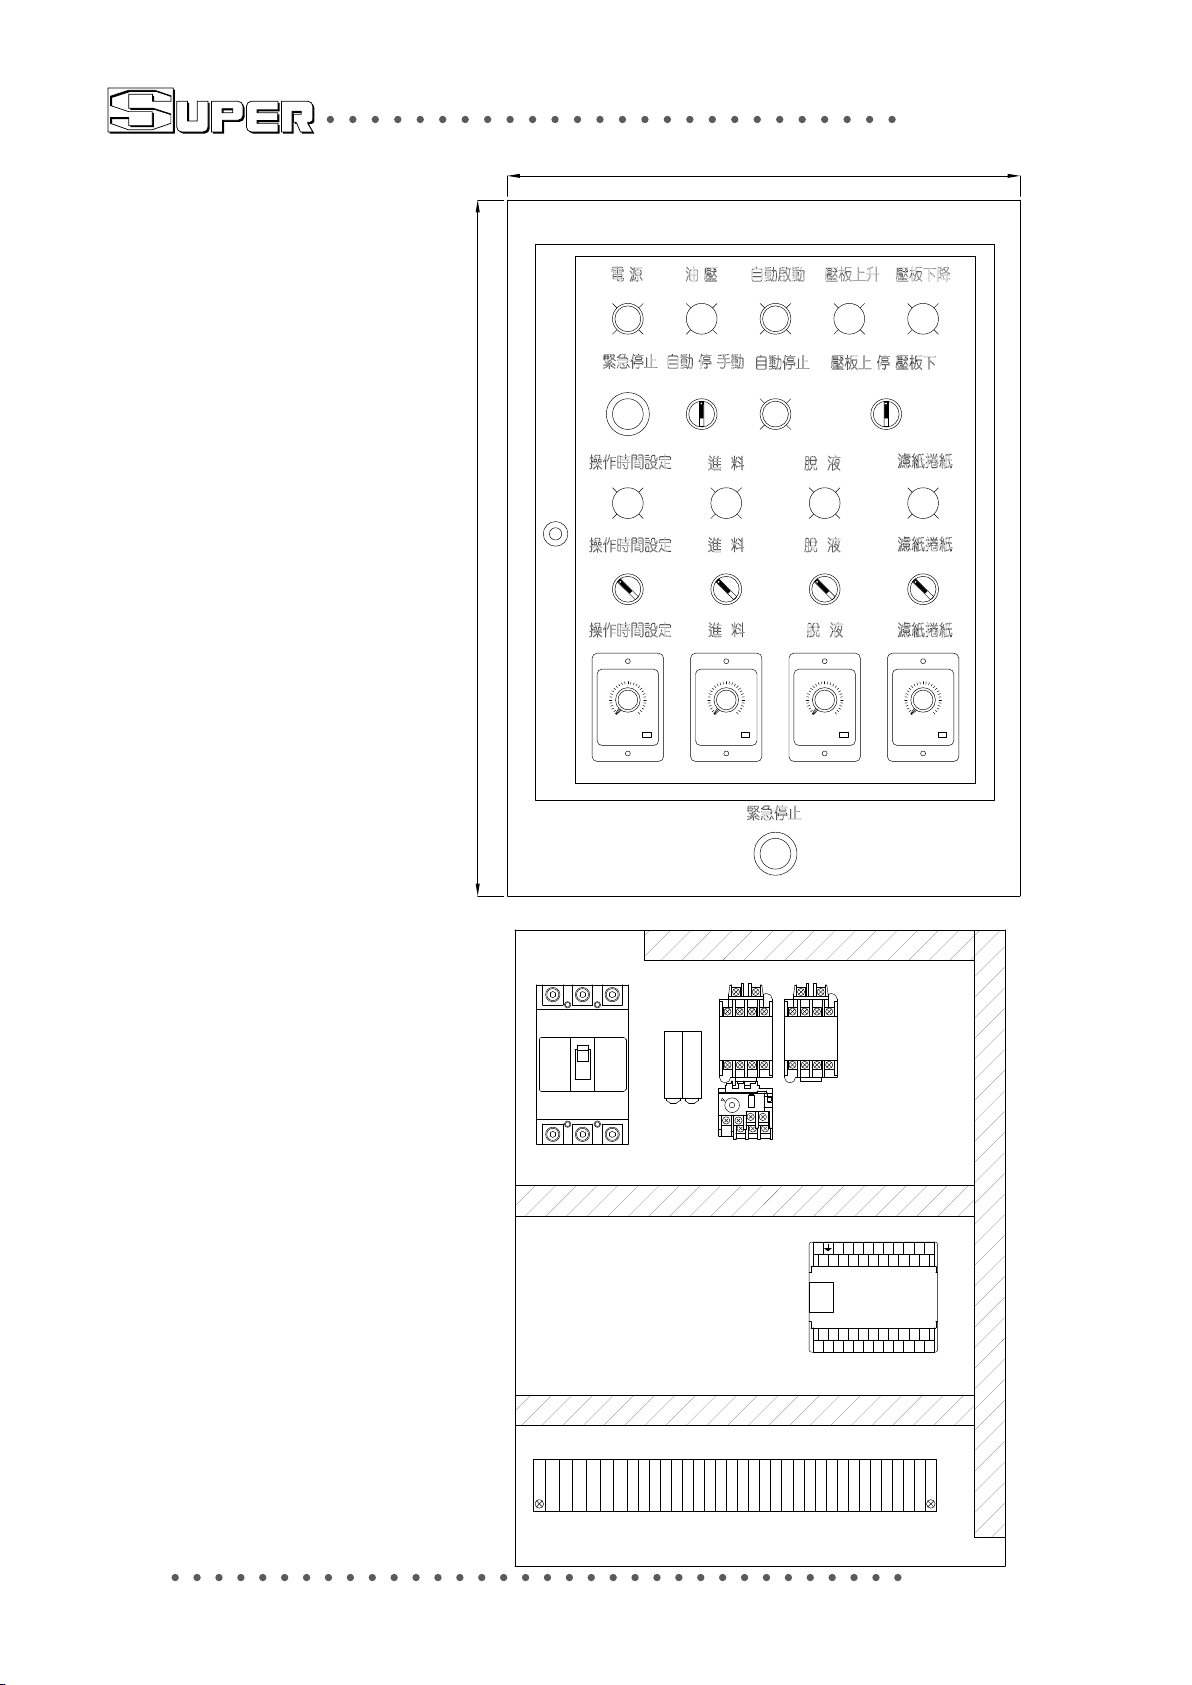
Control Box Layout
450
600
油 壓
POWER
PBLG1 GL1
緊急停止
STOP
EPB1
操作時間設定
OPERATION
操作時間設定 進 料
OPERATION
OFF ON OFF ON OFF ON OFF ON
操作時間設定
OPERATION
HYDRAULIC
SYSTEM
自動 停 手動
AUTO STOP MANUALEMERGENCY
TIMER
GL4
TIMER
CS3 CS4 CS5 CS6
TIMER
12H 30M 30M 30S
T1 T2 T3 T4
自動啟動
AUTO START
PBLG2 GL2 GL3
自動停止
CS1 PBLR3 CS2
進 料
FEEDING
GL5 GL6 GL7
FEEDING
進 料
FEEDING
緊急停止
EMERGENCY STOP
AUTO
STOP
壓板上升
PLATE-UP
壓板上 停 壓板下
PLATE
STOP
UP
脫 液
DE-WATER
脫 液
DE-WATER
脫 液
DE-WATER
ROLLING PAPER
ROLLING PAPER
ROLLING PAPER
壓板下降電 源
PLATE-DOWN
PLATE
DOWN
濾紙捲紙
濾紙捲紙
濾紙捲紙
NFB
3P15A
Power
F2
MS1 MC3
F1
Fuse
Hydraulic Pump
EPB2
Paoer Rolling Motor
. S/S S/S X1 X3 X5 X7 X11 X13 X15 X17
NL X6X4X2X0. X16X14X12X10
PLC
Y00V Y6. Y2 Y4 . Y10 . Y12 Y14
COM0
24V
C0M2
Y5Y3
COM1
Y1 Y13
Y15
COM3
Y11Y7
6
RU1STU
Y0C
W3
U3
V3
W1
V1
W
V
Y4
TLY2TL
X13
Y5
Y6
TL
TL
24V
X14
X15
X17
X16
0V
0V
0V
Page 8
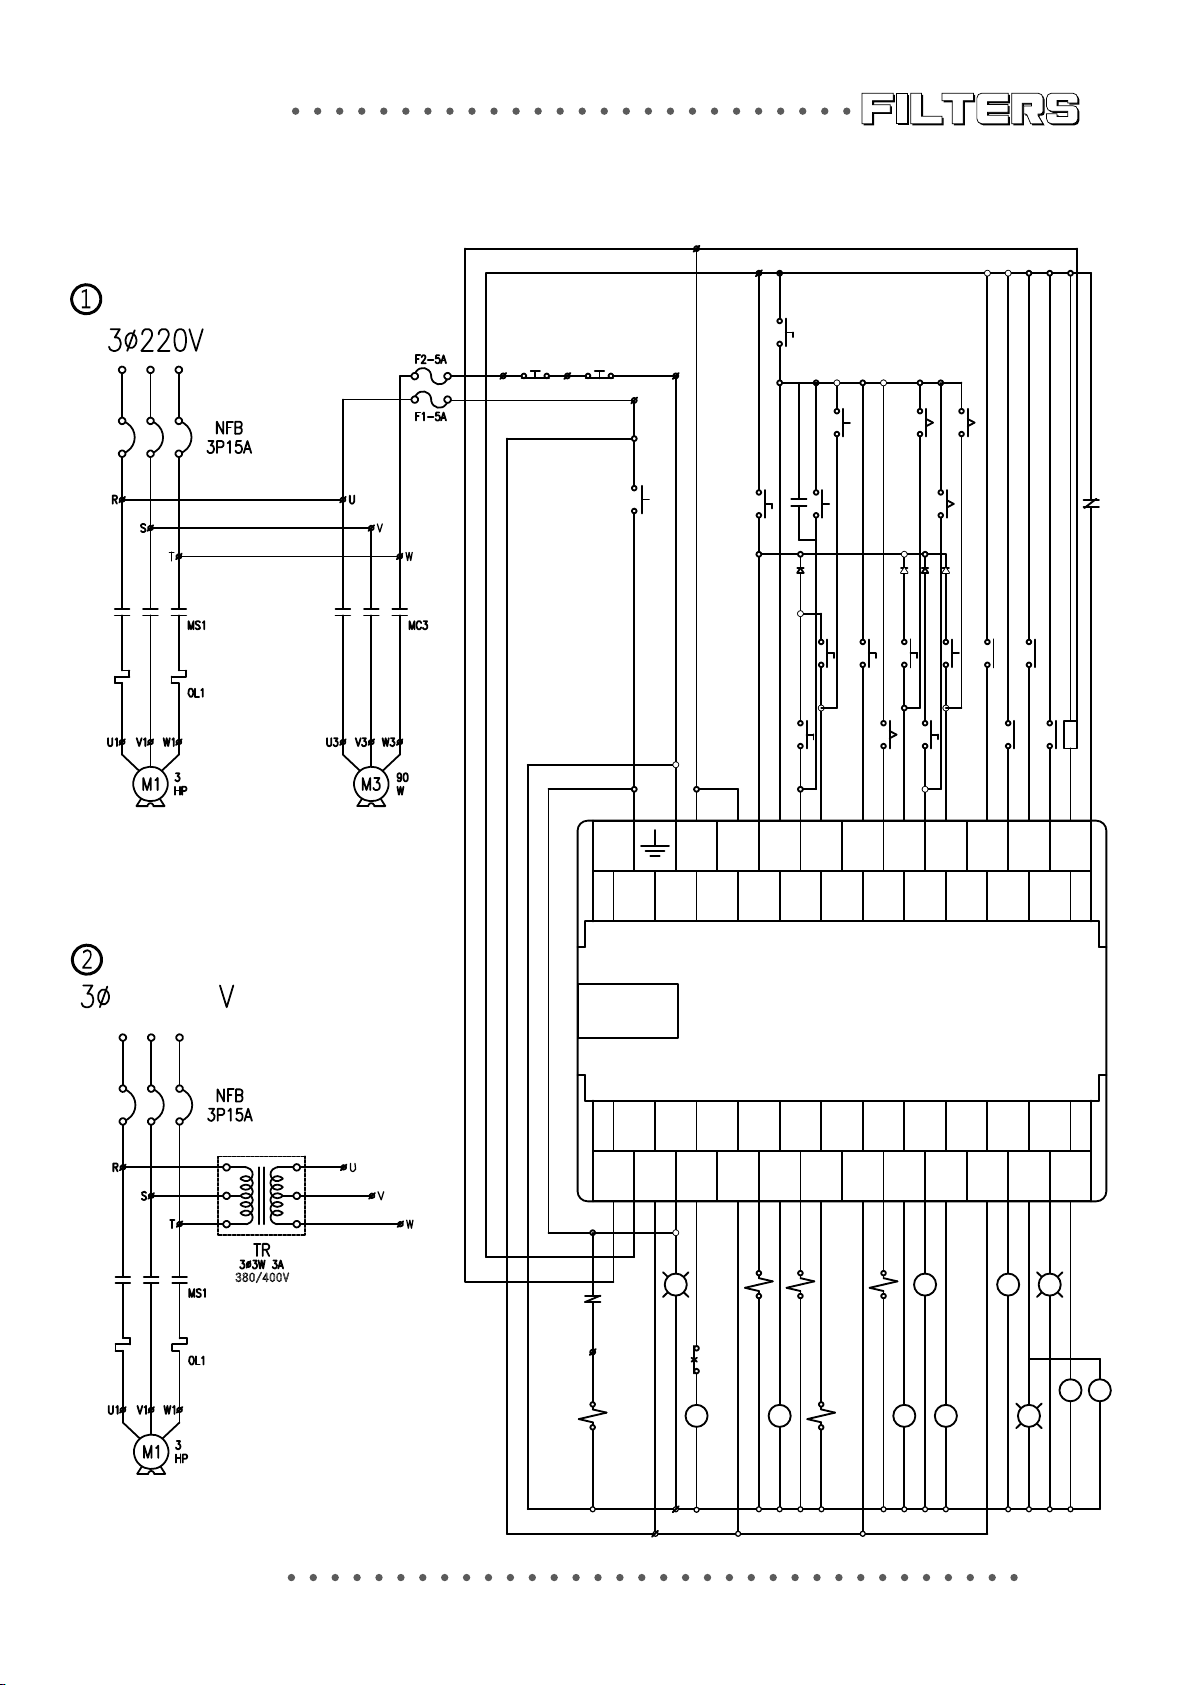
Controller Wiring
Power Input
Emergency Emergency
Stop 1
Stop 2
T2T1
EPB1 EPB2
RL
Power
PBLG1
TL
24V
0V
Manual
CS1
Auto
CS1
R1
Aoto Stop
Auto Start
PBLR3
PBLG2
Plate Up
Operation Time
Feeding
T2T3T4
Feeding
Paper Rolling
Dewatering
Paper Rolling
Plate Up
MS1
Deatering High Pressure
Dewatering Low Pressure
Hydraulic Pump
Power Input
380/400
Paper Rolling Motor
380/400V
.
24V Y1
MC3
Air Source
Y0C
L
COM0
S/S
N
Power
Hydraulic Pump
PBLG1
OL1
S/S
.
COM1
X1 X3
Y2 Y4 .Y00V .
Feeding Pump
Paper Rolling Motor
SOL*2&GL5
Plate Down
CS2
CS2
X4X2X0
C0M2
Y5Y3
Plate Up
SOL&GL2
Plate Down
X5
CS3
T1
X6
Y6
SOL*2&GL6
Operation Time
Dewatering
CS4
CS5
X11 X13
X7
X9 X11
X10
X8
Y10
Y11
Y7
Feeding Time
Dewatering
Operation Time
CS6
X12
X10
Dewatering Time
.
COM3
Plate Down
X15
X13
X14
X12
Y12
Y13
Y11Y9
Rolling Time
T4
X17
X15
X16
X14
Y14
Y12Y8 Y10
Y15
Y13
Auto Start
Aoto Stop
PBLR3
R3
Paper Sensor
R2
Hydraulic Pump
SOL
MS1&GL1
TL
RL
MC3&GL7
SOL&GL3
T1&GL4T2T3
PBLG2
7
Page 9
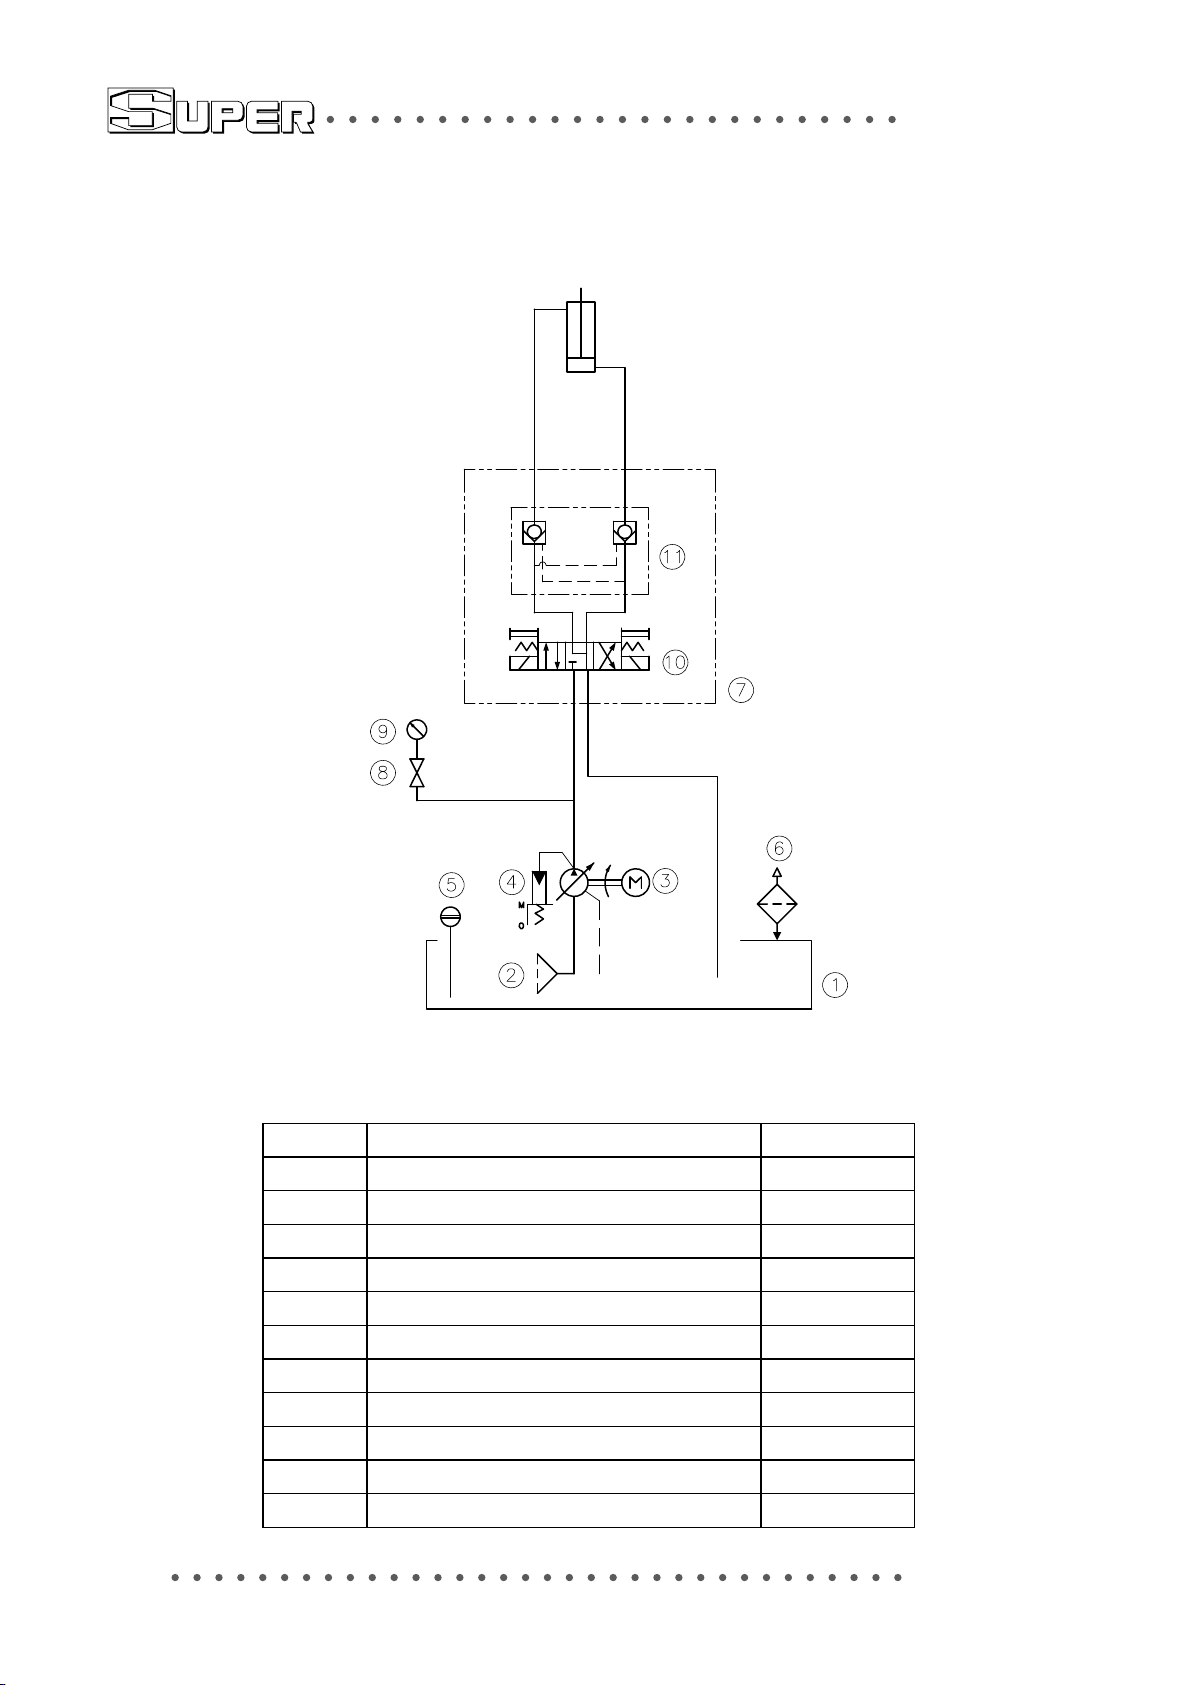
Hydraulic Circuit
8
Item
1 Oil Tank 1
2 Strainer 1
3 Motor 1
4 Pump 1
5 Oil Level 1
6 Oil Filler 1
7 Manifold Block 1
8 Pressure Cock 1
9 Pressure Gauge 1
10 Solenoid Valve 1
11 Pilot Check Valve 1
Description Quantity
Page 10
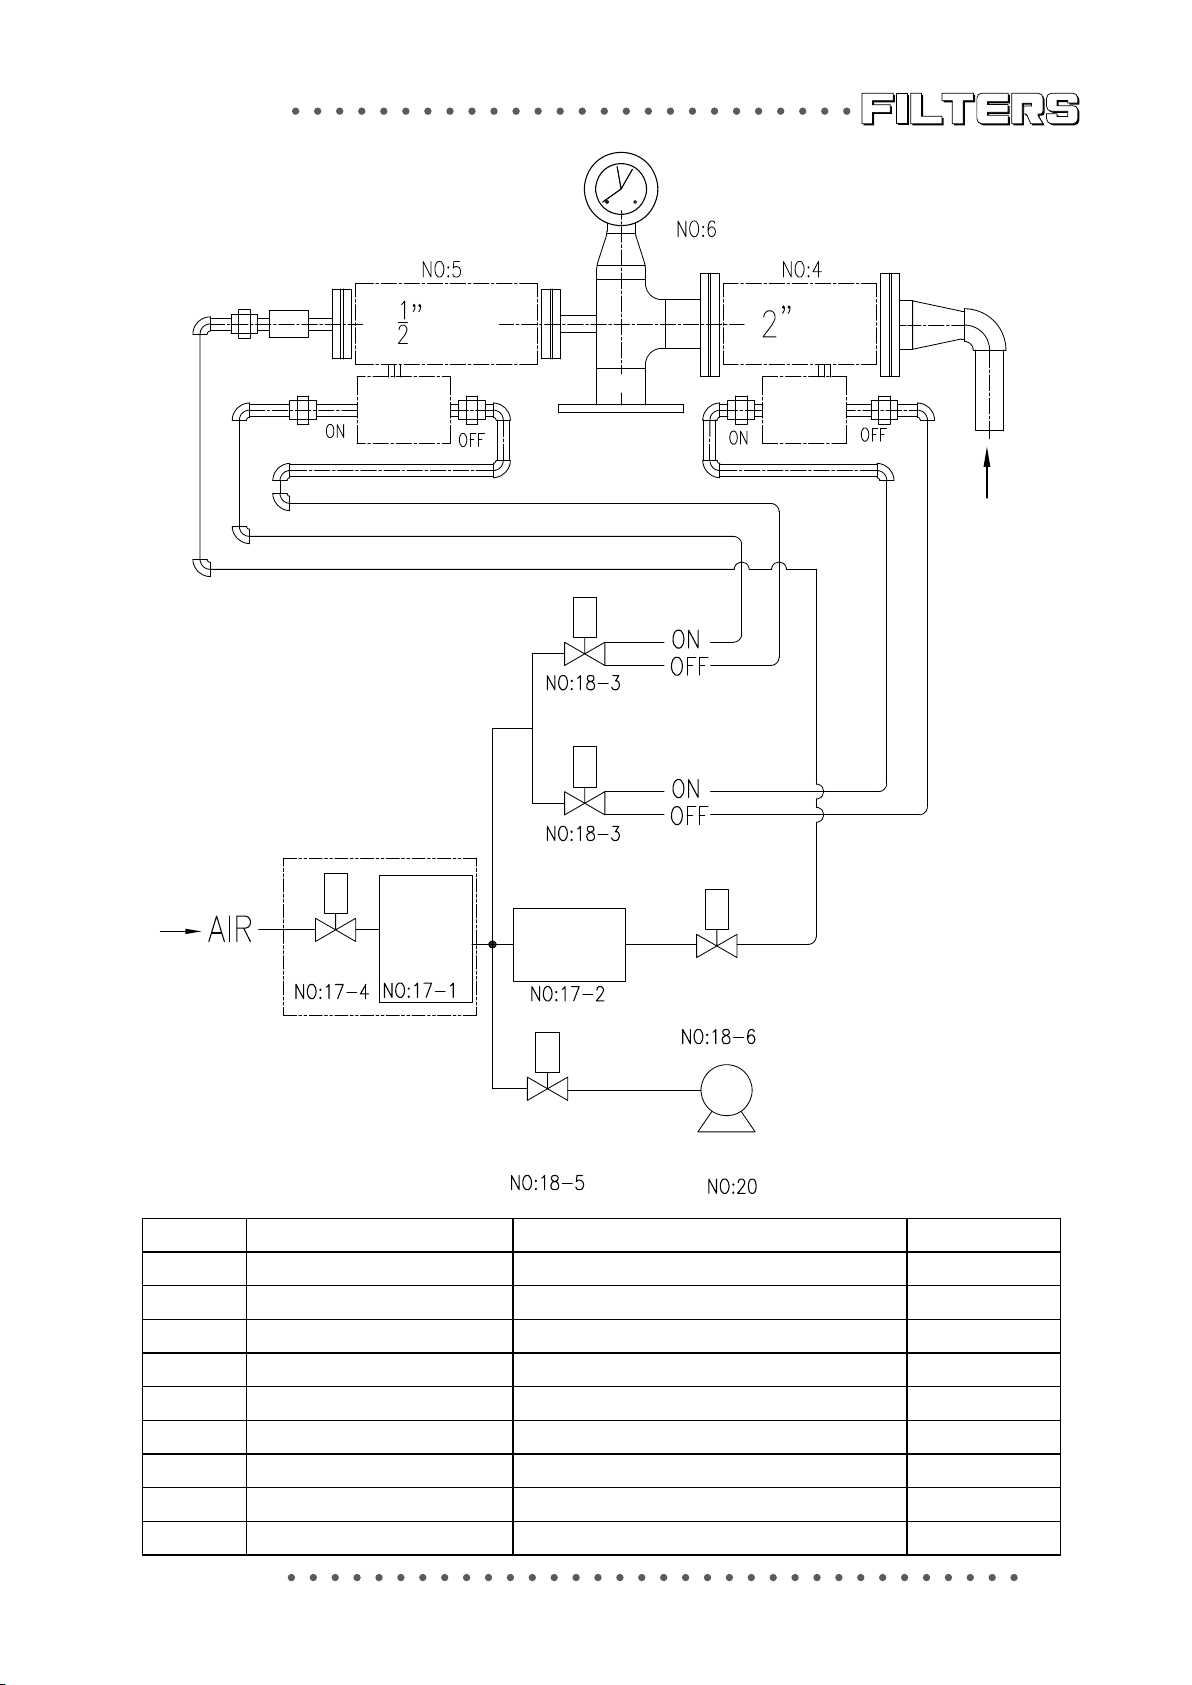
Air Circuit
Pressure
Gauge
Dewatering
Valve
Dewatering
Air Switch
Feeding
Valve
Feedring
Air Switch
Feeding
Inlet
Solenoid
Valve
Solenoid
Valve
Item
FRL
Solenoid
Valve
Set
Component code Description Quantity
Dewatering
Regulation
Valve
AODD Pump
Solenoid Valve
Dewatering
Solenoid
Valve
AODD Pump
1 N0.20 AODD Pump 1” 1
2 NO.4 Feeding Valve 2” 1
3 NO.5 Dewatering Valve 1/2” 1
4 NO.6 Pressure Gauge 4Kg/cm
2
5 NO.17-1,17-4 FRL Set 1
6 NO.18-6 Dewatering Solenoid Valve 1
7 NO.18-3 Solenoid 1
8 NO.18-5 AODD Pump Solenoid Valve 2
9 NO.17-2 Dewatering Regulation Valve 1
1
9
Page 11

Installation
Cautions
1. Place the machine horizoztal stably and keep it up-right.
2. Connect the inlet and outlet pipes according to picture 1. The inlet pipe is
connected to the AODD pump. The outlet pipe is connected to
the outlet under the lter plate.
3. A valve should be installed on the inlet pipe so repairing can be done
easily (picture 2).
4. Set a Tee at the inlet of feeding pump to supply clean water for cleaning.
5. There should be no foreign substances inside the pipe before pumping.
If necessary, clean it with water.
6. Make sure the installed pipes are steady. There should be no vibration.
7. Connect the air pressure pipe to the inlet of the 3-point joint.
8. The external air compressor must match the refrigerating dryer in
specication.
9. Refer to picture 3 for the pumping method of the air compressor and
refrigerating dryer.
10. This machine is 380V, 3-phase. Please connect the power line to the
upper part of the circuit breaker.
11. Please turn on the motor and check whether the direction of operation
is correct after the installation.
12.The refrigerating dryer is external single-phase, 220 V. Refer to picture
3 for power supply.
13. Air compressor power is supplied from ST-60N’s control panel. You
can connect the power line from the bottom part of the circuit breaker to
the air compressor power line housing.
14. Please turn on the power and check whether the operating direction
is correct after assembling the power line of the air compressor.
15. Please refer to the respective instruction manual if you don’t
understand the air compressor & refrigerating dryer fully.
10
Page 12
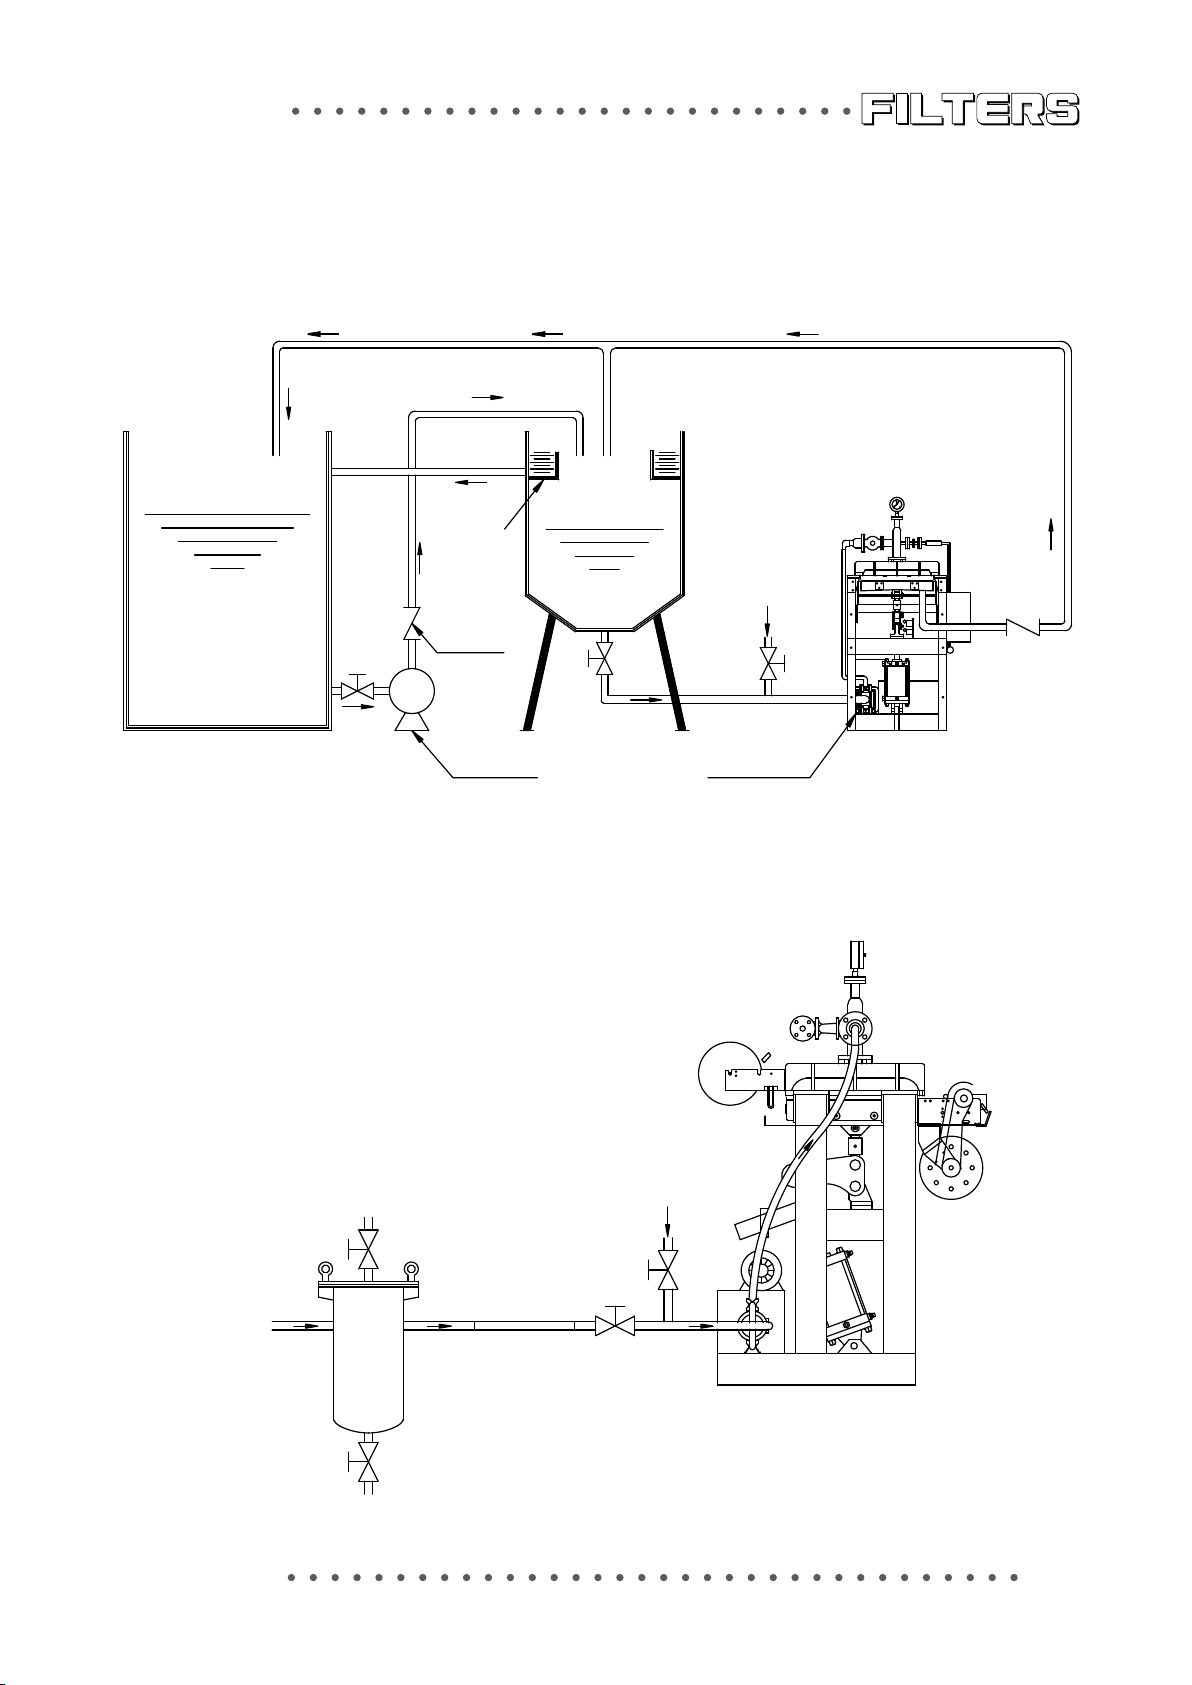
Examples
Tank
Precipitation
Dewatering Filter
Tank
Overflow
Clean Water
Slurry
Check Valve
Check Valve
Circulating Pump AODD Pump
To Precipitation Tank
SUS Pre-filtration Chamber
Air to Clean Block
Slurry
Clean Water
Valve
11
Page 13
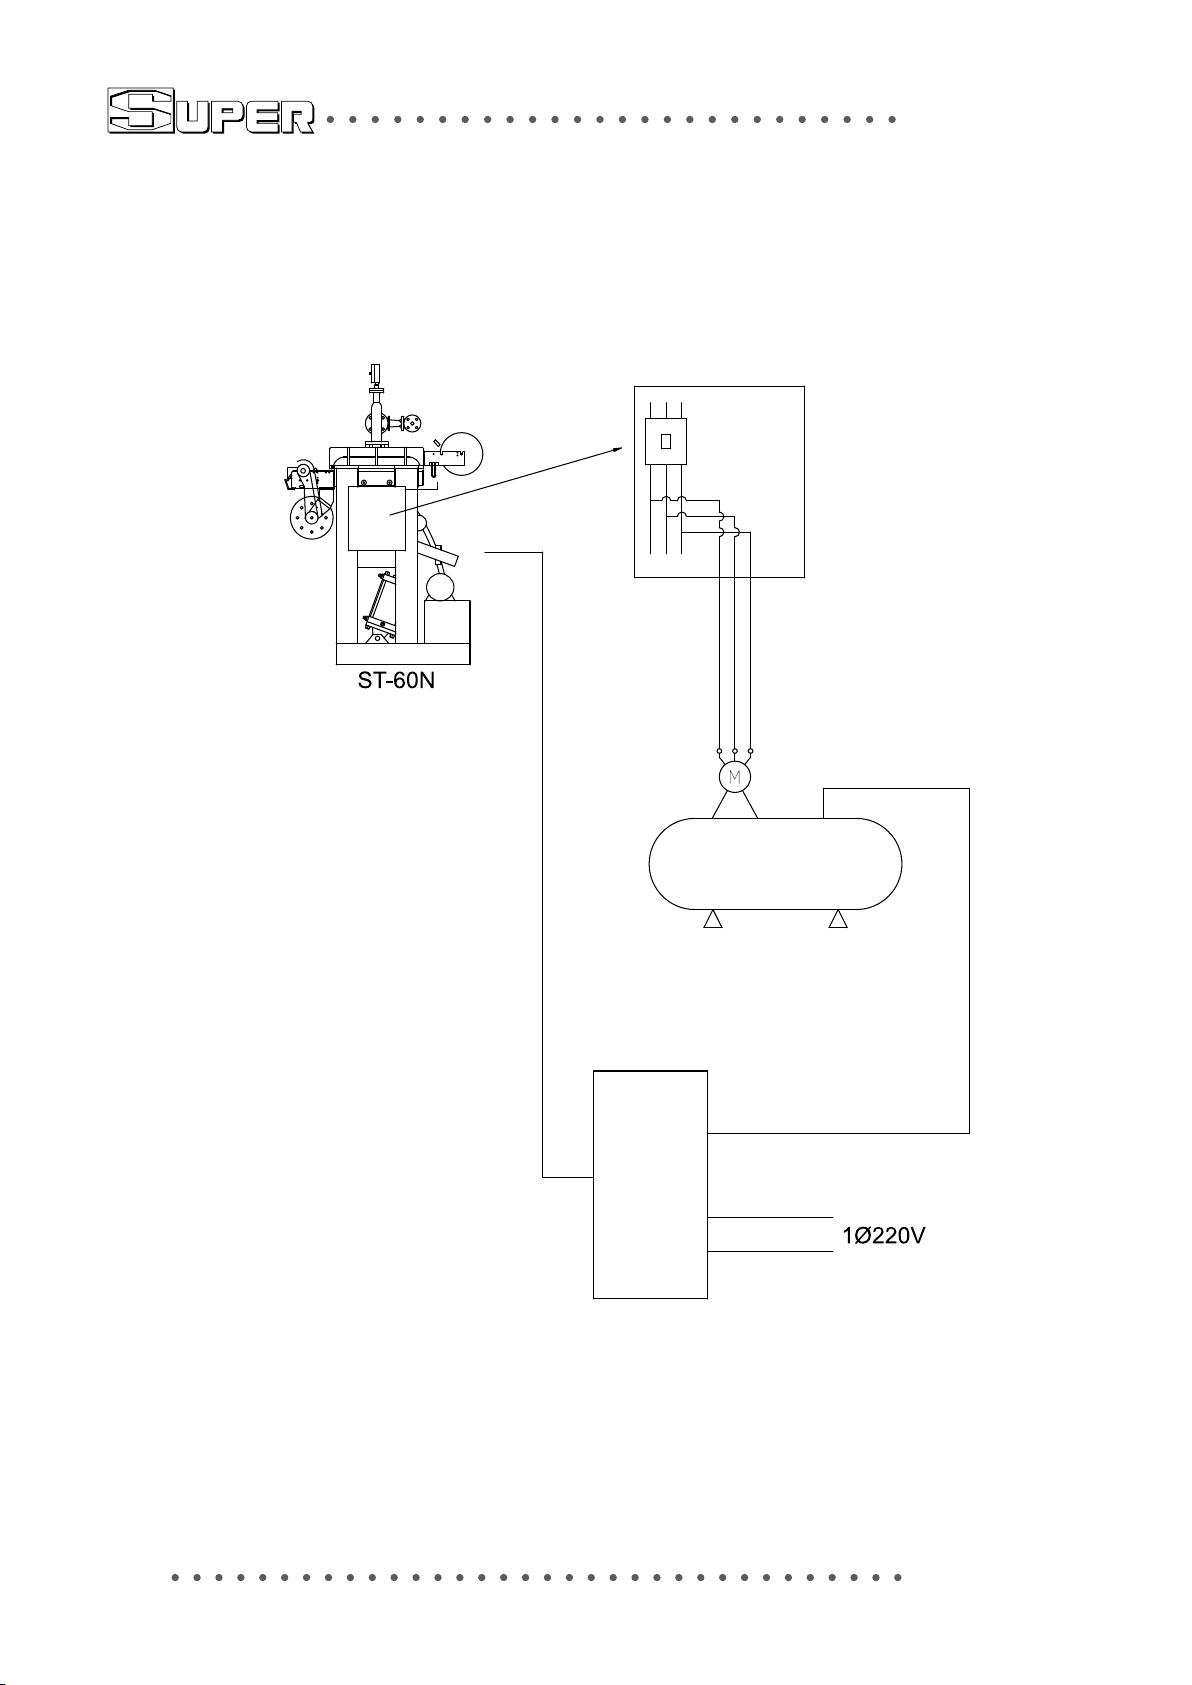
Air Compressor and Dryer Wiring
CONTROL PANEL
ON
OFF
AIR COMPRESSOR
INLET
OUTLET
CHILLER
*Please keep the air dry for longer service life.
12
Page 14
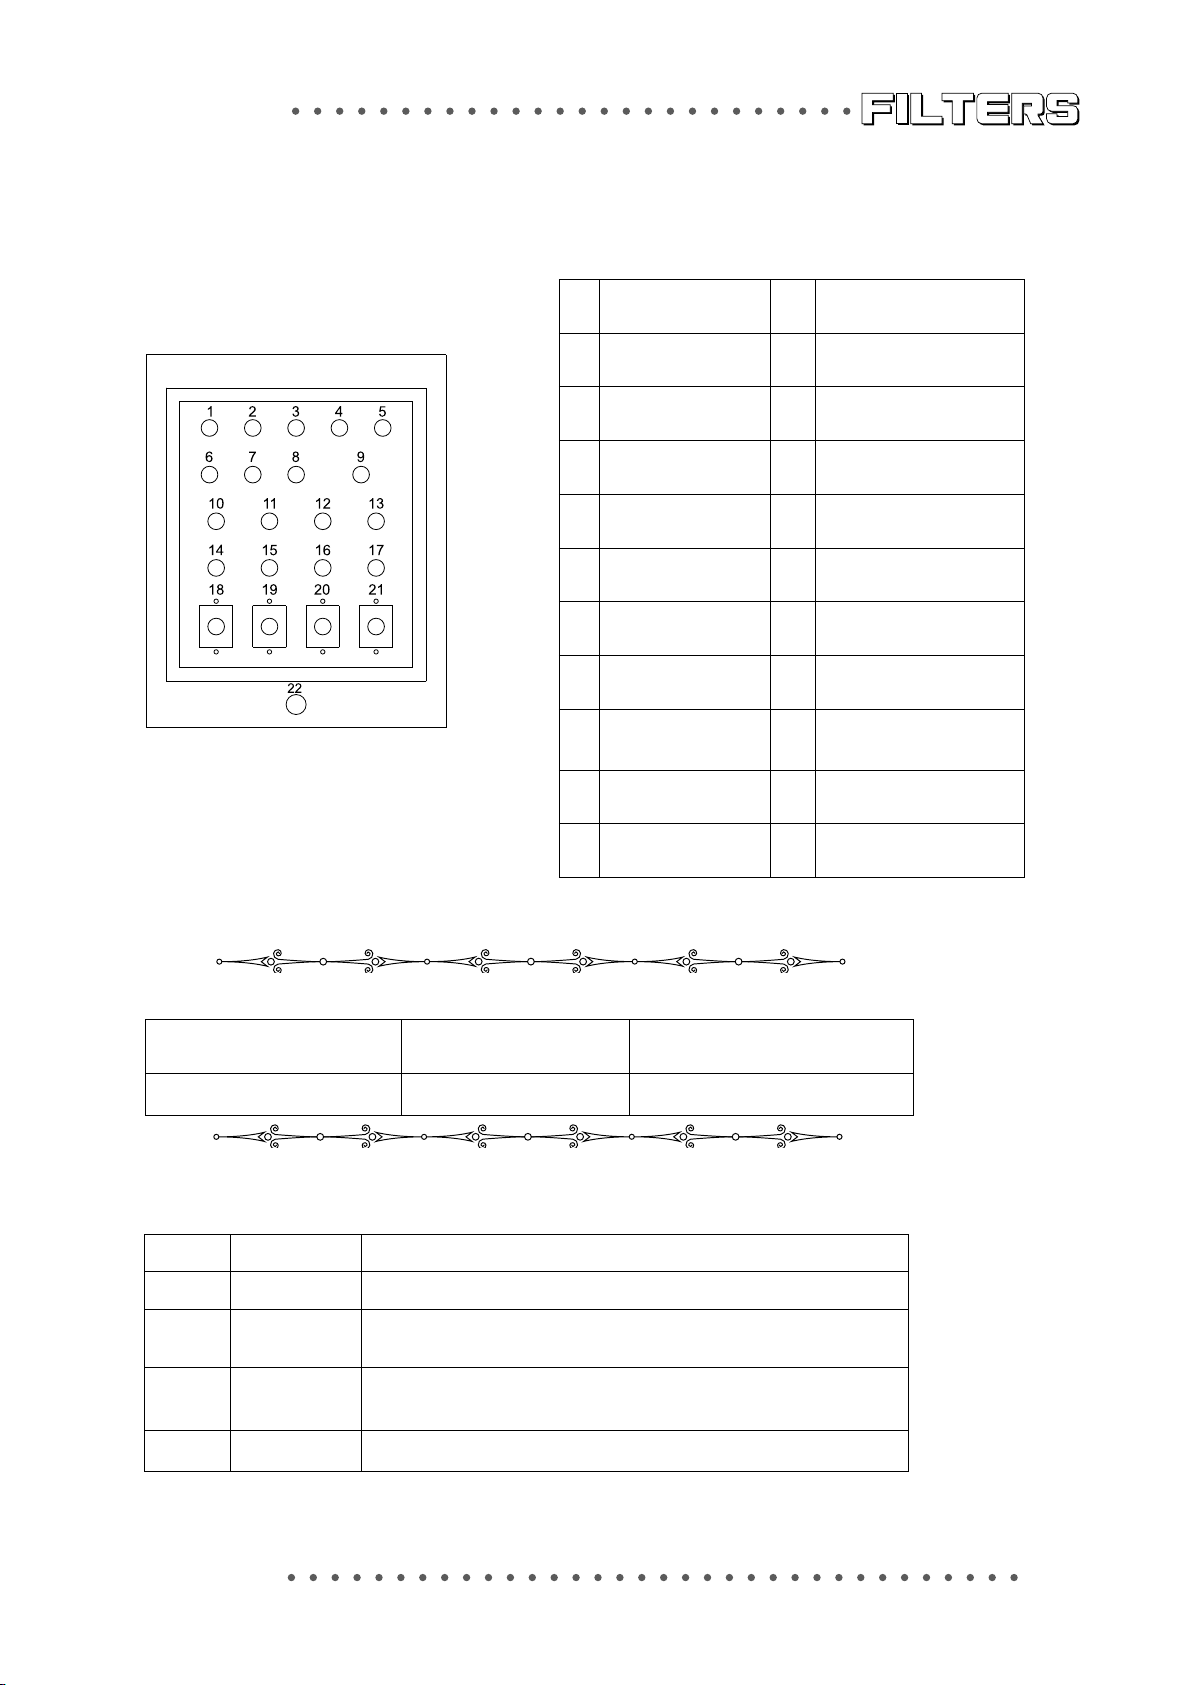
Control panel
1 Power light 12 De-watering light
2 Hydraulic system
light
3 Auto start 14 Operating timer
4 Plate up 15 Feeding switch(ON/
5 Plate down 16 De-watering
6 Power o 17 Rolling paper
7 Mode switch
(auto/stop/manual)
8 Auto stop 19 TR2 feeding timer
9 Plate switch
(plateup/stop/platedown)
10 Operating Timer
light
11 Feeding light 22 Emergency stop
13 Rolling-paper light
switch(ON/OFF)
OFF)
switch(ON/OFF)
switch(ON/OFF)
18 TR1 operating timer
20 TR3 de-watering
timer
21 TR4 Rolling paper
timer
Operating condition
Compressor air
pressure
5kg~6kg/cm
2
Feeding pressure De-watering air pressure
1.5kg~3kg/cm
2
2.5kg~4kg/cm
Timer setting
Timer Setting time Description
TR1 12hour Operating timer
TR2 30min
TR3 30min
TR4 30sec Roll paper and draw out the sediment
The feeding time is dependent upon the thickness
and viscosity of pulp
The de-watering time is dependent upon the
desired dryness of the pulp.
2
13
Page 15

Operation
Prior to automatic running.
1. Set pressure gage range(part #6) at 1.5Kg/cm2 for high(*1) and 0.50.8Kg/cm2 for
low.
2. Set feeding timer(Control panel #19) to 10~15 minutes, and can be up to 30
minutes for thin slurry, but will be terminated if the pressure gauge reaches the
high point.
3. According to the dry up situation, set the de-watering timer(Control panel #20) to
3~5 minutes.
4. Set the paper rolling timer(Control panel #21) to 23~25 seconds to move out the
cake.
5. Hold down the power button(Control panel #1) for 3~5 seconds to power on the
machine.
6. Turn the mode switch(Control panel #7) to automatic.
7. Press auto start(Control panel #3) and the machine will work automatically. If it
failed, check the paper is in position or not from the photoelectric switch(Control
panel #8).
8. When the machine is running in automatic mode(Control panel #7), you can press
auto stop(Control panel #8) to shift to semi-aotomatic mode.
9. Turn on operation timer switch(Control panel #14) and set timer(Control panel
#18) to run the timing for automatic mode.
10. Clean the machine in manual mode with water before shutdown everyday.
Automatic running
1. Set pressure gage range(part #6) at 2.5~3Kg/cm2 for high(*1)
2. Set feeding timer(Control panel #19) to 20~30 minutes
3. Set the de-watering timer(Control panel #20) to 15~20 minutes.
4. Turn the mode switch(Control panel #7) to automatic, and press auto start(Control
panel #3).
(*1)
*Set higher pressure for thin slurry to get thicker cake.
*High pressure 1.5Kg/cm2 for thick slurry.
*High pressure 2Kg/cm2 for normal slurry.
*High pressure 2.5~3Kg/cm2 for no moving cake out ltration.
*Set feeding timer to 15~20 minutes for high pressure 2Kg/cm2.
14
Page 16

*Set feeding timer to 20~30 minutes for high pressure 2.5~3Kg/cm2.
*Hold down and rotate the center knob to set the high and low range of
pressure gauge(patt #6).
(*2)
*Set low pressure for de-watering timer. If de-watering time is up and the
pressure hasn’t down to the low pressure yet, set a longer timer or
higher low pressure.
*Set longer timer for de-watering to get thinner cake.
15 minutes for 2cm cake, 10 minutes for 3cm cake.
5 minutes for cake over 4cm.
Precipitated slurry will get thicker cake and need fewer de-watering timer.
Prior to manual running.
1. Hold down the power button(Control panel #1) for 3~5 seconds to power
on the machine.
2. Turn the mode switch(Control panel #7) to manual.
3. Make sure the paper is at in the chamber and nothing will cause un-
perfect sealing later.
4. Turn the switch(Control panel #9) to plate up to lift the moving plate up
until light (Control panel #4) is o, then turn it back to stop.
5. Turn the feeding switch(Control panel #15) on at pressure gauge below
2Kg/cm2, and then turn it back to o.
6.Turn the de-watering switch(Control panel #16) on for 3~5 minutes and
turn it back to o after de-watering is nished.
7. Make sure the pressure inside the chamber is 0 or below the low point
before turn the switch (Control panel #9) to plate down to pull the
moving plate down, and turn it back to stop after the light(Control
panel #5) is o.
8. Turn the paper rolling switch(Control panel #17)on to move out the
cake, and trun it back to o after nished.
9. Back to “3” to re-start the cycle.
10. Feed clean water and run the fedding pump to clean the machine for
10 minutes, then pull the moving plate down before shutdown.
11. Never exceed pressure 3Kg/cm2 to keep longer service life. Feed
clean water and run for 1~8 cycles with lower pressure.
15
Page 17

Un-sucient cake dewatering.
1. Too short de-watering timer.
2. Cake thickness below 2cm.
3. Too thin slurry.
4. Liquid outlet is lower than the level in the solution tank and without
check valve.
5. The chemical is not suitable for this machine.
6. Viscous slurry is not suitable for this machine (dry up by air).
Prior to semi-automatic running.
1. When the machine is running in automatic mode, you can press auto
stop button(Control panel #8) to shift to semi-aotomatic mode.
2. The semi-automatic mode will run single cycle and stop. It’s feeding,
de-watering, moving plate down, moving cake out.
3. Precipitation tank before the de-watering machine is recommended to
speed up the de-watering.
Capacity
With precipitation tank: 30% liquid, 70% sludge, 20~25Kg for each 10
minutes.
Without precipitation tank: 70% liquid, 30% sludge, 15~20Kg for each 15
minutes.
Slurry of higher specic gravity will slow down the capacity.
Slurry with coagulant is not suitable for this machine.
16
Page 18
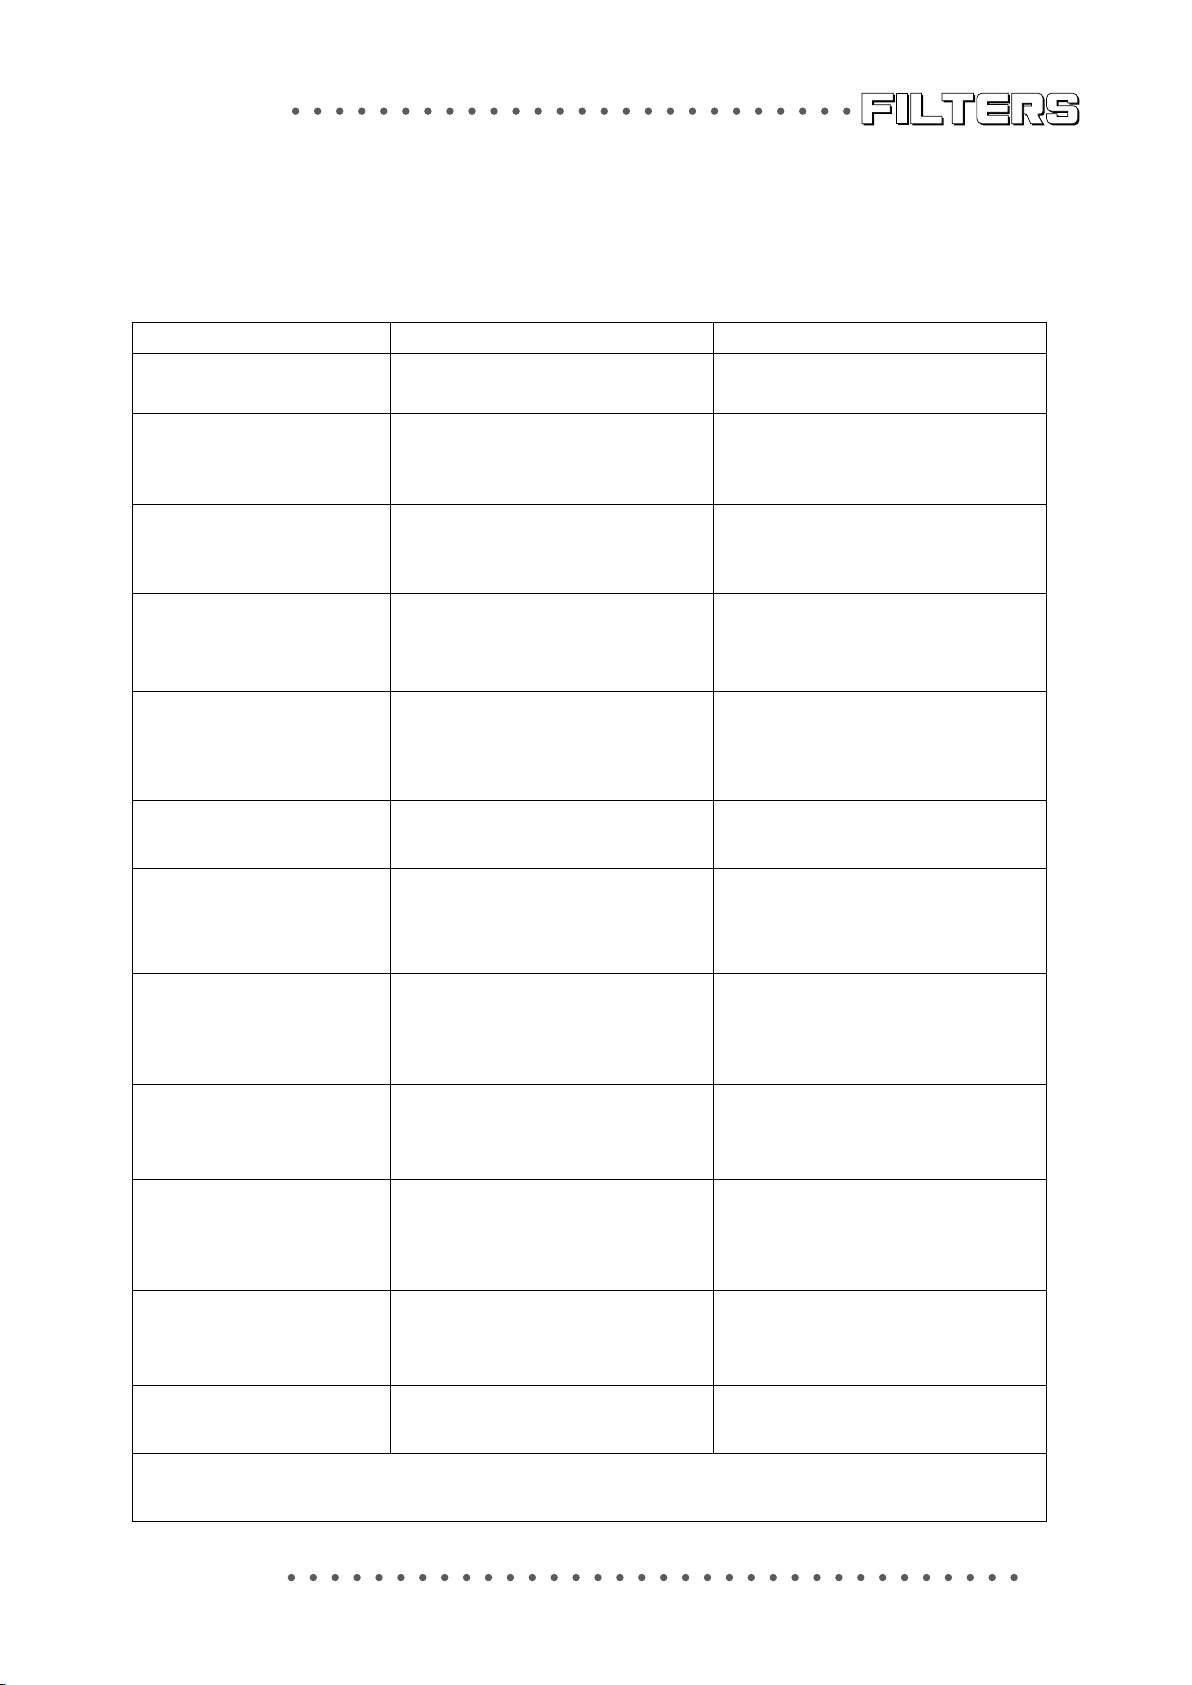
Trouble shooting
Condition Reason Solution
Bad ltration.
1. The paper is not in position
2. The paper is torn.
1. Re-install paper
2. Change the roll
No water coming out and
the feeding pressure is too
high
No water coming out and no
feeding pressure
Water coming out of the
chamber.
Water coming out of the
plate
Water is coming out of the
solenoid
Machine won’t run
automatically
Feeding pump won’t start 1.Air pressure is too low
1. The outlet is stuck
2. Paper is too dirty
1. Pump can’t draw water.
2. Pump is broken
1. Gasket doesn’t seal perfectly.
2. Dewatering air pressure too high.
3. Packing is worn.
1. Filter housing is filled with
sediment.
2. De-watering pressure is too high.
3. Filter housing is worn out.
1. Valve is broken.
2. Check valve is clogged.
1. Paper has run out.
2. light sensor is broken.
3. The plate did not return to the
limit switch S1 position
2. Feeding valve is broken
3. Pump inlet is stuck
1. Clean the outlet pipe
2. Change the paper
1. Clean the inlet pipe and check
valve.
2. Fix the pump
1. clean the gasket.
2. Down the dewatering air pressure.
3. Replace the gasket.
1. Clean the housing.
2. Reduce the de-watering pressure
3. Change the housing
1. Check the valve
2. Clean the check valve.
1. Change the paper
2. Clean or change the sensor.
3. Check the limit switch S1.
1. Check the solenoid and air
pressure(above 5 Kg/cm2)
2. Valve is stuck.
3. Clean the inlet.
Feeding valve doesn’t work 1. Feeding valve is closed
2. Air pressure isn’t above 4 Kg/
cm2
Dewatering valve doesn’t
work.
Paper is torn during rolling. 1. Belt is broken.
The belt doesn’t run properly The belt is broken Replace it
1. Air pressure is too low.
2. Air switch stalled.
3. Dewatering valve malfunctioned.
2.Paper is not in position
3. There is too much sediment.
1. Lubricate
2. Check the air compressor
pressure.
1. Make sure air pressure over 4Kg/
cm2.
2. Lubricant the valve.
3. Check the solenoid.
1. Check the belt.
2.Re-install the paper or change it
3. Re-adjust the feeding pressure.
*Clean the machine with clean liquid to avoid blockage for stop running.
17
Page 19

Maintenance
Clean the chamber gasket periodically.
1.
Clean the chamber strainer periodically.
2.
Make sure the limit switches for moving plate working correctly.
3.
Make sure the paper photoelectric switch light is on or the machine
4.
won’t start.
Lubricating the machine periodically.
5.
Lubricating the paper collecting parts once a week.
6.
Set a Tee to connect to clean liquid and run the machine with it after
7.
running.
Set a check valve before the AODD pump if the slurry tank is higher
8.
than the machine to stop the siphon.
Replace R-68 lube every 3000 hours.
9.
10.
11.
12.
13.
Add grease to grease pot every 6 months or apply to moving parts
for harsh condition.
Keep the hydraulic oil at appropriate level and replace every 2
years. Clean the hydraulic pump and strainer also.
Put on protection glasses and gloves while opening the chamber
for maintenance.
Never leave anything in the chamber while running.
18
Page 20
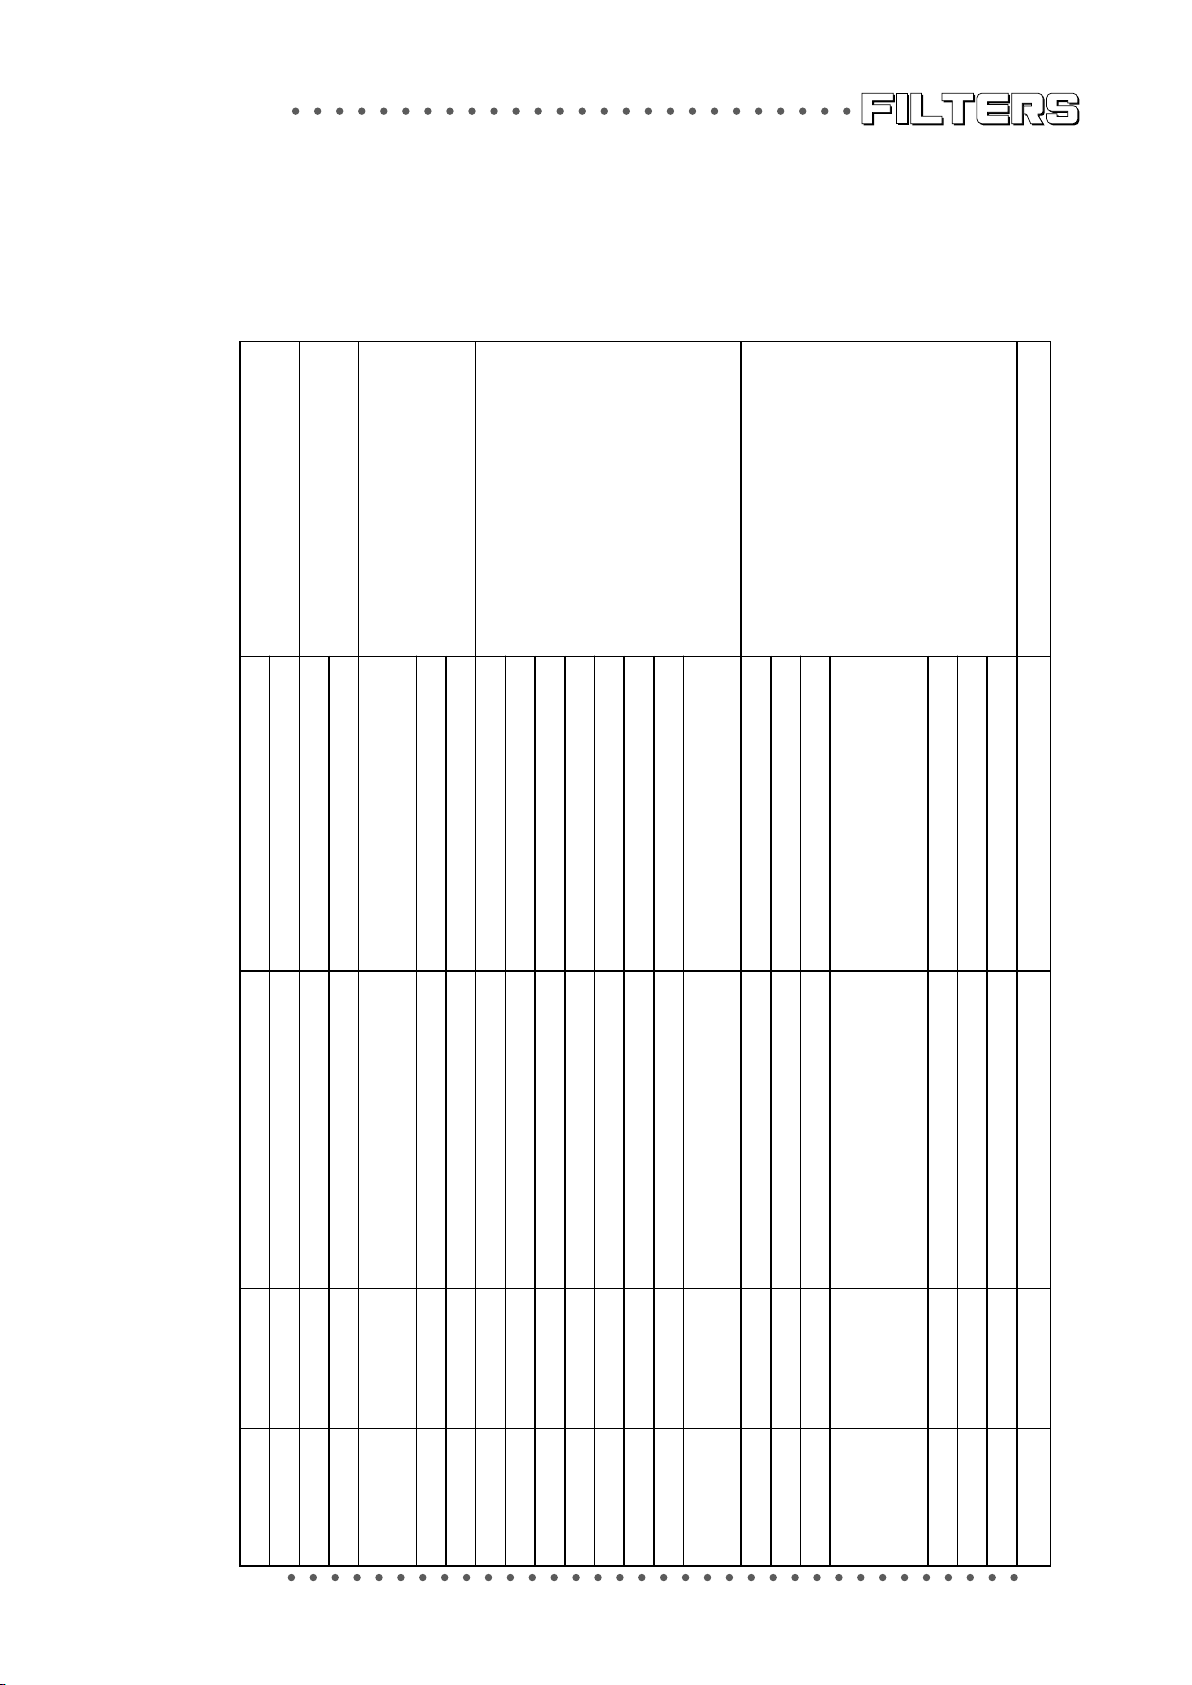
Apendix
Inspection List
5. Others
1. Air compressor. 2HP
2. Chiller 5HP
4. Accessory
manual)
1. Paper roll 1 pc. Installed.
2. AODD pump 1 pc. Installed.
3. Function
7. Label. Correct.
8. Wiring. Same as the document.
1. Dewatering condition. Normal
2. Cake containing water %. Normal
3. Operating instruction (as per
On site.
2. Controller
4. Limit switch control. Signal correct.
5. Timing control. Signal correct.
6. Lighting control. Correct.
3. Pressure control. Signal correct.
5. Paper collecting. Smooth.
6. Sealing. All leak-free at 3.5kg/cm
7. Procedure running. Correct and smooth.
1. PLC Automatic running. PLC automatic running well
2. Manual /Automatic. Switching Smoothly.
(pressure, timing).
1. Machine
1. Frame. Coating and painting well.
2. Lower platen movement. Smooth.
3. Cylinder movement. Smooth.
4. AODD pump running. AODD pump running well and goes
up to 3.5kg/cm2 at most.
(Air pressure: 6kg/cm
Item Contents Testing Datum Result Remark
2
)
2
.
19
Page 21
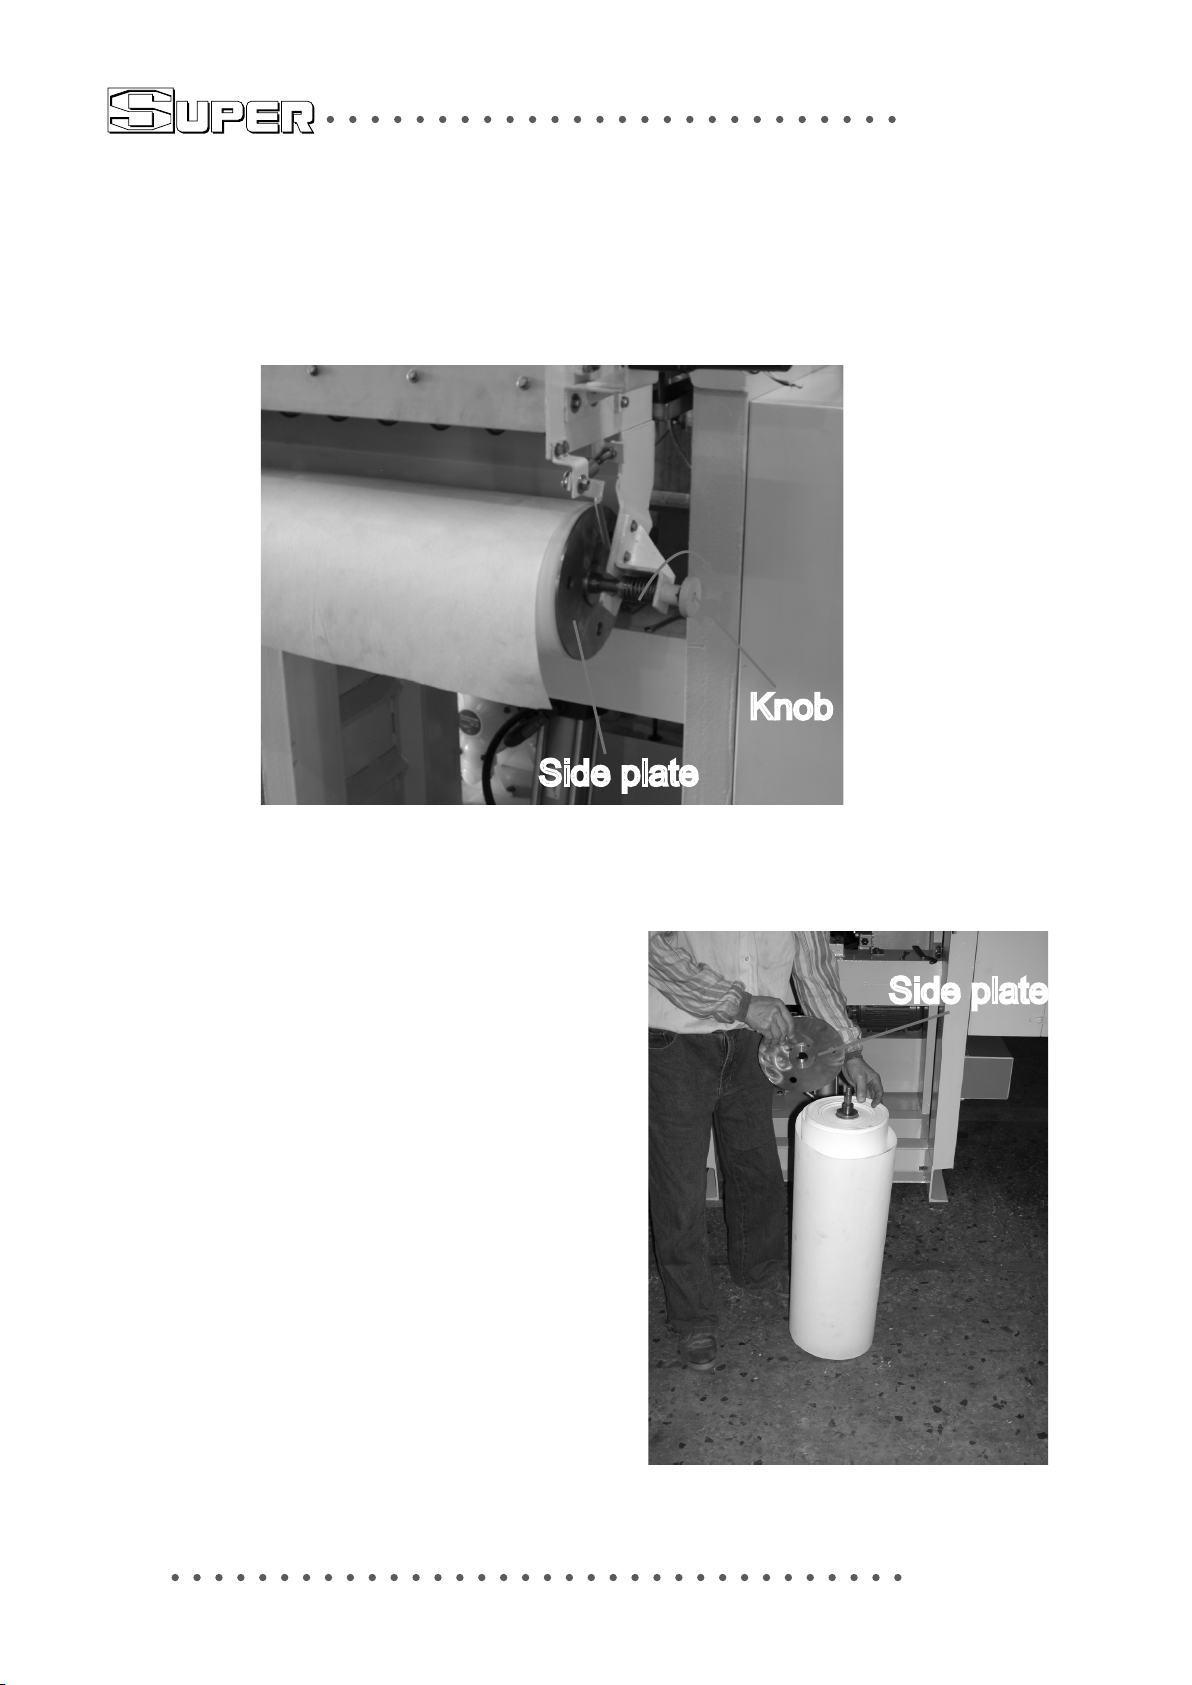
How to replace the paper roll.
Knob
Side plate
1.Pull the knob out and rotate clockwise 90 degree
to unlock it, then take the paper unit out.
2.Put the paper unit down
to the ground.
3.Rotate the side plate
counter-clockwise to
loose it, and replace
the new paper roll.
Side plate
20
Page 22
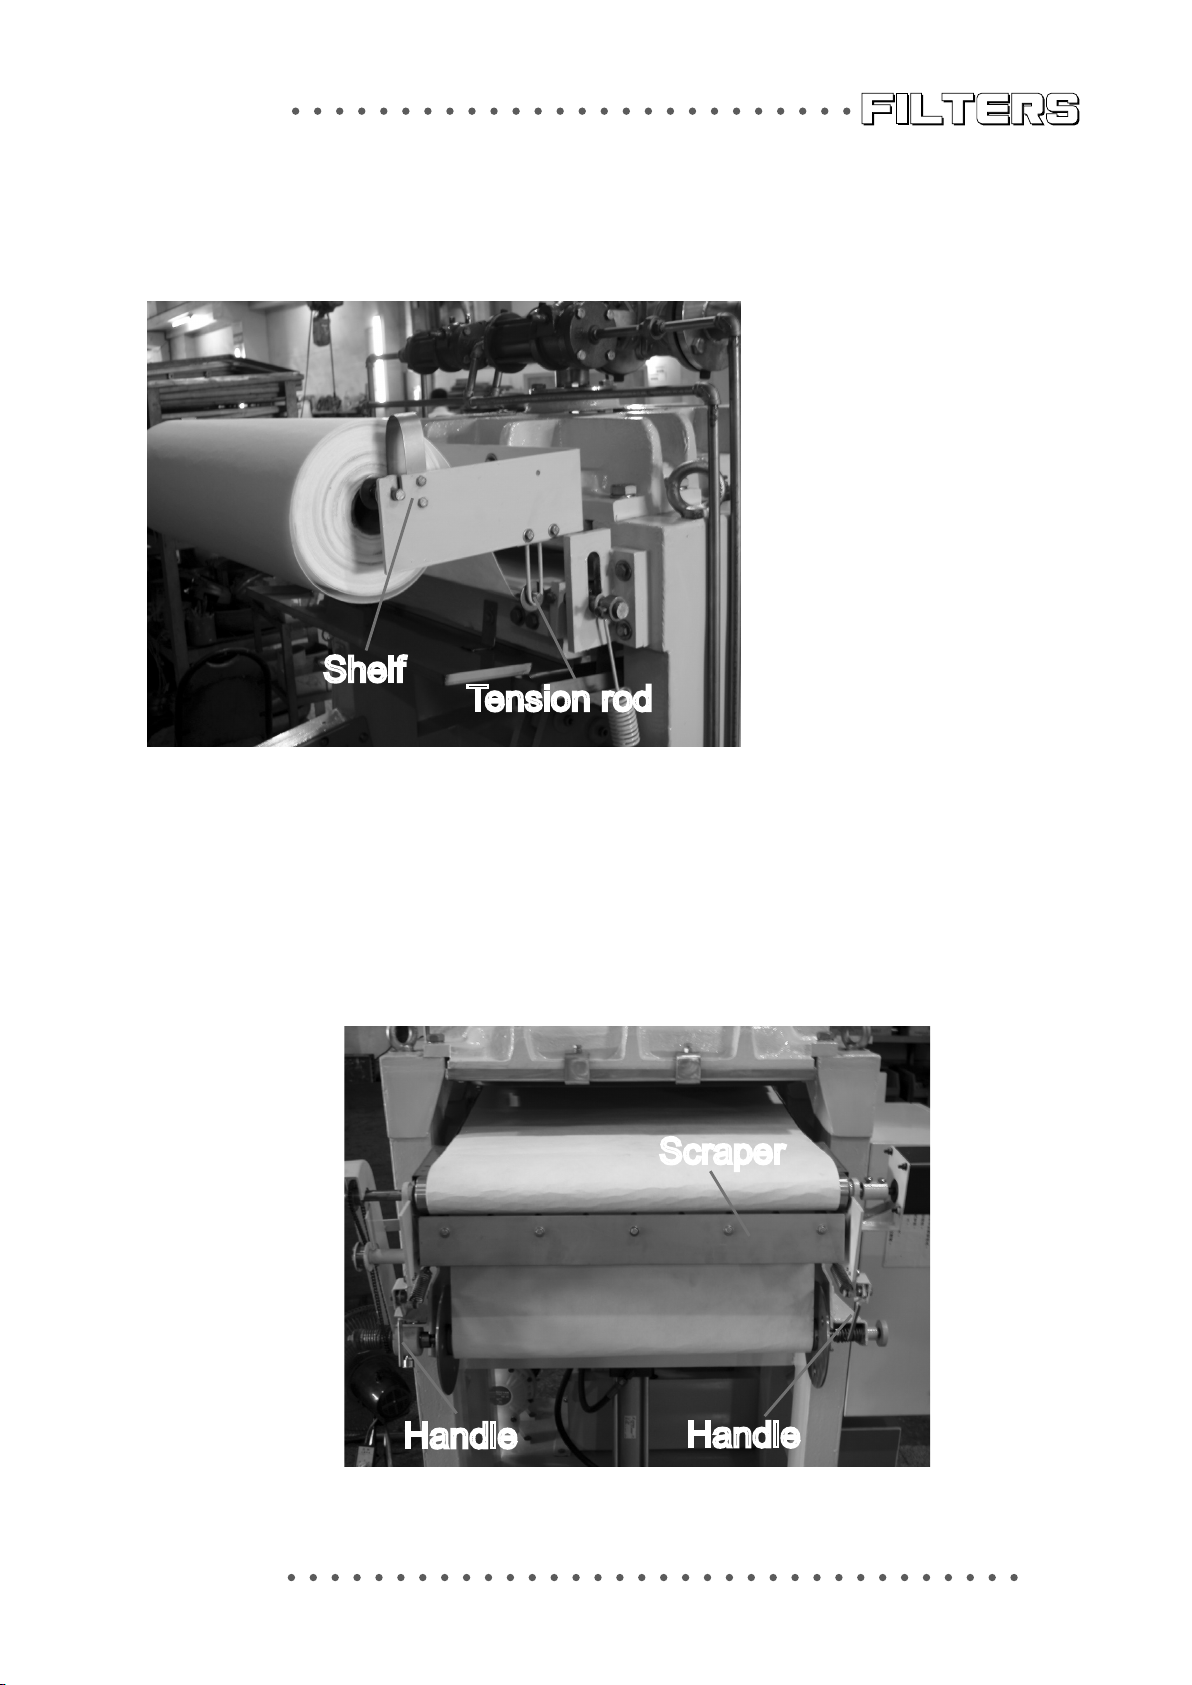
Shelf
Tension rod
4.Mount the new paper unit onto the shelf.
5.Guide the end of paper down through the tension rod, and
then going through the chamber.
6.Push both handles down to loose the scraper, then guide
the paper going through the scraper gap.
Scraper
Handle
Handle
21
Page 23
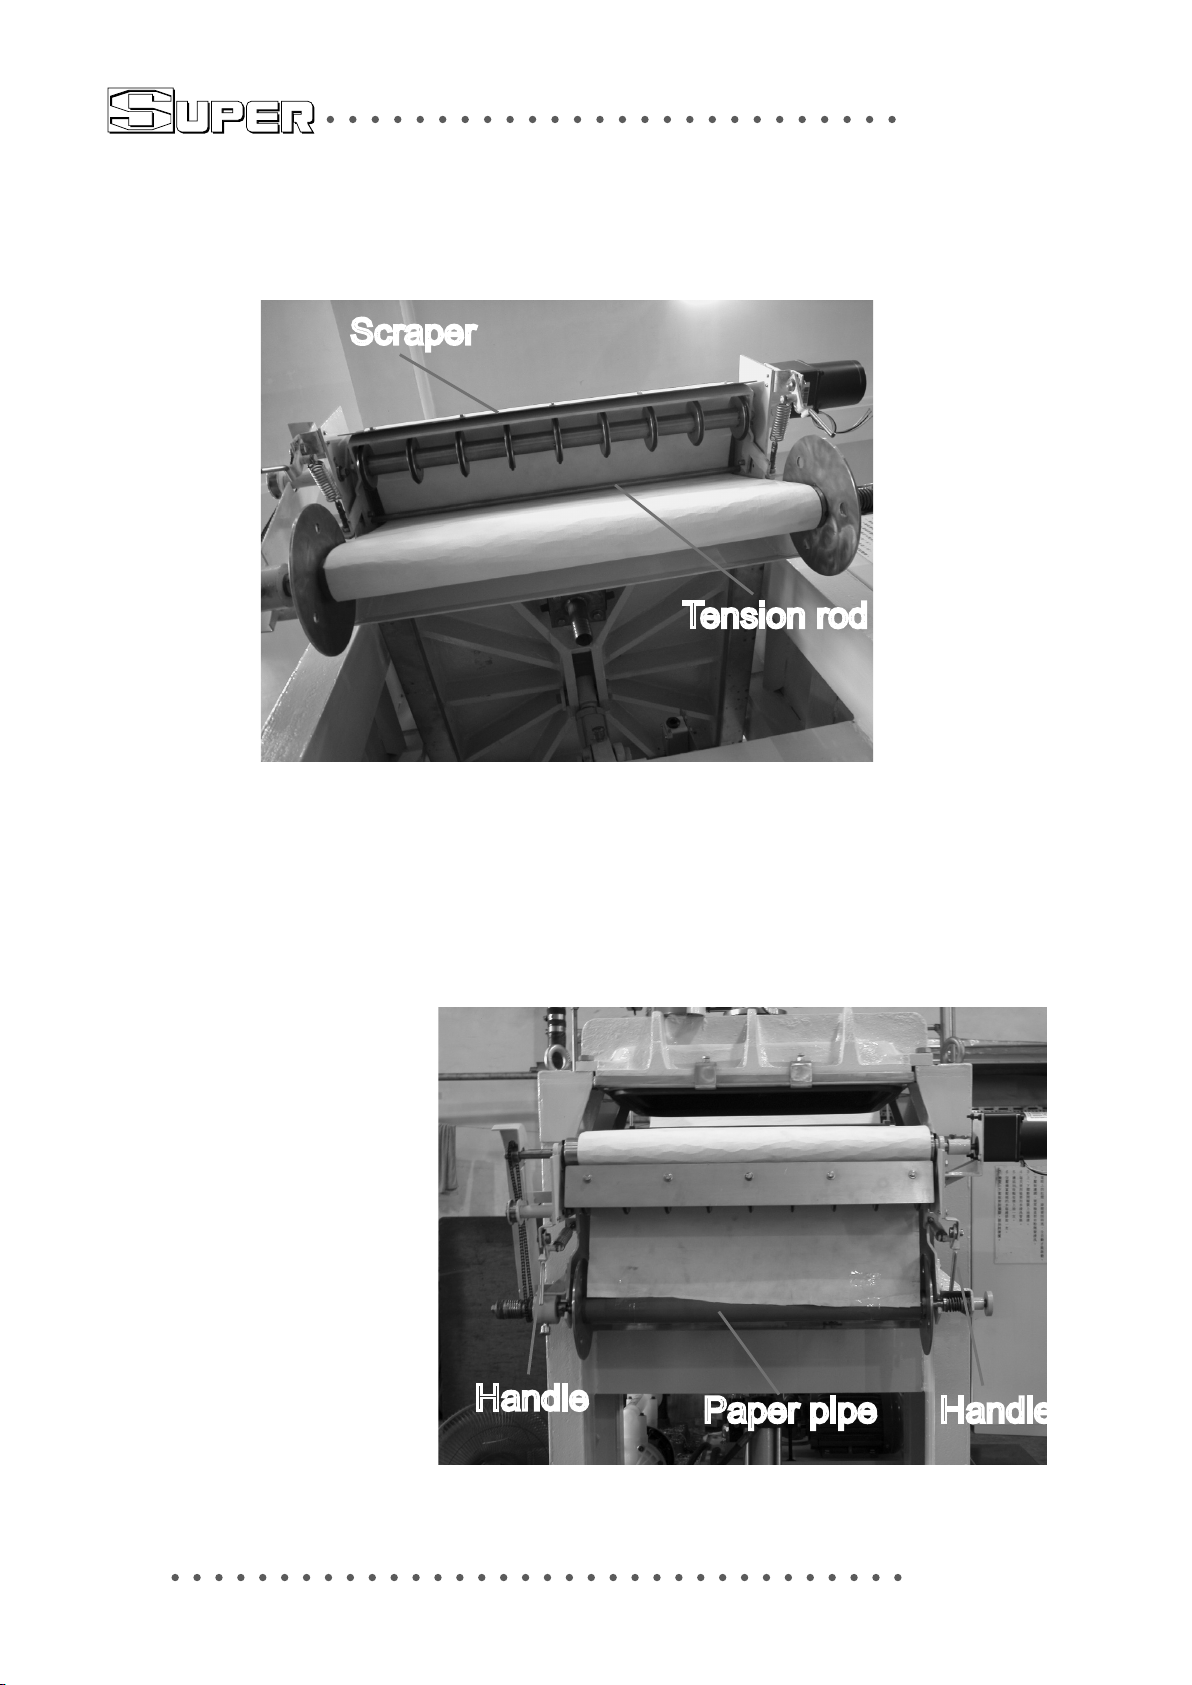
Scraper
Tension rod
7.Guide the paper up through another tension
rod, and then down to the paper pipe.
8.Adhesive the paper to the paper pipe with tape,
pull both handle up to reset the scraper. Done.
Handle
Paper pipe
Handle
22
Page 24
While placing your order...
Please kindly provide us the following information.
1. Chemical: Name/Concentration/Temperature/
Specific gravity/Viscosity.
2. Capacity needed:__________L/min
3. Head needed:__________M
4. Power: Voltage/Frequency
訂購時請提供下列資料:
1.藥液條件: 名稱/溫度/濃度/比重/黏度
2.需求流量:
3.需求揚程:
____________
________
L/min
M
4.馬達: 電壓/頻率
SUPER GIANT ENTERPRISE CO., LTD.
No.7, Lane 404, Chung Cheng South Road, Yen
Hang, Yung Kang, Tainan, Taiwan,
Tel:886-6-2534546, 2541601
Fax:886-6-2534226, 2420509
E-mail:[email protected]
Website: www.superpump.tw
www.chemicalfilter.com.cn
上海區
江蘇省太倉市沙溪鎮岳王區
鎮北路16號 215400
塑寶環保機械
Tel:0512-53303388,53303398
Fax:0512-53303588
E-mail:[email protected]
Website: www.superpump.cn
廣東區
廣東省增城市新塘鎮坭紫村
廟坑路西五巷10號
升展機械
Tel:020-82691835,82602341~3
Fax:020-82708706
E-mail:[email protected]
Website: www.chemicalpump.cn
總公司
昇展實業股份有限公司
台灣省台南市永康區中正南路404巷7號
Tel:886-6-2534546, 2541601
Fax:886-6-2534226, 2420509
Jul. 2018
 Loading...