

Page 1
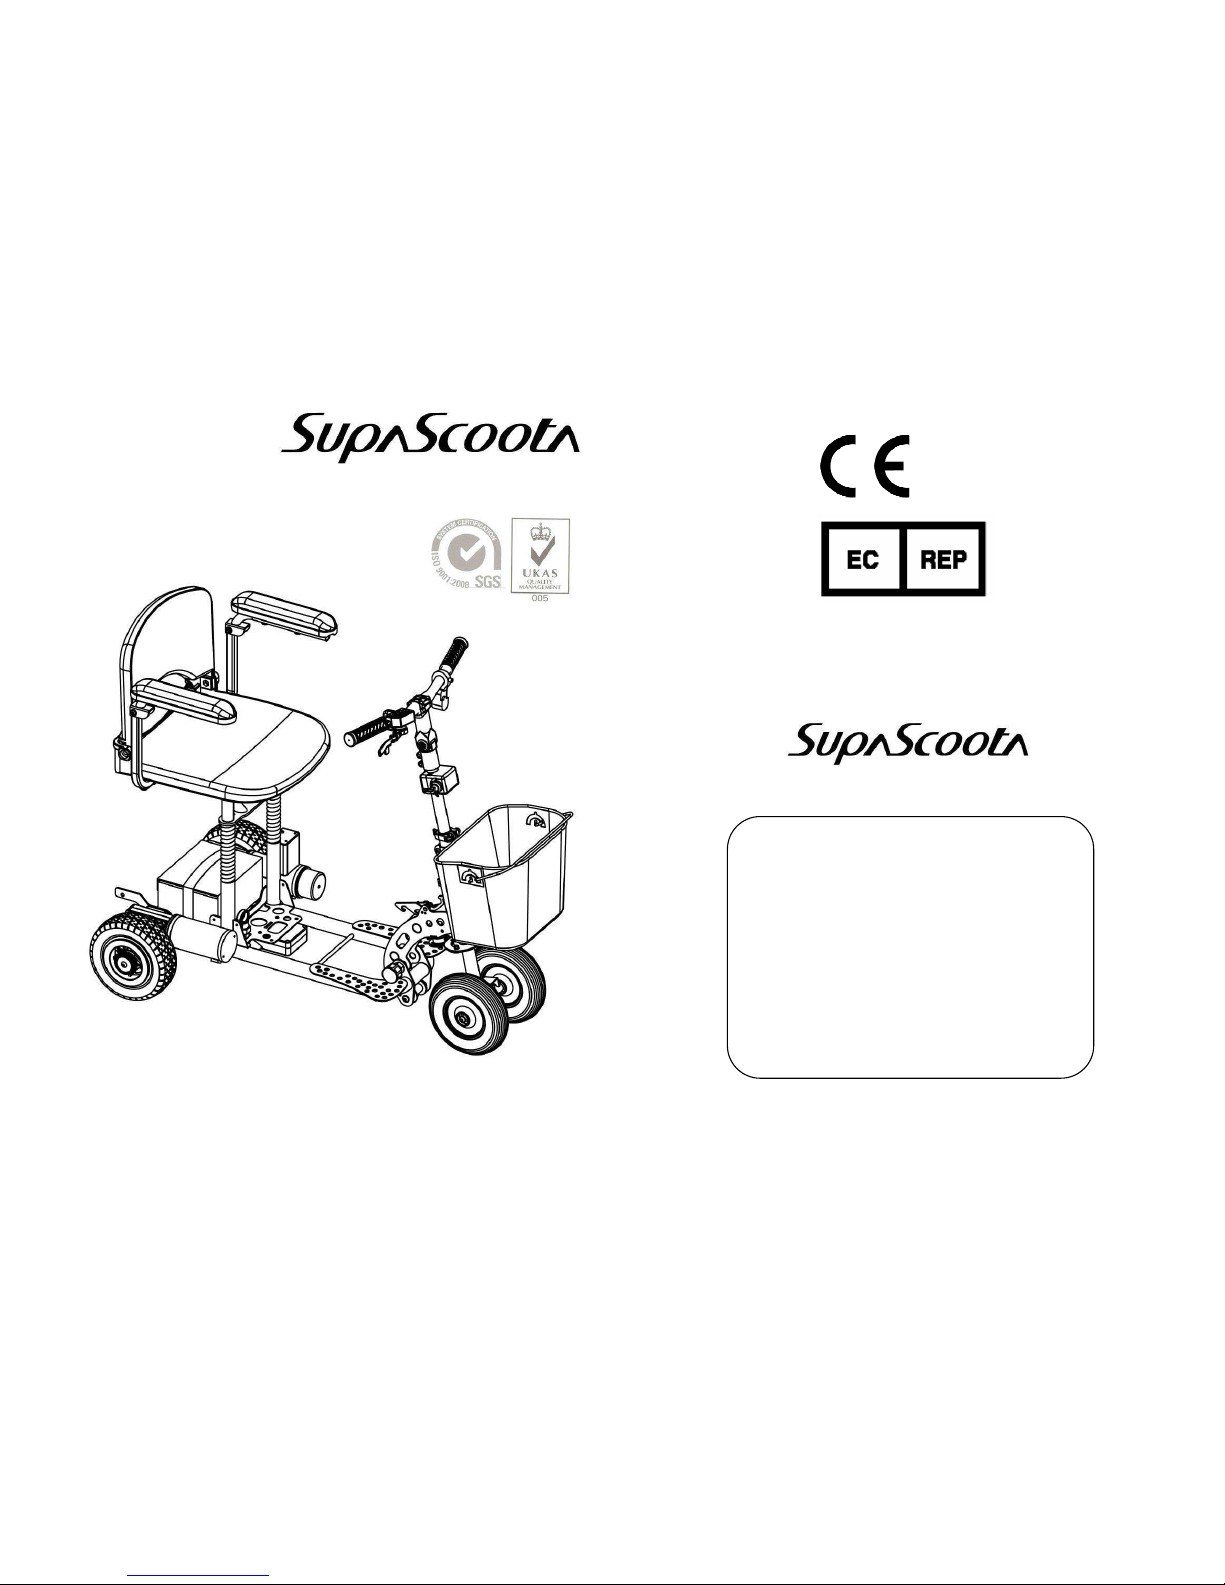
Motorized vehicle
Heavy Duty (HD-02)
User Manual
You must read this manual before using your SupaScoota
MDSS GmbH
Schiffgraben 41
30175 Hannover, Germany
Distributor:
P/N: 903441HD02 Rev. 04/15
Page 2

Table of contents
SAVE THIS MANUAL FOR FUTURE REFERENCE.
- 1 -
INTENDED USE
Intended use of device
As a motorized portable electric vehicle for indoor or outside use by
persons with medical conditions requiring assistance.
Device description
A battery operated lightweight portable mobility device designed for
personal travel indoors and limited outdoor use and available in 3 or 4
wheel configurations.
It is used in a sitting position and operated by a hand controlled
throttle located on the handle bars. Braking is automatically controlled
when releasing the throttle by the electronic controller and magnetic
motor brake.
The product is supplied ready to use with a battery and charger and it
can be disassembled and folded for transport.
Technological characteristics
Unique one piece folding frame available in several models to suit
different users and applications. The compact design and minimal
component weight are of significant benefit to the elderly who are
independent and have a need to transport the scooter in their motor
vehicle. The electronically controlled speed reduction system which
operates when turning is a valuable safety features for elderly users.
- 2 -
Contents Pages
Intended use- - - - - - - - - - - - -- - - - - - - - - - - - - - - - - - - - - -2
Safety Symbols, Words and Labels- - - - - - - - - - - - - - - - - - - - - -3
Safety Instructions - - - - - - - - - - - - - - - - - - - - - - - - - - -4
Electromagnetic Interference - - - - - - - - - - - - - - - - - - - - - - - - -8
Assembling the Seat - - - - - -- - - - - - - - - - - - - - - - - - - - - - 11
To Open the SupaScoota - - - - - - - - - - - - - - - - - - - - - - - - -12
Anti-Tip Wheel- - - - - - - - - - - - - - - - - - - - - - - - - - - - - - - - - - -18
Drive Wheel Release Mechanism- - - - - - - - - - - - - - - - - - - - - - - 19
Lights and Switches - - - - - - - - - - - - - - - - - - - - - - - - - - - - - - - -20
Auto Switch Off Electronic System- - - - - - - - - - - - - - - - - - - - - -21
Electronic Stability Control (ESC) - - - - - - - - - - - - - - - - - - - - - -22
Swivel Seat (Optional) - - - - - - - - - - - - - - - - - - - - - -23
Spare Battery Tray (Optional) - - - - - - - - - - - - - - - - - - - - - -24
Front Wheel Removal (Optional) - - - - - - - - - - - - - - - - - - - - - -25
Precaution - - - - - - - - - - - - - - - - - - - - - - - - - - - - - - - - - - - - - 26
Folding the SupaScoota - - - - - - - - - - - - - - - - - - - - - - - - - -- -27
Battery and Charging- - - - - - - - - - - - - - - - - - - - - - - - - - - - - - 32
Battery Charger (SLA battery) - - - - - - - - - - - - - - - - - - - - - - - - - 34
Battery Care & Maintenance - - - - - - - - - - - - - - - - - - - - - - - - - 35
Specifications - - - - - - - - - - - - - - - - - - - - - - - - - - - - - - - - - - - - 36
Manufacturer: EUROGREEN INTERNATIONAL INC.
No.48, Ln. 220, Sec.1, Fuzun Rd, Yuanlin
Township, Changhua County, 51055, TAIWAN
Page 3
SAFETY SYMBOLS, WORDS AND LABELS
What You Need to Know About Safety Instructions
Warning and Important Safety Instructions appearing in this manual
are not meant to cover all possible conditions and situations that may
occur. Common sense, caution and care must be exercised when
operating or cleaning your SupaScoota.
Always contact your dealer, distributor, service agent or manufacturer
about problems or conditions you do not understand.
WARNING indicates a potentially hazardous
situation which, if not avoided, could result in
death or serious injury.
CAUTION indicates a potentially hazardous
situation which, if not avoided, may result in
minor or moderate injury.
Radio wave sources may affect motorized vehicle.
- 3 -
SAFETY INSTRUCTIONS
● Please read this manual before using your SupaScoota.
● Check the frame lock and all clamps before using your SupaScoota.
● Do not turn your Scooter “On” before you are seated ready to go.
● Practice riding in an open area free of vehicles, pedestrians and
obstacles before using your SupaScoota near other people. It is also
recommended that you have someone accompany you during
practice.
● The SupaScoota was designed for hard and flat surfaces. It should
not be used on steep slopes or loose surfaces
● Reduce speed when turning.
● Driving in wet conditions is not recommended.
● For your safety, it is recommended that you wear a helmet.
● Do not operate the Forward/Reverse switch when moving. This could
damage your SupaScoota.
● Do not use the SupaScoota on slopes over 8 degrees.
● When the yellow battery light comes on, you should recharge your
battery as soon as possible. If the red battery light comes on or is
flashing, you should stop immediately and recharge.
● Always switch the power “Off” before leaving your scooter or while it
is unattended. You can also disconnect the battery plug before
leaving your scooter.
● Do not put your fingers on the Speed Lever before you turn the key
switch “On”. This could cause the SupaScoota to move without
warning.
● Your key switch must be in the “Off” position before connecting the
battery lead.
- 4 -
Page 4

A. ENVIRONMENTAL CONDITIONS WARNING: The scooter is not
designed for use in a heavy rain storm, or in snowy or icy conditions.
i. Contact with water or excessive moisture can cause an electrical
malfunction. The frame, motors and other scooter parts are not
water-tight and may rust or corrode from the inside.
To avoid a scooter failure:
● Minimize exposure of your scooter to a rain storm or very wet
conditions.
● Never take your scooter into a shower, tub, pool or sauna.
● Do not use your scooter in fresh or salt water (such as at the
edge of a stream, lake or ocean).
● Make sure all electrical connections are secure.
ii. Proceed slowly and use extra care if you must operate your
scooter on a wet or slick surface.
● Do so only if you are sure it is safe.
● Stop if one or both main wheels lose traction. If this occurs, you
may lose control of your scooter or fall.
● Never operate your scooter on a slope or ramp if there is snow,
ice, water or oil film present.
iii. When not in use, keep your scooter in a clean, dry place.
B. TERRAIN
i. This scooter is designed for use on firm, even surfaces such as
concrete, asphalt and indoor flooring.
ii. Do not operate your scooter in sand, loose soil or over rough
terrain. Doing so may damage wheels, bearings, axles or motors,
or loosen fasteners.
C. STREET USE WARNING: In most states, scooters are not legal for
use on public roads. Be alert to the danger of motor vehicles on
roads or in parking lots.
i. At night, or when it is hard to see, use reflective tape on your
scooter and clothing.
ii. It may be hard for drivers to see you. Make eye contact with
drivers before you proceed. When in doubt, yield until you are sure
it is safe.
- 5 -
D. MOTOR VEHICLE SAFETY
i. Never sit in this scooter while in a moving vehicle. In an accident or
sudden stop you may be thrown from the scooter.
ii. Always move to an approved vehicle seat. You must be secured
with proper motor vehicle restraints.
iii. Never transport this scooter in the front seat of a vehicle. It may
shift and interfere with the driver.
iv. Always secure this scooter so that it cannot roll or shift.
E. TRANSFERS WARNING: It is dangerous to transfer on your own.
It requires good balance and agility. Be aware that there is a point
during every transfer when the seat is not below you.
To avoid a fall:
i. Always turn off power before you transfer to or from your scooter.
If you fail to do so you may touch the throttle control lever and
cause your scooter to move when you do not expect it.
ii. Make sure scooter is turned “Off”. This keeps the scooter from
moving when you transfer.
iii. Move your scooter as close as you can to the seat you are
transferring to.
iv. Transfer as far back onto the seat surface as you can. This will
reduce the risk that you will miss the seat or fall.
F. REACHING OR LEANING WARNING: Reaching or leaning affects
the center of balance of your scooter. If done improperly, a fall or
tip-over is likely. When in doubt, ask for help or use a scooter to
extend your reach.
To reduce the risk of injury and/or damage to the scooter:
i. Never reach or lean if you must shift your weight sideways or rise
up off the seat.
ii. Never reach or lean if you must move forward in your seat to do
so. Always keep your buttocks in contact with the backrest.
iii. Never try to pick up an object from the floor by reaching down
between your knees.
iv. Never reach or lean over the top of the seat back. This may
damage the backrest and cause you to fall.
If you must reach or lean; do so at your own risk.
Remember to:
- 6 -
Page 5

i. Move your scooter as close as you can to the object you wish to
reach.
ii. Turn off all power to your scooter. If you fail to do so, you may
touch the throttle control lever and cause your scooter to move
when you do not expect it.
G. DRIVING IN REVERSE WARNING: Use extra care when you drive
your scooter in reverse. You may lose control or fall if one of the rear
wheels hits an object.
i. Operate your scooter slowly and at an even speed.
ii. Stop often and check to make sure your path is clear of
obstacles.
H. WEIGHT LIMIT
i. Never exceed the weight limit of the scooter.
ii. The scooter is not designed for weight training and is unsafe for
use as a seat while weight training. Weight training from the
scooter substantially changes the stability of the scooter and may
cause tipping.
iii. Exceeding the weight limit is likely to damage the seat, frame or
fasteners and may cause severe injury to you or others from
scooter failure.
I. STAIRWAYS AND ESCALATORS WARNING:
The scooter is not designed to travel up or down stairs or
escalators. Always use an elevator. DO NOT use an escalator to
move the scooter between floors. Serious bodily injury may occur.
DO NOT attempt to move an occupied scooter between floors
using a stairway.
- 7 -
ELECTROMAGNETIC INTERFERENCE
It is very important that you read this
informa tion regardi ng the possible effects of
Electromagnetic Interference on your Supascoota.
This motorized scooter has an immunity of 20 V/m which should protect it
from Electromagnetic Interference (EMI) from Radio Wave Sources. These
EM waves are invisible and their strength increases as one approaches the
source. All electrical conductors act as antennas to the EM signals and to
varying degrees, all power wheelchairs and scooters are susceptible to
electromagnetic interference (EMI). This interference could result in abnormal,
unintentional movement and/or erratic control of the vehicle.
Motorized scooters may be susceptible to electromagnetic interference (EMI),
which is interfering electromagnetic energy (EM) emitted from sources such a
radio stations, TV stations, amateur radio (HAM) transmitters, two-way radios,
and cellular phones. The interference (from radio wave sources) can cause
the motorized scooter to release its brakes, move by itself, or move in
unintended directions. It can also permanently damage the motorized
scooter control system. The intensity of the interfering EM energy can be
measured in volts per meter (V/m). Each motorized scooter can resist EMI
up to certain intensity. This is called its “immunity level.” The higher the
immunity level, the greater the protection. At this time, current technology is
capable of achieving at least a 20 V/m immunity level, which would provide
useful protection from the more common sources of radiated EMI.
Because EM energy rapidly becomes more intense as one moves closer to
the transmitting antenna (source), the EM fields from hand-held radio wave
sources (transceivers) are of special concern. It is possible to unintentionally
bring high levels of EM energy very close to the motorized scooter control
system while using these devices. Therefore, the warnings listed below are
recommended to prevent possible interference with the control system of the
motorized scooter, which should reduce the chance of unintended brake
release or motorized scooter movement that could result in serious injury.
- 8 –
Page 6
Do not operate hand-held personal communication
devices such as citizens band (CB) radios, or turn ON personal
communication devices and cellular phones while the motorized
scooter is turned ON.
1) Be aware of nearby transmitters, such as radio or TV stations
and try to avoid coming close to them.
2) If unintended movement or brake release occurs, turn the
motorized scooter OFF as soon as it is safe.
3) Be aware that adding accessories or components, or modifying
the motorized scooter, may make it more susceptible to EMI;
and NOTE: There is no easy way to evaluate their effect on
the overall immunity of the motorized scooter.
4) Report all incidents of unintended movement or brake release
to the distributor listed on the back of this manual, and Note
whether there is a radio wave source of EMI nearby.
TURN “OFF” YOUR SCOOTER AS SOON AS POSSIBLE WHEN
EXPERIENCING THE FOLLOWING:
‧Unintended or uncontrollable movement.
‧Unexpected brake release
● Be aware that adding accessories or components, or modifying the
powered wheelchair, may make it more susceptible to interferences
from radio wave sources (Note: There is no easy way to evaluate
their effect on the overall immunity of the powered wheelchair)
● Report all incidents of unintended movement or brake release to
the powered of wheelchair manufacturer, and note whether there is a
radio wave source nearby
- 9 –
● Important Information
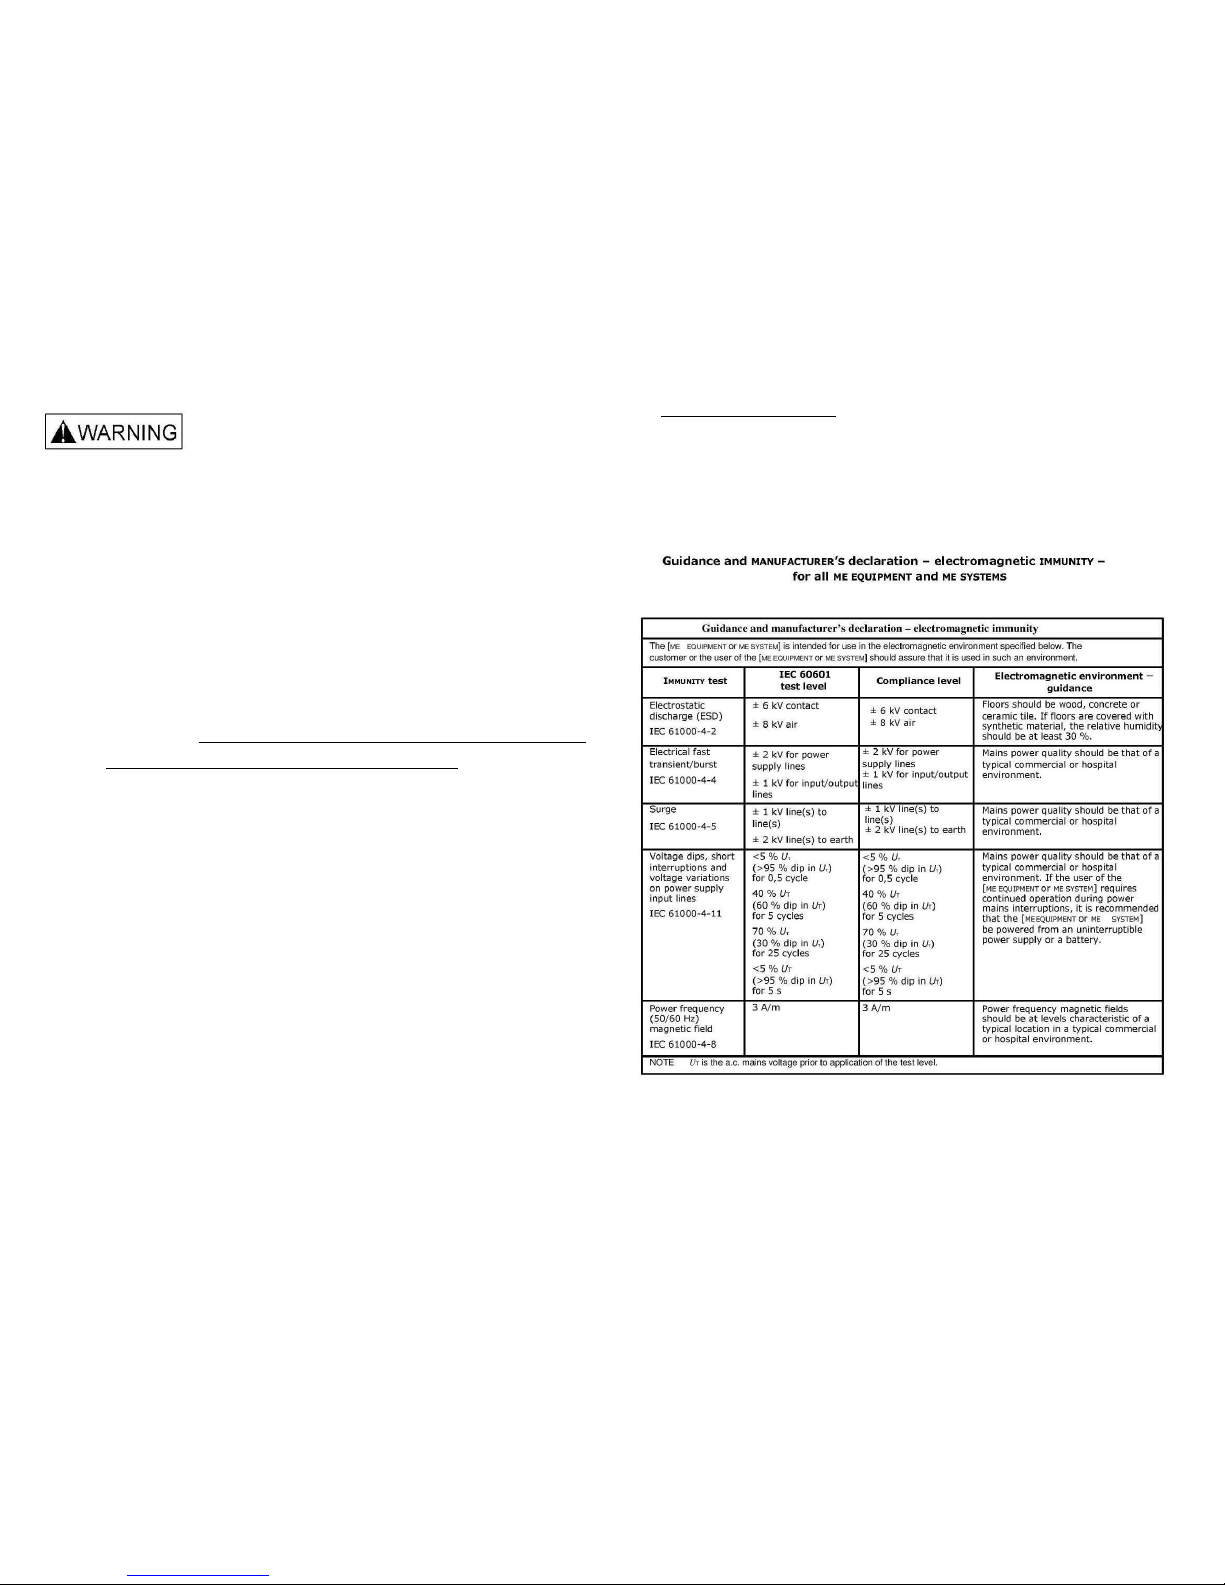
1) 20 Volts per meter (V/m) is a generally achievable and useful
immunity level against interference from radio wave sources (as of
May 1994) (the higher the level, the greater the protection);
2) This product has an immunity level of following:
- 10 –
Page 7
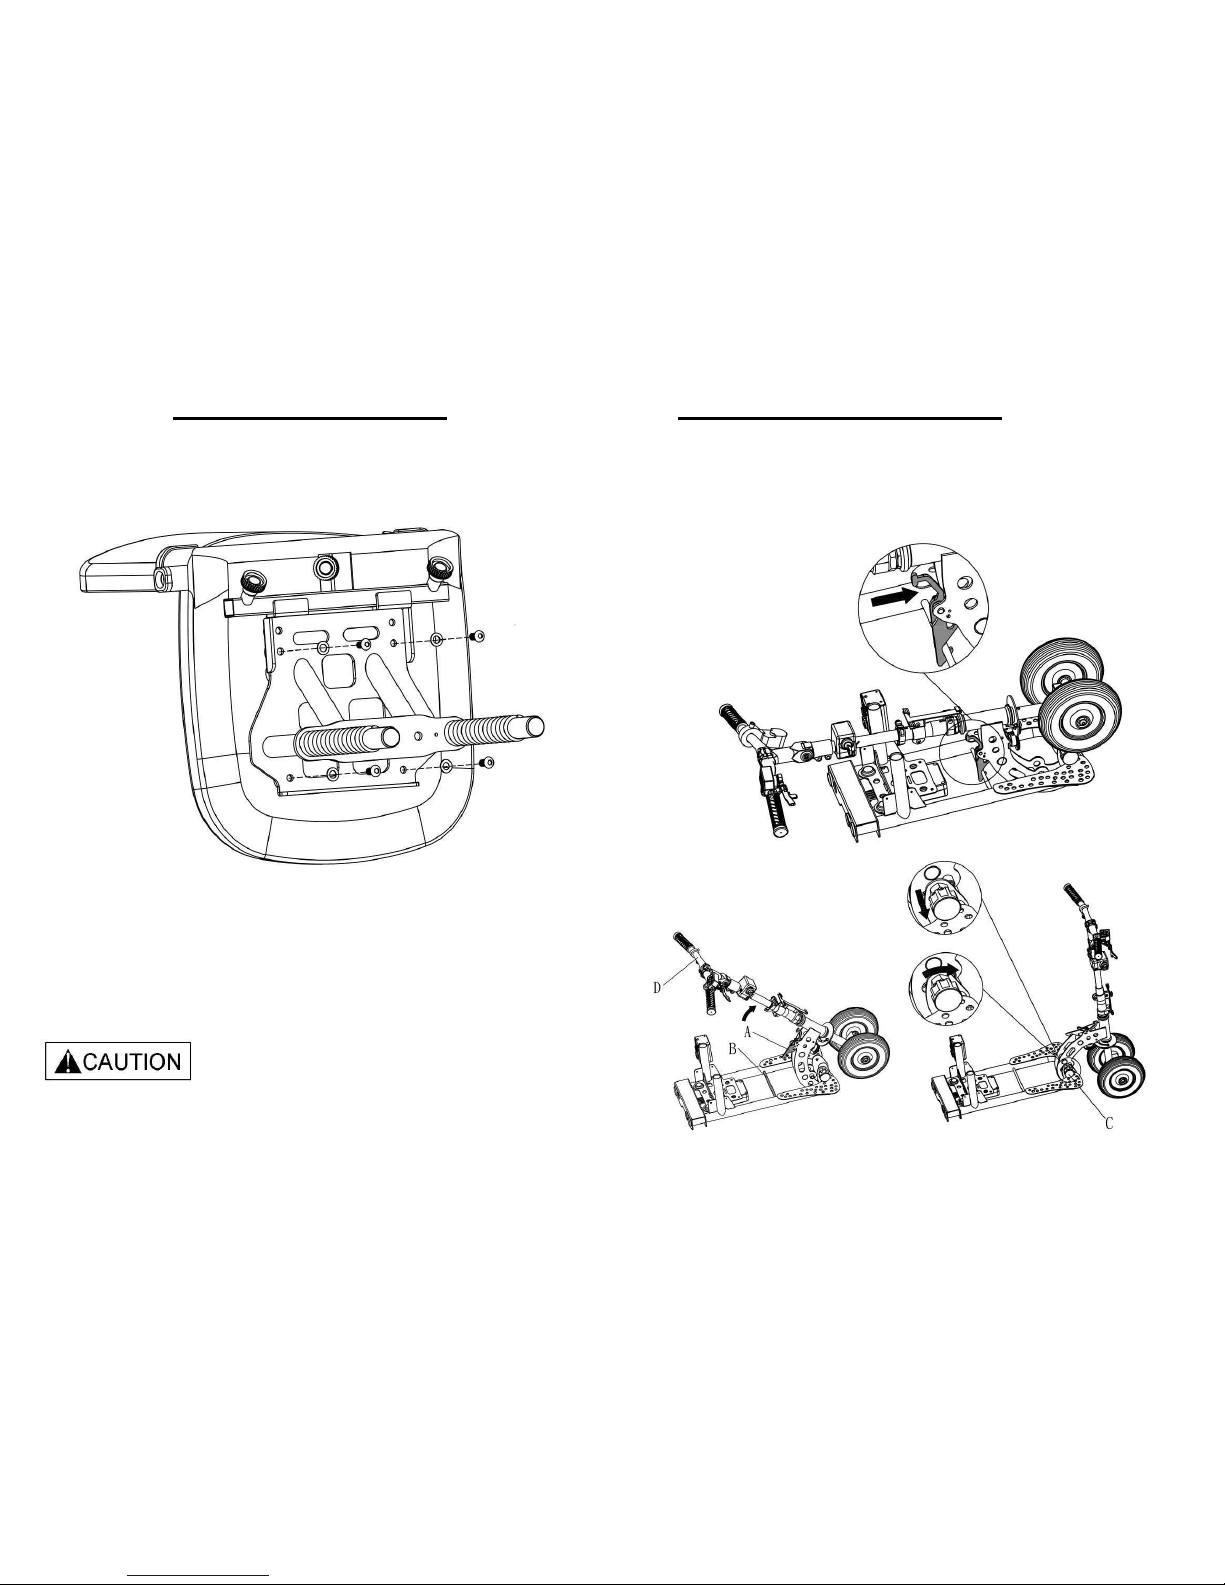
ASSEMBLING THE SEAT
Assemble the seat frame in the manner illustrated.
The armrests on your SupaScoota are not designed to be load bearing.
DO NOT PUT EXCESSIVE WEIGHT ON THE ARMRESTS
- 11 -
TO OPEN THE SUPASCOOTA
● Use one hand to hold the tiller handle (D) and use other hand to push
the lock pin lever as per the illustration and lift the handle. Pull the
tiller lock (C) and turn it clockwise. Continue lifting the tiller until you
hear the “click” of it locking into position.
- 12 -
Page 8
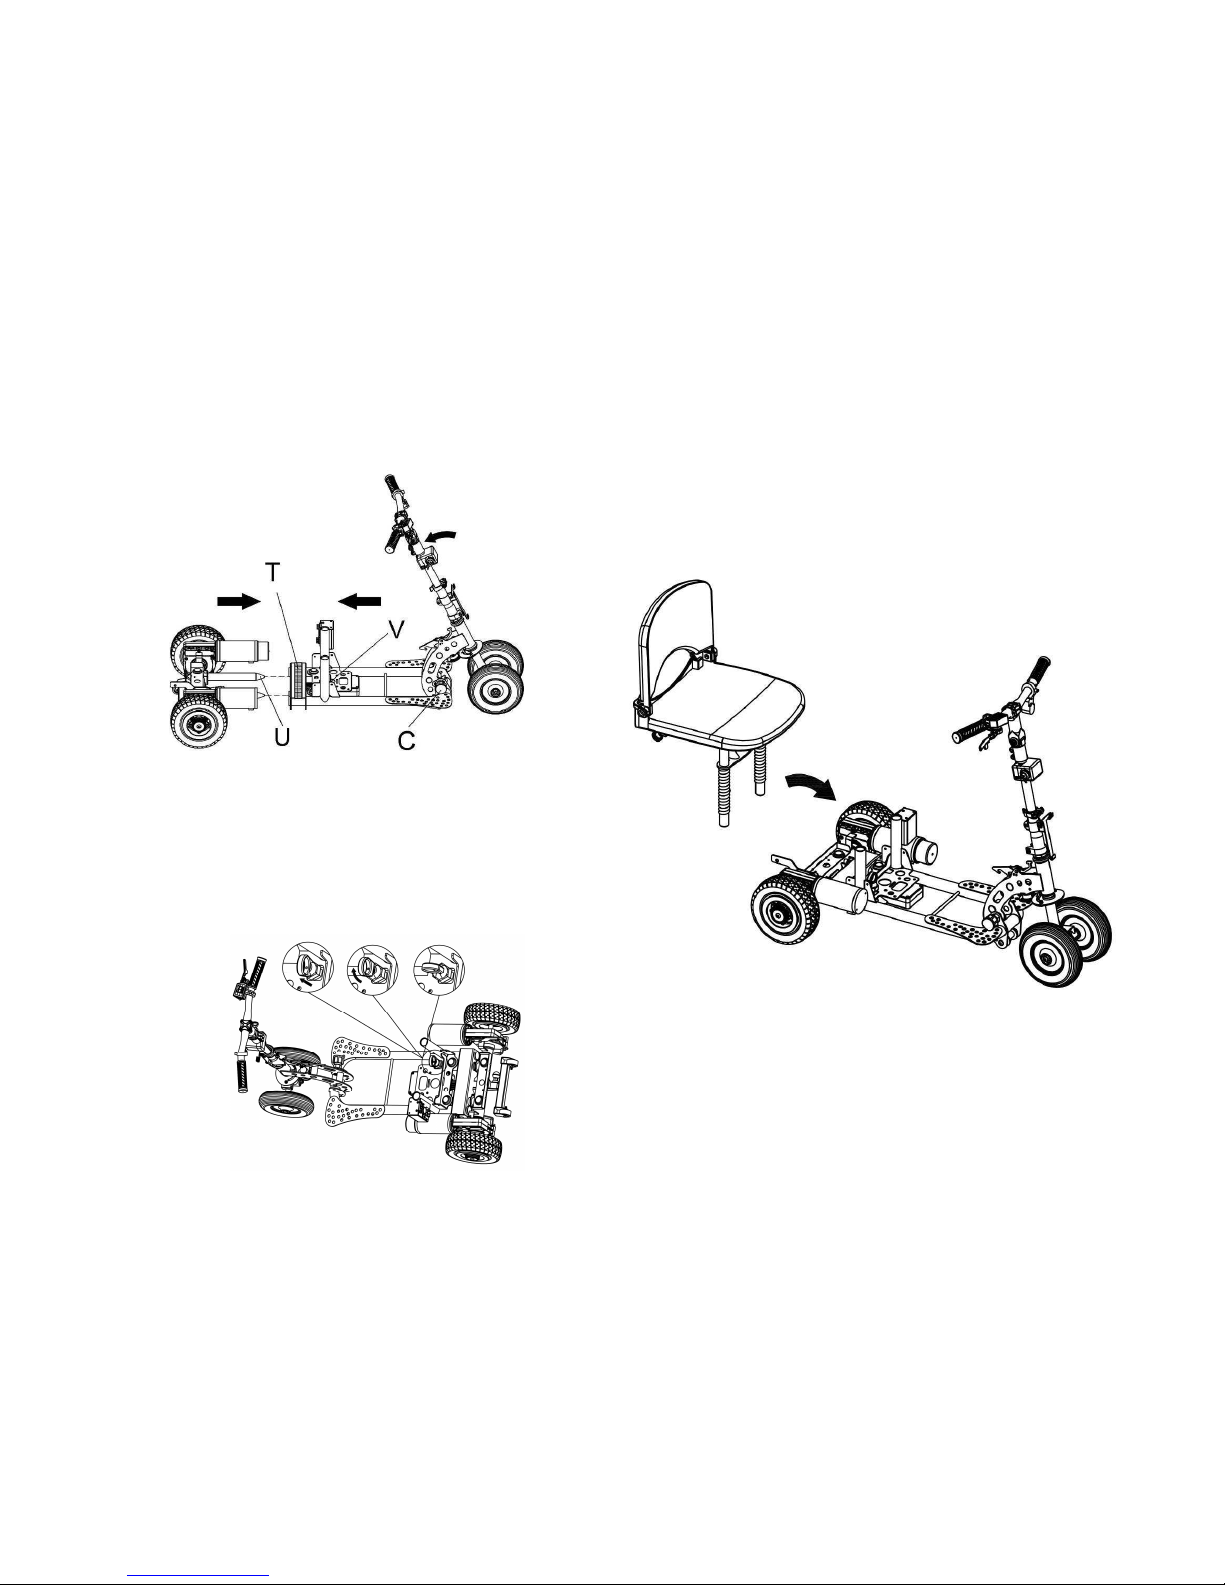
Frame Assembly
Assembly and disassembly is best carried out by pulling the locking
pin C and allowing the tiller assembly to fold forward until it
rests on the ground.
● Pull the lock pin knob (V) and turn it to the “lock” position.
● Hold both frame sections horizontal by using the strap (T) with one
hand and the rear section with the other hand and slide both together
by inserting the tubes (U) into the corresponding holes in the front
frame.
● The pin will click when inserted correctly. You must check that the
pin has locked into position.
● Reconnect plugs.
- 13 -
● Fit the seat on to the frame, inserting the seat frame tubes into the
corresponding holes on the main frame.
-14 -
Page 9
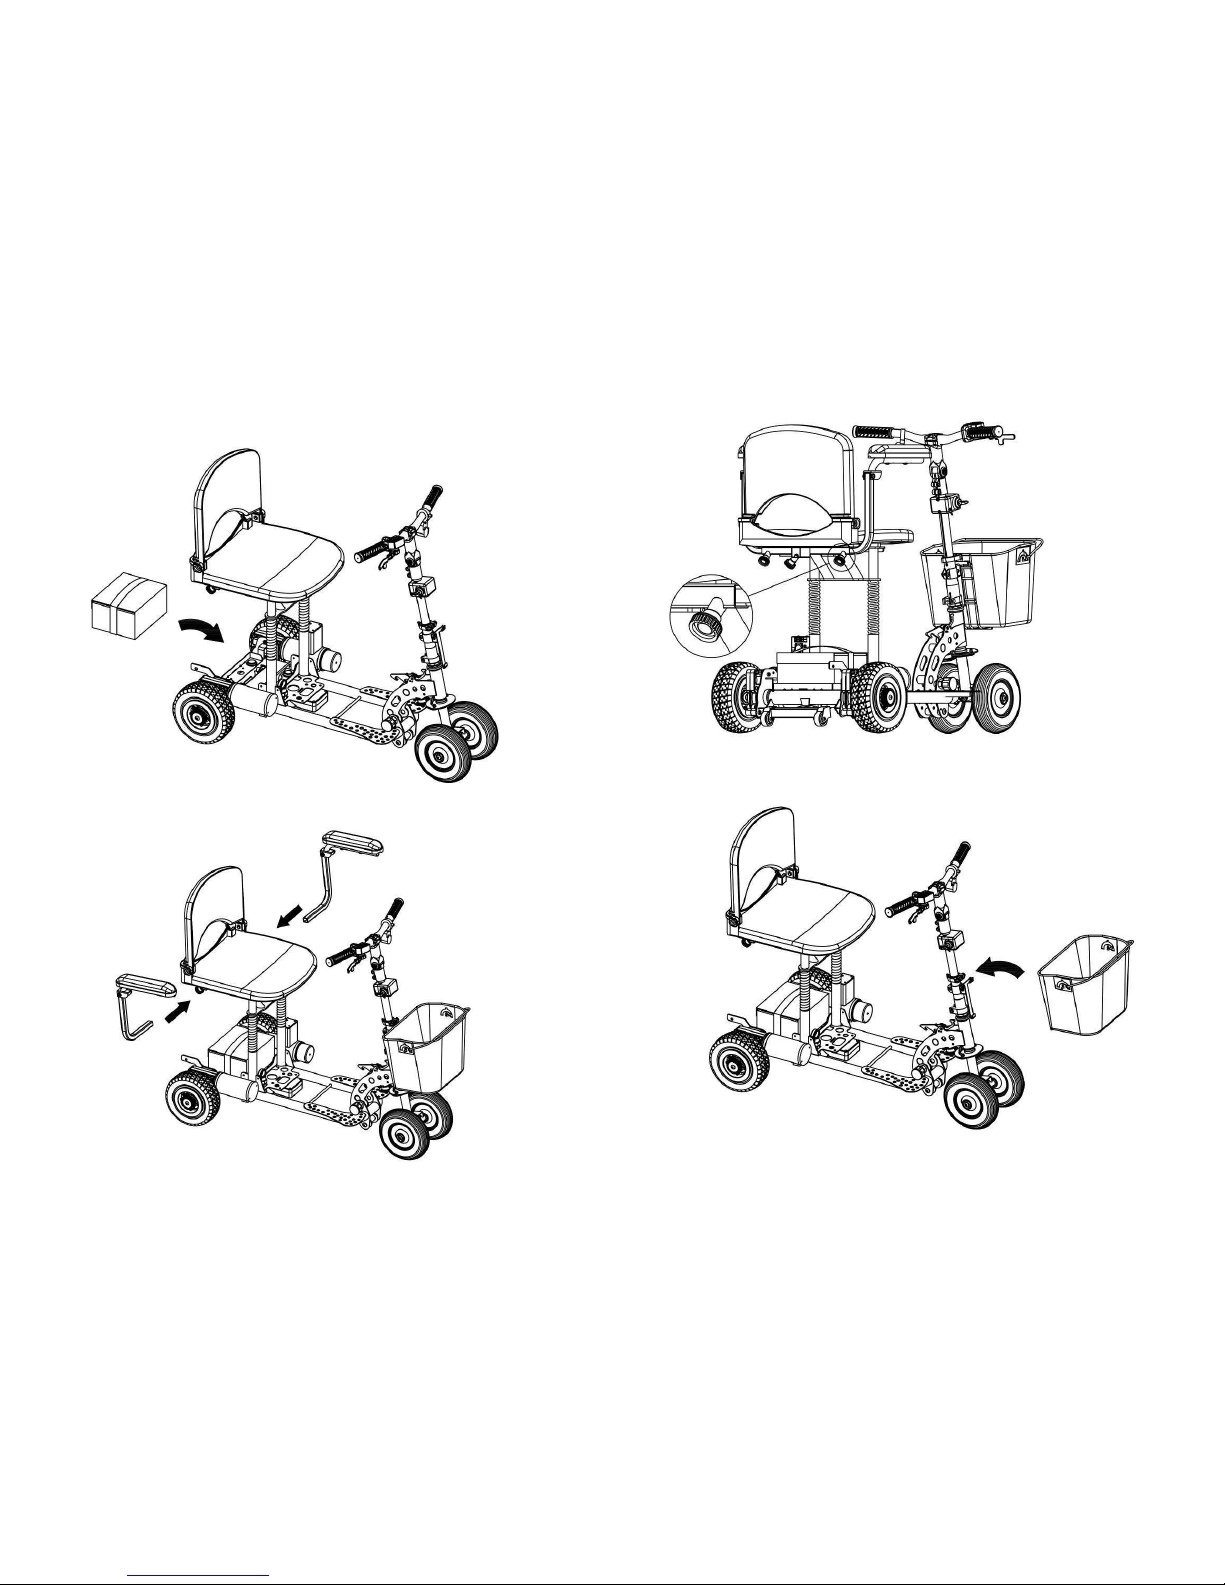
● Install the battery into the tray and fasten it securely.
● Insert arm rest as per the illustration.
- 15 –
● Tighten the screws
● Fit the front basket
- 16 –
Page 10
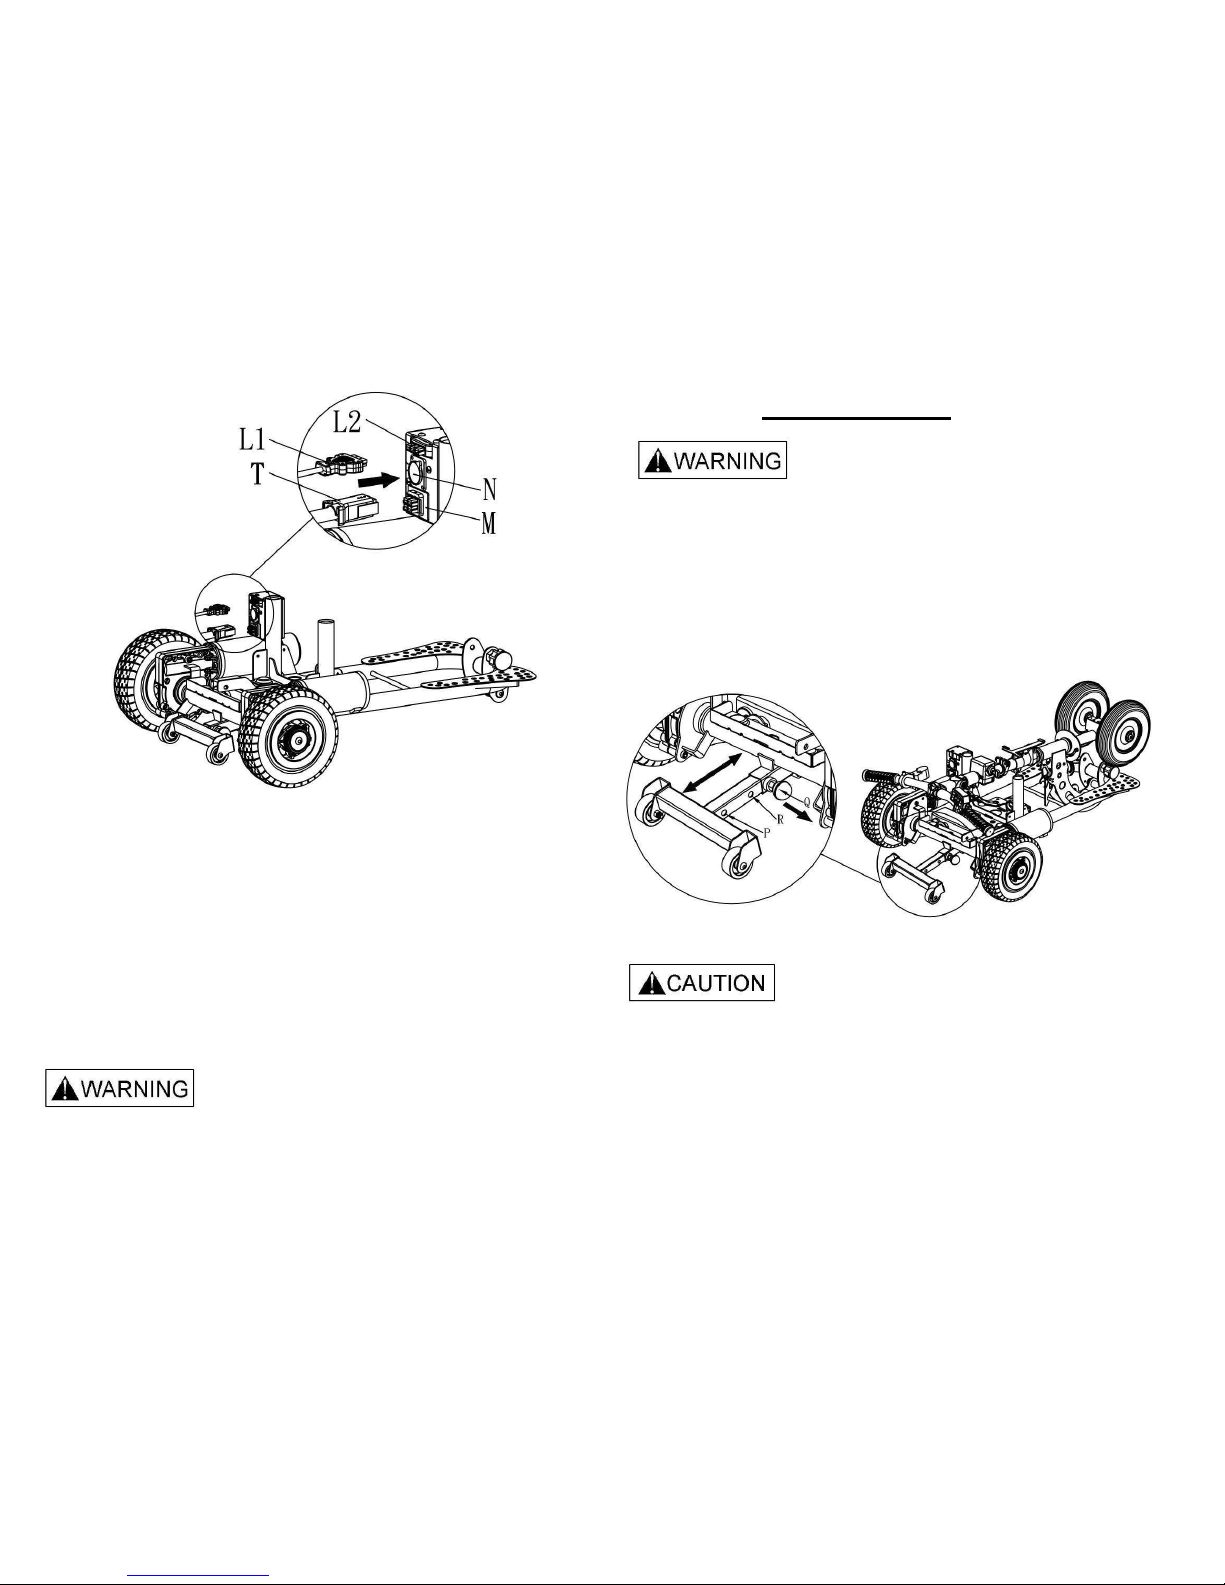
● Plug the main connector “T” into “M” on the frame.
● Plug in the battery connector “L1” into “L2” on the frame.
●The connectors are color matched. Don’t try to force it into the wrong
position.
● Inflate the tyres to a maximum of 40 PSI.
IT IS IMPORTANT THAT YOU TAKE EXTRA CARE TO PRACTICE
IN AN OPEN SPACE AWAY FROM OBSTRUCTIONS.
- 17 -
ANTI-TIP WHEEL
Ensure that the anti-tip wheels are extended and locked in either
position “Q” or “R” when driving on sloping ground. (As per illustration
below)
To change the lock position, just pull the knob “Q” and slide the tube to
the preferred position. Position “Q” provides the greatest stability.
Return the sliding tube to position “P” for transportation or dismantling.
● Do not turn key switch “On” before you are seated ready to go.
● Always turn the key switch “Off” before getting off the scooter.
NOTE: Please be aware that should the scooter wheels meet an
obstruction, you will need to help it out manually. Attempting to drive
through an obstruction when the wheel is stuck could result in
damage.
- 18 -
Page 11
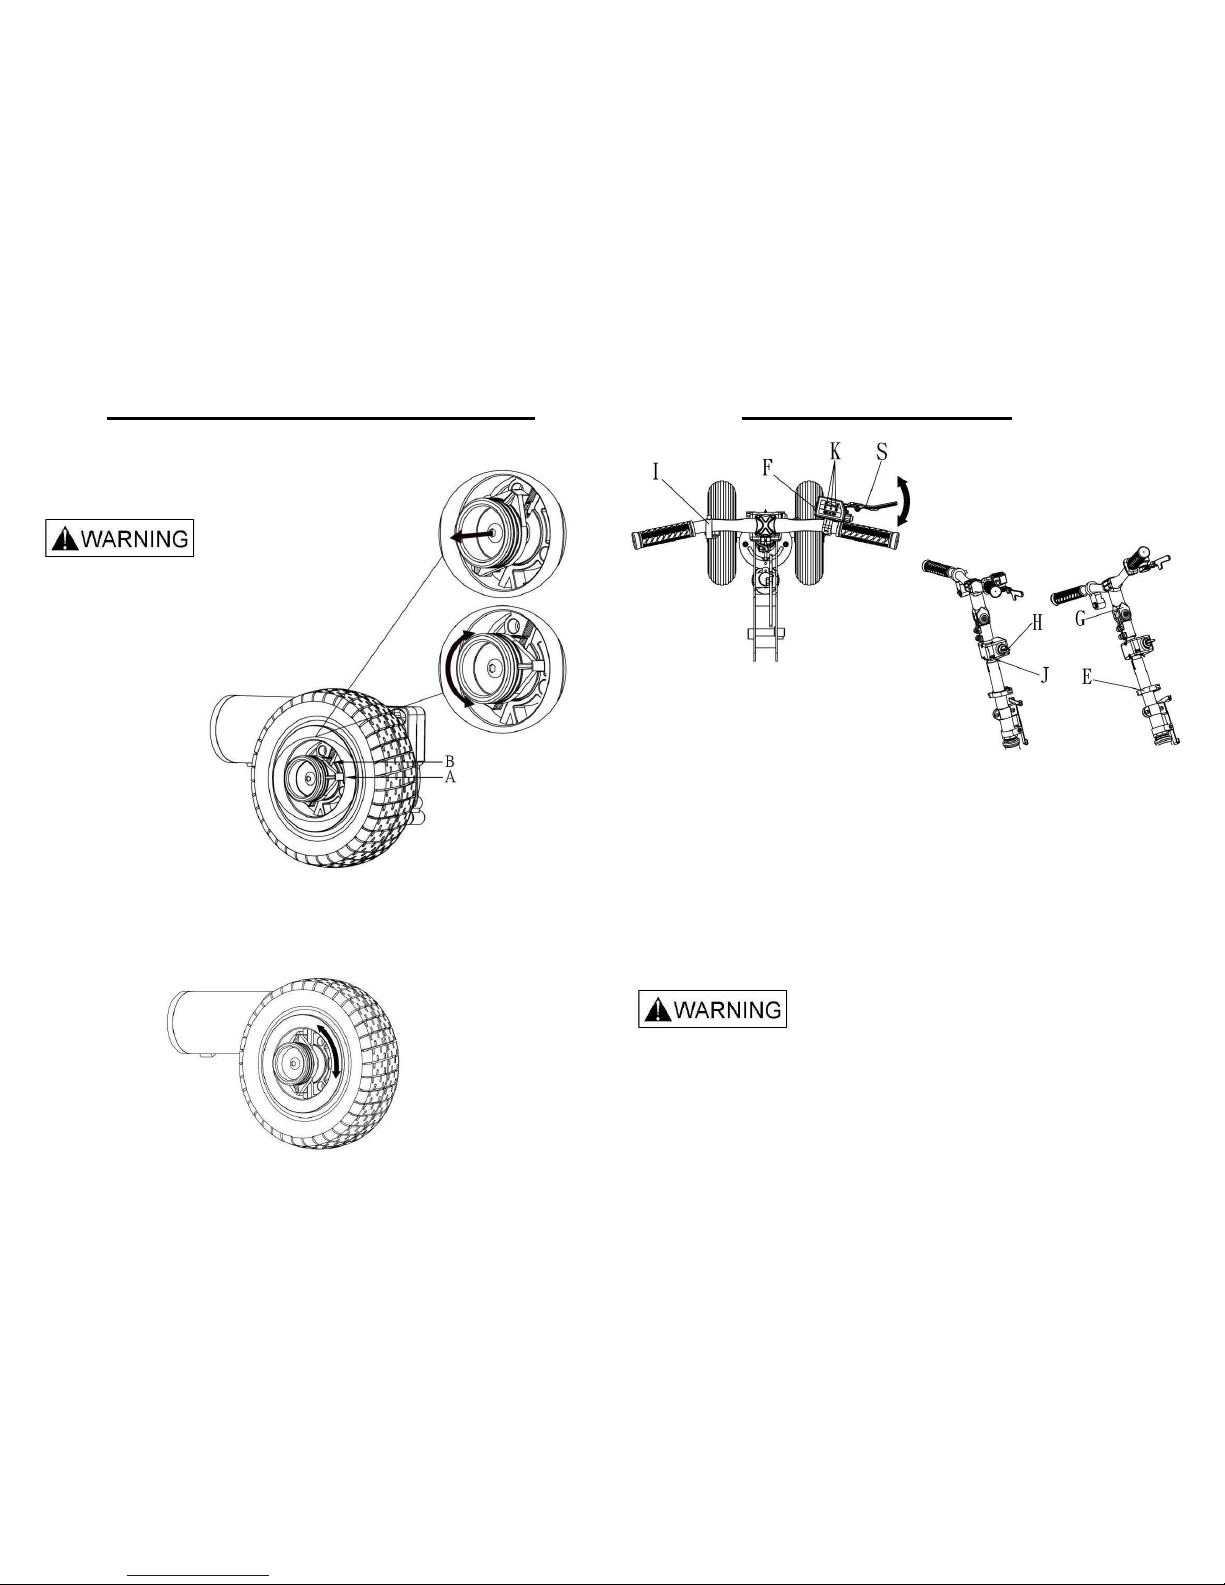
DRIVE WHEEL RELEASE MECHANISM
● This scooter is equipped with drive wheel release
mechanism. Your SupaScoota can be moved
manually after the drive wheels are released.
Do not operate this device while on slope.
To disengage the drive wheels
Pull the drive collar (part “A”) out and
turn it left or right, then release it.
To reconnect the drive wheels
Turn the drive collar (part “A”) until it reconnects with the wheel and
then move the scooter until the collar connects with the drive. (a
loud click)
- 19 -
LIGHTS AND SWITCHES
● F : Forward and Reverse switch.
● S : Speed lever.
● K : Battery level indicator. (for lead-acid battery)
● H : Key switch
● J : Speed selection: F / full speed, S / reduced speed
● I : Disable button for ESC
● E : Clamp for height adjustment
● G : Handle bar angle adjustment
Do not place your fingers on the speed lever before you turn the key
switch “On”.
Do not operate speed selection switch “J” when scooter is moving.
Move the speed lever “S” slowly and accelerate smoothly. Do not pull
lever “S” in quickly.
- 20 -
Page 12
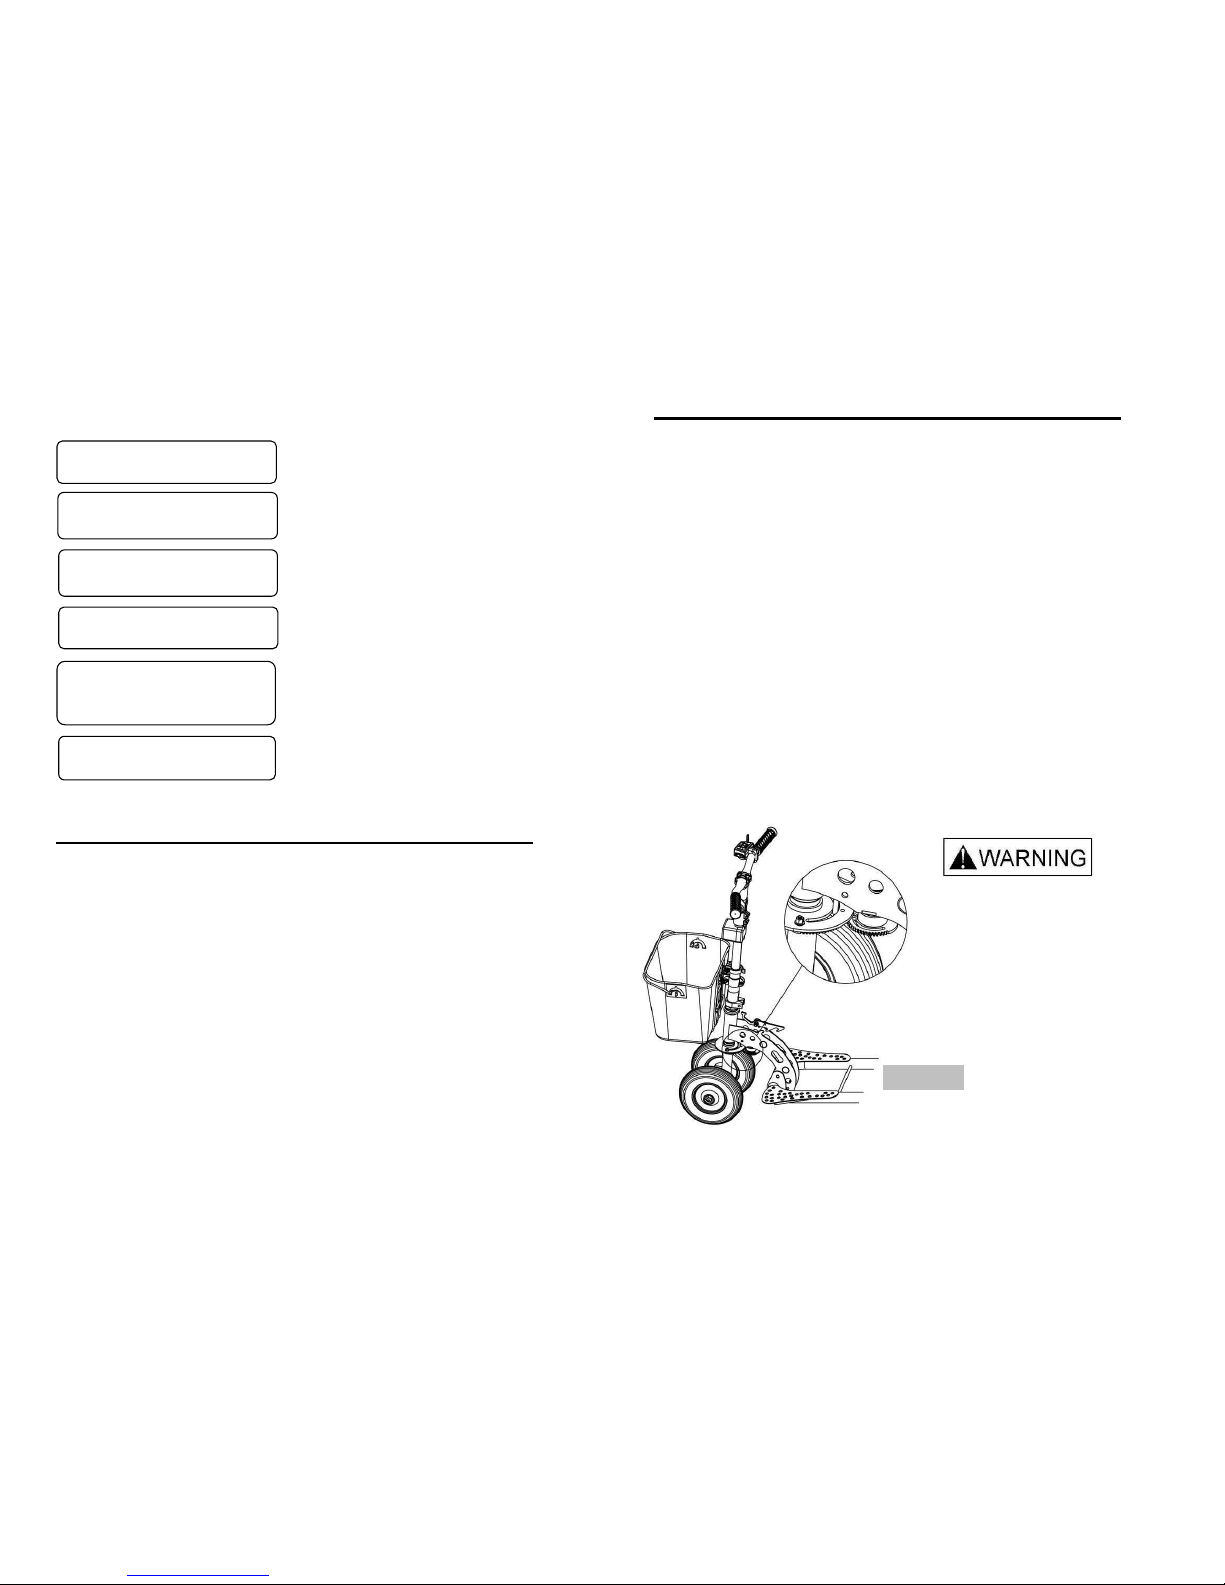
If the scooter will not move after the re-set, one of
the following indicator light may be displayed:
The magnetic brake either turn off or
connectors are loose.
Batteries on scooter for recharging with
the key switch turn on.
Low voltage of batteries detected by
controller
Potentiometer broken down.
Overload protection.
Battery needs recharging or connection
faulty - check grey color connector.
AUTO SWITCH OFF ELECTRONIC SYSTEM
● The electronic system of this scooter is protected by a digital over
current cut-off system. If your SupaScoota stops, you will need to
turn the main key switch to the “Off” position, and then switch to “On”
position to reset the system.
● Possible causes of over current cut-out are battery not fully charged
or near the end of its life, or the slope is too steep for the scooter. Do
not continue to overload the system as this may damage the
controller.
●The electronic system of this scooter will switch itself “Off” after 3
minutes if the key switch is left in the “On” position when the scooter
is not in use. You will then need to turn the key switch to the “Off”
position, and then switch to “On” position to reset the control system.
- 21 -
ELECTRONIC STABILITY CONTROL (ESC)
This is the most significant advancement in mobility scooter safety ever
designed and will dramatically reduce accidents due to operator
misuse. Turning corners at excessive speed has always been one of
the most common causes of accidents but with clever engineering
and sophisticated electronics we have all but eliminated this problem.
The speed of the SupaScoota is now electronically governed in
direct proportion to the rotation of the handle bars, virtually
eliminating any possibility of over speeding when turning. With the
handle bars at maximum rotation and the throttle at maximum speed
the scooter will turn at a very low speed with complete safety. No
other scooter can provide this level of safety.
Some situations may require maximum power to be used when turning
and we have allowed for this with a handlebar mounted push button
which will disable the ESC for 20 seconds if needed. (Push button
for one second)
Keep fingers and clothing
away from the Electronic Stability
Control sensor.
This vital piece of equipment is
very sensitive and could be
damaged, or could cause
damage, if tampered with.
Warning.
If the ESC is disconnected
or faulty, the scooter will continue
to function normally but the speed
will not reduce when turning.
- 22 -
Green light quick flashing
Yellow & Red light ON
Green light slow flashing
Green, Red & Yellow light ON
Red & Green light flashing
alternately
Red light ON
Page 13
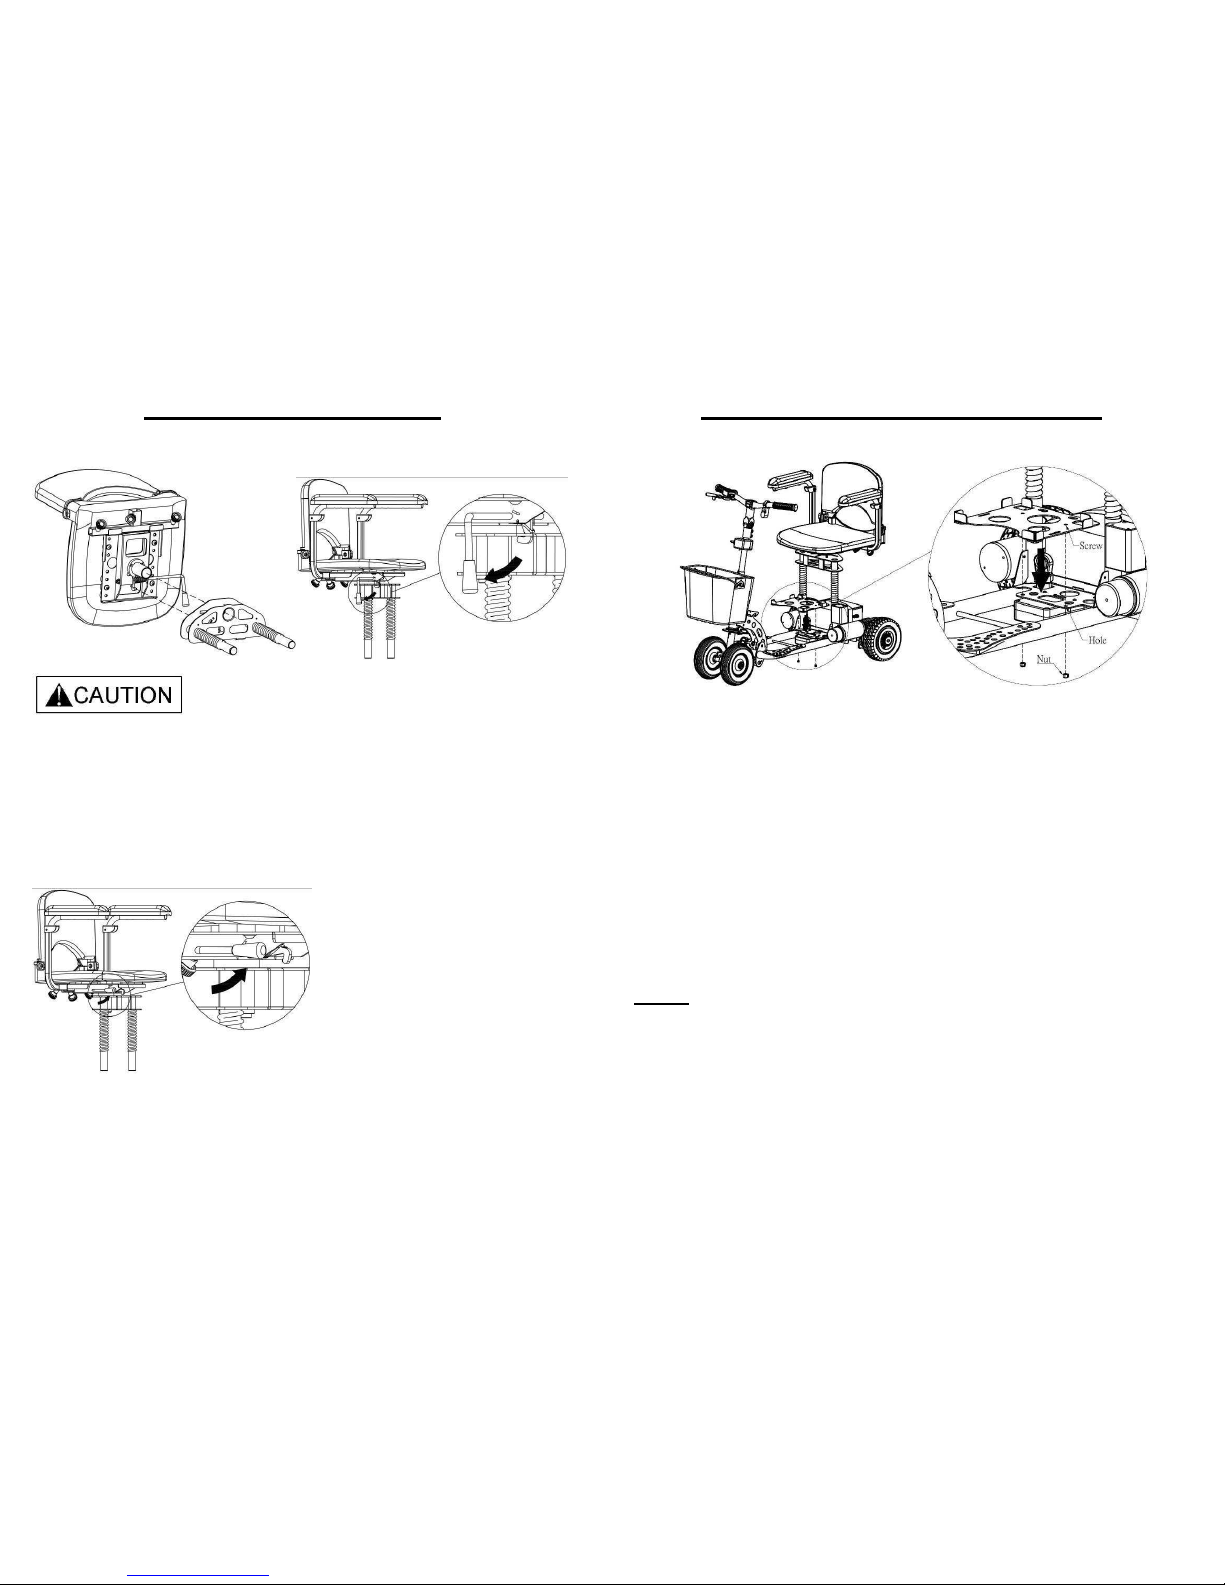
SWIVEL SEAT (OPTIONAL)
When removing the seat, do not lift the turning release handle as this
could cause the seat support frame to disconnect from the seat and
fall.
To turn the seat, lift and hold the turn release handle below the seat (as
shown). This will allow the seat to turn.
- 23 –
SPARE BATTERY TRAY (OPTIONAL)
Assemble the battery tray as illustrated. Insert the screws and tighten
the nuts.
When using a lithium battery it is recommended that you place your
lithium battery on rear tray of the scooter and your SLA battery on the
front tray.
It is also recommended that you use the lithium battery and keep the
SLA battery in reserve.
NOTE:
The battery gauge on the scooter does not give accurate readings
when using a lithium battery.
- 24 –
Page 14
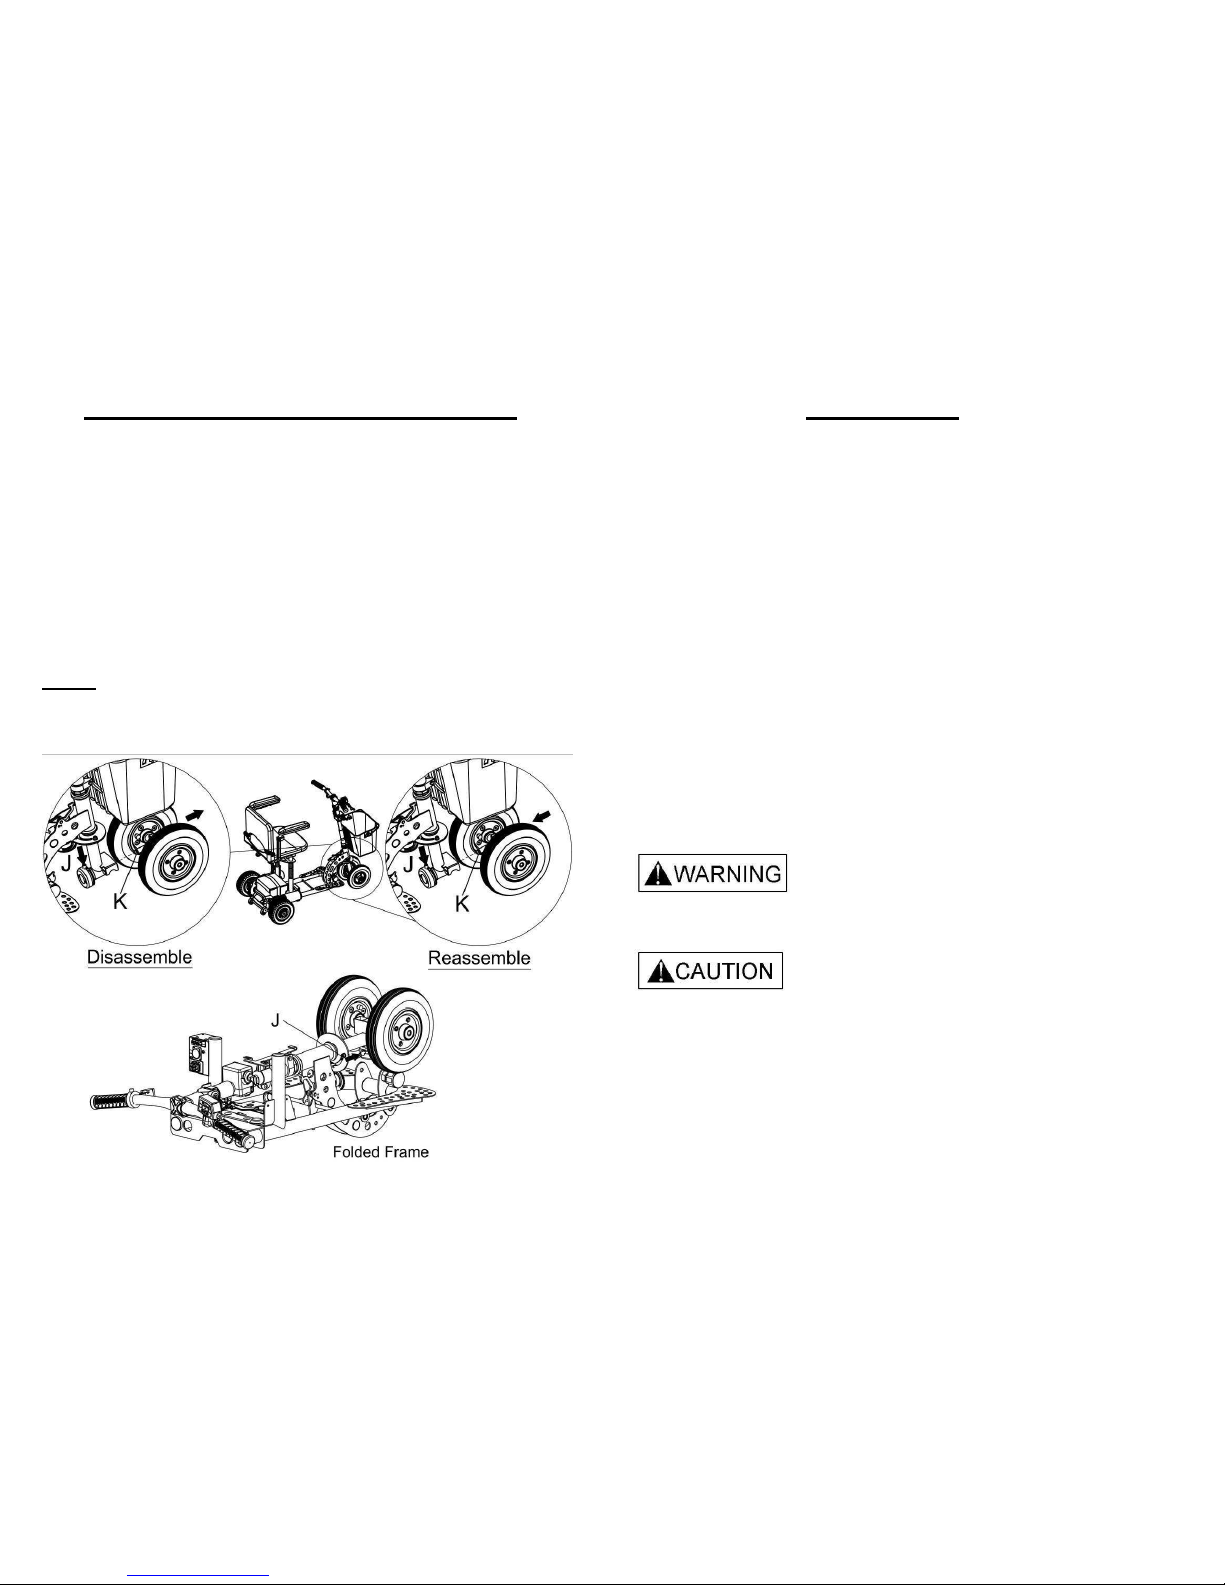
FRONT WHEEL REMOVAL (OPTIONAL)
To reduce weight when lifting the scooter
The front wheels of the scooter can be quickly removed when it is in
the folded position by pushing the release pin “J” and pull front wheels
out as per the illustration. This will reduce the weight by approximately
2 kg
Reassemble in the reverse order.
NOTE: Double check that the shaft "K" is locked in position
before unfolding the frame and using the scooter.
- 25 –
PRECAUTION
● When using your scooter for the first time you should practice at
slow speed in a flat open area free of obstacles, until you are
confident in turning, stopping, reversing and judging braking
distance.
● This scooter is designed for a maximum rider weight of 125kgs.
● Always switch power off (Key switch to “Off” position) before leaving
your scooter.
● Do not store your scooter outside without adequate protection.
● Keep the shipping carton in dry place after unpacking your
SupaScoota in case it needs to be shipped for service.
● This appliance is not intended for use by persons (including children)
with reduced physical, sensory or mental capabilities, or lack of
experience and knowledge, unless they have been given
instructions concerning use of the appliance by a person responsible
for their safety. Children should be supervised to ensure that they do
not play with the appliance.
Your SupaScoota is extremely maneuverable but sharp turns must
only be done at very slow speed.
Do not operate the Forward/Reverse switch when scooter moving.
This could damage your SupaScoota.
Avoid power spray water washing of the scooter as this could cause
damage to the wire connectors and electronic system.
Completely dry off the scooter, if necessary using a dry cloth after
cleaning your scooter.
- 26 -
Page 15
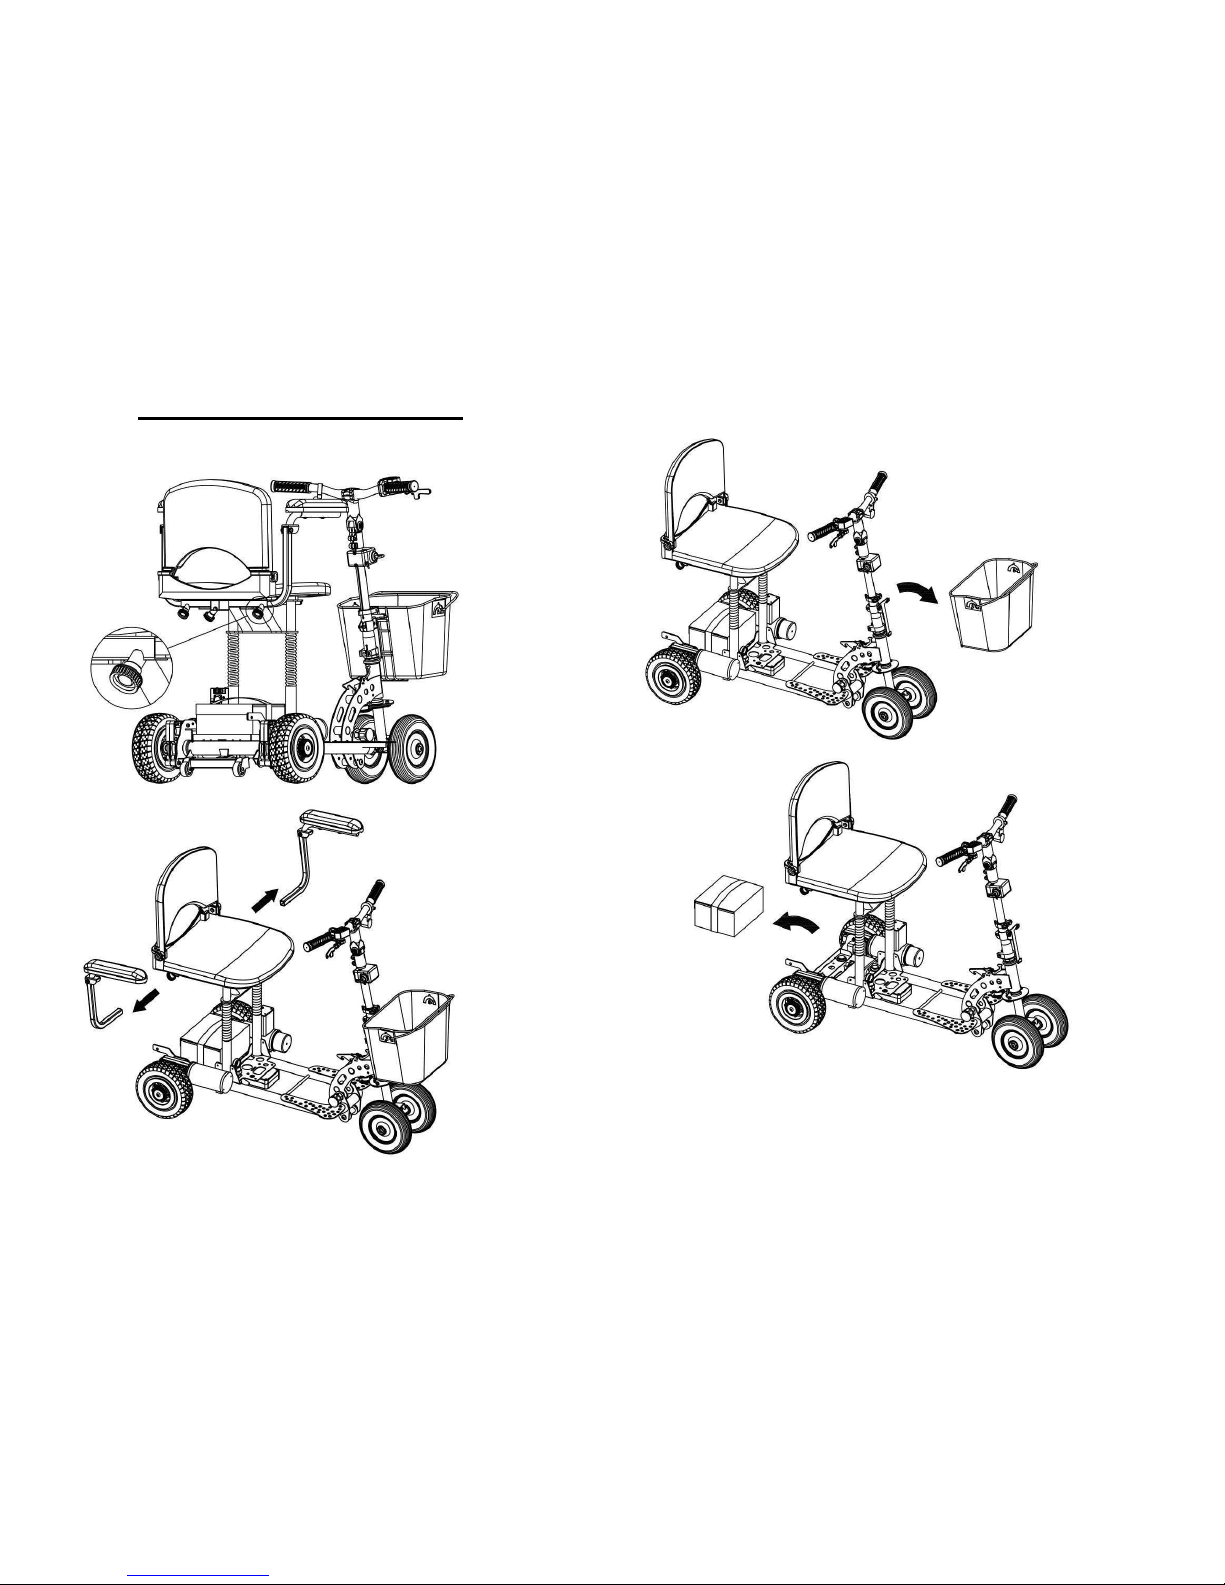
FOLDING THE SUPASCOOTA
● Release screws and then remove the arm rests from scooter.
- 27 -
● Remove front and rear baskets from scooter.
● Unplug the battery connector, undo the strap and remove the battery.
- 28 -
Page 16
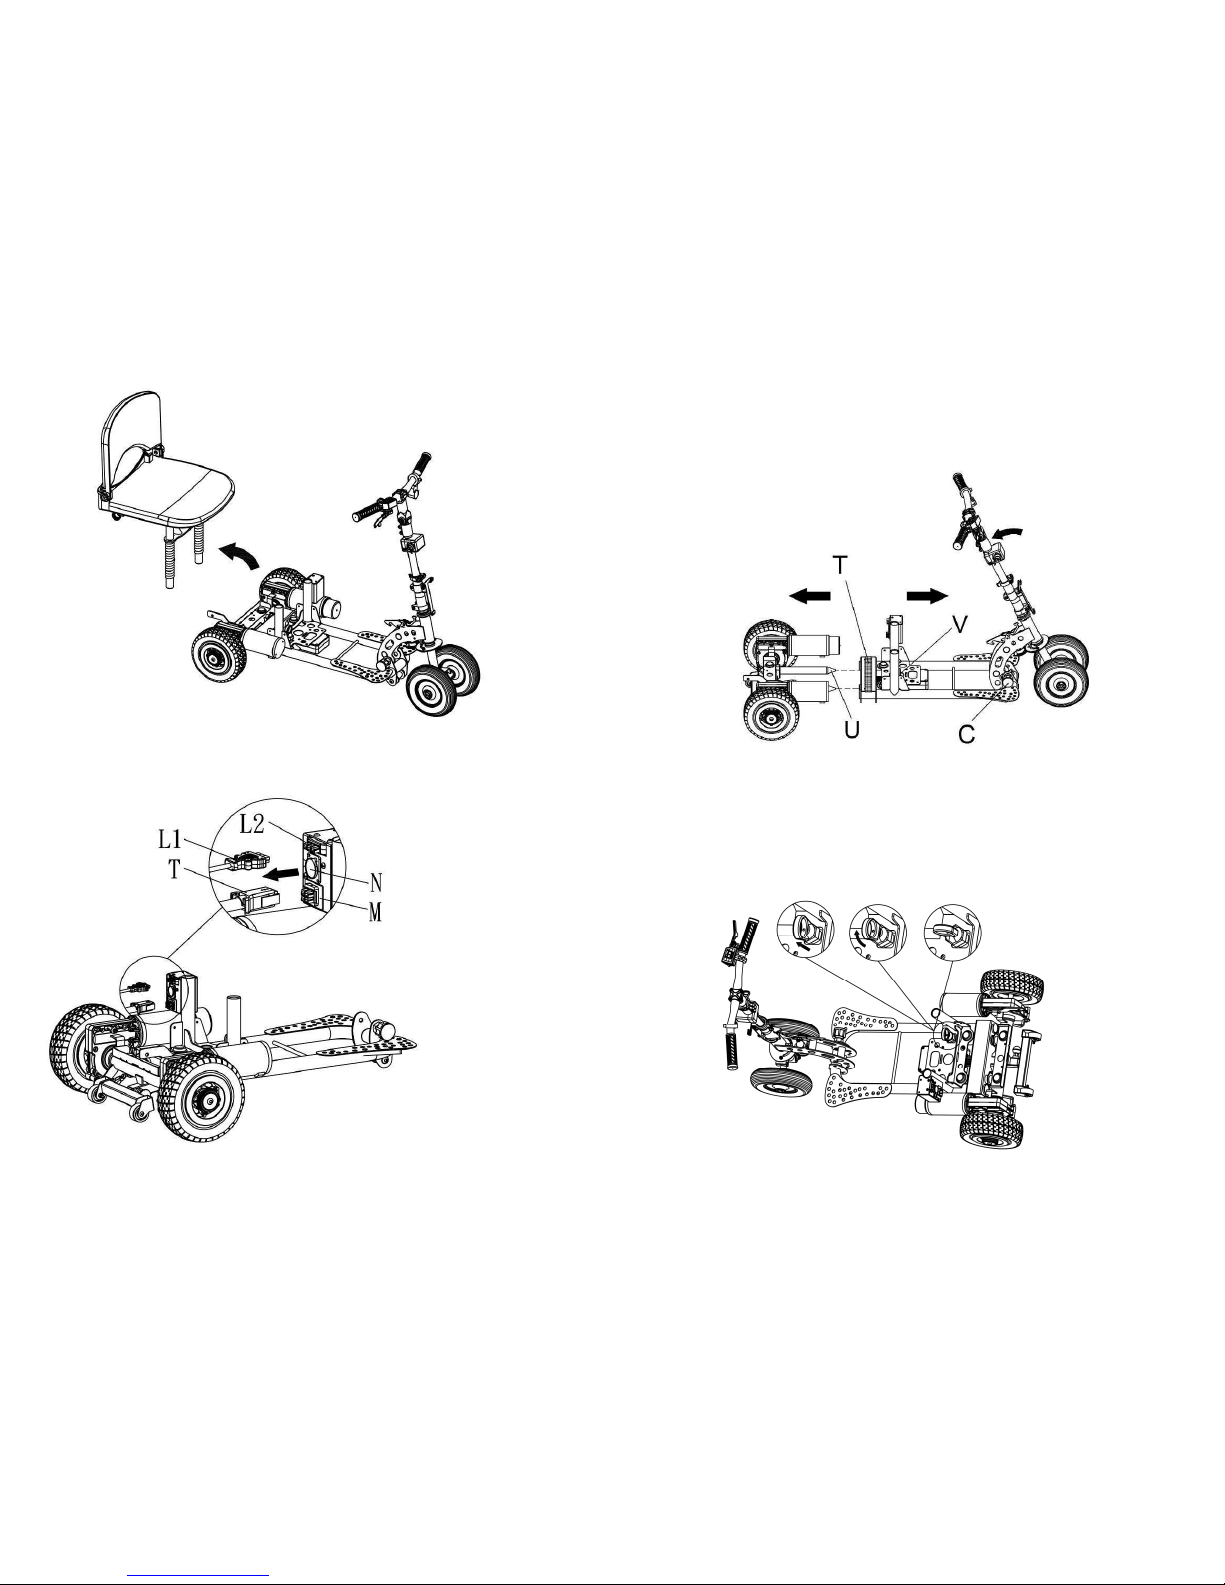
● Remove the seat.
● Press the lock tab of
connector and pull out
to disconnect the
connector as per
illustration.
- 29 -
Frame Disassembly
Assembly and disassembly is best carried out by pulling the locking pin
C and allowing the tiller assembly to fold forward until it rests
on the ground.
● Unplug all connectors.
● Pull the lock pin knob (V) and turn it to the “unlock” position, pull lock
pin (C) and lower the tiller until the frame rests on the ground.
● Hold the strap (T) with one hand and the rear section of the scooter
frame with the other hand and slide the 2 halves of the frame apart.
- 30 -
Page 17
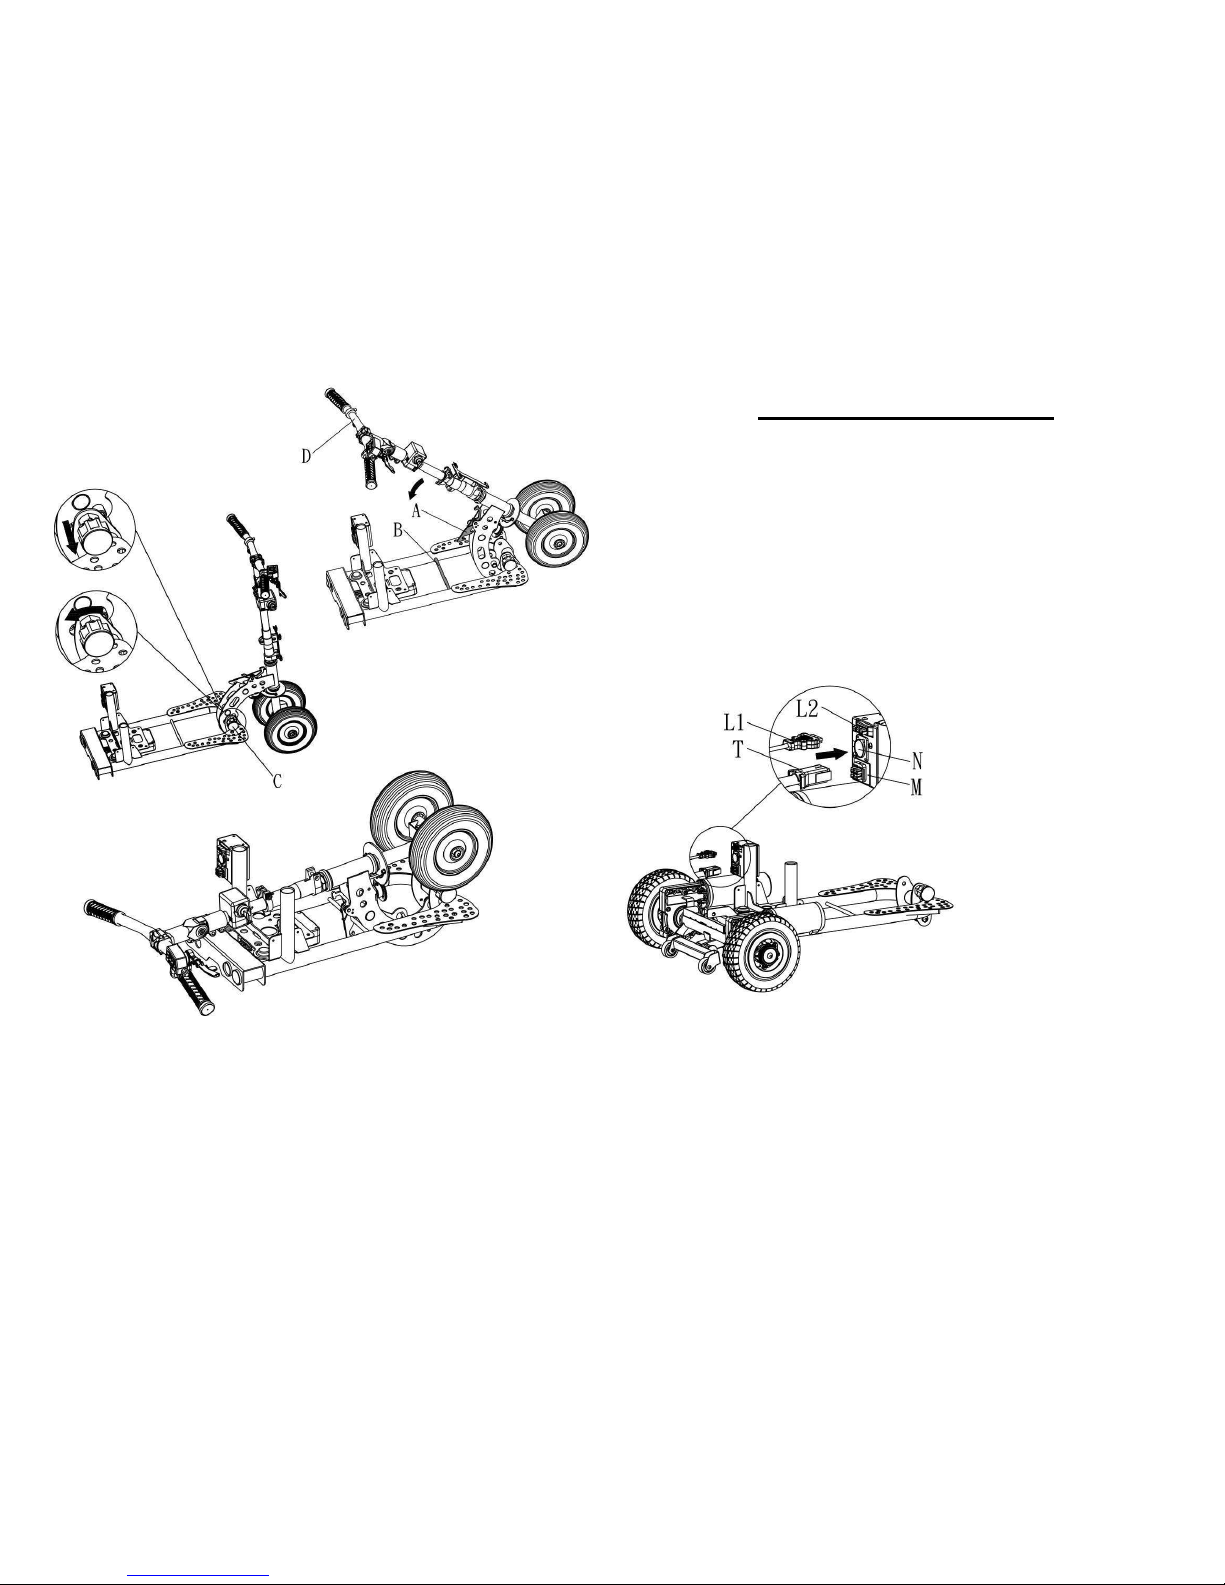
● Use one hand to hold the handle, and use other hand to pull the lock
pin knob (C) and turn it anticlockwise. Then fold the handle down until
you hear the “click” of the locking pin fitting into position on the main
frame.
- 31 -
BATTERY AND CHARGING
● When you get your new battery put it on charge for at least 24 hours.
● When recharging your battery, always charge for at least 12 hours or
until the light on the charger turns green. It is best to charge for at
least another hour after the light turns green.
● Never use the battery for any purpose other than to power your
scooter.
● The battery charger can become hot during charging so your charger
should be placed in a suitable place with good air flow and away
from children.
To recharge the batteries, follow the
steps below:
● Place your Scooter close to
a standard electrical wall
outlet.
● Turn the scooter key switch to
the “Off” position.
● Plug the charger power cord
(Round plug) into the socket
indicated on scooter. (N)
● Plug the charger power plug
into a standard wall outlet.
● When charging is completed, the
yellow LED will turn to green.
● Disconnect the charger power cord from the wall outlet and the plug
from the scooter when the batteries are fully charged.
● NOTE: The battery connector L1 must be connected to L2 for
charging.
- 32 -
Page 18
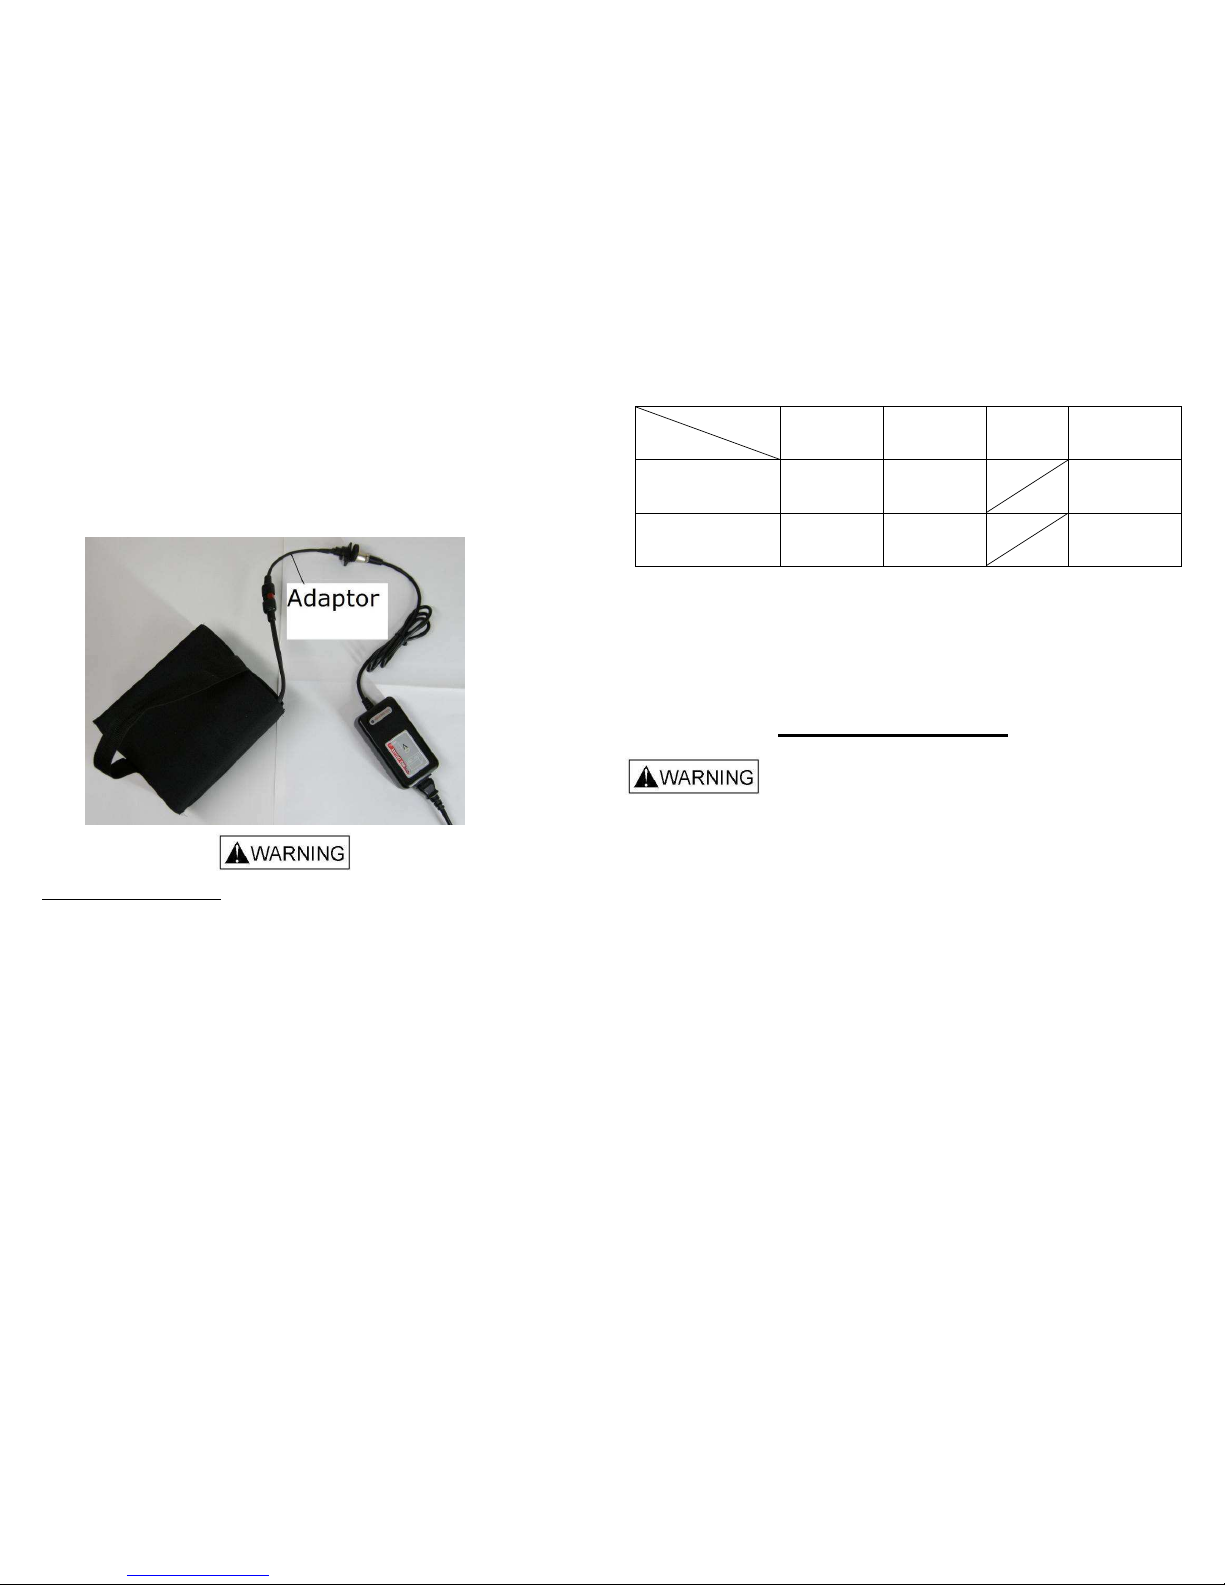
Or remove the battery from scooter, and use the connection adaptor.
(Optional accessory)
Do not place the battery on a concrete floor for charging. Raise the
battery off the concrete with wooden blocks or similar objects.
IMPORTANT NOTICE:
The battery terminal covers must be kept in place at all times to avoid
the possibility of something falling across the terminals and causing a
short circuit. This could damage the battery or even cause it to
explode.
To dispose of your battery, return it to your dealer or to a recycler.
Improper disposal of the battery could result in an explosion causing
injury and/or property damage.
Lithium battery & charger are optional accessories.
- 33 -
Travel distance from battery indicator & Cycles life
Items
Battery Type
Green
light
Yellow
light
Red
light
Cycle life
(battery’s)
24V SLA Battery
12 Km
(7.5 miles)
3.5 Km
(2.2 miles)
400
24V Lithium
Battery
18 Km
(11 miles)
1.5 Km
(0.9 mile)
1000
Above are based on full charged battery with firm & even road surfaces
condition and can be varied from cycles by using which may effected
from duration reduced of riding distance per charge.
When the Yellow light is “On”, you will need to go for recharging the
battery and do not use scooter when Red light is ON.
BATTERY CHARGER
● Before charging, read the instructions. (included with charger)
● For indoor use only, do not expose to rain.
● Disconnect the mains power supply before making or breaking the
connections to the battery.
● This appliance is not intended for use by persons (including children)
with reduced of physical, sensory or mental capabilities, or lack of
experience and knowledge, unless they have been given
instructions concerning use of the appliance by a person responsible
for their safety. Children should be supervised to ensure that they do
not play with the appliance.
● This charger is not for recharging non-rechargeable batteries.
● Do not use for charging any batteries not specified by the
manufacturer.
- 34 -
Page 19
BATTERY CARE & MAINTENANCE
Important notes to help prolong the life of the battery:
• Before the first use of your battery, put it on charge for 24 hours.
• Do not place the battery on a concrete floor for charging, have
the battery raised off the floor on wooden blocks or place the
battery on a shelf.
• To fully charge the battery, choose a place where ambient
temperature is above 10 degrees Celsius.
• Always recharge your battery as soon as possible after use.
• When yellow light is “On” you should recharge your battery as
soon as possible.
• Never use the battery when the red light is “On”. You will
discharge the battery below its designated voltage and damage
it.
• Do not drop the battery.
• STORAGE:
If you know that you will not be using your battery in the near
future, disconnect the battery from the charger and store it in a
suitable dry place.
Recharge your battery before you use it or every 3 months (No
more than 3 months) if it is not used in that period.
• Always contact our service agent before you replace the battery
or the charger. Using an incompatible battery or charger may
damage the scooter and void your warranty.
- 35 -
Specifications
Number of Wheels 4
Front Wheel Size 200mm (8”)
Rear Wheel Size 200mm (8”)
Ground Clearance (tiller)
60mm (2.4”)
Length 1010mm (40”)
Width 570mm (22.5”)
Weight Without Seat
Front frame : 10.2kg (22.4 lbs)
Front Frame Without Front wheels
:8.5kg (18.7 lbs)
Rear Frame : 10kg (22 lbs)
Weight of Seat 7.7kg (17 lbs included seat frame & armrest)
Max Loading 125kg (275 lbs) on level ground
Turn Radius 910mm (36”)
Motor Output 2 - 150 Watt
Transmission Worm Drive Gearbox
Reverse Forward/Reverse Switch
Brakes Dynamic Braking and Electromagnetic Brake
Battery (SLA/Lithium) 24V - 15 ah 9.2kg (20 lbs) / 4.0 kgs (9 lbs)
Charger (SLA/Lithium)
24 volt 2 amp / 24V 4 amp
Max Speed SLA Battery
6.5 kph (4 mph)
2nd speed choice 3.9 kph (2.4 mph)
Slope Grade Ability
9 Degrees with120kg (260 lbs) load.
12 Degrees with 100kg (220 lbs) load
Travel Distance
Up to 16km (10 miles) with standard SLA battery, or
20Km (12.4 miles) with 24V 15ah lithium battery.
Arm Rests
Distance between armrests 45cm - 55cm (18 -22")
- 36 -
Page 20
SupaScoota Warranty
Your SupaScoota is fully guaranteed against faults arising due to
defects in manufacture or materials as follows
Frame: 2 years.
The height adjustable tiller and all other components except those
listed below: 1 year.
Subject to availability of parts, any such defects will be rectified, either
by repair or by unit replacement.
Warranty does not cover
Any damage due to improper use nor the replacement of parts arising
from normal wear and tear such as potentiometers, tyres, arm rests
and upholstery.
Claims due to a normal increase in operational noise level.
This warranty does not cover labour or service calls.
Batteries
Batteries are covered by a six month warranty from the original
manufacturer. Gradual deterioration due to being left in a discharged
state or being left in cold conditions for long periods is not covered.
This section MUST BE READ and SIGNED by the purchaser and
stamped by the dealer
This warranty record must be kept by the purchaser and a copy
supplied with any claim
I / we acknowledge that the SupaScoota has been delivered in good
order and operating condition and that I / we have been instructed in
the care and maintenance, safe operation and proper use of the unit.
Purchasers
name………………………………………………………………………….
Purchase date…………………………………………….
Address ………………………………………………………………………
………………………………………………………………. …………………
Serial No ……………………..............Key No…………...........................
Signature.........................................................
Stamp of Dealer
Date:
 Loading...