

Page 1

SUPAIR-VLD
PARC ALTAÏS
34 RUE ADRASTÉE
74650 ANNECY CHAVANOD
FRANCE
45°54.024’N / 06°04.725’ E
Indice de révision : 20111220 FR
User’s manual
Page 2
2
Thank you for your choice of a Supair XA13. We are proud to join you on your journey in
our common passion : paragliding.
SUP’AIR has been designing, producing and selling accessories for free flying activities
since 1984. By choosing a SUP’AIR product you benefit from almost thirty years of expertise,
innovation and listening. This is also our philosophy : working endlessly to develop better
products and to maintain a high quality production in Europe.
We trust that you will find this user’s manual comprehensive, explicit and hopefully pleasant to read. We advise you to read it carefully !
On our website www.supair.com, you will find the last up to date information about this
product. If you have any further questions, feel free to ask one of our retailers. And of
course, the entire SUP’AIR team are at your disposal through [email protected]
We wish you many safe flying and enjoyable hours, and happy landings
The SUP’AIR team
Design, development, project managing : Bruno DELOUSTAL
Technical advisor, test pilot : Clément LATOUR
Additionnal test pilot : Victor SEBE
Prototyping : Virginie BAUD, Khadija AMER
Production : Romania
Page 3

3
Table des matières
Table des matières 3
Introduction 4
Technical sheet 5
Technical specifications 5
Size choice 6
Nomenclature 7
Harness overview 8
Connecting the handle to the rescue parachute’s deployment bag 9
Rescue parachute assembly 9
Placing the parachute in the rescue parachute pocket 10
Connecting the rescue parachute risers to the harness : Y risers 11
Connecting the rescue parachute risers to the harness : standard risers
12
Speedbag angle setting 13
Leaning angle setting 13
Shoulders’ straps adjustment 13
Comportement en vol 14
Pre-Flight control 15
Take-off 16
In flight 16
Speedbar use 16
Landing 17
Throwing the reserve parachute 17
Wash and care of your harness 18
Lifetime 18
Care 18
Repair 19
Materials 19
Recycling 19
Environmental friendly practices 19
Warranty 20
Disclaimer 20
Pilot’s gear 20
Warranty 20
Service Book 21
Table des matières
Crédits photos :
Horacio LLorens;
Bruno DELOUSTAL;
SUPAIR
Page 4
4
Welcome to the world of lightweight performance! You have in your hands the key that opens
the door to exceptional flights. The XA13 is our most persuasive invitation to adventure and with it
you will be able to go higher, further and fly longer. Now, you just have to find a playground big
enough !
Introduction
After reading this manual, we suggest you check your harness by hanging in it before flying.
N.B : Three important icons will help you when reading this manual
Advice Caution ! Danger !!
Page 5
5
A
B
C
D
E
F
A
B
C
D
E
F
Hauteur du dos
Hauteur réglage de
l'inclinaison du
dossier
Longueur d'assise
Largeur d'assise
Hauteur des points
Distance entre les
points
G
G
Longueur speed-
bag
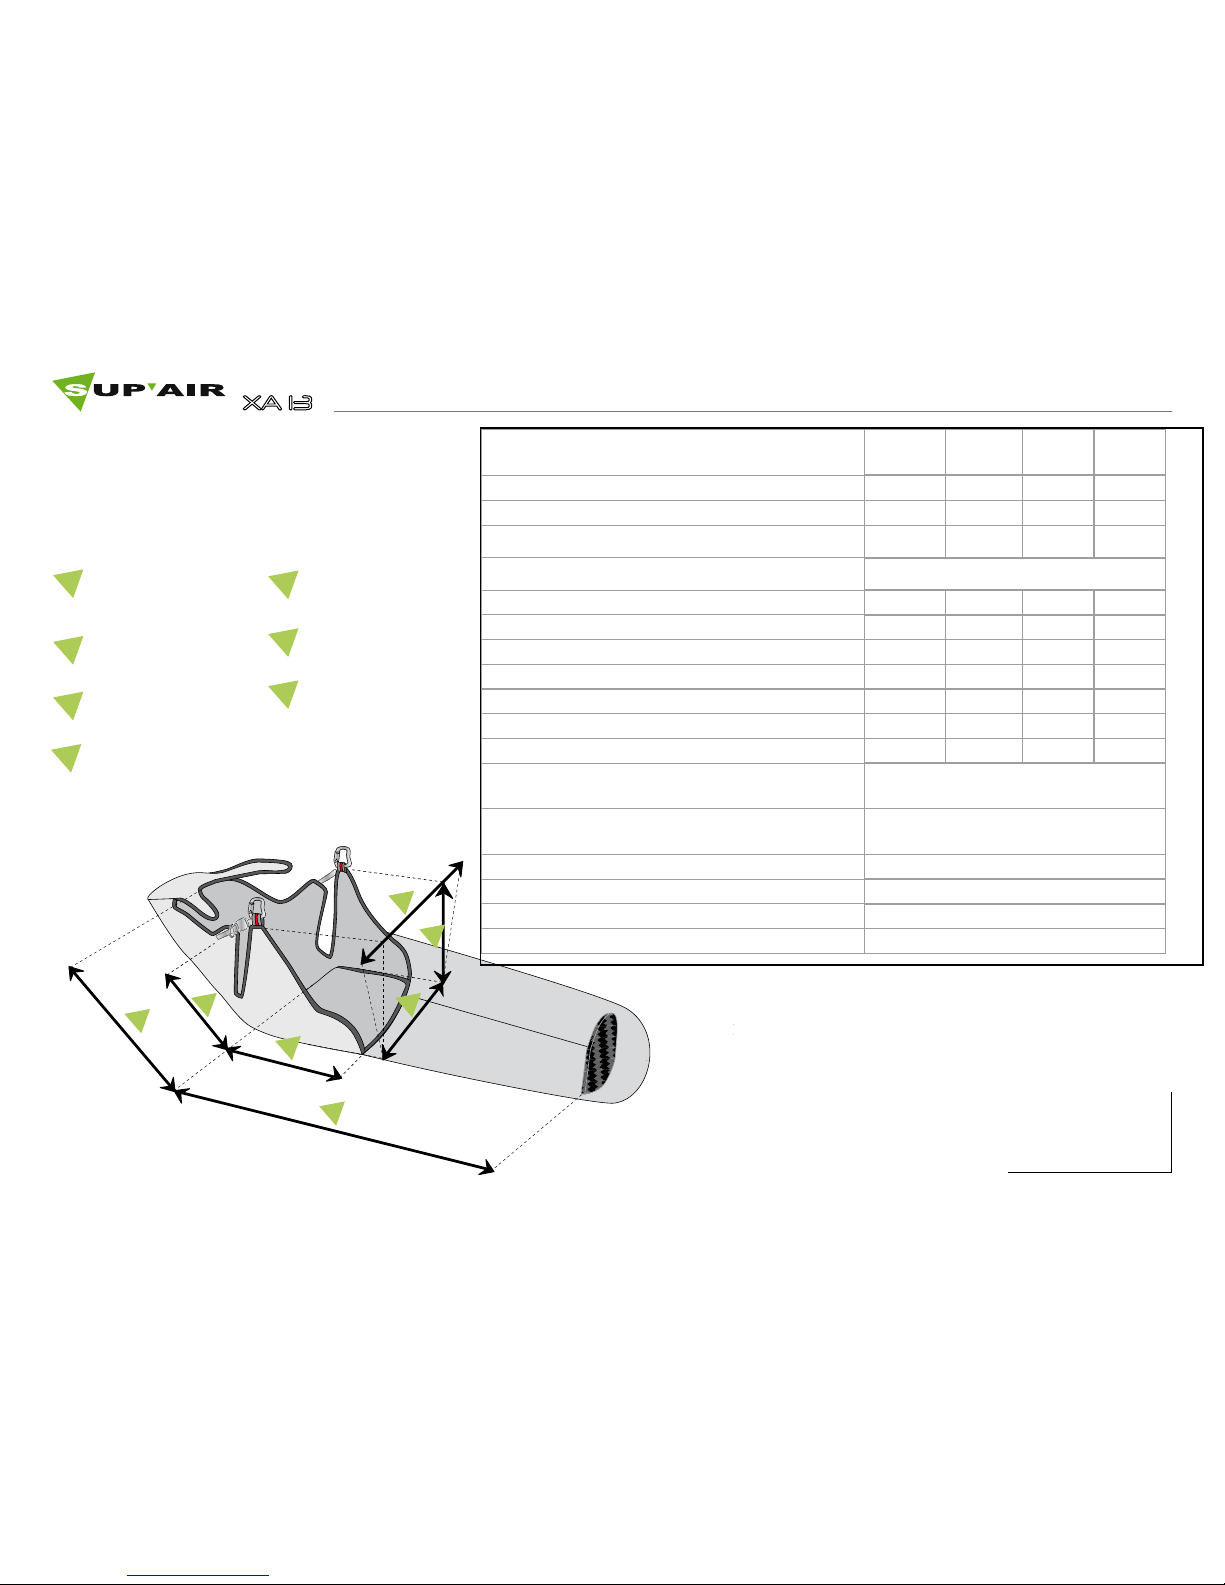
Model XA13 S XA13 M XA13 L XA13 XL
Pilot size 155-170 165-180 175-190 185-200
Weight 60-75 70-80 75-85 75-100
Harness weight (+ carabiners+speedbar) 1,39 1,42 1,52 1,59
Designed for Paragliding only
Back height (cm) 60 66 71 75
Leaning setting height (cm) 38 42 44 48
Seat length (cm) 36 40 44 48
Seat width (cm) 42 44 46 49
Carabiners height (cm) 40 42 44 46
Carabiners distance (cm) 34 - 44 34 -44 34 - 44 34 - 44
Speedbag length (cm) 110-120 115-125 119-129 123-133
Impact damping system : Airbag (Volume): Air-
bag (Volume)
Yes - 20 l
Impact damping system : Bumpair (Thickness)
Bumpair (Volume)
Yes- 10 cm
Homologation EN 1651 - LTF en instance
Flight : tandem (Pilot- Passenger) No-No
Flight : acrobatic flying No
Winching Yes
Technical specifications
Technical sheet
A
B
C
D
E
F
G
Back height (cm)
Leaning setting height
(cm)
Seat length (cm)
Seat width (cm)
Carabiners height
(cm)
Carabiners distance
(cm)
Speedbag length
(cm)
Page 6
6
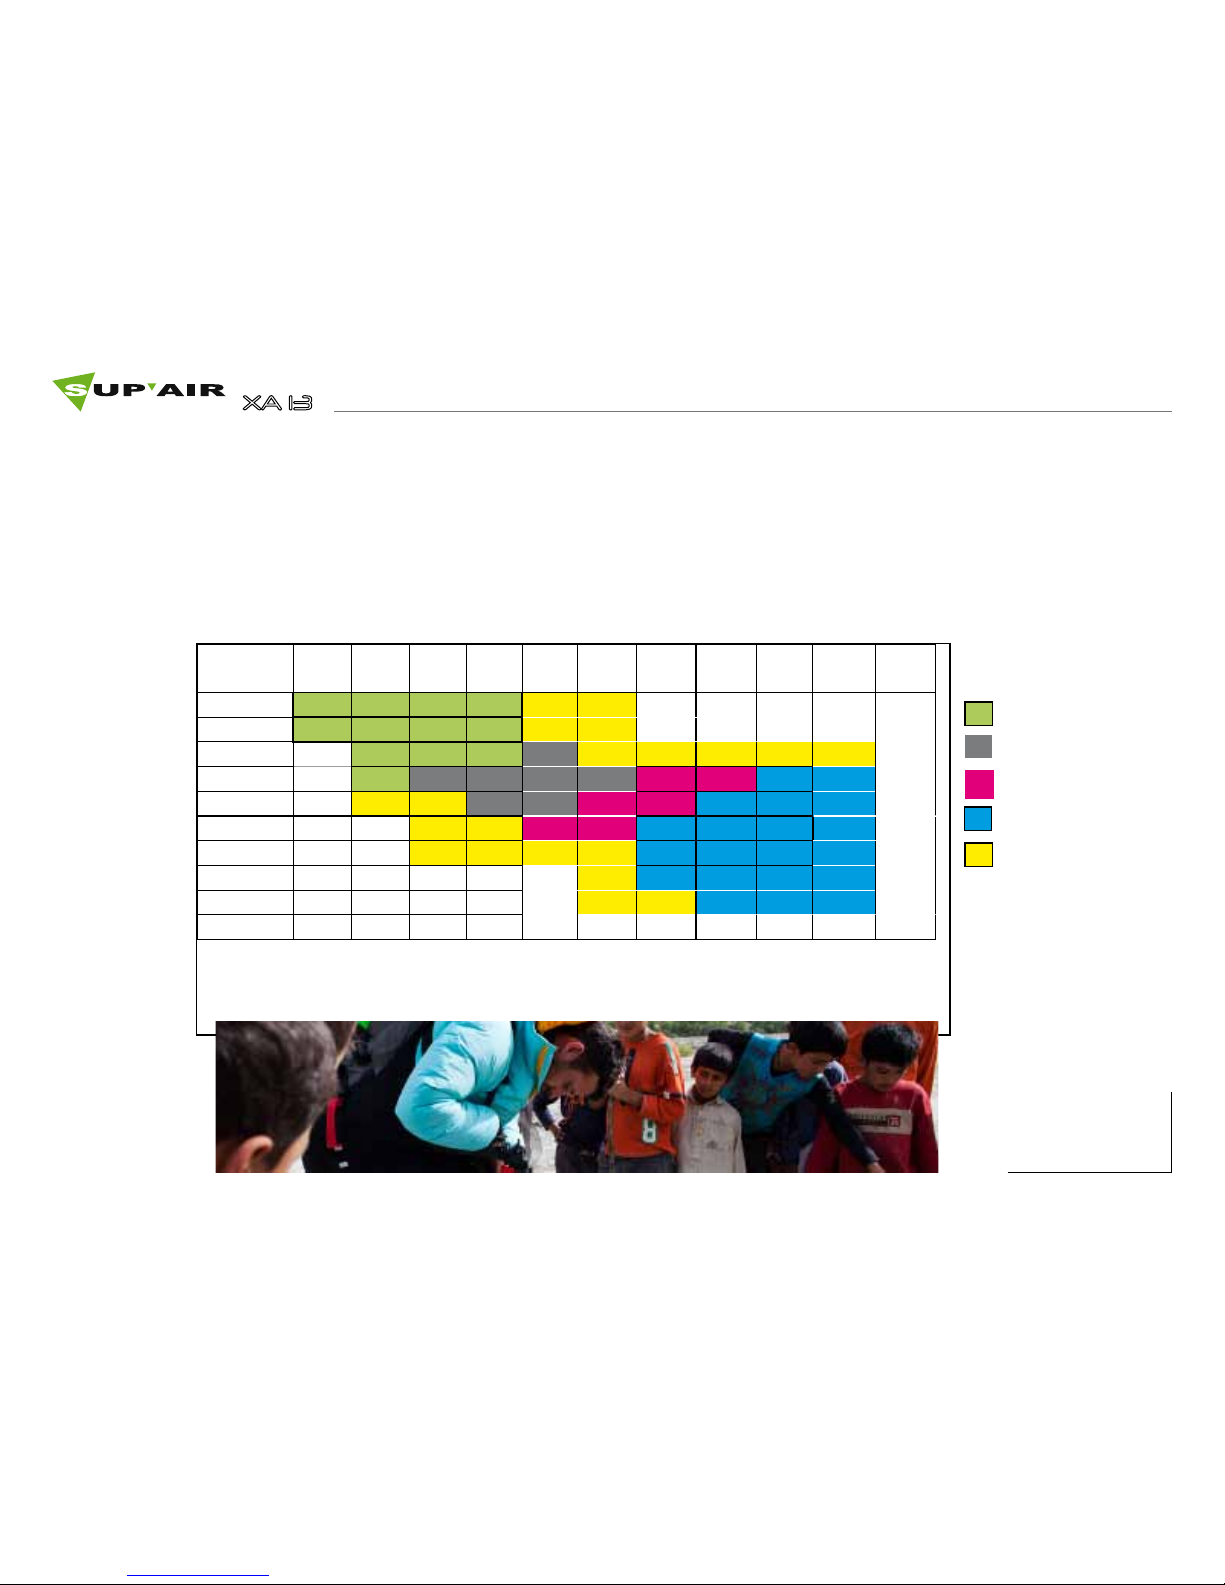
Size
Weight
1m55 1m60 1m65 1m70 1m75 1m80 1m85 1m90 1m95 2m 2m05
60 S S S S
65 S S S S
70 S S S M
75 S M M M M L L XL XL
80 M M L L XL XL XL
85 L L XL XL XL XL
90 XL XL XL XL
95 XL XL XL XL
100 XL XL XL
105
Choosing your harness’ size is important. You will find here below a height/weight table that will
help you in your size choice. With its hammock architecture and its “lying flat” flying position, we
advise you to try out the harness under a hanging device at one of our retailers in order to choose
the correct size. For a complete list of our retailers, please click here : www.supair.com
Size choice
S
M
L
XL
Preliminary test under
hanging device
Page 7
7
1
2
3
4
5
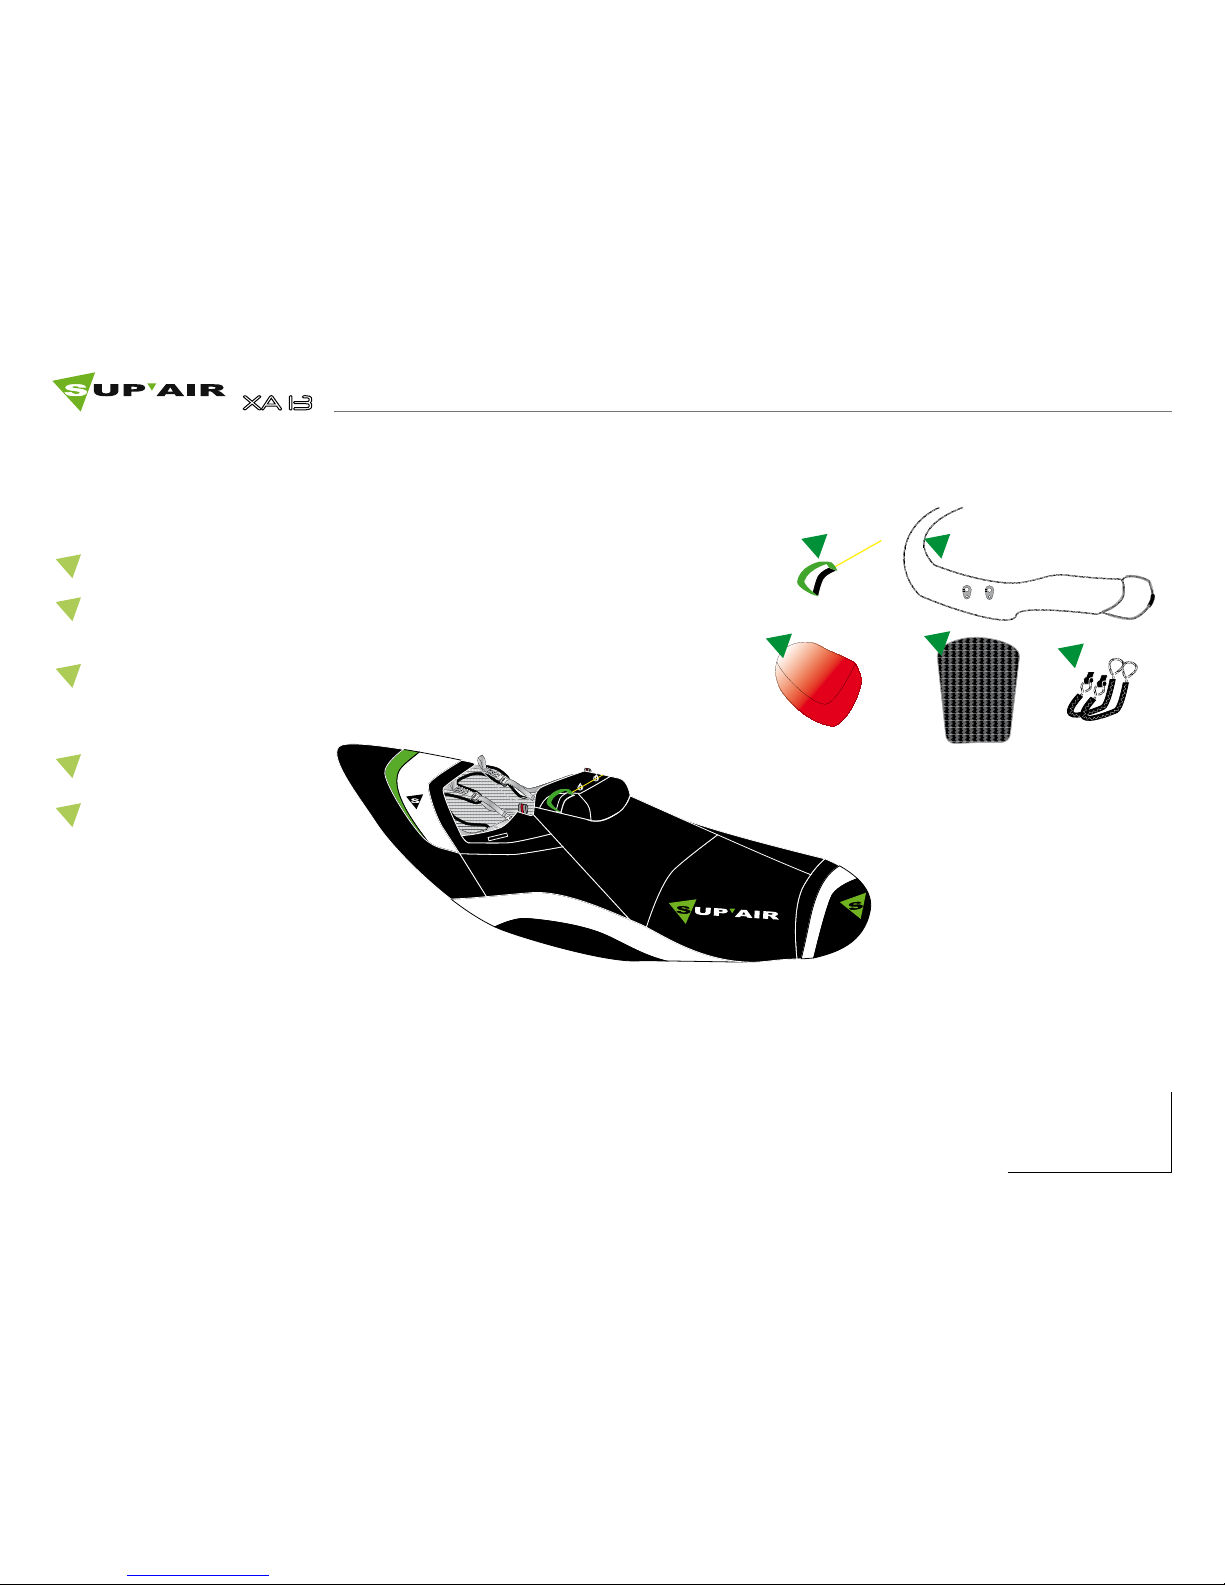
Speedbar
Rescue parachute handle
Connects carabiners
Minibump
Footrest
Size 1 : S-M-L
Size 2 : XL
Nomenclature
1
2
3
4
5
Page 8
8
4
1
9
10
1
2
3
3
4
5
5
6
6
6
6
7
8
8
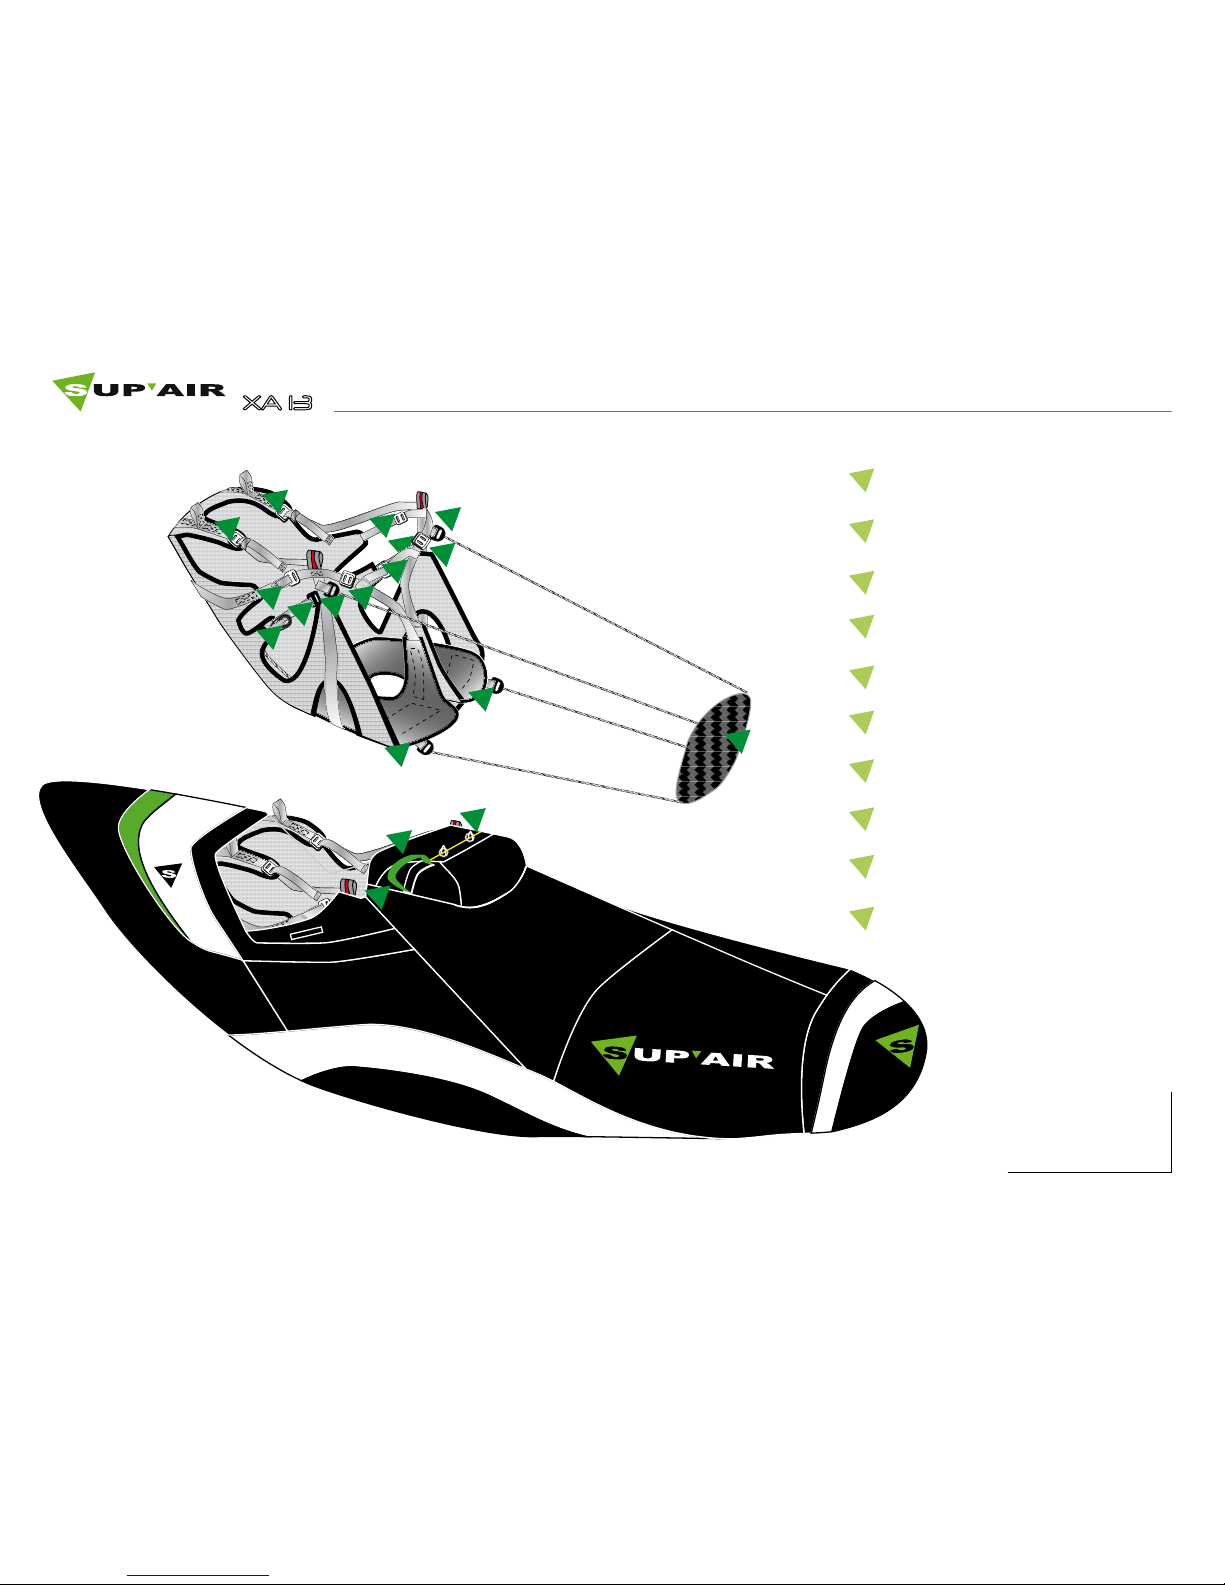
Harness overview
1
8
10
9
2
3
4
5
7
6
Thigh strap buckle
Ventral width adjustment
Leaning setting
Shoulders’straps adjustment
speedbag leaning adjustment
Footrest
Speedbag closing buckles
Rescue parachute handle
Harken® Pulleys
Lumbar support setting
Page 9
9
Rescue parachute assembly
Thanks for reading carefully ! We recommend the initial rescue parachute assembly and installation is made by a qualified person.
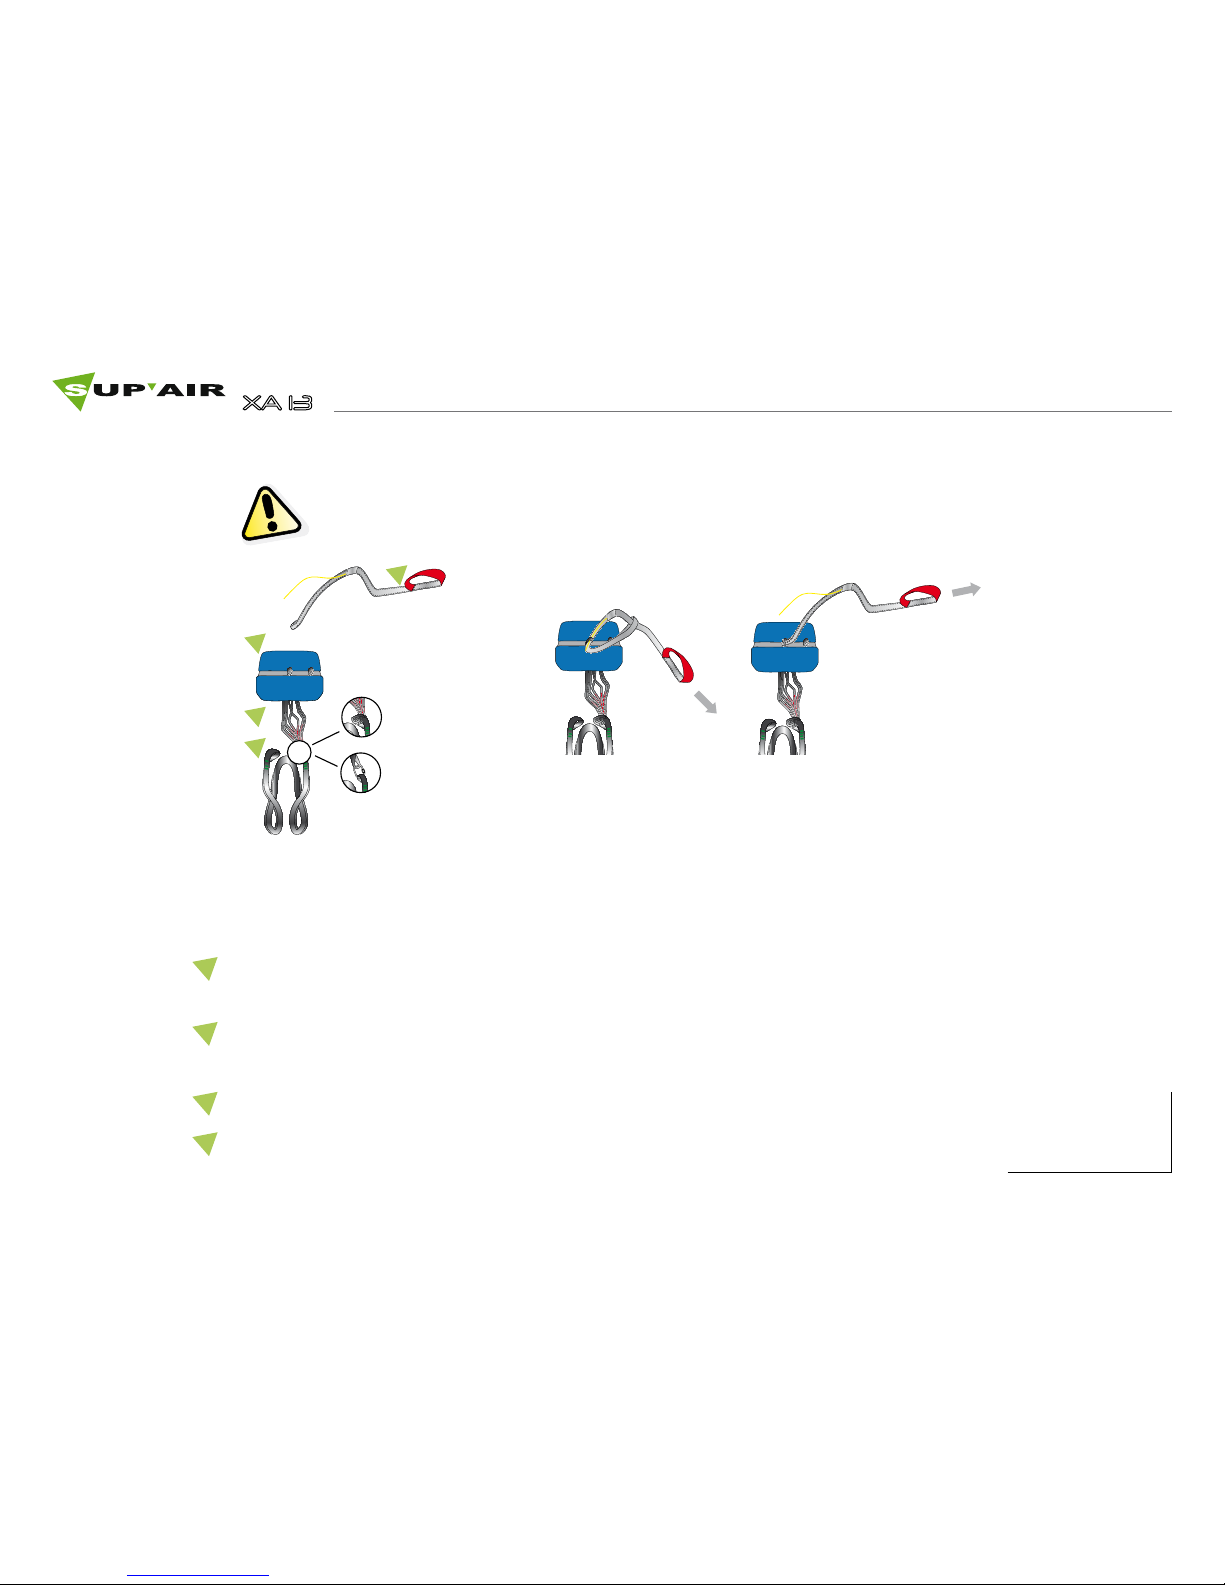
Connecting the handle to the rescue parachute’s deployment bag
A
B
C
D
A :
B :
A
B
C
D
XA13 rescue parachute
handle
Parachute folded according to manufacturers specification and in deployment bag.
Parachute rigging lines
Parachute risers
1. Place the handle inside
the middle webbing loop
and make a lark’s head
knot with the handle.
2. Fasten tightly the lark’s
head knot and verify
the solidity of the link.
Y-Risers : make a lark’s
head and connect the risers to the harness using
Maillon Rapide ® Inox 6
or 7 mm (x2) see page
12
Standard Risers : use one
Maillon Rapide ® Inox 7
mm. see page 13
Page 10
10
A A
B B
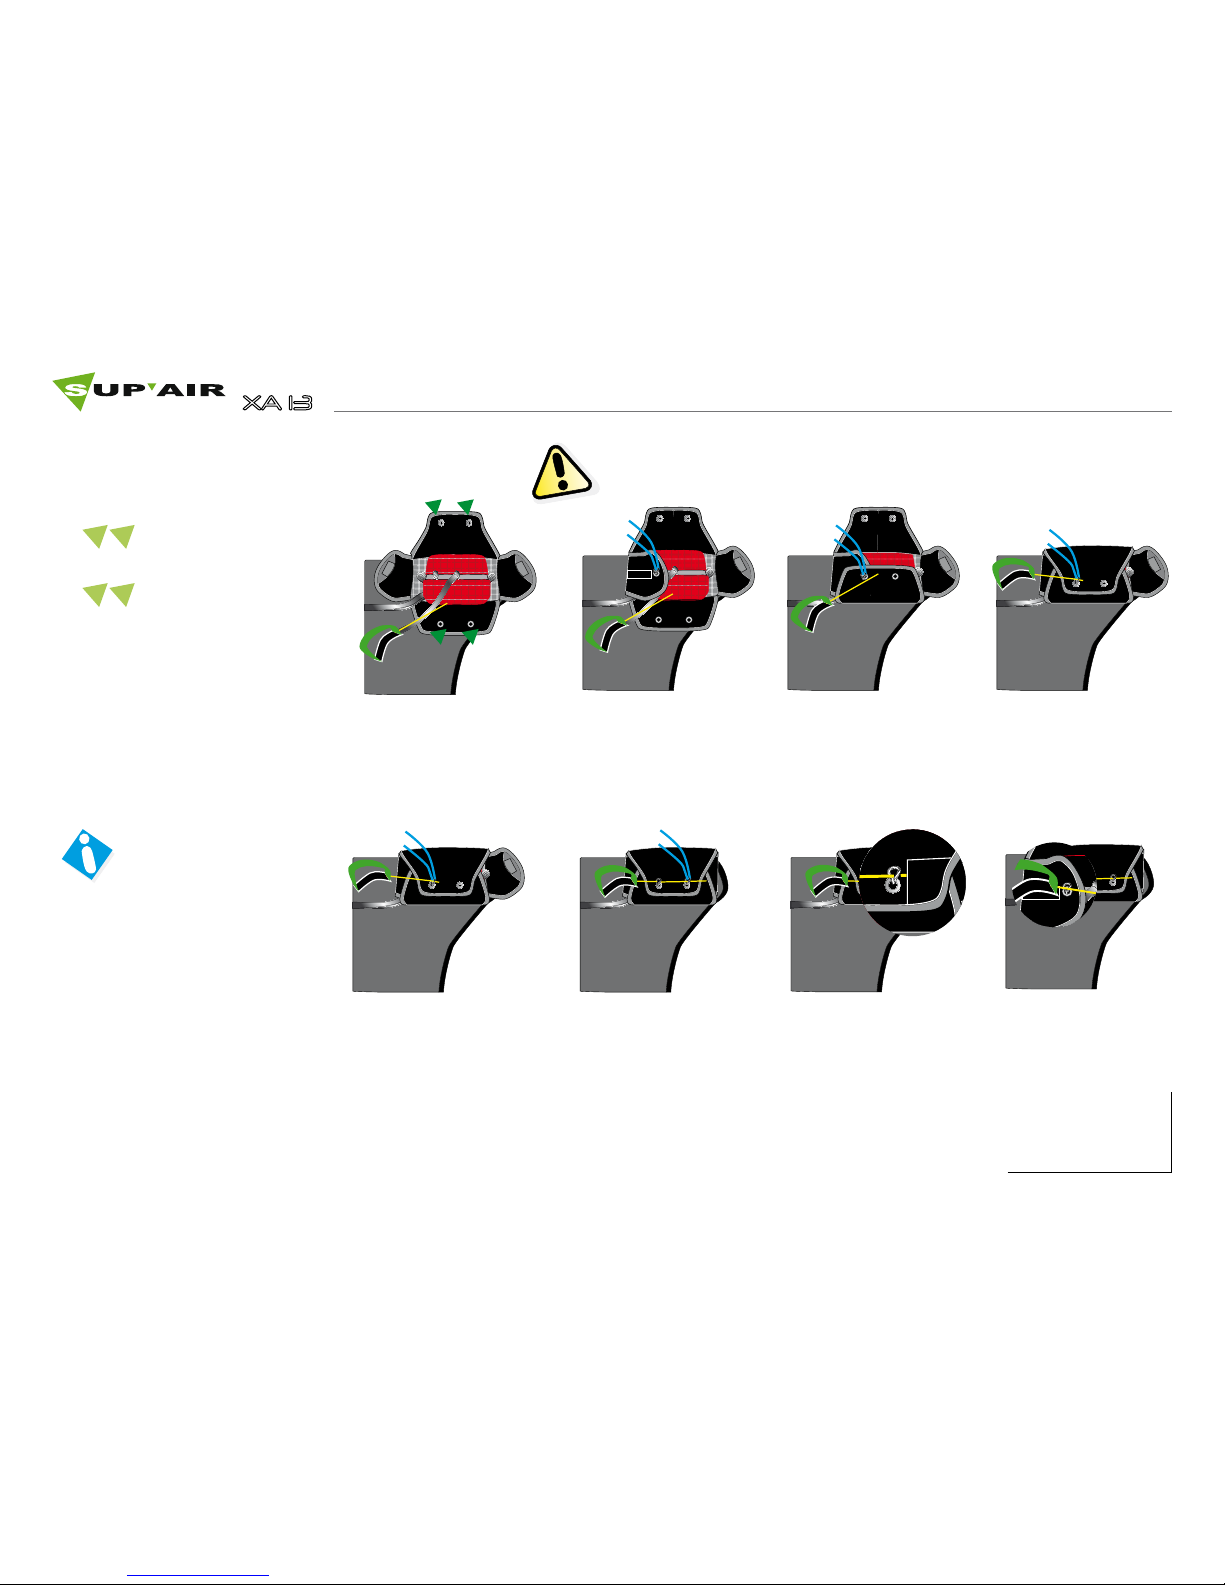
Placing the parachute in the rescue parachute pocket
Thanks for reading carefully ! We recommend the initial rescue parachute installation is made by a qualified person.
A B
C
D
Upper flap
grommets
Under flap
grommets
1. Place the risers’ straps and the
rigging lines of the parachute
clearly coiled
2. Place the parachute
in its pod on top of the
risers and lines.
3. Take a suitable line and
pass it inside the snapper
on handle’s side.
4. Pull the snapper and
pass it through the B
grommet.
5. Pass the snapper
through the C grommet
and pass the handle’s
cable inside the hole of
the down flap and finally inside the snapper.
Pull away gently the line
6. Place the line through
the other snapper in the
A and D grommets (up
and down flaps). Repeat
step #5.
7. Put the cable trim
inside the flap pocket
8. Turn down the last
flap and place the
handle on its velcro.
When the assembly is complete,
perform a test pull
of the handle to
ensure the compatibility and the correct deployment of
the rescue (pod +
handle). Then reassemble as previously done.
Page 11
11
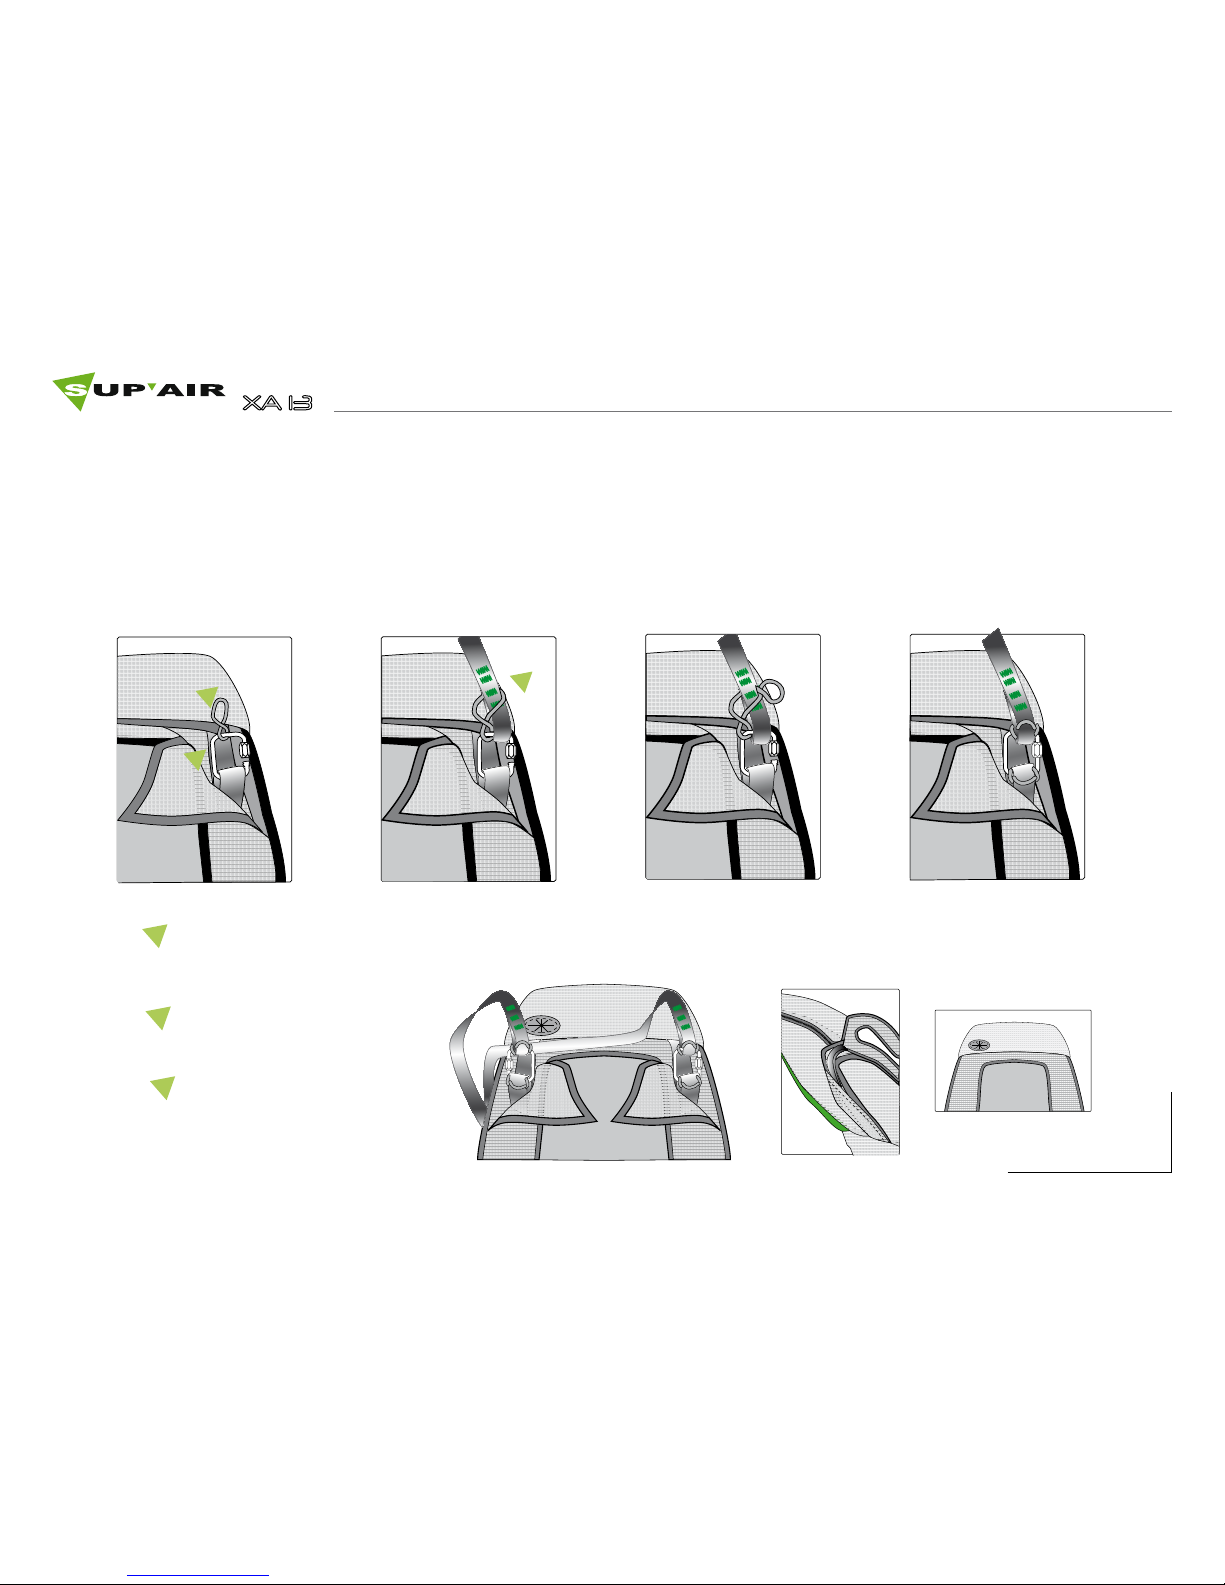
Connecting the rescue parachute risers to the harness : Y risers
1
2
3
Maillon Rapide ® Inox
6mm (x2)
O-Rings (x2)
Parachute risers
1. Place the Maillon Rapide®
(locking nut upwards and on
exterior side) inside the webbing loop. Place the O-ring
inside the Maillon and twist it.
2. Pass the riser inside
the free loop and inside
the Maillon Rapide®.
3. Make a new twisted
loop with the ring and
pass it inside the Maillon
Rapide®.
4. Repeat steps #1, #2 and
#3 with another O-ring for the
connexion to harness. Tighten
the Maillon Rapide® locking
nut correctly, with a spanner if
needed.
5. Neatly stow any surplus risers
under the flaps.
1
2
3
Elévateur parachute de
secours
Page 12
12
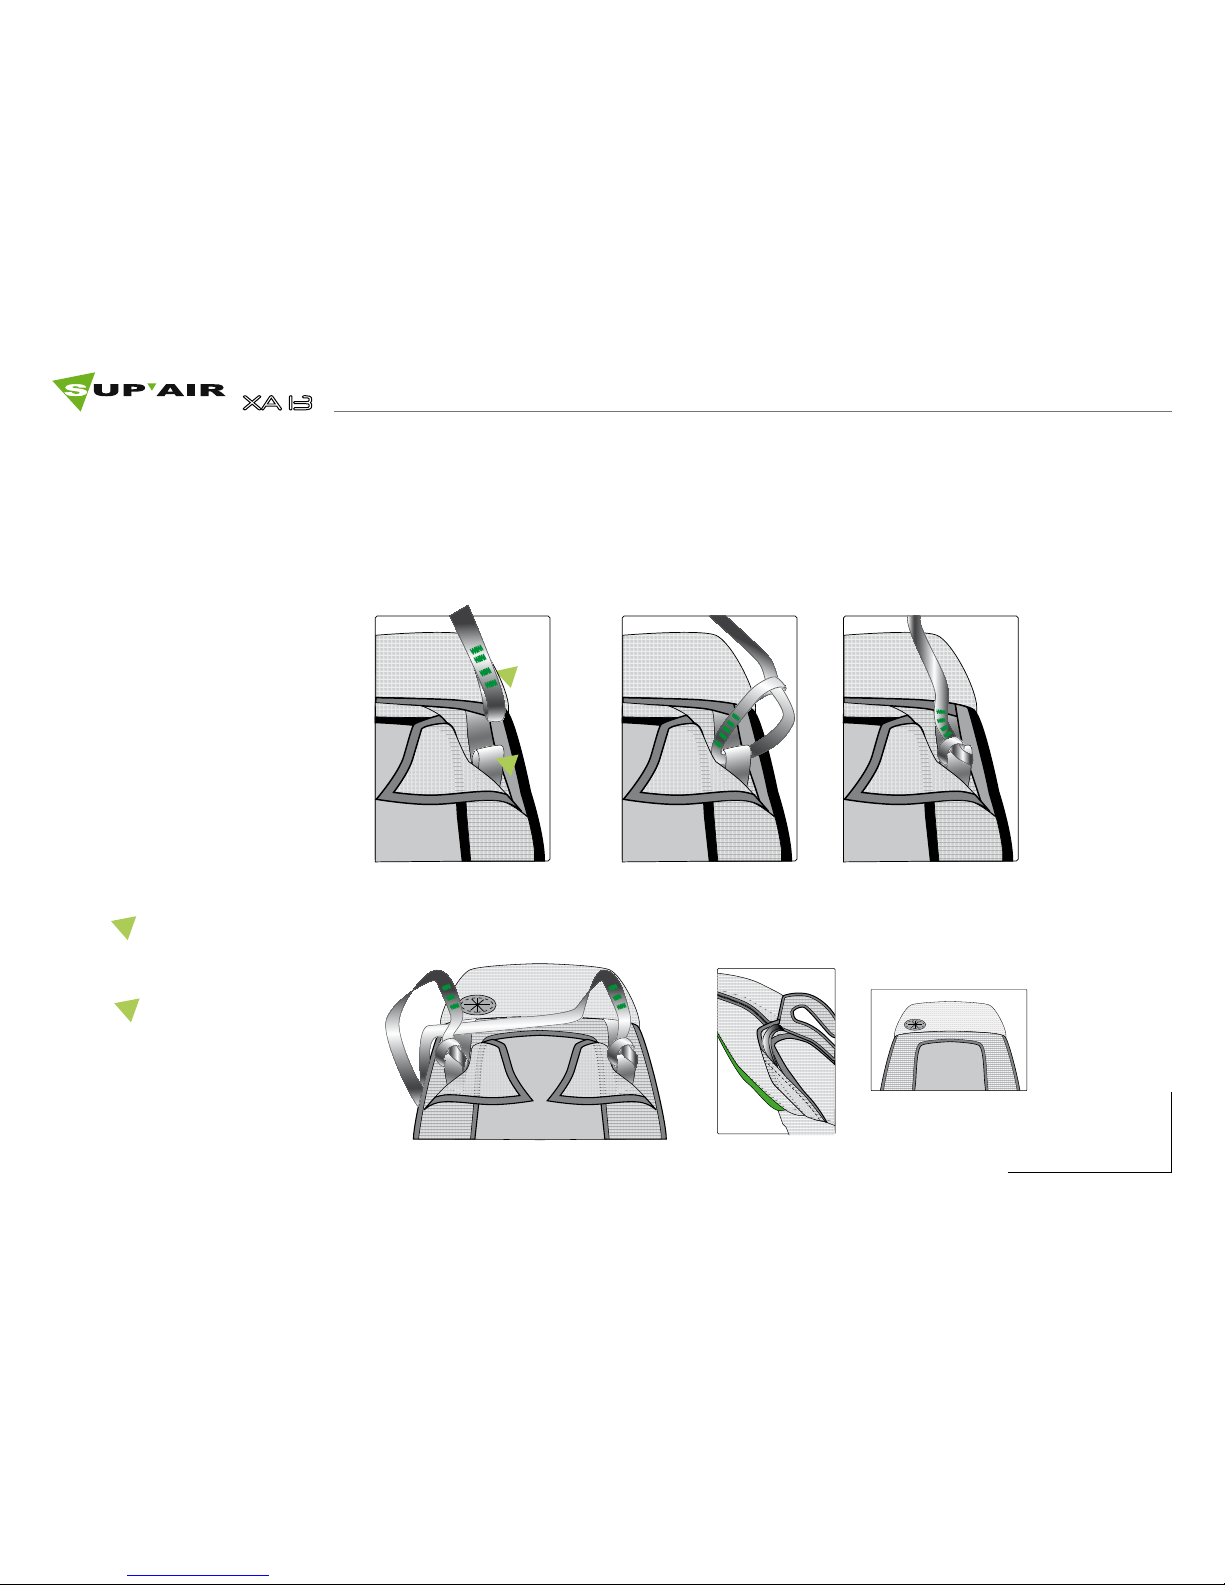
Connecting the rescue parachute risers to the harness : standard risers
1
2
1
2
Rescue parachute
standard risers
Webbing loop for rescue risers attachment
1. Make a lark’s head
between the risers and
the webbing loop for
rescue attachment.
2. Fasten the
lark’s head neatly
3. Neatly stow any surplus risers under the flaps.
Your XA13 is fitted with light standard parachute risers
Page 13
13
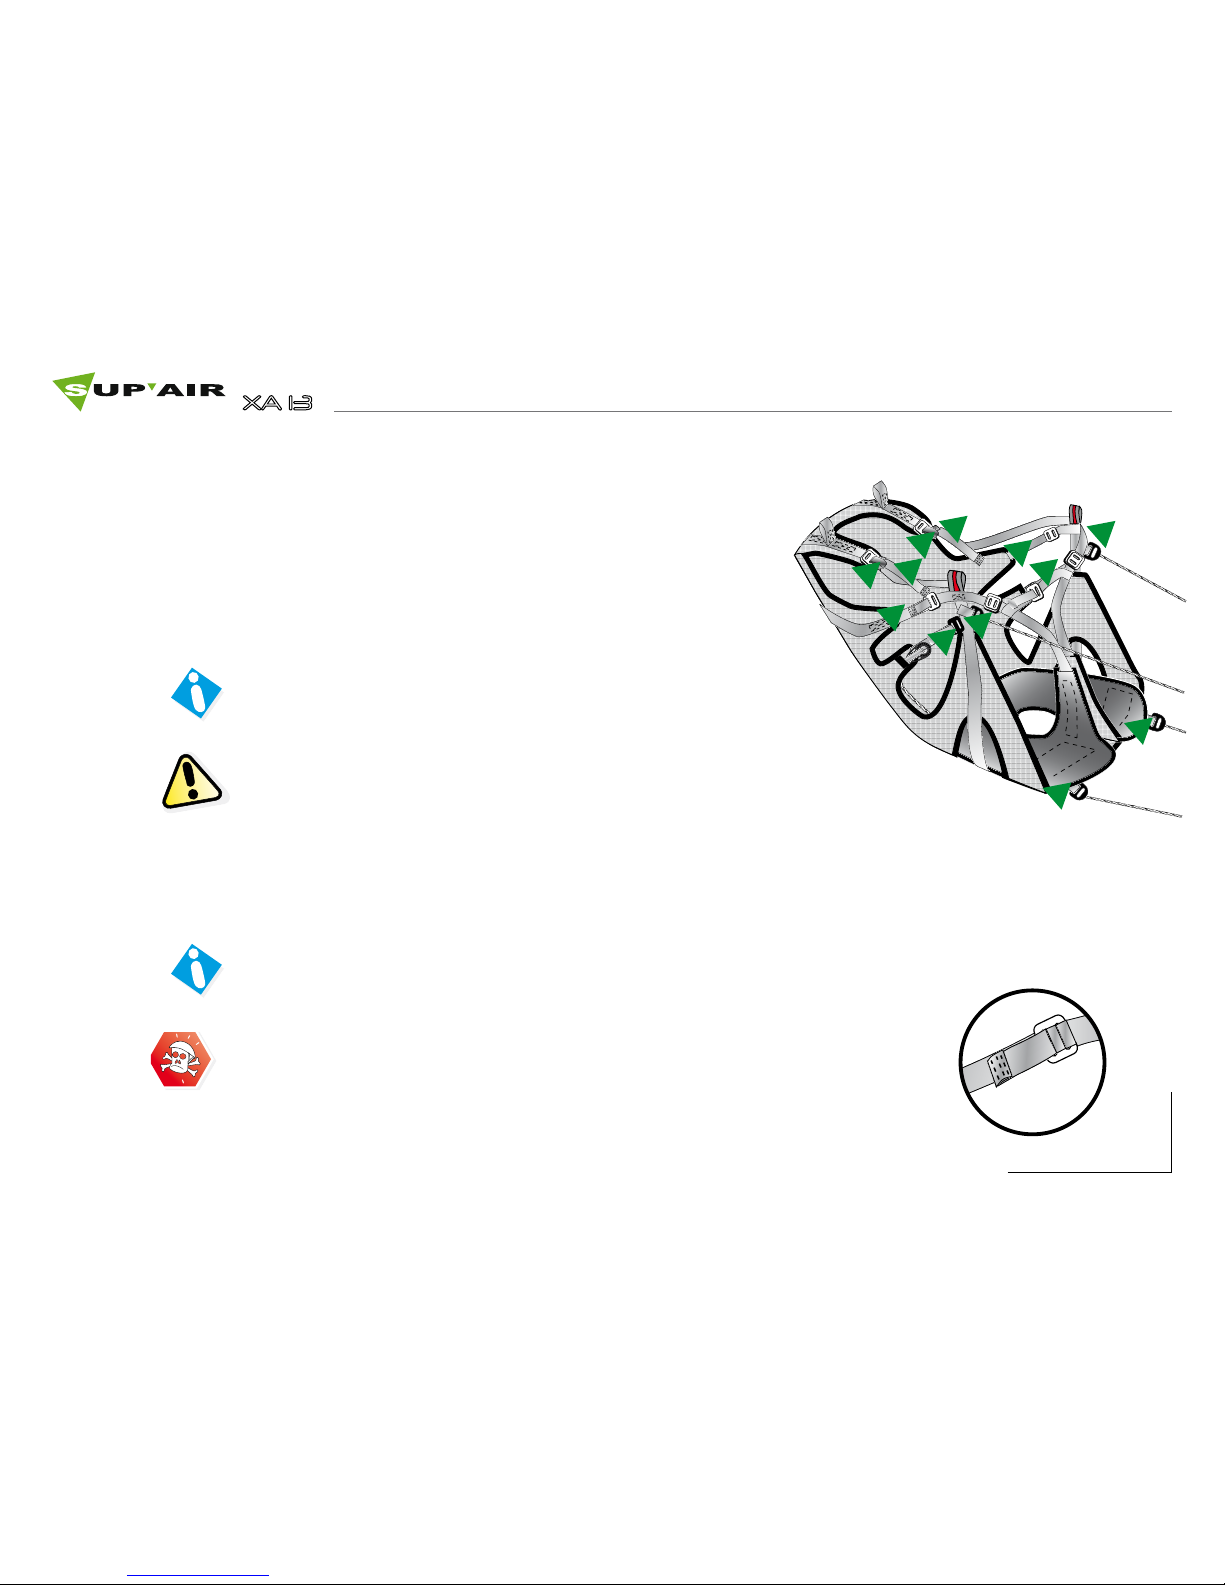
Change the inclination by tightening the 3 webbing (to be more
vertical) or by loosening it (to be more horizontal)
You can increase or decrease the lumbar support by loosening the
4 buckle
Tighten the shoulders’ straps with the 5 webbing
Loosen with the 6 webbing
The support of the shoulders’ straps greatly helps comfort. It should be set
precisely.
Leaning angle setting
Shoulders’ straps adjustment
With the help of the two lateral and under seating buckles, set the
angle of the Speedbag around horizontal position.
Speedbag angle setting
A
B
C
Caution : these settings are only possible under portal
The settings webbings and the chest strap must be IMPERATIVELY put back inside the frames. It is STRICTLY forbidden to cut or unstitch the webbings’ends
as they are integral part of the harness rigidity and EN1651 certification adn
consequently to your safety !
1
2
3
4
5
2
1
3
4
5
6
6
Page 14
14
Comportement en vol
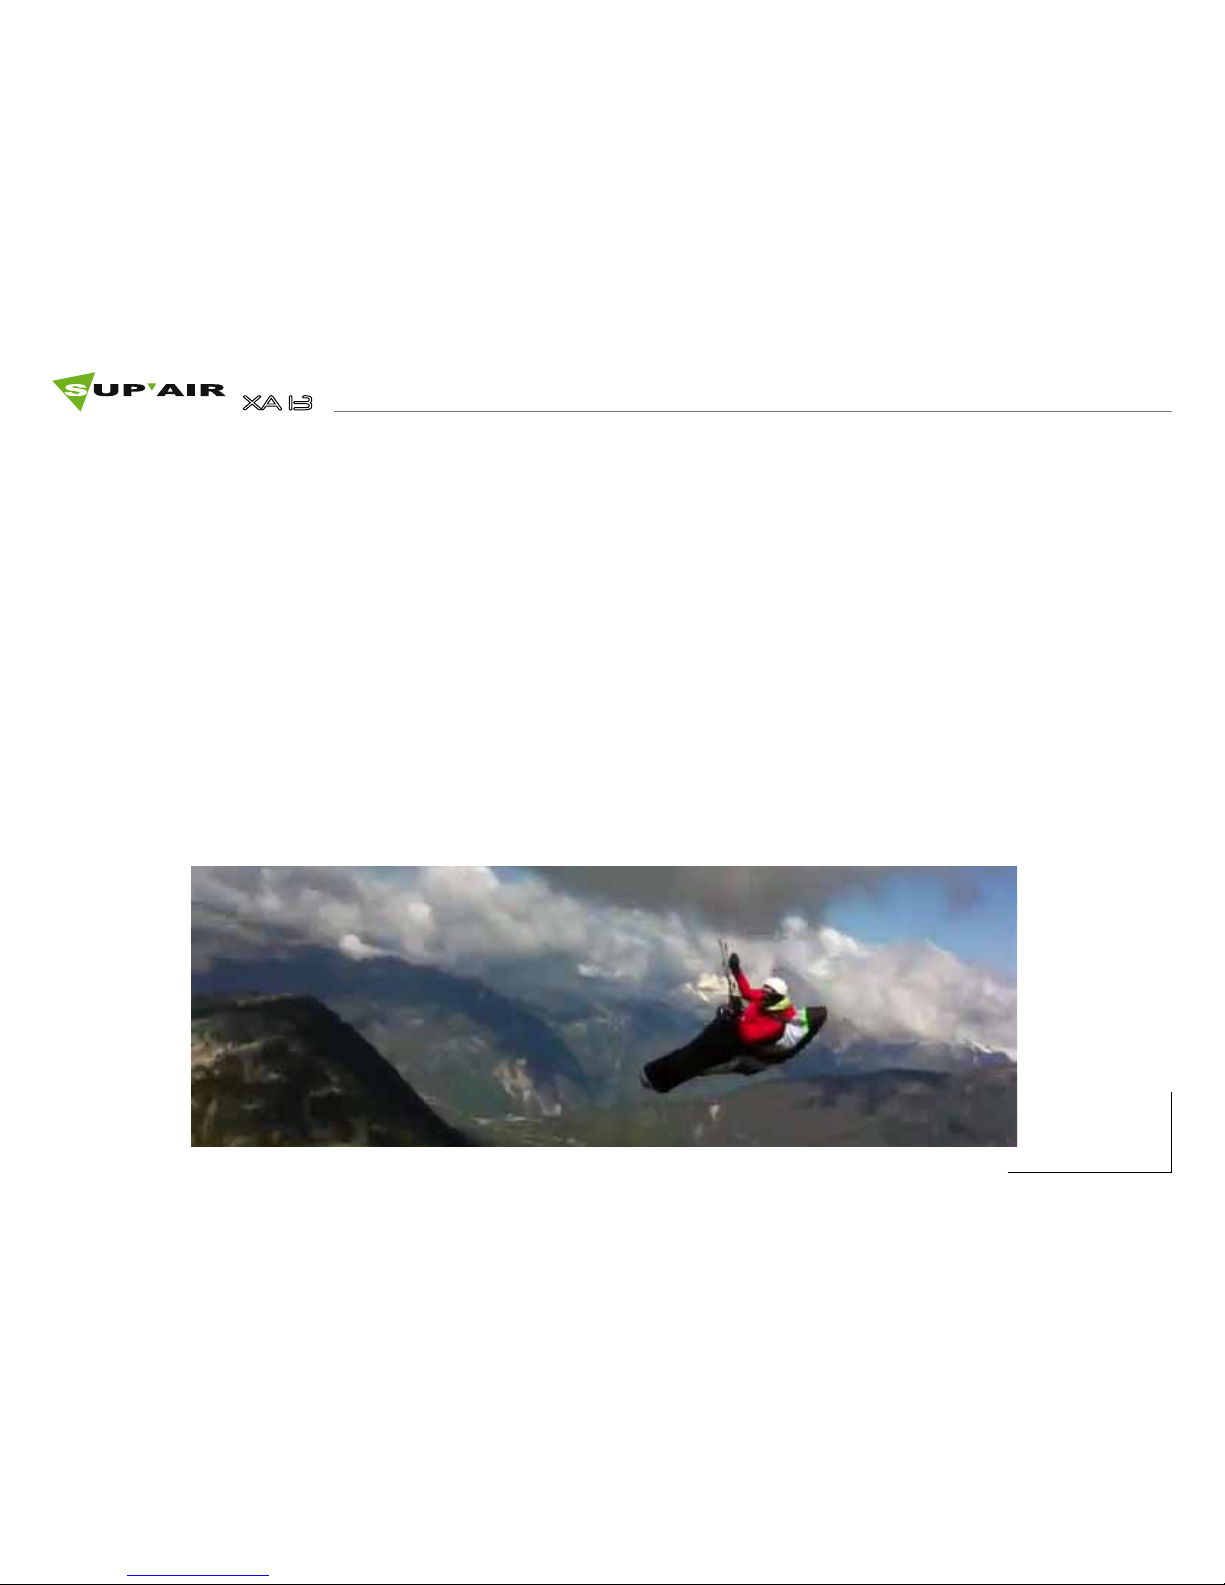
The XA13 has been designed for 2013 Redbull X-Alps. It is consequently a very performent harness.
We have lightened whenever possible but wihout any compromise on both active and passive security
Fligh behaviour is very stable and will enable you to fly in the very strong conditions one may encounter
on suche journey.
Page 15
15
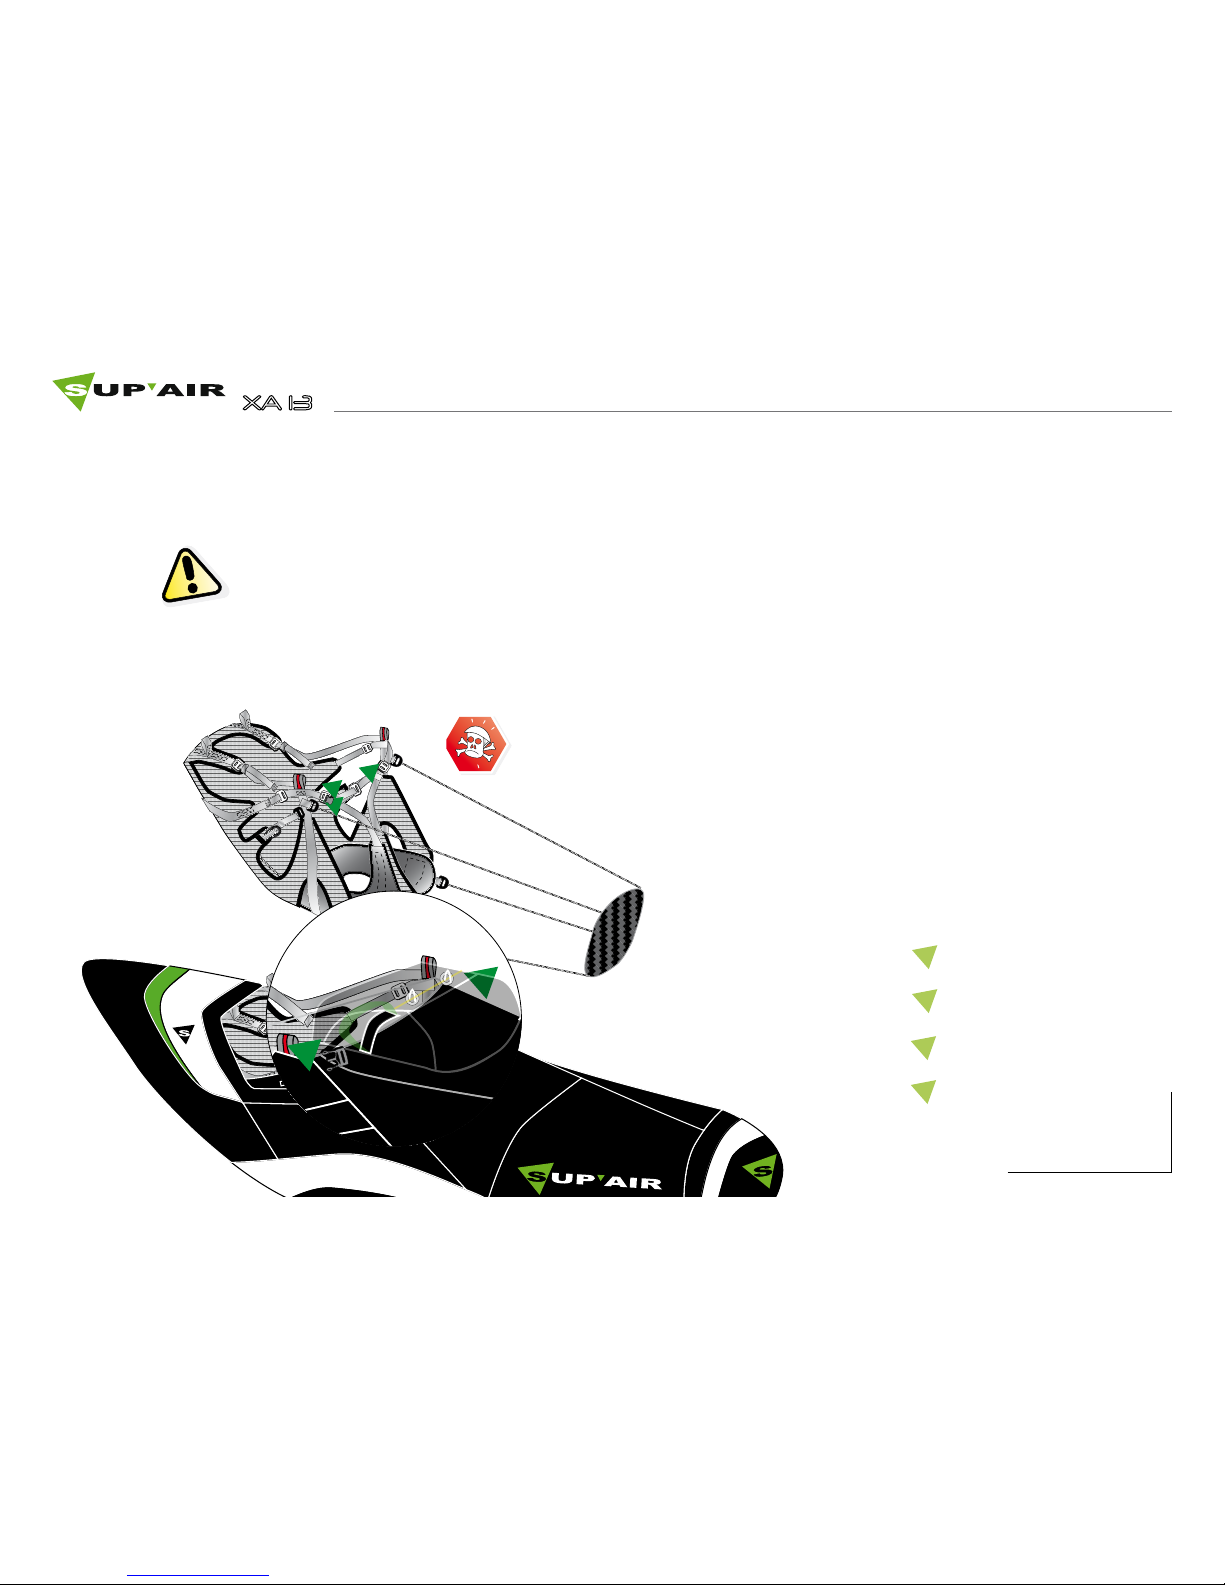
Pre-Flight control
After a thorough weather conditions analysis, when the decision to fly has been taken, fit into
the harness :
• Check that the harness and the carabiners did not deteriorate.
• Check thoroughly that the rescue handle’s cable end has not got outside the snap-
pers’ flaps.
• Check that your personal settings haven’t changed.
• Check that all zippers and buckles are closed.
• Check that the speedbar is correctly connected and set.
• Check that no rigging line or other object comes in contact with rescue parachute
handle.
• Fasten the buckles (thigh straps, safe-T-bar and ventral buckles) with application.
1
Thigh strap buckle
2
Thigh strap buckle
Check that the carabiners are correctly locked.
1
2
3
4
3
Boucle de fermeture du
speedbag (volet droit)
Boucle de fermeture du
speedbag (volet gauche)
3
4
Page 16
16
Take-off
After being correctly fitted into your harness, fasten the left buckle (1, on braided rope) of the
speedbag then fasten the second speedbag buckle (2).
During take-off, maintain a standing position and as soon as you are far enough from the
ground, fetch the speedbag with one of your heels. With help of the foot-rest, push back into
your harness.
Do not release your hands from the brakes when you are close to the
ridge.
In flight
Speedbar use
As soon as you are airborne, the behaviour is very instinctive and precise.
Please set the distance between the two carabiners according to aerology and to wing’s
manufacturer recommendations
We recommend a careful use of the speedbar because of an increased risk of massive collapse. Please read carefully the manual of your glider.
To use the speedbar, maintain one foot on the footrest then with the other, place your foot
onto the centering space and push the first bar. This spacer helps you to obtain a symmetrical acceleration.
Cette cale vous permet une accélération symétrique.
Once your foot touches the footrest, use the other foot to push the second bar.
Tightening provides more stability but less harness piloting efficiency. Be careful as it increases
the risk of risers twisting. On the contrary, loosening the strap provides more efficiency but can
be dangerous by turbulent aerology (increased risk of falling towards the collapsed side of
your glider).
Page 17
17
Landing
Throwing the reserve parachute
We strongly advise you to check frequently the location of the reserve parachute’s handle.
To do this, we recommend that you lower your right hand following the risers. This movement
should be done without looking. By doing this, you increase your chances in case something
goes wrong and you need to throw the reserve parachute.
Evaluate your height from the ground. If you have a lot of altitude, it may be better to attempt
to recover your wing to normal flight, But if you are in any doubt, deploy your rescue parachute.
Deploying a rescue parachute should be done only in an emergency.
With a strong, lateral and then vertical tug, pull the handle towards you and then throw the
whole parachute (including the bag and handle) as hard as you can towards a clear area
of sky. As soon as the parachute deploys, haul down the glider by pulling as symmetrically as
you can the risers (C or d D) or on the brakes.
Be prepared to land by adopting an upright position, with knees together and legs slightly
bent. Prepare to roll down with pivoting shoulders.
In order to land, during the approach, take your legs out of the speedbag in plenty of time.
Stand up inside the harness and adopt an upright position in order to run to dissipate horizontal speed.
Do not land whilst in the seated position, this is dangerous.
Page 18
18
Care
Wash and care of your harness
It is a good idea to wash your harness from time to time. To do this, we recommend to use a soft
solvent (such as soap), use a brush and rinse thoroughly. In any case, do not use chemicals such as
detergents or strong solvent because it may deteriorate the webbing, stitching and fabrics of your
harness.
Lifetime
The threads that compose the webbing and fabrics used in the XA13 have been selected in order
to ensure the best possible lightness/lifetime compromise. Nonetheless, in some conditions, after a
long term exposure to UV and/or significant abrasion or exposure to chemicals, it is compulsory to
check your harness in a certified repair centre. It is about your safety.
The zip fasteners should be lubricated from time to time, using a silicon spray.
If your harness gets wet, it is advisable to treat your automatic buckles and carabiners with silicone grease from time to time.
These carabiners must never be used for anything else else than paragliding (not for climbing, no
towing, etc ...)
The carabiners must be replaced by new ones every 5 years.
Page 19

19
Materials
Recycling
If you judge your XA13 has finished its life, you can separate all the plastic and metallic parts and
apply up-to-date sorting rules in effect in your community. For recycling of the fabric parts, we advise
you to contact your local authority that deals with fabric recycling.
Fabrics
RIPSTOP cordura armé vectran
Skytex 38 gr
Speedbag
LYCRA MEMBRANE
Webbings
Polyamide 20 mm (500 DaN)
Polyester 22 mm (1100 DaN)
Repair
SUP’AIR offer a repair facility for their products beyond the end of the warranty period. Please
contact us either by telephone or by E-mail [email protected] in order to receive a quotation.
Though we use the highest quality materials, it is possible that your harness may eventually deteriorate through general use. If its is showing any signs of significant wear and tear, you should check it
and repair it in an certified repair centre.
Environmental friendly practices
We highly recommend you to respect as much as possible our environment while practicing paragliding and especially : not to go outside tracks, do not make unwanted noise and do
not disturb the mountain areas’ balance. We advise you to do this starting from the take-off.
Page 20
20
Warranty
SUP’AIR takes the greatest care in the design and production of its products. SUP’AIR guarantees
its products 5 years (from purchase date) against any defect or design fault occurring during normal use. Any damage or degradation resulting from incorrect or abusive use, abnormal exposure
to aggressive factors, including, but not limited to; high temperature, intense sun exposure, high
humidity etc will invalidate this warranty
Paragliding is an activity that requires, skill, specific knowledge and sound judgement. Be careful,
learn in certified schools, subscribe an adequate insurance policy as well as a flying license and
make sure your skill match the conditions. SUP’AIR cannot be held responsible for your paragliding
decisions or activities
Disclaimer
Pilot’s gear
This is essential that you carry a helmet, suitable boots and clothing. Taking a reserve parachute
suitable for your weight and correctly connected to your harness is also very important.
Warranty
This SUP’AIR product has been designed exclusively for paragliding. Any other activity such as skydiving or BASE jumping is absolutely forbidden.
Page 21
21
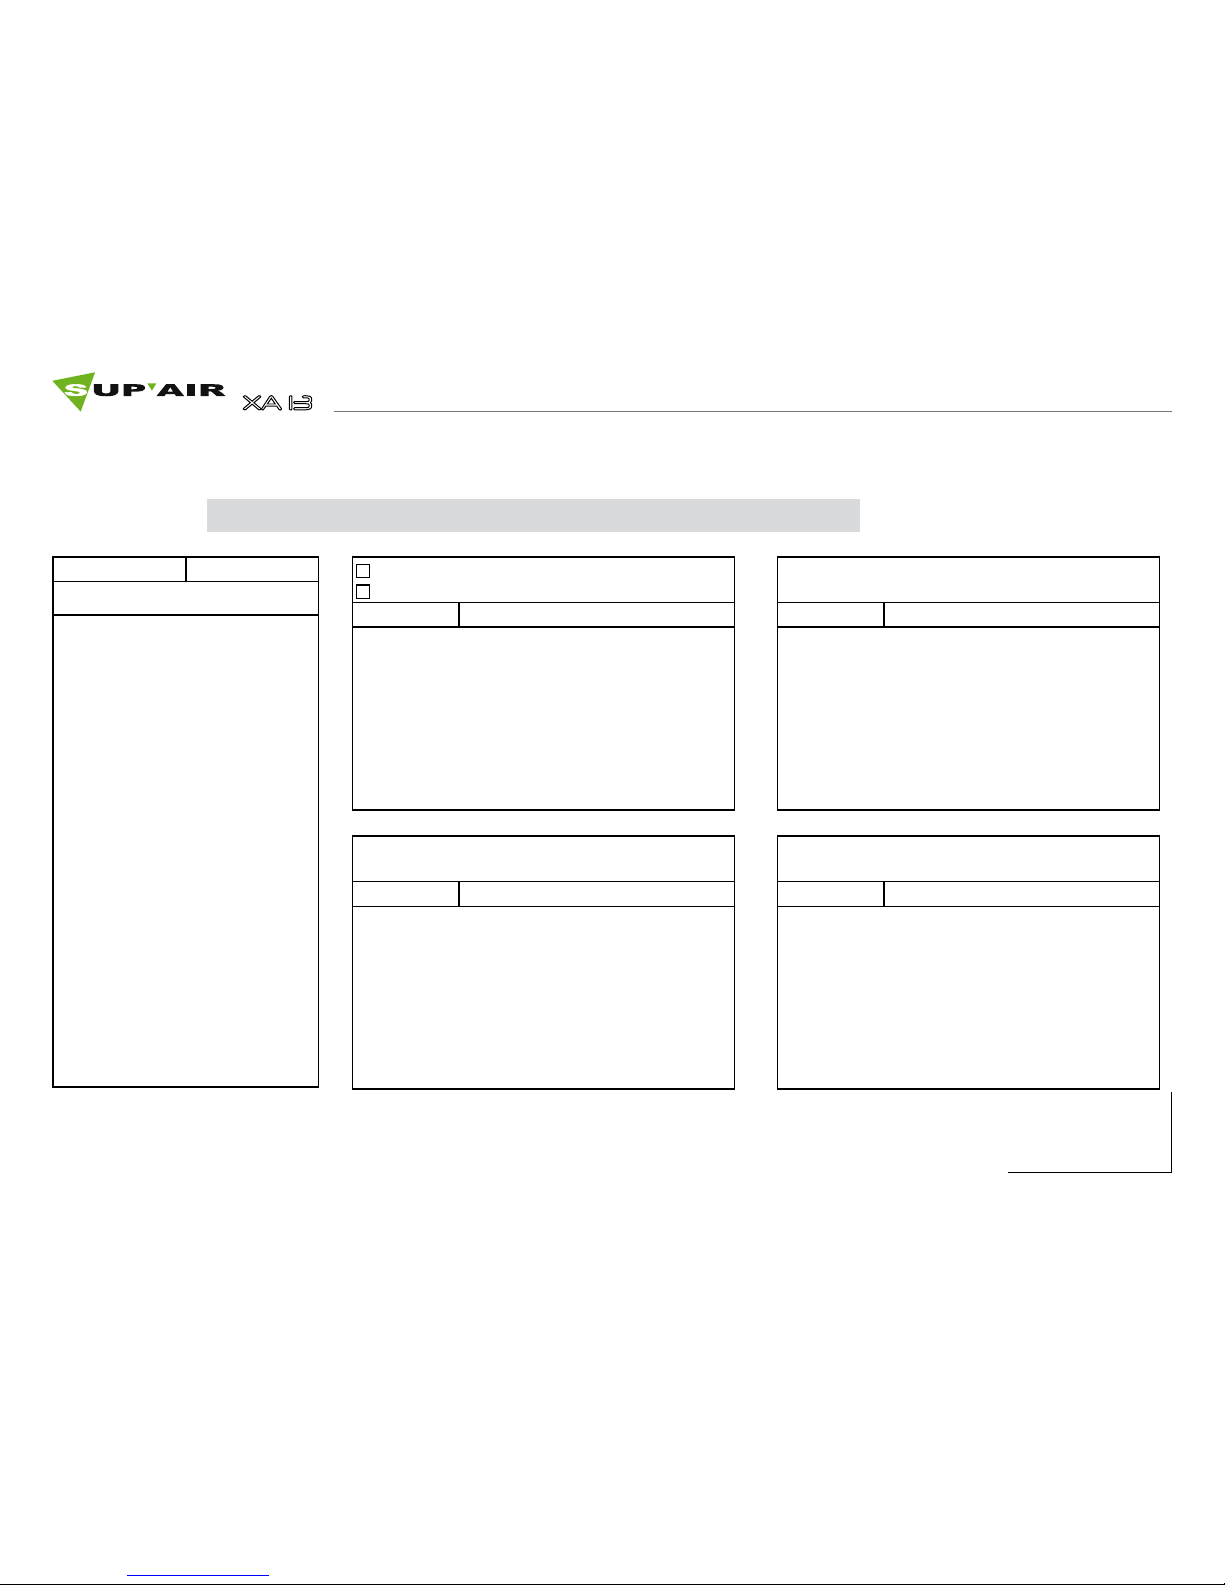
Service Book
This page will help you to record all the life stages of your XA13 harness.
Purchase date
Owner’s name
Name and stamp of the shop
Care
Resale
Date
Workshop’s name/ Buyer’s name
Serial number :
Care
Resale
Date
Workshop’s name/ Buyer’s name
Care
Resale
Date
Workshop’s name/ Buyer’s name
Care
Resale
Date
Workshop’s name/ Buyer’s name
Page 22

SUPAIR-VLD
PARC ALTAÏS
34 RUE ADRASTÉE
74650 ANNECY CHAVANOD
FRANCE
45°54.024’N / 06°04.725’ E
 Loading...