

Page 1
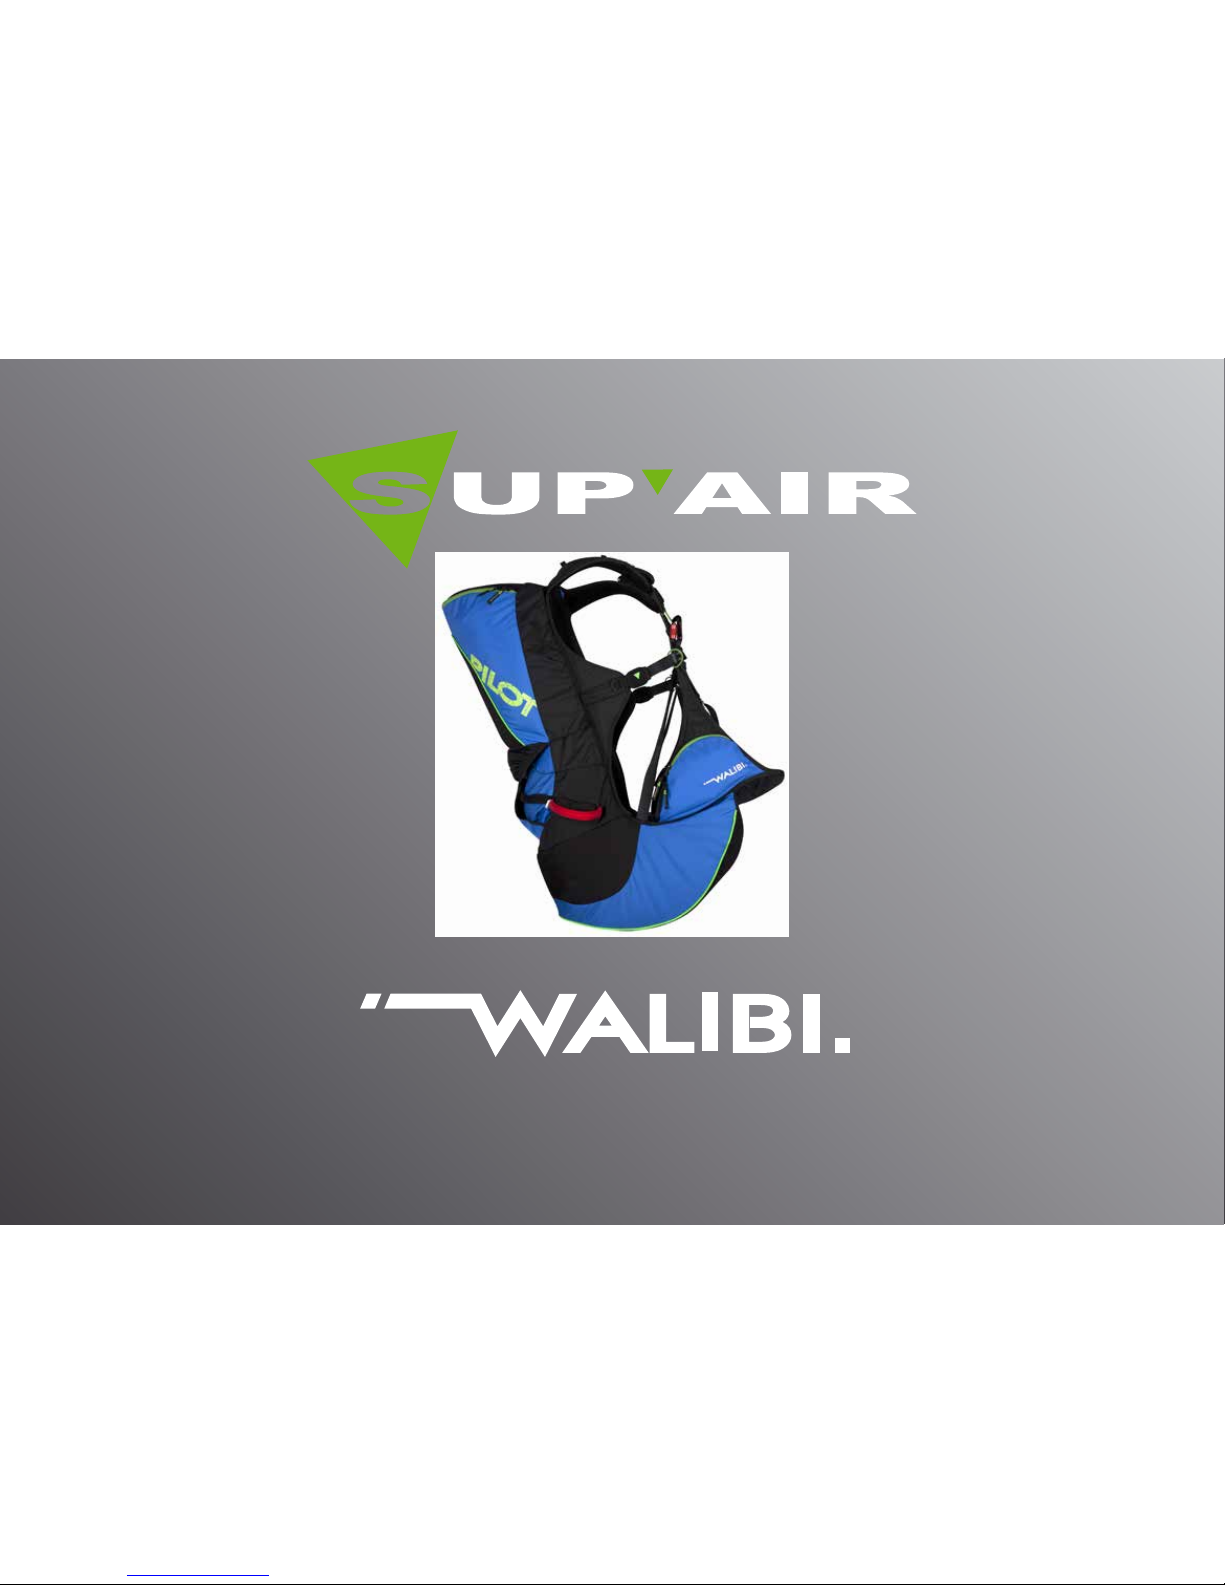
SUPAIR-VLD
PARC ALTAÏS
34 RUE ADRASTÉE
74650 ANNECY CHAVANOD
FRANCE
45°54.024’N / 06°04.725’ E
RCS 387956790
Revision Indice
English version
User’s manual
Page 2

2
Thank you for your choice of a WALIBI². We are proud to join you on your journey
in our common passion : paragliding.
SUP’AIR has been designing, producing and selling accessories for free ying
activities since 1984. By choosing a SUP’AIR product you benet from almost
thirty years of expertise, innovation and listening. This is also our philosophy :
working endlessl
We trust that you will nd this user’s manual comprehensive, explicit and hopefully
pleasant to read. We advise you to read it carefully !
On our website www.supair.com, you will nd the last up to date information about
this product. If you have any further questions, feel free to ask one of our retailers.
And of course, the entire SUP’AIR team are at your disposal through info@supair.
com
We wish you many safe ying and enjoyable hours, and happy landings
The SUP’AIR team
Page 3
3
List of contents 3
Introduction 4
Technical specications 5
Harness overview 6
Components 6
Rescue parachute setup assembly. 7
Adjustable reserve parachute pocket. 8
Reserve parachute installation in the pocket. 8
Installing the reserve parachute in its pocket. 9
Position setting 11
Leaning angle setting 12
Shoulders’ straps adjustments. 12
Chest strap adjustment. 12
Flight behavior 13
Pre-Flight control 14
Take-off 15
In ight 16
Landing 16
Wash and care of your harness 17
Storage and transport 17
Lifetime 17
Care 17
Repair 18
Materials 18
Recycling 18
Environmental friendly practices 18
Warranty 19
Disclaimer 19
Pilot’s gear 19
Service Book 20
List of contents
Pictures credits: SUP’AIR
Page 4
4
Welcome to the tandem world.
With the WALIBI², you are equipped with a tandem harness designed with an integrated
reserve parachute pocket and an AirBag protection. This harness is targeting intensive
professional use.
The split-leg design facilitates the running phase and enables the pilot to adopt an ergonomic posture with the passenger seat locked in place between his legs after takeoff.
Introduction
After reading this manual, we suggest you check your harness by hanging in it before ying.
N.B : Three important icons will help you when reading this manual
Advice Caution ! Danger !!
Page 5
5
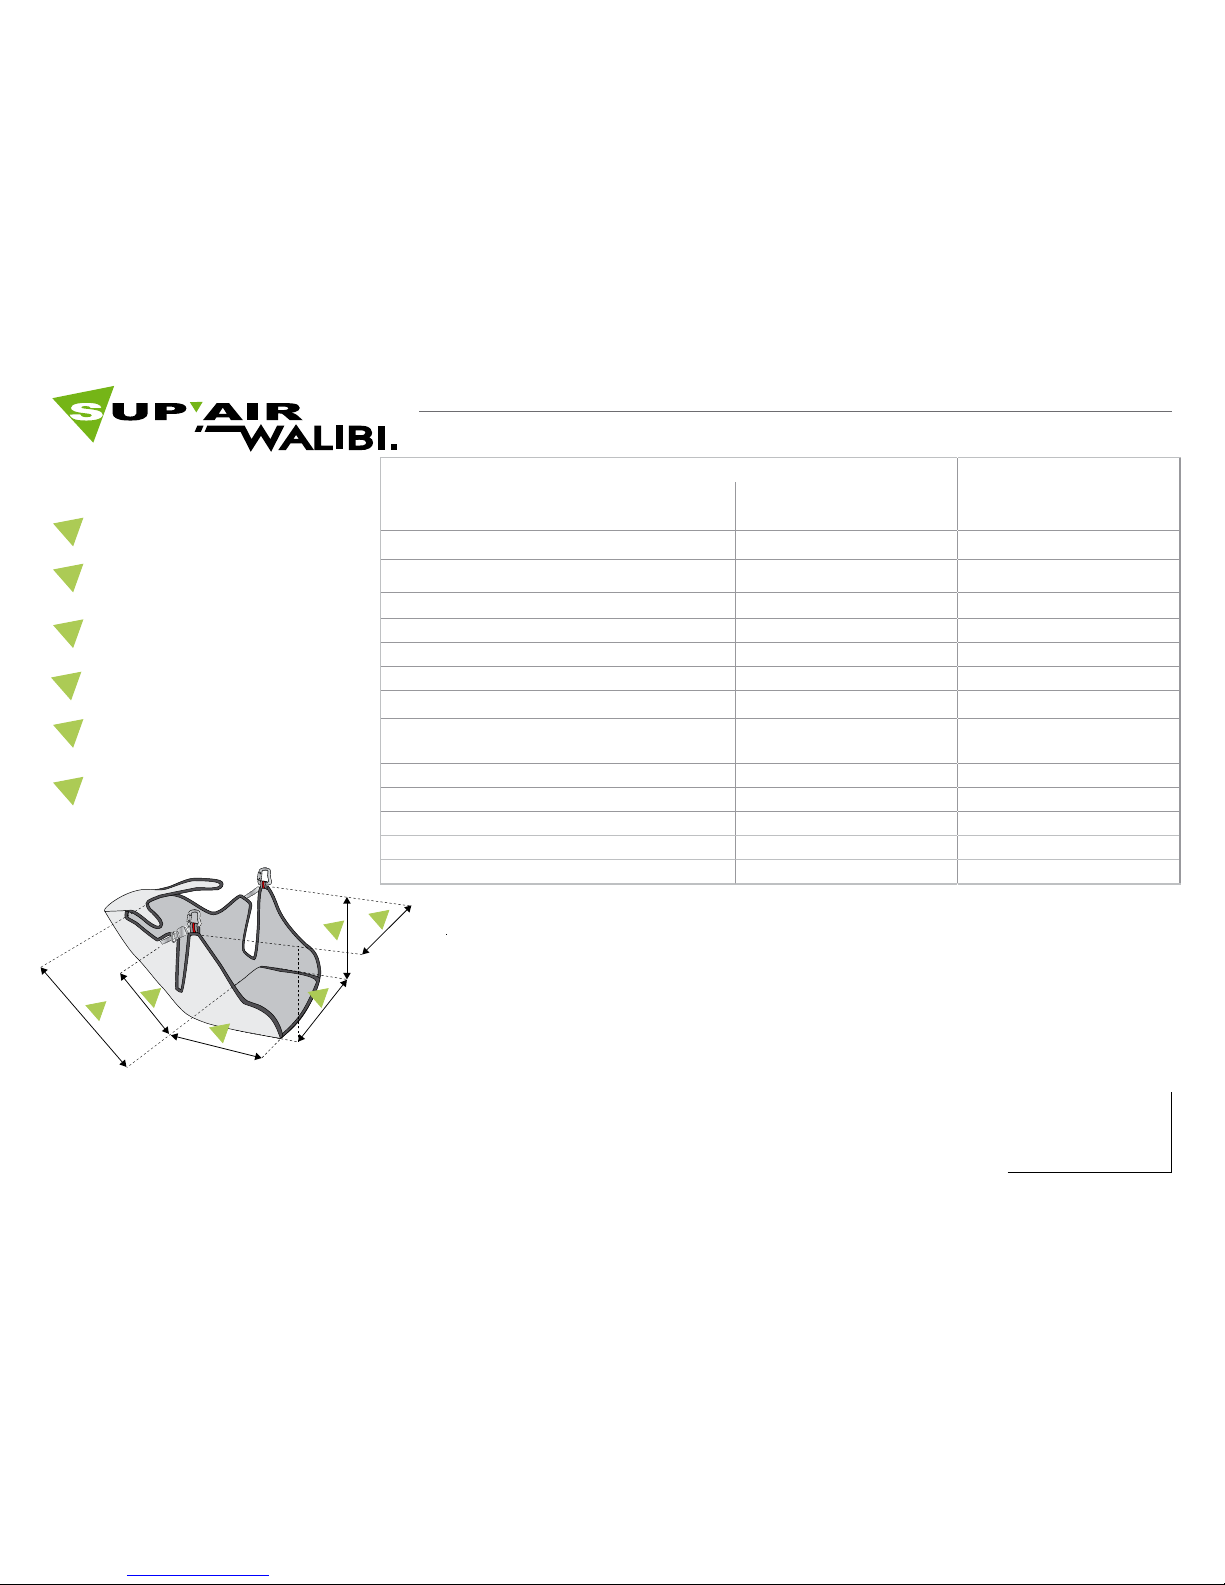
Taille S Taille M/L
Pilot size
155-175 cm 170-195 cm
Harness weight (+ carabiners+speedbar)
3610 g 3650 g
Designed for
Paragliding only Parapente uniquement
Back height (cm)
58 68
Leaning setting height (cm) 28 34
Seat length (cm) 40 47
Carabiners height (cm) 40 40
Impact damping system : Airbag (Volume)
Ye s Ye s
Impact damping system : Bumpair (Thickness)
No No
Homologation EN 1651 - LTF EN 1651 - LTF
Flight : tandem (Pilot- Passenger) Pilot Pilot
Flight : acrobatic ying
No No
Take-off: Winching
No No
Quick-out carabiners compatibility
No No
Technical specications
A
B
C
D
E
F
A
B
C
D
E
F
Back height (cm)
Leaning setting height (cm)
Seat length (cm)
Seat width (cm)
Carabiners height (cm)
Carabiners distance (cm)
This harness is delivered with two 30 mm Biners ( 138 g. for the set ).
Page 6
6
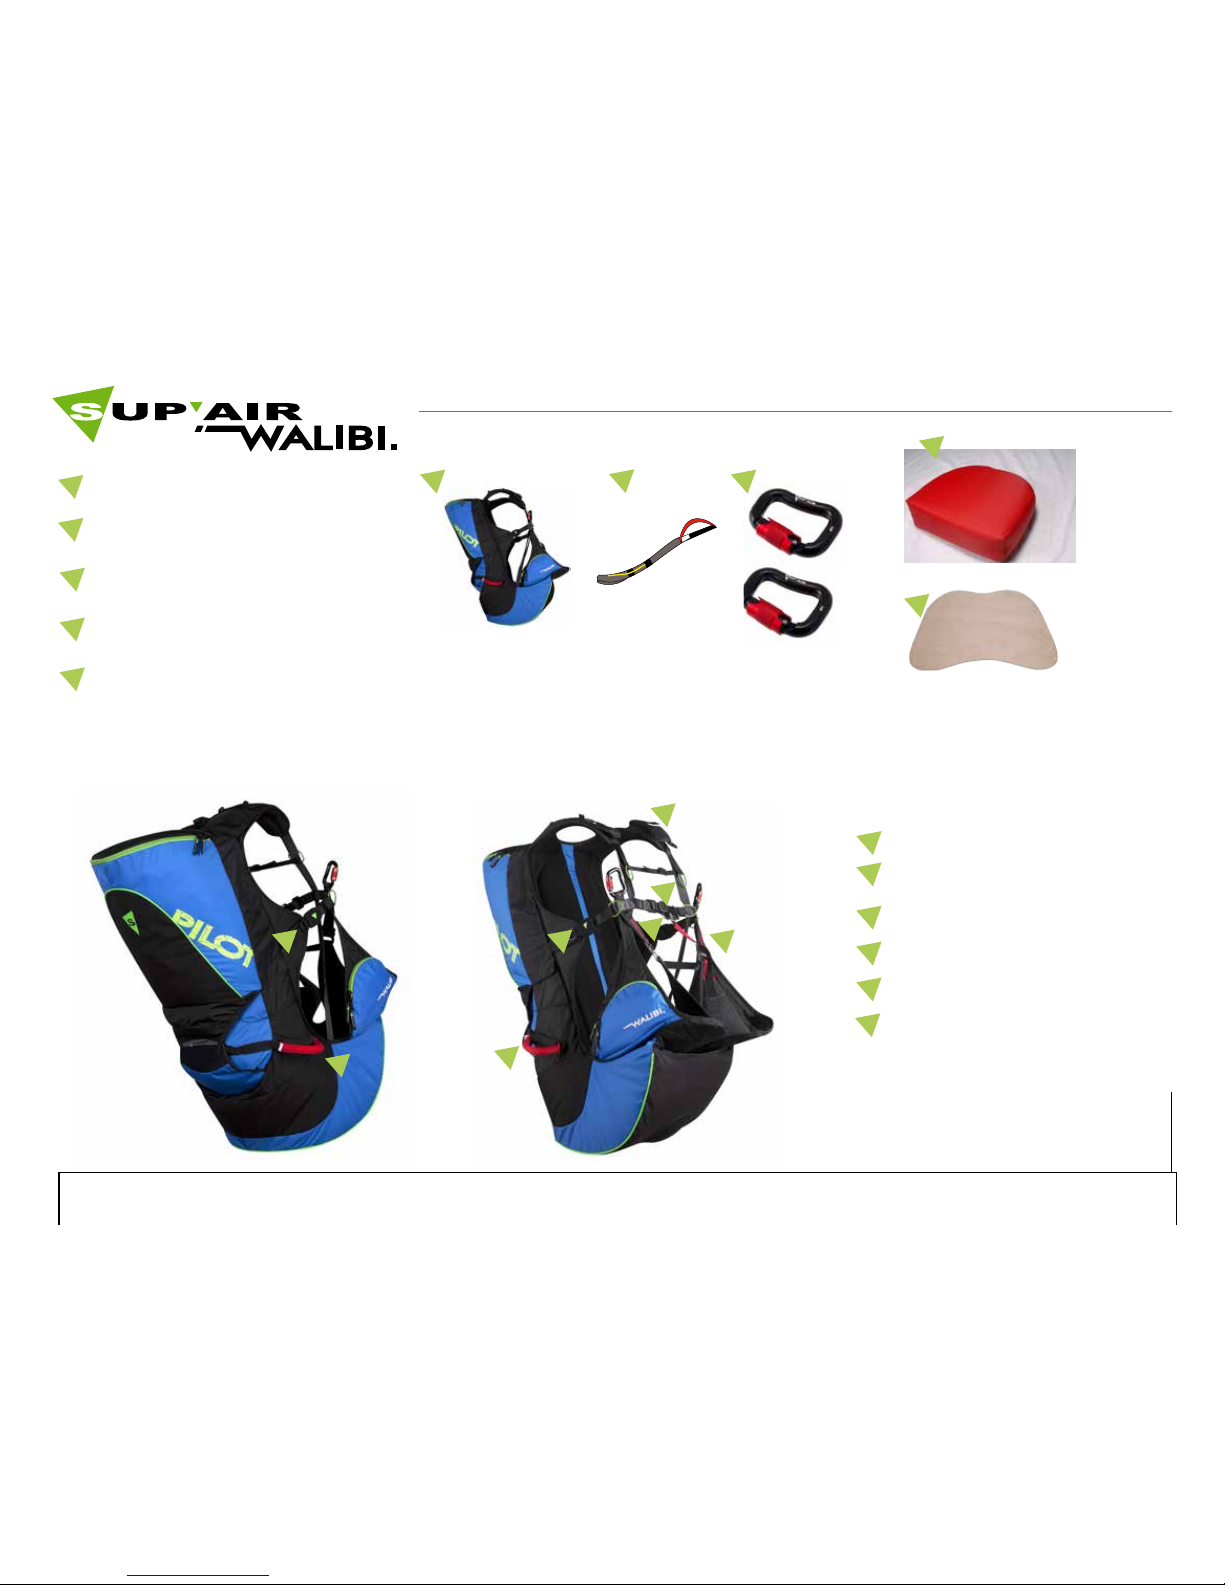
1
2
3
Harness
30 mm Aluminium self-locking biner
Reserve parachute handle (W)
Components
1
2
3
Harness overview
1
2
3
4
5
6
Automatic ventral buckle
Rectangular push-through leg straps
buckles.
Ventral width adjustment
Leaning setting
Shoulders straps adjustment
Reserve parachute handle (W)
This illustration will help you during your reading.
1
2
3
4
5
6
4
4
Mini Bump
4
5
5
Walibi Palte Wood
6
Page 7
7
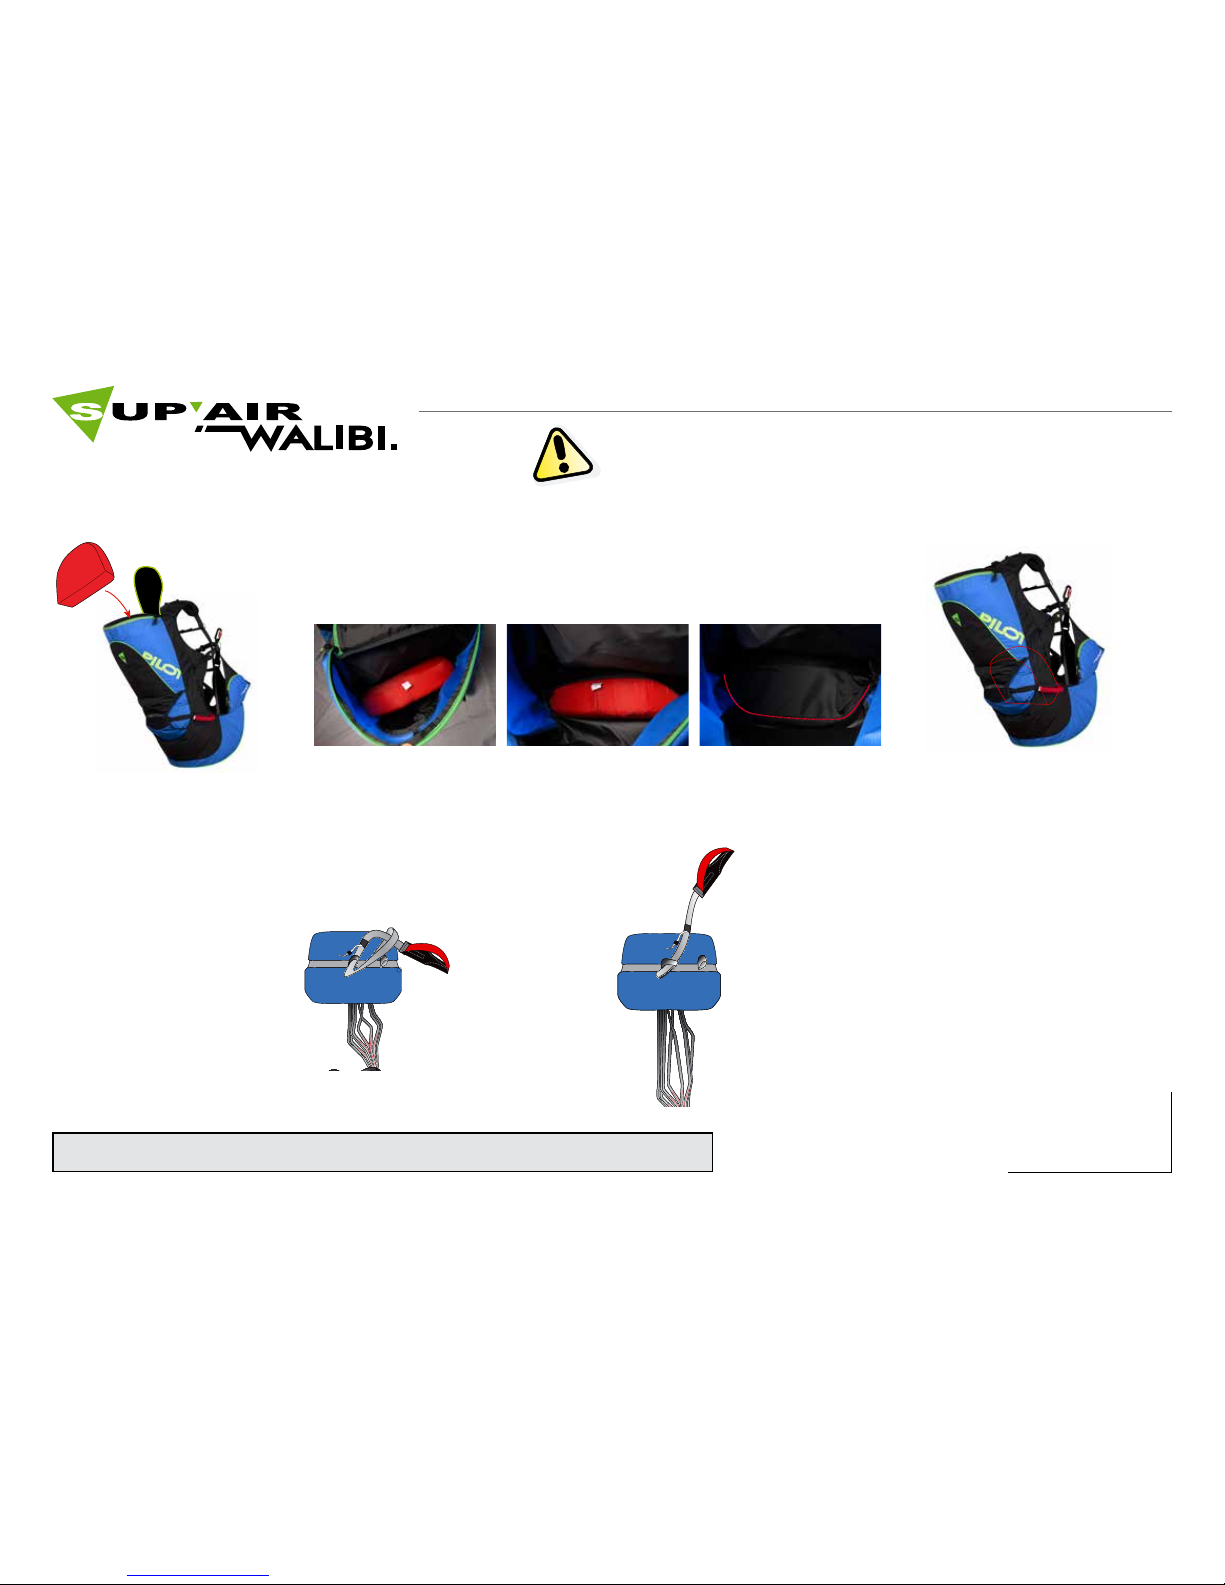
Connecting the handle to the rescue parachute’s deployment bag
Place the handle inside the
middle webbing loop and
make a lark’s head knot with
the handle.
Fasten tightly the lark’s head
knot and verify the solidity of
the link.
The handle must be connected to the central loop.
Rescue parachute setup assembly.
Thank you for comprehensively reading the following ! We will
recommend you to have your reserve parachute initially installed
by someone competent and familiar with the procedure.
Open the Mini-Bump zip located at the bottom of the dorsal pocket. Insert
the Mini-Bump through the dorsal pocket and slide it behind the reserve
parachute pocket.When done, close the Mini-Bump pocket.
Page 8
8
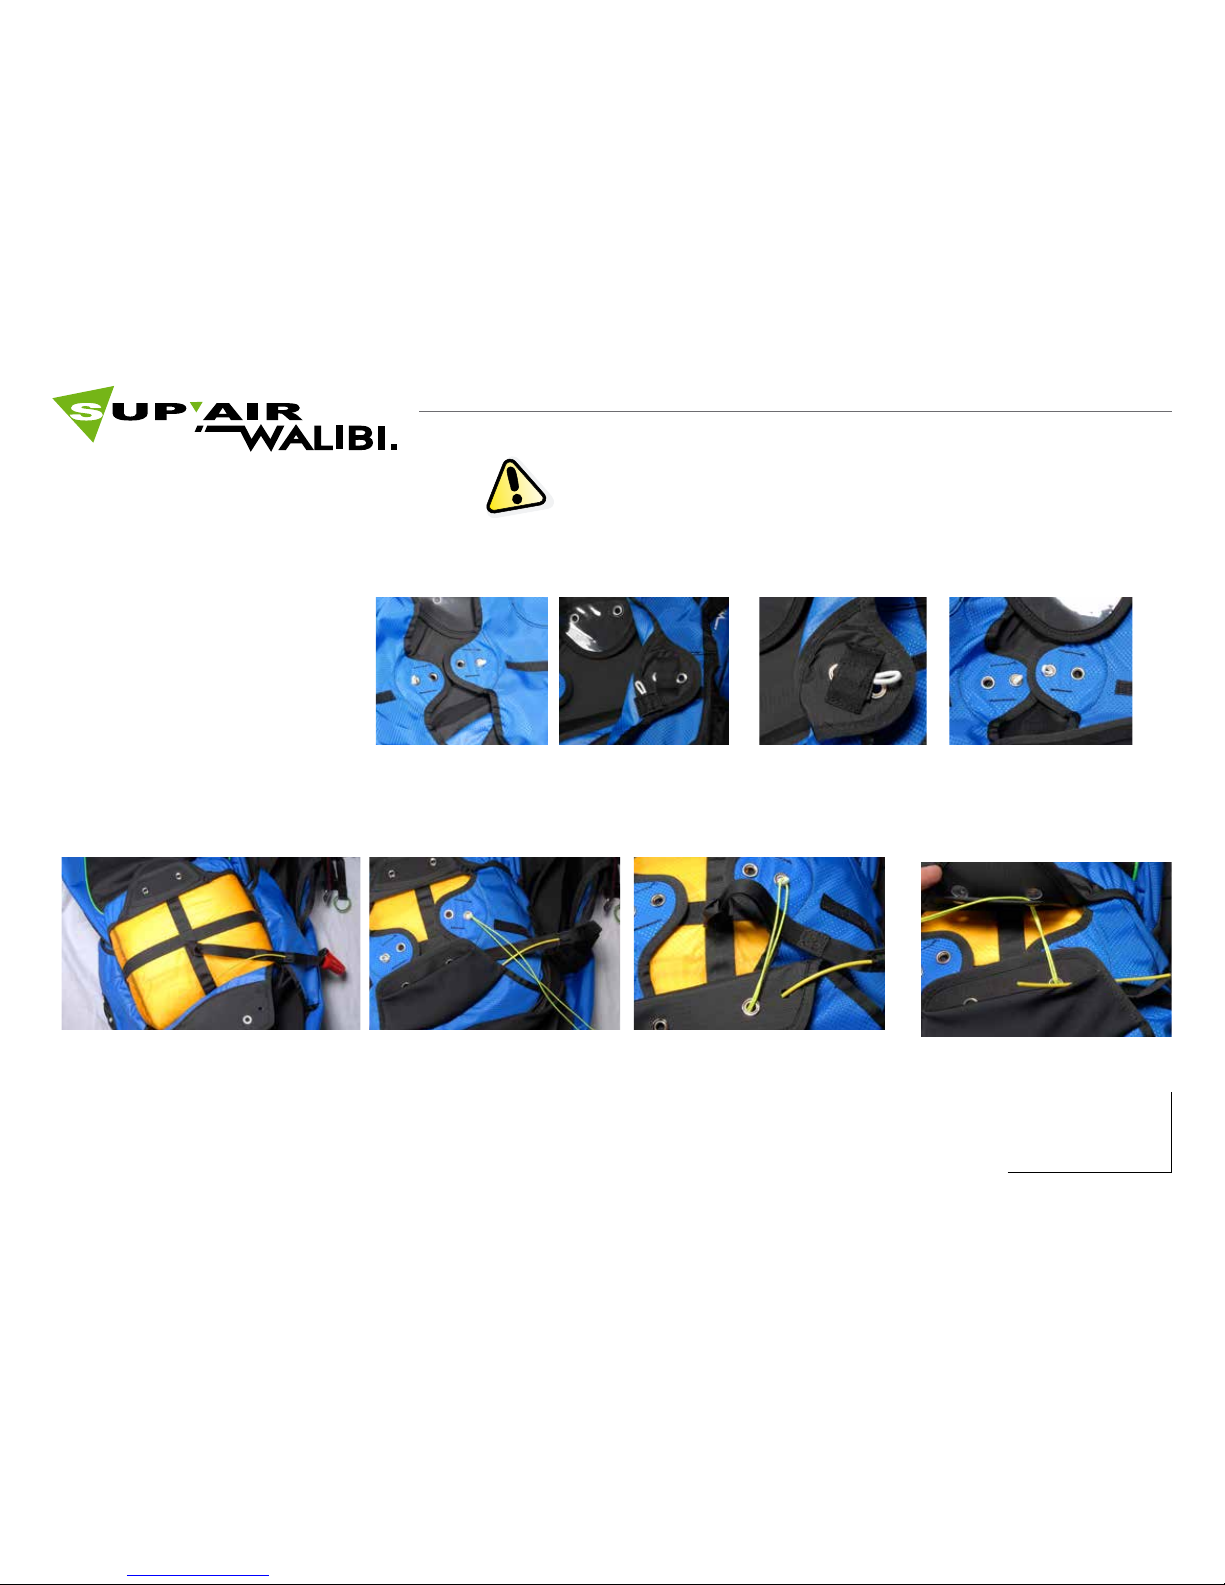
Installing the reserve parachute in its pocket.
Thank you for comprehensively reading the following ! We will recommend
you to have your reserve parachute initially installed by someone competent and familiar with the procedure.
Insert the reserve parachute inside the harness
parachute pocket by opening all the aps. The
POD must be positioned with the handle at the top
with risers and lines at the bottom. Push the risers
through the guiding sleeves ( the risers must be
located behind the parachute ).
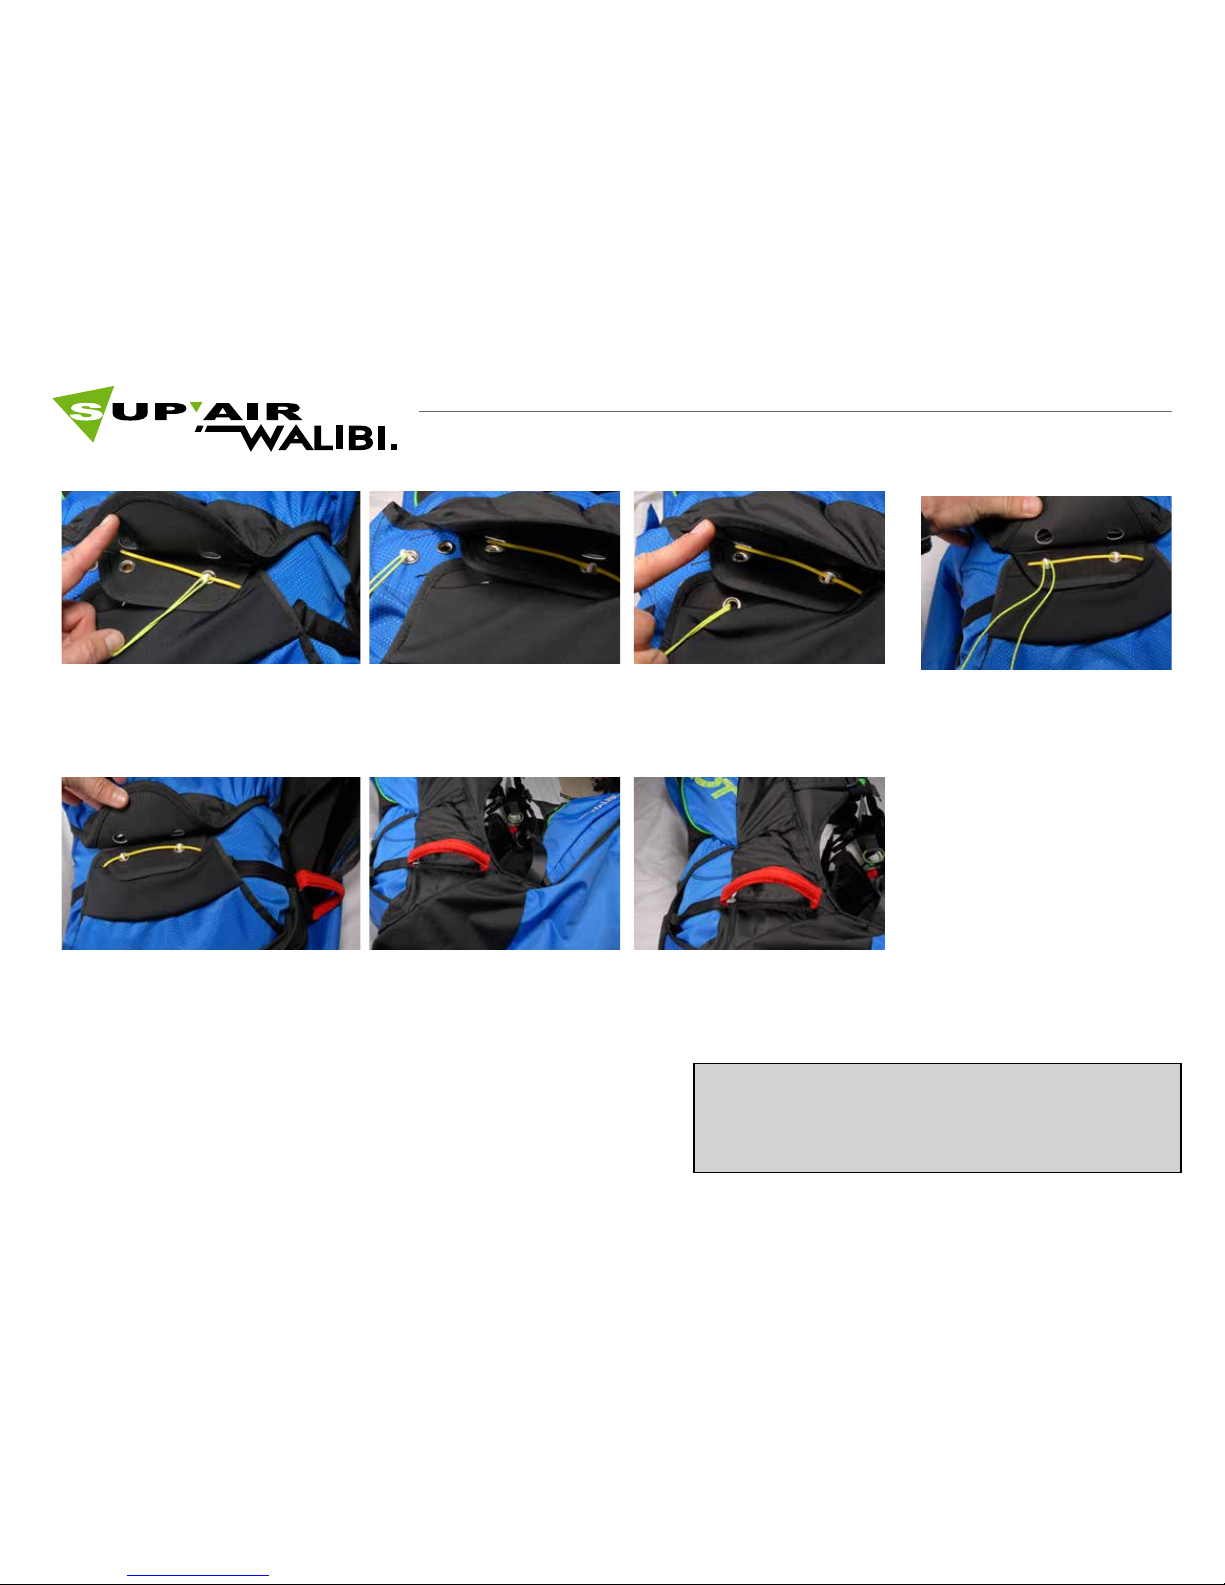
Push the cord through the right loop ( if
the handle is located to the right ).
Push the loop through the lower ap grommet. The yellow cable will also be pushed
through the lower ap guide located near
the grommet.
Push the cord through the upper ap grommet.
The reserve parachute pocket volume is variable in size.You rst must adjust its volume
according to that of your reserve parachute.
Adjustable reserve parachute pocket.
Reserve parachute installation in the pocket.
The pocket volume can slightly be increased by using the lateral aps external
grommets.
The harnesses are delivered by default,
with the “small” volume setting corresponding to the X-TRALITE BI-SUP’AIR reserve
parachute size.
Small volume default setting.
Pull on the rear ap, remove
the cord from it grommet.
Push the piece of line/cord,
underneath the connection
strap, then through the external grommet.
Page 9
9
8
9
10
Upon setup completion, conduct an extraction sequence
during a hang-test to verify that all works properly before
duplicating the installation procedure again...
Push the yellow cable through the loop and gently
pull the cord out.
Push the cord through the left loop. Push the loop through the lower ap grom-
met.
Push the loop through the upper grommet
ap grommet and push the yellow cable
through it ( loop ).
The yellow cable locks the reserve parachute pocket
aps in place. Tuck the upper ap inside its lower
stretchable pocket. Check before every igth for the
yellow cable to be properly inserted through the two
loops keeping the reserve parachute pocket securely
Position the handle in its folding sleeve. It
may not protrude from the harness.
Handle positioning in it holding sleeve.
Page 10
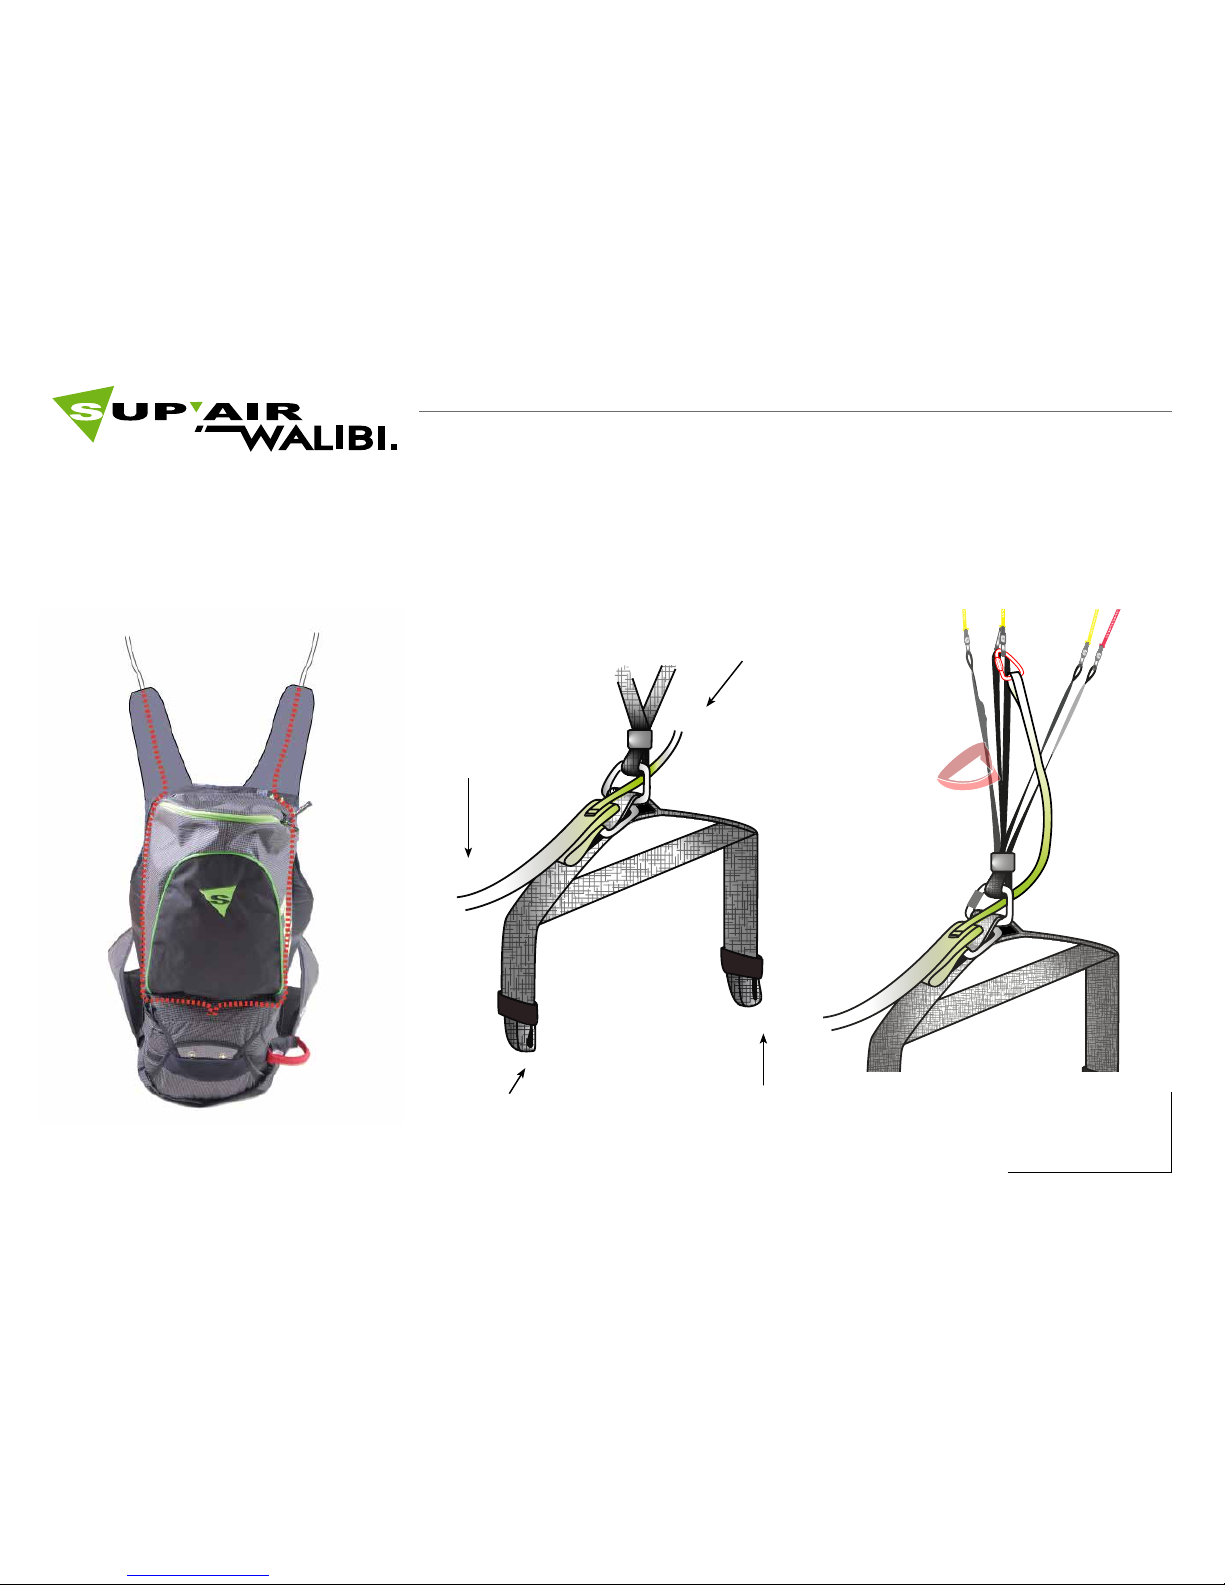
10
Pilot Passenger.
Parachute riser.
Toward the « B « or
« C « wing risers.
« André Rose «
System.
Install the risers inside the lateral guiding sleeve.
The risers come out of each strap guide.
Connect the risers atop each spreader-bar (
main hooking location ), with the maillon rapide
trapeze stainless steel 6 mm + the flexible elastic
rings.
On both sides, push the small recoil » André Rose
« strap / webbing, through the main paraglider
carabiner riser, and connect it to the « B « or «
C « paraglider riser using a triangular ( Delta
shaped ) Maillon - riser denomination can vary
from manufact
Pilot Passenger.
Page 11
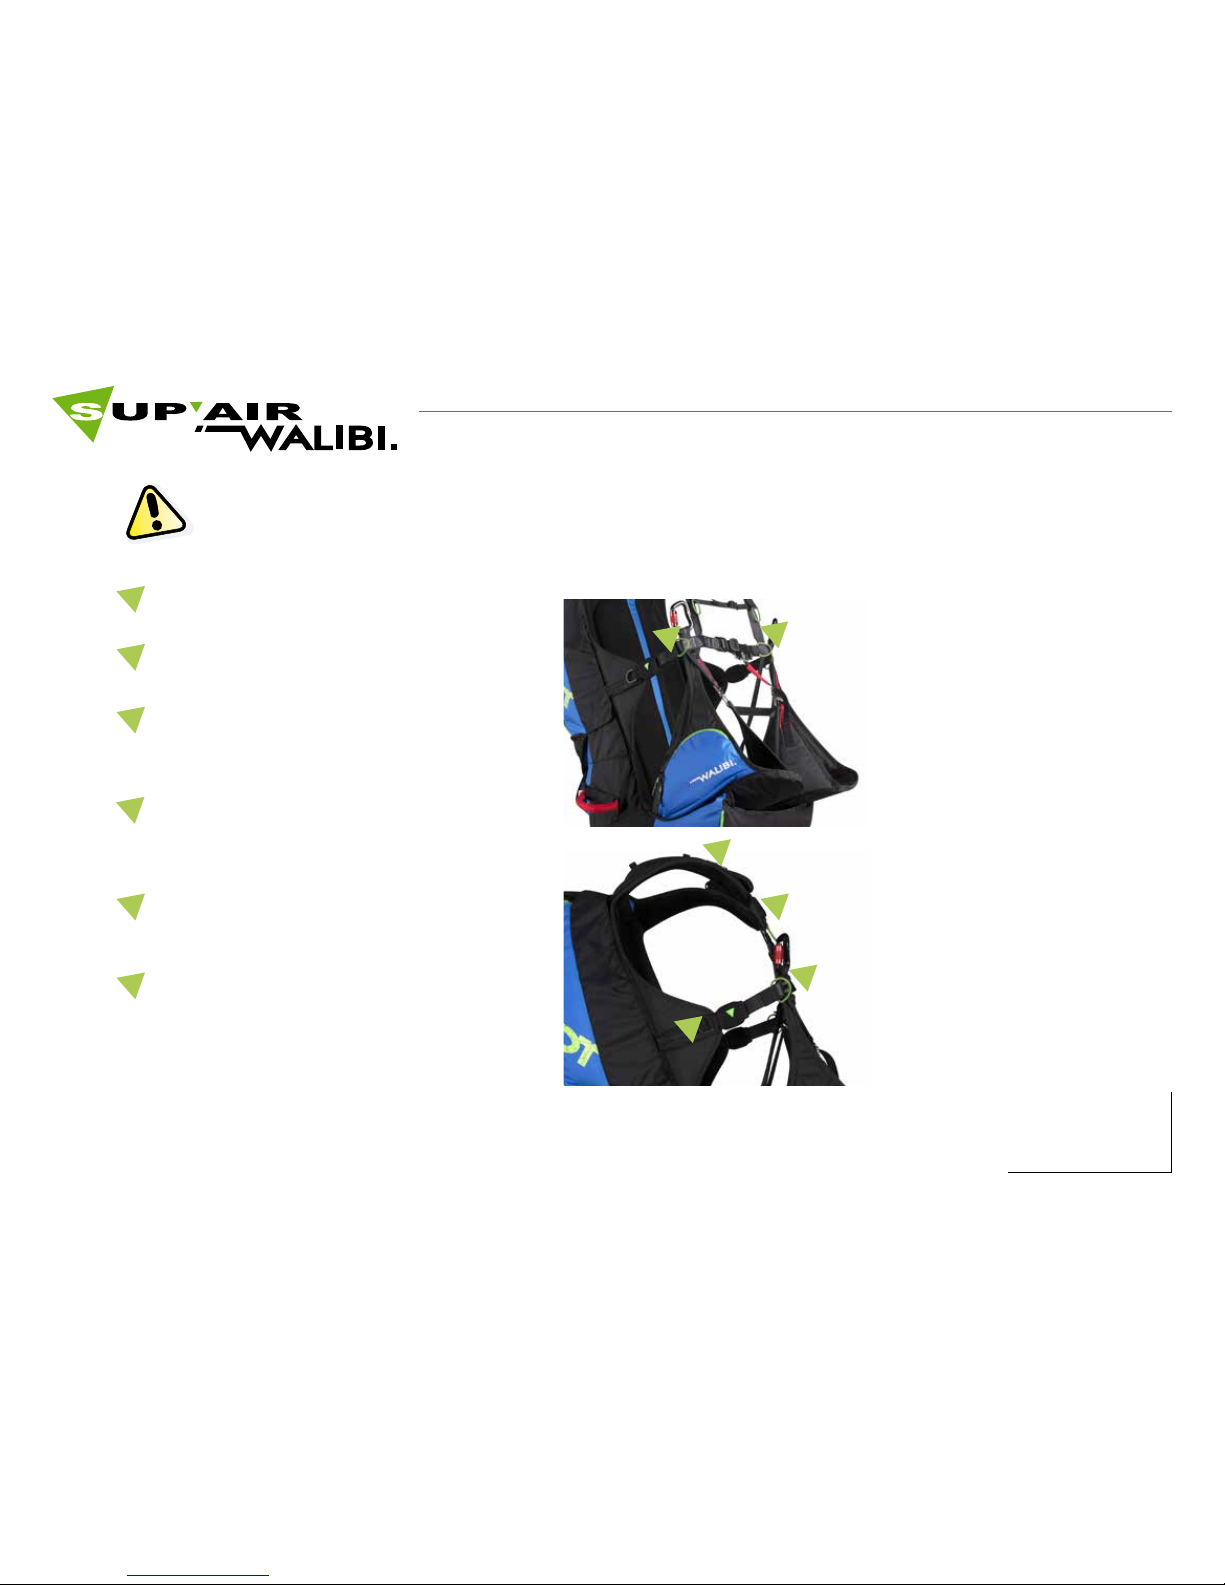
11
2
1
5
4
3
6
Loosening strap (leaning setting)
Tightening snapper (leaning setting)
All harness adjustments must be made prior the rst ight during a hang-test session. It is of utmost importance to adopt a proper ying posture, check all basic adjustments and have easy access to in-ight
adjustments.
Position setting
Tightening snapper (shoulder
strap)
Chest strap nger-loop tension tightening adjustment.
Chest strap nger-loop tension release adjustment.
3
5
6
4
Loosening strap ( shoulder strap)
1
2
Page 12
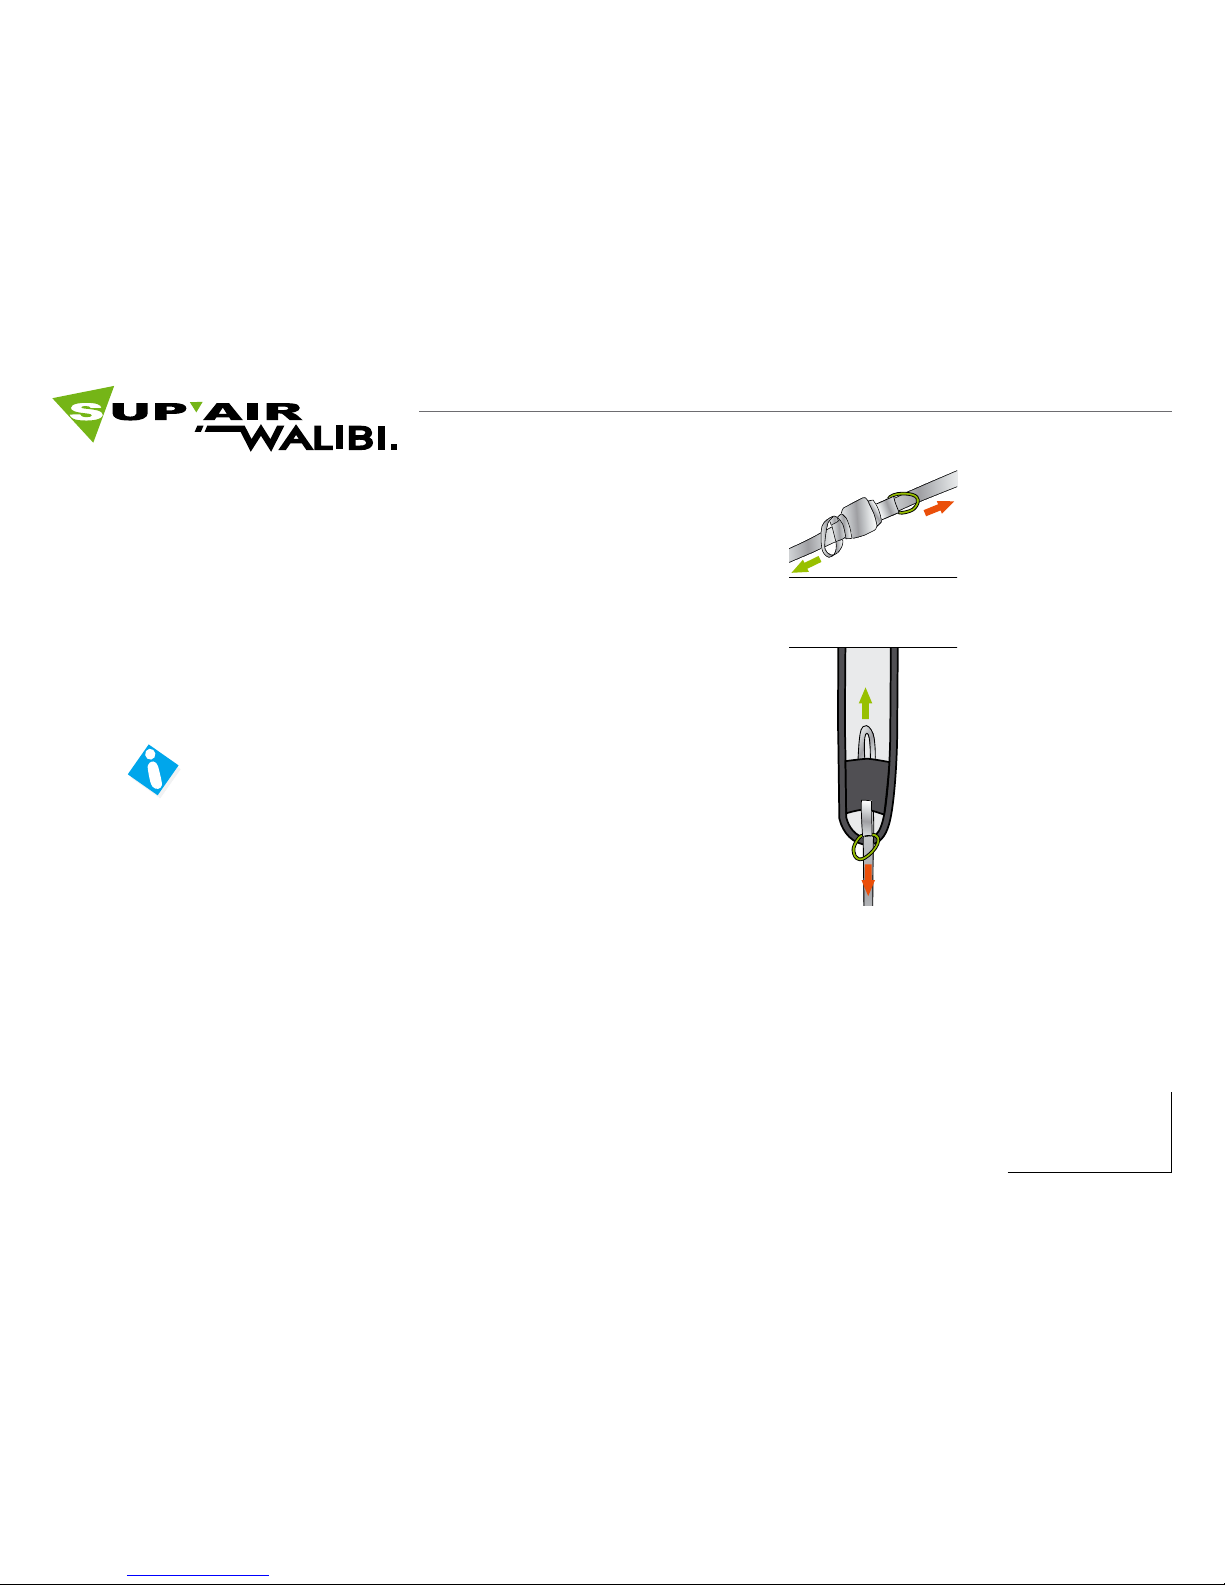
12
Set the angle of leaning by tightening the snapper (towards a more
vertical position) or the black webbing (towards a more horizontal
position). You can extend the lumbar support by tightening the #5
buckle.
Tighten the shoulder straps by pulling the nger loop down.
Pull up to release.
The shoulder straps support, greatly helps the comfort level. It
should be set precisely. You must nd the correct tension between
the side and shoulder straps adjustments.
Leaning angle setting
Shoulders’ straps adjustments.
tighten
loosen
A
B
C
To adjust correctly during a hang-test. The chest-strap tensioning/loosening as little effect on the wing’s incidence
while weight-shifting.
Chest strap adjustment.
loosen
tighten
Page 13
13
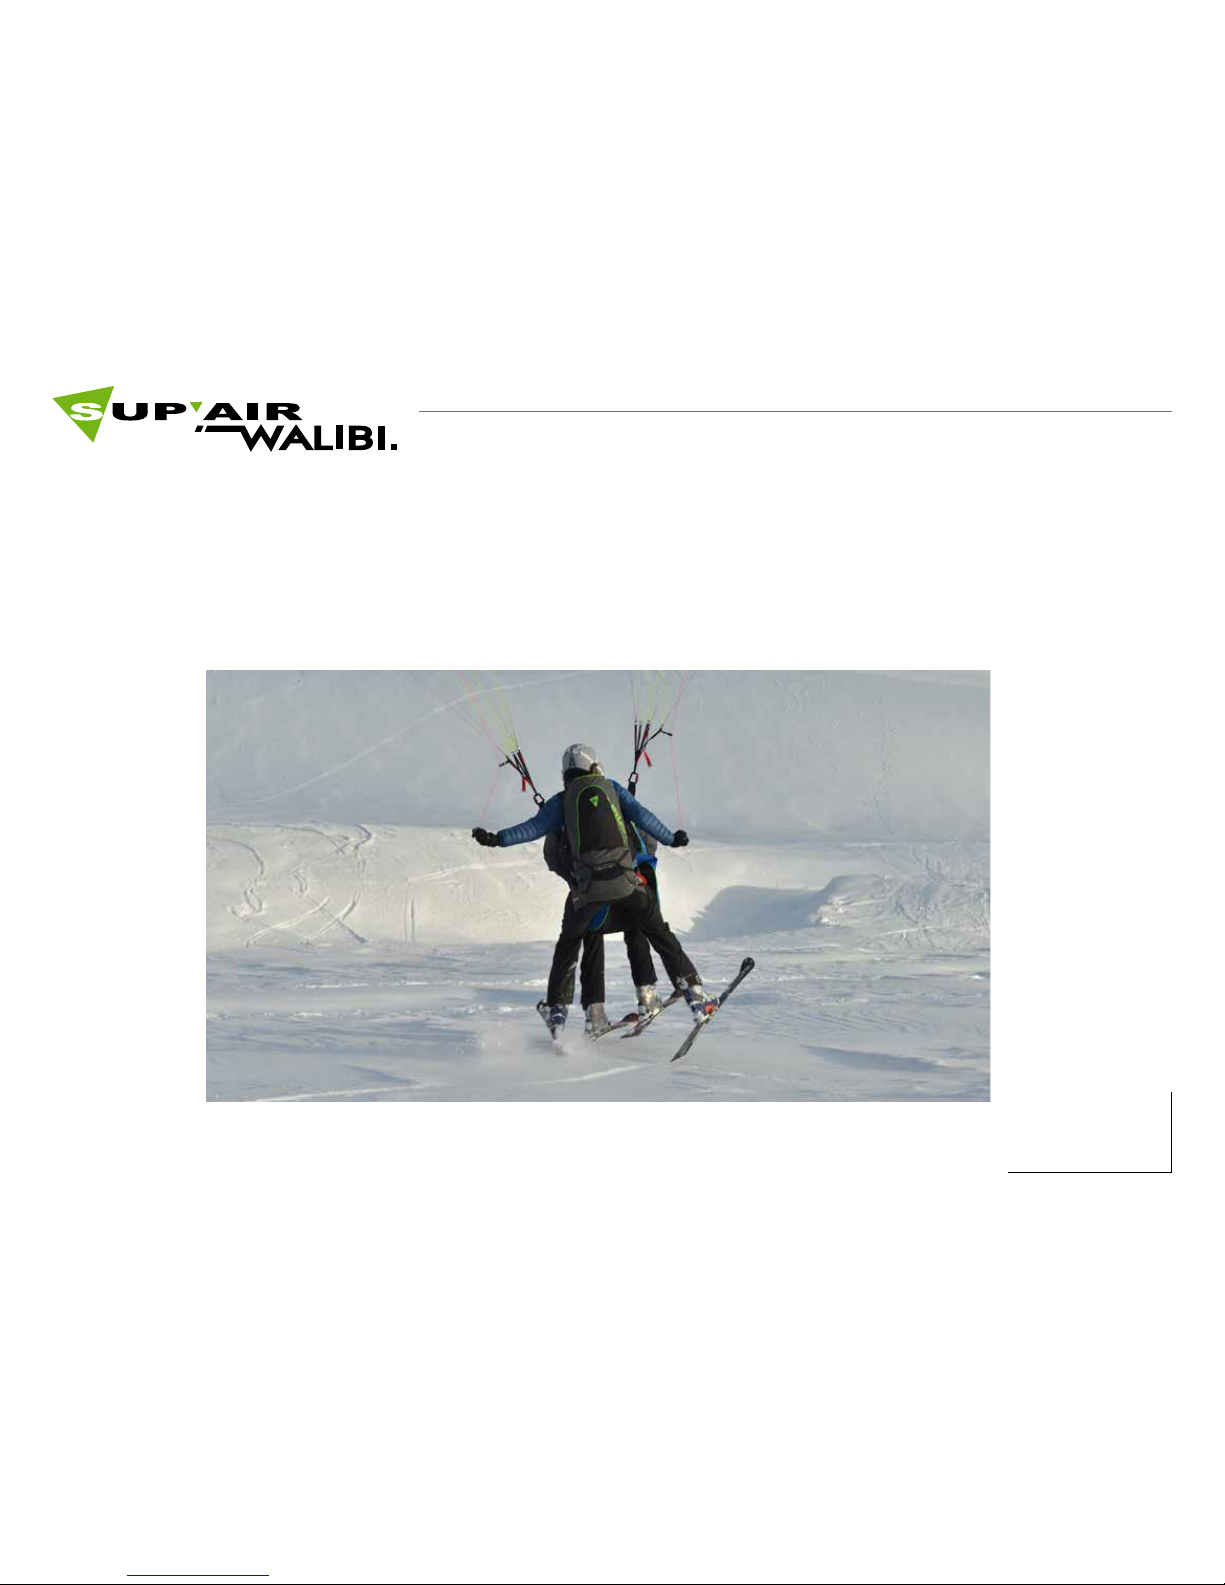
Flight behavior
The WALIBI² is a tandem harness. Its split-leg system enables the pilot to quickly adopt a comfortable
seating posture with the passenger between the legs immediately after takeoff. The split-leg system
facilitates the running phase as well.
The following harness can also be used in solo ights. It is equipped with a split-leg self-stabilizing
system buffering the overall ight handling.
Page 14

14
Conduct a thorough pre-ight check before each takeoff.
• Fasten and securely lock the leg and chest-strap buckles.
• Double check that all buckles are fully locked and secured by pulling rmly on them. Check that no line, tab or cloth
is stuck / jammed in the buckles.
• Be absolutely certain for the reserve parachute handle to work freely without anything impeding its proper functioning.
• Check the harness and Biners integrity.
• Be certain for the reserve parachute pocket to be properly closed with its handle securely in place.
• Check that your harness adjustments have not changed.
• Check the connexion risers / harness as well as the self-locking Biners ( locked and secured ).
Pre-Flight control
Only after a thorough weather conditions analysis, can the decision to
wether y or not be taken, and outt yourself with the harness.
Page 15
15
Take-off
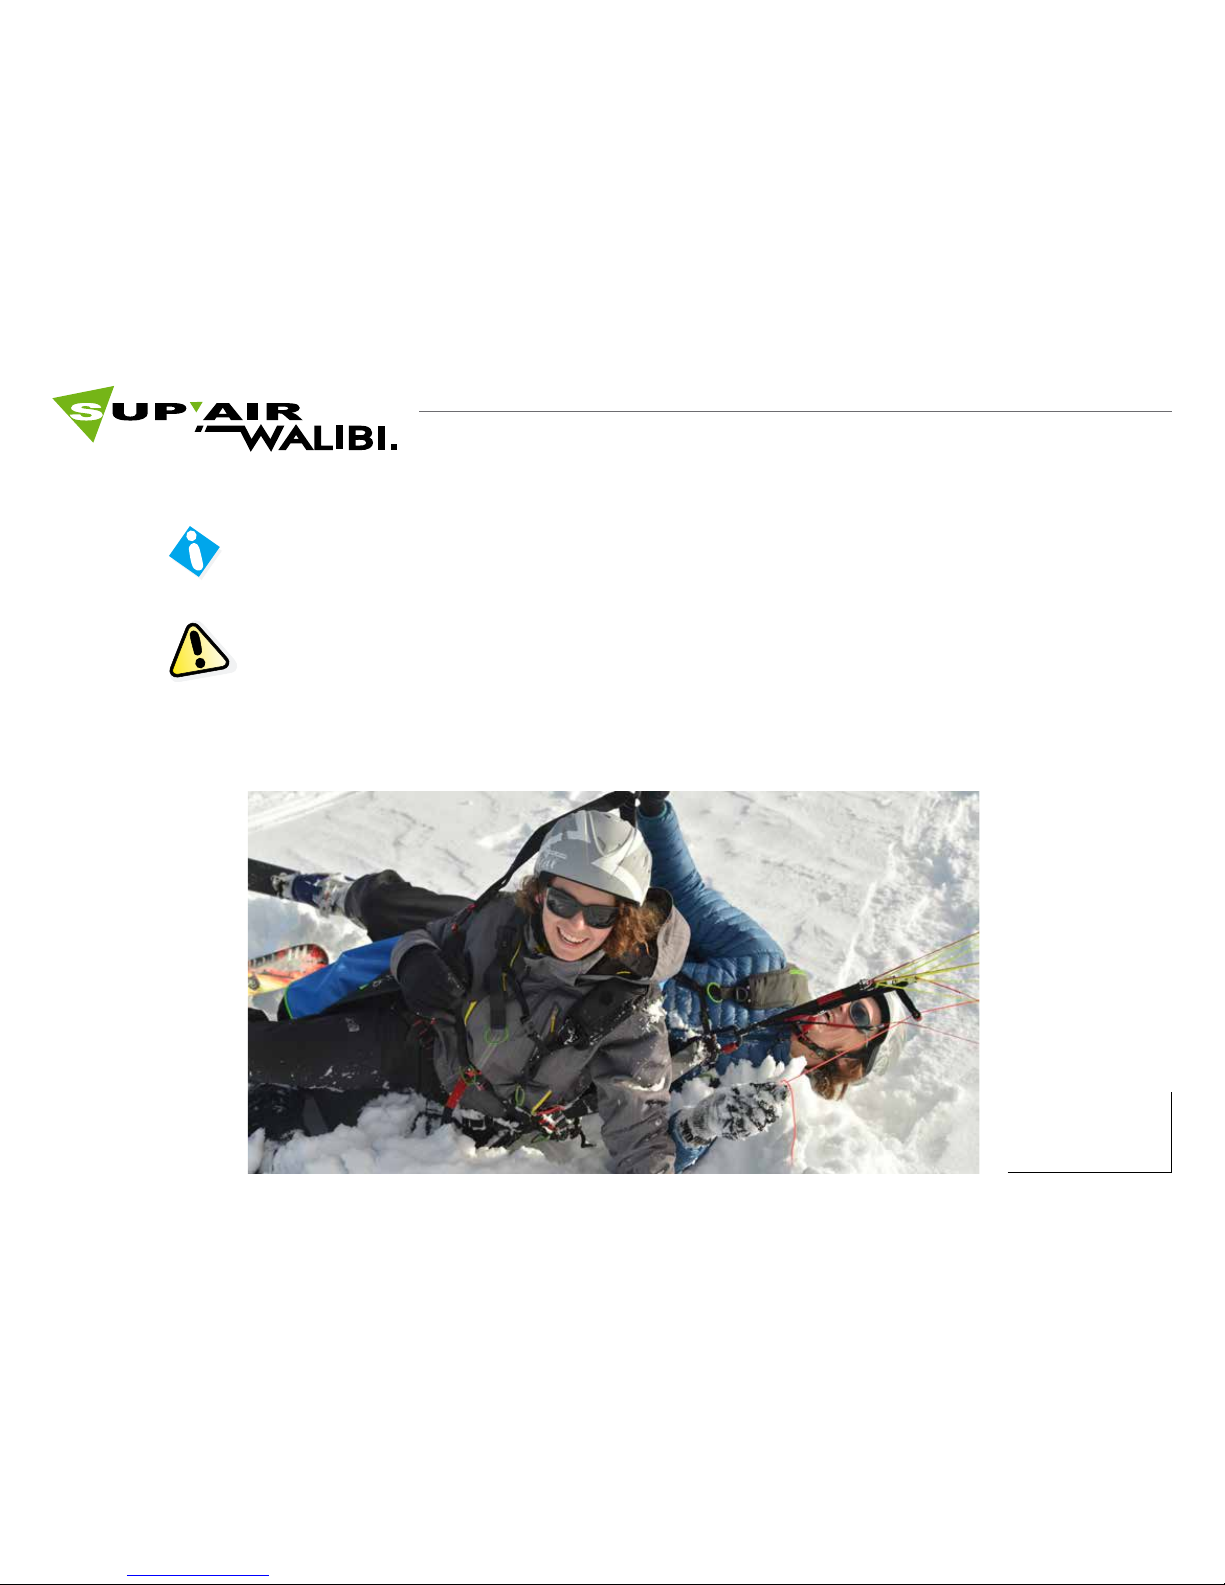
Takeoff is a simple and straight forward. The transition from running to seating is easy.
Do not push yourself inside the seat with the toggles still connected to your hands. There
would be a risk of increasing the angle of attack, slowing the wing down with a possible
stall taking place as a result.
Page 16
16
In ight
Please set the distance between the two carabiners according to the aerology and to
the wing manufacturer’s recommendations. The average distance / spacing for most
gliders from the center of the right Biner to the center of the left Biner where the riser
Tightening the chest strap provides more stability but less harness piloting efficiency. Doing
so,increases the risk of riser twisting. On the contrary, loosening the strap provides more
efficiency but can be dangerous in turbulent aerology while increas
Landing
Stretch your legs the and adopt an upright position in order to run and dissipate horizontal
speed.
Do not land whilst in the seated position, this is dangerous.
With a split-leg harness, adopting a standing/upright posture may feel more difficult to
achieve than with a seat-plate outtted harness. Straightening/ stretching the legs fully will
help reaching a standing posture.
Page 17
17
Care
Wash and care of your harness
It is a good idea to wash your harness from time to time. To do this, we recommend to use a soft solvent (such as soap),
use a brush and rinse thoroughly. In any case, do not use chemicals such as detergents or strong solvent because it may
deteriorate the webbing, stitching and fabrics of your harness.
Lifetime
The threads composing the webbing and fabrics used in the WALIBI LITE have been selected in order to ensure the best
possible lightness/lifetime compromise. Nonetheless, in some conditions, after a long term exposure to UV and/or signicant abrasion or exposure to chemicals, it is compulsory to check your harness in a certied repair centre. It is about your
safety.
The zip fasteners should be lubricated from time to time, using a silicon spray.
These carabiners must never be used for anything else else than paragliding (not for climbing, no towing, etc.).
Sup’air advice to replace the carabiners every 5 years.
Storage and transport When you don’t use your harness, store it inside your paragliding rucksack, in a dry, cool and clean place, protected from
UVs exposure. If your harness is wet, please dry it thoroughly before storing.
For transport, protect the harness from any mechanical or UV deterioration (use a bag). Please avoid long transports in
wet conditions.
Independently of the pre-ight check-out, you have to open and unfold your rescue parachute once every 6 months.
Once every 2 years, you need to perform a complete check of your harness :
Carbon seat plate : no crack, no asperity.
webbings (no excessive wear, no rip beginning, no unwanted folds)
buckles and carabiners ( no structural cracks / works ne ).
If your air bag is damaged, have it professionally checked and repaired if necessary.
If your foam protector is over 5 years old or was subjected to more than 3 consequent impacts, replace it with a new and
identical model.
Page 18

18
Materials
Recycling All our materials are selected for their technical and environmental characteristics. No components of our harnesses may
harm nature. Most of our components are recyclable.
If you judge your harness has nished its life, you can separate all the plastic and metallic parts and apply up-to-date sorting rules in effect in your community. For recycling of the fabric parts, we advise you to contact your local authority that deal
Fabrics
DYNEEMA® RIPSTOP
CORDURA®
Webbings
Polyamide 20 mm (500DaN)
Polyester 25 mm (1250 DaN)
Repair
Though we use the highest quality materials, it is possible that your harness may eventually deteriorate through general
use. If its is showing any signs of signicant wear and tear, you should check it and repair it in an certied repair centre.
SUP’AIR offer a repair facility for their products beyond the end of the warranty period. Please contact us either by telephone or by E-mail [email protected] in order to receive a quotation.
Environmental friendly practices
We highly recommend you to respect as much as possible our environment while practicing paragliding and especially :
not to go outside tracks, do not make unwanted noise and do not disturb the mountain areas’ balance. We advise you to
do this starting from the take-off.
Page 19
19
Warranty SUP’AIR takes the greatest care in the design and production of its products. SUP’AIR guarantees its products 5 years
(from purchase date) against any defect or design fault occurring during normal use. Any damage or degradation resulting
from incorrect or abusive use, abnormal exposure to aggressive factors, including, but not limited to; high temperature,
intense sun exposure, high humidity etc will invalidate this warranty
Paragliding is an activity that requires, skill, specic knowledge and sound judgement. Be careful, learn in certied
schools, subscribe an adequate insurance policy as well as a ying license and make sure your skill match the conditions.
SUP’AIR cannot be held responsible for your paragliding decisions or activities.
Disclaimer
This SUP’AIR product has been designed exclusively for paragliding. Any other activity such as skydiving or
BASE jumping is absolutely forbidden.
Pilot’s gear
This is essential that you carry a helmet, suitable boots and clothing. Taking a reserve parachute suitable for your weight
and correctly connected to your harness is also very important.
We want to inform you and let you know that no harness protection can guarantee a complete protection against injury. In particular,
the back protector which does not prevent potential injuries to the spine or pelvis.
Moreover, only parts of the body covered by the air bag may benet from protection against potential impacts.
CE certification : About the paragliding harnesses protection
Warning, any modication or misuse of the protection can dangerously alter its performance and compromise the integrity of the safety
device.
Protection is ensured only when the protective elements are present and properly installed. Thus, when the protection is removable,
check that it is correctly positioned.
Your harness protection CE conformity labeling is certied by the following laboratory :
CRITT Sport Loisirs nr. 0501, Z.A. du Sanital, 21 Rue Albert Einstein, 86100 Chatellerault – FRANCE
The safeguards incorporated in the SUP’AIR harnesses are guaranteed for use in temperatures averaging (-10 ° C to 35 °
C). The lifespan of foam protectors is 5 years or limited to three substantial impacts. If an air-bag protection is used instead,
check for damage.
Page 20
20
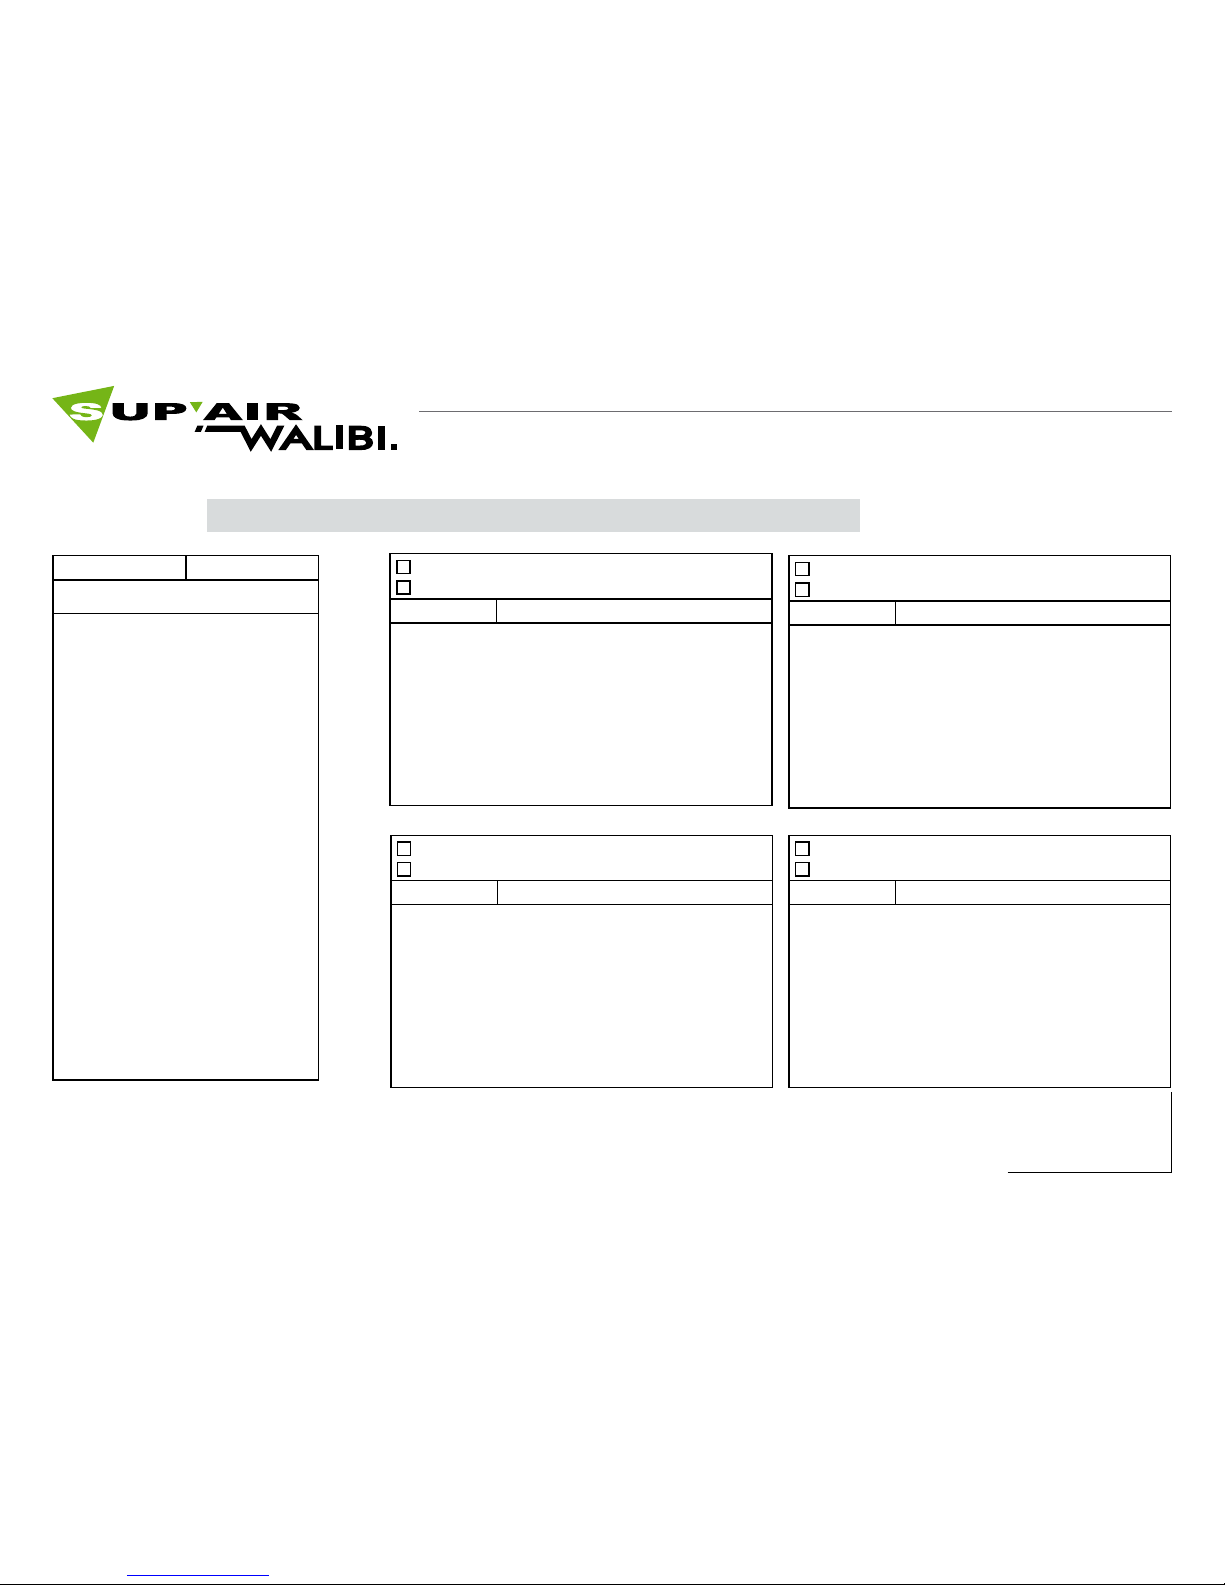
Service Book
This page will help you to record all the life stages of your WALIBI² harness.
Serial number :
Purchase date
Owner’s name
Name and stamp of the shop
Care
Resale
date
Workshop’s name/ Buyer’s name
Care
Resale
date
Nom de l’atelier/de l’acheteur
Care
Resale
date
Workshop’s name/ Buyer’s name
Care
Resale
date
Workshop’s name/ Buyer’s name
Page 21
SUPAIR-VLD
PARC ALTAÏS
34 RUE ADRASTÉE
74650 ANNECY CHAVANOD
FRANCE
45°54.024’N / 06°04.725’ E
RCS 387956790
 Loading...