

Page 1
User’s manual
SUP’AIR - VLD
34 rue Adrastée
Parc Altaïs
74650 Annecy - Chavanod
FRANCE
45°54.024’N / 06°04.725’E
English
Revision index : 14/09/2018
EN-B+
Page 2

Glider user's manual | STEP
SUPAIR | STEP | page 2
Thank you for choosing to fly our STEP to paraglide with. We are delighted
to have you on-board to share our passion for paragliding.
SUP'AIR has been designing producing and selling accessories for free
flying activities since 1984. By choosing a SUP'AIR product you benefit from
almost thirty years of expertise, innovation and customer care. We pride
ourselves for our work ethics and customer care.
We hope you will find this user's manual comprehensive, explicit and hopefully enjoyable as well. We advise you to read it carefully.
You will find the latest information and updates on this product on our
website : www.supair.com. If however you have any further questions, do
not hesitate to ask one of our dealers.
Naturally the entire SUP'AIR team remains at your disposal at info@
supair.com
We wish you many safe and enjoyable flying hours and happy landings.
Team SUP’AIR
Photo : JM Ara
Page 3

Glider user's manual | STEP
SUPAIR | STEP | page 3
Introduction 4
Technical specifications 5
Equipment overview 6
Connecting the glider 7
Pre-flight preparation 9
Take-off 10
Flight characteristics 11
End of the flight 12
Specific practices 12
Fast descents 13
Flight incidents 15
Line layout 16
Materials 17
Measurement table 18
Certificates 22
Maintenance 26
Recycling 27
Mandatory checks 27
Warranty 27
Disclaimer 27
Pilot equipment 27
Contents
Photo : JM Ara
Page 4

Glider user's manual | STEP
SUPAIR | STEP | page 4
Introduction
Advice Caution ! Danger !!
Welcome to the world of free flying: a shared world of passion.
The STEP meets all the sporting pilot's requirements whishing to fly under an accessible but yet powerful B glider.
It was designed for performance flying and will give the pilot maximum comfort to optimize long distance XC adventures.
The well though out design and choice of materials were guided by the same quality and longevity objectives.
The STEP glider is EN EN 926 -1 : 2015 & 926 - 2 : 2013 Classe B. Certified.
This means that the paraglider in spite of good passive safety can react dynamically to over-piloting or in turbulence, and will have to be
handled accordingly to stabilize it.
It also means that it requires a skill level and experience compatible with the wings in that category.
It can be used with most harnesses found on the market today. For better inflight comfort and sensations we will advise you to choose
the SUP'AIR cross or hike & fly harness models.
After reading this manual we advise you to inflate & check your wing on a training hill first.
N.B. : The following three icons will help you to read this manual.
Page 5
Glider user's manual | STEP
SUPAIR | STEP | page 5
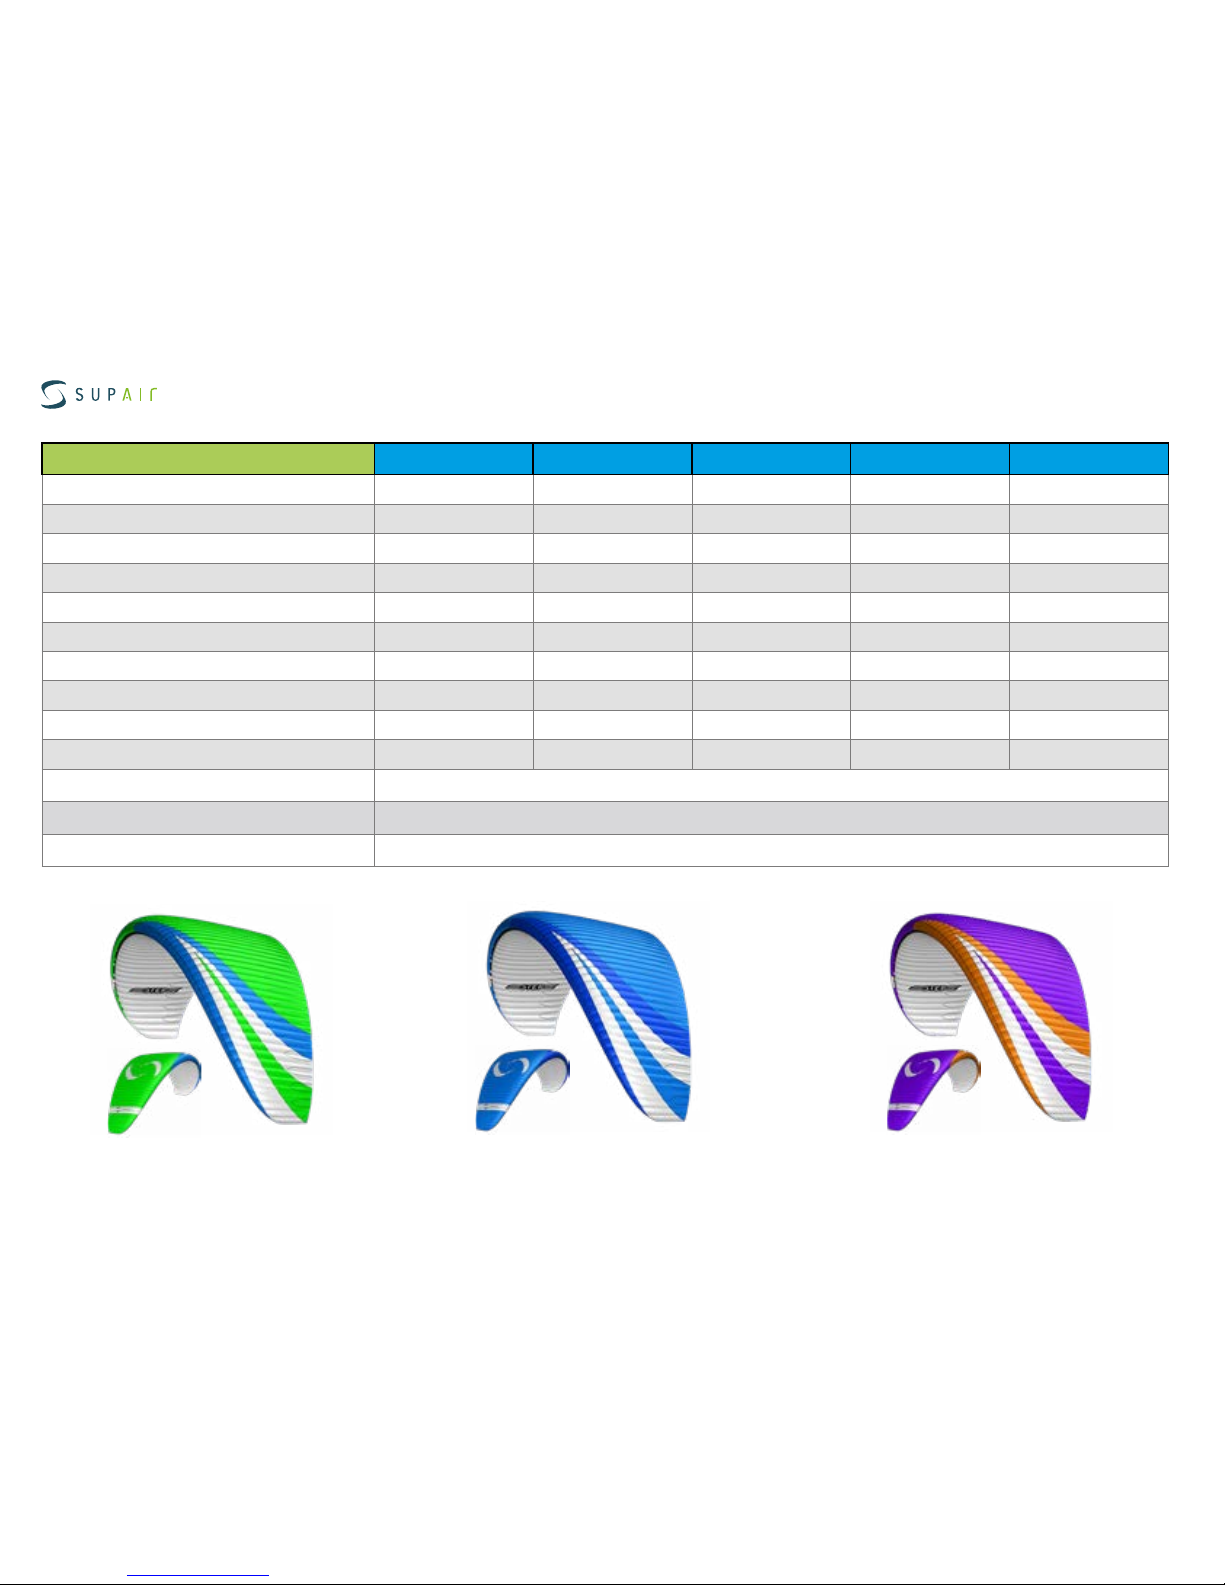
Technical data
Glider STEP XS S M ML L
Cell number 61 61 61 61 61
Flat surface area (m²) 21,5 24 26 28 30
Span (m) 11,07 11,7 12,17 12,63 13,08
Chord (m) 2,4 2,54 2,64 2,74 2,84
Flat Aspect Ratio 5,7 5,7 5,7 5,7 5,7
Projected surface area (m²) 18,106 20,21 21,9 23,58 25,26
Projected span (m) 8,68 9,17 9,55 9,91 10,26
Projected aspect ratio 4,16 4,16 4,16 4,16 4,16
Glider weight (kg) 4,35 4,7 5 5,3 5,5
In-flight weight range (kg) 55-75 70-90 80-100
90-110
105-125
Certification
EN / LTF B
Riser number. 3 + 1
Trimmer no
EARTH OCEAN FLUOR
Page 6
Glider user's manual | STEP
SUPAIR | STEP | page 6
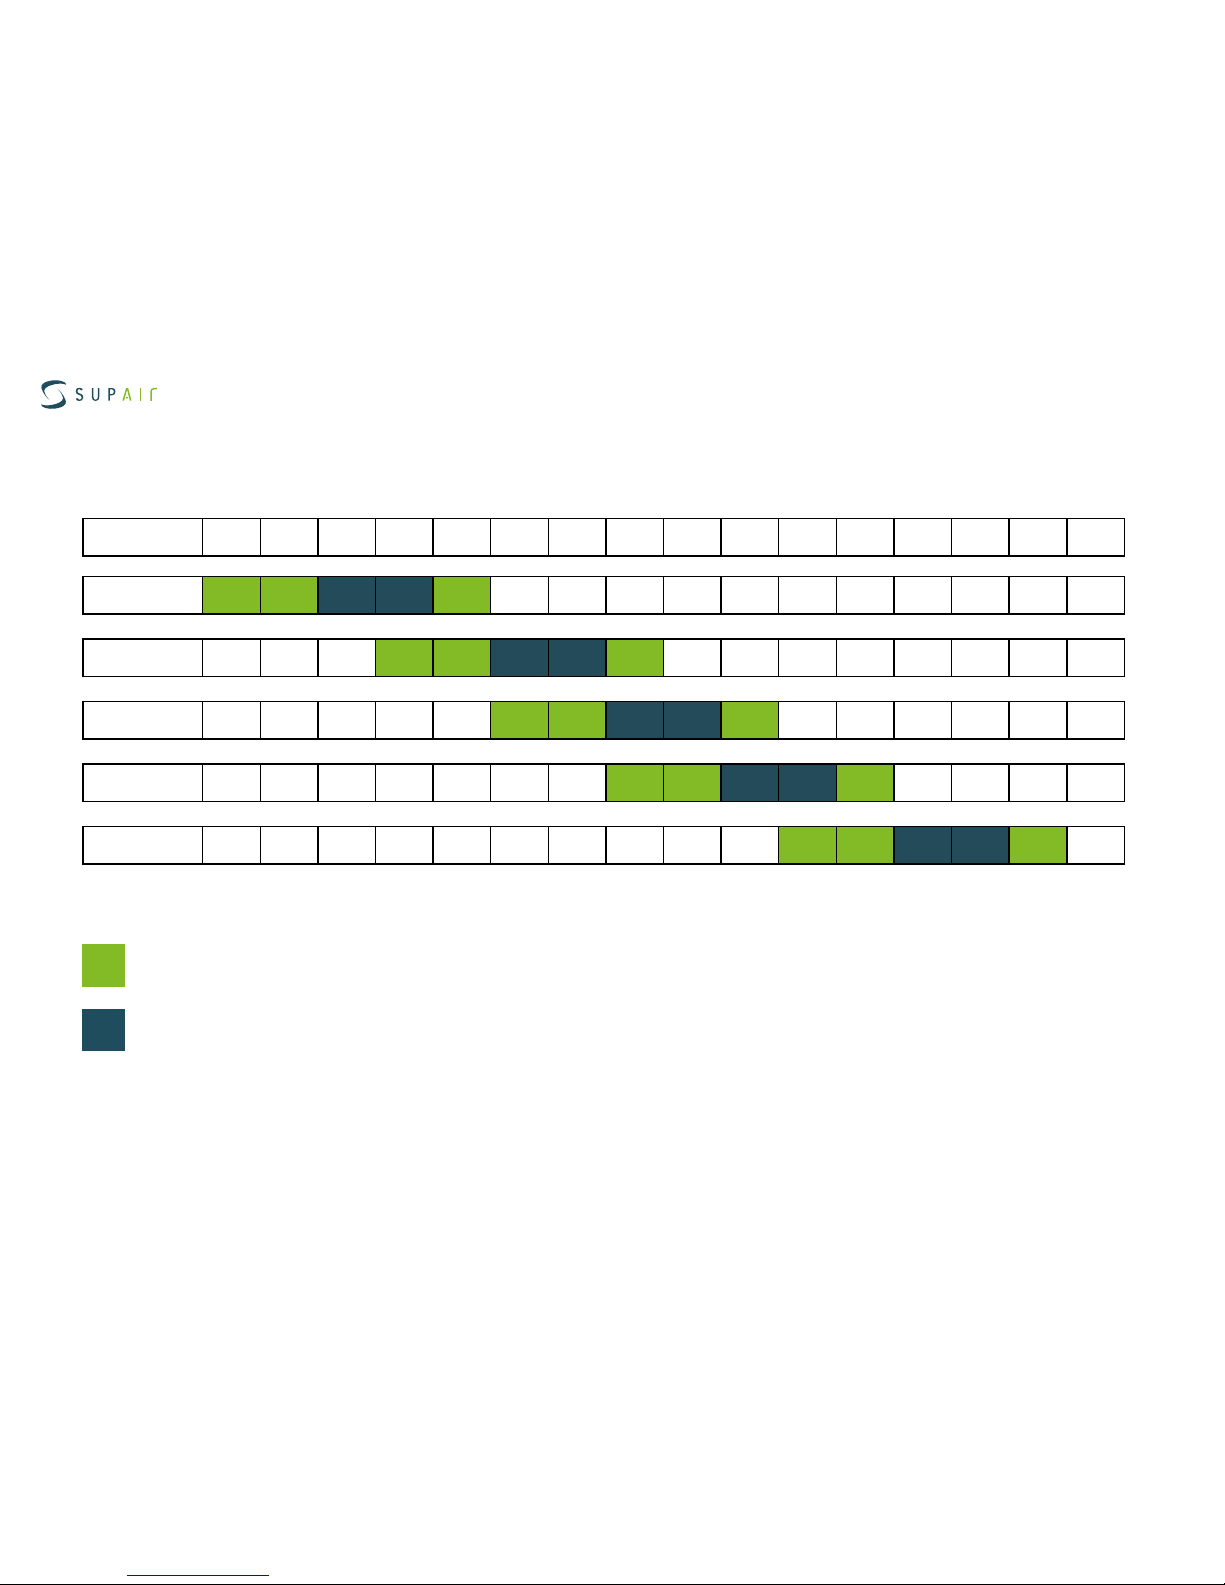
Weight (kg) 55 60 65 70 75 80 85 90 95 100 105 110 115 120 125 130
STEP XS
STEP S
STEP M
STEP ML
STEP L
In-flight weight range
In-flight weight range (kg)
Perfect In-flight weight range (kg) to optimize flight performances
Page 7
Glider user's manual | STEP
SUPAIR | STEP | page 7
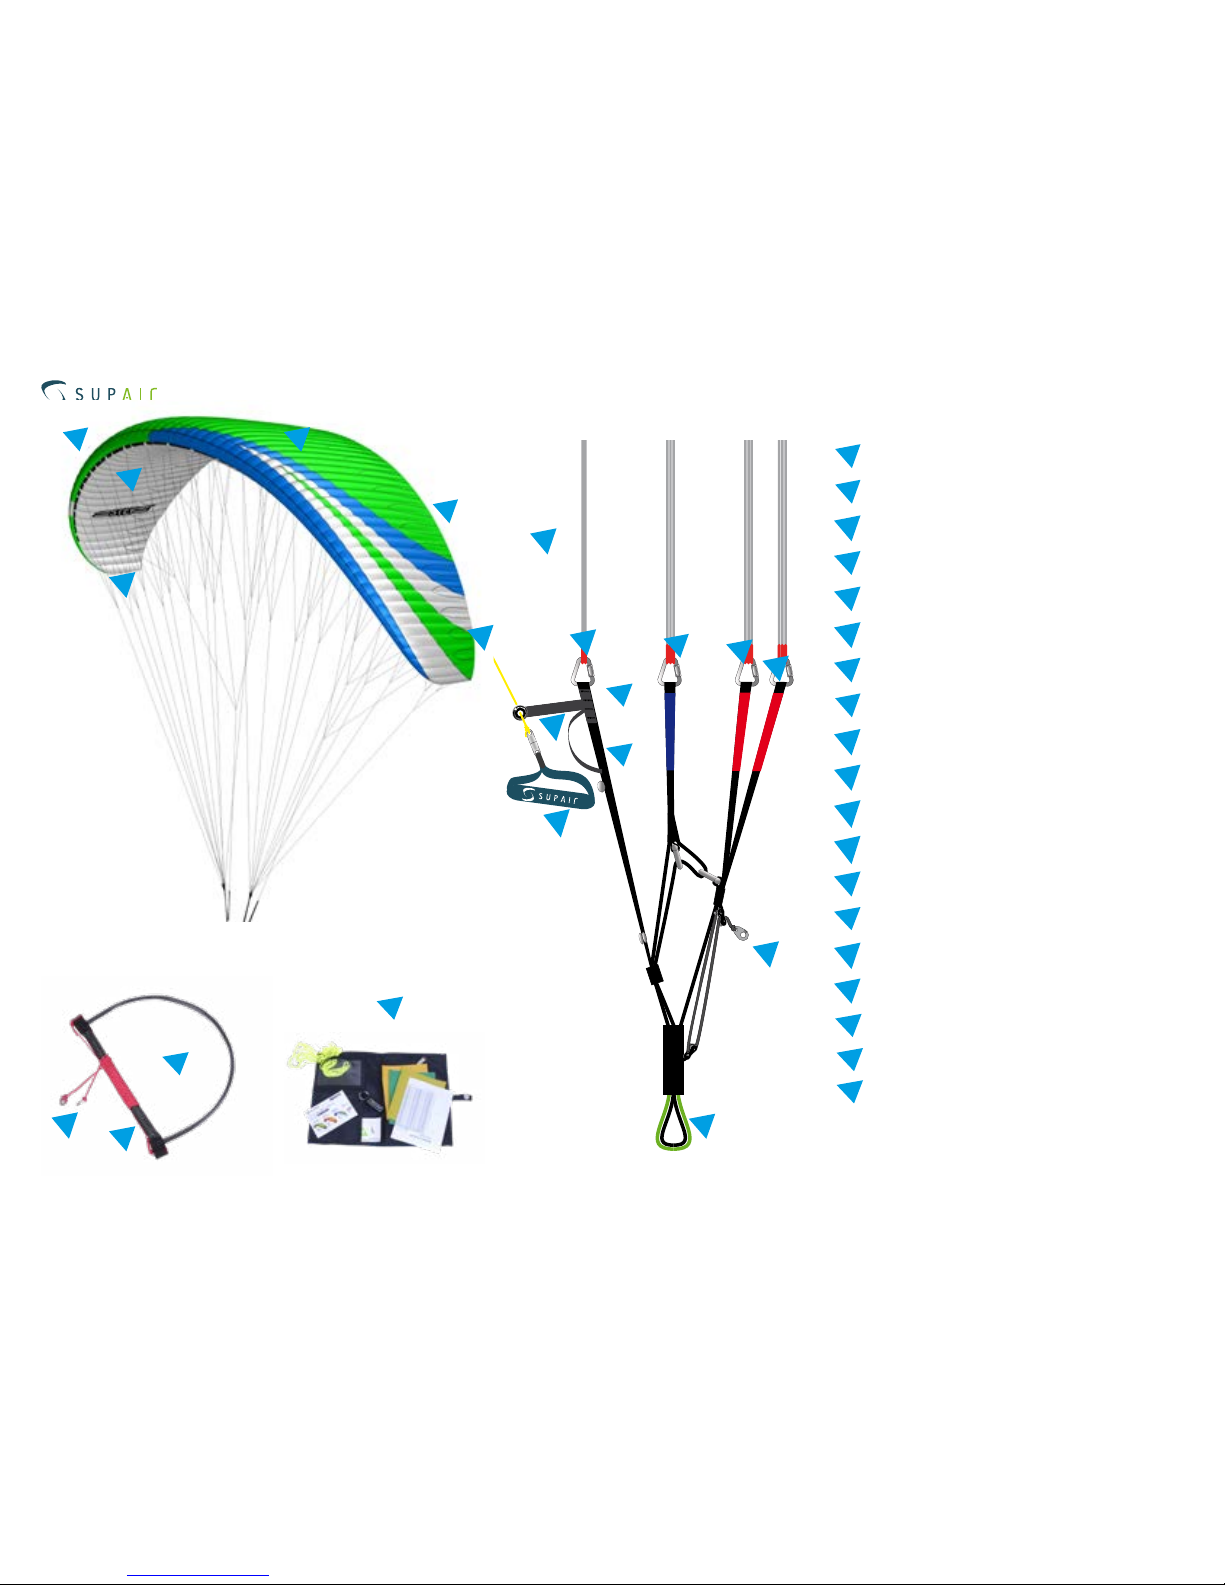
Equipment overview
8
13
Riser hook-up loop
14
15
16
1
Leading edge
2
Trailing edge
3
Stabilizer
4
5
A riser
6
B riser
7
C riser
10
Brake handle
9
Brake line
11
12
Brake holder
«A» split risers (for Big Ears)
Intrados
Extrados
Accelerator/Speedbar.
Accelerator/Speedbar Split-hook.
Accelerator/Speedbar bar.
17
Pocket with repair kit.
8
13
15
16
1
2
3
4
5
6
7
10
9
11
12
17
14
3
15
18
"C" steering ball.
19
"B-C" Recall Strap.
18
19
Page 8
Glider user's manual | STEP
SUPAIR | STEP | page 8
Connecting the glider
Opening the wing
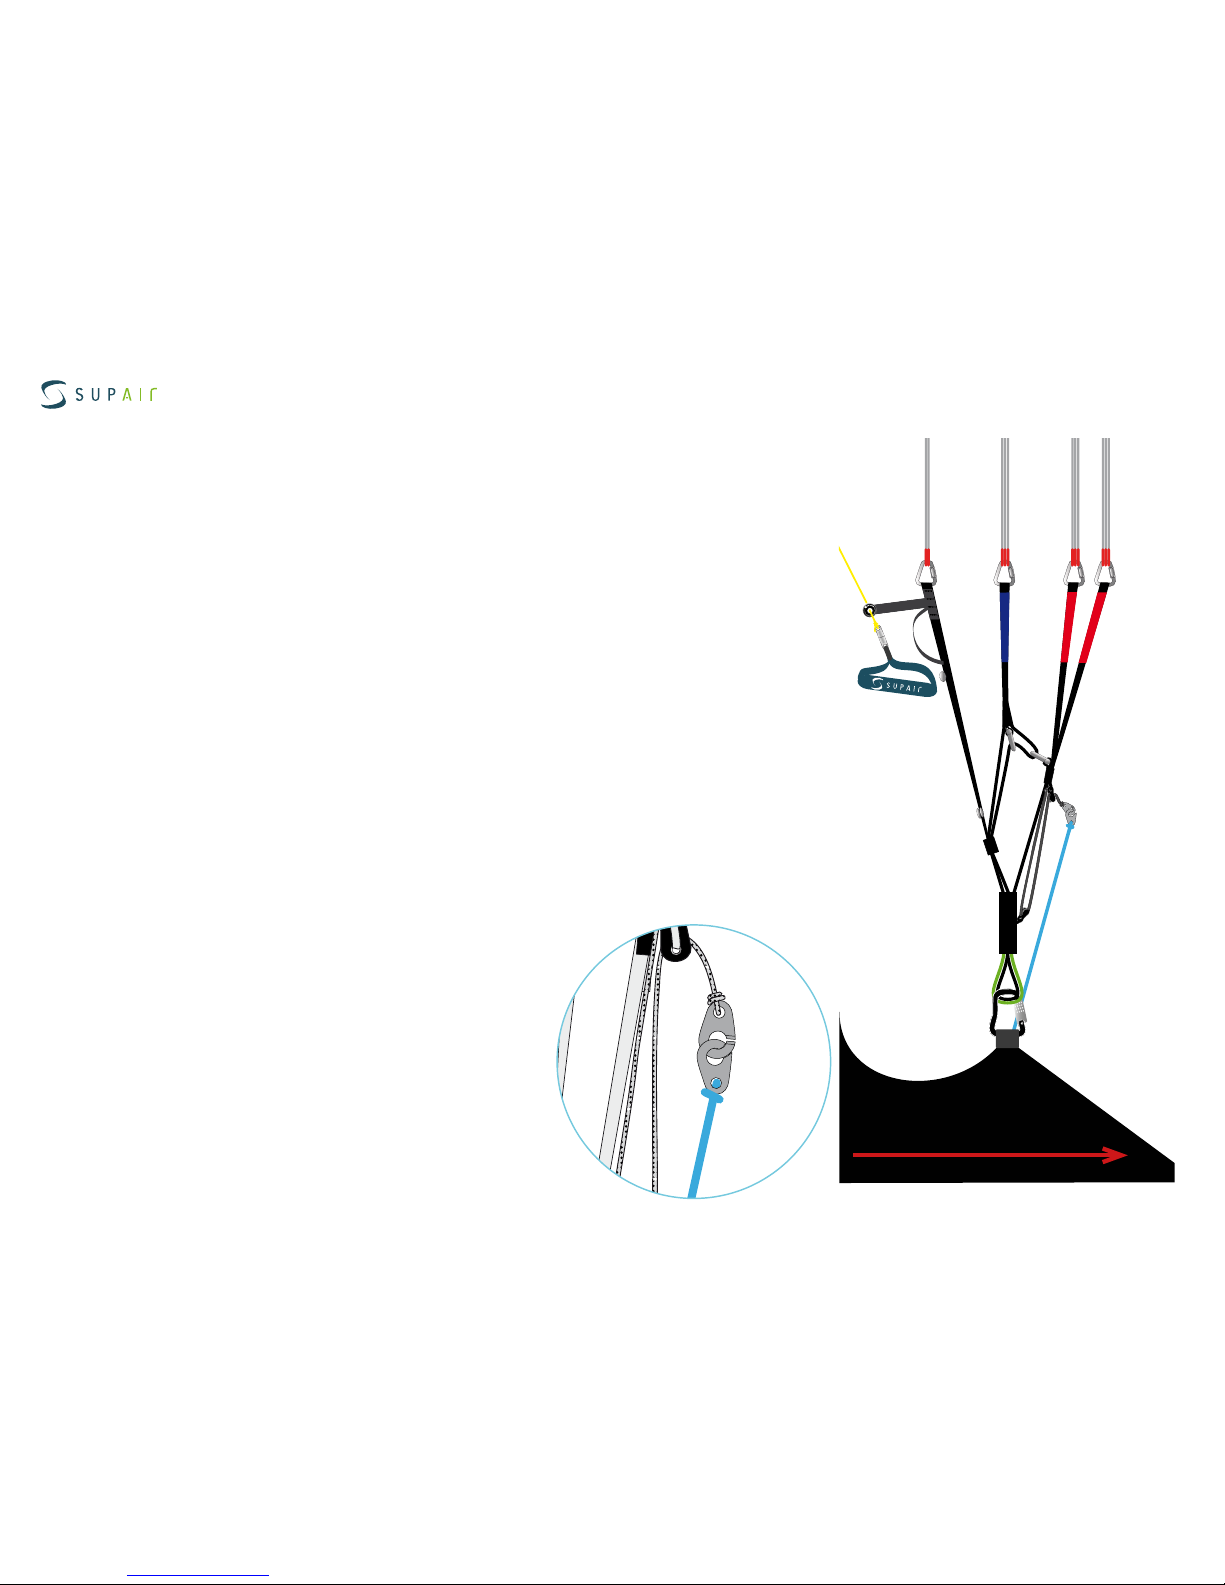
Without twisting the risers, connect them to the harness connection loops using the
self-locking carabiners.
Check for the risers to be properly positioned and untwisted. The "A" risers must be
located at the front and facing the flight direction( see schematic ).
Lastly, check for the main self-locking carabiners to be fully closed and locked in place.
Risers
Self-locking
Carabiners
Harness:
Flight direction
Choosing an adapted harness.
It is advised to adjust the harness's chest strap width based on your wing size :
42 cm for an STEP size XS
44 cm for an STEP size S
46 cm for an STEP size M
46 cm for an STEP size ML
48 cm for an STEP size L
Install the accelerator according to your harness
manufacturer's recommendations.
Connect it to the wing using the split hooks.
Once the accelerator/speedbar is connected,
adjust its length according to your measurements.
For correct use, there must not be any tension at
the split-hook level when the accelerator/speedbar line is relaxed.
Choose a flat or lightly angled training hill without obstacles or wind.
Open your wing and arrange it in a crescent shape.
Check the fabric and the lines for any sign of wear or damage. Check for the links
connecting the lines to the risers to be fully closed. Identify, separate and arrange the
A,B.C, risers as well as the brake lines neatly. Knots or tangles can not be present.
The STEP glider was certified EN B with a EN1651 & LTF certified harness and hence
can be flown with most harnesses models found on the market today. Meaning that it
can be flown with most harnesses models found on the market today.We wil advise you
to choose a EN1651 and or LTF certified harness with a built-in dorsal protection system.
Connecting the wing to the harness.
Harness chest strap spacing
Installing the accelerator
Page 9
Glider user's manual | STEP
SUPAIR | STEP | page 9
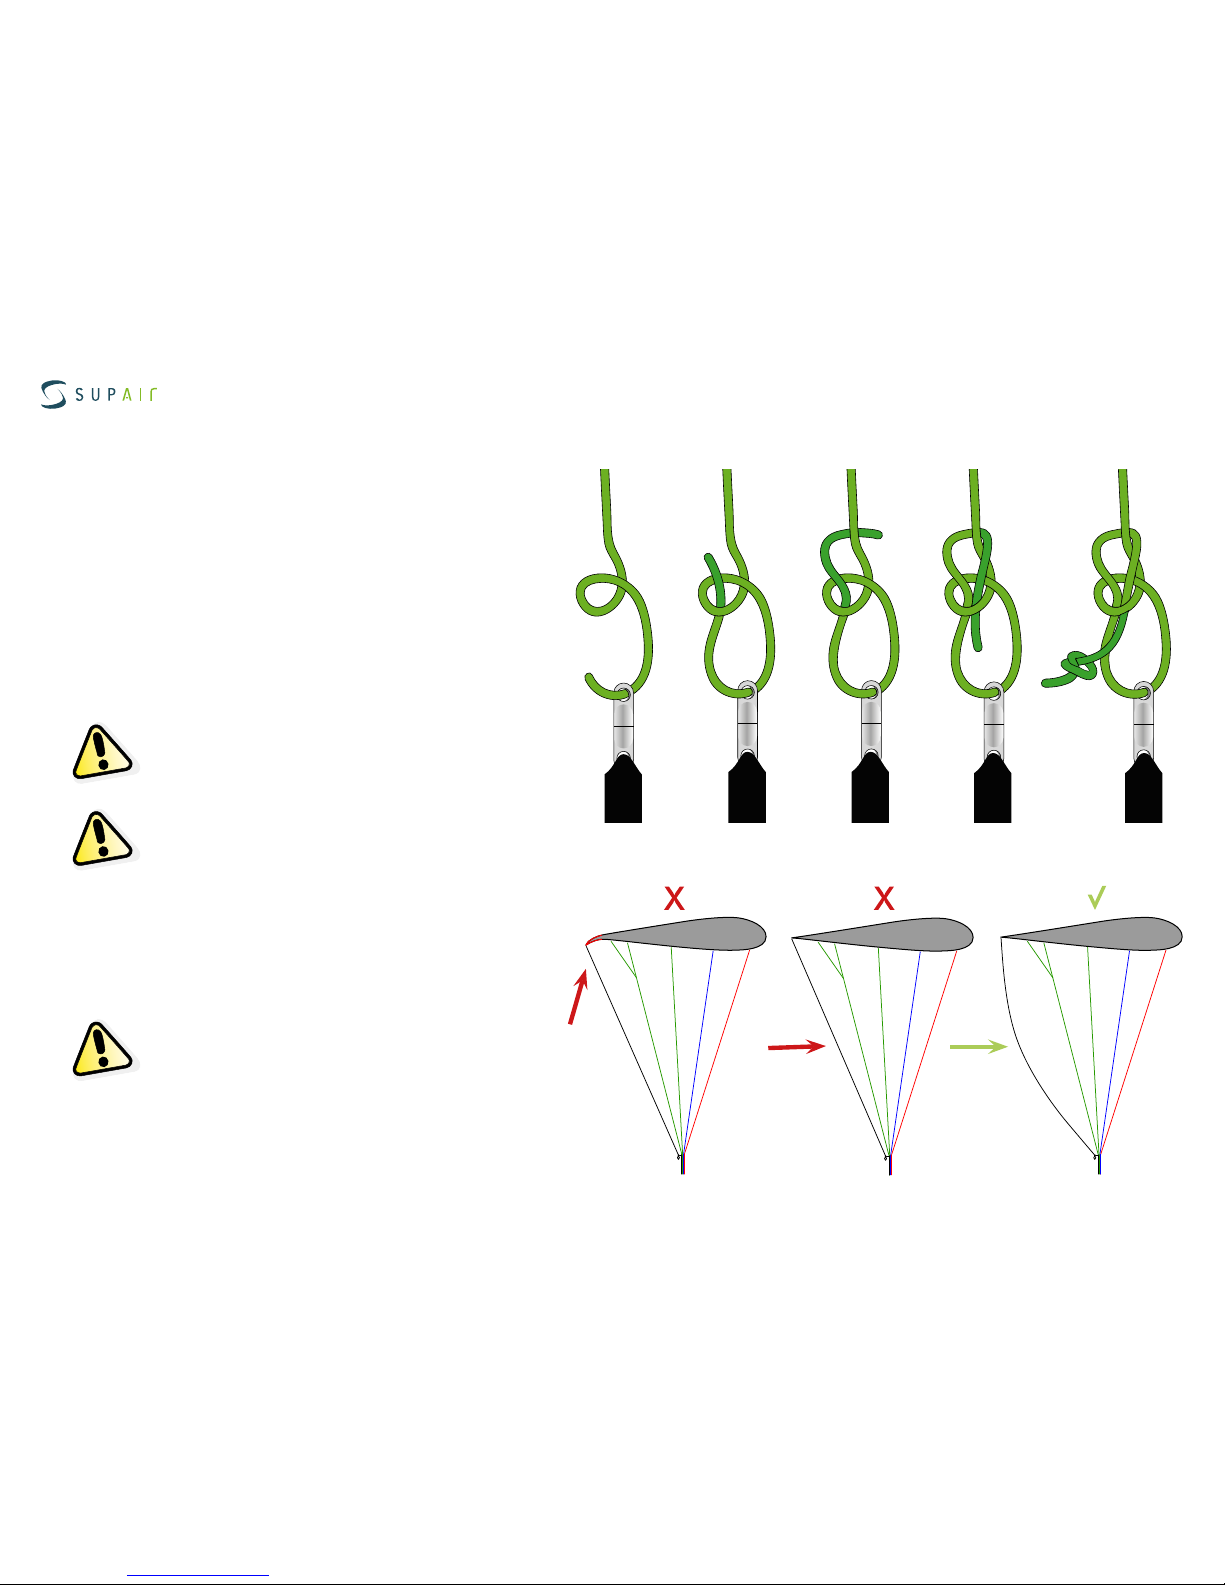
Brake line length
fisherman's knot
Connecting the glider
Garde
Be certain to adjust and leave a small amount of
line slack to keep steering toggle play, prevent wing
profile deformation and hinder the accelerator functionality.
During acceleration, the glider's trailing edge must
not be deformed.
If you modify the original default setting, have it inspected and approved by a professional before flying..
The default factory maximum brake line length is :
55 cm for an STEP size XS
60 cm for an STEP size S
62 cm for an STEP size M
65 cm for an STEP size ML
67 cm for an STEP size L
Brake line lengths are set at the factory to allow
optimal glider control. However, if they do not suit
you they can be adjusted to your liking.
We will advise using a fisherman's knot and to keep
your length changes to a minimum (approx 5cm
maximum).
Margin
Page 10

Glider user's manual | STEP
SUPAIR | STEP | page 10
PRE-FLIGHT PREPARATION
Unfold the glider and place it on its upper surface in an arc.
Separate the A,B,C risers and the brakes, be certain for the risers and lines not to have any twists or knots or be hooked to a branch,
stone etc...
The STEP wing was designed for for recreational pilots, sportsmen, who want a high performance sailing, at the top of category B.
To discover your new wing, we will advise you to conduct your first small flights in calm conditions on a school training hill or a familiar site you are used to flying with your own harness.
Caution !
It vital to conduct a thorough pre-flight check and have the harness properly connected to the glider prior each takeoff.
Run through the following procedure prior each takeoff:
- harness or carabiners do not show signs of wear and tear.
- the reserve parachute container is correctly closed and that the handle is in the correct position
- your personal settings have not been changed
- The wing is properly connected to the risers with all links securely tightened and locked in place.
- The wing is properly connected to the harness without any riser twist.
- You are securely connected to the harness with the leg and chest strap buckles closed, self-locking carabiners locked.
- Your are wearing your helmet and it is properly fastened.
Page 11

Glider user's manual | STEP
SUPAIR | STEP | page 11
Take-off
The R&D team has optimized the wing's performance in response to the most ambitious pilots needs, while maintaining optimal
passive safety, making the STEP a well built and behaved glider in all circumstance.
However, before the first flight, practice ground handling to familiarize yourself with your new wing. It is possible to inflate it forward
or reversed.
Forward launch
To inflate the glider grab the upper ends of the "A" risers with your hands and progressively move foreward guiding the glider
upward. Once the wing is flying overhead, apply brakes as necessary, look up and perform a visual check before accelerating to take
off.
Reverse launch
If the wind speed is sustained and permits it, we will advise you to use a reversed inflation method more adapted to conduct a better
visual check. Face the wing and grab the "A" risers. With a light pull and adaptedrearwardwalking motion, inflate your wing. Once
the glider is stable overhead, turn around, look up once more to check that all is ok. before running down the slope and takeoff.
Note: it is not necessary to use the "A" risers to inflate the wing.
Caution !
Before take-off, ensure for the airspace to be clear in front, around and above you with weather conditions matching your flying skill
level..
Inflating the STEP is easy without any hard point; the sequence demands and adaptation to the weather conditions of the day.
Page 12

Glider user's manual | STEP
SUPAIR | STEP | page 12
FLIGHT CARACTERISTICS
In flight, the TASSKA remains homogeneous even in turbulent air. The "Shark Nose" profile remains solid even when accelerated.
The turn is intuitive and easy to control.
Here are a few tips to take advantage of your STEP wing's performance in flight:
Flying «hands up» will provide the best glide ratio in nil wind.
Using the accelerator/speedbar.
«Hands up» speed or trim speed
Piloting without the toggles/brakes.
According to the EN B norm, the STEP glider was designed to be stable throughout its speed range.
Accelerated, the wing becomes more sensitive to turbulence. If you sense a glider internal pressure decrease while pushing on the
accelerator; lessen the speedbar tension to bring it back to its neutral default setting while slightly applying a small amount of brake
by pulling the hand toggles and prevent a possible leading edge frontal collapse.
The accelerator/speedbar length travel is: from 13 to 15 cm depend of the wing size.
If for whatever reason, the toogles/brakes are no longer available, you will need to pilot your wing using the harness and "C" risers
instead. Beware not to overcontrol the glider to limit the risk of experiencing a possible stall.
To land, let your wing glide for as long as possible before applying a full braking motion. Braking using the "C" risers is not as efficient as using the toggles and could bring a more energetic landing than normal.
Turns
To make your glider turn efficiently, and only after checking that the space below you is clear and safe to land on, weight shift toward
the inside of the turn and progressively pull your brake/toggle on the same side until the desired turning angle is reached. The turning speed and radius can also be adjusted by using the other brake/toggle controlling the upper half side of the wing. If flying at low
speed, begin your turn by raising your hand on the upper and external side of the turn to prevent a possible flat-turn or twisted turn
on the vertical axis.The STEP turns very well with toggle input, and does not require big weigh-shifting in the harness.
If flying at low speed, begin your turn by raising your hand on the upper and external side of the turn to prevent a possible flat-turn
or twisted turn on the vertical axis.
Piloting with the «C».
Piloting with the "C" is used for accelerated or non-accelerated transitions or, in some cases, for winding a thermal, making the
most of the wing's performance.
Piloting with the C risers offers a better wing feedback, and is ideal to anticipate the piloting moves.
This method also optimizes the performance of your wing: usually toggle input to counteract the turbulence, brakes the wing's profile and deteriorates its performance.
By using the "C" an effective controlled action is obtained while maintaining a "clean" profile and therefore a better performance.
To steer the glider with the "C" risers, keep the toggles in hand, and use the handles mounted on the elevators to pilot the wing.
This technique brings a true performance gain, very effective, especially coupled with the accelerator during transition.
Page 13

Glider user's manual | STEP
SUPAIR | STEP | page 13
Specific usage
End of the flight
The STEP wing can be towed up. Fly only with certified gear operated by qualified personal and only after taking a towing clinic. The
towing force must correspond to the weight of the equipment, and the pulling sequence can only start when the wing is fully inflated
and stable over the pilot's head.
Towing
The STEP wing was not designed to enter aerobatic maneuvers. We highly discourage its use for this type of flying.
Aerobatics
Be certain to always have enough altitude for a safe landing before approaching the chosen Landing Zone ( PTU, PTS, etc...). Never
make aggressive maneuvers close to the ground. Always land into the wind ( upwind ), standing up and ready to run to a stop if
necessary. Make your landing approach with maximum air speed if possible depending on the weather conditions of the moment,
then progressively brake to slow the glider to a final touchdown. Beware not to brake too much, too soon and too rapidly to prevent a
possible stall and hard landing.
In case of a landing in sustained higher wind speeds, you will need to quickly turnaround, face the wing, move forward while braking
down symmetrically. You can equally pull the "C" risers down to deflate the glider and bring it to the ground.
Landing
Fold each side of your wing in an accordion-like shape. Stack-up the leading edge reinforcements on top of one another.
.
Folding
The STEP wing was not designed for tandem flying.
Tandem
Page 14
Glider user's manual | STEP
SUPAIR | STEP | page 14
FAST DESCENTS
The following techniques should only be used in emergencies and require prior training to be safely conducted. Appropriate analysis
and anticipation of the conditions will often prevent the need to use fast descent techniques. We will advise you to practice in still air
and preferably above water.
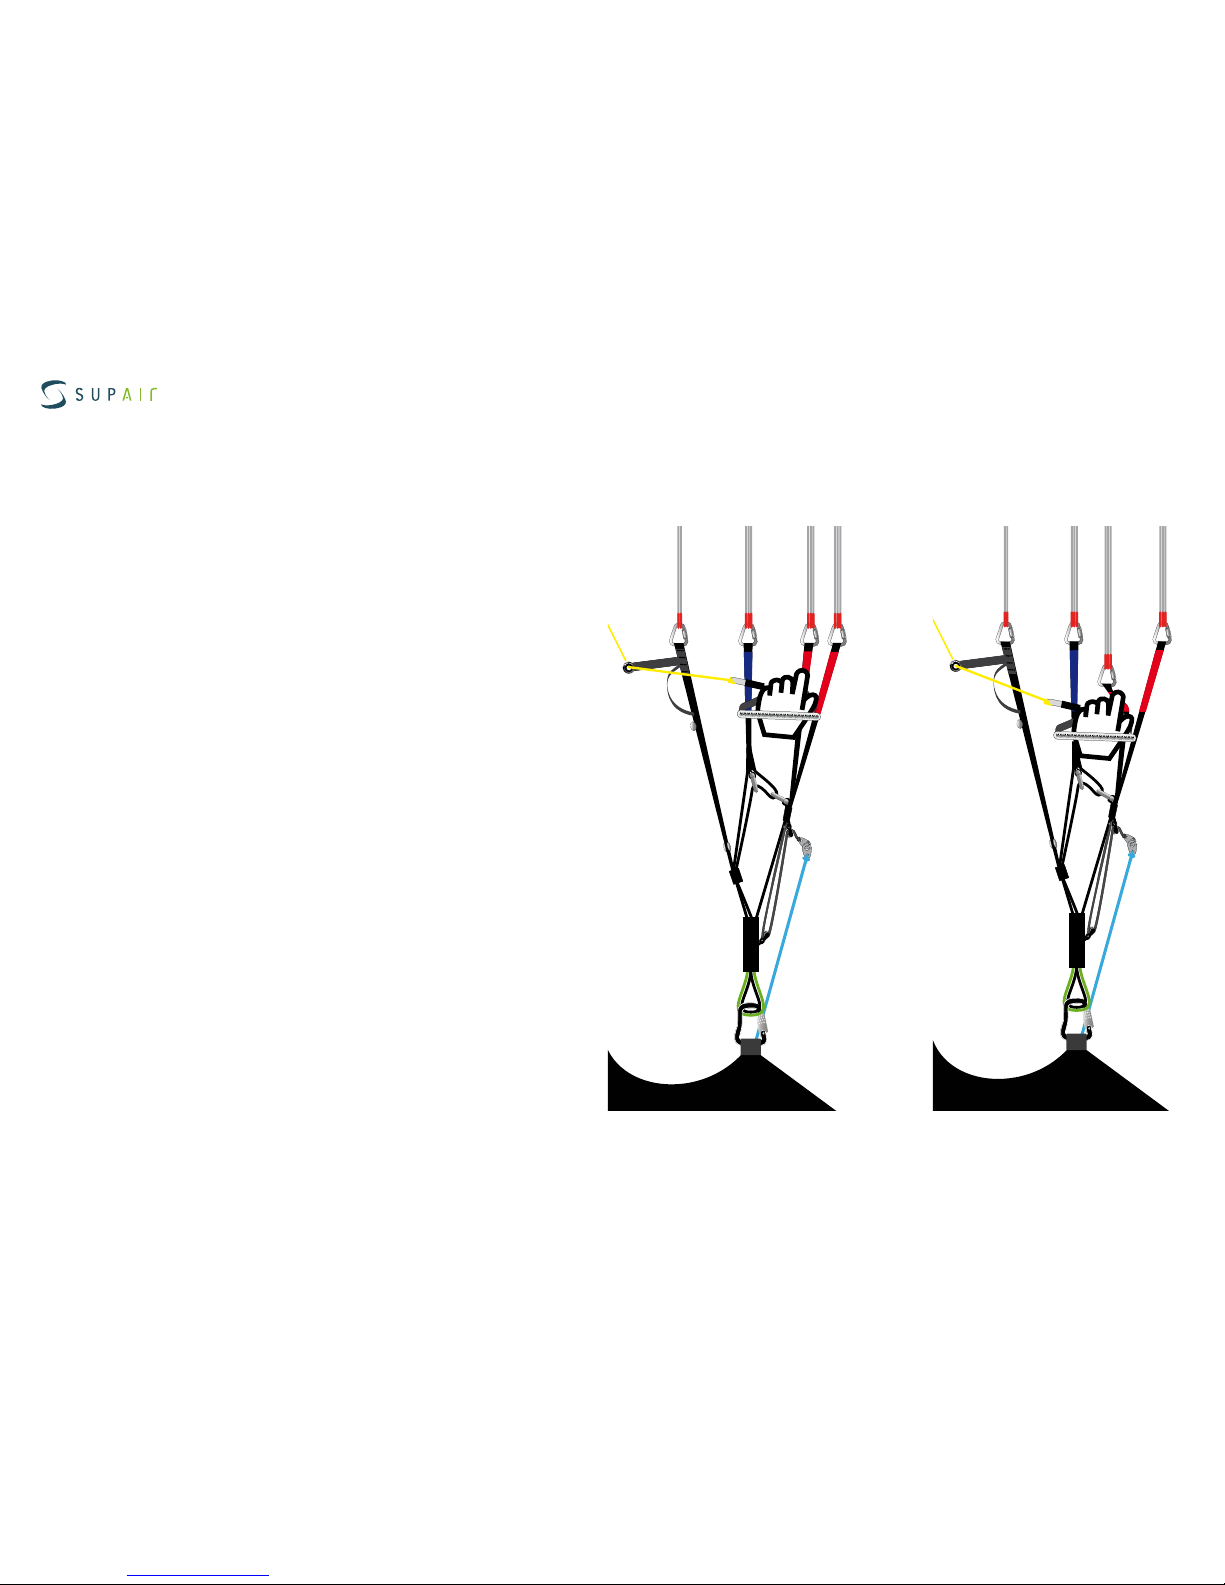
Big Ears
Pulling "ears" increases the glider sink rate. We
do not recommend the use of big ears close to
the ground
In order to pull "ears", grab the specific riser
(outer "A" riser) while keeping the toggles in
hands and lowering them until the win tips collapse. It is preferable to collapse one side after
the other and not simultaneously in order to
prevent an eventual frontal collapse.
Once the "Ears" are folded and stabilized, we will
recommend using the accelerator/speedbar to
regain your initial air speed.
To reopen the "Ears", bring the accelerator/speedbar back to its neutral default setting, then let go the risers symmetrically. You can
pump the brake/toggles on either side of the wing to facilitate its reopening sequence.
Page 15

Glider user's manual | STEP
SUPAIR | STEP | page 15
Fast descents
360° spiral dives
To begin a spiral dive make sure the air space is clear around and below you, then lean toward the chosen side while gradually
applying brake/toggle pressure on that side. The wing will gradually accelerate before entering a full spiral dive. You may use the
outer/upper toggle to manage your sink rate.
In order to exit the rotation, get back to a neutral (centered) position in the harness and gradually release the inside brake. You need
to keep the glider in a turn as it decelerates in order to limit the surge while exiting the spiral. If your exit is too radical the glider
will surge aggressively and experience a substantial dive to be immediately controlled.. Gradually slowing down the rotation with the
outside and upper brake will allow you to exit the spiral in a controlled manner.
DANGER This manœuvre places a lot of stress on the glider. The high speed and "G" force might be disorientating and, in
extreme cases, cause you a temporary loss of consciousness. Practice this maneuver gradually with ample space around
and below you.
This technique is usually physically demanding and will provoke a parachutal wing configuration and hence wing control will be
diminished.
Loosing altitude using the "B" risers is done by grabbing the risers at the metal links level and applying a symmetrical downward
vertical pull until the wing's profile is deformed. This maneuver can be maintained to increase the wing's sink rate.
To regain a normal flying configuration, bring your hands up quickly to the "A" risers red markers, then let go the "B" risers altogether. The wing will experience a moderate surge forward which will need to be instantly neutralized and controlled.
B-line stall
Conforming to the certification, the STEP glider does not show any tendency to stay in a locked spiral configuration and will return by
itself to a normal flying angle in less than two full rotations when the toggles/brakes are brought back up.
To prevent stressing we do not recommend combining spiral dives with "Ears".
Page 16

Glider user's manual | STEP
SUPAIR | STEP | page 16
Flight incidents
Parachutal stall
Spin / asymetric stall
Even though this configuration only rarely occurs, you may find yourself in a situation called "parachutal stall " where the glider descends vertically with no forward motion. If it happens, release the brakes/toggles fully and trims symmetrically. You might also need
to push forward on the "A" risers. Make sure you regained a normal flight configuration before proceeding with brake/toggle usage
again.
Stall
This technique is not recommended as it requires intense physical impute. It is not a safe descent technique.
A spin will only occur because of a piloting error. If so, release the brake fully on the stalled side and be certain to keep the glider in
check during the ensuing dive and reopening sequence.
Asymmetric collapses
Any paraglider may occasionally collapse due to turbulence or a piloting error. In the event of an asymmetric collapse your priority
must be to stay clear of the terrain and regain level flight.
In the event of an asymmetrical collapse induced by turbulence or purposely by the pilot, we want to remind you that the best course
of action to take is:
- Shift all your weight on the open side of the wing.
- If necessary, slightly brake on the open side of the wing to prevent it from rotating.
- Once the wing is balanced and stabilized, ( straight flight ), if the folded side does not spontaneously reopen, give ample up and
down pumping motions until the collapsed glider side is fully reopened. Repeat if necessary until full reinflation is successful. In the
event of a “cravat” (where the wing tip is snagged between the lines) you may use the "ears" technique described above by pulling on
the tangled line to release the wingtip.
Front collapses
During a front collapse according to the certification standard the glider is designed to reopen on its own.
In the event of a frontal collapse induced by turbulence or purposely by the pilot, we want to remind you that the best course of
action to take is:
- Brakes must be fully released during the collapse, we recommend that brake handles be clipped back on the stoppers when you
are producing the collapse
- Wait for the wing to reopen and come back overhead – do not keep the brake pressure on, if the glider falls behind you – risk of
stalling.
- Dampen the surge by using the brakes/toggles proportionally and symmetrically once the wing has overshot you.
Page 17
Glider user's manual | STEP
SUPAIR | STEP | page 17
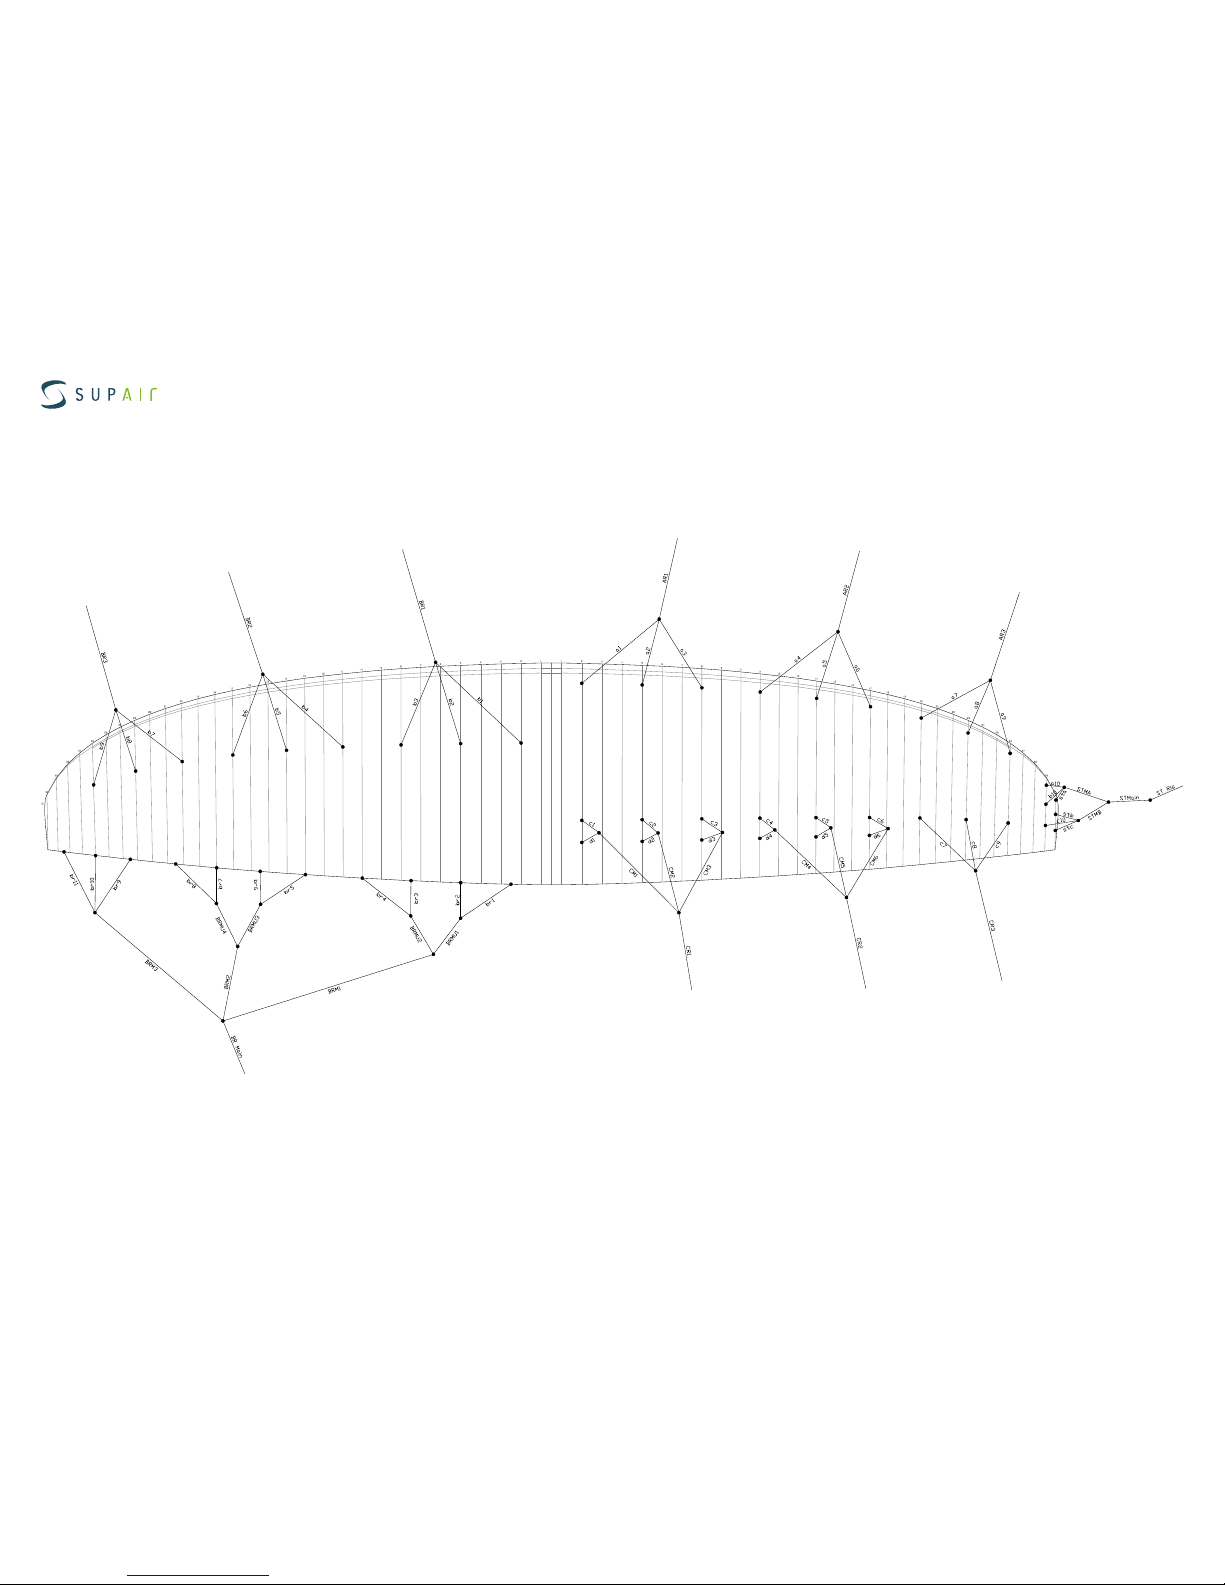
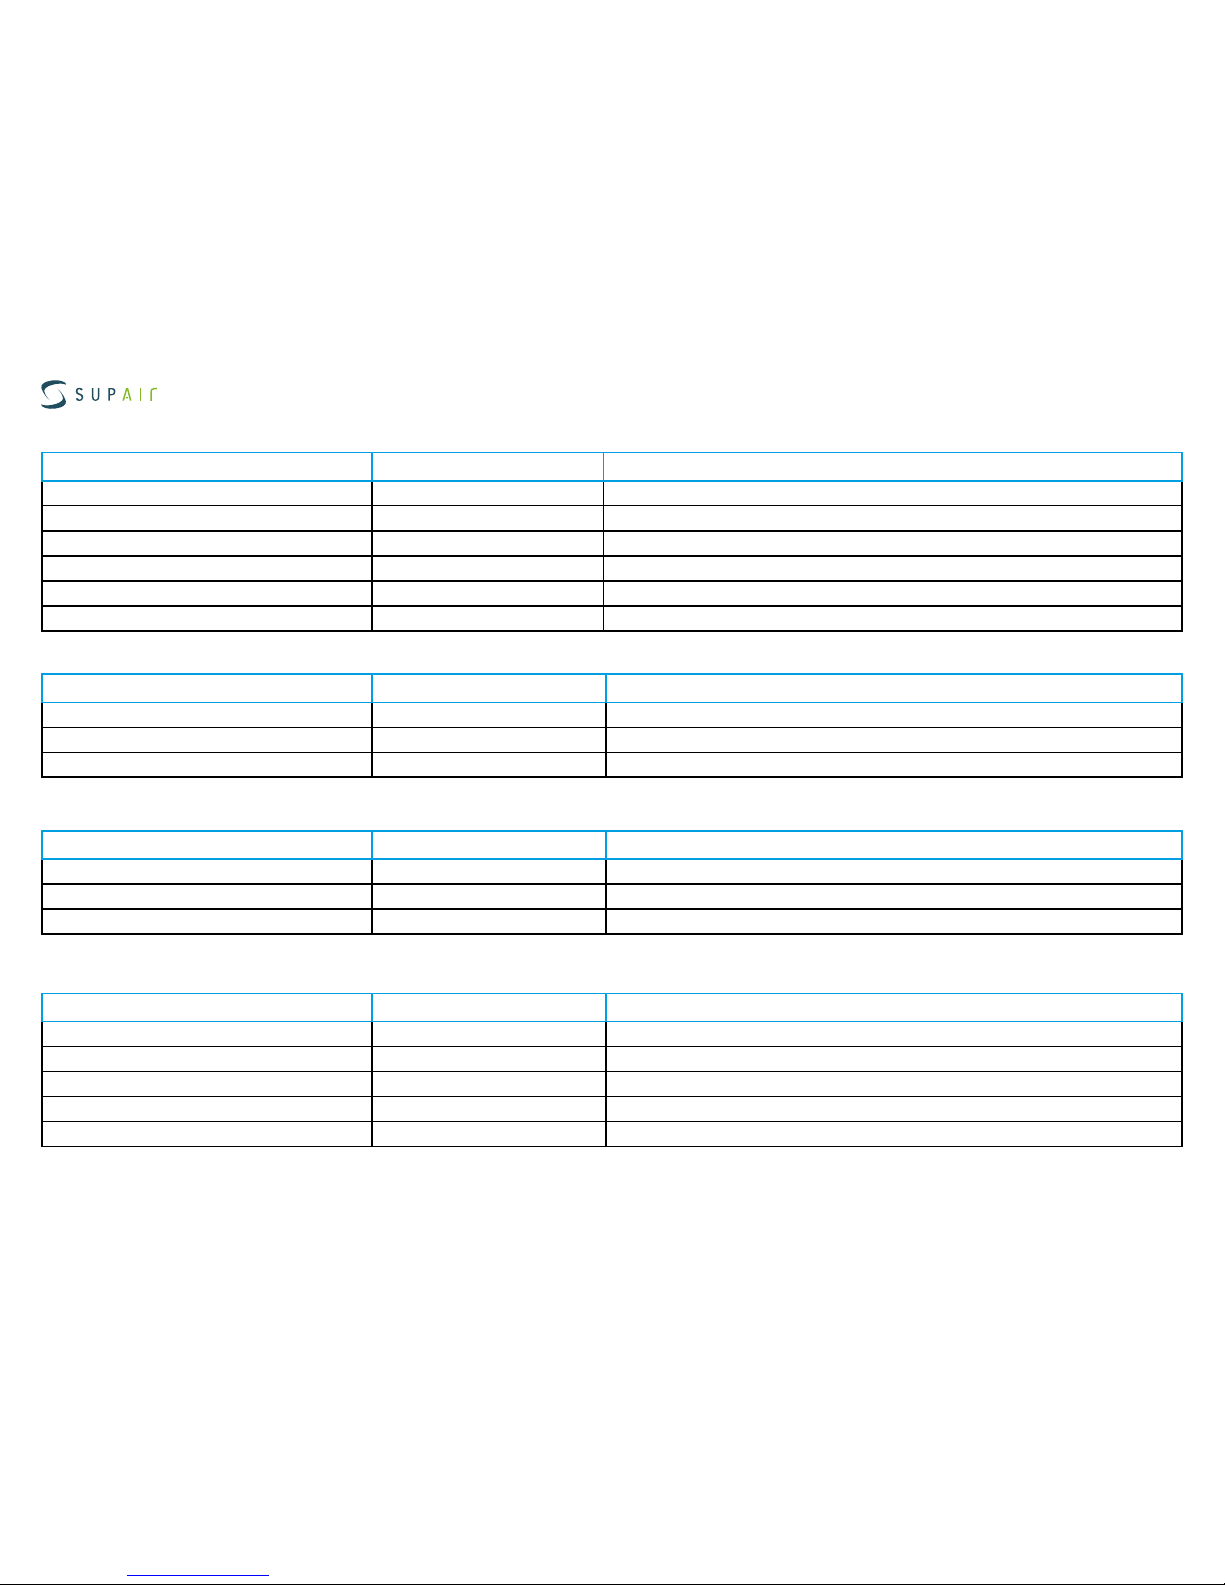
LINE LAYOUT DIAGRAM
Page 18
Glider user's manual | STEP
SUPAIR | STEP | page 18
Materials
Fabrics Producer Reference
Outer surface Porcher Sport Skytex 38 Universal - 9017E25
Inner Surface Porcher Sport Skytex 32 gr Universal - 700032E3W
Supported ribs Porcher Sport Skytex 32 gr Hard finish - 700032E4D
Compression straps and D ribs Porcher Sport Skytex 32 gr Hard finish - 700032E4D
Unsupported ribs Porcher Sport Skytex 32 gr Hard finish - 700032E4D
Rib reinforcements Porcher Sport SR 170
Main lines Producer Reference
Top cascade Edelrid 8000U-90/70/70
Upper middle cascade Edelrid 8000U-90/70
Lower cascade Edelrid 8000U-230/190/130/90
Stabilo lines Producer Reference
Top cascade Edelrid 8000U-50
Middle cascade Edelrid 8000U-50
Lower cascade Edelrid / Liros 8000U-50 / PPSL 70
Brake lines Producer Reference
Top cascade Edelrid 8000U-50
Upper middle cascade Edelrid 8000U-70
ILower middle cascade Edelrid 8000U-90
Lower cascade Edelrid 8000U-190 / N10_300
Mailons Peguet MAILLON RAPIDE MRSI03.5 S12
Page 19
Glider user's manual | STEP
SUPAIR | STEP | page 19
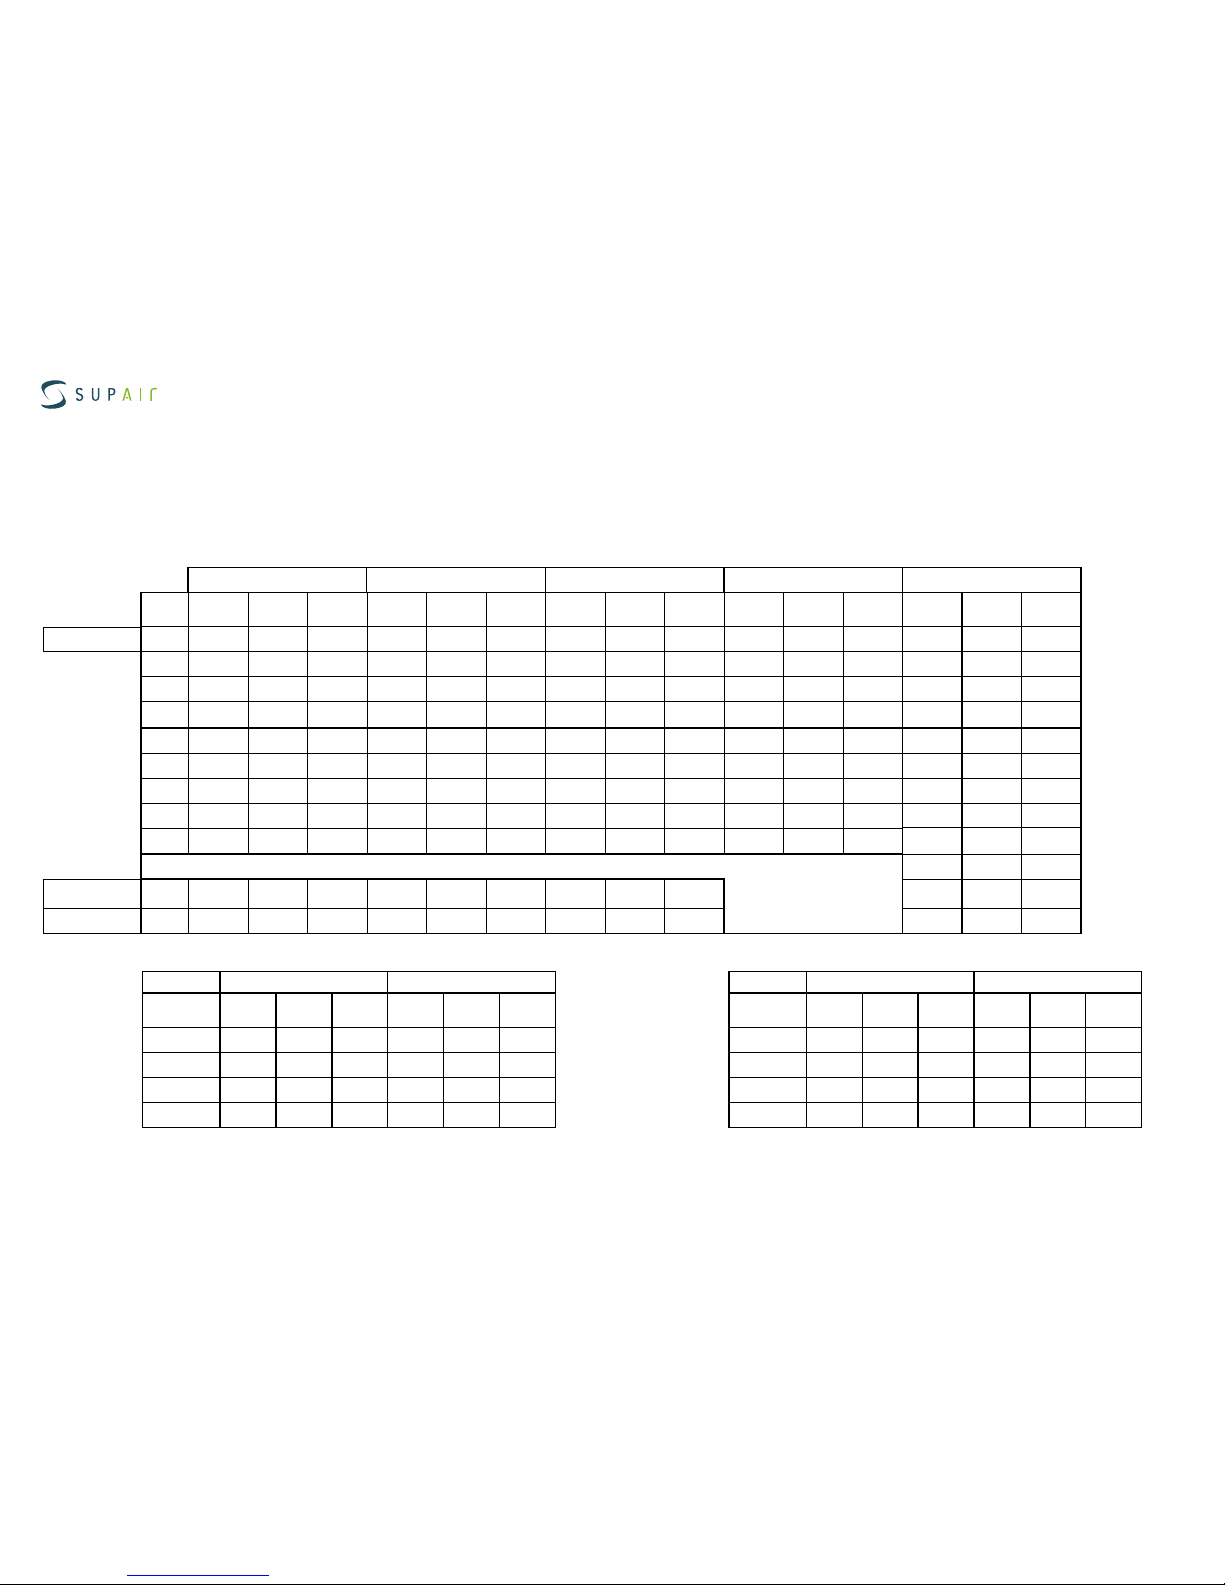
Maintenance sheet
Size XS
Line Check Maintenance Sheet
Tolerance: 10 mm.
Measurements made from the base of the lines to the base of the wing, WITHOUT risers and Maillons Rapides, were under 5 kg.
Risers length,
Measured without carabiner.
Carabiners lenght : 29 mm.
Tolérance +/- 5mm
A B C D Frein
Manual Tested
sample
Diff Manual Tested
sample
Diff Manual Tested
sample
Diff Manual Tested
sample
Diff Manual Tested
sample
Diff
Center
1 6230 6235 5 6148 6152 4 6283 6276 -7 6338 6329 -9 7105 7109 4
2 6145 6153 8 6063 6062 -1 6194 6190 -4 6248 6240 -8 6871 6872 1
3 6176 6179 3 6094 6091 -3 6218 6218 0 6268 6261 -7 6683 6681 -2
4 6120 6124 4 6037 6035 -2 6150 6149 -1 6196 6191 -5 6587 6585 -2
5 6009 6007 -2 5930 5934 4 6035 6031 -4 6077 6072 -5 6412 6409 -3
6 6011 6009 -2 5935 5936 1 6029 6020 -9 6066 6060 -6 6270 6267 -3
7 5876 5880 4 5824 5822 -2 5895 5887 -8 6212 6209 -3
8 5743 5736 -7 5708 5706 -2 5771 5766 -5 6242 6249 7
9 5684 5686 2 5674 5668 -6 5725 5731 6 6106 6103 -3
10 6058 6054 -4
Stabilizers
11 5402 5393 -9 5380 5371 -9 5425 5419 -6 6028 6028 0
Wingtip
12 5292 5298 6 5316 5309 -7 5371 5364 -7
RISERS Non accéléré Accéléré
Manual Tested
sample
Diff Manual Tested
sample
Diff
A
475 475 0 345 345 0
A'
475 474 -1 345 344 -1
B
475 473 -2 388 385 -3
C
475 476 1 475 476 1
RISERS Non accéléré Accéléré
Manual Tested
sample
Diff Manual Tested
sample
Diff
A
505 505 0 375 375 0
A'
505 504 -1 375 374 -1
B
505 503 -2 418 415 -3
C
505 506 1 505 506 1
Risers length,
Measured with
carabiner.
Tolérance +/- 5mm
STEP size XS
Page 20
Glider user's manual | STEP
SUPAIR | STEP | page 20
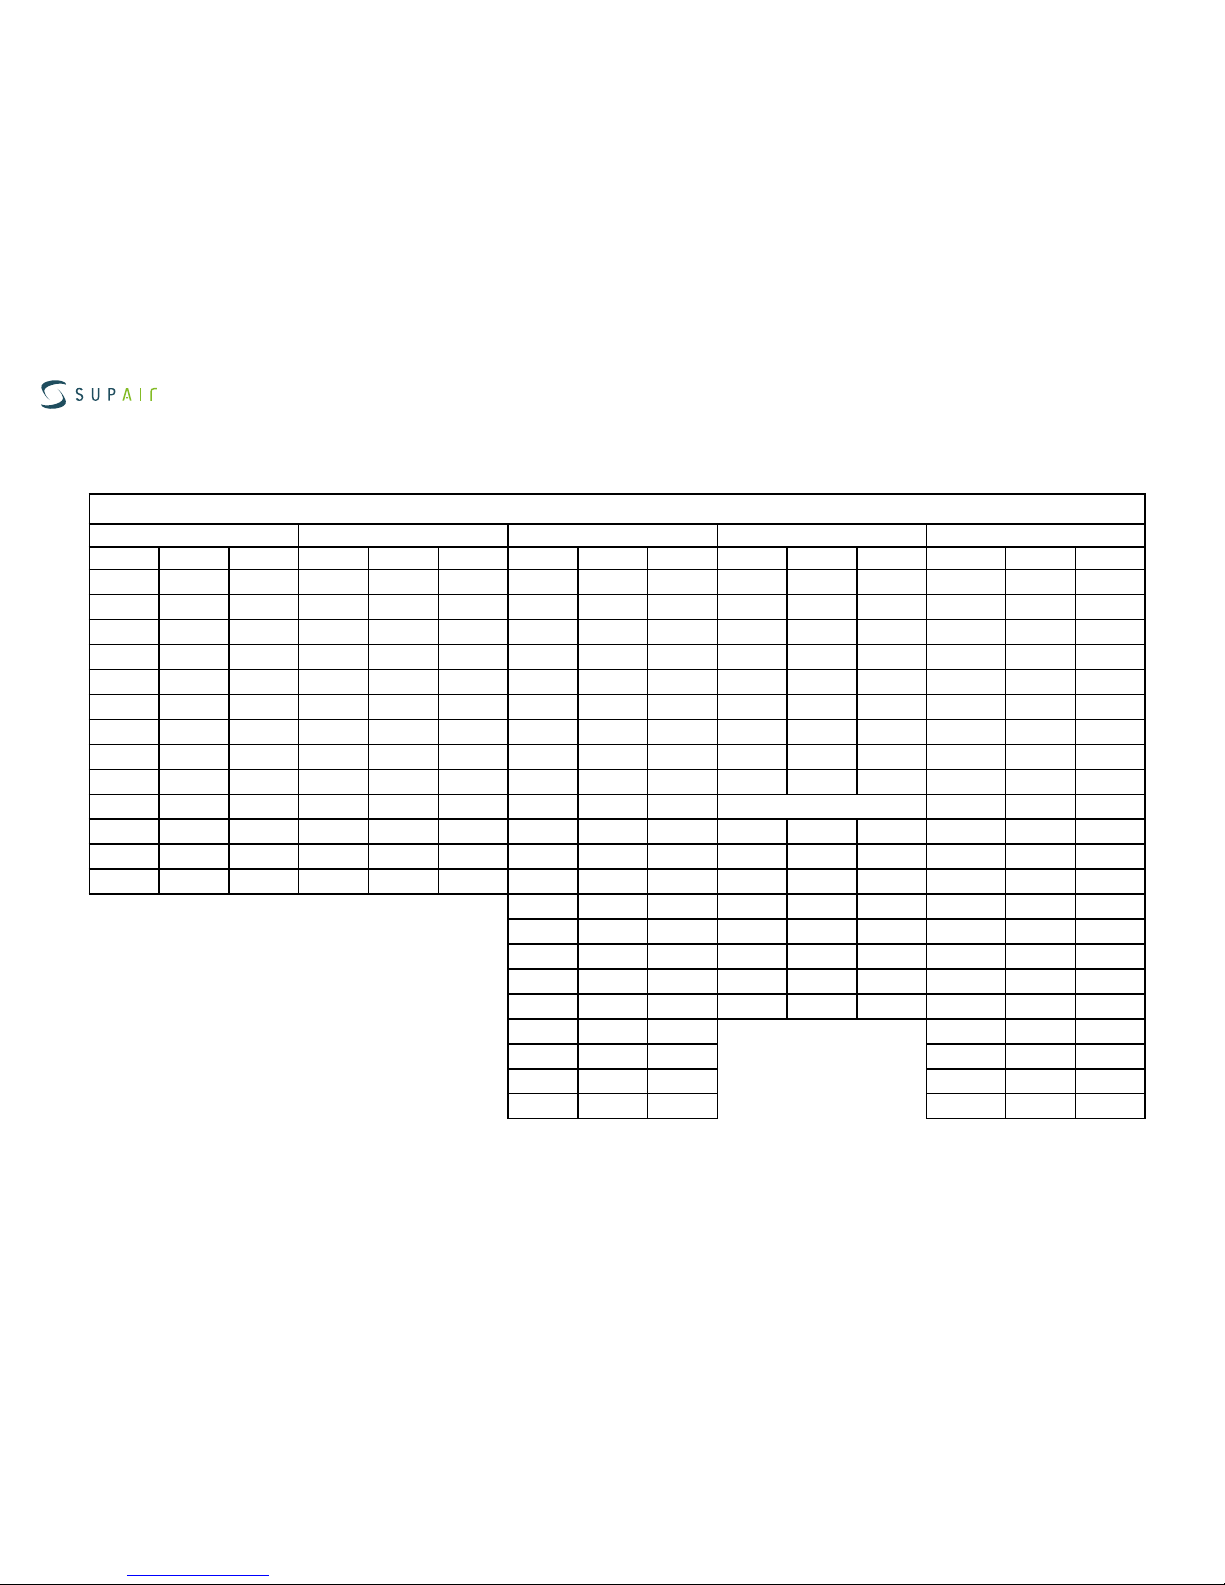
Lines individual lenghts
A LINES B LINES C LINES D LINES BRAKE LINES
NAME CUT SEWN NAME CUT SEWN NAME CUT SEWN NAME CUT SEWN NAME CUT SEWN
AR1 3969 4219 BR1 3921 4171 CR1 4026 4276 d1 501 701 BRML 1250 1450
AR2 4186 4436 BR2 4125 4375 CR2 4215 4465 d2 486 686 BRmain 1459 1459
AR3 4299 4549 BR3 4279 4529 CR3 4345 4595 d3 486 686 BRM1 1701 1901
a1 2273 2473 b1 2241 2441 CM1 1837 2037 d4 431 631 BRM2 2030 2230
a2 2188 2388 b2 2156 2356 CM2 1762 1962 d5 406 606 BRM3 2504 2704
a3 2219 2419 b3 2187 2387 CM3 1782 1982 d6 397 597 BRMU1 1604 1804
a4 1939 2139 b4 1918 2118 CM4 1571 1771 BRMU2 1346 1546
a5 1828 2028 b5 1811 2011 CM5 1477 1677 BRMU3 892 1092
a6 1830 2030 b6 1816 2016 CM6 1475 1675 BRMU4 913 1113
a7 1584 1784 b7 1551 1751 c1 448 648
STABILO LINES
br1 1288 1488
a8 1451 1651 b8 1435 1635 c2 434 634
NAME CUT SEWN
br2 1054 1254
a9 1387 1587 b9 1396 1596 c3 438 638 STMain 4253 4453 br3 1124 1324
a10 385 585 b10 363 563 c4 387 587 STRis 305 505 br4 1028 1228
c5 366 566 STMA 471 671 br5 978 1178
c6 362 562 STMB 488 688 br6 836 1036
c7 1552 1752 sta 273 473 br7 757 957
c8 1428 1628 stb 280 480 br8 787 987
c9 1382 1582 stc 335 535 br9 1087 1287
c10 391 591 br10 1039 1239
br11 1009 1209
Maintenance sheet
STEP size XS
Page 21
Glider user's manual | STEP
SUPAIR | STEP | page 21
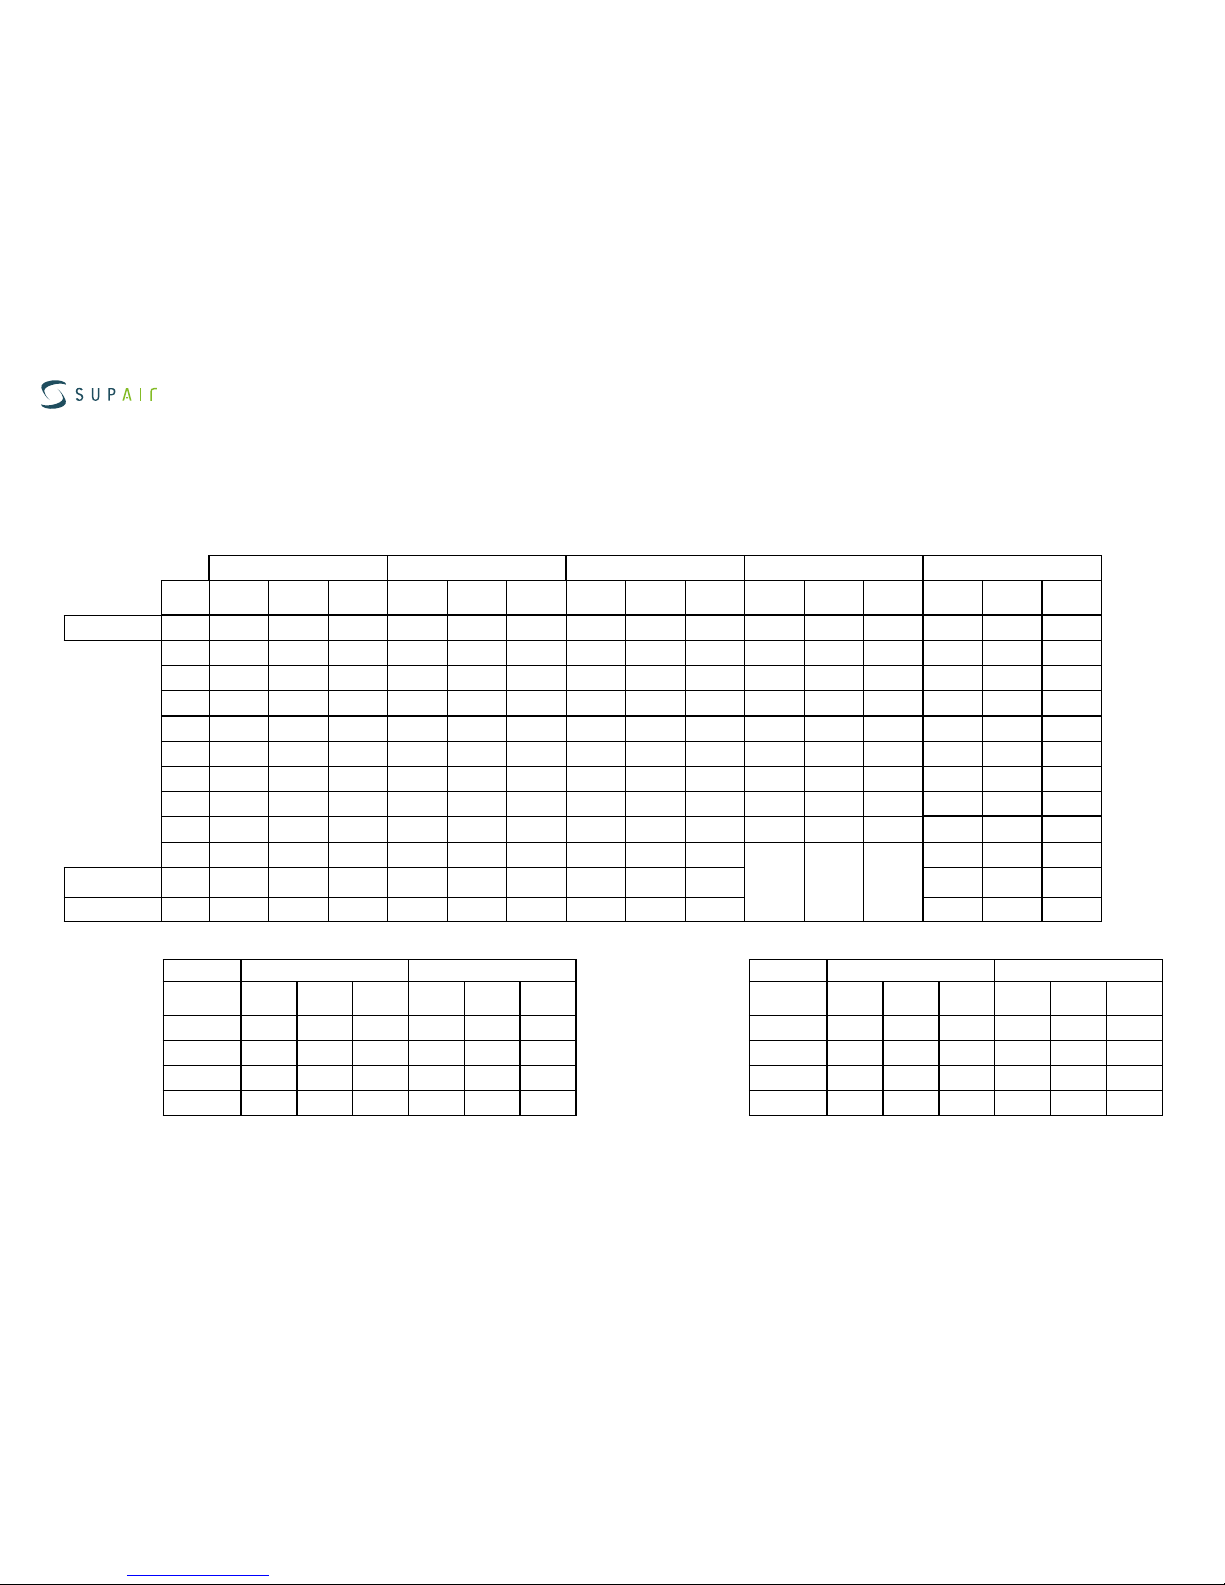
Size S
Line Check Maintenance Sheet
Maintenance sheet
STEP size S
Tolerance: 10 mm.
Measurements made from the base of the lines to the base of the wing, WITHOUT risers and Maillons Rapides, were under 5 kg.
Risers length,
Measured without carabiner.
Carabiners lenght : 29 mm.
Tolérance +/- 5mm
A B C D Frein
Manual Tested
sample
Diff Manual Tested
sample
Diff Manual Tested
sample
Diff Manual Tested
sample
Diff Manual Tested
sample
Diff
Center
1 6600 6609 9 6512 6517 5 6656 6653 -3 6714 6713 -1 7484 7483 -1
2 6512 6516 4 6423 6427 4 6563 6565 2 6620 6623 3 7241 7236 -5
3 6547 6554 7 6457 6457 0 6590 6585 -5 6643 6642 -1 7043 7034 -9
4 6493 6502 9 6406 6404 -2 6527 6525 -2 6575 6576 1 6944 6938 -6
5 6376 6383 7 6294 6299 5 6406 6403 -3 6451 6449 -2 6760 6755 -5
6 6379 6383 4 6299 6303 4 6400 6395 -5 6439 6439 0 6613 6613 0
7 6236 6245 9 6184 6185 1 6260 6255 -5 6550 6542 -8
8 6095 6101 6 6061 6065 4 6129 6127 -2 6584 6586 2
9 6033 6039 6 6025 6027 2 6097 6094 -3 6442 6438 -4
10 6393 6385 -8
Stabilizers
11 5780 5781 1 5757 5756 -1 5805 5804 -1 6360 6368 8
Wingtip
12 5670 5670 0 5690 5687 -3 5747 5746 -1
RISERS Non accéléré Accéléré
Manual Tested
sample
Diff Manual Tested
sample
Diff
A
490 490 0 320 318 -2
A'
490 490 0 320 318 -2
B
490 489 -1 376 373 -3
C
490 489 -1 490 489 -1
RISERS Non accéléré Accéléré
Manual Tested
sample
Diff Manual Tested
sample
Diff
A
520 518 -2 350 346 -4
A'
520 518 -2 350 346 -4
B
520 517 -3 406 401 -5
C
520 517 -3 520 517 -3
Risers length,
Measured with
carabiner.
Tolérance +/- 5mm
Page 22
Glider user's manual | STEP
SUPAIR | STEP | page 22
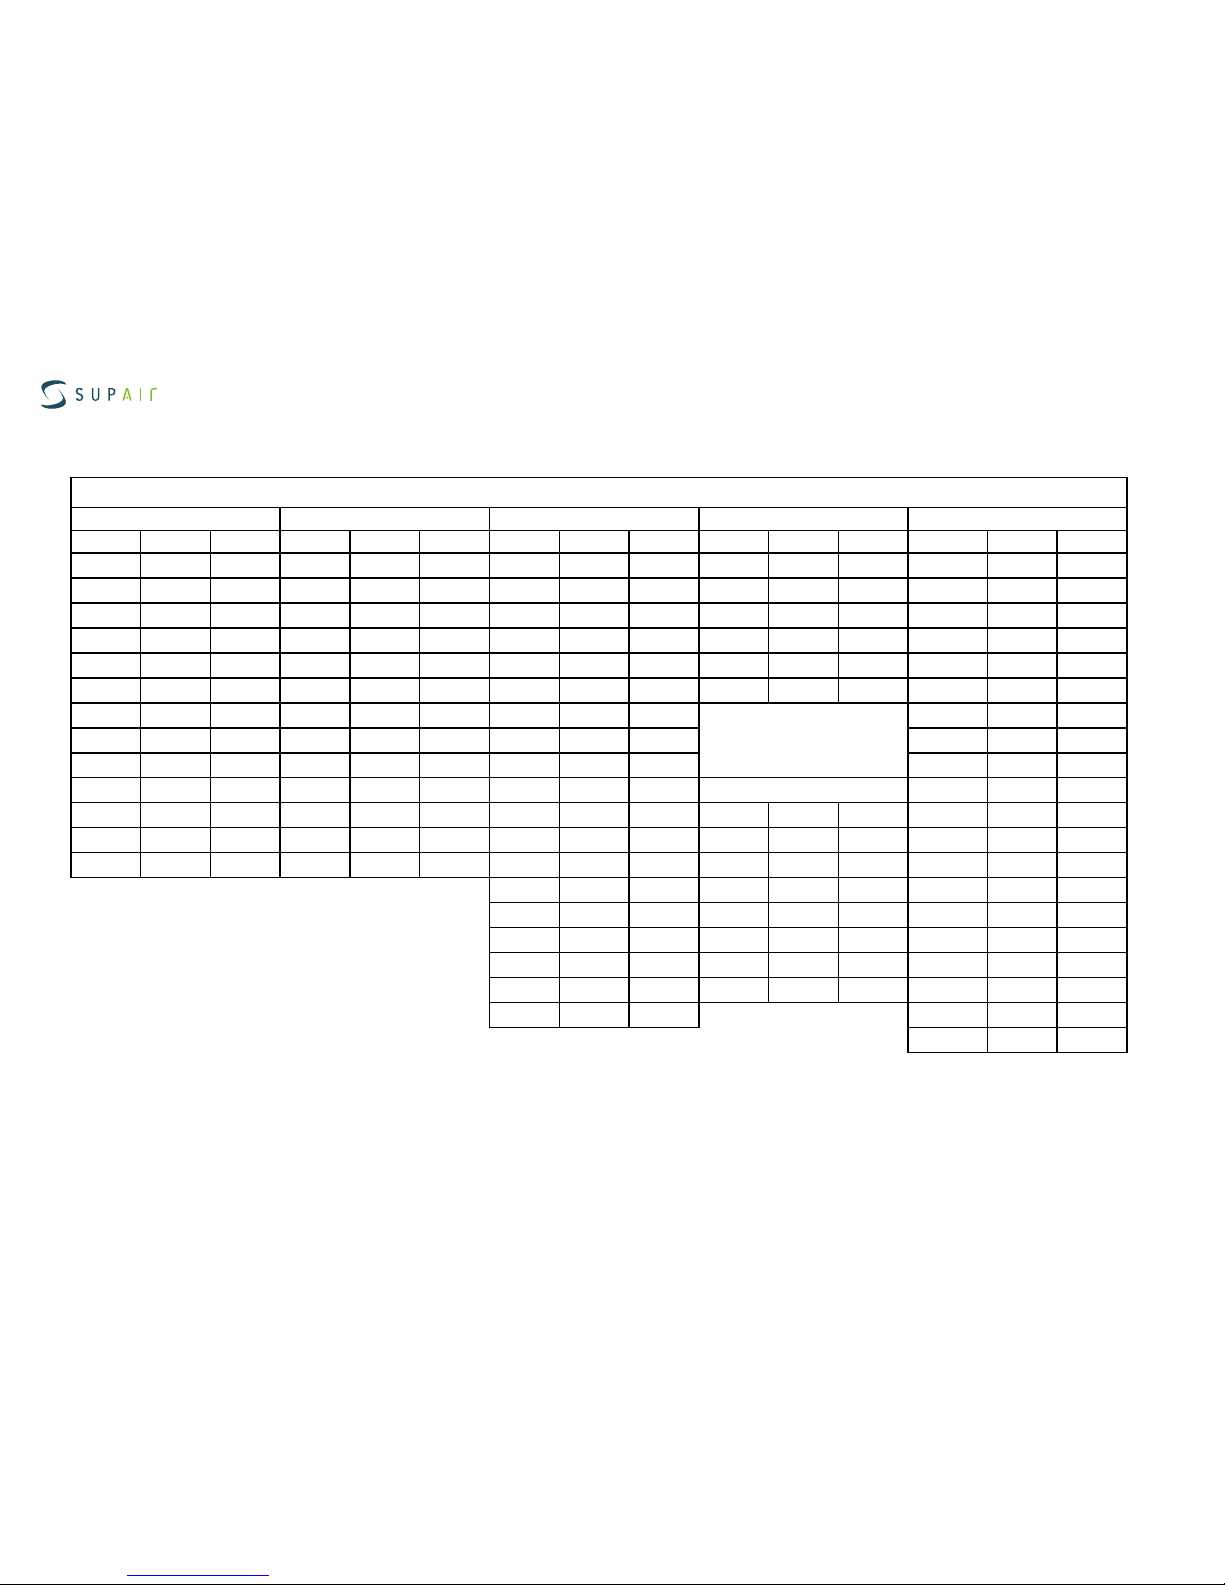
Maintenance sheet
STEP size S
Lines individual lenghts
A LINES B LINES C LINES D LINES BRAKE LINES
NAME CUT SEWN NAME CUT SEWN NAME CUT SEWN NAME CUT SEWN NAME CUT SEWN
AR1 4464 4214 BR1 4409 4159 CR1 4523 4273 d1 734 534 BRML 1543 1343
AR2 4697 4447 BR2 4636 4386 CR2 4736 4486 d2 718 518 BRmain 1463 1463
AR3 4820 4570 BR3 4795 4545 CR3 4879 4629 d3 718 518 BRM1 2023 1823
a1 2608 2408 b1 2577 2377 CM1 2147 1947 d4 657 457 BRM2 2385 2185
a2 2520 2320 b2 2488 2288 CM2 2069 1869 d5 632 432 BRM3 2899 2699
a3 2555 2355 b3 2522 2322 CM3 2092 1892 d6 622 422 BRMU1 1914 1714
a4 2261 2061 b4 2236 2036 CM4 1866 1666 BRMU2 1646 1446
a5 2144 1944 b5 2124 1924 CM5 1767 1567 BRMU3 1158 958
a6 2147 1947 b6 2129 1929 CM6 1765 1565 BRMU4 1181 981
a7 1883 1683 b7 1855 1655 c1 678 478
STABILO LINES
br1 1578 1378
a8 1742 1542 b8 1732 1532 c2 663 463
NAME CUT SEWN
br2 1335 1135
a9 1675 1475 b9 1691 1491 c3 667 467 STMain 4774 4574 br3 1405 1205
a10 604 404 b10 581 381 c4 611 411 STRis 505 305 br4 1306 1106
c5 589 389 STMA 715 515 br5 1248 1048
c6 585 385 STMB 720 520 br6 1101 901
c7 1843 1643 sta 492 292 br7 1015 815
c8 1712 1512 stb 507 307 br8 1049 849
c9 1680 1480 stc 564 364 br9 1371 1171
c10 624 424 br10 1322 1122
br11 1289 1089
Page 23
Glider user's manual | STEP
SUPAIR | STEP | page 23
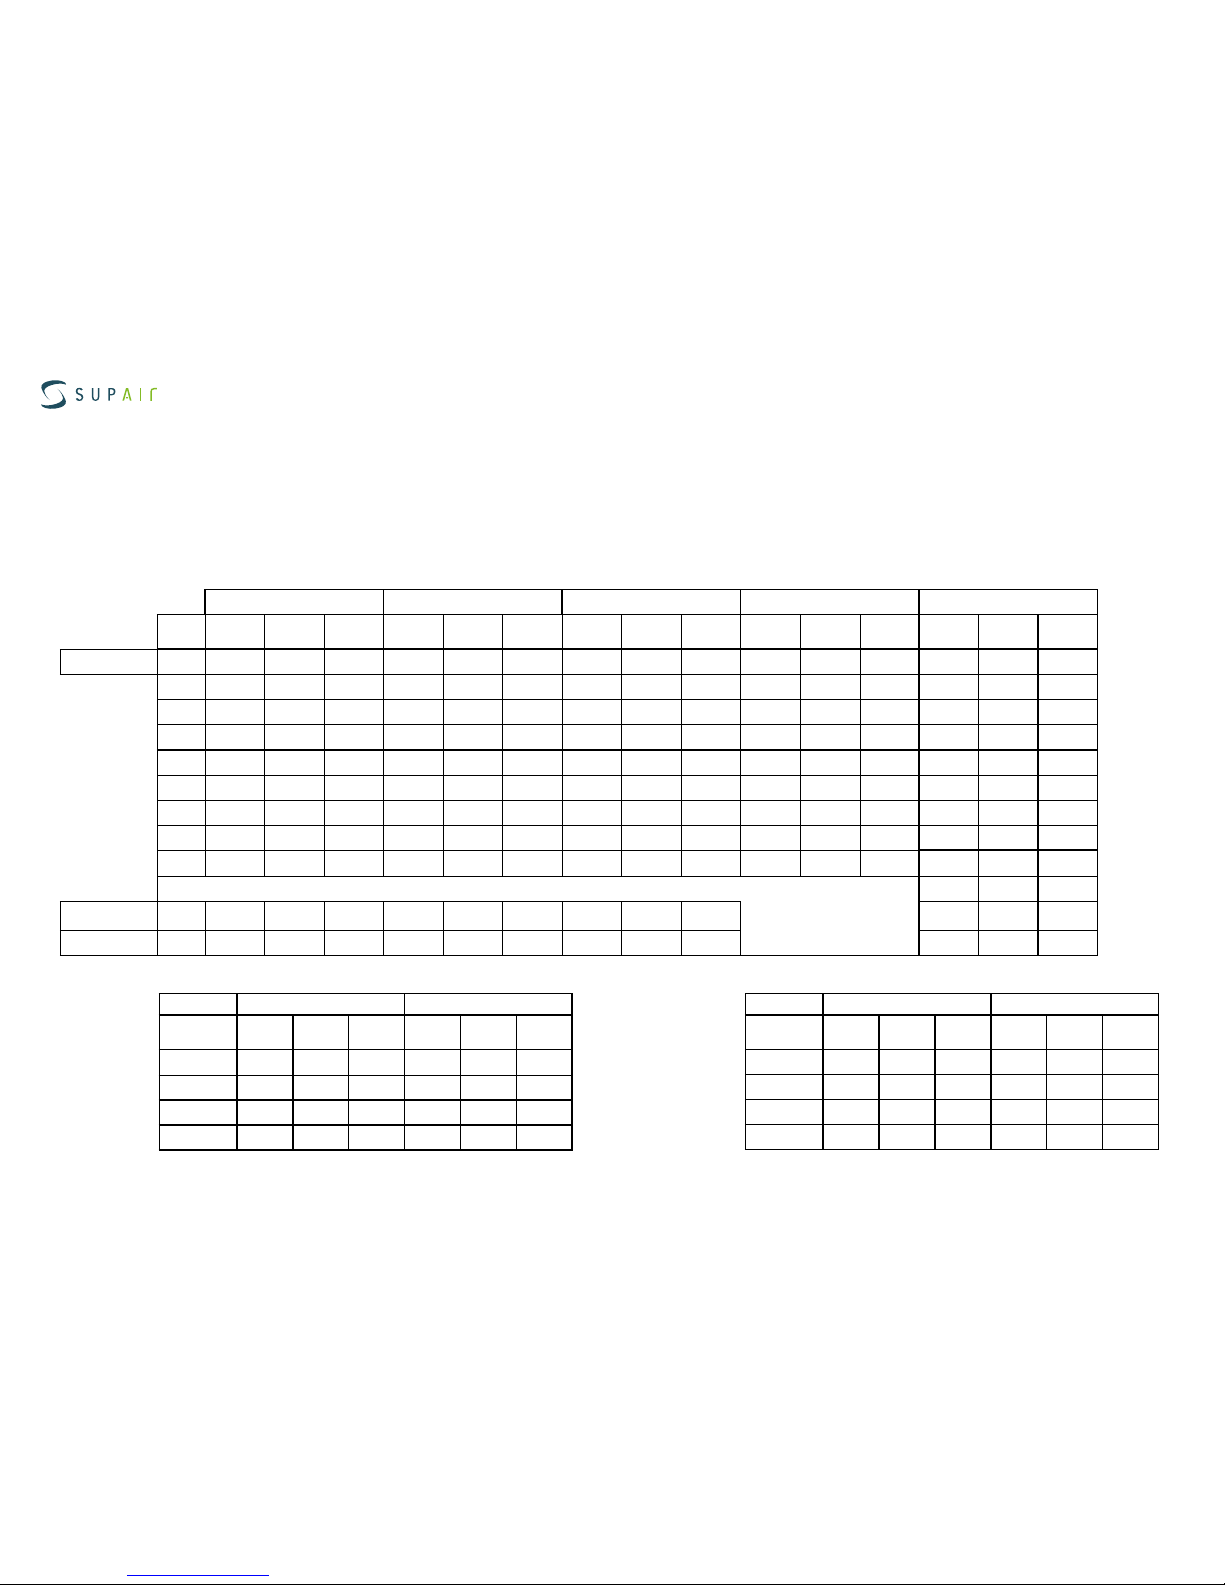
Size M
Line Check Maintenance Sheet
Maintenance sheet
STEP size M
Tolerance: 10 mm.
Measurements made from the base of the lines to the base of the wing, WITHOUT risers and Maillons Rapides, were under 5 kg.
Risers length,
Measured without carabiner.
Carabiners lenght : 29 mm.
Tolérance +/- 5mm
A B C D Frein
Manual Tested
sample
Diff Manual Tested
sample
Diff Manual Tested
sample
Diff Manual Tested
sample
Diff Manual Tested
sample
Diff
Center
1
6893 6897 4 6797 6802 5 6951 6951 0 7012 7005 -7 7890 7896 6
2
6803 6805 2 6707 6708 1 6856 6852 -4 6915 6910 -5 7641 7647 6
3
6840 6844 4 6743 6740 -3 6885 6881 -4 6940 6932 -8 7427 7421 -6
4
6784 6788 4 6691 6692 1 6817 6812 -5 6868 6864 -4 7325 7320 -5
5
6663 6668 5 6575 6573 -2 6692 6684 -8 6738 6730 -8 7136 7135 -1
6
6666 6667 1 6581 6574 -7 6686 6681 -5 6726 6717 -9 6983 6984 1
7
6516 6516 0 6459 6461 2 6530 6523 -7 6916 6915 -1
8
6369 6369 0 6331 6332 1 6394 6391 -3 6950 6951 1
9
6304 6310 6 6292 6289 -3 6360 6352 -8 6804 6805 1
10
6756 6749 -7
Stabilizers
11
6041 6035 -6 6017 6010 -7 6067 6064 -3 6722 6719 -3
Wingtip
12
5921 5926 5 5947 5940 -7 6007 6002 -5
RISERS Non accéléré Accéléré
Manual Tested
sample
Diff Manual Tested
sample
Diff
A
490 494 4 330 327 -3
A'
490 492 2 330 325 -5
B
490 493 3 380 380 0
C
490 494 4 490 494 4
RISERS Non accéléré Accéléré
Manual Tested
sample
Diff Manual Tested
sample
Diff
A
520 524 4 360 357 -3
A'
520 522 2 360 355 -5
B
520 523 3 410 410 0
C
520 524 4 520 524 4
Risers length,
Measured with
carabiner.
Tolérance +/- 5mm
Page 24
Glider user's manual | STEP
SUPAIR | STEP | page 24
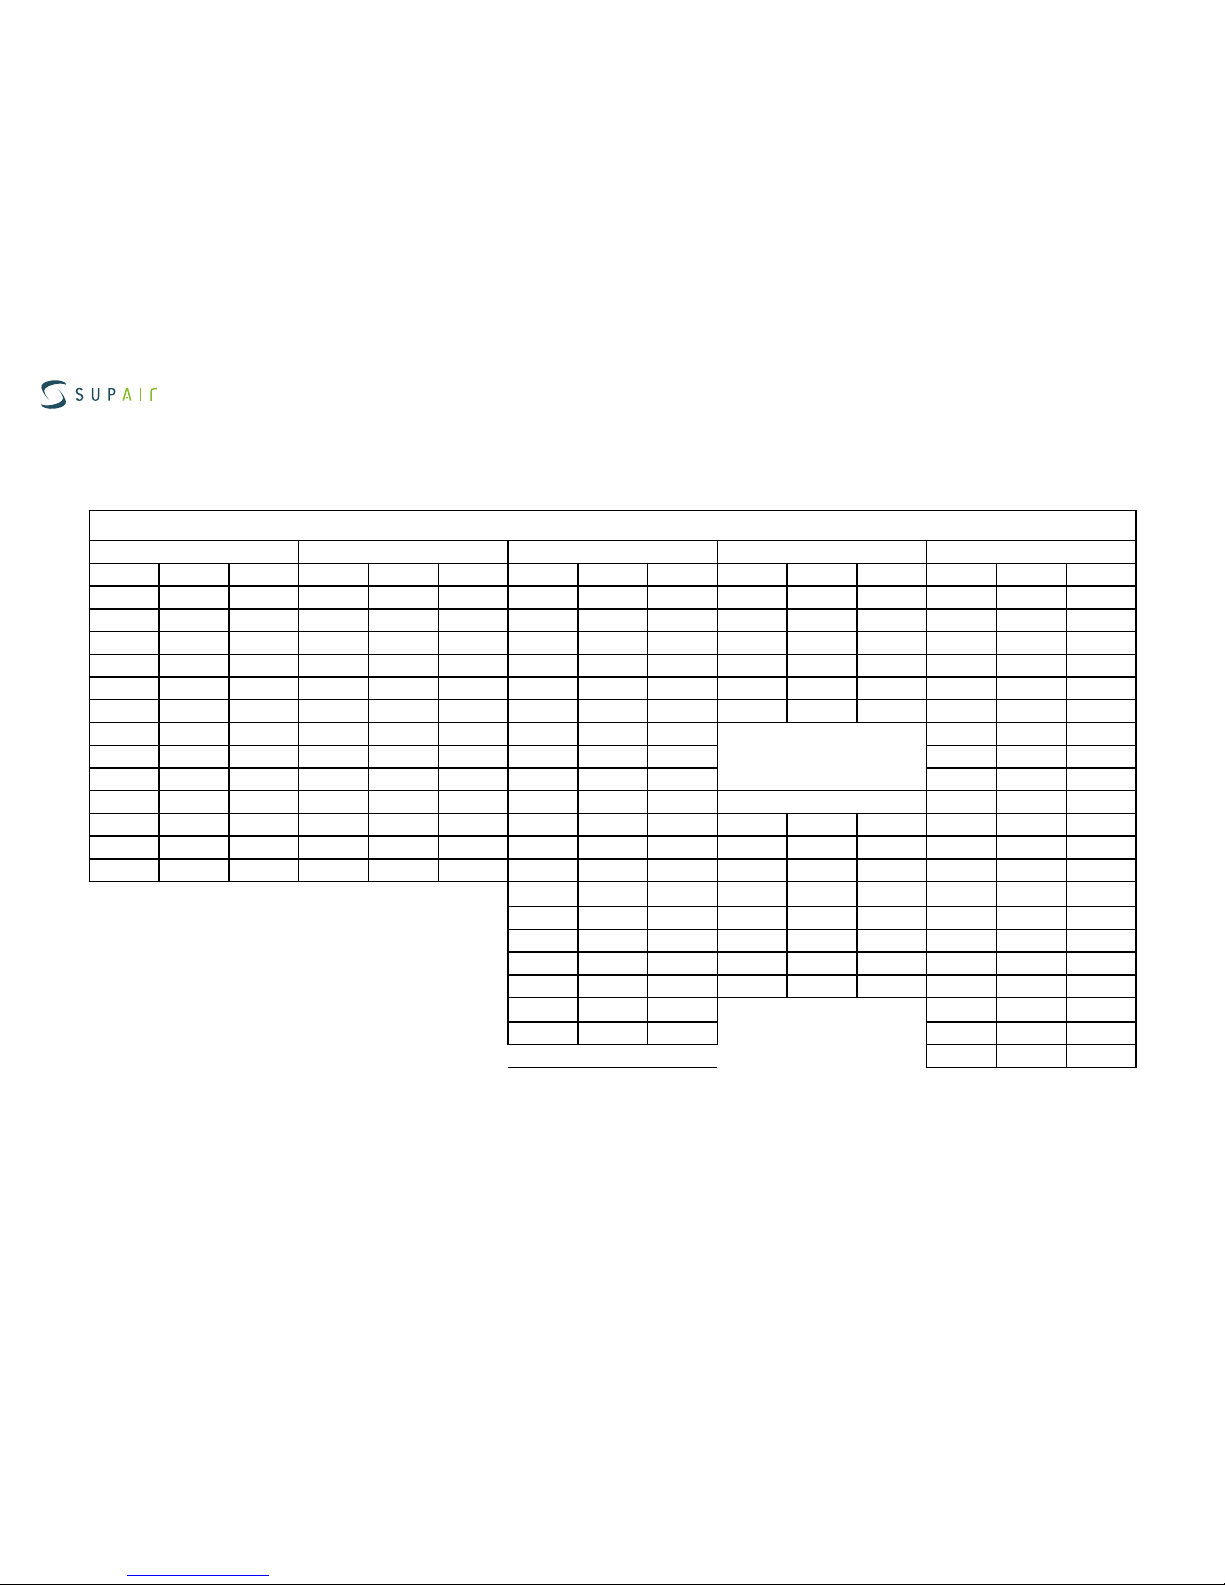
Maintenance sheet
STEP size M
Lines individual lenghts
A LINES B LINES C LINES D LINES BRAKE LINES
NAME CUT SEWN NAME CUT SEWN NAME CUT SEWN NAME CUT SEWN NAME CUT SEWN
AR1 4651 4401 BR1 4592 4342 CR1 4716 4466 d1 755 555 BRML 1615 1415
AR2 4898 4648 BR2 4832 4582 CR2 4936 4686 d2 738 538 BRmain 1474 1474
AR3 5021 4771 BR3 4997 4747 CR3 5074 4824 d3 739 539 BRM1 2116 1916
a1 2714 2514 b1 2679 2479 CM1 2231 2031 d4 677 477 BRM2 2503 2303
a2 2624 2424 b2 2589 2389 CM2 2151 1951 d5 649 449 BRM3 3039 2839
a3 2661 2461 b3 2625 2425 CM3 2175 1975 d6 639 439 BRMU1 2009 1809
a4 2351 2151 b4 2325 2125 CM4 1939 1739 BRMU2 1722 1522
a5 2230 2030 b5 2209 2009 CM5 1837 1637 BRMU3 1209 1009
a6 2233 2033 b6 2215 2015 CM6 1835 1635 BRMU4 1232 1032
a7 1962 1762 b7 1928 1728 c1 696 496 STABILO LINES br1 1643 1443
a8 1815 1615 b8 1800 1600 c2 681 481 NAME CUT SEWN br2 1394 1194
a9 1745 1545 b9 1756 1556 c3 686 486 STMain 5001 4801 br3 1467 1267
a10 629 429 b10 605 405 c4 628 428 STRis 505 305 br4 1365 1165
c5 605 405 STMA 724 524 br5 1302 1102
c6 601 401 STMB 744 544 br6 1149 949
c7 1921 1721 sta 507 307 br7 1059 859
c8 1785 1585 stb 513 313 br8 1093 893
c9 1751 1551 stc 573 373 br9 1440 1240
c10 635 435 br10 1392 1192
c10 635 435 br11 1358 1158
br11 1358 1158
Page 25
Glider user's manual | STEP
SUPAIR | STEP | page 25
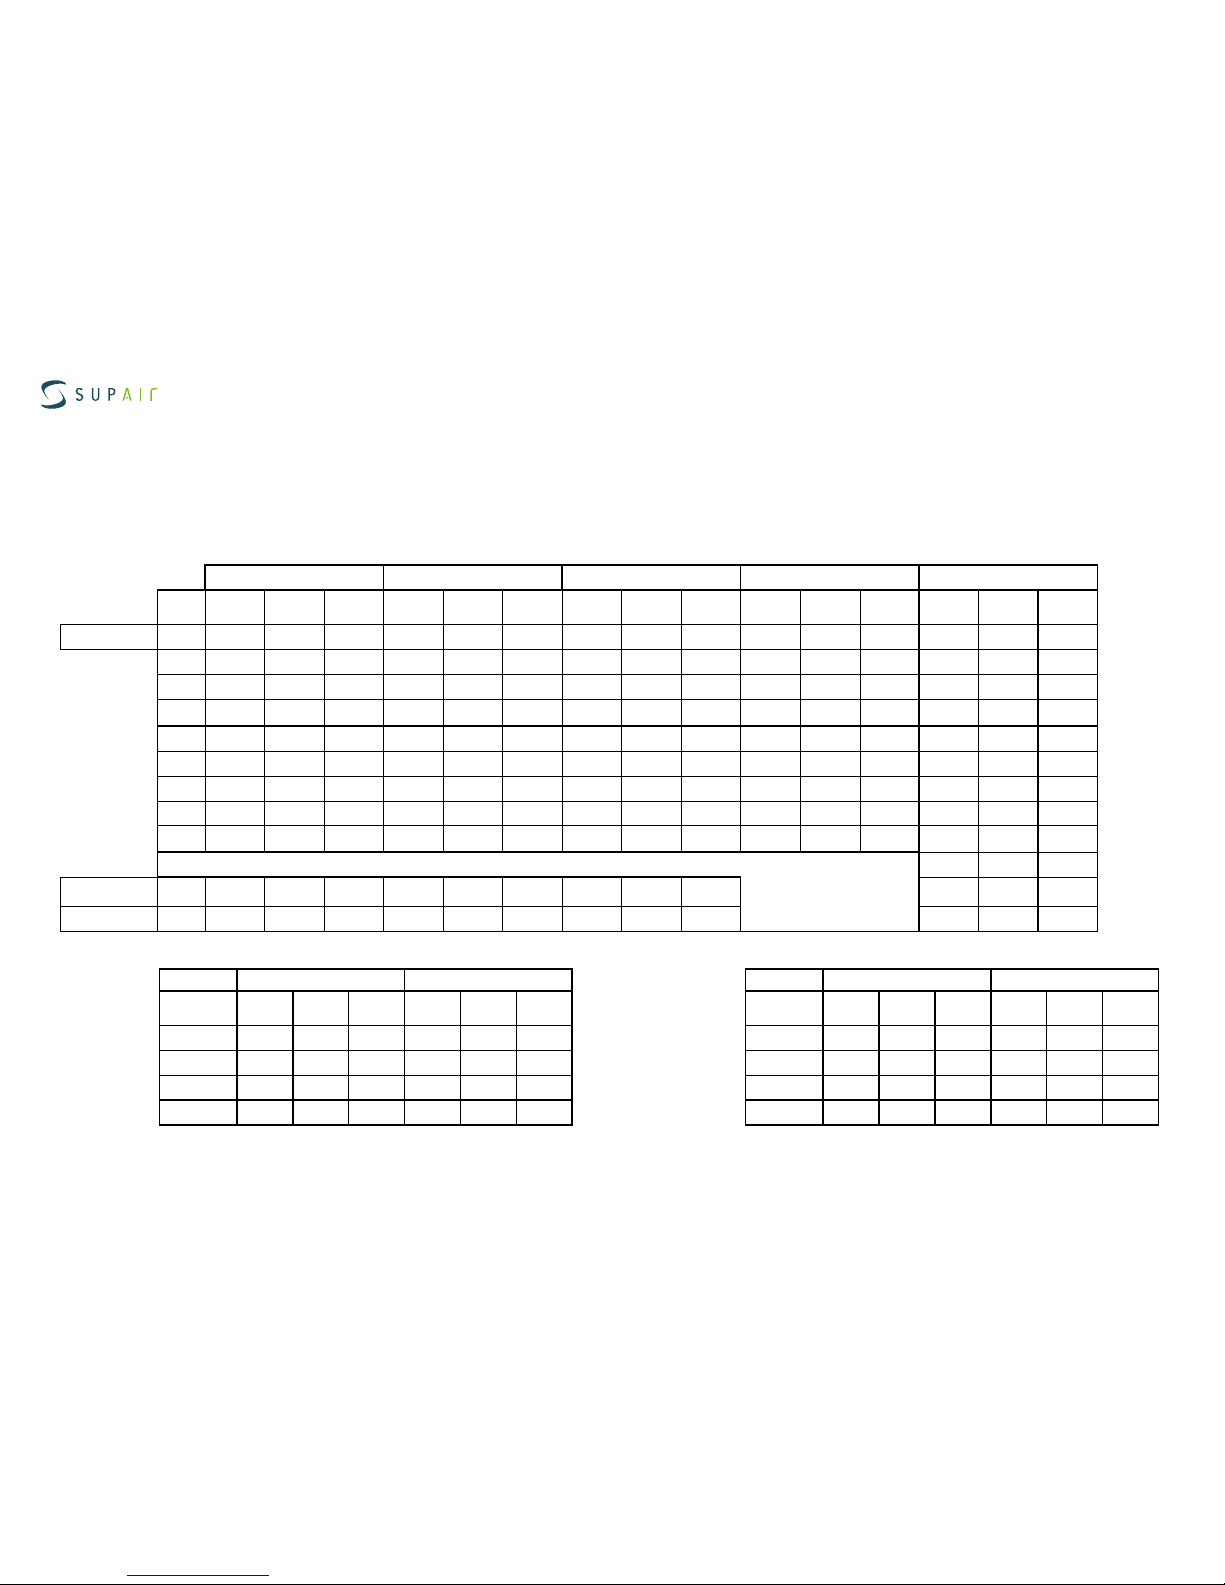
Size ML
Line Check Maintenance Sheet
Maintenance sheet
STEP size ML
Tolerance: 10 mm.
Measurements made from the base of the lines to the base of the wing, WITHOUT risers and Maillons Rapides, were under 5 kg.
Risers length,
Measured without carabiner.
Carabiners lenght : 29 mm.
Tolérance +/- 5mm
A B C D Frein
Manual Tested
sample
Diff Manual Tested
sample
Diff Manual Tested
sample
Diff Manual Tested
sample
Diff Manual Tested
sample
Diff
Center
1 7176 7182 6 7074 7082 8 7241 7235 -6 7304 7298 -6 8143 8139 -4
2 7084 7088 4 6982 6989 7 7144 7137 -7 7205 7202 -3 7887 7887 0
3 7123 7131 8 7020 7024 4 7174 7168 -6 7225 7216 -9 7679 7678 -1
4 7067 7075 8 6972 6977 5 7103 7095 -8 7155 7147 -8 7574 7577 3
5 6942 6947 5 6852 6858 6 6973 6970 -3 7021 7017 -4 7379 7376 -3
6 6945 6949 4 6858 6859 1 6967 6969 2 7009 7011 2 7220 7225 5
7 6795 6799 4 6736 6738 1 6803 6808 5 7151 7154 3
8 6642 6640 2 6603 6604 1 6662 6666 4 7185 7186 1
9 6574 6576 2 6563 6561 -2 6626 6630 4 7037 7035 -2
10 6985 6979 -6
Stabilizers
11 6294 6288 -6 6269 6266 -3 6321 6320 -1 6953 6949 -4
Wingtip
12 6169 6177 8 6196 6201 5 6258 6256 -2
RISERS Non accéléré Accéléré
Manual Tested
sample
Diff Manual Tested
sample
Diff
A
515 515 0 360 361 1
A'
515 513 -2 360 361 1
B
515 514 -1 412 410 -2
C
515 514 -1 515 514 -1
RISERS Non accéléré Accéléré
Manual Tested
sample
Diff Manual Tested
sample
Diff
A
545 545 0 390 391 1
A'
545 543 -2 390 391 1
B
545 544 -1 442 440 -2
C
545 544 -1 545 544 -1
Risers length,
Measured with
carabiner.
Tolérance +/- 5mm
Page 26
Glider user's manual | STEP
SUPAIR | STEP | page 26
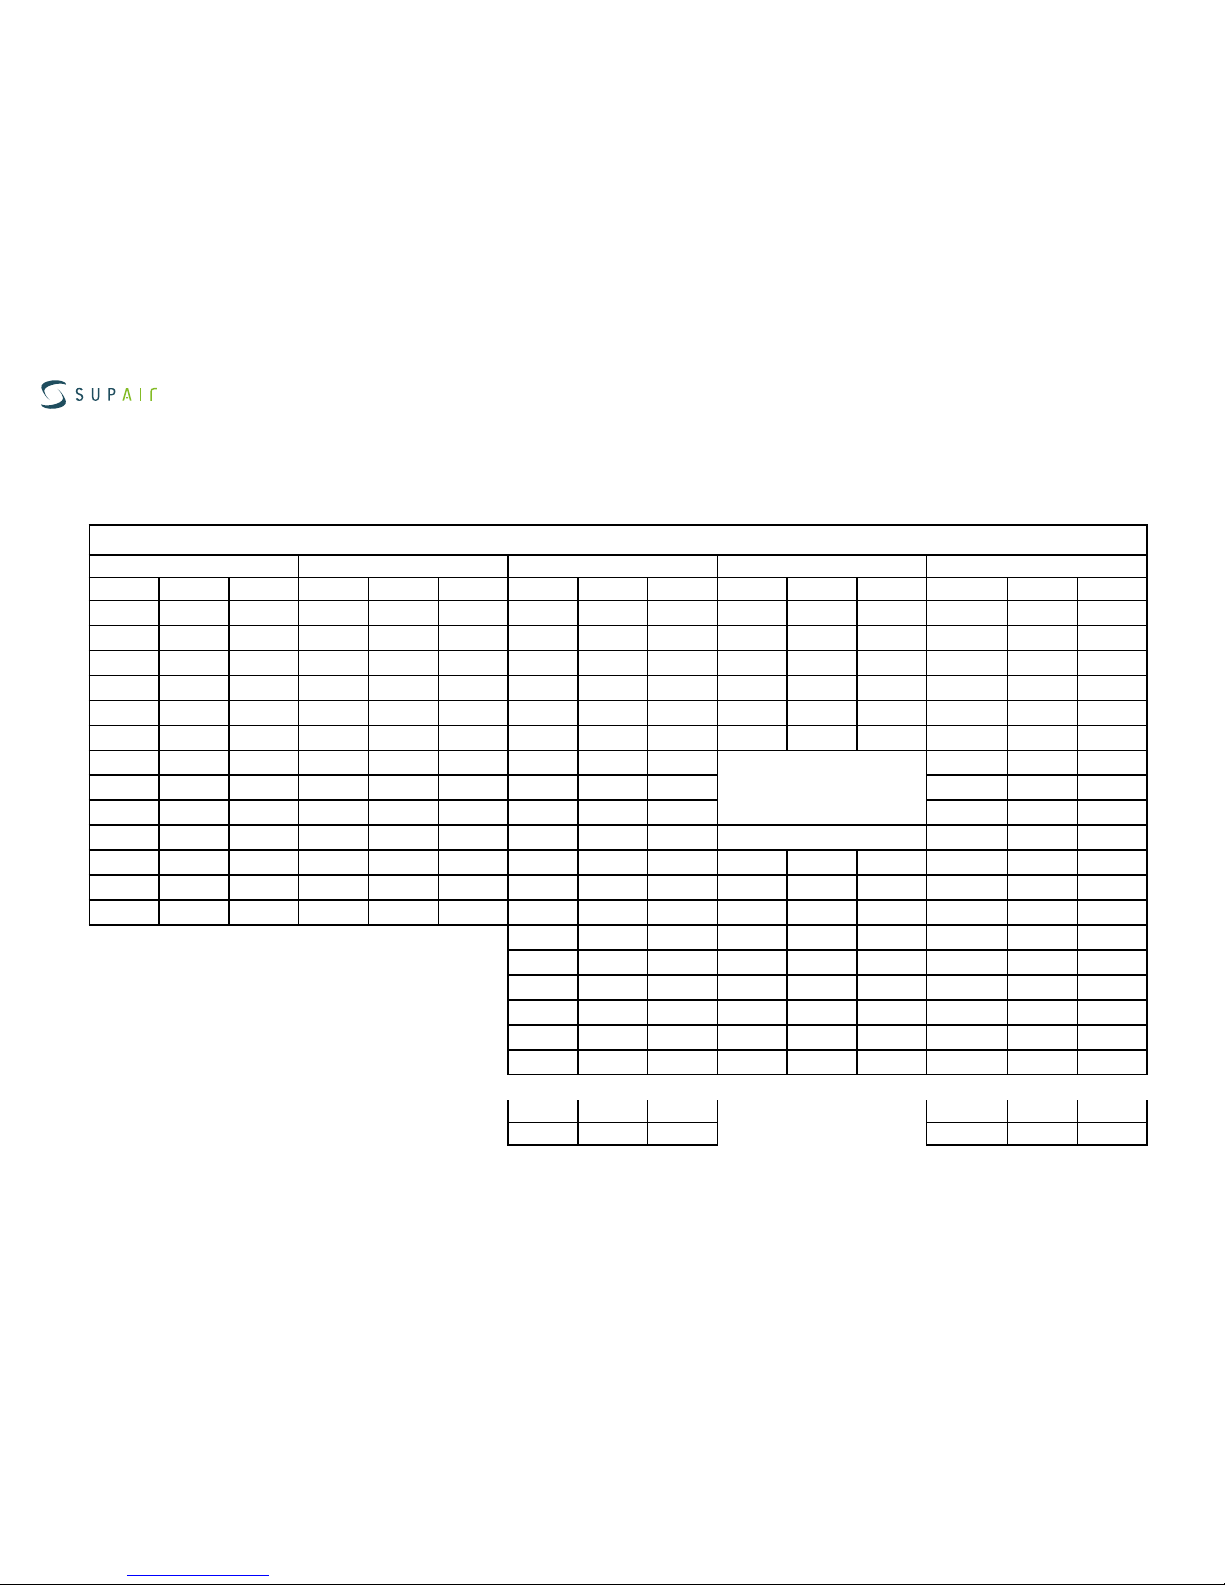
Maintenance sheet
STEP size ML
Lines individual lenghts
A LINES B LINES C LINES D LINES BRAKE LINES
NAME CUT SEWN NAME CUT SEWN NAME CUT SEWN NAME CUT SEWN NAME CUT SEWN
AR1 4833 4583 BR1 4766 4516 CR1 4904 4654 d1 778 578 BRML 1664 1464
AR2 5093 4843 BR2 5026 4776 CR2 5132 4882 d2 761 561 BRmain 1474 1474
AR3 5229 4979 BR3 5202 4952 CR3 5275 5025 d3 760 560 BRM1 2206 2006
a1 2815 2615 b1 2782 2582 CM1 2312 2112 d4 698 498 BRM2 2617 2417
a2 2723 2523 b2 2690 2490 CM2 2230 2030 d5 670 470 BRM3 3183 2983
a3 2762 2562 b3 2728 2528 CM3 2255 2055 d6 660 460 BRMU1 2080 1880
a4 2439 2239 b4 2412 2212 CM4 2009 1809 BRMU2 1796 1596
a5 2314 2114 b5 2292 2092 CM5 1903 1703 BRMU3 1257 1057
a6 2317 2117 b6 2298 2098 CM6 1901 1701 BRMU4 1282 1082
a7 2033 1833 b7 2000 1800 c1 717 517 STABILO LINES br1 1706 1506
a8 1880 1680 b8 1867 1667 c2 702 502 NAME CUT SEWN br2 1450 1250
a9 1807 1607 b9 1822 1622 c3 707 507 STMain 5215 5015 br3 1526 1326
a10 646 446 b10 621 421 c4 648 448 STRis 505 305 br4 1421 1221
c5 624 424 STMA 746 546 br5 1354 1154
c6 620 420 STMB 767 567 br6 1195 995
c7 1990 1790 sta 519 319 br7 1101 901
c8 1849 1649 stb 525 325 br8 1135 935
c9 1813 1613 stc 587 387 br9 1500 1300
c10 652 452 br10 1448 1248
br11 1416 1216
Page 27
Glider user's manual | STEP
SUPAIR | STEP | page 27
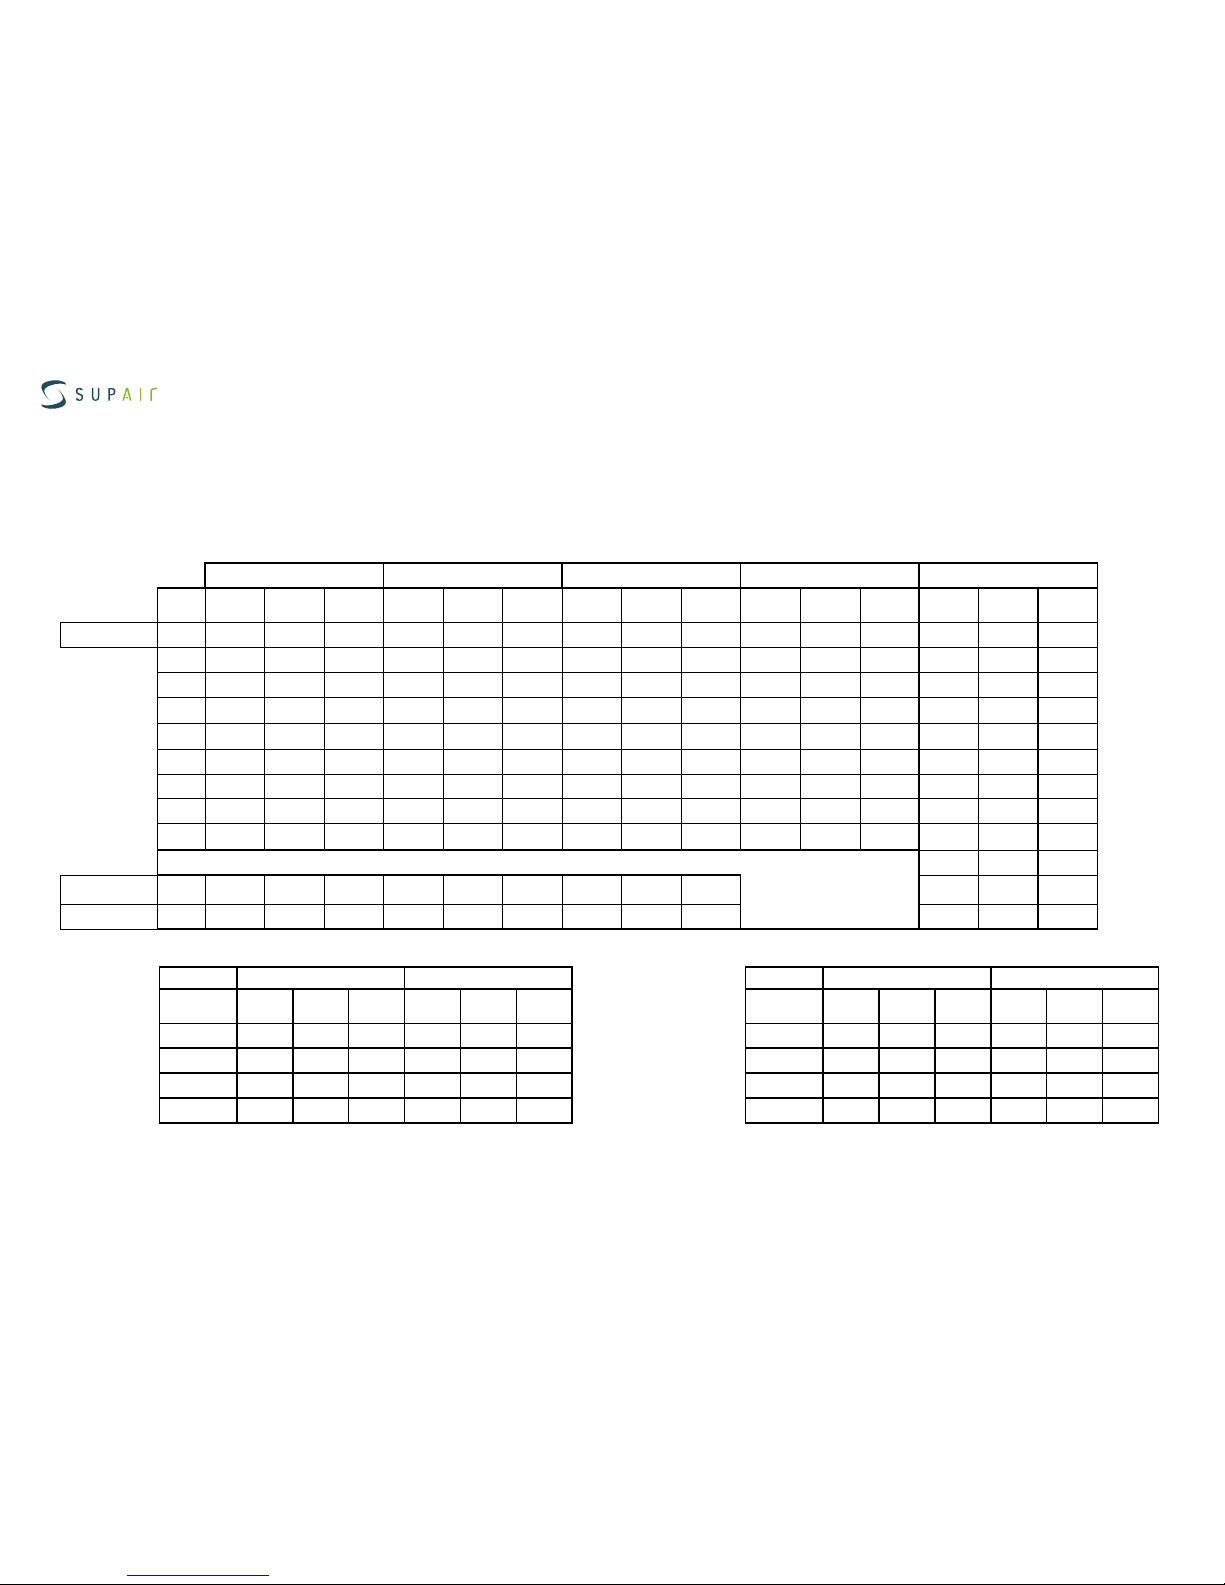
Size L
Line Check Maintenance Sheet
Maintenance sheet
STEP size L
Tolerance: 10 mm.
Measurements made from the base of the lines to the base of the wing, WITHOUT risers and Maillons Rapides, were under 5 kg.
Risers length,
Measured without carabiner.
Carabiners lenght : 29 mm.
Tolérance +/- 5mm
A B C D Frein
Manual Tested
sample
Diff Manual Tested
sample
Diff Manual Tested
sample
Diff Manual Tested
sample
Diff Manual Tested
sample
Diff
Center
1 7451 7460 9 7349 7353 4 7521 7521 0 7586 7584 -2 8461 8459 -2
2 7357 7363 6 7255 7259 4 7421 7415 -6 7485 7477 -8 8193 8192 -1
3 7398 7403 5 7295 7298 3 7454 7453 -1 7512 7507 -5 7975 7982 7
4 7345 7348 3 7247 7250 3 7382 7382 0 7436 7432 -4 7868 7865 -3
5 7216 7217 1 7123 7124 1 7249 7246 -3 7299 7294 -5 7667 7665 -2
6 7219 7219 0 7130 7129 -1 7242 7241 -1 7286 7284 -2 7506 7505 -1
7 7054 7062 8 7003 6998 -5 7081 7078 -3 7438 7434 -4
8 6897 6892 -5 6865 6860 -5 6935 6929 -6 7479 7474 -5
9 6826 6827 1 6823 6820 -3 6887 6887 0 7322 7314 -8
10 7264 7256 -8
Stabilizers
11 6538 6530 -8 6513 6506 -7 6566 6559 -7 7238 7232 -6
Wingtip
12 6419 6410 -9 6438 6432 -6 6501 6492 -9
RISERS Non accéléré Accéléré
Manual Tested
sample
Diff Manual Tested
sample
Diff
A
517 516 -1 357 359 2
A'
517 516 -1 361 359 -2
B
517 518 1 410 411 1
C
517 518 1 517 518 1
RISERS Non accéléré Accéléré
Manual Tested
sample
Diff Manual Tested
sample
Diff
A
545 544 -1 385 387 2
A'
545 544 -1 385 387 -2
B
545 546 1 438 439 1
C
545 546 1 545 546 1
Risers length,
Measured with
carabiner.
Tolérance +/- 5mm
Page 28
Glider user's manual | STEP
SUPAIR | STEP | page 28
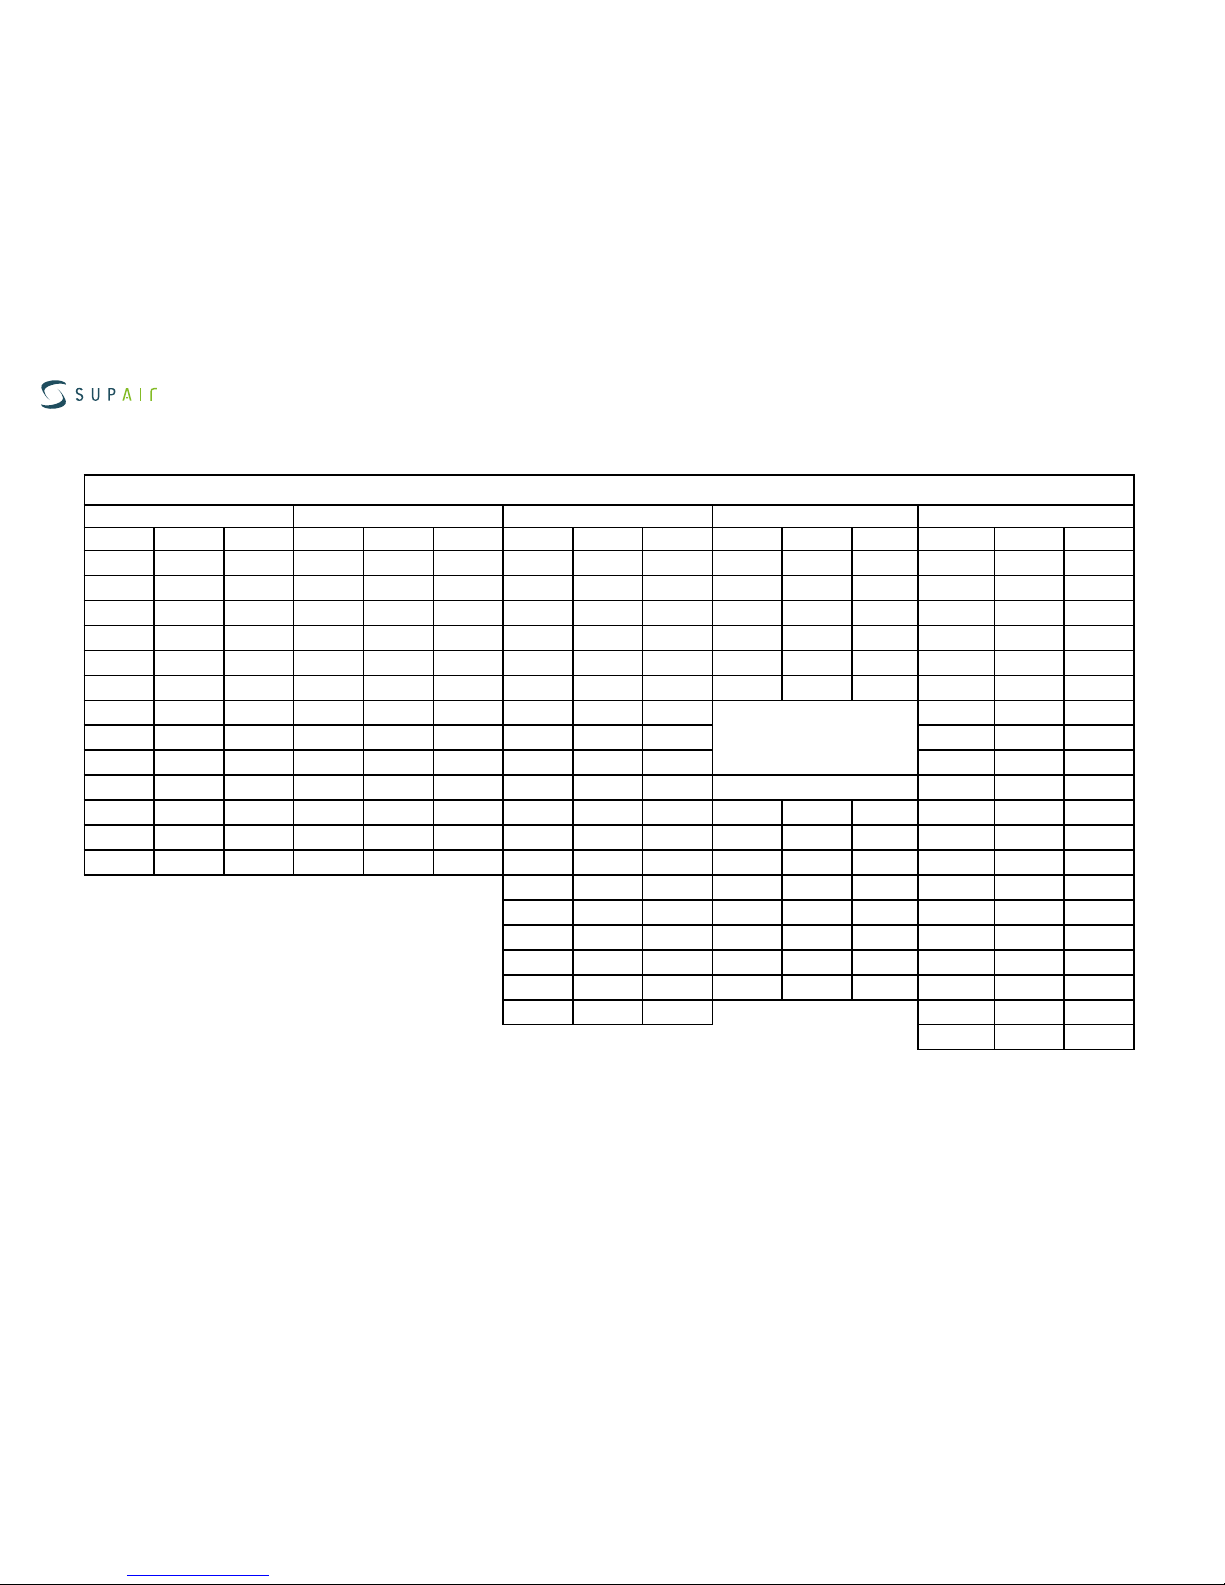
Maintenance sheet
STEP size L
Lines individual lenghts
A LINES B LINES C LINES D LINES BRAKE LINES
NAME CUT SEWN NAME CUT SEWN NAME CUT SEWN NAME CUT SEWN NAME CUT SEWN
AR1 5002 4752 BR1 4939 4689 CR1 5075 4825 d1 797 597 BRML 1751 1551
AR2 5278 5028 BR2 5208 4958 CR2 5315 5065 d2 780 580 BRmain 1492 1492
AR3 5413 5163 BR3 5392 5142 CR3 5478 5228 d3 780 580 BRM1 2292 2092
a1 2911 2711 b1 2874 2674 CM1 2390 2190 d4 716 516 BRM2 2727 2527
a2 2817 2617 b2 2780 2580 CM2 2306 2106 d5 687 487 BRM3 3316 3116
a3 2858 2658 b3 2820 2620 CM3 2333 2133 d6 677 477 BRMU1 2158 1958
a4 2522 2322 b4 2495 2295 CM4 2076 1876 BRMU2 1856 1656
a5 2393 2193 b5 2371 2171 CM5 1968 1768 BRMU3 1294 1094
a6 2396 2196 b6 2378 2178 CM6 1965 1765 BRMU4 1330 1130
a7 2098 1898 b7 2067 1867 c1 734 534
STABILO LINES
br1 1765 1565
a8 1941 1741 b8 1929 1729 c2 718 518
NAME CUT SEWN
br2 1497 1297
a9 1865 1665 b9 1882 1682 c3 724 524 STMain 5414 5214 br3 1581 1381
a10 662 462 b10 637 437 c4 664 464 STRis 505 305 br4 1474 1274
c5 639 439 STMA 769 569 br5 1400 1200
c6 635 435 STMB 790 590 br6 1239 1039
c7 2055 1855 sta 541 341 br7 1135 935
c8 1909 1709 stb 539 339 br8 1176 976
c9 1861 1661 stc 602 402 br9 1557 1357
c10 669 469 br10 1499 1299
br11 1473 1273
Page 29

Glider user's manual | STEP
SUPAIR | STEP | page 29
CERTIFICATES
Page 30

Glider user's manual | STEP
SUPAIR | STEP | page 30
CERTIFICATES
Page 31

Glider user's manual | STEP
SUPAIR | STEP | page 31
CERTIFICATES
Page 32

Glider user's manual | STEP
SUPAIR | STEP | page 32
CERTIFICATES
Page 33

Glider user's manual | STEP
SUPAIR | STEP | page 33
Maintenance
Washing and glider maintenance.
It is not a good idea to often wash your glider from time to time. Anyway if you have to do it, we recommend using sponge or soft hair
brush and a non aggressive water-soluble cleaning agent (such as baby soap).
We will recommend wing inspections to be conducted at regular intervals:
- Repair eventual small fabric damages ( holes smaller than a 1Euro coin or 1 US. 25 cents coin) with the small rounded sticky ripstop pieces included in your repair kit.
- Empty out the cells/caissons from sand, pebbles, grass, leaves, etc...
Storage and transport.
When not using your glider store it inside your paragliding rucksack in a dry cool and clean place protected from UV exposure. If
your harness is wet please dry thoroughly before storing. If your glider is wet or humid, dry it thoroughly first.
Keep all metal parts away from corrosive elements.
Product longevity.
Irrespective of pre-flight checks, your glider must be serviced regularly and in accordance with its maintenance schedule. We will
recommend for the wing to be inspected once a year or every one hundred (100) hours, and more specifically check the followings:
• Lines (no excessive wear no breakages or folds) maillons and carabiners
• Materials selected for the STEP ensure the best compromise for lightness and longevity. However in certain conditions such as
exposure to UV or abrasion or exposure to chemical products the glider must be submitted to a thorough inspection by a qualified facility. Your safety depends on it!
• Carabiners must be replaced every five (5) years by identically rated and certified models recommended by the manufacturer
(SUPAIR).
Repair
In spite of using the best quality materials, your glider may be subjected to wear and tear ( Gigi, subjected et non subject ) and hence
will need to be regularly inspected at a qualified repair center.
SUP’AIR also offers the possibility for its products to be repaired beyond the end of the warranty period. Please contact us either by
telephone or by E-mail [email protected] in order to receive a quote.
Page 34

Glider user's manual | STEP
SUPAIR | STEP | page 34
All our materials are selected for their technical and environmentally friendly characteristics. None of the components found in our
products will harm the environment. Most of them are recyclable.
If your STEP's life span is over, you can separate all metallic and plastic parts from the cloth and dispose of the rest according to
your country's recycling guide lines and requirements. Please contact your local recycling center for more information..
Your glider must be checked every year or every 100 flight hours by a qualified operator.
We advise you to take this opportunity to have your reserve repacked.
Disclaimer
Paragliding is an activity requiring, skills, specific knowledge and sound judgement. Be safe by learning in certified schools, subscribe and obtain an adequate insurance policy as well as a flying license while always making sure your flying skills are up to the
task in various weather flying conditions. SUP'AIR cannot be held responsible for your paragliding decisions or activities.
This SUP'AIR product was designed for solo use only. Any other activity such as tandem paragliding, skydiving or BASE jumping is
absolutely forbidden.
Pilot’s gear
It is essential to wear a helmet, suitable shoes with good ankle support and adapted clothing. Carrying a reserve emergency parachute corresponding to your weight and properly connected to the harness is also highly recommended.
The entire Sup'Air harness, accessory and reserve parachute selection (except for tandem gear), is compatible with the STEP glider.
For additional information, please access our internet site: www.supair.com
SUP'AIR takes the greatest care in the design and production of its product line hence offers a 3 years limited warranty from the
purchase date against any manufacturing defect or design issues occurring during normal use. Any damage or degradation resulting from incorrect or abusive use, abnormal exposure to aggressive factors including but not limited to; high temperature intense
sun exposure high humidity etc. will invalidate this warranty.
Recycling
Mandatory controls
Warranty
Page 35
EN-B+
SUPAIR-VLD
Parc Altaïs
34 rue Adrastée
74650 Chavanod, Annecy
FRANCE
[email protected]
+33(0)4 50 45 75 29
45°54.024’N / 06°04.725’E
 Loading...