

Page 1
SUPAIR-VLD
PARC ALTAÏS
34 RUE ADRASTÉE
74650 ANNECY CHAVANOD
FRANCE
45°54.024’N / 06°04.725’ E
Revision index 20131125 EN
User’s manual
English
Page 2
SUP’AIR manufactures its products in Europe. Most of the components used are Made in Europe.
SUP’AIR _SKYPPERFR Page 2
Thank you for your choice of a SKYPPER FR ! We are proud to join you on your journey in
our common passion : paragliding.
SUP’AIR has been designing, producing, and selling accessories for free flying activities
since 1984. By choosing a SUP’AIR product you benefit from almost thirty years of expertise
innovation and listening. This is also our philosophy : working endlessly to develop better
products and maintain a high quality production in Europe.
We trust that you will find this user’s manual comprehensive explicit and hopefully pleasant to read. Please scroll through it carefully !
You will find the most recently updated product informationat www.supair.com. If you have
any further questions, feel free to ask one of our retailers. And of course, the entire SUP’AIR
team is at your disposal through [email protected]
We wish you many safe flights, enjoyable hours , and happy landings
The SUP’AIR team
Photo / Pilot : Charles CAZAUX
Page 3
SUP’AIR manufactures its products in Europe. Most of the components used are Made in Europe.
SUP’AIR _SKYPPERFR Page 3
Introduction 4
Technical information 5
Technical specifications 5
Size choice 6
Nomenclature 7
Harness overview 8
Pockets and portability 9
BUMPAIR assembly 10
Installing the cockpit 11
Reserve parachute pocket : characteristics. 12
Connecting the handle to the POD. 12
Reserve parachute installation. 12
Placing the parachute in its pocket. 13
Connecting the « Y » risers. 14
Connecting the standard risers. 15
Installing the accelerator. 16
Adjustments 17
Adjusting the SpeedBag angle and length. 18
Adjusting the backrest angle. 18
Adjusting the shoulder straps. 18
Inflight harness behavior. 19
Pre-Flight check. 20
Take-off 21
SpeedBag installation. 22
In flight 23
Speed-bar use 23
Landing 24
Using the reserve parachute. 24
Complements/Accessories 25
Washing and harness maintenance. 26
Storage and transport. 26
Product longevity. 26
Maintenance 26
Repair 27
Materials 27
Recycling 27
Warranty 28
Disclaimer 28
Pilot’s gear 28
Service Book 29
Table of contents
Photo : SUP’AIR
Page 4
SUP’AIR manufactures its products in Europe. Most of the components used are Made in Europe.
SUP’AIR _SKYPPERFR Page 4
Welcome to the SKYPPER FR world: one of performance, comfort, and piloting precision. You now
own a fully equipped harness targetting high level competition pilots and long distance records
seekers... Perfectly seated in an integrated streamlined profile, you will be able to feel with great
accuracy, every movement your wing will send to the SKYPPER FR, during long efficient high speed
flights !
Introduction
After reading this manual, we will recommend checking your harness during a hang-test before
flying.
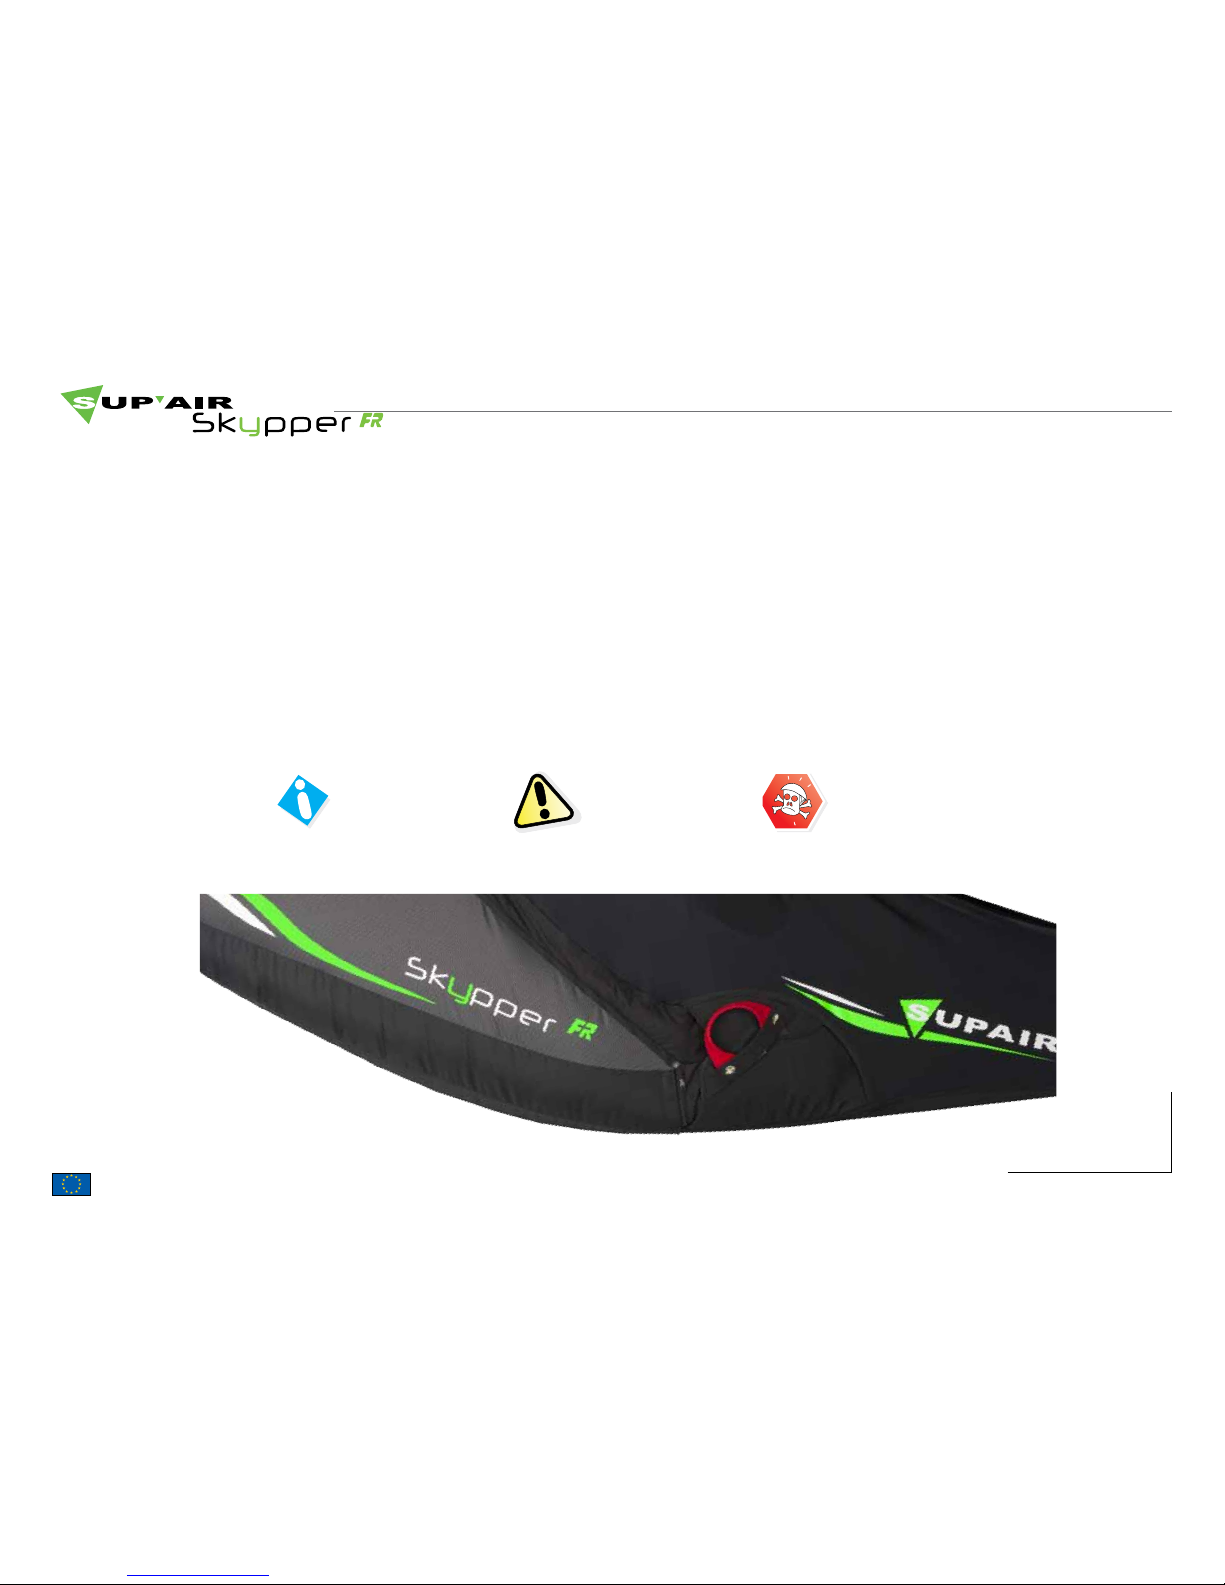
N.B : Three important icons will help you while reading this manual.
Advice Caution ! Danger !!
Page 5
SUP’AIR manufactures its products in Europe. Most of the components used are Made in Europe.
SUP’AIR _SKYPPERFR Page 5
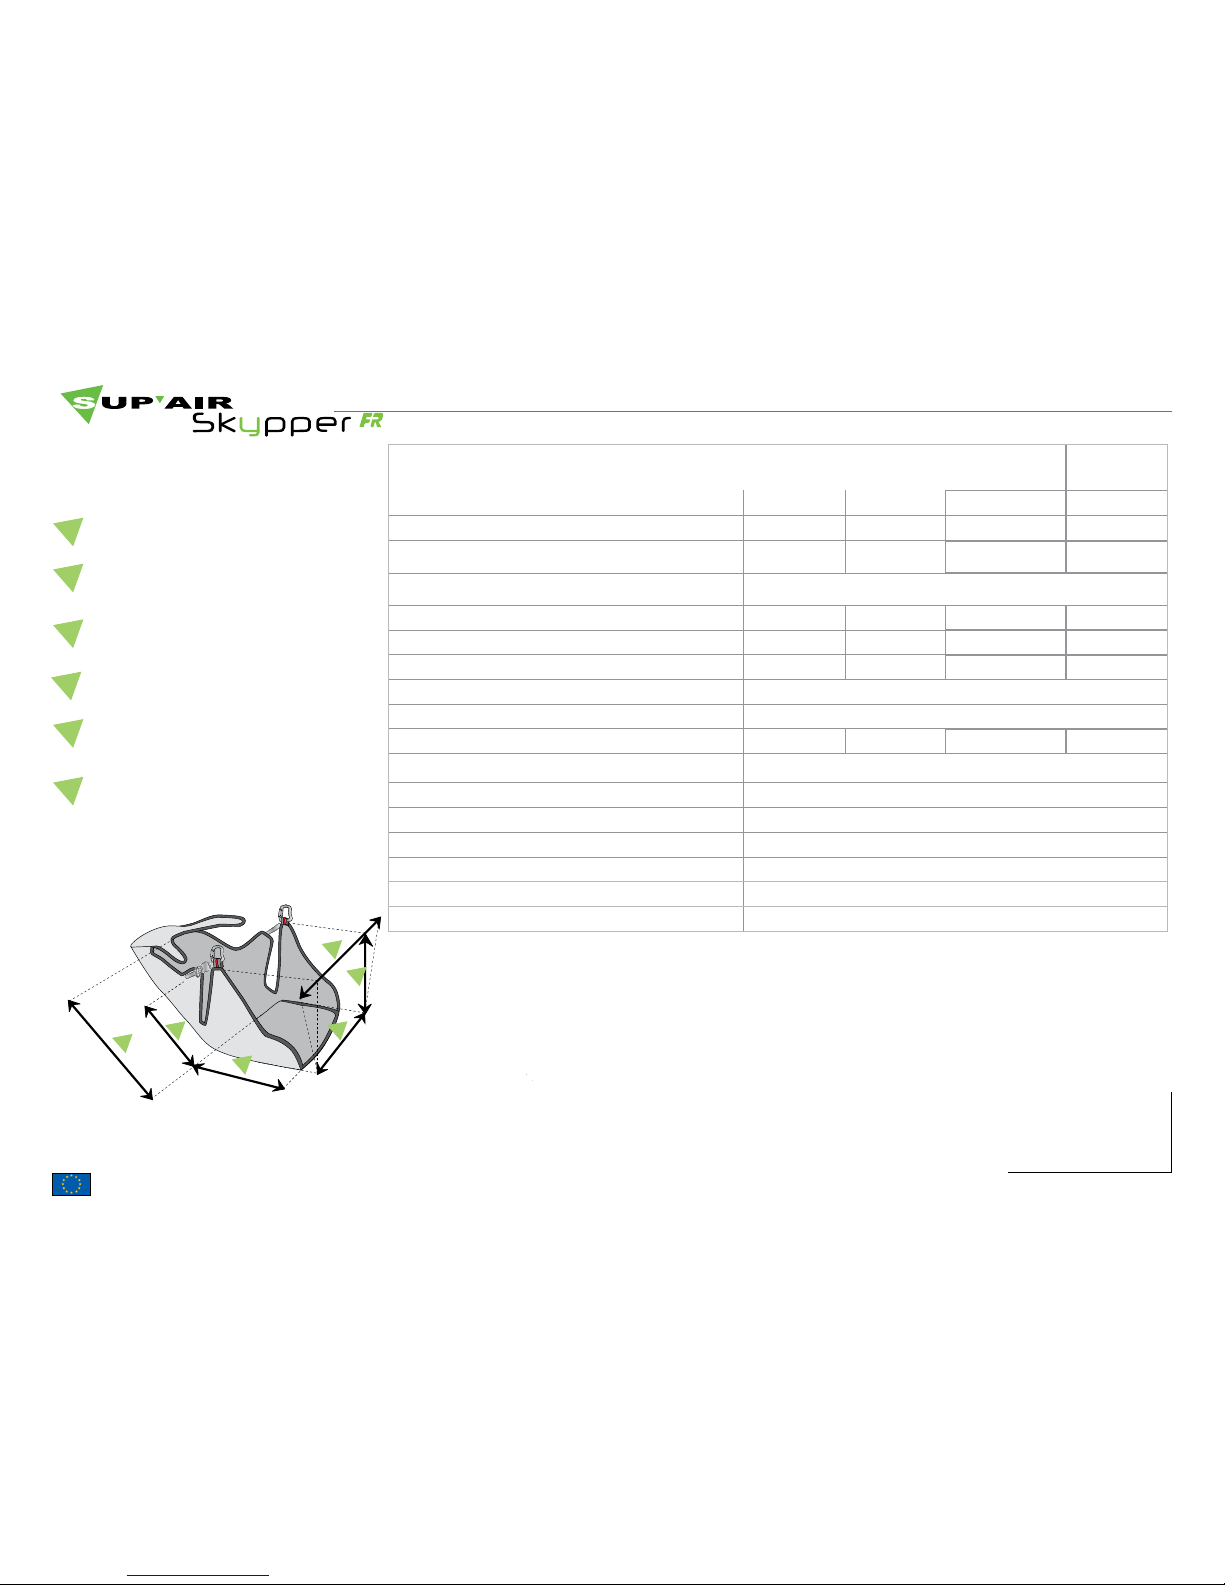
Model SKYPPER FR SSKYPPER FR MSKYPPER FR
L
SKYPPER FR
XL
Pilot size 160-170 170-180 180-190 190-200
Pilot weight (cm) 60-75 70-85 80-100 80-110
Harness weight (+ carabiners + speedbar) 7.45 7.57 7.69 7.81
Designed for Paragliding only
Backrest height (cm) 70 72 75 78
Seat length (cm) 42 42 42 44
Seat width (cm) 33 33 33 33
Carabiners height (cm) 48
Carabiners distance (cm) 36-46
Speedbar length ( cm ) 78 81 85 89
Impact damping system : Airbag (Volume) No
Impact damping system : Bumpair (Thickness) Yes- 15 cm
Certification EN 1651 - LTF
Flight : tandem (Pilot- Passenger) No - No
Flight : acrobatic flying No
Take-off : Winching - towing Yes
Quick-out carabiners compatibility Yes
Technical specifications
A
B
C
D
E
F
A
B
C
D
E
F
Hauteur du dos
Hauteur réglage de
l'inclinaison du
dossier
Longueur d'assise
Largeur d'assise
Hauteur des points
Distance entre les
points
A
B
C
D
E
F
Backrest height (cm)
Reclined seating height (cm)
Seat length (cm)
Seat width (cm)
Carabiners height (cm)
Carabiners distance (cm)
Page 6
SUP’AIR manufactures its products in Europe. Most of the components used are Made in Europe.
SUP’AIR _SKYPPERFR Page 6
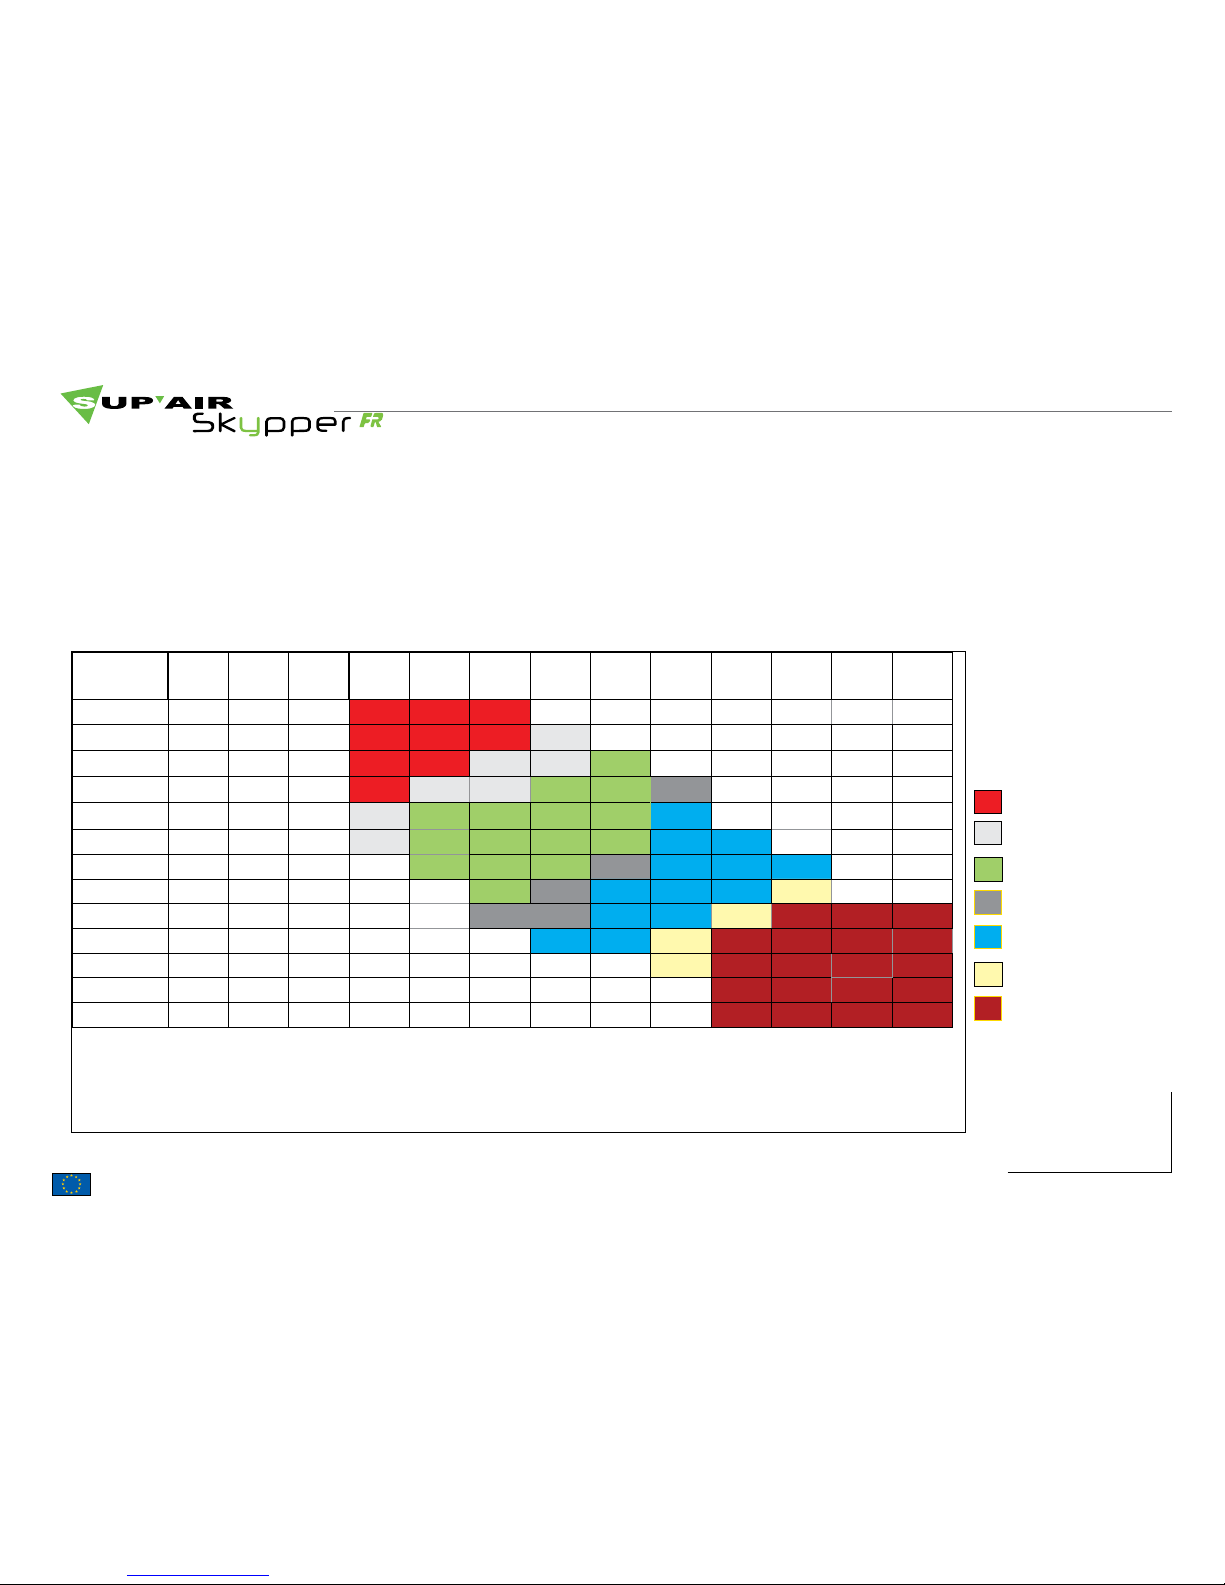
Size
Weight
1m45 1m50 1m55 1m60 1m65 1m70 1m75 1m80 1m85 1m90 1m95 2m 2m05
50
55
60
65
70
75
80
85
90
95
100
105
110
Choosing your harness size is important. You will find below a measurement chart to help with your
selection. Nonetheless we will advise you to try the harness in various sizes during a hang-test at
one of our retailers to find your correct fitting size.
For a complete list of our retailers, please click here : www.supair.com
Size choice
M
M/L
L
L/ XL
XL
S/M
S
Page 7
SUP’AIR manufactures its products in Europe. Most of the components used are Made in Europe.
SUP’AIR _SKYPPERFR Page 7
1
8
2
3
4
5
7
6
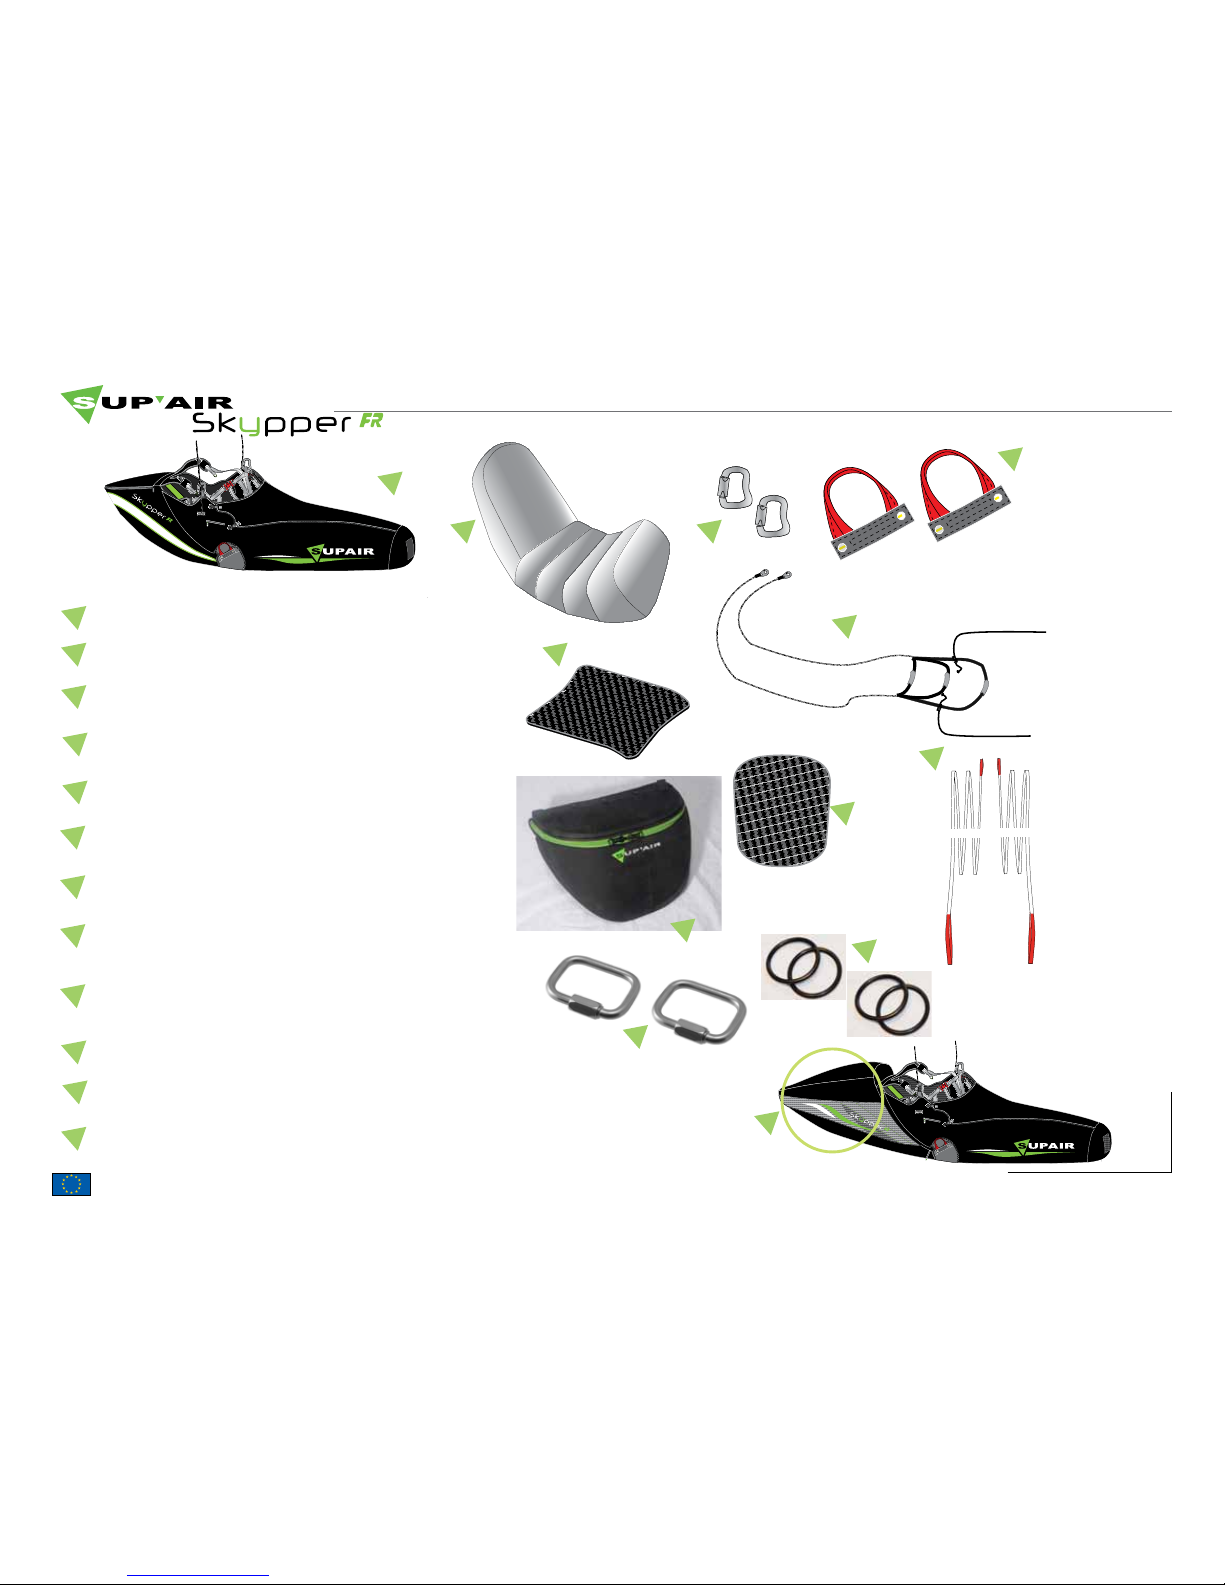
Triple stage speedbar for 29 mm Harken pulleys.
Reserve parachute handle for pod located
beneath the seat ( ref : E2 ) x2.
30 mm self-locking carabiners (x2).
1 BUMPAIR 15 cm.
Speedbag carbon fiber seat plate (SML) oder (XL).
Nomenclature
Removable Cockpit and its
instrument support.
XC carbon fiber seat plate (36x33).
SKYPPER FR harness.
1
2
3
4
5
6
7
8
11
10
9
Dyneema reserve parachute risers ( 1 pair ).
6 mm x 2 Maillon Rapide®.
O ring ( x4 ).
11
10
9
12
Rear profile.
12
Page 8
SUP’AIR manufactures its products in Europe. Most of the components used are Made in Europe.
SUP’AIR _SKYPPERFR Page 8
Harness overview
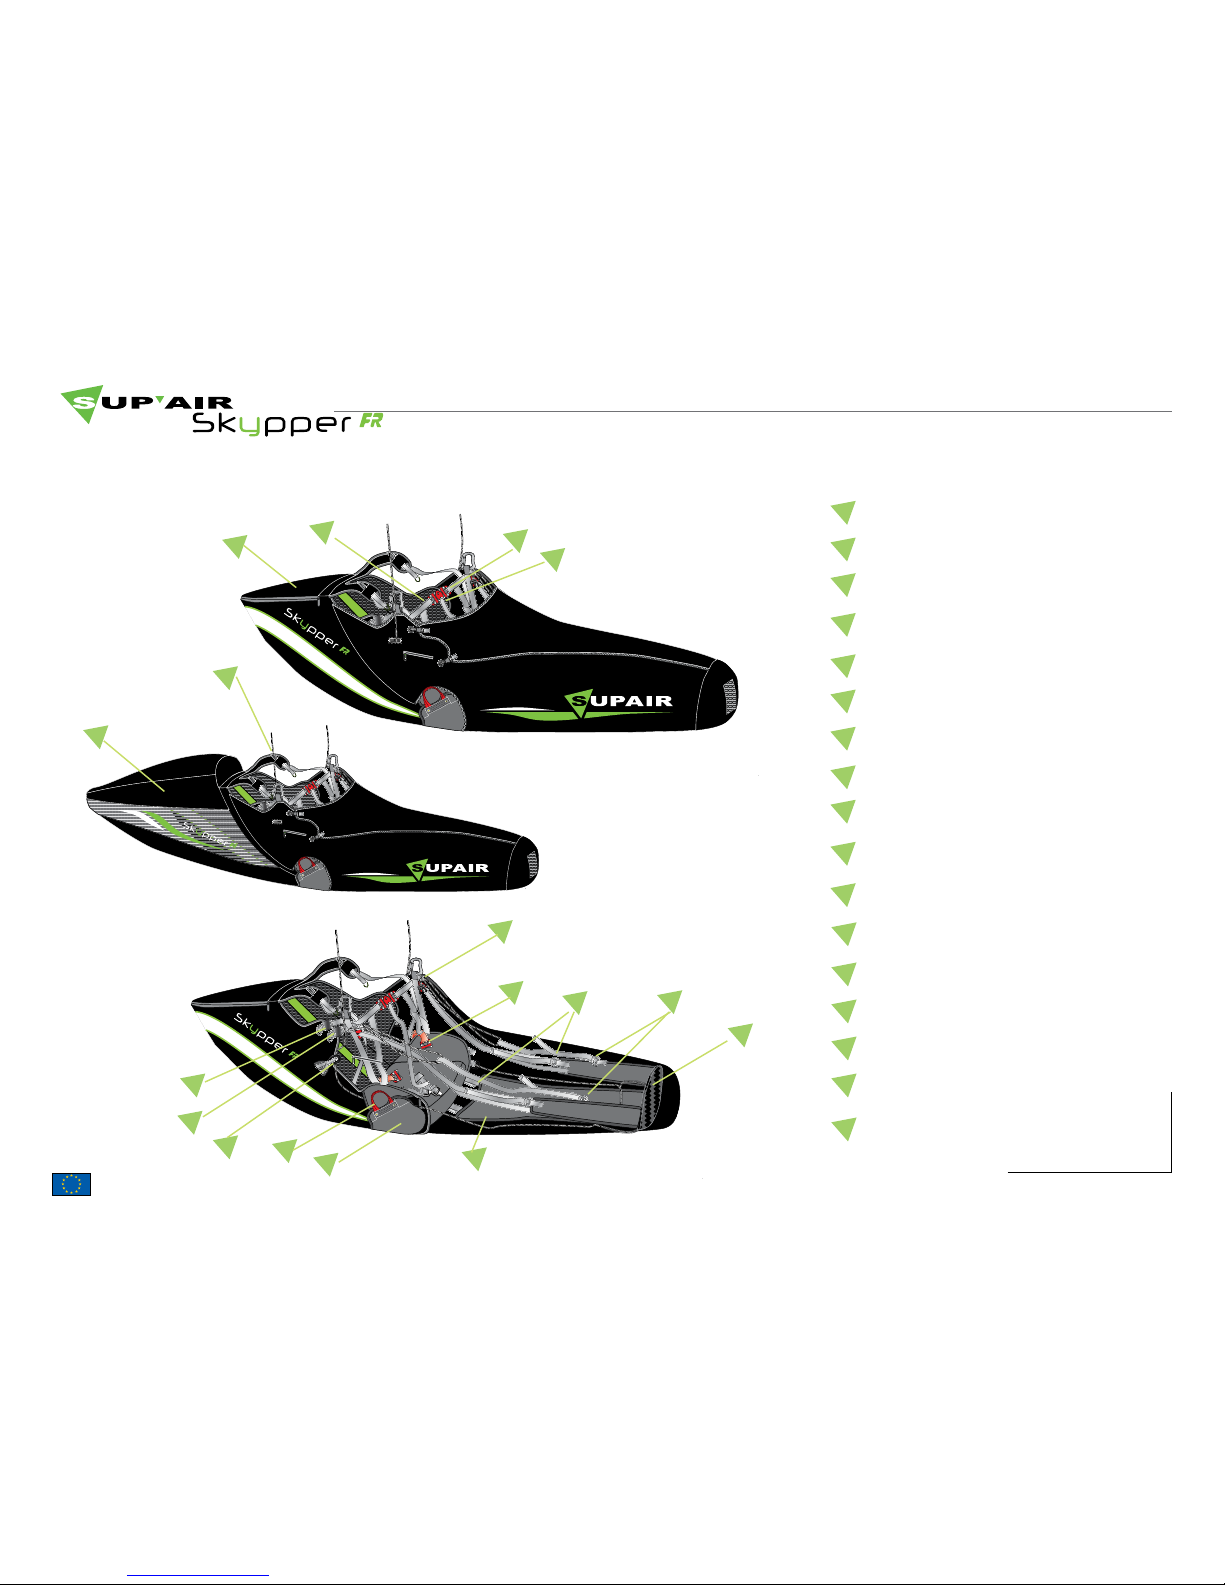
This illustration will help you understanding the user’s manual.
Chest strap quick release buckle.
Chest strap adjustment.
Safe-T-strap.
Leg strap quick release buckle.
Backrest tilt adjustment.
Shoulder straps adjustment.
Dorsal storage pocket.
Sliding guide system diagram.
Adjusting the Speedbag length.
Foot-plate.
Speedbag closing buckles.
Reserve parachute handle;
Reserve parachute container;
Harken® pulley.
1
8
12
11
10
14
13
15
9
2
3
4
5
7
6
16
Lower back support.
Adjusting the SpeedBag angle.
Rear profile.
1
2
3
4
5
6
7
8
9
10
11
12
13
14
15
1
7
16
1
7
Page 9
SUP’AIR manufactures its products in Europe. Most of the components used are Made in Europe.
SUP’AIR _SKYPPERFR Page 9
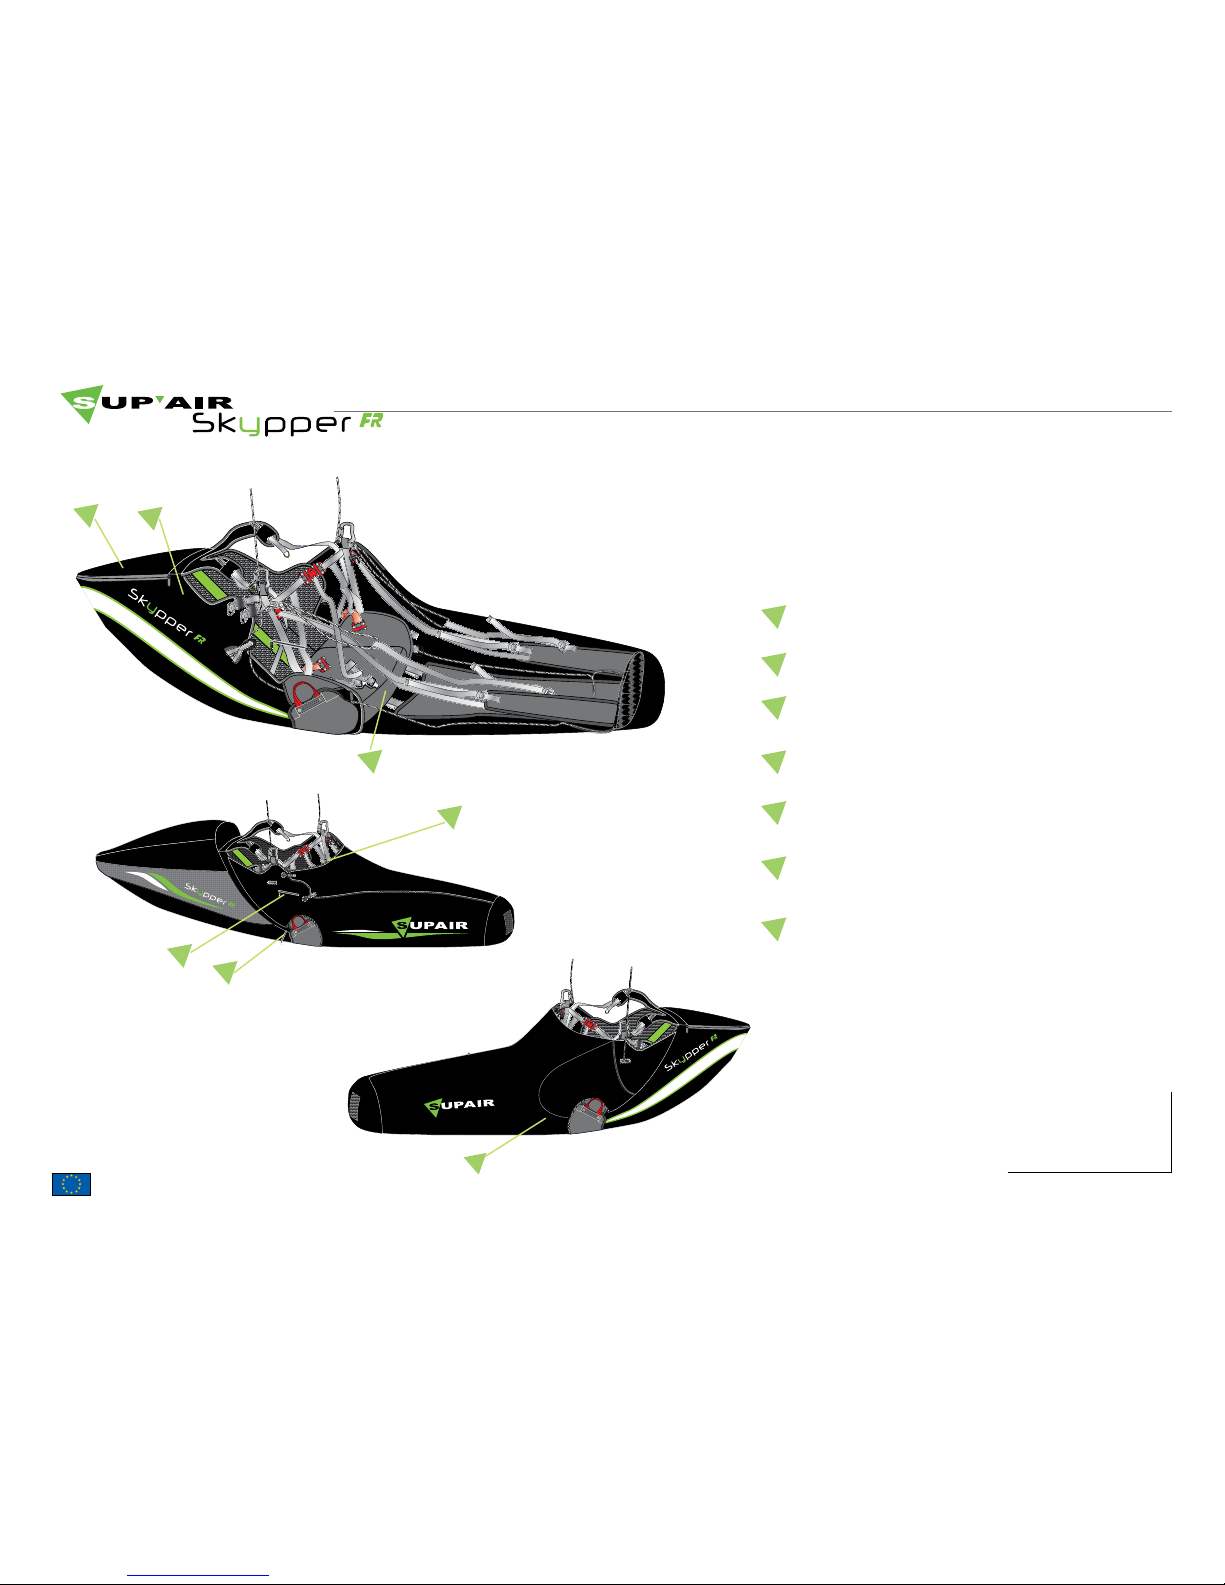
Pockets and portability
Dorsal storage pocket.
Drag-Chute compartment.
1
2
3
4
5
7
6
Inner water pocket.
Inner (10 liter) water ballast pocket.
Side storage pocket.
Ballast dumping valve passage.
Cockpit.
1
2
3
4
5
6
7
Page 10
SUP’AIR manufactures its products in Europe. Most of the components used are Made in Europe.
SUP’AIR _SKYPPERFR Page 10
Installing the seat plate
1
2
3
Page 11
SUP’AIR manufactures its products in Europe. Most of the components used are Made in Europe.
SUP’AIR _SKYPPERFR Page 11
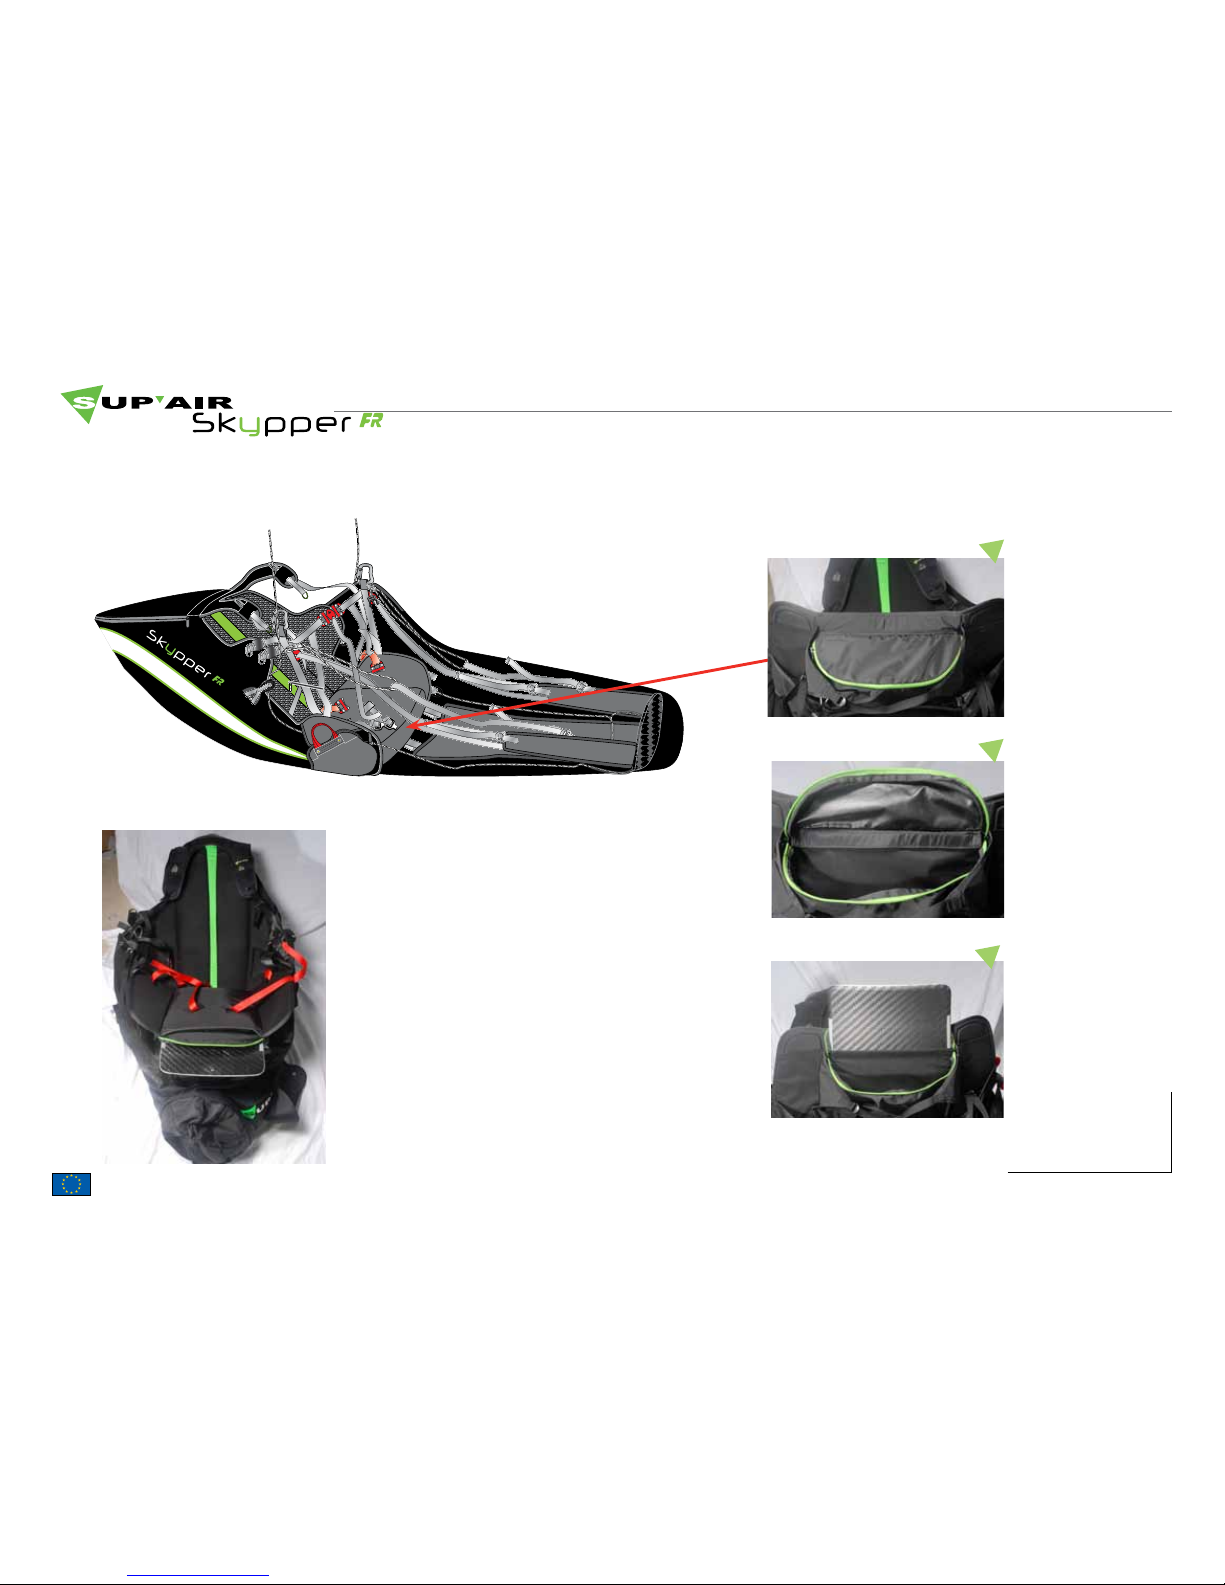
BUMPAIR assembly
1
2
3
4
Open the zipped pocket.
Open the internal zip ( green ) of the
« U » shaped pocket.
Push the Bumpair forward while checking the following points :
The upper Bumpair section must be
inserted inside the « hood » beneath
the backrest straps.
The Bumpair must be pushed all the
way in, sandwiched beneath the seating area and the supporting wall stitched along the green seam marker.
The Bumpair will set itself in this compartment, resting against the reserve
parachute pockets.
The Bumpair is installed in place permanently. There is no need to remove it from its location except in case of severe impact, when it would
be necessary to inspect it for possible damage.
1
2
3
4
Page 12
SUP’AIR manufactures its products in Europe. Most of the components used are Made in Europe.
SUP’AIR _SKYPPERFR Page 12
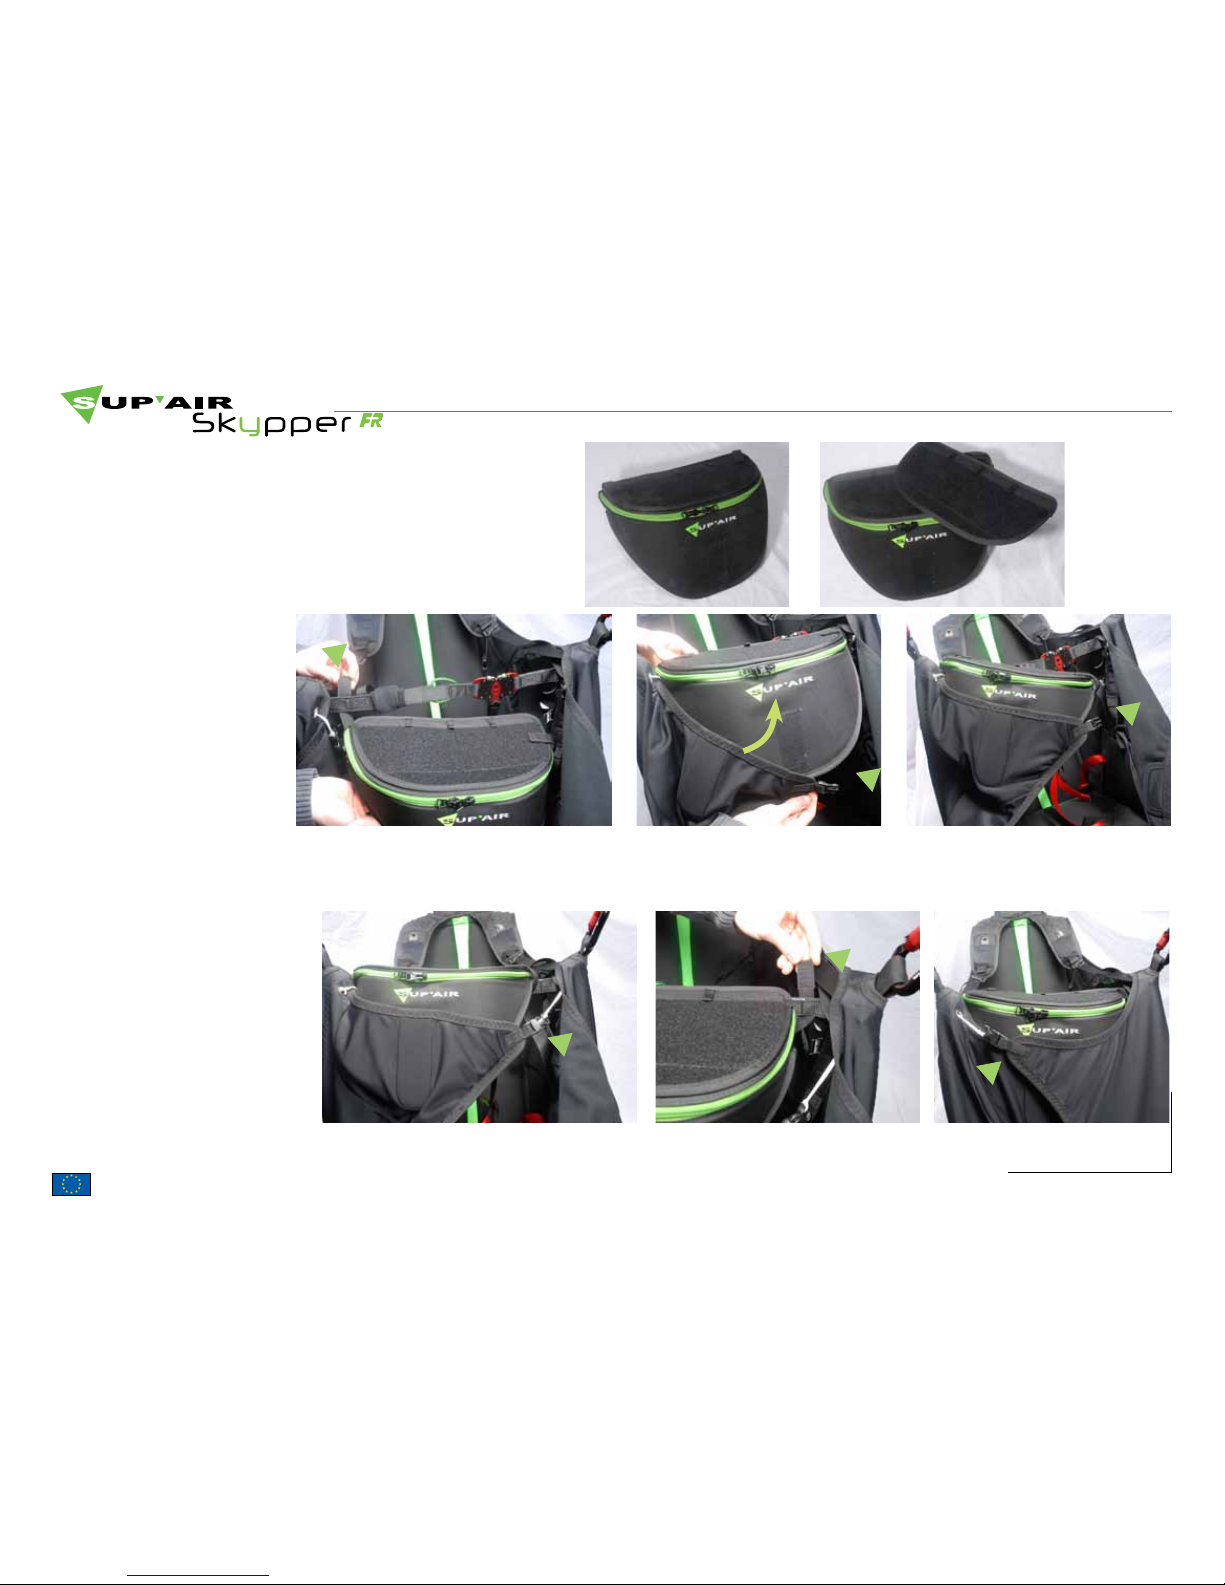
Installing the cockpit
The cockpit is installed on the right side of the harness and Speedbag. Wen entering and seating inside the harness, the Cockpit automatically finds its correct location and positioning, for optimal and
direct instrument visibility. Easily removable, it is nevertheless equipped with a detachable velcroed supporting instrument platform to
carry away to briefings if needed.
Installing the cockpit in the
compartment inside the
Speeedbag.
When ready to seat inside the harness after locking the plastic leg
and chest straps buckles, close
the plastic Speebag buckles,
then fold the Velcro strap over the
Cockpit.
1
2
3
1
2
2
For better instrument visibility and
need to straighten the Cockpit,
it can simply be done by raising
the velcro central location.
1
Page 13
SUP’AIR manufactures its products in Europe. Most of the components used are Made in Europe.
SUP’AIR _SKYPPERFR Page 13
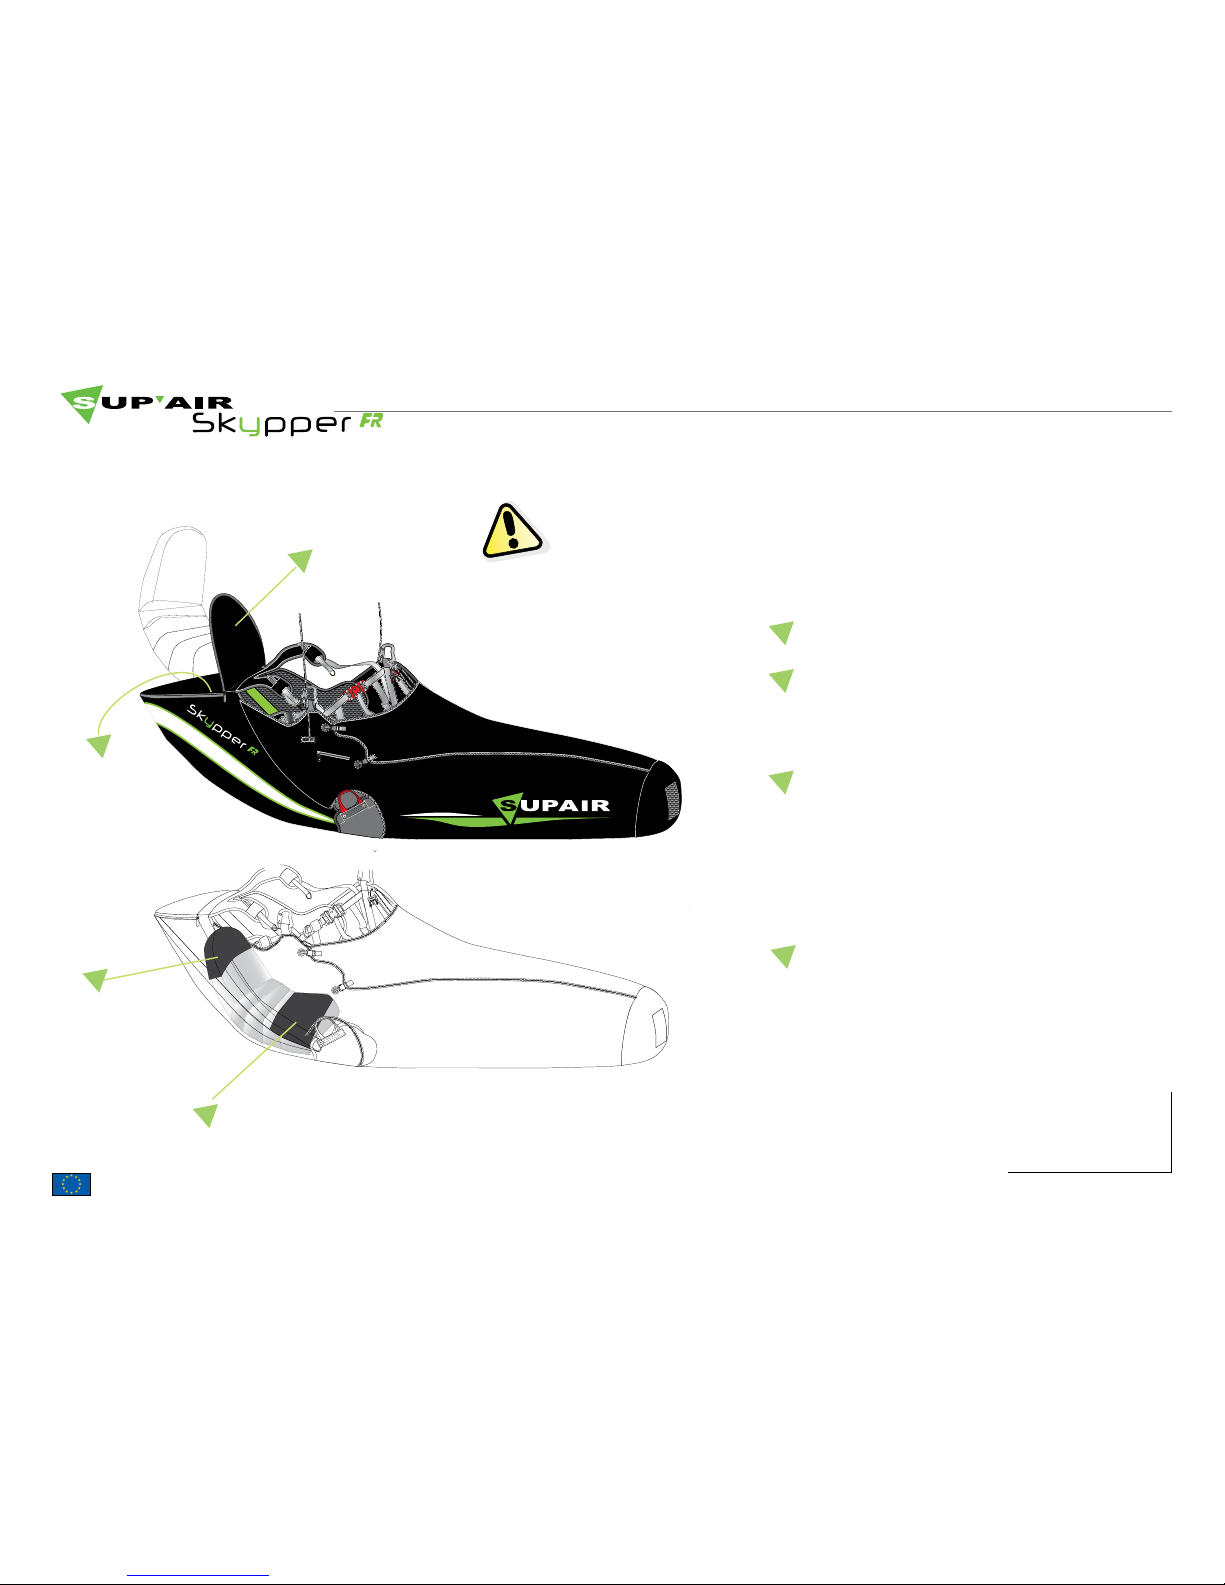
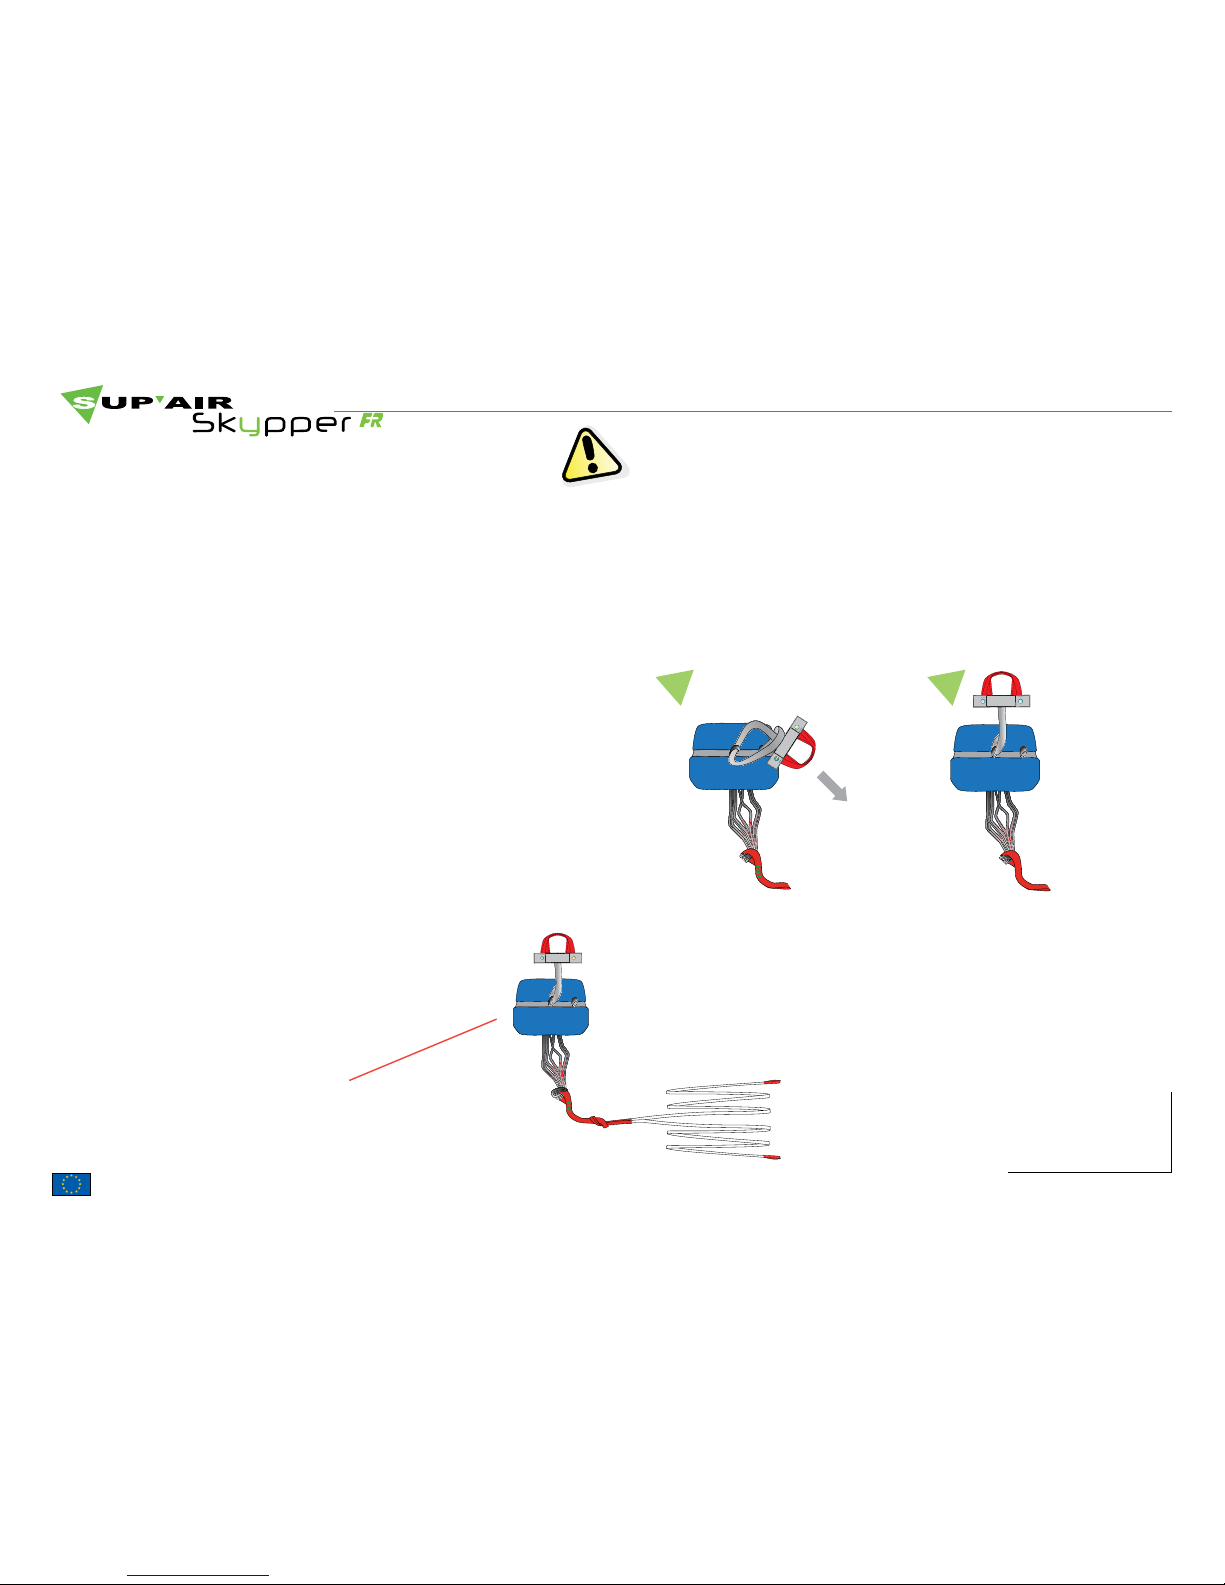
Reserve assembly
Thank you for carefully reading the following! We advise you to have
the initial rescue parachute installation done by someone knowledgeable with the process.
Handle to POD connection.
1. Attach the handle to the POD central webbing passage and make a
loop to loop configuration.
2. Tighten the loop to loop connection, then check the overall integrity of
the assembly.
Connecting each of the 2 reserve parachutes
Dyneema riser sets with a loop to loop configuration.
Reserve parachute pocket : characteristics
• 2 side pockets with 4 flaps. One to the right and one to the left,
symettrically located.
• Cable locking system.
• Volume : 3 to 8 liters.
• Compatible with the SUPAIR LIGHT or X-TRALITE reserve parachutes as well other solo models.
1 2
Connecting the Dyneema risers to the reserve parachute.
x2
The handle must be connected to
the central POD loop.
Page 14
SUP’AIR manufactures its products in Europe. Most of the components used are Made in Europe.
SUP’AIR _SKYPPERFR Page 14
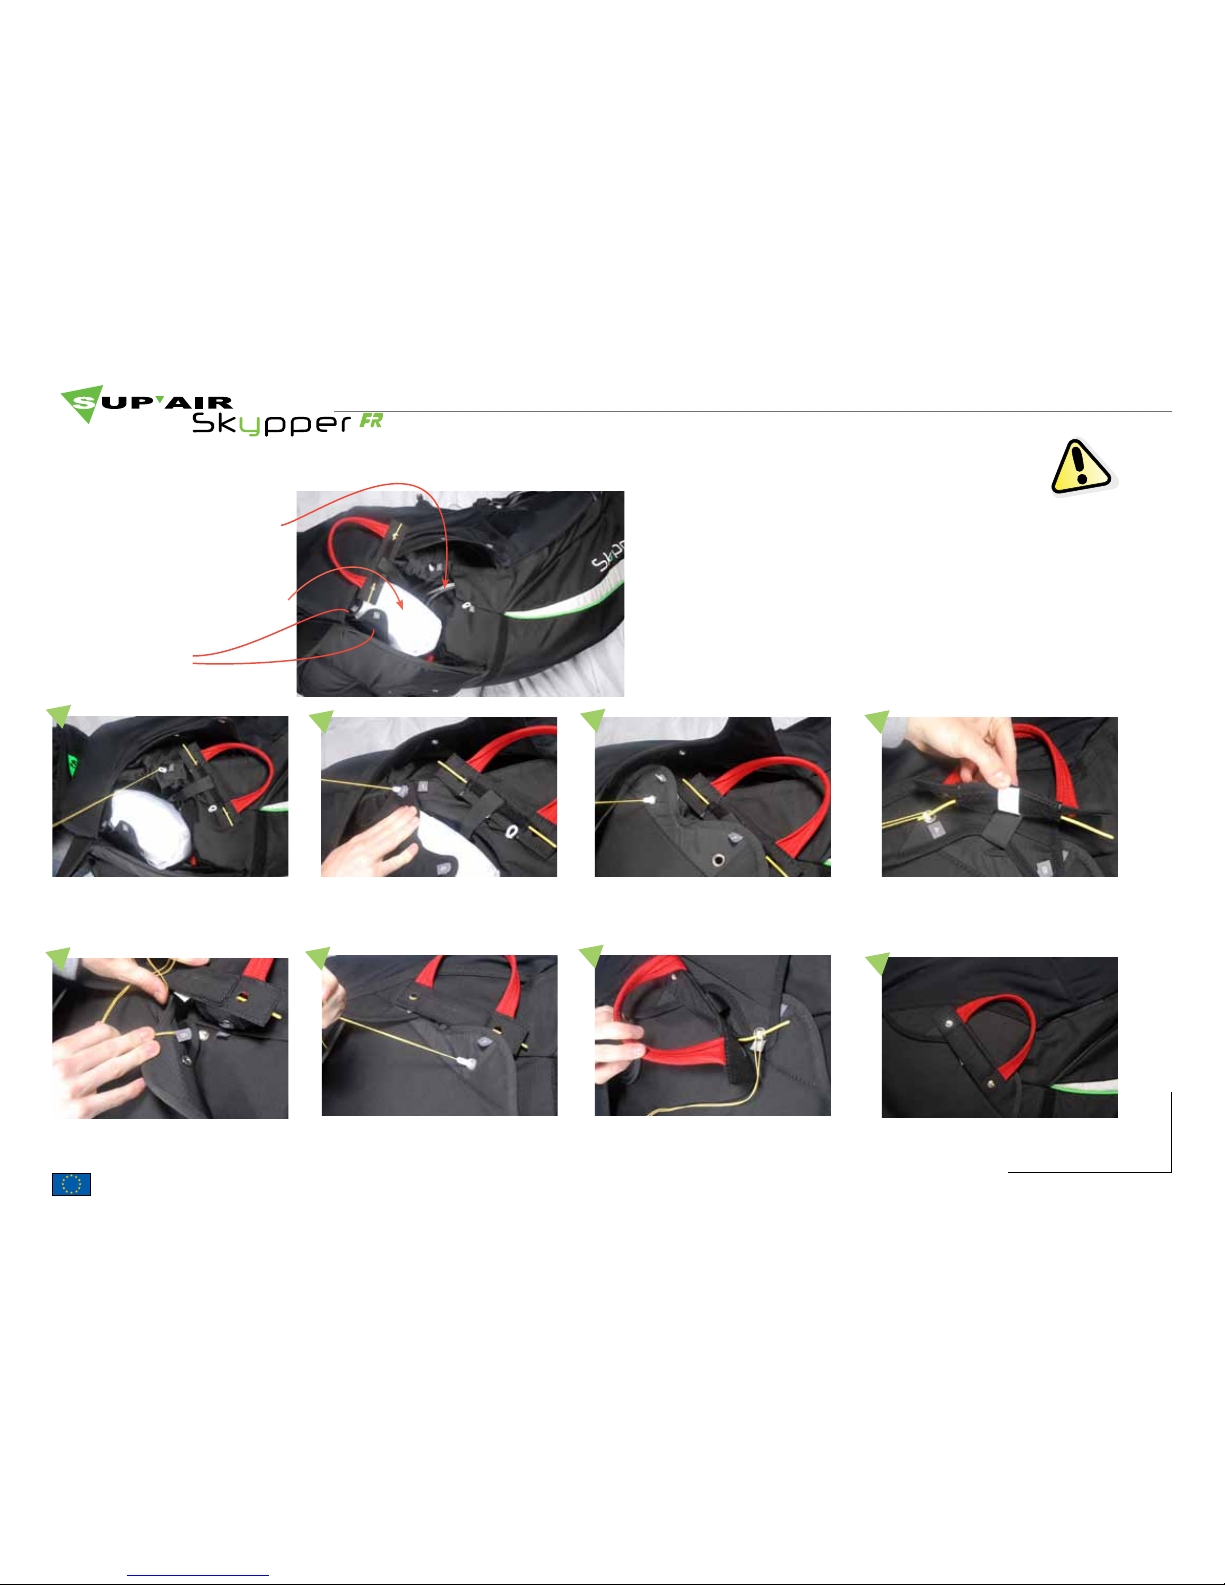
Installing the reserve parachutes
Thank you for care-
fully reading the
following! We advise
you to have the initial
rescue parachute
installation done by
someone knowled-
geable with the
process.
Insert the reserve parachute in its receiving
pocket with the flaps extented outward. The
handle must be pointing upward.
Push the reserve parachute risers through
the risers guiding sleeve ( the risers must be
positioned behind the parachute ).
Push the cord through the elasticated loop 1.
Push the cord through grommet
2.
Still using the cord, push the elasticated loop 5 through grommet 6.
Installing the reserve parachutes in their respective pockets.
Right handed pilots will install and connect
the left reserve parachute first. The reverse
will apply to left handed pilots.
POD, handle pointing upward.
Reserve risers beneath the
POD, guided through the
sleeve to the shoulders. The
shoulder connection should
preferably be made last.
Extendable flaps.
Push the cord through grommet
3.
Push the cord through grommet 4, and insert
the yellow handle cable in the loop. Carefully
remove the cord, and tuck away the end of
the handle under the outer end pockets.
Push the cord through grommet 7.
Push cord through grommet 8. Insert
the yellow handle cable in the loop.
Carefully remove the cord.
Tuck away the end of the handle
under the outer end pockets.
1
8
2
3
4
5
7
6
Page 15
SUP’AIR manufactures its products in Europe. Most of the components used are Made in Europe.
SUP’AIR _SKYPPERFR Page 15
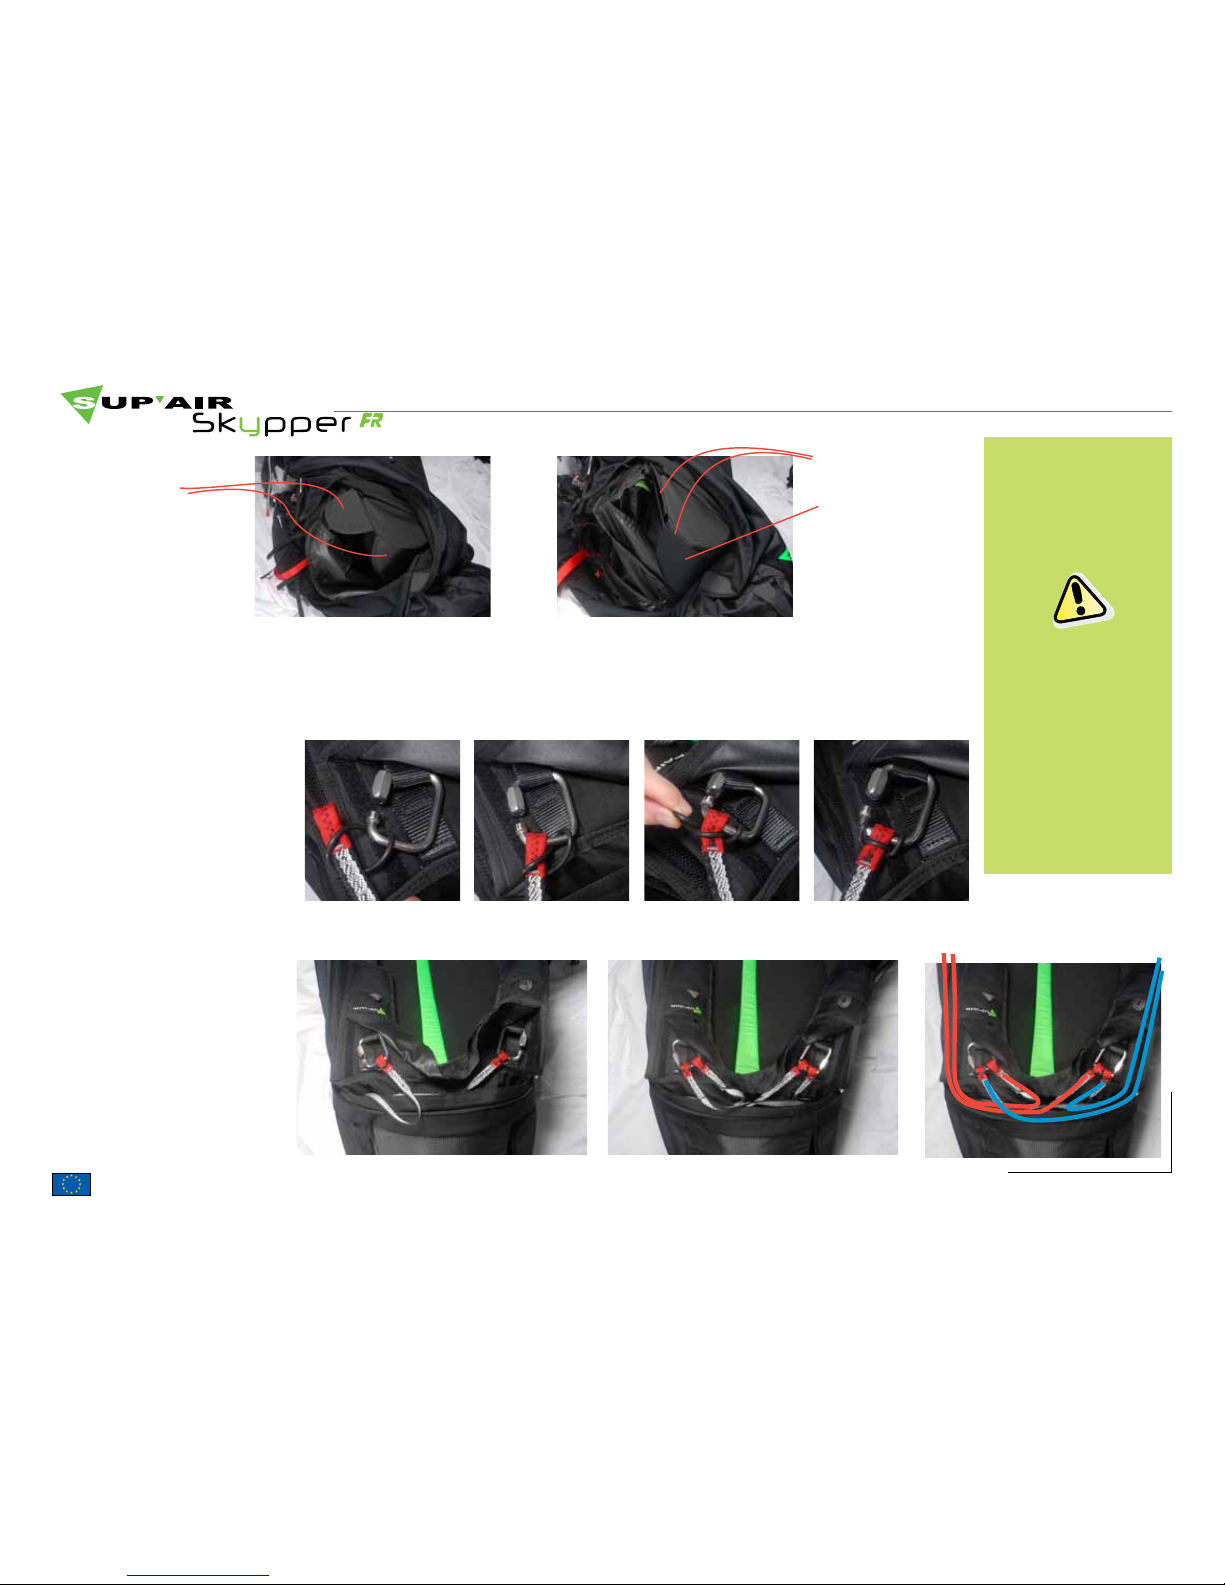
Rescue parachute riser connection.
Installing the reserve parachutes.
Two rigid flaps are to be closed
on the inside of the Speedbag.
Close the two rigid flaps between
the stiffened panel and the neoprene lining.
Neoprene lining.
Inner rigid flaps.
Rigid internal
flaps.
Each Dyneema riser connects
to the harness via a Maillon Rapides®, and is kept in
place with a toric joint.
Connecting the left, then
right reserve parachutes.
The risers are connected to
the same Maillons Rapides®
joining the right and left
reserve parachutes.
Connecting the left reserve parachute risers.
Connecting the right reserve parachute risers
over the left reserve parachute risers.
Left reserve
parachute risers.
Right reserve
parachute risers.
Once the installation
has been comple-
ted, gently pull on the
reserve parachute
handle to check and
validate the proper
extraction sequence (
POD + handle ). Repeat
installation procedure
afterward.
You can only install
one reserve parachute
to the right or the left
for a total of 2 para-
chutes between the two
containers.
Page 16
SUP’AIR manufactures its products in Europe. Most of the components used are Made in Europe.
SUP’AIR _SKYPPERFR Page 16
Installing the accelerator.
A
5 mm accelerator Dyneema line.
B
Speedbag elasticated connection.
A
B
2
1
Page 17
SUP’AIR manufactures its products in Europe. Most of the components used are Made in Europe.
SUP’AIR _SKYPPERFR Page 17
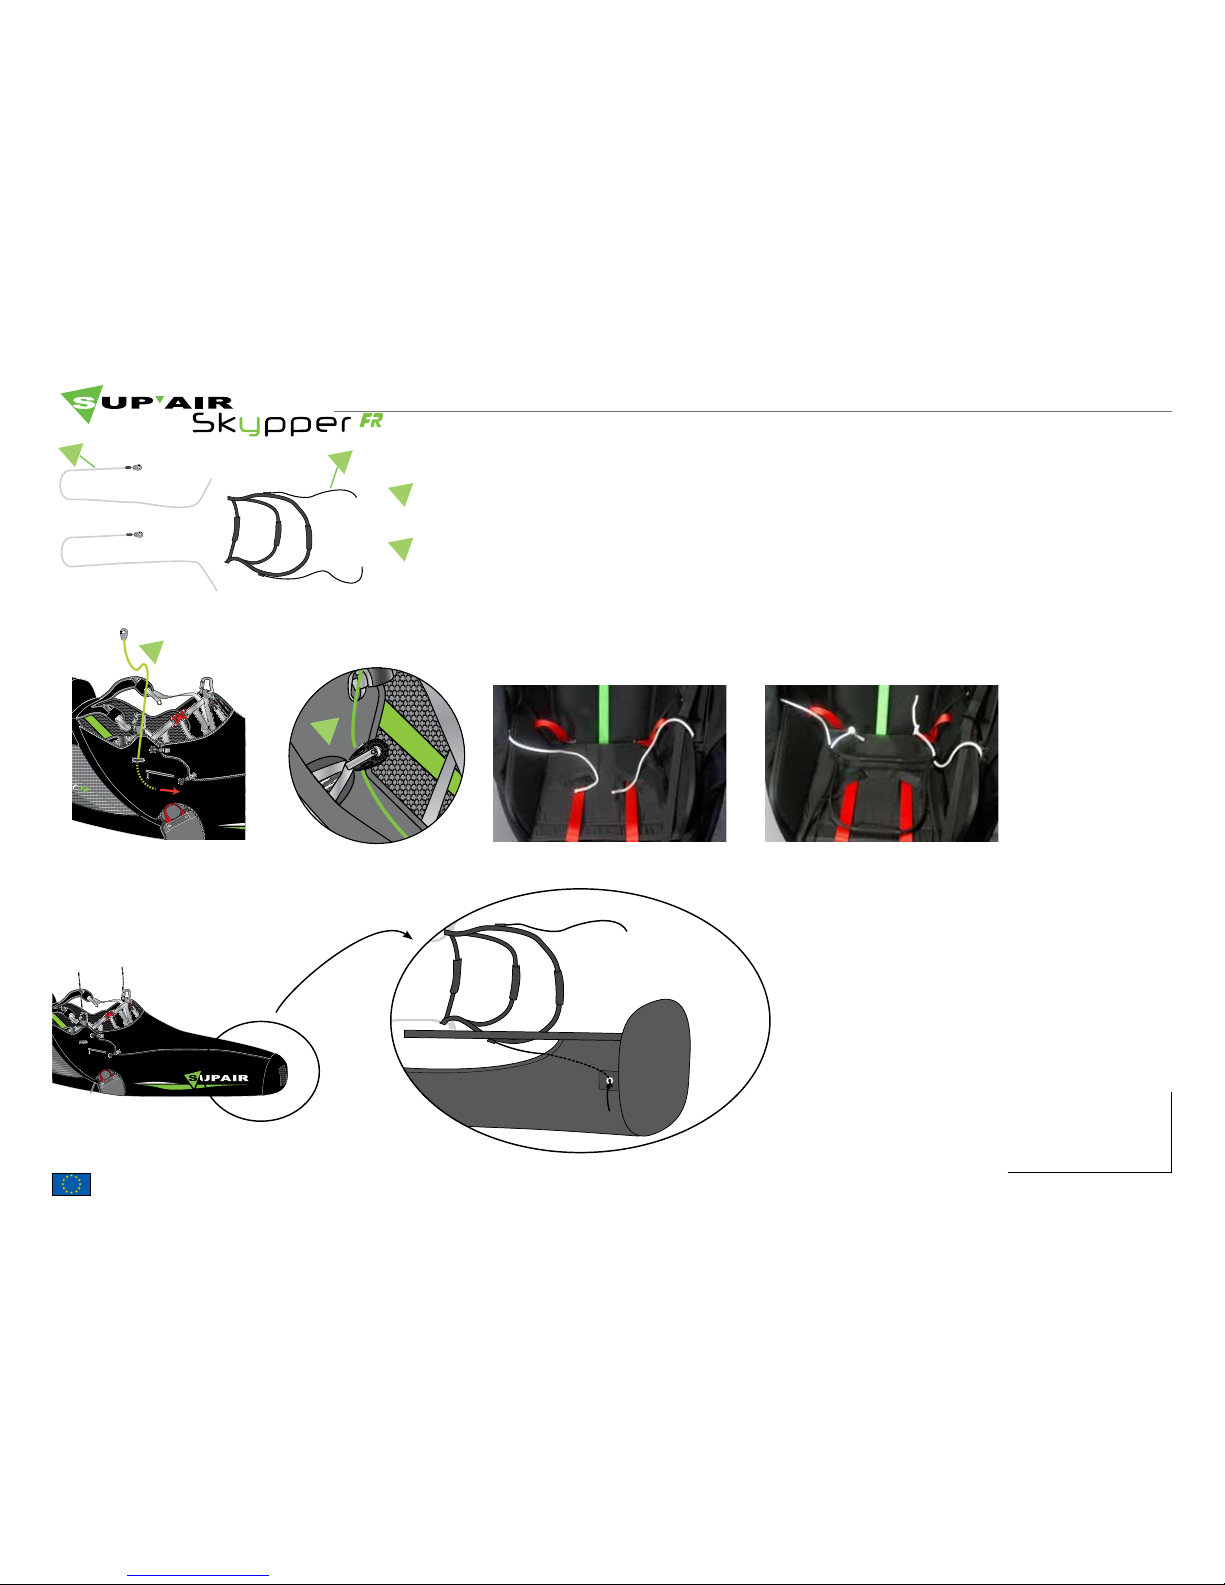
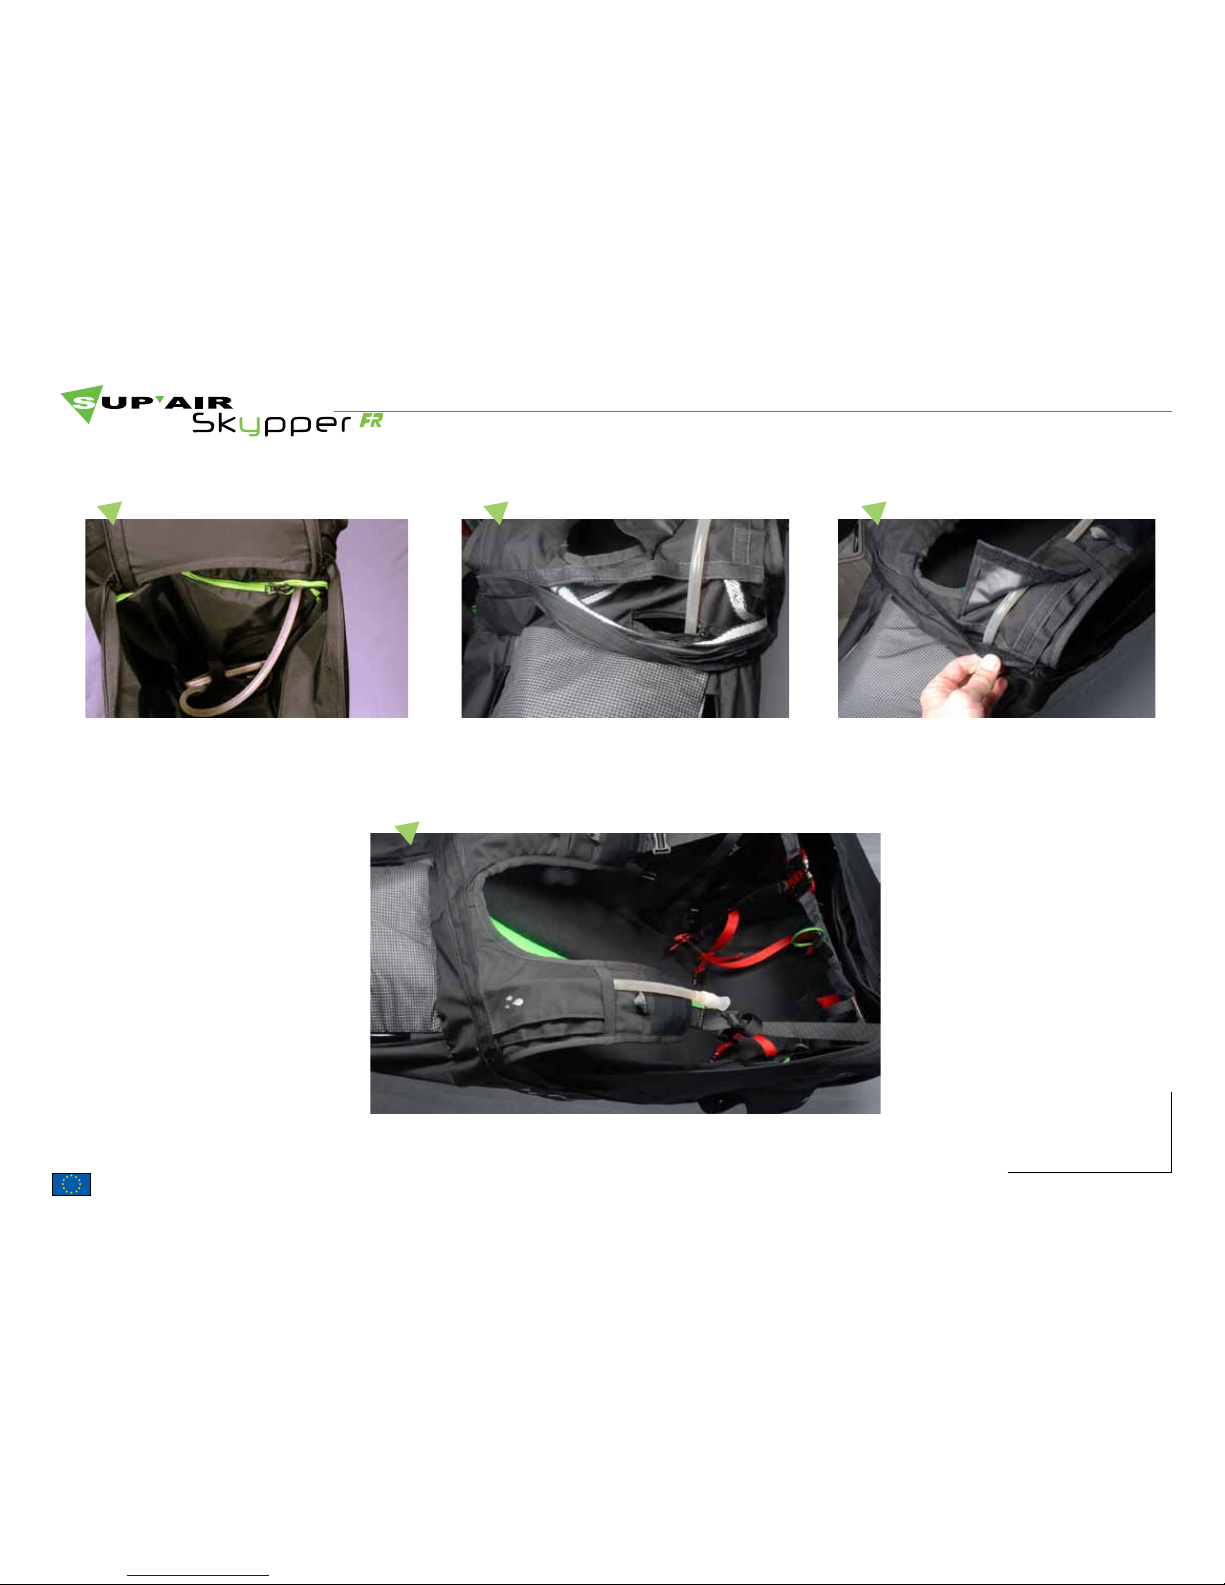
Using a flexible drinking water pouch – Camelback like.
1
2
3
4
Place the pouch inside the receptacle located inside the dorsal storage pocket. Push
the drinking tube through the green zip accessing the Bumpair.
Push the drinking tube through the guiding
zip located underneath the reserve parachute risers sleeve.
Close the risers guide flaps while placing
the drinking tube between the velcros.
Overall view of the shoulder straps with the drinking tube.
Page 18
SUP’AIR manufactures its products in Europe. Most of the components used are Made in Europe.
SUP’AIR _SKYPPERFR Page 18
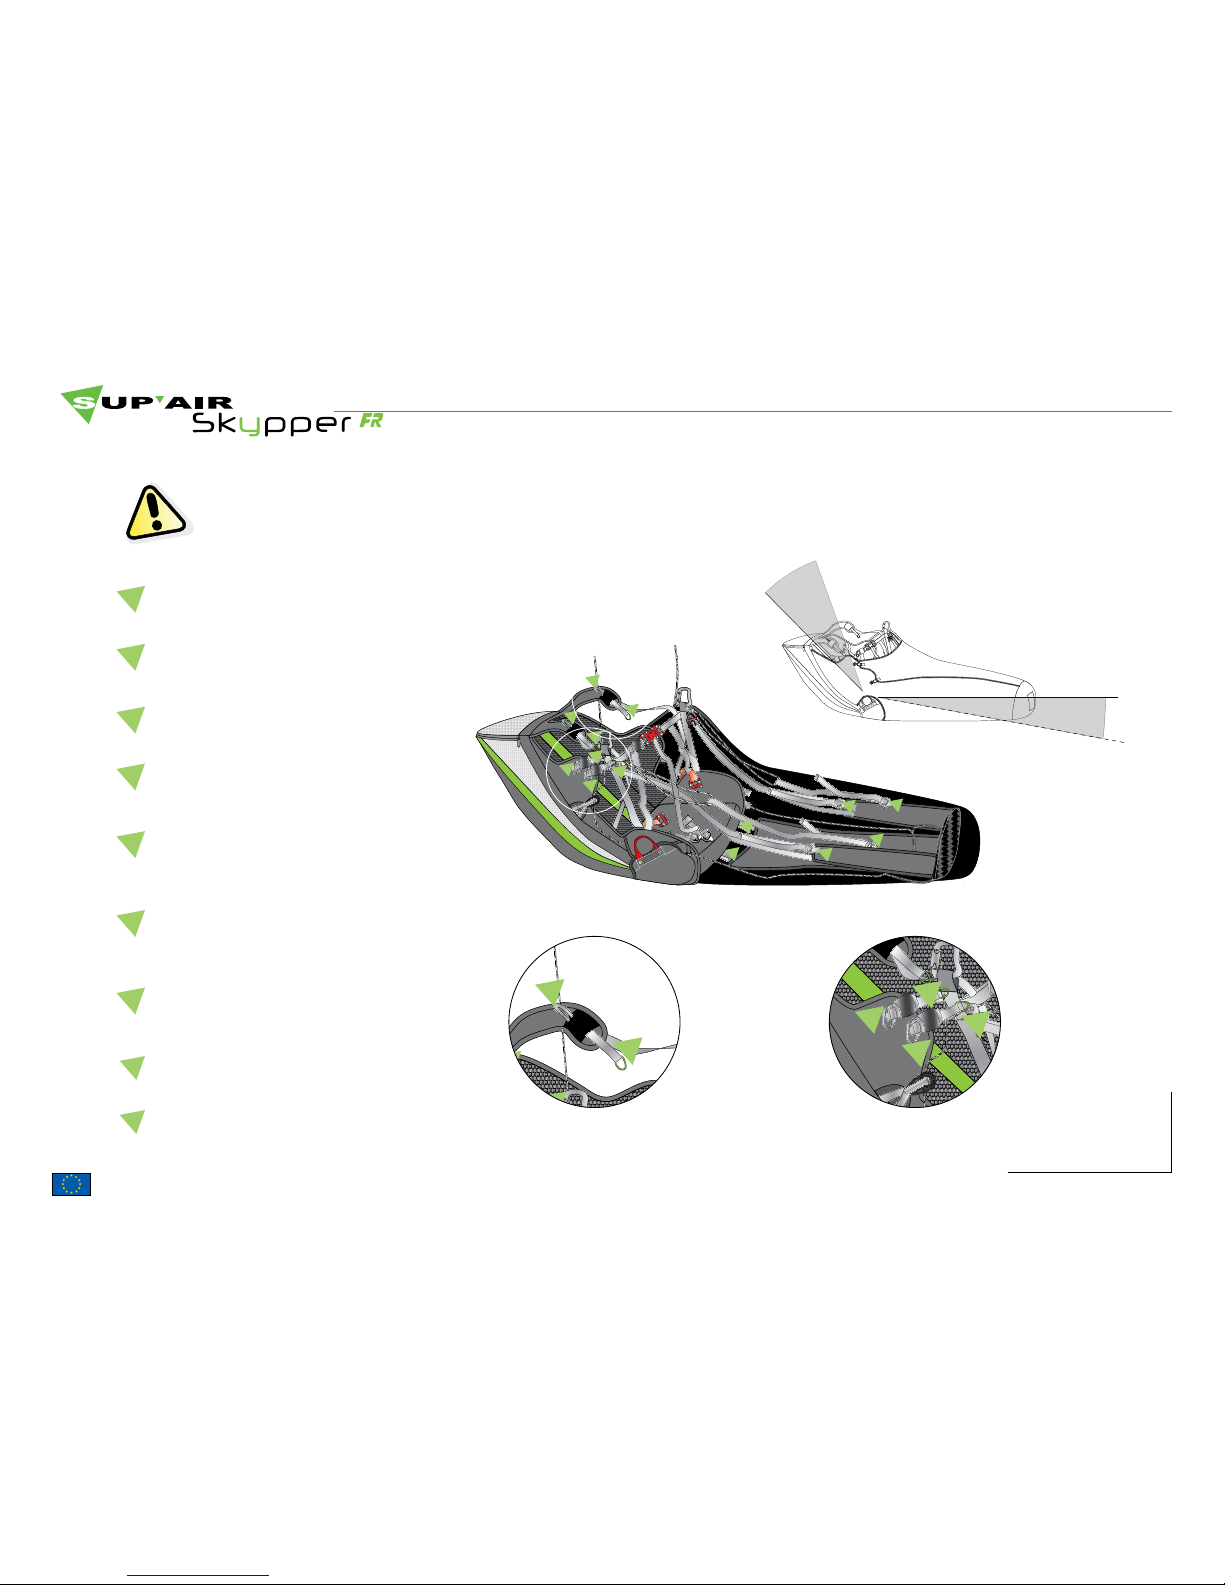
1
1
2
2
3
3
4
8
6
7
9
5
8
9
8
9
4
8
6
7
9
5
9
2
1
5
4
3
7
6
Speedbag adjustment buckles
beneath the seat.
Speedbag lateral adjustment
buckles.
Speedbag lateral tension adjustment strap buckles.
Backrest angle adjustment loosening strap.
Tightening loop-cord ( backrest
angle adjustment ).
Lumbar loosening adjustment support strap.
Tightening loop-cord ( lumbar support).
Adjusting the harness prior takeoff is extremely important.
Adjusting the seating posture.
B
A
C
B
Shoulder tightening loop-cord (
shoulder strap ).
Shoulder loosening strap.
8
9
Page 19
SUP’AIR manufactures its products in Europe. Most of the components used are Made in Europe.
SUP’AIR _SKYPPERFR Page 19
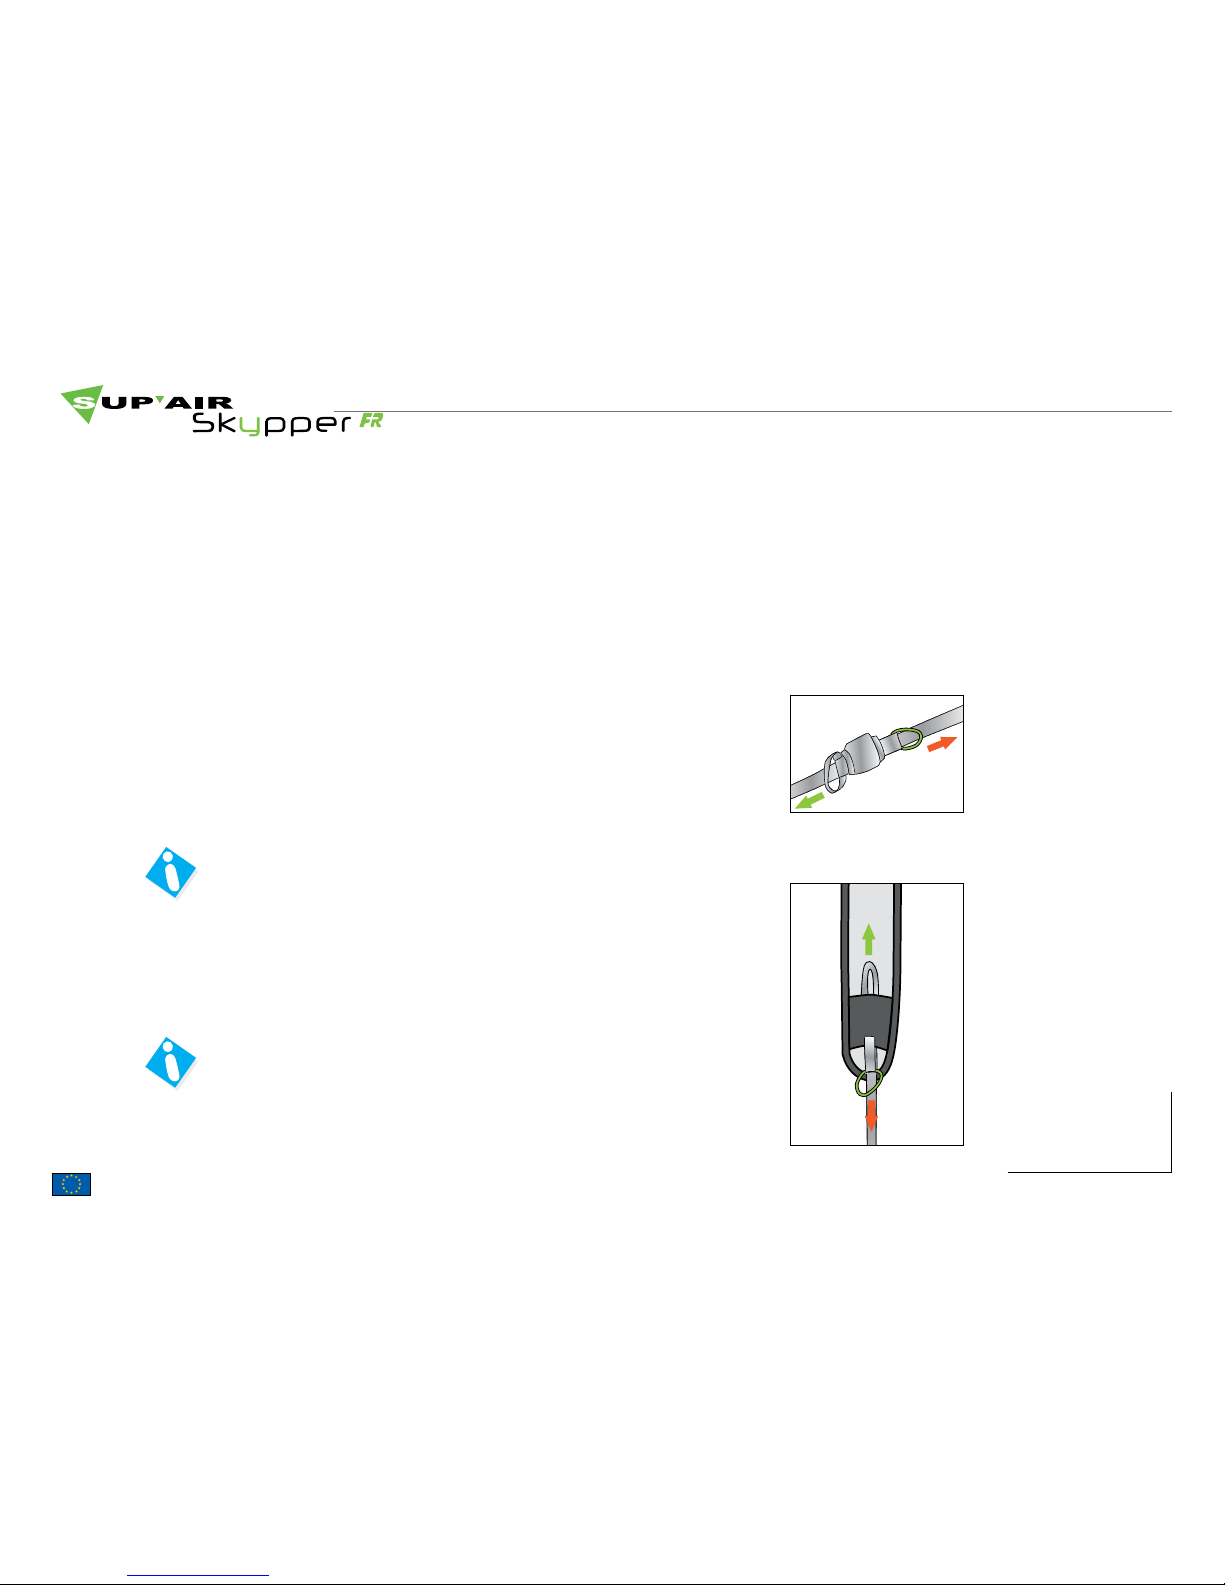
Modify the angle by pulling on the cord ( to become closer to the
vertical axis ), or the black strap ( to pull away from the vertical
axis ).
The lumbar support can be tightened/increased or loosened
with the strap or the loop-cord.
Tighten the shoulder straps by pulling the the loop-cord forward.
Loosen by pulling the tubular strap rearward.
Resting against the shoulder straps enhances comfort ; the adjustment must be precisely done.
B Adjusting the backrest angle.
C Adjusting the shoulder straps.
Using the two lateral buckles and the two buckles underneath
the seat, modify the Speedbag angle around the horizontal axis.
A Adjusting the Speedbag angle and length.
Tighten
Tighten
Loosen
Loosen
B
C
Page 20
SUP’AIR manufactures its products in Europe. Most of the components used are Made in Europe.
SUP’AIR _SKYPPERFR Page 20
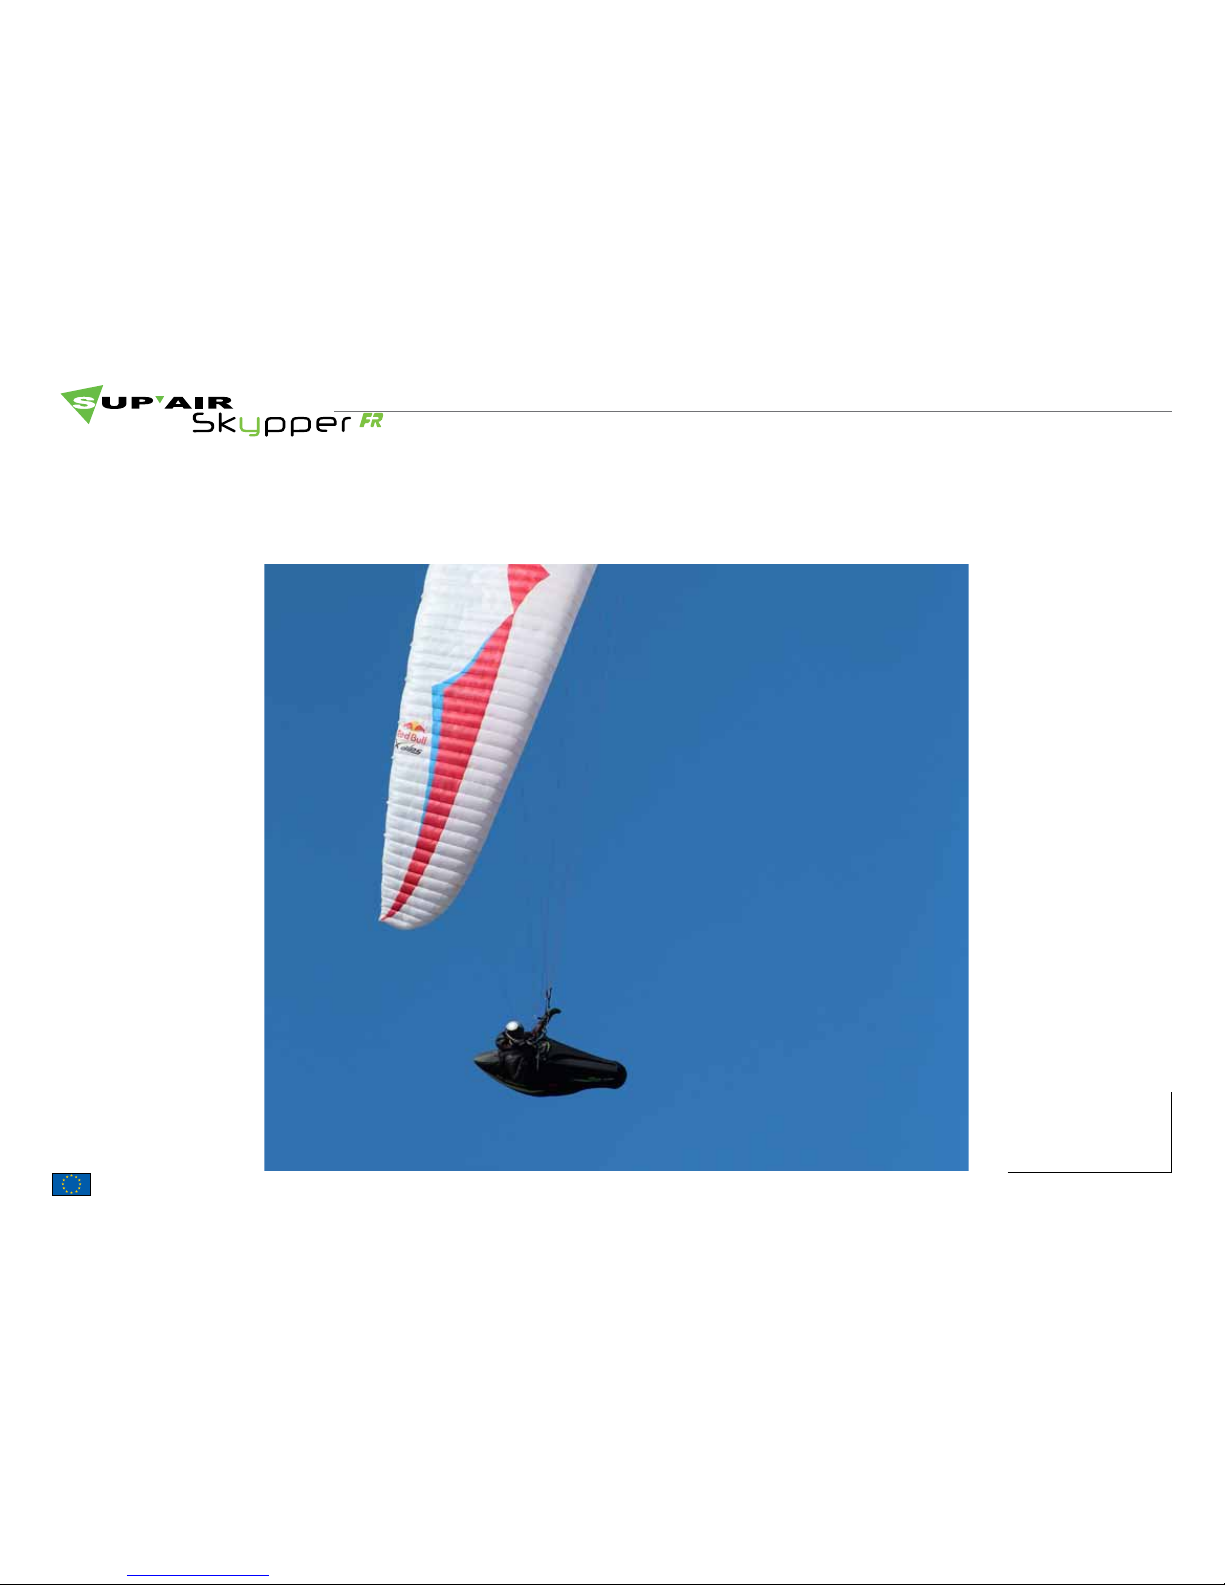
Inflight behavior
The SKYPPER is a XC and competition harness. Efficient and stable, it transmits precisely the wing’s output to the pilot.
Keep in mind that we want to see you practice this specialty with peace of mind and for as long as possible. The best gear will
not protect you against over confidence or a cascade of mishaps.
Page 21
SUP’AIR manufactures its products in Europe. Most of the components used are Made in Europe.
SUP’AIR _SKYPPERFR Page 21
1
1
2
2
3
4
4
1
1
2
2
3
4
4
Pre-Flight check.
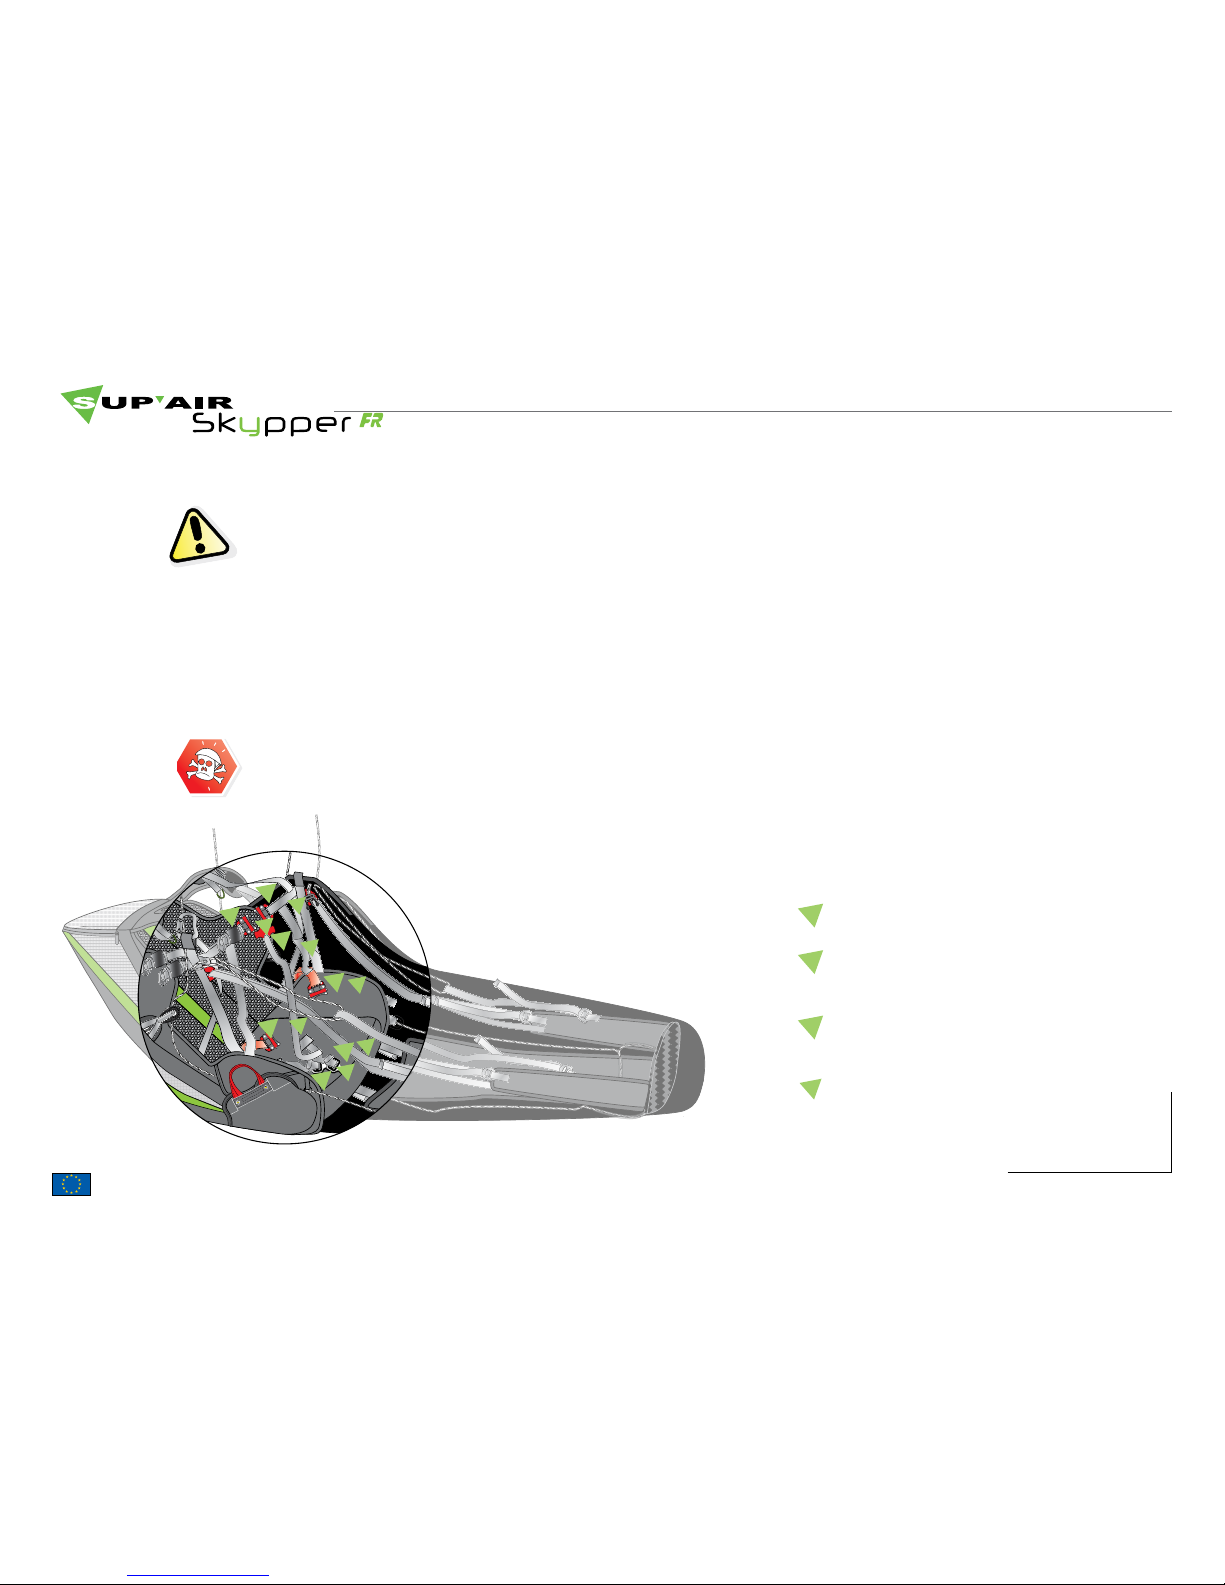
After a thorough weather conditions analysis, when the decision to fly has been taken, put your
harness on :
• Carefully close and lock the leg-straps, Safe-T strap, and chest strap buckles.
1
Thigh strap quick-release buckles (female).
2
3
• Check that the harness and the carabiners are not damaged.
• Check thoroughly that the rescue handle cable has not come out of the snapper flaps
• Check that your personal settings have not been modified.
• Check that all zippers and buckles are properly closed.
• Check that the speed-bar is properly adjusted and connected to the wing ( refer to page 20 ).
• Check that no rigging line or other object comes in contact with the rescue parachute handle.
Thigh strap quick-release buckles (male).
Chest strap quick-release buckles (female).
Safe-T-Bar.
4
Page 22
SUP’AIR manufactures its products in Europe. Most of the components used are Made in Europe.
SUP’AIR _SKYPPERFR Page 22
Take-off
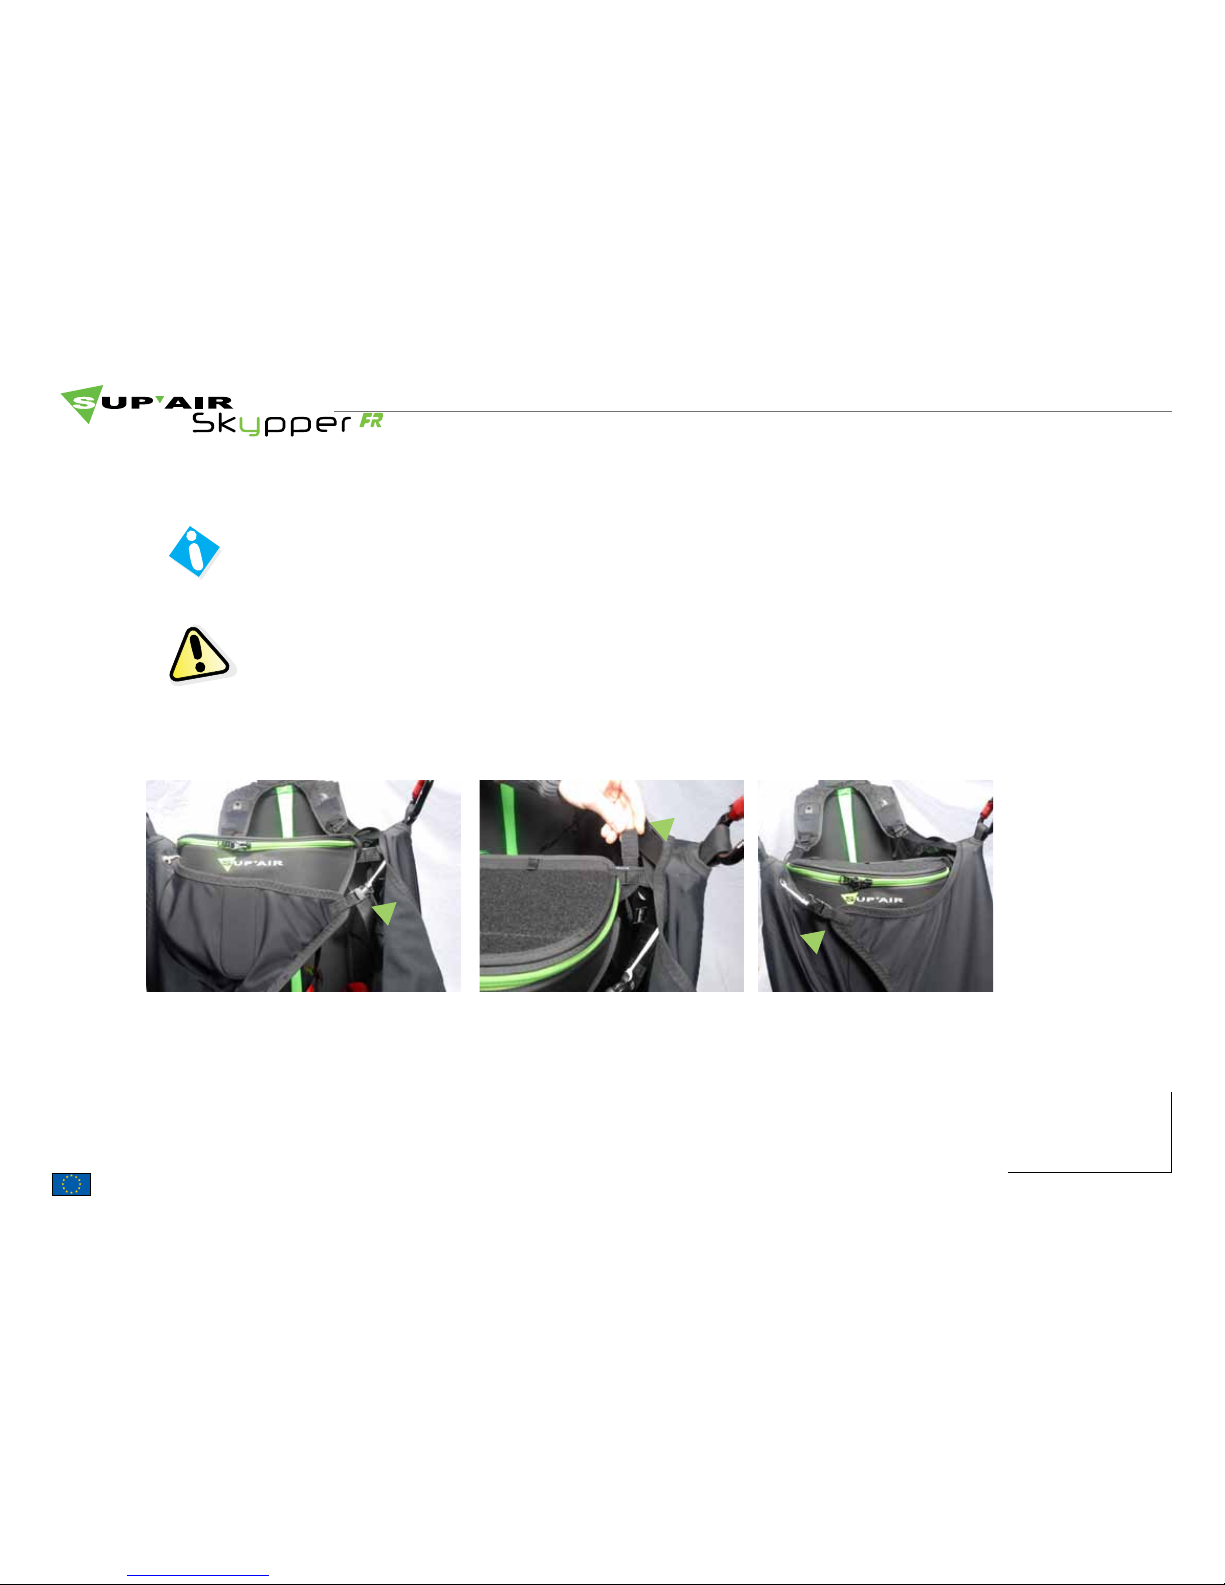
After being properly connected, lock the Speedbag’s left buckle (1) fastened to a line, then connect the Cockpit supporting
velcro (2), and lock the Speedbag’s second buckle (3) to the right.
Keep an upright posture while taking off ( do not try to immediately seat in your harness ) distance yourself from the ground
first, then backpedal to reach and grab the Speedbag. Push yourself all the way into the harness by using the foot-rest to
reach a comfortable seating posture.
Note that it is easier to backpedal and grab the Speedbag while standing upright inside the harness, and inversely, more
difficult when already seated.
Do not let go your toggles from your hands when flying close to the terrain.
2
3
1
Page 23
SUP’AIR manufactures its products in Europe. Most of the components used are Made in Europe.
SUP’AIR _SKYPPERFR Page 23
In flight
Speed-bar use
Once in flight, the SKYPPER FR’s behavior is intuitive and precis.
Please set the distance between the two carabiners according to aerology conditions and to the wing manufacturer’s
recommendations.
We recommend a careful use of the speed-bar due to the increased
risk a possible frontal collapse. Please carefully read your glider’s operation manual.
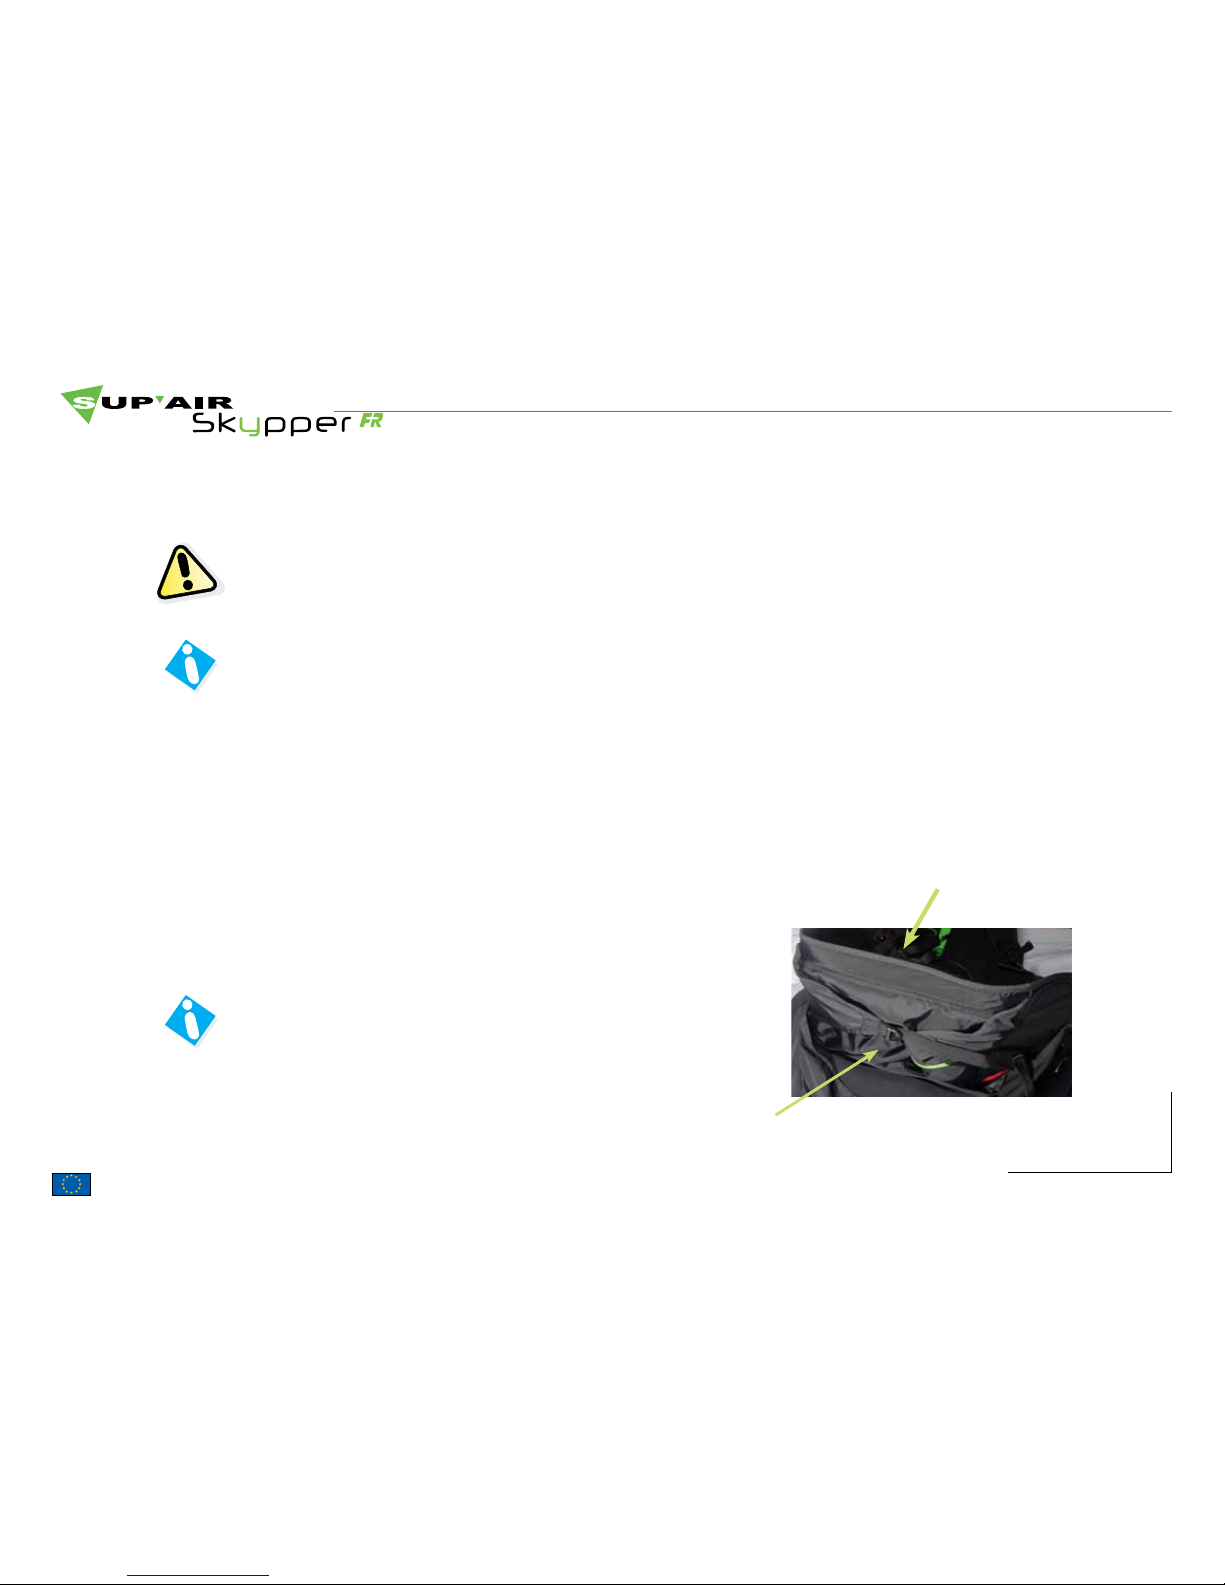
The SKYPER FR accelerator is equipped with three stages (3 bars). The
first bar rides beneath the ballast pocket. When the ballast pocket is
empty, be certain to tighten it and decrease its volume to enable the
accelerator to operate smoothly.
Tightening provides more stability but less harness piloting efficiency. Beware of the increased risk of riser twisting. On the
contrary loosening the strap provides more efficiency but can be dangerous in turbulent aerology (increased risk of falling
towards the collapsed side of your glider).
Seat
When this pocket is empty: the ballast pouch must be fully tightened to
diminish its volume, and enable the accelerator to operate smoothly.
Page 24
SUP’AIR manufactures its products in Europe. Most of the components used are Made in Europe.
SUP’AIR _SKYPPERFR Page 24
Landing
Using the reserve parachute.
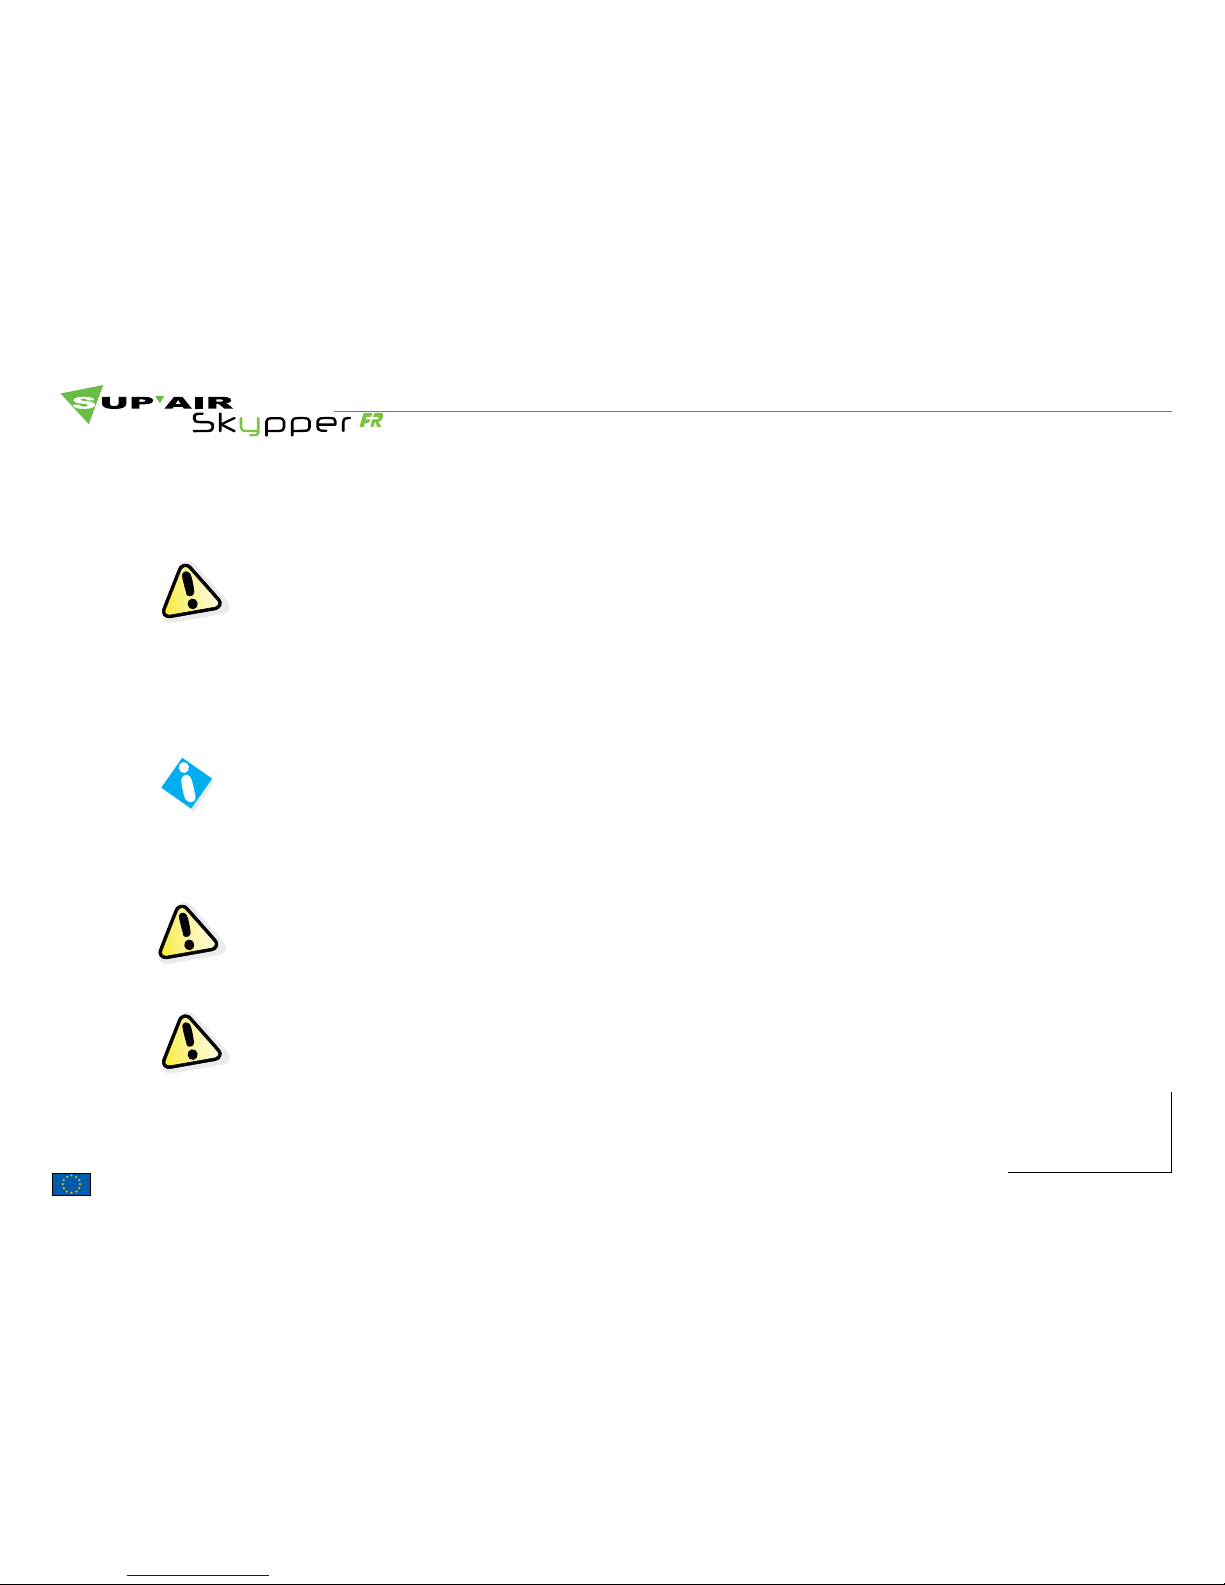
We strongly advise you to frequently check the reserve parachute handle location to lowering your right hand following
the risers. This movement should become second nature to maximize your chance of rapide and successful extractions in
case of an emergency.
Evaluate your height over the ground. If you have a lot of altitude it may be better to attempt a wing recovery to normal
flight. If in doubt then deploy you reserve parachute.
Deploying a rescue parachute should only be done as an emergency.
With a strong, lateral and then vertical tug pull the handle towards you and then throw the whole parachute (including
the bag and handle) as hard as hard as possible away from the harness and an unobstructed trajectory. As soon as the
parachute deploys, haul down the glider by pulling as symmetrically as possible on the risers (C or D) lines.
Be prepared to land by adopting an upright position.
The second reserve parachute must only be deployed when subsequent problems occur with the main and first rescue
system sequence.
Approaching landing, take your legs out of the Speedbag early enough. Straighten your body, adopt an upright posture
and be ready to run to dissipate the horizontal speed to a stop.
Do not land whilst still seated position, this is dangerous.
Page 25
SUP’AIR manufactures its products in Europe. Most of the components used are Made in Europe.
SUP’AIR _SKYPPERFR Page 25
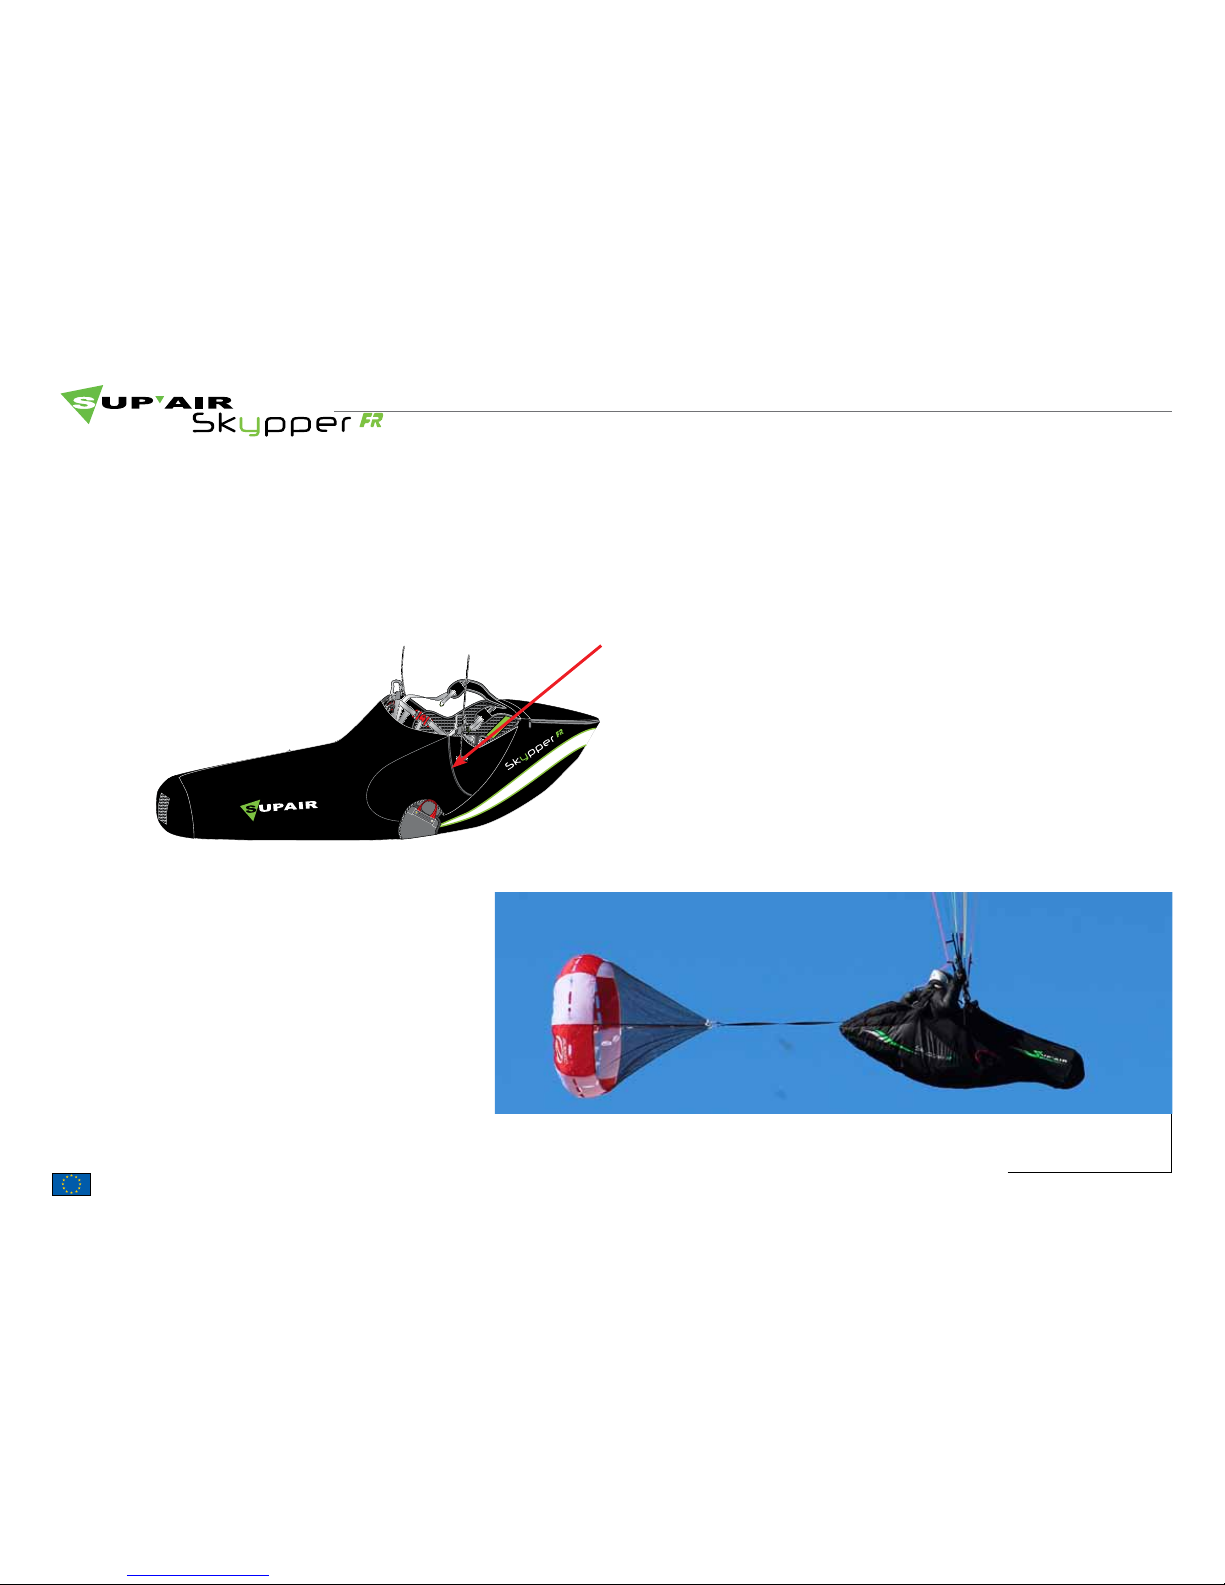
Using the Drag-Chute.
The SKYPPER FR was designed to use a Drag-Chute.
If the Drag-Chute was to be used in flight, it can be found stowed away inside the left pocket along the Speedbag. This pocket is large
and open enough for an easy chute extraction.
Page 26

SUP’AIR manufactures its products in Europe. Most of the components used are Made in Europe.
SUP’AIR _SKYPPERFR Page 26
Maintenance
Washing and harness maintenance.
It is a good idea to wash your harness from time to time. We recommend using a soft solvent (such as soap), a brush and
rinse thoroughly.
DO NOT use chemicals such as aggressive detergents or strong solvents as they may deteriorate the webbing, stitching and
harness fabrics. The zip fasteners should be lubricated from time to time, using a silicon spray only.
Product longevity.
The threads making the webbing and fabrics used in the ACRO3 have been selected to offer the best possible light weight
to longevity ratio. Nonetheless, in some conditions, after long term exposure to UV and/or significant abrasion or exposure
to chemicals, it is compulsory to have your harness’s integrity checked at a certified repair centre. Your safety depends on it.
These carabiners must never be used for anything else than paragliding (not for climbing, nor towing, etc.).
Carabiners must be replaced by new ones every five ( 5 ) years by identical models or models recommended by the
manufacturer ( SUPAIR ).
Storage and transport.
When not using your harness, store it inside your paragliding rucksack, in a dry, cool and clean place, protected from UV
exposure. If your harness is wet, dry it thoroughly before storing.
During transport, protect the harness from any mechanical or UV deterioration (use a bag). Avoid long transports in wet or
humid conditions.
Independently from the pre-flight checks, you must open and unfold your rescue parachute once every 6 months.
Once every 2 years, you need to perform a complete harness check :
• webbings (no wear, tear or material unraveling, no unwanted folds).
Page 27

SUP’AIR manufactures its products in Europe. Most of the components used are Made in Europe.
SUP’AIR _SKYPPERFR Page 27
Materials
Recycling
All our materials are selected for their technical and environmentally friendly characteristics. None of thre components
found in them will harm the environment, and most are recyclable.
If you estimate that your harness has reached the end of its lifespan, you can then separate the plastic from the metallic
parts and apply up-to-date sorting rules in effect in your community. As for the fabric parts, we will advise you to contact
your local specialized recycling center(s).
Fabrics
DYNEEMA® RIPSTOP
CORDURA®
CORDURA® RIPSTOP
Speedbag
LYCRA
Webbings
Polyamide 20 mm (500 DaN)
Polyester 25 mm (1250 DaN)
Under the seat parachute risers
Dyneema® (1350 N)
Repair
SUP’AIR also offers the possibility for its products to be repaired beyond the end of the warranty period. Please contact us
either by telephone or by E-mail [email protected] in order to receive a quotation.
In spite of using the highest quality materials, it is possible for your harness to eventually deteriorate through general use.
If showing any signs of significant wear and tear, you should check it and have it repaired at a certified repair centre if
necessary.
Page 28
SUP’AIR manufactures its products in Europe. Most of the components used are Made in Europe.
SUP’AIR _SKYPPERFR Page 28
Warranty
SUP’AIR takes the greatest care in the design and production of its product line, hence, offers a five (5) years limited warranty from the purchase date against any manufacturing defect or design issues occurring during normal use. Any damage
or degradation resulting from incorrect or abusive use, abnormal exposure to aggressive factors, including, but not limited
to; high temperature, intense sun exposure, high humidity etc., will invalidate this warranty
Paragliding is an activity requiring, skills, specific knowledge and sound judgement. Be safe by learning in certified schools,
subscribe and obtain an adequate insurance policy as well as a flying license while always making sure your flying skills
are up to the task in various weather flying conditions. SUP’AIR cannot be held responsible for your paragliding decisions
or activities.
Disclaimer
Pilot’s gear
It is essential to wear a helmet, suitable boots and clothing. Carrying a reserve parachute suitable for your weight and
correctly connected to your harness is also very important.
This SUP’AIR product has been designed exclusively for paragliding. Any other activity such as skydiving or BASE jumping
is absolutely forbidden.
Page 29
SUP’AIR manufactures its products in Europe. Most of the components used are Made in Europe.
SUP’AIR _SKYPPERFR Page 29
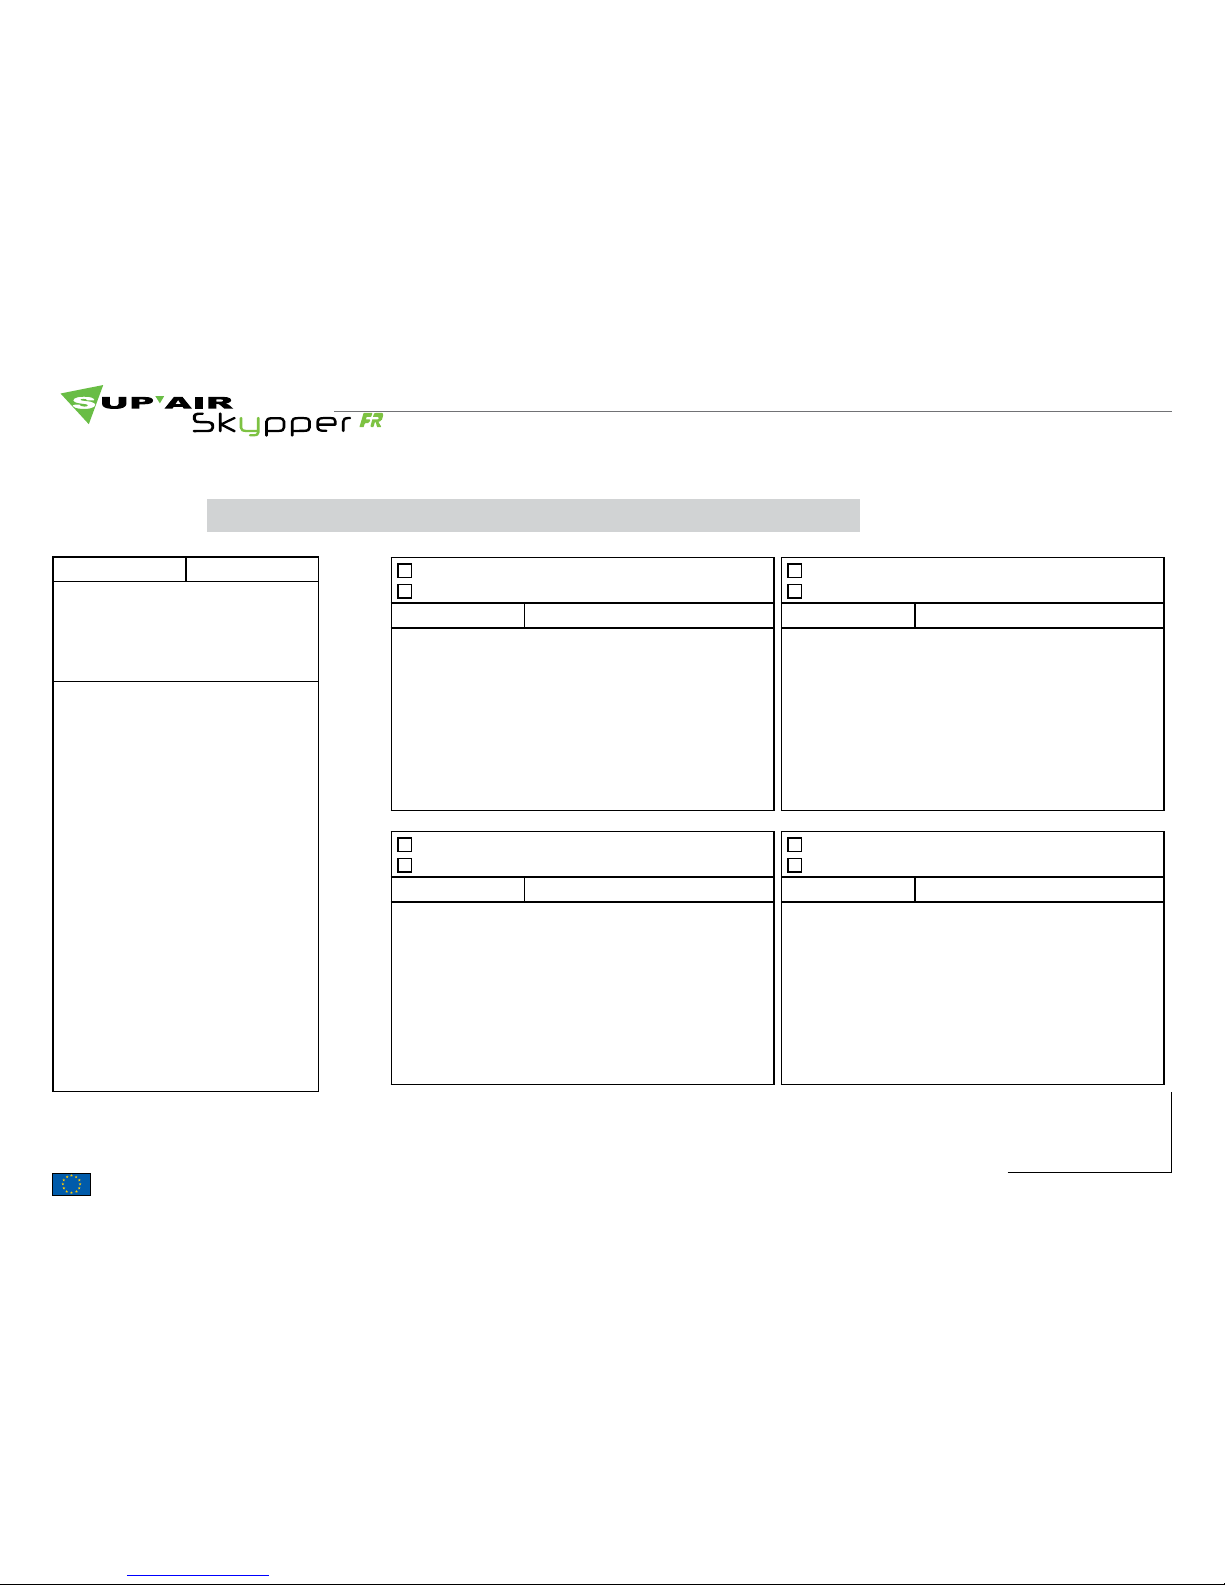
Maintenance manual
This page will help you to record all the life stages of your ACRO3 harness.
Purchase date
Owner’s name
Name and stamp of the shop
Serial number :
Care
Resale
Date
Workshop’s name/ Buyer’s name
Care
Resale
Date
Workshop’s name/ Buyer’s name
Care
Resale
Date
Workshop’s name/ Buyer’s name
Care
Resale
Date
Workshop’s name/ Buyer’s name
Page 30
SUPAIR-VLD
PARC ALTAÏS
34 RUE ADRASTÉE
74650 ANNECY CHAVANOD
FRANCE
45°54.024’N / 06°04.725’ E
 Loading...