

Page 1
User’s manual
English
SUPAIR-VLD
PARC ALTAÏS
34 RUE ADRASTÉE
74650 ANNECY CHAVANOD
FRANCE
45°54.024’N / 06°04.725’ E
RCS 387956790
Revision index : 29/11/2018
Page 2
Notice d’utilisation sellette | SKYPPER2
Thank you for choosing the SKYPPER2 We
are glad to be able to share our common paragliding passion with you.
SUPAIR has been designing, producing and
selling free flying equipment since 1984. By
choosing a SUPAIR product you benefit from
almost thirty years of expertise, innovation
and listening. This is also our philosophy :
working endlessly to develop better products and to maintain a high quality production.
We hope you will find this user’s manual
comprehensive, explicit and hopefully enjoyable as well. We advise you to read it
carefully.
You will find the last up to date information
about this product, On our website www.
supair.com. If you have any further questions, feel free to ask one of our retailers for
answers. And naturally, the entire SUP’AIR
team is at your disposal on [email protected]
We wish you many safe enjoyable flying
hours, and happy landings
Team SUPAIR
SUPAIR | SKYPPER2 | page 2
Page 3

Notice d’utilisation sellette | SKYPPER2
List of contents
Introduction 4
Technical specifications 5
Size choice 6
Components list 7
Equipment overview 8
Accessories assembly 9
Carabiners 9
Seat-plate 9
foot plate 10
Bumpair 10
Speed-bar system 11
Installing the main reserve parachute 12
Main Container specifications 12
Installing the reserve parachute in the POD 12
Risers connection – harness 13
Riser connection – reserve parachute 13
Installing the reserve parachute in the container 14
Installing the front reserve parachute 16
Installing the right connection point 16
Installing the left connection point 17
Installing the front reserve parachute container 18
Front reserve parachute pocket characteristics 19
Connecting the front reserve parachute container 19
Installing the front reserve parachute 20
Mandatory extraction test procedure 21
Drogue-Chute 22
Gear packing and tips 23
Safety Kit 24
Adjustments 25
The various adjustments 25
Adjusting the harness 26
Wing/harness Connection 27
Inflight behavior 28
Flight phases 29
Pre-Flight check 29
Take-off 29
In flight 30
Speed-bar use 30
Landing 30
Using the reserve parachute 31
Towing 31
Mandatory controls 31
Maintenance 32
Harness cleaning and maintenance 32
Storage and transport 32
Product longevity 32
Repairs 33
Materials 33
Recycling 33
Warranty 34
Disclaimer 34
Pilot’s gear 34
Service Book 35
SUPAIR | SKYPPER2 | page 3
Page 4

Notice d’utilisation sellette | SKYPPER2
Welcome to the world of paragliding according to SUPAIR, a world of shared passion.
A technically advanced design harness, aiming at the Cross-Country and demanding pilots engaged on
a regular practice. Inspird by the first SKYPPER, this new one is outfitted with a cocoon in addition to a
standard ergonomically fitting efficient top to bottom back protector with a reasonable weight and size
for a high performance and precision.
Accurate feedback without parasitic instabi lity, enables precise and efficient steering.
It was designed with schooling and fun in mind to provide full comfort and a worry free learning curve.
The SKYPPER2 harness was certified EN 1651 : 1999 et LTF Nfl II 91/09.
Indicating that it meets European and German safety requirements.
After reading this manual, we suggest you to check your harness in static hang-posts to adjust it before
your first flight.
Introduction
N.B : Three important icons will help you when reading this manual :
Advice Caution ! Danger !!
SUPAIR | SKYPPER2 | page 4
Page 5
Notice d’utilisation sellette | SKYPPER2
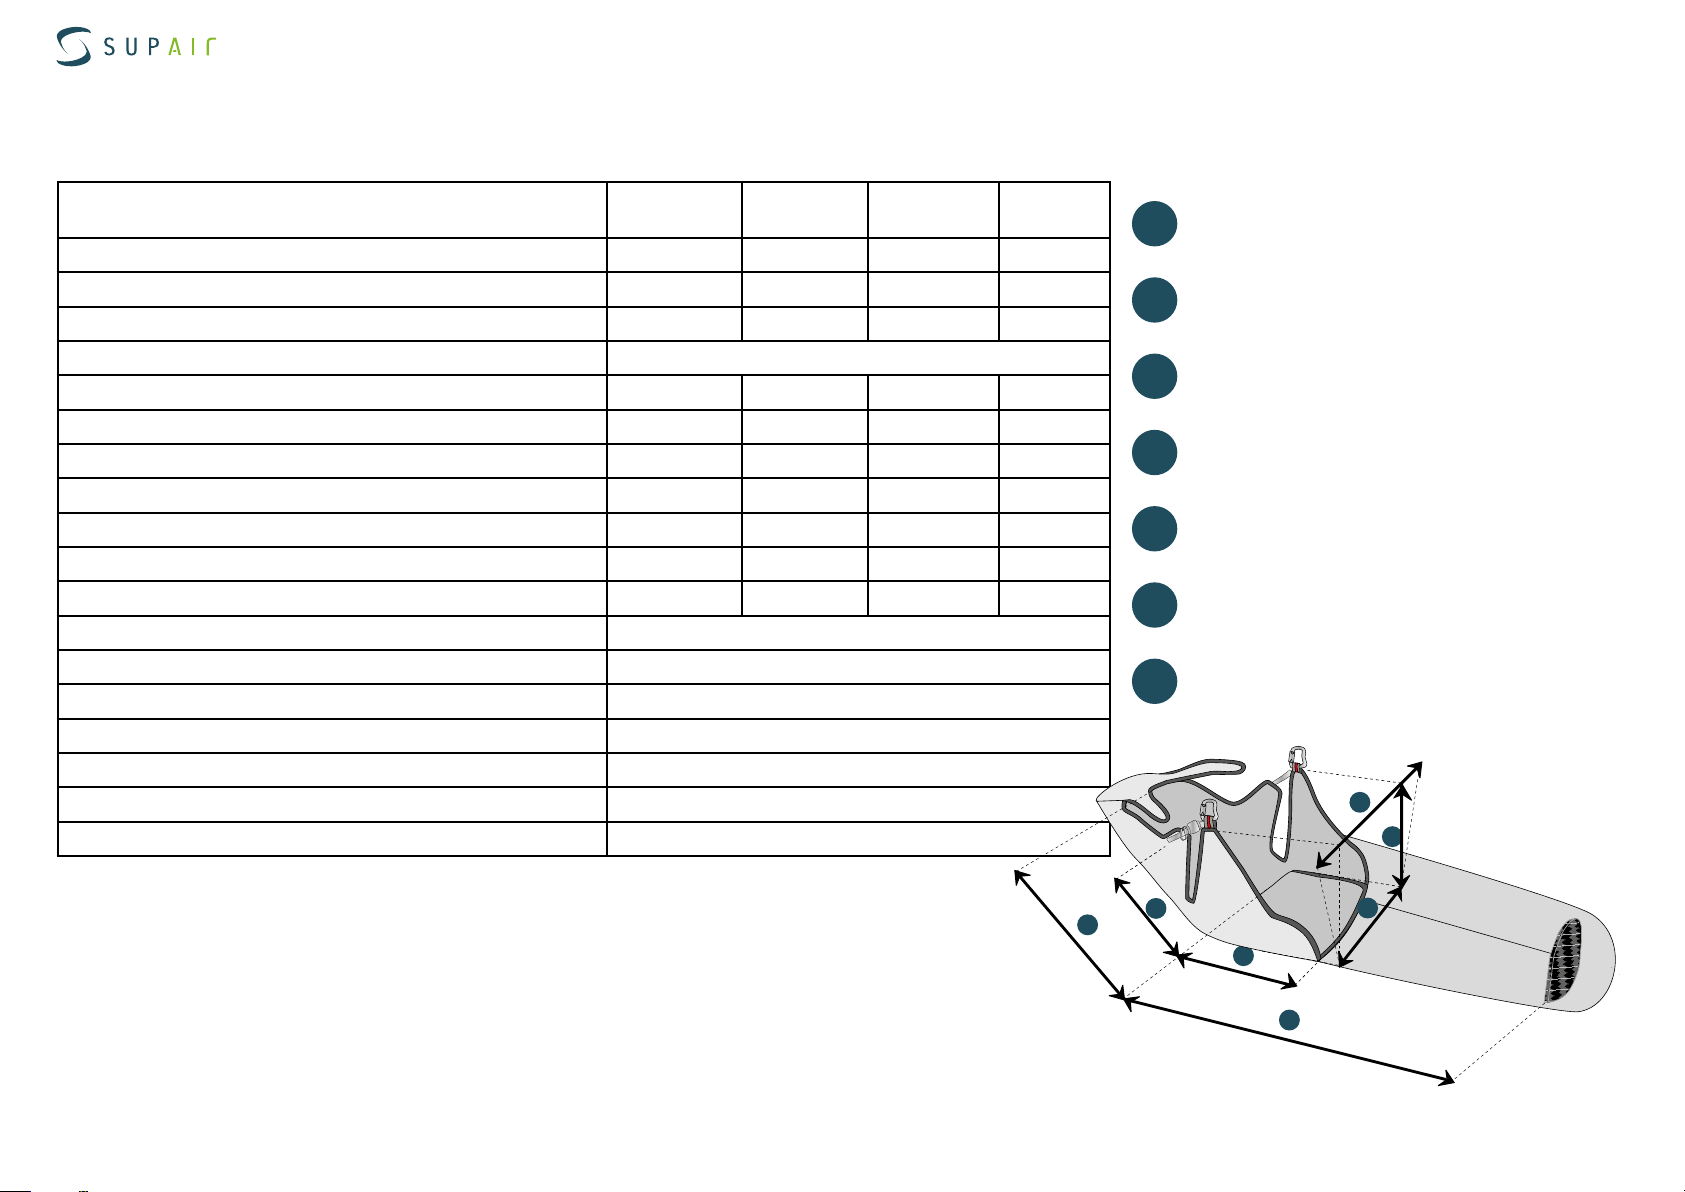
Technical specifications
Model
S M L XL
Pilot size (cm) 150 -165 160 -183 180 - 195 > 195
Pilot weight (mini - maxi) (kg) 50-60 65-85 75-105 90-115
Harness weight (+ carabiners+speedbar)(kg) 5500 5700 5900 6100
Designed for Parapente uniquement
Back lenght (cm) 65
Back inclination adjustment (cm) 31
Seat length (cm) 41,5
Seat width (cm) 34
Carabiners height (cm) 46
Carabiners distance (cm) 39-45
Speedbag length (cm) 86
Impact damping system : Airbag No
Impact damping system : BUMPAIR Yes - 18 cm + Plastazote
Certification EN 1651 : 1999 - LTF Nfl II 91/09
Tandem (Pilot or Passenger) No
Acrobatic flying No
Towing Yes
Reserve parachute pocket volume (L) 7 Liter volume capacity
A
B
C
D
E
F
G
Back lenght
Back inclination adjustment
Seat length
Seat width
Carabiners height
Carabiners distance
Speedbag length
F
E
A
B
C
G
D
SUPAIR | SKYPPER2 | page 5
Page 6
Notice d’utilisation sellette | SKYPPER2
Size choice
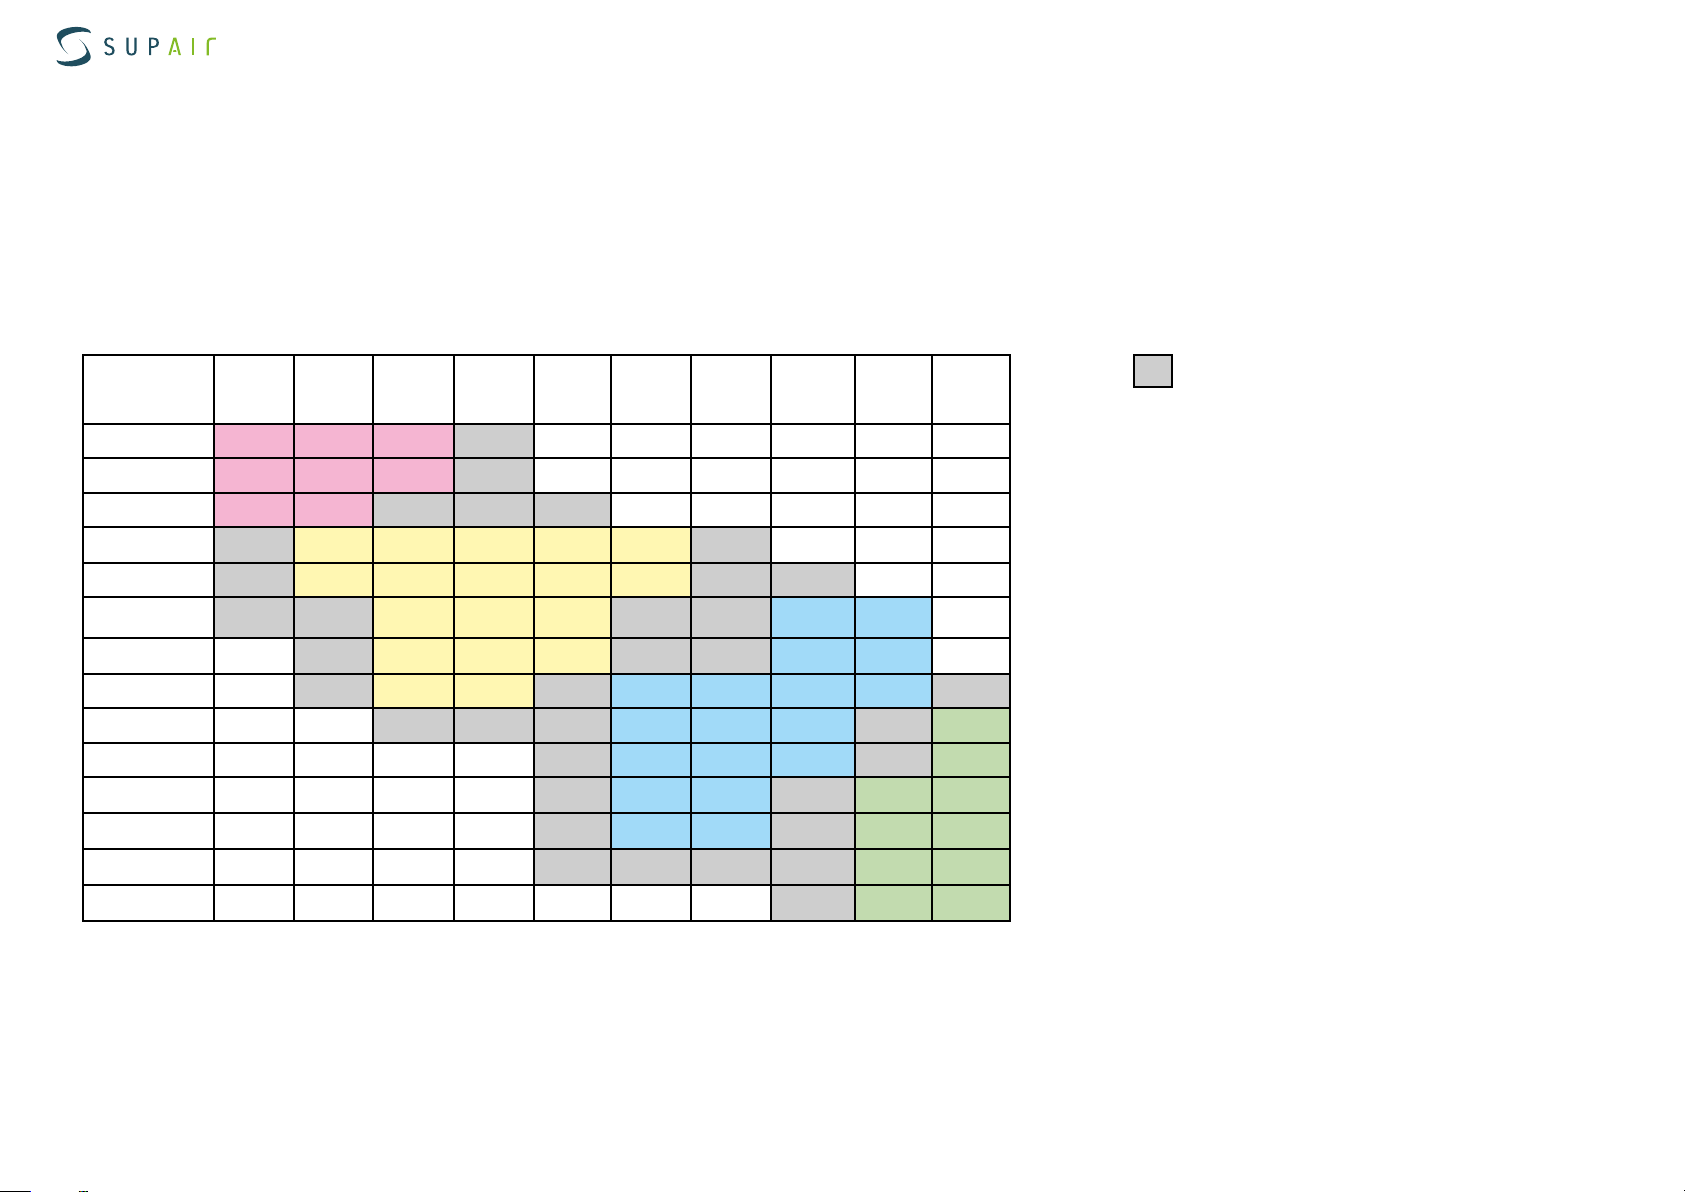
Choosing your harness’ size is important. You will find here below a height/weight table that will help you in your size choice. With its hammock architecture and its “lying flat” flying position, we advise you to try out the harness under a hanging device at one of our retailers in order to choose the
correct size.
Find a complete list of our retailers on www.supair.com
Size
Weight
50 S S S
55 S S S
60 S S
65
70 M M M M M
75
80
85 M M L L L L
90
95 L L L XL
100
105
110
115
1m55 1m60 1m65 1m70 1m75 1m80 1m85 1m90 1m95 2m
M M M M M
M M M L L
M M M L L
L L L XL
L L XL XL
L L XL XL
XL XL
XL XL
Preliminary test under hanging device
SUPAIR | SKYPPER2 | page 6
Page 7
Notice d’utilisation sellette | SKYPPER2
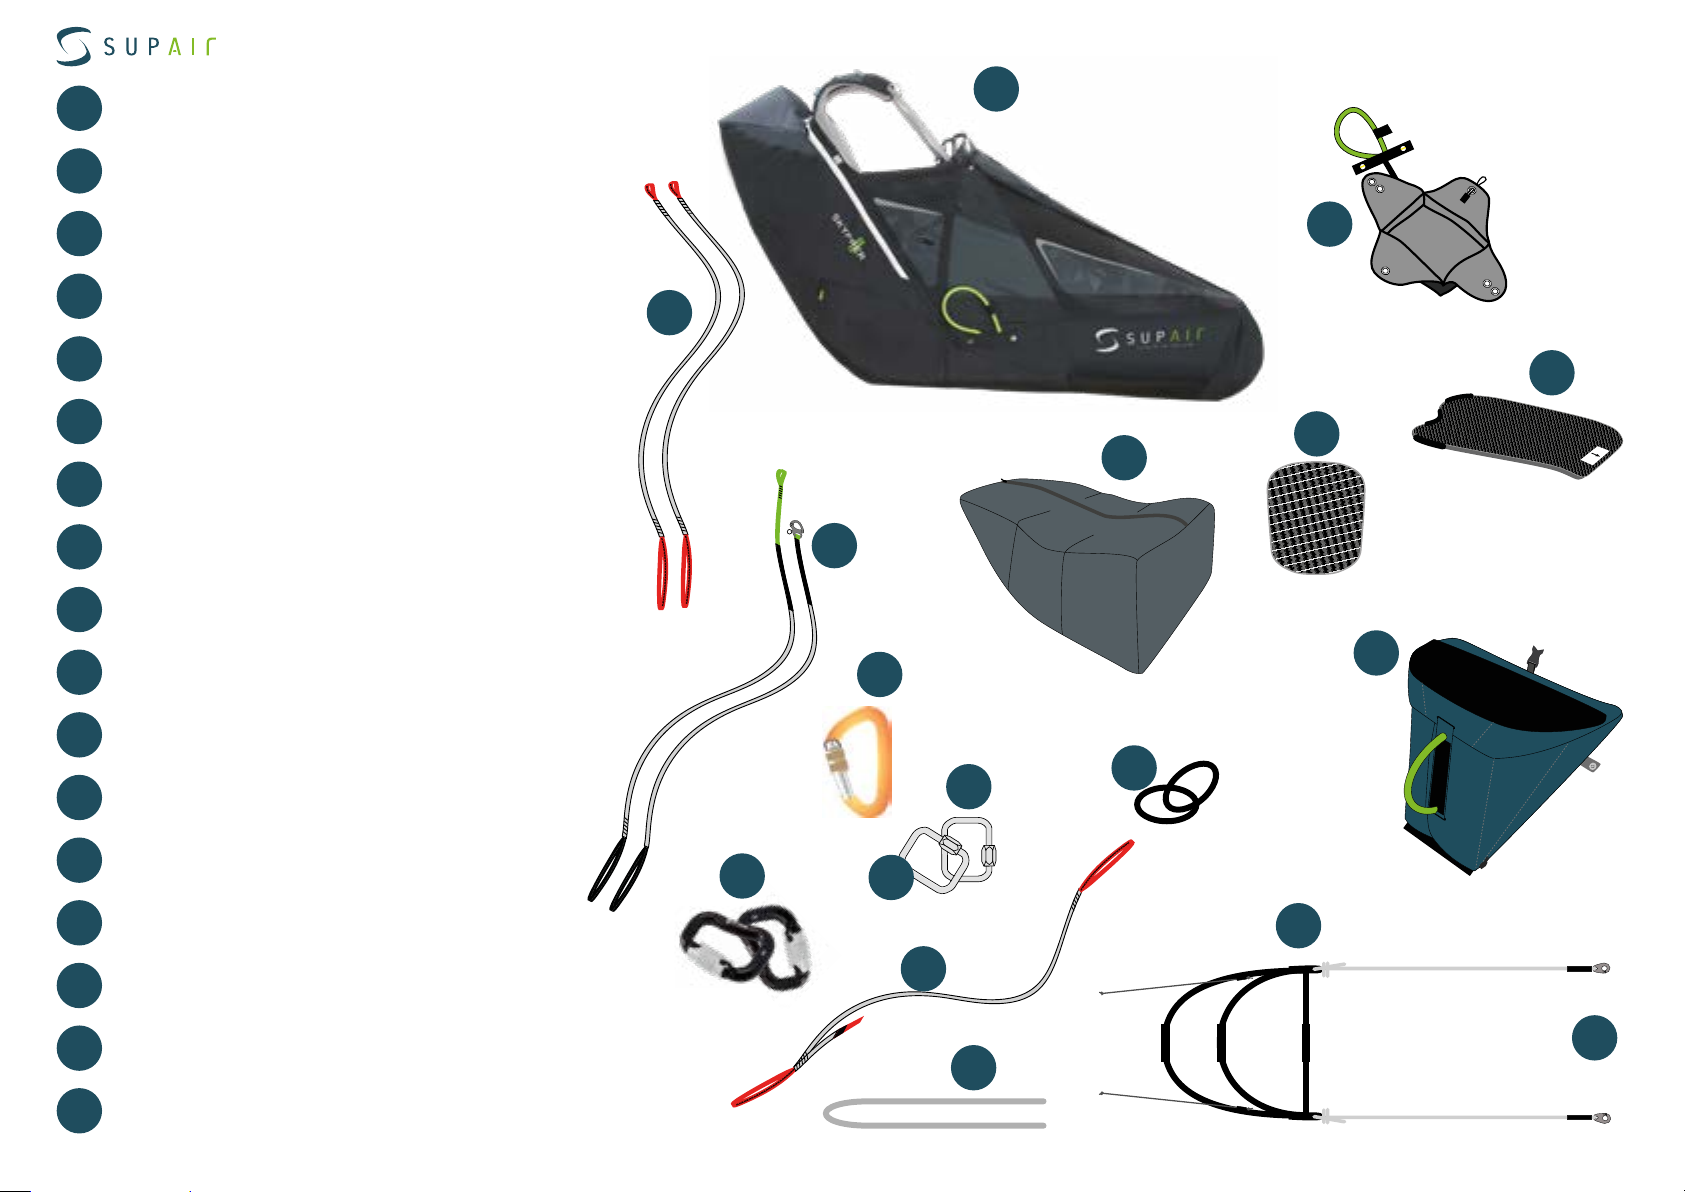
1
2
3
4
5
6
7
8
9
10
Harness
SK2 reserve parachute handle with POD
Carbon fiber seatplate
Carbon fiber foot plate
BUMPAIR 18 SK2
Removable front reserve parachute container
with handle
Accelerator 3B Speedbag
Speed-bar crimped hooks
Zicral 30 mm carabiners
Dyneema® risers
10
11
12
1
Components list
2
3
4
5
6
11
12
13
14
15
16
17
Asymmetric Dyneema® risers for front reserve
GRIVEL Plume Carabiner
Toric ring
Safety lanyard
Reserve parachute pocket safety pin.
6mm square Maillons Rapides®
7mm square Maillon Rapide®
w
w
w
w
w
16
13
w
w
w
w
w
w
w
w
w
w
w
w
w
9
17
w
w
w
w
w
w
w
w
w
w
w
w
w
w
w
w
w
w
w
w
w
w
w
w
w
w
w
w
w
w
w
7
14
8
15
SUPAIR | SKYPPER2 | page 7
Page 8
Notice d’utilisation sellette | SKYPPER2
1 2
34
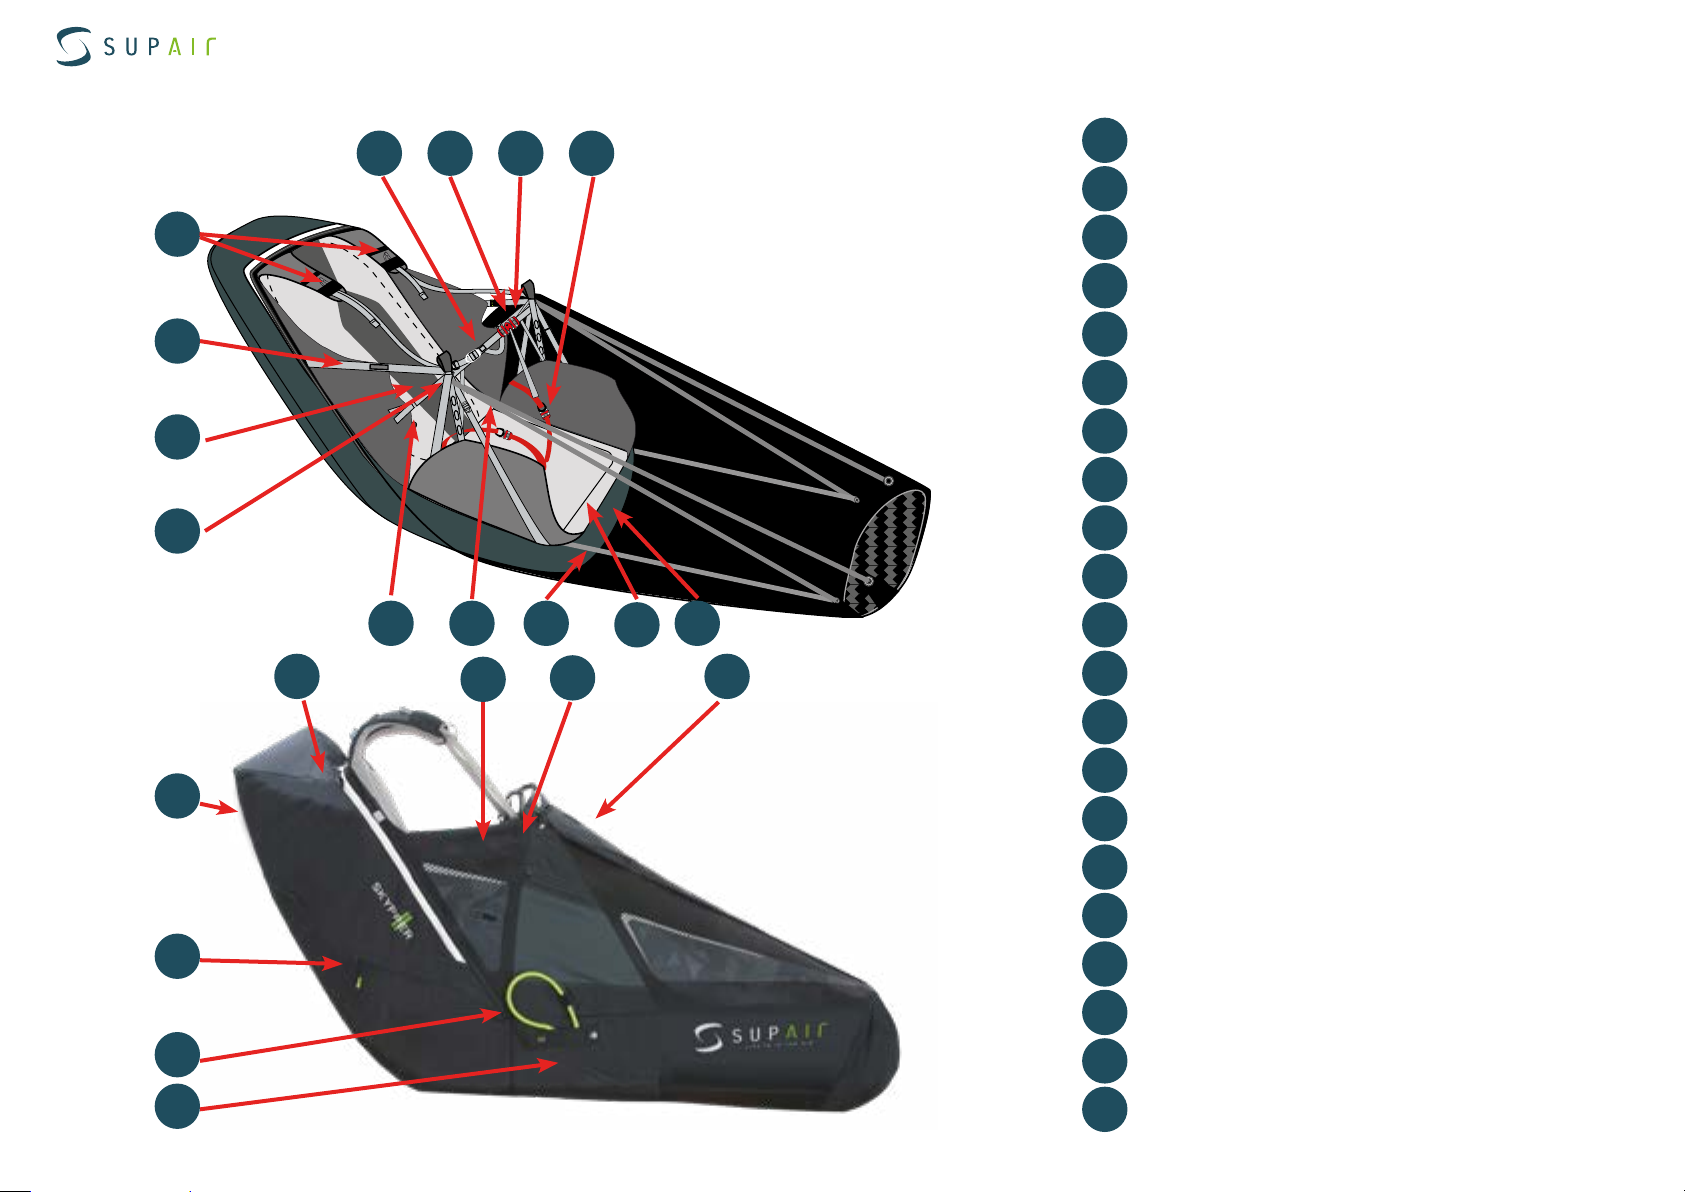
chest Buckles
1
Safe-T-Bar
2
Harness overview
7
5
6
11
18
12
8
15
Leg Buckles
3
Chest strap adjustment
4
Backrest angle adjustment
5
Lumbar adjustments
6
Shoulder strap adjustment
7
8
10
9
10
20
19
11
1617
12
13
14
15
16
17
Speedbag upper length adjustments
Speedbag lower length adjustments
9
Speedbag carbon fiber foot plate.
Speedbag closing buckles
Harken® Pulleys
Rescue parachute handle
Rescue parachute pocket
Safety kit
Instrument Cockpit and/or front mounted
reserve parachute container
Hydration tube opening.
21
13
14
18
19
20
21
Back storage pocket
Ballast
Radio pocket
Drogue-Chute
SUPAIR | SKYPPER2 | page 8
Page 9
Notice d’utilisation sellette | SKYPPER2
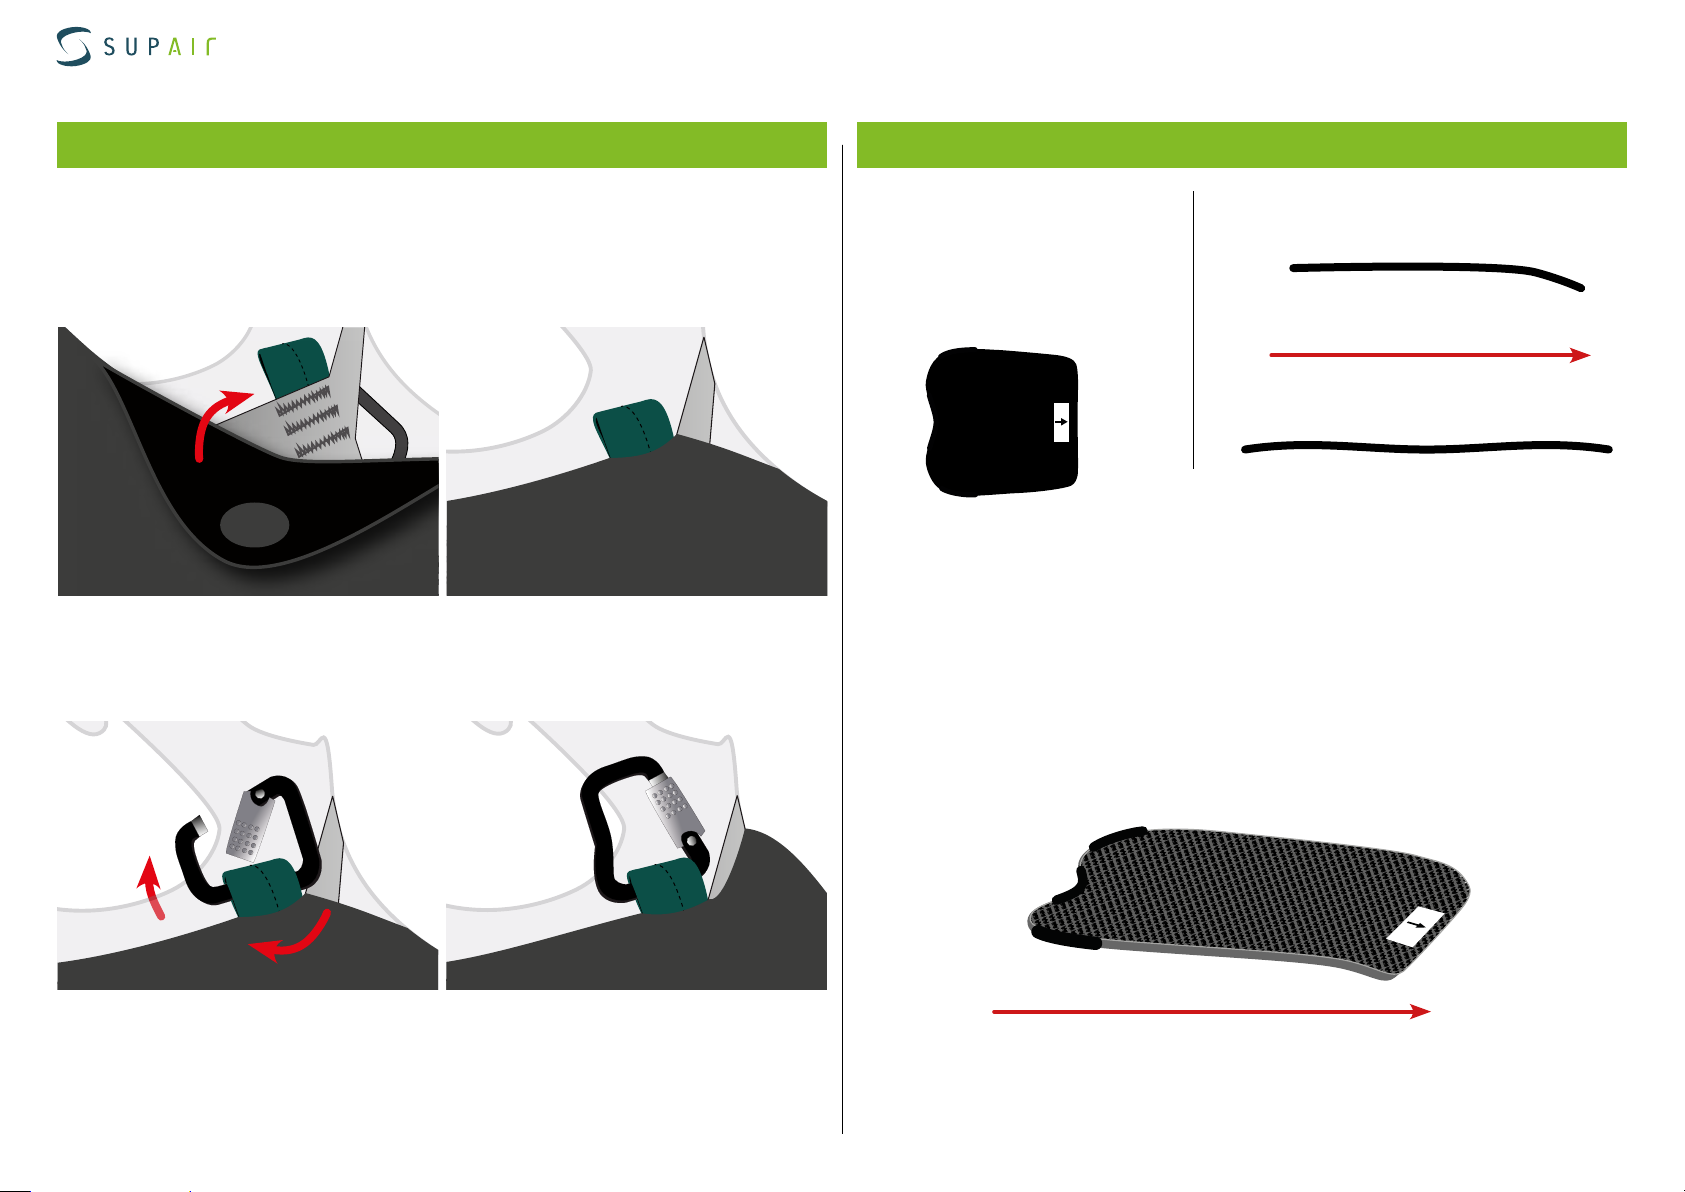
Accessories assembly
SeatplateCarabiners
Compatible carabiners:
Zicral 30 mm carabiners
Réf. : MAILCOMOUS30
Carbon fiber seatplate:
Size S and M Réf. : MPPL022
Size L Réf. : MPPL026
Size XL Réf. : MPPL027
Profile view :
Top
Bottom
Flight direction
Front view :
Installing the seatplate :
1. Open the pocket located beneath and at the front of the seat.
2. Open the velcro located at the top of the pocket and access the seat-
plate compartment.
2. Insert the seatplate in its compartment and close the velcro.
Rear
Front
Flight direction
SUPAIR | SKYPPER2 | page 9
Page 10
Notice d’utilisation sellette | SKYPPER2
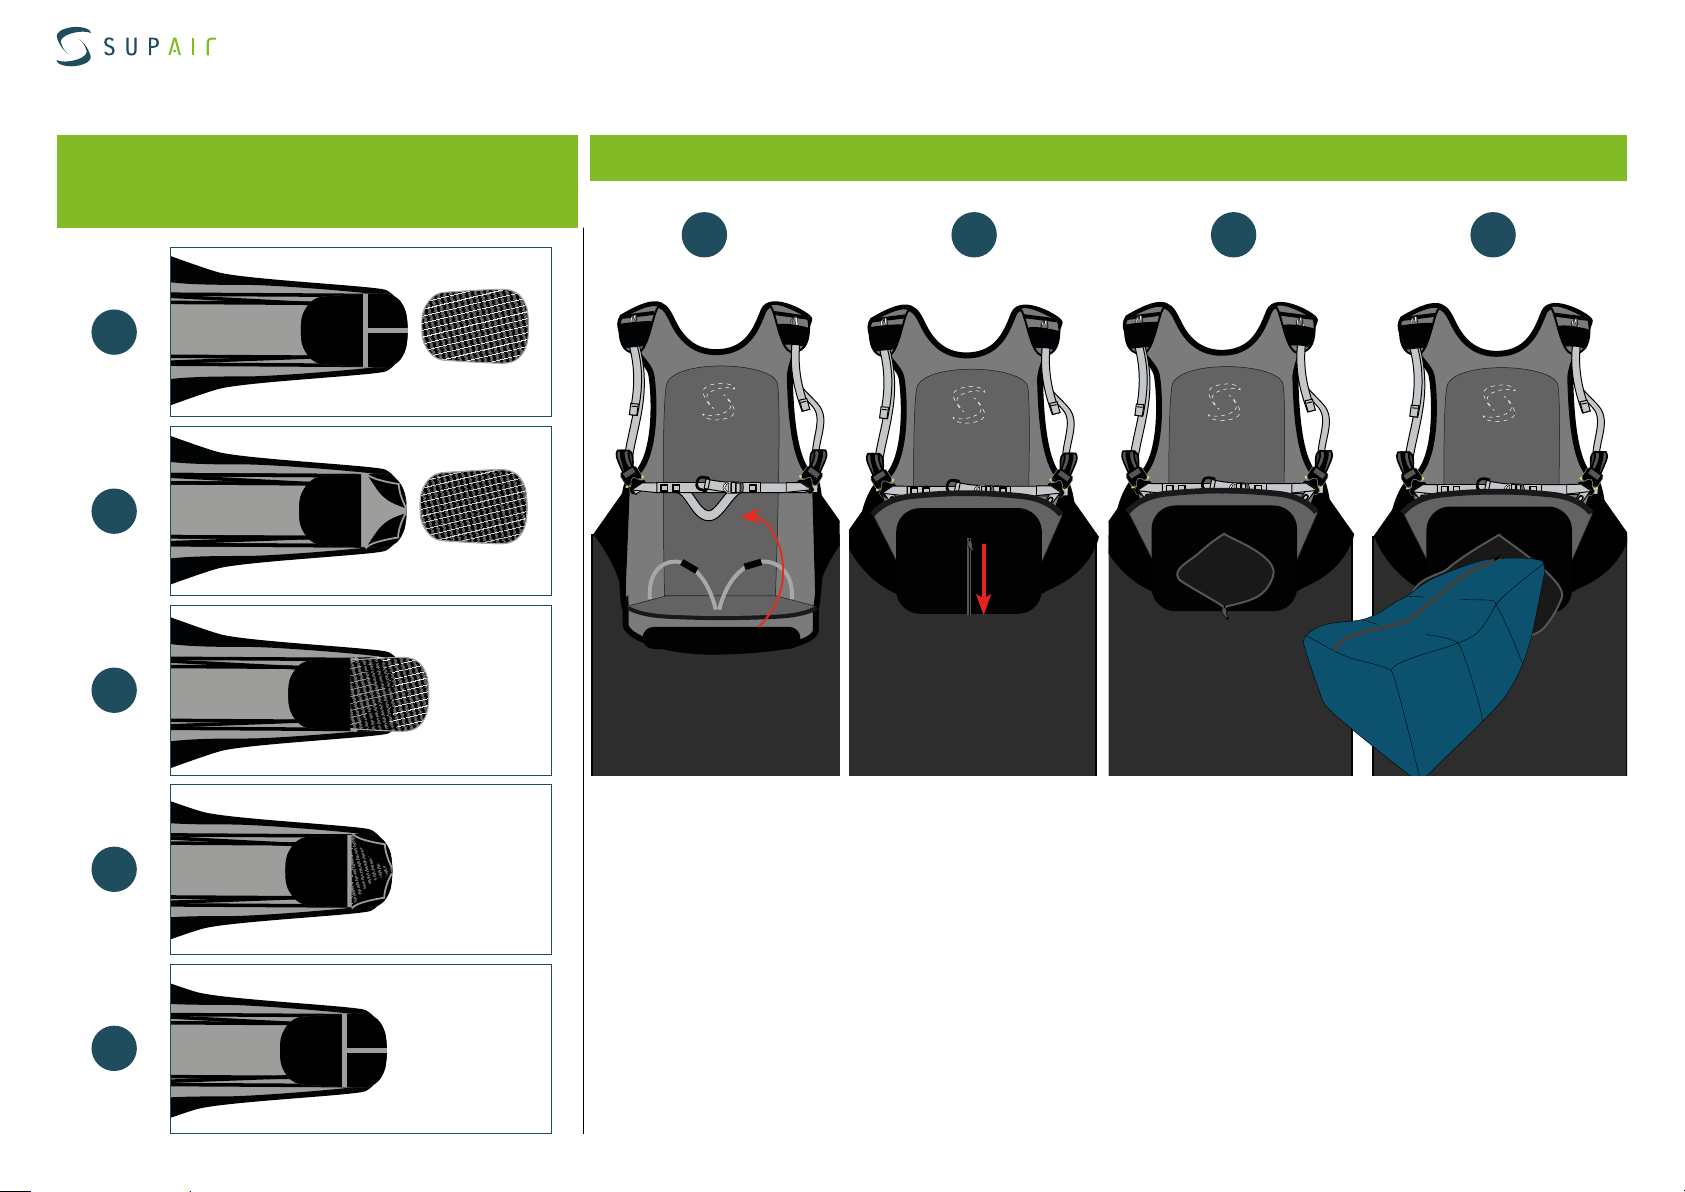
FOOT PLATE for Speedbag
1
2
Accessories assembly
BUMPAIR
1 2 3 4
zip
3
4
5
SUPAIR | SKYPPER2 | page 10
Page 11
Notice d’utilisation sellette | SKYPPER2
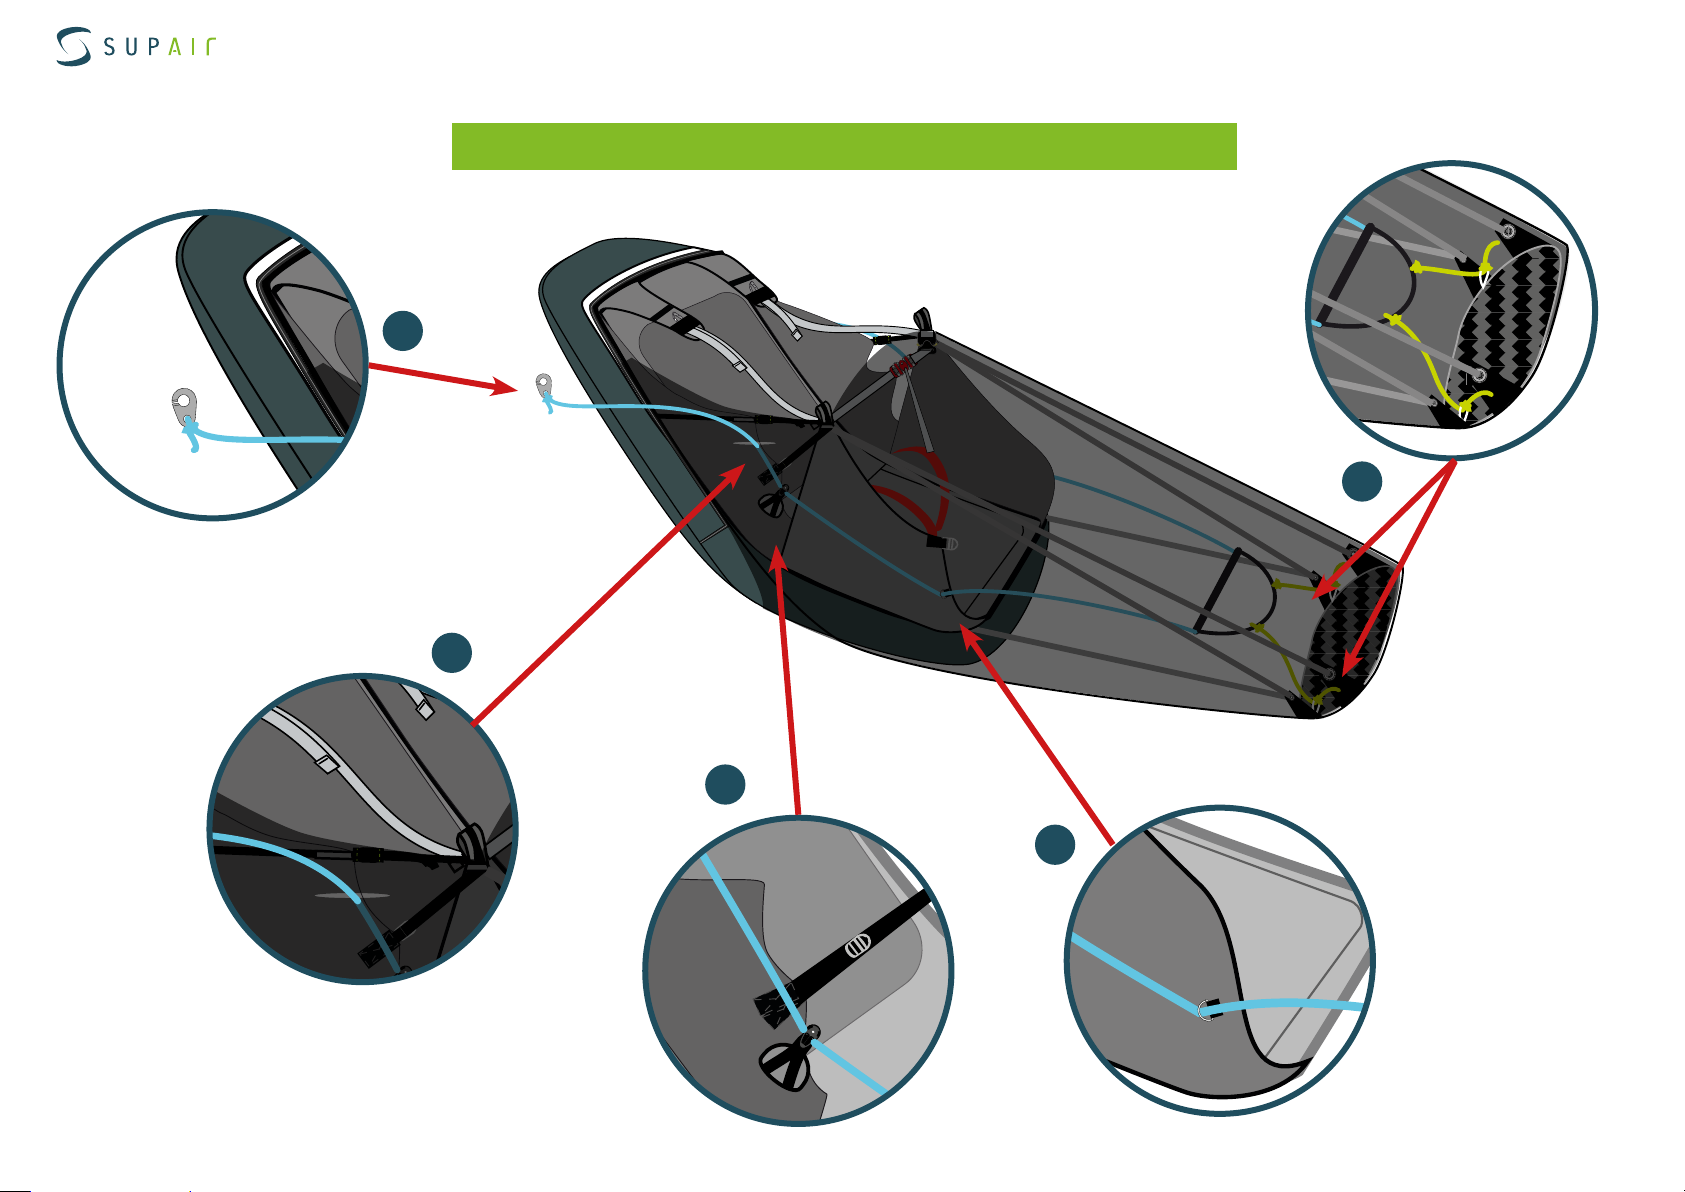
4
Accessories assembly
SPEED-BAR SYSTEM
5
3
2
1
SUPAIR | SKYPPER2 | page 11
Page 12
Notice d’utilisation sellette | SKYPPER2
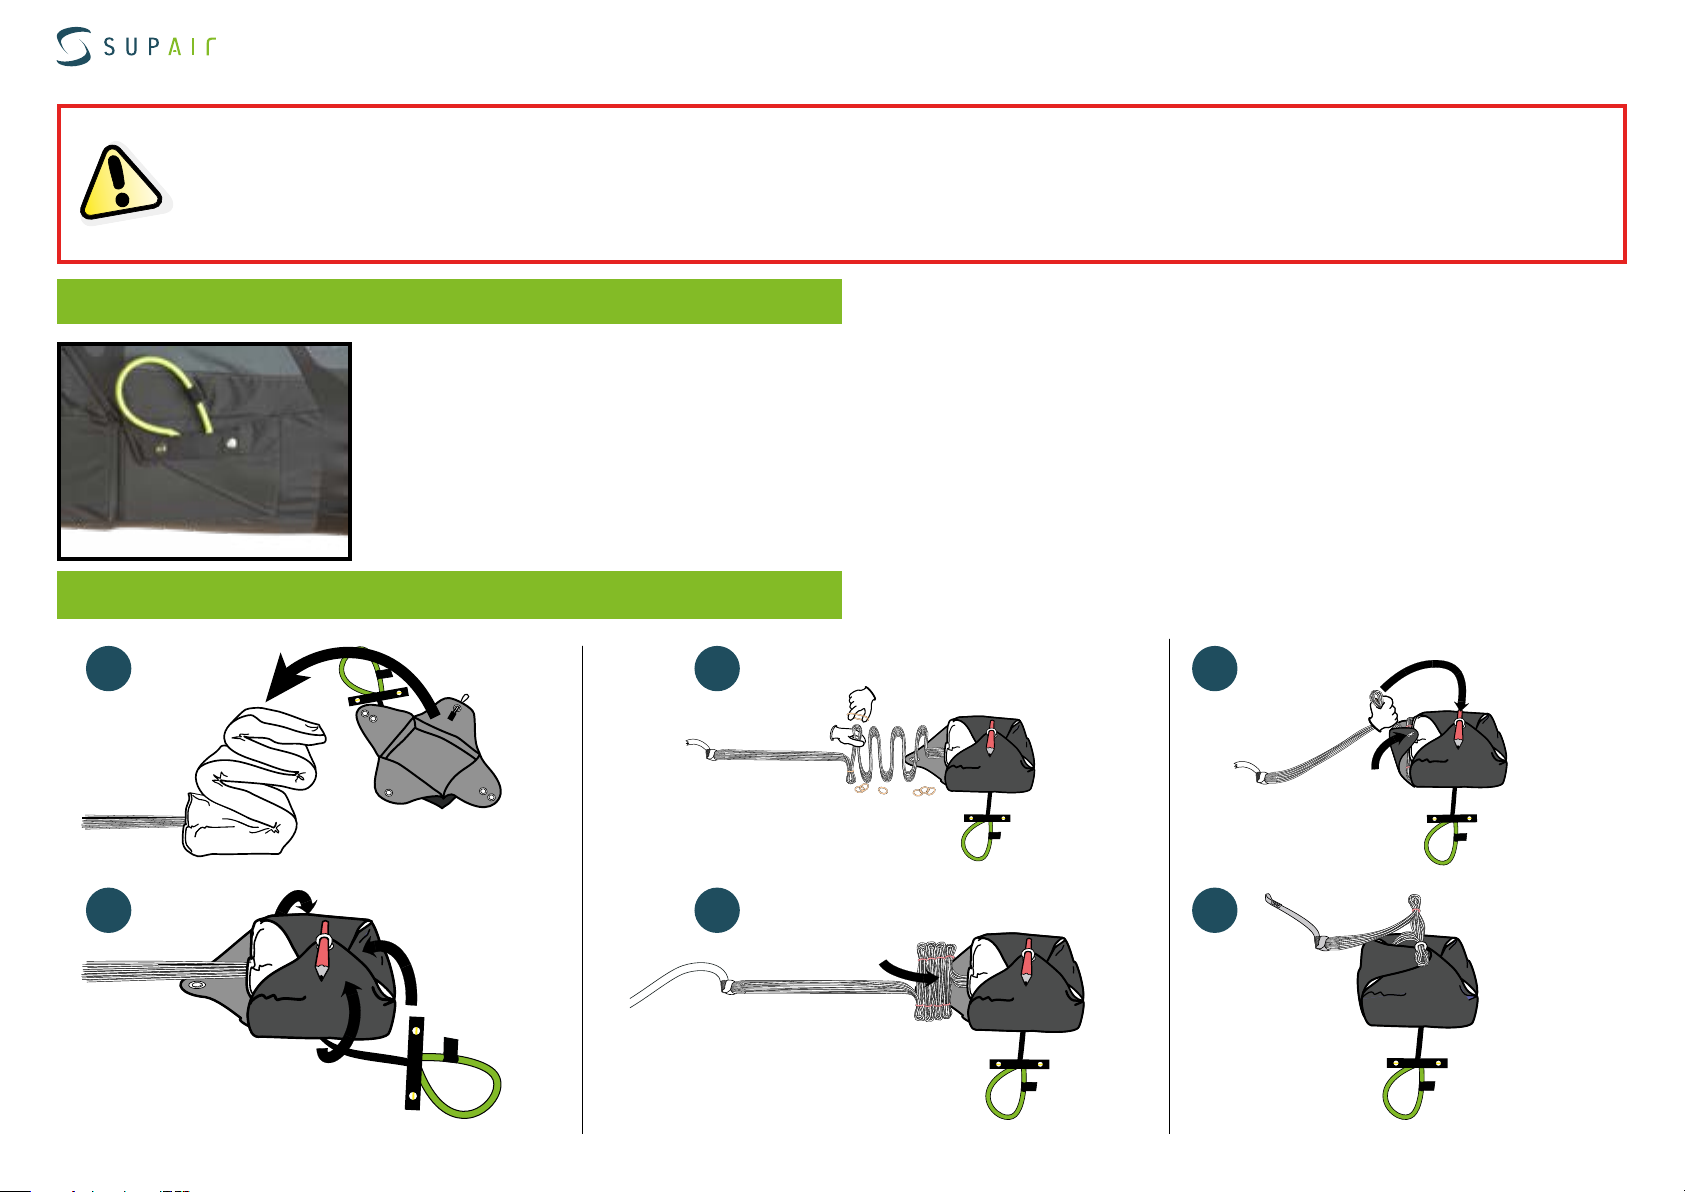
Installing the main reserve parachute
Thank you for reading carefully ! We recommend for the initial rescue parachute assembly and installation to be made by a qualified
professional.
Folding and installation of the reserve parachute inside the harness must conform to the specic line guide found in this manual.
Rescue parachute pocket characteristics
• Container closed by flaps
• Locked via a double cable system
• Right sided handle and opening
• 7 liter volume capacity
• Compatible with the SUPAIR rescue parachutes and other solo rescue parachutes
Reserve parachute installation in the POD
1
2 4
53
6
SUPAIR | SKYPPER2 | page 12
Page 13
Notice d’utilisation sellette | SKYPPER2
w
w
w
w
w
w
w
w
w
w
w
w
w
w
w
w
w
w
w
w
w
w
w
w
w
w
w
w
w
w
w
w
w
w
w
w
w
w
w
w
w
w
w
w
w
w
w
w
w
w
w
w
w
w
w
w
w
w
w
M
M
M
M
M
M
M
M
M
M
M
M
M
M
M
M
M
M
M
M
M
M
M
M
M
M
M
M
M
M
M
M
M
M
M
M
M
M
M
M
M
M
M
M
M
M
M
M
M
M
M
M
M
w
w
w
w
w
w
w
w
w
w
w
w
w
w
w
w
w
w
w
w
w
w
w
w
w
w
w
w
M
M
M
M
M
M
M
M
M
M
M
M
M
M
M
M
M
M
M
M
M
M
M
M
M
M
w
w
w
w
w
w
w
w
w
w
w
w
w
w
w
w
w
w
w
w
w
w
w
w
w
w
w
w
w
w
w
w
w
w
w
M
M
M
M
M
M
M
M
M
M
M
M
M
M
M
M
M
M
M
M
M
M
M
M
M
M
M
M
M
M
M
M
M
Installing the main reserve parachute
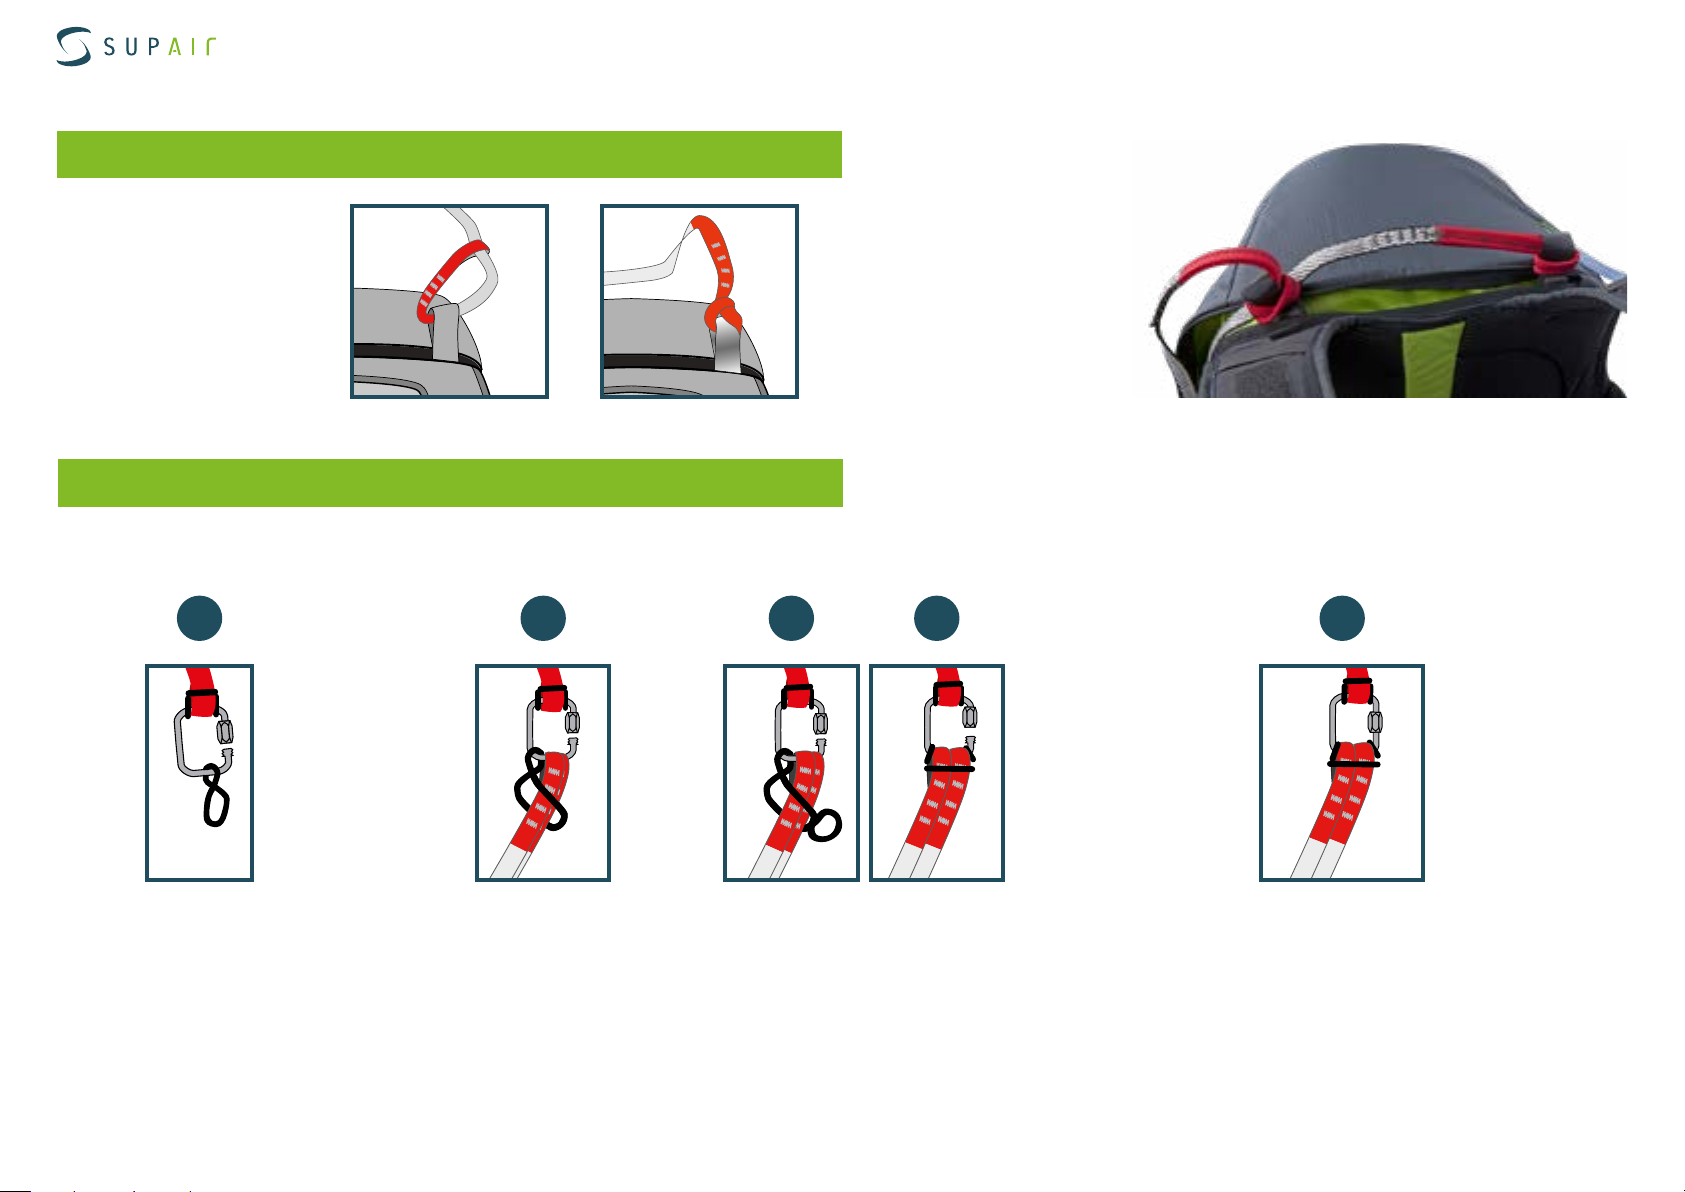
Connecting parachute risers & harness
Connecting the reserve
parachute risers to the
harness
Connecting parachute & risers
One maillon Rapide® 7mm and two toric flexible rings are needed
1
2 4 53
- Assemble everything cor-
rectly.
- Make sure for the risers
not to be longer than one
another.
- Tighten each connection
securely.
- Open the 7mm square
Maillon Rapide
- Connect the bridle’s loop
to the Maillon Rapide®
- Push the maillon through
the plastic ring
- Twist
- Push the end risers
through the toric ring
- Push the maillon through
the risers buckles
- Give a second twist to
the plastic ring
- Push the buckle through
the maillon
- Tidy up the assembly
- Be certain for the riser end loops to be securely
fastened
- Close the Maillon Rapides® by hand first
- Tighten it using pliers by making a clockwise 1/4
turn
SUPAIR | SKYPPER2 | page 13
Page 14
Notice d’utilisation sellette | SKYPPER2
w
w
w
w
w
w
w
w
w
w
w
w
w
w
w
w
w
w
w
w
w
w
w
w
w
w
w
w
w
w
w
w
w
w
w
w
w
w
w
w
w
w
w
w
w
w
w
w
w
w
w
w
w
w
w
w
w
w
w
w
w
w
w
w
w
w
w
w
w
w
w
w
w
w
w
w
w
w
w
w
w
w
w
w
w
w
w
w
w
w
w
w
w
w
w
w
w
w
w
w
w
w
w
w
w
w
w
w
w
w
w
w
w
w
w
w
w
w
w
w
w
w
w
w
w
w
w
w
w
w
w
w
w
w
w
w
w
w
w
w
w
w
w
w
w
w
w
w
w
w
w
w
w
w
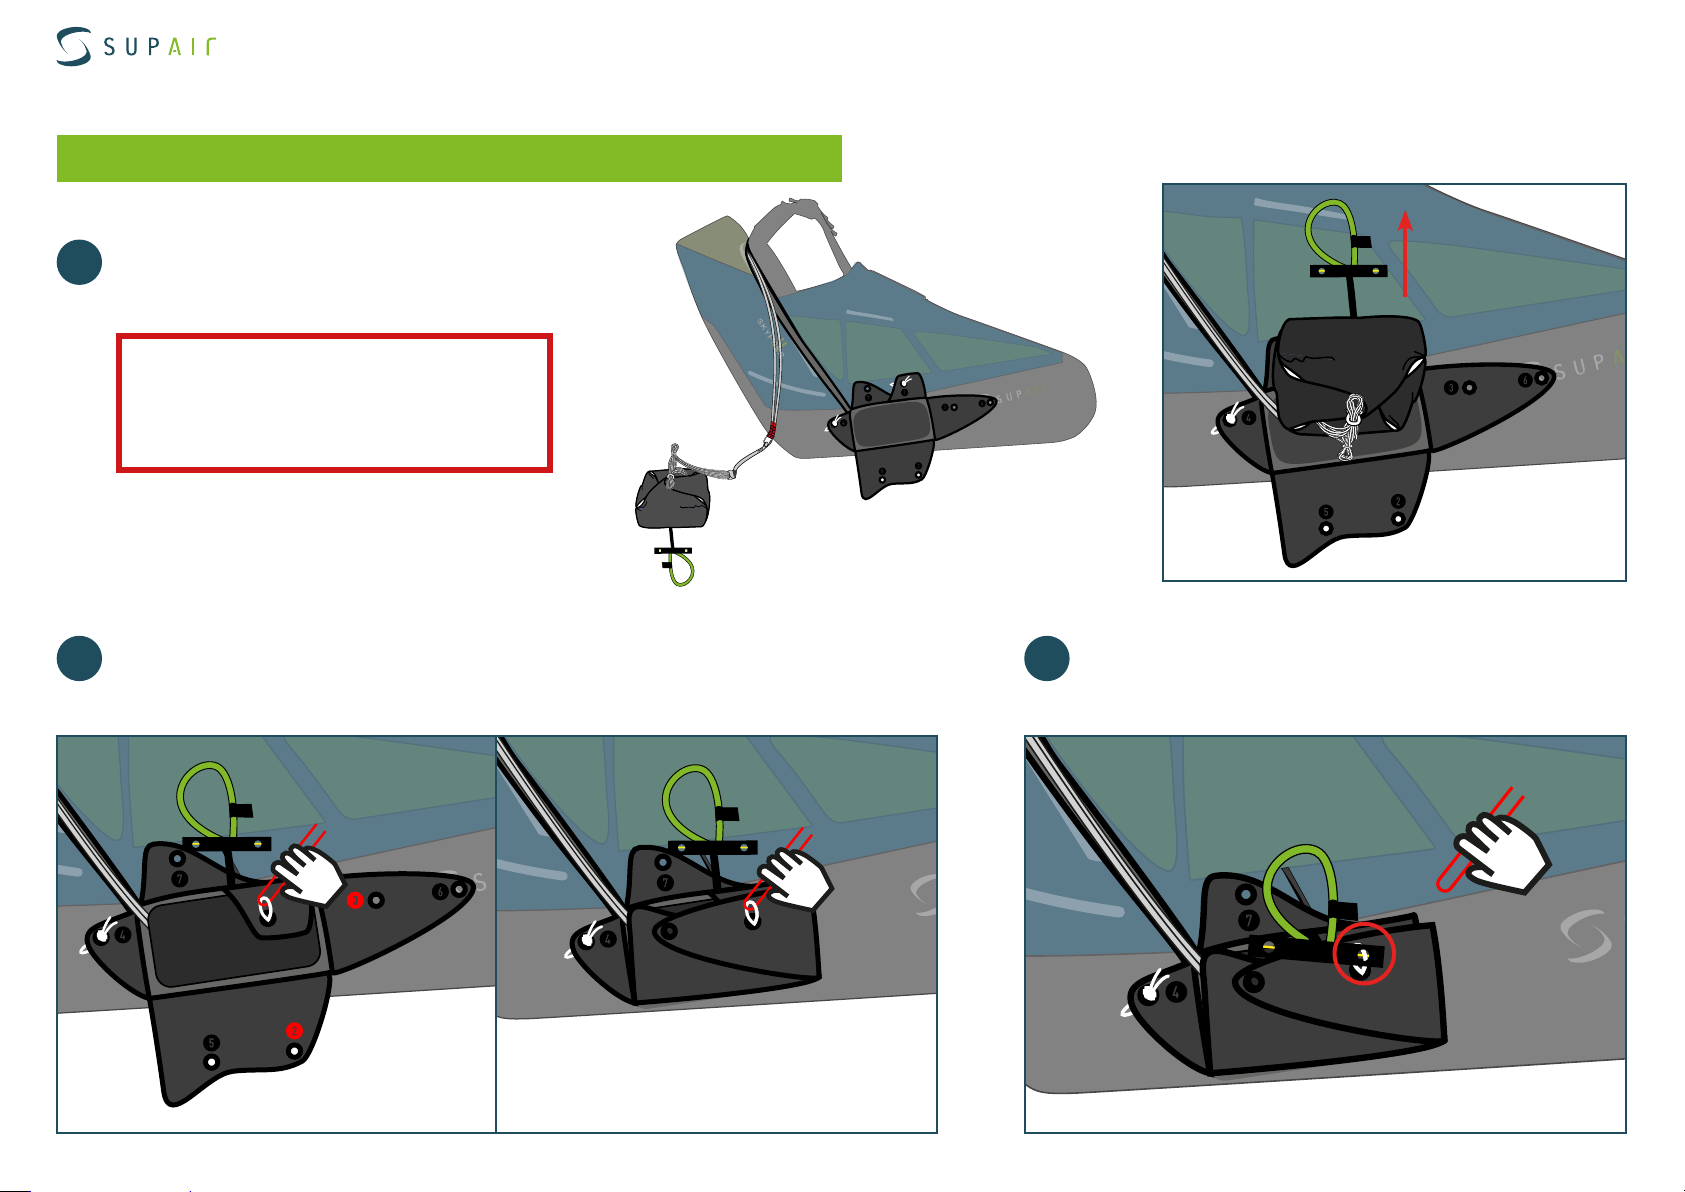
Rescue parachute assembly
Installing the main reserve parachute
Poignée vers
le haut
Place the excess lines and then the
1
reserve parachute in the reserve parachute containe.
WARNING!
The pod must be positioned with the
w
w
w
w
w
w
w
w
w
w
w
w
w
w
w
w
w
w
w
w
w
w
w
w
w
w
w
w
w
w
w
w
w
w
w
w
w
w
w
w
w
w
w
w
w
w
w
w
w
w
w
w
w
w
w
w
w
handle exiting at the top
Push the reserve parachute to the end of
the reserve parachute pocket.
Take the safety pin
2
With the help of a small cord, pull loop #1 through grommets #2 and #3
w
w
w
w
w
w
w
w
w
w
w
w
w
w
w
w
w
w
w
w
w
w
w
w
w
w
w
w
w
w
w
w
w
w
w
w
w
w
w
w
w
w
w
w
w
w
w
w
7
w
w
w
w
w
w
w
w
w
w
w
w
w
4
5
1
2
3
6
w
w
w
w
w
w
w
w
w
w
w
w
w
w
w
w
w
w
w
w
w
w
w
w
w
w
w
w
w
w
7
w
w
w
w
w
w
w
w
w
w
w
w
w
w
w
4
Push the yellow right plastic pin through the loop
3
to fasten and secure the assembly. Remove the pin.
w
w
w
w
w
w
w
w
w
w
w
w
w
w
w
w
w
w
w
w
w
w
w
w
w
w
w
w
w
w
w
w
w
w
w
w
w
w
w
w
w
w
w
w
w
w
w
w
w
w
7
w
w
w
w
w
w
w
w
w
w
w
w
w
w
w
w
4
SUPAIR | SKYPPER2 | page 14
Page 15
Notice d’utilisation sellette | SKYPPER2
w
w
w
w
w
w
w
w
w
w
w
w
w
w
w
w
w
w
w
w
w
Installing the main reserve parachute
Using the cord, pull loop #4 through
4
grommets #5,6 and 7
w
w
w
w
w
w
w
w
w
w
w
w
w
w
w
w
w
w
w
w
w
w
w
w
w
w
w
w
w
w
w
w
w
w
w
w
w
w
w
w
w
w
w
w
w
w
w
w
w
Close the risers zipper sleeve by
7
pulling the tab to the end then back
7
w
w
w
w
w
w
w
w
w
w
w
w
w
w
w
to the beginning
Push the yellow left plastic pin
5
through loop #4 to fasten ans secure
the assembly
Remove the pin
Tuck away the two yellow plastic pins
inside their respective housing
w
w
w
w
w
w
w
w
w
w
w
w
w
w
w
w
w
w
w
w
w
w
w
w
w
w
w
w
w
w
w
w
w
w
w
w
w
w
w
w
Mandatory extraction test procedure
Fasten the handle using the Velcro
6
inside the upper small pocket
w
w
w
w
w
w
w
w
w
w
w
w
w
w
w
w
w
w
w
w
w
w
w
Check the completed installation during a
w
w
w
w
w
w
w
w
w
w
w
w
w
w
w
w
w
w
w
w
w
w
w
w
w
w
w
w
w
w
w
w
w
w
w
w
w
w
w
w
w
w
w
w
w
w
w
w
w
w
w
w
w
w
w
w
w
w
w
w
w
w
w
w
w
w
w
w
w
w
w
w
w
w
w
w
w
w
w
w
w
w
w
w
w
Have the installation checked by a professional outfit.
Conduct an extraction test every six ( 6 ) months to assure proper system
functionality
Note:
Conducting and extraction test does not imply deploying the reserve parachutewhich will stay inside its POD.
Hang-test.
SUPAIR | SKYPPER2 | page 15
Page 16
Notice d’utilisation sellette | SKYPPER2
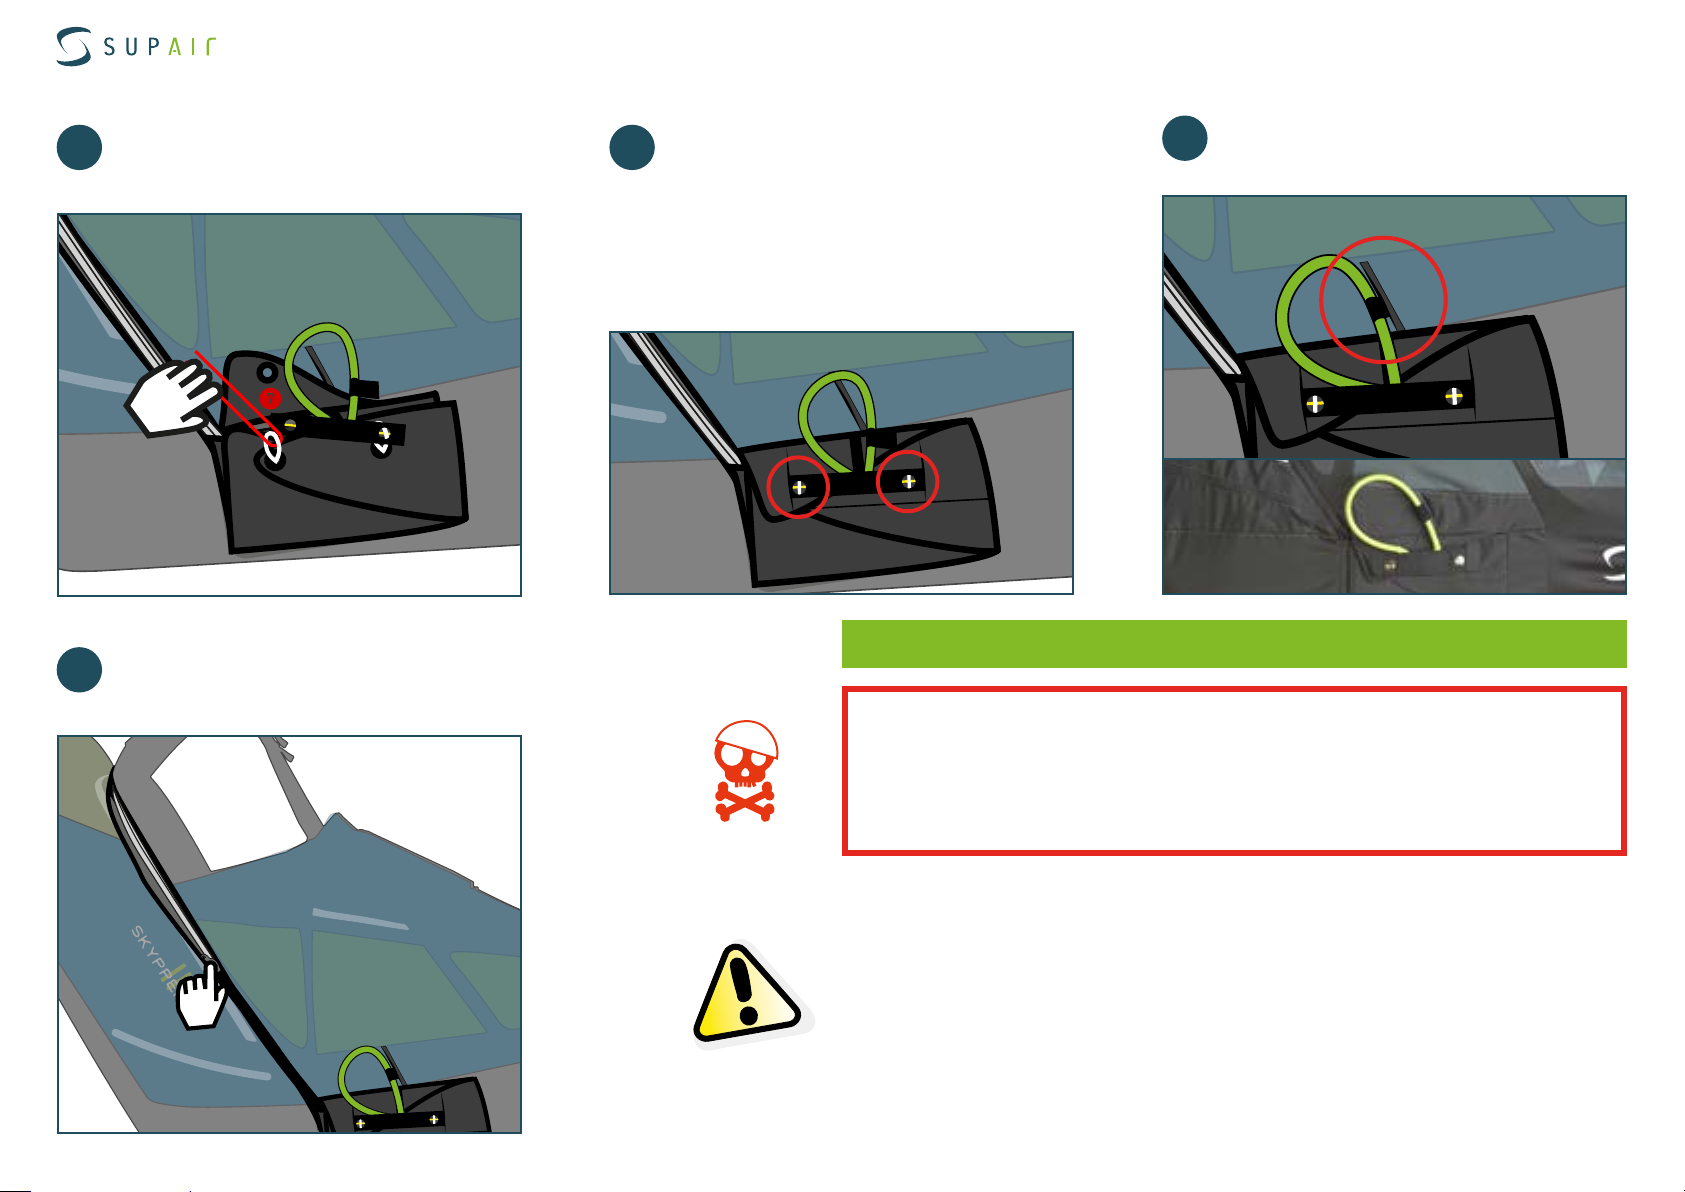
Installing the right connection point
Open the connection point
1
Installing the front reserve parachute
Bring both the connection
3
point and the carabiner
main connection point out
of the cocoon
2
Push the loop through the ring
located beneath the main location between the two straps
Do not connect the
main self-locking ca-
rabiners to this junc-
tion point
SUPAIR | SKYPPER2 | page 16
Page 17
Notice d’utilisation sellette | SKYPPER2
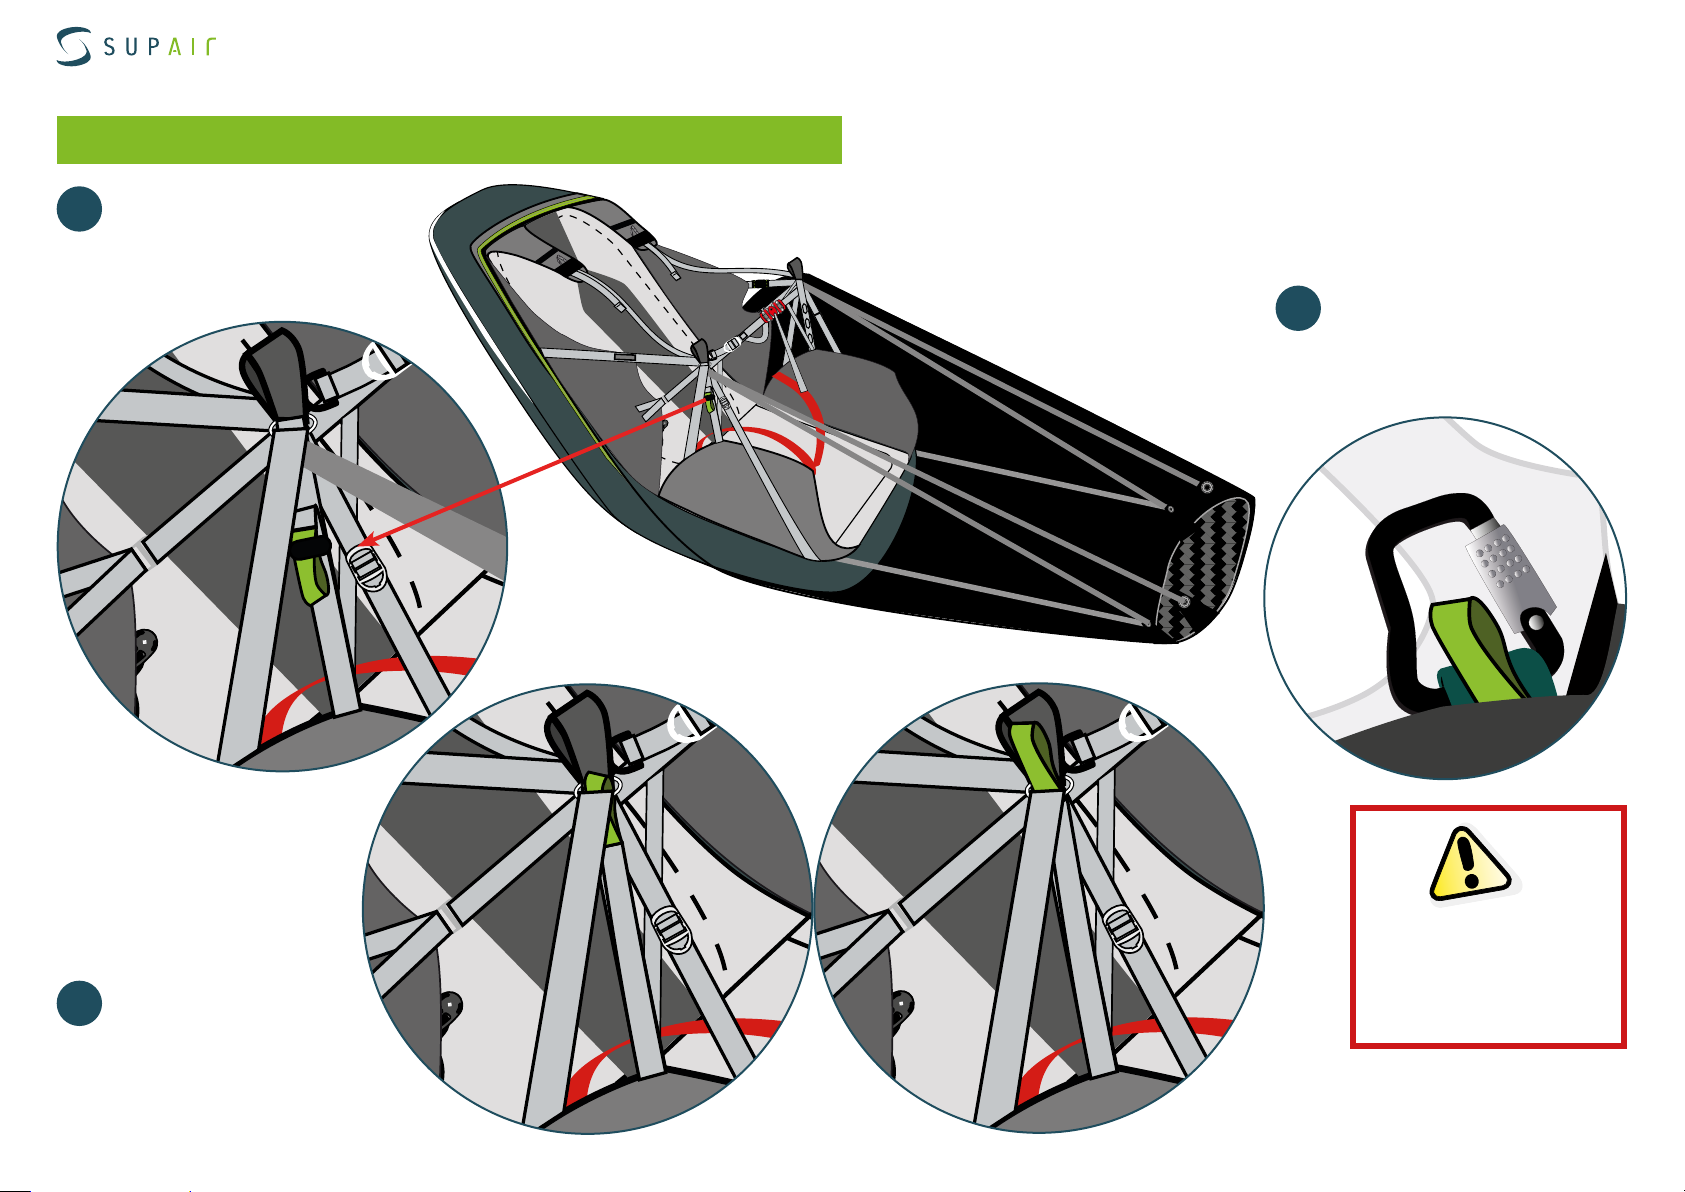
Installing the front reserve parachute
Installing the left riser attachment point
Look for the green left at-
1
tachment point which must
run though the metal ring
4
Pull the riser with
the main carabiner
connection through the
cocoon opening slot
3
Push the riser through the
upper metal ring where
the main connection point
is located, between the
two straps
2
Connect the left riser, green
buckle side, with a larks head
knot.
SUPAIR | SKYPPER2 | page 17
Page 18
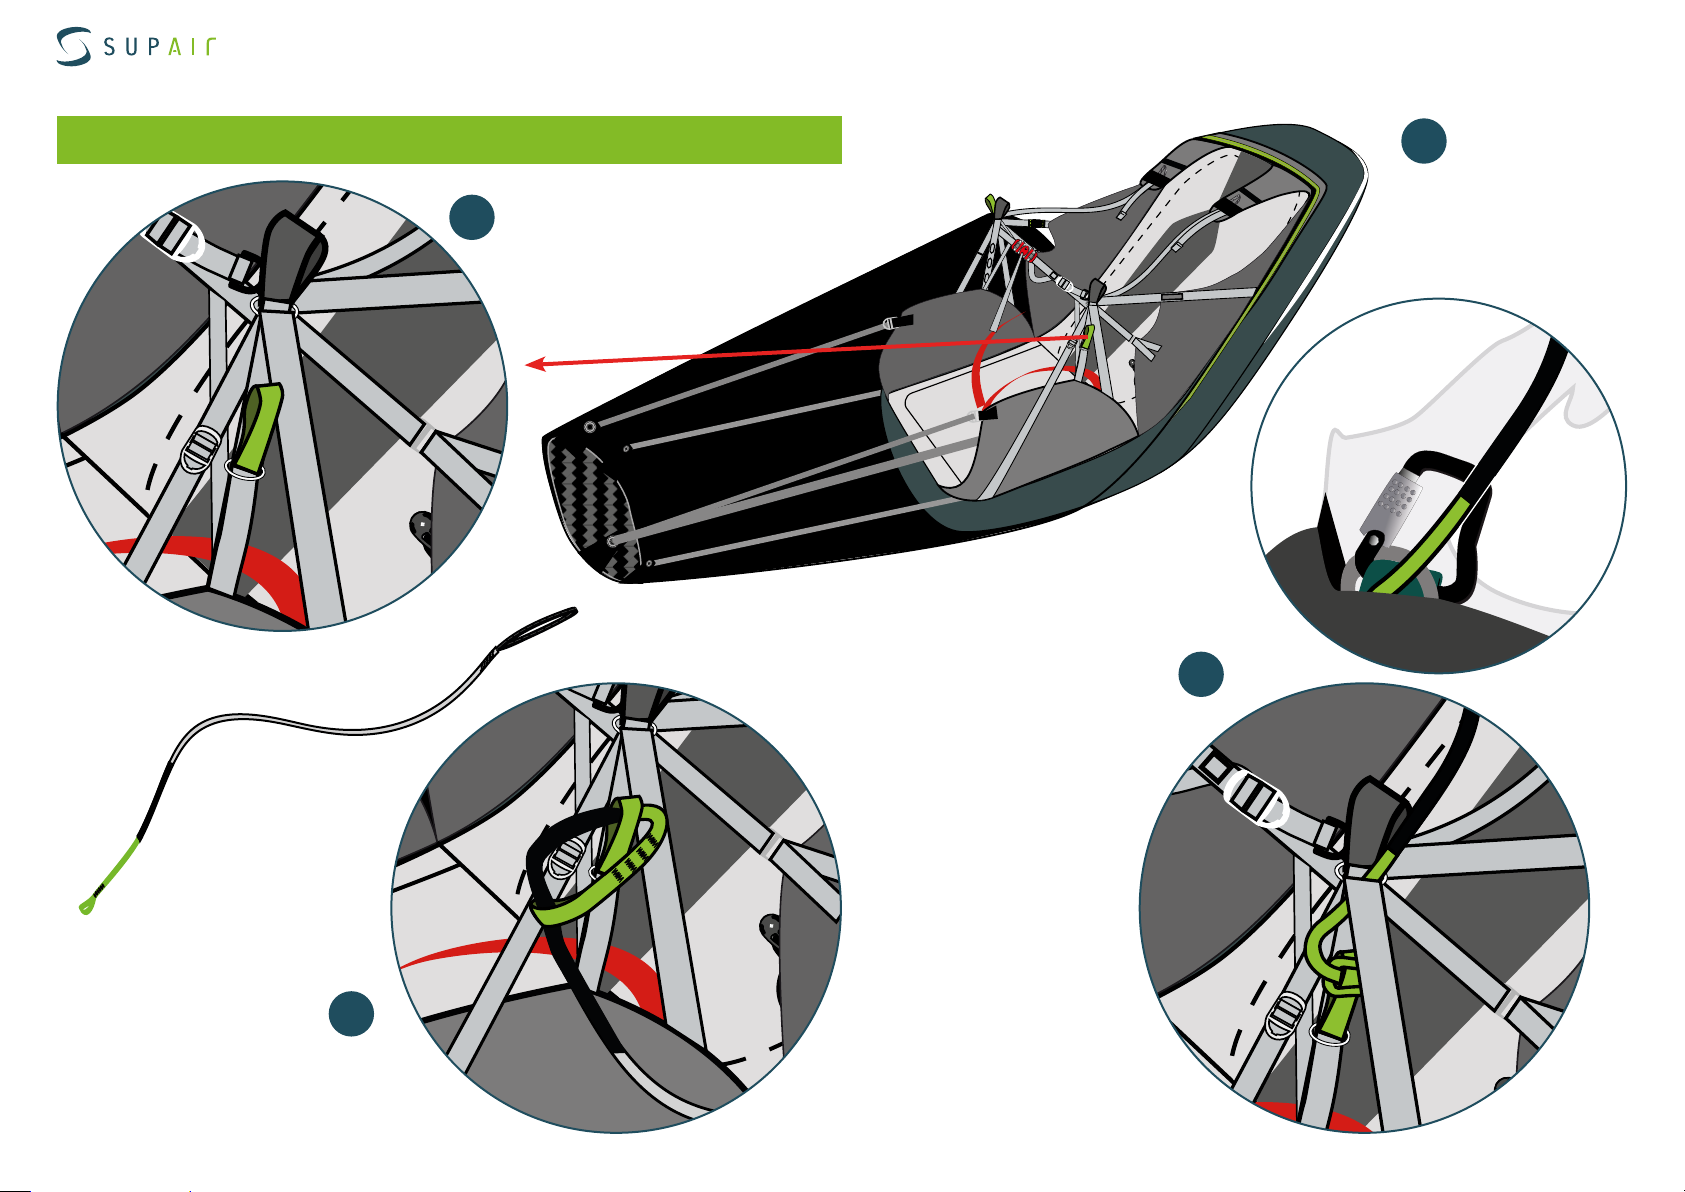
Notice d’utilisation sellette | SKYPPER2
w
w
w
w
w
w
w
w
w
w
w
w
w
w
w
w
w
w
w
w
w
w
w
w
w
w
w
w
w
w
w
w
w
w
w
w
w
w
w
w
w
w
w
w
w
w
w
Installing the front container
Installing the front reserve parachute
Disconnect the cockpit by opening the
1 2 3
zip on each side of it
Unfasten the velcro
w
w
w
w
w
w
w
w
w
w
w
w
w
w
w
w
w
w
w
w
w
w
w
w
w
w
w
w
w
w
w
w
w
w
w
w
w
w
w
w
w
w
w
w
w
w
w
w
w
w
w
w
w
w
w
w
w
w
w
w
w
w
w
w
w
w
w
w
w
w
w
w
w
w
w
w
w
w
w
w
w
w
w
w
w
w
w
w
w
w
w
w
w
w
w
w
w
w
w
w
w
w
w
w
w
w
w
w
w
w
w
w
w
w
w
w
w
w
w
w
w
w
w
w
w
w
w
w
w
w
w
w
w
w
w
w
w
w
w
w
w
Duplicate steps 1 and 2 in reverse to
install the front reserve parachute
pocket
w
w
w
w
w
w
w
w
w
w
w
w
w
w
w
w
w
w
w
w
w
w
w
w
w
w
w
w
w
w
w
w
w
w
w
w
w
w
w
w
w
w
w
w
w
w
w
w
w
w
w
w
w
w
w
w
w
w
w
w
w
w
w
w
w
w
w
w
w
w
w
w
w
w
w
w
w
w
w
w
w
w
w
w
w
w
w
w
w
w
w
w
w
w
SUPAIR | SKYPPER2 | page 18
Page 19
Notice d’utilisation sellette | SKYPPER2
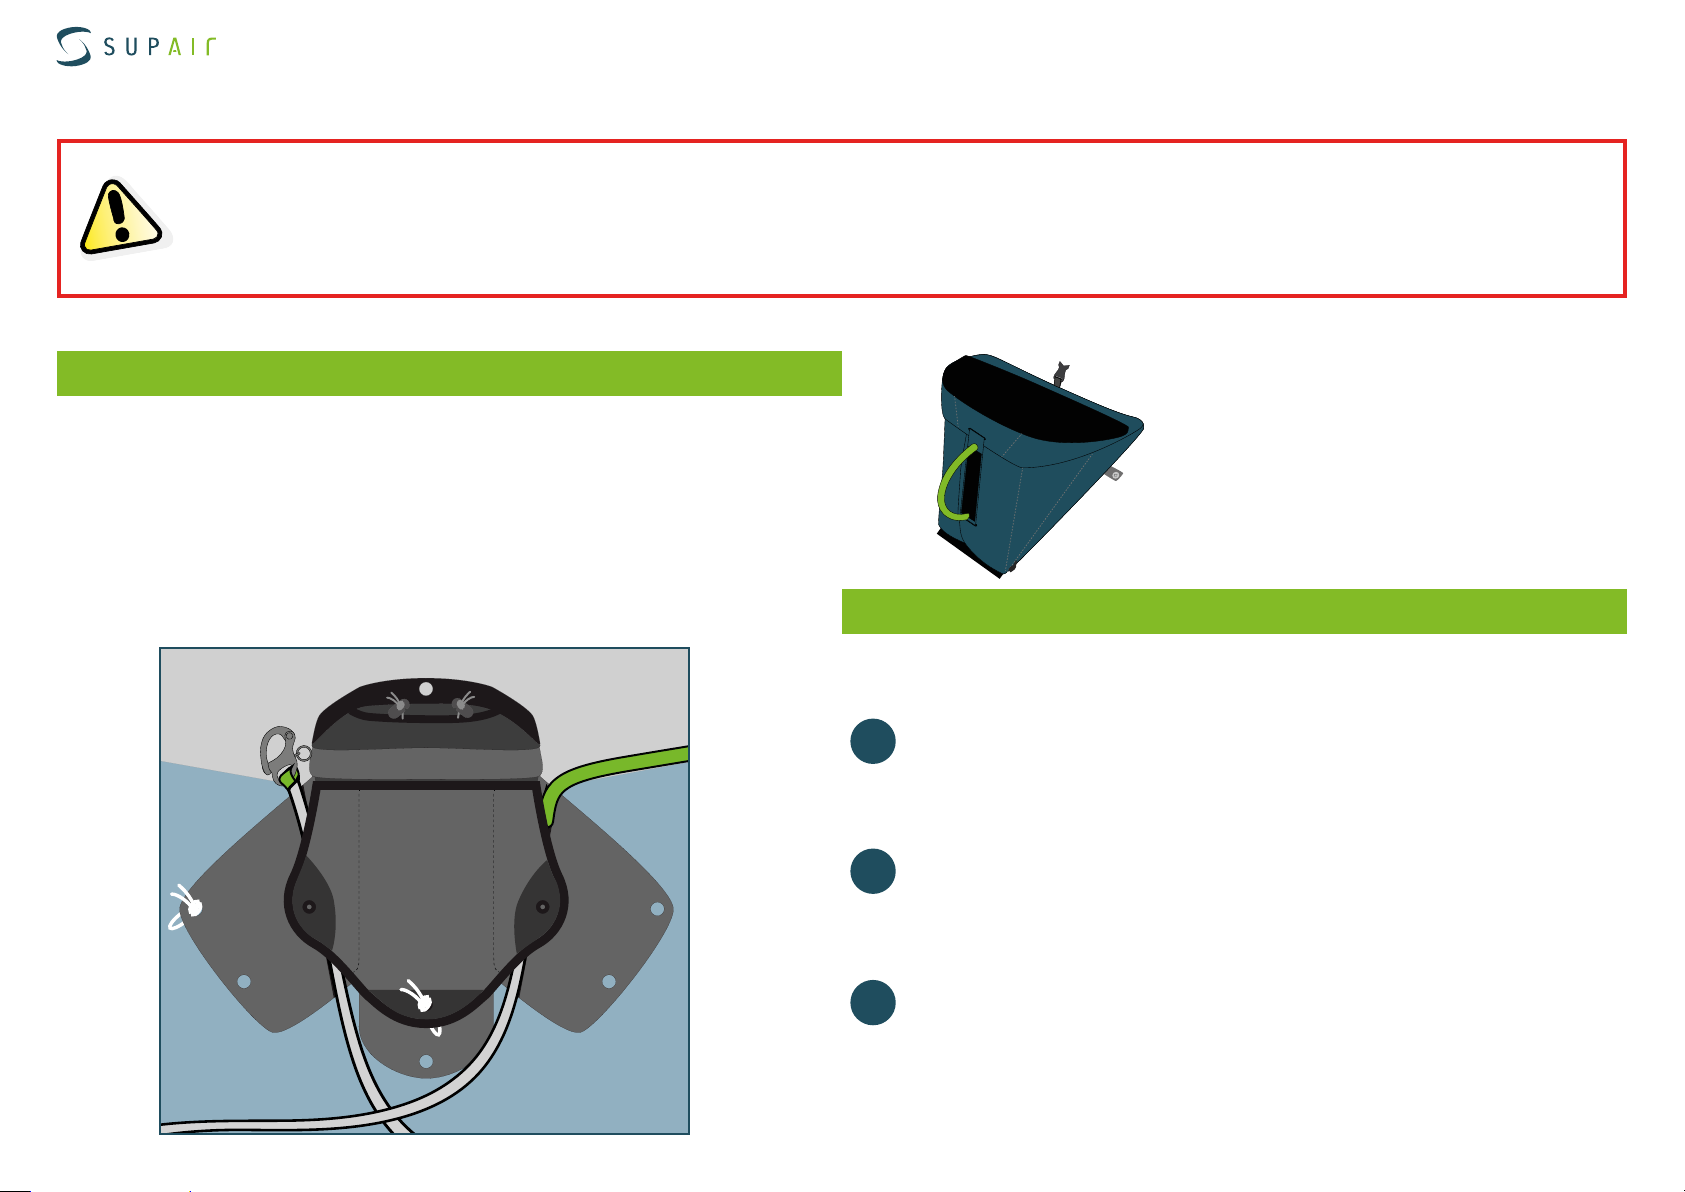
Installing the front reserve parachute
Thank you for reading carefully ! We recommend for the initial rescue parachute assembly and installation to be made by a qualified
professional.
Folding and installation of the reserve parachute inside the harness must conform to the specic line guide found in this manual.
Rescue front container characteristics
• Front container with flaps
• Locked via a double cable system.
• Right sided handle and opening.
• 7 liter volume capacity.
• Compatible with the SUPAIR rescue parachutes and other solo rescue
parachutes.
w
w
w
w
w
w
w
w
w
w
w
w
w
w
w
w
w
w
w
w
w
w
w
w
w
w
w
w
w
w
w
w
w
w
w
w
w
w
w
w
w
w
w
w
w
w
w
w
w
Connecting the reserve parachute
9
7
2 3
5 6
1
4
Connect the reserve parachute
1
pod to the handle with a lark’s
head knot
Connect the reserve parachute
to the asymmetrical risers fol-
2
8
lowing the instructions on page
13
Affix the other risers end to the
3
Velcro® strips on each side of
the container.
SUPAIR | SKYPPER2 | page 19
Page 20
Notice d’utilisation sellette | SKYPPER2
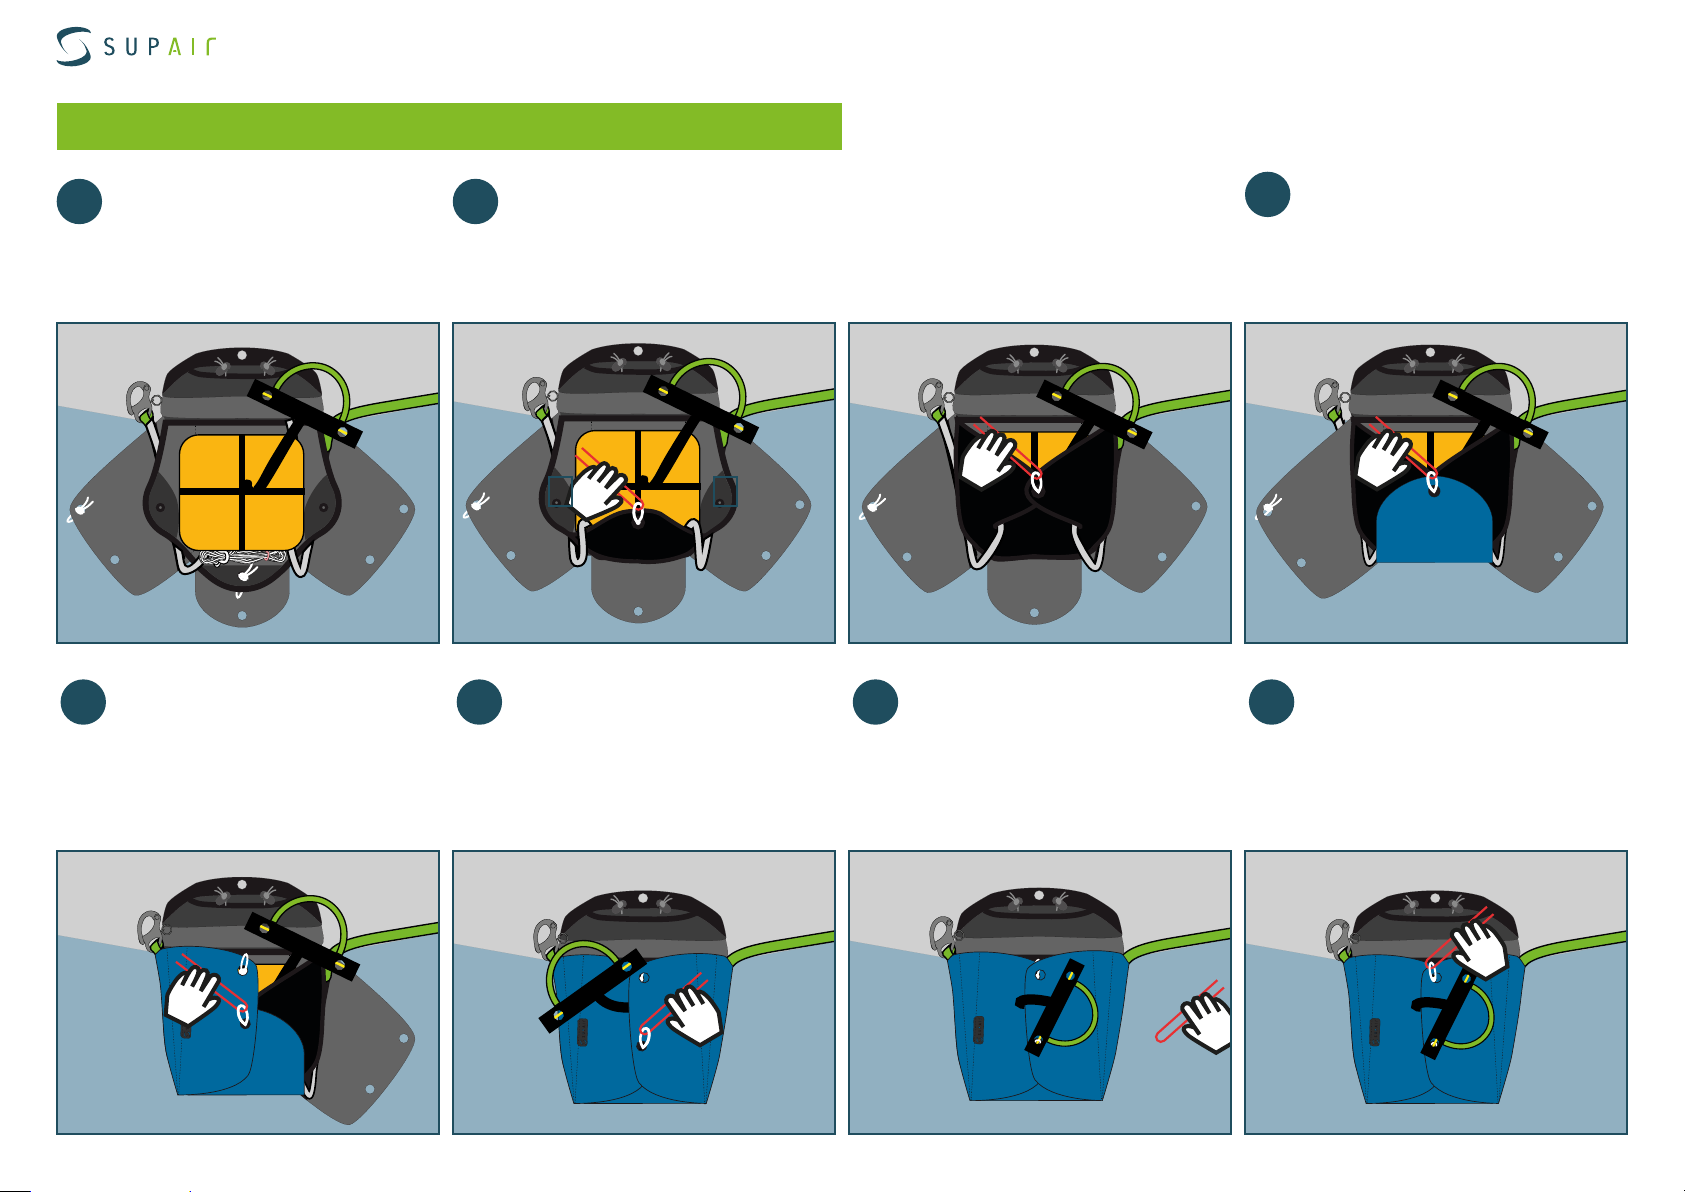
Installing the front parachute container
Placing the front reserve parachute
Place the line excess first
1 2
followed by the reserve parachute inside the reserve
parachute container
… then through grommet #5 … then through grommet #6 Push the yellow left plastic
4 7
Take the pin
Using the pin, pull cord loop #1 through grommets #2 and #7
2
1
3
4
5 6
pin through loop #4 to fasten
and secure the assembly.
Remove the pin.
… then through grommet #4
3
5 6
Take the pin
Using the pin, pull loop #7
through grommet #8
9
8
7
SUPAIR | SKYPPER2 | page 20
Page 21
Notice d’utilisation sellette | SKYPPER2
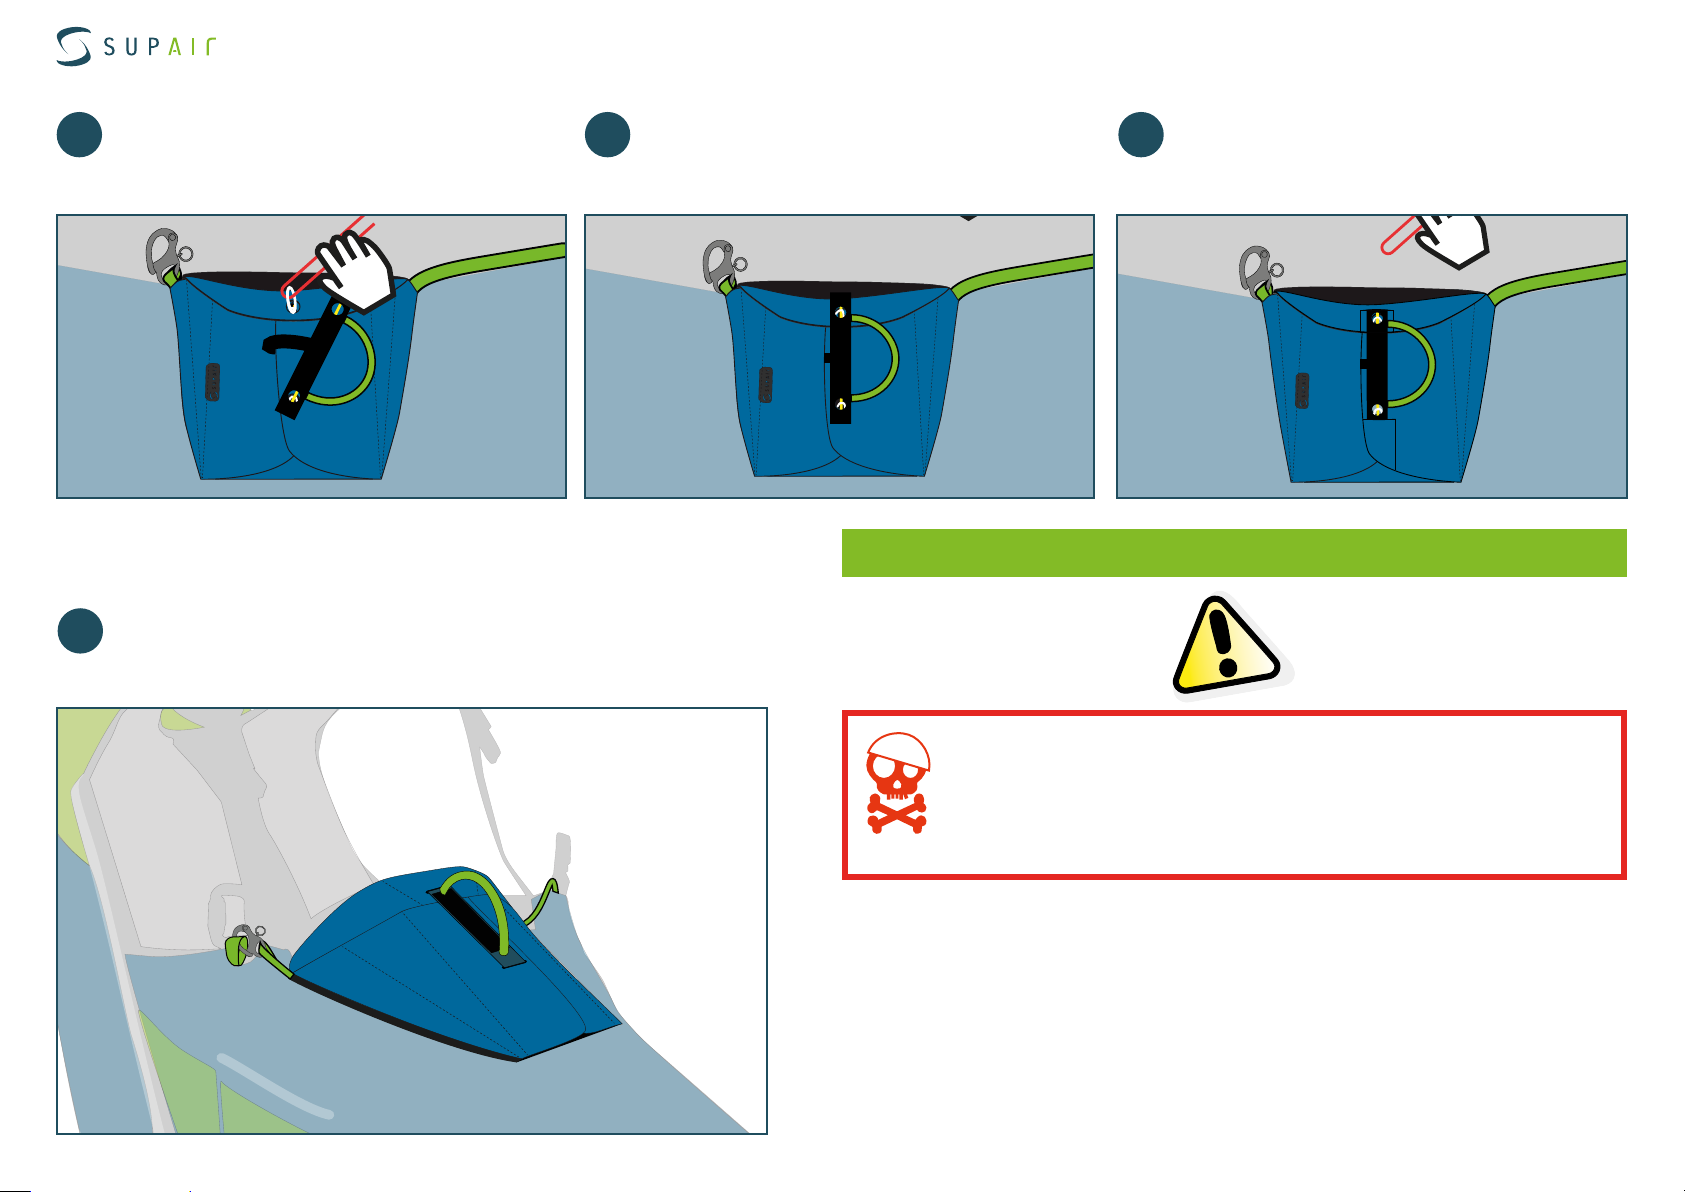
Installing the front reserve parachute
… then through grommet #9 Push the right yellow handle pin through
8
9
loop #7 to fasten and secure the assembly
Mandatory extraction test procedure
Once fastened to te harness, close the cocoon clip, then connect the
11
Whichard connector to the right reserve parachute attachment point
Tuck away the two yellow plastic pins
10
inside their respective housing
Check the completed installation
during a Hang-test.
Have the installation checked by a professional outfit.
Conduct an extraction test every six ( 6 ) months to assure proper system
functionality.
Note:
Conducting and extraction test does not imply deploying the reserve parachutewhich will stay inside its POD.
SUPAIR | SKYPPER2 | page 21
Page 22
Notice d’utilisation sellette | SKYPPER2
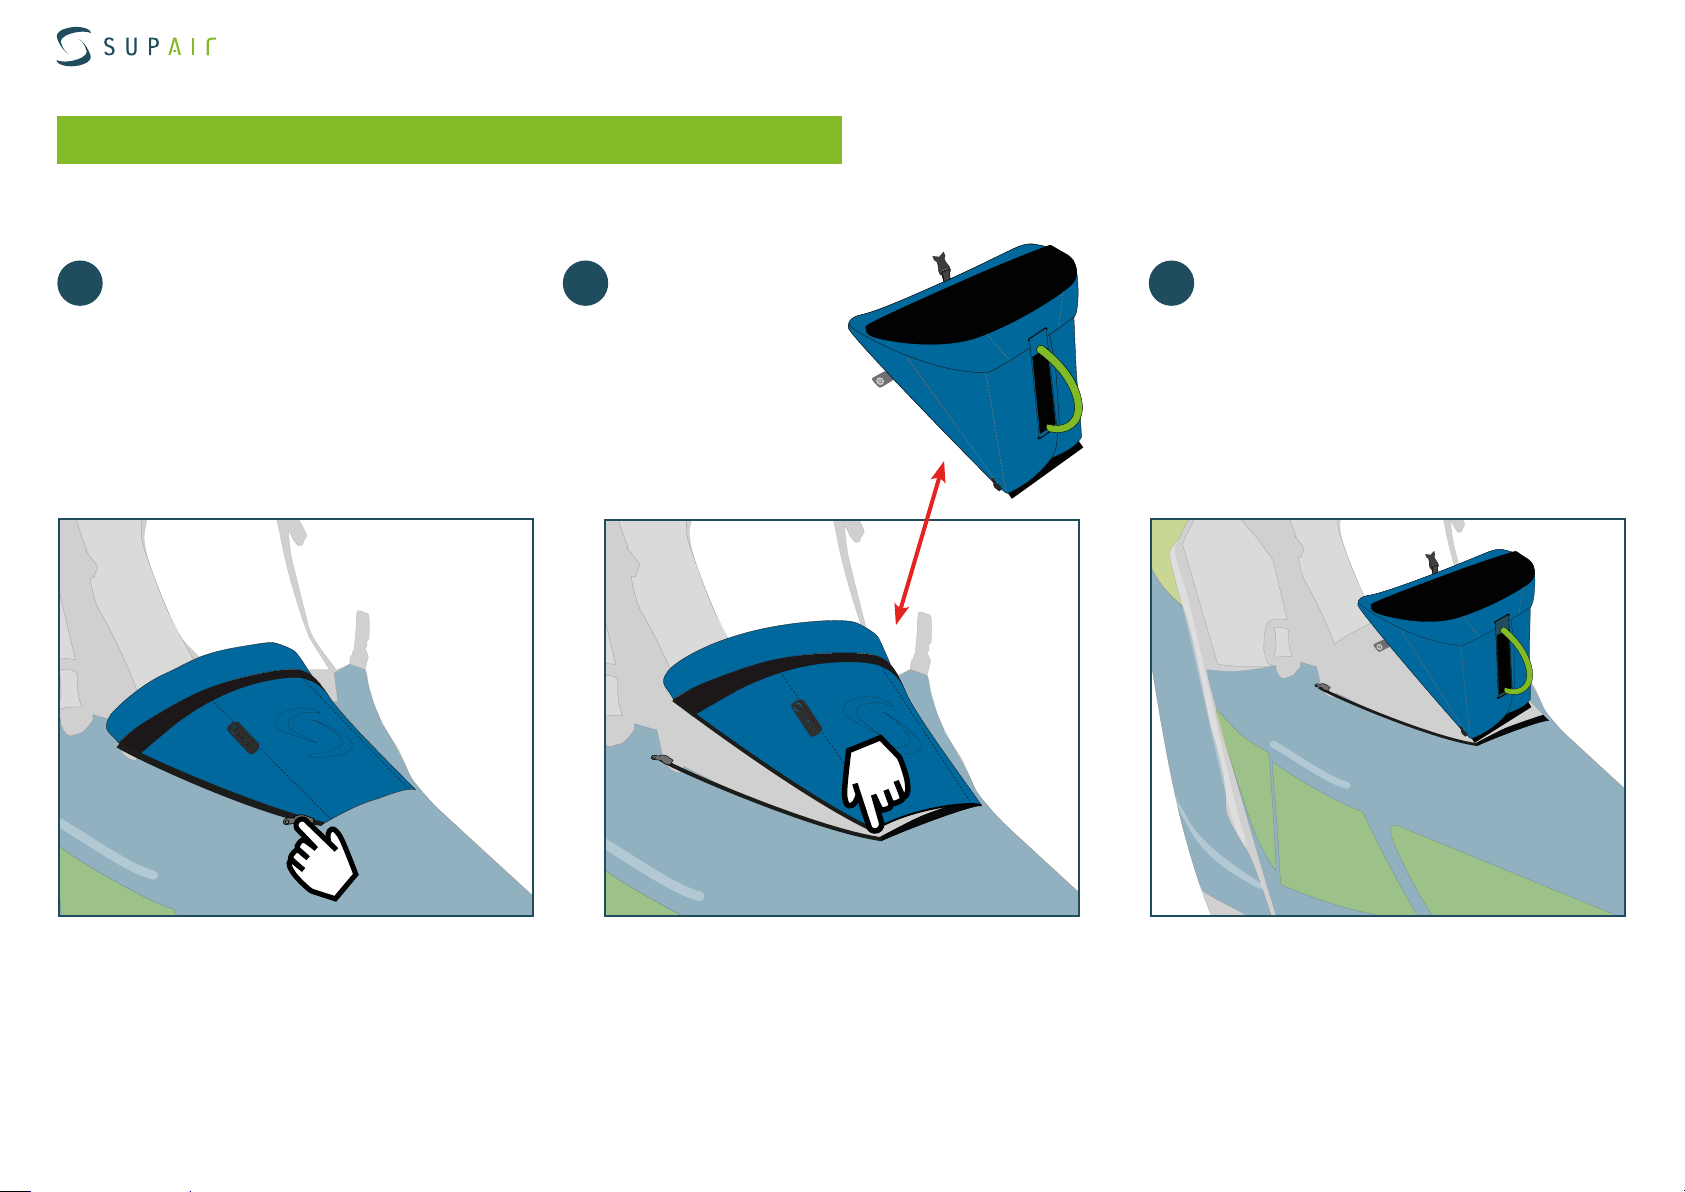
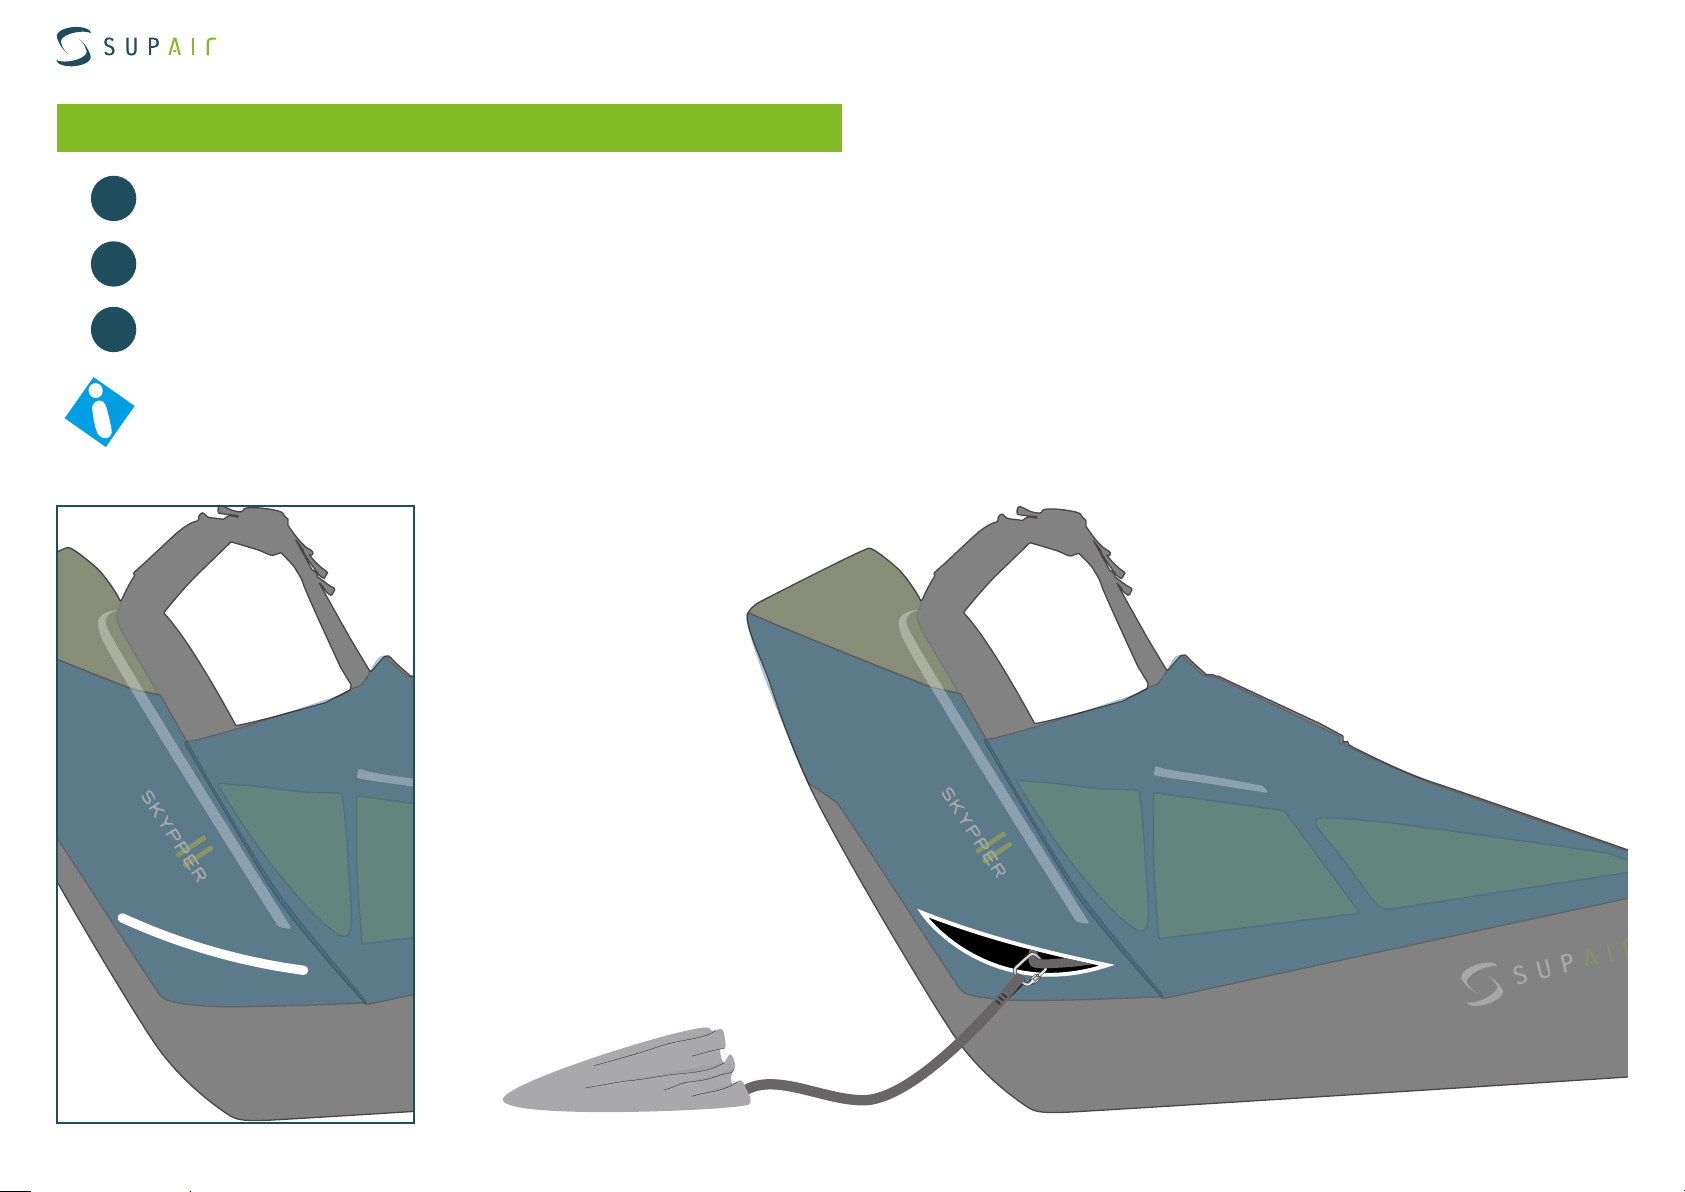
Drogue-Chute
Installing the Anti-G parachute
Open the right or left zipper to access the container
1
Connect the Anti-G drogue-chute to the Maillon Rapide®
2
Tuck the Anti-G drogue-chute away inside the container and close it the zipper
3
The Anti-G drogue-chute is connected at the center of the harness’s frame. It can be extracted from the right or left side
SUPAIR | SKYPPER2 | page 22
Page 23
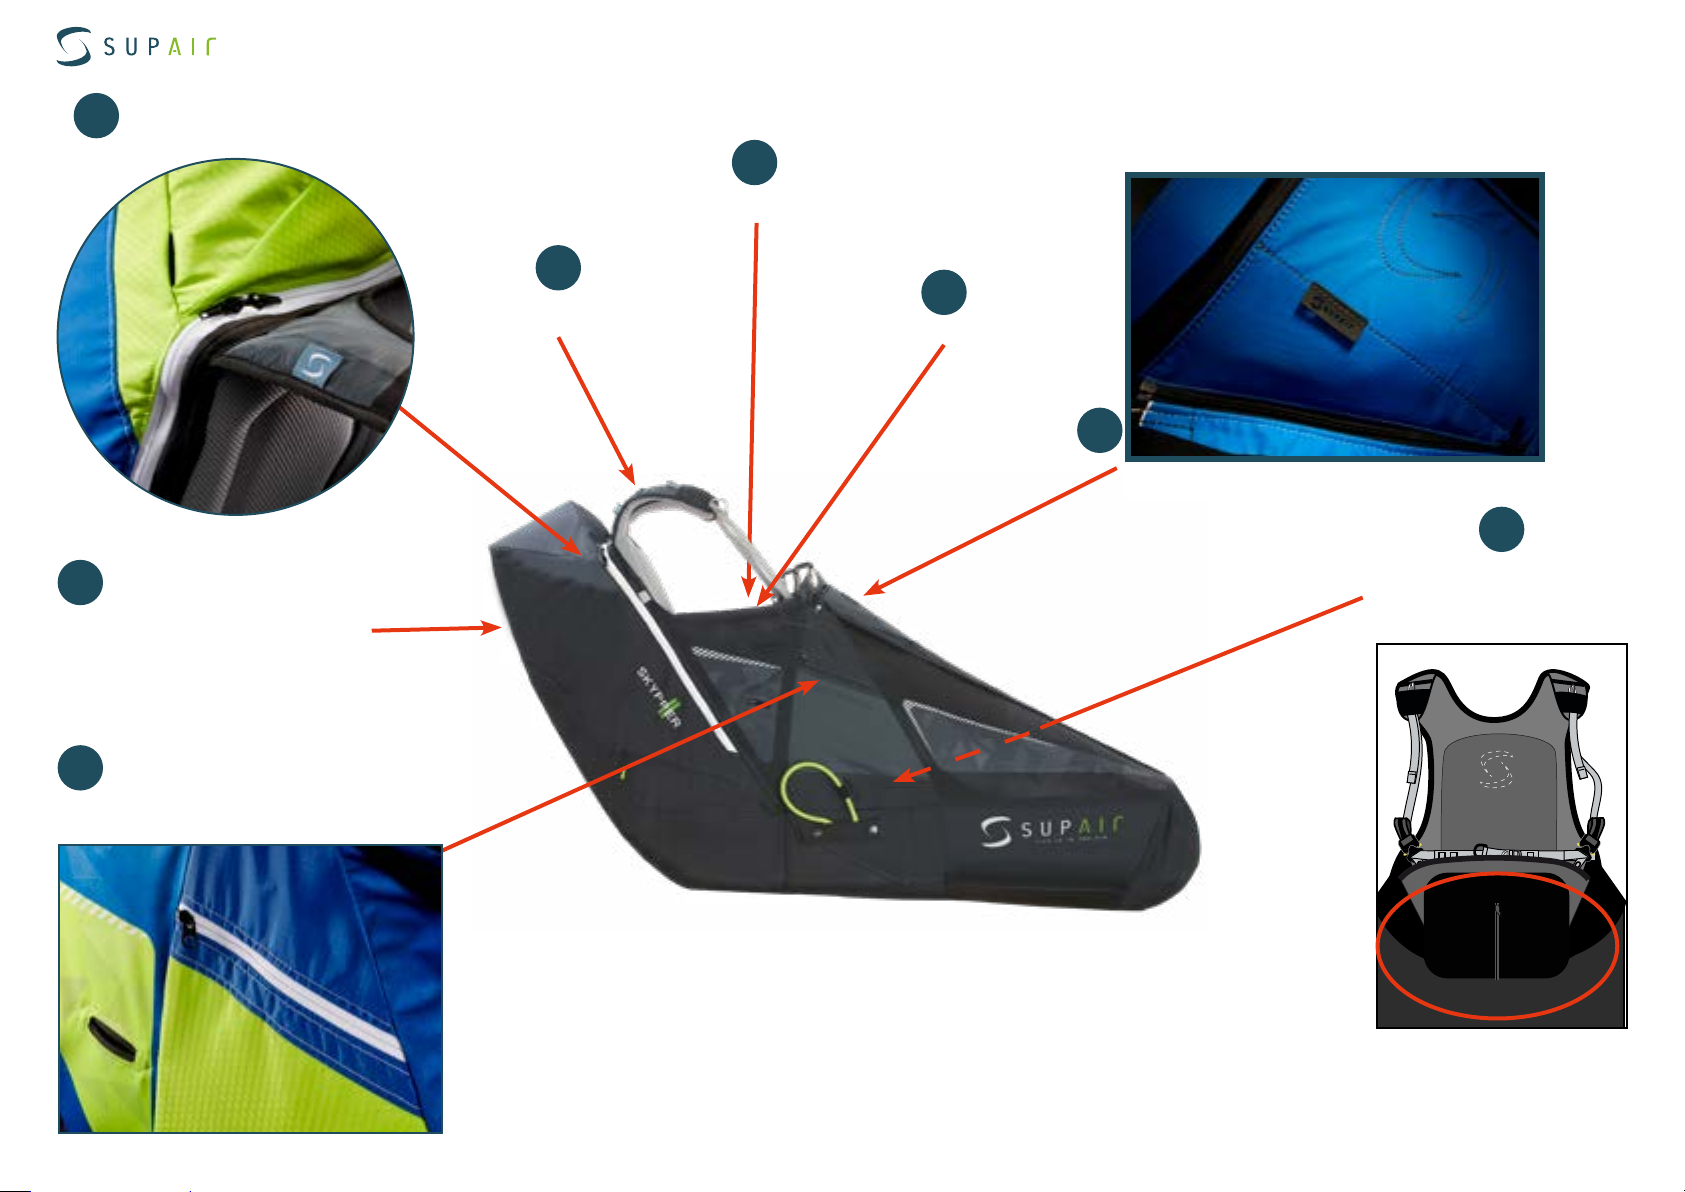
Notice d’utilisation sellette | SKYPPER2
1
Hydration tube opening.
2
Tag pocket
Packing and Tips
3
Radio pocket.
4
Safety kit
5
Removable Cockpit
6
8
Back storage pocket
7
Small storage pocket
5 liter ballast pocket
under the seat.
SUPAIR | SKYPPER2 | page 23
Page 24
Notice d’utilisation sellette | SKYPPER2
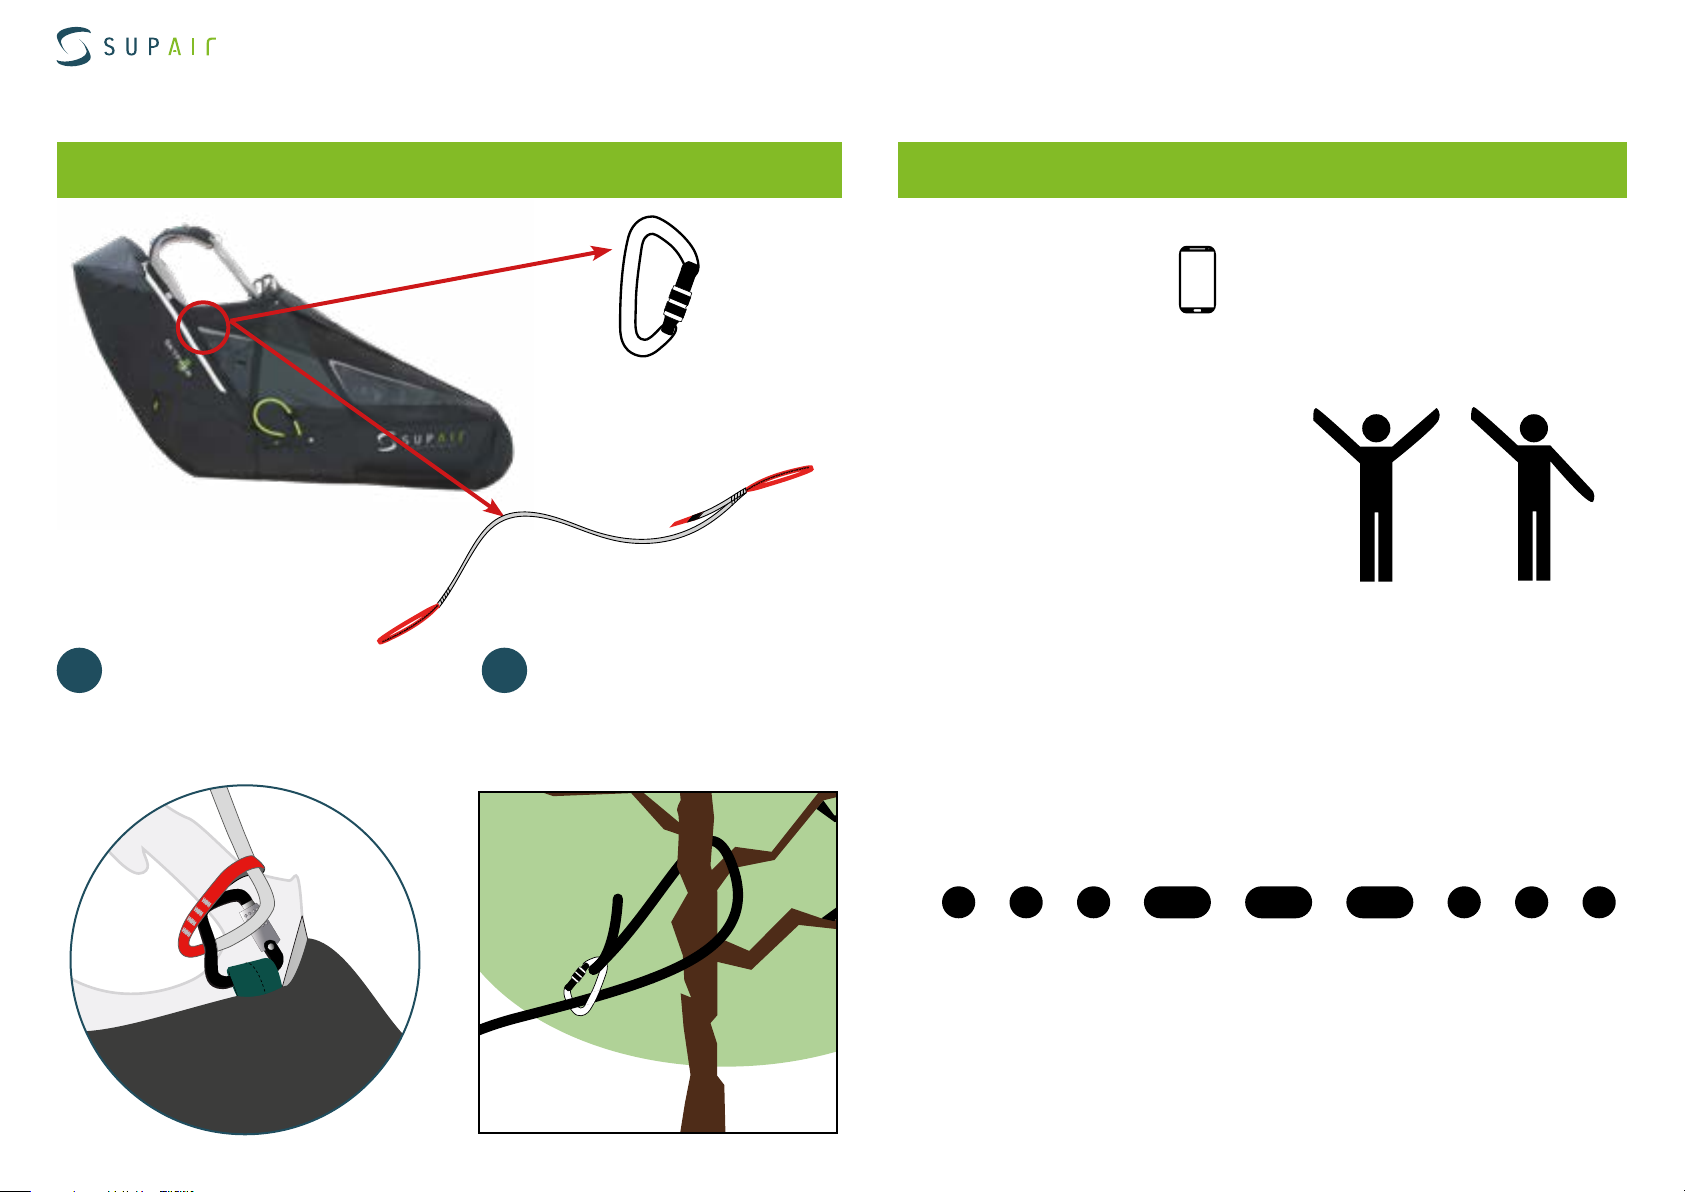
Safety kit
How to secure oneself after a tree landing
Make a lark’s head knot on
1 2
one of the main carabiners
Secure yourself by wrapping
the lanyard around the tree
trunk or a thick limb before
closing the loop with the
carabiner
Call for help after an accident
Emergency
call numbers
112EUROPE / INDIA
911USA / CANADA
119CHINA / JAPAN
101NEPAL
112IRAN
000AUSTRALIA
111NEW ZEALAND
Help needed?
YES NO
SOS lumineux :
SUPAIR | SKYPPER2 | page 24
Page 25
Notice d’utilisation sellette | SKYPPER2
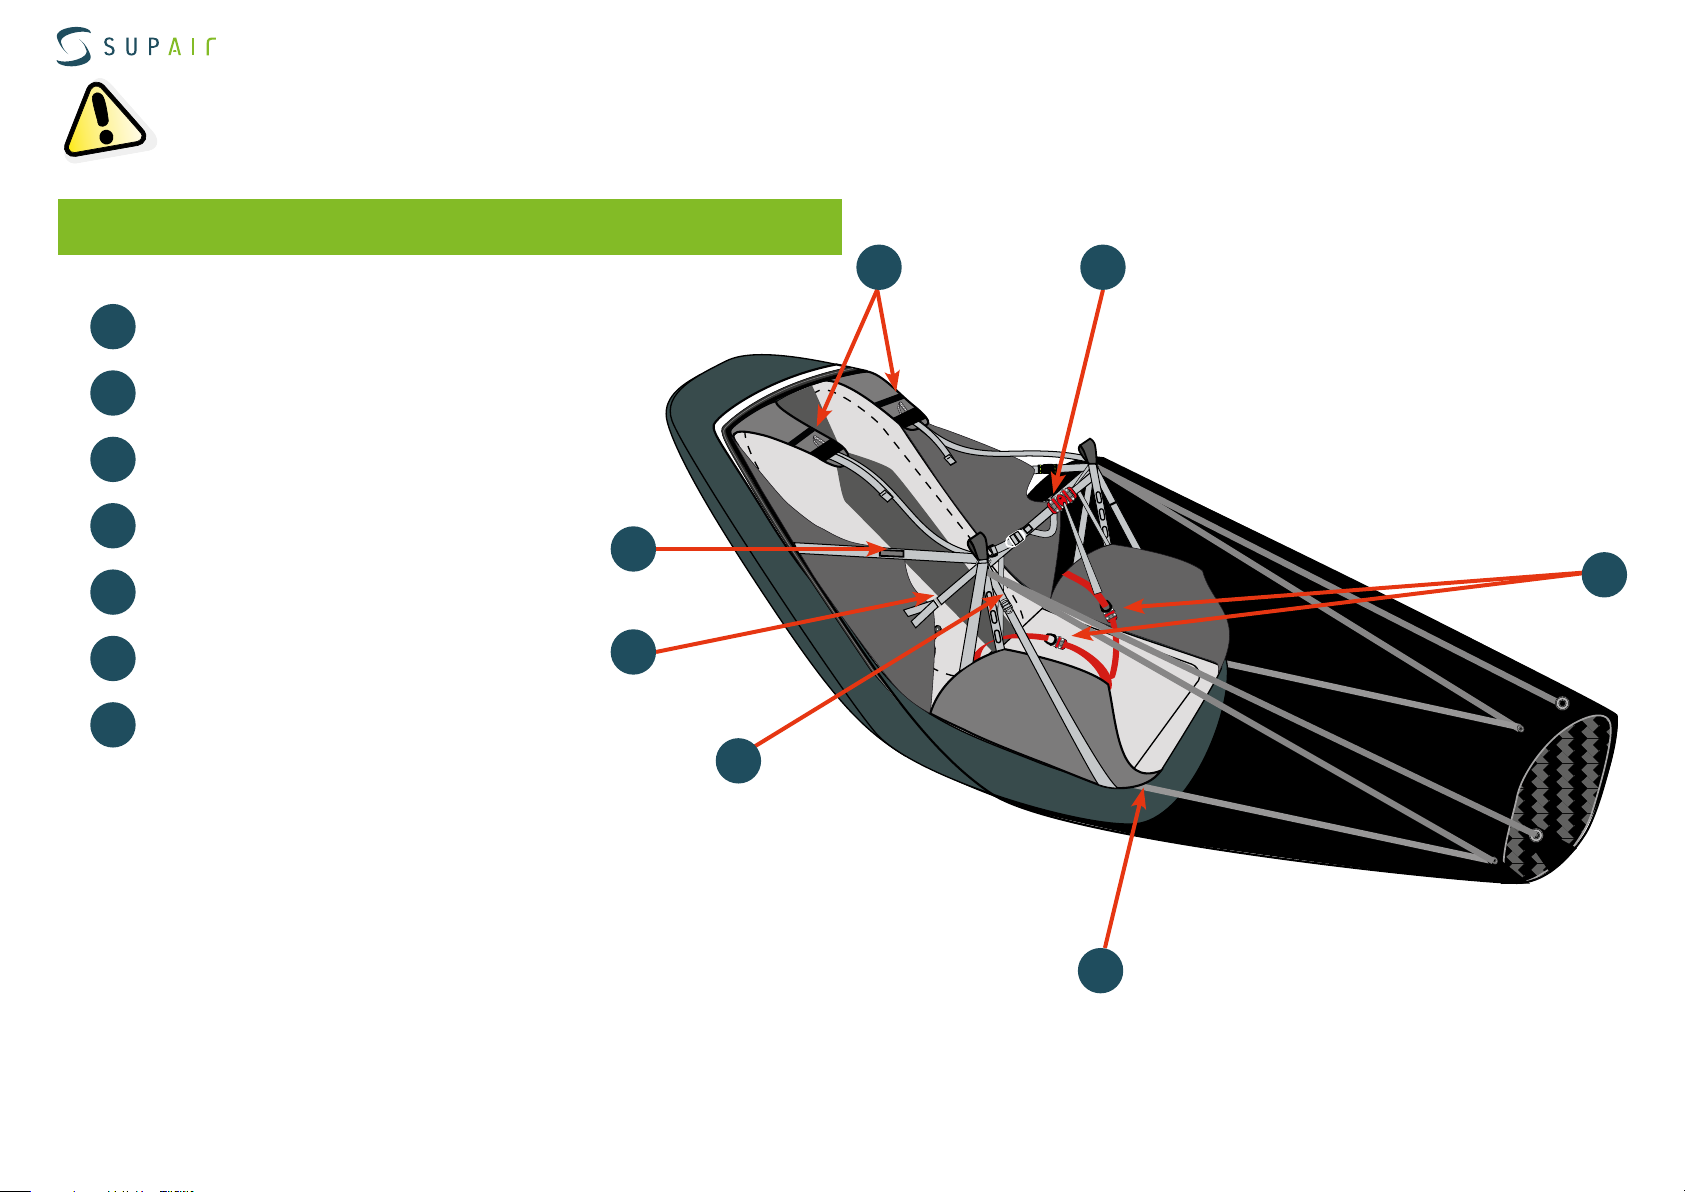
Adjusting the harness prior each takeoff is vital.
The various adjustments
Adjusting the harness
12
1
2
3
4
Adjusting the chest strap
Adjusting the shoulder straps
Adjusting the backrest
Lumbar adjustments
3
6
5
6
7
Lower Speedbag length adjustment
Leg straps adjustment
Upper Speedbag length adjustment
4
7
5
SUPAIR | SKYPPER2 | page 25
Page 26
Notice d’utilisation sellette | SKYPPER2
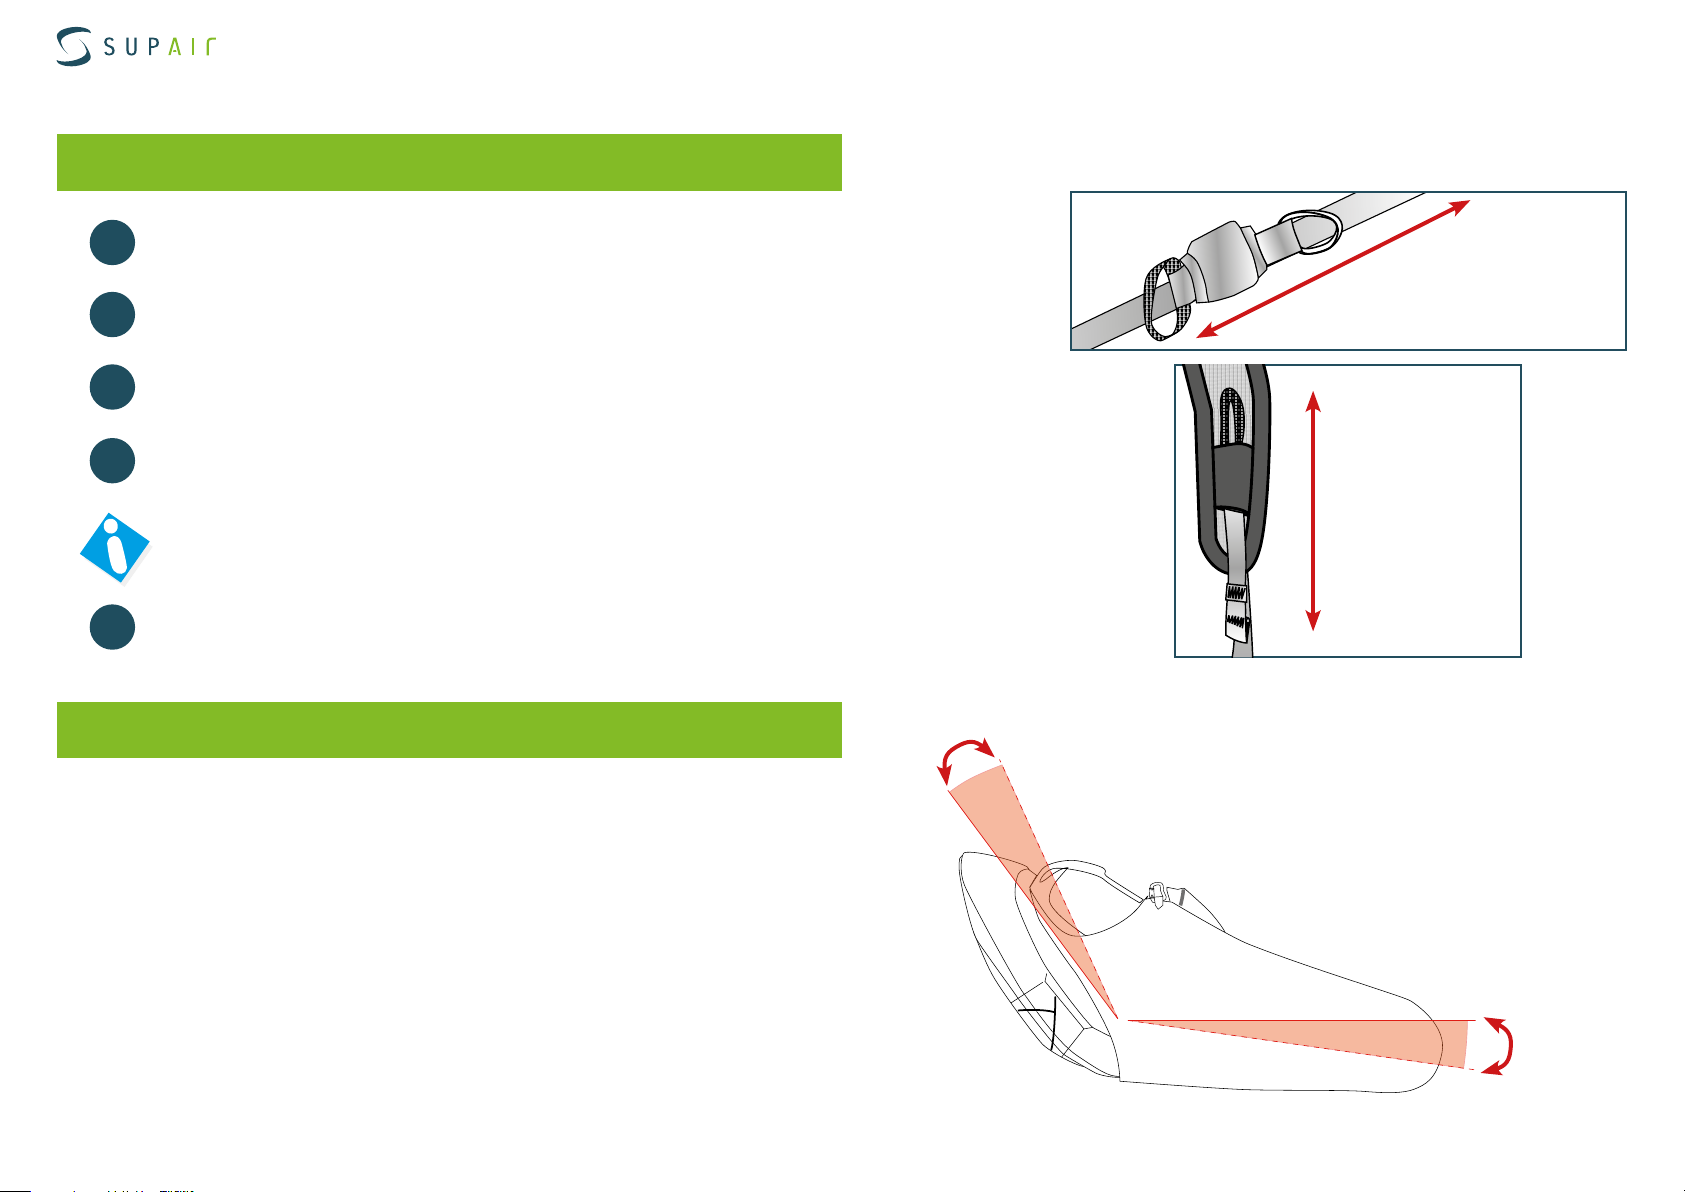
Adjusting the harness
Harness adjustments
1
2
Sit in the harness connected to a hang-test device. Fasten the self-locking buckles.
Adjust the shoulder straps using the shoulders adjustment buckles.
Adjust the backrest using the two lateral buckles relative to your piloting posture.
3
4
Adjust the Speedbag length with its upper and lower adjustment buckles.
Tension on the shoulder straps helps with comfort, and must be precisely adjusted.
5
The internal lateral adjustment enables the lower backrest section to be fine tuned
and reduce the empty space commonly found on the lower part of the spine while
seating.
Adjusting the Speedbag
Once well seated inside the harness, there is only the backrest to adjust.
tighten
loosen
loosen
tighten
>> Tilting the Speedbag angle.
- Shorten the Speedbag upper adjustment straps.
>> Tilt the lower Speedbag section
- Lengthen the upper Speedbag straps.
SUPAIR | SKYPPER2 | page 26
Page 27
Notice d’utilisation sellette | SKYPPER2
Connexion voile - Sellette
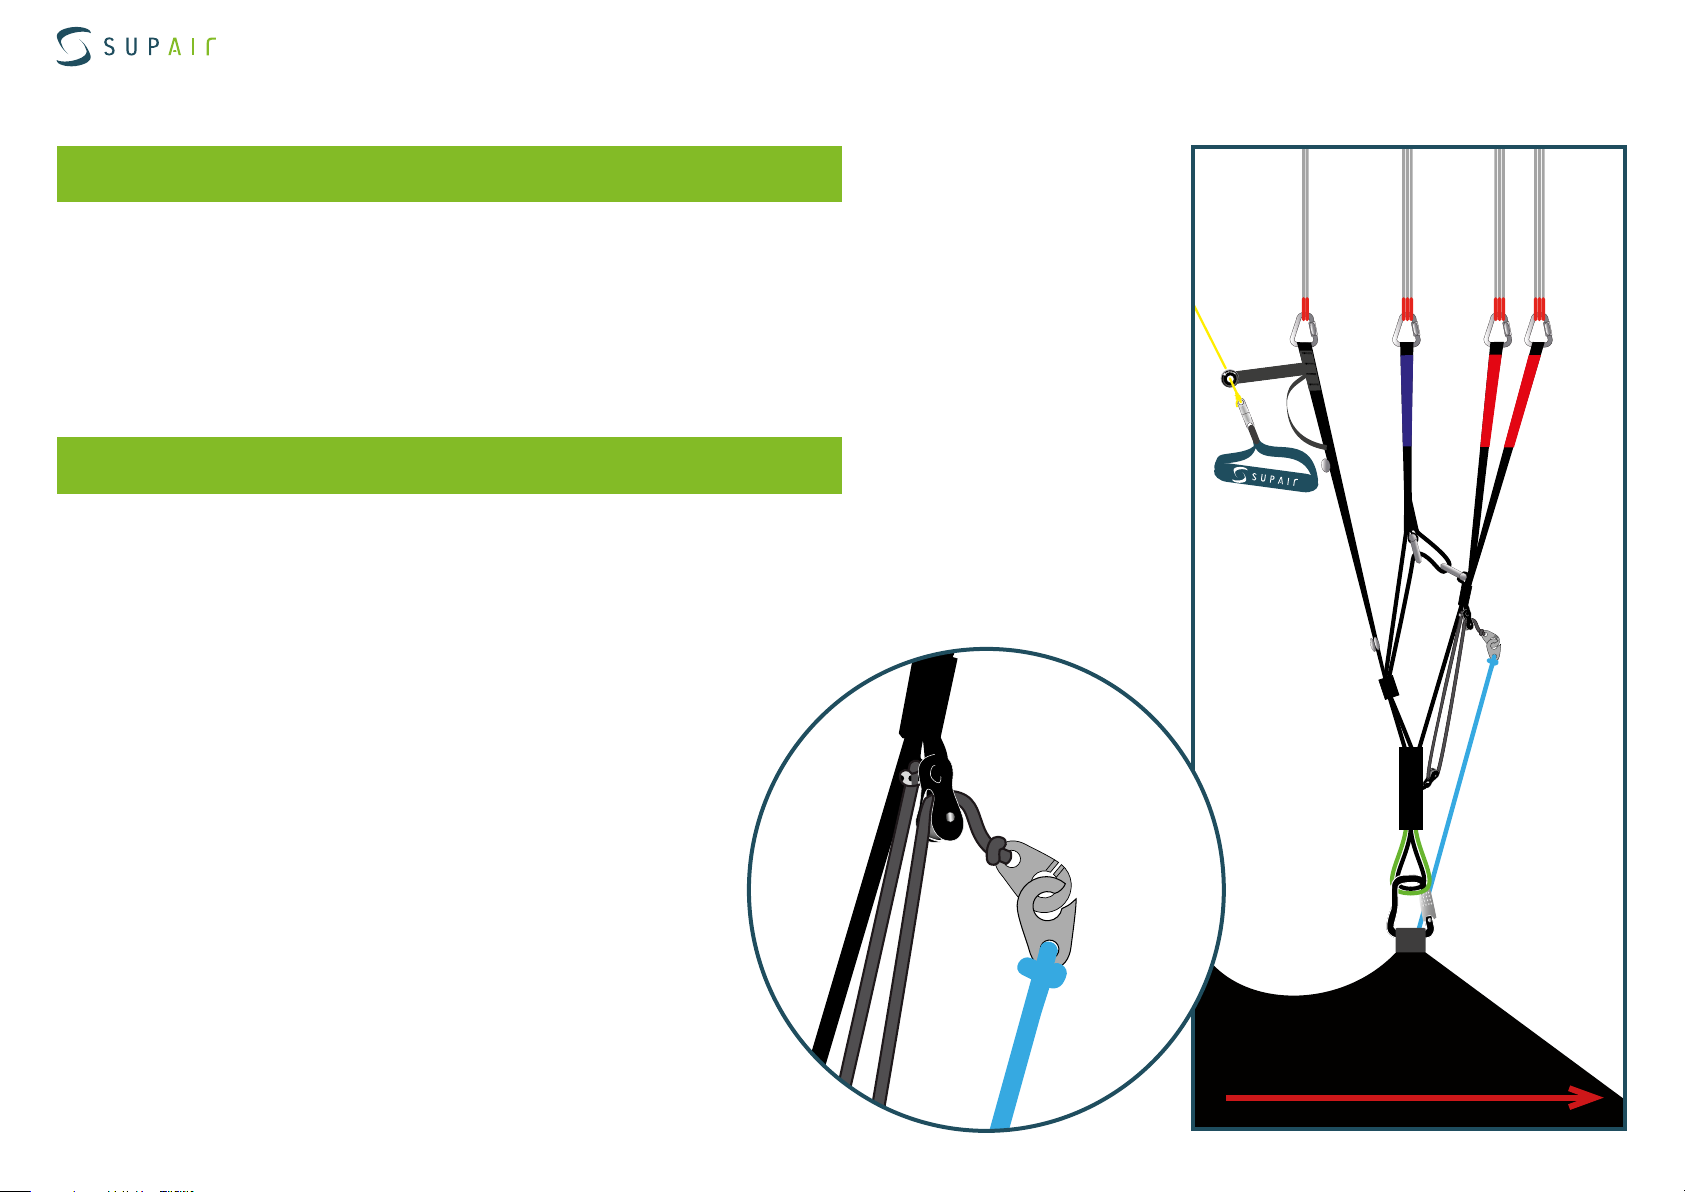
Connecting the wing to the harness
Without twisting the risers, connect them to the harness attachment loops using the self-locking carabiners.
Check for the risers to be properly positioned and untwisted. The «A» risers must be located at the front
and facing the flight direction (see diagram).
Lastly, check for the main self-locking carabiners to be fully closed and locked in place.
Installing the accelerator
Install the accelerator by following the instructions found on page 11.
Connect it to the wing using the split hooks.
Once the accelerator/speedbar is connected, adjust its length according to your measurements. For
correct use, there must not be any tension at the split-hook level when the accelerator/speedbar line is
fully relaxed.
«A» risers
Harness
Flight direction
SUPAIR | SKYPPER2 | page 27
Self-locking
carabiner
Page 28

Notice d’utilisation sellette | SKYPPER2
Flight behavior
The SKYPPER2 is designed to long technical flights. Its behavior is predictable, precise and stable enough to be used with a precis high level reactive
wing, not necessitating heavy weight shiftingor high performance modern wings reactive enough to necessitate heavy weight shifting.
SUPAIR | SKYPPER2 | page 28
Page 29
Notice d’utilisation sellette | SKYPPER2
Flight phases
Pre-Flight control
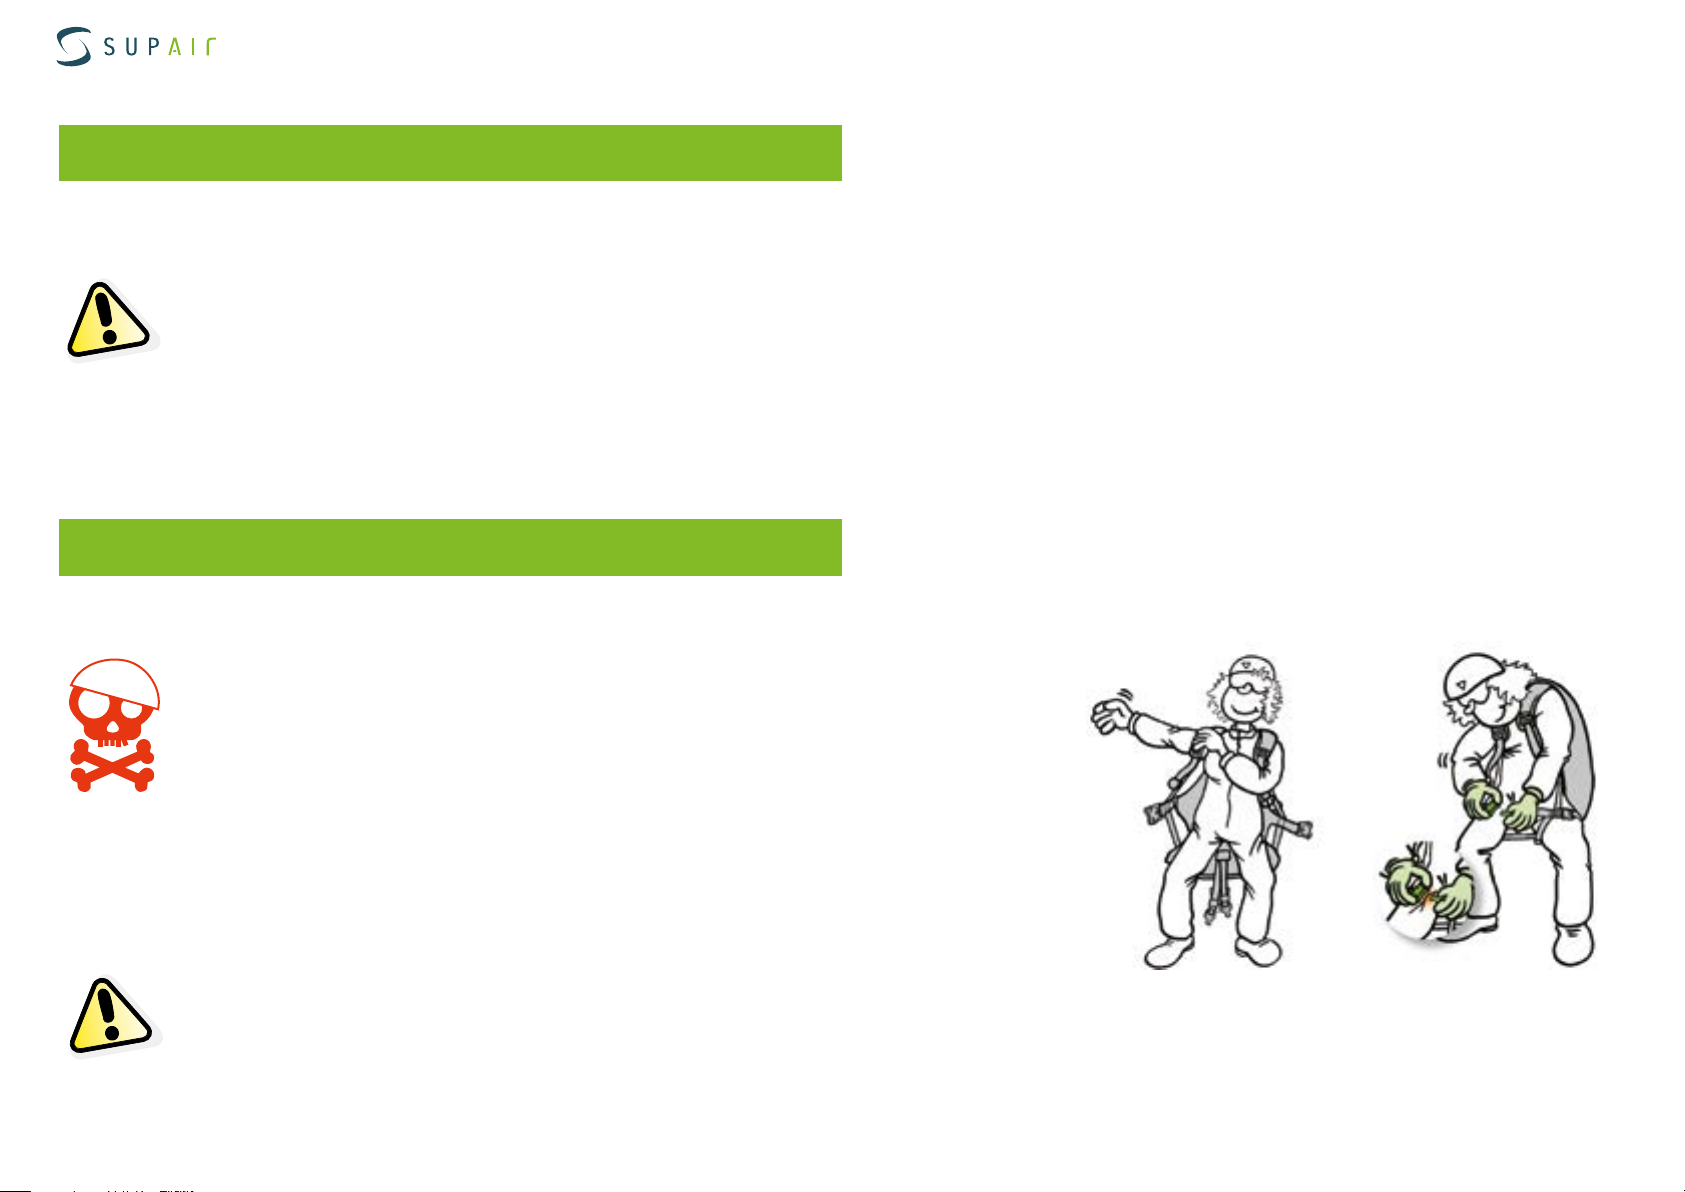
• Check that the harness and the carabiners are not damaged..
• Make sure that the reserve parachute safety cables to ride through the closing tabs keeping the reserve rescue pocket flaps closed
• Check that your personal settings haven’t changed.
• Check that all zippers and buckles are closed.
• Check that the speedbar is correctly connected and set up.
• Check that no rigging line or other object comes in contact with rescue parachute handle.
• Make sure that the self-locking carabiners are locked and connected to the paraglider.
Take-off
After a thorough weather conditions analysis, when the decision to fly has been taken, put your harness on and follow the next steps
• Fully close the chest strap buckles.
• Close the Speedbag closing buckle to the right side.
• Close the Speedbag closing buckle to the left side.
• Connect the front resreve’s wichard if you have intalled it
During takeoff, maintain a standing posture and grab the Speedbag with one of your heels
once far enough from the ridge. Using the foot-rest, push yourself inside the harness.
The Speedbag closes and the Cockpit positions itself automatically.
Do not release your hands from the brakes when you are close to terrain.
SUPAIR | SKYPPER2 | page 29
Page 30

Notice d’utilisation sellette | SKYPPER2
Flight phases
In flight
Please set the distance between the two carabiners according to aerology and to the wing manufacturer’s recommendations.
Speedbar use
We recommend a cautious speed-bar use due to the increased risk of major partial or full frontal collapses.
Use the speed-bar/accelerator ( transitions ) only when far away from the ridge and in calm weather conditions as the wing becomes
more sensitive to turbulence when accelerated. If you feel a loss of tension in the speed-bar/accelerator, stop pushing it and apply a light
brake pressure on the toggles to prevent the glider from experiencing a potential frontal collapse. To properly use the speed-bar, keep
one foot at the foot-rest center space, and push with the second foot on the first speed-bar to obtain a symmetrical acceleration.
Use one foot for the first stage and the other for the second stage.
To decelerate, stop pushing and gradually release the accelerator/speedbar tension.
Landing
When making a landing approach, take your legs out of the Speedbag well in advance. Stand up inside the harness and adopt an upright
position in order to run and dissipate the horizontal speed.
Always be certain to have enough altitude to make a landing approach corresponding to the weather conditions of the moment and terrain. During the landing approach, never make hasty maneuvers. Always land upwind in a standing posture and be ready to run upon
touchdown if necessary.
During your final approach, use as much airspeed as possible based on the weather conditions of the moment, then gradually reduce the
glider air speed by pushing the toggles all the way down until contact with the ground is made. Beware not to brake too soon and too rapidly
and too deep which could lead to a stall and a dangerous landing.
Do not land in a seated position as it is dangerous.
Using the reserve parachute.
SUPAIR | SKYPPER2 | page 30
Page 31

Notice d’utilisation sellette | SKYPPER2
Using the reserve parachute
Throwing the reserve parachute
It is strongly recommended to frequently check your reserve parachute handle location while in flight. This exercise should be executed
instinctively and will increase your chances of a successful parachute extraction in case of an emergency.
Estimate your AGL ( Altitude Above Ground Level ), which if high enough may make it worth trying to bring your wing back to a normal flying
configuration. If in doubt, quickly deploy your emergency parachute.
Deploying a rescue parachute should be done only in an emergency.
With a strong, lateral and then vertical tug, pull the handle towards you and then throw the parachute away from you ( including the container and its handle ) toward a clear unobstructed area of the sky. As soon as the parachute deploys, bring as much of the glider as possible
toward you by pulling as symmetrically as possible on the “C” or “D” risers or on the toggles/brakes.
Be prepared to land by adopting an upright position, with knees together and legs slightly bent. Prepare to roll down with pivoting shoulders
in a paragliding fall (PLF).
Towing
To takeoff under tow, you must be equipped with a quick release specially designed for the task.
Connect the tow bridle to the wing riser loops with a Dyneema adaptor with a resistance greater or equal to 300kg. The tow bridle will then be fastened
by using a lark’s head knot or an adapted metal link. To complete the installation, follow the tow bridle reales manufacturer’s recommendations. Before towing, you should consult with a competent towing outfit about safety recommendations.
Mandatory controls
Mandatory biannual inspection
- Ascertain parachute deployment functionality by pulling the handle to activate a clean POD extraction sequence
- Inspect the harness for wear and tear.
Annual check
- An annual deployment and repacking of the reserve parachute must be conducted by competent and certified personnel.
SUPAIR | SKYPPER2 | page 31
Page 32

Notice d’utilisation sellette | SKYPPER2
Care
Harness cleaning and maintenance
It is a good idea to clean your harness from time to time. We recommend using a brush and soft solvents only ( soap or mild cleaning agents ). Rinse
thoroughly. Never use aggressive chemicals such as strong solvents which could be harmful to the harness’s fabric, webbings, stitching and weaken
its integrity. The zip fasteners should be lubricated from time to time, using a silicon spray.
If you regularly use your harness in a dusty environment ( dirt, sand, etc... ), we advise you to regularly check and maintain your carabiners and buckles: clean them with a mild detergent, then blow dry them fully but DO NOT LUBRICATE!
Prior to using them, conduct a thorough carabiners and buckles checkup to insure their full functionality.
If you use your harness in a marine/sandy/salty environment, pay particular attention to your gear and follow a rigorous care/maintenance routine.
If your dorsal foam protector is more than 5 years old or has been subjected to 2 significant shocks, replace it by a new identical model.
Storage and transport
When not in use, your harness should be stored inside your paragliding backpack, in a dry, cool and clean place, protected from UV exposure. If your
harness is wet, please dry it thoroughly before storing.
For transport, protect the harness from any mechanical or UV deterioration (use a bag). Please avoid long transports in wet conditions.
Life span
Once every two (2) years, a thorough harness inspection must be conducted :
• Webbing wear and tear (no excessive wear, no rip beginning, no unwanted folds)
• Buckles and carabiners ( functionality, wear and tear ).
• BUMPAIR dorsal protector damage after substantial impact(s). It must be replaced by a new one after three (3) substantial impacts or
three (3) years of use ( whichever comes first ).
The threads and fabric used for the manufacturing of the SKYPPER2 were specifically selected for their quality and resilience levels. However, in particular instances such as long term UV exposure, abrasion, contact with damaging chemicals, general wear and tear, the harness
will need to be inspected at a professional certified repair facility. Safety comes first!
The self-locking carabiners are NEVER to be used for any activities other than paragliding.
Independently of the pre-flight check-out, you have to open and unfold your rescue parachute once every year.
SUPAIR | SKYPPER2 | page 32
Page 33

Notice d’utilisation sellette | SKYPPER2
Care
Repair
In spite of using the highest quality products to manufacture the SKYPPER2 , it is possible for your harness to deteriorate through general use. If
showing any sign of wear and tear, it should be sent for inspection and/or repairs at a professional certified facility.
SUPAIR now offers an extended warranty period reaching beyond the product standard protection plan against manufacturing defects.
Please contact us either by telephone or by E-mail [email protected] in order to receive a quotation.
Hardware & Parts
- Self-locking Zicral 30mm carabiners ( Reference: MAILCOMOUS 30 ).
- BUMPAIR 18 SK2 ( Reference: PROBUMP18SK2 ).
- Accelerator/speedbar Split-hooks ( Reference: MPPM050 ).
- Crochets d’accélérateur (référence : MPPM050)
- Carbon fiber plate (référence : MPPL022 taille S, M ou MPPL026 tailles
L, ou MPPL027 tailles XL )
- Speedbag carbon fiber plate
(référence : MPPL010 taille S, M ou MPPL024 L, XL)
- White loop to close the reserve parachute pocket
- POD with handle for front reserve container
- Front reserve parachute container handle
Materials
Fabrics
N/210D 3line Honey Comb
Speedbag
LYCRA MEMBRANE
Webbings
Polyamide 20 mm (500 daN)
Polyester 25 mm (1250 daN)
Recycling
Tous nos matériaux sont sélectionnés pour leurs excellentes caractéristiques techniques et environnementales. Aucun des composants de nos sellettes n’est dangereux pour l’environnement. Un grand nombre de nos composants sont recyclables.
If you estimate that your SKYPPER2 has reached the end of it life span, you can separate plastics from metals and recycle them according to your
community rules in effect. As for the fabric itself, contact your local authorities to find out how to proceed to discard it.
SUPAIR | SKYPPER2 | page 33
Page 34

Notice d’utilisation sellette | SKYPPER2
Warranty
SUPAIR takes the greatest care in its products design and manufacturing and hence offers a five (5) year limited warranty from the date of purchase
against manufacturing defects or flaws occurring during normal use. Any damage or degradation resulting from incorrect or abusive use, abnormal
exposure to aggressive factors, including, but not limited to; high temperature, intense sun exposure, high humidity etc, will invalidate this warranty.
The provided safety protections in the SUPAIR harnesses are guaranteed for use in medium temperature (between -10ºC and 35ºC).
The protections lifespan is 5 years or limited to 2 consequent shocks. If an airbag is used instead of foam, check that it is correctly installed.
Disclaimer
Paragliding is an activity requiring specific skills and sound judgement. Learn how to fly within the environment of a certified paragliding
school. Carry an insurance policy with you in addition to you pilot certification. Always mind and gauge your personal skills relative to the
elements you want to be flying in. Better be safe than sorry ! SUPAIR can not be held responsible for your paragliding decisions or activities.
This SUP’AIR product has been designed exclusively for paragliding. Any other activity such as skydiving or BASE jumping is absolutely
forbidden.
Pilot’s gear
It is essential for you to wear a suitable head protection ( certified paragliding helmet ), boots and right clothing for the activity. Moreover,
carrying a reserve parachute connected to your harness in flight is highly recommend.
CE certification : About the paragliding harnesses protection
We want to inform you and let you know that no harness protection can guarantee a complete protection against injury. In particular,
the back protector which does not prevent potential injuries to the spine or pelvis.
Moreover, only parts of the body covered by the air bag may benefit from protection against potential impacts
Warning, any modification or misuse of the protection can dangerously alter its performance and compromise the integrity of the
safety device.
Protection is ensured only when the protective elements are present and properly installed. Thus, when the protection is removable,
check that it is correctly positioned.
Your harness protection CE conformity labeling is certified by the following laboratory :
CRITT Sport Loisirs n°0501 ,Z.A. du Sanital, 21 Rue Albert Einstein, 86100 Chatellerault, FRANCE
SUPAIR | SKYPPER2 | page 34
Page 35
Notice d’utilisation sellette | SKYPPER2
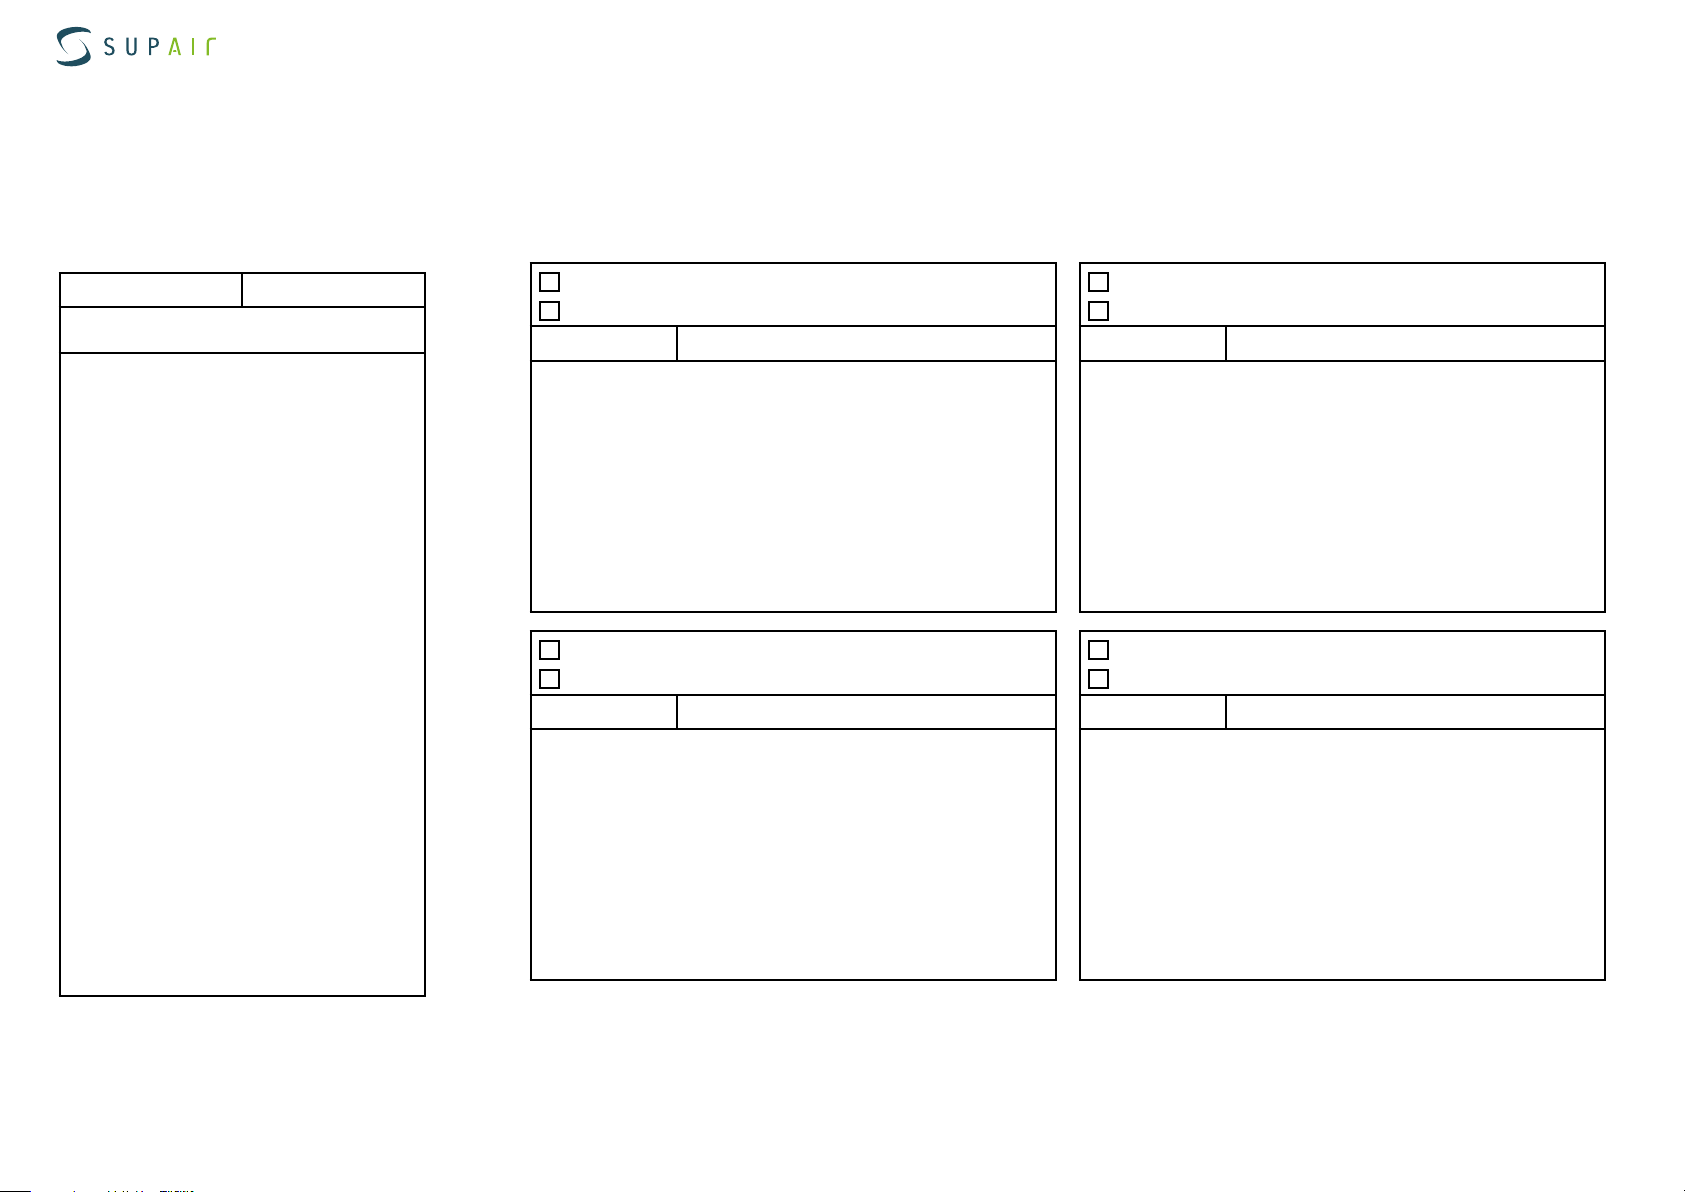
This page will help you keep record of your SKYPPER2 scheduled maintenance.
Service Book
Purchase date
Owner’s name
Name and stamp of the shop
Care
Resale
Date
Workshop’s name/ Buyer’s name
Care
Resale
Date
Workshop’s name/ Buyer’s name
Care
Resale
Date
Workshop’s name/ Buyer’s name
Care
Resale
Date
Workshop’s name/ Buyer’s name
SUPAIR | SKYPPER2 | page 35
Page 36

SUPAIR-VLD
Parc Altaïs
34 rue Adrastée
74650 Chavanod, Annecy
FRANCE
+33(0)4 50 45 75 29
45°54.024’N / 06°04.725’E
 Loading...