

Page 1
English
User manual
Reserve Parachute
SHINE
Pull down APEX Rescue parachutes
Revision index : 28/09/2017
SUP’AIR - VLD
34 rue Adrastée
Parc Altaïs
74650 Annecy - Chavanod
FRANCE
45°54.024’N / 06°04.725’E
Page 2

SHINE reserve parachute’s manual SHINE
Thank you for choosing the SHINE reserve
parachute!.We are glad to be able to share
our common paragliding passion with you.
SUP’AIR has been designing, manufacturing and distributing accessories world wide
since 1982. Choosing a SUP’AIR product is
the right choice for anyone to make, for it
is supported by thirty year of expertise and
innovating designs driven by customer feed
Next, are explicit instructions to familiarize
yourself with the product’s technical features. Please, carefully read the following
content!
Visiting our website at www.supair.com , will
also bring you the latest updates. Additionally, if in doubt, questions will be answered
by contacting any of our network representatives. Naturally the entire SUP’AIR Team will
be at your disposal to promptly
We wish you the best of flights.
The SUP’AIR team.
SUP’AIR _SHINE Page 2
Page 3

SHINE reserve parachute’s manual SHINE
List of contents
Introduction 4
Technical specifications 5
Equipment overview 6
EN 1249 Norm 7
Use 9
Reserve parachute/harness connection 10
Tandem reserve parachute connection – Split-A 12
Installing the reserve parachute. 13
Packing 14
Measurement table 17
Maintenance 19
Warranty 20
Disclaimer 20
Pilot’s gear 20
Service Book 21
SUP’AIR _SHINE Page 3
Page 4

SHINE reserve parachute’s manual SHINE
Introduction
Welcome to the world of free flying : a shared world of passion.
The SHINE is a round reserve parachute, stable with an optimal descent rate, simple to use by design and efficient. It will perfectly suit
and meet the requirements all paraglider pilots need.
The reserve parachute “SHINE” was designed by the SUP’AIR in-house Development team.
The SHINE is part of the latest hemispherical reserve parachute generations, using Decitex 20 fabric and a line layout entirely made of
Dyneema®. Those characteristics make it a reliable, light and robust rescue system.
We use known materials for best results and highest performance. The design and material choices were well thought-out in regard to
longevity and quality.
SUP’AIR’s reserve parachute SHINE
Indicating that it meets European and German safety requirements.
After reading this manual, we recommend you to conduct a harness hang-test before your first flight to ensure proper rescue setup and
functionality.
N.B. : The following three icons will help you to understand this manual
Advice Caution ! Danger !!
SUP’AIR _SHINE Page 4
Page 5
SHINE reserve parachute’s manual SHINE
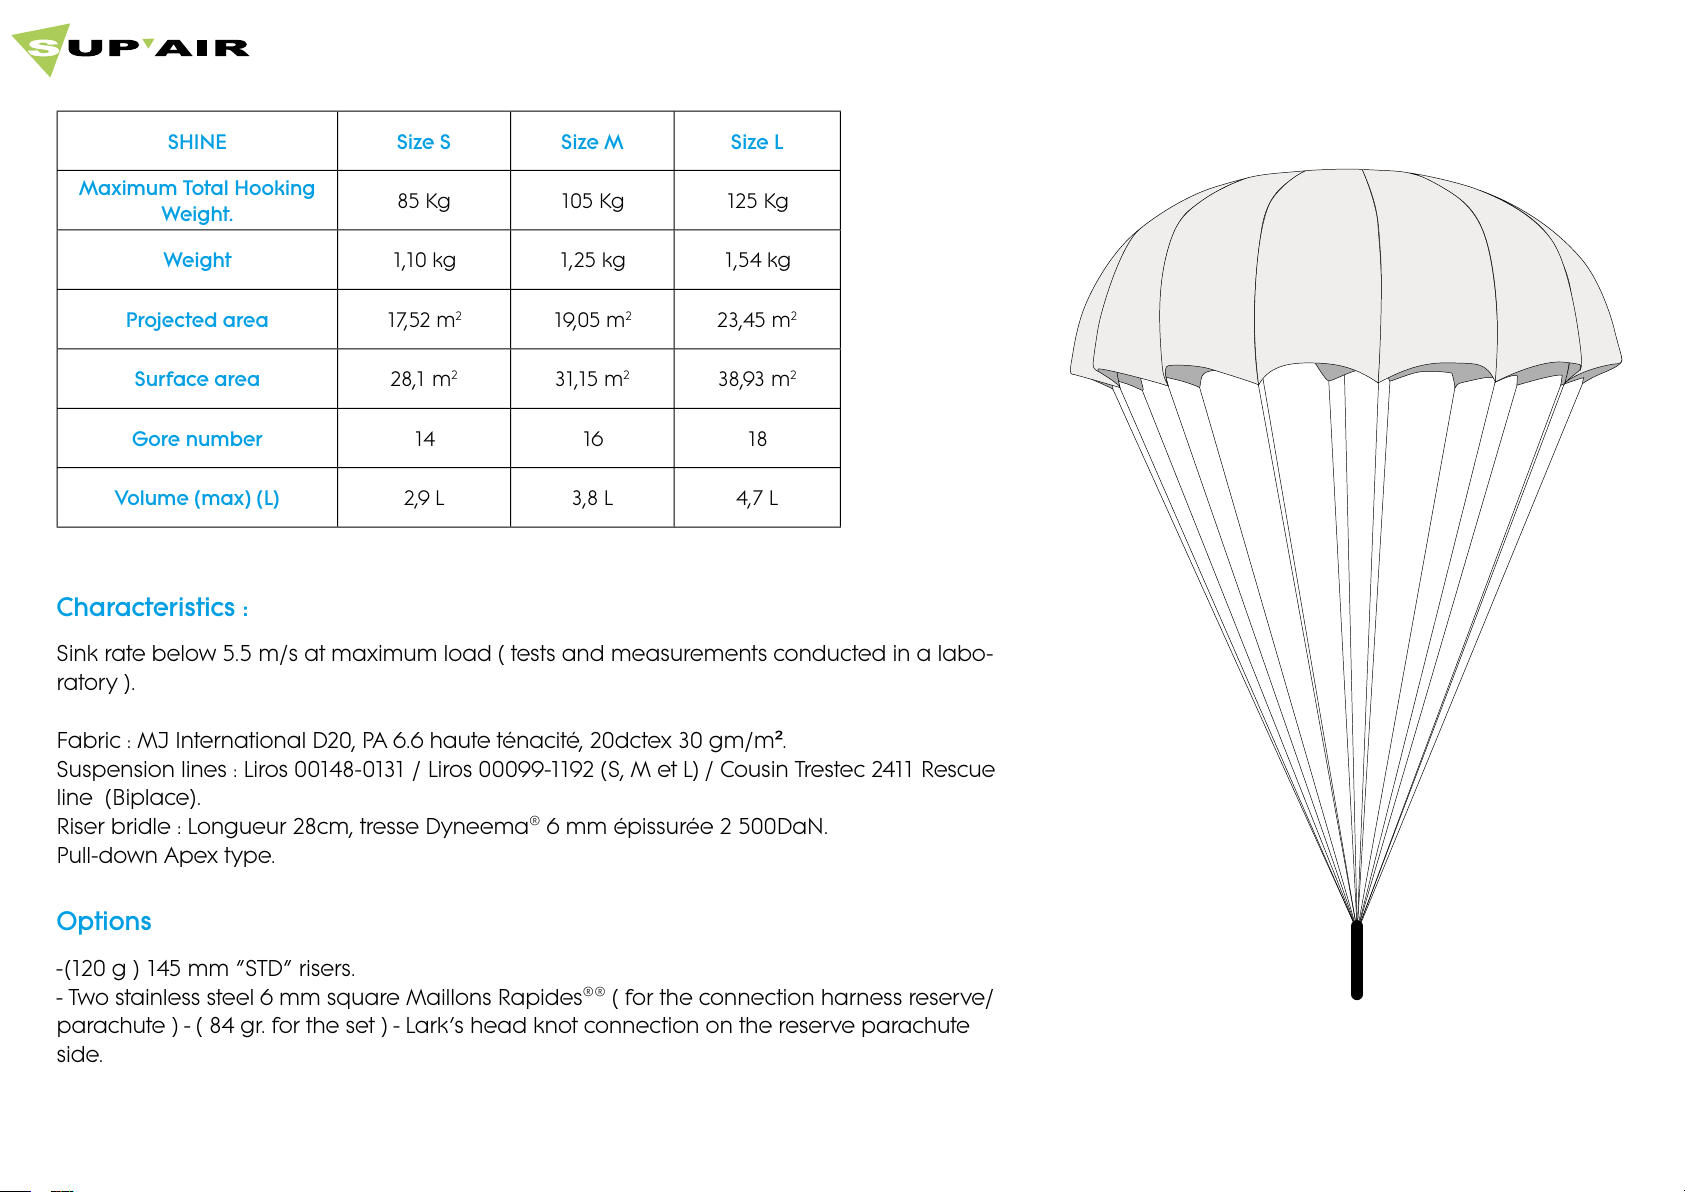
Characteristics :
Sink rate below 5.5 m/s at maximum load ( tests and measurements conducted in a labo-
ratory ).
Fabric : MJ International D20, PA 6.6 haute ténacité, 20dctex 30 gm/m².
Suspension lines : Liros 00148-0131 / Liros 00099-1192 (S, M et L) / Cousin Trestec 2411 Rescue
line (Biplace).
Riser bridle : Longueur 28cm, tresse Dyneema® 6 mm épissurée 2 500DaN.
Pull-down Apex type.
Options
-(120 g ) 145 mm “STD” risers.
- Two stainless steel 6 mm square Maillons Rapides®® ( for the connection harness reserve/
parachute ) - ( 84 gr. for the set ) - Lark’s head knot connection on the reserve parachute
side.
SHINE Size S Size M Size L
Maximum Total Hooking
Weight.
85 Kg 105 Kg 125 Kg
Weight 1,10 kg 1,25 kg 1,54 kg
Projected area 17,52 m
2
19,05 m
2
23,45 m
2
Surface area 28,1 m
2
31,15 m
2
38,93 m
2
Gore number 14 16 18
Volume (max) (L) 2,9 L 3,8 L 4,7 L
*Total flying weigth without the glider.
Technical specifications
SUP’AIR _SHINE Page 5
Page 6
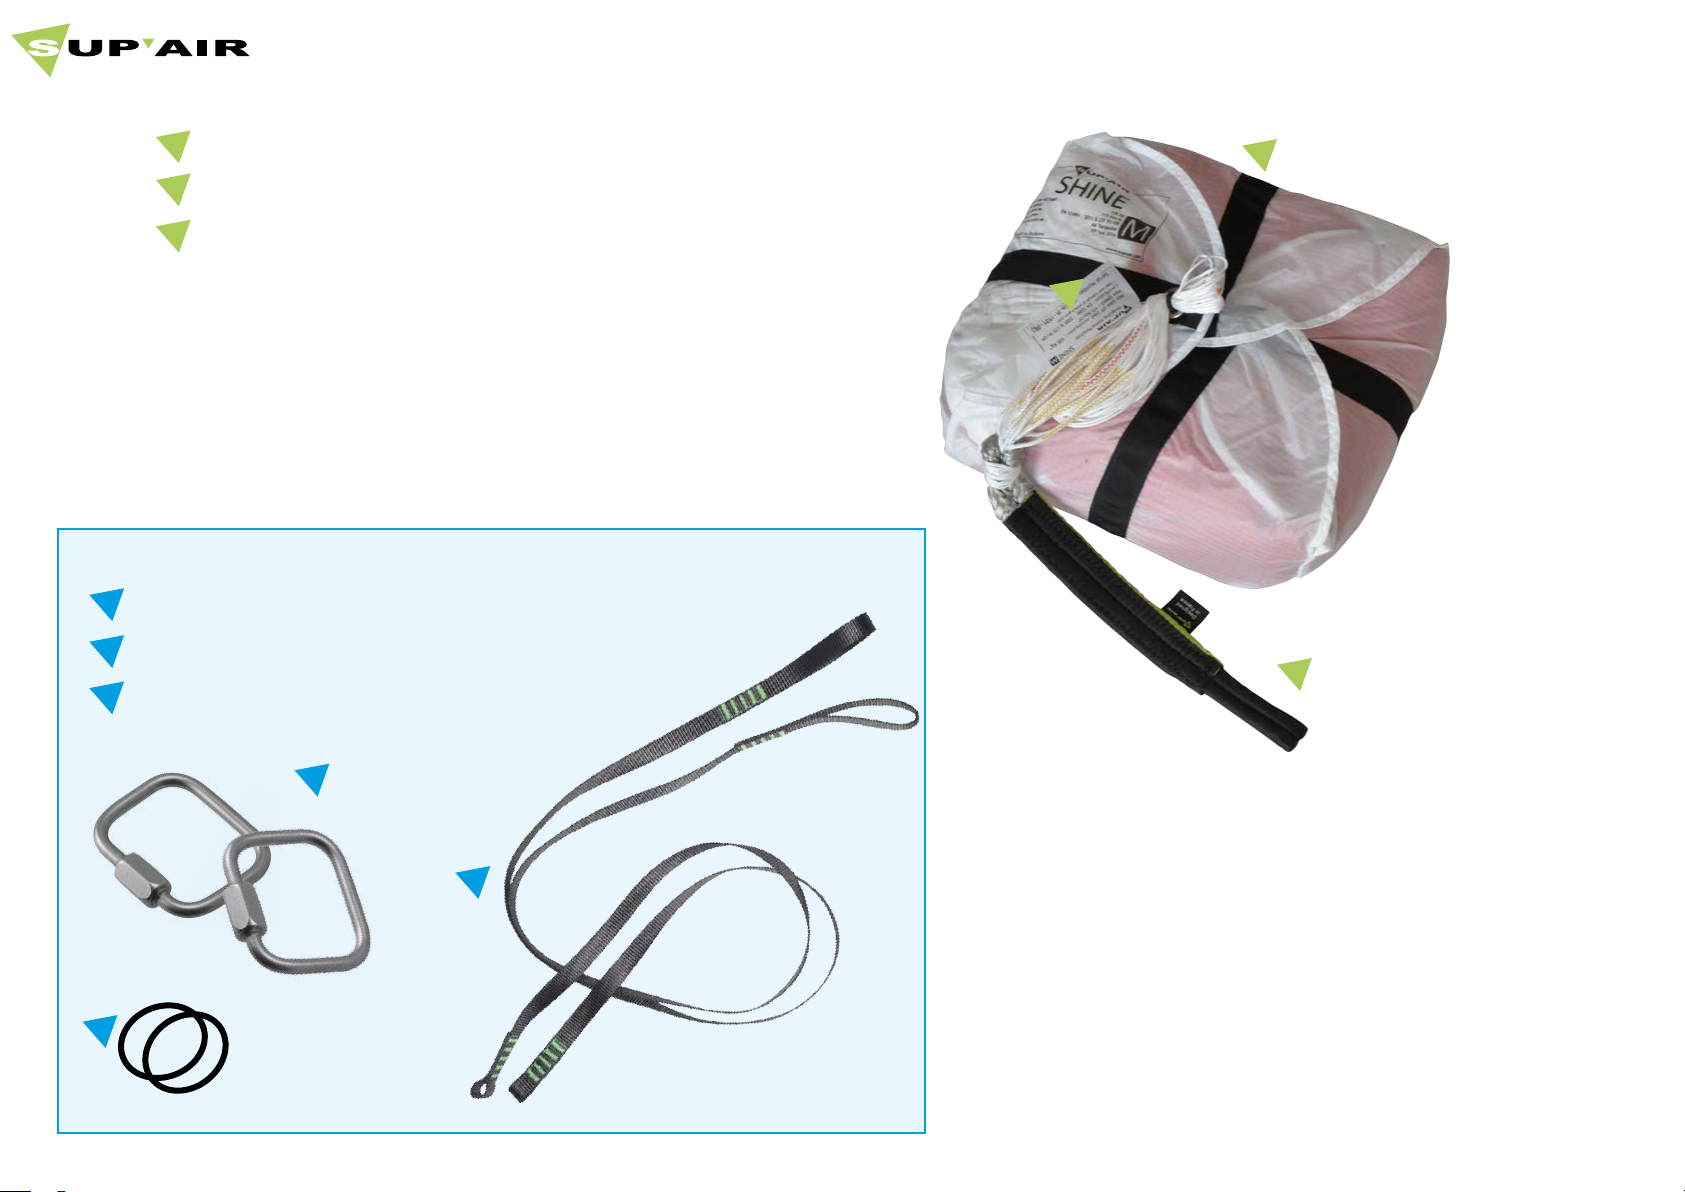
Options :
4
1
Folded reserve parachute inside its deployment bag ( POD )..
2
Single reserve parachute bridle loop.
3
Label with serial number, and manufacturing date.
Split risers
SHINE reserve parachute’s manual SHINE
Equipment overview
1
3
5
Maillons Rapides® 6mm
2
Flexible toric rings
6
5
4
6
SUP’AIR _SHINE Page 6
Page 7
SHINE reserve parachute’s manual SHINE
This notice shows the information requested
by the EN 12491. norm. This European Norm
(EN) is required for all the paragliding reserve
parachutes. All our reserve parachutes are
conforming to the EN norm.
The reserve parachute certification code EN
12491 is described as follows:
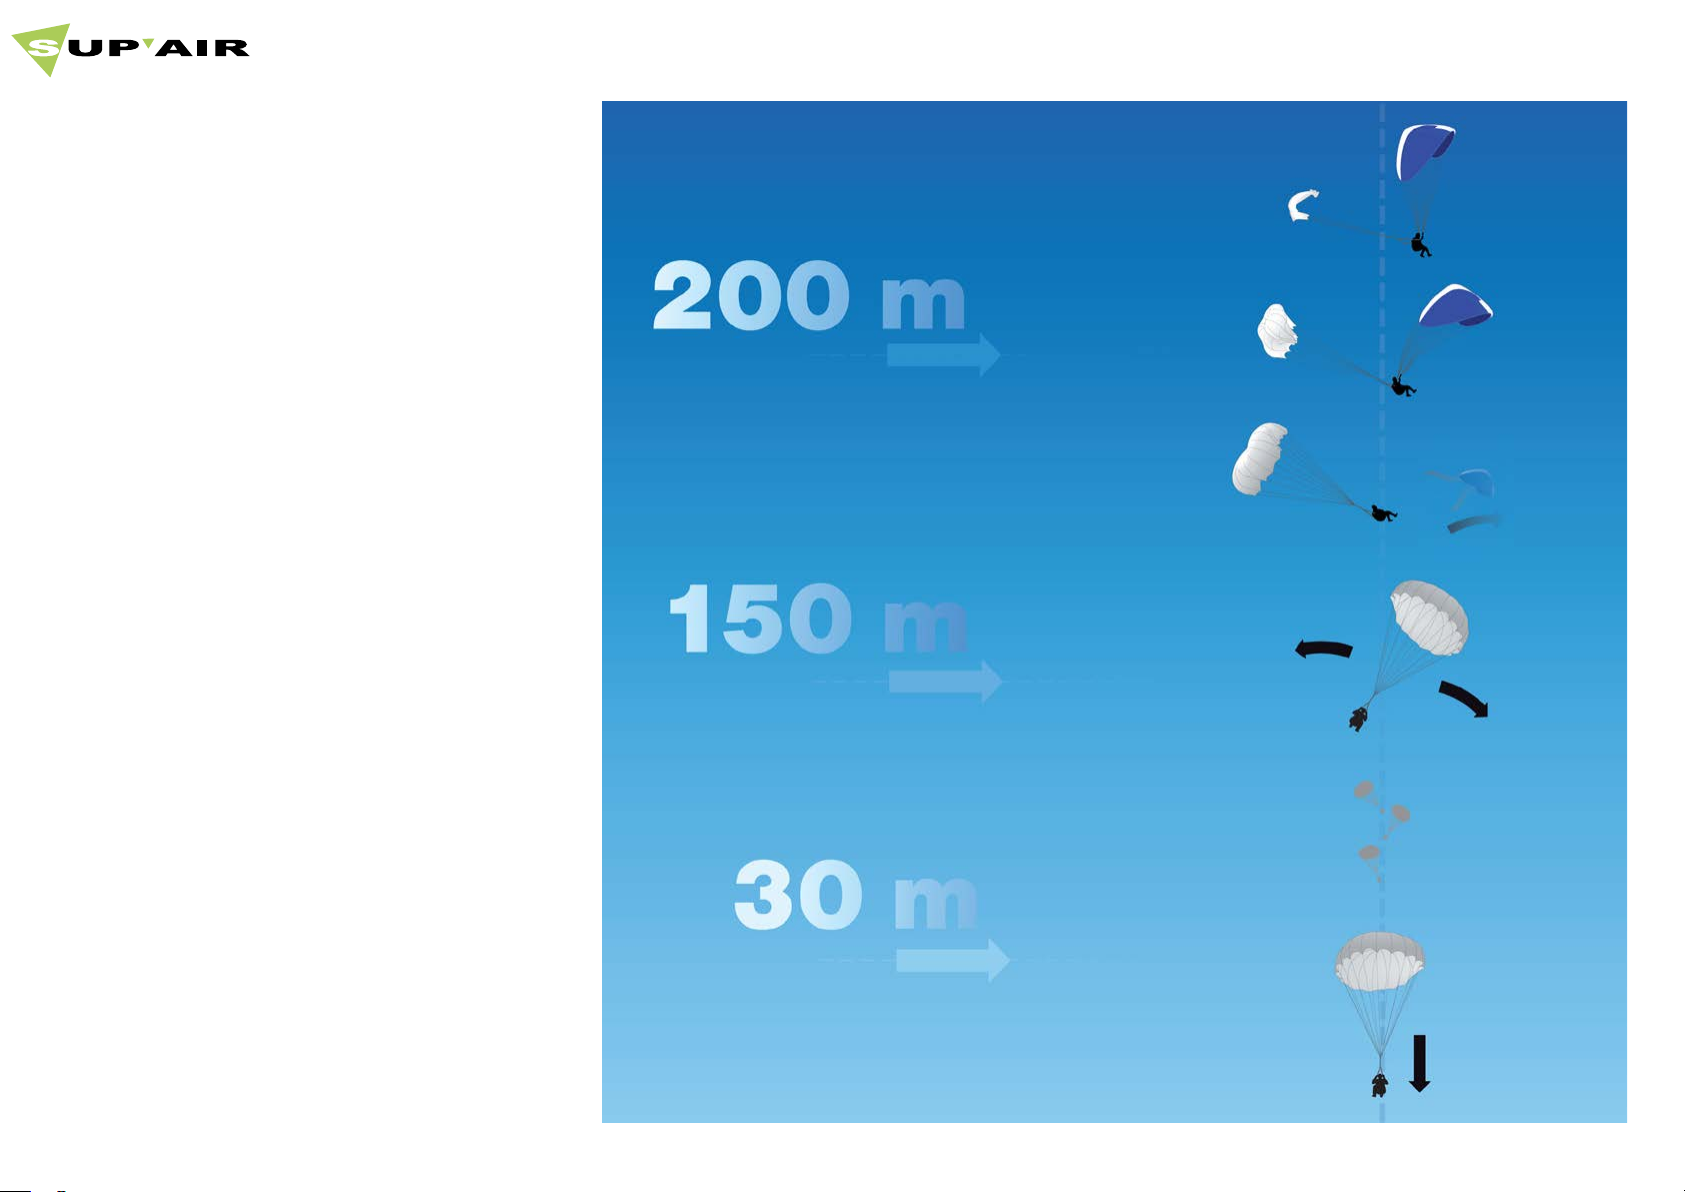
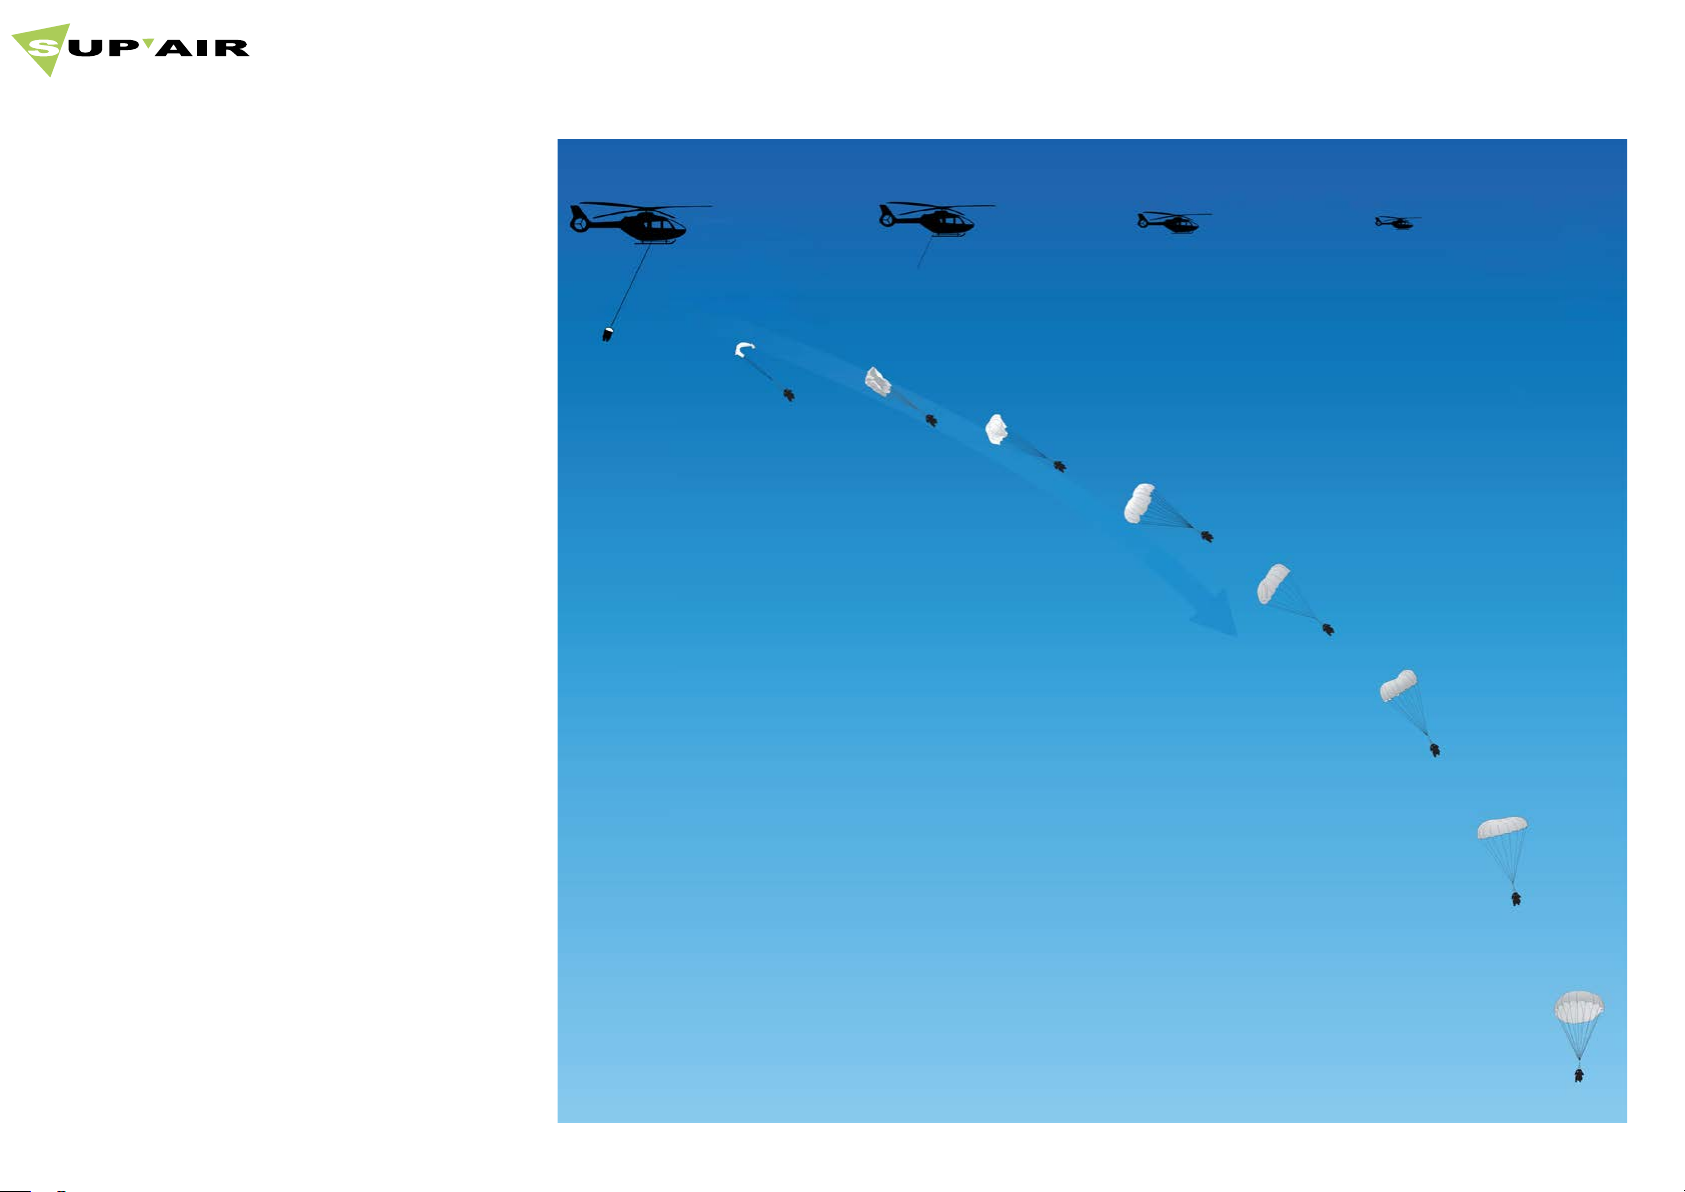
- Flight proper sequence: during a straight flight,
the reserve parachute is deployed. In order to
conduct accurately reproducible tests by avoiding any interference from the paraglider, the
test-pilot releases his paraglider at peak height
during a roll
•The maximum sink rate is measured during the
last 30 meters, the paragliding wing is released,
below or equal to 5,5 m/s under maximum
load.
•Stability is checked in a subjective visual way
( with a rolling effect or not ), and is gauged
against the overall sink rate ( an unstable reserve
parachute usually demonstrates a higher sink
rate).
•The reserve parachute opening speed must be
inferior to 5 seconds.
- Structural tests ( resistance ): consists of verifying the
overall structural integrity of the parachute under
maximal load for a given horizontal 40 m/s speed.
There can not be any failure / damage taking
place on the riser / lines / canopy system
EN 12491 norm
Flight test
European Norm 12491
Opening speed + Wing jettisoning
STABILITY
The certification results can be found at www.supair.
com
Sink rate ≤ 5,5 m/s at maximum load.
SUP’AIR _SHINE Page 7
Page 8
SHINE reserve parachute’s manual SHINE
STRUCTURAL TEST
EUROPEAN NORM 12491
Horizontal speed 32 m/s or
115 km/h at maximum load.
EN 12491 norm
SUP’AIR _SHINE Page 8
Page 9

SHINE reserve parachute’s manual SHINE
Use
Guideline procedures to follow with our
reserve parachutes::
To begin with, we must stress that using a reserve parachute should never be taken for granted
or considered to be without risks to the pilot. A reserve parachute is only there to deploy in case of
an emergency situation.
The pilot’s weight must conform to the parachute
manufacturer’s recommended load limitations to
be fully operational. Any intent to use a reserve parachute above the manufacturer’s recommended
weight limitations is dangerous and must totally be
a
- Any reserve parachute riser connection to the harness must result with the pilot landing on his legs
and standing.
The parachute must be left unmodified to keep
it aligned with the certification procedure it went
through to assure for a proper deployment
sequence to take place.
- It is very important to learn how the parachute
works, and only during a SIV course (Simulated
Flight Incident ) or equivalent exercise.
Deploying the Reserve Canopy:
- Find the deployment handle.
- Hold it firmly and pull it out of the outer container
or harness.
- Using the deployment handle, jettison the inner
pod forcefully into open air and AWAY from the
paraglider.
The reserve parachute pod will automatically open
upon reaching maximum line and riser length
once under tension.
- Thanks to the Apex line, the reserve deployment
will be short and easy
- Once the reserve parachute is deployed, the pilot
must disable the paraglider by symmetrically pulling as much as possible on the «B» risers to bring
the rescue overhead to stabilize the descent.
- Upon landing, the pilot must be ready to cushion
the impact by flexing his legs and roll sideways;
exercising what is called a PLF landing ( Parachute
Landing Fall ).
RECOMMENDATION AND CARE FOR THE
PARACHUTE AFTER A WATER LANDING:
In case of a water landing, the parachute must be
dried, followed by line stretching and reconditioning, following the manufacturer’s guide lines.
Let the parachute dry outdoors in a shaded area,
away from direct sunlight
Pre-stretch the lines with a 30 kg., and 50 kg. load
for the Apex in order to limit Nylon shrinkage due to
moisture and humidity. It is preferable to check the
lines length with a 9 kg. load (see measurements
chart on page 13).
- Proceed with the repacking procedure according
to the manufacturer’s guide line manual.
- Ensure a correct reserve parachute installation
inside the harness by doing an extraction during a
hang-test. Repeat installation procedure afterward.
To be noted:
An EN12491 certified reserve parachute must theoretically have a touch-down speed, equal or inferior
to 5,5 m/s, which corresponds to a 1,80 meter jump.
This impacting speed can greatly vary due to a few
relevant factors: The air mass, the overall hooking
The paragliding wing’s influence on the overall setup ( paraglider / reserve parachute ) is important
and not predictable nor quantifiable. The scenario
can not be reproduced during the tests.
As such, the descent rate of a non neutralized wing
could bring the risk of experiencing much higher
values than those obtained during the certification
procedure.
In spite of the positive statistics showing
the obvious benefits of using a reserve
parachute in case of an emergency, the
later can not be taken for granted at any
time or place.
Let go the rescue pod handle!
Do not keep it in your hand!
SUP’AIR _SHINE Page 9
Page 10
SHINE reserve parachute’s manual SHINE
Connecting the reserve parachute to the harness
The reserve parachute installation will vary relative to the riser type used. Please review the following recommendations :
- « Y » risers setup. >>Two (2) 6mm Maillons Rapides® are needed ( Ref. : MAILCARIN6 ) + two (2) toric elastic rings ( Ref. : MPPP044 ).
- Separate STD risers ( Ref. : ELESOLOSTD ). >> One (1) square 7mm Maillon Rapide® will be needed ( Ref. : MAILCARIN7 ) + four (4) flexible toric rings (
Ref. : MPPP044 ).
Follow the instructions corresponding to the type of risers you intend to use.
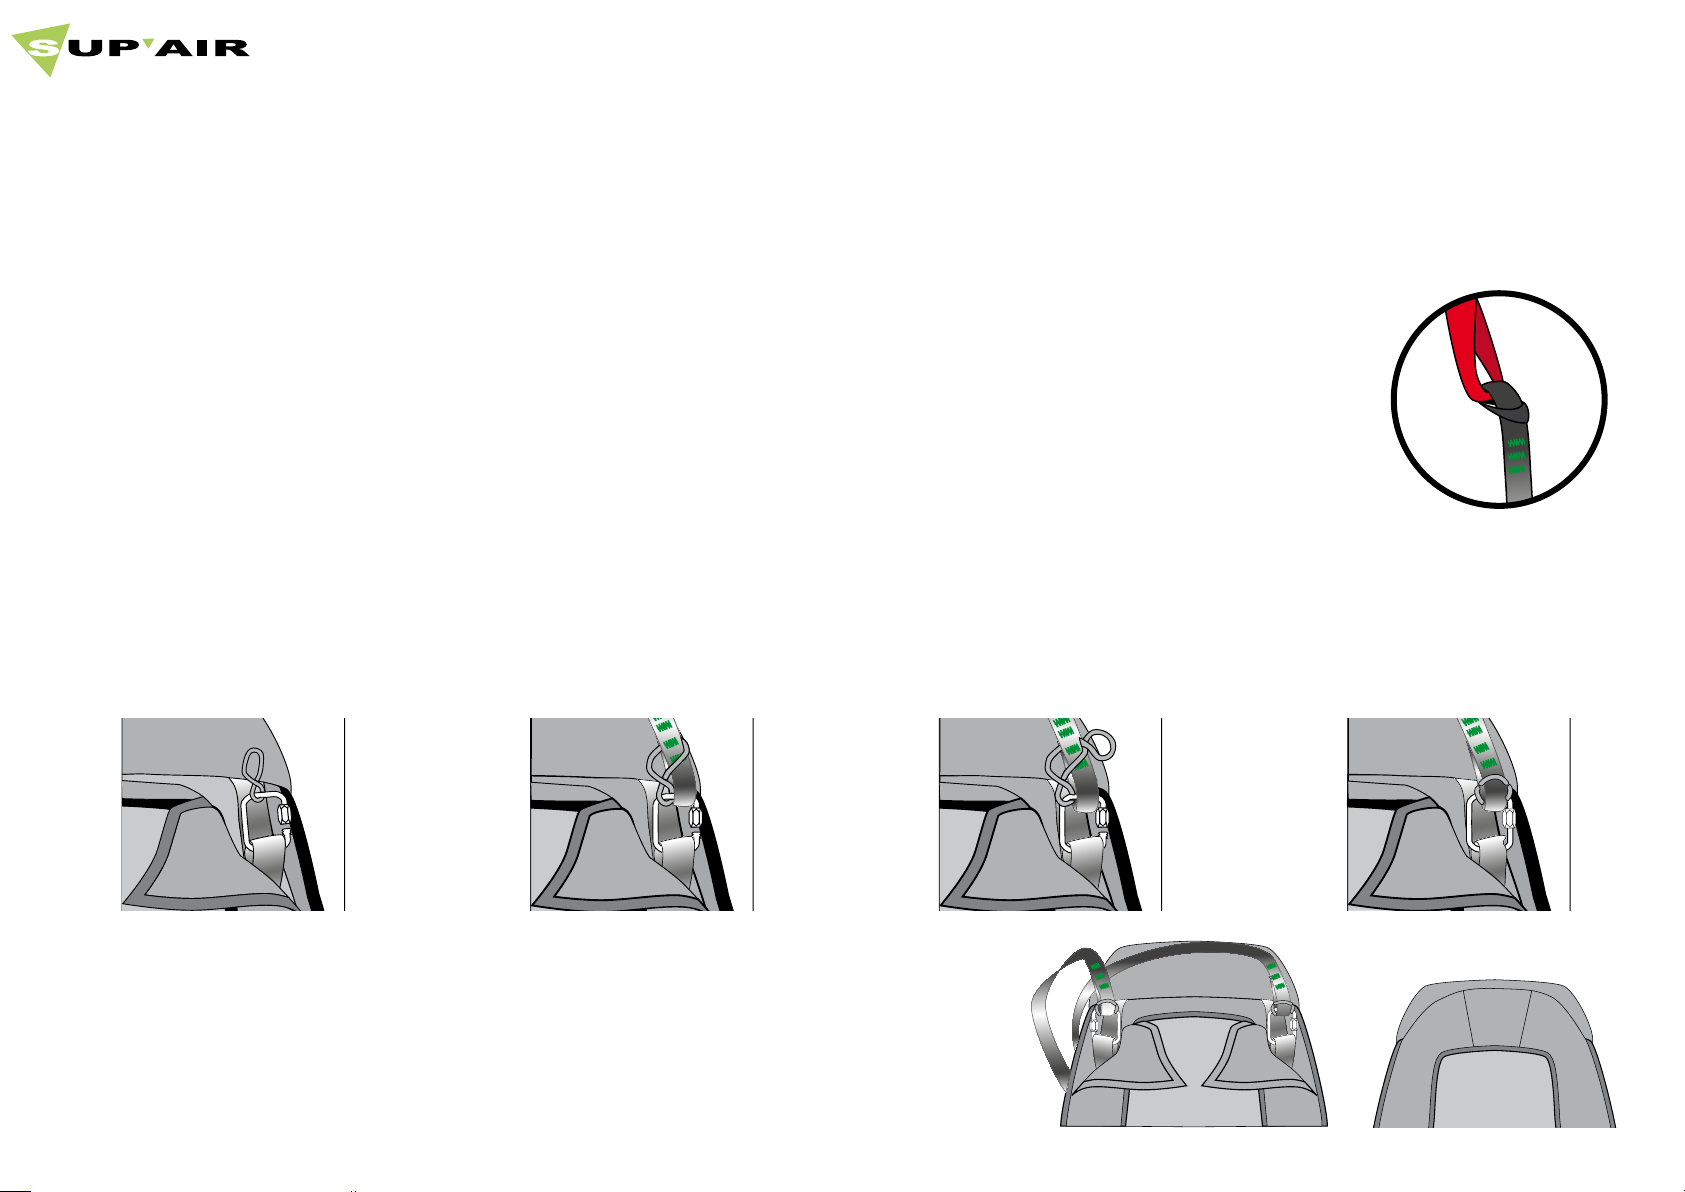
1. Reserve parachute to harness connection with « Y » risers.
>> « Y » riser reserve parachute connection.
Make a loop to loop ( Lark’s head ) knot between the single reserve parachute riser and the base of the « Y » riser where the
bigger bridle diameter loop is located.
>> « Y » riser connection to the harness.
1. - Take two (2) square 6mm Maillons Rapides® and two (2) flexible toric rings.
- Unfasten the Velcros (or zip) located alongside the shoulder protective sleeves to reach the reserve parachute connection
loops on the shoulder straps.
2. - Open the Maillon Rapide®- Push
the bridle’s buckle through.
- Push the maillon through the flexible toric ring.
- Twist
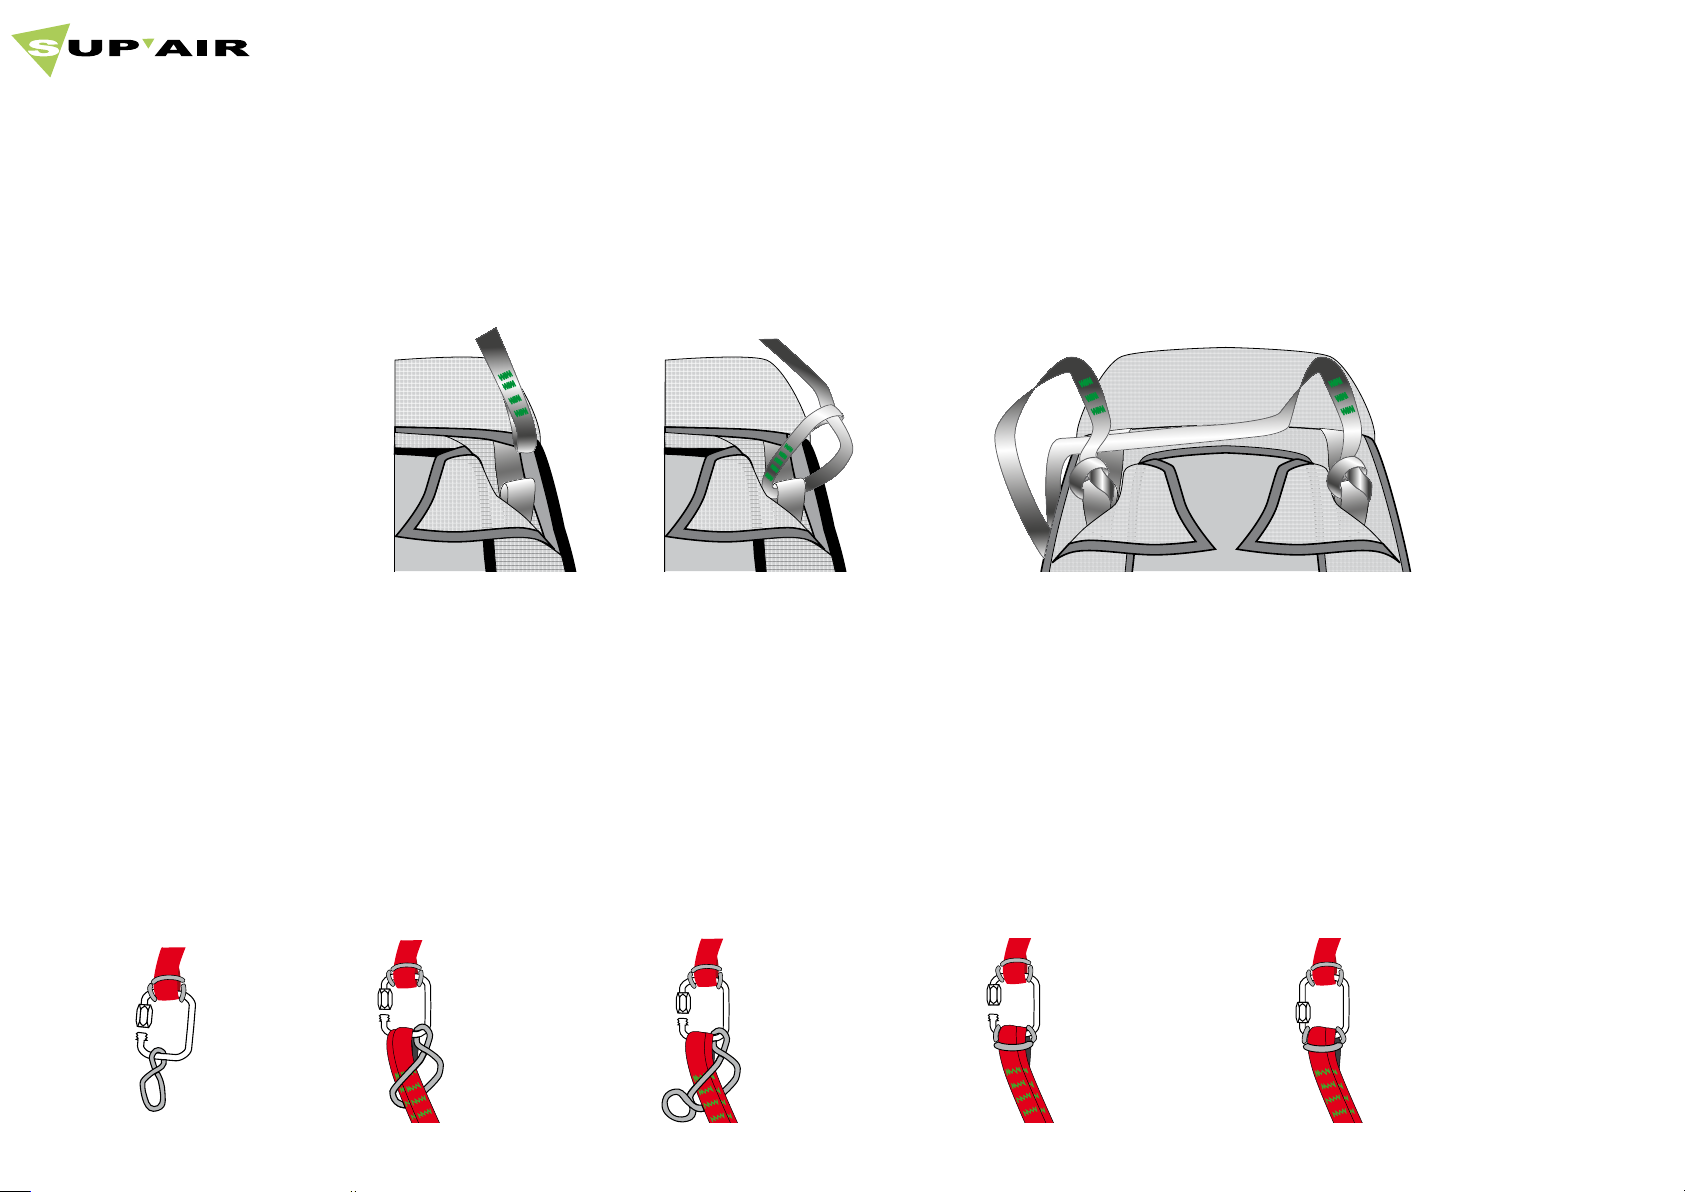
6. Repeat sequence
1 through 5 on the
other side of the
harness.
7. Tuck away the risers excess ( without making knots ) under one
single flap :
- Either to the right side if you wish to place your reserve parachute
handle to the right ( recommended if right handed ).
- Or to the left side if you wish to place your reserve parachute
handle to the left ( recommended if left handed )..
- Close the protective sleeves Velcros (or zip).
3. - Push the riser’s loop
through the flexible toric ring.
- Push the maillon through the
riser’s loop.
4. - Give a second twist to the
toric ring.
- Push the Maillon Rapide®
through the riser loop.
5. - Tidy up the assembly.
- Be certain that the risers end loops
are securely in place.
- Close the maillon tightly by hand.
- Complete tightening with pliers by
making a ¼ tightening turn.
SUP’AIR _SHINE Page 10
Page 11
SHINE reserve parachute’s manual SHINE
Connecting the reserve parachute to the harness
2. Reserve parachute/harness connection with SDT separate risers.
>> Risers to harness connection using a loop to loop ( Lark’s head ) knot.
1. - Unfasten the
Velcros located
alongside the
shoulder protective
sleeves to reach the
reserve parachute
shoulder straps
connection loops.
>> Separate riser reserve parachute connection.
One (1) square 7mm Maillon Rapide® will be needed + two (2) flexible toric rings.
1. - Open the 7mm
square Maillon Rapide®.
- Connect the reserve
parachute single riser
loop.
- Push the maillon
through the toric ring
- Twist
2. - Attach each riser to the shoulder attachment points by
making a Lark’s knot ( loop to loop connection ). Use the largest bridle loop ends.
2. - Push the end riser
through the toric ring.
- Push the maillon
through the risers
buckles.
3. - FGive a second
twist to the toric ring.
- Push the buckle
through the maillon.
3. - Tidy up the assembly.
- Make sure for the risers not to be longer than
one another.
- Tighten each connection securely.
4. - Repeat steps 1 through
3 with the second riser..
5. - Tidy up the assembly.
- Make sure for the risers not to
be longer than one another.
- Close the Maillon Rapide®
tightly by hand.
- Tighten using pliers and making a ¼ turn.
SUP’AIR _SHINE Page 11
Page 12
SHINE reserve parachute’s manual SHINE
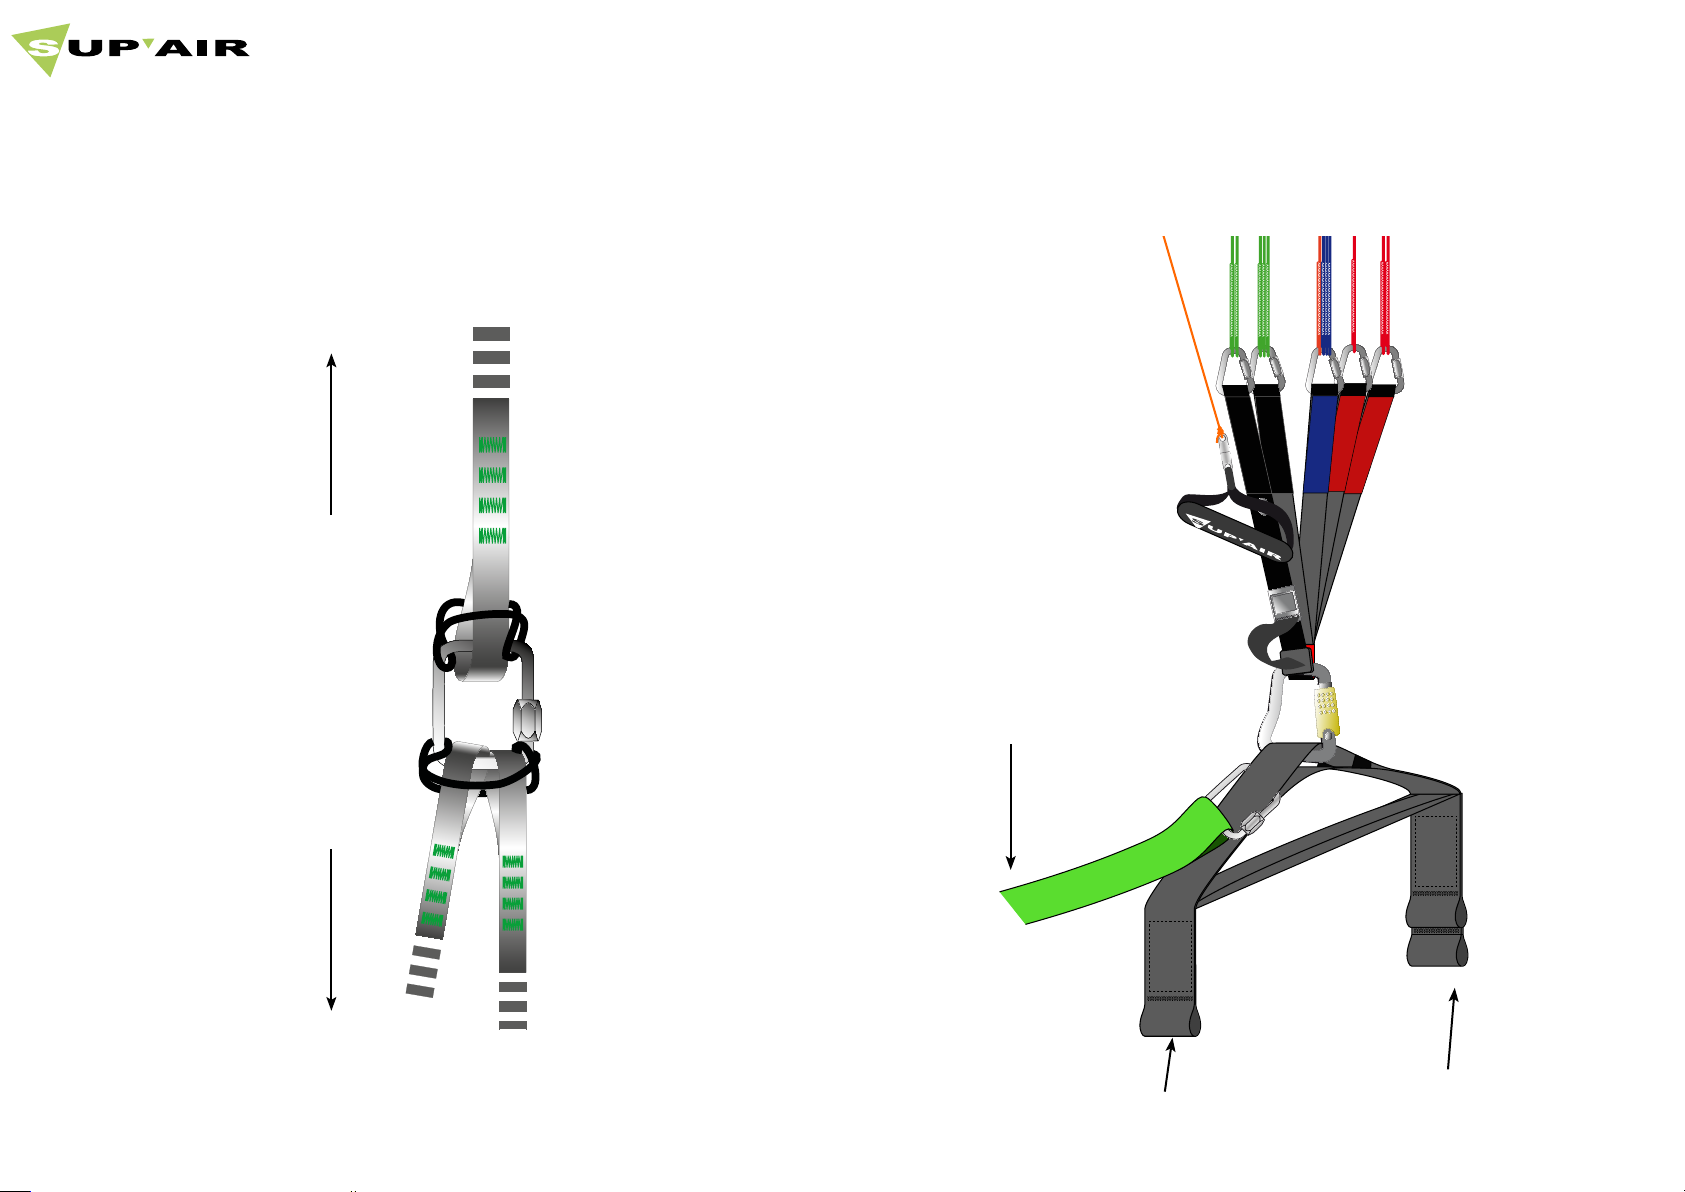
Connection of the tandem reserve parachute to the risers
1. Connect the risers to the parachute using a rectangular 7 mm stainless
steel ( Inox )Maillon Rapide®, then use toric elastic rings to secure the bridles to
the Maillons as indicated below.
Toward the reserve parachute.
2. Connect the risers on top of each spreader bar (at the main loop),
with the rectangular stainless steel maillons and the flexible elastic rings.
Parachute riser.
Toward the
spreader-bars.
passenger
pilot
SUP’AIR _SHINE Page 12
Page 13

SHINE reserve parachute’s manual SHINE
Installing the reserve parachute
3.Installing the parachute in its container.
Weather you have an outer front container or an integrated reserve parachute pocket in your harness, proceed with the installation according to the
manufacturer’s guidelines.
Check the completed installation during a hang-test.
After installing the reserve parachute in its container, it is mandatory to conduct a hang-test. Be certain for the handle to open all the container flaps
prior the parachute extraction while evaluating the force amount exerted during the pull to jettison
Have the installation checked by a professional outfit.
Conduct an extraction test every six ( 6 ) months to ensure proper system functionality.
Note : conducting a hang-test extraction does not imply deploying the reserve parachute which will stay inside its POD.
Advise : In order to guaranty a quick opening speed and a sound structural integrity, your reserve parachute must be repacked every six months.
Take advantage of the repacking procedure to conduct a hang-test extraction.
Reserve parachute folding and installation inside the harness must conform to the specific
guidelines found in this manual.
SUPAIR is not liable for any other use or installation.
SUP’AIR _SHINE Page 13
Page 14
SHINE reserve parachute’s manual SHINE
16
1
9
9
9
10
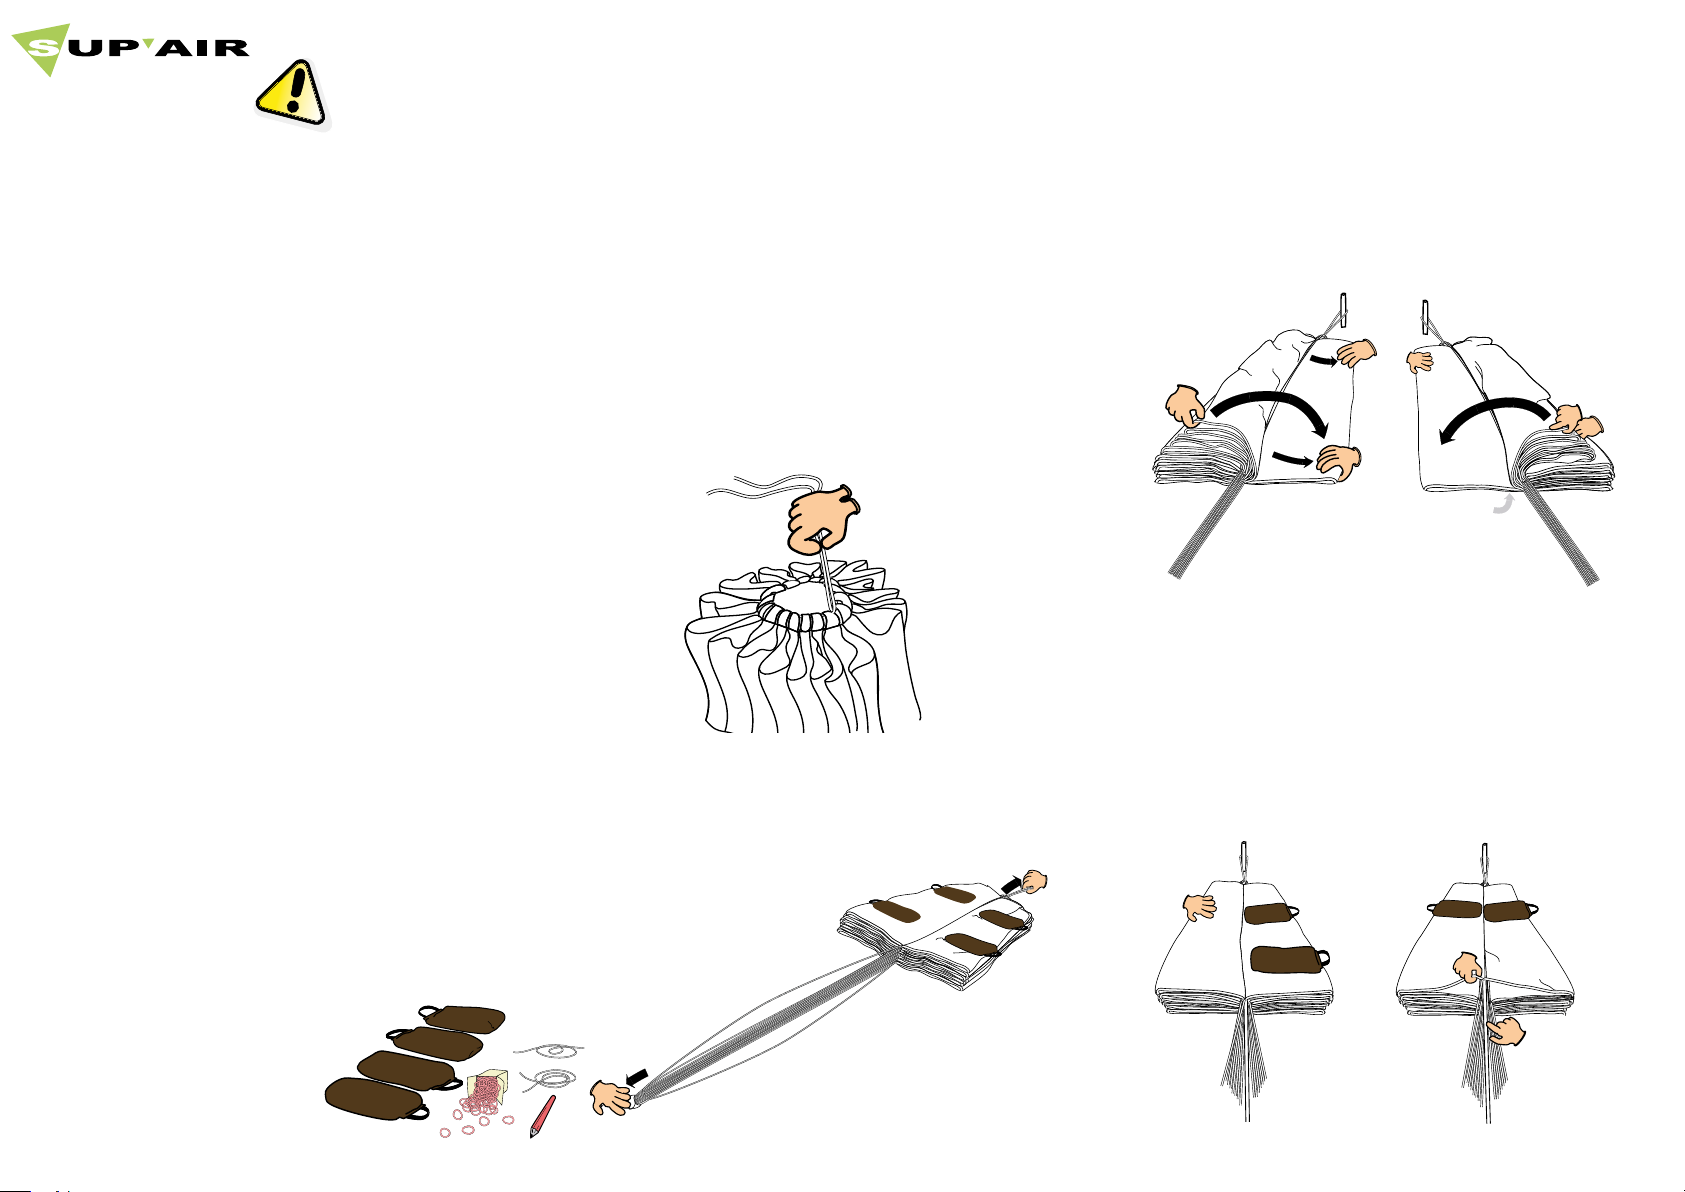
Packing a reserve parachute is not very difficult
but requires a methodical and precise folding
procedure. If you feel uneasy about repacking
the reserve parachute yourself, it will be advisable for you to seek professional assistance to
do the job correc
Tip: take advantage of having to repack your
parachute, to deploy it on the ground and
vent it for a while, prior proceeding to folding it
again.
Before each repacking procedure, the following
sequence must be observed :
- Carefully check each line from the canopy to the
riser for any possible damage.
- Aerate the parachute for at least twelve ( 12 ) hours.
Not in direct sunlight nor in a room filled with polluting
chemical agents ( sprays ).
- Check the fabric for damage or soiling of any kind.
- Inspect the pod and parachute pocket for wear
and tear to ensure a clean extraction.
- Check the properly fastened reserve parachute
handle to the pod.
- Inspect the elasticated loop keeping the pod flaps
securely closed.
- If you notice something unusual, send your parachute to be inspected by a professional specialized
certified outfit.
2. BKeep the parachute unruffled with
the lines running freely from the bridle «loop to
loop» connection to the canopy’s leading edge.
3. Tension all the lines from the riser. Push
a string through the packing buckles located at the
center of the panels stitching and balancing point
between the lines and the central cord.
4. Control both lower and upper lines, en-
suring that they run freely from the canopy to the
riser(s).
PACKING
to the right. Repeat the procedure with the white
panels to the left, starting with panel number one (
1 ).
gore ) count on each side ( the panel numbers
may vary with other parachute models ). Be precise and verify that the bottom of the skirt ( leading
edge ) is perfectly aligned and tidied..
5. Successively overlap all the red panels
6. Be certain to have an equal panel (
1Make a selective list of
the following items needed to complete the repacking procedure :
- Elastics to keep the lines in place.
- Sand ballasts weights or books.
- A small thin piece of line about
30cm long.
POD
SUP’AIR _SHINE Page 14
Page 15
SHINE reserve parachute’s manual SHINE
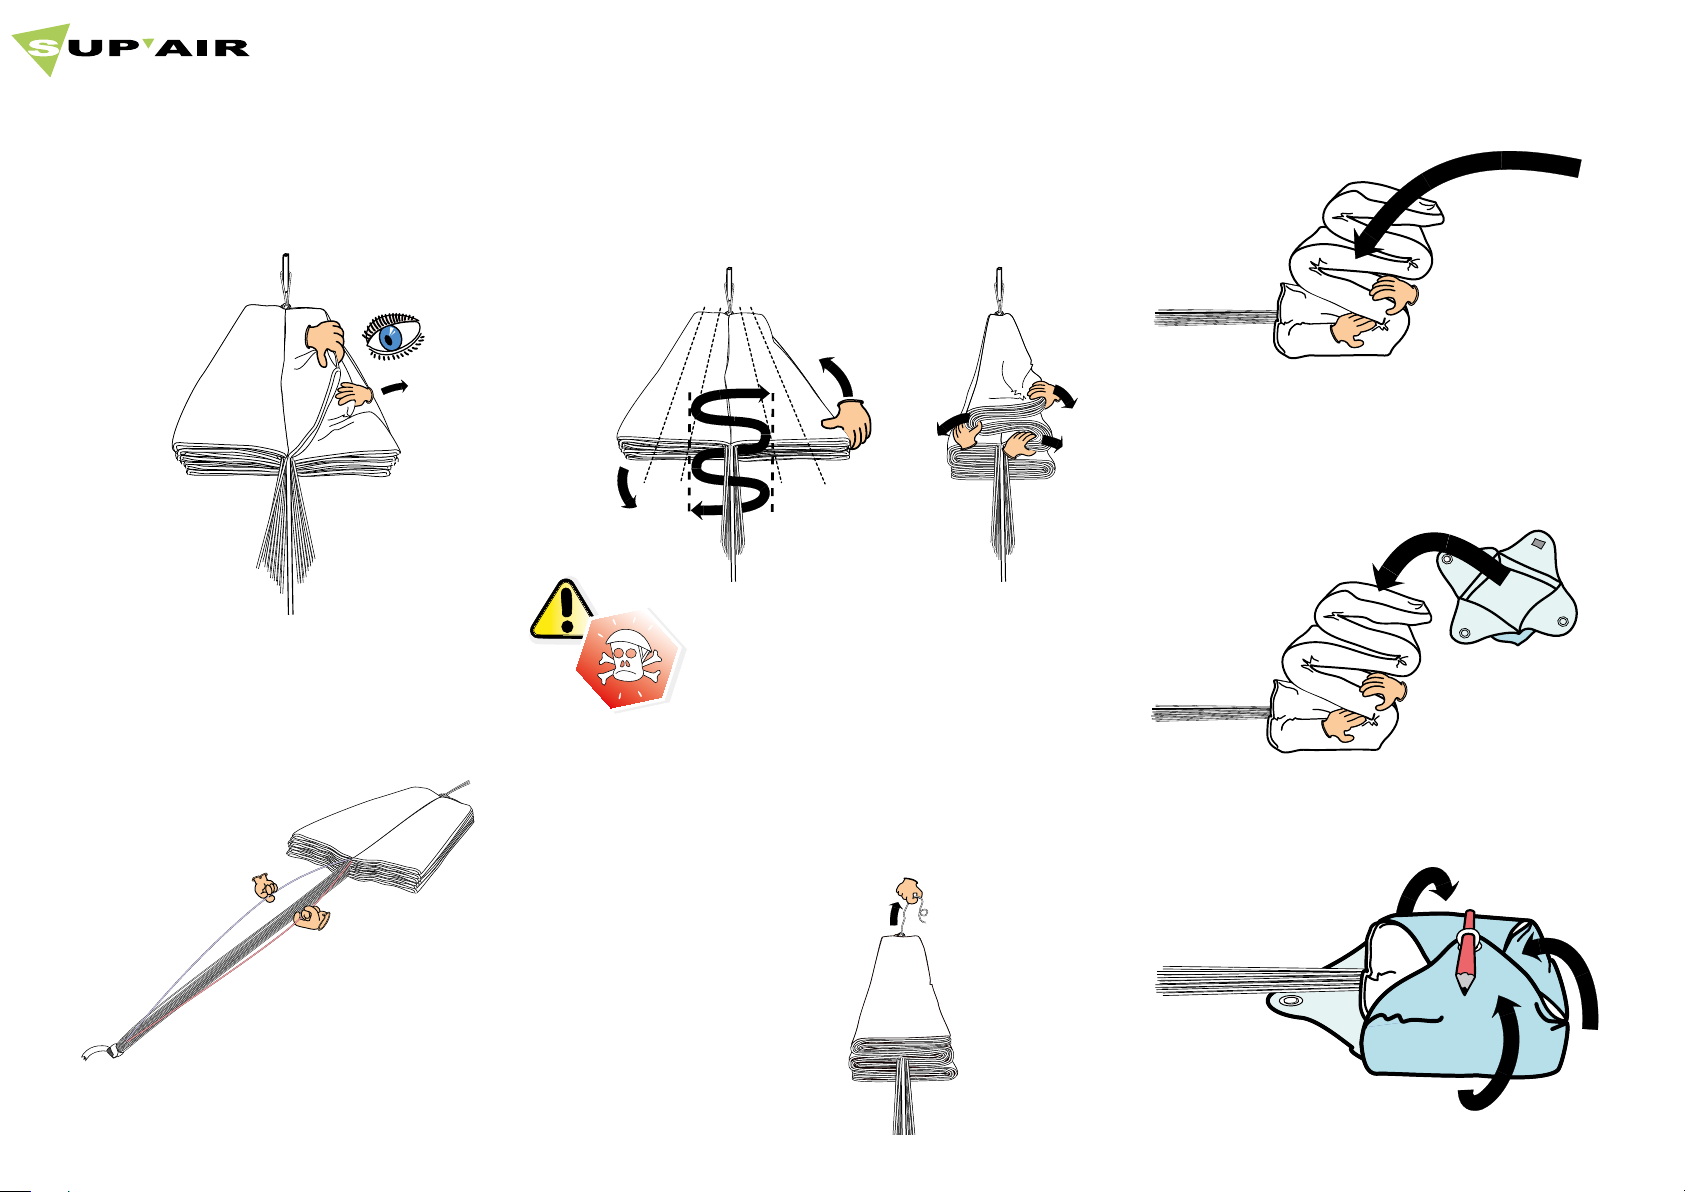
PACKING
7. Lift the upper line to keep the folds tidied
up along the entire panels length, and the wind
channel unobstructed right up to the canopy’s apex.
8. Be certain for the upper and lower lines
to freely run from the canopy to the risers.
9
9. S-fold the left side of the canopy under
the centre of the parachute, then S-fold the right
side of the canopy onto the centre of the chute.
Keep the canopy neatly folded in place using
sandbags or books.
9
10. WARNING! Release the tension on
the canopy and
IMMEDIATELY REMOVE THE TIE
holding the folding loops together. Not confor-
ming to the described procedure would prevent
the parachute from opening! ( See check list ).
11. “S” fold the fabric.
12. Place the pod at the top, then flip it all
upside down with the “S” folded parachute. Keep a
small space at the front of the parachute’s leading
edge to later fold and tuck away the lines.
13. Close the container’s rear flap and
two lateral flaps..
SUP’AIR _SHINE Page 15
Page 16
SHINE reserve parachute’s manual SHINE
PACKING
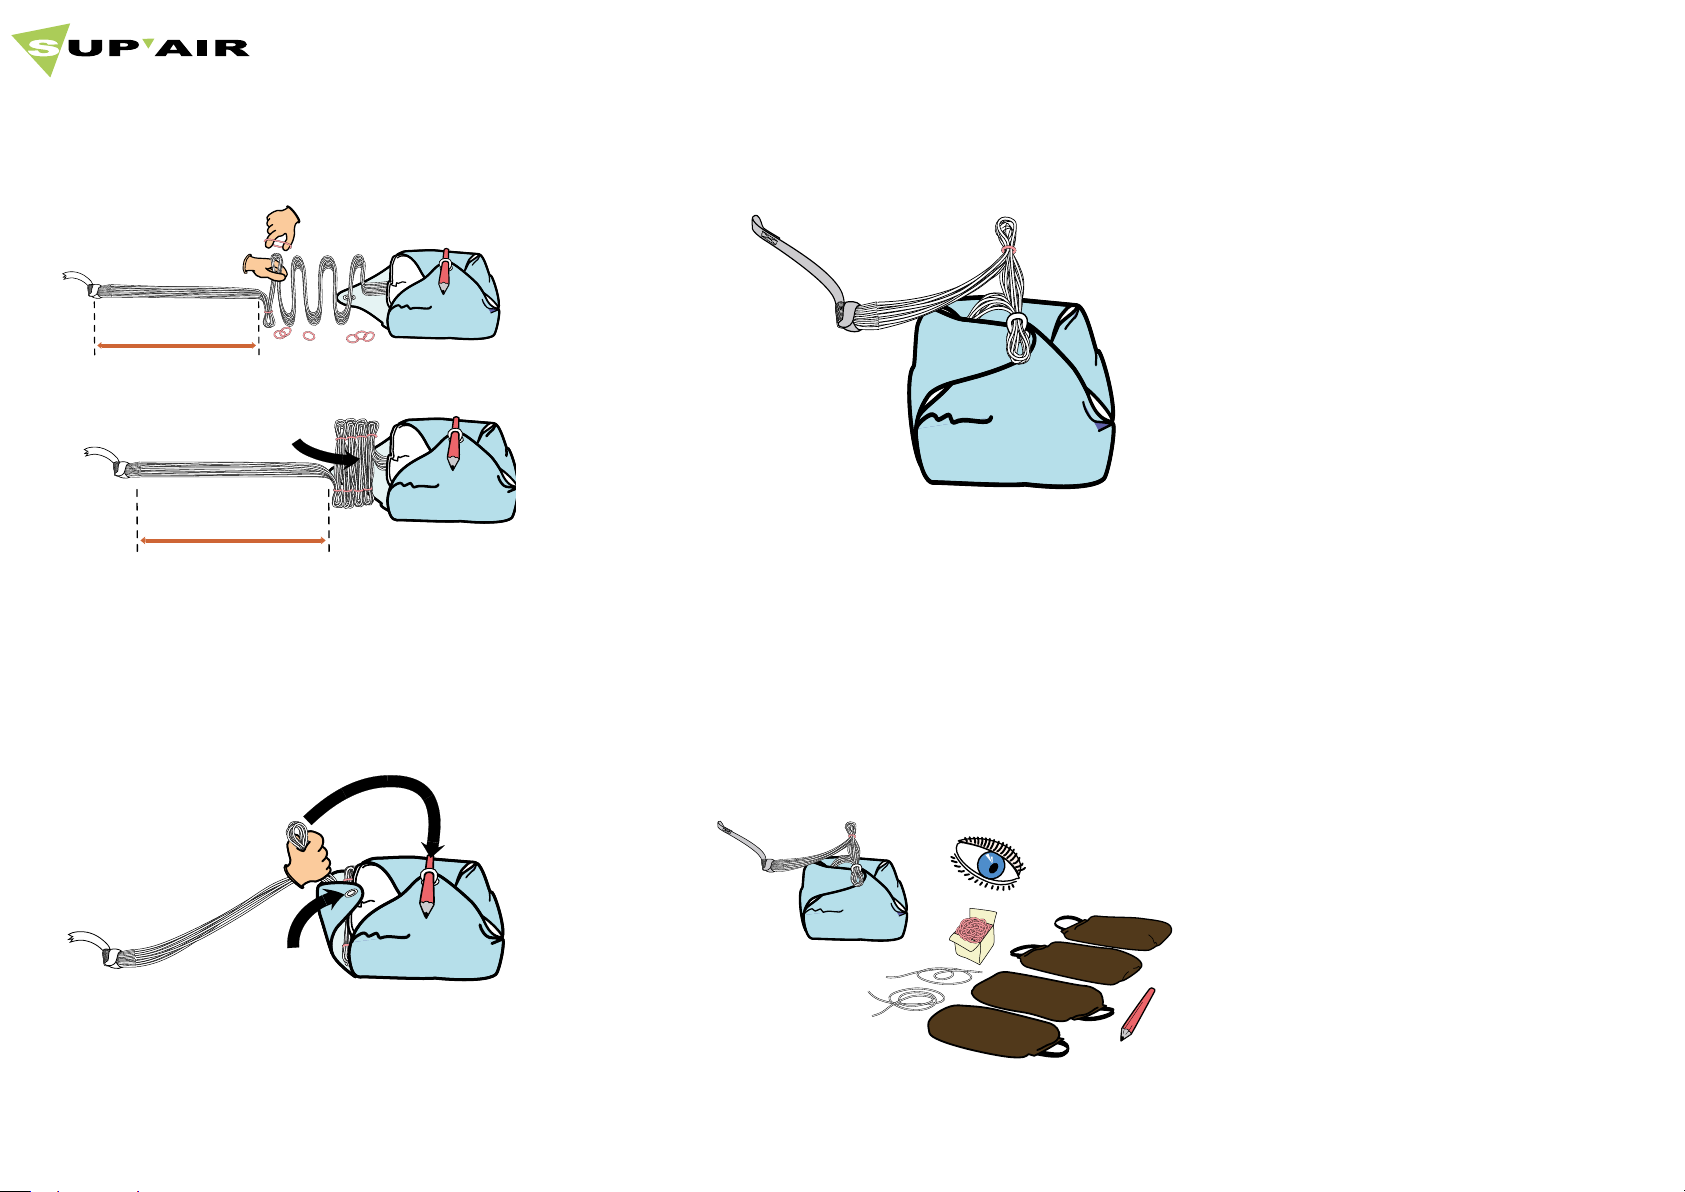
14. «S» fold the lines into the accommodating
space left for them, leaving about 1m length of lines
outside for the outer coils.
1m
1 m
15. Close the fourth flap and insert about 4
cm of folded lines through the elasticated loop to keep
the container closed.
16. «S» fold the coil the remainder of the lines
on the outside of the reserve parachute container.
of the listed items in step 1, as confirmation that none
of them have been left inside the folded parachute.
17. Verify that you have in your possession all
NOTE : Videos pertaining to our
reserve parachutes use and packing
are available, and can be viewed at
www.supair.com
SUP’AIR _SHINE Page 16
Page 17
SHINE reserve parachute’s manual SHINE
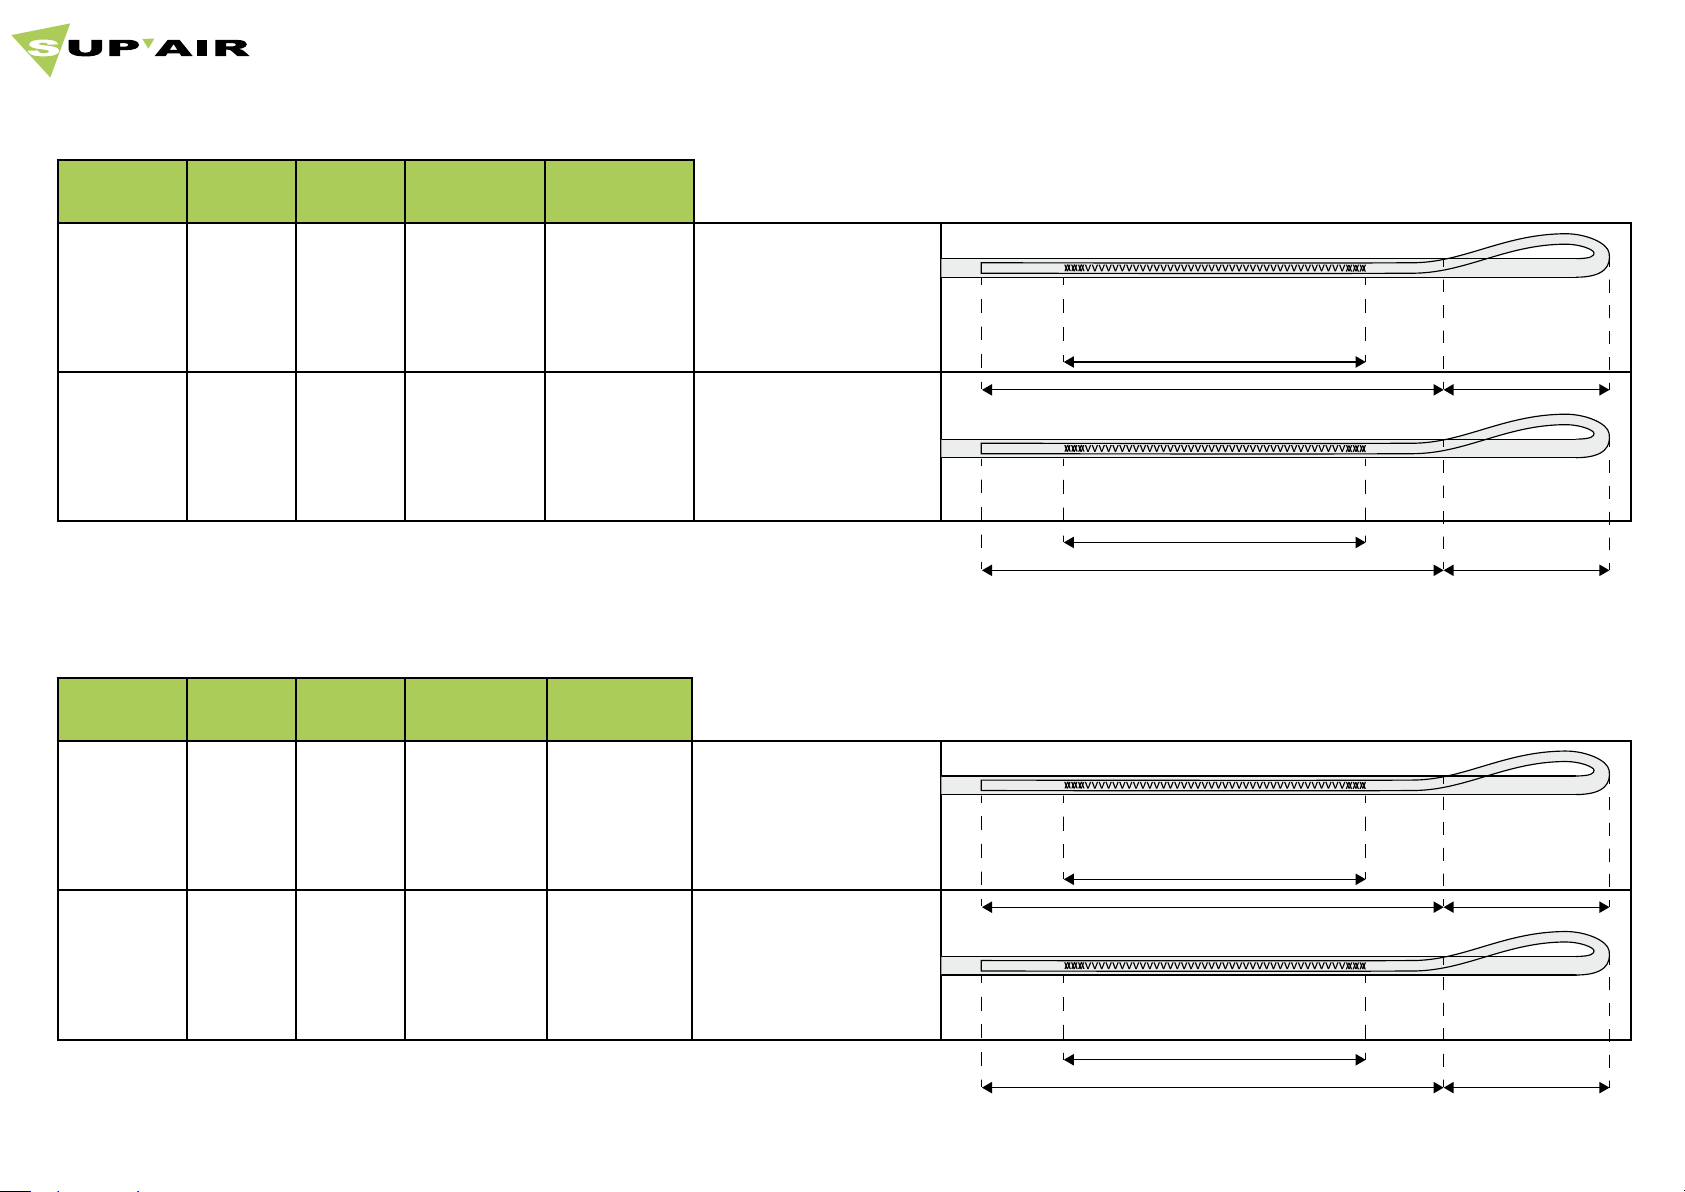
SHINE Size S reserve parachute line chart.
* Measurements made under a 5 kg. tension.
Measurement table
Line Cut Sewn
Lines num-
ber
Main lines 4740 4430 14
Apex 5750 5250 2
SHINE Size M reserve parachute line chart .
* Measurements made under a 5 kg. tension.
Line Cut Sewn
Lines num-
ber
Line mate-
rial
Liros
00148 - 0131
Liros
00099 - 1192
Line mate-
rial
2 times 155 mm extra
lenght ( 35 mm buc-
kle + 120 mm splicing
- stitching lenght = 90
mm)
2 times 250 mm extra
lenght ( 50 mm buc-
kle + 200 mm splicing
- stitching lenght = 150
mm)
seam 90 mm
splice 120 mm
seam 150 mm
splice 200 mm
loop 35 mm
loop 50 mm
Main lines 511 0 4800 16
Apex 6070 5570 2
Liros
00148 - 0131
Liros
00099 - 1192
2 times 155 mm extra
lenght ( 35 mm buc-
kle + 120 mm splicing
- stitching lenght = 90
mm)
2 times 250 mm extra
lenght ( 50 mm buc-
kle + 200 mm splicing
- stitching lenght = 150
mm)
seam 90 mm
splice 120 mm
seam 150 mm
splice 200 mm
loop 35 mm
loop 50 mm
SUP’AIR _SHINE Page 17
Page 18
SHINE reserve parachute’s manual SHINE
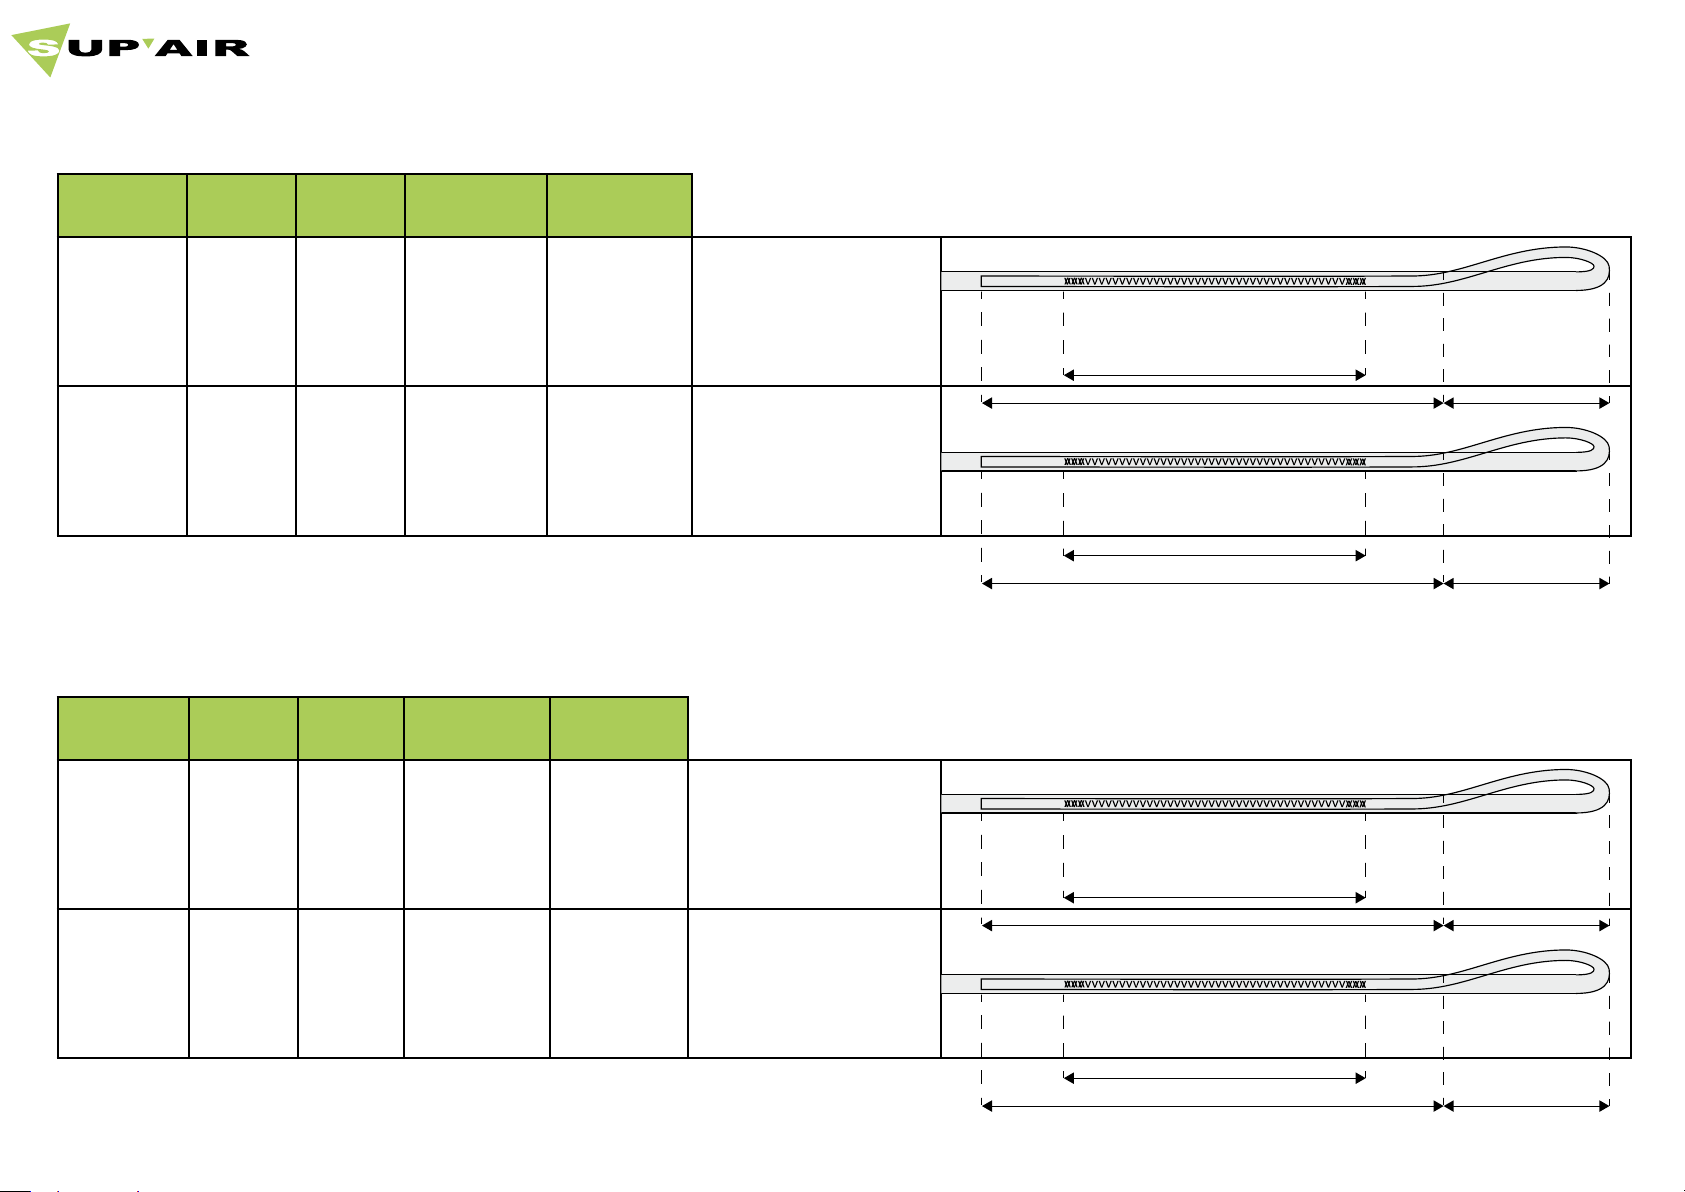
SHINE Size L reserve parachute line chart .
* Measurements made under a 5 kg. tension.
Measurement table
Line Cut Sewn
Lines num-
ber
Main lines 5 810 5500 18
Apex 6880 6380 2
SHINE Tandem reserve parachute line chart .
* Measurements made under a 5 kg. tension.
Line Cut Sewn
Lines num-
ber
Line mate-
rial
Liros
00148- 0131
Liros
00099 - 1192
Line mate-
rial
2 times 155 mm extra
lenght ( 35 mm buc-
kle + 120 mm splicing
- stitching lenght = 90
mm)
2 times 250 mm extra
lenght ( 50 mm buc-
kle + 200 mm splicing
- stitching lenght = 150
mm)
seam 90 mm
splice 120 mm
seam 150 mm
splice 200 mm
loop 35 mm
loop 50 mm
Main lines 7330 7020 22
Apex 8650 8150 2
Liros
00099-1628
Liros
00099-1628
2 times 155 mm extra
lenght ( 35 mm buckle
+ 120 mm splicing -
stitching lenght = 90
mm)
2 times 250 mm extra
lenght ( 50 mm buckle
+ 200 mm splicing -
stitching lenght = 150
mm)
seam 90 mm
splice 120 mm
seam 150 mm
splice 200 mm
loop 35 mm
loop 50 mm
SUP’AIR _SHINE Page 18
Page 19

SHINE reserve parachute’s manual SHINE
Maintenance
5 If wet, you will have to immediately dry your parachute to avoid any bacteria / fungi buildup. Gasoline contact, or any other solvent / chemical
agent, can considerably decrease and compromise your reserve parachute’s structural integrity. If the case,
Storage and transport.
When not in use, you must stow away your reserve parachute in a dry, cool, clean and UV rays free environment.
During transport protect the harness against against abrasion or UV deterioration (use a bag). Avoid long transports in wet conditions.
REPACKING FREQUENCY
To guaranty a fast deployment sequence and proper care for your reserve parachute, you must open and repack it every six (6) months.
LONGEVITY
Your reserve parachute was designed to last ten years if properly maintained as per manufacturer’s recommendations. Pass that period, we will
recommend you to have your parachute inspected at a professional certified outfit. The procedure should be implem
Maintenance
RECYCLING
Our materials have been specifically selected for their exceptional resilience and environmentally friendly abilities. None of the components used
in the manufacturing of our reserve parachutes is environmentally harmful. The majority of the components
Repairs
In spite of using the highest quality products used during manufacturing, it is possible for your reserve to deteriorate through general use. If showing
any sign of wear and tear, it should be sent for inspection and/or repairs at a professional certified
Hardware & Parts
- POD
Materials
>> Line
• Liros 00148 - 0131
• Liros 00099-1192 (S, M et L)
• Cousin Trestec 2411 Rescue line (Biplace).
>> Fabrics
• MJ International D20,
• PA 6.6 High strength, 20dctex 30gm/m².
>> Riser bridle :
• Braid 6 mm 2 500DaN.
SUP’AIR _SHINE Page 19
Page 20

SHINE reserve parachute’s manual SHINE
Warranty
SUP’AIR takes great care in its product design and manufacturing. SUP’AIR guaranties its parachutes two years from the date of purchase against any defect or design flaw that would arise under normal use. Product mishandling, excessive exposure to aggress
Disclaimer
Paragliding is an activity requiring specific skills and sound judgement. Learn how to fly within the environment of a certified paragliding school. Carry an insurance policy with you in addition to you pilot certification. Always mind and gauge your pers
SUP’AIR does not assumes the liability in connection with your paragliding practice. Any other use or assembly than those described in
this manual is not the responsibility of SUPAIR.
This SUP’AIR product has been designed exclusively for paragliding. Any other activity such as skydiving or BASE jumping is absolutely
forbidden.
Pilot’s gear
It is essential for you to wear a suitable head protection (certified paragliding helmet), adequate footwear and right clothing for the
activity. Moreover, carrying a reserve parachute connected to your harness in flight is highly recommend.
SUP’AIR _SHINE Page 20
Page 21
SHINE reserve parachute’s manual SHINE
This page will help you keep record of your SHINE scheduled maintenance.
Service Book.
Purchase date
Owner’s name
Name and stamp of the shop
Care
Resale
Purchase
date
Workshop’s name/ Buyer’s name
Care
Resale
Purchase
date
Workshop’s name/ Buyer’s name
Care
Resale
Purchase
date
Workshop’s name/ Buyer’s name
Care
Resale
Purchase
date
Workshop’s name/ Buyer’s name
SUP’AIR _SHINE Page 21
Page 22

SUPAIR-VLD
Parc Altaïs
34 rue Adrastée
74650 Chavanod, Annecy
FRANCE
+33(0)4 50 45 75 29
45°54.024’N / 06°04.725’E
 Loading...