

Page 1
Little Strawber r y
Bluetooth Keyboard
Addre ss: No. 2,Y ihe R d., Shi lon g Co mmu nit y,Sh iya n Str eet ,B aoa n Dis tri ct, Sh enz hen ,Ch ina
Spec iation
Mode l No.:SWD-007
Page 2
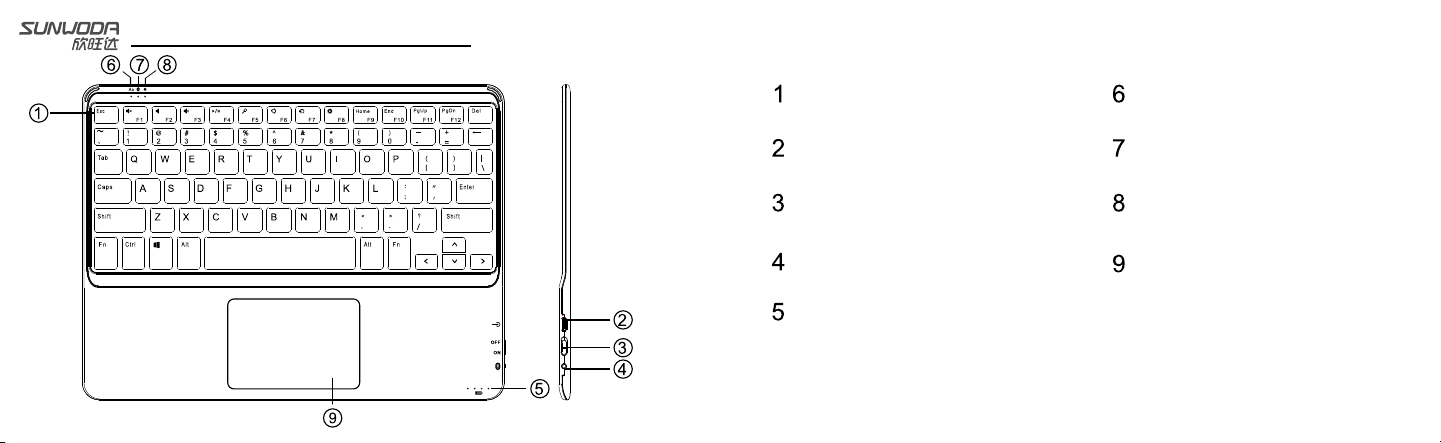
Know about th e ke yboard
TPU ke yboard button
USB ba ttery charge in terface
Toggle powe r switch
Swit ch to code
Powe r indicator
Caps l ock indicator
Blue tooth search/
conn ection indica tor
Audi ble feedback in dicator
Touch panel
Page 3
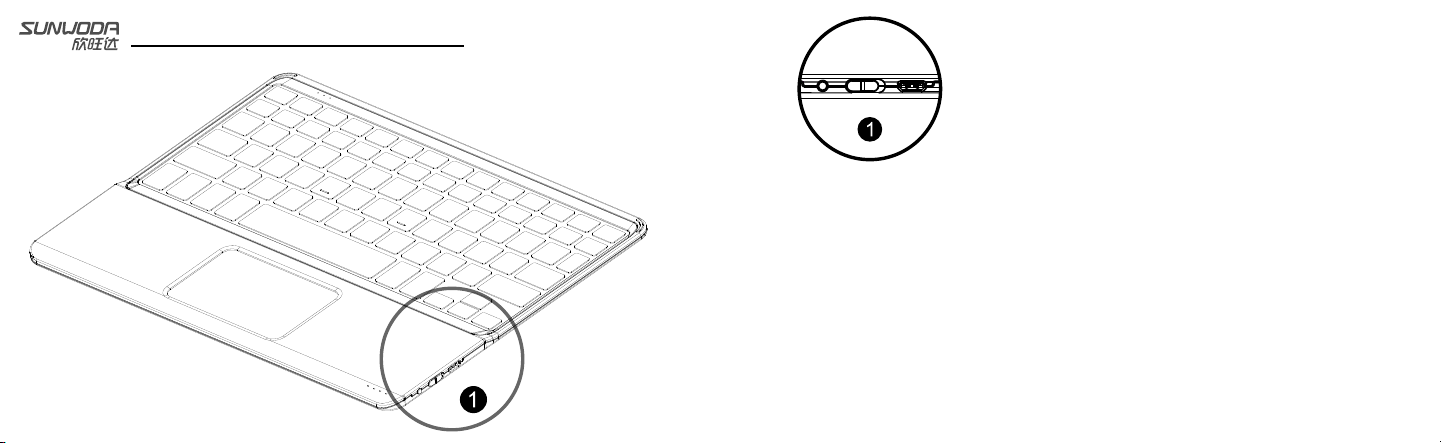
Set up the keyb oa rd
1.Turn ON the pow er s witch
The Bluetoot h will be in search aut om atically, the light is off when
the ke yb oard is connected . If it is failed to sear ch t he paired device
in 5 min ut es, the light will be o ff.
2.Pl ea se ensure the Bluet oo th function of the pa ired deviceis ope ne d .
Plea se c hoose:Set up—Ge ne ral—Bluetooth – Open
3. Cho os e “Bluetooth 3.0 ke yb oard” in menu
4. Ent er i n PIN code
If the pai red device reques t to e nter in the PIN cod e, p lease press the
butt on o n bluetooth keybo ard. The B luetooth indica tor light is turn
blue w he n the keyboard is con nected, then off.
Page 4
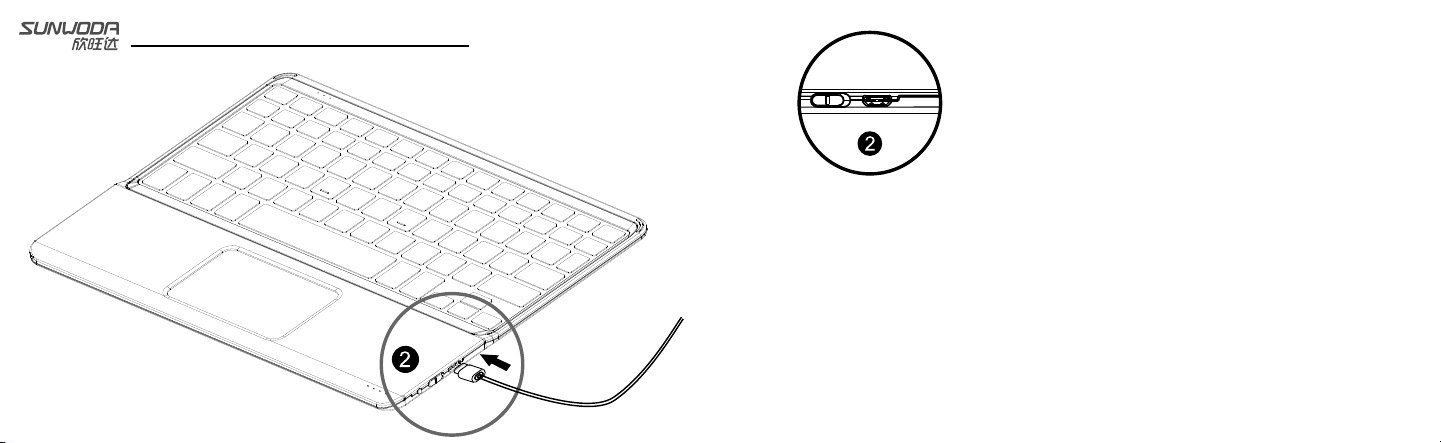
Charging fo r ke yboard
1.Us e th e Micro USB to connec t th e keyboard and po we r source, the power
indi ca tor light will be fla shing in red.
2. The power ind icator light will s ta y lit once it is fully ch arged.
Page 5
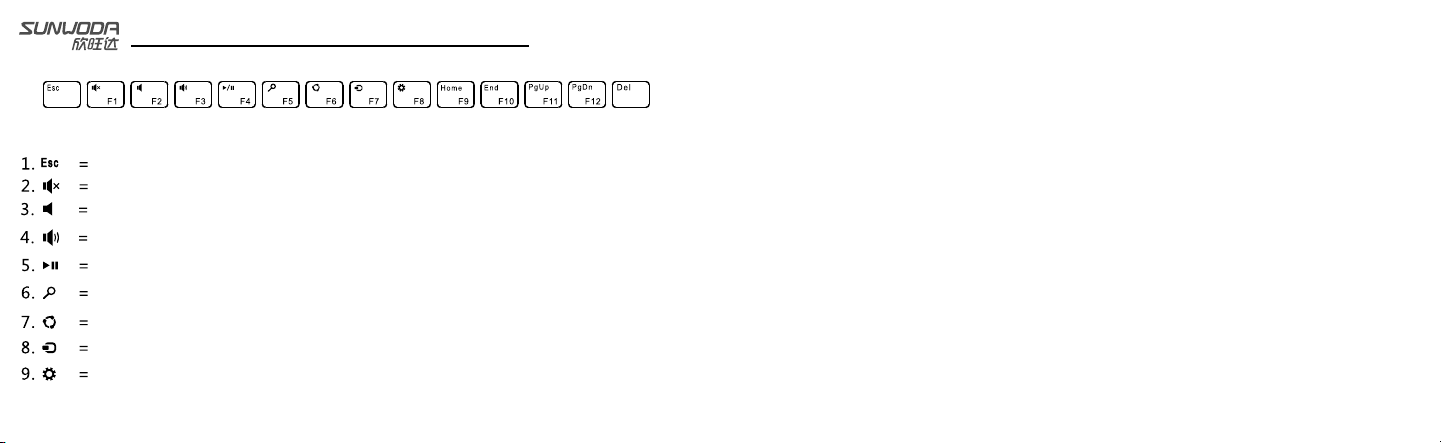
Key function descriptio n
Return to the main inte rf ac e of the paired device.
Sound off
Tur n do wn t he volume
Tur n up t he v olume
Pause/Play
Start the search fu nc ti on
Sharing
Connect the other dev ic e vi a pa ired device
Set up the windows
Use your WIN8
Special shortcuts
10. Slide the mouse = Sin gl e re fers to the sliding ins id e
11. Page turning = Two fi ngers slide to a direct io n
12. View th e pr op er ties: three fingers t ou ch t he p anel together
13. “FN” +”Space” = Tu rn o n/ off the back ligh t of k ey bo ard, 4 differ en t br ig htness
levels can be chose n to m ak e th e back light fit the work in g en vi ronment well.
14. “FN” + “>” = Turn on/o ff the audible feedba ck i nd ic ator
15. “FN” + “B” = Show bat te ry l ev el
Page 6
Use your WIN8
Protect the k ey board
Status indicator lamp des cript ion
Indicator
The power light flick er i n tu rn
The power light flick er i n wa rn ing
The Blue indicator li gh t is t wi nkling
The Bluetooth indic at or t winkle
normally
Description
In charging state
Please charge the bat te ry a sap, the battery is
running low.
Twinkle quickly: the k ey bo ar d is in searching state
Twinkle slowly: the keyboa rd is trying to re-connect
pai red device
Pairing successfu ll y
Please use the keyboard pro perly
1. Please keep the keybo ar d aw ay f rom the sharp tool
2. Connect the keyboar d an d de vi ce successfully
3. Please do not put the hea ve t hi ng o n the keyboard
4. Please do not put the key bo ar d in the Microwave oven
5. Please do not use the key bo ar d to beat other things
6. Please keep the keybo ar d aw ay f rom the oils or corrosi ve c he mi cals
7. Please do not put the key bo ar d in to the water
8. Please keep the keybo ar d fu ll o f energy.
Page 7

FCC STATEMENT
1. This device complies with Part 15 of the FCC Rules. Operation is subject to the following
two conditions:
(1) This device may not cause harmful interference.
(2) This device must accept any interference received, including interference that may cause
undesired operation.
2. Changes or modifications not expressly approved by the party responsible for compliance
could void the user's authority to operate the equipment.
NOTE:
This equipment has been tested and found to comply with the limits for a Class B digital
device, pursuant to Part 15 of the FCC Rules. These limits are designed to provide reasonable
protection against harmful interference in a residential installation.
This equipment generates uses and can radiate radio frequency energy and, if not installed
and used in accordance with the instructions, may cause harmful interference to radio
communications. However, there is no guarantee that interference will not occur in a particular
installation. If this equipment does cause harmful interference to radio or television reception,
which can be determined by turning the equipment off and on, the user is encouraged to
try to correct the interference by one or more of the following measures:
Reorient or relocate the receiving antenna.
Increase the separation between the equipment and receiver.
Connect the equipment into an outlet on a circuit different from that to which
the receiver is connected.
Consult the dealer or an experienced radio/TV technician for help.
RF warning statement:
The device has been evaluated to meet general RF exposure requirement. The device
can be used in portable exposure condition without restriction.
 Loading...