


Preface SUR-47 User’s Manual
Preface
About this manual
This manual is designed to make using the SUR-47 Touch Screen Remote Control as easy as possible. Information in
this document has been carefully checked for accuracy; however, no guarantee is given to the correctness of the
contents. The information in this document is subject to change without notice.
Copyright
This document contains proprietary information protected by copyright. All rights are reserved. No part of this manual
may be reproduced by any mechanical, electronic or other means, in any form, without prior written permission of Sima
Products Corporation.
© Copyright Sima Products Corporation 2003
Trademarks
All trademarks and registered trademarks are the property of their respective owners.
The Federal Communication Commission Radio Frequency interference Statement includes the following paragraph:
FCC -
Note: This equipment has been tested and found to comply with the limits for a Class B digital device, pursuant to part 15
of the FCC rules. These limits are designed to provide reasonable protection against harmful interference in a residential
installation. This equipment generates, uses and can radiate radio frequency energy and if not installed and used in
accordance with the instructions, may cause harmful interference to radio communications. However, there is no
guarantee that the interference will not occur in a particular installation. If this equipment does cause harmful interference
to radio or television reception, which can be determined by turning the equipment on and off, the user is encouraged to
try to correct the interference by one or more of the following measures:
* Reorient or relocate the receiving antenna
* Increase separation between the equipment and the receiver.
* Connect the equipment into an outlet on a circuit different from that to which the receiver is connected.
* Consult the dealer or an experienced radio/TV technician for help.
The user should not modify or change this equipment without written approval from Sima Products Corp. Modification could
void authority to use this equipment.
90 Day Limited Warranty
Sima Products Corporation warrants this product against defects in materials and workmanship for a period of 90 days from
the date of purchase. During the warranty period, the product will be repaired or replaced, at Sima’s option. If you think you
need to send your unit in for service, call Sima Customer Service at 800-345-7462.
Conditions
Ship unit, freight prepaid, including reasonable proof of purchase and description of problem to:
This warranty is void if any defects are caused by abuse, misuse, negligence or unauthorized repairs. All liability for
incidental or consequential damages is specifically excluded. Some states do not allow the exclusion or limitation of
incidental or consequential damages, so the above limitation or exclusion may not apply to you. This warranty gives you
specific legal rights, and you may have other rights which vary from state to state.
ii
Attn: Customer Service
Sima Products
140 Pennsylvania Ave., Bldg #5,
Oakmont, PA 15139

SUR-47 User’s Manual Table Of Contents
Table of Contents
Chapter 1 - Introducing the SUR-47................................................................................................................1
SUR-47 Features ..............................................................................................................................................1
Unpacking the SUR-47 ..................................................................................................................................1
Identifying Components ..............................................................................................................................2
Chapter 2 - Getting Started.............................................................................................................................4
Installing The Base Unit..................................................................................................................................4
Using the IR blaster cable.............................................................................................................................4
Installing Batteries ..........................................................................................................................................4
Battery Indicator......................................................................................................................................4
Battery Tips and Precautions.................................................................................................................5
About the Touch Screen ..............................................................................................................................5
Turning the Touch Screen On................................................................................................................5
Touch Screen Precautions.....................................................................................................................5
Touch Screen Buttons .............................................................................................................................5
Using Hard Keys..............................................................................................................................................6
Entering the Setup Menus............................................................................................................................6
Navigating the Setup Menus ................................................................................................................6
The Setup menu tree.....................................................................................................................................7
Chapter 3 - Setting Up the SUR-47 ..................................................................................................................8
Device Menu..................................................................................................................................................8
Creating a New Device.........................................................................................................................9
Re-Labeling Devices.............................................................................................................................10
Setting the RF Address..........................................................................................................................10
Deleting Devices ...................................................................................................................................11
Code Menu ..................................................................................................................................................11
Using Pre-Code to Program Devices.................................................................................................12
Using the Learning Mode.....................................................................................................................13
Before Using the Learning Function...................................................................................................13
Erasing Key Codes ................................................................................................................................15
Erasing Device Codes ..........................................................................................................................16
Debugging Device Codes ..................................................................................................................17
LCD Layout ...................................................................................................................................................18
Using Macros ................................................................................................................................................18
Creating a New Macro........................................................................................................................19
Deleting a Macro ..................................................................................................................................20
Viewing a Macro...................................................................................................................................21
Setting Channels..........................................................................................................................................21
Adding a Quick Channel ....................................................................................................................22
Deleting a Quick Channel...................................................................................................................23
Relabeling a Quick Channel ..............................................................................................................23
iii

Table of Contents SUR-47 User’s Manual
Using the Transmission Feature ..................................................................................................................24
Miscellaneous Menus..................................................................................................................................24
Setting the Date and Time ..................................................................................................................25
Setting the Power Down Time.............................................................................................................26
Setting the Backlight On Time.............................................................................................................26
Setting the Beep Signal ........................................................................................................................27
Checking the Version Number ...........................................................................................................27
Resetting the SUR-47 to Factory Defaults................................................................................................28
Chapter 4 - Controlling Devices ...................................................................................................................29
Selecting a Device to Control...................................................................................................................29
Alternating Touch Screen Pages ..............................................................................................................29
Viewing the Macro Key ..............................................................................................................................30
Using the Quick Channel Buttons.............................................................................................................31
Controlling Devices .....................................................................................................................................32
Using the AUX Key........................................................................................................................................32
Appendix A - Specifications .........................................................................................................................33
Appendix B - Accessories .............................................................................................................................34
Appendix C – Troubleshooting......................................................................................................................35
Troubleshooting Tables...............................................................................................................................35
iv

SUR-47 User’s Manual Introduction
Chapter 1 - Introducing the SUR-47
Congratulations on your purchase of the SUR-47 Touch-Screen Remote Control. The SUR-47 is a digital universal
remote control that is easy to use, enabling you to control up to 16 electronic devices equipped with an
infrared (IR) remote.
•
The SUR-47 comes with an IR/RF base unit to receive and send signals from the remote and operate
devices from any room in your house or up to 100 feet away.
•
The SUR-47 uses a Touch Screen panel and control buttons and is simple to use. Simply select a device and
the appropriate screen appears. You can control up to sixteen devices, including VCRs, DVDs, TVs, and
satellite dishes.
•
The SUR-47 is easy to set up. You can quickly configure each device in your household or office using the
innovative “learning eye” feature. In addition, the advanced macro function enables you to initiate a
chain of up to 60 commands with the touch of a single button.
•
The SUR-47 is equipped with a remote finder feature to help locate it when lost.
Convenient and easy to use, the SUR-47 provides you with a complete central control solution.
This manual helps you learn how to use the advanced features of the SUR-47. It does not explain how to use the
functions for your devices. Please refer to your device user's manual for information related to your device.
SUR-47 Features
The following list identifies the SUR-47’s key features.
• Choice of IR (direct to device) or RF (to base unit to device) signal transmission.
• Lost remote finder button - activates beep to locate remote when lost.
• Large Touch Screen display.
• Macro sequence function—each macro can store 60 commands.
• Controls up to 16 devices including DVDs, TVs, Satellite Receivers, VCRs and CDs.
• Learns the IR codes from your existing remote controls to quickly set up devices.
• Pre-programmed manufacturer’s codes for many models.
• User programmable buttons for each device include 6 hardware buttons, the device key and 42 soft
buttons.
• Optional PC Interface for connection to a personal computer.
Unpacking the SUR-47
After you have unpacked the SUR-47, check the contents to make sure the following items are included.
• SUR-47 ● SUR-BU base unit
• This User’s Manual ● IR blaster cable
• Pre-programmed Code List ● AC adap ter
If any of the above items are missing or appear damaged, contact your dealer immediately. Do not throw the
shipping carton away in case you need to ship your SUR-47.
1
Introduction SUR-47 User’s Manual
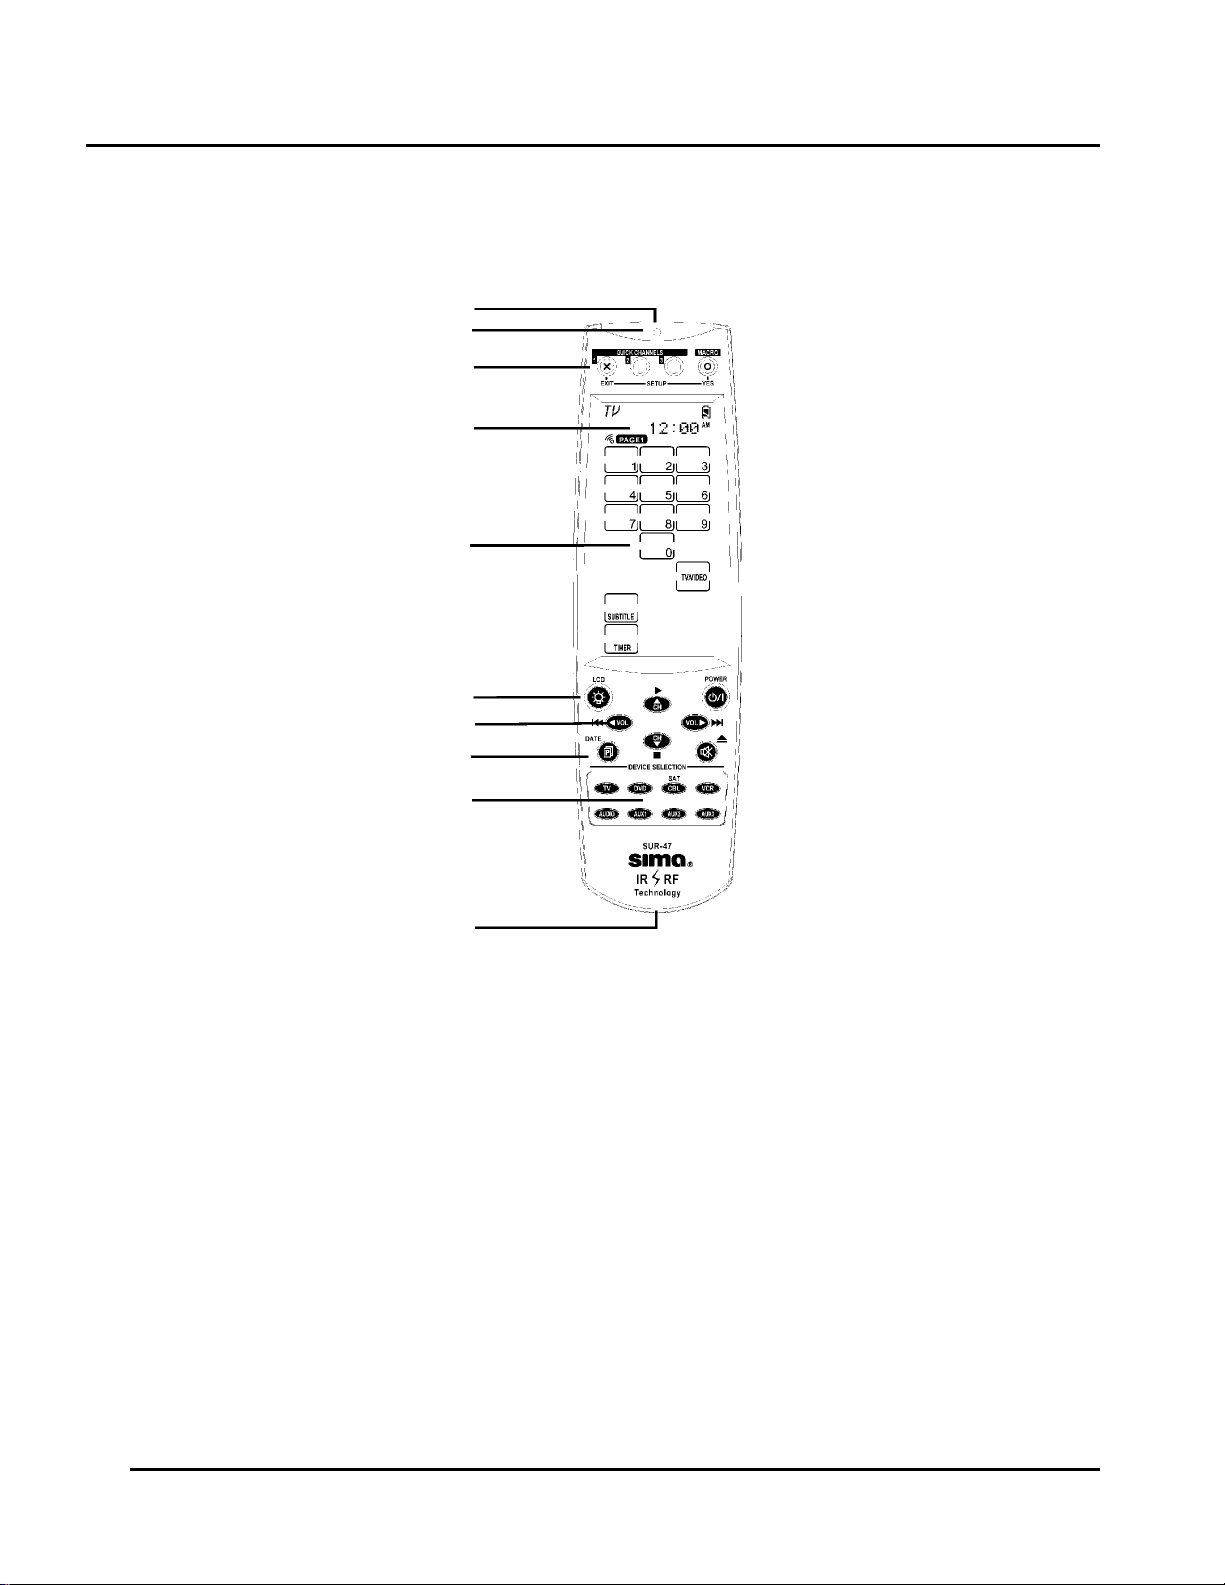
Identifying Components
Refer to the following illustration to identify the components of the SUR-47.
Infrared Emitter: Point the
infrared emitter at the device you
want to operate.
Light Sensor: Detects ambient
light to automatically set the LCD
panel backlight.
Quick Channel: Enables you to
group channel types for easy
access.
LCD: Backlit LCD emulates the
hard key controls, and provides a
user interface for the SUR-47.
Touch Screen: Enables you to
change channels, configure the
SUR-47, create macros, and
more.
Backlight/LCD: Press this button
to turn on the LCD backlight or to
wake up the unit.
Hard Key: These buttons enable
you to turn the controlled devices
on and off, change channels, and
adjust or mute the audio volume.
Page/Date: Press this button to
browse through the device
screens. Press and hold this
button to display the date and
time.
Device Keys: Press these
buttons to display remote control
screens for the devices listed.
Learning Eye: Point your
device's remote control at the
learning eye to enable the SUR47 to learn your device's infrared
codes.
Infrared Emitter
Light Sensor
Quick Channel
LCD
Touch Screen
Backlight/ LCD
Hard Key
Page/Date
Device Keys
Learning Eye
Figure 1A: SUR-47 Front View
2
SUR-47 User’s Manual Introduction
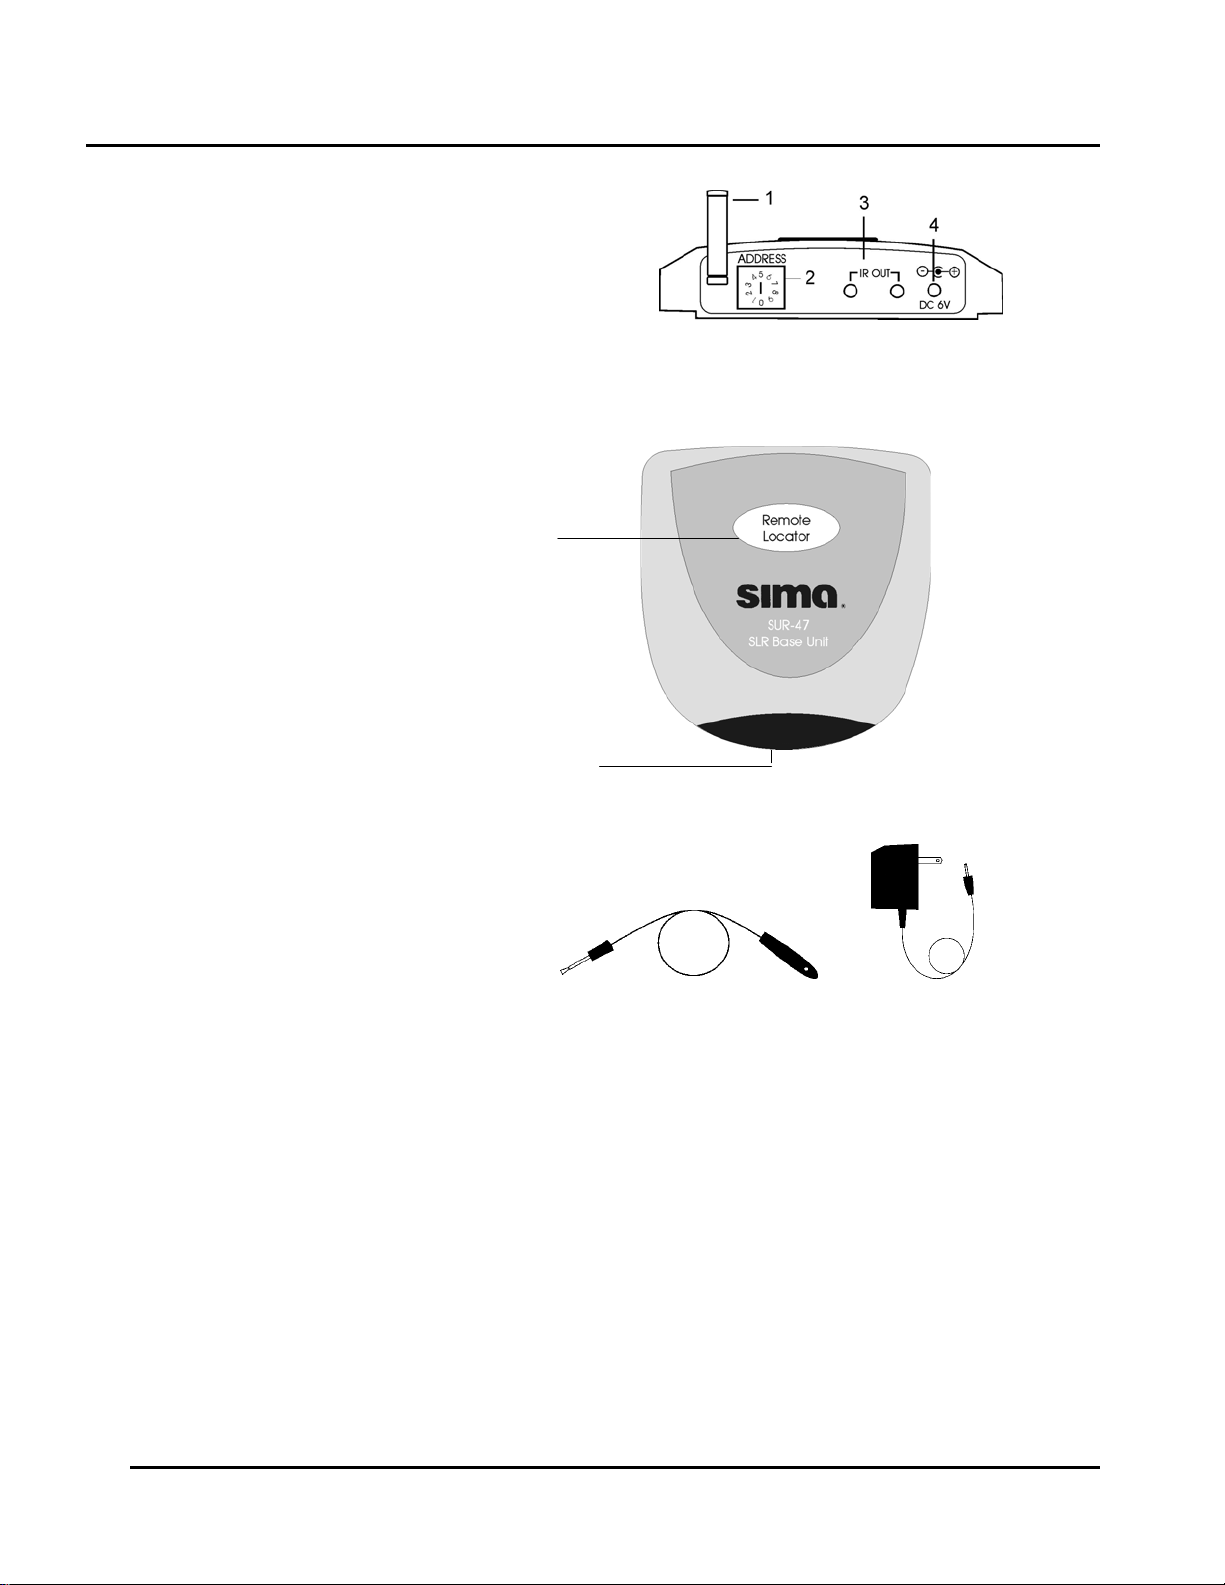
t
Fig. 1B IR Out jack – Connect the IR
blaster cable to this jack to operate a
specific device.
Base Unit address setting – Set the RF
address of the base unit by selecting an
address number between 0 and 9.
AC adapter input – Plug AC adapter into
jack.
RF Antenna – to receive RF signal
Fig. 1C Remote Locator Button – Press
to trigger beep signal and locate remote.
Infrared Emitter– Sends IR signal, aim
at equipment
Fig. 1D IR Blaster Cable – Attach
directly to equipment that is not within
directional range of base unit. With front
and rear adhesive.
Fig. 1E AC Adapter – Plug into base uni
and into 120V AC outlet.
1. RF antenna
2. Base Unit
address setting
3. IR Out jack
4. AC adapter input
Remote Locator
Button
Figure1B: SUR-BU Rear View
Infrared
Emitter
RF
Figure 1C: SUR-BU front view
Figure 1D: IR Blaster cable Figure 1E: AC adapter
with front and rear adhesive
3
Getting Started SUR-47 User’s Manual
Chapter 2 - Getting Started
Installing The Base Unit
The SUR-BU base unit is equipped with 4 IR emitting LEDs which are positioned
in a North, South, East and West configuration to flood the room with IR
signals. Place the unit so the IR transmission can be “seen” by the IR receiving
windows on your TV, VCR, DVD and A/V equipment. You may want to
experiment to find a location that gives the best results. Rubber feet for table
top placement and screws for wall mounting are included.
1. Plug AC adapter into AC adapter jack on base unit and into 120V
AC wall outlet.
2. Set address code if necessary. See page 10, Setting the RF Address
for more information.
3. Position base unit so that it is aimed at equipment. Use IR blaster cable for equipment out of directional
range.
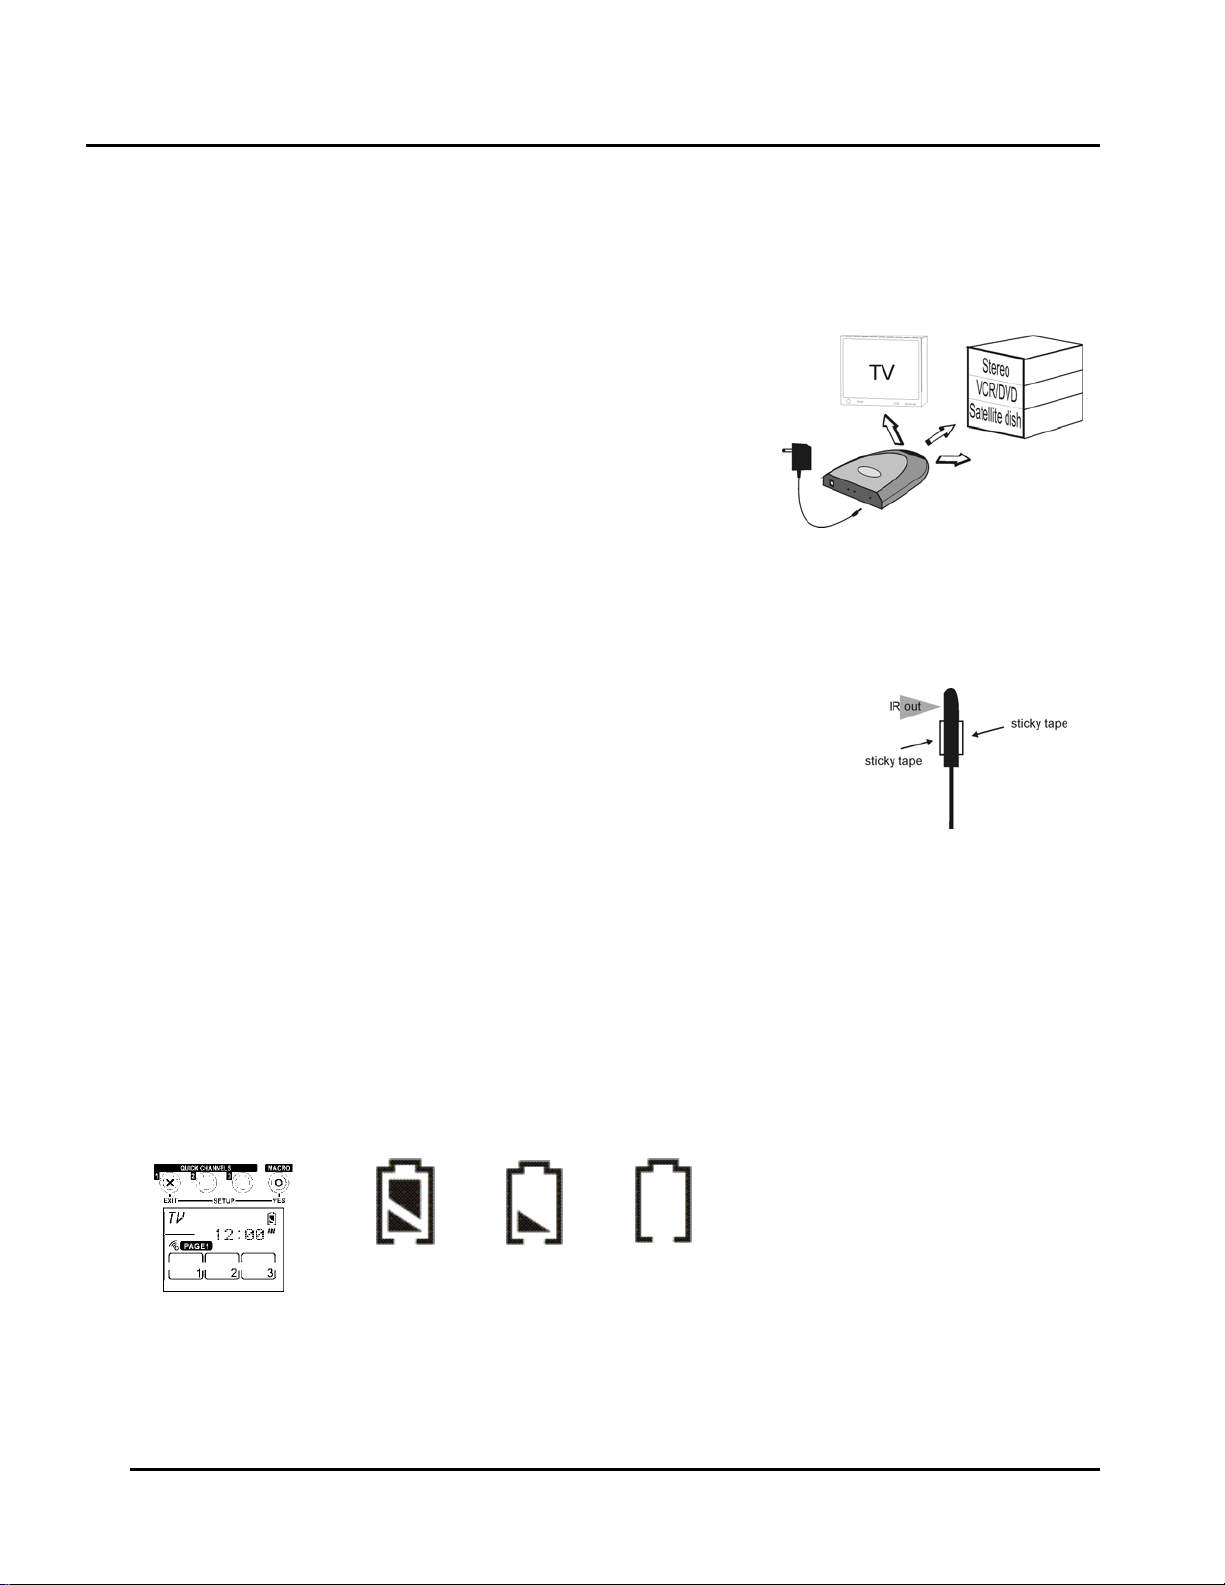
Using the IR blaster cable
The IR blaster cable can be used with individual pieces of equipment that face
different directions, are located in a cabinet or otherwise not in direct line of sight
with the base unit. The cable comes with double stick tape on both sides to allow
attachment directly to a device or to aim at several devices. Contact Sima at
800-345-7462 if additional IR blaster cables are needed.
Installing Batteries
The SUR-47 operates on four AAA Alkaline batteries (not included). Batteries must be inserted before you can
operate the SUR-47.
1. Turn the remote over, push the tab in the direction of the arrow on the battery cover and slide the
cover off.
2. Insert the batteries, matching the batteries to the (+) and (–) marks inside the battery case.
Snap the battery cover back into place.
3.
Battery Indicator
A battery icon is displayed in the upper right-hand corner near the time display. When the batteries are almost
depleted, the battery low icon appears. When the battery low icon appears, you are not allowed to enter
setup mode.
Battery
full
Battery half
full
Figure 2: The Battery Icon
Battery
low
4

SUR-47 User’s Manual Getting Started
Battery Tips and Precautions
• Immediately replace the batteries when the battery low icon appears.
• The SUR-47 will not lose programmed data when replacing batteries, but will reset the time.
• Always use fresh batteries. Alkaline batteries are recommended. Do not mix different types of batteries.
• Match the positive (+) and negative (–) polarities of the batteries to the diagram in the compartment.
• Do not expose the batteries to excessive heat or flame.
• Keep batteries out of the reach of children.
• Weak batteries reduce the effective distance of the unit.
• To reduce danger of leakage and damage, remove used batteries when used longer than two years.
About the Touch Screen
The Touch Screen reduces the number of buttons by changing its configuration for each device selected. In
this way, the Touch Screen provides 672 buttons (16 devices x 2 pages x 21 buttons per page).
Turning the Touch Screen On
Touch the screen to activate it. It will turn itself off after the user-defined power down time period. (To change
the down time, see Setti ng the Dow n Time on page 26.
Touch Screen Precautions
Please read the following instructions carefully:
• Tap the LCD Touch Screen gently; never use force.
• Do not use a pen or any sharp object to tap the screen. You might damage the surface.
• Keep the Touch Screen dry. Wipe off any spills immediately. The SUR-47 is not waterproof; never immerse
it in liquid.
• Don't expose the SUR-47 to extreme temperatures. Keep it away from heat sources.
• Avoid dropping the SUR-47.
• Don't drop anything on the Touch Screen.
• Clean the LCD Touch Screen with a soft cloth. If needed, dampen the cloth slightly before cleaning.
Never use abrasives or cleaning solutions.
Touch Screen Buttons
The Touch Screen buttons enable you to operate the SUR-47 and your external devices. Use these buttons to
program codes from your existing remotes, control your devices, and set up command sequences called
macros. You will hear a beep when you press a button. To activate or deactivate the beep, see Setting the
Beep Signal on Page 27. the SUR-47 turns itself off after a user-specified time. To change the time, see Setting the
Power Down Time on page on page 26. Press the LCD button to wake the unit up.
5
Getting Started SUR-47 User’s Manual
Using Hard Keys
The buttons on the bottom part of the SUR-47 enable you to operate devices as well as program the SUR-47.
Three buttons have special functions:
Page/Date Button: Toggles from Page 1 to Page 2 of the device buttons menus. If held down for more
than two seconds, the date and time are displayed.
Power Button: Turns devices off and on. During Touch Screen Layout (see page 18) displays all possible
LCD options.
Backlight/LCD Button: Press this button quickly to turn on the backlight or to wake up SUR-47 if LCD has
turned off.
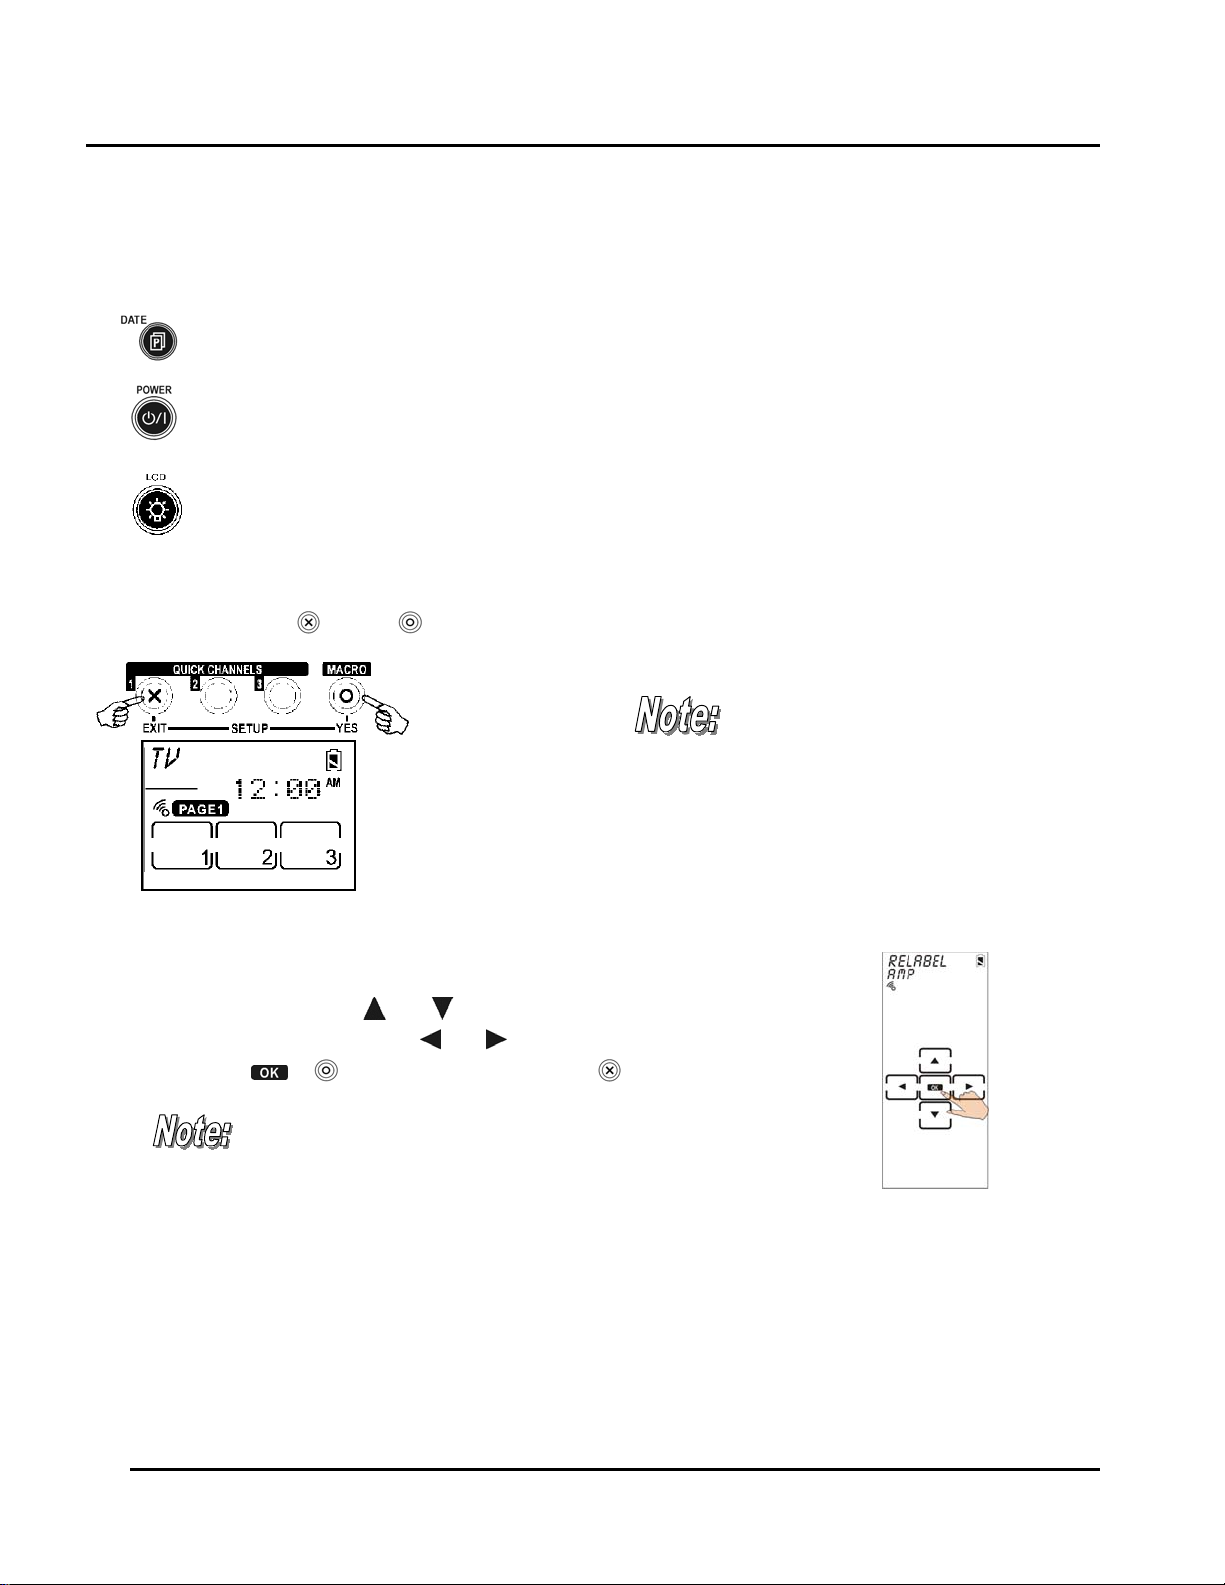
Entering the Setup Menus
Press and hold the and the buttons simultaneously to access the setup menus.
When the battery low icon appears or
you are in Quick Channel mode, you
are not allowed to enter setup mode.
Figure 2: Entering the Setup Menus
Navigating the Setup Menus
While in the setup menus, press and on the Touch Screen to scroll up and down
through the menus and settings. Press
and settings. Press
or to confirm settings, and press to exit a menu.
When using the setup menus,
you must press each button
within two minutes of pressing
the last button. Otherwise, the
SUR-47 will exit setup mode and
return to normal operation
mode.
and to scroll left and right through menus
Fig:4 Navigating Menus
6
SUR-47 User’s Manual Getting Started
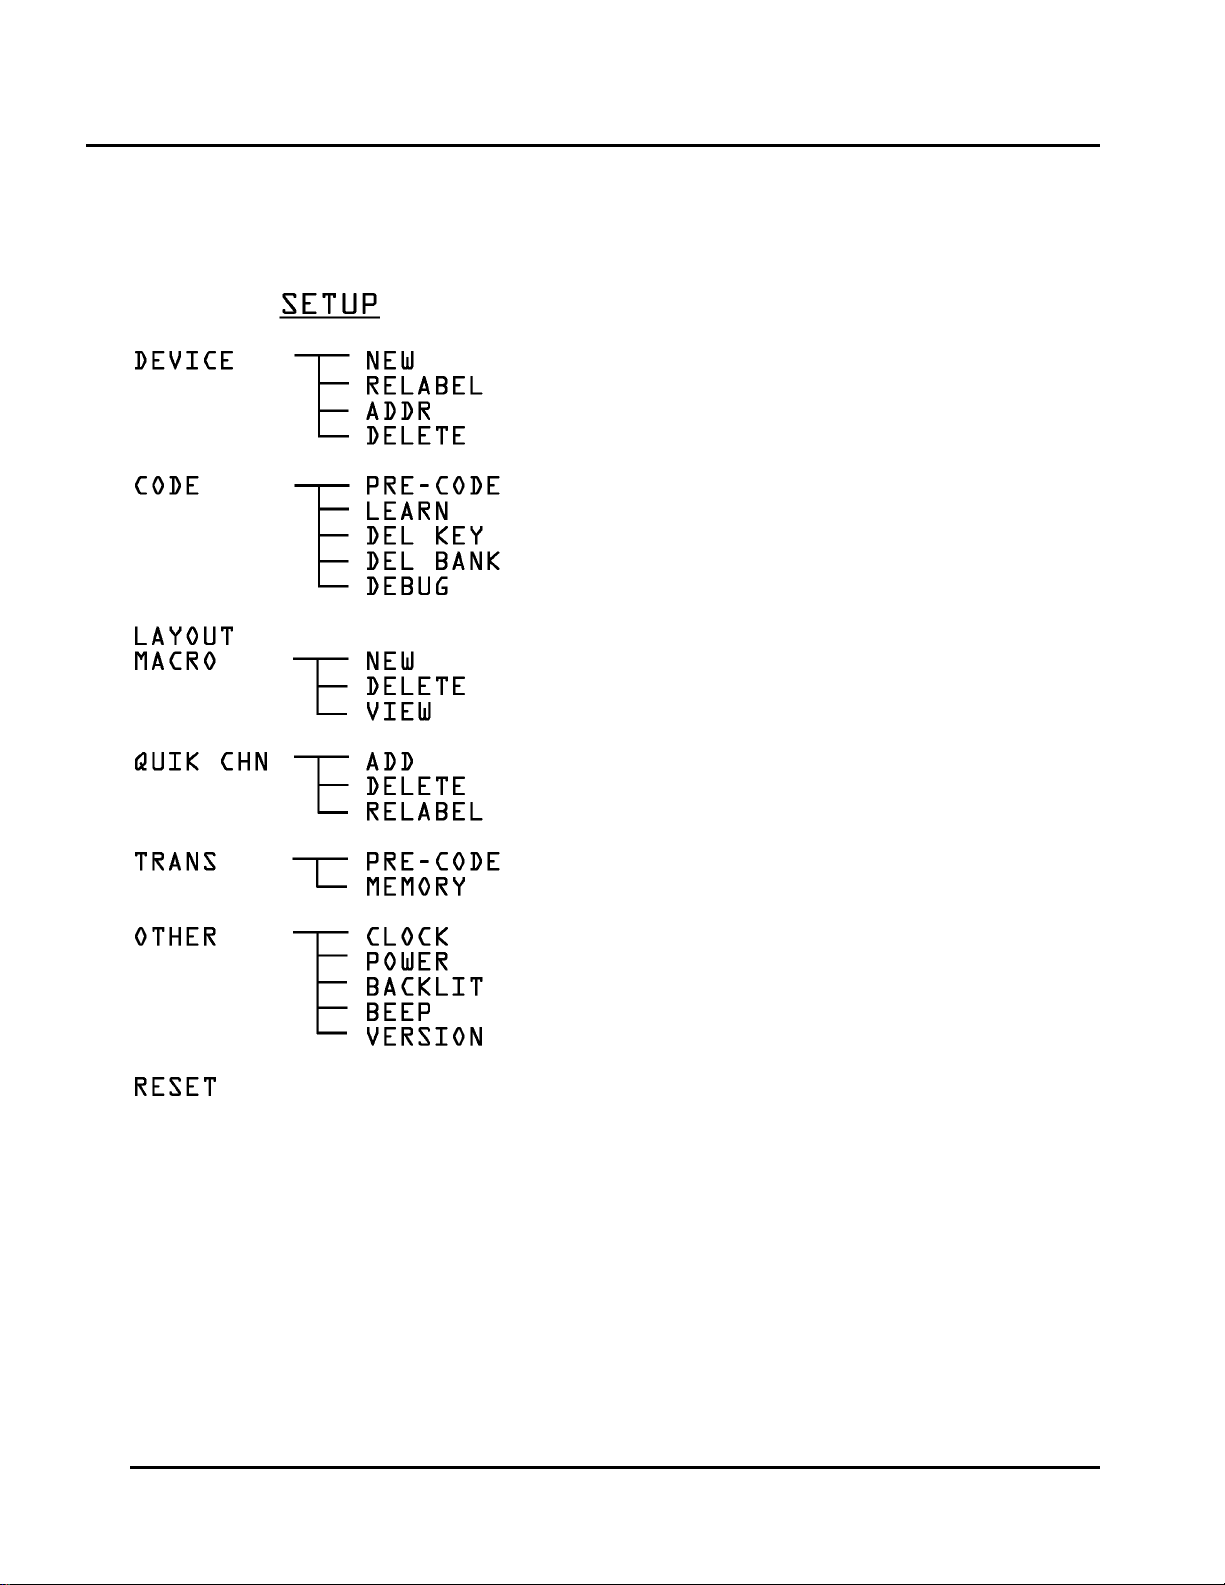
The Setup menu tree
New Device
Edit Device Label
Address for RF
Erase Device Code
Pre-programmed Code
Code Learning
Erase Key Code
Erase Device Code
Collect Unrecognizable (Un-learnable) IR Codes
Set Macro Key
Erase Macro Key
View Macro Process
Set Channel Classification
Delete Channel Classification
Edit Channel Classification
Pre-programmed Code
Memory
Date & Clock
Power Down
Backlit Period
Beep on/off
Program & Pre-programmed Code Version
Figure 5: Setup Menu Hierarchy
Reset To Factory Setting
7
Getting Started SUR-47 User’s Manual
Chapter 3 - Setting Up the SUR-47
Before the SUR-47 can be used to control a device, it needs to be configured to display your existing remote
control buttons. It must be programmed to send the correct infrared signals.
This chapter guides you through the Touch Screen layout and SUR-47 setup procedure.
Before continuing, refer to Navigating the Setup Menus on page 6 to learn how to navigate the menus.
Device Menu
Enter the setup menus, scroll to Device and press to enter the device menu. In the device menu, press
and
to scroll through the menu options:
•
New
: enables you to set up a new device
•
Relabel
•
Delete
The SUR-47 includes eight default de vic es :
TV DVD SAT VCR
AMP TUNER CD AUX
: enables you to rename a device
: enables you to delete a device configuration
When a new device is created, the SUR-47
automatically loads a default device configuration
making it easy for you to edit the new device layout.
8
SUR-47 User’s Manual Specifications
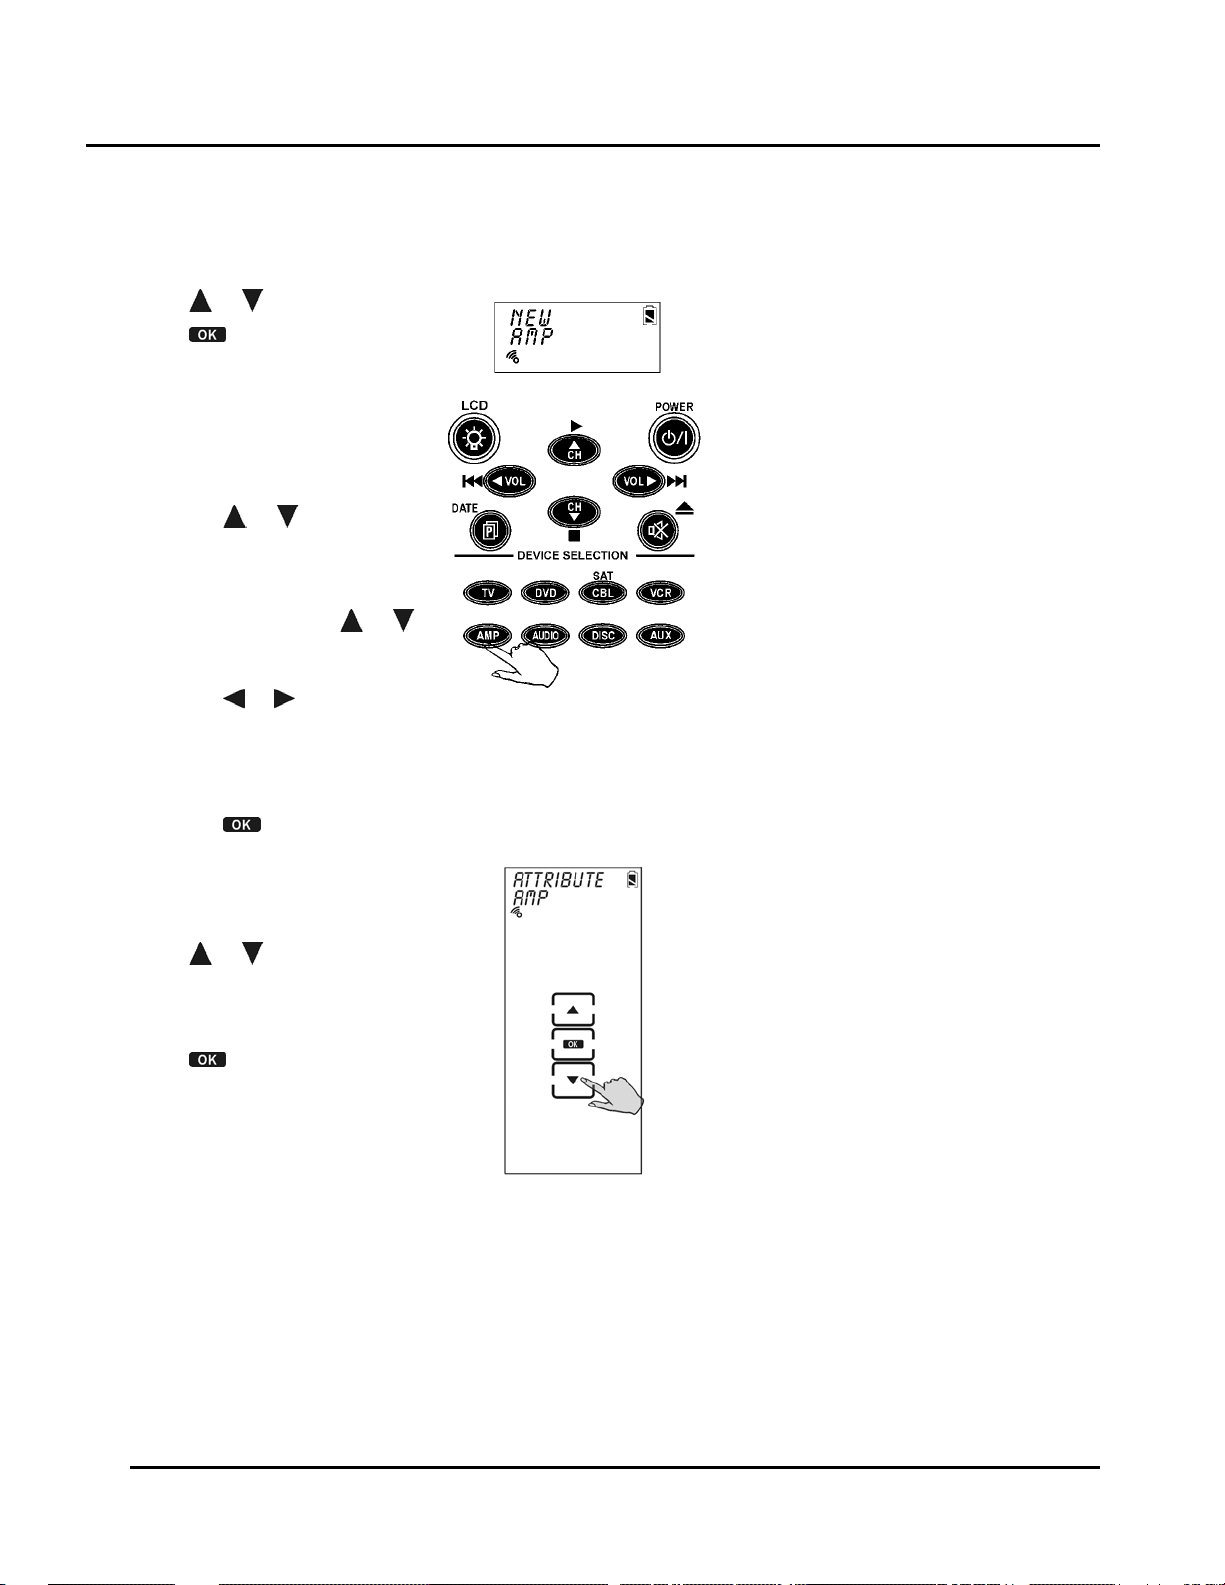
Creating a New Device
Follow these steps to create a new device:
1. Press or to select
2. Press
3. Press the device key you
want to use for this device
(for example AMP).
4. Edit the device label. The
label can be up to 8
alphanumeric characters:
• Press
Note: Press and hold
to quickly scroll through the
characters.
• Press
• Press
You are prompted to select
an attribute for the new
device.
5. Press
device whose attributes will
be loaded to the new
device.
6. Press
entry.
.
or to scroll
through the characters
(from A-Z, 0-9, and the
space key).
or to move to
the previous or next
character. When
selected, the character
blinks.
to confirm the
entry.
or to select a
to confirm the
NEW
or
.
9
Getting Started SUR-47 User’s Manual
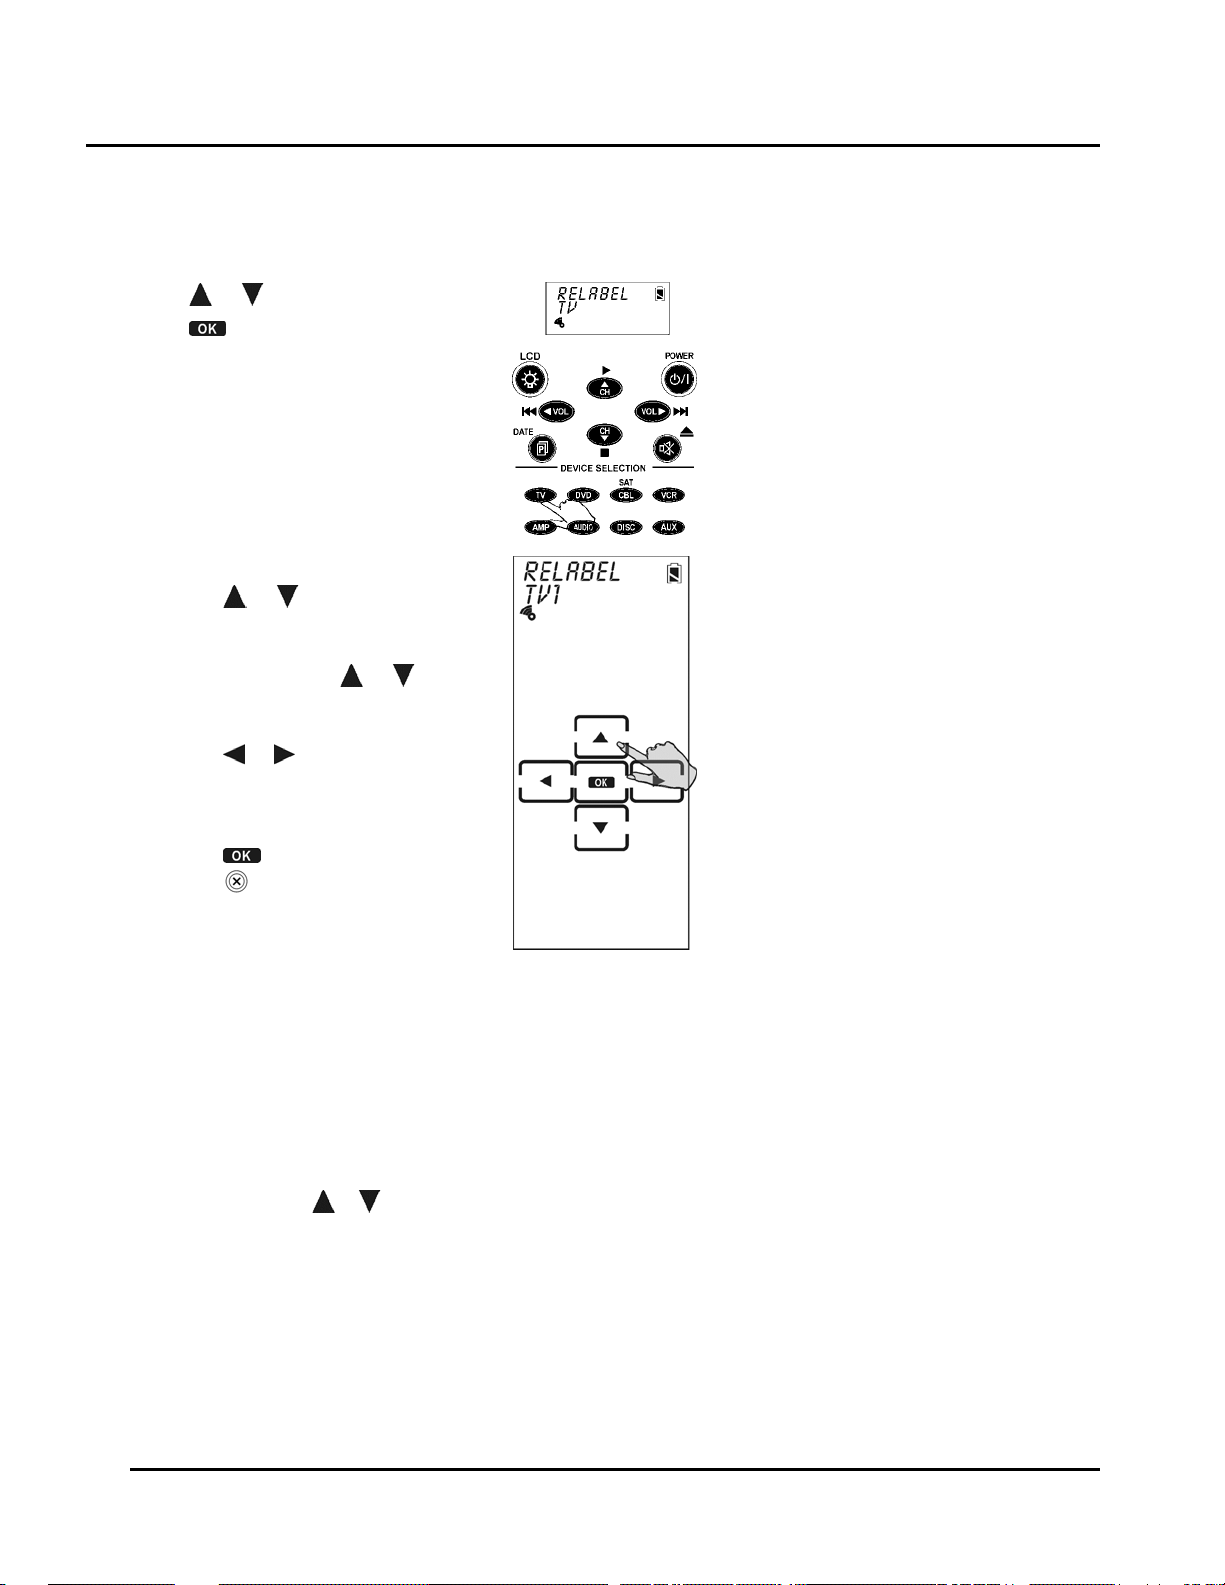
Re-Labeling Device s
Follow these instructions to edit a device label.
1. Press or to select
2. Press
.
RELABEL
3. Press the device key you want to
relabel (for example TV).
4. Edit the device label:
• Press
or to scroll through
the characters (from A-Z, 0-9,
and the space key).
Note: Press and hold
or to
quickly scroll through the
characters.
• Press
or to move to the
previous or next character.
When selected, the character
blinks.
• Press
5. Press Exit
to confirm the entry.
to exit to the device
menu.
.
Setting the RF Address
Each device button (TV, VCR, DVD etc.) can be set to operate on either IR or RF frequencies. When transmitting an IR signal
the SUR-47 will operate the selected device by directly sending IR signals to the device. To operate in this mode, you must
point the SUR-47 at the desired device.
To operate in the RF mode, the SUR-47 transmits an RF frequency signal to the SUR-BU base unit, which sends an IR signal to
the desired device. Both the device and the base unit must be set to the same RF address to operate properly. To set the
RF address:
or to select ADDR
10
1. Press
2. Press OK
3. Select either IR to operate in the IR mode or an RF address (0-9) for the base unit and device
If an RF address is selected, set the base unit to the same RF address by adjusting the ADDRESS wheel on
4.
the rear panel as needed.

SUR-47 User’s Manual Specifications
Deleting Devices
Follow these instructions to delete a device configuration including the LCD display and codes.
1. Press or to select
2. Press
.
DELETE
.
3. Press the device key you want to
delete (for example TV).
4. Press
to delete the device. You
are prompted to confirm the
deletion.
5. Press
to confirm the deletion.
Press EXIT to cancel the deletion.
6. Press Exit
to exit the setup menu.
Code Menu
Enter the setup menus, scroll to Code and press to enter the code menu. In the code menu, press and
to scroll through the code menu options:
• Pre-Code - use this method to automatically configure all buttons on the SUR-47 for use with a specific
manufacture model number. This feature is the fastest way to program the SUR-47 but requires that your
device be located in the Pre-programmed Code List that was bundled with the SUR-47. Some newer or
less-common devices may not be pre-programmed and must be learned using the Learning Function.
• Learn - use this method to directly learn the proper infrared signals from another remote control. This
method is perfect for newer or less common devices or if a certain button still does not perform the
desired function after using pre-programmed manufacturer codes; however, not 100% of codes can be
learned and it may be necessary to collect unrecognized codes and send them to Sima Products. (See
page 17 for more information on unrecognized code collection.)
• Del Key - erases the key code
• Del Bank - erases the device code
• Debug - collects unrecognizable (un-learnable) infrared codes for debugging purposes
11

Getting Started SUR-47 User’s Manual
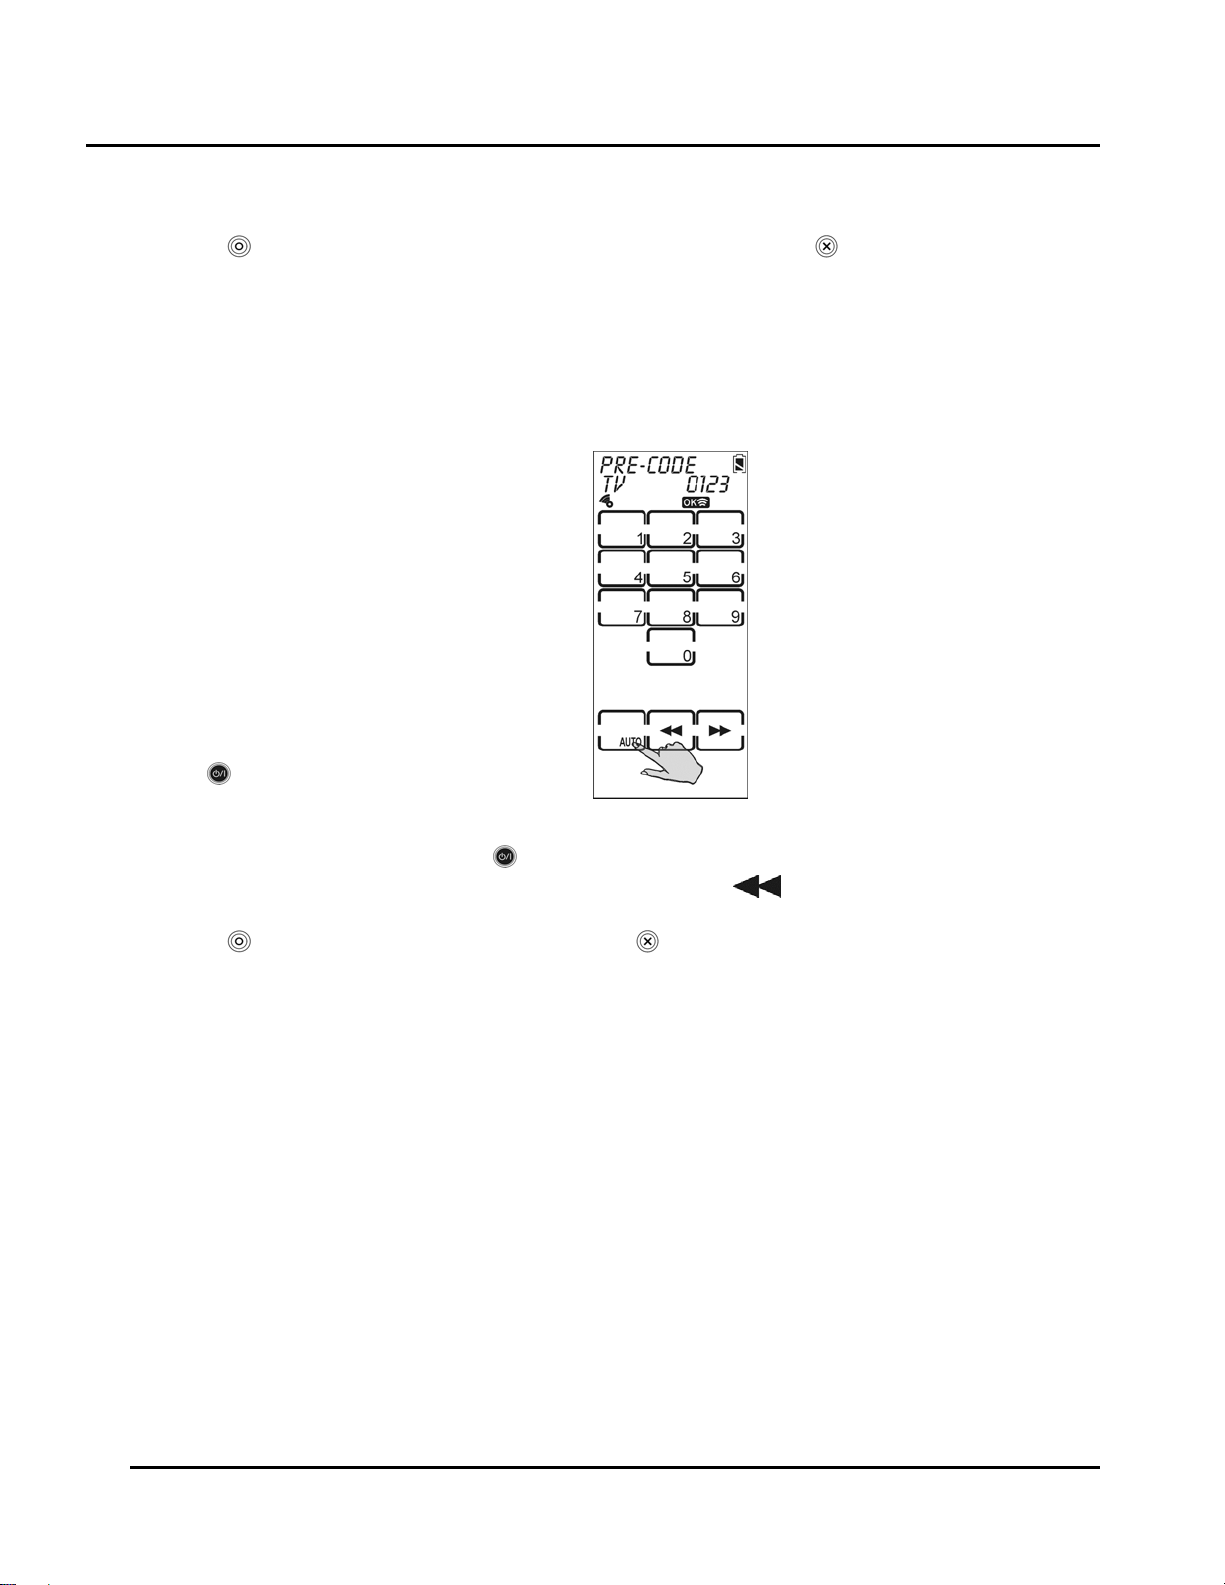
Using Pre-Code to Program Devices
Follow these instructions to program a device using preprogrammed codes.
Press
Manually Selecting the Code
1. Turn on the device you want
to program the SUR-47 to
control.
2. Select the device (for
example TV).
3. Check the preprogrammed
code list that was bundled
with the SUR-47 for the fourdigit code number of your
device. If no code is
displayed, that means this
device has no pre-code.
4. Enter the four-digit code
number and press YES button
Note: If the code only has
one digit (for example, 0001),
you do not have to input the
preceding zeros; in this
example, press ‘1’.
5. Press the POWER button
test the code. The device
you are trying to control
should turn on (or off) as you
press this button. If not, return
to Step 2 and try another
code.
You can also press
number.
Note: Some codes are designed to operate more than one model. It
may take several tries to find the code that works with your unit.
or to select PRE-CODE,and then press OK.
to confirm the entry.
to
or to decrease or increase the four-digit code
12
SUR-47 User’s Manual Specifications
6. Press YES to confirm the selection and save the settings or click EXIT
to exit.
Note: When you enter the Manufacture Code and an 'ERROR’ message
is displayed, it could be for two reasons:
1. That code number doesn't exist in the Manufacture Code table
yet.
2. That code number is not in the range of the Manufacture Code
table reserved for the default device screen
Selecting a Code Automatically
1. Turn on the target device you want
to control.
2. Press the device hardware button
(for example TV).
3. Point the SUR-47 at the target
device.
Press the AUTO button. An “OK”
message displays while the SUR-47
automatically cycles through the
codes. Wait for the device to turn
on and then press the POWER
button
automatic search.
or AUTO key to stop the
The last tried code is displayed in the upper right-hand corner. Test this
code by pressing the POWER button
If it doesn't work, you may need to press the tuning down key
.
and
try a few of the previously scanned codes.
4. Press YES
to confirm and save the settings or EXIT to exit.
Using the Learning Mode
Follow these instructions to detect and learn a remote control's configuration.
Before Using the Learn ing Function
Before you start using the SUR-47's learning function, please heed the following precautions:
• Not all infrared codes are learnable by the SUR-47. You may need to first collect the codes (see page 17
for more information) and then email them to Sima Products. New system firmware will be sent to you
allowing your SUR-47 to learn the codes.
• To change from a device that has already been programmed, delete all of the commands for the first
device before teaching new ones. For example, to operate the living room TV instead of the bedroom
TV, delete all commands for the bedroom TV first. Then re-configure the TV device screen for the living
room TV.
Code learning does not work with all devices. Select one device screen in advance before using code learning
mode. All keys except the quick channel keys, sleep, page and macro can be learned.
13

Getting Started SUR-47 User’s Manual
Learning from Another Remote Control
Before using learning mode, set both remotes on a flat surface so that the device’s remote control IR is pointed
at the SUR-47’s learning eye, which is located at the bottom of the unit.
1. Press or to select
2. Press
3. Point the target device's remote
control at the SUR-47 learning eye
located at the base of the unit
(see Figure 1A: SUR-47 Front View).
4. Press the button corresponding to
the target device.
The SUR-47 Touch Screen sequentially displays screens
corresponding to first the hard keys, then page one of the
soft keys, and finally page two of the soft keys. The blinking
rectangle denotes the key being learned.
5. Press the corresponding button of
the target device's remote
control.
The SUR-47 screen displays an OK
message if the code was
successfully learned or an ERROR
message if the code was not
learned.
Press PAGE
hard and soft key displays.
Note: When the remote has
learned the last button on the
page, the next page is
automatically displayed.
6. Press EXIT
.
to toggle between
to exit learning mode.
LEARN
.
14

SUR-47 User’s Manual Specifications
Erasing Key Codes
Follow these instructions to delete SUR-47 key codes.
1. Press or to select
2. Press
3. Select the device whose key code you
want to delete (for example TV).
4. Select the key corresponding to the
code that you want to delete.
The SUR-47 screen displays an OK
message if the code was successfully
deleted.
Press PAGE
key and soft key displays.
Press the device buttons to select a
different device.
5. Repeat the above steps to delete other
keys.
6. Once you press the button that you
want to delete, the code is deleted.
Press YES
.
to toggle between hard
or EXIT to exit.
DEL KEY
.
15

Getting Started SUR-47 User’s Manual
Erasing Device Codes
Follow these instructions to delete a device code from the SUR-47.
1. Press or to select
DEL BANK
.
2. Press OK.
3. Select the device whose codes you
want to delete (for example TV).
Press PAGE
to scroll between
device pages.
4. Press YES
to delete the device
codes. You are prompted to
confirm the deletion.
5. Press
to confirm the deletion or
EXIT to cancel.
16

SUR-47 User’s Manual Specifications
Debugging Device Codes
Use this procedure if the SUR-47 is unable to recognize the infrared signals from another remote control.
Once you have collected unrecognizable codes, you can use the optional SUR-PC link cable (see
Appendix B - Accessories on page 34 for more info) to upload them to your personal computer and then email
them to Sima Products for analysis.
The email address is info@simacorp.com
Every time you enter DEBUG mode, the SUR-47 replaces previously stored
unrecognized codes with new ones. If you have more than one remote that is not
programmable, upload the first remote’s unrecognized codes and then gather the
second remote's unrecognized codes.
Set up the LCD display before using this function. See LCD Layout on page 18.
1. Press or to select
2. Press
.
DEBUG
.
3. Point the target device's remote
control at the SUR-47 learning eye
located at the bottom of the unit
(see Figure 1A: SUR-47 Front View).
4. Select a device (for example TV).
The SUR-47 Touch Screen sequentially displays screens corresponding to first the hard
keys, then page one of the soft keys, and finally page two of the soft keys. The blinking
rectangle denotes the key being learned.
5. Press the corresponding button of
the target device's remote control.
The SUR-47 screen displays an OK
message if the code was
successfully learned.
Press PAGE
to toggle between
hard key and soft key displays.
6. Press YES
or EXIT to exit debug
mode.
17

Setting Up SUR-47 User’s Manual
LCD Layout
The layout edit mode enables you to customize the SUR-47's Touch Screen display to match your existing
remote controls.
1. Press or to select
2. Press
.
LAYOUT
.
3. Select a device (for example TV).
4. On the device pages, select the
key you want to customize.
Continue pressing the key to scroll
through the available choices for
the key.
Press POWER
to display available
icons for the page of LCD display.
Press PAGE
to scroll through the
LCD screens for the device.
5. After you have finished customizing
the layout, press YES
changes, or press EXIT
to confirm
to exit
without making any changes.
Using Macros
A macro is a series of commands. The Macro feature enables you to initiate a sequence of up to 60
commands with a single button. You can create a macro on any control button and insert time delays into the
sequence. Remember, however, assigning a macro eliminates the button's original function.
You cannot assign a macro to any of the eight Device keys, the page/date key, the backlight
key, and the macro key, or the three Quick Channel keys.
Enter the setup menus, scroll to Macro and press OK to enter the macro menu. In the macro menu, press
and
18
to scroll through the menu options:
•
•
•
enables you to set up a new macro
New
Delete
View
delete a macro
view the macro steps

SUR-47 User’s Manual Setting Up
Creating a New Macro
Follow these steps to create a new macro:
1. Press or to select
2. Press
.
NEW
.
3. Press the device key you want to use
for this macro (for example TV), and
then press any key to define as the
macro key. You hear three beeps to
indicate that macro creation mode
has started.
Note: If you select a key that already
has a macro stored in it, the new
macro will replace the old macro.
4. Press the key or button sequence that
you want to record.
5. Press YES
. You enter the Delay and
Save screen. Do one of the following:
• Enter the number of seconds you
want to delay between each
command. For example, if you
want a six second delay
between turning on your TV and
then turning on your VCR, press
‘6’.
• Press YES
and exit macro creation mode.
The following steps shows how to record a macro that turns on your TV, switches the TV to DVD viewing mode,
turns on the DVD, and plays a DVD. Create other macros to suit your needs.
1. Press the EXIT
to save the macro
and YES
9. Press the DVD device button
buttons to enter the SETUP mode.
2. Press
or to select MACRO.
10. Press YES
to select a time delay (1-10
sec) for each step. (Press '0' on the
screen to select 10 seconds.)
3. Press OK to enter the MACRO
11. Press the DVD power button
menu.
4. Press OK to enter the NEW menu. 12. Press the DVD play key.
5. Press OK to enter the SET KEY
13. Press Yes
To save the macro
menu.
6. Press the TV device button
7. Press the TV power button
14. Press Yes
15. Press EXIT
to exit the MACRO mode
twice to exit the SETUP
menu and return to the main menu.
8. Press the TV/Video key
19

Setting Up SUR-47 User’s Manual
Deleting a Macro
Follow these steps to delete a macro:
1. Press or to select
2. Press
3. Press the device key for the
macro you want to delete.
The screen displays the macro
key for the device.
4. Press the macro key you want to
delete; the macro key is
deleted when the key is
pressed.
5. Press YES
.
or EXIT to exit
DELETE.
20

SUR-47 User’s Manual Setting Up
Viewing a Macro
Follow these steps to view the steps of a macro:
1. Press or to select
2. Press
.
VIEW
3. Press the device key for the
macro you want to view.
The screen displays the
macro keys for the device.
4. Press the macro key for the
macro you want to view.
The screen displays the
macro sequence.
5. After viewing the macro,
press EXIT
to exit this menu.
.
Setting Channels
The SUR-47 enables you to classify channels into Quick Channel groups making it easier to locate all the
programs on every device.
Enter the setup menus, scroll to QUIK CHN and press
menu, press
•
Add
•
Delete
•
Relabel
and to scroll through the menu options:
enables you to add a Quick Channel
enables you to delete a Quick Channel
enables you to rename a Quick Channel label
The SUR-47 has three groups of Quick Channels; the total number of
channels that can be assigned to all three groups is 50. For example,
if 40 channels are included in the "News" category, 8 channels in
"Movies", then only 2 channels can be included in the "Kids" category
to enter the Quick Channel menu. In the channel
21

Setting Up SUR-47 User’s Manual
Adding a Quick Channel
Follow these steps to add a new channel to a Quick Channel group:
1. Press or to select
2. Press
3. Press the device key you
want to use to set the Quick
Channel (for example TV).
4. Enter the channel number
(e.g., 12).
Note:
buttons number 0-9, +10, and
Enter to enter the channel.
5. Select the Quick Channel
classification (e.g., News).
6. Repeat steps 4 to 5 to
continue adding channels.
7. Press YES
setup menu.
.
You can only use
to exit to the
ADD
.
22

SUR-47 User’s Manual Setting Up
Deleting a Quick Ch annel
Follow these steps to delete a Quick Channel:
1. Press or to select
2. Press
3. Press the device key whose Quick Channel you want
to delete (for example TV).
4. Press the Quick Channel that has the channel you
want to delete (e.g., News).
5. Press
6. Press
7. Repeat the previous steps to delete other channels.
8. Press YES
.
or to locate the channel.
to delete the channel.
to exit.
DELETE
.
Relabeling a Quick Channel
This option enables you to edit the Quick Channel label on the LCD.
Follow these steps to edit a Quick Channel:
1. Press or to select
2. Press
3. Press the Quick Channel that you want to relabel
(e.g., News).
.
RELABEL
.
4. Edit the Quick Channel. The name of the Quick
Channel can be up to 8 alphanumeric characters:
• Press
(from A-Z, 0-9, and the space key).
Note: Press and hold
the characters.
• Press
character. When selected, the character blinks.
• Press
• Press EXIT
After setting up the QUIK CHN, press any Quick Channel button (e.g., “NEWS”) to
open the Quick Channel screen. Use the CH+ and CH- to scroll through all channels
stored in this Quick Channel category. Press that Quick Channel button (e.g.,
“NEWS”) again to exit the Quick Channel screen.
or to scroll through the characters
or to quickly scroll through
or to move to the previous or next
to confirm the entry.
to exit to the device menu.
23

Setting Up SUR-47 User’s Manual
Using the Transmission Feature
The SUR-47 can transmit data to another SUR-47 or to a PC with the optional USB-UART cable. You can
download firmware upgrades from the Internet or transfer configuration data.
Enter the setup menus, scroll to TRANS and press
Before you use this feature to transfer data with
your PC, you must connect the optional USB-UART
cable. Refer to Appendix B for more information.
1. Press or to select TRANS.
2. Press
3. Press
.
or to select one of the
following options:
• PRE-CODE – transmits
Preprogrammed Codes only
• MEMORY –transmits All Flash
Memory Data
(Preprogrammed Code
included)
to enter the transmission menu.
4. Press
to begin transmission.
During the transmission, the LCD
displays blank keys as shown in
the illustration.
When the transmission is
completed, OK is displayed on
the LCD. If there is an error in
transmitting the data, ERROR is
displayed.
Miscellaneous Menus
Enter the setup menus, scroll to Other and press to enter this menu. Press and to scroll through the
menu options:
•
Clock
Power
•
Backlight
•
Beep
•
Version
•
enables you to set the date and time
enables you set the time that will elapse before the SUR-47 turns off
lets you set the time that the backlight remains on
turns the key and button beep signal on and off
displays the SUR-47 firmware version
24

SUR-47 User’s Manual Setting Up
Setting the Date and Time
1. Press or to select CLOCK.
2. Press
3. Enter the date:
• Press
Note: Press and hold
quickly scroll through the
characters.
• Press
4. Press
You are prompted to enter the
hour and minute.
5. Set the hour and minute:
• Press
Note: Press and hold
quickly scroll through the
characters.
• Press
• Press
Note: The clock is in a 12-hour
format.
.
or to scroll
through the characters:
Month: JAN~DEC
Day: 01~31
Year: 02~50 (2002~2050)
or to
or to cycle
between the month, day,
and year fields. When
selected, the characters in
the field blink.
to confirm the date.
or to scroll
through the characters
(from 1~12 hours, 00 ~59
minutes).
or to
or to move the
cursor to the previous or
next character.
to confirm the
time.
25

Setting Up SUR-47 User’s Manual
Setting the Power Down Time
1. Press or to select
2. Press
3. Press
elapse before the SUR-47 turns off.
Note: The power down time can be set
from 01 ~ 90 minutes at 1-minute
increments.
4. Press
.
or to select the time that will
to confirm the setting.
POWER
.
Setting the Backlig ht On Time
1. Press or to select
2. Press
3. Press
backlight stays on after pressing a key or
button.
Note: The backlight ON time can be set from
00 ~ 60 seconds at 1-second increments.
Choose 0 second will disable Backlight
function.
4. Press
.
or to select the time that the
to confirm the setting.
BACKLIT
.
5. Press
manually or press POWER to automatically
detect the ambient light brightness.
Note:
0
5-8
9-12 bright room
16 - always comes on
6. Press
or to set the light sensor sensitivity
The light sensor levels are 0 ~ 16.
never comes on
normal dark room
to confirm the setting.
26

SUR-47 User’s Manual Setting Up
Setting the Beep Signal
1. Press or to select
2. Press
and off. When on, appears in
the LCD screen.
3. Press EXIT
to toggle the beep on
to exit.
Checking the Version Number
1. Press or to select
2. Press
3. Press
and pre-programmed (pre-code)
version numbers.
4. Press EXIT
.
or to view the program
to exit.
BEEP
.
VERSION
.
27

Setting Up SUR-47 User’s Manual
Resetting the SUR-47 to Factory Defaults
This item enables you to set the SUR-47 back to the factory default configuration.
All macros, taught codes and user-defined
keys are erased when resetting the SUR-47 to
factory defaults!
1. Press or to select
2. Press
3. You are prompted to confirm
the reset.
4. Press
press EXIT
.
to confirm the reset or
to exit.
RESET.
.
28

SUR-47 User’s Manual Controlling Devices
Chapter 4 - Controlling Devices
The SUR-47 is designed to be simple and straightforward to operate. This chapter explains how to use the SUR47 to control all your devices.
This Chapter assumes you have already setup the SUR-47,
assigned Infrared codes to different buttons and installed the SURBU, aiming it at your equipment.
Selecting a Device to Control
Press one of the eight
device buttons to pick the
device. Press the same
device button again to
cycle through different
devices in that bank.
Note: The maximum number
of devices you can assign
to the 8 device keys of the
SUR-47 is 16.
For example, if there are 8 devices in "TV", 2 in "DVD", 2 in "CBL",
1 in "VCR", 1 in "AMP", 1 in "Audio", and 1 in " Disc", then no
device can be included in "Aux".
Alternating Touch Screen Pages
Press the PAGE Button to
alternate between page 1
and page 2 of the device
buttons.
29

Controlling Devices SUR-47 User’s Manual
Viewing the Macro Key
You can view which keys are assigned to macros for any particular device. Follow these instructions:
1. Press the DEVICE button.
2. Press the MACRO
button. The assigned
macro keys are
displayed for the
device.
30

SUR-47 User’s Manual Controlling Devices
Using the Quick Channel Buttons
For information on setting up the Quick Channel buttons, refer to Setting Channels on page 21.
1. Press the Device button
that corresponds to the
quick channel you want
to use (for example, TV).
2. Press the Quick Channel
button. The selected
Quick Channel is
displayed with the
device.
3. Press
through the chann
assigned to this Quick
Channel (refer to Setting
Channels on page 21).
. Press the Quick Channel
4
classification button
again or press any De
key to return to return to
normal operating mode.
or to s
croll
els you
vice
31

Controlling Devices SUR-47 User’s Manual
Controlling Devices
1. In direct IR mode, make sure the SUR-47 is pointing at the target device. In RF mode make sure SUR-BU
is pointing toward target device.
2. Press the hardware button or Touch Screen key you want to send.
The Record Key Must Be Held Down for 2 Seconds
feature, the record button needs to be pressed for 2 seconds. This
is to prevent accidentally pressing the VCR record button and
overwriting a tape.
: As a safety
Using the AUX Key
The control buttons on the AUX device screen can easily be made identical to the control buttons on any
other device screen. You can use it to operate a TV, VCR, or other device. For more information refer to
Creating a New Device on page 9.
32

SUR-47 User’s Manual Specifications
Appendix A - Specifications
Model
Dimensions (WxHxD): 2.3 x 8.2 x 0.9 inches
Weight (with Batteries): 7.0 oz (195g)
Weight (without Batteries): 5.3 oz (150g)
Number of Device: 16 devices
LCD Screen (WxH): 1.5 x 3.5 inches (3.9 x 9.0 cm)
Soft Button: 2 pages/21 keys (42 keys total)
Hard Buttons: 20 (6 command buttons)
Backlighting: Blue LED
Learning Frequency: 10 kHz – 125 kHz, 455 kHz & Pulse
Memory: 256 KB flash memory
Batteries: 4 AAA Alkaline Batteries
Power Consumption:
Battery Life: Approx. 3 - 6 months
RF frequency 433 MHz
SUR-47 Remote
(6.0 x 20.9 x 2.6 cm)
LCD Off: 50 µA
LCD On: 450 µA
Operation: 150 mA (Max)
Operating Distance: Approx. 30 feet (IR) /100’ RF
PC Interface (option): SUR-PC
Model
Dimensions (WxHxD) 4.2 x 4.5 x 1.0 inches
Weight 7.0 oz (195g)
RF Addresses/Freq 10 / 433 MHz
Power Input 5.5V, 500 ma
Operating Distance Approx. 100’ RF / 15’ IR
SUR-BU Base Unit
(11.0 x 11.5 x 2.6 cm)
33

Accessories SUR-47 User’s Manual
Appendix B - Accessories
PC Interface Kit – SUR-PC
The SUR-PC is an optional link cable that enables transmission of system setup to a personal computer or
another SUR-47. The following information can be transferred using the TRANS selection in the setup menus:
• PROGRAM – MCU Program
• PRE-CODE – Preprogrammed Code only
• MEMORY – All Flash Memory Data (Pre-programmed Codes included)
Please refer to the SUR-PC manual for instructions on using the cable.
IR Blaster Cable – SUR-IR
The IR Blaster Cable is an optional 6 ft. cable with an IR emitter on one end. It enables the base unit to send
signals to a device that would not be within its normal directional range. A device can be operated by aiming
the cable at the device or placing it directly onto the device.
Additional RF Base Unit – SUR-BU
The RF Base Unit receives the RF signal sent by the SUR-47and then sends the
appropriate IR signal to the desired device. The SUR-BU should be aimed at the
equipment you want to operate. It has 10 RF address settings that correspond
to settings selected in the SUR-47. Additional base units can be p througho
the house.
laced ut
34

SUR-47 User’s Manual Trouble Shooting
Appendix C – Troubleshooting
Troubleshooting Tables
Problem Solution
LCD does not show
anything when you touch
it or press the hardware
buttons.
The SUR-47 doesn’t
operate a device.
Batteries may be dead. Replace the
batteries with 4 new AAA Alkaline Batteries
(page 4). Check that the batteries are
properly installed by pressing the SLEEP
button.
Make sure that the desired device screen on
the SUR-47 LCD panel has been selected.
Ensure programming with the learning
function (page 12) or using the
manufacturer codes (page 13) has been
properly done. If you see the ERROR
message when pressing buttons, re-teach
the button.
In IR mode:
Move closer to the device. The maximum
operating distance is approximately 30 feet.
Ensure that you are aiming the SUR-47
directly at the device and that there are no
obstructions between the SUR-47 and the
device.
In RF mode:
Make sure the SUR-BU base unit is aimed at
desired equipment.
Make sure RF address on base unit matches
settings in SUR-47.
You cannot operate a
device even after
teaching the device using
the learning function.
Make sure that your SUR-47 has correctly
“learned” device's remote control code.
(page 12).
Delete the device data from the SUR-47 and
carry out the learning function again (page
12).
Make sure you did not program more than
one remote for a given device.
35

Trouble Shooting SUR-47 User’s Manual
Problem Solution
You see “ERROR” display
on the LCD during the
learning procedure.
Make sure you hold the other remote’s
button down for about 2 seconds.
Make sure you did not program more than
one remote for a given device.
Make sure the two remotes are not too close
or too far apart and are aiming directly at
each other - keep apart between 2~4
inches (5~10cm).
You see “ERROR” display
during operation.
The button that you pressed has not been
taught.
Learn the button using the learning
procedure (page12).
Your VCR will not record. As a safety feature on SUR-47, you must
press the REC key for 2 seconds.
Problems changing
channels.
If your original remote requires the ENTER key
to be pressed after a channel is selected,
press the ENTER key to select the channel.
Macro does not work. Be sure to aim the SUR-47 at the devices
while the macro commands are being sent.
Macro was not properly set up. Repeat
macro set-up procedure (page 18).
IR LEARNING is not
successful.
A button of your existing
remote performs two or
more functions
Replace batteries in the SUR-47 and the
remote you are trying to configure.
Keep distance between remotes to about
2~4 inches.
Do not learn near an incandescent or
florescent lamp. Bright or indirect light may
interfere with learning codes.
Memory capacity is full (48 keys for each of
16 models).
The learning process has no errors, but you
still can’t control your AV devices: repeat
the learning procedure again. If you still
can’t solve the problem, use the debug
code feature and email codes to Sima
Products (page 17).
Original remote might not be compatible
with learning procedure.
Some remotes issue multiple commands
when a button is held down. Please be sure
to teach different buttons of SUR-47 for these
different commands. Each button of SUR-47
can only learn one command.
36

SUR-47 User’s Manual Trouble Shooting
Problem Solution
The LCD screen turns off. The SUR-47 is preset automatically to switch
the LCD off after the Power Down time. Just
tap the SLEEP button to turn the SUR-47 back
on again. You can also reset the Power
Down time period (page 26).
One or more devices do
not respond in RF mode.
When operating properly, the red LED light
on the front of the base unit will blink while
sending or receiving signals. To test base
unit:
1. Press Remote Locator button.
2. Use remote in RF mode.
LED should blink during each test.
RF addresses for device(s) and base unit
may not set to the same setting. Check
setting on each and reset if needed.
Check to make sure SUR-47 is set to operate
in RF mode.
Base unit is not aimed at desired device. Reposition base unit.
No AC power to base unit. Make sure AC
adapter is plugged in.
Batteries may be low in remote. Change
batteries if needed.
37

Sima Products Corporation
140 Pennsylvania Ave
Bldg. #5
Oakmont, PA 15139
800-345-7462
www.simacorp,com
 Loading...