

Sunwave Technology SRC3815, SEL6000 User Manual

Preface SUR-47 User’s Manual
Preface
About this manual
This manual is designed to make using the SUR-47 Touch Screen Remote Control as easy as possible. Information in
this document has been carefully checked for accuracy; however, no guarantee is given to the correctness of the
contents. The information in this document is subject to change without notice.
Copyright
This document contains proprietary information protected by copyright. All rights are reserved. No part of this manual
may be reproduced by any mechanical, electronic or other means, in any form, without prior written permission of Sima
Products Corporation.
© Copyright Sima Products Corporation 2003
Trademarks
All trademarks and registered trademarks are the property of their respective owners.
The Federal Communication Commission Radio Frequency interference Statement includes the following paragraph:
FCC -
Note: This equipment has been tested and found to comply with the limits for a Class B digital device, pursuant to part 15
of the FCC rules. These limits are designed to provide reasonable protection against harmful interference in a residential
installation. This equipment generates, uses and can radiate radio frequency energy and if not installed and used in
accordance with the instructions, may cause harmful interference to radio communications. However, there is no
guarantee that the interference will not occur in a particular installation. If this equipment does cause harmful interference
to radio or television reception, which can be determined by turning the equipment on and off, the user is encouraged to
try to correct the interference by one or more of the following measures:
* Reorient or relocate the receiving antenna
* Increase separation between the equipment and the receiver.
* Connect the equipment into an outlet on a circuit different from that to which the receiver is connected.
* Consult the dealer or an experienced radio/TV technician for help.
The user should not modify or change this equipment without written approval from Sima Products Corp. Modification could
void authority to use this equipment.
90 Day Limited Warranty
Sima Products Corporation warrants this product against defects in materials and workmanship for a period of 90 days from
the date of purchase. During the warranty period, the product will be repaired or replaced, at Sima’s option. If you think you
need to send your unit in for service, call Sima Customer Service at 800-345-7462.
Conditions
Ship unit, freight prepaid, including reasonable proof of purchase and description of problem to:
This warranty is void if any defects are caused by abuse, misuse, negligence or unauthorized repairs. All liability for
incidental or consequential damages is specifically excluded. Some states do not allow the exclusion or limitation of
incidental or consequential damages, so the above limitation or exclusion may not apply to you. This warranty gives you
specific legal rights, and you may have other rights which vary from state to state.
ii
Attn: Customer Service
Sima Products
140 Pennsylvania Ave., Bldg #5,
Oakmont, PA 15139

SUR-47 User’s Manual Table Of Contents
Table of Contents
Chapter 1 - Introducing the SUR-47................................................................................................................1
SUR-47 Features ..............................................................................................................................................1
Unpacking the SUR-47 ..................................................................................................................................1
Identifying Components ..............................................................................................................................2
Chapter 2 - Getting Started.............................................................................................................................4
Installing The Base Unit..................................................................................................................................4
Using the IR blaster cable.............................................................................................................................4
Installing Batteries ..........................................................................................................................................4
Battery Indicator......................................................................................................................................4
Battery Tips and Precautions.................................................................................................................5
About the Touch Screen ..............................................................................................................................5
Turning the Touch Screen On................................................................................................................5
Touch Screen Precautions.....................................................................................................................5
Touch Screen Buttons .............................................................................................................................5
Using Hard Keys..............................................................................................................................................6
Entering the Setup Menus............................................................................................................................6
Navigating the Setup Menus ................................................................................................................6
The Setup menu tree.....................................................................................................................................7
Chapter 3 - Setting Up the SUR-47 ..................................................................................................................8
Device Menu..................................................................................................................................................8
Creating a New Device.........................................................................................................................9
Re-Labeling Devices.............................................................................................................................10
Setting the RF Address..........................................................................................................................10
Deleting Devices ...................................................................................................................................11
Code Menu ..................................................................................................................................................11
Using Pre-Code to Program Devices.................................................................................................12
Using the Learning Mode.....................................................................................................................13
Before Using the Learning Function...................................................................................................13
Erasing Key Codes ................................................................................................................................15
Erasing Device Codes ..........................................................................................................................16
Debugging Device Codes ..................................................................................................................17
LCD Layout ...................................................................................................................................................18
Using Macros ................................................................................................................................................18
Creating a New Macro........................................................................................................................19
Deleting a Macro ..................................................................................................................................20
Viewing a Macro...................................................................................................................................21
Setting Channels..........................................................................................................................................21
Adding a Quick Channel ....................................................................................................................22
Deleting a Quick Channel...................................................................................................................23
Relabeling a Quick Channel ..............................................................................................................23
iii

Table of Contents SUR-47 User’s Manual
Using the Transmission Feature ..................................................................................................................24
Miscellaneous Menus..................................................................................................................................24
Setting the Date and Time ..................................................................................................................25
Setting the Power Down Time.............................................................................................................26
Setting the Backlight On Time.............................................................................................................26
Setting the Beep Signal ........................................................................................................................27
Checking the Version Number ...........................................................................................................27
Resetting the SUR-47 to Factory Defaults................................................................................................28
Chapter 4 - Controlling Devices ...................................................................................................................29
Selecting a Device to Control...................................................................................................................29
Alternating Touch Screen Pages ..............................................................................................................29
Viewing the Macro Key ..............................................................................................................................30
Using the Quick Channel Buttons.............................................................................................................31
Controlling Devices .....................................................................................................................................32
Using the AUX Key........................................................................................................................................32
Appendix A - Specifications .........................................................................................................................33
Appendix B - Accessories .............................................................................................................................34
Appendix C – Troubleshooting......................................................................................................................35
Troubleshooting Tables...............................................................................................................................35
iv

SUR-47 User’s Manual Introduction
Chapter 1 - Introducing the SUR-47
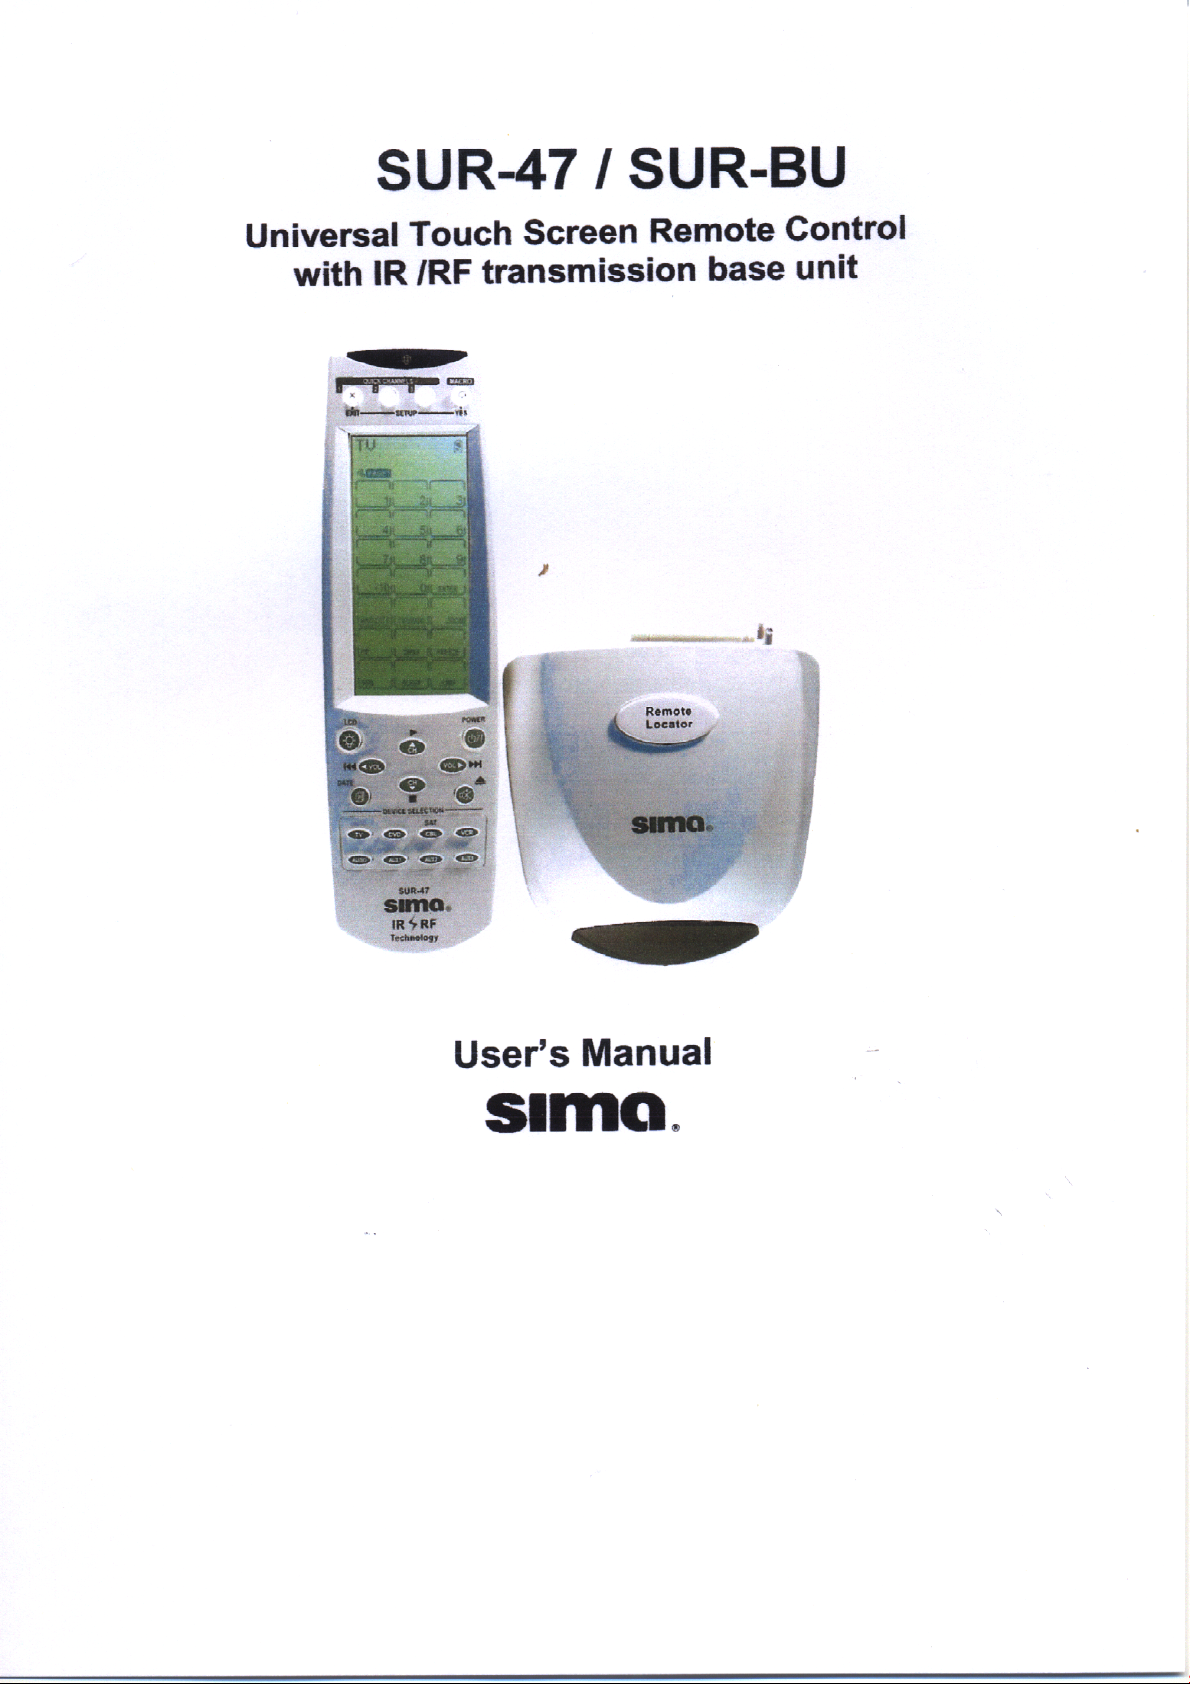
Congratulations on your purchase of the SUR-47 Touch-Screen Remote Control. The SUR-47 is a digital universal
remote control that is easy to use, enabling you to control up to 16 electronic devices equipped with an
infrared (IR) remote.
•
The SUR-47 comes with an IR/RF base unit to receive and send signals from the remote and operate
devices from any room in your house or up to 100 feet away.
•
The SUR-47 uses a Touch Screen panel and control buttons and is simple to use. Simply select a device and
the appropriate screen appears. You can control up to sixteen devices, including VCRs, DVDs, TVs, and
satellite dishes.
•
The SUR-47 is easy to set up. You can quickly configure each device in your household or office using the
innovative “learning eye” feature. In addition, the advanced macro function enables you to initiate a
chain of up to 60 commands with the touch of a single button.
•
The SUR-47 is equipped with a remote finder feature to help locate it when lost.
Convenient and easy to use, the SUR-47 provides you with a complete central control solution.
This manual helps you learn how to use the advanced features of the SUR-47. It does not explain how to use the
functions for your devices. Please refer to your device user's manual for information related to your device.
SUR-47 Features
The following list identifies the SUR-47’s key features.
• Choice of IR (direct to device) or RF (to base unit to device) signal transmission.
• Lost remote finder button - activates beep to locate remote when lost.
• Large Touch Screen display.
• Macro sequence function—each macro can store 60 commands.
• Controls up to 16 devices including DVDs, TVs, Satellite Receivers, VCRs and CDs.
• Learns the IR codes from your existing remote controls to quickly set up devices.
• Pre-programmed manufacturer’s codes for many models.
• User programmable buttons for each device include 6 hardware buttons, the device key and 42 soft
buttons.
• Optional PC Interface for connection to a personal computer.
Unpacking the SUR-47
After you have unpacked the SUR-47, check the contents to make sure the following items are included.
• SUR-47 ● SUR-BU base unit
• This User’s Manual ● IR blaster cable
• Pre-programmed Code List ● AC adap ter
If any of the above items are missing or appear damaged, contact your dealer immediately. Do not throw the
shipping carton away in case you need to ship your SUR-47.
1
Introduction SUR-47 User’s Manual
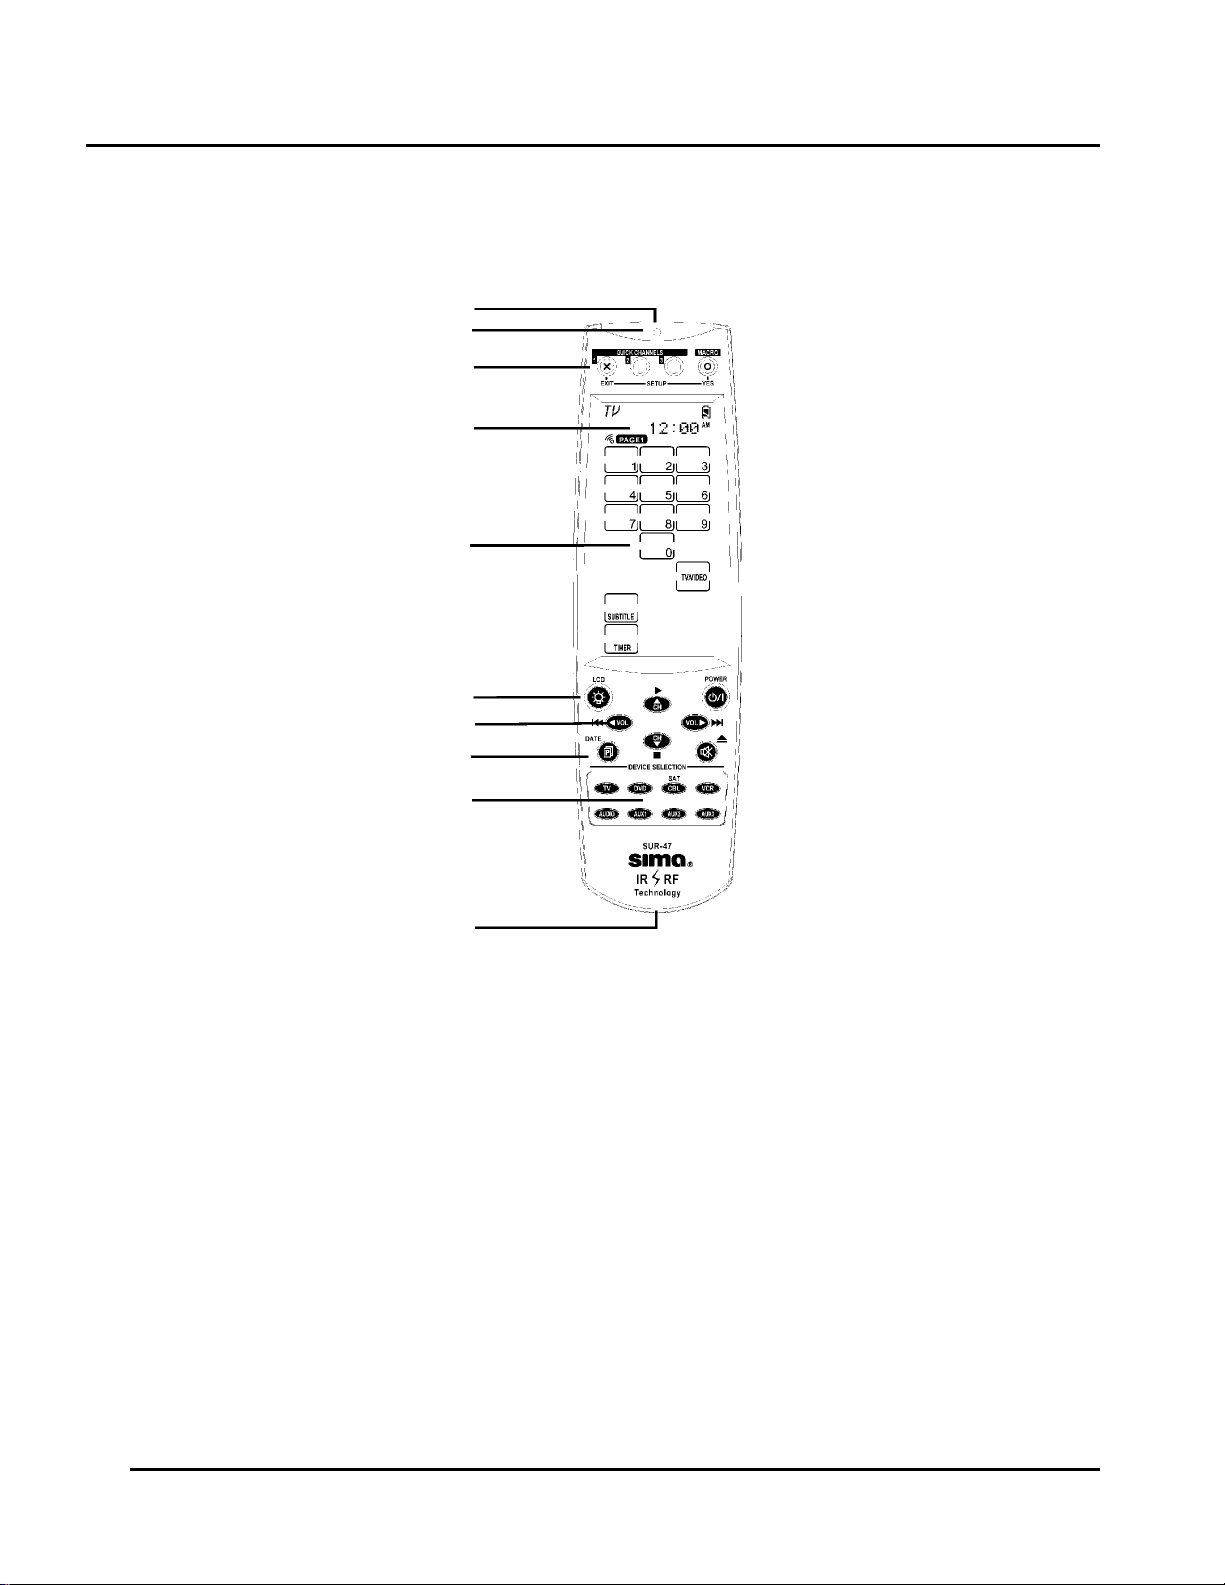
Identifying Components
Refer to the following illustration to identify the components of the SUR-47.
Infrared Emitter: Point the
infrared emitter at the device you
want to operate.
Light Sensor: Detects ambient
light to automatically set the LCD
panel backlight.
Quick Channel: Enables you to
group channel types for easy
access.
LCD: Backlit LCD emulates the
hard key controls, and provides a
user interface for the SUR-47.
Touch Screen: Enables you to
change channels, configure the
SUR-47, create macros, and
more.
Backlight/LCD: Press this button
to turn on the LCD backlight or to
wake up the unit.
Hard Key: These buttons enable
you to turn the controlled devices
on and off, change channels, and
adjust or mute the audio volume.
Page/Date: Press this button to
browse through the device
screens. Press and hold this
button to display the date and
time.
Device Keys: Press these
buttons to display remote control
screens for the devices listed.
Learning Eye: Point your
device's remote control at the
learning eye to enable the SUR47 to learn your device's infrared
codes.
Infrared Emitter
Light Sensor
Quick Channel
LCD
Touch Screen
Backlight/ LCD
Hard Key
Page/Date
Device Keys
Learning Eye
Figure 1A: SUR-47 Front View
2
SUR-47 User’s Manual Introduction
t
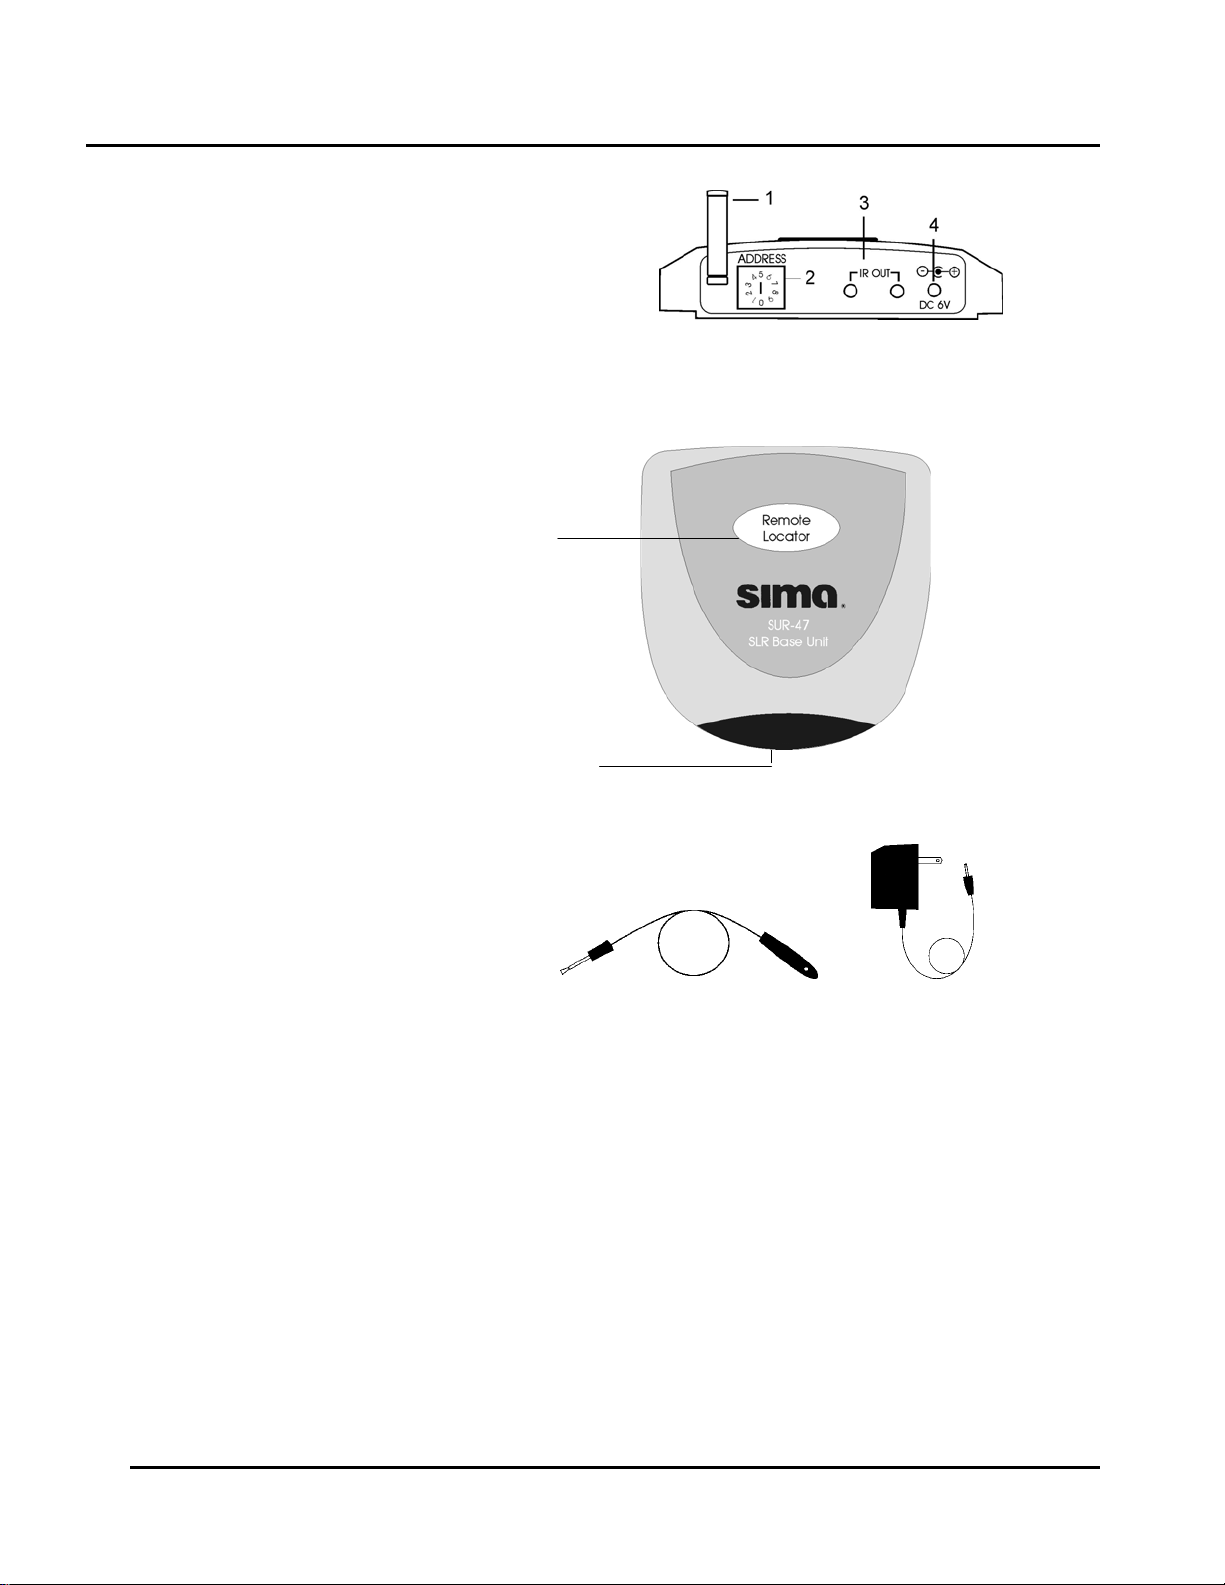
Fig. 1B IR Out jack – Connect the IR
blaster cable to this jack to operate a
specific device.
Base Unit address setting – Set the RF
address of the base unit by selecting an
address number between 0 and 9.
AC adapter input – Plug AC adapter into
jack.
RF Antenna – to receive RF signal
Fig. 1C Remote Locator Button – Press
to trigger beep signal and locate remote.
Infrared Emitter– Sends IR signal, aim
at equipment
Fig. 1D IR Blaster Cable – Attach
directly to equipment that is not within
directional range of base unit. With front
and rear adhesive.
Fig. 1E AC Adapter – Plug into base uni
and into 120V AC outlet.
1. RF antenna
2. Base Unit
address setting
3. IR Out jack
4. AC adapter input
Remote Locator
Button
Figure1B: SUR-BU Rear View
Infrared
Emitter
RF
Figure 1C: SUR-BU front view
Figure 1D: IR Blaster cable Figure 1E: AC adapter
with front and rear adhesive
3
Getting Started SUR-47 User’s Manual
Chapter 2 - Getting Started
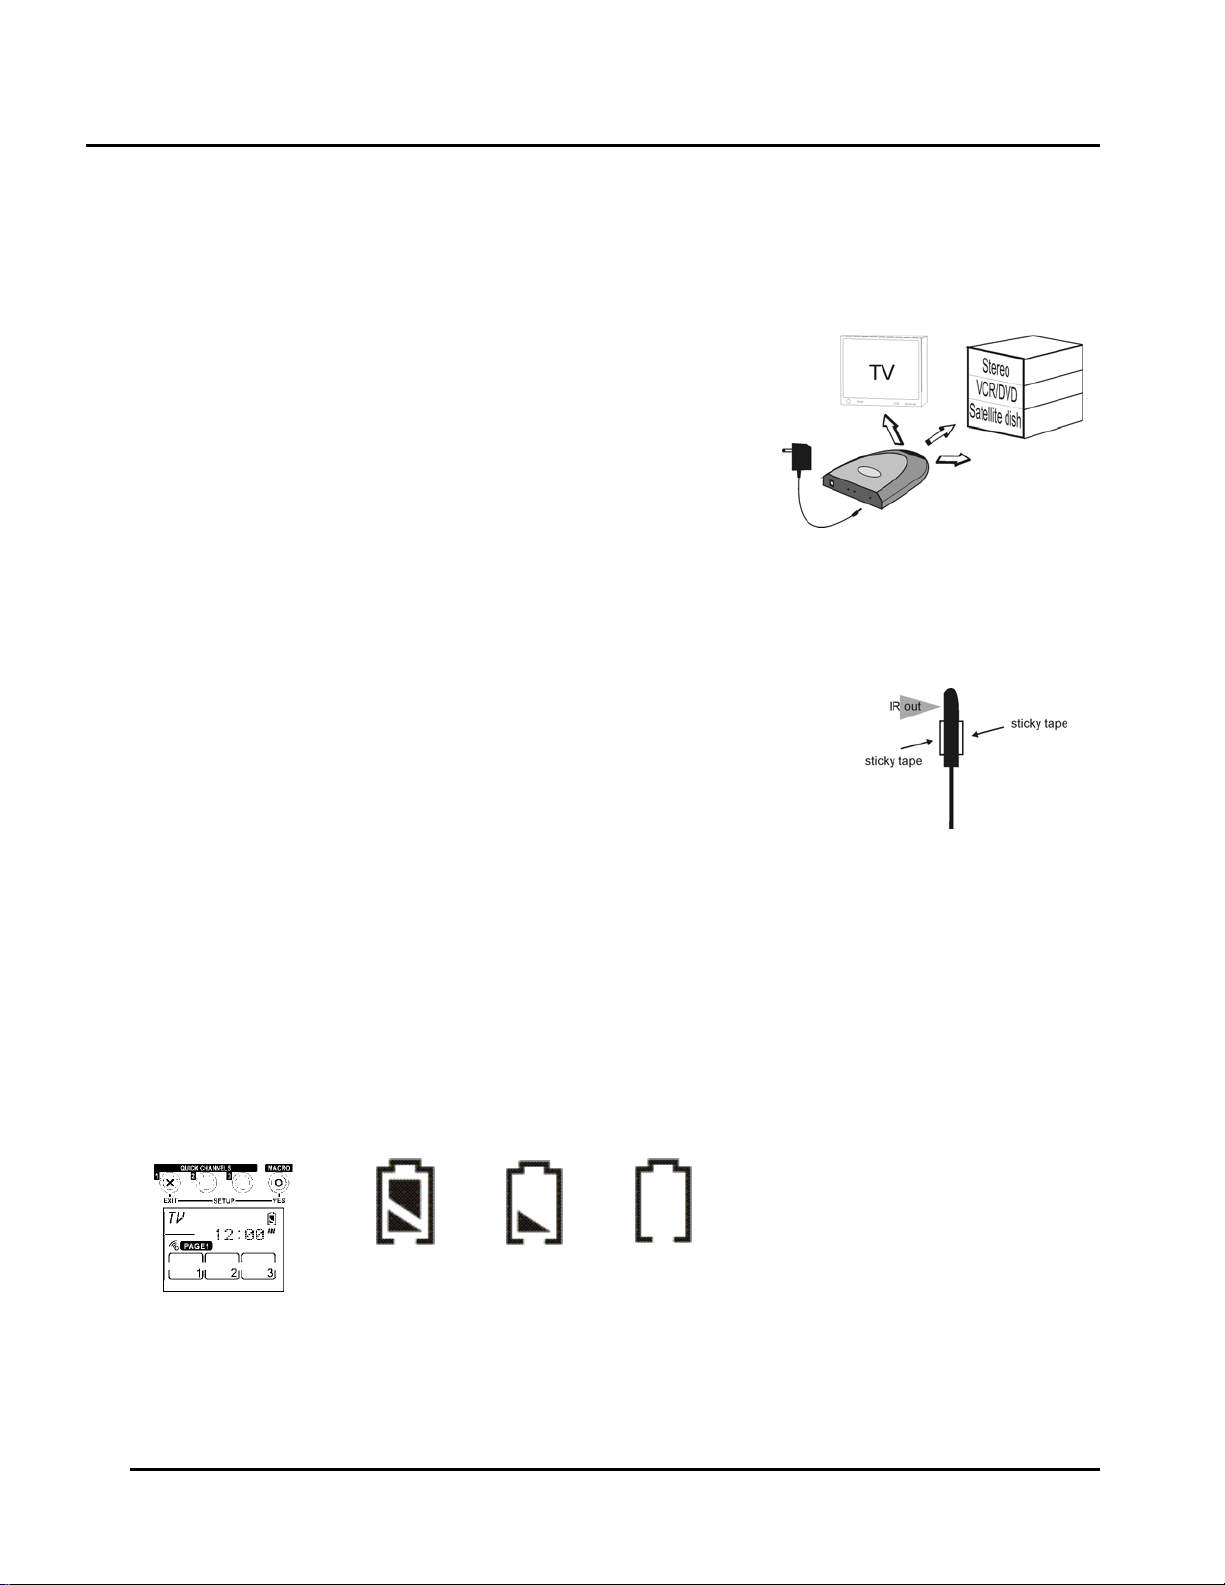
Installing The Base Unit
The SUR-BU base unit is equipped with 4 IR emitting LEDs which are positioned
in a North, South, East and West configuration to flood the room with IR
signals. Place the unit so the IR transmission can be “seen” by the IR receiving
windows on your TV, VCR, DVD and A/V equipment. You may want to
experiment to find a location that gives the best results. Rubber feet for table
top placement and screws for wall mounting are included.
1. Plug AC adapter into AC adapter jack on base unit and into 120V
AC wall outlet.
2. Set address code if necessary. See page 10, Setting the RF Address
for more information.
3. Position base unit so that it is aimed at equipment. Use IR blaster cable for equipment out of directional
range.
Using the IR blaster cable
The IR blaster cable can be used with individual pieces of equipment that face
different directions, are located in a cabinet or otherwise not in direct line of sight
with the base unit. The cable comes with double stick tape on both sides to allow
attachment directly to a device or to aim at several devices. Contact Sima at
800-345-7462 if additional IR blaster cables are needed.
Installing Batteries
The SUR-47 operates on four AAA Alkaline batteries (not included). Batteries must be inserted before you can
operate the SUR-47.
1. Turn the remote over, push the tab in the direction of the arrow on the battery cover and slide the
cover off.
2. Insert the batteries, matching the batteries to the (+) and (–) marks inside the battery case.
Snap the battery cover back into place.
3.
Battery Indicator
A battery icon is displayed in the upper right-hand corner near the time display. When the batteries are almost
depleted, the battery low icon appears. When the battery low icon appears, you are not allowed to enter
setup mode.
Battery
full
Battery half
full
Figure 2: The Battery Icon
Battery
low
4

SUR-47 User’s Manual Getting Started
Battery Tips and Precautions
• Immediately replace the batteries when the battery low icon appears.
• The SUR-47 will not lose programmed data when replacing batteries, but will reset the time.
• Always use fresh batteries. Alkaline batteries are recommended. Do not mix different types of batteries.
• Match the positive (+) and negative (–) polarities of the batteries to the diagram in the compartment.
• Do not expose the batteries to excessive heat or flame.
• Keep batteries out of the reach of children.
• Weak batteries reduce the effective distance of the unit.
• To reduce danger of leakage and damage, remove used batteries when used longer than two years.
About the Touch Screen
The Touch Screen reduces the number of buttons by changing its configuration for each device selected. In
this way, the Touch Screen provides 672 buttons (16 devices x 2 pages x 21 buttons per page).
Turning the Touch Screen On
Touch the screen to activate it. It will turn itself off after the user-defined power down time period. (To change
the down time, see Setti ng the Dow n Time on page 26.
Touch Screen Precautions
Please read the following instructions carefully:
• Tap the LCD Touch Screen gently; never use force.
• Do not use a pen or any sharp object to tap the screen. You might damage the surface.
• Keep the Touch Screen dry. Wipe off any spills immediately. The SUR-47 is not waterproof; never immerse
it in liquid.
• Don't expose the SUR-47 to extreme temperatures. Keep it away from heat sources.
• Avoid dropping the SUR-47.
• Don't drop anything on the Touch Screen.
• Clean the LCD Touch Screen with a soft cloth. If needed, dampen the cloth slightly before cleaning.
Never use abrasives or cleaning solutions.
Touch Screen Buttons
The Touch Screen buttons enable you to operate the SUR-47 and your external devices. Use these buttons to
program codes from your existing remotes, control your devices, and set up command sequences called
macros. You will hear a beep when you press a button. To activate or deactivate the beep, see Setting the
Beep Signal on Page 27. the SUR-47 turns itself off after a user-specified time. To change the time, see Setting the
Power Down Time on page on page 26. Press the LCD button to wake the unit up.
5
Getting Started SUR-47 User’s Manual
Using Hard Keys
The buttons on the bottom part of the SUR-47 enable you to operate devices as well as program the SUR-47.
Three buttons have special functions:
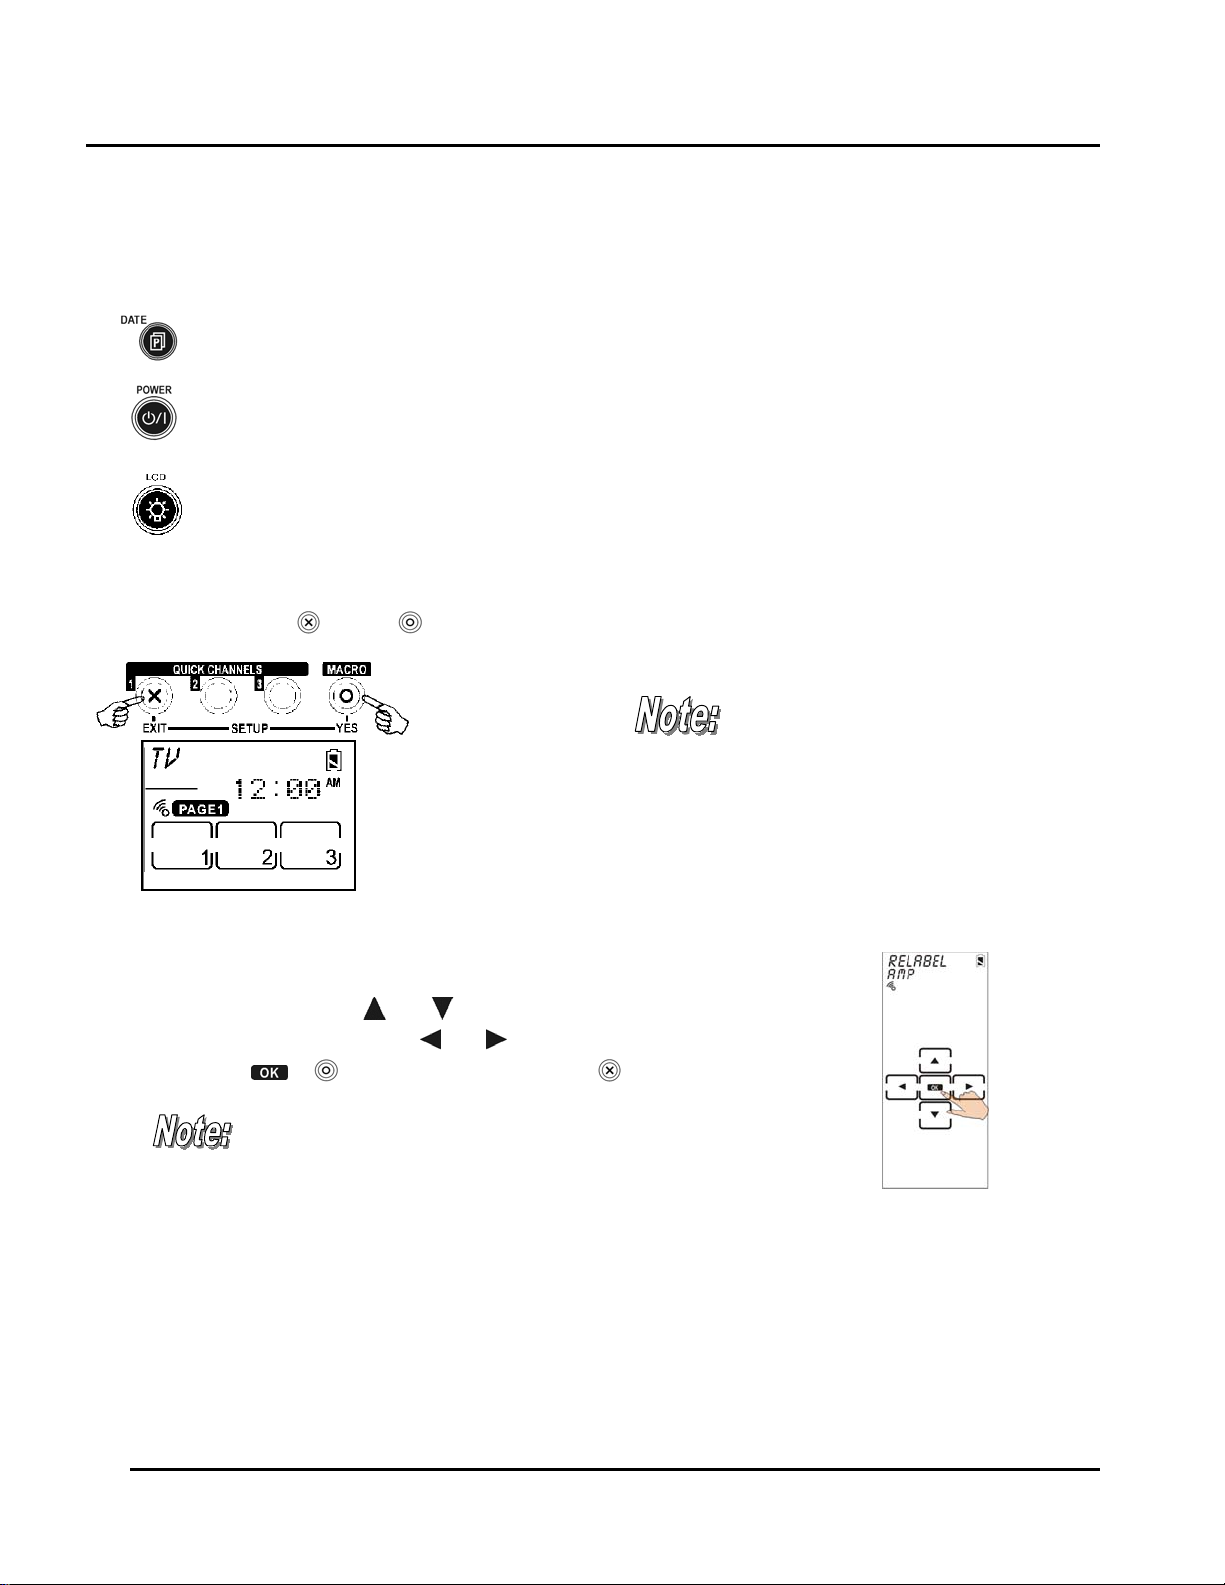
Page/Date Button: Toggles from Page 1 to Page 2 of the device buttons menus. If held down for more
than two seconds, the date and time are displayed.
Power Button: Turns devices off and on. During Touch Screen Layout (see page 18) displays all possible
LCD options.
Backlight/LCD Button: Press this button quickly to turn on the backlight or to wake up SUR-47 if LCD has
turned off.
Entering the Setup Menus
Press and hold the and the buttons simultaneously to access the setup menus.
When the battery low icon appears or
you are in Quick Channel mode, you
are not allowed to enter setup mode.
Figure 2: Entering the Setup Menus
Navigating the Setup Menus
While in the setup menus, press and on the Touch Screen to scroll up and down
through the menus and settings. Press
and settings. Press
or to confirm settings, and press to exit a menu.
When using the setup menus,
you must press each button
within two minutes of pressing
the last button. Otherwise, the
SUR-47 will exit setup mode and
return to normal operation
mode.
and to scroll left and right through menus
Fig:4 Navigating Menus
6
SUR-47 User’s Manual Getting Started
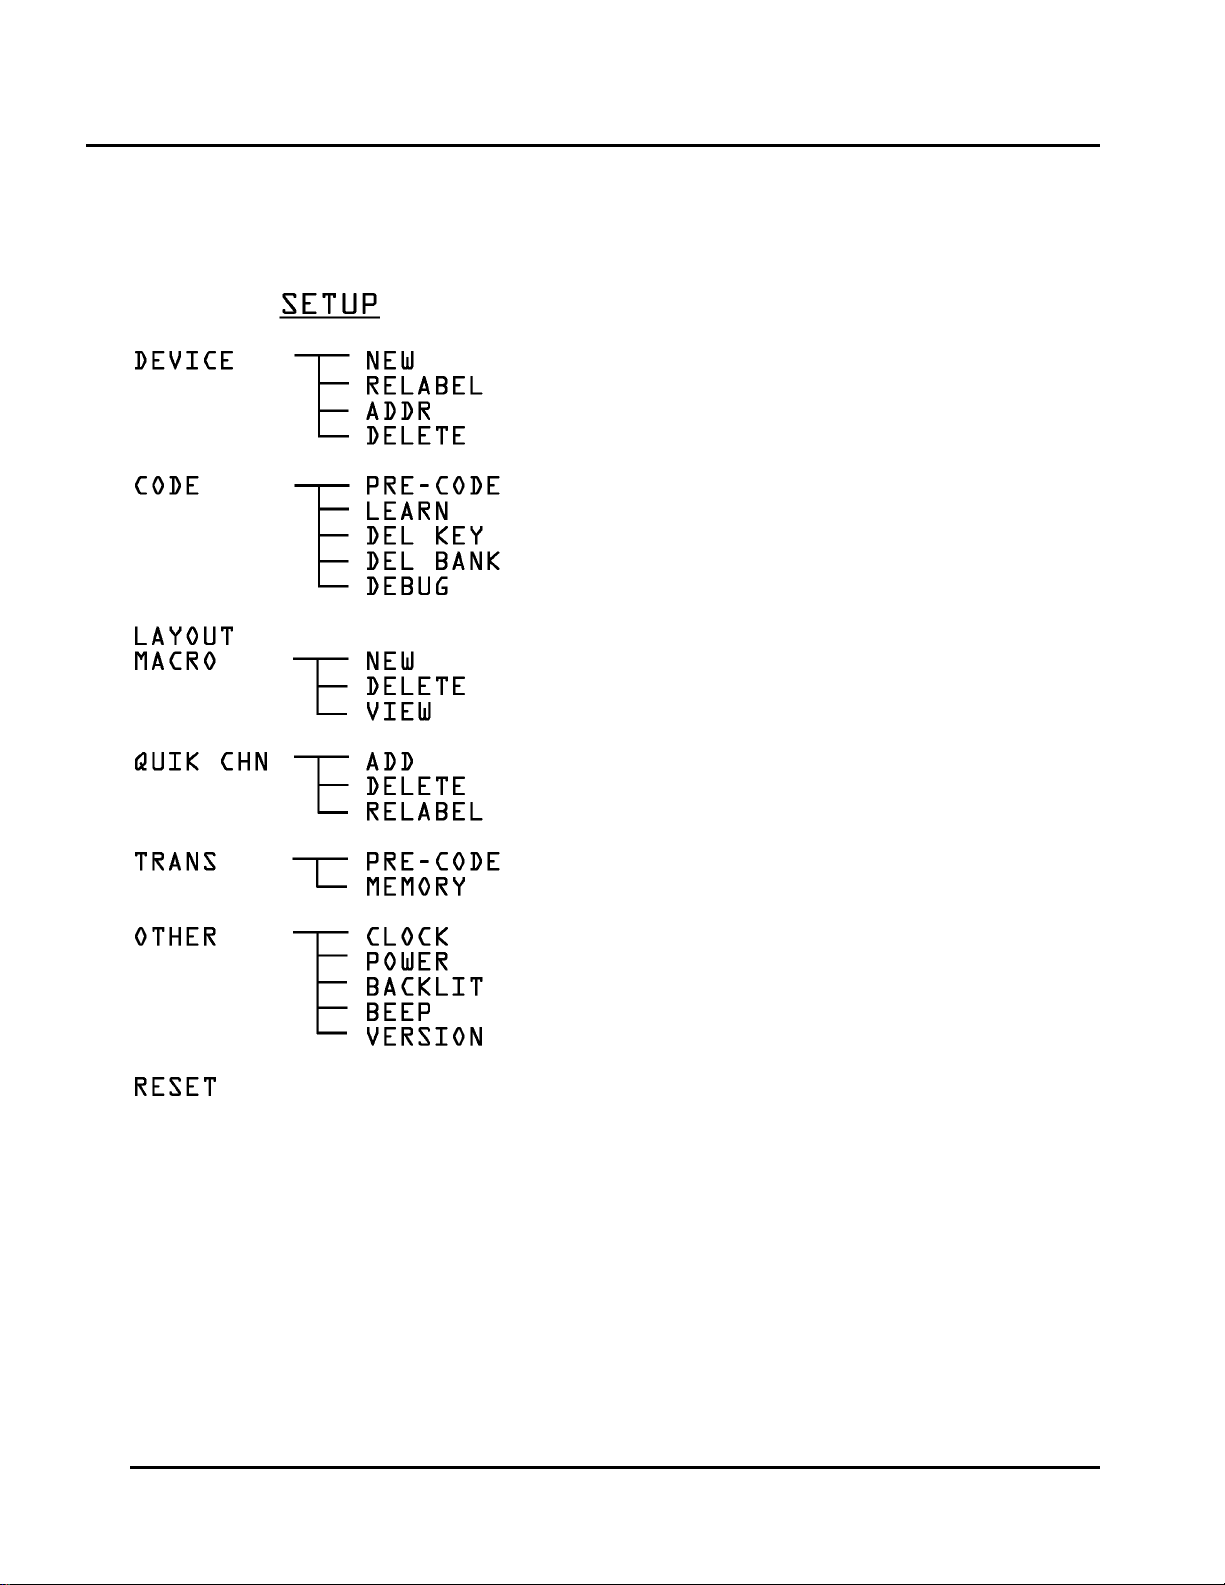
The Setup menu tree
New Device
Edit Device Label
Address for RF
Erase Device Code
Pre-programmed Code
Code Learning
Erase Key Code
Erase Device Code
Collect Unrecognizable (Un-learnable) IR Codes
Set Macro Key
Erase Macro Key
View Macro Process
Set Channel Classification
Delete Channel Classification
Edit Channel Classification
Pre-programmed Code
Memory
Date & Clock
Power Down
Backlit Period
Beep on/off
Program & Pre-programmed Code Version
Figure 5: Setup Menu Hierarchy
Reset To Factory Setting
7
Getting Started SUR-47 User’s Manual
Chapter 3 - Setting Up the SUR-47
Before the SUR-47 can be used to control a device, it needs to be configured to display your existing remote
control buttons. It must be programmed to send the correct infrared signals.
This chapter guides you through the Touch Screen layout and SUR-47 setup procedure.
Before continuing, refer to Navigating the Setup Menus on page 6 to learn how to navigate the menus.
Device Menu
Enter the setup menus, scroll to Device and press to enter the device menu. In the device menu, press
and
to scroll through the menu options:
•
New
: enables you to set up a new device
•
Relabel
•
Delete
The SUR-47 includes eight default de vic es :
TV DVD SAT VCR
AMP TUNER CD AUX
: enables you to rename a device
: enables you to delete a device configuration
When a new device is created, the SUR-47
automatically loads a default device configuration
making it easy for you to edit the new device layout.
8
SUR-47 User’s Manual Specifications
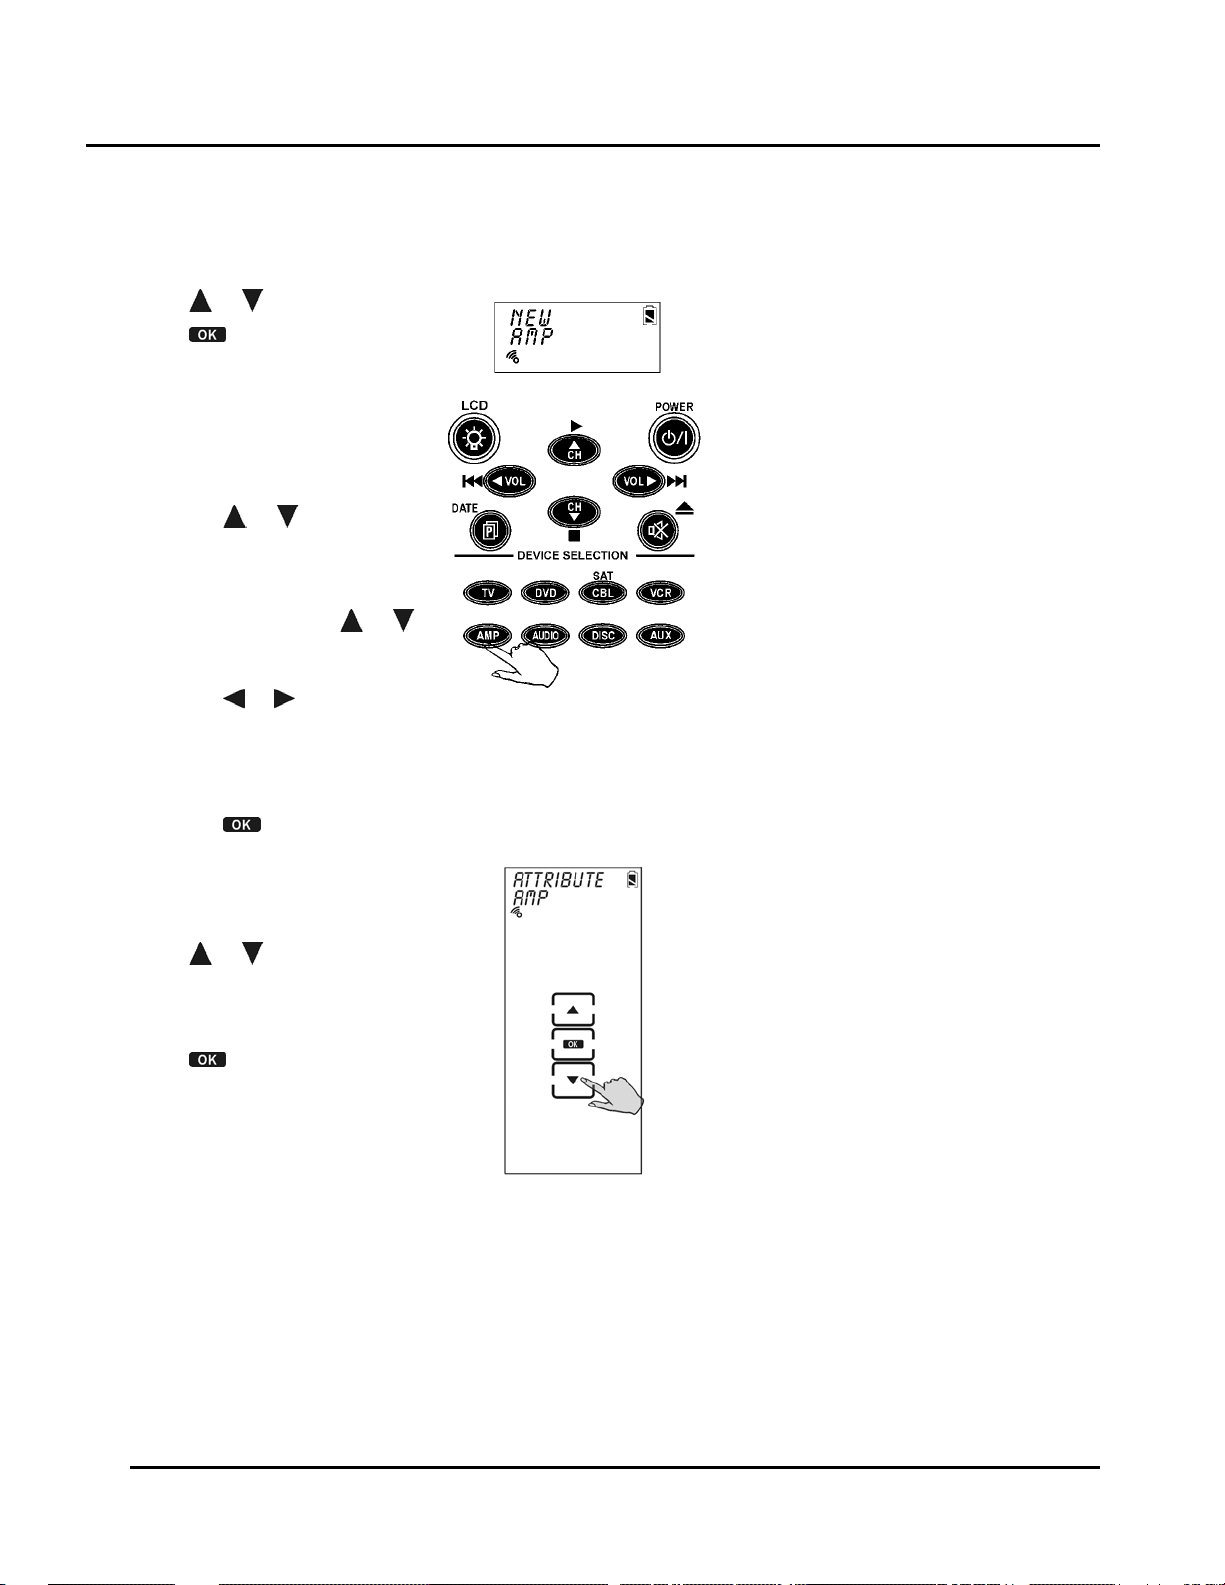
Creating a New Device
Follow these steps to create a new device:
1. Press or to select
2. Press
3. Press the device key you
want to use for this device
(for example AMP).
4. Edit the device label. The
label can be up to 8
alphanumeric characters:
• Press
Note: Press and hold
to quickly scroll through the
characters.
• Press
• Press
You are prompted to select
an attribute for the new
device.
5. Press
device whose attributes will
be loaded to the new
device.
6. Press
entry.
.
or to scroll
through the characters
(from A-Z, 0-9, and the
space key).
or to move to
the previous or next
character. When
selected, the character
blinks.
to confirm the
entry.
or to select a
to confirm the
NEW
or
.
9
 Loading...