

Page 1
Page 2

Preface
About this manual
This manual is designed to make using the SRC-2200 Universal Remote Control as easy as
possible. Information in this document has been carefully checked for accuracy and is
subjected to change without further notice.
Copyright
© Copyright 2008
This document is protected by the international copyright law. No part of this publication may
be reproduced by any means without the permission of SUNWAVE TECHNOLOGY CORP.
The information provided from SUNWAVE TECHNOLOGY CORP. is believed to be accurate.
Any changes and enhancements to the product and to the information thereof will be
documented and issued as a new release to this manual.
Trademarks
Other product names mentioned in this manual are used for identification purposes only. All
trademarks and registered trademarks are the property of their respective
1
Page 3

Table of Content
About the SRC-2200 Universal Remote Control..........................................................3
Safety Notices..............................................................................................................4
Battery Usage .................................................................................................................4
Device Safety..................................................................................................................4
Main Features..............................................................................................................4
Appearance and Functions..........................................................................................5
SRC-2200 device Setup versus RemoteComm Setup................................................6
Setting up the SRC-2200.............................................................................................7
Installing the Batteries..................................................................................................7
How to Start Using the SRC-2200...............................................................................7
Guide on Major Setup Operations................................................................................8
Start Using the SRC-2200...............................................................................................8
Basic Operations ............................................................................................................9
Menu Setup ..................................................................................................................10
Setting Up the RF Dongle..........................................................................................12
Code Setup................................................................................................................12
Deleting Items............................................................................................................16
<PART I-1> Deleting Device/Key.................................................................................. 16
<PART I-2> Deleting Code............................................................................................ 18
<PART II> Deleting Macro/Timer...................................................................................19
Multifunctional Macro Key Setup................................................................................20
About Macro Keys.........................................................................................................20
TYPE 1.- Adding a Macro Key.......................................................................................21
TYPE 2.- Learning Macro Key Settings.........................................................................23
Macro Key Timer Settings.............................................................................................25
General Settings ........................................................................................................28
Specification...............................................................................................................30
2
Page 4

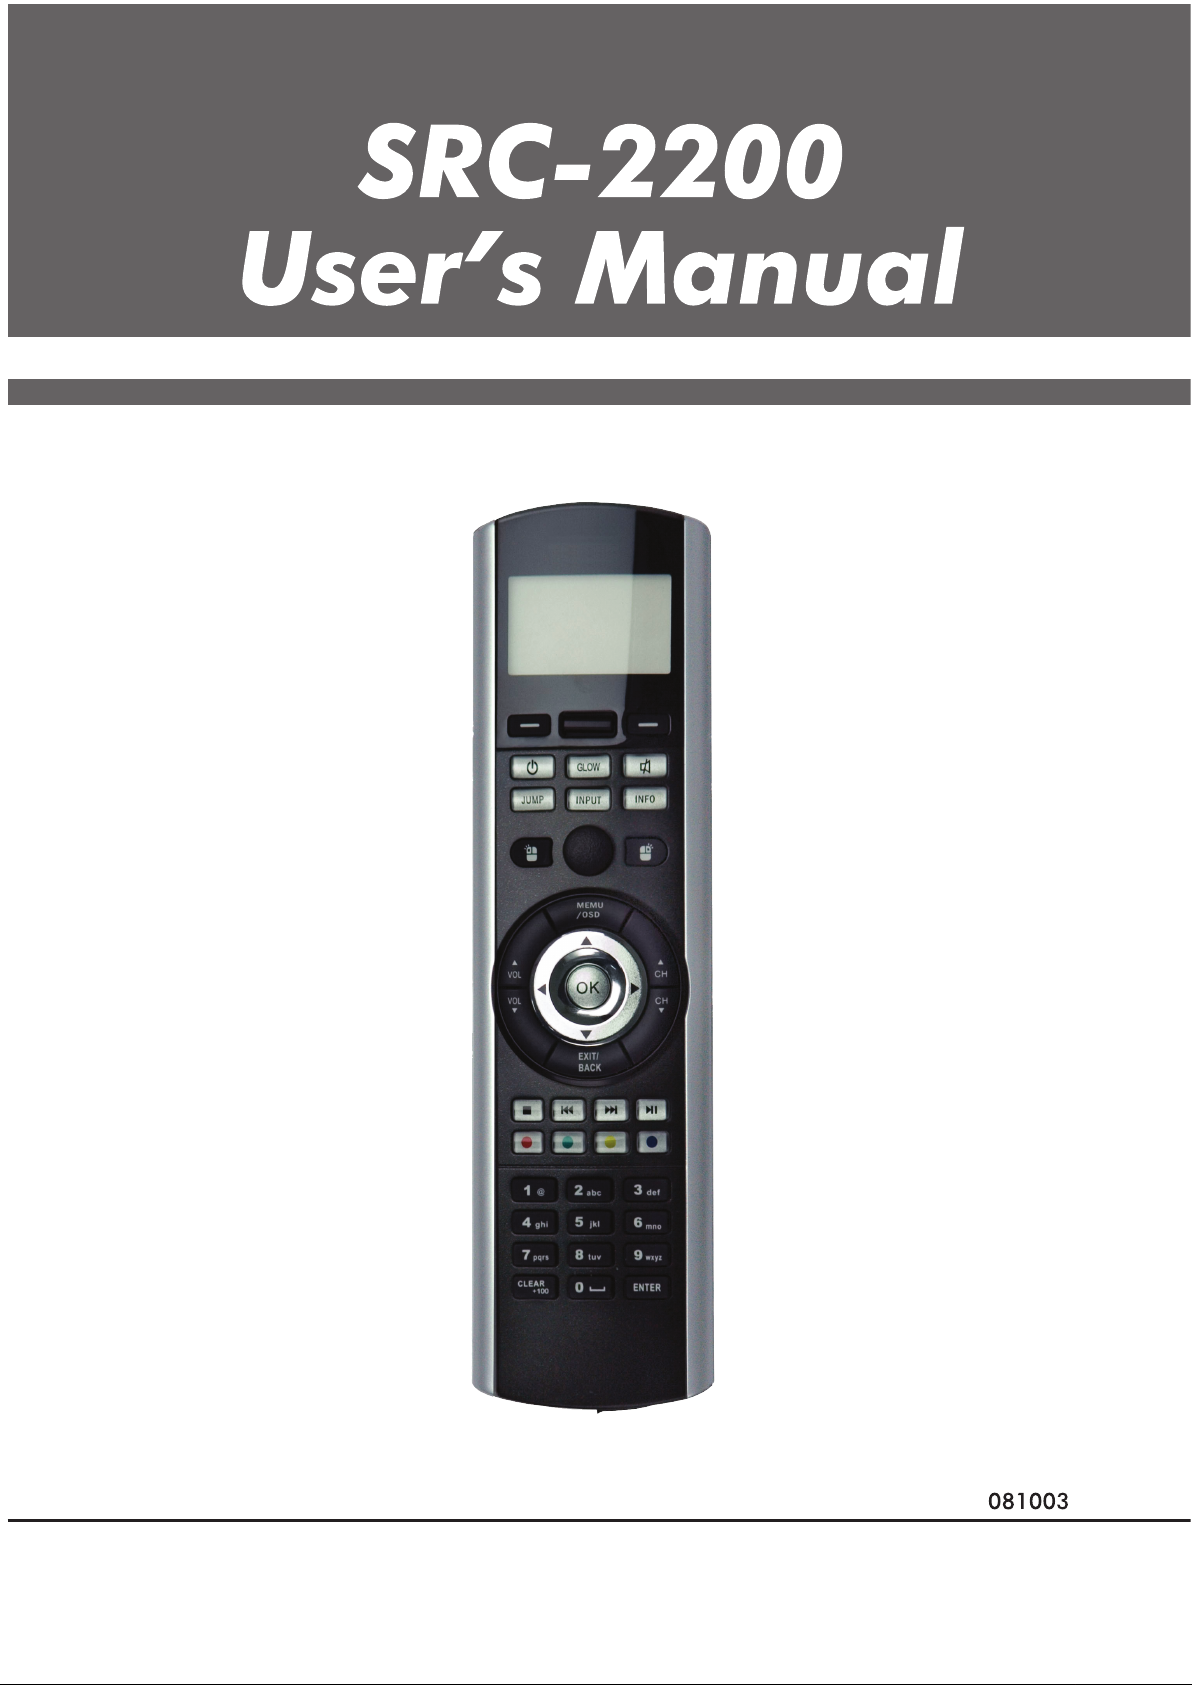
About the SRC-2200 Universal Remote Control
Designed with built-in pre-programmed codes and Infrared code learning, the SRC-2200
is an epoch-making IR/RF universal remote control. The SRC-2200 incorporates remote
control for 16 devices in one powerfully integrated combi nati on.
Using the simple interface, you can control all of your household A/C devices such as
TVs, DVDs, VCDs, satellite dishes, and other devices through this single remote control.
Completely hassle-free, our user-friendly interface and intuitive setup get you started and
running in no time.
The SRC-2200 provides you with an automatic backlight for low light situations, as well
as a mouse control function, and an LCD screen with editing function to facilitate PC
software settings for your convenience.
The SRC-2200 firmware can be upgraded periodically, which enables the users to have
the newest features available in our databank server. The SRC-2200 let s you enjoy all
your digital home entertainment equipment from the comfort of your couch.
Note: The SRC-2200 can setup simple function by the device itself. For more
advanced function setups, please install our proprietary software drive,
RemoteComm. For further details, please refer to the function comparison chart
on page 7 for setup methods.
Packing List
SRC-2200 package includes the following items:
1. SRC-2200 x 1 pc
2. USB Cable x 1 pc
3. RF Dongle x 1 pc
4. User’s Manual x 1 pc
5. Quick Start Guide x 1 pc
6. SRC-2200 Installer Guide x 1pc
7. CD RemoteComm Software x 1 pc
If item is missing or appears to be damaged, please contact your nearest local vendor.
Note:
We recommend you use RemoteComm for confi guring initial settings.
3
Page 5

Safety Notices
Heed the following safety notices regarding batteries and the device.
Battery Usage
• Use brand new alkaline batteries. To avoid any risk or damage of the Remote Control,
DO NOT use different types of batteries at the same time.
• Ensure the batteries are inserted correctly (+/-) and securely placed in the battery
compartment.
• Don’t expose the batteries to excessive fire or heat.
• Keep batteries out of reach of children.
• Weak batteries may result malfunction of remote operation; when a low battery sign
appears; replace the weak batteries with brand new ones.
• To avoid the risk of batteries leakage, remove them when the remote control is not in
use for a long period of time (over two months). Replace the batteries back to the
battery compartment, when starting to use the remote again.
Device Safety
• Do not use any sharp or place heavy objects on the LCD panel.
• This device is not waterproof. Keep the device in a dry and safe place.
• Do not expose this device to extreme temperatures, such as near a fire stove or
radiator.
• Do not intentionally drop this device or striking other objects with it.
• When the LCD panel gets dirty, clean it with a soft and dry cloth. Do not use any
chemicals or detergents.
• Do not place the device under direct sunlight.
• The device will not function properly in environments with temperatures below 5°C
Main Features
1. 16-in-one LCD remote control with intelligent integration
2. IR/RF control
3. Web base remote code library
4. Infrared code learning
5. LCD keys with editing function
6. Macro command key and macro timer setting
7. Mouse control function
8. Built-in LCD automatic power-saving mode
9. Built-in calendar and clock
10. Built-in LED backlight
11. Multilingual display
12. Compatible with MCE systems
13. Advanced function setup via PC link
14. Online upgrading service available
4
Page 6
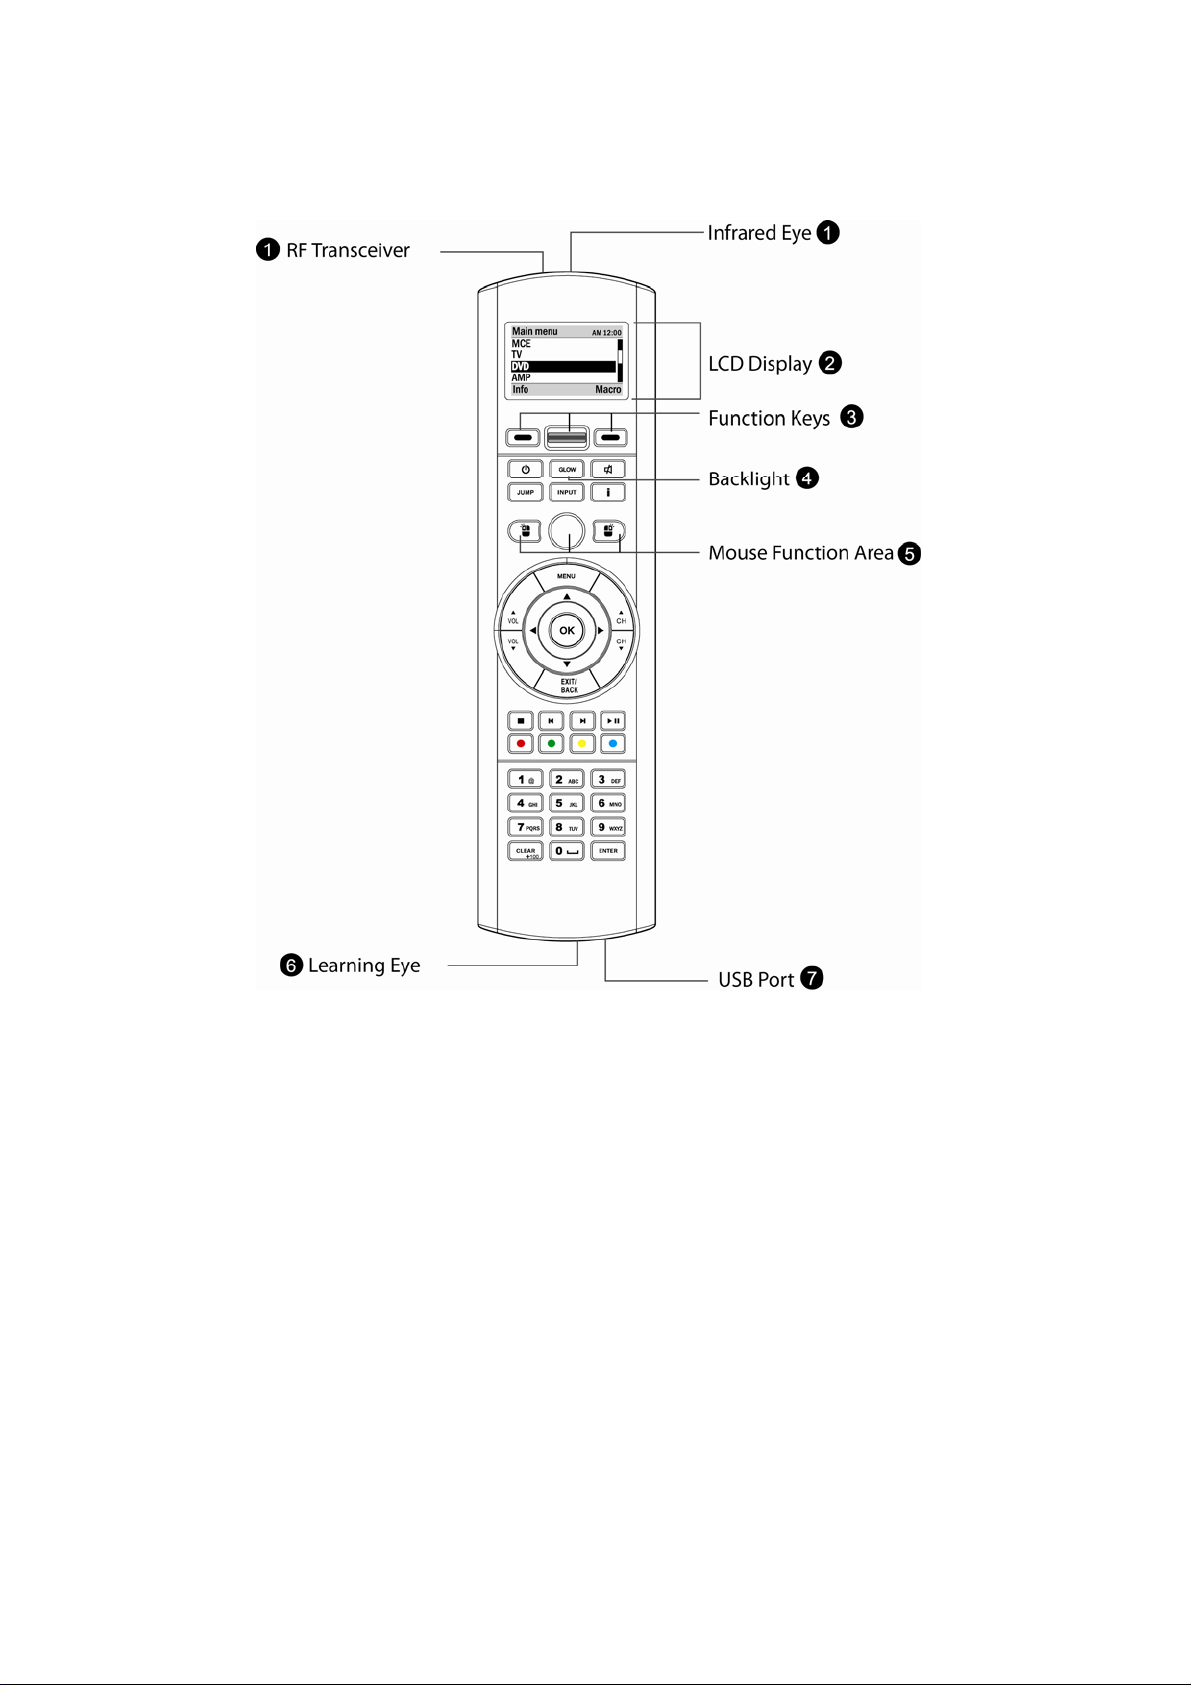
Appearance and Functions
n IR/RF - transmits infrared codes or radio signals.
oLCD screen - displays soft keys and setup implement ati on.
pSystem function operating area - middle scroll key selects and confirm setup items;
left and right function keys provide dynamic display according to current function.
qBacklight key - illuminates LEDs.
rMouse function operating area - directly replaces mouse function, including operation
with left and right keys.
sIntelligent learning eye - enables SRC-2200 to learn infrared codes of other devices.
tUSB port - enables you to link SRC-2200 to a PC via USB cable and perform advanced
function setup.
5
Page 7
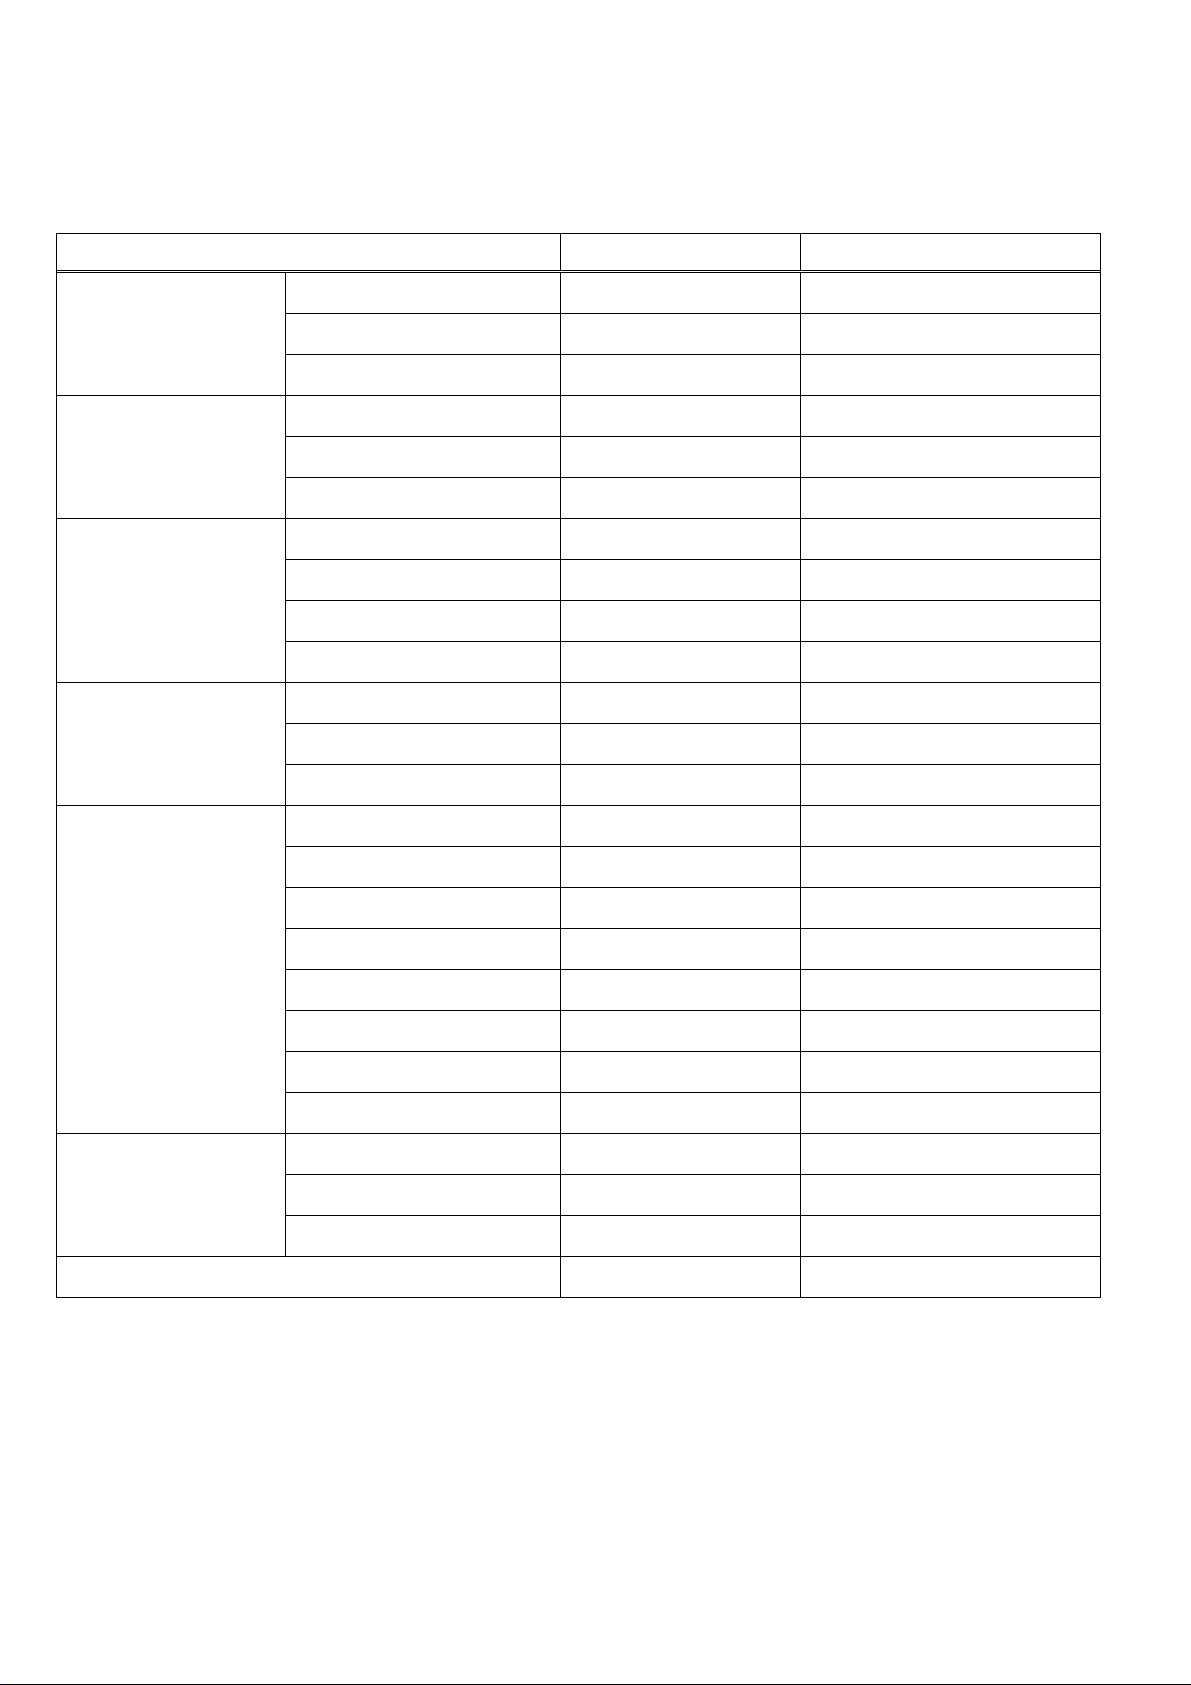
SRC-2200 device Setup versus RemoteComm Setup
Setup Items SRC-2200 RemoteComm
Activate
device
Key layout
Macro
Delete
Pre-code - √
Learning √ √
Debug
Add key - √
Edit key - √
Move key
Add Macro √ √
Timer Modify √ √
Macro Modify - √
Learning Macro
Device & Key √ √
Code √ √
Macro
Date √ √
Time √ √
- √
- √
√ √
√ √
Beep √ √
Contrast √ √
Setting
LCD off √ √
Glow √ √
Motion √ √
Reset
Info - √
File
Device data - √
management
Backup
Upgrade - √
√ -
- √
6
Page 8

Setting up the SRC-2200
This section explains how to set up the SRC-2200, how to install the batteries, and how
to configure the remote control codes.
Installing the Batteries
Four AAA size alkaline batteries are needed for the SRC-2200. Ensure that you insert the
batteries with the correct polarity and the +/- signs of the batteries match the +/- signs in
the battery compartment. When batteries are securely placed, close the battery
compartment cover before using the SRC-2200.
How to Start Using the SRC-2200
The SRC-2200 is a smart integrative remote control, and paired with the proprietary
RemoteComm setup software, all settings can be done easily and quickly.
There are two basic approaches that you can use to integrate SRC-2200 with your other
home remote controls.
1 Download remote control codes from the Internet code database
The SRC-2200 has thousands of pre-programmed code groups. Using the Internet,
you can automatically locate the codes that match your audio/video equipment.
2 Make use of the powerful learning feature.
With the SRC-2200’s powerful learning capability, you’ll be able to quickly install all
your original remote control’s codes by pointing your remote control’s transmitter
at the SRC-2200’s Intelligent Learning Eye.
7
Page 9
Guide on Major Setup Operations
Start Using the SRC-2200
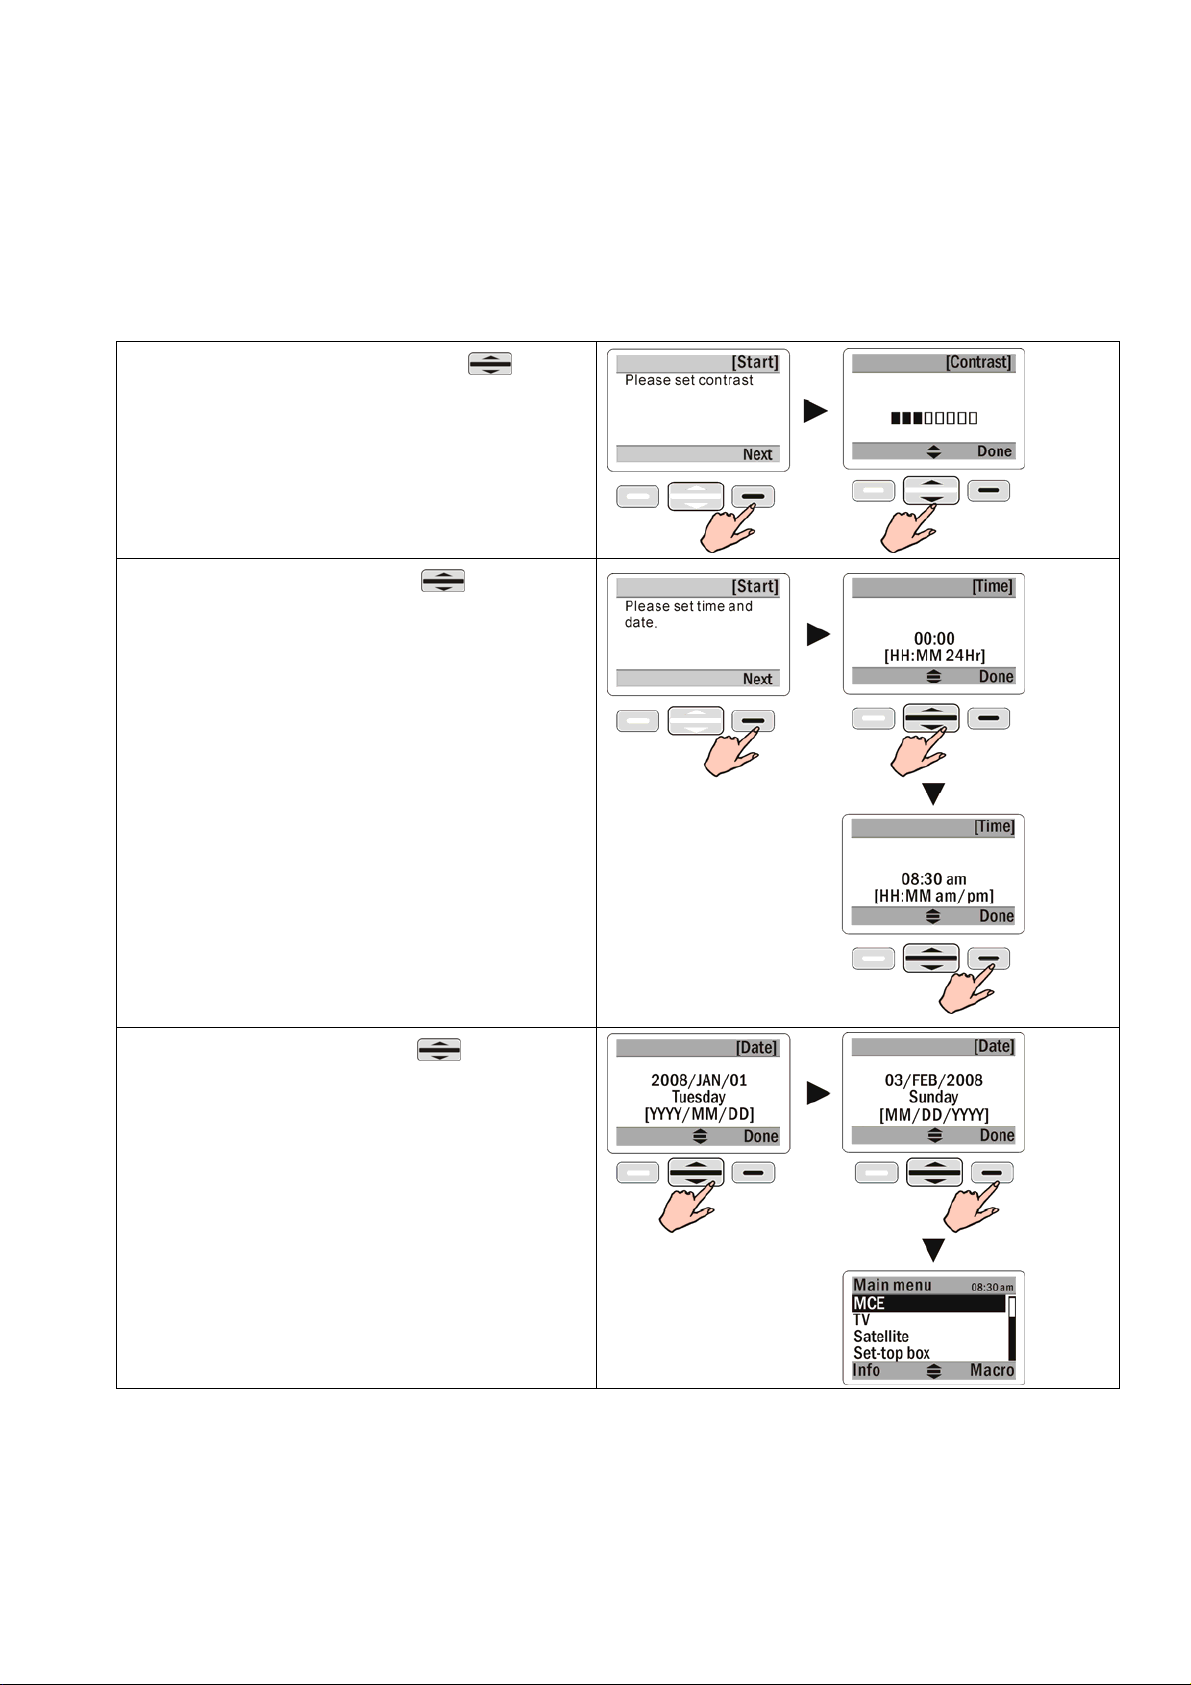
Basic set-up: LCD contrast /time/date
Main Manu->REMOTE SETUP->Setting->
Contrast: Use the scroll key
adjust the display contrast. Press Done
to save your setting.
Time: Use the scroll key to adjust
the time in the format of 12 hrs or 24
hrs. Press Done to save your setting.
to
Date: Use the scroll key to adjust
the date. Press Done to save your
setting.
8
Page 10
Basic Operations
The system function operating area (Scroll key and [Shift keys] ) includes all
the general settings. Some functions will need to display a system reminder on screen,
which require user’s confirmation. The following sections describe major operation
functions and menus.
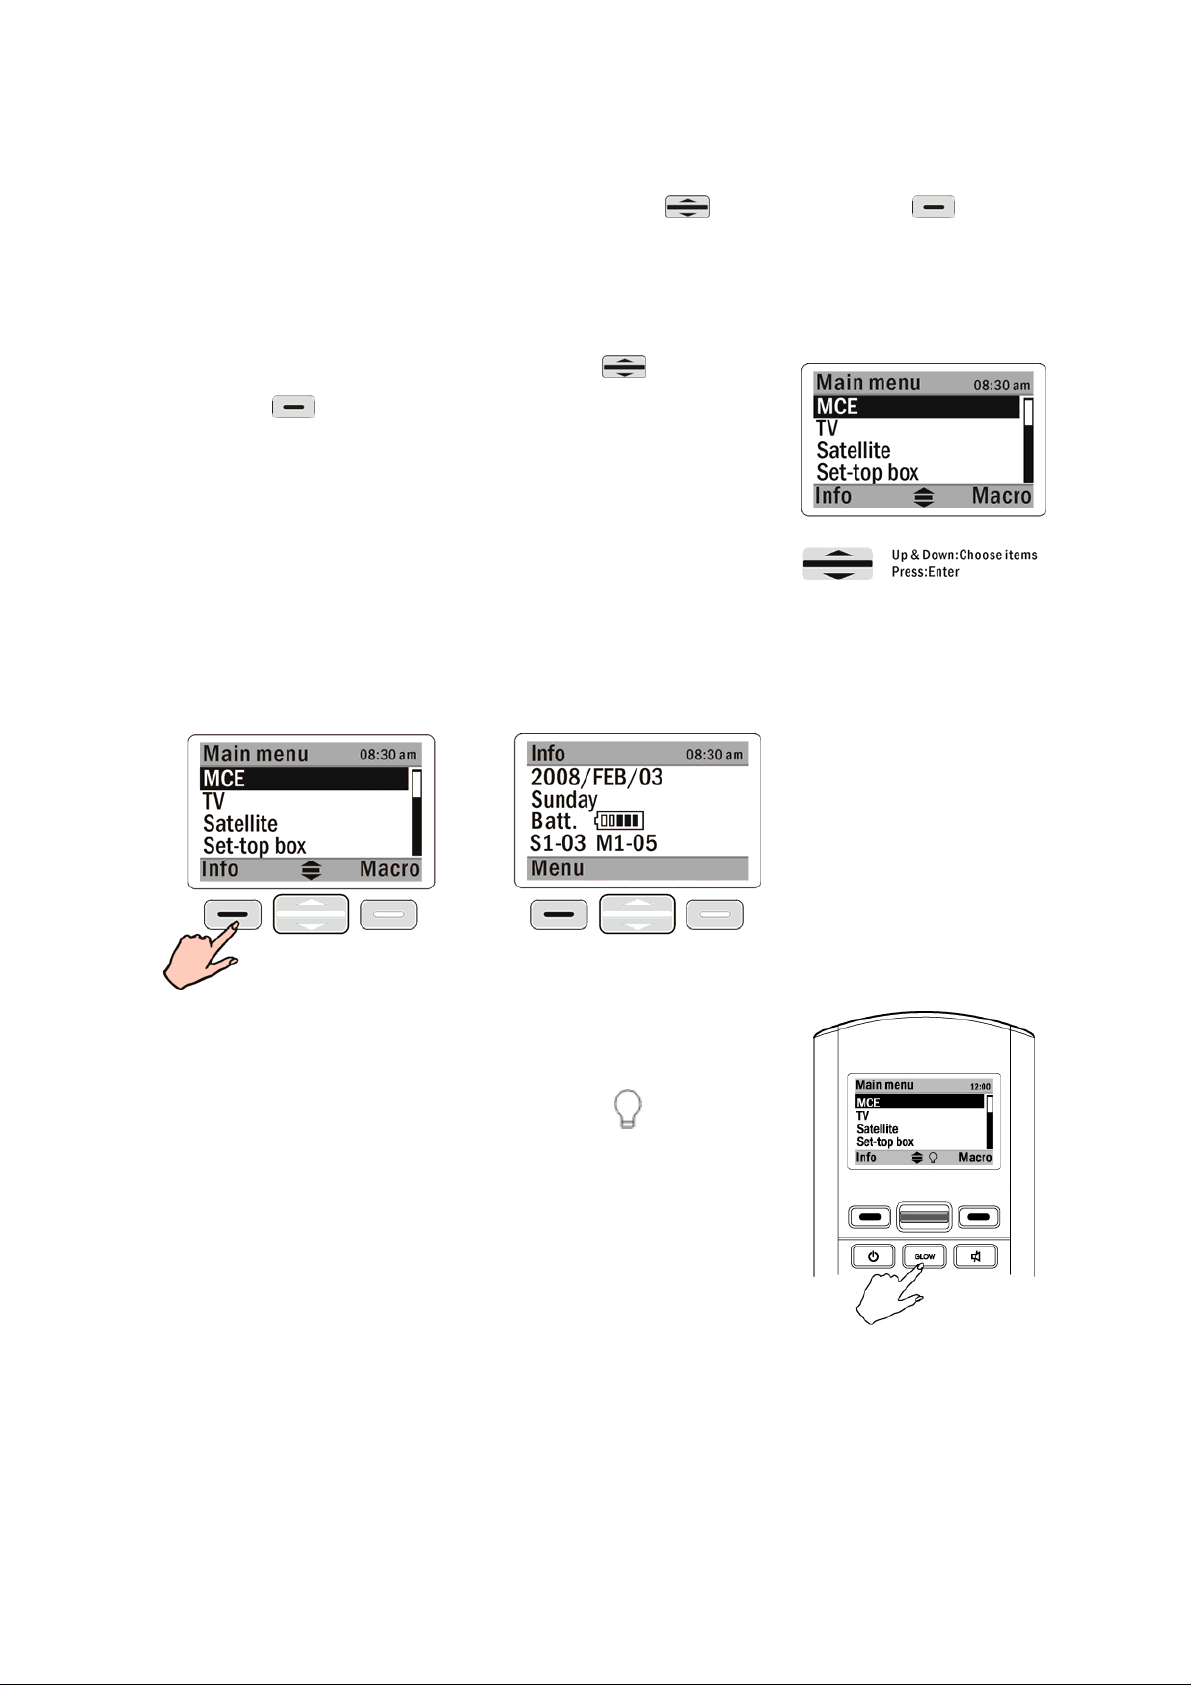
(1) The LCD is controlled by the scroll key .
Shift keys
scroll key, which will represent two symbols at two
sides on the screen bottom
(2) Enter the Main Menu and press the button under Info on the left to see
information about the date, battery capacity, and firmware version. Press Menu
to return to the main page.
are placed on the left and right of the
(3) Press GLOW to activate the backlight. Press and
hold GLOW to switch the auto backlight feature on
and off. Once the backlight is activated,
displayed on bottom of the screen. The backlight
stays on regardless of user’s operation
(4) The SRC-2200 has a built-in vibration sensor. When an outside vibration is
sensed, the remote control automatically returns to operating mode from
sleeping mode.
(5) If any key is pressed by mistake for more than 30 seconds, the SRC-2200 will
automatically stop transmitting the code.
icon is
.
9
Page 11

Menu Setup
In the Main Menu, select REMOTE SETUP with the scroll key to enter Setup mode.
There are four options in Setup mode: Learning, Delete, Macro/Timer, and Setting.
(1) Learning: enables the SRC-2200 to learn remote control codes from the original
remote control.
(2) Delete: includes Delete Device/key, Delete Code, and Delete Macr o/Timer.
10
Page 12

(3) Macro/Timer: provides continuous functions setting, coupled with timer function,
can be set up the delay time between every pre-determined step; besides, the
Macro key is included in the Learning mode setup.
(4) Setting: enables you to set non-operational functions: Date, Time, Beep, Contrast,
LCD off, Glow, Motion, Connect, and Reset.
11
Page 13

Setting Up the RF Dongle
The RF dongle enables the SRC-2200 to plug and play on your computer for quick
setup operation. You only need to plug in the RF dongle into the USB port in your PC.
By inserting it, the SRC-2200 will be able to operate the MCE system and control
mouse
If you are unable to link to your PC, follow the step s below:
(1) Press the button on the RF dongle. The LED begins
flashing.
(2) On the Main SRC-2200, press REMOTE SETUP Æ
Setting Æ Connect to set up the connection and begin
matching codes.
(3) Connection is established when the screen displays a
check mark “√” & ID address, and the RF dongle LED
light remains off.
(4) Pairing takes 10 seconds. If p airing fails, an “X” will appear; repeat steps (1) to (3)
(5) The remote control RF module can only be activated in MCE mode
Note:
An ID Address will display on the remote control when matching is complete.
We recommend you that wait for the LED light to light up on the RF Dongle, before
pressing the Connect button on SRC 2200. The connection should be ready for use.
12
Page 14

Code Setup
This section explains how to use the SRC-2200’s learning function to learn the infrared
codes of another remote control.
Read the following reminders before proceeding to operate the learning function.
Reminder 1:
The SRC-2200's learning eye must be kept in a
straight line with the transmitter of the original
remote control at a distance between 2 and 4
inches (approximately 5-10cm).
Reminder 2:
During learning, keep pressing each learning key
of the original remote until a “√” appears and two
beeps are heard; then release the learning key.
If an “X” mark appears, repeat the operation.
If desired, you can directly reassign codes to keys
with the learning function which will replace the
original codes automatically.
A key with
learned code.
Reminder 3:
Except for the pre-setup of
MCE/XBOX /PS2 device codes,
which they can not be learned by
SRC-2200, all the other keys for
other devices can be learned by
using the learning function.
mark means the key already has a
13
Page 15

(1) Access the Setup menu and select
Learning to begin the learning
procedures.
(2) Press the scroll key to select the
device you want to learn, and then
enter the device to learn each single
key. Learning process for both soft and
hard keys will be done and shown on
the screen.
Note: A key with “
” mark means it’s a
hard key.
(3) Aim the transceiver of your original
remote control at the Learning Eye,
keep a distance of between 2 and 4
inches. (approx. 5-10 cm)
(4) Follow the wizard, which guides you to
learn the key one by one, or directly
select keys you want to assign codes
to.
(5) Press a corresponding key on original
remote until “√” appears on the right
hand side of the learning key and two
beeps are heard; then release the key.
14
Page 16

(6) An “X” mark indicates that the learning has failed. Repeat step 5 until you see the “√”
symbol.
(7) Repeat steps (4) to (7) to continue learning codes for other keys.
(8) After you have finished assigning
codes with the learning function, press
Menu to exit.
(9) Repeat steps (2) to (8) if you want to learn codes for other devices
15
Page 17

Deleting Items
<PART I>
In the Delete menu you will see that the Device/key and Code are separated in content.
The menu item Device/key represents the key itself. The menu item Code represents the
code loaded in the key. If you delete a key, the code of the key (if any) will also be deleted.
Deleting a code will remove the code but preserve its key. MCE/XBOX/PS2 is set default
by the manufacturer, so you cannot delete this code/key.
<PART I-1> Deleting Device/Key
This section explains how to delete keys and codes.
(1) Access the Setup menu and select Delete.
(2) Delete a group of devices or a single key
Select the option Device/Key. You may choose to delete a group of devices or
delete a single key in a device. Corresponding codes will be deleted if the codes
are loaded in the keys. All soft keys on the screen can be deleted. If the key is a
hard key, then the Key Deleting function is not available.
Notes:
MCE/Xbox/PS2 options will always appear in gray and cannot be deleted
because they are set default by the manufacturer.
To stop the delete procedure, press Back to return to the setup p age.
Delete a group of device
(1) Select a device you wish to
delete from the Main Menu.
Press Delete to display a
confirmation page.
16
Page 18

(2) Select Yes to remove this
device, and go back to the
Delete menu.
Delete a single key
(1) Press the scroll key
to select the key you wish to delete from the device.
(2) An “X” appears on the right side of the key which means the key is ready to
be deleted.
(3) If you change your mind, just select the key again to cancel the “X”.
(4) Repeat steps (2) and (3) to select all keys you want to delete.
(5) Press Done to confirm the deletion.
(6) To delete other device keys, repeat steps (1) to (5).
(7) Press Back to exit.
17
Page 19

<PART I-2>
Select Delete and then select Code. You may choose to delete all codes for a group of
devices, or delete a single code for a single key.
Deleting Code
Delete all codes for a device
(1) Select a device you wish to
delete from the Main Menu.
(2) Press Delete to display a
confirmation page. Select
“Yes” to remove all the
codes for the device.
Delete a code for a single key
(1) Select the device you wish to delete from the Main Menu.
(2) Press the scroll key
appears on the right side of the key which means the code of the key is ready
to be deleted.
(3) If you change your mind, just select the key again to cancel the “X”.
(4) Repeat steps (2) and (3) to select all key codes you want to delete.
(5) Press Done to confirm the deletion.
to select a key with the code to be deleted. An “X”
A key with a “ ” mark is a hard key.
A key without the “
” mark is a soft key.
18
Page 20

(6) To delete other device codes, repeat steps (1) to (5).
(7) Press Back to exit.
<PART II> Deleting Macro/Timer
Under Delete function, select the Macro/Ti mer.
Note:
In this option you may delete Macro keys. If a Macro key includes a Timer setting, it
removed as well. will be
(1) Select Macro/Timer.
(2) Select unwanted “Macro/Timer” keys.
(3) Press Delete to delete the unwanted Macro/Timer keys.
(4) To delete other “Macro/Timer” keys, repeat steps
(2) to (3).
(5) Press Back to exit
:indicates a macro is already in place
: indicates a timer is already in place
19
Page 21

Multifunctional Macro Key Setup
This section describes how to set up Macro keys.
About Macro Keys
The Macro key function enables you to execute a series of commands with a touch of a
button. You can replace complex steps by utilizing Macro keys. There are two types of
Macro keys for the SRC-2200. Their features are as follows:
TYPE 1. SRC-2200 provides max. 32 Macro
keys setting option for you. Every Macro key
can store up to 60 commands. Delay time can
be set between each command
TYPE 2. The other kind of Macro functions,
“Learning Macro”, will not be set in default
Macro setting area like TYPE 1. Instead, it will
be assigned on any soft key. Every “Learning
Macro” stores up to 16 commands. No delay
time can be set between each command
After setting up a Macro key, all you have to do is to sit back and press one button
and the remote will turn on the TV, turn on the DVD player, and play a movie, as an
example. Everything will be ready. In the next section you will learn how to set a
Macro.
20
Page 22

TYPE 1.- Adding a Macro Key
Note: Make sure that all related codes of equipment to be used in the Macro have been
successfully loaded before Macro setup.
Access REMOTE SETUP, follow the steps to select the Macro key.
1. Examples: St ore all DV D playing procedures into Macro 01 (Watch DVD)
Steps include:
(1) TV: Power on, delay x
(2) TV: Input, delay x
(3) DVD: Power on, delay 2 sec
(4) DVD: OK, delay x
Examples of Macro Setup Procedure
Setup procedure Setup Menu
Step 1: (TV power on)
Use the scroll key
to select TV.
21
Page 23

Step 2: (TV power on)
Select Power soft key in TV menu, or the TV Power
hard key.
Step 3: (TV input)
Select Input soft key in TV menu, or the Input hard
key, then return to the Main Menu and select the
DVD/VCD option.
Step 4: (DVD/VCD power on)
Select DVD/VCD from the Main Menu.
Step 5: (DVD/VCD power on & Delay 2 sec)
Select Power hard key in DVD/VCD menu, or the
Power hard key, and then select Delay to set the
delay time.
Step 6: (DVD/VCD power on & delay 2 sec)
Select 2 seconds. When the prompt screen appears,
press Enter to confirm.
22
Page 24

Step 7: (DVD/VCD OK)
Select OK soft key in DVD/VCD menu, or the OK
hard key, then select Menu to return to the Main
Menu
Step 8:
Macro setup can be completed by including more
than two commands. The Done option appears in the
lower right hand corner when returning to the Menu.
Step 9:
Press Done to save the settings and go to the timer setting page. Select No to go
back to Main Macro Menu if no Timer is required.
For Macro T imer setting procedure, please view P. 26
TYPE 2.- Learning Macro Key Settings
Prepare the original remote control for the equipment before using the Learning Macro
function.
The SRC-2200’s Learning Macro can only be stored in Soft keys. Hard
keys cannot execute macro functions. Each Learning Macro key can store up to 16
commands.
There is no delay function available between different commands and no Timer settings
for Learning Macro.
Examples: Appoint “Macro 01” key under TV as Learning Macro procedures of watching
DVD in the key. key, then store all
23
Page 25

Steps include:
1. Select L. Macro 01 under TV as the designated Learning Macro key.
2. Enter every original remote control code one by one
Step 1:
Go to the “Remote Setup” menu, select
Macro/Timer, then select Learning
Macro.
Step 2:
Select TV device.
Step 3:
Assign “L. Macro 01” as the Learning
Macro key.
Note:
z Only Soft key can be assigned as a Learning Macro key
z We suggest you create a new key as a Learning Macro key.
Ex. L. Macro 01.
z You are able to add keys by using the RemoteComm software.
Step 4:
Keep 5-10cm distance away between
the original remote control and
SRC-2200 and put them in a direct line.
During learning, hold and press every
learned key of the original remote to
24
Page 26

transmit IR code to the SRC-2200, until
the number on the right side is changed.
Refer to the Learning function chart on
page14.
Step 5:
Input all commands from every remote
control into the “Learning Macro” in
order. The default delay time is 1 sec
(unchangeable) between two
commands. It can store up to 16
commands.
Step 6:
Press Done to save the setting. After
the Learning Macro setup finishes, a
sign appears next to the appointed key.
Macro Key Timer Settings
Macro key timer settings provide a customized transmission of Macro commands on
the specific time and date (in other words, it’s a scheduled transmission function).
Once a group of Macros is set, you can select the SRC-2200 to automatically send
the scheduled time and date.
1. After the initial setting of a Macro is completed, you will be at the Timer Setting
page, where you can select whether to use the Timer function or not. Select YES
if you want this Macro to have a Timer function.
Note:
A Date and a Day of the week cannot be set repeatedly; you can only
one option. choose
25
Page 27

Step 1:
After saving the settings in a
macro, a prompt for timer setting
will be displayed. Select Yes to
enter, then input the time.
Press NEXT to enter the next
step.
Step 2:
If select Specific Date, then
press next to set an exact date.
Otherwise select specified
weekday(s).
Note: This Macro will not have a
timer function if you select OFF.
Step 3:
After setting a specific date,
press Done to save the setting .
OR
After setting specified
weekday(s), press Next to save
the setting.
OR
Select Off, press Next to save
the setting.
26
Page 28

Macros and Timers have the following three types of status:
• Macro is set, but timer is not.
• Macro is set, and timer is activated.
• Macro is set, but timer is NOT activated.
2. Add a Timer after the Macro is set.
Go to Macro/Timer, then select Set Timer.
Path: REMOTE SETUP Æ Macro/Timer Æ Set Timer.
Select the Macro that requires a Timer, and set it according to the above steps.
: indicates a Macro is already set up.
: indicates a T imer is already activated.
3. Turn off the timer after the timer is set. Select the Macro which will not need a
Timer.
4. Select Off on the top to disable the Timer function. Press Next to save setting
press Back to return to the Set timer page.
27
Page 29

General Settings
The General Settings menu contains message and function options, including: Date, Time,
Beep, Contrast, LCD off, Lit period, Motion, Connect, and Reset.
To access the General Settings menu, select Settings from Remote Setup.
(See page 9 for the Date / Time /LCD contrast setup, and page 13 for the Connect setup)
(1) Beep:
Use the scroll key
adjust the beep volume to one
of the following settings: Large
(default), Middle, Small, and
to
Off.
Press [Done] to save your
setting.
(2) LCD off (The period before
LCD is off, when you stop
using the remote):
Use the scroll key
to
adjust the LCD off time from 10
sec to 600 sec in 10 second
intervals. The default is 90
seconds.
Press Done to save your
setting.
28
Page 30

(3) Glow:
Use the scroll key
to
adjust the backlight on timeout,
from 0 (Off) to 60 sec in
one-second intervals. The
default value is 8 seconds.
Press Done to save your
setting.
(4) Motion:
Use the scroll key
to
enable (On) or disable (Off) the
touch sensor function. The
default is On.
Press Done to save your
setting.
(5) Reset:
Select Reset to reset the
SRC-2200 back to its factory
default configuration. A
confirmation message will
appear. Press Yes to confirm
the reset.
29
Page 31

Specification
Model
Battery Four 1.5V AAA Alkaline Batteries
Dimensions ( L x W x H ) 210 x 56 x 26 mm
Weight (without batteries) 4.8 oz (135 g)
Keys 64 Keys (36 Hard keys, 28 Soft keys)
Display LCD
LCD Screen (W x H) 39 x 24 mm
LCD Resolution (W x H) 128 x 80 pixels, 4 gray scale
Integrating Capability Control up to 16 devices
Learning Frequency 20KHz - 455KHz & Pulse up to 380 bits long
SRC-2200
Learning Distance 2” to 4” / 5 cm up to 10cm
IR Operating Distance 8-10 meters
RF Transceiver 2.4GHz transceiver GFSK
RF Operating Distance 30 meters (No Obstacles)
Memory 2MB Flash memory
PC Interface USB 1.1
Backlight Blue LED
Power Consumption
Operation Current: 150 mA (max)
LCD On Current: 1.2 mA
LCD Off Current: 90 µA
30
 Loading...