

Page 1

TLX RFP
What is a room thermostat?
A room thermostat simply switches the heating system on and off as necessary. It works by sensing the air temperature,
switching on the heating when the air temperature falls below the thermostat setting, and switching it off once this set
temperature has been reached.
Turning a room thermostat to a higher setting will not make the room heat up any faster. How quickly the room heats up
depends on the design of the heating system, for example, the size of boiler and radiators.
Neither does the setting affect how quickly the room cools down. Turning a room thermostat to a lower setting will result in
the room being controlled at a lower temperature, and saves energy.
The heating system will not work if a time switch or programmer has switched it off.
The way to set and use your room thermostat is to find the lowest temperature setting that you are comfortable with, and
then leave it alone to do its job. The best way to do this is to set the room thermostat to a low temperature – say 18oC –
and then turn it up by one degree each day until you are comfortable with the temperature. You won’t have to adjust the
thermostat further. Any adjustment above this setting will waste energy and cost you more money.
If your heating system is a boiler with radiators, there will usually be only one room thermostat to control the whole house.
But you can have different temperatures in individual rooms by installing thermostatic radiator valves (TRVs) on individual
radiators. If you don’t have TRVs, you should choose a temperature that is reasonable for the whole house. If you do have
TRVs, you can choose a slightly higher setting to make sure that even the coldest room is comfortable, then prevent any
overheating in other rooms by adjusting the TRVs.
Room thermostats need a free flow of air to sense the temperature, so they must not be covered by curtains or blocked by
furniture. Nearby electric fires, televisions, wall or table lamps may prevent the thermostat from working properly.
This thermostat can replace most common residential thermostats. It is designed to be used with electric, gas or oil heating
or cooling control systems.
Unlike most common single design thermostats, the TLX RFP(v) separates the thermostat function into two units. The
receiver makes the hard wired connection to the pump, boiler, motorised valve etc, whilst the transmitter (thermostat) cam
be situated in any room to read and control the temperature and transmit the information to the RF receiver.
- 1 -
Page 2
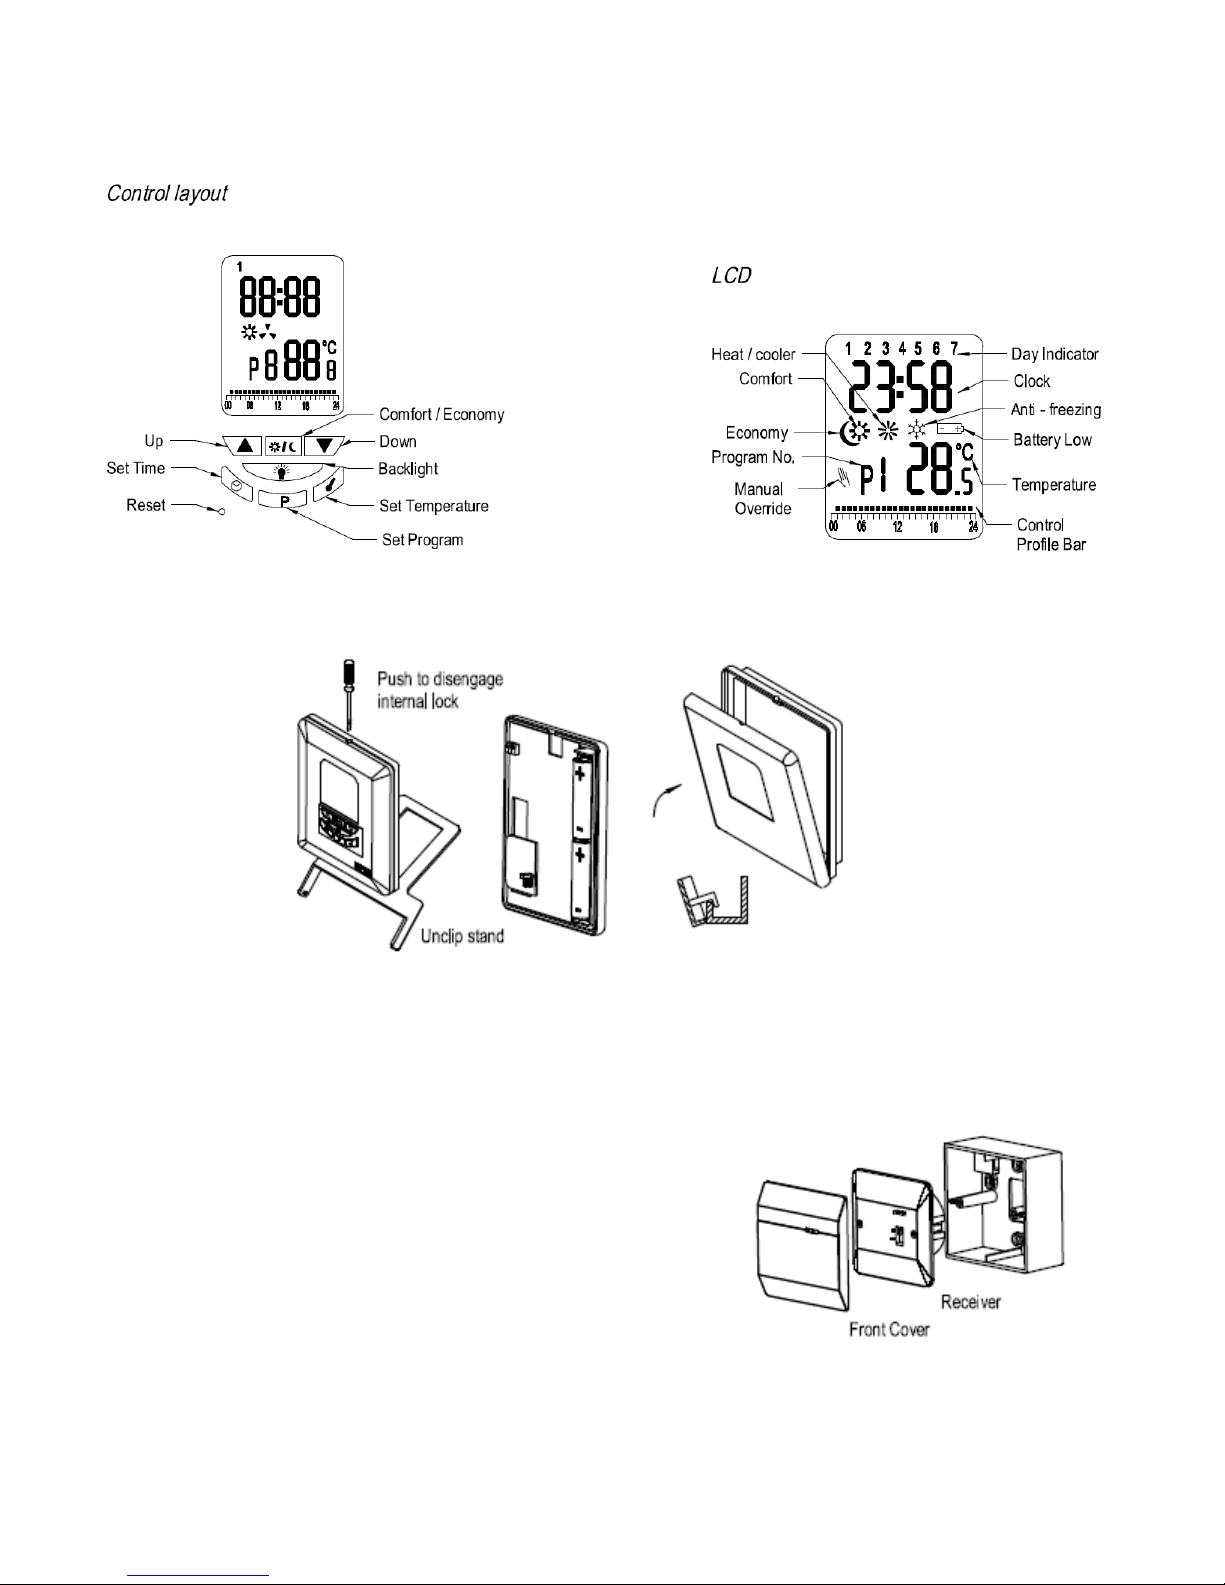
THERMOSTAT LAYOUT
Thermostat
RF Range 30Metres LCD Shows ‘need to know’ information only
Real time clock with day of week display Room temperature display
Control profile display Simplified temperature adjustment
Simplified programming procedure Frost protection
Temporary ‘set’ temperature override
Receiver
User selectable differential (span)
User selectable Heater/Cooler modes
Low battery level indicator
Uses 2 x AA alkaline batteries
EL backlight
Linked to thermostat by RF
Switch rating 230V 16A Resistive
Mains powered
Two LED indicators
- 2 -
Page 3
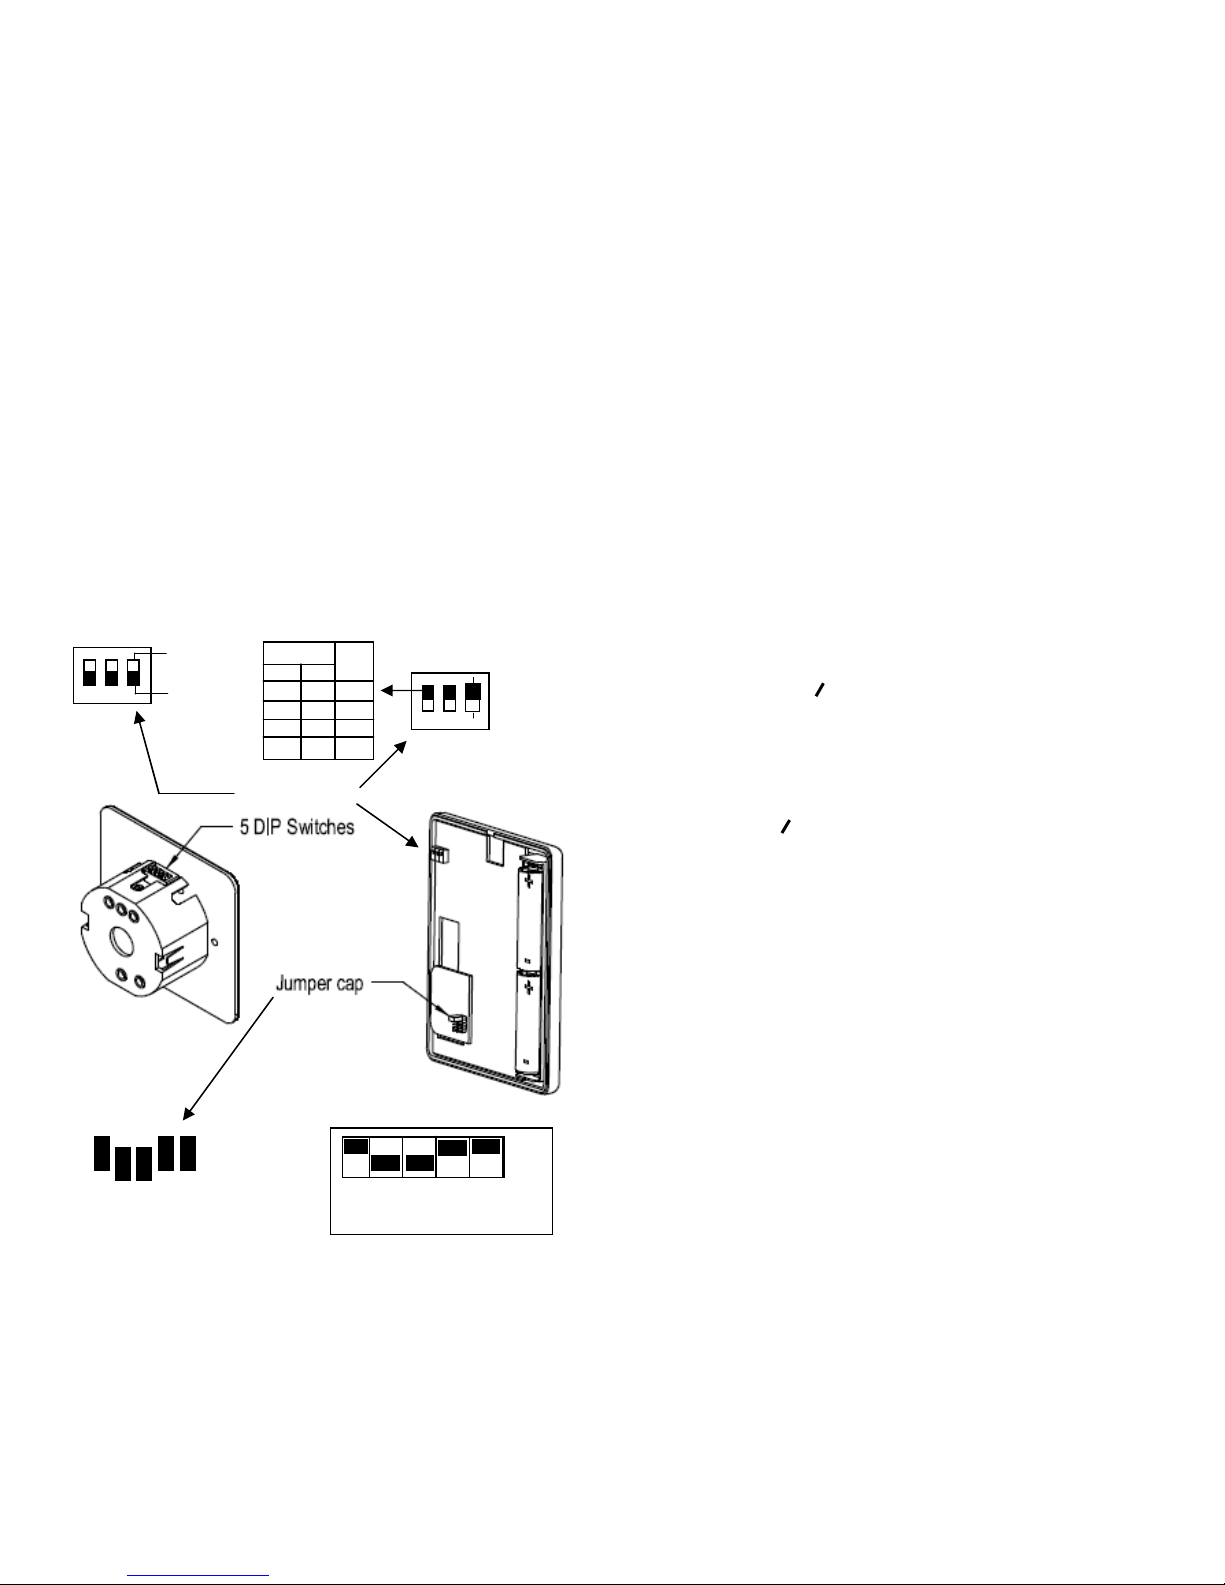
Inserting batteries
On heater
DIP switch Diff
ON
1 2 3
Shows DIP switches
DIP ON
.
. .
Using a small screwdriver or similar probe, push down
through the hole in the top of the thermostat until some
resistance is felt, then pull forward to split the front of the
thermostat from the backplate.
Insert 2 X AA batteries into the thermostat, observing
correct polarity. When the power is applied for the first
time, the display must show,Time, Day, Room
temperature, P1 and a Sun symbol. If not, press reset
button until the above display appears.
Heater/Cooler selection
Mounted on the left hand side and above centre of the
thermostat PCB are three DIP switches, these are used
to control the differential and the heat/cool system.
The switches must be set before the batteries are
installed. For Heating, switch number 3 must be in the
ON position. For Cooling, switch number 3 must be in the
OFF position. To change from heater to cooler and vice
versa, the batteries must be removed, and the display
cancelled, the reset button must be pressed when the
batteries are re-installed.
Off cooler
1 2 ºC
On On 1
Off On 2
On Off 3
Off Off 4
3 DIP switches
1,2 & 3 On (heating)
Differential setting
Differential is the difference between the unit
switching OFF and switching back ON again. For
example, with a 1ºC differential, if the ‘stat Switches OFF
at 20ºC, it will drop back 1ºC and then switch back ON
again.
RF Address code setting (See Fig. 1 )
Switch off power to the receiver and remove batteries
from thermostat.
To set the address code, remove at least two of the
‘jumpers’ on the thermostat pcb. (park the ‘jumpers’ on
one of the jumper legs). Where a ‘jumper’ is removed, the
corresponding DIP switch on the receiver must be moved
to the OFF position. Replace batteries into the receiver
and press the reset button. Switch on the power to the
receiver. Set the thermostat to demand heat. The rotating
icon will appear on the display to indicate heating
demand and the green light will illuminate on the
receiver. On initial set up, it may take up to two minutes
for this to appear. In a cooling application, it may take up
to four minutes for the icon to appear initially.
SETTING CONTROL TEMPERATURE
1. Press the button to display the set
temperature.
2. Press the / button to toggle between
economy and comfort modes.
3. Press the ▲ or ▼ buttons to change the set
temperature by 0.5ºC increments.
4. Press again to save the set temperature.
5. The unit will return to normal operating mode if
no key is pressed for 10 seconds.
6. The default setting for comfort mode is 21ºC for
heater, and 23ºC for cooler
The economy mode is 18ºC for heater, and 26ºC
for cooler.
Fig. 1
1 2 3 4 5
- 3 -
The blacked out portion above the numbers indicates
when the thermostat is in 'Comfort' mode and the clear
spaces indicate 'Economy’ mode.
Having set the day number/numbers, press 'P' , and a ‘P’
number will flash at the bottom of the display. Again
using the buttons with the triangles, step through to the
pre-set programmes to select one of these if they are
suitable for your requirements.
USER DEFINED PROFILES
Press ‘P’ and a number will flash at the top of the screen.
If using the 24 Hr set up, then using either of the keys
showing a triangle on it or keep pressing it until all of
the numbers 1,2,3,4,5,6 & 7 are displayed, then follow
setting up procedure as below.
If you are using the 5/2 day set up, press P for the
flashing number at the top of the screen, then using
either of the keys showing a triangle on it keep pressing it
Page 4

until all of the numbers 1,2,3,4, & 5 are showing, then
follow the setting up procedure as below. press P for the
flashing number at the top of the screen, then using
either of the keys showing a triangle on it keep pressing it
until all of the numbers 6 & 7 are showing, then follow the
setting up procedure as below.
Please note if using the 5/2 day set up, then you need
to select one program for the 5 days and a different
one for the remaining 2 days.
If using any of the factory pre-set programmes 1,2,3,4,5
or 6, only the Comfort and Economy temperatures can be
altered. The ON/OFF times remain as pre-set.
If you want to put in your own programme, keep pressing
the triangle button until you reach programme 7, 8, or 9.
Press 'P' again.
The display should now show, the day/days number the
number '0' and your programme number, plus a sun or
moon icon. Press ‘P’ again and a flashing cursor
appears in the bottom left hand corner of the display. The
0 equals the time between midnight and one o'clock, 1
equals the time between one and two o'clock etc. This
time will change as you move along the timeline.
SETTING UP
When setting up your own programme for the first time,
there will be a black square above each of the hours
along the timeline at the bottom of the screen. Using the
button with the SUN/MOON icon (top middle button),
scroll along removing Black squares till you get to the
point where you want your first heating time ON. Then
using the upward pointing triangle, continue to scroll
along till you get to the point where you want the heating
to switch OFF. Using the SUN/MOON icon button, again
scroll along till you get to the point where you want the
heating to come back ON, and then use the upward
pointing triangle to scroll to the switch OFF point. Repeat
this process for Switch ON Switch OFF times. Each
Black square gives an hour of Comfort heating.
Next press the button with the clock symbol, the day
number will flash and the time will be displayed. Using
either of the triangle buttons,set the current day of the
week. Monday = day 1,Tuesday = day 2 etc.
Press the clock symbol again, the HOURS will flash. Set
this using either of the triangle buttons. When the hours
have been set, press the clock symbol again and the
minutes will flash. Again using either triangle buttons, set
the minutes. When you have done this, press the clock
symbol to exit the time setting.
Press the button showing the 'THERMOMETER' (right
hand side of the 'P' button) If a crescent moon symbol
appears, press the SUN/MOON button until a SUN
symbol appears. This is your COMFORT temperature,
- 4 -
the temperature you want to sit in and relax. Again use
the triangle buttons to set this temperature to say 20°C
Press the SUN/MOON button again, a crescent moon
appears, this is the ECONOMY temperature setting. This
is the temperature you don't want your house to fall
below. Use the triangle buttons to set this temperature,
typically around 15deg C, but you choose your own
temperature settings. (Economy setting typically 6°C
below Comfort setting, this is to prevent your heating
from coming on if the room temp drops a couple of
degrees below Comfort temp).
If you find your room is too warm and you're in
COMFORT mode, press the SUN/MOON button, this will
toggle from COMFORT to ECONOMY and switch your
heating off. Obviously if you are too cold in an
ECONOMY setting, toggle it to the COMFORT setting.
If too cold in a COMFORT setting, use the thermometer
button to raise the temperature to something a little
higher. (Remember the SUN symbol must be showing
when raising the COMFORT temperature).
Temporary Override
During normal operation, pressing / will toggle the
set temperature between Economy and Comfort settings.
During override, the current operating mode icon and the
hand icon will be displayed.
Override the SET temperature
1. During normal operation, press or to
change set temperature. The new temperature
and the hand icon will be displayed. Both the
and the will be turned off.
2.
2.
Press any button except or to end setting
2.2.
and return to normal operation
3.
3.
The unit will return to normal operating mode
3.3.
after 10 secs. If no buttons are pressed.
Frost protection mode.
1. Press and simultaneously to activate frost
protection mode (heater mode only). The and
icons will be displayed and the and icons
will be turned off.
2. Pressing any button will end the frost protection
mode.
3. The pre-set temperature for frost protection is
7ºC
Backlight
Press the middle button (light bulb icon) to illuminate
the backlight.The light will will turn off again after 10
secs.
Battery replacement
The batteries should be replaced when the battery
icon appears in the display. N.B.always press the
reset button after installing the batteries.
Page 5
SPECIFICATION
Power source (Thermostat) 2 AA (LR 6
Batteries)
Switch rating (Receiver) 250v ~ 16 amp
resistive. 3 Amp inductive.
Clock accuracy +/- 60 seconds
per month
Temperature measurement 0 – 40 ºC, 0.5ºC
resolution
Temperature accuracy +/- 1ºC at 20ºC
Temperature control 7ºC to 30ºC in
0.5ºC increments
Temperature differential 1, 2, 3 or 4ºC
(adjustable)
Min. air conditioner off time 3 minutes
Operating temperature 0 - 40ºC
Storage temperature -10 - 60ºC
Size 116 x 100 x
23.5mm
Weight 220g
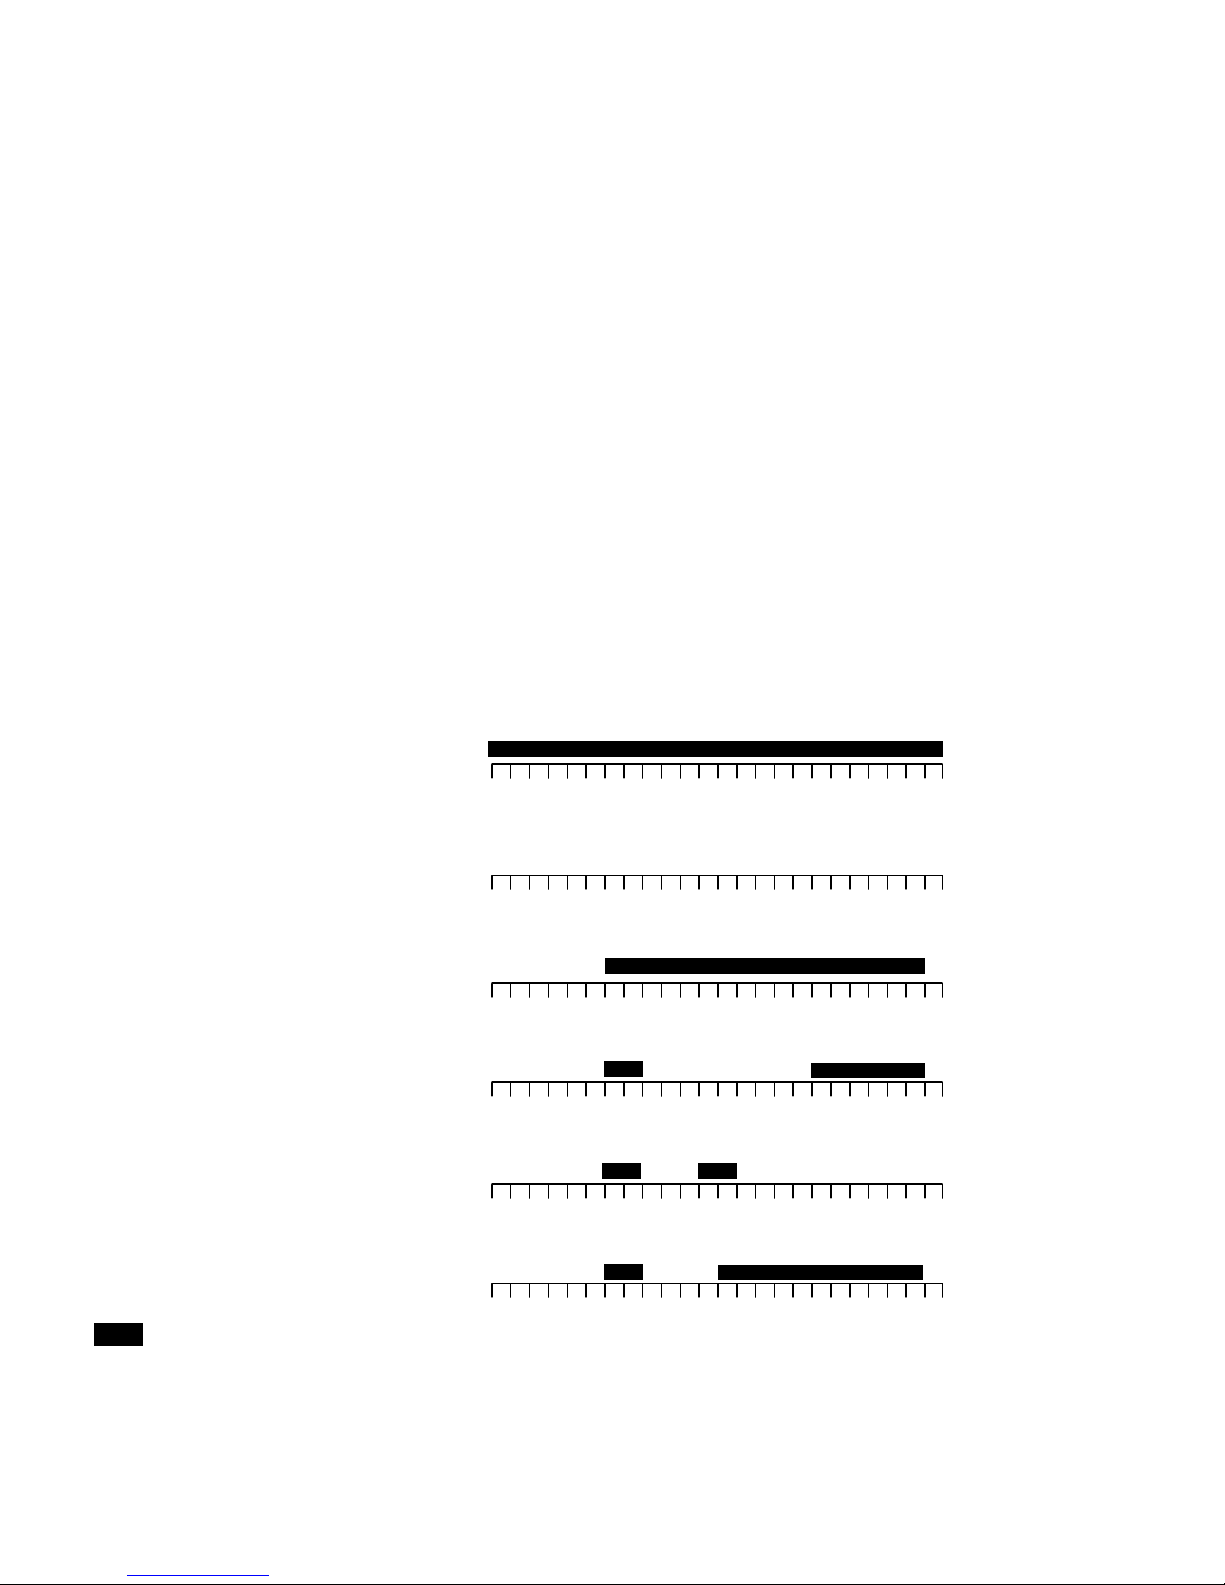
Programme number and Profile
Programme number
programme profile
Programme 1
Whole day comfort
00 6 12 18 24
Program 2
Whole day economy
00 6 12 18 24
Programme 3
Holiday
00 6 12 18 24
Programme 4
Whole day (A)
00 6 12 18 24
Programme 5
Whole day ( B )
00 6 12 18 24
Programme 6
Half-day work
00 6 12 18 24
Block shows time period in
COMFORT mode. Remainder is in ECONOMY
mode
- 5 -
Page 6

Easy set guide
Press 'P' on the 'stat. You will see a number flashing on top of the
display. This is the 'DAY' number. At this point you select which system
you want to use. Either 24 Hr. (each day the same), or 5/2 day. If using the 24 Hr set up, then
using either of the keys showing a triangle on it keep pressing it until all of the numbers 1,2,3,4,5,6
& 7 are displayed, then follow setting up procedure as below. If you are using the 5/2 day set up,
press P for the flashing number at the top of the screen, then using either of the keys showing a
triangle on it keep pressing it until all of the numbers 1,2,3,4, & 5 are showing, then follow the
setting up procedure as below. press P for the flashing number at the top of the screen, then using
either of the keys showing a triangle on it keep pressing it until all of the numbers 6 & 7 are
showing, then follow the setting up procedure as below.
Please note if using the 5/2 day set up, then you need to select one program for the 5 days
and a different one for the remaining 2 days.
You are now going to select your programme. There are 9 programmes in the thermostat.
Programmes 1 - 6 are pre-set in the factory and cannot be altered, except for temperatures.
Please refer to your instruction manual where it shows PROGRAM NUMBER & PROGRAM
PROFILE.
The numbers along the bottom of the program profile, represent the 24 hours in the day.
The blacked out portion above the numbers indicates when the thermostat is in 'Comfort' mode
and the clear spaces indicate 'Economy’ mode.
Having set the day number/numbers, press 'P' , and a ‘P’ number will flash at the bottom of the
display. Again using the buttons with the triangles, step through to the pre-set programmes to
select one of these if they are suitable for your requirements.
If you want to put in your own programme, keep pressing the triangle button until you reach
programme 7, 8, or 9. Press 'P' again.
The display should now show, the day/days number the number '0' and your
programme number, plus a sun or moon sign and a flashing cursor in the bottom left hand corner
of the display. The 0 equals the time between midnight and one o'clock, 1 equals the time between
one and two o'clock etc.
When setting up your own programme for the first time, there will be a black square above each of
the hours along the timeline at the bottom of the screen. Using the button with the SUN/MOON
icon (top middle button), scroll along removing Black squares till you get to the point where you
want your first heating time ON. Then using the upward pointing triangle, continue to scroll along till
you get to the point where you want the heating to switch off. Using the SUN/MOON icon button,
again scroll along till you get to the point where you want the heating to come back on, and then
use the upward pointing triangle to scroll to the switch off point. Repeat this process for Switch on
Switch off times. Each Black square gives an hour of Comfort heating
Pressing the ‘SUN/MOON’ button will place a black box down if there isn’t one there, or will
remove one if there is.
- 6 -
Page 7
N.B. If using the 5/2 day option on personal programmes , the 5 day settings have to be
DIP ON
.
. .
made on programme 7,8 or 9, then the 2 day settings have to be made on one of the
remaining two programmes.
Next press the button with the clock symbol, the day number will flash and the time will be
displayed. Using either of the triangle buttons,set the current day of the week. Monday = day
1,Tuesday = day 2 etc.
Press the clock symbol again, the HOURS will flash. Set this using either of the triangle buttons.
When the hours have been set, press the clock symbol again and the minutes will flash. Again
using either triangle buttons, set the minutes. When you have done this, press the clock symbol to
exit the time setting.
Press the button showing the 'THERMOMETER' (right hand side of the 'P' button) If a crescent
moon symbol appears, press the SUN/MOON button until a SUN symbol appears. This is your
COMFORT temperature, the temperature you want to sit in and relax. Again use the triangle
buttons to set this temperature to say 20°C
Press the SUN/MOON button again, a crescent moon appears, this is the ECONOMY
temperature setting. This is the temperature you don't want your house to fall below. Use the
triangle buttons to set this temperature, typically around 15deg C, but you choose your own
temperature settings. (Economy setting typically 6°C below Comfort setting, this is to prevent your
heating from coming on if the room temp drops a couple of degrees below Comfort temp).
If you find your room is too warm and you're in COMFORT mode, press the SUN/MOON button,
this will toggle from COMFORT to ECONOMY and switch your heating off. Obviously if you are too
cold in an ECONOMY setting, toggle it to the COMFORT setting.
If too cold in a COMFORT setting, use the thermometer button to raise the temperature to
something a little higher. (Remember the SUN symbol must be showing when raising the
COMFORT temperature).
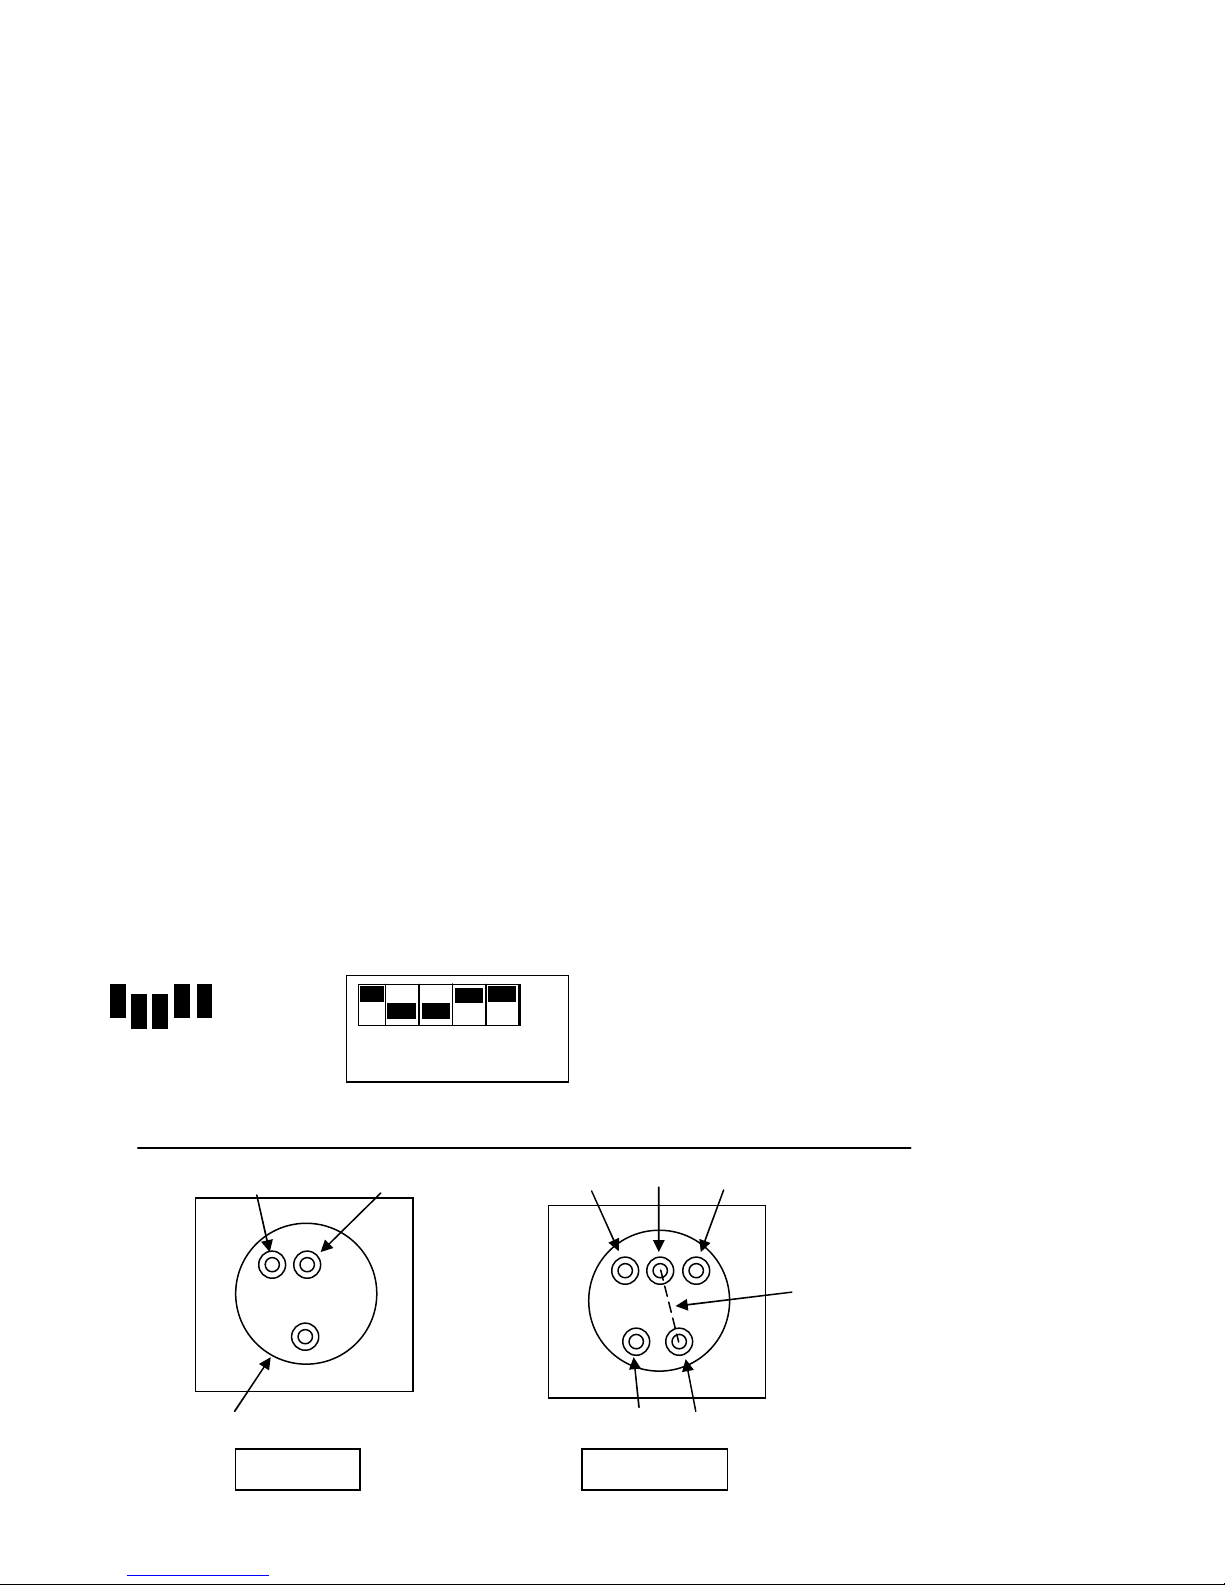
FOR RFP & RFP(V) ONLY Setting jumpers and DIP switches. Remove at least two jumpers from
thermostat and set the appropriate number of DIP switches. See diag.
1 2 3 4 5
DIP switch to ‘ON’ position if jumper is present
Live 240v Output
Off Common On
Neutral
Neutral Live
Remove link for
Volt free operation
TLX RFP TLX RFP(V)
- 7 -
Receivers
Page 8

Please note, when setting up the system, ensure that the batteries are NOT in the thermostat and
that the receiver is not powered up.
- 8 -
 Loading...