


TLX 6501
thermostat
programmable room
- 1 -
- 2 -

Hard wiring thermostat
Open thermostat and remove terminal block cover as
shown in diag.
- 3 -

Wiring diagram
The thermostat can be used with any single Heating or
Cooling system.
Inside the unit are three terminal blocks marked COM,
N/O and N/C.
The switch is an SPDT which means it can be used for
heating and cooling applications.
The connections are as follows:Heating. Connect the LIVE to the terminal marked COM.
The switched live from the unit connects to terminal N/O.
This switch does not require an Earth or a Neutral
connection.
For Cooling applications, the switched live is connected
to terminal N/C
N/O
COM
N/C
N/O
N/C
Easy set guide
Press 'P' on the 'stat. You will see a number
flashing on top of the
display. This is the 'DAY' number. At this point
you select which system
you want to use. Either 24 Hr. (each day the
same), or 5/2 day. If using the 24 Hr set up,
then using either of the keys showing a triangle
on it keep pressing it until all of the numbers
1,2,3,4,5,6 & 7 are displayed, then follow
setting up procedure as below. If you are using
the 5/2 day set up, press P for the flashing
number at the top of the screen, then using
either of the keys showing a triangle on it keep
pressing it until all of the numbers 1,2,3,4, & 5
are showing, then follow the setting up
procedure as below. press P for the flashing
number at the top of the screen, then using
either of the keys showing a triangle on it keep
pressing it until all of the numbers 6 & 7 are
showing, then follow the setting up procedure
as below.
- 4 -
Please note if using the 5/2 day set up, then
you need to select one program for the 5
days and a different one for the remaining 2
days.
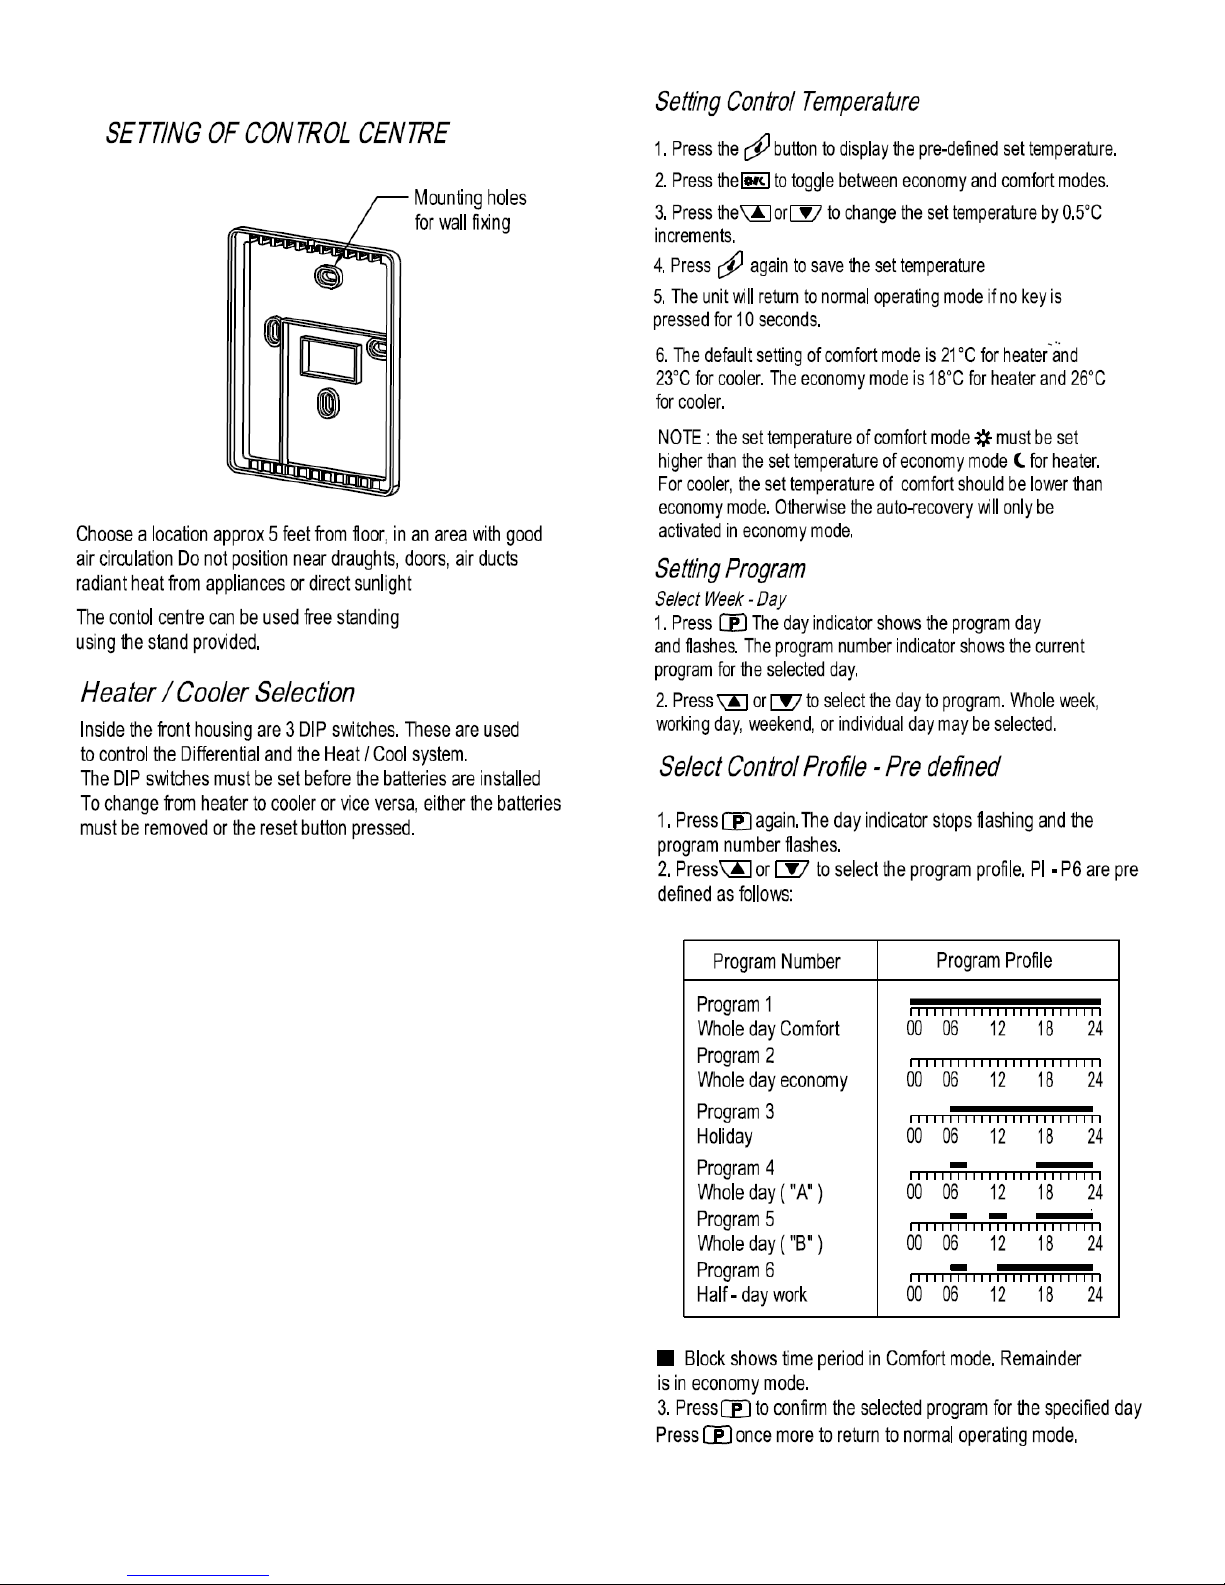
You are now going to select your programme.
There are 9 programmes in the thermostat.
Programmes 1 - 6 are pre-set in the factory and
cannot be altered, except for temperatures.
Please refer to your instruction manual where it
shows PROGRAM NUMBER & PROGRAM
PROFILE. Table.
The numbers along the bottom of the program
profile, represent the 24 hours in the day.
The blacked out portion above the numbers
indicates when the thermostat is in 'Comfort'
mode and the clear spaces indicate 'Economy’
mode.
Having set the day number/numbers, press 'P' ,
and a ‘P’ number will flash at the bottom of the
display. Again using the buttons with the
triangles, step through to the pre-set
programmes to select one of these if they are
suitable for your requirements.
If you want to put in your own programme, keep
pressing the triangle button until you reach
programme 7, 8, or 9. Press 'P' again.
The display should now show, the day/days
number the number '0' and your
programme number, plus a sun or moon sign
and a flashing cursor in the bottom left hand
corner of the display. The 0 equals the time
between midnight and one o'clock, 1 equals the
time between one and two o'clock etc.
When setting up your own programme for the
first time, there will be a black square above
each of the hours along the timeline at the
bottom of the screen. Using the button with the
SUN/MOON icon (top middle button), scroll
along removing Black squares till you get to the

point where you want your first heating time
ON. Then using the upward pointing triangle,
continue to scroll along till you get to the point
where you want the heating to switch off. Using
the SUN/MOON icon button, again scroll along
till you get to the point where you want the
heating to come back on, and then use the
upward pointing triangle to scroll to the switch
off point. Repeat this process for Switch on
Switch off times. Each Black square gives an
hour of Comfort heating
Pressing the ‘SUN/MOON’ button will place
a black box down if there isn’t one there, or
will remove one if there is.
N.B. If using the 5/2 day option on personal
programmes , the 5 day settings have to be
made on programme 7,8 or 9, then the 2 day
settings have to be made on one of the
remaining two programmes.
Next press the button with the clock symbol, the
day number will flash and the time will be
displayed. Using either of the triangle
buttons,set the current day of the week.
Monday = day 1,Tuesday = day 2 etc.
Press the clock symbol again, the HOURS will
flash. Set this using either of the triangle
buttons. When the hours have been set, press
the clock symbol again and the minutes will
flash. Again using either triangle buttons, set
the minutes. When you have done this, press
the clock symbol to exit the time setting.
Press the button showing the
'THERMOMETER' (right hand side of the 'P'
button) If a crescent moon symbol appears,
press the SUN/MOON button until a SUN
symbol appears. This is your COMFORT
temperature, the temperature you want to sit in
and relax. Again use the triangle buttons to set
this temperature to say 20°C
Press the SUN/MOON button again, a crescent
moon appears, this is the ECONOMY
temperature setting. This is the temperature
you don't want your house to fall below. Use the
triangle buttons to set this temperature, typically
around 15deg C, but you choose your own
temperature settings. (Economy setting typically
6°C below Comfort setting, this is to prevent
your heating from coming on if the room temp
drops a couple of degrees below Comfort
temp).
If you find your room is too warm and you're in
COMFORT mode, press the SUN/MOON
button, this will toggle from COMFORT to
ECONOMY and switch your heating off.
Obviously if you are too cold in an ECONOMY
setting, toggle it to the COMFORT setting.
If too cold in a COMFORT setting, use the
thermometer button to raise the temperature to
something a little higher. (Remember the SUN
symbol must be showing when raising the
COMFORT temperature).
- 5 -
 Loading...