


Select 107 XLS User Instructions
A timeswitch allows you to set ‘On’ and ‘Off’ time periods. The timeswitch will allow you to set the ‘On’ and
‘Off’ time periods for either Hot water or Central heating to suit your own lifestyle. On some timeswitches you
must also set whether you want the heating or hot water to run continuously, run under the chosen ‘On’ and
‘Off’ heating periods, or be permanently off.
The time on the timeswitch must be correct. Some types have to be adjusted in spring and autumn at the
changes between Greenwich Mean Time and British Summer Time.
You may be able to temporarily adjust the heating programme, for example, ‘Override’, ‘Advance’ or ‘Boost’.
These are explained in the manufacturer’s instructions.
The heating will not work if the room thermostat has switched the heating off. And, if you have a hot-water
cylinder, the water heating will not work if the cylinder thermostat detects that the hot water has reached the
correct temperature.
USER INSTRUCTIONS
SELECT 107XLS
INTRODUCTION
The SELECT 107 XLS electronic timeswitch can automatically switch ON and OFF, up to 3 times a day, at
whatever times you choose.
During installation, the installer selects 24 hour, or 5 day/2 day, or 7 day programming and 2 or 3 on/off
periods per day, via a 4 position DIP switch on the back of the unit (see installation instructions).
Select 107 XLS User Guide Page 1 of 7
IMPORTANT: These settings should only be changed by a qualified person. Contact your installer.
The 24 hour programmer option runs the same programme every day.
The 5 day/2 day programmer options allows different ON/OFF times at weekends.
The 7 day programmer option allows different ON/OFF times for each day of the week.
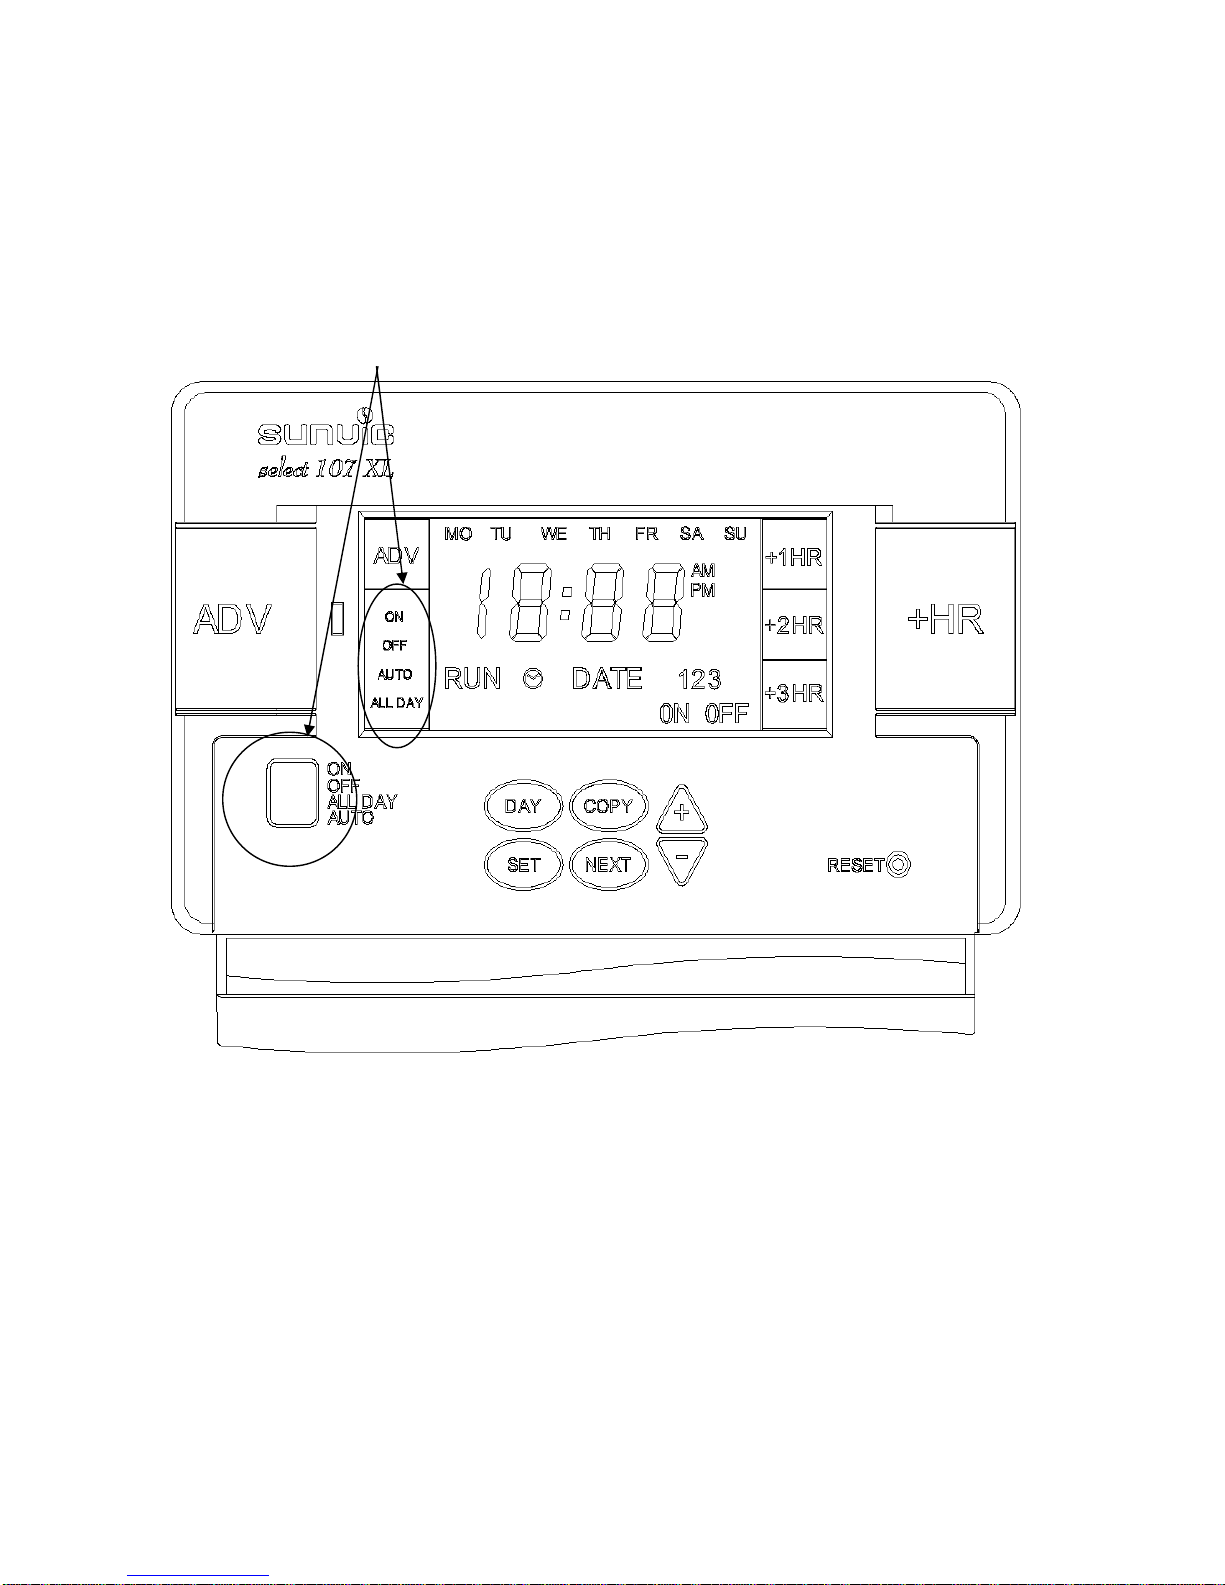
The unit is designed to eliminate the possibility of accidental changes to your programme. Buttons normally
visible, only affect your set programme temporarily. All buttons which can permanently change your
programme are located behind the flip-down fascia.
SELECTING OPERATING MODE
Use the Mode button to select one of the four operating modes
ON Switch will be on continuously (I.E. All the time).
AUTO Switch will be switched On or Off as programmed
ALLDAY Switch will be switched On only once each day.
It will switch ON at the first ON time and OFF at the last OFF time.
OFF Switch will be continuously OFF.
Press the SET button once. The clock icon on the screen will flash. Press the +/- buttons to adjust the time.
Hold down button to change time quicker.
Select 107 XLS User Guide Page 2 of 7

Setting the Time and Date
Press SET button till the Y:00 icon (year) appears and the letter D flashes. Press the +/- button to set the
year. Press NEXT. N:00 appears (month). Press +/- button to set month. Press NEXT. d:00 appears (Day).
Press +/- button to set day.
Note: The unit will automatically return to run mode if a period of 5 minutes passes without any buttons being
pressed.
CHANGING PROGRAMME TIMES
The built in programme can be easily changed to better suit your needs
To change the programme, press SET until PROGRAM
icon flashes in the screen and 1 ON appears. This
indicates the time shown on the display is the first ON
time. Change this to the required ON time by pressing
the +/- buttons.
Press NEXT button, display will now show
1 OFF. Change as before.
Use the NEXT and +/- buttons in this way to programme
the second time period.
If the unit is set for three ON/OFF periods, the number 3
will appear. This is set in exactly the same way as the
previous first and second time period.
If unit is installed as a 7 day programmer, the initial programme displayed will be for Monday. You can go to
any day of t he week by pressing DAY button repeatedly. The ON/OFF times can be changed for each day
as above. If you press COPY button, the current programme will be copied into the next day.
If unit is installed as a 5day/2day programmer, the initial programme displayed will be for Monday to Friday.
Pressing DAY button will take you to the programme for Saturday and Sunday. The ON/OFF times can be
changed for each day group as above. If you press COPY button, the current programme will be copied into
the next day group.
If the unit is installed as a 24hr. Programmer, the built in programme will be the same for each day (as for
Monday to Friday overleaf). The COPY function is not required if installed as a 24 hr. programmer.
To return to RUN mode, press SET button until the word RUN appears
Note
It is not possible to copy Sunday to Monday.
For convenience to allow for programmes to go past midnight, the programme day is from 03:00am to
02:50am the next day.
If your programme gets scrambled, or you want to start again, press the reset button using a non-metallic
tool to re-load the default programmes, then press any button to clear the DIP switch configuration code. The
unit should revert to time setting mode ready for programming.
USING ADVANCE
This function is only available when programme is in AUTO or ALLDAY operating modes.
Select 107 XLS User Guide Page 3 of 7

Press the ADV button. This will turn
The switch ON if it was in an OFF period
And vice versa. It will stay in this state until
either ADV is pressed again, or until a
programmed ON/OFF commences.
An indicator will appear on display top left hand
Corner, showing ADV.
USING+1HR.
For +1hr
Press the +1hr button. If the operating mode is OFF then it will switch on for 1 hr.
If the operating mode is AUTO or ALLDAY, then during an OFF period, it will switch on for 1hr. If during a
ON period, then it will temporarily extend that programme up to a maximum of three hours.
An indicator will appear on display at the right hand side showing +1Hr, +2Hr or +3Hr depending on how
often the +Hr button was pressed
Pressing +1hr again cancels this function. When in the ON mode the +1hr button has no effect.
POWER INTERRUPTION
In the event of a mains supply failure, the back-up batte ry ensures the programmer continues to keep time
and retain your stored programme. The screen will go blank, but will return when power is restored.
RESET BUTTON
Press the reset button with a non-metallic pointed tool to restore the built in programme plus the time and
date. The display will then show the current state of the configuration switches.
Press any button to revert to time setting mode. The unit is then ready for programming. See SETTING TI ME
OF DAY section.
BUILT IN PROGRAMME
For convenience, the programmer has a built in
programme which for many people is perfectly
satisfactory, but it can be changed quite easily
Factory programme settings
Mon-Fri Sat&Sun
st
ON 6:00am 7:00am
1
st
1
OFF 8:30am 9:00am
nd
2
ON 12:00 noon 12:00 noon
nd
2
OFF 12:00 noon 12:00 noon
rd
ON 4:30pm 4:30pm
3
rd
OFF 10:30pm 11:00pm
3
The timer will automatically change from Greenwich mean time to British summer time and vice versa
Select 107 XLS User Guide Page 4 of 7

Installation Instructions
SELECT 107 XLS Programmer
Technical Data
Power supply: 230v AC 50Hz.
Ambient temperature: Operating 0°C to 35°C
Total Input: 6A
Switch Rating: 230vAC 6(2)A
Battery: Never needs replaced
Wiring: For fixed wiring only
Maintenance: No user maintenance reqd.
Disconnection class: 1B
This unit must be installed by a competent person in accordance with the latest appropriate wiring
regulations.
Pre Installation set-up
Before installing, set the bank of 4 DIP switches
on the back, to configure the unit according to the
chart below.
Not used
DIP switches shown in factory default position
24Hr. - Runs same programme every day
5/2 Day - Allows different ON/OFF times at
weekend
7 Day - Allows different on/off times every day
When unit is first switched on, or when the reset
button is pressed, the status of the DIP switches
is displayed.
INSTALLATION
Be sure to switch off the mains supply before
starting. Please read all installation instructions
before proceeding.
Ensure that the fixed wiring connections to the
mains supply, is via a fuse rated at not more
6 amps, and a class ‘A’ switch, having a contact
separation of a minimum of 3mm in all poles.
DIRECT UPGRADE FOR EXISTING
TIMESWITCHES
1.Switch off mains. Loosen 2 securing screws on
old programmer and unplug it.
24Hr.
2 on/offs
Not used
7 day
5/2 day
3 on/offs
2.Check existing wall-plate has been correctly
fitted. (See section,Fitting wall plate)
3.Plug SELECT programmer into wall-plate and
re-tighten screws. Switch on at mains.
4.Set timing and programme as detailed in user
guide
Please note, If you wish to change any of the DIP
switch functions at any time, when the unit is
replaced back on the wall plate, it will flash the
latest configuration for 10 secs. and then revert
back to normal run time. If you don’t want to wait
for the 10 secs. pressing any button will also take
the programmer back to the normal run time.
FITTING WALL PLATE
1.Position the wall-plate (terminals along the top
edge) with 60mm(Min) clearance to its right,
25mm(Min) above, 90mm(Min) below. Ensure that
the supporting surface will fully cover the back of
the programmer.
2.Ideal location would be 1.4m above floor level,
easily accessible, reasonably lit and free from
condensation or temperature extremes.
3.Fix the wall-plate to a flush mounting single
conduit box type UA1(BS4662) using M3.5 x 14
bolts.
4.Ensure that the wiring to the wall-plate terminals
leads directly away from the terminals and is
completely enclosed within the wall-plate
aperture. Wire ends must be stripped and
screwed to the terminals, so that minimal bare
wire is showing.
5.If the unit is fitted to a metal surface, IT IS
ESSENTIAL that the metal be earthed. Do not use
a surface mounting box.
6.Ensure the mains supply is switched off, then
make wiring connections. No EARTH connection
is required, but ensure continuity of EARTH
throughout the system.
7.After wiring, plug unit into wall plate and tighten
the securing screws. Switch on at mains.
Select 107 XLS User Guide Page 5 of 7
8.Setting timing and programme as detailed in
user guide.
9.NEVER fit or remove the unit to a LIVE
wall-plate.
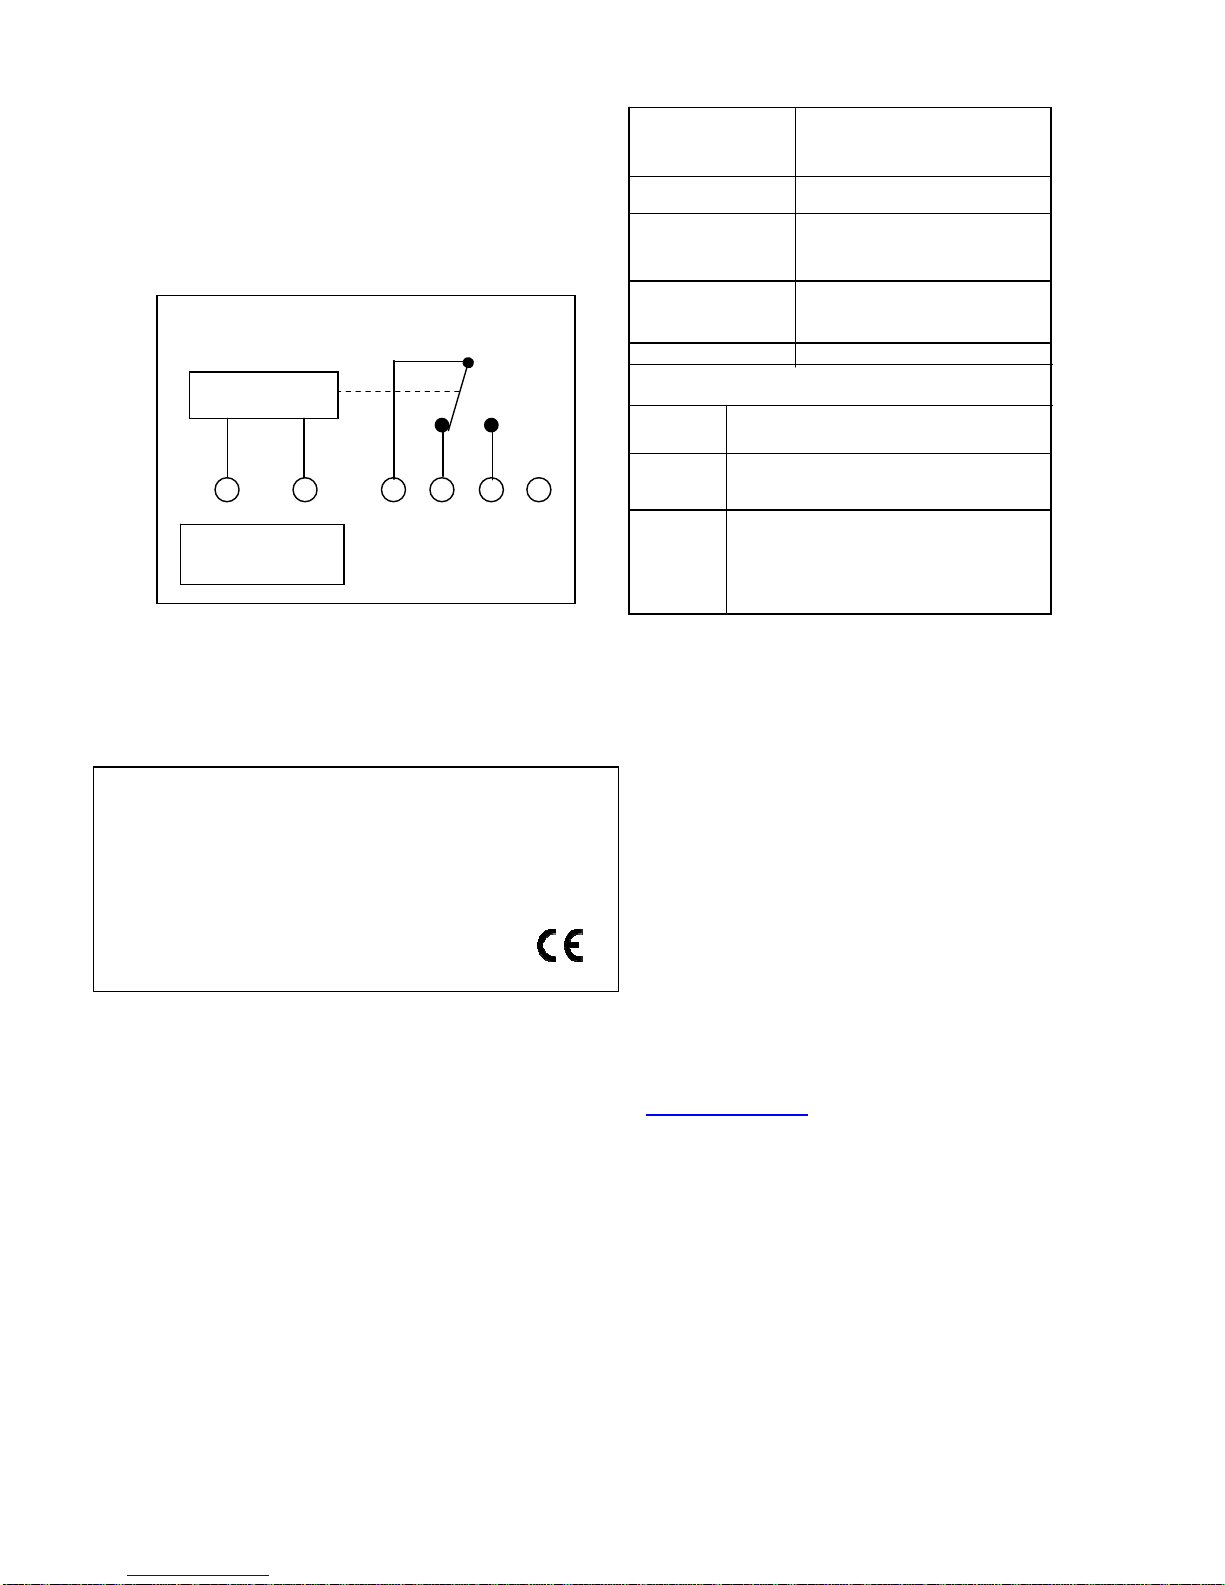
Programmer Internal Wiring Diagram
Electronics
This product complies with the essential requirements of
the following E C di r ec tives:
Electro-magnetic Compatability directive EMC 89/336/EEC
(as amended by 91/263/ EEC and 92/31/EEC)
Low voltage directive LVD 73/23/EEC; 93/68/EEC
N L 1 2 3 4
Mains Fused
3 Amps
COM OFF ON
Configuration Display
Configuration Display
2 On/Off 2PU
pumped
3 On/Off 3PU
pumped
Mon to Sun indicators
7 Day Mon to Sun successively on
5/2 Day Mon to Fri on alte rnating with
Sat Sun on
24 Hour Mon to Sun on all together
SUNVIC CONTROLS Ltd.
Units 1 & 2, Block 1
251 low Waters Road
Cadzow Industrial Estate
Hamilton
Ml3 7QU
Tel 01698 812944
Fax 01698 813637
Tech Helpline 01698 810945
Tech Help. Fax 01698 307437
WWW.sunvic.co.uk
In the interests of continuous product
improvement, Sunvic Controls reserve the right to
alter designs, specifications and materials, without
prior notice, and cannot accept liability for error.
Installation leaflet LE/497/0003 ISSUE 02 Jan 2013
Select 107 XLS User Guide Page 6 of 7
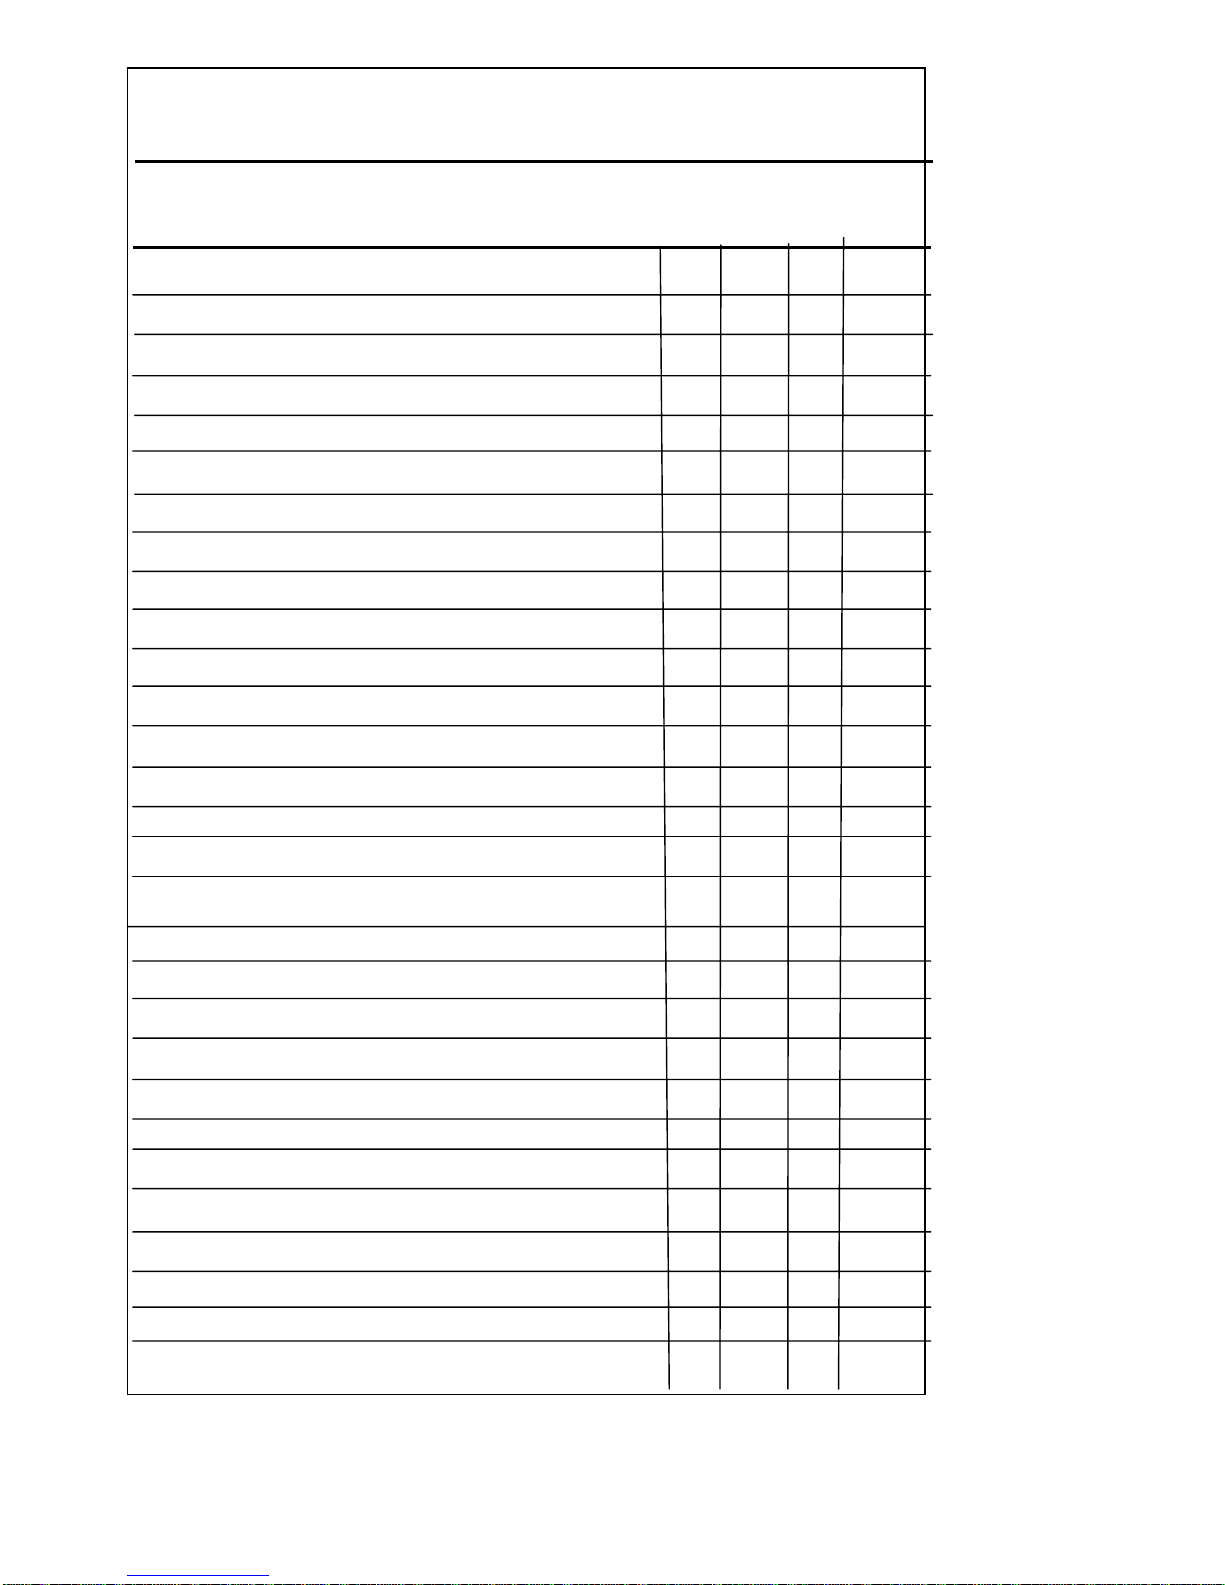
TIME SWITCH TERMINAL COMPARISONS
MAKE MODEL TERMINALS
Sunvic 107XL N L 1 2 3
ACL-Drayton LP111, LP711 N L 1 2 3 ***
ACL-Drayton TC (Towerchron) 2 1 7
ACL-Drayton Tempus 1 & 2 N L 1 3 2
ACL-Drayton Switchmaster N L 4 1
Danfoss TS 715 Si N L 1 2 3 ***
Danfoss 103, 103E5, 103E7 5 6 3 1
Danfoss Set1E N L 5 6 4
Danfoss Ran . TS15 75(Mk 18) N L 1 2 4
Danfoss Ran. Set 1 N L 5 6 4
Danfoss Ran. Set 4 N L 5 6 4
Danfoss Ran. 103, 103E, 103E7 N L 3 1
Danfoss Ran. 911, 971 N L 5 4 6
Honeywell ST6100A, ST6100C N L 1 2 4
Honeywell ST 7000B N L 2 3
Horstmann Centaur SC1, SC7 N L 4 3
Horstmann Coronet N L 5 6 4
Horstmann Emerald 423, Pearl auto N L 4
Horstmannn 517 N L 5 6 4
Landis & Gyr RWB 3 N L 3 4
Landis & Gyr
RWB30, RWB50, 100, 152, 170 N L 2 3 4
Sunvic SP20, SP35 N L 3 4 5
Potterton EP4000, 4001 N L 5 2 4
Sangamo M6 4 6 3 2 1
Smiths Centroller Mk1, Mk2 N L 3 2
Smiths Centroller 30 1 2 4/5
Smiths Centroller 300, 980 N L 4 1
Towerchron DT71 N L 3 2 4
Towerchron T2001, T2001Q N L 7
Venner Vennerette N L Line Load
Select 107 XLS User Guide Page 7 of 7
 Loading...