

Page 1
www.vava.com
ASIA PACIFIC
E-mail: support.jp@vava.com(JP)
JPImporter:株式会社SUNVALLEYJAPAN
Address:〒104-0032東京都中央区八丁堀3丁目18-6PMO京橋東9F
EUROPE
E-mail:
support.uk@vava.com(UK)
support.de@vava.com(DE)
support.fr@vava.com(FR)
support.es@vava.com(ES)
support.it@vava.com(IT)
EU Importer: ZBT International Trading GmbH
Address:Halstenbeker Weg 98C, 25462 Rellingen, Deutschland
NORTH AMERICA
E-mail: support@vava.com
Tel: 1-888-456-8468 (Monday-Friday: 9:00 – 17:00 PST)
US Distributor: SUNVALLEYTEK INTERNATIONAL INC.
Address:46724 Lakeview Blvd, Fremont, CA 94538
MANUFACTURER
Shenzhen NearbyExpress Technology Development Co., Ltd.
Address: 333 Bulong Road, Shenzhen, China, 518129
VP-SPR001_V1.1
Model: VP-SPR001
VAVApet Pet Cam
User Guide
Page 2

CONTENTS
English
Deutsch
Français
Español
Italiano
日本語
01 / 11
12 / 23
24 / 34
35 / 45
46 / 56
57 / 67
Page 3

EN
What’s in the Box
· 1 x VAVApet Pet Cam (VP-SPR001)
· 1 x Adapter
· 3 x Cat Teasers
· 1 x User Guide
Back
11 12
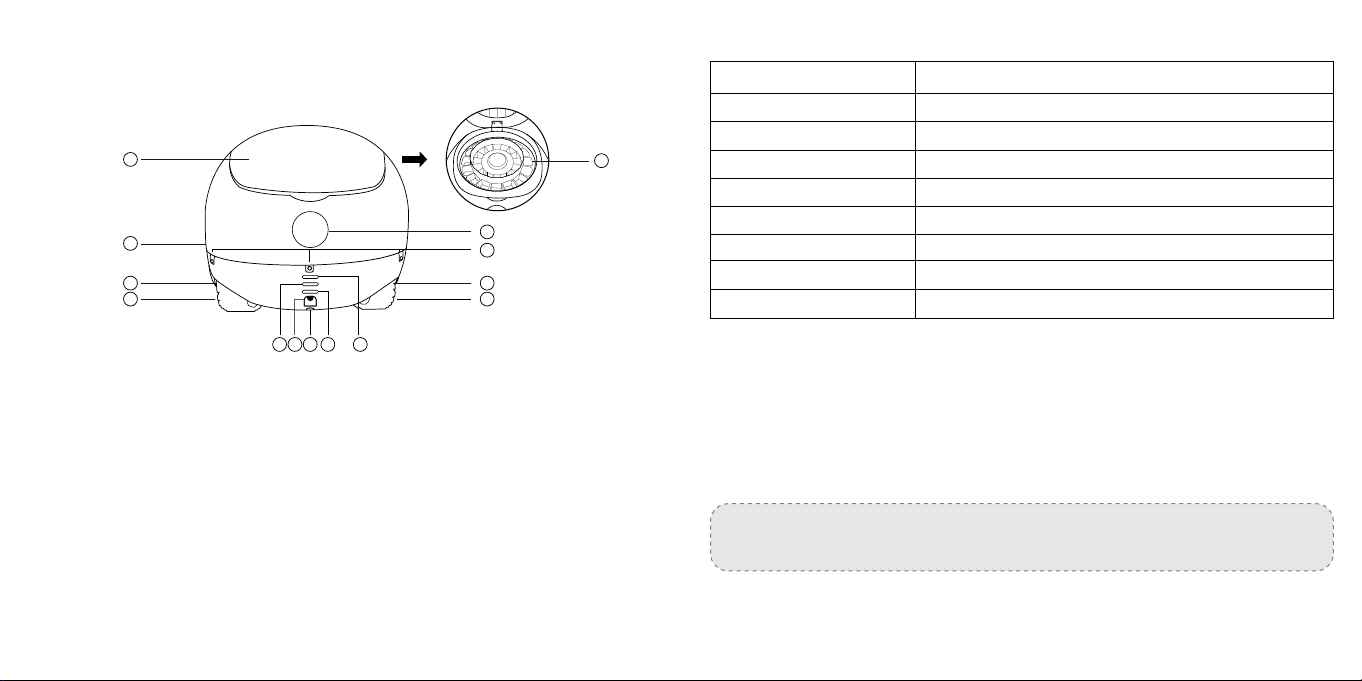
Product Diagram
Front
1. Cat Teaser Installation Port
2. Microphone
3. Fill Light
4. Decoration Light
10
1
9
8
5
6
2
3
44
5
6
3 3
5789 6
1. Treat Dispenser Cover Release Button
2. Anti-collision Sensors
7
6. Anti-fall Sensors
7. Treat Tossing Port
8. Laser Light
3. Anti-fall Sensors
4. Wheels
5. Power Indicator
6. Charging Indicator
9. Lens
1
2
44
7. Power Button
8. Charging Port
9. WiFi Indicator
10. Speaker
11. Treat Dispenser Cover
12. Treat Dispenser
5. Anti-collision Sensors
01 02
Page 4
Specifications
Model
Battery Capacity
Lens Angle
Speaker
Microphone Sensitivity
Working Time (Full Charge)
Standby Time
Working Temperature
Dimensions
VP-SPR001
11.1V, 4400mAh, 48.84Wh
140°Wide Angle Lens with Night Vision
8Ω, 1Wh
-42 ±3 dB
8 hours
5 days
0-40°C / 32-104°F
245 x 238 x 221mm / 9.6 x 9.4 x 8.7in
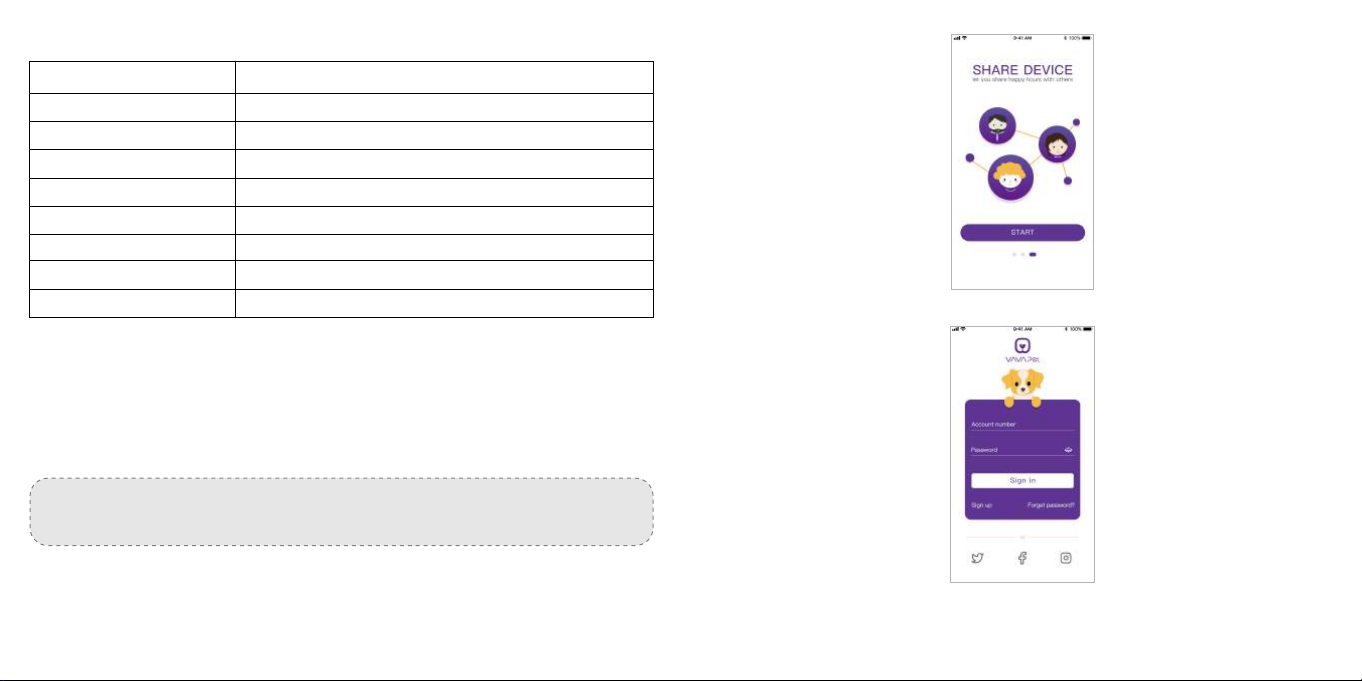
3) Sign up your account as instructed in the app.
Get Started
1. Charging
Connect the unit to a power source using the included power adapter, and charging will start
automatically. The charging indicator will stay solid blue when fully charged.
Note: Please charge the unit when the power indicator flashes red or when the battery bar
on homepage of the VAVA Pet Cam app becomes red.
2. Downloading the App
1) Search “VAVA Pet Cam” on the App Store or Google Play, tap on the name to install.
2) When it’s installed, tap the icon to run and then tap START to start using the app.
03 04
3. Cat Teaser Installation
Plug the included cat teaser into the cat teaser installation port to tease your cats.
Page 5
Using the Pet Cam
1. Turn On / Off
· Press the Power Button once to turn on the unit with the power indicator lighting up in red.
· Press and hold the Power Button for 3 seconds to turn off the unit.
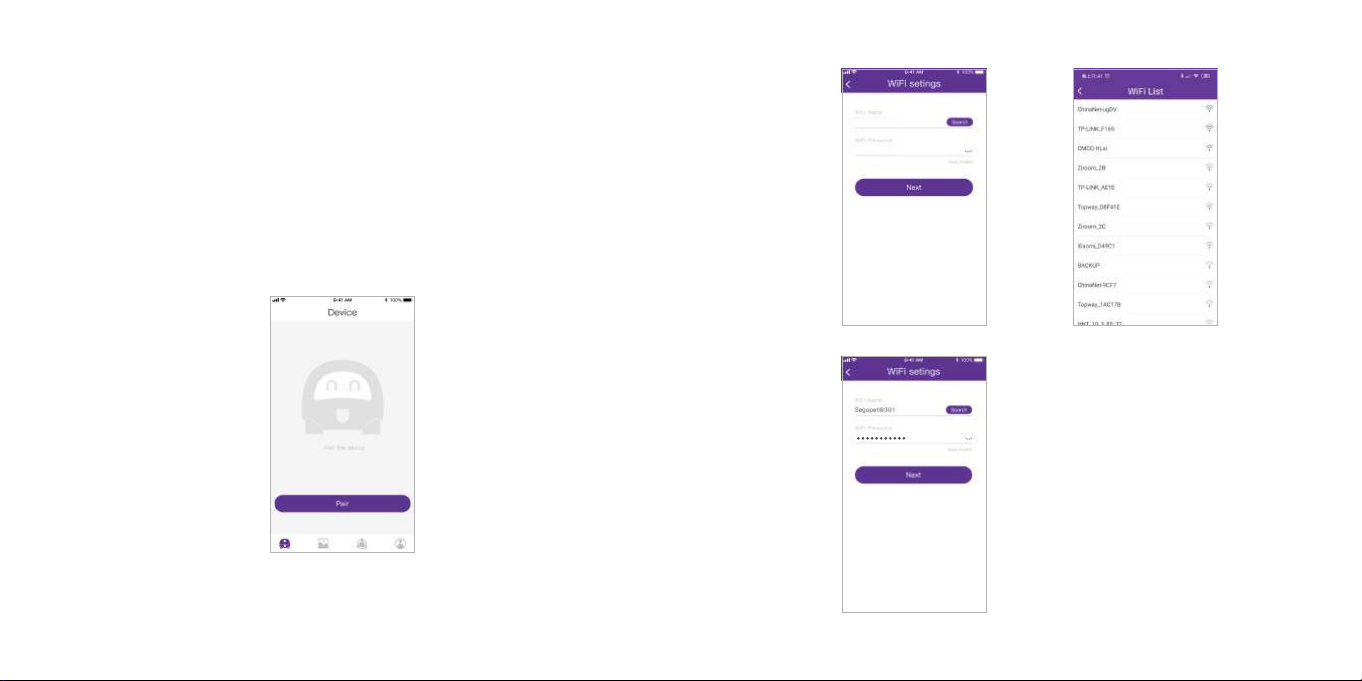
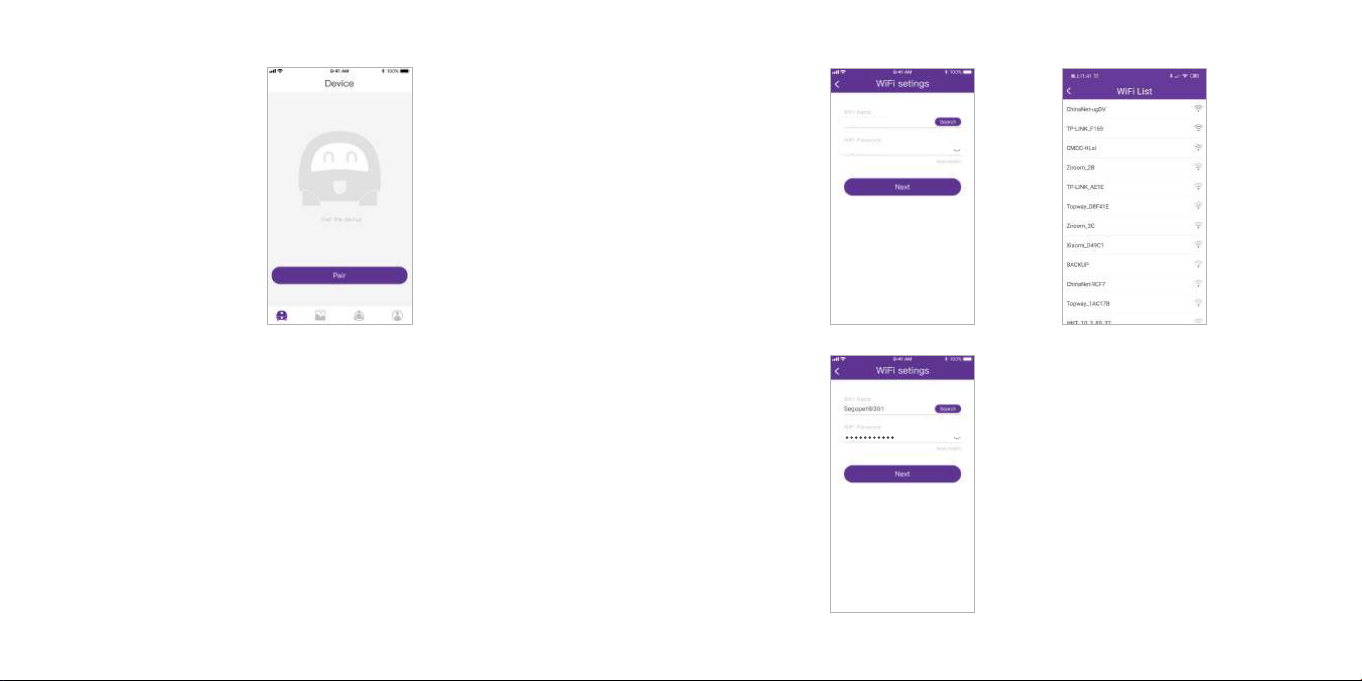
2. Pairing
Please connect your pet cam to the Wifi network of the place where it is to be used and pair
it with your phone by following the instructions below:
1) Connect your phone to the mentioned Wifi network.
2) Activate your phone’s Bluetooth function.
3) Run the app. Tap Pair on the homepage.
4) Phones with iOS system will detect the connected Wifi network automatically, please
enter the password to complete pairing. For phones with Android system, please tap Search
to search the nearby Wifi connections, and choose the one connected with your phone and
enter its password to complete pairing.
05 06
Page 6
Note:
· Make sure to activate the Bluetooth function on your phone before pairing.
· It is recommended to finish pairing within 5 minutes after you turned on the unit. If pairing
failed, please press the Power Button on the bottom of the pet cam once and try again.
· The Wifi indicator will keep flashing when pairing and stay solid once paired successfully.
2) Control Interface
1
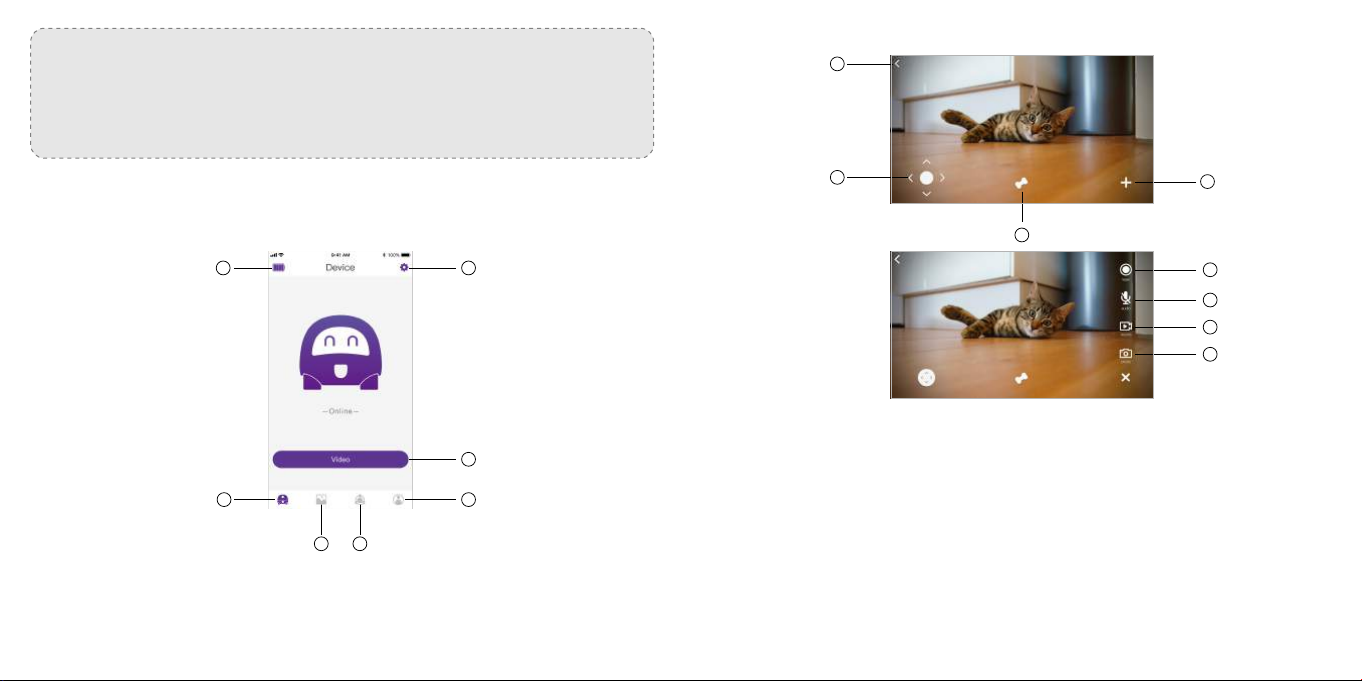
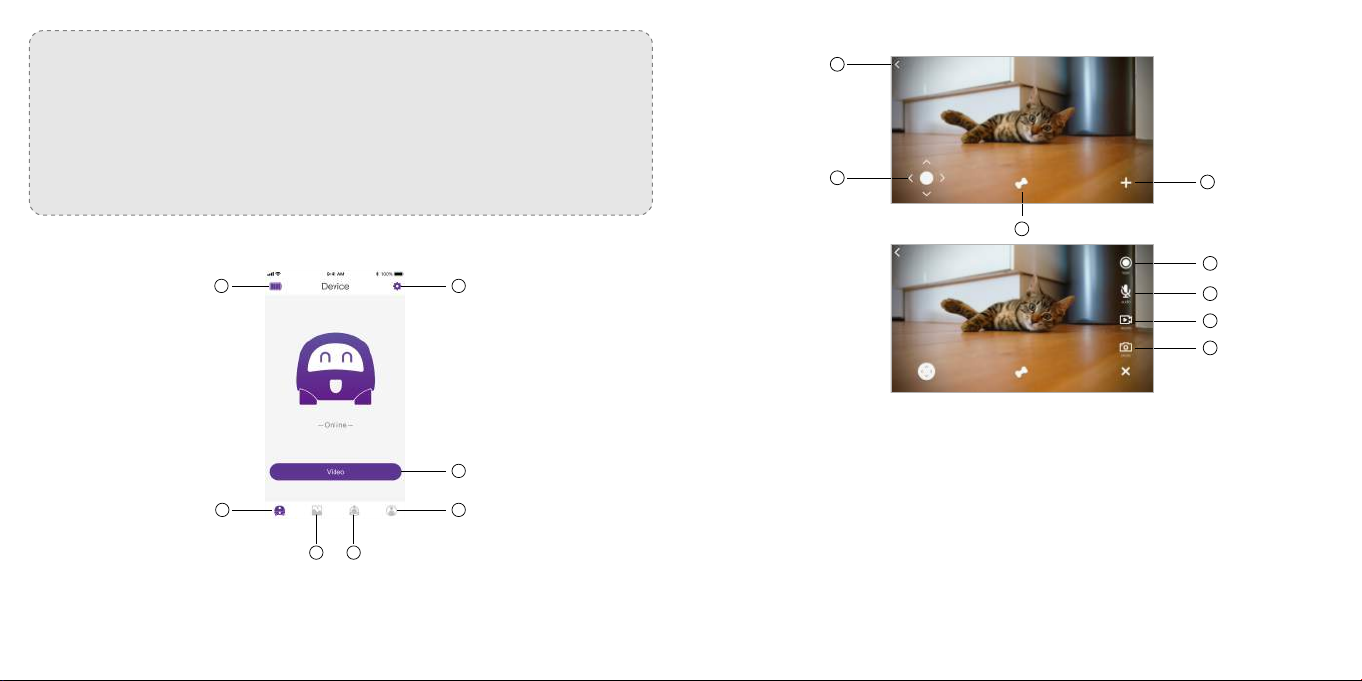
3. Operation and Functions
1) Homepage
2
3
1
2
4
5
6
7
8
1. Back to home page
3
2. Movement control (tap once to enter the movement control, press and hold the corresponding
arrow to control the movement)
7
4
3. Treat tossing
4. More functions
5
6
1. Battery Display
2. Settings
3. Enter control interface
07 08
4. Personal Center
5. Device Management
6. View photos / recorded videos
7. Homepage
5. Tap to switch between laser and cat teaser modes. When set, slide the screen to control the
movement of the laser / cat teaser
6. Audio on / off
7. Record videos
8. Take photos
Page 7
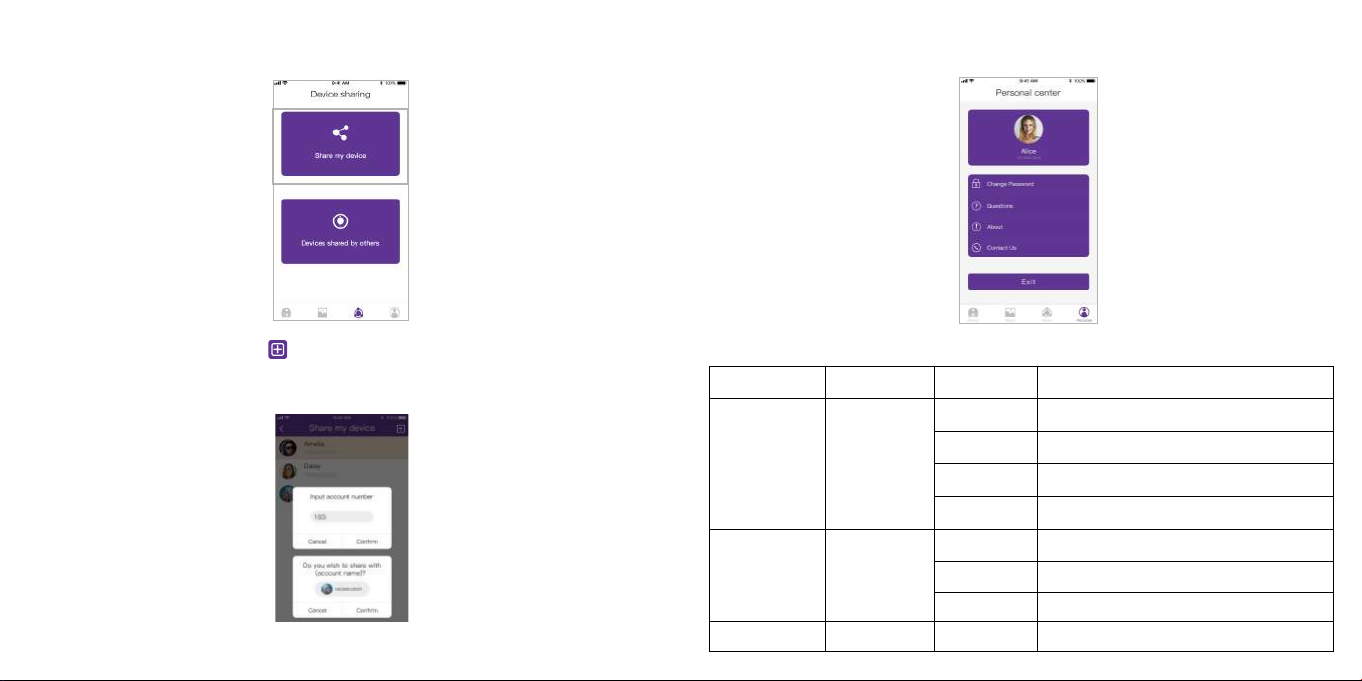
3) Device Sharing
a) Tap Device Management to enter sharing management.
4) Personal Center
Tap the personal center to get to know about your account and change its settings.
b) Tap “Share my device”, then tap on the top right corner and enter the registered
account name to share your device. Once shared, max. 5 users could operate the pet cam
at the same time.
c) To cancel sharing, just slide the user name to the left and remove it from the sharing list.
09 10
LED Indication
LED Indicator
Power Indicator
Wifi Indicator
Charging Indicator
Color Status
Off Unit not on
Red
Blue
Blue
Flash slowly
Flash fast
Solid on
Flash fast
Flash slowly
Solid on
Solid on
Indication
Unit turning on
Low battery, please charge
Unit turned on
Connecting Wifi
Wifi not connected
Wifi connected
Fully charged
Page 8

Restore to Factory Settings
Press and hold the Power Button for 8 seconds to restore to factory settings.
DE
Das ist im Lieferumfang enthalten
Night Vision Mode
The pet cam will change to night vision mode when surrounding light is inadequate where the
image will become black and white.
Note:
· Do not use the unit when it is being charged.
· Only support 2.4GHz network (5G network not supported).
· Please connect your phone to the Wifi network and activate its Bluetooth function before
you run the app.
· The pet cam will detect the obstacles 10-20cm / 3.9-7.8in away automatically (e.g. it will
stop moving if wall is detected to avoid collision).
· If the altitude variance is beyond 20cm / 7.8in, the pet cam will stop moving to avoid falling.
· 1 x VAVApet Haustier-Kamera (VP-SPR001)
· 1 x Adapter
· 3 x Katzenspielzeug
· 1 x Bedienungsanleitung
Produktabbildung
Vorderseite
9
8
5
1
2
3
44
5
Warranty
12-month Warranty
Lifetime Support
1. Katzenspielzeug-Anbringung
2. Mikrofon
3. Aufhelllicht
4. Dekorationsbeleuchtung
5. Antikollisions-Sensoren
11 12
6
7
6. Antisturz-Sensoren
7. Leckerli-Spenderöffnung
8. Laserpointer
9. Linse
6
Page 9
Back
Spezifikationen
11
10
3 3
1. Öffner der Leckerli-Spenderabdeckung
2. Antikollisions-Sensoren
3. Antisturz-Sensoren
4. Räder
5. Stromanzeige
6. Ladeanzeige
13
1
2
44
5789 6
7. Powertaste
8. Ladeanschluss
9. WLAN-Anzeige
10. Lautsprecher
11. Leckerli-Spenderabdeckung
12. Leckerli-Spender
Modell
Akkukapazität
Objektivwinkel
12
Lautsprecher
Mikrofonsensitivität
Betriebszeit (voll aufgeladen)
Standby-Zeit
Betriebstemperatur
Maße
VP-SPR001
11.1V, 4400mAh, 48.84Wh
140° Weitwinkelobjektiv mit Nachtsicht
8Ω, 1Wh
-42 ±3 dB
8 Stunden
5 Tage
0-40°C / 32-104°F
245 x 238 x 221mm / 9.6 x 9.4 x 8.7in
Erste Schritte
1. Ladevorgang
Schließen Sie das Gerät mithilfe des mitgelieferten Netzteils an einer Stromquelle an; der
Ladevorgang beginnt dann automatisch. Die Ladeanzeige leuchtet nach vollständiger
Ladung konstant blau.
Anmerkung: Bitte laden Sie das Gerät, wenn die Stromanzeige rot blinkt oder wenn die
Akku-Leiste auf der Homepage der VAVA Haustier-Kamera auf Rot wechselt.
2. Herunterladen der App
1) Suchen Sie im App Store oder Google Play Store nach "VAVA Pet Cam" und tippen Sie zum
14
Page 10

Installieren auf den Namen.
2) Tippen Sie nach der Installation auf das Icon und dann auf START.
3. Anbringen des Katzenspielzeugs
Stecken Sie das beiliegende Katzenspielzeug in die Katzenspielzeug-Anbringung, damit Ihre
Katzen damit spielen können.
3) Registrieren Sie Ihren Account wie in der App beschrieben.
15
Verwenden der Haustier-Kamera
1. Ein- / Ausschalten
· Drücken Sie die Powertaste ein Mal, um das Gerät einzuschalten, wobei die Stromanzeige
rot leuchtet.
· Halten Sie die Powertaste 3 Sekunden lang gedrückt, um das Gerät auszuschalten.
2. Koppeln
Bitte verbinden Sie Ihre Haustier-Kamera mit dem WLAN-Netzwerk des Ortes, an dem sie
verwendet werden soll, und koppeln Sie sie entsprechend der Anleitung unten mit Ihrem
Telefo n:
1) Verbinden Sie auch Ihr Telefon mit obigem WLAN-Netzwerk.
2) Aktivieren Sie die Bluetooth-Funktion Ihres Telefons.
3) Starten Sie die App. Tippen Sie auf der Homepage auf "Pair".
16
Page 11
4) Telefone mit iOS-System erkennen das verbundene WLAN-Netzwerk automatisch; bitte
geben Sie das Passwort ein, um das Koppeln abzuschließen. Bei Telefonen mit Android System tippen Sie zum Suchen von WLAN-Verbindungen in der Nähe auf Suchen. Wählen
Sie dann das gleiche, mit dem Ihr Telefon verbunden ist, und geben Sie zum Abschluss des
Koppelns das Passwort ein.
17 18
Page 12
Anmerkung:
· Achten Sie darauf, dass die Bluetooth-Funktion auf Ihrem Handy vor dem Koppeln
eingeschaltet ist.
· Es wird empfohlen, das Koppeln innerhalb von 5 Minuten nach Einschalten des Geräts
abzuschließen. Sollte das Koppeln fehlschlagen, drücken Sie die Powertaste auf der
Unterseite der Haustier-Kamera ein Mal und versuchen es dann erneut.
· Die WLAN-Anzeige blinkt beim Koppeln und leuchtet nach erfolgreichem Koppeln konstant.
2) Kontroll-Interface
1
2
4
3. Bedienung und Funktionen
1) Homepage
1
2
3
5
6
7
8
1. Zurück zur Homepage
2. Bewegungssteuerung (einmal tippen, um die Bewegungssteuerung zu öffnen; den jeweiligen
3
7
4
Pfeil gedrückt halten, um die Bewegung zu steuern)
3. Leckerli-Ausgabe
4. Weitere Funktionen
5. Tippen, um zwischen Laser- und Katzenspielzeugmodus zu wechseln. Wischen Sie nach dem
5
6
1. Akku-Anzeige
2. Einstellungen
3. Öffnen des Kontroll-Interfaces
4.Benutzerzentrum
19 20
5.Geräte-Management
6.Fotos / aufgenommene Videos anzeigen
7.Homepage
Einstellen über den Bildschirm, um die Bewegungen des Laserpointers / Katzenspielzeugs zu
steuern.
6. Audio an / aus
7. Videos aufnehmen
8. Fotos schießen
Page 13

3) Teilen des Geräts
a) Tippen Sie für die Teil-Einstellungen auf Geräte-Management.
4) Benutzerzentrum
Tippen Sie auf Benutzerzentrum, um mehr über Ihren Account zu erfahren und dessen
Einstellungen zu ändern.
b) Tippen Sie auf “Share my device”, dann oben rechts auf und geben zum Teilen Ihres
Geräts dann den registrierten Accountnamen ein. Einmal geteilt, können max. 5 Nutzer
das Gerät gleichzeitig bedienen.
c) Um das Teilen zu beenden, wischen Sie den Benutzernamen einfach nach links und löschen
ihn somit aus der Teilen-Liste.
21 22
Bedeutung der LED-Anzeigen
LED-Anzeige
Stromanzeige
WLAN-Anzeige
Ladeanzeige
Farbe Status
Aus Gerät nicht eingeschaltet
Rot
Blau
Blau
Langsames Blinken
Schnelles Blinken
Konstant an
Schnelles Blinken
Langsames Blinken
Konstant an
Konstant an
Bedeutung
Gerät schaltet sich ein
Niedriger Akkustand, bitte laden
Gerät eingeschaltet
Verbindet sich mit WLAN
WLAN nicht verbunden
WLAN verbunden
Vollständig geladen
Page 14

Auf Werkseinstellungen zurücksetzen
Zum Zurücksetzen auf Werkseinstellungen die Powertaste 8 Sekunden lang gedrückt halten.
Nachtsicht-Modus
Die Haustier-Kamera wechselt in den Nachtsicht-Modus, wenn das Umgebungslicht unzureichend ist. Das Bild wird dann schwarz-weiß.
Anmerkung:
· Verwenden Sie das Gerät nicht, während es geladen wird.
· Unterstützt nur 2.4GHz Netzwerke (5G Netzwerke werden nicht unterstützt).
· Bitte verbinden Sie Ihr Telefon mit dem WLAN-Netzwerk und aktivieren Sie dessen
Bluetooth-Funktion, bevor Sie die App starten.
· Die Haustier-Kamera erkennt Hindernisse in einer Entfernung von 10-20cm / 3.9-7.8in
automatisch (stoppt z.B. die Bewegung, um Kollision zu vermeiden, wenn eine Wand erkannt
wird).
· Wenn der Höhenunterschied 20cm / 7.8in überschreitet, stoppt die Haustier-Kamera die
Bewegung, um nicht herunterzufallen.
FR
Dans la boîte
· 1 x VAVApet Caméra de Surveillance (VP-SPR001)
· 1 x Adaptateur
· 3 x Jeux pour chat
· 1 x Guide utilisateur
Schéma produit
Face
1
9
8
5
2
3
44
5
6
6
Garantie
12 Monate Garantie
Lebenslanger Support
23 24
1. Port d'installation du jeu pour chat
2. Microphone
3. Lumière d'éclairage
4. Lumière décorative
5. Capteurs anti-collision
7
6. Capteurs anti-chute
7. Port de remplissage du distributeur de
friandises
8. Laser Light Lumière laser
9. Lentille
Page 15

Arrière
Spécifications
VP-SPR001
11.1V, 4400mAh, 48.84Wh
140° Grand angle avec vision nocturne
8Ω, 1Wh
-42 ±3 dB
8 heures
5 jours
0-40°C / 32-104°F
245 x 238 x 221mm / 9.6 x 9.4 x 8.7in
11
10
3 3
5789 6
Modèle
Capacité de batterie
Angle de vision
12
Haut-parleur
Sensibilité microphone
1
2
Autonomie (charge complète)
Temps de veille
Température de fonctionnement
44
Dimensions
Mise en place
1. Charge
Branchez l'appareil à une source d'alimentation en utilisant l'adaptateur secteur inclus, et la
1. Bouton d'ouverture du distributeur
de friandises
2. Capteurs anti-collision
3. Capteurs anti-chute
4. Roues
5. Indicateur d'allumage
7. Bouton d'allumage
8. Port de charge
9. Indicateur WiFi
10. Haut-Parleur
11. Couvercle du distributeur de friandises
12. Distributeur de friandises
6. Indicateur de charge
25 26
charge débutera automatiquement.
Note: Veuillez charger l'appareil lorsque l'indicateur de batterie clignote en rouge ou lorsque
la barre de batterie sur la page d'accueil de l'appli VAVA Pet Cam devient rouge.
2. Téléchargement de l'application
1) Recherchez "VAVA Pet Cam" sur l'App Store ou Google Play Store, touchez le nom pour
installer.
Page 16

2) Une fois installée, touchez l'icône pour la lancer et appuyez sur START pour commencer à
utiliser l'application.
3) Inscrivez-vous tel qu'indiqué dans l'application.
3. Installation du jeu pour chat
Insérez le jeu pour chat inclus dans le port d'installation du jeu, pour amuser vos chats.
Utilisation de la caméra de surveillance
1. Allumage / Extinction
· Appuyez sur le bouton d'allumage une fois pour allumer l'appareil, avec le témoin d'allumage
s'allumant en rouge.
· Appuyez et maintenez le bouton d'allumage pendant 3 secondes pour éteindre l'appareil.
2. Appairage
Veuillez connecter votre caméra de surveillance au réseau WiFi domestique et appairez-la à
votre téléphone en suivant les consignes suivantes:
1) Connectez votre téléphone au réseau WiFi.
2) Activez la fonction Bluetooth de votre téléphone.
3) Lancez l'application. Appuyez sur Pair à la page d'accueil.
27 28
Page 17

4) Les téléphones sous iOS détecteront le réseau WiFi automatiquement, entrez le mot de
passe pour terminer l'appairage. Pour les téléphones sous Android, veuillez lancer une
recherche WiFi et choisir le réseau approprié sur votre téléphone et entrez le mot de passe
pour finir l'appairage.
Note:
· Assurez-vous d'activer le Bluetooth sur votre téléphone avant l'appairage.
· Il est conseillé de finir l'appairage dans les 5 minutes après l'allumage de l'appareil. Si
l'appairage échoue, veuillez appuyer une fois sur le bouton d'allumage au bas de la caméra
et réessayez.
· L'indicateur WiFi clignotera pendant l'appairage et restera fixe une fois l'appairage réussi.
3. Utilisation et Fonctions
1) Page d'accueil
1
2
3
7
5
6
1. Niveau de batterie
2. Réglages
3. Interface de commande
29 30
4. Profil
4
5. Gestion de l'appareil
6. Afficher les photos / vidéos
enregistrées
7. Page d'accueil
Page 18

2) Interface de commande
1
3) Partage d'appareil
a) Touchez le bouton de Gestion de l'appareil pour accéder au partage d'appareil.
2
3
4
5
6
7
8
b) Touchez "Share my device", puis en haut à droite et entrez le nom du compte enregistré
pour partager l'appareil. Une fois partagé, 5 personnes peuvent utiliser la caméra de
1. Retour à la page d'accueil
surveillance en même temps.
2. Contrôle de mouvement (touchez une fois pour ouvrir le contrôle de mouvement, appuyez
et maintenez la flèche correspondante au mouvement souhaité)
3. Friandise
4. Plus de fonctions
5. Touchez pour basculer entre le laser et le jeu pour chat. Une fois choisi, faites glisser l'écran
pour contrôler le mouvement du laser / du jeu pour chat.
6. Audio actif / inactif
7. Enregistrer des vidéos
8. Prendre des photos
31 32
c) Pour annuler le partage, faites glisser l'appareil vers la gauche et et supprimez-le de la liste.
Page 19

4) Profil
Touchez le bouton Personal Center pour explorer votre compte et changer les réglages.
Restauration aux paramètres d'usine
Appuyez et maintenez le bouton d'allumage pendant 8 secondes pour revenir aux paramètres
d'usine.
Vision nocturne
La caméra de surveillance passera en vision nocturne lorsque la lumière est insuffisante avec
l'image passant en noir et blanc.
Note:
· Ne pas utiliser l'appareil pendant la recharge.
· Support des réseaux 2.4GHz uniquement (réseau 5G non supporté).
· Veuillez connecter votre téléphone au réseau WiFi et activer le Bluetooth dessus avant
d'ouvrir l'application.
Indications LED
Témoin LED
Indicateur
d'allumage
Indicateur WiFi
Indicateur de charge
33 34
Couleur Statut
Éteint Appareil éteint
Rouge
Bleu
Bleu
Clignotant lentement
Clignotant rapidement
Allumé fixe
Clignotant rapidement
Clignotant lentement
Allumé fixe
Allumé fixe
Indication
Allumage de l'appareil en cours
Batterie faible, veuillez la recharger
Appareil allumé
Connexion au WiFi
WiFi non connecté
WiFi connecté
Charge complète
· La caméra détecte les obstacles à 10-20cm / 3.9-7.8in de distance automatiquement (elle
s'arrêtera si un mur est détecté pour éviter les collisions).
· Si une hauteur diffère à plus de 20cm / 7.8in, la caméra arrêtera de bouger pour ne pas chuter.
Garantie
12 mois de garantie
Support à vie
Page 20

FR
Contenido Del Paquete
· 1 x Cámara Para Mascota VAVA (VP-SPR001)
· 1 x Adaptador
· 3 x Juguete de Gato
· 1 x Guía del Usuario
Parte Trasera
11
12
Diagrama Del Producto
Parte Frontal
1
9
8
5
6
2
3
44
5
6
1. Botón de Liberación de la Cubierta
del Dispensador de Snacks
7
1. Puerto de Instalación Para Los Juguetes
2. Micrófono
3. Luz de Relleno
4. Luz Decorativa
5. Sensores Anti-Choques
35 36
6. Sensores Anti-Caída
7. Lanzador de Snacks
8. Luz Laser
9. Lente
2. Sensores Anti-Choques
3. Sensores Anti-Caída
4. Ruedas
5. Indicador de Encendido
6. Indicador de Carga
10
3 3
5789 6
7. Botón de Encendido
8. Puerto de Carga
9. Indicador WiFi
10. Bocina
11. Cubierta del Dispensador de Snacks
12. Dispensador de Snacks
1
2
44
Page 21

Especificaciones Técnicas
Modelo
Capacidad de la Batería
Ángulo del Lente
Bocina
Sensibilidad del Micrófono
Tiempo de Operación (Carga Completa)
Tiempo de Espera
Temperatura de Trabajo
Dimensiones
2) Una vez que la instalación haya finalizado, presione el ícono para usar la aplicación y luego
toque INICIAR para comenzar a usar la aplicación.
VP-SPR001
11.1V, 4400m Ah, 48.84Wh
Lente de Ángulo Amplio de 140° con Visión Nocturna
8 Ω, 1Wh
-42 ± 3 dB
8 horas
5 días
0-40°C / 32-104°F
245x238x221 mm / 9.6x9.4x8.7 pulgadas
Guía De Inicio
1. Carga
Conecte la unidad a una fuente de alimentación usando el adaptador de corriente incluido,
la carga comenzará automáticamente. El indicador de carga se iluminará en azul cuando se
complete la carga.
Nota: Cargue la unidad cuando el indicador de encendido parpadee en rojo o cuando la
barra de la batería en la página de inicio de la aplicación VAVA Pet Cam se ilumine roja.
2. Descarga del App
1) Busca "VAVA Pet Cam" en el App Store o en el Google Play Store, presione en el nombre
para instalar.
37 38
3) Inscriba a su cuenta como indicado en la imagine inferior.
Page 22

3. Instalación del Juguete de Gato
Conecte el juguete de gato incluido en el puerto de instalación para entretener a sus gatos.
Usando La Cámara De Mascotas
1. Encender / Apagar
· Presione el Botón de Encendido para encender la unidad, el indicador se iluminará en rojo
· Mantenga presionado el Botón de Encendido durante 3 segundos para apagar la unidad.
2. Emparejamiento
Por favor, conecte su cámara de mascota a la red Wifi del lugar donde se va a utilizar y
emparéjelo con su teléfono siguiendo las instrucciones a continuación:
1) Conecte su teléfono a la red wifi mencionada.
2) Active la función Bluetooth de su teléfono.
3) Inicie la aplicación. Presione la función de emparejar en la página de inicio.
4) Los smartphones con sistema operativo iOS detectarán automáticamente la red Wifi
conectada, ingrese la contraseña para completar el emparejamiento. Para teléfonos con
sistema operativo Android, toque ¨Buscar¨ para buscar las conexiones Wifi cercanas, elija la
que esté conectada con su teléfono e ingrese su contraseña para completar la conexión.
39 40
Page 23

Notas:
· Asegúrese de activar la función Bluetooth en su teléfono antes de emparejar.
· Se recomienda finalizar el emparejamiento dentro de los 5 minutos posteriores a la
activación de la unidad. Si el emparejamiento falla, presione el Botón de Encendido en la
parte inferior de la cámara de mascotas una vez y vuelva a intentarlo.
· El indicador de wifi seguirá parpadeando cuando se empareja y dejará de parpadeará una
vez que se empareja correctamente.
2) Interfaz De Control
1
2
4
3. Operación y funciones
1) Página Principal
1
2
3
5
6
7
8
1. Volver a la página de inicio
3
2. Control de movimiento (presione una vez para ingresar al control de movimiento, mantenga
presionada la flecha correspondiente para controlar el movimiento)
7
4
3. Lanzamiento de snacks
4. Más funciones
5
6
1. Indicador de la Batería
2. Configuración
3. Entrar al Interfaz de Control
41 42
4. Centro Personal
5. Gestión de Dispositivos
6. Ver Fotos / Videos Grabados
7. Página Principal
5. Presione para cambiar entre el modo luz laser o de juguete. Una vez que esté configurado,
deslice la pantalla para controlar el movimiento del láser / juguete del gato.
6. Encender / Apagar audio
7. Grabar video
8. Tomar fotos
Page 24

3) Compartir Dispositivos
a) Presione Administración de Dispositivos para iniciar la función de compartir la administración.
4) Centro de la persona
Presione el centro personal para conocer su cuenta y cambiar su configuración.
b) Presione "Compartir mi dispositivo", luego presione en la esquina superior derecha e ingrese
el nombre de la cuenta registrada para guardar su dispositivo. Una vez compartido, 5 usuarios
máximo pueden operar la cámara de mascotas al mismo tiempo.
c) Para cancelar el uso compartido, simplemente deslice el nombre de usuario a la izquierda y
elimínelo de la lista de uso compartido.
43 44
Indicación LED
Indicador Led
Indicador de
Poder
Indicador WiFi
Indicador de Carga
Color Estado
Apagado Unidad no encendida
Rojo
Azul
Azul
Parpadeo lento
Parpadeo rápido
Iluminado
Parpadeo rápido
Parpadeo lento
Iluminado
Iluminado
Indicación
Unidad en proceso de encenderse
Batería baja, por favor cargue
Unidad encendida
Conectando WiFi
Wifi no conectado
Wifi conectado
Carga completa
Page 25

Restaurar A Configuración De Fabrica
Mantenga presionado el Botón de Encendido durante 8 segundos para restablecer a la
configuración de fábrica.
Modo De Visión Nocturna
La cámara de mascota cambiará al modo de visión nocturna cuando la luz circundante sea
inadecuada, la imagen se tomará en color blanco y negro.
Notas:
· No use la unidad si se está cargando.
· Solo es compatible con una red de 2.4GHz (no admite una red 5G).
· Conecte su teléfono a la red Wifi y active su función Bluetooth antes de iniciar la aplicación.
· La cámara de mascotas detectará los obstáculos a 10-20 cm / 3.9-7.8 pulgadas de distancia
automáticamente (por ejemplo, dejará de moverse si se detecta una pared para evitar una
colisión).
· Si la variación de altitud es superior a 20 cm/7.8 pulgadas, la cámara de mascota dejará de
moverse para evitar caídas.
IT
Contenuto della Confezione
· 1 Videocamera per Animali Domestici VAVApet (VP-SPR001)
· 1 Adattatore
· 3 Piumini per gatto
· 1 Manuale Utente
Schema del Prodotto
Anteriore
1
9
8
5
2
3
44
5
6
6
Garantía
Garantía de 12 Meses
Soporte Técnico de por Vida
45 46
1. Porta di Installazione del Piumino
2. Microfono
3. Luce di Riempimento
4. Luce Decorativa
5. Sensori Anti Collisione
7
6. Sensori Anti Caduta
7. Porta di Uscita del Premio
8.Luce Laser
9.Lente
Page 26

Posteriore
Specifiche
VP-SPR001
11,1V, 4400mAh, 48,84Wh
Grandangolo da 140° con Visione Notturna
8Ω, 1Wh
-42 ±3 dB
8 ore
5 giorni
0-40 °C / 32-104 °F
245 x 238 x 221mm / 9.6 x 9.4 x 8.7in
11
10
3 3
5789 6
Modello
Capacità della Batteria
Angolo della Lente
12
Altoparlante
Sensibilità del Microfono
1
2
44
Durata di Funzionamento
(con una carica completa)
Tempo di Stand-by
Temperatura di Esercizio
Dimensioni
Come Iniziare
1. Ricarica
Collegare il dispositivo ad una fonte di alimentazione utilizzando l’adattatore di alimentazi-
1. Bouton d'ouverture du distributeur
de friandises
2. Capteurs anti-collision
3. Capteurs anti-chute
4. Roues
5. Indicateur d'allumage
7. Bouton d'allumage
8. Port de charge
9. Indicateur WiFi
10. Haut-Parleur
11. Couvercle du distributeur de friandises
12. Distributeur de friandises
6. Indicateur de charge
47 48
one fornito, e la ricarica inizierà automaticamente. L’indicatore di ricarica resterà blu fisso
una volta completata la ricarica.
Nota: Si prega di ricaricare il dispositivo quando l’indicatore di alimentazione lampeggia di
rosso o quando la barra della batteria sulla pagina iniziale dell’app VAVA Pet Cam diventa
rossa.
Page 27

2. Scaricare l’App
1) Cercare “VAVA Pet Cam” sull’App Store o su Google Play. Premere sul nome per installare.
2) Quando l’app è installata, premere sull’icona per farla partire, quindi premere START per
iniziare ad utilizzare l’app.
3) Registra il tuo account come spiegato all’interno dell’app.
3. Installazione del Piumino per Gatto
Inserire il piumino per gatto incluso nella porta di installazione del piumino per far giocare i tuoi gatti.
Utilizzare la Pet Cam
1. Spegnimento / Accensione
· Premere il Pulsante di Accensione una volta per accendere il dispositivo. L’indicatore di
alimentazione si accenderà di rosso.
· Premere e tenere premuto il Pulsante di Accensione per 3 secondi per spegnere il dispositivo.
2. Accoppiamento
Si prega di collegare la propria pet cam alla rete Wifi del luogo dove dovrà essere utilizzata e
accoppiarla con il proprio telefono seguendo queste istruzioni:
1) Collegare il telefono alla rete Wifi citata.
2) Attivare la funzione Bluetooth sul proprio telefono.
3) Avviare l’app. Premere su “Pair” sulla pagina iniziale.
49 50
Page 28

4) I telefoni dotati di sistema operativo iOS rileveranno automaticamente la rete WiFi collegata.
Inserire la password per completare l’accoppiamento. Per i telefoni dotati di sistema operativo
Android, premere “Search” per cercare le connessioni Wifi nelle vicinanze e di scegliere quella
collegata al proprio telefono, inserendone la password per completare l’accoppiamento.
Nota:
· Assicurarsi di attivare la funzione Bluetooth sul proprio telefono prima di effettuare l’accoppiamento.
· Si raccomanda di completare l’accoppiamento entro 5 dopo aver accesso il dispositivo. Se
l’accoppiamento non va a buon fine, si prega di premere il Pulsante di Accensione sul fondo
della pet cam una volta e di riprovare.
· L’indicatore Wifi continuerà a lampeggiare durante l’accoppiamento e diventerà fisso una
volta completato con successo l’accoppiamento.
3. Operazioni e Funzioni
1) Pagina Iniziale
1
2
3
7
5
6
1. Indicatore della Batteria
2. Impostazioni
3. Entrare nell’interfaccia di controllo
51 52
4. Centro Personale
4
5. Gestione del Dispositivo
6. Vedi foto / video registrati
7. Pagina Iniziale
Page 29

2) Interfaccia di Controllo
1
3) Condivisione del Dispositivo
a) Premere Gestione del Dispositivo per condividere la gestione
2
3
4
5
6
7
8
b) Premi “Share my device” (“Condividi il mio dispositivo”), quindi premi nell’angolo in alto a
destra e inserisci il nome dell’account registrato per condividere il tuo dispositivo. Una
volta condiviso, al massimo 5 utenti potranno agire contemporaneamente sulla pet cam.
1. Ritorna alla pagina iniziale
2. Controllo del movimento (premere una volta per accedere al controllo del movimento, premere
e tenere premuta la freccia corrispondente per controllare il movimento)
3. Lancio del premio
4. Altre funzioni
5. Premere per passare dalla modalità laser alla modalità gioco per gatto. Quando impostato,
scorrere il dito sullo schermo per controllare il movimento del laser o del gioco per gatto
6. Audio acceso / spento
7. Registra video
8. Scatta foto
53 54
c) Per cancellare la condivisione, far scorrere il nome dell’utente verso sinistra per rimuoverlo
dalla lista di condivisione.
Page 30

4) Centro Personale
Premere su Personal Center (“Centro Personale”) per avere maggiori informazioni sul proprio
account e per modificarne le impostazioni.
Ripristinare le Impostazioni di Fabbrica
Premere e tenere premuto il Pulsante di Accensione per 8 secondi per ripristinare il dispositivo
alle impostazioni di fabbrica.
Modalità Visione Notturna
La pet cam passerà alla modalità visione notturna quando la luce ambientale è insufficiente, e
l’immagine diventerà in bianco e nero.
Nota:
· Non utilizzare il dispositivo mentre è in ricarica.
· Supporta esclusivamente le reti a 2,4GHz (reti 5G non supportate).
· Si prega di collegare il telefono alla rete Wifi e di attivare la funzione Bluetooth prima di
avviare l’app.
Significato dei LED
Indicatore LED
Indicatore di
Alimentazione
Indicatore Wifi
Indicatore di Ricarica
55 56
Colore Stato
Spento Il dispositivo non è acceso
Rosso
Blu
Blu
Lampeggiante (lento)
Lampeggiante (veloce)
Acceso fisso
Lampeggiante (veloce)
Lampeggiante (lento)
Acceso fisso
Acceso fisso
Significato
Il dispositivo si sta accendendo
Livello batteria basso, si prega di ricaricare
Il dispositivo è acceso
In connessione al Wifi
Wifi non connesso
Wifi connesso
Ricarica completata
· La pet cam rileverà automaticamente ostacoli a distanza di 10-20cm / 3.9-7.8in (ad es.
smetterà di avanzare se viene rilevato un muro per evitare la collisione con lo stesso).
· Se la differenza di altezza è superiore a 20cm / 7.8in, la pet cam smetterà di muoversi per
evitare di cadere.
Garanzia
Garanzia di 12 mesi
Supporto a Vita
Page 31

JP
パッケ ー ジ 内 容
· 1 x VAVApet Pet Cam (VP-SPR001)
· 1 x アダプター
· 3 x ネコじゃらし
· 1 x ユーザーガイド
後方
11
12
製品図
前方
1
9
8
5
6
7
1. ネコじゃらし設置ポート
2. マイク
3. 補 充 ラ イト
4. デコレーションライト
57 58
5. 衝突防止センサー
2
3
44
5
6
6. 落下防止センサー
7. おやつ供給口
8. レー ザ ー ラ イト
9. レンズ
10
3 3
5789 6
1. おやつディスペンサーカバー解除ボタン
2. 衝突防止センサー
3. 落下防止センサー
4. タイヤ
5. 電源表示
6. 充電表示
7. 電源ボタン
8. 充電ポート
9. WiFi表示
10. スピーカー
11. おやつディスペンサーカバー
12. おやつディスペンサー
1
2
44
Page 32

仕様
2) インストールしたら、アイコンをタップしてアプリを起動、STARTをタップしてアプリを開 始します。
モデル
バッテリー 容 量
レンズ角
スピーカー
マイク 感 度
作動時間 (フル充電時)
スタンバイ時間
作動気温
サイズ
VP-SPR001
11.1V, 4400mAh, 48.84Wh
140°広角レンズ(夜間レンズ付き)
8Ω, 1Wh
-42 ±3 dB
8時間
5日
0-40℃
245 x 238 x 221mm
3) アプリの指 示に 従いアカウントを作 成します。
はじめる
1. 充電
付属の電源アダプターで本体を電源につなげます。充電が自動的に開始され、充電が完了すると充電表
示が青く点灯します。
注意: 本体の充電表示ライトが赤く点滅した際、またはVAVA P et Ca mアプリのホ ーム ページの バッテ
リーバーが赤くなった際に、本体の充電をしてください。
2.アプリのダウンロード
1) App StoreまたはGoogle Playで “VAVA Pet Cam”を検索し、 タップしてインストールします。
59 60
Page 33

3. ネコじゃらしの設置
ネコじゃらしをネコじゃらし設置ポートに差し込みます。
PetCamを使う
1. 電源オン/オフ
· 電源ボタンを一回押すと、本体の電源がオンになり電源表示ライトが赤く点灯します。
· 電源ボタンを3秒間押し続けると、本体の電源がオフになります。
2. ペアリング
以下の手順に従い、Pet Camを利用する場所のWifiネットワークとお使いのスマートフォンと接続してく
ださい。
1) お使いのスマートフォンをPet Camを利用する場所のWifiと接 続します。
2) スマ ートフォンのBluetooth機能をオンにします。
3) アプリを起動し、ホームページのPairをタップしま す。
4) iOS機は、Wifiネットワークが自動で検知されるので、パスワードを入力して、ペアリングを完了してく
ださい。アンドロイド機は、Searchをタップして 近 くの Wifiを 検 索し 、スマ ートフォンと接 続 して いるネ
ットワークを選んでパスワードを入力し、ペアリングを完了してください。
61 62
Page 34

注意:
· ペアリングを行う前に、必ずBluetooth機能がオンになっていることを確認してください。
· ペアリングを行う際、本体の電源をオンにした後5分以内に設定を完了することをお勧めします。
ペアリングが完了できなかった場合、本体の底面にある電源ボタンを押して、再度やり直してください。
· Wifi表示は、ペアリングを行っている際に点滅し続け、ペアリングが完了すると点灯に変わります。
3.操作と機能
1) ホームページ
2)操作画面
1
2
3
4
1
2
5
6
7
8
1. ホームページに戻る
3
7
5
6
1. バッテリーレベル
2. 設定
3. コントロール画面へ
63 64
4. 個人情報
4
5. 機器管理
6. 写真やビデオを見る
7. ホームページ
2. 動 作 コント ロ ー ル (1回タップすると動作コントロール画面に移動します。動かしたい方向の矢印を押
し続けると動かすことができます。)
3. おやつをあげる
4. その他の機能
5. タップするとレーザーモードとネコじゃらしモードの切り替えが行えます。スクリーン上で指をスライド
させるとレーザーやネコじゃらしを動かすことができます。
6. 音声オン/オフ
7. ビデオ録画
8. 写真撮影
Page 35

3) 機器の共有
a) 機器管理をタップすると、機器の共有設定ができます。
4)個人情報
“personalcenter(個人情報)”をタップすると、個人アカウントの情報を確認したり、設定を変更したりでき
ます。
b) “Share my device(機器を共有)”をタップし、右 上の をタップすると、あなたのPet Camを登録されたアカ
ウントと共有することが可能です。共有の設定が完了したら、最大5人のユーザーが同時にPet Camの操作
を行うことができます。
c) 共有設定を解除するには、登録されたユーザーアカウント名を左へスライドし、共有リストから削除し
てください。
65 66
LEDライト表示
LED ライト
電源表示
Wifi表示
充電表示
色 状況
消灯 本体の電源がオフの状態
赤
青
青
低速点滅
高速点滅
点灯
高速点滅
低速点滅
点灯
点灯
インジケーター
本体の電源がオフになります。
バッテリーレベルが低いので、充電してください。
本体の電源がオンの状態
Wifiに接続しています。
Wifiに接続していません。
Wifiに接続しました。
充電が完了しました。
Page 36

工場出荷時状態への初期化
電源ボタンを8秒押し続けると出荷状態へ初期化できます。
夜 間 モ ード
Pet Camは、周囲のライトが十分ではなく画像が白黒になる場合、夜間モードに切り替わります。
注意:
· 充電中は利用しないでください。
· 2.4GHzのネットワークにのみ対応しています(5Gネットワークには対応していません)。
· アプリを利用する前に、スマートフォンをWifiネットワークに接続しBluetooth機能を起動してください。
· PetCamは10-20cm離れた障害物を自動で検知します。(壁を感知したら、衝突を避けるために止まり
ます)。
· PetCamは20cm以上の段差がある場合、落下を避けるために止まります)。
保証
12か月保証
生涯サポート
FCC STATEMENT :
This device complies with Part 15 of the FCC Rules. Operation is subject to the following
two conditions:
(1) This device may not cause harmful interference, and
(2) This device must accept any interference received, including interference that may cause
undesired operation.
Warning: Changes or modifications not expressly approved by the party responsible for
compliance could void the user's authority to operate the equipment.
NOTE: This equipment has been tested and found to comply with the limits for a Class B
digital device, pursuant to Part 15 of the FCC Rules. These limits are designed to provide
reasonable protection against harmful interference in a residential installation. This
equipment generates uses and can radiate radio frequency energy and, if not installed
and used in accordance with the instructions, may cause harmful interference to radio
communications. However, there is no guarantee that interference will not occur in a
particular installation. If this equipment does cause harmful interference to radio or
television reception, which can be determined by turning the equipment off and on, the
user is encouraged to try to correct the interference by one or more of the following
measures:
- Reorient or relocate the receiving antenna.
- Increase the separation between the equipment and receiver.
- Connect the equipment into an outlet on a circuit different from that to which the receiver
is connected.
- Consult the dealer or an experienced radio/TV technician for help.
FCC Radiation Exposure Statement:
This equipment complies with FCC radiation exposure limits set forth for an uncontrolled
environment. This equipment should be installed and operated with minimum distance 20cm
between the radiator & your body.
67
Page 37

尺寸:120*120mm
胶装成册
材质:封面128克铜版纸 内页80克书纸
 Loading...