

Page 1

www.vava.com
ASIA PACIFIC
E-mail: support.jp@vava.com(JP)
Tel : 03-5542-0238(10-18時/土日祝除く))
JP Importer: 株式会社SUNVALLEY JAPAN
Address: 〒104-0032 東京都中央区八丁堀3丁目18-6 PMO京橋東9F
EUROPE
E-mail:
support.uk@vava.com(UK)
support.de@vava.com(DE)
support.fr@vava.com(FR)
support.es@vava.com(ES)
support.it@vava.com(IT)
EU Importer: ZBT International Trading GmbH
Address: Halstenbeker Weg 98C, 25462 Rellingen, Deutschland
NORTH AMERICA
E-mail: support@vava.com
Tel: 1-888-456-8468 (Monday-Friday: 9:00 – 17:00 PST)
US Distributor: SUNVALLEYTEK INTERNATIONAL INC.
Address: 46724 Lakeview Blvd, Fremont, CA 94538
MANUFACTURER
Shenzhen NearbyExpress Technology Development Co.,Ltd.
Address: 333 Bulong Road, Shenzhen, China, 518129
Learn more about the EU Declaration of
Conformity: https://www.vava.com/downloads-VA-VD004-CE-Cert.html
VA-VD004
MADE IN CHINA
DASH CAM USER MANUAL
Please read this manual before operating your device and keep it for future reference.
Page 2

What’s in the Box
VAVA Dash Cam Mount Car Charger Snapshot Button
Note: The package contents may vary according to different orders.
Product Diagram
①
MODEL: VA-VD004
DASH CAM USER MANUAL
Please read this manual before operating your device and keep it for future reference.
Charging Cable Crowbar Cable Clips User Manual
②
③
④
⑤
⑥
1. Car Mount
2. Micro USB Port
3. Power / Working Status LED
4. WiFi Status LED
5. Reset Button
6. Micro SD Card Slot
01/02
Page 3
Product Specifications
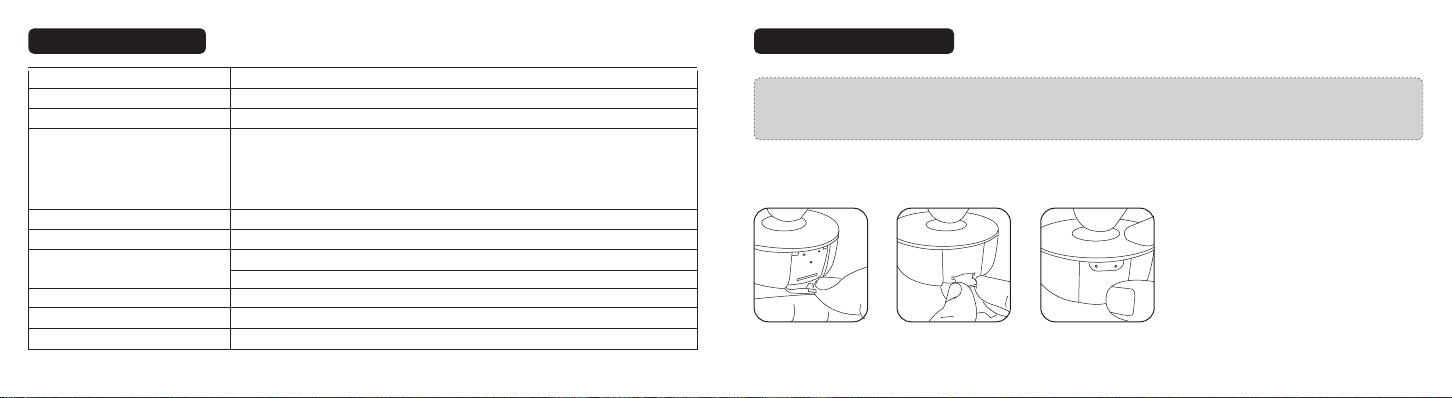
Memory Card Installation
CPU
Camera Sensor
Lens (FOV)
Video Resolution
G-sensor
Video Clip / Photo Format
Wireless Connections
Power Input
Built-in Battery Capacity
Operating Temperature
H22A55
Sony IMX317
4G + 2P +1 IR Lens(135°)
3840*2160/30fps
2560*1440/30fps
1920*1080/60fps
1920*1080/30fps(HDR)
3-axis Accelerometer
MP4 / JPG
Wi-Fi (between smart phone and Dash Cam)
2.4G (between Snapshot Button and Dash Cam)
5V / 1A
320mAh
-20°C to 50°C/-4°F to 122°F
Note: 1. Don’t install or remove the Micro SD card when the Dash Cam is powered on to avoid breakage of the card.
2. Please format the Micro SD card regularly for a better user experience. Remember to backup your f iles before
formatting the memory card..
For reliable operation, please use a U3 microSD/TF card with a capacity of 16GB, 32GB, 64GB or 128GB.
Brands Recommended:Sandisk / Kingston / Samsung / Transcend
① Insert a card with the gold contacts facing down. Push the card until it clicks into place.
② To remove the card, gently push it until it clicks and pull it out of the slot.
03/04
Page 4

Dash Cam Installation
①
②
① Ideal Mounting Position
② Car Charger
1. Insert the micro SD card into the micro SD card slot.
2. Stick the car mount onto your car windshield (ideally right in the middle).
3. Fix the VAVA Dash Cam onto the mount via the magnet.
4. Connect the USB cable to the micro USB port of the dash cam. Run the cable along the edge of the windshield, tuck it away
in the seams, and extend it all the way to the USB port of the Car Charger. Be sure to keep it away from the airbag area.
5. Insert the Car Charger into your cigarette lighter, connect the Dash Cam to the Car Charger.
6. Start your car to turn on the VAVA Dash Cam. Connect it with your phone (refer to the “VAVA Dash App” section) and open
the VAVA Dash App to view a real-time feed.
Note: · Do not remove or insert the micro SD card when the camera is working.
· Do not use the Car Charger to charge devices with Quick Charge technology.
· Install the car mount on windshields that are titled on an angle between 17° - 58°.
05/06
Page 5

Snapshot Button
Dash Cam and Snapshot Button Pairing
Dash Cam and Snapshot Button Pairing: Once the Dash Cam is turned on, press and hold the Snapshot Button for 5 -20
seconds until you hear 4 beep sounds. This means that they are synced.
Installing the Snapshot Button
① Install the Snapshot Button onto the steering wheel with the 3M sticker.
② Attach it to your key chains if needed.
Using the Snapshot Button
① Taking photos: Press once to take photos
② Taking short videos: Press and hold for 3 seconds until you hear a beep to take videos.
Replacing the battery:
Batterry Model: Lithium Battery CR 2032 3V
Replace the battery: Open the Snapshot Button
and put the battery inside with the right polarities.
Note: The Snapshot Button enters standby mode
once there is no operation for 1 minute.
Press again to restart and take a photo.
VAVA Dash Cam App Download
Please search ‘VAVA Dash’ in App Store or Google Play to download the App.
Note: Systems supported: Android 4.4 and above / iOS 8.0 and above.
Connect Dash Cam with Smartphone
1. Turn on Wi-Fi on your phone
2. Find “VAVA_XXXXXXXXXXXX” in the Wi-Fi list and connect to it, enter the password (initial password: 12345678).
3. Open VAVA Dash App and follow the instructions to complete the connection.
07/08
Page 6

Using Your VAVA Dash Cam
Videos and Photos / Media Gallery
LED Indicator Information
LED Indicator
Blue LED light slowly blinks
Blue LED light solid on
Red LED light blinks
Red LED light solid on
Red LED light flashes once
White LED light on
White LED light off
Blue LED light and red LED light solid on
Blue LED light solid on: Please reset the Dash Cam and format the TF card.
Red LED light solid on: Please install the Micro SD card properly to ensure its functionality and format it.
Blue LED light and red LED light solid on: Please reset the Dash Cam.
Dash Cam Status
Working
Stopped working / microSD card storage full
Recording an emergency video clip /a manual video clip taken via the
app or Snapshot Button / micro sd card not inserted
Micro SD card error
Taking a photo by app or Snapshot Button
Mobile phone connected to Wi-Fi
Mobile phone disconnected from Wi-Fi
The Dash Cam has crashed
Videos
Automatic Recording: Video recording is automatically activated once the car is started.
Manual Recording: A default 20-second video footage will be recorded through the app or the Snapshot Button.
Emergency Recording: A video footage is generated once a collision or bump is detected through the G-sensor during driving
or in parking monitor mode.
Photos
The photos can be taken via the Snapshot Button or you can tap the snapshot icon in the app to take a photo.
Media Gallery
1. View the videos and photos in the Media Gallery of the App.
2. You can take out the memory card and view the videos and photos on a computer.
Downloading Videos & Photos
When the Dash Cam is succesfully connected to your mobile phone, go to the app and select Media Gallery. From here, you can
download the photos and videos onto your mobile storage.
09/10
Page 7

Features
Firmware / APP Update
Parking Mode
When your car is not running, i.e. the engine is turned off, the Dash Cam will automatically power off in 10seconds and enter
Parking Mode. When a shock or crash is detected, the G-Sensor will activate the Dash Cam and start recording a 15-second
video. The Dash Cam will then re-enter the Parking Mode.
Emergency Recordings
A 20-second video will be captured when the G-Sensor is activated in case of sharp turns or a sudden stop. When the capacity
of these videos reaches 30% of the Micro SD card space, the oldest ones will be overwritten by the new ones.
APP Update
Once there is a new App version released, your mobile system and the App will send an update notif ication. Follow the prompts
to update it.
Firmware Update
Firmware update can be achieved through OTA or memory card.
OTA Upgrading:
Once there is a new f irmware version published, the App will notify you that it is time to upgrade. Or you can open
APP - my VAVA - Update, click to detect the latest version, then follow the prompt to upgrade. Please backup your f iles in time
and format the memory card before and after upgrading.
Memory Card Upgrading:
Copy th e f irmware upgrading f ile into the memory card, insert the card into Dash Cam, and power on the Dash Cam.
It will upgrade automatically when the Dash Cam starts again. Please contact us at support@vava.com for the f irmware
upgrading f ile and more detailed instruction .
Notes: Don’t power off the Dash Cam during the upgrade. The Dash Cam will restart automatically after the f irmware is
successfully updated. Please contact us immediately if the update fails.
11/12
Page 8

FAQ
1. How to deal with a solid red LED indicator?
There are two reasons leading to this issues: no memory card or a memory card error.
Please install the card properly and format it via the app.
2. App cannot connect with the Dash Cam?
Make sure the Dash Cam is started and working well.
Make sure the phone is connected with the Dash Cam Wi-Fi successfully.
Dash Cam may crash if you connect and disconnect it too frequently. Reset it and try again.
For some Android phones, you may need to turn OFF the Mobile data to allow the App to connect the Dash Cam.
More connection issues, you may f ind answers in App FAQ or contact us at : support@vava.com .
3. With Android phone, the phone cannot access to the Internet once the App is connected.
Due to the features of android system, the mobile data is disabled once it is connected to the Wi-Fi of Dash Cam. If you want to
use mobile data, please disconnect the Wi-Fi f irst. The Dash Cam will still work properly when disconnected from the phone.
4. The Dash Cam crashed or malfunction occurs?
Please reset the Dash Cam or contact us immediately.
5. Fail to view and playback videos and photos on your phone ?
Check on your smartphone if Wi-Fi is successfully connected to the Dash Cam.
6. Cannot record ?
Check if the memory card is inserted properly and there is enough free capacity.
7. Forget about the password or get a wrong password notif ication ?
Press and hold the Reset Button for approx. 3s and the device will restore the WiFi password to factory settings (12345678).
Note: Please send us your feedback through the App or contact us at support@vava.com if you have further questions,
our technical team will assist you to solve them.
Customer Service
18-month Warranty
Life-time Support
E-mail: support@vava.com
Tel: 1-888-456-8468 (Monday-Friday: 9:00 – 17:00 PST)
Social Media: @LetsVAVA Facebook / Twitter / Instagram
13/14
Page 9

Notices
FCC Compliance
This device complies with Part 15 of the FCC Rules: Operation is subject to the following two conditions:
1. This device may not cause harmful interference and
2. This device must accept any interference that is received, including any interference that may cause undesired operation.
This device is acting as slave and operating in the 2.4 GHz (2412 ~2462 MHz) band. Ad Hoc function is supported but not able to
operate on non-US frequencies.
NOTE: This equipment has been tested and found to comply with the limits for a Class B digital device, pursuant to part 15 of the
FCC Rules.
These limits are designed to provide reasonable protection against harmful interference in a residential installation. This equipment
generates uses and can radiate radio frequency energy and, if not installed and used in accordance with the instructions, may cause
harmful interference to radio communications. However, there is no guarantee that interference will not occur in a particular
installation.
If this equipment does cause harmful interference to radio or television reception, which can be determined by turning the
equipment off and on, the user is encouraged to try to correct the interference by one or more of the following measures:
- Reorient or relocate the receiving antenna.
- Increase the separation between the equipment and receiver.
-Connect the equipment into an outlet on a circuit different from that to which the receiver is connected.
-Consult the dealer or an experienced radio/TV technician for help
Changes or modifications not expressly approved by the party responsible for compliance could void the user's authority to
operate the equipment.
RF Exposure Warning Statements:
This equipment complies with FCC radiation exposure limits set forth for an uncontrolled environment.
This equipment shall be installed and operated with minimum distance 20cm between the radiator & body.
Page 10

www.vava.com
 Loading...