

Page 1

VA-VD002 说明书设计
尺寸:78 x 130 mm
装订成册
材质:128克铜版纸,内页80g书写纸
Page 2

www.vava.com
NORTH AMERICA
E-mail: support@vava.com
Tel: (408) 409-1519
(Monday-Friday: 9:00 – 17:00 PST)
US Importer: SUNVALLEYTEK INTERNATIONAL INC.,
Address: 4674 Lakeview Blvd, Fremont, CA 94538
EUROPE
E-mail:
support.uk@vava.com(UK)
support.de@vava.com(DE)
support.fr@vava.com(FR)
support.es@vava.com(ES)
support.it@vava.com(IT)
EU Importer: ZBT International Trading GmbH
Address: Halstenbeker Weg 98C, 25462 Rellingen, Deutschland
ASIA PACIFIC
03-5542-0238(10-17時/土日祝除く)
JP Importer: 株式会社SUNVALLEY JAPAN
Address: 〒104-0032 東京都中央区八丁堀3丁目18-6 PMO京橋東9F
MANUFACTURER
Shenzhen NearbyExpress Technology Development Co.,Ltd.
Address: 333 Bulong Road, Shenzhen, China, 518129
Learn more about the EU Declaration of
Conformity: https://www.vava.com/downloads-VA-VD002-CE-Cert.html
VA-VD002
MADE IN CHINA
DASH CAM USER MANUAL
Please read this manual before operating your device and keep it for future reference.
Page 3

CONTENTS
English
Deutsch
Français
Español
Italiano
日本語
01/15
16/31
32/47
48/63
64/78
79/94
Page 4
EN
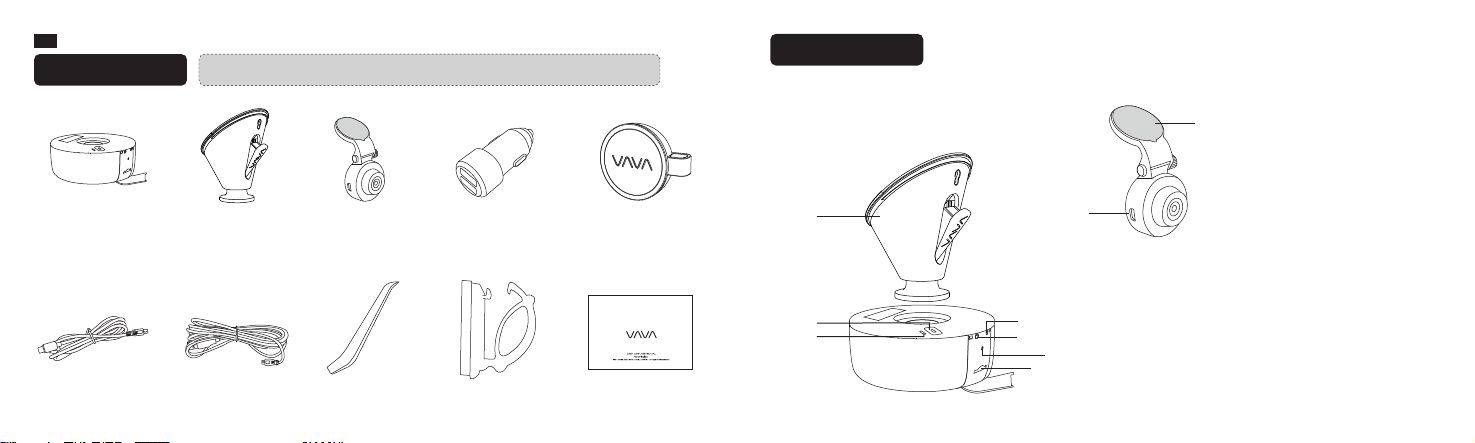
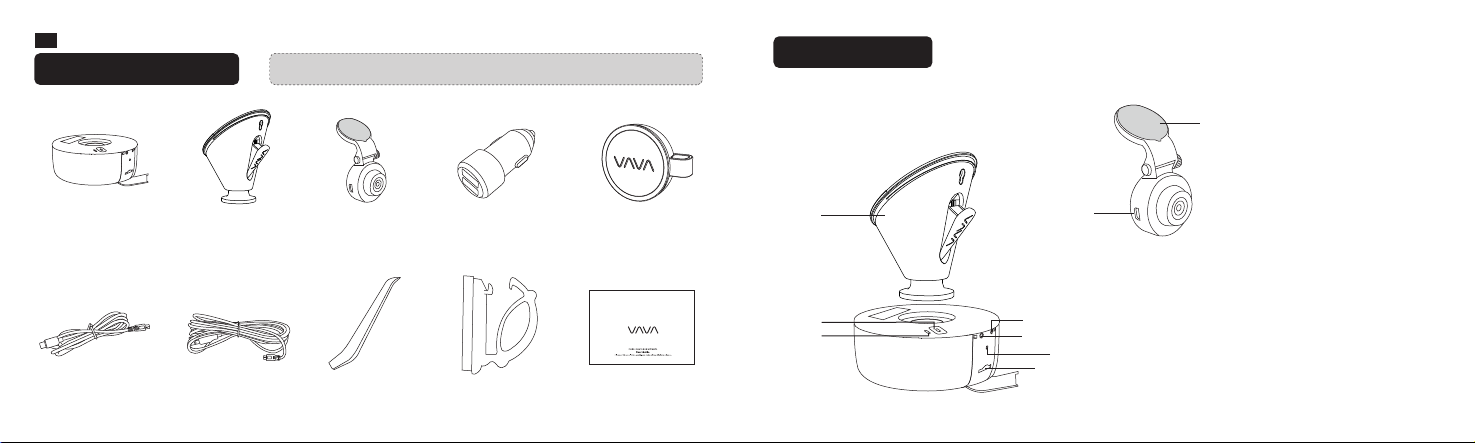
What’s in the Box
Product Diagram
Note: The package contents may vary according to dierent orders.
⑧
VAVA Dash Cam Mount Car Charger Snapshot Button
Charging Cable Crowbar Cable Clips
Rear Camera
Connecting Cable
Rear Camera
User Manual
①
②
③
④
⑤
⑦
⑥
⑨
1. Car Mount
2. Micro USB Port
3. Type-C Port
4. Power / Working Status LED
5. WiFi Status LED
6. Reset Button
7. Micro SD Card Slot
8. Sticker
9. Mini USB Port
01/02
Page 5

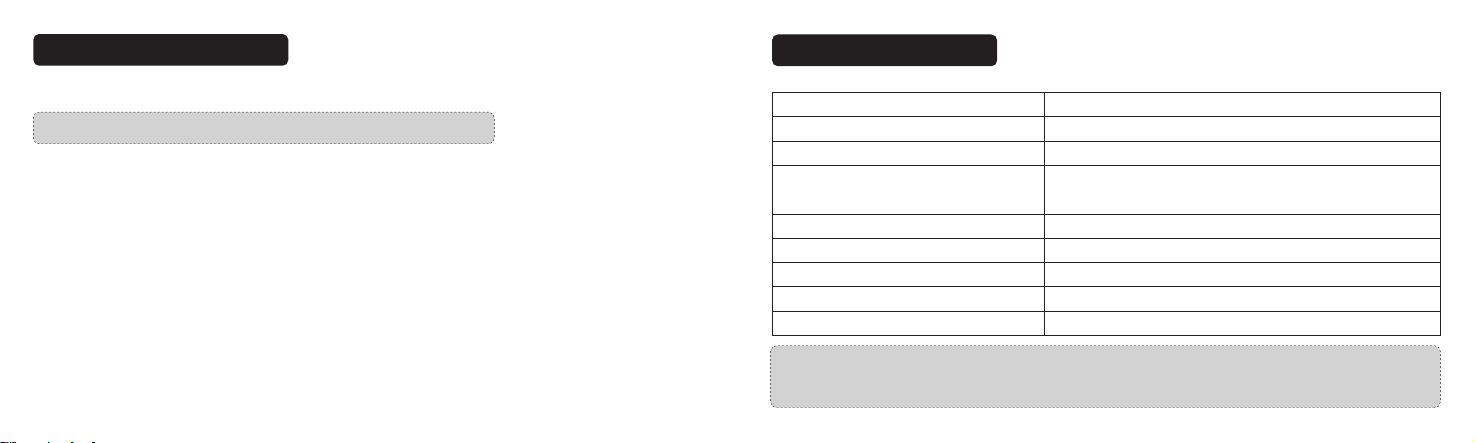
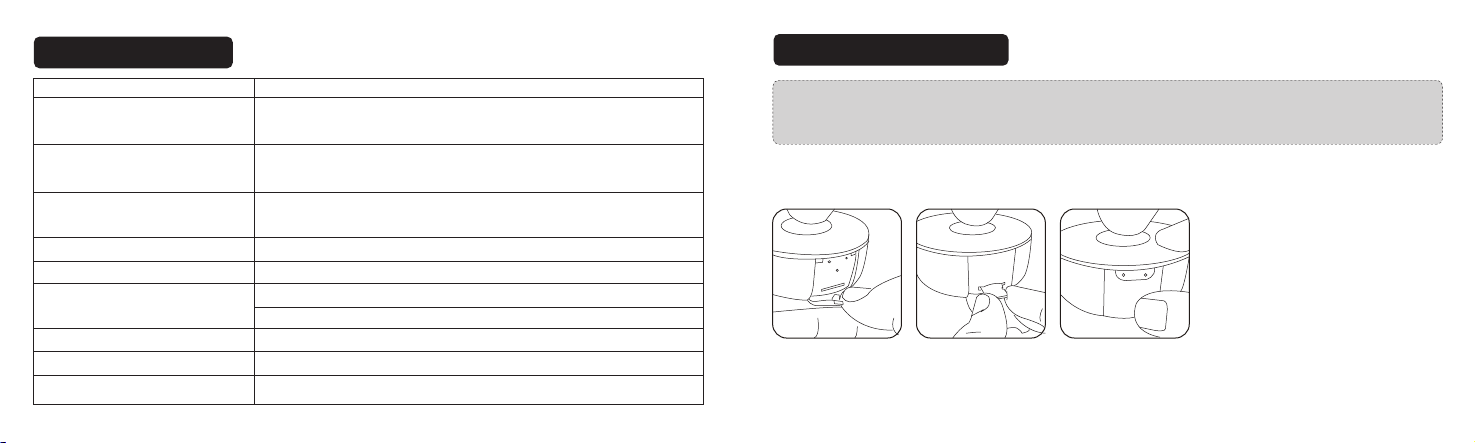
Product Specifications
Memory Card Installation
CPU
Camera Sensor
Lens (FOV)
Max Video Resolution
G-sensor
Video Clip / Photo Format
Wireless Connections
Power Input
Built-in Battery Capacity
Operating Temperature
NT96663
Sony IMX307(Front Camera)
Sony IMX323 (Rear Camera)
Full 6G +1 IR Lens (155°)
Full 4G+1 IR Lens (126°)
1920*1080@60FPS
1280*720@30FPS
3-axis Accelerometer
MP4 / JPG
Wi-Fi(between smart phone and Dash Cam)
Bluetooth(between Snapshot Button and Dash Cam)
5V-1.5A
320mAh
-10°C~50°C / 14°F~122°F
Note:
1. Don’t install or remove the TF card when the dash cam is powered on to avoid breakage of the card.
2. Please format the TF card regularly for better using experiences. Remember to backup your f iles
before the formatting.
For reliable operation, please use a Class 10 microSD/TF card with a capacity of 32GB, 64GB or 128GB.
Brands Recommended:Sandisk / Kingston / Samsung / Transcend
① Insert a card with the gold contacts facing the downside of the Dash Cam.
Push the card until it clicks into place.
② To remove the card, gently push it until it clicks and pull it out of the slot.
03/04
Page 6
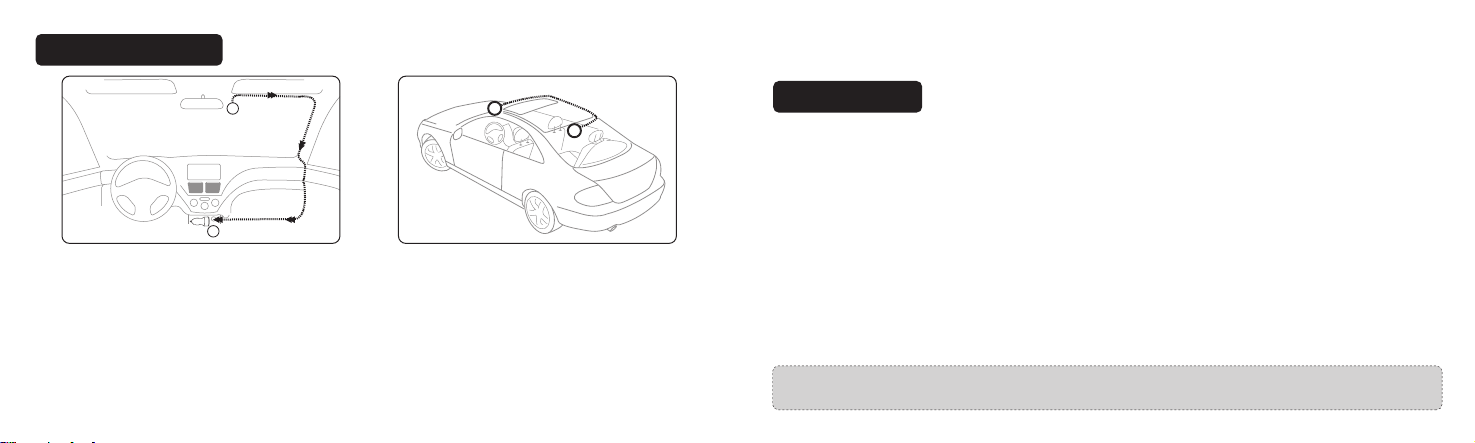
Dash Cam Installation
7. Adjust the dash cam to keep the lens level with the ground.
8. Start the car engine to check if the dash cam is working properly.
1
2
A
B
1. Turn off the car engine.
2. Stick the car mount onto your car windshield (ideally right in the middle).
3. Fix the VAVA Dash Cam onto the mount via the magnet.
4. Connect the USB cable to the micro USB port of the dash cam. Run the cable along the edge of the
windshield, tuck it away in the seams, and extend it all the way to the USB port of the Car Charger.
Be sure to keep it away from the airbag area.
5. Insert the Car Charger into your cigarette lighter, connect the Dash Cam to the Car Charger.
6. Plug the rear camera connecting cable into the rear camera connecting port, and install the rear
camera properly.
Snapshot Button
Dash Cam and Snapshot Button Pairing
Dash Cam and Snapshot Button Pairing: Once the dash cam is turned on, press and hold the Snapshot
Button for 5 -20 seconds until you hear 4 beep sounds and they are synced.
Installing the Snapshot Button
① Install the Snapshot Button onto the steering wheel with the 3M sticker.
② Install it on the key ring or no installation is applied (Pay attention not to miss it).
Using the Snapshot Button
① Taking photos: Press once to take photos
② Taking short videos: Press and hold for 3 seconds with a beep sound to take videos.
Replacing the battery:
Batterry Model:Lithuim Battery CR 2032 3V
Replace the battery: Open the Bluetooth Button and put the battery inside with the right polarities.
Notes:The Snapshot Button enters standby mode once there is no operation in 1 minute.
Press again to restart and take a photo.
05/06
Page 7
VAVA Dash Cam App Download
Please search ‘VAVA Dash’ in App Store or Google Play to download the App.
Note: Systems supported: Android 4.4 and above / iOS 8.0 and above.
Connect Dash Cam with Smartphone
1. Turn on Wi-Fi on your phone
2. Find the “VAVA_XXXXXXXXXXXX” in the Wi-Fi list and connect it, enter the password
(initial password: 12345678)
3. Open the VAVA Dash App and follow the instruction to complete the connection.
Using Your VAVA Dash Cam
LED Indicator information
LED Indicator
Blue LED light slowly blinks
Blue LED light solid on
Red LED light blinks
Red LED light solid on
Red LED light flashes once
White LED light on
White LED light off
Blue LED light and red LED light solid on
Blue LED light solid on:Please reset the dash cam and format the TF card.
Red LED light solid on:Please install the TF card properly to ensure its functionality and format it.
Blue LED light and red LED light solid on:Please reset the dash cam.
Dash Cam Status
Working
Stop working / microSD card storage full
Recording an emergency video clip /a manual video clip taken
by app or snapshot button
MicroSD card error
Taking a photo by app or snapshot button
Mobile phone connected to Wi-Fi
Mobile phone disconnected from Wi-Fi
The Dash Cam Crashed
07/08
Page 8

Videos and Photos / Media Gallery
Videos
Automatic Recording: Video recording is automatically activated once the car is started
Manual Recording: A default 20-second video footage will be recorded through the app or the Snapshot
Button.
Emergency Recording: A video footage is generated once a collision or bump is detected through the
G-sensor during driving or in parking monitor mode.
Photos
The photos can be taken by the Snapshot button or you can just tapping the snapshot icon in the app to
take a photo.
Media Gallery
1. View the videos and photos in the Media Gallery of the App.
2. You can take out the memory card and view the videos and photos on computer.
Downloading to mobile phone
After successfully connected with the dash cam, enter App->Media Gallery to download and save the
photos and videos on your phone.
Features
Parking Mode
When your car is not running, i.e. engine being shut down, the dash cam will automatically power off in 10
seconds and enter Parking Mode. When a shock or crash is detected, the G-Sensor will activate the dash
cam and start recording a 15-second video. The dash cam will then re-enter the Parking Mode.
Emergency Recordings
A 20-second video will be captured when the G-Sensor is activated in case of sharp turns or a sudden stop.
When the capacity of these videos reaches 30% of the SD card space, the oldest ones will be overwritten
by the new ones.
Real-time Path
Display the real-time driving path
Note: Phones with android system can’t preview the real-time path due to its feature of unable to use
mobile data when Wi-Fi is connected.
09/10
Page 9
Travel Log
Record the driving path of your journey. Upload photos to create travel log and share to your social media
(GPS module is not included in the package).
Notes:
1. The APP and f irmware will be updated regularly, the features may change a little after the update.
2. Do not attempt to repair, dismantle, or modify the dash cam by yourself.
Firmware / APP Update
Memory Card Upgrading
Copy the f irmware upgrading f ile into the memory card, insert the card into dash cam, and power the dash
cam, it will upgrade automatically until the dash cam restart again. Please contact us at support@vava.com
for the f irmware upgrading f ile and more detailed instruction .
Notes:
Don’t power o the dash cam during the upgrading. The dash cam will restart automatically after the
f irmware is successfully updated. Please contact us immediately if the update failed.
APP Update
Once there is a new App version released, your mobile system and the App will send a update notif ication.
Follow the prompts to update it.
Firmware Update
Firmware update can be achieved through OTA or memory card.
OTA Upgrading
Once there is a new f irmware version published, App will prompt to ask for upgrading. Or you can open
APP - my VAVA - Update, click to detect the latest version, then follow the prompt to upgrade.
Please backup your f iles in time and format the memory card before and after upgrading.
FAQ
1. How to deal with a solid red LED indicator?
There are reasons leading to this issues: no memory card or memory card error.
Please install the card properly and format it to FAT32 with your computer or App.
2. App cannot connect with the dash cam?
Make sure the dash cam is started and working well.
Make sure the phone is connected with the dash cam Wi-Fi successfully.
Dash cam may crash if you connect and disconnect it too frequently, just reset it and try again.
11/12
Page 10

For some Android phone, you may need to turn OFF the Mobile data to allow the App to connect the dash cam.
More connection issues, you may f ind answers in App FAQ or contact us at : support@vava.com .
3. With Android phone, the phone cannot access to the Internet once the App is connected.
Due to the features of android system, the mobile data is disabled once it is connected to the Wi-Fi of dash
cam. If you want to use the mobile data, please disconnect the Wi-Fi f irst. The dash cam will still work
properly when disconnected with the phone.
4. The dash cam crashed or malfunction occurs?
Please reset the dash cam or contact us immediately.
5. Fail to view and playback videos and photos on your phone ?
Check on your smartphone if Wi-Fi is successfully connected to the dash cam.
6. Cannot record ?
Check if the memory card is inserted properly and there is enough free capacity.
7. Forget about the password or get a wrong password notif ication ?
Please contact us to refresh the f irmware to reset the password.
Note: Please send us your feedback through the App or contact us at support@vava.com if you have
further questions, our technical team will assist you to solve them.
Customer Service
18-month Warranty
Life-time Support
E-mail::support@vava.com
Tel: (408) 409-1519 (US) Mon-Fri 9:00am-5:00pm PST
Social Media: @LetsVAVA fb/Tiw /Ins
Product Link:https://www.vava.com/caraccessories-dash-cam/VA-CD001-3BF0325777F6
13/14
Page 11
DE
Das ist im Lieferumfang
Anmerkung: Der Lieferumfang kann je nach Bestellung variieren.
Produktabbildung
⑧
VAVA Dashcam Halterung Rückfahrkamera Schnappschussknopf
Rückfahrkamera-
Aufladekabel Mini-Stemmeisen Kabelclips
Verbindungskabel
Autoladegerät
Bedienungsanleitung
①
②
③
④
⑤
⑦
⑥
⑨
1. Autohalterung
2. Micro-USB-Anschluss
3. Type-C Port
4. Betriebs- / Status-LED
5. WLAN-Status-LED
6. Reset-Knopf
7. Micro-SD-Kartenschacht
8. Aufkleber
9. Mini-USB-Anschluss
15/16
Page 12
Produktspezifikationen
Einsetzen der Speicherkarte
CPU
Kamerasensor
Objektiv (FOV)
Max. Videoauflösung
G-sensor
Videoclip- / Fotoformat
Drahtlose Verbindungen
Leistungsaufnahme
Eingebaute Batteriekapazität
Betriebstemperatur
NT96663
Sony IMX307( Vordere Kamera )
Sony IMX323 ( Rückfahrkamera )
Volle 6G + 1-IR-Linse (155°)
Volle 4G + 1 IR-Linse (126°)
1920*1080@60FPS
1280*720@30FPS
3-Achsen-Beschleunigungsmesser
MP4 / JPG
WLAN (zwischen Smartphone und Autokamera)
Bluetooth (zwischen Snapshot-Taste und Autokamera )
5V-1.5A
320mAh
-10°C~50°C / 14°C~122°F
Anmerkung:
1. Legen Sie die TF-Karte weder ein noch nehmen Sie sie heraus, wenn die Dashcam eingeschaltet ist,
um eine Beschädigung der Karte zu vermeiden.
Für zuverlässigen Betrieb benutzen Sie bitte eine Class 10 MicroSD-/TF-Karte mit einer Kapazität von
32GB, 64GB oder 128GB. Empfohlene Marken: Sandisk / Kingston / Samsung / Transcend
① Legen Sie eine Karte mit den Goldkontakten nach unten in die Dashcam ein. Drücken Sie die Karte hinein,
bis sie einrastet.
① Legen Sie eine Karte mit den Goldkontakten nach unten in die Dashcam ein. Drücken Sie die Karte hinein,
bis sie einrastet.
17/18
Page 13

Montage der Dashcam
7. Passen Sie die Bindestrichnocke an, um das Objektiv auf Bodenhöhe zu halten.
8. Starten Sie den Automotor, um zu prüfen, ob die Dash-Nocke ordnungsgemäß funktioniert.
1
2
A
B
1. Schalten Sie den Automotor aus.
2. Kleben Sie die Autohalterung an die Windschutzscheibe Ihres Autos (idealerweise in die Mitte).
3. Befestigen Sie die VAVA Dashcam mit Hilfe des Magneten in der Halterung.
4. Schließen Sie das USB-Kabel am Micro-USB-Anschluss der Dashcam an. Legen Sie das Kabel entlang
des Rands der Windschutzscheibe, verstecken Sie es in den Nähten und führen Sie es ganz bis zum
USB-Anschluss des Autoladegeräts. Führen Sie es nicht durch die Airbagzonen.
5. Stecken Sie das Autoladegerät in den Zigarettenanzünder und schließen Sie die Dashcam am Autoladegerät an.
6. Schließen Sie das hintere Kamera-Verbindungskabel an den hinteren Kamera-Anschluss an und installieren Sie die
hintere Kamera ordnungsgemäß.
Schnappschussknopf
Koppeln von Dashcam und Schnappschussknopf
Koppeln von Dashcam und Schnappschuss-Knopf: Halten Sie den Schnappschuss-Knopf 5 - 20 Sekunden
lang gedrückt, sobald die Dashcam eingeschaltet ist, bis Sie 4 Pieptöne hören und beide synchronisiert sind.
Montage des Schnappschuss-Knopfs
① Befestigen Sie den Schnappschussknopf mithilfe des 3M-Klebers am Lenkrad.
② Befestigen Sie ihn am Schlüsselbund oder befestigen Sie ihn gar nicht (passen Sie aber auf, ihn nicht zu verlieren).
Verwendung des Schnappschussknopfs
① Fotos aufnehmen: Einmal drücken, um Fotos zu schießen.
② Kurze Videos aufnehmen: 3 Sekunden lang bis zum
Piepton gedrückt halten, um Videos aufzunehmen.
Austauschen der Batterie:
Batterie-Modell:Lithium-Batterie CR 2032 3V
Austauschen der Batterie: Öffnen Sie den Bluetooth-Knopf und legen Sie dann die Batterie mit der korrekten Polung ein.
Anmerkung:Der Schnappschussknopf wechselt in den Standbymodus, wenn er 1 Minute lang nicht
benutzt wird. Drücken Sie ihn erneut, um ihn wieder zu aktivieren und ein Foto schießen zu können.
19/20
Page 14
VAVA Dash Cam App
Bitte suchen Sie im App Store oder im Google Play Store nach "VAVA Dash", um die App herunterzuladen.
Anmerkung: Unterstützte Betriebssysteme: Android 4.4 und höher / iOS 8.0 und höher
Verbinden der Dashcam mit dem Smartphone
1. Schalten Sie WLAN auf Ihrem Handy ein.
2. Suchen Sie in der WLAN-Liste nach "VAVA_XXXXXXXXXXXX" und verbinden Sie sich damit; geben Sie das
Passwort ein. (Standardpasswort: 12345678)
3. Öffnen Sie die VAVA Dash App und folgen Sie den Anweisungen, um die Verbindung fertigzustellen.
Benutzung Ihrer VAVA Dashcam
LED-Anzeigeinformation
LED-Anzeige
Die blaue LED blinkt langsam
Die blaue LED leuchtet konstant
Die rote LED blinkt
Die rote LED leuchtet konstant
Die rote LED blinkt einmal auf
Die weiße LED ist an
Die weiße LED ist aus
Die blaue und die rote LED leuchten konstant
Die blaue LED leuchtet konstant:Bitte setzen Sie die Dashcam zurück und formatieren Sie die TF-Karte.
Die rote LED leuchtet konstant:Bitte setzen Sie die TF-Karte korrekt ein, um deren Funktionalität zu
gewährleisten, und formatieren Sie sie.
Dashcam-Status
Am Arbeiten
Betrieb gestoppt / MicroSD-Kartenspeicher voll
Aufnahme eines Notfallvideoclips / eines manuellen Videoclips,
initiiert durch die App oder den Schnappschussknopf
MicroSD-Kartenfehler
Aufnahme eines Fotos durch App oder Schnappschussknopf
Handy verbunden mit WLAN
Handyverbindung zum WLAN getrennt
Die Dashcam ist abgestürzt
21/22
Page 15

Videos und Fotos / Mediengalerie
Videos
Automatische Aufnahme: Die Videoaufnahme wird automatisch gestartet, sobald das Auto angelassen wird.
Manuelle Aufnahme: Eine standardmäßige 20-sekündige Videoaufnahme wird durch die App oder den
Schnappschussknopf aufgenommen. Notfallaufnahme: Es wird eine Videoaufnahme erstellt, sobald eine
Kollision oder ein Ruck durch den G-Sensor während des Fahrens oder im Parküberwachungsmodus erfasst
wurde.
Fotos
Fotos können mithilfe des Schnappschussknopfs aufgenommen werden oder, indem Sie das
Schnappschuss-Symbol in der App antippen.
Mediengalerie
1. Sehen Sie sich die Videos und Fotos in der Mediengalerie der App an.
2. Sie können die Speicherkarte auch herausnehmen und sich die Videos und Fotos auf einem Computer
ansehen.
Herunterladen aufs Handy
Nach erfolgreicher Verbindung mit der Dashcam können Sie in der App auf "Media Gallery" gehen, um Fotos
und Videos auf Ihr Handy herunterzuladen und zu sichern.
Funktionen
Park-Modus
Wenn Ihr Auto nicht läuft, d.h. wenn der Motor aus ist, schaltet sich die Dashcam automatisch nach 10
Sekunden aus und wechselt in den Park-Modus. Sobald eine Erschütterung oder ein Unfall registriert wird,
aktiviert der G-Sensor die Dashcam und startet eine 15-sekündige Videoaufnahme. Danach wird die
Dashcam wieder in den Park-Modus zurückkehren.
Notfallaufnahmen
Es wird ein 20-sekündiges Video aufgenommen, wenn der G-Sensor im Falle von scharfen Drehungen oder
plötzlichen Stopps aktiviert wird. Wenn die Größe dieser Videos 30% des SD-Kartenspeichers füllt, werden
die ältesten von den neuen überschrieben.
Echtzeitroute
Zeigt die Echtzeit-Fahrroute an.
Anmerkung: Handys mit Android-Betriebssystem können die Echtzeitroute nicht anzeigen, da sie keine
mobilen Daten nutzen können, wenn sie per WLAN verbunden sind.
23/24
Page 16

Reiseprotokoll
Zeichnet die Fahrroute Ihrer Reise auf. Laden Sie Fotos hoch, um ein Reiseprotokoll zu erstellen und über
Social Media zu teilen(GPS-Modul ist nicht im Lieferumfang enthalten).
Anmerkungen:
1. Die APP und die Firmware werden regelmäßig aktualisiert; die Funktionen können sich
dementsprechend nach Aktualisierungen etwas verändern.
2. Versuchen Sie nicht, die Dashcam selbst zu reparieren, auseinanderzubauen oder zu modif izieren.
Firmware- / APP-Aktualisierung
Speicherkarte vor und nach der Aktualisierung.
Aktualisierung per Speicherkarte
Kopieren Sie die Firmware-Aktualisierungsdatei auf die Speicherkarte, stecken Sie die Speicherkarte in die
Dashcam und schalten diese dann ein. Das Update verläuft automatisch, bis sich die Dashcam neustartet.
Bitte kontaktieren Sie uns für die Firmware-Aktualisierungsdatei und detailliertere Anweisungen unter
support@vava.com.
Anmerkungen: Schalten Sie die Dashcam während des Aktualisierungsvorgangs nicht aus. Die Dashcam
startet automatisch neu, nachdem die Firmware erfolgreich aktualisiert wurde. Bitte kontaktieren Sie uns
umgehend, wenn die Aktualisierung fehlgeschlagen ist.
APP-Aktualisierung
Sobald eine neue App-Version veröffentlicht wird, zeigt Ihnen Ihr Handysystem und die App eine
Update-Benachrichtigung an. Befolgen Sie zum Aktualisieren die Anweisungen.
Firmware-Aktualisierung
Firmware-Updates können mithilfe von OTA oder der Speicherkarte vorgenommen werden.
Aktualisierung per OTA
Sobald eine neue Firmware-Version veröffentlich wird, zeigt Ihnen die App eine Anfrage zum Aktualisieren an.
Oder Sie öffnen die App - my VAVA - Update; tippen Sie, um die aktuellste Version zu finden und folgen Sie
dann den Anweisungen zum Aktualisieren. Bitte sichern Sie Ihre Dateien rechtzeitig und formatieren Sie die
FAQ
1. Was sollte ich bei einer konstant leuchtenden roten LED-Anzeige tun?
Es gibt Ursachen, die zu diesem Problem führen: keine Speicherkarte oder Speicherkartenfehler.
Bitte legen Sie die Karte korrekt ein und formatieren Sie sie mit Ihrem Computer oder der App auf FAT32.
2. Die App kann sich nicht mit der Dashcam verbinden?
Stellen Sie sicher, dass die Dashcam an ist und richtig funktioniert.
Vergewissern Sie sich, dass sich das Handy erfolgreich mit dem Dashcam-WLAN verbunden hat.
Die Dashcam könnte abstürzen, wenn Sie sich zu häufig verbinden und die Verbindung wieder trennen;
25/26
Page 17

setzen Sie sie zurück und versuchen Sie es dann erneut. Bei manchen Android Handys müssen Sie die
mobilen Daten AUSSCHALTEN, damit sich die App mit der Dashcam verbinden kann.
Bei weiteren Verbindungsproblemen finden Sie vielleicht in der App FAQ Antworten oder Sie kontaktieren
uns unter: support@vava.com .
3. Mein Android Telefon kann nicht auf das Internet zugreifen, sobald es mit der App verbunden ist.
Durch die Eigenart des Android Betriebssystems werden die mobilen Daten deaktiviert, sobald es mit dem
WLAN der Dashcam verbunden ist. Wenn Sie mobile Daten nutzen wollen, trennen Sie bitte zuerst die
Verbindung zum WLAN. Die Dashcam funktioniert weiterhin ordnungsgemäß, auch wenn die
Handyverbindung getrennt wird.
4. Die Dashcam ist abgestürzt oder es ist eine Fehlfunktion aufgetreten?
Bitte setzen Sie die Dashcam zurück oder kontaktieren Sie uns umgehend.
5. Das Anzeigen und Abspielen von Videos und Fotos auf Ihrem Telefon ist fehlgeschlagen?
Überprüfen Sie, ob Ihr Smartphone erfolgreich mit dem Dashcam-WLAN verbunden ist.
6. Sie können nichts aufnehmen?
Überprüfen Sie, ob die Speicherkarte richtig eingelegt ist und ob genügend freier Speicherplatz zur
Verfügung steht.
7. Sie haben das Passwort vergessen oder Ihnen wird die Benachrichtigung "Wrong Password" angezeigt?
Bitte kontaktieren Sie uns, um die Firmware zu aktualisieren und das Passwort zurückzusetzen.
Anmerkung: Bitte schicken Sie uns Ihr Feedback über die App zu oder kontaktieren uns unter
support@vava.com, wenn Sie weitere Fragen haben; unser Technikteam wird Ihnen gerne bei der
Problemlösung helfen.
Kundenservice
18 Monate Garantie
Lebenslanger Support
E-Mail:support@vava.com
Tel: (408) 409-1519 (US) Mon-Fri 9:00am-5:00pm PST
Social Media: @LetsVAVA fb/Tiw /Ins
Produkt-Link:https://www.vava.com/caraccessories-dash-cam/VA-CD001-3BF0325777F6
27/28
Page 18

FR
Dans la boîte
Schéma produit
Note: Le contenu de la boîte peut varier selon les commandes.
⑧
Dash Cam VAVA Support Chargeur voiture Bouton
Câble de Charge Barre-levier Pinces de câbles
Câble de Connexion
de Caméra de Recul
Rückfahrkamera
Guide utilisateur
①
②
③
④
⑤
⑦
⑥
⑨
1. Support voiture
2.Port Micro USB
3. Port de Type-C
4. LED de statut de fonctionnement
5. LED de statut de WiFi
6. Bouton Reset
7. Emplacement de carte Micro SD
8. Autocollant
9. Mini port USB
29/30
Page 19

Product Spécif ications
Installation de la carte
CPU
Capteur de la Caméra
Lens (FOV)
Résolution Vidéo Maximale
G-capteur
Clip Vidéo / Format Photo
Connexions sans Fil
Entrée d'Alimentation
Capacité de la Batterie Intégrée
Température de fonctionnement
NT96663
Sony IMX307(Caméra Frontale)
Sony IMX323 ( Caméra Arrière )
Full 6G +1 IR Lens (155°)
Full 4G+1 IR Lens (126°)
1920*1080@60FPS
1280*720@30FPS
Accéléromètre 3-axes
MP4 / JPG
Wi-Fi (entre Smartphone et Dash Cam)
Bluetooth ( entre Bouton Snapshot et Dash Cam)
5V-1.5A
320mAh
-10°C~50°C / 14°C~122°F
Note: 1. Ne pas installer ou sortir la carte mémoire lorsque la dash cam est allumée pour éviter de
corrompre la carte. 2. Veuillez formater la carte mémoire régulièrement pour une meilleure expérience
d’utilisation. Pensez à sauvegarder vos f ichiers avant le formatage.
Marques conseillées:Sandisk / Kingston / Samsung / Transcend
① Insérez une carte mémoire avec les contacts dorés orientés vers le bas de la dash cam. Poussez la carte
jusqu’à ce qu’elle fasse un clic et reste en place.
② Pour retirer la carte, appuyez dessus doucement pour entendre un clic et la déverrouiller pour la sortir.
31/32
Page 20

Installation de la Dash Cam
7. Ajustez la dashcam pour que l'objectif soit au même niveau que le sol.
8. Démarrez le moteur de la voiture pour vérifier si la dashcam fonctionne correctement.
1
2
A
B
1. Eteignez le moteur de la voiture.
2. Collez le support voiture sur votre pare-brise (idéalement au milieu).
3. Accrochez la Dash Cam VAVA sur le support avec l’aimant.
4. Branchez le câble USB au port micro USB de la dash cam. Déroulez le f il le long du bord du pare-brise,
glissez-le dans les joints et étirez-le jusqu’au port USB du Chargeur Voiture. Assurez-vous de le garder
éloigné de la zone des airbags.
5. Insérez le chargeur voiture dans votre port allume-cigare, branchez la Dash Cam au chargeur voiture.
6. Branchez le câble de connexion de la caméra de recul sur le port de connexion et installez correctement
la caméra de recul.
Bouton déclencheur
Appairage de la Dash Cam et du Bouton déclencheur
Appairage de la Dash Cam et du Bouton déclencheur: Une fois que la dash cam est allumée, appuyez et
maintenez le bouton déclencheur pendant 5 – 20 secondes jusqu’à entendre 4 bips sonores et ils seront
synchronisés.
Installation du bouton déclencheur
① Installez le bouton déclencheur sur le volant avec l’adhésif 3M.
② Attachez-le à votre trousseau de clés ou ne l’utilisez pas (faites attention à ne pas le perdre).
Utilisation du bouton déclencheur
① Capture de photos: Appuyez une fois pour prendre des photos
② Capture de courtes vidéos: Appuyez et maintenez pendant
3 secondes avec un bip sonore pour prendre des vidéos.
Remplacement de la pile:
Modèle de la pile:Pile Lithium CR 2032 3V
Changement de la pile: Ouvrez le bouton Bluetooth et placez la pile dedans en respectant les polarités.
Notes:Le bouton déclencheur passe en mode veille lorsqu’il n’est pas utilisé pendant 1 minute.
Appuyez à nouveau pour le relancer et prendre une photo.
33-34
Page 21

Téléchargement de l’appli VAVA Dash Cam
Veuillez rechercher « VAVA Dash » dans l’App Store ou Google Play pour télécharger l’application.
Note: Systèmes pris en charge: Android 4.4 et plus récent / iOS 8.0 et plus récent.
Connecter la Dash Cam avec le Smartphone
1. Activez le Wi-Fi sur votre smartphone
2. Trouvez “VAVA_XXXXXXXXXXXX” dans la liste de recherche Wi-Fi et connectez-vous, entrez le mot de
passe (par défaut: 12345678)
3. Ouvrez l’appli VAVA Dash Cam et suivez les consignes pour f inir l’appairage.
Utilisation de votre VAVA Dash Cam
Informations du témoin LED
Témoin LED
LED bleue clignotante doucement
LED bleue f ixe allumée
LED rouge clignotante
LED rouge f ixe allumée
LED rouge clignotante une fois
LED blanche allumée
LED blanche éteinte
LED bleue et rouge f ixes allumées
LED bleue allumée f ixe: Veuillez réinitialiser la dash cam et formater la carte mémoire.
LED rouge allumée f i xe:Veuillez installer la carte mémoire de manière appropriée pour assurer son
fonctionnement et la formater.
LED bleue et rouge allumées xes:Veuillez réinitialiser la Dash Cam
Statut de la Dash Cam
En fonctionnement
Arrêt du fonctionnement / stockage carte microSD rempli
Enregistrement d’une vidéo d’urgence / une vidéo manuelle
lancée par l’appli ou le bouton déclencheur
Erreur de carte microSD
Capture d’une photo par l’appli ou le bouton déclencheur
Téléphone connecté au Wi-Fi
Téléphone déconnecté du Wi-Fi
La Dash Cam a crashé
35/36
Page 22

Vidéos et Photos / Galerie médias
Vidéos
Enregistrement automatique: L’enregistrement vidéo est activé automatiquement lorsque la voiture est en
marche
Enregistrement manuel: Un enregistrement de 20 secondes par défaut est enregistré via l’appli ou le bouton
déclencheur
Enregistrement d’urgence: Une vidéo est générée lorsqu’une collision ou qu’un choc est détecté grâce à
l’accéléromètre, pendant la conduite ou en mode parking.
Photos
Les photos peuvent être prises avec le bouton déclencheur ou en touchant l’icône déclencheur dans l’application.
Galerie médias
1. Visualisez les vidéos et photos dans la Galerie Médias de l’appli.
2. Vous pouvez sortir la carte mémoire et visualiser les vidéos et photos sur votre ordinateur.
Chargement sur le téléphone mobile
Après avoir réussi l’appairage avec la dash cam, allez sur l’appli puis « Media Gallery » pour télécharger et
sauvegarder les photos et vidéos sur votre téléphone.
Fonctionnalités
Mode Parking
Lorsque la voiture n’est pas en marche, à l’extinction du moteur, la dash cam s’éteint automatiquement
après 10 secondes et passe en Mode Parking. Si un choc est détecté, l’accéléromètre active la dash cam et
enregistre une vidéo de 15 secondes. La dash cam repasse ensuite en mode Parking.
Enregistrements d’urgence
Une vidéo de 20 secondes sera enregistrée lorsque l’accéléromètre est déclenché par un virage brusque ou
un arrêt soudain. Lorsque la capacité de ces vidéos atteint 30% de la mémoire de la carte SD, les plus
anciennes seront écrasées par les récentes.
Trajectoire de conduite en temps réel
Aff iche la trajectoire de conduite en temps réel
Note: Les smartphones sous Android ne peuvent pas aff icher la trajectoire en temps réel car ils ne peuvent
utiliser les données mobiles en même temps que le Wi-Fi est connecté.
37/38
Page 23

Historique de voyage
Enregistrez les trajets de votre voyage. Chargez des photos pour créer un journal de voyage et partagez-le
sur les réseaux sociaux.
Notes:
1. L’appli et le logiciel sont mis à jour régulièrement, des options peuvent changer légèrement après la
mise à jour.
Mise à jour par la carte mémoire
Copiez le f ichier de mise à jour logicielle sur la carte mémoire, insérez la carte mémoire dans la dash cam et
allumez-la, la mise à jour se fera automatiquement puis la dash cam redémarrera. Veuillez nous contacter à
support@vava.com pour obtenir le f ichier de mise à jour et plus de détails sur la procédure.
Notes: Ne pas éteindre la dash cam pendant la mise à jour. La dash cam redémarre automatiquement
après la mise à jour. Veuillez nous contacter rapidement si la mise à jour échoue.
Mise à jour logiciel / application
Mise à jour de l’application
A la publication d’une nouvelle version de l’application, votre téléphone et l’appli vous enverront une
notif ication. Suivez les consignes pour mettre à jour.
Mise à jour du logiciel
La mise à jour logicielle peut se faire en OTA ou par la carte mémoire.
Mise à jour OTA
Lorsqu’une nouvelle version du logiciel est publiée, l’application vous demandera de le mettre à jour. Ou vous
pouvez ouvrir l’application – my VAVA – Mise à jour, cliquez pour détecter la dernière version, puis suivez les
consignes pour mettre à jour. Veuillez sauvegarder vos f ichiers à temps et formater la carte mémoire avant
et après la mise à jour.
FAQ
1. Que faire en cas de témoin LED rouge f i xe?
Plusieurs raisons sont possibles: pas de mémoire ou une erreur de carte mémoire. Veuillez installer la carte
de manière appropriée et la formater en FAT32 avec votre ordinateur ou l’application.
2. A L’application n’arrive pas à se connecter à la dash cam?
Assurez-vous que la dash cam est allumée et fonctionnelle. Assurez-vous que le téléphone est bien
appairé avec la dash cam en Wi-Fi. La Dash cam peut crasher si vous vous connectez et déconnectez
trop fréquemment, réinitialisez-la et réessayez. Pour certains utilisateurs Android, vous pouvez désactivez
les données mobiles pour permettre à l’application de se connecter à la dash cam. Pour plus de problèmes
de connexion, vous pouvez trouver plus de réponses dans la FAQ de l’application ou nous contacter
39/40
Page 24

à : support@vava.com.
3. Avec un smartphone sous Android, le smartphone n’arrive pas à accéder à Internet lorsque
l’application est connectée.
En raison des limitations du système Android, les données mobiles sont désactivées lorsque le Wi-Fi de la
dash cam est connecté. Si vous voulez utilisez les données mobiles, veuillez déconnecter d’abord le Wi-Fi.
La dash cam continuera à fonctionner en étant déconnectée du téléphone.
4. La dash cam a crashé ou ne fonctionne pas normalement?
Veuillez réinitialiser la dash cam ou nous contacter immédiatement.
5. Impossible de visualiser et lire les photos et vidéos sur votre smartphone?
Vérif iez que le Wi-Fi est bien connecté à la dash cam sur votre smartphone.
6. Impossible d’enregistrer?
Vérif iez que la carte mémoire est bien insérée et qu’elle dispose de suff isamment d’espace libre.
7. Mot de passe oublié ou notif ication de mot de passe erroné?
Veuillez nous contacter pour rafraîchir votre logiciel pour réinitialiser le mot de passe.
Note: Veuillez nous envoyer vos retours via l’application ou nous contacter à support@vava.com pour
toutes questions supplémentaires, notre équipe technique vous assistera pour les résoudre.
Service Client
Garantie 18-mois
Support à vie
E-mail::support@vava.com
Tel: (408) 409-1519 (US) Lun-Ven 9:00am-5:00pm PST
Réseaux sociaux: @LetsVAVA FB/Twitter/Instagram
Lien produit:https://www.vava.com/caraccessories-dash-cam/VA-CD001-3BF0325777F6
41/42
Page 25

ES
Lo que está en la caja
Diagrama del Producto
Nota: El contenido del paquete puede variar según los diferentes pedidos.
⑧
Cámara de Tablero Soporte Cargador de Coche Botón de Foto
Cable de Carga Palanca Clips para Cables
Cable de Conexión
de la Cámara Trasera
Cámara Frontal
Instantánea
Manual de Usuario
①
②
③
④
⑤
⑦
⑥
⑨
1. Soporte de Coche
2. Puerto Micro USB
3. Puerto Tipo-C
4. Indicador LED de Alimentación
/ Estado de funcionamiento
5. Indicador LED de estado de Wifi
6. Botón de Restablecimiento
7. Ranura para Tarjeta Micro SD
8. Pegatina
9. Mini Puerto USB
43/44
Page 26

Especif icaciones del Producto
Instalación de la Tarjeta de Memoria
UPC
Sensor de Cámara
Lente (FOV)
Resolución Máxima de Video
G-sensor
Video Clip / formato de foto
Conexiones Inalámbricas
Entrada de Energía
Capacidad de la Batería Incorporada
Temperatura de Operación
NT96663
Sony IMX307( Cámara Frontal )
Sony IMX323 ( Cámara Trasera )
Completa 6G +1 Lente IR (155 °)
Completa 4G +1 Lente IR (126 °)
1920*1080@60FPS
1280*720@30FPS
Acelerómetro de 3-ejes
MP4 / JPG
Wi-Fi (entre teléfono inteligente y Cámara de Tablero)
Bluetooth (entre botón de instantáneas y Cámara de Tablero )
5V-1.5A
320mAh
-10°C~50°C / 14°F~122°F
Notas: 1. No instale ni extraiga la tarjeta TF cuando la cámara de tablero esté encendida para evitar la
rotura de la tarjeta. 2. Formatee la tarjeta TF regularmente para tener mejores experiencias de uso.
Recuerde hacer una copia de seguridad de sus archivos antes del formateo.
Para una operación más confiable, utilice una tarjeta clase 10 MircoSD / TF con una capacidad de 32 GB,
64 GB o 128 GB. Marcas Recomendadas : Sandisk / Kingston / Samsung / Trascend
1. Inserte una tarjeta con los contactos dorados hacia la parte inferior de la Cámara de Tablero, empuje la
tarjeta hasta que encaje en su lugar.
2. Para retirar la tarjeta, presiónela suavemente hasta que encaje y extráigala de la ranura.
45/46
Page 27

Instalación de la Cámara de Tablero
7. Ajuste la cámara de tablero para mantener el nivel de la lente con el suelo.
8. Arranque el motor del automóvil para verificar si la tabla de tablero de instrumentos funciona correctamente.
1
2
A
B
1. Apague el motor del automóvil.
2. Pegue el soporte del coche en el parabrisas del coche (idealmente justo en el medio).
3. Fije la Cámara de Tablero de VAVA en el soporte a través del imán.
4. Conecte el cable USB al puerto micro USB de la cámara del tablero. Pase el cable por el borde del
parabrisas, guárdelo en las costuras, y extiéndalo hasta el puerto USB del cargador de coche. Asegúrese
de mantenerlo alejado de la zona de bolsas de aire.
5. Inserte el cargador del coche en el encendedor de cigarrillos, conecte la cámara al cargador del coche.
6. Enchufe el cable de conexión de la cámara trasera en el puerto de conexión de la cámara trasera e
instale la cámara trasera correctamente.
Botón de Fotografía Instantánea
Emparejamiento entre la Cámara y el Botón de Foto Instantánea
Emparejamiento entre la cámara y el botón de foto instantánea: una vez que se enciende la cámara del
tablero, mantenga presionado el botón foto instantánea durante 5 -20 segundos hasta que escuche 4
pitidos y se sincronicen.
Instalando el Botón de Foto Instantánea
1. Instale el Botón de Foto Instantánea en el volante con la pegatina 3M.
2. Instálelo en el llavero o no se completará la instalación (preste atención para no perderlo).
Utilizando el Botón de Foto Instantánea
1. Tomando fotos: Presione una vez para tomar fotos
2. Tomando vídeos cortos: Mantenga presionado por 3 segundos con un pitido para tomar vídeos
Nota: El Botón de Foto Instantánea entrá en el modo de espera si no hay ninguna operación en 1 minuto.
Presione nuevamente para reiniciar y tomar una foto.
Reemplazando la Batería:
Modelo de la Batería: Batería de Litio CR 2032 3V
Reemplace la batería: Abra el botón de bluetooth y coloque la batería dentro con las polaridades correctas.
47/48
Page 28

Descarga de la Aplicación de la Cámara de Tablero de VAVA
Por favor busque 'VAVA Dash' en App Store o Google Play para descargar la aplicación.
Nota: Solo compatible con sistemas operativos Android 4.4 y superiores / iOS 8.0 y superiores
Conecte la Cámara de Tablero al Smartphone
1. Encienda el Wi-Fi en su teléfono
2. Busque el "VAVA_XXXXXXXXXXXX" en la lista de Wi-Fi y conéctese, ingrese la contraseña
( contraseña inicial: 12345678 )
3. Abra la aplicación VAVA Dash y siga las instrucciones para completar la conexión.
Usar su Cámara de Tablero de VAVA
Información del Indicador LED
Indicador LED
LED azul parpadea lentamente
LED azul encendido
LED rojo parpadea
LED rojo encendido
LED rojo parpadea una vez
LED blanco encendido
LED blanco apagado
LED azul y LED rojo encendidos
LED Azul Encendido: Por favor reinicie la cámara de tablero y formatee la tarjeta TF.
LED Rojo Encendido: Por favor instale la tarjeta TF correctamente para garantizar su funcionalidad y formatearla.
LED Azul y LED rojo Encendidos: Por favor reinicie la cámara de tablero.
Estado de la Cámara
Trabajando
Deja de trabajar / almacenamiento lleno de tarjeta microSD
Grabando un vídeo clip de emergencia / vídeo clip manual
tomado por la aplicación o por el Botón de Foto Instantánea
Error de la tarjeta Micro SD
Tomando una foto por la aplicación o por el Botón de Foto Instantánea
Teléfono móvil conectado al Wi-Fi
Teléfono móvil desconectado del Wi-Fi
Se estrelló la cámara de tablero
49/50
Page 29

Vídeos y Fotos / Galería de Medios
Vídeos
Grabación Automática: la grabación de vídeo se activa automáticamente una vez que se inicie el automóvil.
Grabación Manual: se grabará un vídeo de 20 segundos a través de la aplicación o presionado el botón de
foto instantánea.
Grabación de Emergencia: Se generará un vídeo una vez que se detecte una colisión o choque a través del
sensor G durante la conducción o en el modo de monitoreo de estacionamiento.
Fotos
Las fotos se pueden tomar con el botón de foto instantánea o simplemente tocando el ícono de foto
instantánea en la aplicación.
Galería de medios
1. Vea los vídeos y las fotos en la galería multimedia de la aplicación.
2. Puede sacar la tarjeta de memoria y ver los vídeos y fotos en la computadora.
Descargando al Teléfono Móvil
Después de conectar con éxito la cámara de tablero, ingrese a App-> Galería Multimedia para descargar y
guardar las fotos y vídeos en su teléfono.
Características
Modo de Estacionamiento
Cuando su automóvil no está funcionando, es decir, el motor está apagado, la cámara de tablero se
apagará automáticamente en 10 segundos e Ingresará a modo de estacionamiento. Cuando se detecta
una colisión o un choque, el G-Sensor activará la cámara del tablero y comenzará a grabar un vídeo de 15
segundos. La cámara del tablero volverá a ingresar al modo de estacionamiento.
Grabaciones de Emergencia
Un vídeo de 20 segundos se grabará cuando el G-Sensor se activa en caso de curvas bruscas o una parada
repentina. Cuando la capacidad de estos vídeos alcanza el 30% del espacio de la tarjeta SD, los más
antiguos serán sobrescritos por los nuevos.
Ruta en Tiempo Real
Muestra la ruta de conducción en tiempo real.
Nota: Los teléfonos con sistema Android no pueden pre visualizar la ruta en tiempo real debido a su función
de no poder utilizar datos móviles cuando el Wi-Fi está conectado.
51/52
Page 30

Registro de Viaje
Registre la ruta de su viaje. Suba fotos para crear un registro de viaje y compartir en sus redes sociales.
Notas:
1. La aplicación y el rmware se actualizarán regularmente, las características pueden cambiar un poco
después de la actualización.
2. No intente reparar, desarmar o modicar la cámara de tablero usted mismo.
Actualización de Firmware / APP
Actualización de la App
Una vez que haya una nueva versión de la aplicación, su sistema móvil y la aplicación enviará una
notif icación de actualización. Siga las instrucciones para actualizarla.
Actualización de OTA
Una vez que haya una nueva versión del firmware publicada, la aplicación le pedirá para que lo actualice.
O también si desea, puede abrir el App e ir - my VAVA - Update, hacer clic para detectar la última versión,
luego seguir el mensaje para actualizarlo.
Haga una copia de seguridad de sus archivos a tiempo y formatee la tarjeta de memoria antes y
después de la actualización.
Actualización de la Tarjeta de Memoria.
Copie el archivo de actualización del firmware en la tarjeta de memoria, inserte la tarjeta en la cámara y
enciéndala, se actualizará automáticamente hasta que la cámara se reinicie nuevamente. Póngase en
contacto con nosotros en support @ vava.com para obtener el archivo de actualización de firmware y
obtener instrucciones más detalladas.
Nota: No apague la cámara de tablero durante la actualización. La cámara de tablero se reiniciará
automáticamente después de que el rmware se haya actualizado correctamente. Por favor contacte
con nosotros inmediatamente si la actualización falla.
Actualización de Firmware
La actualización del firmware se puede lograr a través de OTA o de la tarjeta de memoria.
FAQ
1. ¿Qué hacer contra a un indicador LED iluminado rojo?
53/54
Page 31

a. Estas son algunas de las razones que conducen a este problema: falta tarjeta de memoria o error en la
tarjeta de memoria. Instale la tarjeta correctamente y formatéela en FAT32 con su computadora o aplicación.
2. ¿La aplicación no se puede conectar con la cámara del tablero?
a. Asegúrese de que la cámara esté encendida y funcionando bien. Asegúrese de que el teléfono esté
conectado al Wi-Fi de la cámara exitosamente. La cámara puede bloquearse si la conecta y desconecta
con demasiada frecuencia, simplemente reiníciela y vuelva a intentarlo. Para algunos teléfonos Android,
es posible que tenga que desactivar los datos móviles para permitir que la aplicación se conecte a la
cámara de tablero. Más problemas de conexión, puede encontrar respuestas en la parte de preguntas
frecuentes de la aplicación o contactar con nosotros en: support @ vava.com .
3. Con el teléfono Android, el teléfono no puede acceder a Internet una vez que la aplicación está conectada.
a. Debido a las características del sistema Android, los datos móviles se desactivan una vez que están
conectados a la red Wi-Fi de la cámara. Si desea utilizar los datos móviles, primero desconecte el Wi-Fi.
La cámara de tablero aún funcionará correctamente cuando se desconecte con el teléfono.
4. ¿La cámara de tablero se apaga o se produce un mal funcionamiento?
a. Reinicie la cámara de tablero o contacte con nosotros inmediatamente.
5. ¿Falla de ver y reproducir vídeos y fotos en su teléfono?
a. Revise en su smartphone si el Wi-Fi está conectado exitosamente a la cámara de tablero.
6. ¿No se puede grabar?
a. Verifique si la tarjeta de memoria está insertada correctamente y si hay suficiente capacidad.
7. ¿ Olvide la contraseña o recibe una notificación de contraseña incorrecta?
a. Contacte con nosotros para actualizar el firmware y restablecer la contraseña.
Nota: Envíenos sus comentarios a través de la aplicación o contacte con nosotros a support@vava.com si
tiene más preguntas, nuestro equipo técnico le ayudará a resolverlas.
Servicio al Cliente
18 Meses de Garantía
Soporte de por Vida
E-mail: support@vava.com
Tel: (408) 409-1519 (EE. UU.) De Lunes a Viernes de 9:00 a.m. a 5:00 p.m. PST
Redes Sociales: @LetsVAVA fb / Tiw / Ins
Enlace del Producto: https://www.vava.com/caraccessories-dash-cam/VA-CD001-3BF0325777F6
55/56
Page 32

IT
Contenuto della Confezione
Schema del Prodotto
Nota: Il contenuto della confezione può variare in base agli ordini.
⑧
Dash Cam VAVA Supporto Caricabatterie
Cavo di Ricarica Palanchino Clip per cavo
Cavo di Collegamento
Telecamera Posteriore
Fotocamera Posteriore
per auto
Pulsante istantanea
Manuale Utente
①
②
③
④
⑤
⑦
⑥
⑨
1. Supporto per Auto
2. Porta Micro USB
3. Porta Tipo-C
4. LED di Accensione / Stato di
Funzionamento
5. LED Stato WiFi
6. Pulsante Reset
7. Alloggiamento Scheda Micro SD
8. Adesivo
9. Mini Porta USB
57/58
Page 33

Specif iche del Prodotto Installazione della Scheda di Memoria
CPU
Sensore della Fotocamera
Lenti (FOV)
Massima Video Risoluzione
G-sensore
Video Clip / Foto Formato
Wireless Connesioni
Ingresso di Alimentazione
Capacità della Batteria Integrata
Temperatura
NT96663
Sony IMX307(Fotocamera Frontale)
Sony IMX323 (Fotocamera Posteriore)
Completo 6G +1 IR Lenti (155°)
Completo 4G+1 IR Lenti (126°)
1920*1080@60FPS
1280*720@30FPS
3-assi Accelerometro
MP4 / JPG
Wi-Fi(tra smart phone e Dash Cam)
Bluetooth(tra Pulsante Snapshot e Dash Cam)
5V-1.5A
320mAh
-10°C~50°C / 14°F~122°F
Nota: 1. Non installare o rimuovere la scheda TF quando la dash cam è alimentata per evitare danni alla
scheda. 2. Formattare regolarmente la scheda TF per una migliore esperienza d’uso. Ricordarsi di
eettuare il backup dei propri f ile prima di formattare.
Per un funzionamento aff idabile, si prega di utilizzare una scheda microSD/TF Classe 10 con una capacità
di 32GB, 64GB o 128GB. Marche Consigliate:Sandisk / Kingston / Samsung / Transcend
① Inserire la scheda con i contatti dorati verso la parte bassa della Dash Cam.Premere la scheda fino a sentire
un click.
② Per rimuovere la scheda, tirarla fuori con delicatezza fino a sentire un click e rimuoverla dall’alloggiamento.
59/60
Page 34

Installazione della Dash Cam
7. Regolare la camma del cruscotto per mantenere il livello dell'obiettivo con il terreno.
8. Avviare il motore dell'auto per verificare se la camma del cruscotto funziona correttamente.
1
2
A
B
1. Spegnere il motore dell'auto.
2. Applicare il supporto per auto al parabrezza (preferibilmente nel mezzo).
3. Fissare la Dash Cam VAVA sul supporto con la calamita.
4. Collegare il cavo USB alla porta micro USB della dash cam. Far scorrere il cavo lungo il bordo del
parabrezza, nascondendolo nel bordo, e tirarlo completamente fino alla porta USB del Caricabatteria.
Assicurarsi di tenerlo lontana dalla zona d’azione dell’airbag.
5. Inserire il Caricabatteria nella presa accendisigari, collegare la Dash Cam al Caricabatteria.
6. Inserire il cavo di collegamento della telecamera posteriore nella porta di collegamento della telecamera
posteriore e installare la fotocamera posteriore in modo corretto.
Pulsante Istantanea
Accoppiamento di Dash Cam e Pulsante Istantanea
Accoppiamento di Dash Cam e Pulsante Istantanea: Una volta accesa la dash cam, premere e tenere
premuto il Pulsante Istantanea per 5-20 secondi fino a sentire 4 bip. A questo punto i dispositivi sono
sincronizzati.
Installare il Pulsante Istantanea
① Installare il Pulsante Istantanea sul volante con l’adesivo 3M.
② Installarlo sull’anello portachiavi oppure non potrà essere installato (Fare attenzione a non perderlo).
Utilizzare il Pulsante Istantanea
① Scattare fotografie: Premere una volta per scattare fotografie.
② Girare brevi video: Premere e tenere premuto per 3 secondi
con un bip per riprendere dei video.
Sostituire la batteria:
Modello di Batteria: Batteria al Litio CR 2032 da 3V
Sostituire la batteria: Aprire il Pulsante Bluetooth e inserire la batteria con le polarità corrette.
Note:Il Pulsante Istantanea entra in modalità stand-by se non viene messo in funzione nel giro di un
minute. Premere nuovamente per riprendere e scattare una foto.
61/62
Page 35

Download dell’App VAVA Dash Cam
Si prega di cercare ‘VAVA Dash’ nell’App Store o in Google Play per effettuare il download dell’App.
Nota: I sistemi supportati sono Android 4.4 e superiori / iOS 8.0 e superiori.
Connettere la Dash Cam con lo Smartphone
1. Accendere il Wi-Fi sul telefono
2. Trovare “VAVA_XXXXXXXXXXXX” nella lista dei Wi-Fi e connettersi. Inserire la password
(password iniziale: 12345678)
3. Aprire l’App VAVA Dash e seguire le istruzioni per completare la connessione.
Usare la Dash Cam VAVA
Signif icato degli Indicatori LED
Indicatore LED
Luce LED blu lampeggiante lentamente
Luce LED blu accesa f issa
Luce LED rossa lampeggiante
Luce LED rossa accesa f issa
Luce LED rossa lampeggiante una volta
Luce LED bianca accesa
Luce LED bianca spenta
Luce LED blu e Rosso accese f isse
Luce LED blu accesa ssa: Si prega di resettare la dash cam e formattare la scheda TF. Luce LED rossa
accesa ssa: Si prega di installare la scheda TF correttamente per assicurare le sue funzionalità e di
formattarla. Luce LED blu e Rosso accese f isse: Si prega di resettare la dash cam.
Stato della Dash Cam
In funzione
Non in funzione / Spazio su scheda microSD esaurito
Registrazione di un video di emergenza / di un video manuale
ripreso dall’app o con il pulsante istantanea
Errore della scheda MicroSD
Scatto di una foto con l’app o con il pulsante istantanea
Telefono cellulare connesso al Wi-Fi
Telefono cellulare disconnesso dal Wi-Fi
La Dash Cam è andata in crash
63/64
Page 36

Video e Foto / Galleria Media
Video
Registrazione Automatica: La registrazione video viene attivata automaticamente una volta che viene
avviata l’auto.
Registrazione Manuale: Un video di default di 20 secondi verrà registrato attraverso l’app o il Pulsante
Istantanea.
Registrazione di Emergenza: Viene attivata una registrazione video automatica quando viene rilevata una
collisione o uno scontro attraverso il sensore G durante la guida o nella modalità monitor di parcheggio.
Foto
Le foto possono essere scattate con il Pulsante Istantanea oppure è sufficiente premere l’icona Istantanea
sull’app.
Galleria Media
1. E’ possibile visualizzare video e foto nella Galleria Media dell’App.
2. E’ possibile estrarre la scheda di memoria e vedere video e foto su un computer.
Effettuare il Download su un telefono cellulare
Dopo aver effettuato la connessione con successo con la dash cam, entrare in App->Galleria Media per
scaricare e salvare le foto e i video sul proprio telefono.
Caratteristiche
Modalità Parcheggio
Quando la macchina non è in movimento, ad es. quando il motore viene spento, la dash cam si spegnerà
automaticamente entro 10 secondi ed entrerà in Modalità Parcheggio. Quando viene rilevato un urto o una
collisione, il Sensore G attiverà la dash cam ed inizierà a registrare un video di 15 secondi. La dash cam
ritornerà successivamente in Modalità Parcheggio.
Registrazioni di Emergenza
Un video di 20 secondi verrà registrato quando il Sensore G viene attivato in caso di svolte ad alta velocità
o fermate improvvise. Quando la capacità di tali video raggiunge il 30% dello spazio della scheda SD, i più
vecchi verranno sovrascritti da quelli nuovi.
Percorso in Tempo Reale
Mostra il percorso di guida in tempo reale
Nota: I telefoni dotati di sistema operativo Android non possono mostrare l’anteprima in tempo reale per
l’impossibilità di non potere usare i dati mobili quando il Wi-Fi è connesso.
Memorizzazione del Percorso
Registra il percorso del viaggio. Carica le foto per creare un log di viaggio e condividerle sui tuoi social media.
65/66
Page 37

Note:1. L’APP e il rmware verranno aggiornati regolarmente. Le caratteristiche potrebbero cambiare
dopo l’aggiornamento. 2. Non cercare di riparare, smontare o modicare la dash cam da soli.
Aggiornamento Firmware / APP
Aggiornamento dell’APP
Quando viene rilasciata una nuova versione dell’App, il sistema del proprio smartphone e l’App inviano una
notifica dell’aggiornamento. Seguire le istruzioni per effettuare l’aggiornamento.
Aggiornamento del Firmware
L’aggiornamento del firmware può essere ottenuto via OTA o con la scheda di memoria.
Aggiornamento via OTA
Quando viene rilasciata una nuova versione del firmware, l’App richiederà se si intende effettuare l’aggiornamento.
In alternativa è possibile aprire l’APP〉my VAVA〉Aggiornamento, cliccare per rilevare l’ultima versione, quindi
seguire le istruzioni per aggiornare.
Si prega di effettuare per tempo il backup dei propri f ile e di formattare la scheda di memoria prima e dopo
l’aggiornamento.
Aggiornamento attraverso Scheda di Memoria
Copiare il f ile di aggiornamento del firmware sulla scheda di memoria. Inserire la scheda nella dash cam e
accenderla. L’aggiornamento avverrà automaticamente, e la dash cam si riavvierà nuovamente. Si prega di
contattarci all’indirizzo email support@vava.com per ottenere il file per l’aggiornamento del firmware e per
istruzioni più dettagliate.
Note: Non spegnere la dash cam durante l’aggiornamento. La dash cam si riavvierà automaticamente
dopo che il rmware sarà stato aggiornato con successo. Si prega di contattarci immediatamente nel
caso l’aggiornamento non sia andato a buon ne.
DOMANDE FREQUENTI
1. Cosa posso fare se l’indicatore LED è rosso f isso?
Possono esserci diversi motivi che determinano questo problema: l’assenza della scheda di memoria o un
errore della scheda di memoria.
Si prega di installare la scheda in modo corretto e di formattarla in FAT32 con un computer o utilizzando l’App.
2. Perché l’app non riesce a collegarsi con la dash cam?
Assicurarsi che la dash cam sia accesa e che funzioni regolarmente. Assicurarsi che il telefono sia collegato
67/68
Page 38

con successo al Wi-Fi della dash cam. La dash cam potrebbe andare in crash se viene collegata e disconnessa
troppo di frequente. Effettuare un reset e provare nuovamente. Per alcuni telefoni Android, potrebbe dover
essere necessario SPEGNERE i dati mobili per consentire all’App di collegarsi alla dash cam. Per altri problemi
di collegamento è possibile trovare risposte nelle FAQ dell’App o contattandoci all’indirizzo email support@vava.com .
3. Con un telefono Android, il telefono non riesce a collegarsi ad internet una volta che l’App è collegata.
A causa di caratteristiche specifiche del sistema Android, i dati mobili sono disabilitati una volta che il telefono
è connesso al Wi-Fi della dash cam. Se si vogliono utilizzare i dati mobili, si prega di scollegare per prima cosa
il Wi-Fi. La dash cam funzionerà ancora correttamente quando scollegata dal telefono.
4. La dash cam va in crash oppure si verificano dei malfunzionamenti.
Si prega di resettare la dash cam o di contattarci immediatamente.
5. Perché non è possibile visualizzare e riprodurre video e foto sul telefono?
Controllare sullo smartphone se il Wi-Fi è collegato con successo alla dash cam.
6. Perché non è possibile registrare?
Controllare se la scheda di memoria è inserita correttamente e se c’è abbastanza spazio libero.
7. Perché la password non viene ricordata o ottengo una notif ica di password sbagliata?
Si prega di contattarci per effettuare il refresh del firmware per resettare la password.
Nota: Vi preghiamo di inviarci i vostri feedback attraverso l’App o di contattarci all’indirizzo support@vava.com
per qualsiasi ulteriore richiesta. Il nostro staff tecnico è a vostra disposizione per aiutarvi.
Servizio Clienti
Garanzia di 18 mesi
Supporto a Vita
E-mail: support@vava.com
Telefono: (408) 409-1519 (Stati Uniti) Lun-Ven 9,00-17,00pm PST
Social Media: @LetsVAVA fb/Tiw /Ins
Link al Prodotto:https://www.vava.com/caraccessories-dash-cam/VA-CD001-3BF0325777F6
69/70
Page 39

JP
同梱商品一覧
商品概要
ご注意:オーダータイミングにより、パッケージの内容物が異なる場合があります。
⑧
VAVADashCam マウント 車用充電器 ス ナ ップ ショットボ タ ン
充電ケーブル バール ケ ー ブ ルクリップ
バックカメラ接続ケーブル
バックカ メラ
ユーザーマニュアル
①
②
③
④
⑤
⑦
⑥
⑨
1.車載マウント
2.マイクロUSBポート
3.Type-Cポート
4.電源オン/動作中ステータスLED
5.WiFiステータスLED
6. リセットボタン
7.マイクロSDカードスロット
8.ス テッカ ー
9.ミニUSBポート
71/72
Page 40

商品の仕様 メモリー カード のセット
CPU
カメラセンサー
レンズ(FOV)
最大ビデオ画面解像度
G-センサー
ビ デ オ クリップ /写 真 フォ ー マ ット
無線接続
電源入力
内蔵バッテリー容量
作動温度範囲
NT96663
Sony IMX307(フロントカメラ)
Sony IMX323 (リアカ メラ)
フル6G +1 IR レンズ (155°)
フル 4G+1 IRレンズ (126°)
1920*1080@60FPS
1280*720@30FPS
3軸 加速度センサー
MP4 / JPG
Wi-Fi(ス マートフォンと Dash Cam間)
Bluetooth( ス ナップ ショット ボ タ ンとDash Cam間)
5V-1.5A
320mAh
-10°C~50°C / 14°F~122°F
ご注意:
1.DashCamの電源が入っている時は、TFカードの出し入れは行わないでください。カードの破損につながる可能
性があります。2.より良いご使用体験のために、TFカードは定期的に初期化を行ってください。初期化の際にはファ
イルのバックアップを忘れないようご注意ください。
作動安定の為、容量32GB、64GB、128GBのスピードクラス10に対応したマイクロSD/TFカードをご使用下さい。
推奨ブランド:Sandisk、Kingston、Samsung、Transcend
①カードを金のチップがDashCamの下側に触れるよう挿入し、カチッと音がするまでカードを差し込みます。
②カードを取り外すには、優しく押して(その際カチッと音がします)スロットから抜き出します。
73/74
Page 41

DashCamのセット
7.ドライブレコーダーを調整して、レンズの高さを地面に保ちます。
8.車のエンジンを始動して、.ドライブレコーダーが正常に作動しているかどうかを確認します。
1
2
A
B
1.エンジンを停止します。
2.カーマウントをフロンドガラスへ貼り付けます(正面やや下が理想的)
3.VAVADashCamをマウントへマグネットで固定します。
4.USBケーブルをDashCamのUSBポートへ接続します。ケーブルをフロントガラスの縁に沿って、継目にしまい込みながら、
車用充電器のUSBポートまで這わせます。エアバック付近からは遠ざけるようご注意ください。
5.車用充電器をシガーソケットへ挿入し、DashCamを充電器へ接続します。
6.バックカメラ接続ケーブルを接続ポートに差し込み、正しく取り付けます。
ス ナップ ショットボ タ ン
Dashcamとスナップショットボタンのペアリング
DashCamの電源を入れ、スナップショットボタンをビープ音が4回なるまで、5〜20秒押し続けてください。
これでペアリングは完了です。
ス ナッ プ ショット ボ タ ン の 取り 付 け
①スナップショットボタンを3M両面ステッカーでハンドルに取り付けます。
②キーリング上に設置、または設置せずそのまま使用いただけます。(紛失しないようご注意ください。)
ス ナッ プ ショット ボ タ ン の 使 用
①写真撮影:ボタンを一回押すと写真が撮れます
②ショートビデオ撮影:ボタンを3秒押し続けると
ビープ音がなり、ビデオ撮影ができます。
75/ 76
Page 42

バッテリ ー 交 換
バッテリーモデル:リチウムバッテリーCR20323V
交換方法:Bluetoothボタンを開け、バッテリーを正しい方向にセットして下さい。
ご注意:
スナップショットボタンは、1分間作動しないとスタンバイモードになります。写真を撮る際は、ボタンを一度押してください。
VAVADashCamAPP
AppStoreまたはGooglePlayで、ʻVAVADashʼを検索し、アプリをダウンロードしてください。
ご注意:Android4.4またはそれ以降、iOS8.0またはそれ以降のスマートフォンに対応しています。
スマートフォンとDashCamの接続
1.スマートフォンのWi-Fiをオンにします。
2.Wi-Fiリストから“VAVAXXXXXXXXXXXX”を探し接続します。パスワード(初期設定:12345678)を入力します。
3.VAVADashアプリを開き、指示に従い接続を完了します。
VAVADashCam使用について
LEDライトのサイン内容
LEDライトのサイン
青のLEDライトがゆっくり点滅
青のLEDライトが点灯
赤のLEDライトが点滅
赤のLEDライトが点灯
赤のLEDライトが一度光る
白のLEDライトが点灯
白のLEDライトが消灯
赤のLEDライトが点灯
青のLEDライト点灯:DashCamをリセットし、TFカードを初期化してください。
赤のLEDライト点灯:TFカードを正しく挿入してください。また、カードが正常な状態で初期化されているか確認してください。
赤のLEDライト:点灯:DashCamをリセットしてください。
DashCamの状況
作動中
動作中止/マイクロSDカードが満杯
緊急ビデオクリップ録画中/アプリまたはスナップショットボタンにより手動ビデオク
リップ作動
マイクロSDカードエラー
アプリまたはスナップショットボタンによる写真撮影
携帯電話がWi-Fiに接続
携帯電話がWi-Fiから切断
DashCamの故障
77/78
Page 43

ビデオと写真/メディアギャラリー
ビデオ
自動録画:ビデオ撮影は、車のエンジンがかかると自動的に開始されます。
手動録画:アプリまたはスナップショットボタンで20秒(初期設定)のビデオ撮影が行えます。
緊急録画:運転中またはパーキングモニターモードの際に、Gセンサーが衝突・衝撃を感知するとビデオ撮影が開始されます。
写真
スナップショットボタンまたはアプリのスナップショットアイコンをタップすれば、写真撮影が可能です。
メディアギャラリー
1. アプリのメディアギャラリーでビデ オや写真 を見ることができま す。
2.メモリーカードを取り出し、コンピューターでビデオや写真を見ることも可能です。
携帯電話へダウンロード
DashCamとの接続が完了したら、アプリの”MediaGallery”から、スマートフォンへ写真やビデオをダウンロードできます。
特徴
駐 車 モ ード
車が止まると(エンジンが停止した際など)、10秒後にDashCamは自動的に駐車モードに切り替わります。衝撃や衝突を
感知するとGセンサーが作動し、DashCamが作動し、15秒のビデオ撮影を行います。その後DashCamは、自動的に駐車
モードに戻ります(GPSモジュールはパッケージに含まれていません)。
緊急録画
急ブレーキや急ターンを行った場合、Gセンサーが作動し、20秒のビデオ撮影を行います。このビデオがSDカード容量
の30%に達した場合、古いものが新しいものに書き換えられます。
現在位置表示
現時の位置情報を表示します。
注意:アンドロイドフォンをご利用の場合、Wi-Fiに接続している際にモバイルデータを利用できない特徴から、現在位置
の表示は行えません。
トラベ ルログ
あなたの運転行程を記録します。写真をアップロードしトラベルログを作成すれば、SNSで共有できます。
79/80
Page 44

ご注意:
1.アプリとファームウエアの更新は定期的に行われます。更新すると特徴などが少し変更する場合があります。
2.ご自身で、DashCamを修理、分解、改造しないで下さい。
ファー ムウエア/ アプリの 更 新
アプリの更 新
アプリの新しいバージョンがリリースされると、スマートフォンシステムとアプリから更新情報が送信されます。
案内に従い更新を行ってください。
ファームウエアの 更 新
ファームウエアの更新はOTAまたはメモリーカード経由で行うことができます。
OTAアップグレード
ファームウエアの 新しい バ ージョンがリリースされると、アプリがアップグレードを 促します。または 、アプリを開き、
myVAVA→Updateと進み、クリックして最新のバージョンを確認し、指示に従いアップグレードを行ってください。
更新の前後には、メモリーカードの初期化を行ってください。その際、初期化前にファイルのバックアップを忘れずに行っ
てください。
メモリー カ ード の アップグレ ード
メモリーカードにファームウエア更新ファイルをコピーし、DashCamにそのカードを差し込みます。DashCamの電源を
入れると、自動的にアップグレードが行われ、DashCamを再起動します。ファームウエアアップグレードファイルや、より
詳細な手順などに関しては、support@vava.comまでご連絡ください。
ご注意:
アップグレードの最中は、DashCamの電源を切らないでください。ファームウェアのアップグレードが完了したら、
DashCamは自動的に再起動します。更新作業に失敗した場合は、直ちにサポートチームへご連絡ください。
FAQ
1.赤いLEDライトが点灯している場合、どのような対応をすれば良いですか?
2つの原因が考えられます:メモリーカードが入っていない、または、メモリーカードに何かしらのエラーが起こっている。
まずは、カードが正しく挿入されているかご確認ください。また、メモリーカードは、コンピューターまたはアプリで、
FAT32への初期化を行ってください。
2.アプリがDashCamと接続できません。
DashCamが正常に作動しているかご確認ください。スマートフォンがDashCamWi-Fiと正常に接続しているか確認
81/82
Page 45

してください。Dashcamは、頻繁に接続と切断を繰り返すと、正常に作動しなくなることがあります。リセットして再度
試してください。アンドロイドの場合、モバイルデータをオフにしないとアプリをDashCamへ接続できない場合があ
ります。接続に関する問題は、アプリのFAQにも情報があります。または、support@vava.comへご連絡ください。
3 . アンドロイドでアプリに 接 続すると、インター ネットにアクセスでき なくなってしまいます。
アンドロイドシステムの特徴で、DashCamWi-Fiに接続するとモバイルデータが利用できなくなります。モバイルデー
タを利用するには、Wi-Fiを切断してください。DashCamは、スマートフォンと接続していなくても正常に作動します。
4.DashCamが故障、または誤作動を起こしています。
DashCamをリセットしてください。またはサポートチームへすぐにご連絡ください。
5. ビデオや 写真をスマートフォンで見ることができません。
スマートフォンで、Wi-FiがDashCamと接続されているか確認してください。
6.録画ができません。
メモリーカードがきちんと挿入されているか、十分な空き容量があるかご確認ください。
7.パスワードを忘れてしまった。またはパスワードが違いますとエラーが出る。
サポートチームへ連絡をしてください。ファームウエアを再インストールしてパスワードをリセットします。
ご注意:アプリでご意見やご感想を送りいただけますと幸いでございます。上記以外の質問がある場合は、サポートチ
ーム(support@vava.com)へご連絡ください。テクニカルチームが問題解決のお手伝いをさせていただきます。
カスタマーサー ビス
18カッ月の製品保証
ライフタイム・サ ポート
E-mail:support.jp@vava.com
Tel:(408)409-1519(JP)(10-18時/土日祝除く)
ソーシャルメディア:@VAVAjapanfb/Tiw/Ins
ProductLink:https://www.vava.com/caraccessories-dash-cam/VA-CD001-3BF0325777F6
83/84
Page 46

Notices
FCC Compliance
This device complies with Part 15 of the FCC Rules: Operation is subject to the following two conditions:
1. This device may not cause harmful interference and
2. This device must accept any interference that is received, including any interference that may cause
undesired operation.
This device is acting as slave and operating in the 2.4 GHz (2400 ~2480 MHz) band. Ad Hoc function is supported
but not able to operate on non-US frequencies.
NOTE: This equipment has been tested and found to comply with the limits for a Class B digital device, pursuant
to part 15 of the FCC Rules. These limits are designed to provide reasonable protection against harmful
interference in a residential installation. This equipment generates uses and can radiate radio frequency energy
and, if not installed and used in accordance with the instructions, may cause harmful interference to radio
communications. However, there is no guarantee that interference will not occur in a particular installation.
If this equipment does cause harmful interference to radio or television reception, which can be determined by
turning the equipment off and on, the user is encouraged to try to correct the interference by one or more of the
following measures:
- Reorient or relocate the receiving antenna.
- Increase the separation between the equipment and receiver.
-Connect the equipment into an outlet on a circuit different from that to which the receiver is connected.
-Consult the dealer or an experienced radio/TV technician for help
Changes or modifications not expressly approved by the party responsible for compliance could void the
user's authority to operate the equipment.
RF Exposure Warning Statements:
This equipment complies with FCC radiation exposure limits set forth for an uncontrolled environment.
This equipment shall be installed and operated with minimum distance 20cm between the radiator & body.
85/86
Page 47

www.vava.com
 Loading...