

Page 1
www.vav
a.
com
ASIA PACIFIC
E-mail: support.jp@sunvalley.co.jp
Tel:
03-5542-0238(10-18時/土日祝日を除く)
JP Importer: 株式会社SUNVALLEY JAPAN
Address: 〒104-0032東京都中央区八丁堀3丁目18-6 PMO京橋東9F
EUROPE
E-m
ail: eur
ope@
EU Importer: ZBT International Trading GmbH
Address: Halstenbeker Weg 98C, 25462 Rellingen, Deutschland
sunvalley-group.de
NORTH AMER
E-mail: support@vava.com
Tel: 1-888-456-8468 (Monday-Friday: 9:00 – 17:00 PST)
US Distributor: SUNVALLEYTEK INTERNATIONAL INC.
Address: 46724 Lakeview Blvd, Fremont, CA 94538
ICA
MANUFACTURER
Shenzhen NearbyExpress Technology Development Co.,Ltd.
Address: 333 Bulong Road, Shenzhen, China, 518129
Le
arn mor
e about th
MADE IN CHINA
e EU Declaration of C
onfo
rmity:
www.vava.com
MODEL: VA-IH006BU, VA-IH006PU
BABY MONITOR
User Guide
V1.4
Page 2

CONTENTS
SAFETY INSTRUCTIONS
01
CAUTION 01
PACKAGE CONTENTS 02
PRODUCT DIAGRAM 03
GETTING STARTED 05
1.
Charging & Powering Baby Monitor 05
2.
Powering Camera 05
3.
Pairing the Baby Monitor & the Camera 05
4.
Placing the Camera 06
5.
Wall Mounting Camera 06
6.
Wide-Angle Lens (Optional) 07
FUNCTIONS & OPERATIONS
Monitor Interface Overview 08
1.
Monitor Settings 09
2.
Add / View / Delete a Camera 10
3.
Digital Zoom & Circulating 10
4.
Pan-n-Tilt 11
5.
Volume Adjustment 11
6.
Night Vision 11
7.
Alarm 11
8.
Talkback 12
9.
Wide-angle Viewing (Optional) 12
10.
Temperature Alert
SPECIFICATIONS
TROUBLESHOOTING
WARRANTY & CUSTOMER SERVICE
FCC STATEMENT
08
12
13
15
16
17
IC STATEMENT 19
Page 3
SAFETY INSTRUCTIONS
MENU
ZOOM
AUTO-PILOT
/ OK
TALK
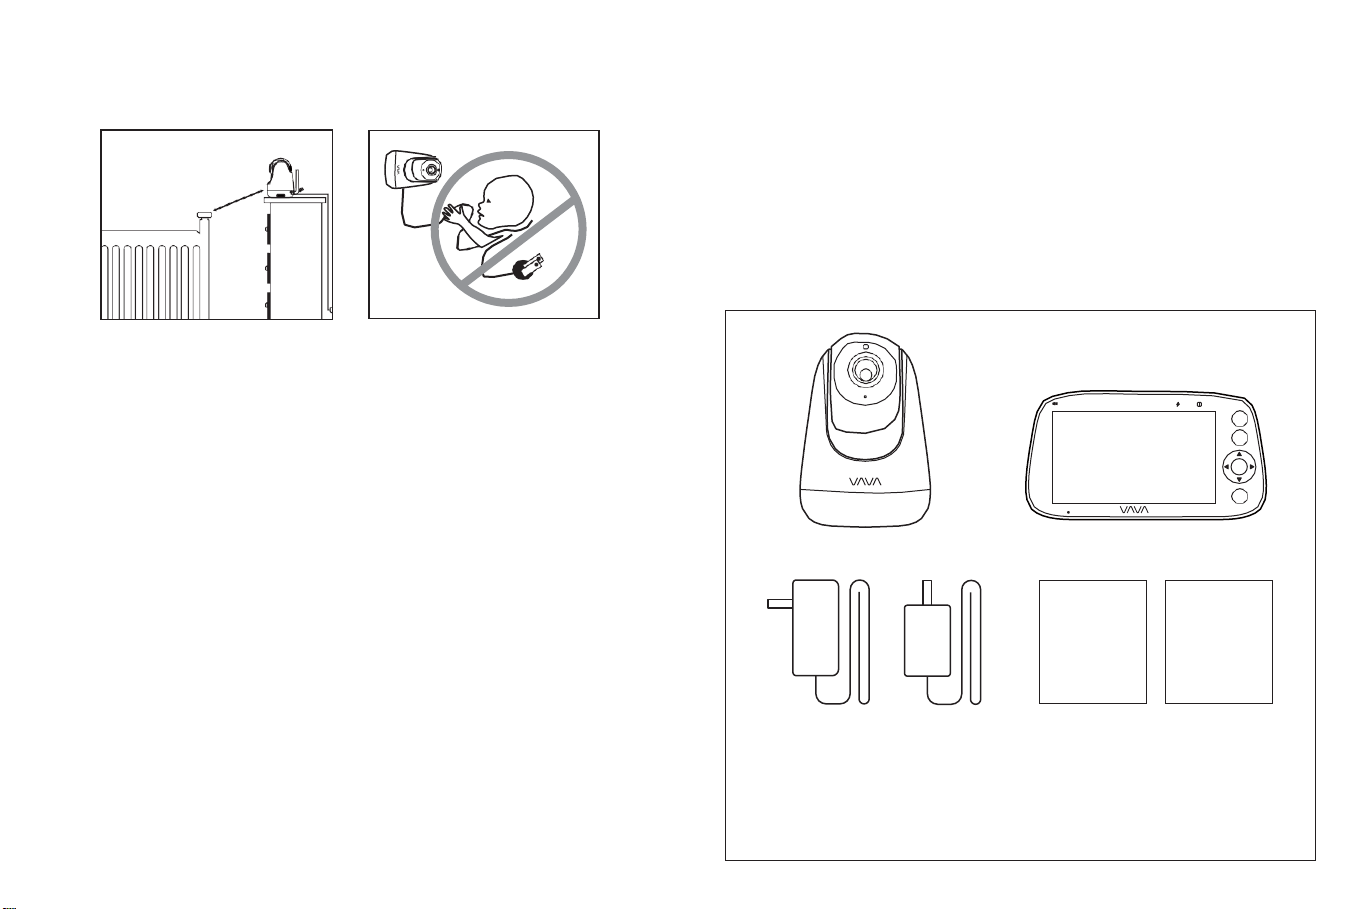
Baby Monitor (Model: VA-IH006PU) & Camera (Model: VA-IH006BU)
·
Monitor Adapter with USB-C Charging Cable
·
Camera Adapter
·
Micro-USB Charging Cable
·
Quick Start Guide
·
User Guide
User Guide
Quick Start
Guide
3
ft
·
Keep cord out of the reach of children (more than 3ft / 0.9m away) in case
of STRANGULATION.
·
NEVER place the camera or cord in or near the crib or playpen.
·
NEVER mount the camera directly above the crib or playpen to avoid the
risk of injury.
·
Only use the AC adapters provided.
·
Never use the unit near water, including near a bathtub, sink, laundry
mac
hine
tube, wet basement, etc
·
Do not install near any heat sources such as radiators, heat registers,
stoves, or other devices that produce heat.
·
Only use attachments and accessorie
·
Unplug this device when unused for long periods of time.
·
Do not insert anything into the upgrade pinholes. This operation is only
intended for professionals.
.
s specified by the m
anufac
turer.
the initial installation, and on a regular basis after that.
·
Check the reception regul
arly. Test the camera before use and after
changing the camera’s location.
·
For indoor
·
Clean the c
·
Do not block any ventilation openings.
·
Microphone feedback might occur when the monitor is too close to the
use only.
amera
with a
dry cloth only.
camera. Please keep them at least 1.5m / 4.9ft apart.
PACKAGE CONTENTS
CAUTION
·
NOT toys. Do not allow children to play with them.
·
The lens and lens hood are small parts, keep them out of your baby’s reach
at all times.
·
This product is NOT intended to replace the proper supervision of children.
You
MUST check
·
This product is not intended for use as a medical camera and its use should
not replace adult supervision.
·
Unplug the product during lightning storms.
·
Please check the operating range and condition of the camera carefully at
01 02
your child’s acti
vity regul
arly.
Page 4
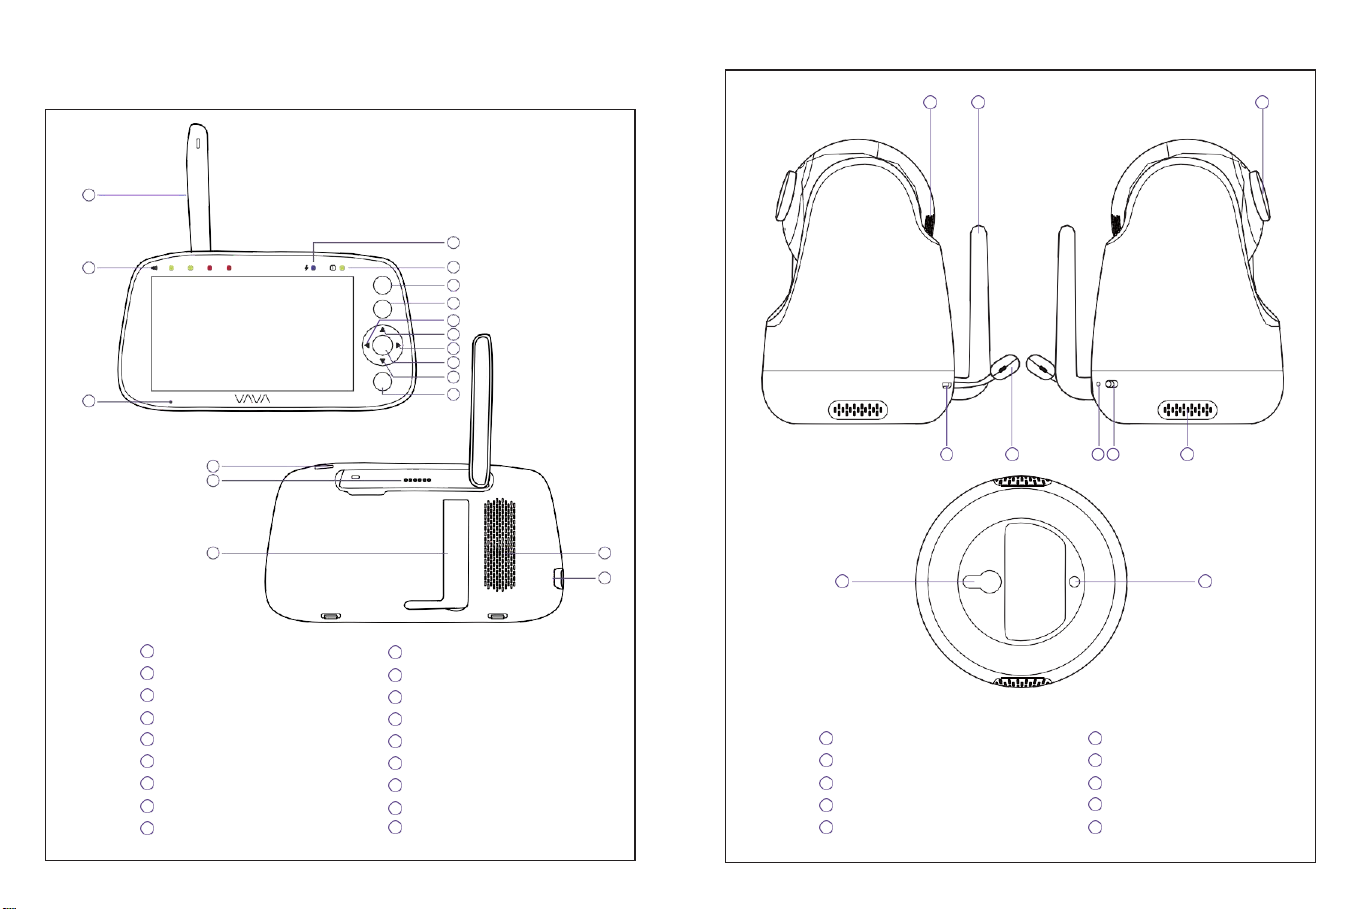
PRODUCT DIAGRAM
1
4
2
5
MENU
6
7
ZOOM
8
9
AUTO-PILOT
/
OK
10
11
12
TALK
3
13
14
15
16 17
18
1 2 8
3 4 5 6 7
9 10
1
Antenna
10
Right Button
2
Volume Indicators
11
OK Button
3
Microphone
12
Down Button
4
Charging Indicator
13 Talk Button
5
Power Indicator
14
Power Button
1
Camera Vents
6
Power Switch
6
Menu Button
15
Upgrade Pinholes
2
Camera Antenna
7
Speaker
7
Zoom Button
16
Back Stand
3
Micro-USB Port
8
Lens
8
Left Button
17 Speaker
4
Temperature Sensor
9
Pairing Button
9
Up Button
18
USB-C Port
5
Reset Pinhole
10
Mounting Hole
04
Camera
Page 5

GETTING STARTED
It’s strongly recommended to use
a screw and screw anchor. Don’t
release the camera until you’re sure it is firmly mounted.
·
Once they’re paired successfully, the c
amera
number with icon
1 will be shown at the top left.
·
Microphone feedback might occur when the monitor is too close
to the camera. Please keep them at least 1.5m / 4.9ft apart.
·
It is recommended to pair in the baby's room, or wherever you
intend to place the camera.
·
Only use the power adapters inc
luded in the package.
·
Do not place the camera and power cord within the reach of your
b
aby
.
1.
Charging & Powering Baby Monitor
1)
Connect the monitor adapter to the monitor and a power outlet.
2)Unp
lug the unit when its power indicator turn
3)
Press the Power button on the monitor to power on with the power indicator
lighting green.
2.
Powering Camera
1)
Connect the camera to power source via the Micro-USB cable and
c
amera adapter.
2)
Slide the Power Switch on camera to power on. Make sure the power
indicator light is green.
3.
Pairing the Baby Monitor & the Camera
By default, one camera has been paired with the monitor when manufactured.
When you power on the monitor and camera, the two will automatically pair.
To add more cameras, press the Pair Button at the bottom of the camera,
press Menu button, select through ->
auto-pair with the camera.
s off, indic
-> , and then the monitor will
ating a
full charge
.
4.
Placing the Camera
Place the c
and for a better view when in night vision mode.
5.
Wall Mounting Camera
1)
Select the spot to mount the camera, keeping it beyond your baby’s reach.
2)
Insert the screw (not included) pre-installed on wall into the mounting hole
of the camera.
amera 1.5-2m / 4.
9-6
.6ft away from your baby for safety re
aso
n
05 06
Page 6

PM 12:08
1 2
25
6.
Signal
4 levels
1
Current Camera
Camera 1 / Camera 2 / Camera 3/ Camera 4
2
Zoom
2X / 4X
Current Temperature
°C / °F
Night Vision
Auto ON in a dim environment
PM 12:08
Current Time
AM / PM
Alarm
ON / OFF
Mute
Mute all system sounds
Talk-back
ON / OFF
Battery
5 levels
1 2 3 4
Wide-Angle Lens (Optional)
The aluminum lens hood (no special video effects) has been installed when
the camera was manufactured.
To install wide-angle lens (sold separately), simply rotate the original lens
hood counterclockwise to remove. Then install the new lens and rotate
clockwise to fix in place.
FUNCTIONS & OPERATIONS
Monitor Interface Overview
Top Status Indications
07 08
Page 7

Bottom Menu Brief
Add Camera
Max. 4 cameras
View Camera
Select to view each at a time
Delete Camera
Select to delete cameras
Speaker Volume
0-6 levels (mute when it’s 0)
Brightness
1-8 levels
Camera
To add / view / delete cameras
Alarm
OFF / 2Hr / 4Hr /6Hr / Set Time
(hour / minute / AM, PM)
Settings
Time
System sound volume
Temperature scale
Auto-sleep time
Restore to factory setting
Customer service contacts
·
To mute the sound during poor monitor-camera connection, please
set the system sound volume to mute.
·
When the monitor screen is under sleep mode, the power indicator
flashes green slowly while the audio is still on; press any button to
awake. You can
also short press the Power Button to
turn the scree
n
off.
·
Press and hold the Power Button to power on / off the monitor.
You can switch viewing different cameras; the current camera
number will be shown with the Camera icon on the monitor.
You can only select one camera to view at one time.
2.
Add / View / Delete a Camera
1)
Press Menu button, select through
2)
Select through -> to view a camera.
3)
Select through
1.
Monitor Settings
Press Menu Button, Left and Right Buttons, and then OK Button to set the
monitor:
1)Time setting: Set the current
2)
System sound volume: Select between Low, High, and
3)Temperature scale: Select between °C and °F
4)Screen auto-sl
5)Restore to factory settings: Pre
“Restoring factory settings” will be shown when restoring, and you can’t
press any button to control the device during this period. The monitor will
auto restart when it’s done.
6)C
ustomer se
for customer service.
09 10
eep time: Select between
rvice contacts: Check the em
time b
y set
ting hour,
1min, 2min, 5min, and
ss OK Button to confirm reset
ail, Tel. number, and addre
minute, and
Mute.
.
AM/ PM.
OFF
.
tin
g;
ss
3.
Digital Zoom & Circulating
Press Zoom Button to zoom in to 2X / 4X when viewing the camera. A third
pressing of the
Press and hold OK Button 4 seconds to start auto circulating, press OK
ag
ain t
o stop.
The current zoom level number will be shown with the Zoom icon
2
->
to delete a camera.
button
will restore to the original image.
on the monitor
->
-> to add a camera.
Page 8

4.
·
When the timer is set, the Alarm icon will be shown on the monitor.
·
Before setting, please check that the monitor time is your current
time.
When the mo
nitor is mute, you may not be
able to h
ear the b
aby.
For system sound adjustment, please go to Monitor Settings ->
System sound volume .
When you enter the talking mode, the icon will be shown on
the monitor.
When it’s mute or the speaker volume is too low, you may not be
able to h
ear the b
aby.
When you’re pressing the Talk Button, the camera will not
transfer the sound to the monitor. Please release the button to
listen t
o your baby.
Pan-n-Tilt
When viewing the camera, press Left / Right / Up / Down Button to view at
different angles, 108 degrees vertically and 270 degrees horizontally.
8. Talkback
Press and hold Talk Button to talk to your baby, release it to exit the talking
mode.
5. Volume Adjustment
Press Menu Button -> OK Button -> Left / Right Button to volume down / up,
and OK Button to saving your settings.
9. Wide-angle Viewing (Optional)
Install your wide-angle lens (separately sold) referring to the previous
6. Night Vision
The night vision is automatically activated in a dim environment. The camera
has 12 high-intensity infrared LEDs for picking up clear images in the dark.
Black and
white images can be captured
wit
hin 2m distance.
mounting wide-angle lens section. Now you can view the camera in a wider
angle of about 170 degrees.
10. Temperature Alert
The monitor will prompt too high (>35°C / 95°F) and too low (<0°C / 32°F)
7. Alarm
Press Menu Button -> Right Button to locate Alarm menu -> OK Button ->
Up / Down Button to select the timer setting. You can set a 2Hr, 4Hr or 6Hr
al
arm, or set the hour and minute othe
a beep will be heard. Press OK Button to stop; otherwise it’ll keep beeping for
30s, beeping again in 1min, stops after it’s alerted 3 times.
11 12
rwise. When the al
arm time is reached,
temperatures with the “HH” and “LL” icon, accompanied with a & icon
and a beep alert.
Page 9

SPECIFICATIONS
Model
VA-IH006BU
Cmos
720p (1280x720), 3.0M, 1/4"
Connectivity
2.4GHz
Image Compression
h.264 (frame rate = 18fs)
Power Input
5V / 1.2A, 2.5m-long Micro-USB cable
Pan-n-Tilt
108 degrees vertical (Up=90, Down=18)
270 degrees ho
rizontal (Left=135,
Righ
t=135)
Zoom
Zoom In (2X)
Zoom In (4X)
Auto-Pilot (1 Cycle)
View Angle
Vertical: 1.5m, Horizontal: 1.4m
Lens Focal Length
1.5m to infinity
Night Vision
Black & White image, up to 2m clear range
IR LED
Non-visible IR LED with wavelength 940nm (x 12 pcs)
Light Sensor
Yes
Two-Way Talk
Yes
Storage Temperature
-10°C ~ 55°C / 14 - 131°F
Model
VA-IH006PU
Sonix IC
SN93700
Resolution
IPS (720 x 1280), PPI=293
Connectivity
2.4GHz
Image Aspect
16:9 (HD720)
Image Compression
h.264 (frame rate = 18fs)
Operating Range
280 - 300m (antenna vertically positioned at 90°)
Temperature Alert
Yes
Volume Control
8 levels
Brightness
8 levels
Antenna
Rotatable (max. 90 degree)
Power Input
Zoom
Zoom In (2X)
Zoom In (4X)
Auto-Pilot (1 Cycle)
Two-Way Talk
Yes
Multi-Camera
Max. 4 cameras
Storage Temperature
-10°C ~ 55°C / 14 - 131°F
Operation Temperature
0°C ~ 40°C / 32 - 104 °F
Monitor
Camera
5V / 2A (1.5m long USB C cable)
13 14
Page 10
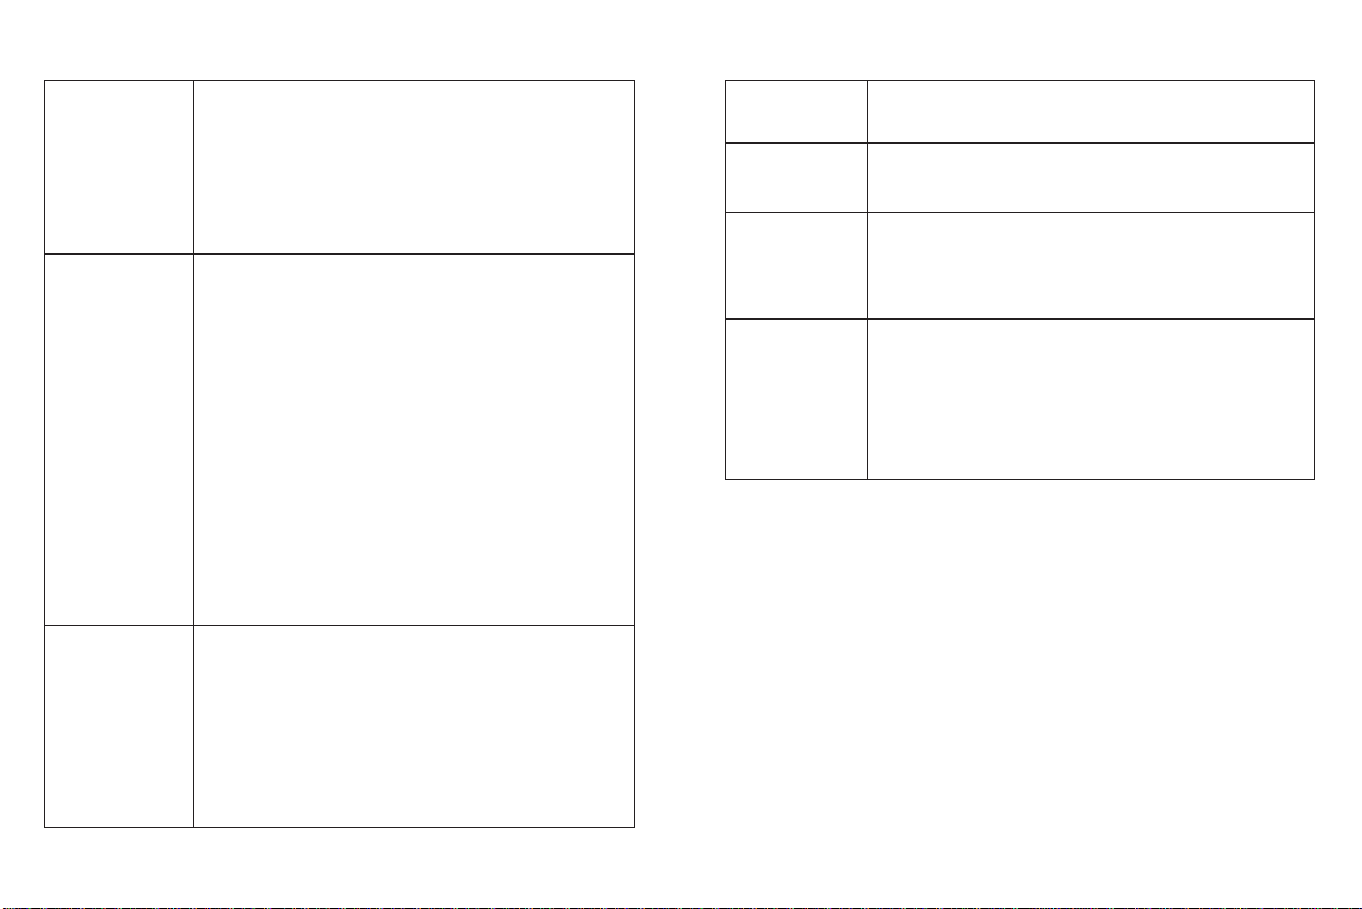
TROUBLESHOOTING
No sound from
the monitor?
Check whether the system sound volume is set High
or Low. It
’ll be
mute if set so.
Black and white
pictures?
Night vision LED may be ON. Please turn on room
lights to force it out of the night mode.
Choppy videos?
·
Check whether the camera is near the monitor and
that there’re no obstacles between them.
·
Adjust the monitor antenna to vertical position for
better signal transfer.
Too much noise?
·
Volume may be set too high. Press Menu Button ->
OK Button -> Left Button to volume down.
·
The camera and monitor may be put too close; keep
them at least 1.5m / 4.9ft apart.
·
The camera may be too out of range. Please keep it
within 10m / 32.8ft to the monitor.
WARRANTY & CUSTOMER SERVICE
18 months warranty
Lifetime customer service (contacts on the monitor, and back cover of this
User Guide)
15 16
Product not
powering on?
·
Check that the camera and monitor are turned on.
·
Check the camera is connected to power properly (it
cannot be charged; it’s power off once disconnected
from power).
·
Check that the monitor is of enough battery (it’ll auto
shut off when battery level icon flashes red slowly on
the monitor).
Baby monitor
can’t connect
with the camera?
·
Check whether the camera is near the monitor
(recommended to keep
wit
hin 1.5-2m / 4.9-6
.6f
t).
·
Check whether the mo
nitor i
s of low battery. Charge it
in time to restore good connection.
·
Check whether the camera is well connected to power.
·
Check whether there are any large metallic objects
including doors, refrigerators, mirrors, etc.,
are place
d
between the camera and monitor thus blocking the
radio signals.
·
Check whether there’s any other 2.4GHz product is
used nearby like WiFi routers, microwave ovens, which
may interfere the connection.
·
If nothing above is involved, please retry to pair:
Press and hold the OK button on monitor to enter
pairing mode, and the monitor will connect with the
c
amera nearb
y automatically.
Nothing shown
when I view a
camera?
·
Check all connections to the camera (power cable
plugging and pairing).
·
Check whether the screen is in sleep mode. Press any
button to awake it.
·
Check whether the camera is within range of the
monitor.
·
Adjust the monitor antenna to vertical position for
better signal transfer.
Page 11

FCC STATEMENT
changes or modifications not expressly approved by the party responsible for
compliance could void the user’s authority to operate the equipment.
This device complies with Part 15 of the FCC Rules. Operation is subject to
the following two conditions:
(1) this device m
ay not cause harmful interference, and
(2) this device must accept any interference received, including interference
that may cause undesired operation.
FCC 20cm Statement
This equipment complies with FCC radiation exposure limits set forth for an
Note: This equipment has been tested and found to comply with the limits
for
a Cl
ass B digital device, pur
suant to Part 15 of the FCC Rules. Thes
e
limits are designed to provide reasonable protection against harmful
interference in a residential installation. This equipment generates, uses, and
can radiate radio frequency energy, and if not installed and used in
accordance with the instructions, may cause harmful interference to radio
communications. However, there is no guarantee that interference will not
occur in a particular installation. If this equipment does cause harmful
interference to radio or television reception, which can be determined by
turning the equipment off and on, the user is encouraged to try to correct
the interference by one or more of the following measures:
– Reorient or relocate the receiving antenna.
– Increase the separation bet
ween the
equipment and receiver.
– Connect the equipment into an outlet on a circuit different from that to
which the receiver is connected.
– Consult the dealer or an experienced radio/TV technician for help.
uncontrolled environment. This equipment should be installed and operated
with a
minimum distance of 20cm bet
ween the radiator
& your body. Thi
s
transmitter must not be co-located or operating in conjunction with any
other antenna or trans
mitter.
18
15.21& SAR statements
This equipment complies with FCC radiation exposure limits set forth for an
uncontrolled environment. End user must follow the specific operating
inst
ructions for s
ati
sfying RF exposure compliance. This trans
mitter
mus
t
not be co-located or operating in conjunction with any other antenna or
transmitter.
The mobile device is designed to meet the requirements for
exposure to radio waves established by the Federal Communications
Commission (USA). These requirements set a SAR limit of 1.6 W/kg
averaged over one gram of tissue. The
highest SAR
value reported under
17
this standard during product certification for use when properly worn on the
body is 0.515 W/kg.
For body operation, this device has been tested and meets FCC RF exposure
guidelines when used with any accessory that contains no metal and that
p
ositions a
minimum of 15mm from the body.
Use of other accessories m
ay
not ensure compliance with FCC RF exposure guidelines.
Page 12

IC STATEMENT
This device contains licence-exempt transmitter(s)/receiver(s) that comply
with Innovation, Science and Economic Development Canada’s licence-ex-
empt RSS(s). Operation is subject to the following two conditions:
(1) This device m
ay not cause interference.
(2) This device must accept any interference, including interference that m
ay
c
ause undesired operation of the d
evice.
L'émetteur/récepteur exempt de licence contenu dans le présent appareil est
conforme aux CNR d'Innovation, Sciences et Développement économique
Canada applicables aux
appareils radio exempts de licence. L'explo
itation est
autorisée aux deux conditions suivantes :
1) L'appareil ne doit pas produire de brouillage;
2) L'appareil doit accepter tout brouillage radioélectrique subi, même si le
brouillage est susceptible d'en compromettre le fonctionnement.
The device meets the exemption from the routine evaluation limits in section
2.5 of RSS 102 and compliance with RSS-102 RF exposure, users can obtain
Canadian inform
ation on RF
exposure and compliance.
Le dispositif rencontre l'exemption des limites courantes d'évaluation dans la
section 2.5 de RSS 102 etla conformité à l'exposition de RSS-102 rf, utilisateurs peut obtenir l'information canadienne surl'exposition et la conformité
de rf.
This transmitter must not be co-located or operating in conjunction with any
other antenna or trans
mitter. This
equipment should be inst
alled and
operated with a minimum distance of 20 centimeters between the radiator
and
your body.
Cet émetteur ne doit pas être Co-placé ou ne fonctionnant en même temps
qu'
aucune
autre antenne ouémetteur. Cet équipement devr
ait être installé e
t
actionné avec une distance minimum de 20 centimètres entre le radiateur et
votre corps.
19
Page 13

尺寸:
120*160mm
装订成册
材质:封面128克铜版纸 内页80克书纸
 Loading...