

Page 1
www.taotronics.com
LED FLOOR LAMP
User Guide
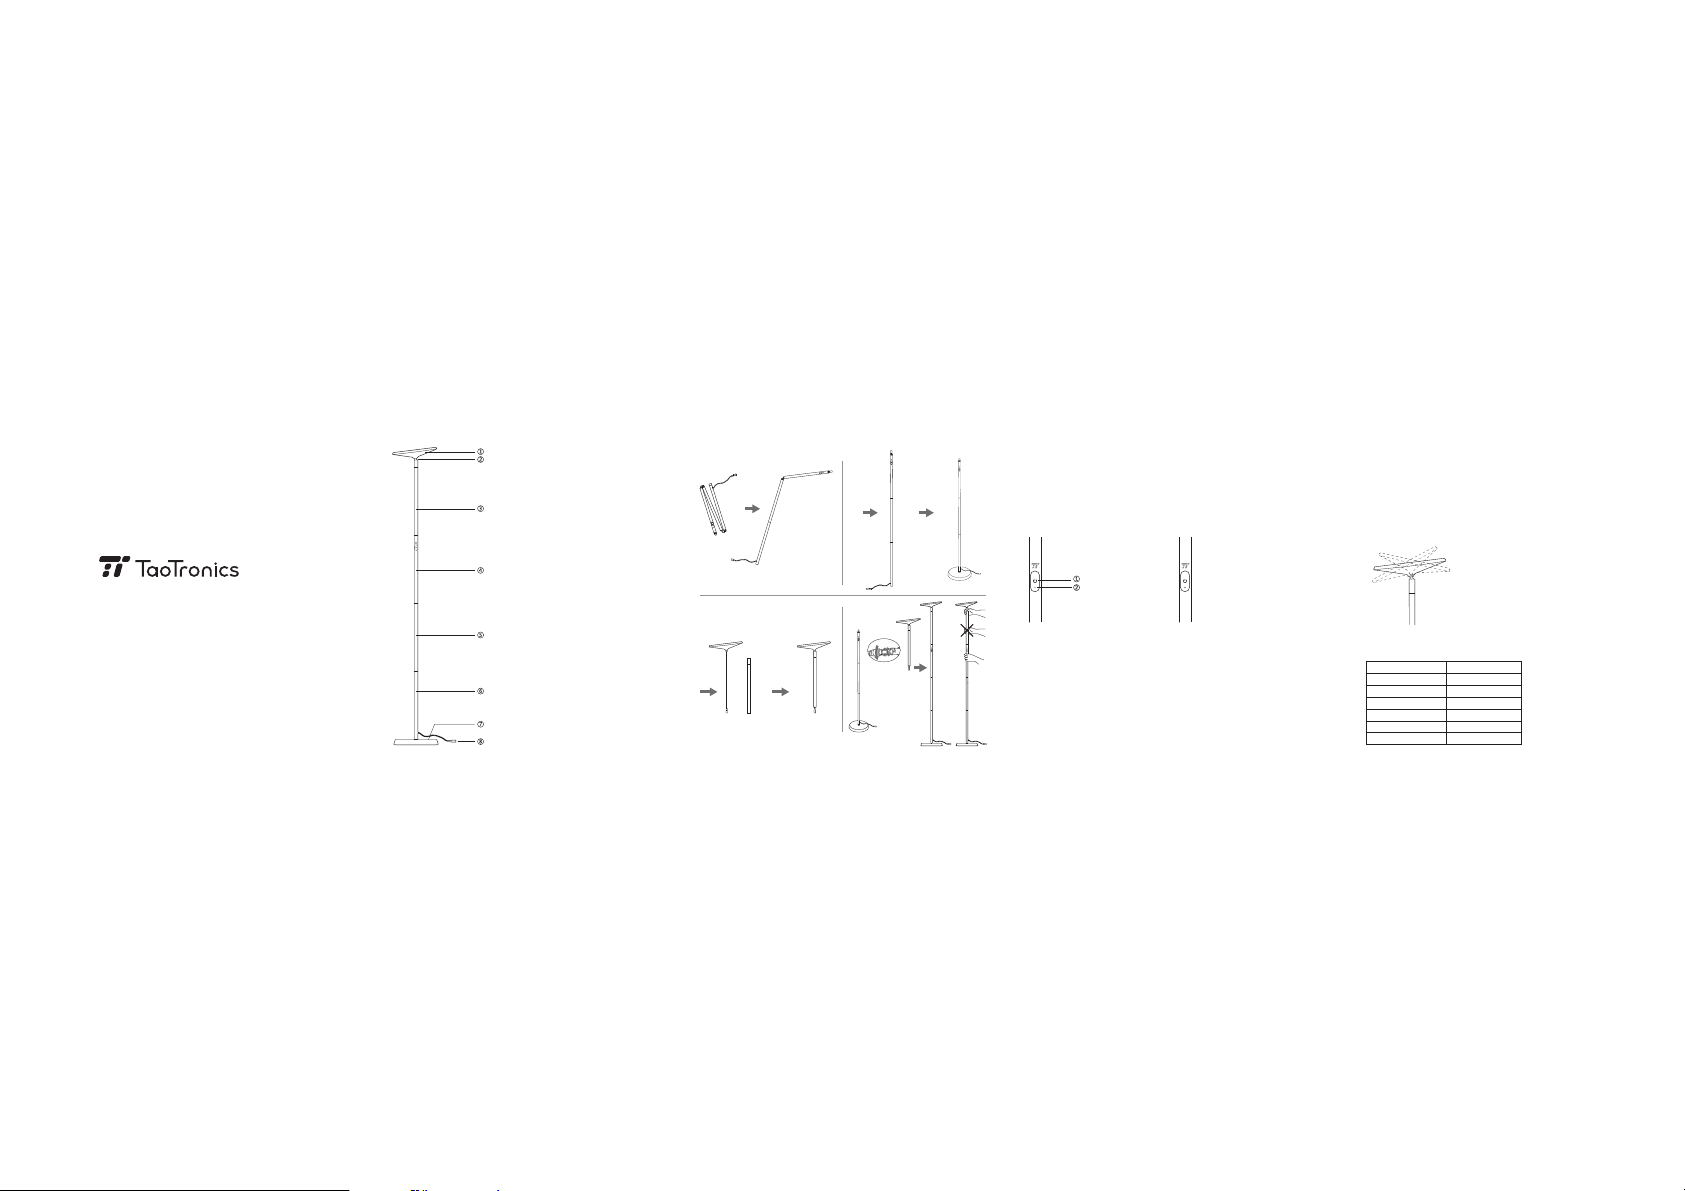
Product Diagram
ʒ
Lamp Head
ʓ
Universal Joint
ʔ
Pole Section # 4
ʕ
Pole Section # 3
ʖ
Pole Section # 2
ʗ
Pole Section # 1
ʘ
Base
ʙ
Power Connector
Assembly and Disassembly
+
Note:
• Remove the plastic rings before installing the lamp.
• When connecting the lamp sections with the base or the lamp head,
rotate in d ifferent directions with both hands. Do not screw with too much force.
If it gets stuck, undo and restart again.
• Align the male connector with the female connector, then click and rotate
90° or 270° to lock in place.
How to Use
Power
Power Indicator
Standby Mode
o
90o/270
+
Connect the cable connector from Section #1 to the power adapter. Plug the
adapter into a power source. The lamp enters standby mode, and the Power
Indicator on the Power Button lights up in white.
Power On / Off
Tap the Power / Brightness Button to turn on the lamp. The LED Indicator turns off.
Memory Function
With the power connected, each time the lamp is turned on, it will
automatically return to the brightness of the last time it was turned off.
Power On
Brightness Adjustment
When the lamp is turned on, tap and hold the Power / Brightness Button to
adjust the brightness. Keep tapping on the Power / Brightness Button to
increase or decrease its brightness.
Adjust the Lamp Head
The lamp head is 20° rotatable in horizontal 360° directions.
Specif ications
Model
Light Source
Operate Voltage
Power
Color Temperature
Lumens
CRI
TT-DL035
LED
DC 24V / 1A
30W
3000K±250K
1400 - 1500 lm
> 80
Page 2
TT-DL035
www.taotronics.com
NORTH AMERICA
E-mail : support@taotronics.com(US)
support.ca@taotronics.com(CA)
Tel : 1-888-456-8468 (Monday-Friday: 9:00 – 17:00 PST)
US Importer: SUNVALLEYTEK INTERNATIONAL INC.,
46724 Lakeview Blvd, Fremont, CA 94538
Caution
• Please do not dismantle the product by yourself, always ask a professional
electrician or authorized technician for repairs.
• If you smell a bad odor or anything unusual,
please turn off the unit immediately.
• Please do not remove the power cable with wet hands as it may cause an
electric shock.
• Do not put this unit near extreme heat sources, moisture, or corrosive
substances.
• Clean the lamp with a dry cloth when needed.
• Please store the lamp in a dry and shady place if not being used for a long
period of time.
• Use the original power adapter to power the lamp. A wrong input may
damage the lamp.
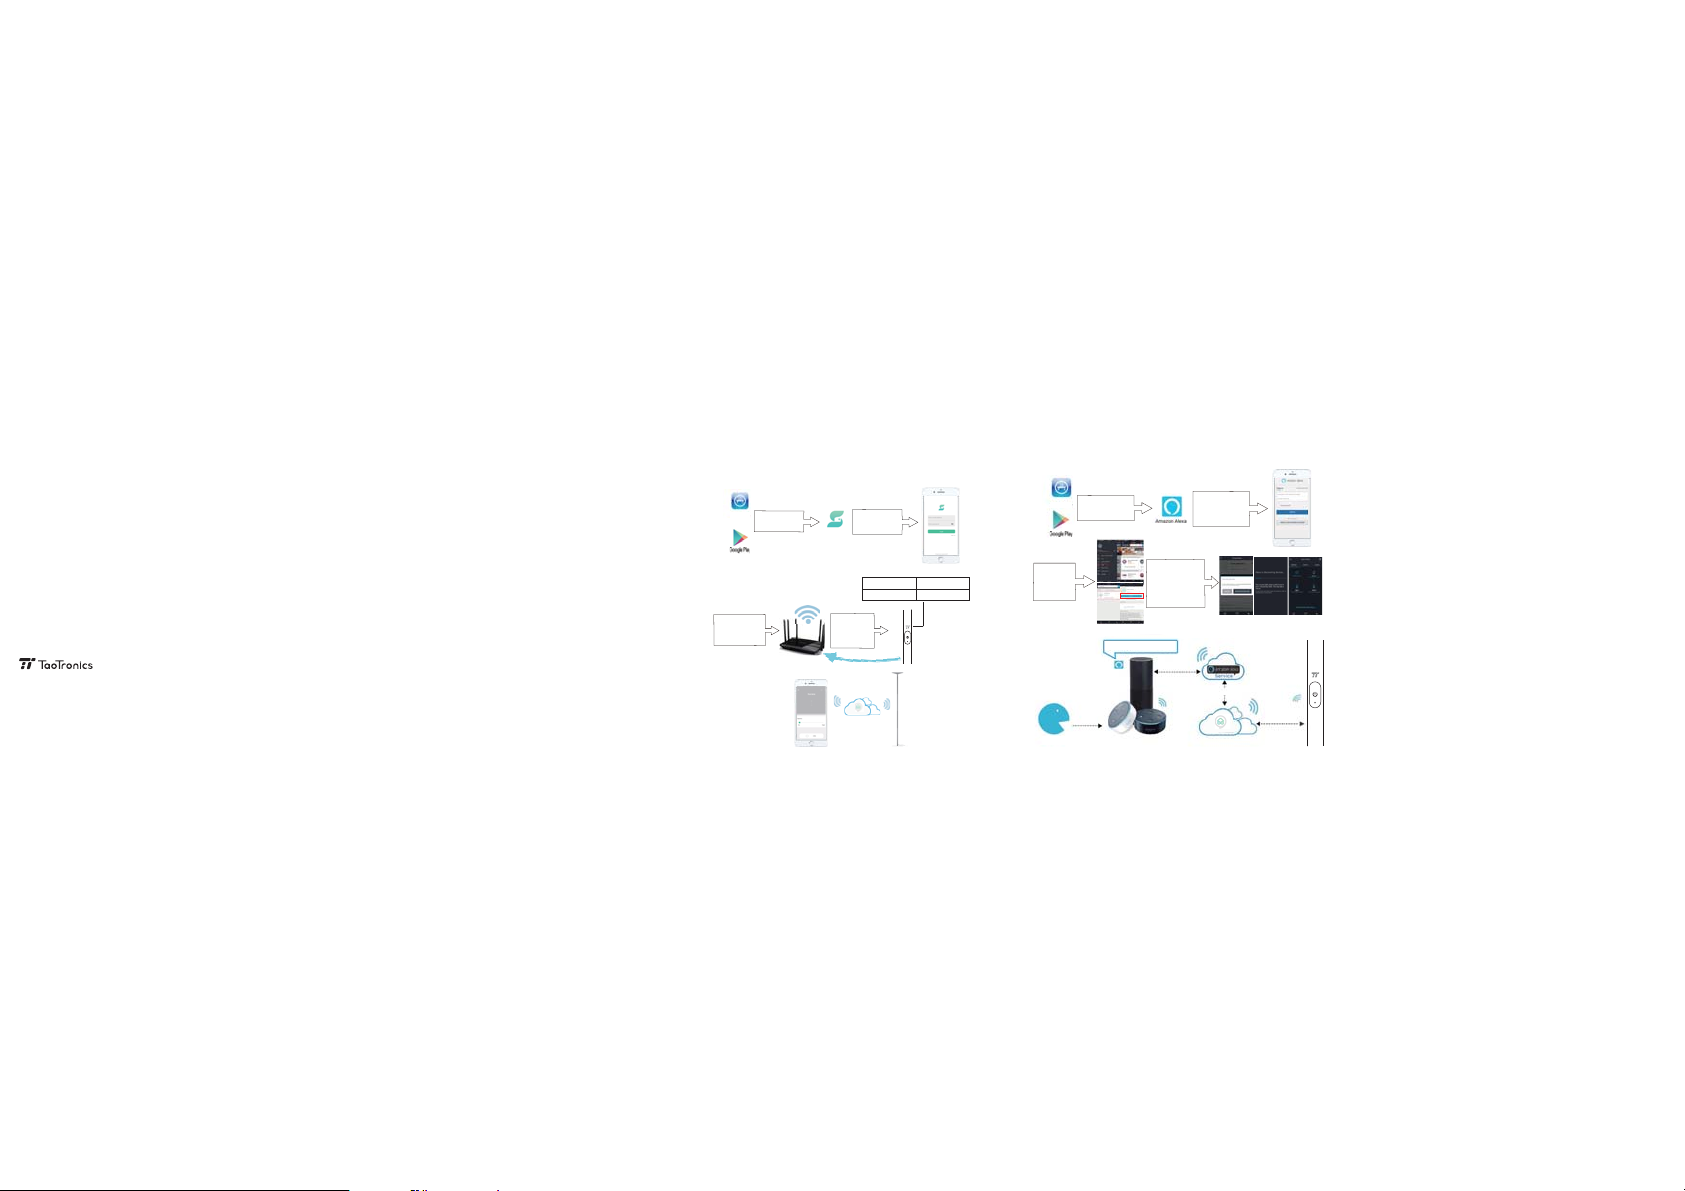
Smartphone App Control
How to use
· Smartphone Control
'VV9ZUXK
Search
“SunHome ” in the
or
app store .
Connect your
smartphone to the
WiFi router, register
the user account
and log in.
SunHome
Follow the
instructions in the
app to connect
the Floor Lamp
to the 2.4GHz WiFi
network .
Download to
install, open the
app.
White LED blinks rapidly
White LED stops
blinking
iFutureHome
Resetting, conguring
wireless network
Conguration is
successful
· Voice Control
Follow the Smartphone Control section above to congure the lamp with the WiFi router, then set up your Alexa as
below to command and use the lamp through voice control.
Link to
”iFutureHome”
app account, then
return to Amazon
Alexa app and
DISCOVER
DEVICES.
Transmit the
control signal
Download and
open the app,
register or log in
the Amazon
account.
iFutureHome Skill
iFutureHome
Transmit the
control signal
Search ”Amazon
'VV9ZUXK
Alexa” in the app
store.
Search
”iFutureHome”
skills and
ENABLE.
Alexa, discover my devices...
Alexa, turn on the Floor Lamp (whatever name you set for the lamp in the app)
Send out the
voice command
iFutureHome
iFutureHome
3.
Follow the instructions in Amazon
Alexa app to use the Amazon Alexa Service
Amazon Echo Series and other
brand Alexa voice device
TECHNOLOGY ENHANCES LIFE
Page 3

FCC Radiation Exposure Statement:
This equipment complies with FCC radiation exposure limits set forth for an uncontrolled environment. This equipment should be installed and operated with
minimum distance 20cm between the radiator & your body.
FCC Warning
This device complies with Part 15 of the FCC Rules. Operation is subject to the following two conditions:
(1) This device may not cause harmful interference, and (2) this device must accept any interference received, including interference that may cause undesired
operation.
NOTE 1: This equipment has been tested and found to comply with the limits for a Class B digital device, pursuant to part 15 of the FCC Rules. These limits are
designed to provide reasonable protection against harmful interference in a residential installation. This equipment generates, uses and can radiate radio frequency
energy and, if not installed and used in accordance with the instructions, may cause harmful interference to radio communications. However, there is no guarantee that
interference will not occur in a particular installation. If this equipment does cause harmful interference to radio or television reception, which can be determined by
turning the equipment off and on, the user is encouraged to try to correct the interference by one or more of the following measures:
- Reorient or relocate the receiving antenna.
- Increase the separation between the equipment and receiver.
-Connect the equipment into an outlet on a circuit different from that to which the receiver is connected.
-Consult the dealer or an experienced radio/TV technician for help.
NOTE 2: Any changes or modifications to this unit not expressly approved by the party responsible for compliance could void the user's authority to operate the
equipment.
 Loading...