

Page 1
TT-CL009
www.taotronics.com
NORTH AMERICA
E-mail : support@taotronics.com(US)
support.ca@taotronics.com(CA)
Tel : 1-888-456-8468 (Monday-Friday: 9:00 – 17:00 PST)
US Distributor: SUNVALLEYTEK INTERNATIONAL INC.
Address:46724 Lakeview Blvd, Fremont, CA 94538
EUROPE
E-mail:
support.uk@taotronics.com(UK)
support.de@taotronics.com(DE)
support.fr@taotronics.com(FR)
support.es@taotronics.com(ES)
support.it@taotronics.com(IT)
EU Importer: ZBT International Trading GmbH
Address:Halstenbeker Weg 98C, 25462 Rellingen, Deutschland
ASIA PACIFIC
E-mail: support.jp@taotronics.com(JP)
Tel :03-5542-0238(10-18時/土日祝除く)
JPImporter:株式会社ニアバイダイレクトジャパン
Address:東京都中央区入船2-9-5HKビル2F
www.taotronics.com
MANUFACTURER
Manufacturer: Shenzhen NearbyExpress Technology Development Co.,Ltd.
Address: 333 Bulong Road, Shenzhen, China, 518129
Learn more about the EU Declaration of Conformity:
https://www.taotronics.com/downloads-TT-CL009-CE-Cert.html
LED BEDSIDE LAMP
User Guide
Page 2
CONTENTS
English
Deutsch
Français
Español
Italiano
日本語
01/05
06/10
11/15
16/20
21/25
26/30
Page 3
①
EN
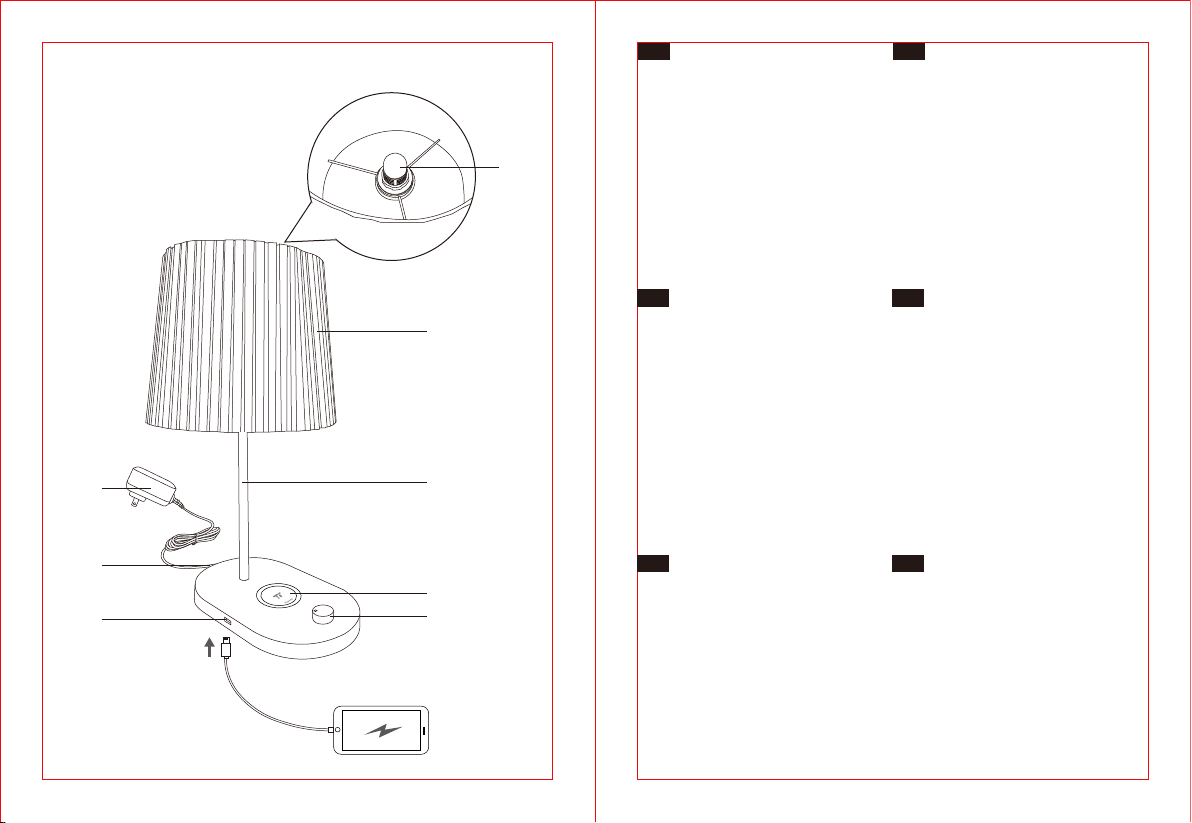
Product Diagram
1. LED Light Bulb
2. Lamp Shade
3. Lamp Arm
4. Wireless Charging Pad
5. Power Button / Brightness Knob
6. USB Port
7. Power Port
8. Power Adapter
DE
Produktabbildung
1. LED-Leuchtmittel
2.Lampenschirm
3. Lampenarm
4. Induktives Ladepad
5. Powerknopf / Helligkeitsdrehknopf
6. USB-Anschluss
7. Stromanschluss
8. Stromstecker
⑧
⑦
⑥
②
③
④
⑤
FR
Description du Produit
1. Ampoule à LED
2. Abat-jour
3. Tige de Lampe
4. Zone de Chargement Sans Fil
5. Bouton d’Alimentation / Bouton
de Luminosité
6. Port USB
7. Port d’Alimentation
8. Adaptateur Secteur
IT
Schema del Prodotto
1. Paralume
2. Lampadina LED
3. Braccio della Lampada
4. Base di Ricarica Wireless
5. Pulsante di Accensione /
Manopola Luminosità
6. Porta USB
7. Porta di Alimentazione
8. Adattatore di Corrente
ES
Diagrama del Producto
1. Bombilla LED
2. Pantalla de Lámpara
3. Brazo de Lámpara
4. Base de Carga Inalámbrica
5. Botón de Encendido / Perilla de
Brillo
6. Puerto USB
7. Puerto de alimentación
8. Adaptador de Corriente
JP
製品図
1.ランプシェード
2.LEDライト電球
3.ランプアーム
4.ワイヤレス充電パッド
5.電源ボタン/明るさ調整ダイヤル
6.USBポート
7.電源ポート
8.電源アダプター
Page 4

EN
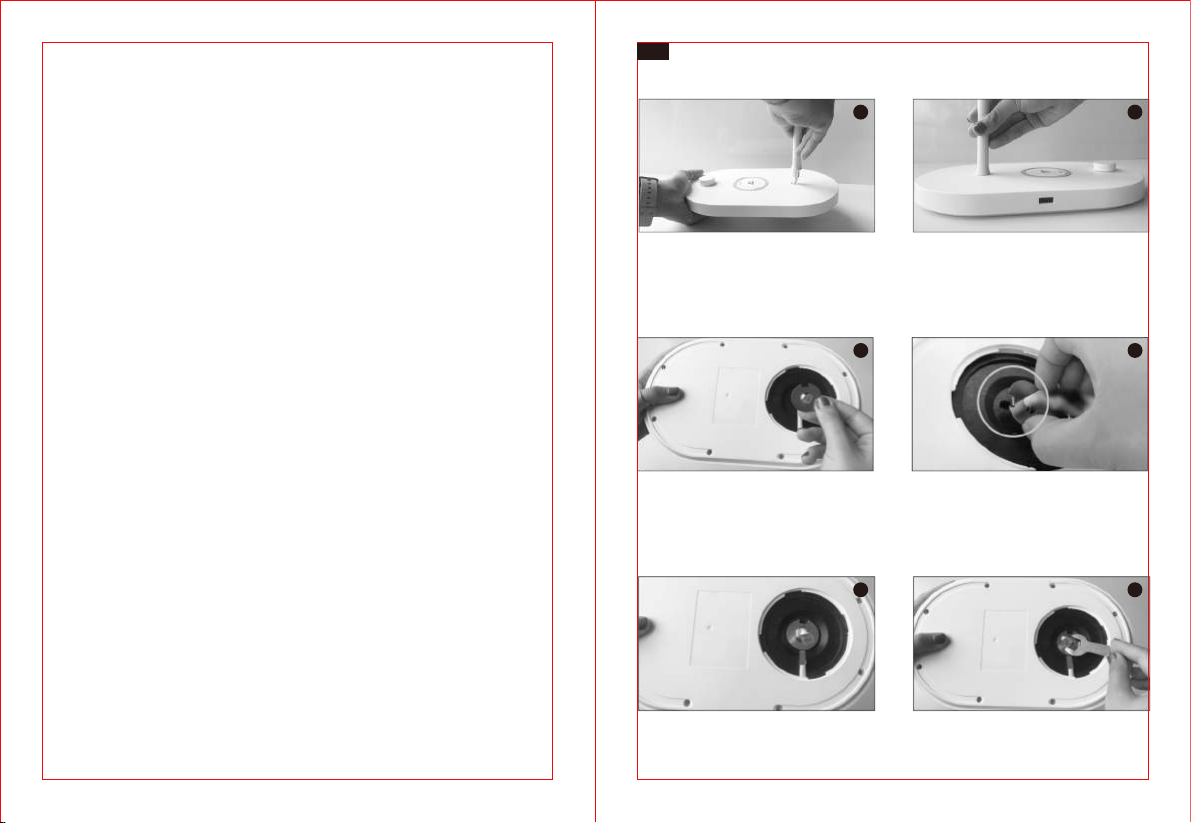
Assembling the Lamp
1 2
1. Thread the wire through the hole on the base
2. Hold tight the lamp pole with one hand, lift the base upside down
3 4
3. Align and mount the washer
4. Washer is well mounted with all the corners aligned
7 8
7. Connect the wires, make sure the terminals perfectly t in place
8. Cover up the hole and rotate the cover clockwise to lock in place
9
3
1
2
9. Remove the double-sided tape protectors on the inner lamp shade,
patch the 3 pieces together in sequences as labelled
10. Squeeze the inner lamp shade into the outer shade, stretch them to
form a circular shape
Note: Do not wash the outer shade.
10
5 6
5. Mount the screw nut onto the washer
6. Hold tight the lamp pole while tightening the nut with the included
wrench
11 12
11. Move the outer shade around to align with the 3 holes with that of the
inner shade for the support frame
12. Insert the separate bar into the frame support ring to set up the shade
support frame
01/02
Page 5

13 14
13. Align the 3 bars of the frame with the holes on the shades
14. Fix the frames in place with the nuts
15 16
15. Place the shade on top of the lamp pole
16. Lock the shade in place with the plastic ring
17
Specications
Model
Light Source
CRI
Operating Voltage
Power (Only for the Light)
USB Output
Wireless Charger Output
Lumens
Color Temperature
Operating Temperature
How to Use
TT-CL009
LED
>80
DC 10V / 3A
11W
DC 5V / 1A
10W Max
350lm
2600K - 3000K
-10°C to 45°C / -14°F to 113°F
17. Lamp ready for use
Power On / Off
· Connect the adapter to a wall outlet, the lamp enters standby mode.
· Tap the Power Button to turn on / off the lamp.
· Press and hold the Power Button to turn on the lamp on the lowest
brightness setting.
03/04
Page 6
Brightness Control
Rotate the Brightness Knob clockwise to increase the brightness and
counterclockwise to dim the light.
Memory Function
The lamp will resume the brightness setting of the time when it was last
turned off.
Note: Set the lamp to low brightness level when you turn it off to prevent
glare.
DE
Zusammenbau der Lampe
1 2
USB Port
Charge your smartphone, tablet, e-reader or any USB devices through the
5V / 1A USB port.
Wireless Charging Pad
· Place your phone with Qi-BPP compatibility on the wireless charging
station to automatically start charging.
· The charger supports 7.5W wireless charging for newest
iPhone X / 8 Plus / 8 in iOS 11.2 or above and 10W fast charging to
selected Samsung Galaxy, Google Nexus, or Microsoft Lumia phones.
Note:
If charging does not occur, adjust the phone so its receiver can be
detected. Please note that different model phones have their receivers in
different positions.
1. Führen Sie das Kabel durch das Loch in der Basis
2. Halten Sie die Lampenstange mit einer Hand fest und drehen Sie die
Basis verkehrtherum
3 4
3. Richten Sie die Unterlegscheibe aus und montieren Sie sie
4. Die Unterlegscheibe ist mit der Aussparung richtig ausgerichtet
angebracht
5 6
5. Schrauben Sie die Mutter auf die Unterlegscheibe
6. Halten Sie die Lampenstange fest, während Sie die Mutter mithilfe des
mitgelieferten Schraubenschlüssels festziehen
05/06
Page 7

7 8
13 14
7. Verbinden Sie die Kabel, stellen Sie sicher, dass die Anschlüsse perfekt an
Ort und Stelle passen
8. Verdecken Sie die Öffnung wieder und drehen Sie die Abdeckung im
Uhrzeigersinn, um sie zu verschließen
9 10
3
3
2
1
1
2
9. Entfernen Sie die doppelseitigen Klebebandschützer auf dem inneren
Lampenschirm und kleben Sie die 3 Teile in der angegebenen
Reihenfolge zusammen
10. Drücken Sie den inneren Lampenschirm in den äußeren Lampenschirm
und strecken Sie ihn, um eine kreisförmigen Form zu bilden
Hinweis: Waschen Sie den Außenschirm nicht.
11 12
11. Verschieben Sie den Außenschirm, um die 3 Löcher mit dem
Innenschirm des Stützrahmens auszurichten
12. Setzen Sie die separate Stange in den Rahmenhalterungsring, um den
Schattenhalterahmen einzurichten
13. Richten Sie die 3 Stangen des Rahmens an den Löchern der Schirme
aus.
14. Befestigen Sie die Rahmen mit den Muttern
15
15. Platzieren Sie den Schirm oben auf dem Lampenstange
16. Schließen Sie den Schirm mit dem Plastikring ab
17
17. Die Lampe ist betriebsbereit
07/08
16
Page 8

Spezikationen
Modell
Lichtquelle
CRI
Betriebsspannung
Leistung (Nur das Licht)
USB-Ausgang
Ausgangsleistung des kabellosen
Ladegerätes
Lumen
Farbtemperatur
Betriebstemperatur
Anleitung
TT-CL009
LED
>80
10V / 3A
11W
DC 5V / 1A
10W max
350 lm
2600K - 3000K
-10°C bis 45°C / -14°F bis 113°F
Helligkeitssteuerung
Drehen Sie den Helligkeitsdrehknopf im Uhrzeigersinn, um die Helligkeit zu
erhöhen, und gegen den Uhrzeigersinn, um das Licht zu dimmen.
Speicherfunktion
Die Lampe nimmt die Helligkeitseinstellung wieder auf, die beim letzten
Ausschalten aktiv war.
Anmerkung: Stellen Sie die Lampe auf eine niedrige Helligkeitsstufe, wenn
Sie sie ausschalten, damit Sie nicht geblendet werden.
USB-Anschluss
Laden Sie Ihr Handy, Tablet, E-Reader oder andere USB-Geräte mit dem
5V/1A USB-Anschluss.
Kabellos auaden
· Legen Sie Ihr Handy mit Qi-BPP-Kompatibilität auf die kabellose
Ladestation, um es automatisch aufzuladen.
· Das Ladegerät unterstützt 7.5W kabelloses Laden für die neuesten
iPhone X / 8 Plus / 8 mit dem aktuellen iOS 11.2 oder höher, und 10W
Schnellladen für bestimmte Samsung Galaxy, Google Nexus und
Microsoft Lumia.
Hinweis:
Wenn das Laden nicht automatisch beginnt, legen Sie Ihr Handy so hin,
dass der Empfänger erkennt werden kann. Bitte beachten Sie, dass
verschiedene Handymodelle ihren Empfänger an unterschiedlichen
Positionen haben.
Ein- / Ausschalten
· Stecken Sie den Netzstecker in eine Steckdose. Die Lampe wechselt in
den Standby-Modus.
· Tippen Sie den Powerknopf an, um die Lampe ein- / auszuschalten.
· Halten Sie den Powerknopf gedrückt, um die Lampe auf geringster
Helligkeitseinstellung einzuschalten.
09/10
Page 9

FR
Assemblage de la Lampe
1 2
1. Faites passer le câble par le trou du socle
2. Tenez fermement la tige de la lampe d'une main, tournez le socle à
l’envers
3 4
3. Alignez et installez la rondelle
4. La rondelle est bien mise quand tous les coins sont alignés
7 8
7. Connectez les câbles, assurez-vous que les terminaux sont parfaitement
en place
8. Couvrez le trou et faites tourner le cache dans le sens horaire pour le
verrouiller en place
9 10
3
3
2
1
1
2
9. Enlevez les protecteurs de ruban adhésif double-face sur l'abat-jour
intérieur de lampe, collez les 3 morceaux ensemble dans des
séquences comme étiquetées
10. Pressez l'abat-jour intérieur dans l'abat-jour extérieure, étirez-les pour
former une forme circulaire
Remarque: Ne pas laver l'abat-jour extérieur.
5 6
5. Mettez l’écrou sur la rondelle
6. Tenez fermement la tige de la lampe tout en serrant l'écrou avec la clé
incluse
11 12
11. Déplacez l'abat-jour extérieur pour l'aligner avec celui de l'abat-jour
intérieur pour le cadre de support
12. Insérez la barre séparée dans la bague du cadre de support pour
installer le cadre de support d’abat-jour
11/12
Page 10

13 14
13. Alignez les 3 barres du cadre avec les trous de l'abat-jour
14. Fixez les cadres en place avec les écrous
15
15. Placez l'abat-jour sur le dessus de la lampe
16. Verrouillez l'abat-jour en place avec l'anneau en plastique
17
17. La lampe est prête à utiliser
Spécications
Modèle
Source Lumineuse
CRI
Tension de Fonctionnement
Puissance (Seulement pour la Lampe)
Sortie USB
Sortie de Chargement Sans Fil
16
Lumens
Température de Couleur
Température de fonctionnement
TT-CL009
LED
>80
10V / 3A
11W
DC 5V / 1A
10W Max
350lm
2600K - 3000K
-10 à 45°C
Mode d’Emploi
Marche / Arrêt
· Connectez l'adaptateur à une prise secteur, la lampe entre en mode
veille.
· Touchez le Bouton d'Alimentation pour allumer / éteindre la lampe.
· Appuyez et maintenez le Bouton d'Alimentation pour allumer la lampe
avec le réglage de luminosité le plus bas.
13/14
Page 11

Réglage de Luminosité
Tournez le Bouton de Luminosité dans le sens horaire pour augmenter la
luminosité et dans le sens antihoraire pour baisser la lumière.
Fonction Mémoire
La lampe rétablira le réglage de luminosité de la dernière fois où elle a été
éteinte.
Nota: Réglez la lampe sur un niveau de luminosité faible lorsque vous
l'éteignez pour éviter l'éblouissement.
ES
Ensamblar la Lámpara
1 2
Port USB
Chargez votre smartphone, tablette, liseuse électronique, ou tout autre
périphérique USB via le port USB 5V / 1A.
Chargeur Sans-l
· Placez votre téléphone compatible Qi-BPP sur la station de charge sans
l pour démarrer automatiquement le chargement.
· Le chargeur supporte la recharge sans l de 7,5 W pour le dernier
iPhone X / 8 Plus / 8 avec iOS 11.2 ou supérieur, et le chargement
rapide de 10W pour Samsung Galaxy, Google Nexus ou Microsoft
Lumia sélectionné.
Nota:
Si le chargement ne démarre pas, bougez le téléphone pour que son
récepteur puisse être détecté. Veuillez noter que suivant le modèle de
téléphone, les récepteurs sont dans différentes positions.
1. Inserte el cable a través del agujero en la base
2. Sostenga el poste de la lámpara con una mano, levante la base boca
abajo
3 4
3. Alinee y coloque la arandela
4. La arandela estará bien montada cuando todas las esquinas estén
alineadas
5 6
5. Atornille la tuerca a la arandela
6. Mantenga apretado el poste de la lámpara mientras apriete la tuerca
con la llave incluida
15/16
Page 12

7 8
13 14
7. Conecte los cables, asegúrese de que los terminales encajen
perfectamente en su lugar
8. Cubra el agujero y gire la tapa a la derecha para bloquear en su lugar
9 10
3
3
2
1
1
2
9. Retire los protectores de cinta de doble cara en la pantalla interior de la
lámpara, coloque las 3 piezas juntas en orden de marcado
10. Apriete la pantalla interna de la lámpara para que lo ponga dentro de
la pantalla externa, estírela para restaurar la apariencia circular
Nota: No lave la pantalla exterior.
11 12
11. Mueva la pantalla externa para alinear los 3 oricios con los de la
interna para el marco de soporte
12. Inserte la barra separada en el anillo de soporte del marco para
congurar el marco de soporte de la pantalla
13. Alinee las 3 barras del marco con los agujeros en las pantallas
14. Fije el marco en su lugar con las tuercas
15
15. Coloque la pantalla en la parte superior de la poste de la lámpara
16. Ajuste el marco en su lugar con el anillo de plástico
17
17. La lámpara está lista para usar
16
17/18
Page 13

Especicaciones
Modelo
Fuente de luz
CRI
Voltaje de Operación
Energía (Solo para la luz)
Salida USB
Salida de Cargador Inalámbrico
Lúmenes
Temperatura del Color
Temperatura de Funcionamiento
Cómo usarla
TT-CL009
LED
> 80
10V/3A
11W
DC 5V/1A
10W Max
350 lm
2600K - 3000K
-10°C a 45°C / -14°F a 113°F
Control de Brillo
Gire la Perilla de Brillo a la derecha para aumentar el brillo y a la izquierda
para reducirlo.
Función de Memoria
La lámpara se reanudará a la conguración de brillo que fue usada la
última vez.
Nota: Ajuste la lámpara a bajo nivel de brillo cuando la apague para
evitar el deslumbramiento.
Puerto USB
Cargue su smartphone, tableta, e-reader o cualquier dispositivo USB a
través del puerto USB 5V /1A .
Cargador Inalámbrico
· Coloque su teléfono con compatibilidad Qi-BPP en la estación de
carga inalámbrica para comenzar la carga automáticamente.
· El cargador soporta la carga inalámbrica de 7,5W para el nuevo
iPhone X / 8 Plus / 8 con el sistema iOS 11.2 o más superior y la de 10 W
para la carga rápida a dispositivos seleccionados de Samsung Galaxy,
Google Nexus, o los Lumia de Microsoft.
Nota:
Si no se inicia la carga, ajuste el teléfono para que se pueda detectar su
receptor. Tenga en cuenta que diferentes modelos de teléfono tienen sus
receptores en diferentes lugares.
Encendido / Apagado
· Conecte el adaptador a una toma de corriente de pared, la lámpara
entrará en modo de espera.
· Toque el Botón de Encendido para encender / apagar la lámpara.
· Presione y mantenga presionado el Botón de Encendido para
encender la lámpara con la conguración de brillo más baja.
19/20
Page 14

IT
Assemblaggio della Lampada
1 2
1. Inlare il cavo attraverso il foro nella base
2. Stringere il sostegno per lampada con una mano, capovolgendo la
base
3 4
3. Allineare e montare la rondella
4. La rondella è montata correttamente quando tutti gli angoli sono
allineati
7 8
7. Collegare i cavi, assicurarsi che i terminali si adattano perfettamente al
posto
8. Coprire il foro e ruotare il coperchio in senso orario per bloccare
9 10
3
3
2
1
1
2
9. Rimuovere le protezioni del nastro biadesivo sul paralume interno,
rappezzare i 3 pezzi insieme in sequenze come etichettato
10. Spremere il paralume interno nel paralume esterno, allungarli per f
ormare una forma circolare
Nota: non lavare il paralume esterno.
5 6
5. Montare il dado sopra la rondella
6. Stringere il sostegno per lampada e stringere il dado con la chiave
inclusa
11 12
11. Spostare il paralume esterno per allinearlo con i 3 fori con quello del
paralume interno per la struttura di supporto
12. Inserire la barra separata nell'anello di supporto della struttura per
impostare la struttura di supporto del paralume
21/22
Page 15

13 14
13. Allineare le 3 barre della struttura con i fori sulle paralumi
14. Fissare la struttura in posizione con i dadi
15
15. Posizionare il paralume sopra il Sostegno della lampada
16. Bloccare il paralume in posizione con l'anello di plastica
17
17. Lampada pronta per l'uso
Speciche
Modello
Fonte Luminosa
IRC
Tensione di Esercizio
Alimentazione (Solo per la Luce)
Uscita USB
Uscita Caricabatterie Wireless
16
Lumen
Temperatura Colore
Temperatura di Esercizio
TT-CL009
LED
>80
10V / 3A
11W
5V DC / 1A
10W Max
350lm
2600K - 3000K
Da -10°C a 45°C / Da -14°F a 113°F
Modalità di Utilizzo
Accensione / Spegnimento
· Collegare l'adattatore ad una presa di corrente. La lampada entrerà in
modalità stand-by.
· Premere il Pulsante di Accensione per accendere / spegnere la
lampada.
· Premere e tenere premuto il Pulsante di Accensione per accendere la
lampada con le impostazioni di luminosità più basse.
23/24
Page 16

Controllo della Luminosità
Ruotare la Manopola Luminosità in senso orario per aumentare la
luminosità e in senso antiorario per attenuare la luce.
Funzione Memoria
La lampada si riaccenderà con le impostazioni di luminosità memorizzate
prima dell'ultimo spegnimento.
Nota: Prima dello spegnimento, impostare la lampada su un livello di
luminosità basso per evitare bagliori indesiderati.
JP
ランプの組み立て手順
1 2
Porta USB
Per ricaricare smartphone, tablet, e-reader o qualsiasi altro dispositivo USB
attraverso la porta USB da 5V/1A. .
Caricabatterie Wireless
· Appoggiare un telefono compatibile con lo standard Qi-BPP sulla base
di ricarica wireless per iniziare automaticamente la ricarica.
· Supporta wireless charging no a 7.5W per l’iPhone X / 8 Plus / 8 con
iOS 11.2 o superiore e fast charging no a 10W per i dispositivi Samsung
Galaxy, Google Nexus e Microsoft Lumia compatibili.
Nota:
Se la ricarica non parte, regolare il telefono in modo che il suo ricevitore
possa essere rilevato. Si prega di notare che non tutti i telefoni hanno il
ricevitore nella stessa posizione.
1. ベースの穴にワイヤーを通してください
2. ランプポ ール を片 手でしっかり固定し、ベースを逆さまにして下さ い
3 4
3. ワッシャー を設 置して下さい
4. ワッシャーの位置が全て正確に設置されていることを確認して下さい
5 6
5. スクリューナットをワッシャーの 上に設 置して下さい
6. ランプポールをしっかり持ち付属のレンチでナットを締めて下さい
25/26
Page 17

7 8
13 14
7. ワイヤーを繋げて下さい。端子が完全に固定されていることを確認して下さい
8. 穴にカバーをかぶせ、時計回りに回して固定して下さい
9 10
3
3
2
1
1
2
9. 内側のランプシェードの両面テーププロテクターを取り外し、ラベルが付いた順に3
つの部分を貼り付けて下さい
10. 内側のシェードを外側のシェードに押し込み、伸ばして円形にします
ご 注 意:グレアを防ぐために、ランプを消灯する前に、明るさを低輝度レベルに設定し
てくだ さ い
11 12
11. 外側のシェードを動かして、3つの穴とサポートフレームの内側のシェードの穴に
合わせて下さい
12. 別のバーをフレームサポートリングに差し込んでシェードサポートフレームをセッ
トアップしてください
13. シェードの穴とシェードフレーム3つのポールを合わせて下さい
14. ナットでフレームを 固定して下さ い
15 16
15. ランプポールの上にシェードを設置して下さい
16. プラスティックリングでシェードを固定して下さい
17
17.準備完了
27/28
Page 18

仕様
モデル
ライト源
CRI
動作電圧
電源 (ライトのみ)
USB 出力
ワイヤレス充電出力
ルーメン
色温度
動作温度
使い方
TT-CL009
LED
>80
10V / 3A
11W
DC 5V / 1A
最大10W
350lm
2600K - 3000K
-10°C ~ 45°C
NOTE: This equipment has been tested and found to comply with the limits
for a Class B digital device, pursuant to part 15 of the FCC Rules. These
limits are designed to provide reasonable protection against harmful
interference in a residential installation. This equipment generates uses and
can radiate radio frequency energy and, if not installed and used in
accordance with the instructions, may cause harmful interference to radio
communications.
However, there is no guarantee that interference will not occur in a
particular installation. If this equipment does cause harmful interference to
radio or television reception, which can be determined by turning the
equipment off and on, the user is encouraged to try to correct the
interference by one or more of the following measures:
- Reorient or relocate the receiving antenna.
- Increase the separation between the equipment and receiver.
-Connect the equipment into an outlet on a circuit different from that to
which the receiver is connected.
-Consult the dealer or an experienced radio/TV technician for help
Changes or modications not expressly approved by the party responsible
for compliance could void the user's authority to operate the equipment.
This device complies with Part 15 of the FCC Rules. Operation is subject to
the following two conditions:
(1) this device may not cause harmful interference, and (2) this device
must accept any interference received, including interference that may
cause undesired operation.
RF Exposure Warning Statements:
電源オン/オフ
·コンセントへアダプターを接続すると、ランプはスタンバイモードになります。
·電源ボタンをタッチすると電源のオン/オフが出来ます。
·電源ボタンを長押しすると、一番低い明るさのレベルに設定出来ます。
This equipment complies with FCC radiation exposure limits set forth for an
uncontrolled environment. This equipment shall be installed and operated
with minimum distance 20cm between the radiator & body.
29/30
 Loading...