

Page 1
RP-SH014
www.ravpower.com
NORTH AMERICA
E-mail : support@ravpower.com(US)
support.ca@ravpower.com(CA)
Tel : 1-888-456-8468 (Monday-Friday: 9:00-17:00 PST)
Address : 46724 Lakeview Blvd, Fremont, CA 94538
EUROPE
E-mail:
support.uk@ravpower.com(UK)
support.de@ravpower.com(DE)
support.fr@ravpower.com(FR)
support.es@ravpower.com(ES)
support.it@ravpower.com(IT)
EU Importer : ZBT International Trading GmbH
Address: Halstenbeker Weg 98C, 25462 Rellingen, Deutschland
ASIA PACIFIC
E-mail:support.jp@ravpower.com(JP)
JPImporter:株式会社SUNVALLEYJAPAN
Tel:03-5542-0238(10〜18時/土日祝日を除く)
Address:〒104-0032東京都中央区八丁堀3丁目18-6PMO京橋東9F
MANUFACTURER
Manufacturer: Shenzhen NearbyExpress Technology
Development Co., Ltd.
Address: 333 Bulong Road, Shenzhen, China, 518129
MADE IN CHIN A
WIRELESS CHARGING CAR HOLDER
User Guide
Page 2

English
Deutsch
Français
Español
Italiano
日本語
01/05
06/10
11/15
16/20
21/25
26/31
Page 3
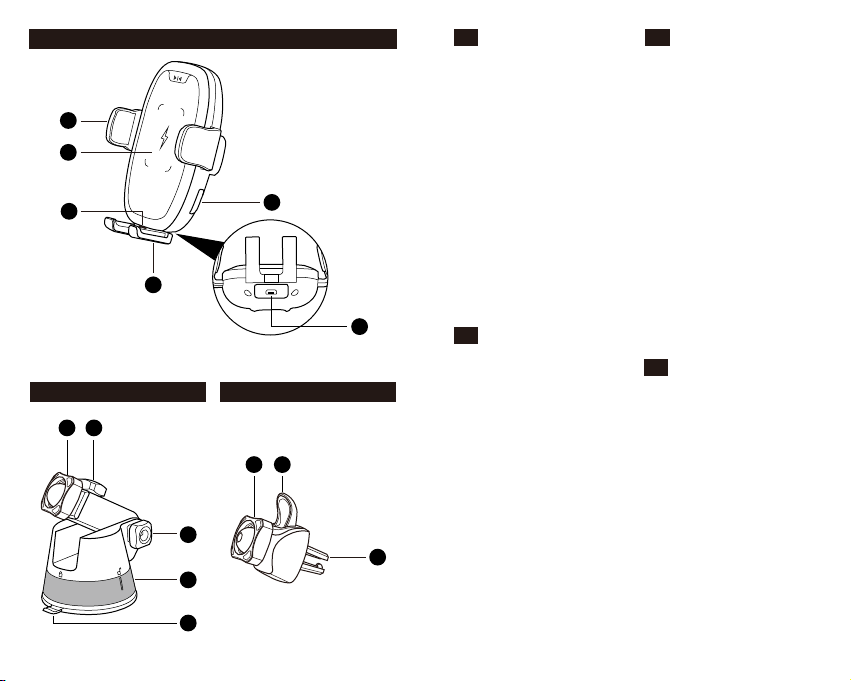
Holder
1
2
3
OPEN
6
4
Suction Base Clip Mount
7 8
12 13
9
10
11
EN
Product Diagram
1. Cradle
2. Wireless Charger
3. LED Indicator
4. Tray
5. Micro USB Charging Port
6. Cradle Release Button
7. Ball Joint & Stabilizing Nut
8. Arm Extension Button
9. Angle Adjuster
10. Suction Cup Lock
11. Suction Cup Release Tab
12. Ball Joint & Stabilizing Nut
13. Clip Release Tab
5
14. Clip
FR
Schéma du produit
1. Socle
2. Chargeur sans l
3. Indicateur LED
4. Plateau
5. Port de chargement Micro USB
6. Bouton de déverrouillage du socle
7. Joint à rotule et écrou stabilisateur
8. Bouton d'extension du bras
9. Dispositif de réglage de l'angle
10. Verrouillage de la ventouse
14
11. Languette de déverrouillage de
la ventouse
12. Joint à rotule et écrou stabilisateur
13. Languette de déverrouillage de
la pince
14. Pince
DE
Produktdarstellung
1. Schale
2. Drahtlosladegerät
3. LED-Anzeige
4. Einsatz
5. Micro-USB-Ladeanschluss
6. Schalenfreigabetaste
7. Kugelgelenk und
Stabilisierungsmutter
8. Armverlängerungstaste
9. Winkelregler
10. Saugnapf-Verriegelung
11. Saugnapf-Freigaberiegel
12. Kugelgelenk und
Stabilisierungsmutter
13. Klemmfreigaberiegel
14. Klemme
ES
Diagrama del producto
1. Base
2. Cargador inalámbrico
3. Indicador LED
4. Bandeja
5. Puerto de carga Micro-USB
6. Botón de liberación de la base
7. Articulación de bola y tuerca
estabilizadora
8. Botón de extensión del brazo
9. Ajustador de ángulo
10. Bloqueo de la ventosa
11. Pestaña de liberación de la ventosa
12. Articulación de bola y tuerca
estabilizadora
13. Pestaña de liberación de la pinza
14. Pinza
Page 4
IT
Diagramma del prodotto
1. Base
2. Caricatore wireless
3. LED
4. Vano
5. Porta di carica micro USB
6. Tasto di rilascio base
7. Giunto a sfere e dado di
stabilizzazione
8. Tasto di estensione braccio
9. Regolatore angolo
10. Blocco supporto a ventosa
11. Linguetta di rilascio supporto
a ventosa
12. Giunto a sfere e dado di stabilizzazione
13. Linguetta di rilascio clip
14. Clip
JP
製品外観図
1.クレードル
2.ワイヤレス充電器
3.LEDインジケータ
4 . トレイ
5.MicroUSB充電ポート
6.クレードルのリリースボタン
7.ボールジョイントと固定ナット
8.アーム延長ボタン
9.角度調整器
10.吸着カップのロック
11.吸着カップのリリースタブ
12.ボールジョイントと固定ナット
13.クリップのリリースタブ
14.クリップ
※7.~11.は吸着スタンド用
12.~14.はクリップマウント用
EN
Package Contents
1 x Holder
1 x Car Charger
1 x Micro USB Cable
1 x Suction Base / Clip Mount
Note:
For suction base or clip mount, the actual package prevails.
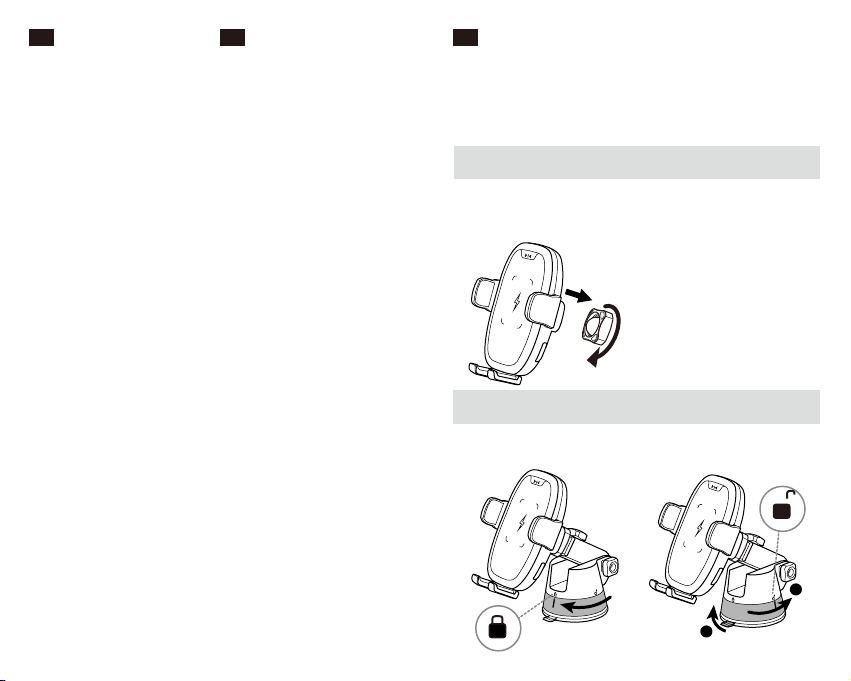
Quick Installation
Assembling the Wireless Charging
Car Holder
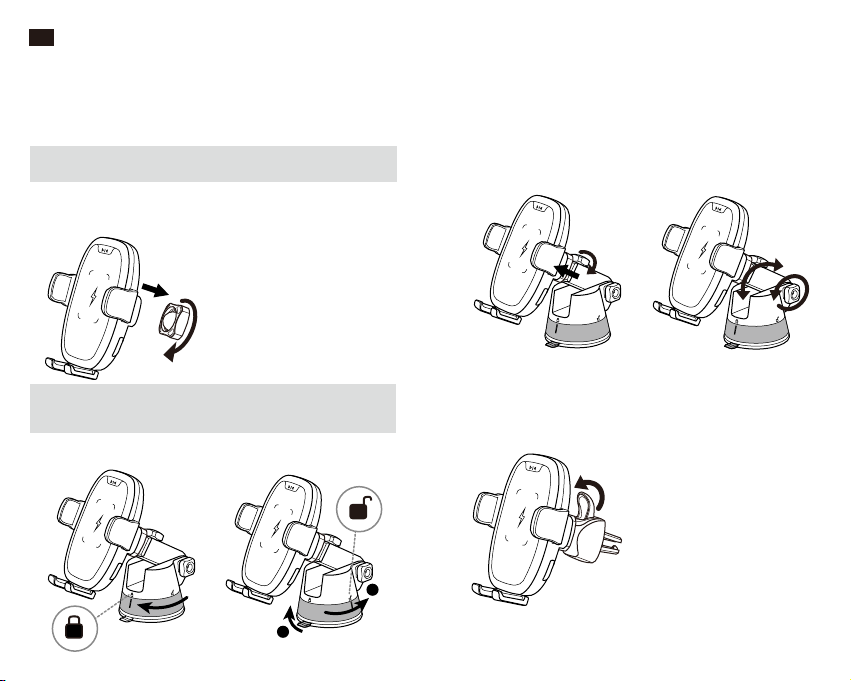
Click the ball into the connecting
joint, screw the stabilizing nut to
OPEN
Note:
Place the stabilizing nut correctly or the ball won’t t into the joint.
For Suction Base
lock in place.
OPEN
OPEN
1
2
01
Page 5
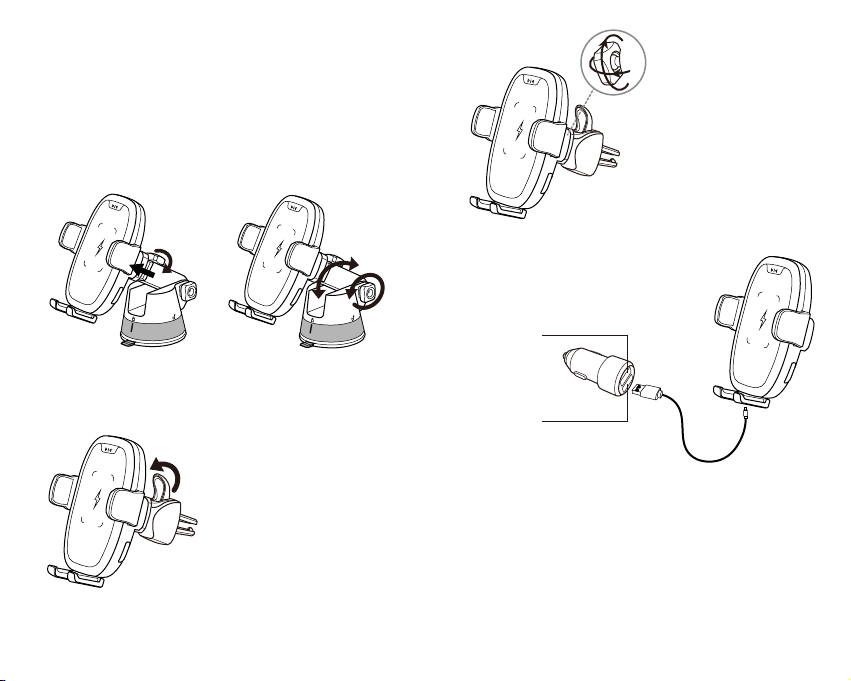
1. Wipe clean the surface before installation.
2. Place the base onto the cleaned spot.
3. Press the base tight and rotate the suction cup lock counterclockwise to
lock in place.
4. Rotate the lock clockwise and pull the suction cup release tab to
remove it.
360°
Swivel the holder as desired and x
it by the stabilizing nut.
OPEN
OPEN
OPEN
Use the Arm Extension Button and Angle Adjuster to change the height
and angle of the mount.
For Clip Mount
1. Pinch and press the clip release
tab and the ball joint to open the
clip.
2. Insert the two sides of the clip into
the car vent outlet, and release the
OPEN
clip release tab.
3. To remove it, just pinch and press
the tab and take the mount out.
Green Chip: 9V
(Quick Charge,
Recommended)
OPEN
White Chip: 5V
Using the Wireless Charging Car Holder
1. Connect the Micro USB cable into the charging port.
2. Insert the USB connector into the car charger. The LED indicator will
turn on blue indicating a successful connection.
02/03
Page 6
OPEN
OPEN
1
2
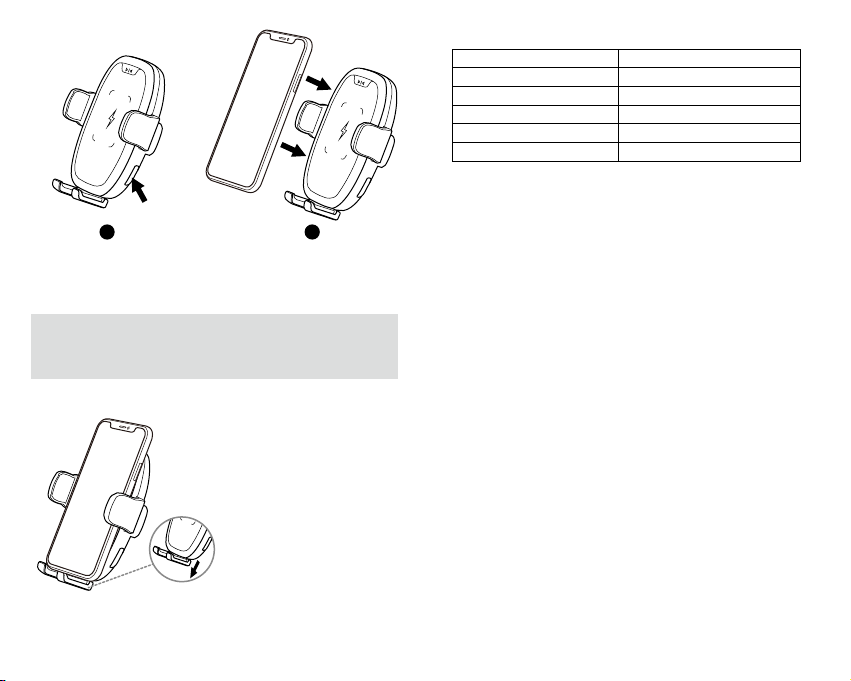
1. Press the Cradle Release Button to open up the cradle.
2. Place the smartphone with wireless charging functionality onto the
phone holder. Squeeze gently the cradle to t your device.
Note:
• Phone cases with thickness over 0.2 inch / 0.5cm will not be detected.
• Align the center of your phone on the wireless charging zone for
faster charging.
Adjust the tray as per your phone
size. The indicator will blink blue
indicating charging is started.
OPEN
Specications
Model
Input (Wireless Charger)
Output (Wireless Charger)
Micro USB Cable Length
Dimensions
Weight
OPEN
RP-SH014
5V / 9V; 18W
10W Max
120cm / 47.2in
114 x 60 x 25mm / 4.5 x 2.4 x 1in
175g / 6.18oz
Caution
• Do not drop, knock, or squeeze the product.
• Do not dismantle or throw the product in re or water to avoid causing
short circuit or leakage.
• Do not use the wireless charger in severely hot, humid, or corrosive
environments to avoid circuit damage and leakage.
• Do not place close to magnetic stripe or chip card
(ID card, bank cards, etc.) to avoid magnetic failure.
• Make sure the back of your phone or phone case is even without foreign
metal objects.
• Keep at least 20cm / 7.9in away from implantable medical devices
(pacemakers, implantable cochlear, etc.) to avoid potential magnetic
interference.
• Keep away from children.
04/05
Page 7

DE
Lieferumfang
1 x Halterung
1 x Kfz-Ladegerät
1 x Micro-USB-Kabel
1 x Saugnapf-Basis / Klemm halterung
Hinweis:
Bezüglich Saugnapf-Basis oder Klemmhalterung orientieren Sie sich
bitte am tatsächlichen Lieferumfang.
Schnellinstallation
Kfz-Halterung mit
Drahtlosauadung montieren
Lassen Sie die Kugel am
Anschlussgelenk einrasten,
schrauben Sie die
OPEN
Hinweis:
Platzieren Sie die Stabilisierungsmutter richtig. Andernfalls passt die
Kugel nicht in das Gelenk.
Saugnapf-Basis
OPEN
Stabilisierungsmutter fest.
OPEN
2
1. Oberäche vor der Installation abwischen.
2. Basis auf der gesäuberten Stelle platzieren.
3. Basis festdrücken und Saugnapfriegel zum Verriegeln gegen den
Uhrzeigersinn drehen.
4. Riegel im Uhrzeigersinn drehen und zum Entfernen
Saugnapf-Freigaberiegel ziehen.
OPEN
OPEN
Verwenden Sie zum Ändern von Höhe und Winkel der Halterung
Armverlängerungstaste und Winkelregler.
Klemmhalterung
1. Klemmfreigaberiegel und
Kugelgelenk zum Önen der
Klemme zusammendrücken.
2. Zwei Seiten der Klemme in die
Fahrzeugbelüftungsschlitze
stecken und Klemmfreigaberiegel
OPEN
1
loslassen.
3. Zum Entfernen Riegel
zusammendrücken und Halterung
herausnehmen.
06/07
Page 8

360°
OPEN
Schwenken Sie die Halterung wie
gewünscht und befestigen Sie sie
über die Stabilisierungsmutter.
OPEN
OPEN
OPEN
Grüner Chip: 9 V
(Schnellauadung
empfohlen)
OPEN
Weißer Chip: 5 V
Kfz-Halterung mit Drahtlosauadung verwenden
1. Verbinden Sie das Micro-USB-Kabel mit dem Ladeanschluss.
2. Stecken Sie den USB-Anschluss in das Kfz-Ladegerät. Die LED-Anzeige
leuchtet blau, was auf eine erfolgreiche Verbindung hinweist.
1
2
1. Drücken Sie zum Önen der Schale die Schalenfreigabetaste.
2. Platzieren Sie das Smartphone mit Drahtlosauadefunktion in der
Telefonhalterung. Drücken Sie die Schale vorsichtig zusammen,
damit Ihr Gerät sicher gehalten wird.
Hinweis:
• Telefonhüllen mit einer Dicke von mehr als 0.2 inch/0,5 cm werden
nicht erkannt.
• Richten Sie die Mitte Ihres Telefons zum schnelleren Auaden an der
Drahtlosladezone aus.
Passen Sie den Einsatz entsprechend
der Größe Ihres Telefons an. Die
Anzeige zeigt durch blaues Blinken
an, dass der Ladevorgang gestartet
wurde.
OPEN
08/09
Page 9

Technische Daten
Modell
Eingang (Drahtlosladegerät)
Ausgang (Drahtlosladegerät)
Länge des Micro-USB-Kabels
Maße
Gewicht
RP-SH014
5 V / 9 V; 18 W
10 W max.
120cm / 47.2in
114 x 60 x 25 mm/ 4.5 x 2.4 x 1in
175 g / 6.18oz
FR
Contenu de la boîte
1 x Support
1 x Chargeur de voiture
1 x Câble Micro USB
1 x Base à ventouse / Montant à pince
Remarque:
Pour la base à ventouse ou le montant à pince, l'emballage réel prévaut.
Achtung
• Produkt nicht fallen lassen, Stößen aussetzen oder zusammendrücken.
• Produkt nicht demontieren oder in Feuer oder Wasser werfen.
Andernfalls drohen Kurzschluss und Leckage.
• Verwenden Sie das Drahtlosladegerät nicht an sehr heißen, feuchten
oder korrosiven Orten. Andernfalls drohen Kurzschluss und Leckage.
• Platzieren Sie das Produkt zur Vermeidung magnetischer Ausfälle nicht
in der Nähe von Magnetstreifen oder Chipkarten
(Personalausweis, EC-Karten usw.).
• Achten Sie darauf, dass Ihr Telefon oder Ihre Telefonhülle glatt ist und
keine metallischen Fremdkörper aufweist.
• Halten Sie das Gerät mindestens 20 cm/ 7.9in von implantierten
medizinischen Geräten (Schrittmachern, Cochlea-Implantat usw.) fern,
damit keine magnetischen Störungen auftreten.
• Halten Sie das Gerät von Kindern fern.
Installation rapide
Assemblage du support de voiture
à chargement sans l
Enclenchez la rotule dans le joint de
raccordement, serrez l'écrou
OPEN
Remarque:
Placez correctement l'écrou stabilisateur, dans le cas contraire la rotule
ne s'insèrera pas dans le joint.
Pour la ventouse
OPEN
stabilisateur pour verrouiller en place.
OPEN
2
1
10/11
Page 10

1. Nettoyez la surface avant installation.
2. Placez la base sur la zone nettoyée.
3. Appuyez fermement sur la base et tournez le dispositif de verrouillage
de la ventouse dans le sens inverse des aiguilles d'une montre pour la
verrouiller en place.
4. Tournez le dispositif de verrouillage dans le sens des aiguilles d'une
montre et tirez la languette de libération de la ventouse pour la retirer.
360°
Pivotez le support comme souhaité
et xez-le à l'aide de l'écrou
stabilisateur.
OPEN
OPEN
OPEN
Utilisez le bouton d'extension du bras et le dispositif de réglage de
l'angle pour modier la hauteur et l'angle du montant.
Pour le montant à pince
1. Pincez et appuyez sur la languette
de libération de la pince et le joint
à rotule pour ouvrir la pince.
2. Insérez les deux côtés de la pince
dans la sortie d'aération de la
OPEN
voiture et relâchez la languette de
libération de la pince.
3. Pour l'enlever, pincez et appuyez
sur la languette puis retirez le
-support.
Prise verte: 9 V
(Charge rapide
recommandée)
OPEN
Prise blanche: 5 V
Utilisation du support de voiture à chargement sans l
1. Raccordez le câble Micro USB dans le port de chargement.
2. Insérez le connecteur USB dans le chargeur de voiture. L'indicateur LED
s'allume en bleu, indiquant un branchement eectué avec succès.
12/13
Page 11

OPEN
OPEN
1
OPEN
2
1. Appuyez sur le bouton de déverrouillage du socle pour ouvrir le socle.
2. Placez le smartphone doté de la fonctionnalité de chargement sans l
sur le support pour téléphone. Serrez délicatement le socle pour
installer votre appareil.
Remarque:
• Les étuis de téléphone d'une épaisseur supérieure à 0,2 pouce / 0,5 cm
ne seront pas détectés.
• Alignez le centre de votre téléphone sur la zone de chargement sans
l pour un chargement plus rapide.
Ajustez le plateau en fonction de la
taille de votre téléphone. L'indicateur
clignote en bleu, indiquant que le
chargement a commencé.
OPEN
Spécications
Modèle
Entrée (Chargeur sans l)
Sortie (Chargeur sans l)
Longueur du câble Micro USB
Dimensions
Poids
RP-SH014
5 V / 9 V ; 18 W
10 W Max
120cm / 47.2in
114 x 60 x 25 mm / 4,5 x 2,4 x 1 po
175 g / 6,18 oz
Attention
• Ne faites pas tomber, ne heurtez pas et ne serrez pas le produit.
• Ne démontez pas ou ne jetez pas le produit au feu ou dans l'eau pour
éviter de causer un court-circuit ou une fuite.
• N'utilisez pas le chargeur sans l dans des environnements extrêmement
chauds, humides ou corrosifs pour éviter les fuites et les dommages au
circuit.
• Ne le placez pas à proximité d'une piste magnétique ou d'une carte à
puce (carte d'identité, cartes bancaires, etc.) pour éviter toute défaillance
magnétique.
• Assurez-vous que le dos de votre téléphone ou de l'étui de votre
téléphone est régulier, sans objets métalliques étrangers.
• Laissez au moins 20 cm / 7,9 po de distance par rapport à des dispositifs
médicaux implantables (stimulateurs cardiaques, implant cochléaire,
etc.) pour éviter toute interférence magnétique potentielle.
• Maintenir à l'écart des enfants.
14/15
Page 12
ES
Contenido del paquete
1 x Soporte
1 x Cargador para vehículo
1 x Cable Micro-USB
1 x Ventosa / Soporte con pinza
Nota:
Para la ventosa o el soporte con pinza, prevalece el paquete real.
Instalación rápida
Ensamblar el soporte para vehículo
de carga inalámbrica
Haga clic en la bola en la articulación
de conexión y atornille la tuerca
estabilizadora para bloquearla en su
OPEN
Nota:
Coloque la tuerca estabilizadora correctamente o la bola no se ajustará
en la articulación.
Para ventosa
OPEN
lugar.
OPEN
2
1. Limpie la supercie antes de realizar la instalación.
2. Coloque la base en un lugar limpiado.
3. Presione la base rmemente y gire el cierre de la ventosa en sentido
contrario a las agujas del reloj para bloquearlo.
4. Gire el cierre hacia la derecha y tire de la pestaña de liberación de la
ventosa para extraerla.
OPEN
OPEN
Utilice el botón de extensión del brazo y el ajustador de ángulo para
cambiar la altura y el ángulo del soporte.
Para el soporte de pinza
1. Apriete y presione la pestaña de
liberación del soporte y la
articulación de bola para abrirlo.
2. Inserte los dos lados del soporte
en la salida de ventilación del
vehículo y suelte la pestaña de
1
OPEN
liberación del soporte.
3. Para quitarla, simplemente apriete
y presione la pestaña y saque el
soporte.
16/17
Page 13

360°
OPEN
Gire el soporte como desee y fíjelo
mediante la tuerca estabilizadora.
OPEN
Chip verde: 9 V
(carga rápida
recomendada))
OPEN
Chip blanco: 5 V
Utilizar el soporte para vehículo de carga inalámbrica
1. Conecte el cable Micro-USB en el puerto de carga.
2. Inserte el conector USB en el cargador para automóvil. El indicador LED
se iluminará en azul, lo que signica que la conexión es correcta.
OPEN
1
2
1. Presione el botón de liberación de la base para abrirla.
2. Coloque el teléfono inteligente con la funcionalidad de carga
inalámbrica en el soporte del teléfono. Apriete suavemente la base
para ajustar el dispositivo.
Nota:
• Las carcasas de teléfono con un grosor superior a 0,5 cm/0,2 pulgadas
no se detectarán.
• Alinee el centro del teléfono en la zona de carga inalámbrica para
realizar la carga más rápido.
Ajuste la bandeja según el tamaño
del teléfono. El indicador parpadeará
en azul, lo que signica que la carga
se ha iniciado.
OPEN
OPEN
18/19
Page 14

Especicaciones
Modelo
Entrada (cargador inalámbrico)
Salida (cargador inalámbrico)
Longitud del cable Micro-USB
Dimensiones
Peso
RP-SH014
5 V o 9 V; 18 W
10 W máximo
120cm / 47.2in
114 x 60 x 25 mm/4,5 x 2,4 x 1 in
175 g / 6,18 oz
IT
Contenuto della confezione
1 x Supporto
1 x Caricatore per auto
1 x Cavo micro USB
1 x Base a ventosa / Supporto a clip
Nota:
Per la base a ventosa o il supporto a clip, prevale la confezione reale.
Precaución
• No deje caer, golpee ni agite el producto.
• Para evitar cortocircuitos o fugas, no desmonte ni arroje el producto al
fuego o al agua.
• Para evitar daños en los circuitos y fugas, no use el cargador inalámbrico
en entornos con mucho calor, humedad o corrosión.
• Para evitar errores magnéticos, no lo coloque el producto cerca de una
banda magnética o una tarjeta con chip (tarjeta de identicación,
tarjetas bancarias, etc.).
• Asegúrese de que la parte posterior del teléfono o la carcasa del mismo
no tenga objetos metálicos extraños.
• Para evitar posibles interferencias magnéticas, mantenga el producto
alejado una distancia mínima de 20 cm/7,9 in de dispositivos médicos
implantables (marcapasos, coclear implantable, etc.).
• Mantenga el producto alejado de los niños.
Installazione rapida
Montaggio del supporto per auto
di carica wireless
Fare clic sulla sfera del giunto di
collegamento e avvitare il dado di
OPEN
Nota:
Collocare correttamente il dado di stabilizzazione, altrimenti la sfera
non entra nel giunto.
Per base a ventosa
OPEN
stabilizzazione per bloccare in
posizione.
OPEN
2
1
20/21
Page 15

1. Pulire la supercie prima dell'installazione.
2. Collocare la base sul punto pulito.
3. Premere a fondo la base e ruotare il blocco della ventosa in senso
antiorario per bloccarla in posizione.
4. Ruotare il blocco in senso orario e tirare la linguetta di rilascio della
ventosa per rimuoverla.
360°
Girare il supporto come desiderato
e ssarlo con il dado di
stabilizzazione.
OPEN
OPEN
OPEN
Utilizzare il tasto di estensione braccio e il regolatore angolo per
modicare l’altezza e l’angolo del supporto.
Per supporto a clip
1. Stringere e premere la linguetta
di rilascio del fermaglio e il giunto
sferico per aprire il fermaglio.
2. Inserire i due lati del fermaglio
nell’uscita dell'aria dell’auto e
rilasciare la linguetta di rilascio
OPEN
del fermaglio.
3. Per rimuoverlo, basta stringere e
premere la linguetta, quindi
estrarre il supporto.
Chip verde: 9 V
(carica rapida
consigliata)
OPEN
Chip bianco: 5 V
Uso del supporto per auto di carica wireless
1. Collegare il cavo micro USB alla porta di carica.
2. Inserire il connettore nel caricatore per auto. Il LED si accende in blu
per indicare un collegamento corretto.
22/23
Page 16

OPEN
OPEN
1
OPEN
2
1. Premere il tasto di rilascio base per aprire la base.
2. Collocare lo smartphone con funzione di carica wireless sul supporto
telefono. Premere delicatamente la base per montare il dispositivo.
Nota:
• Le cover per smartphone con spessore superiore a 0,2 pollici / 0,5 cm
non vengono rilevate.
• Allineare il centro dello smartphone sulla zona di carica wireless per
una carica più rapida.
Regolare il vano in base alle
dimensioni dello smartphone.
L’indicatore lampeggia in blu per
indicare l'avvio della carica.
OPEN
Speciche
Modello
Ingresso (caricatore wireless)
Uscita (caricatore wireless)
Lunghezza cavo micro USB
Dimensioni
Peso
RP-SH014
5 V / 9 V; 18 W
10 W max.
120cm / 47.2pollici
114 x 60 x 25 mm / 4,5 x 2,4 x 1 pollici
175 g / 6,18 oz
Attenzione
• Non far cadere, sbattere o schiacciare il prodotto.
• Non smontare o gettare il prodotto nel fuoco o in acqua per evitare
cortocircuiti o perdite.
• Non utilizzare il caricatore wireless in ambienti estremamente caldi,
umidi o corrosivi per evitare danni al circuito e perdite.
• Non collocare in prossimità di strisce magnetiche o carte con chip
(carta di identità, carte di credito o bancomat, ecc.) per evitare guasti
magnetici.
• Assicurarsi anche che il retro dello smartphone o della cover dello
smartphone sia privo di oggetti metallici estranei.
• Mantenere una distanza di almeno 20 cm / 7,9 pollici da dispositivi
medici impiantati (pacemaker, coclea impiantabile, ecc.) per evitare
potenziali interferenze magnetiche.
• Tenere lontano dalla portata dei bambini.
24/25
Page 17

JP
パッケ ー ジ 内 容
ホルダー x1
車載充電器 x1
Micro USBケーブル x1
吸 着ス タンド / クリップ マ ウント x 1
注意:
パッケージに応じて吸着スタンドとクリップマウントのいずれかが付
属します。
クイックセットアップ方 法
ワイヤレス 充 電 式カ ー ホル ダーの
組立
ボールをホルダー側のジョイントに
はめ込み、固定ナットを締めて
OPEN
注意:
固定 ナットを正しく調整しないと、ボール がジョイントには まりません。
吸着スタンドを使用する場合
OPEN
位置・角度を固定します。
OPEN
1.お取り付け前にスタンド取り付け先の表面を丁寧に拭き取ってください。
2.向きを調節後、吸着スタンドを清掃した箇所の上に配置してください。
3.吸着スタンドを押し当てた後、吸着スタンドのロックを反時計回りに
回して位置を固定してください。
4.取り外す場合は、吸着スタンドのロックを時計回りに回しロックを外し
た後、吸着スタンドのリリースタブを引き上げてください。
OPEN
OPEN
アーム延長ボタンと角度調整器を使用してスタンドの高さと角度を調整
します。
クリップ マ ウントを 使 用 す る 場 合
1. クリップのリリースタブとボール
ジョイントをつまんで挟み込めば、
クリップが開きます。
2.クリップを車のエアコン排気口へ
挿入し、クリップのリリースタブを
離してください。
1
OPEN
3.取り外す場合は、タブをつまんで
挟み込み、マウントを外します。
2
26/27
Page 18

360°
OPEN
ホルダーを望みの角度に合わせ、
固 定ナットを使 用して固 定します。
OPEN
緑色のUSBポート:9V
(高速充電用、使用推奨)
OPEN
白色のUSBポート:5V
ワイヤレス充電式カーホルダーの使用方法
1.MicroUSBケーブルをホルダーの充電ポートへ接続します。
2.USBコネクタを付属の車載充電器へ接続します。無事接続されると、
ホルダーのLEDインジケータが青色に点灯します。
OPEN
1
OPEN
2
1.クレードルのリリースボタンを押すと、クレードルが開きます。
2.ワイヤレス充電機能を備えたスマートフォンをホルダーへ置きます。
クレードルをゆっくりと締め付け、スマートフォンを固定します。
注意:
• スマートフォンのケースの厚みが0.2 inch/0.5cm以上の場合、スマー
トフォンが検出されません。
• スマートフォンの中心をワイヤレス充電箇所に合わせると、より早く
充電できます。
スマートフォンのサイズにあわせて
トレイの長さを調整します。スマート
フォンへ充電が開始されると、LED
インジケータが青色に点滅します。
OPEN
28/29
Page 19

仕様
モデル
入力 (ワイヤレス充 電 器)
出力 (ワイヤレス充 電 器)
Micro USBケーブル 長
寸法
重量
RP-SH014
5V/9V、18W
最大10W
120cm
114x60x25mm
175g
注意
•製品を落下させたり、衝撃を与えたり、強く締め付けないでください。
•ショートや液漏れを防ぐために、製品を火や水に近づけないでください。
•回路の損傷や液漏れを防ぐために、ワイヤレス充電器を極端な高温、
高湿、腐食性の環境で使用しないでください。
•磁気回路の故障を防ぐために、磁気ストリップやチップ入りカード
(身分証、銀行カードなど)の付近に配置しないでください。
•スマートフォン・ホルダーに金属製の異物が存在しないか確認し、スマ
ートフォンやスマートフォンケースの裏側が平坦になるようにしてくだ
さい。
・スマートフォンへのワイヤレス充電中は長時間その場を離れないでく
ださい。
•磁気干渉を防ぐために、埋め込み式医療デバイス(ペースメーカー、
人工内耳など)から少なくとも20cm/7.9in離してください。
•お子様の手の届かない場所に保管してください。
保証書
品名ワイヤレス充電器車載ホルダー 品番RP-SH014
お名前
様
ご住所
お客様
保証期間
ご購入日
電話
お買い上げから1年間有効
年 日月
購入店名
住所
電話
注意事項
この保証書は再発行しませんので、大切に保管してください。
販売店様がご購入の日付を記入していない場合、またはお
客様の購入日を確認できる書類(レシートなど)が添付され
ていない場合は適用されませんのでご注意ください。
株式会社SUNVALLEYJAPANカスタマーセンター
〒104-0032
東京都中央区八丁堀三丁目18番6号PMO京橋東9F
製品に関するお問合せ窓口 TEL 03-5542-0238
受付時間平日10:00〜18:00(土日祝日、弊社指定休日を除
く)
※通話料はお客様負担となります。
Visit the following website for user manuals in other languages:
https://www.ravpower.com/support/oine-downloads.html
30/31
Page 20

FCC STATEMENT :
This device complies with Part 15 of the FCC Rules. Operation is subject to
the following two conditions:
(1) This device may not cause harmful interference, and
(2) This device must accept any interference received, including
interference that may cause undesired operation.
Warning: Changes or modications not expressly approved by the party
responsible for compliance could void the user's authority to operate the
equipment.
NOTE: This equipment has been tested and found to comply with the
limits for a Class B digital device, pursuant to Part 15 of the FCC Rules.
These limits are designed to provide reasonable protection against
harmful interference in a residential installation. This equipment
generates uses and can radiate radio frequency energy and, if not
installed and used in accordance with the instructions, may cause
harmful interference to radio communications. However, there is no
guarantee that interference will not occur in a particular installation.
If this equipment does cause harmful interference to radio or television
reception, which can be determined by turning the equipment o and
on, the user is encouraged to try to correct the interference by one or
more of the following measures:
· Reorient or relocate the receiving antenna.
· Increase the separation between the equipment and receiver.
· Connect the equipment into an outlet on a circuit dierent from that
to which the receiver is connected.
· Consult the dealer or an experienced radio/TV technician for help.
FCC Radiation Exposure Statement:
This equipment complies with FCC radiation exposure limits set forth for an
uncontrolled environment. This equipment should be installed and operated
with minimum distance 20cm between the radiator & your body.
 Loading...