

Page 1

www.hootoo.com
ASIA PACIFIC
E-mail: support.jp@hootoo.com (JP)
JP Importer: 株式会社SUNVALLEY
Address: JAPAN 〒104-0032東京都中央区八丁堀3丁目18-6
PMO京橋東9F
EUROPE
E-mail:
support.uk@hootoo.com (UK)
support.de@hootoo.com (DE)
support.fr@hootoo.com (FR)
support.es@hootoo.com (ES)
support.it@hootoo.com (IT)
EU Importer: ZBT International Trading GmbH
Address: Halstenbeker Weg 98C, 25462 Rellingen, Deutschland
NORTH AMERICA
E-mail: support.ca@hootoo.com (CA)
support@hootoo.com (US)
Tel: 1-888-456-8468 (Monday-Friday: 9:00 – 17:00 PST)
US Distributor: SUNVALLEYTEK INTERNATIONAL INC.
Address: 46724 Lakeview Blvd, Fremont, CA 94538
MANUFACTURER
Manufacturer: Shenzhen NearbyExpress Technology
Development Co.,Ltd.
Address: 333 Bulong Road, Shenzhen, China, 518129
MODEL: HT-BS012
MADE IN CHINA
HT-BS012_V1.6
Barcode Scanner
User Guide
Page 2

CONTENTS
Important
Know Your Barcode Scanner
What’s in the Box
Product Diagram
Specifications
Scan Aiming
Decode Zoom
Get Started
Power On / Off
Charge the Barcode Scanner
LED Indicator & Beeper
Pair the Scanner with a Device
Set Your Barcode Scanner
Normal Mode
Inventory Mode
Set Sleep Timer
Set Power off Time
Scanner Sound Setting
Same Code Delay Time Setting
Reading Setting
Code Suffix / Prefix Setting
Code ID Table
USB Receiver Setting
Language
Code Symbol On / Off
Troubleshooting
01
01-05
01
02
03
04
05
05-07
05
05-06
06
07
08-15
08
08-09
09-10
10
10-11
11
12
12-13
13
14
15
16-18
19
Page 3
Important
Regularly clean the scanning window for better scanning accuracy
Keep the window away from any abrasive material
Remove any dirt particles with a damp cloth
Wipe the window using a tissue moistened with ammonia / water
Do not spray water or other cleaning liquids directly into the window
Know Your Barcode Scanner
The HooToo barcode Scanner combines top scanning performance and excellent
ergonomics to provide the best value in a lightweight laser scanner. Whether used as a
hand-held scanner or hands-free in a stand, the scanner ensures comfort and ease of
use for extended periods of time.
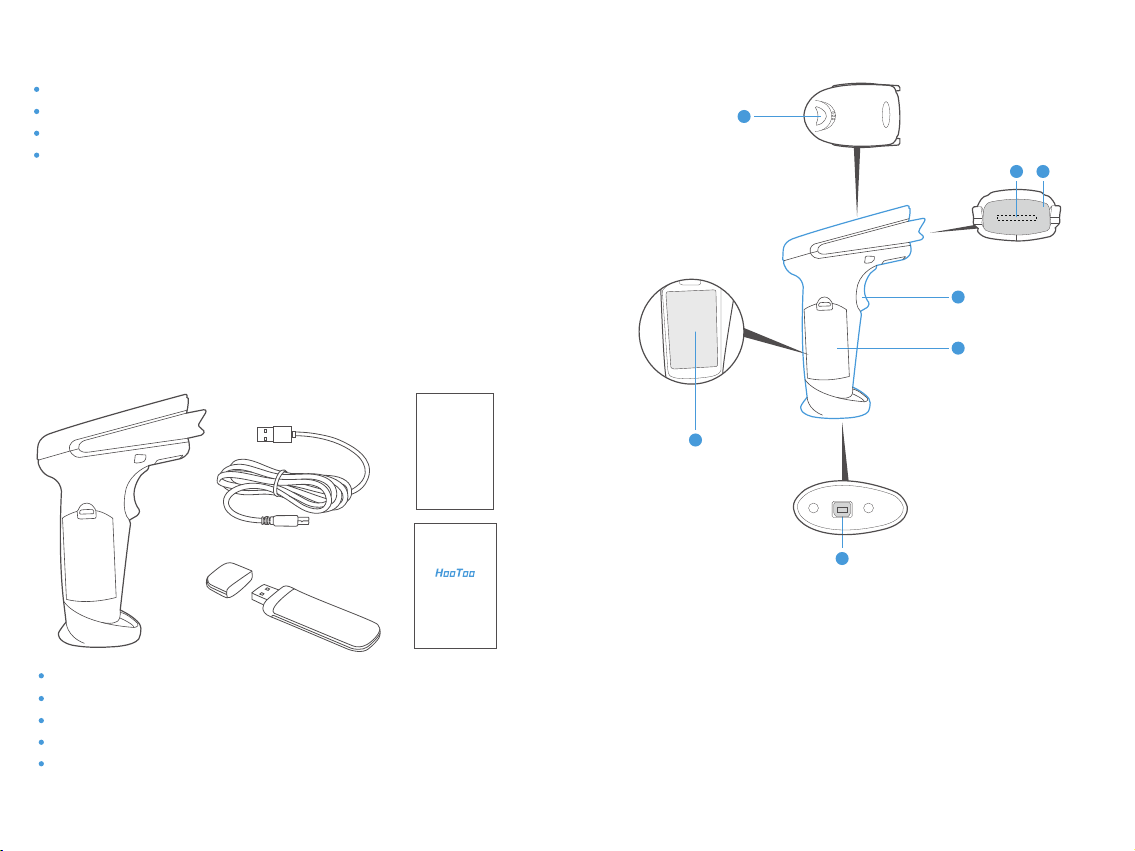
What’s in the Box
Product Diagram
6
1
2
3
4
Thank You
Card
5
7
1. Scan Lens
2. Laser Diode
3. Trigger
4. Battery Compartment
5. Battery
6. LED Indicator
7. Charging / Data Port
1 x HooToo 2.4GHz Wireless Barcode Scanner
1 x Charging / Data Cable
1 x Thank You Card
1 x User Guide
Barcode Scanner
User Guide
1 x 2.4GHz Wireless Receiver
01 02
Page 4
Specifications
Communication Distance
Communication Protocol
Compatibility
Data Memory
Scanning Type
Source
Max Scanning Speed
Decoding Accuracy
Depth of Focus
Processor
Print Contrast
Working Current
Battery
Charging Input
Charging Time
Service Time
Scan Mode
Prompting Mode
Error Rate
7 to 10 m / 22.9 to 32.8 ft
2.4Ghz Wireless and Wired
MAC OS, Windows, Linux etc
16MB Flash
Single / Continuous / Automatic Scan
LED (622nm – 628nm)
200 times / second
3.3mil
3.3mil: 2mm – 100mm
10mil: 2mm – 350mm
15mil: 5mm – 500mm
30mil: 10mm – 600mm
32-bit Decoder
Minimum reflectivity of 30%
Decoding: 40mA
Working: 20mA
Standby: 5mA
Shutdown: 1.8uA
750mAh
5V 500mA
1.5 hours
30 hours
Wired / Wireless
Buzzer, LED Light
1/5000000
Scanning Angle
Decoding Ability
Receiver Mode
Rotation Angle: ±42°
Oblique Angle: ±65°
Deflecting Angle: ±65°
UPC-A, UPC-E, EAN-8, EAN-13, Code 128,
Code 39, Code 39, Full ASCII, Codabar / NW7,
Code 93, Code 11, MSI, Interleaved 25, Industrial
25, ISBN, ISSN, China Post etc.
General one-dimensional codes
USB HID, USB Virtual Serial (Need to install drive
and setup code), SPP
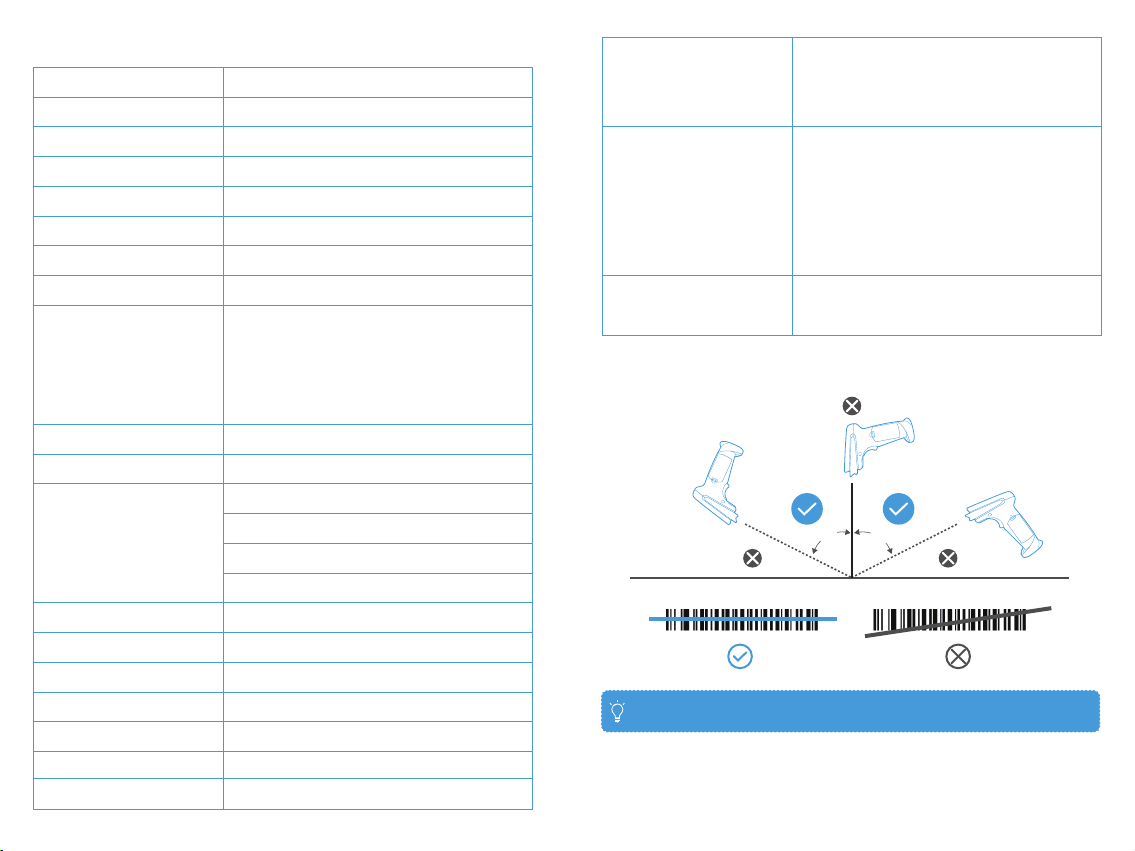
Scan Aiming
65°
65°
Note: Do not hold the scanner directly over the barcode.
03 04
Page 5

in.
Decode Zone
TT Scanner
5 mil
2.5”
1.5”
1.0” 14.5”
0 17.0 ”
* 23.0”
cm 0512.71025.41538.12050.82563.5
*Minimum distance determined by symbol length and scan angle
6”
7.5 mil
0in.
10 mil
100% UPC
10.0”
20 miL
Depth of Field
cm
10 25.4
12.7
5
0
0
12.7
5
25.4
10
Width
of
field
Note: Typical performance at 75° on high quality symbols in normal room light.
Get Started
Power On / Off
Pressing the Trigger will turn on the scanner and make the laser appear.
The scanner will automatically shut off if detecting no operation in 30 seconds. You
can also scan the following barcode to manually shut it off.
Shut Down
Charge the Barcode Scanner
Simply connect the scanner with any USB power adapter via the included USB cable.
The LED light will flash red and blue alternately while the scanner is being charged.
05
Note:
Charge the scanner if the LED indicator flashes red 3 times as low battery alarm.
Scan the barcode to learn about the battery status on your PC.
Battery Status
LED Indicator & Beeper
Beeper
3 beeps
3 beeps
N/A
N/A
3 beeps
2 beeps
1 tick
1 short beep
1 beep
1 tick
2 beeps
LED Indicator
Blue LED On
Red LED flashes 3 times
Red LED flashes 3 times
Red LED flashes
Red LED flashes, blue LED solid on
Blue LED on
Red LED on
Blue LED on
Blue LED on
Red LED on
N/A
Indication
Power up with over 30% battery
Power up with battery lower
than 30%
Power off with battery lower
than 20%
Battery drained
(Charge for 30 to 50 minutes,
then power on again)
Pairing
Paired (Power up then pair)
Transmission error
Code scanned and uploaded
Code scanned and saved in
inventory mode
Transmission error or insufficient
space in inventory mode
Connected to host device in
wired mode
06
Page 6

Pair the Scanner with a Device
Wired Connection
1. Plug the cable connector into the data port on the bottom of the scanner handle.
2. Gently tug the cable to ensure the connector is properly secured.
3. Connect the other end of the interface cable to the host computer.
4. Your PC will install the driver automatically. Once the driver installation is completed,
the scanner is ready for use.
Set Your Barcode Scanner
Normal Mode (*)
Scan the barcodes directly, the decoded data will be transferred to the receiver and
displayed on the PC or your host. A prompt sound will be heard if registration failed.
Normal Mode
Inventory Mode
Inventory mode allows you to use the scanner without any connection to a host. The
scanned codes will be stored in the built-in memory of the scanner. At the end of your
work, scan the “Transfer Data” code to transfer the data to your PC or other host.
Inventory Mode
Note:
Scan the following barcodes to switch from wireless into wired mode to enable /
disable wired mode.
Wired Mode On *
Wired Mode Off
Wireless Connection
1. Disable the wired mode.
2. Plug the included wireless receiver into your host device.
Return to default
07
Scan “Total Number of Data Entry” to check how many data is decoded
Transfer Data
Total Number of Data Entry
After you transfer the data in inventory mode, scan “Clear Data” to clear the inventory
data.
Clear Data
Transfer Speed Setting (Inventory Mode Only)
Fast
Standard
08
Page 7

Slow
Set Sleep Time
Sleep Time 10 Minutes
Sleep Time 10 Seconds
Sleep Time 20 Seconds
Sleep Time 5 minutes
Sleep Time 30 minutes
Sleep Time 30 Seconds
Sleep Time 60 Seconds
Sleep Time 2 Minutes
Sleep Time 20 Minutes
Stay Powering On
Set Power Off Timer
Turn Off in 10 Seconds
Turn Off in 15 Minutes
Shut Down
Scanner Sound Setting
To ne 0
To ne 1
1009
Page 8

Beeper Sound Off
Lower Beeper Volume
Medium Beeper Volume
High Beeper Volume
Scanner Reading Setting
Continuous Scan
Single Scan
Automatic Off
Automatic On
Same Code Delay Time Setting
Set up the minimum delay time between decoding of the same codes:
Same code delay time 0 sec *
Same code delay time 1 sec
Same code delay time 2 sec
Same code delay time infinite
11
Note: When you use the automatic mode, the sleep time is set to 15 minutes.
Code Suffix / Prefix Setting
CR
LF
CR+LF
Disable
Preamble - STX
12
Page 9

Postamble - ETX
USB Receiver Setting (Functional with USB Cable Plugged in)
1. USB virtual serial
Code Type
Code 39
EAN8
Code 128
Industrial 2 of 5
Code11
China Post Code
Add ID AS Prefix on
Add ID AS Prefix off *
Code ID Table
Code Type
ID
UPC-A
a
EAN13
d
Code9 3
g
CODABAR
j
Code32
M
MSI
y
ID
b
e
h
k
c
I
Code Type
UPC-E
ISBN
Interleaved 2 of 5
GS1 Data Bar
GS1 Expanded
GSI Limited
USB Virtual Serial
Note: to activate the USB virtual serial, you need to install the driver beforehand.
2. USB HID *
USB HID *
ID
c
f
i
D
E
L
USB HID Fast (WINDOWS)
USB HID Slow (APPLE)
13 14
Page 10

Language Setting
UNITED STATES
Code Symbol On / Off
CODE11
FRANCE
SERBIA / YUGOSLAVIA
BELGIUM
GERMANY
SLOVENIA
BRAZIL
PORTUGAL
SPAIN
I TA LY
Enable * Disable
CODE128
Enable * Disable
CODE 39
Enable * Disable
FULL ASCII Enable
FULL ASCII Disable *
UNIVERSAL
1615
Page 11

CODE 93
UPC-E
Enable * Disable
CODABAR
Enable * Disable
Interleaved 2 of 5
Enable * Disable
Industrial 2 of 5
Enable * Disable
Enable * Disable
EAN - 13
Enable * Disable
EAN - 8
Enable * Disable
CODE32
Enable * Disable
CODE32 Check Digit
UPC-A
On Off
17
Enable * Disable
18
Page 12

Troubleshooting
Problem Possible Causes
Nothing happens when
you operate the scanner
as instructed, or the
scanner performs
abnormally (laser does
not come on, scanner
emits frequent beeps).
Laser comes on, but
decoding falis
Barcode is decoded, but
not transmitted to the
host.
Scanned data is
incorrectly displayed on
the host.
19
No power to the scanner.
Interface / power cables
are loose.
Scanner is not
programmed for the
barcode type.
Barcode is unreadable. Check the barcode to
Scanning angle /
distance is incorrect.
The laser head is out of
condition
Scanner is not programmed
for the correct host type.
The scanner is out of
condition
Scanner is not
programmed to work with
the host.
Possible Solutions
Check the power
connection. Ensure the
power is connected if
required for your
configuration.
Check for loose cable
connections.
Be sure to program the
scanner to read the type of
barcode you are scanning.
make sure it is not defaced.
Try scanning test barcodes
of the same type.
Move the scanner closer
to or further from the
barcode.
Contact us for replacement
Scan the appropriate hose
type barcode in page 14 of
this manual.
Contact us for replacement
Check scanner host type in
page 14 of this manual,
make sure proper host is
selected.
FCC STATEMENT
This device complies with Part 15 of the FCC Rules. Operation is subject to the
following two conditions:
(1) This device may not cause harmful interference, and
(2) This device must accept any interference received, including interference that may
cause undesired operation.
Warning: Changes or modifications not expressly approved by the party responsible for
compliance could void the user's authority to operate the equipment.
NOTE: This equipment has been tested and found to comply with the limits for a Class
B digital device, pursuant to Part 15 of the FCC Rules. These limits are designed to
provide reasonable protection against harmful interference in a residential installation.
This equipment generates uses and can radiate radio frequency energy and, if not
installed and used in accordance with the instructions, may cause harmful
interference to radio communications. However, there is no guarantee that interference will not occur in a particular installation. If this equipment does cause harmful
interference to radio or television reception, which can be determined by turning the
equipment off and on, the user is encouraged to try to correct the interference by one
or more of the following measures:
Reorient or relocate the receiving antenna.
Increase the separation between the equipment and receiver.
Connect the equipment into an outlet on a circuit different from that to which the
receiver is connected.
Consult the dealer or an experienced radio/TV technician for help.
FCC Radiation Exposure Statement:
This equipment complies with FCC radiation exposure limits set forth for an
uncontrolled environment. This equipment should be installed and operated with
minimum distance 20cm between the radiator & your body.
WEEE Compliance
Correct Disposal of This Product (Waste Electrical & Electronic Equipment)
(Applicable in countries with separate collection systems)
This marking on the product, accessories or literature indicates that the product and
its electronic accessories should not be disposed of with other household waste at the
end of their working life. To prevent possible harm to the environment or human health
from uncontrolled waste disposal, please separate these items from other types of
waste and recycle them responsibly to promote the sustainable reuse of material
resources. Household users should contact either the retailer where they purchased
this product, or their local government office, for details of where and how they can
take these items for environmentally safe recycling. Business users should contact
their supplier and check the terms and conditions of the purchase contract. This
product and its electronic accessories should not be mixed with other commercial
wastes for disposal.
 Loading...