

Page 1
www.anjou.com
ASIA PACIFIC
E-mail: support.jp@anjou.com(JP)
Tel: 03-5542-0238(10-17時/土日祝除く)
JP Importer: 株式会社SUNVALLEY JAPAN
Address: 〒104-0032 東京都中央区八丁堀3丁目18-6 PMO京橋東9F
EUROPE
E-mail:
support.uk@anjou.com(UK)
support.de@anjou.com(DE)
support.fr@anjou.com(FR)
support.es@anjou.com(ES)
support.it@anjou.com(IT)
EU Importer: ZBT International Trading GmbH
Address: Halstenbeker Weg 98C, 25462 Rellingen, Deutschland
NORTH AMERICA
E-mail: support@anjou.com
Tel: 1-888-456-8468 (Monday-Friday: 9:00 – 17:00 PST)
Address: 46724 Lakeview Blvd, Fremont, CA 94538
MANUFACTURER
Shenzhen NearbyExpress Technology Development Co., Ltd.
Address: 333 Bulong Road, Shenzhen, China, 518129
Learn more about the EU Declaration of Conformity:
http://customer.anjou.com/media/downloads/AJ-CBL001-CE-Cert.pdf
AJ-CBL001_V1.0
MODEL: AJCBL001
NAIL PRINTER
User Guide
Page 2
CONTENTS
English
Deutsch
Francais
Espanol
Italiano
日本語
01/11
12/21
22/31
32/41
42/51
52/61
Page 3
①
⑤ ⑥
FR
Description du Produit
1. Couvercle Avant Amovible
2. Cartouche d'Encre
3. Support à Ongle
4. Support de Cartouche d'Encre
5. Bouton d'Alimentation
(s’allume en blanc quand en
marche)
6. Écran 7"
ES
Diagrama del Producto
1. Cubierta Frontal Extraíble
2. Cartucho de Tinta
3. Porta Uñas
4. Soporte del Cartucho de Tinta
5. Botón de Encendido
(iluminado cuando esta
encendido)
6. Pantalla de 7 pulgadas
②
EN
Product Diagram
1. Removable Front Cover
2. Ink Cartridge
3. Nail Holder
4. Ink Cartridge Holder
5. Power Button
(lighting white when it’s on)
6. 7’’ Screen
④
③
DE
Produktabbildung
1. Abnehmbare Frontblende
2. Tintenpatrone
3. Nagelhalter
4. Tintenpatronenhalterung
5. Power-Taste
(leuchtet im Betrieb weiß)
6. 7" Bildschirm
IT
Schema del Prodotto
1. Coperchio Frontale Rimovibile
2. Cartuccia d’Inchiostro
3. Reggiunghie
4. Portacartuccia
5. Pulsante di Accensione
(che si illumina quando
acceso)
6. Schermo da 7”
JP
製品図
1.フロントカバー
2.インクカ ートリッジ
3.ネイルホルダー
4.インクカートリッジホルダー
5.電源ボタン
(電源をオンにすると白く光ります)
6.7インチスクリーン
Page 4
①
②
③
⑤
④
IT
Schema del Prodotto
1. Altoparlante
2. Porta USB
3. Forellino per il Reset
4. Porta LAN
5. Porta di Alimentazione DC
JP
製品図
1.スピーカー
2.USBポート
3.リセットボタン
4.LANポート
5.DC電源ポート
EN EN
Product Diagram
1. Speaker
2. USB Port
3. Reset Pinhole
4. LAN Port
5. DC Power Port
FR
Description du Produit
1. Haut-parleur
2. Port USB
3. Trou de Reset
4. Port LAN
5. Port d’alimentation
DE
Produktabbildung
1. Lautsprecher
2. USB-Anschluss
3. Reset-Stiftloch
4. LAN-Anschluss
5. Gleichstromanschluss
ES
Diagrama del Producto
1. Bocina
2. Puerto USB
3. Botón de Reinicio
4. Puerto LAN
5. Puerto de Corriente Continua
Warning
· Please use the included power adapter only.
· Keep away from water or other liquids as it may damage the device.
· Please unplug the power cable if not being used for a long period of
time.
· Do not use the adapter if the AC cable is damaged or broken to avoid
fire hazards.
· The appliance can be used by persons with reduced physical, sensory
or mental capabilities or lack of experience and knowledge if they
have been given supervision or instruction concerning use of the
appliance in a safe way and understand the hazards involved.
· When using any electrical appliance, especially when children are
present, basic safety precautions should always be followed.
· Keep the unit and accessories away from children.
· Keep the cord away from heated surfaces.
· Do not wrap the cord around the unit when in use.
· Avoid hanging the cord over a counter or table where it can be pulled
by children
· Using of accessories not recommended by manufacturers may cause
or tripped over unintentionally.
01/02
Page 5
hazards.
· Never use the device for any other purposes other than the intended
use.
· Avoid contact of the gel with eyes, cloth, leather, or fabric.
· Do not leave the running appliance unattended.
· Never operate the appliance on uneven surface.
· Do not insert objects through the slots in the printer's cabinet.
· Do not put your hand inside the printer or touch the ink cartridge
during printing.
· Before transporting the printer, make sure that the print head is in the
home (far right) position and the ink cartridge is in place.
· Keep ink cartridge and gel out of the reach of children. Do not allow
children to drink from or otherwise handle the cartridge and gel bottle.
· Be careful when you handle the used ink cartridge, as there may be
some ink surrounding the ink supply port. If ink should come into direct
contact with your skin, wash the area thoroughly with soap and water.
If ink should come into direct contact with your eyes, flush them
immediately with water. If you should feel discomfort or if vision is
impaired, see a doctor immediately.
· If you remove an ink cartridge for later use, protect the ink supply area
from dirt and dust and store it in the same environment as the printer.
· This appliance is FOR INDOOR USE ONLY.
Package Contents
· 1 x Nail Printer
· 1 x Power Adapter
· 1 x Power Cable
· 1 x Ink Cartridge
· 1 x Manicure Tool Kit
(Nail clippers, cuticle nippers, cuticle pusher, and nail file)
· 1 x Base Coat (10ml)
· 1 x Gel Polish (10ml)
· 1 x Print Gel (10ml)
· 1 x Top Coat (10ml)
· 1 x Calibration Support
· 1 x Nail Support
· 1 x User Manual
Note:
You may need a UV lamp or other dryers to dry the nails fast in
case of any scrape or smudging.
Warranty
This product is covered by the Anjou Product and Labor Warranty for 12
months from the date of its original purchase. If manufacturing defects
occur, please contact Anjou support (support@anjou.com) immediately
to launch a warranty claim. We will instruct you on how to return the
defective unit back to us for repair or replacement. No return will be
accepted without seller authorization.
Specifications
Model
Working Voltage
Power
Display Resolution
Operating Temperature and Humidity
Waterproof Level
Dimensions
Net Weight
AJ-CBL001
DC 12V 4A
48W
1024 x 600 Pixels
10°C - 35°C, 20% - 80% (RH)
Not supported
214.8 x 208.6 x 208.6mm /
8.45 x 8.21 x 8.21in
2.5kg / 88.2oz
03/04
Page 6
1 2
①
②
3 4
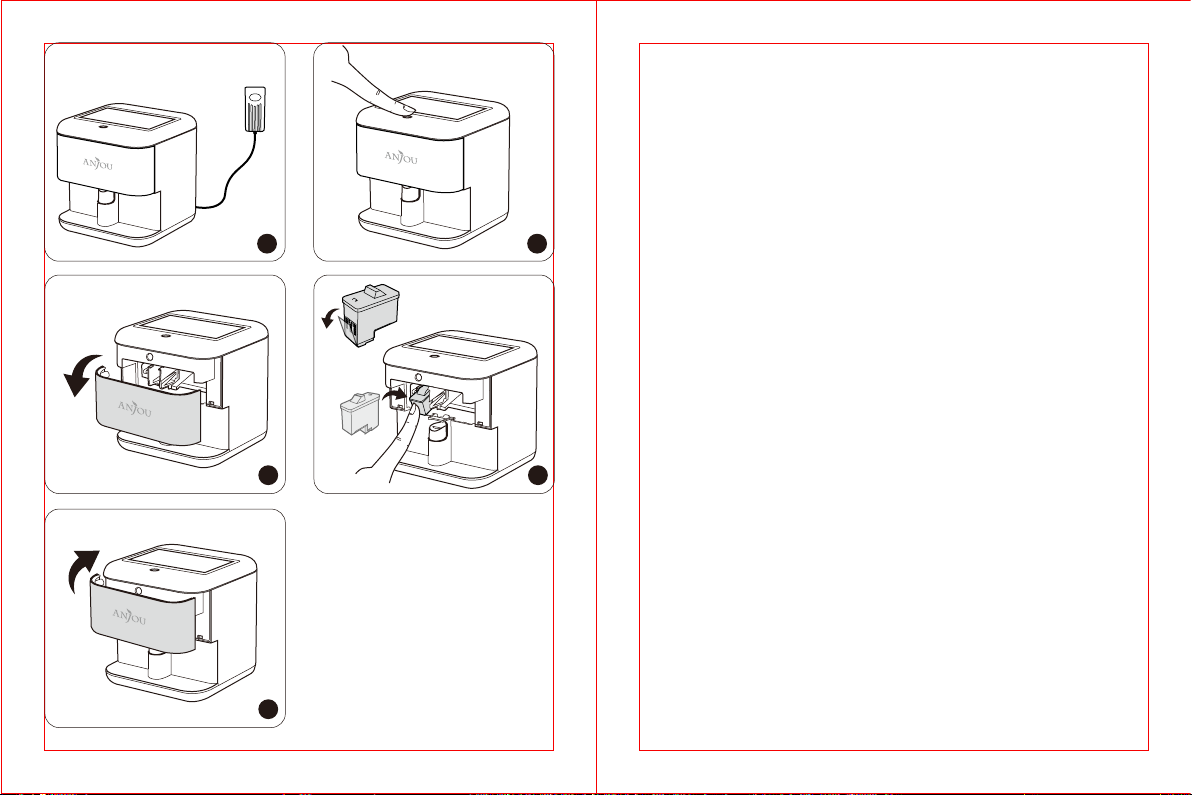
Quick Installation Guide
1. Connect the power cable and adapter to the printer.
2. Press the Power Button to power it on (lighting white when it’s on).
3. Remove the front cover.
4. Insert the ink cartridge into the printer.
1) Unpack the ink cartridge, remove the protective seal on the ink
nozzle. Do not touch the nozzle or copper-colored contacts.
2) Slide the ink cartridge at a slight upward angle into the slot with
the contacts facing down. Gently push it upward until it snaps into
place with a click sound. Make sure it’s installed tightly.
5. Install the front cover back. Align the bulges and the holes in the
printer, push it from front to back.
5
05/06
Page 7
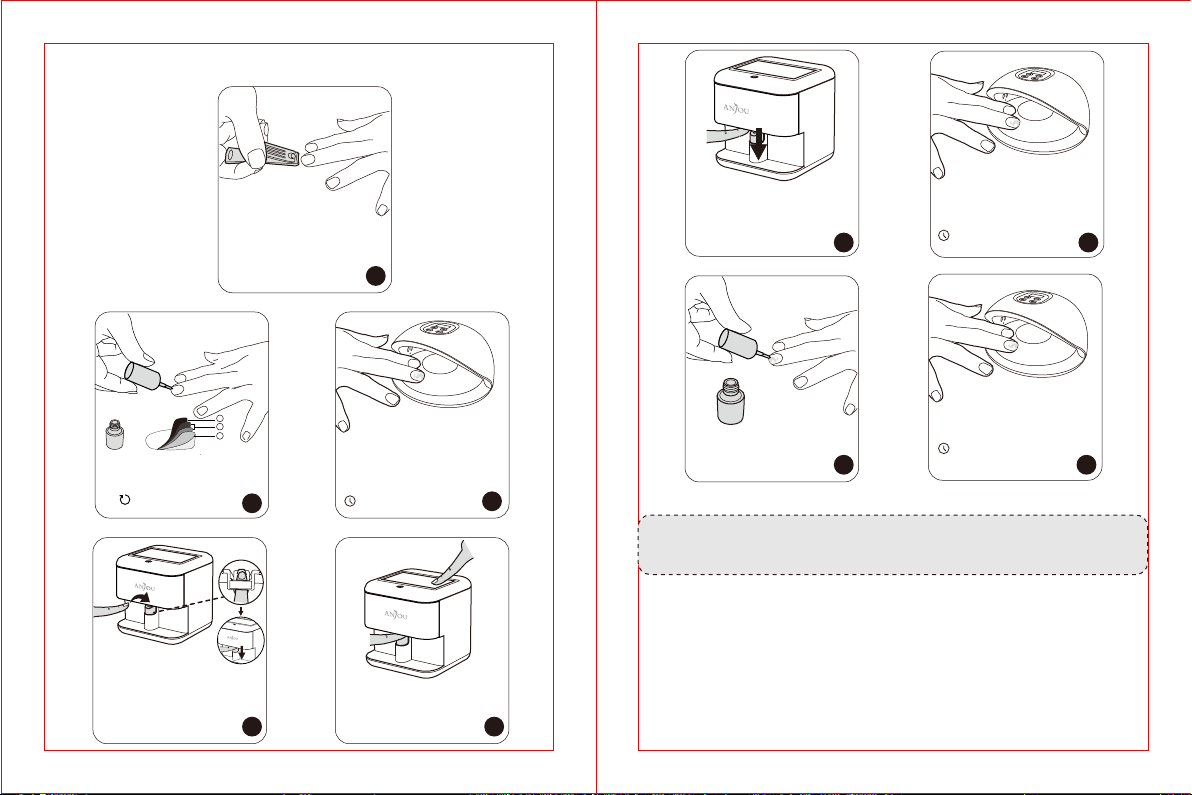
Quick Start
Prep your nails using the manicure
tools.
3
2
1
Apply four layers.
1)Base coat
2)White gel polish
2
Twice
3)Print gel polish
Place your finger on the nail holder
Press down and release to spring
back.
Note: Avoid scratching the
nail coats.
2
4 5
1
Dry using a UV lamp after
each application.
60s
Select a pattern.
Tap Print.
Note: Remain still during
printing.
Press down again to release your
finger.
Apply a layer of top coat.
6 7
Dry with a UV lamp.
60s
Dry with a UV lamp.
120s
8 9
3
Note: For detailed instructions, please refer to the Video Tutorials
section on the nail printer.Video Tutorials
07/08
Page 8
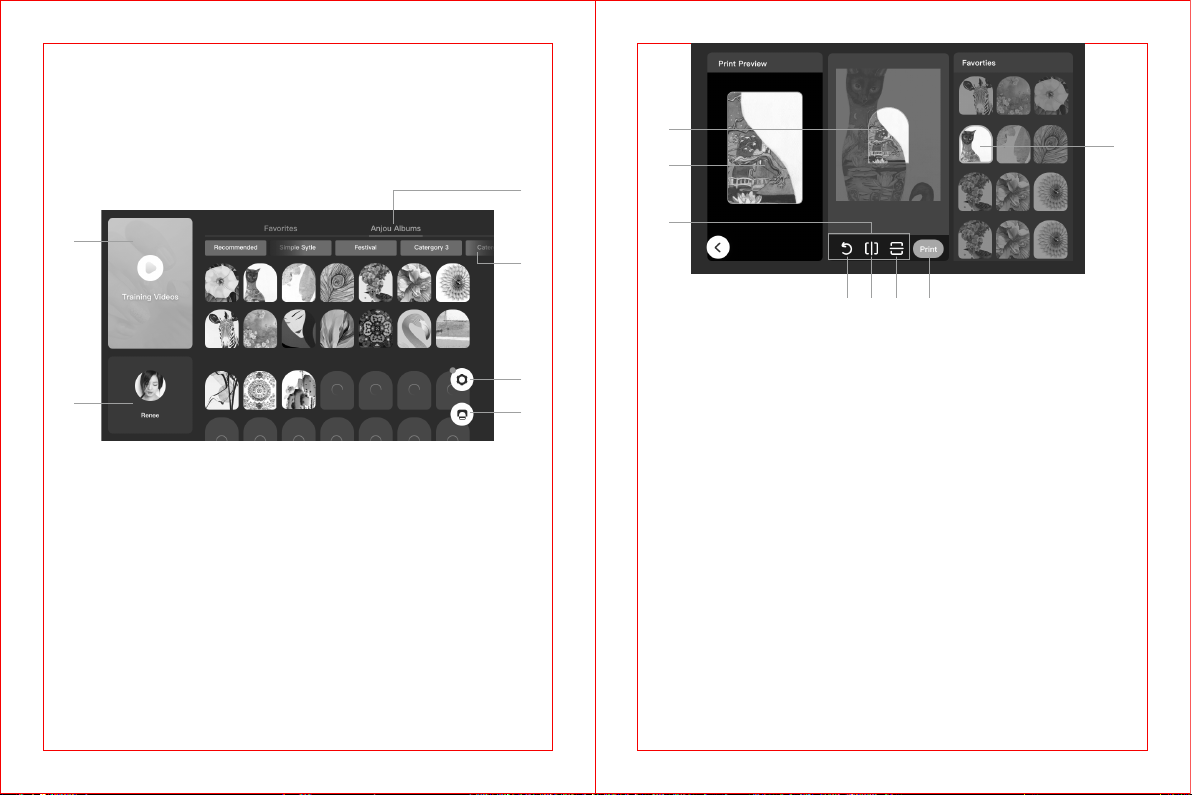
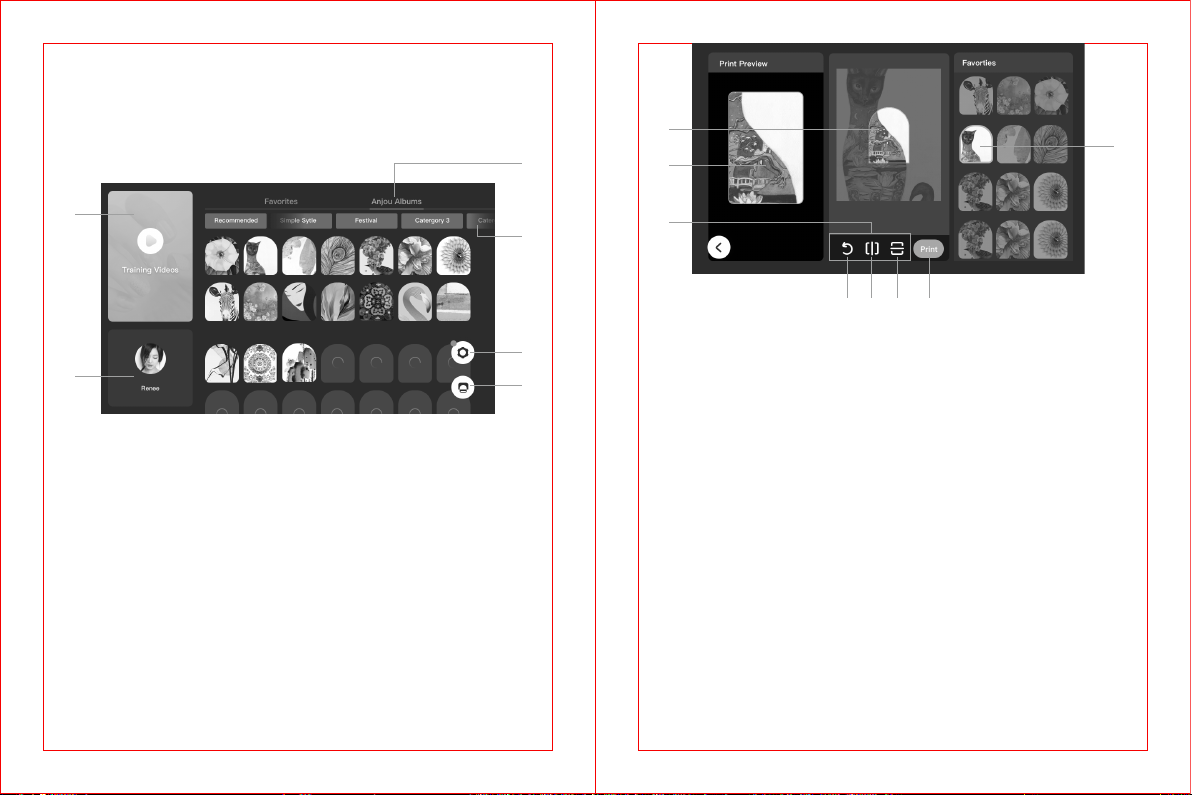
Using with App
1. On the screen of the printer, you may see the video and pattern
sections. You may be prompted with some instructions for
applying the printer right after it is initialized.
①
③
④
①
⑧
②
③
②
1) Video Tutorials section
2) Profile section
3) All albums
4) Each album
5) Setting
6) Print
⑤
⑥
④ ⑤ ⑥ ⑦
1) Nail outline
2) Print preview
3) Adjustment buttons
4) Rotate
5) Mirror (Flip horizontally)
6) Mirror (Flip vertically)
7) Print the current pattern
8) Select a pattern
2. For mobile app: Find and install the app Anjou Nails in App Store
for iOS and Google Play for Android. Follow the instructions on
your device to complete the DIY printing.
09/10
Page 9
Precautions
1. Do not use non-standard power adapters. Please power off the
product and unplug the power adapter when it’s idle for a long
time.
2. Do not use the product in a humid environment for a long time since
it’s not waterproof.
3. Do not try to reset the unit through the Reset pinhole unless it is
confirmed by our customer service.
Troubleshooting Guide
1. Power Button indicator does not light up
Turn on the printer and the Power Button indicator will light up once
the unit is on.
2. Cables not connected properly
Your printer can be connected to power cable, LAN cable and USB
cable. Make sure the cables are connected to both the printer and
computer for pattern DIY.
3.
How to change the ink cartridge
If a warning of insufficient ink is prompted, you need to change the
ink cartridge. Remove the front cover gently, press down the ink
cartridge to remove it, and slide a new one into the slot of its holder
as instructed previously.
DE
Warnung
· Bitte verwenden Sie nur den mitgelieferten Netzstecker.
· Vor Flüssigkeiten schützen, da diese das Gerät beschädigen können.
· Bitte ziehen Sie das Stromkabel ab, wenn Sie das Gerät längere Zeit
nicht verwenden.
· Um Brandgefahr zu vermeiden, verwenden Sie den Stecker bitte nicht,
wenn das Stromkabel beschädigt oder gebrochen ist.
· Das Gerät kann von Personen mit eingeschränkten körperlichen,
sensorischen oder geistigen Fähigkeiten oder einem Mangel an
Erfahrung und Wissen bedient werden, wenn sie beaufsichtigt werden
oder Anweisungen bezüglich der sicheren Nutzung des Geräts erhalten
haben und die involvierten Risiken verstehen.
· Wenn irgendein elektrisches Gerät benutzt wird - besonders in
Anwesenheit von Kindern - sollten grundlegende Sicherhe
itsmaßnahmen stets eingehalten werden.
· Halten Sie Gerät und Zubehör von Kindern fern.
· Halten Sie das Kabel von heißen Oberflächen fern.
· Wickeln Sie das Kabel nicht um das Gerät, wenn es in Betrieb ist.
· Lassen Sie das Kabel bitte nicht von einer Theke oder einem Tisch
herabhängen, wo Kinder daran ziehen können oder man ungewollt
darüber stolpern kann.
· Das Verwenden von Zubehörteilen, die nicht vom Herstellen empfohlen
werden, kann Risiken bergen.
· Zweckentfremden Sie das Gerät niemals.
· Vermeiden Sie Kontakt des Gels mit Augen, Kleidung, Leder oder Stoff.
· Lassen Sie das laufende Gerät nicht unbeaufsichtigt.
· Benutzen Sie das Gerät nur auf ebenem Untergrund.
· Stecken Sie keine Objekte durch die Gehäuseschlitze des Druckers.
· Stecken Sie Ihre Hand nicht in den Drucker und berühren Sie die
Tintenpatrone während des Druckvorgangs nicht.
· Sie sollten vor dem Transport des Druckers sicherstellen, dass sich der
Druckkopf auf der Home-Position (ganz rechts) befindet und die
Tintenpatrone richtig eingesetzt ist.
11/12
Page 10
· Bewahren Sie Druckerpatrone und Gel außerhalb der Reichweite von
Kindern auf. Lassen Sie Kinder nicht aus Patrone oder Gelflasche
trinken oder damit spielen.
· Seien Sie vorsichtig, wenn Sie mit der benutzten Tintenpatrone
hantieren, da sich um die Anschlussöffnung herum Tinte angesammelt
haben kann. Sollte die Tinte in direkten Kontakt mit Ihrer Haut kommen,
waschen Sie die Stelle sorgfältig mit Wasser und Seife ab. Sollte die
Tinte in direkten Kontakt mit Ihren Augen kommen, spülen Sie sie sofort
mit Wasser aus. Suchen Sie umgehend einen Arzt auf, wenn Sie
Unbehagen verspüren oder Ihre Sehkraft beeinträchtigt ist.
· Wenn Sie die Tintenpatrone zur späteren Verwendung entnehmen,
schützen Sie die Anschlussöffnung vor Schmutz und Staub und lagern
Sie sie dann am gleichen Ort wie den Drucker.
· Dieses Gerät eignet sich NUR FÜR DEN INNENGEBRAUCH.
Im Lieferumfang enthalten
· 1 x Nageldrucker
· 1 x Netzstecker
· 1 x Stromkabel
· 1 x Tintenpatrone
· 1 x Maniküre-Set
(Nagelknipser, Nagelhautzange, Nagelhautschieber und Nagel feile)
· 1 x Grundlack (10ml)
· 1 x Gelpolitur (10ml)
· 1 x Druckgel (10ml)
· 1 x Versiegelungsgel (10ml)
· 1 x Kalibrierungsunterstützung
· 1 x Nagelauflage
· 1 x Bedienungsanleitung
Garantie
Anjou Produkte sind ab dem Kaufdatum durch die 12-monatige
Garantie abgedeckt. Falls das Produkt während dieser Zeit defekt sein
sollte, kontaktieren Sie bitte unverzüglich den Kundendienst.
Wir bieten unseren Kundendienst nur für Produkte an, die bei Anjou oder
einem von Anjou autorisierten Händler und Vertriebsdienstleister
gekauft wurden. Falls Sie Ihr Produkt bei einem anderen Händler gekauft
haben, wenden Sie sich bezüglich des Garantieanspruchs an den
Verkäufer.
This product is covered by the Anjou Product and Labor Warranty for 12
months from the date of its original purchase. If manufacturing defects
occur, please contact Anjou support (support@anjou.com) immediately
to launch a warranty claim. We will instruct you on how to return the
defective unit back to us for repair or replacement. No return will be
accepted without seller authorization.
Anmerkung:
Im Falle von Kratzern oder Schmierern brauchen Sie vielleicht eine
UV-Gel-Lampe oder andere Trockengeräte, um die Nägel schnell
zu trocknen.
Spezifikationen
Modell
Betriebsspannung
Leistung
Displayauflösung
Betriebstemperatur und -feuchtigkeit
Wasserschutzgrad
Maße
Nettogewicht
AJ-CBL001
DC 12V 4A
48W
1024 x 600 Pixel
10°C - 35°C, 20% - 80% (RH)
Nicht unterstützt
214.8 x 208.6 x 208.6mm /
8.45 x 8.21 x 8.21in
2,5kg / 88.2oz
13/14
Page 11

1 2
①
②
3 4
Schnellstartanleitung
1. Schließen Sie Stromkabel und Stecker am Drucker an.
2. Drücken Sie die Power-Taste, um ihn einzuschalten (diese leuchtet
dann weiß).
3. Nehmen Sie die Frontblende ab.
4. Setzen Sie die Tintenpatrone in den Drucker ein.
1) Nehmen Sie die Tintenpatrone aus der Verpackung und ziehen Sie
die Schutzfolie von der Anschlussöffnung. Berühren Sie weder die
Düse noch die kupferfarbenen Kontakte.
2) Schieben Sie die Tintenpatrone leicht nach oben angewinkelt und
mit den Kontakten nach unten zeigend in den Steckplatz. Drücken Sie
sie sanft nach oben, bis sie mit einem Klicken einrastet. Vergewissern
Sie sich, dass sie fest sitzt.
5. Setzen Sie die Frontabdeckung wieder ein. Richten Sie Ausbuchtun
gen und Löcher des Druckers aneinander aus und drücken Sie sie von
vorne nach hinten.
5
15/16
Page 12
Schnellstart-Prozedur
Bereiten Sie Ihre Nägel mit den
Maniküre-Werkzeugen vor
3
2
1
Tragen Sie vier Schichten auf.
1)Grundlack
2)Weiße Gellacke
2
Zweimal
3)Gelpolitur drucken
Legen Sie Ihren Finger auf den
Nagelhalter. Nach unten drücken
und loslassen, um zurückzuspringen.
Hinweis: Vermeiden Sie
Kratzer auf den Nagellacken.
1
Nach jeder Anwendung mit
einer UV-Lampe trocknen.
2
4 5
60s
Wählen Sie ein Muster aus.
Tippen Sie auf Drucken.
Hinweis: Bleiben Sie während
des Druckens.
Erneut drücken, um den Finger
freizugeben.
Eine Schicht Decklack auftragen.
6 7
Mit einer UV-Lampe trocknen.
60s
Mit einer UV-Lampe trocknen.
120s
8 9
3
Hinweis: Detaillierte Anweisungen finden Sie im Abschnitt Video
Tutorials auf dem Nageldrucker.
17/18
Page 13
Verwenden der App
1. Auf dem Display des Druckers sehen Sie Videos und die Musterauswahl. Es können Anweisungen erscheinen, wie Sie den Drucker
richtig verwenden, nachdem er initialisiert wurde.
①
②
1) Video Tutorials bereich
2) Profilbereich
3) Alle Alben
4) Einzelne Alben
5) Einstellungen
6) Druck
③
④
⑤
⑥
①
⑧
②
③
④ ⑤ ⑥ ⑦
1) Nagelumriss
2) Druckvorschau
3) Justiertasten
4) Drehen
5) Spiegeln (horizontal)
6) Spiegeln (vertikal)
7) Wählen eines Musters
8) Drucken des aktuellen Musters
2. Für die Mobile App: Suchen und installieren Sie die App "Anjou Nails"
im App Store für iOS und Google Play für Android. Befolgen Sie die
Anweisungen auf Ihrem Gerät, um den DIY-Druck fertigzustellen.
19/20
Page 14

Vorsichtsmaßnahmen
1. Verwenden Sie keine ungeeigneten Netzstecker. Bitte schalten
Sie das Gerät aus und ziehen Sie den Netzstecker heraus, wenn
Sie es längere Zeit nicht benutzen.
2. Verwenden Sie das Gerät nicht längere Zeit in feuchter Umgebung, da es nicht wasserdicht ist.
3. Versuchen Sie nicht, das Gerät über das Reset-Stiftloch
zurückzusetzen, solange dies nicht von unserem Kundenservice
bestätigt wird.
Problembehandlung
1. Die Power-Taste leuchtet nicht auf
Schalten Sie den Drucker ein. Die Power-Taste leuchtet, wenn das Gerät
eingeschaltet ist.
2.
Die Kabel sind nicht richtig angeschlossen
Ihr Drucker kann per Strom-, LAN- und USB-Kabel angeschlossen
werden. Vergewissern Sie sich, dass die Kabel sowohl am Drucker als
auch am Computer richtig angeschlossen sind.
3.
So wechseln Sie die Tintenpatrone
Wenn ein Warnhinweis bezüglich zu wenig Tinte erscheint, müssen Sie
die Tintenpatrone wechseln. Nehmen Sie die Frontblende vorsichtig ab
und drücken Sie die Tintenpatrone nach unten, um sie zu entnehmen.
Schieben Sie eine Neue wie oben beschrieben in den Steckplatz.
FR
Avertissement
· Veuillez utiliser uniquement l’adaptateur secteur fourni.
· Tenir à l’écart de l’eau ou autres liquides, car cela pourrait endommager
l’appareil.
· Veuillez débranchez le cordon d'alimentation en cas d’inutilisation
pendant une longue durée.
· N’utilisez pas l’adaptateur si le cordon secteur est endommagé ou
coupé pour éviter les risques d’incendie.
· L'appareil peut être utilisé par des personnes ayant des capacités
physiques, sensorielles, ou mentales réduites, ou par manque d'expéri ence ou de connaissances, si elles sont sous surveillance, ou si elles
ont reçu des instructions concernant l'utilisation de l'appareil de
manière sûre et si elles comprennent les risques encourus.
· Lorsque vous utilisez un appareil électrique, en particulier lorsque des
enfants sont présents, les précautions de sécurité de base doivent
toujours être suivies.
· Tenir l’appareil et ses accessoires hors de portée des enfants.
· Tenez le cordon éloigné des surfaces chauffées.
· Ne pas enrouler le cordon autour de l'appareil pendant l'utilisation.
· Évitez de suspendre le cordon à un comptoir ou à une table où des
enfants pourraient tirer dessus ou trébucher par inadvertance.
· L'utilisation d'accessoires non recommandés par le fabricant peut
entraîner des dangers.
· N'utilisez jamais l'appareil à d'autres fins que celles pour
lesquelles il est prévu.
· Évitez le contact du gel avec les yeux, le cuir ou le tissu.
· Ne laissez pas l'appareil en marche sans surveillance.
· N’utilisez jamais l'appareil sur une surface irrégulière.
· N’insérez pas d’objets dans les slots du coffret de l’imprimante.
· Ne mettez pas votre main à l’intérieur de l'imprimante et ne touchez
pas la cartouche d'encre pendant l'impression.
· Avant de transporter l'imprimante, assurez-vous que la tête d'impres sion est en position de repos (à l’extrême droite) et que la cartouche
21/22
Page 15

d'encre est en place.
· Conservez la cartouche d’encre et le gel hors de portée des enfants. Ne
laissez pas les enfants boire ou manipuler la cartouche et le flacon de
gel.
· Soyez prudent lorsque vous manipulez la cartouche d’encre utilisée, car
il peut y avoir de l’encre autour de la tête d’impression. Si de l'encre
entrait en contact direct avec votre peau, lavez soigneusement la
zone à l'eau et au savon. Si de l'encre entrait en contact direct avec
vos yeux, rincez-les immédiatement à l'eau. Si vous ressentiez une
gêne ou si votre vision était altérée, consultez immédiatement un
médecin.
· Si vous retirez une cartouche d'encre pour une utilisation ultérieure,
protégez la zone d'alimentation en encre de la saleté et de la poussière
et stockez-la dans le même environnement que l'imprimante.
· Cet appareil est destiné UNIQUEMENT À UN USAGE INTÉRIEUR.
Garantie
Anjou fournit une garantie limitée de 12 mois pour ce produit, à compter
de la date d’achat initial. Si votre produit devenait défectueux, veuillez
contacter l’équipe du Service Clients par email.
Nous ne pouvons fournir de service après-vente que pour les appareils
vendus par Anjou ou un de ses distributeurs ou revendeurs autorisés. Si
vous avez acheté votre appareil depuis un autre endroit, veuillez
contacter le vendeur pour les questions de retour et de garantie.
Contenu du Paquet
· 1 x Imprimante à Ongles
· 1 x Adaptateur Secteur
· 1 x Câble d’Alimentation
· 1 x Cartouche d'Encre
· 1 x Kit d’Outils de Manucure
(Coupe-ongles, pinces à cuticules, pousseur de cuticules et lime
à ongles)
· 1 x Gel de Base (10ml)
· 1 x Gel Vernis (10ml)
· 1 x Gel Printing (10ml)
· 1 x Gel Supérieur d’Étanchéité (10ml)
· 1 x Support de Calibration
· 1 x Support à Ongles
· 1 x Manuel de l'Utilisateur
Nota:
Vous devrez peut-être utiliser une lampe UV à gel ou d’autres séchoirs,
pour sécher les ongles rapidement en cas d’éraflure ou de coulure.
Spécifications
Modèle
Tension d’Alimentation
Puissance
Résolution d’Affichage
Température et Hygrométrie de
Fonctionnement
Niveau d’Étanchéité
Dimensions
Poids Net
AJ-CBL001
DC 12V 4A
48W
1024 x 600 Pixels
10°C - 35°C, 20% - 80% (RH)
Non applicable
214.8 x 208.6 x 208.6mm /
8.45 x 8.21 x 8.21in
2.5kg
23/24
Page 16
1 2
①
②
3 4
Guide d'Installation Rapide
1. Connectez le cordon d'alimentation et l’adaptateur à
l’imprimante.
2. Appuyez sur le bouton d'alimentation pour l’allumer (s’éclaire en
blanc quand est en marche).
3. Retirez le couvercle avant.
4. Insérez la cartouche dans l’imprimante
1) Déballez la cartouche, retirez la protection de la buse d’encre.
Ne touchez pas la buse ni les contacts cuivrés.
2) Faites glisser la cartouche d'encre dans le slot en l’inclinant
légèrement vers le haut, avec les contacts vers le bas. Pous
sez-la doucement vers le haut, jusqu’à ce qu’elle s’enclenche en
place avec un clic sonore. Assurez-vous qu’elle est fermement
en place.
5. Remettez le capot avant. Alignez les creux et les bosses de
l’imprimante, poussez-le de l’avant vers l’arrière.
5
25/26
Page 17

Démarrage Rapide
Préparez vos ongles en utilisant
les outils de manucure
3
2
1
Appliquez quatre couches.
1)Gel de Base
2)Gel Vernis Blanc
fois
2
3)Gel Vernis
Placez votre doigt sur le support à
ongles. Appuyez et relâchez pour
revenir en arrière.
Remarque: évitez de rayer les
couches de vernis.
2
4 5
1
Séchez à l'aide d'une lampe UV
après chaque application.
60s
Sélectionnez un motif.
Appuyez sur Imprimer.
Remarque: restez immobile
pendant l'impression.
Appuyez à nouveau pour relâcher
votre doigt.
Appliquez un gel Supérieur
d’Étanchéité
6 7
Sécher avec une lampe UV.
60s
Sécher avec une lampe UV.
120s
8 9
3
Remarque: pour des instructions détaillées, reportez-vous à la
section Tutoriels vidéos de l’imprimante à ongles.
27/28
Page 18

Utilisation Avec l’Appli
1. Sur l’écran de l’imprimante, vous pouvez voir les sections vidéo et
motif. Vous pouvez être sollicité pour quelques instructions à appliquer
à l’imprimante juste après son initialisation.
③
①
⑧
②
①
②
1) Tutoriels Vidéos d’entraînement
2) Section profil
3) Tous les albums
4) Chaque album
5) Réglages
6) Impression
④
⑤
⑥
③
④ ⑤ ⑥ ⑦
1) Contour de l’ongle
2) Prévisualisation de l’impression
3) Boutons d’ajustement
4) Rotation
5) Miroir (retournement horizontal)
6) Miroir (retournement vertical)
7) Choix d’un motif
8) Impression
2. Pour l’appli mobile : Cherchez et installer l’appli Anjou Nails dans l’App
Store pour iOS et Google Play pour Android. Suivez les instructions sur
votre appareil pour compléter l’impression manuelle.
29/30
Page 19

Précautions
1. N’utilisez pas d’adaptateurs secteurs non standard. Veuillez éteindre
le produit et débrancher l’adaptateur secteur quand il est inutilisé
pendant longtemps.
2. N’utilisez pas l’appareil dans un environnement humide pendant une
longue durée, car il n’est pas étanche.
3. N'essayez pas de réinitialiser l'appareil par le trou de réinitialisation, à
moins que cela ne soit confirmé par notre service client.
Guide de Dépannage
1. Le voyant du Bouton d’Alimentation ne s’éclaire pas
Allumez l'imprimante et le voyant du Bouton d’Alimentation s’éclairera
une fois l’appareil en marche.
2. Les câbles ne sont pas correctement connectés
Votre imprimante peut être connectée à un câble électrique, un câble
réseau et un câble USB. Assurez-vous que les câbles sont connectés en
même temps à l'imprimante et l’ordinateur pour des motifs personnalisés.
3. Comment changer la cartouche d’encre
Si vous avez un avertissement d'encre insuffisante, vous devez changer
la cartouche d'encre. Retirez délicatement le capot avant, poussez la
cartouche d’encre vers le bas pour la retirer et faites-en glisser une
nouvelle dans la fente de son support, comme indiqué précédemment.
ES
Advertencia
· Utilice únicamente el adaptador de corriente incluido.
· Mantenga alejado del agua u otro líquidos ya que puede dañar el
dispositivo.
· Desenchufe el cable de alimentación si no lo usa durante un largo
período de tiempo.
· No use el adaptador si el cable de CA está dañado o roto para evitar
riesgos de incendio.
· Este aparato no debe ser utilizado por personas (con discapacidades
físicas, sensoriales o mentales, o por personas con falta de experien ciay conocimiento, a menos que se les haya supervisado o instruido
sobre el uso del aparato de una forma segura y que entiendan los
riesgos involucrados
· Al usar cualquier artefacto eléctrico, especialmente cuando hay niños
presentes, siempre se deben seguir las precauciones de seguridad
básicas.
· Mantenga la unidad y los accesorios lejos de los niños.
· Mantenga el cable alejado de superficies calientes.
· No enrolle el cable alrededor de la unidad cuando esté en uso.
· Evite colgar el cable sobre un mostrador o una mesa donde los niños
puedan tirar de él o tropezarse involuntariamente.
· El uso de accesorios no recomendados por los fabricantes puede
causar riesgos.
· Nunca use el dispositivo para ningún otro fin que no sea el uso previsto.
· Evite el contacto del gel con los ojos, telas, cueros o fibras.
· No deje desatendida la aplicación si esta encendida.
· Nunca opere el artefacto en superficies irregulares.
· No inserte objetos a través de las ranuras en el gabinete de la
impresora.
· No introduzca la mano dentro de la impresora ni toque el cartucho de
tinta durante la impresión.
· Antes de transportar la impresora, asegúrese de que el cabezal de
impresión esté en la posición de inicio (extremo derecho) y el cartucho
de tinta se quede en su lugar.
31/32
Page 20

· Mantenga el cartucho de tinta y gel fuera del alcance de los niños. No
permita que los niños ingieran ni agarren la botella de cartucho y de
gel.
· Tenga cuidado cuando manipule el cartucho de tinta usado, ya que
puede haber algo de tinta alrededor del orificio de suministro de tinta.
Si la tinta entra en contacto directo con su piel, lave bien el área con
agua y jabón. Si la tinta entrar en contacto directo con sus ojos,
láveselos inmediatamente con agua. Si siente malestar o visión
deteriorada, consulte a un médico de inmediato.
· Si retira un cartucho de tinta para utilizarlo más adelante, proteja el
área de suministro de tinta de suciedad y de polvo y guárdelo en el
mismo lugar que la impresora.
· Este electrodoméstico es PARA USO EN INTERIORES SOLAMENTE.
Garantía
Anjou ofrece una garantía limitada de 12 meses para este producto
desde la fecha de compra original. Si su producto resulta defectuoso,
póngase en contacto con nuestro equipo de atención al cliente por
correo electrónico.
Sólo podemos ofrecer servicios de postventa de los productos que se
venden por Anjou o Anjou autorizados minoristas y distribuidores. Si
usted ha comprado su unidad desde un lugar diferente, por favor
póngase en contacto con el vendedor directamente para cuestiones de
retorno y de garantía.
Contenidos del Paquete
· 1 x Impresora de Uñas
· 1 x Adaptador de Energía
· 1 x Cable de Alimentación
· 1 x Cartucho de Tinta
· 1 x Kit de Herramientas de Manicura
(Corta uñas, cutículas, empuja cutículas, y lima uñas)
· 1 x Gel Base (10ml)
· 1 x Gel Smalto (10ml)
· 1 x Gel de Sellado Superior (10ml)
· 1 x Gel de Sellado Superior (10ml)
· 1 x Almohadilla Limpiadora
· 1 x Base Removedor de Esmalte de Uñas
· 1 x Manual de Usuario
Nota:
Es posible que necesite una lámpara de gel UV u otros secadores para
secar las uñas rápidamente en caso de raspaduras o manchas.
Especificaciones Técnicas
Modelo
Voltaje de Operación
Energía
Resolución de la Pantalla
Temperatura de Funcionamiento
y Humedad
Nivel de Impermeabilidad
Dimensiones
Peso Neto
AJ-CBL001
DC 12V 4A
48W
1024 x 600 Pixeles
10°C - 35°C , 20% - 80% (RH)
No Soportado
214.8 x 208.6 x 208.6mm /
8.45 x 8.21 x 8.21in
2.5 kg / 88.2 oz
33/34
Page 21

1 2
①
②
3 4
Guía de Instalación Rápida
1. Conecte el cable de alimentación y el adaptador a la impresora.
2. Presione el Botón de Encendido para encenderla (se ilumina en
blanco cuando está encendida).
3. Retire la cubierta frontal.
4. Inserte el cartucho de tinta en la impresora
a. Desempaque el cartucho de tinta, quite el sello protector en la
boquilla de tinta. No toque la boquilla ni los contactos de color
cobre.
b. Deslice el cartucho de tinta en un ligero ángulo hacia arriba en la
ranura con el contactos hacia abajo. Empuje suavemente hacia
arriba hasta que encaje en su lugar con un sonido de clic. Asegúrese
de que esté bien instalado.
5. Instale de nuevo la cubierta frontal. Alinee las marcas y los agujeros
den la impresora, empuje la cubierta de frente hacia atrás.
5
35/36
Page 22

Procedimientos de Inicio Rápido
Prepare sus uñas utilizando las
herramientas de manicura.
3
2
1
Aplique cuatro capas.
1)Extienda capa de base
2)Esmalte de gel blanco.
veces
2
3)Extienda el gel base
Coloque su dedo en el soporte de
uñas.Presione abajo y suelte hacia
atrás para saltar
Nota: Evite rascarse el
superficie de uñas.
2
4 5
1
Seque utilizando la lámpara
UV después de cada
aplicación.
60s
Seleccione un patrón.
Presione extender.
Nota: Permanezca quieto
durante la impresión.
Presione abajo otra vez para
soltar el dedo.
Aplique una capa de gel superior.
6 7
Dry with a UV lamp.
60s
Dry with a UV lamp.
120s
8 9
3
Nota: Para obtener instrucciones detalladas, consulte la sección de
tutoriales en Video en la impresora de uñas
37/38
Page 23

Usar Con El App
1. En la pantalla de la impresora, es posible que vea las secciones de
vídeo y el patrón. Es posible que se le soliciten algunas instrucciones
para usar la impresora justo después de inicializarla.
③
①
⑧
②
①
②
1) Tutoriales de Vídeo de Instrucciones
2) Sección de Perfil
3) Todos los Álbumes
4) Cada Álbum
5) Configuración
6) Impresión
④
⑤
⑥
③
④⑤⑥
1) Contorno de Uña
2) Vista Previa de Impresión
3) Botones de Ajuste
4) Girar
5) Espejo (Voltear Horizontalmente)
6) Espejo (Voltear Verticalmente)
7) Seleccione un Patrón
8) Imprimir el Patrón Actual
2. Para aplicaciones móviles: encuentre e instale la aplicación Anjou
Nails en el App S ore para iOS y Google Play para Android. Siga las
instrucciones del dispositivo para completar la impresión.
⑦
39/40
Page 24

Precauciones
1. No utilice adaptadores de corriente no estándar. Por favor, apague el
producto y desenchufe el adaptador de alimentación cuando esté
inactivo durante un largo tiempo.
2. No use el producto en un ambiente húmedo durante mucho tiempo
ya que no es resistente al agua.
3. No intente reiniciar la unidad a través del botón de reinicio a menos
que nuestro servicio al cliente lo confirme.
Guía de Solución de Problemas
1. El Indicador del Botón de Encendido no se Enciende Encienda la
impresora y el Indicador del Botón de Encendido se iluminara una vez
que la unidad esté encendida.
2. Cables no Conectados Adecuadamente Su impresora puede estar
conectado al cable de alimentación , cable LAN y cable USB .
Asegurase de que los cables están conectados tanto a la impresora
como a la computadora para el patrón DIY .
3. Cómo Cambiar el Cartucho de Tinta Si una advertencia de tinta
insuficiente aparece, debe cambiar el cartucho de tinta. Retire la
cubierta frontal suavemente, presione hacia abajo el cartucho de
tinta para extraerla y deslice una nueva en la ranura de su soporte
como se indicó anteriormente.
IT
Attenzione
· Si prega di utilizzare esclusivamente l’adattatore di alimentazione
incluso.
· Tenere al riparo da acqua o altri liquidi che potrebbero danneggiare il
dispositivo.
· Si prega di scollegare il cavo di alimentazione se il dispositivo non
viene utilizzato a lungo.
· Non utilizzare l’adattatore se il cavo di alimentazione è danneggiato o
rotto per evitare il pericolo di incendio.
· L’apparecchio può essere utilizzato da persone con capacità fisiche,
sensoriali o mentali ridotte, o da persone con mancanza di esperienzae
conoscenza, a condizione che siano supervisionati e che siano stati
istruiti sull’utilizzo del dispositivo in sicurezza e abbiano capito i rischi
legati all’utilizzo dello stesso.
· Durante l’uso di qualsiasi apparecchio elettrico, specialmente in
presenza di bambini, è necessario seguire sempre le precauzioni di
sicurezza di base.
· Tenere il dispositivo e i suoi accessori lontano dalla portata dei
bambini.
· Tenere il cavo al riparo da superfici riscaldate.
· Non avvolgere il cavo attorno al dispositivo quando in uso.
· Evitare di far penzolare il cavo da un banco o da un tavolo dove possa
essere tirato da un bambino o causare il ribaltamento non intenzionale
dell’apparecchio.
· L’utilizzo di accessori non consigliati dal produttore può provocare
rischi di sicurezza.
· Non utilizzare mai il dispositivo per scopi diversi da quelli per cui è
stato progettato.
· Evitare il contatto del gel con occhi, vestiti, cuoio o tessuti.
· Non lasciare il dispositivo acceso e non sorvegliato.
· Non mettere mai in funzione l’apparecchio su una superficie non
stabile.
· Non inserire oggetti tra le fessure nell’alloggio della stampante.
· Non inserire le mani nella stampante, né toccare la cartuccia
41/42
Page 25
dell’inchiostro durante la stampa.
· Prima di trasportare la stampante, assicurarsi che la testina di stampa
sia nel suo alloggiamento (a destra) e che la cartuccia dell’inchiostro
sia nella sua posizione.
· Tenere la cartuccia dell’inchiostro e il gel fuori dalla portata dei
bambini. Non consentire ai bambini di ingerire né di maneggiare in
altro modo il contenuto della cartuccia dell’inchiostro o della bottiglia
del gel.
· Prestare particolare attenzione alla cartuccia di inchiostro usata, dal
momento che attorno all’ugello dell’inchiostro potrebbe esserci
dell’inchiostro residuo. Qualora l’inchiostro venisse a diretto contatto
con la pelle, lavare accuratamente l’area con acqua e sapone. Qualora
l’inchiostro venisse a diretto contatto con gli occhi, risciacquarli
immediatamente con acqua. In caso di dolore o problemi alla vista,
contattare immediatamente un medico.
· Qualora si decida di rimuovere una cartuccia di inchiostro per
utilizzarla in seguito, proteggere l’area della cartuccia dove fuoriesce
l’inchiostro da sporcizia e polvere e riporla nello stesso ambiente della
stampante.
· Questo dispositivo È ESCLUSIVAMENTE PER USO IN INTERNI.
Contenuto della Confezione
· 1 x Stampante per Unghie
· 1 x Adattatore di Corrente
· 1 x Cavo di Alimentazione
· 1 x Cartuccia di Inchiostro
· 1 x Set di Strumenti per Manicure
(Tagliaunghie, pinzette per cuticole, scalzapelli e lima per le unghie)
· 1 x Base di Gel (10ml)
· 1 x Smalto Gel (10ml)
· 1 x Stampa Gel (10ml)
· 1 x Gel Sigillante Superiore (10ml)
· 1 x Supporto di Calibrazione
· 1 x Supporto per le Unghie
· 1 x Manuale Utente
Nota:
Potrebbe essere necessaria una lampada UV per gel o altri strumenti
per asciugare rapidamente le unghie in caso di graffi o sbavature.
Garanzia
Anjou fornisce per questo prodotto, una garanzia limitata di 12 mesi
dalla sua data d'acquisto. In caso di difetti del prodotto, si prega di
contattare via email il nostro team di supporto clienti.
Forniamo servizio di post vendita esclusivamente per prodotti venduti
da Anjou o da distributori e rivenditori autorizzati Anjou. Se acquistati
da terzi, vi invitiamo a rivolgervi al vostro venditore per casi attinenti
alla restituzione del prodotto e questioni sulla garanzia.
Specifiche
Modello
Tensione di Esercizio
Potenza
Risoluzione dello Schermo
Temperatura e Umidità di Esercizio
Impermeabilità
Dimensioni
Peso Netto
AJ-CBL001
12V DC 4A
48W
1024 x 600 Pixel
10°C - 35°C, 20% - 80% (UR)
Non supportata
214.8 x 208.6 x 208.6mm /
8.45 x 8.21 x 8.21in
2,5kg / 88.2oz
43/44
Page 26

1 2
①
②
3 4
Guida Rapida all’Installazione
1. Collegare il cavo di alimentazione e l’adattatore alla stampante.
2. Premere il Pulsante di Accensione per accendere (con luce bianca a
stampante accesa).
3. Rimuovere il coperchio frontale.
4. Inserire la cartuccia d’inchiostro nella stampante
1) Aprire la confezione della cartuccia, rimuovere il sigillo protettivo
sull’ugello dell’inchiostro. Non toccare l’ugello o i contatti colore rame.
2) Far scivolare la cartuccia con un angolo leggermente inclinato
nell’alloggiamento con i contatti rivolti verso il basso. Spingere
delicatamente verso l’alto finché la cartuccia non è entrata con un
suono di click. Assicurarsi che sia ben inserita.
5. Rimettere il coperchio frontale. Allineare le sporgenze e i fori della
stampante, spingendo dalla parte anteriore verso quella posteriore.
5
45/46
Page 27

Procedure di Avvio Rapido
Prepara le tue unghie con gli
strumenti per manicure
3
2
1
Applicare quattro strati.
1)Cappotto di base
2)Smalto bianco gel
2
Due Volte
3)Stampa smalto del gel
Posiziona il dito sul portachiodi
Preme verso il basso e rilasciare
per tornare indietro.
Nota: Evitare di graffiare i
cappotti per unghie.
1
Asciugare con una lampada
UV dopo ogni applicazione.
2
4 5
60s
Seleziona un modello.
Tocca Print.
Nota: Rimane ancora durante
la stampa.
Premere di nuovo verso il basso
per rilasciare il dito.
Applicare uno strato di top coat.
6 7
Asciugare con una lampada UV.
60s
Asciugare con una lampada UV.
120s
8 9
3
Nota: Per le istruzioni dettagliate, si prega di consultare la sezione
Video Tutorial sulla stampante chiodo.
47/48
Page 28
Utilizzo con App
1. Sullo schermo della stampante è possibile vedere le sezioni video e
disegni. Dopo che la stampante è stata inizializzata, potresti ricevere
alcune istruzioni.
③
①
⑧
②
①
②
1) Tutorial Video illustrativi
2) Sezione profilo
3) Tutti gli album
4) Album singoli
5) Impostazioni
6) Stampa
④
⑤
⑥
③
④ ⑤ ⑥ ⑦
1) Profilo dell’unghia
2) Anteprima di stampa
3) Pulsanti di regolazione
4) Ruota
5) Specchia (in orizzontale)
6) Specchia (in verticale)
7) Scegli un disegno
8) Stampa il disegno corrente
2. Per l’app mobile: trovare e installare l’app Anjou Nails nell’App Store
per iOS o su Google Play per Android. Seguire le istruzioni sul proprio
dispositivo per completare la stampa fai da te.
49/50
Page 29

Precauzioni
1. Non utilizzare adattatori di alimentazione non standard. Si prega di
spegnere il dispositivo e di disconnettere l’adattatore di alimentazi one quando il prodotto non viene utilizzato per un lungo periodo.
2. Non utilizzare il prodotto in ambienti umidi per lungo tempo dal
momento che l’apparecchiatura non è impermeabile.
3. Non cercare di resettare il dispositivo attraverso il forellino per il
Reset a meno che non venga confermato dal nostro servizio clienti.
Guida alla Risoluzione dei Problemi
1. L’indicatore del Pulsante di Accensione non si accende
Accendere la stampante, e l’indicatore del Pulsante di Accensione si
illuminerà una volta che il dispositivo è acceso.
2.
I cavi non sono connessi correttamente
La tua stampante non può essere collegata al cavo di alimentazione,
al cavo LAN e al cavo USB. Assicurarsi che i cavi siano connessi sia
alla stampante che al computer per i disegni fai da te.
3.
Come sostituire la cartuccia d’inchiostro
Se viene visualizzato un avviso di inchiostro insufficiente, è necessario
sostituire la cartuccia d’inchiostro. Rimuovere delicatamente il
coperchio frontale, premere la cartuccia verso il basso per rimuoverla, e
inserirne una nuova nell’alloggiamento come descritto sopra.
JP
ご注意
·付属の電源アダプター以外は使用しないで下さい。
·水等、液体に近づけないでください。機器に不具合が起こる場合がありま
す。
·長時間ご利用にならない際は、コンセントを抜いてください。
·電源ケーブルが損傷している場合は、火災の原因になる恐れがあるため、
使用しないで下さい。
·ハンディキャップの方や経験・知識の乏しい方がご利用になる場合は、危
険が伴うことを理解した上で、保護者監視の下、行ってください。
·電化製品を利用する際、特にお子様が近くにいる際は、周囲の安全を十
分ご確認下さい。
·本体と付属品はお子様の手の届かないところで保管してください。
·コードは熱を持った表面には置かないでください。
·本製品をご利用の際、コードに何か覆いかぶさる物がないよう注意くださ
い。
·お子様がコードを引っ張ったり、引っかけたりすることがないようご注意く
ださい。
·メーカーにより推奨されていない付属品を使用すると危険を伴うことが
あります。
·指定の使用用途以外には絶対に利用しないでください。
·目や衣服にジェルがつかないようお気をつけください。
·作動させた機器から離れないでください。
·本製品は、必ず水平な面でご利用ください。
·プリンターキャビネットのスロットに物を差し込まないでください。
·プリント中、プリンターの中に手を入れたり、インクカートリッジを触ったり
しないでください。
·プリンターを動かす際は、プリンターヘッドが所定の位置(一番右)に あり、
インクカートリッジ がしっかり収まっていることをご 確 認ください。
·インクカートリッジとジェルはお子様の手の届かないところで保管してく
ださい。カートリッジボトル、ジェルボトルで遊ばせ、中身を飲み込んでし
まうと危険です。
51/52
Page 30

·インクカートリッジの供給ポートの周辺にはインクが付いている場合があ
りますので、取り扱いにはご注意ください。肌についてしまった場合は、石
鹸と水でよく洗い流してください。インクが目に入ってしまった場合は、直
ちに水で洗い流してください。洗い流しても問題がある場合は、医師にご
相談ください。
·インクカートリッジを後の利用に保管する場合は、供給ポート周辺にホコ
リやゴミがつかないよう、プリンターに保管している環境と同様に保護し
てください。
·この製品は、室内での利用に限ります。
安心保障
本商品の保証はお買い上げ日から12か月間です。通常のご使用範囲での
自然故障等の不具合がありましたら、お手数ではございますが、弊社まで
ご連絡いただければ、返品・交換・返金に対応いたします。
パッケージ 内 容
·1xネイルプリンター
·1x電源アダプター
·1x電源ケーブル
·1xインクカートリッジ
·1xネイルケアセット
(ツメキリ、キューティクルニッパー、キューティクルプッシャー、ネイル
ファイル)
·1xベースコート(10ml)
·1xジェルネイル(10ml)
·1xプリントジェルネイル(10ml)
·1xトップコート(10ml)
·1xキャリブレーションスタンド
·1xネイルサポート
·1xユーザーマニュアル
注意:
擦れやにじみを防止する効果のある『速乾』にはUVライトやドライヤーが
必要です。
仕様
モデル
作動電圧
電力
ディスプレイ解像度
作動温度と湿度
防水レベル
サイズ
重さ
AJ-CBL001
DC12V4A
48W
1024x600ピクセル
10℃-35℃,20%-80%(RH)
防水ではありません。
214.8 x 208.6 x 208.6mm
2.5kg
53/54
Page 31

1 2
①
②
3 4
クイック設定ガイド
1.プリンターに電源ケーブルとアダプターをつなげます。
2.電源ボタンを押してオンにします(白く光ります)。
3.フロントカバーを 外します。
4.プリンターの中にインクカートリッジを挿入します。
1)インクカートリッジを袋から出し、保護シールをインクノズルから外し
ます。ノズル(または赤銅色の部分)を触らないでください。
2)インクカートリッジを下に向け、少し上へ傾けてスロットへ差し込みま
す。クリック音が聞こえるまで、やさしく上方向へ押し、正しい位置へ設
置します。きちんと設置できているかご確認ください。
5.フロントカバーを元に戻します。プリンターの凹凸を揃え、前から後ろへ
押します。
5
55/56
Page 32

クイックスタ ート手 順
ネイルケアツールを使って、爪の 長さ
と形を 整えま す。
3
2
1
4 枚 重ね ジェルネ イルを 塗ります。
1)ベース コ ート
2)ホワ イト ジェ ル ネ イ ル
2
回
3)プリントジェ ル ネ イル
指をネイルサーポートに置いてから
一回押してバネを放す。
注意:爪を傷 つけないように。
1
ベースコートを塗るたびに UVライ
トで硬化させます。
60s
2
模様を一つ選択します。
プリントをクリックします。
注意:プリント中は動かないで 下
4 5
さい。
ボタンを 押して指 を離します。
6 7
トップコ ート を 塗りま す。
UVランプで硬化させます。
60s
UVランプで硬化させます。
120s
8 9
3
注 意: 詳細な説明については、ネイルプリンの動画をご覧ください。
57/58
Page 33

アプリを使う
1.プリンターのスクリーンに、ビデオとパターン項目が表示されます。初期
化された後、プリンターを適用するための設定を要求される可能性があ
ります。
③
①
⑧
②
①
②
1)動画教程
2)プロフィール
3)すべてのアルバム
4)個別のアルバム
5)設定
6)プリント
④
⑤
⑥
③
④ ⑤ ⑥ ⑦
1)ネイルアウトライン
2) プリントレ ビュー
3)調整ボタン
4)回転
5)ミラー(水平に反転)
6)ミラー(垂直に反転)
7)現在のパターンをプリント
8)パターンを選択
2.携帯アプリ:iOSにはAppStore、AndroidにはGooglePlayで、Anjou
Nailsアプリを検索し、インストールします。DIYプリンティングを完了させ
るためには機器の手順に従ってください。
59/60
Page 34

事前の注意
1.付属のアダプター以外は利用しないでください。長時間、機器を利用
しない場合は、電源をオフにし、電源アダプターのコンセントを抜いてく
ださい。
2.防水ではないため、湿度の高い環境での長時間のご利用はお避けくだ
さい。
3.カスタマーサービスの指示がない限り、リセットボタンで本体をリセット
しないでください。
トラブ ル シュ ー ティング ガ イド
1.電源ボタンにライトがつかない
プリンターの電源をオンにし、電源が入ると電源ボタンが光ります。
2.ケーブルが正しく接続されていない
プリンターは電源ケーブル、LANケーブル、USBケーブルと接続されます。す
べてのケーブルがプリンターとコンピューターに接続されていることをご
確認ください。
3.インクカートリッジの交換方法
インク不足の警告が表示されたら、インクカートリッジの交換が必要です。
フロントカバーをゆっくり外し、インクカートリッジを押し下 げ 外し、新しい
カートリッジをスロットに差し込んで下さい。
FCC STATEMENT :
This device complies with Part 15 of the FCC Rules. Operation is
subject to the following two conditions:
(1) This device may not cause harmful interference, and
(2) This device must accept any interference received, including
interference that may cause undesired operation.
Warning: Changes or modifications not expressly approved by the
party responsible for compliance could void the user's authority to
operate the equipment.
NOTE: This equipment has been tested and found to comply with the
limits for a Class B digital device, pursuant to Part 15 of the FCC Rules.
These limits are designed to provide reasonable protection against
harmful interference in a residential installation. This equipment
generates uses and can radiate radio frequency energy and, if not
installed and used in accordance with the instructions, may cause
harmful interference to radio communications. However, there is no
guarantee that interference will not occur in a particular installation. If
this equipment does cause harmful interference to radio or television
reception, which can be determined by turning the equipment off and
on, the user is encouraged to try to correct the interference by one or
more of the following measures:
Reorient or relocate the receiving antenna.
Increase the separation between the equipment and receiver.
Connect the equipment into an outlet on a circuit different from that to
which the receiver is connected.
Consult the dealer or an experienced radio/TV technician for help.
FCC Radiation Exposure Statement:
This equipment complies with FCC radiation exposure limits set
forth for an uncontrolled environment. This equipment should be
installed and operated with minimum distance 20cm between the
radiator & your body.
61
 Loading...