

Suntrica SolarBadge, SolarBadgePRO User Manual
Solar Charger
Suntrica
User Guide
SolarBadge
SolarBadgePRO
A
™
™
C
1
B
C
C
D
C
1. 2. 3. 4.
+
kg
24h
2
3
4
!
www.suntrica.com
EN
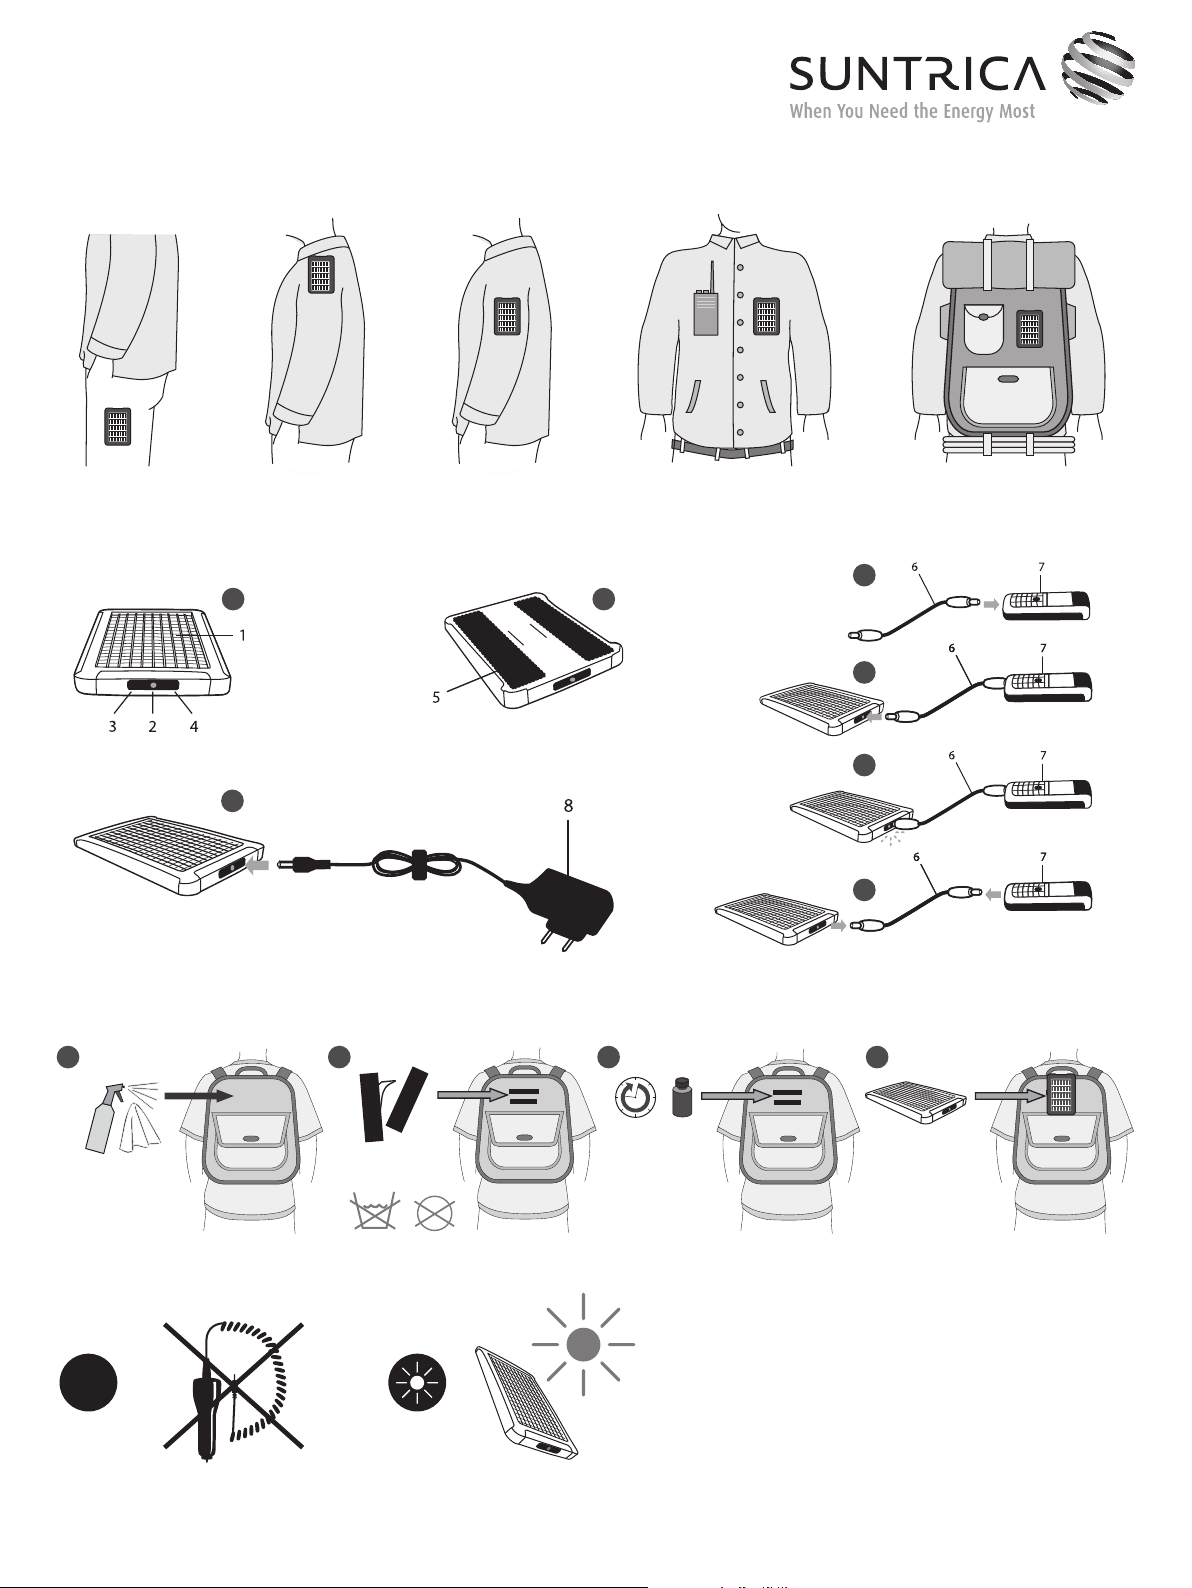
Descriptions for the numbers:
1. Solar panel
2. Input/output connector
3. Red light
4. Green light
5. Hook-and-loop fastener tape (hook)
6. Charging cable
7. Target device to be charged
8. Mains adapter (available as accessory)
Suntrica
Solar Charger
User Guide
SolarBadge
SolarBadgePRO
™
™
Suntrica Solar Charger
Congratulations on your purchase of Suntrica Solar Charger
(the user guide refers to Suntrica SolarBadge™ and
SolarBadgePRO™), a solar powered charging device. Suntrica
Solar Charger provides charging power to most devices having
a charging voltage of 5 V DC, for example mobile phones, MP3
players, GPS devices, and digital cameras. The charging
necessitates a device specific charging adapter, which can be
purchased from your local distributor.
Before using Solar Charger, carefully read this user guide and
all instructions and cautionary markings on Solar Charger, the
device to be charged, and the mains adapter for charging Solar
Charger.
This guide contains important safety and operating
instructions.
Contents of the box Available accessories
• Suntrica Solar Charger • Charging cables
• Charging cable • Mains adapter
• Loop fastener tapes • Target device specic adapters
• User Guide • Cigarette lighter adapter
Important safety instructions
• Read and observe all warnings on Suntrica Solar Charger
and in this user guide
• Power consumption of the connected device must not
exceed 5.5 V DC, 800 mA
• Do not expose Solar Charger under water
• Do not place inammable, explosive or hazardous objects
near Solar Charger
• Do not place any heavy objects on Solar Charger
• Do not bend solar panel heavily
• Only use Suntrica charging cables and accessories with the
Solar Charger
• Charging of the Solar Charger from 12 V DC with a
cigarette lighter cable other than approved by Suntrica
!
Ltd. is strictly prohibited. Use of any non-approved
cable may damage the Solar Charger permanently
• Only use Solar Charger in an environment with the proper
temperature (+0...+50 °C)
• Do not use Solar Charger if it has been subjected to
damage
• Unplug Solar Charger from the mains power adapter when
cleaning and when the battery is fully charged
• Unplug the charging cable from Solar Charger when
not in use
• Allow a sufcient amount of free space all around Solar
Charger and ensure adequate ventilation
• Solar Charger should not be disposed by burning or with
other household wastes
Functional overview
Figure A: Suntrica Solar Charger gathers solar energy by the
high efciency solar panel and stores the energy into a light-
weight battery. Green and red lights indicate the charging level
of the internal battery, and the status of a charging circuitry.
The Input/output connector is used for:
• charging a target device
• fast-charging the internal battery
Figure B: The back side of Solar Charger contains a hook type
hook-and-loop fastener tape for attaching Solar Charger to
various surfaces having the loop type fastener, e.g. to clothes
and back bags.
Figure C: Solar Charger provides charging power to most
devices with a service voltage of 5 V DC.
Figure D: Solar Charger can be fast charged using a mains
adapter available as an accessory.
How to charge with Solar Charger
1. Connect the charging cable to the target device
2. Connect the other end of the charging cable to
Solar Charger
3. Charging begins, this is indicated with two pulses of red
light blinked at few seconds intervals
4. After the target device is fully charged or the internal
battery is empty (please, see charging level indication),
remove the charging cable from both devices
Full Solar Charger can fully charge a typical mobile phone.
The charging time is approximately similar with the mobile
phone’s own charging device. The charging feature is disabled,
if the internal battery is empty. Plugging of the charging cable
to the Solar Charger increases the power consumption of the
electronics. Therefore, unplug the charging cable from Solar
Charger when not in use.
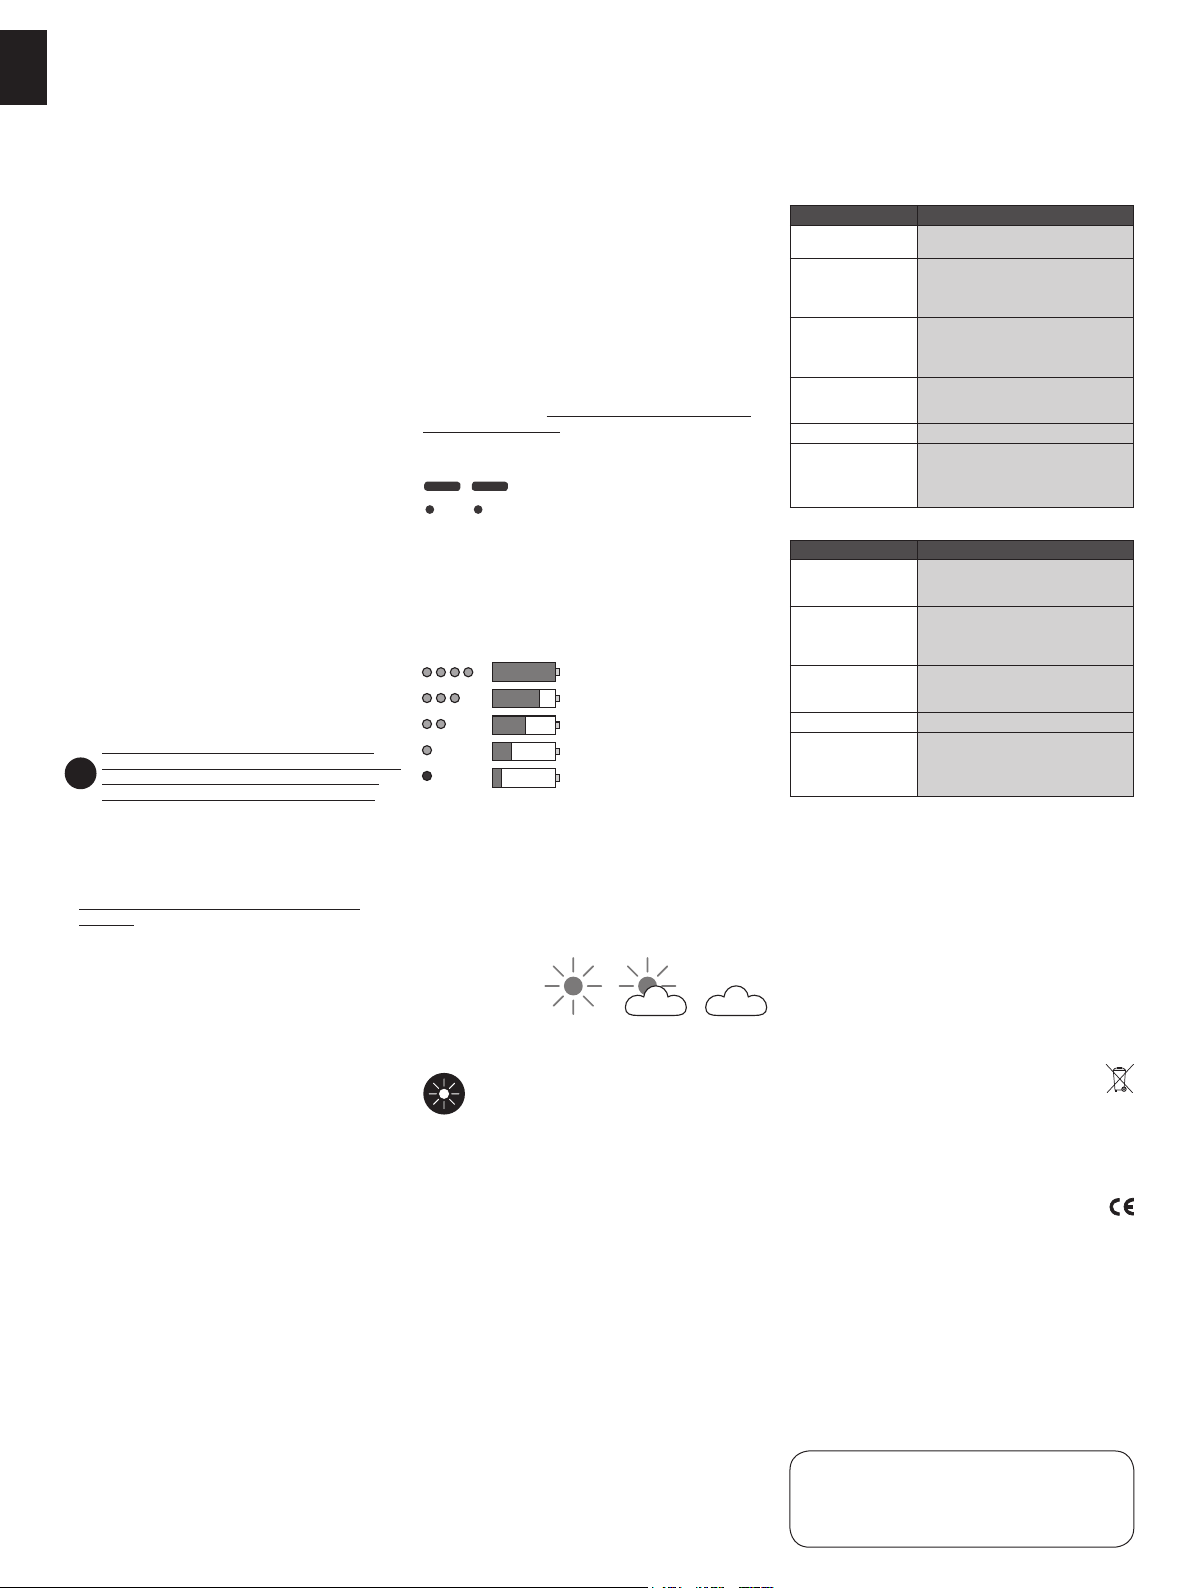
Blinks Description
Charging of a target device in process.
Charging cable connected and Solar
Charger ready to charge a target device.
Charging level indication
The green and red lights indicate the approximate charging
level of an internal battery by regular blinks. The approximate
charging level is interpreted as follows:
Blinks Charging level Battery status
Full
Nearly full
Half full
Nearly empty
Empty
Solar powered charging
Energy gathering from the light begins instantly, when Solar
Charger is placed in light. Optimal charging performance is
achieved outdoors in direct sunlight. Clouds and shadowing
reduce the charging performance notably. The approximate
performance of solar powered charging is presented in the
following figure. The figure indicates approximate charging
time of an empty internal battery until the battery is full.
Weather condition
Charging time:
SolarBadge™
SolarBadgePRO™
Optimal solar charging position
In order to achieve the best possible charging performance
Solar Charger should be positioned toward the sun.
Charging using a mains adapter
When needed, the internal battery of Solar Charger can be fast
charged by a mains adapter (accessory). First, plug a mains
adapter to an AC wall outlet, and then plug the charging plug
to Solar Charger. Continuously pulsing red light indicates that
the fast-charging is in process. The red light turns off, when
the charging is finished. The charging time is typically two
hours.
10 hours 20 hours 4 days
20 hours 40 hours 8 days
Troubleshooting
Problem: Solar Charger does not charge a connected device
Possible cause: Solution:
The internal battery is
empty
Solar Charger or the
charging adapter is not
compatible with the
connected device
The current consumption
of the device exceeds
the rated output of Solar
Charger
Improper connection
between device and
Solar Charger
Damaged charging cable Replace the charging cable
Problems with the
electrical circuits of Solar
Charger
Charge Solar Charger in sunlight or by a
mains adapter until the green light blinks
Contact your local distributor for confirming
the compatibility and for selecting a suitable
charging adapter for your device
Indication: The red light blinks five times.
Refer to the user manual of the device
Make sure that the charging cable is properly
inserted into the device and Solar Charger
Suntrica products have been tested in
factory. If you suspect that the Solar Charger
has been defected, please contact your local
distributor
Problem: A mains adapter does not charge Solar Charger
Possible cause: Solution:
The internal battery is full Indication: The green light blinks slowly
The service voltage of the
mains adapter does not
correspond with that of
Solar Charger
Improper connection
between mains adapter
and Solar Charger
Damaged mains adapter Replace the mains adapter
Problems with the
electrical circuits of Solar
Charger
Maintenance
• Use a soft cloth to clean Solar Charger exterior
• Do not use harsh chemicals, cleaning solvents or strong
detergents
• Do not disassemble Solar Charger
Technical specification
Rated input (mains adapter) 5.0–6.0 V DC
Rated output 5.5 V DC, 800 mA
Battery capacity/SolarBadge™ 3.7 Wh
Battery capacity/SolarBadgePRO™ 7.3 Wh
Operation temperature +0...+50 °C
Size 144 x 105 x 11 mm
Weight/SolarBadge™ 120 g
Weight/SolarBadgePRO™ 130 g
Correct disposal of the product
The marking shown on the product or its literature, indicates
that it should not be disposed with other household wastes
at the end of its working life. This product should be disposed
similarly with any other product having batteries and electrical
components. This product should not be mixed with other
wastes for disposal.
DECLARATION OF CONFORMITY
Hereby, Suntrica Ltd. declares that this Solar Charger product
is in compliance with the essential requirements and other
relevant provisions of Directive 2004/108/EC.
© 2009 Suntrica. All rights reserved. Suntrica®, Suntrica
SolarBadge™ and Suntrica SolarBadgePRO™ are trademarks
or registered trademarks of Suntrica Ltd. Suntrica Ltd. reserves
all rights to any changes to this User Guide and/or product
specifications without a prior notice.
four times after plugging the charger.
Check the charging level of the battery
For ensuring that the product works properly
and the guarantee is not void, use only
original Suntrica mains adapter and
accessories
Make sure that the charging cable is properly
inserted into Solar Charger
Suntrica products have been tested in
factory. If you suspect that the Solar Charger
has been defected, please contact your local
distributor
WARRANTY
If you believe that you are entitled to a repair or replacement of your SUNTRICA product based on your statutory
rights under the applicable national laws relating to the sale of consumer products or warranty given by the retailer
who has sold the SUNTRICA product to you, please contact your retailer.
Your local distributor
 Loading...