

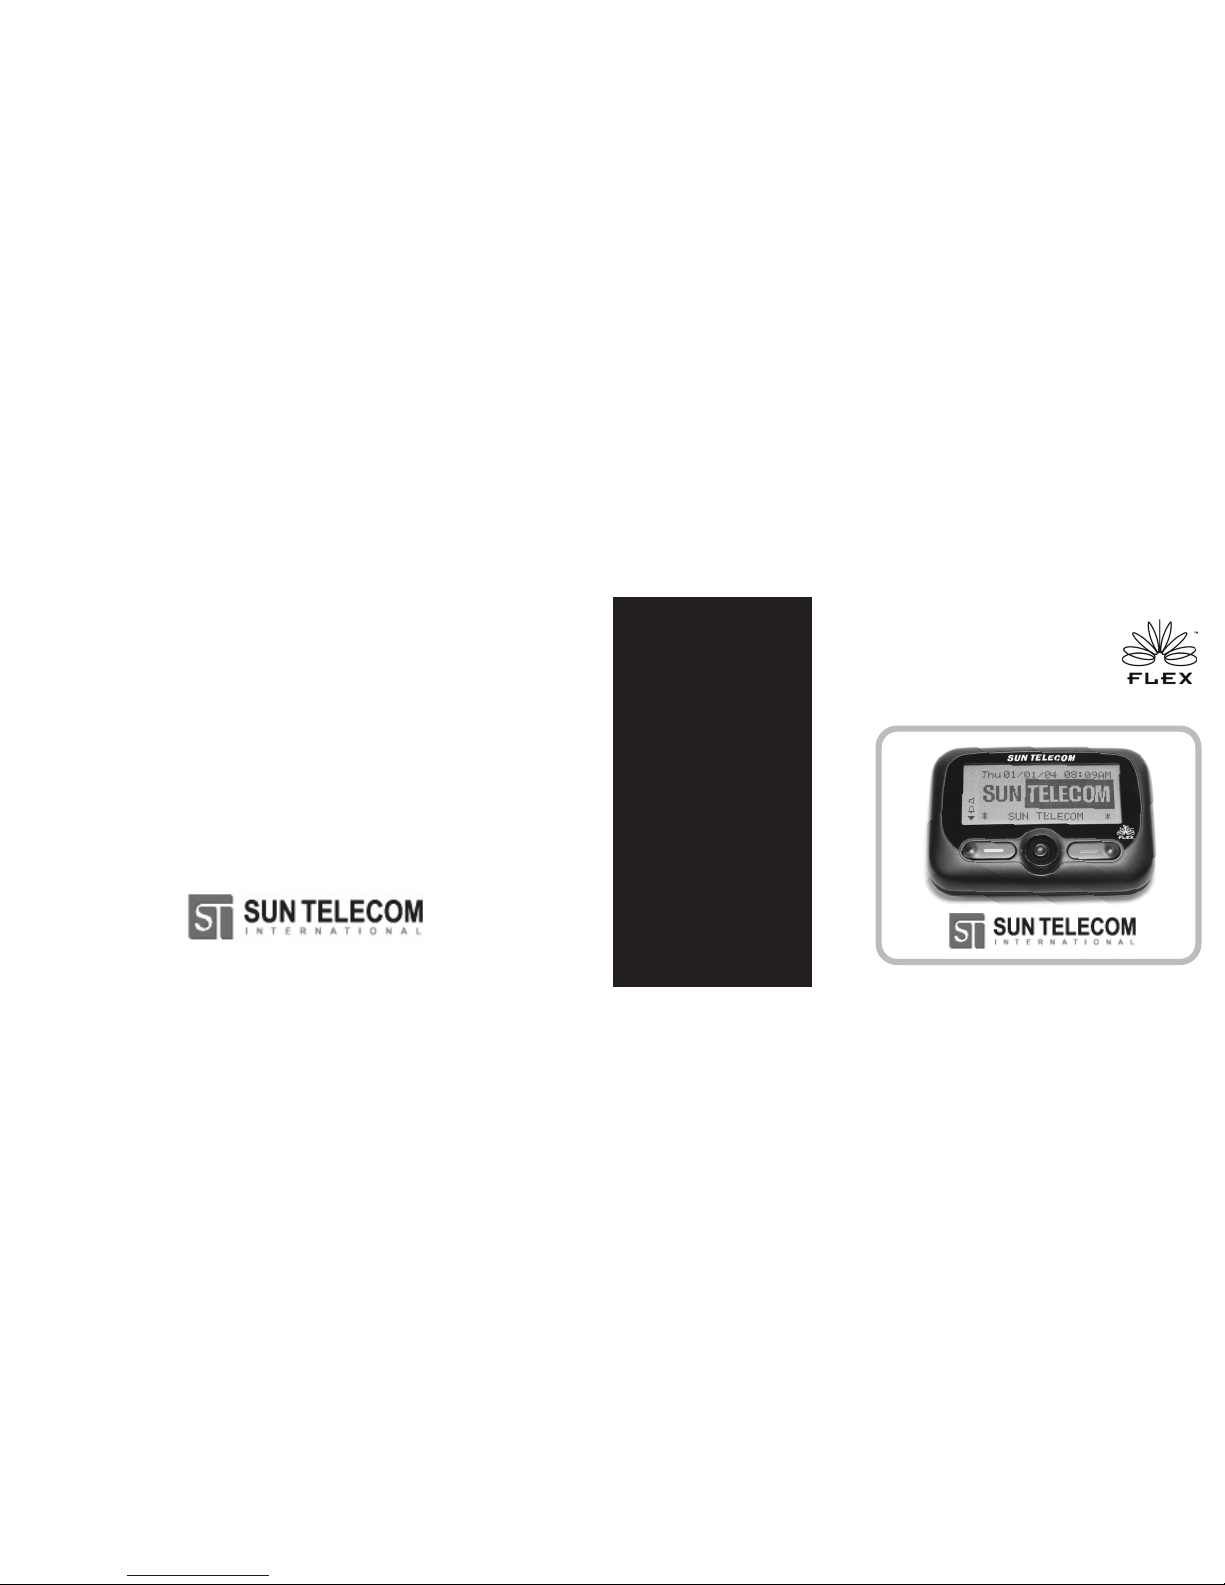
Model: STW-1093A
FLEX Technology
UUSSEERR’’SS GGUUIIDDEE
Word Message Pager
ⓒ 2004 Sun Telecom International, Inc.
All Rights Reserved.
Printed in KOREA 12/2004
S/N :
Rev : 1.00

1. General Safety Instructions
1.1 Battery Safety
1.2 Agency Approvals
1.3 Cleaning Your Pager
1.4 Care and Maintenance
2. Introduction
2.1 Welcome
2.2 Features
3. Getting Started
3.1 What’s included in the package ?
3.2 Outline & Control Buttons
3.3 Indicator & Symbols
3.4 Battery Information
3.5 Installing/Replacing the Battery
3.6 Backlighting
3.7 Out of Range Indicator
3.8 Using the Main Menu
3.9 Main Menu
3.10 Turning On Your Pager
3.11 Turning Off Your Pager
4. Messages
4.1 Reading Messages
4.2 Scrolling Between Messages
4.3 Working with the Message
Options Menu
4.4 Deleting Messages
4.5 Moving a Message to Saved Folder A/B
4.6 Deleting Read Messages with
Main Menu
4.7 Deleting All Messages with Main Menu
5. Message Boxes & Folder
5.1 Using Your News/Info InBox
5.2 Saved Folder A, Saved Folder B
6. Preferences
6.1 Setting the Quiet Mode
6.2 Setting the Time and Date
6.3 Selecting the InBox and the News/Info
Alert Type
6.4 Selecting the Tone of InBox and News/
Info Alert
6.5 Setting the Reminder Alert
6.6 Setting the LCD Contrast
6.7 Setting the Key Click
6.8 Setting the Alarms
6.9 Setting the Auto On/Off
6.10 Setting the Private Time
6.11 Setting the UI Style
6.12 Setting the Button Switch
6.13 Setting the Zoom In/Out
6.14 About
7. Limited Warranty
Contents
2
3

Follow these guidelines to help ensure the safe use of your pager and accessories.
1.1 Battery Safety
☞ Do not dispose of the battery in fire. Batteries can explode when exposed to fire.
☞ To prevent injure or burns, do not allow metal objects to contact or short circuit the
battery connectors.
1.2 Agency Approvals
The pager has been approved for use by the Federal Communications Commission (FCC) and
Underwriter’s Laboratories, Inc. (UL).
1.3 Cleaning Your Pager
To clean smudges and grime from the exterior of your pager, use a soft, non-abrasive cloth
moistened in a mild soap and water solution. Do not immerse in water. Do not use alcohol or
other cleaning solution.
1.4 Care and Maintenance
The pager is durable, reliable, and can provide years of dependable service ; however the are
1. General Safety Instructions
4
5
precision electronic products. Water and moisture, excessive heat, and extreme shock may
damage the device. Do not expose your device to these conditions. If repair is required, the
Service Organization, staffed with specially trained technicians, offers repair and maintenance
facilities in the USA.
You can protect your pager purchase with an optional extended limited warranty covering
parts and labor.
2.1 Welcome
Congratulations on your purchase of our Pager. By incorporating some of the most advanced
electronic paging technologies, the pager is reliable and easy to use. Best of all, it is
affordable and will keep you in touch with those important to you. Please carefully read this
manual before using your pager in order to fully understand the functions and capabilities.
Once again, congratulations on your purchase.
This guide contains operating instructions that explain how to use your new pager, and it
provides helpful suggestions for first-time users as well as experienced users.
2. Introduction
2.2 Features
Technology
·FLEXProtocol for Advanced Paging Reliability
·16 FLEX Addresses
·Information Services Capable
Display
·20 character x 6 Line LCD display
·120 x 48 High Resolution LCD EL Backlight
·Show Time and Date
Indicators/ Alert Features
·Built-In Alarm Clock ( 2 Alarms )
·User Selectable Alerts
·Vibrating Alert
·Reminder Alert
·Graphical Battery Gauge
·Error Message Indication
·New Message Indication
·Battery Status Display
·Message Full Indication
·Out of Service Range Indication
Messaging Features
·Stores up to 210,000 total characters
·Duplicate Message Management
·Selective Erase / Erase All
·Messages Saved While Off or Changing
the Battery
·2 Folders for Important Messages
·Message Preview
·Time and Date Stamp
·Message Scrolling
Control Features
·Zoom In/Out
·Private Time
·Auto On/Off
·Quiet Mode
·Key Click
·Adjusting LCD Contrast
·Selectable ICON Interface/ Text Interface
·Joystick Navigation
·Button Switch for Left-handed users
6
7
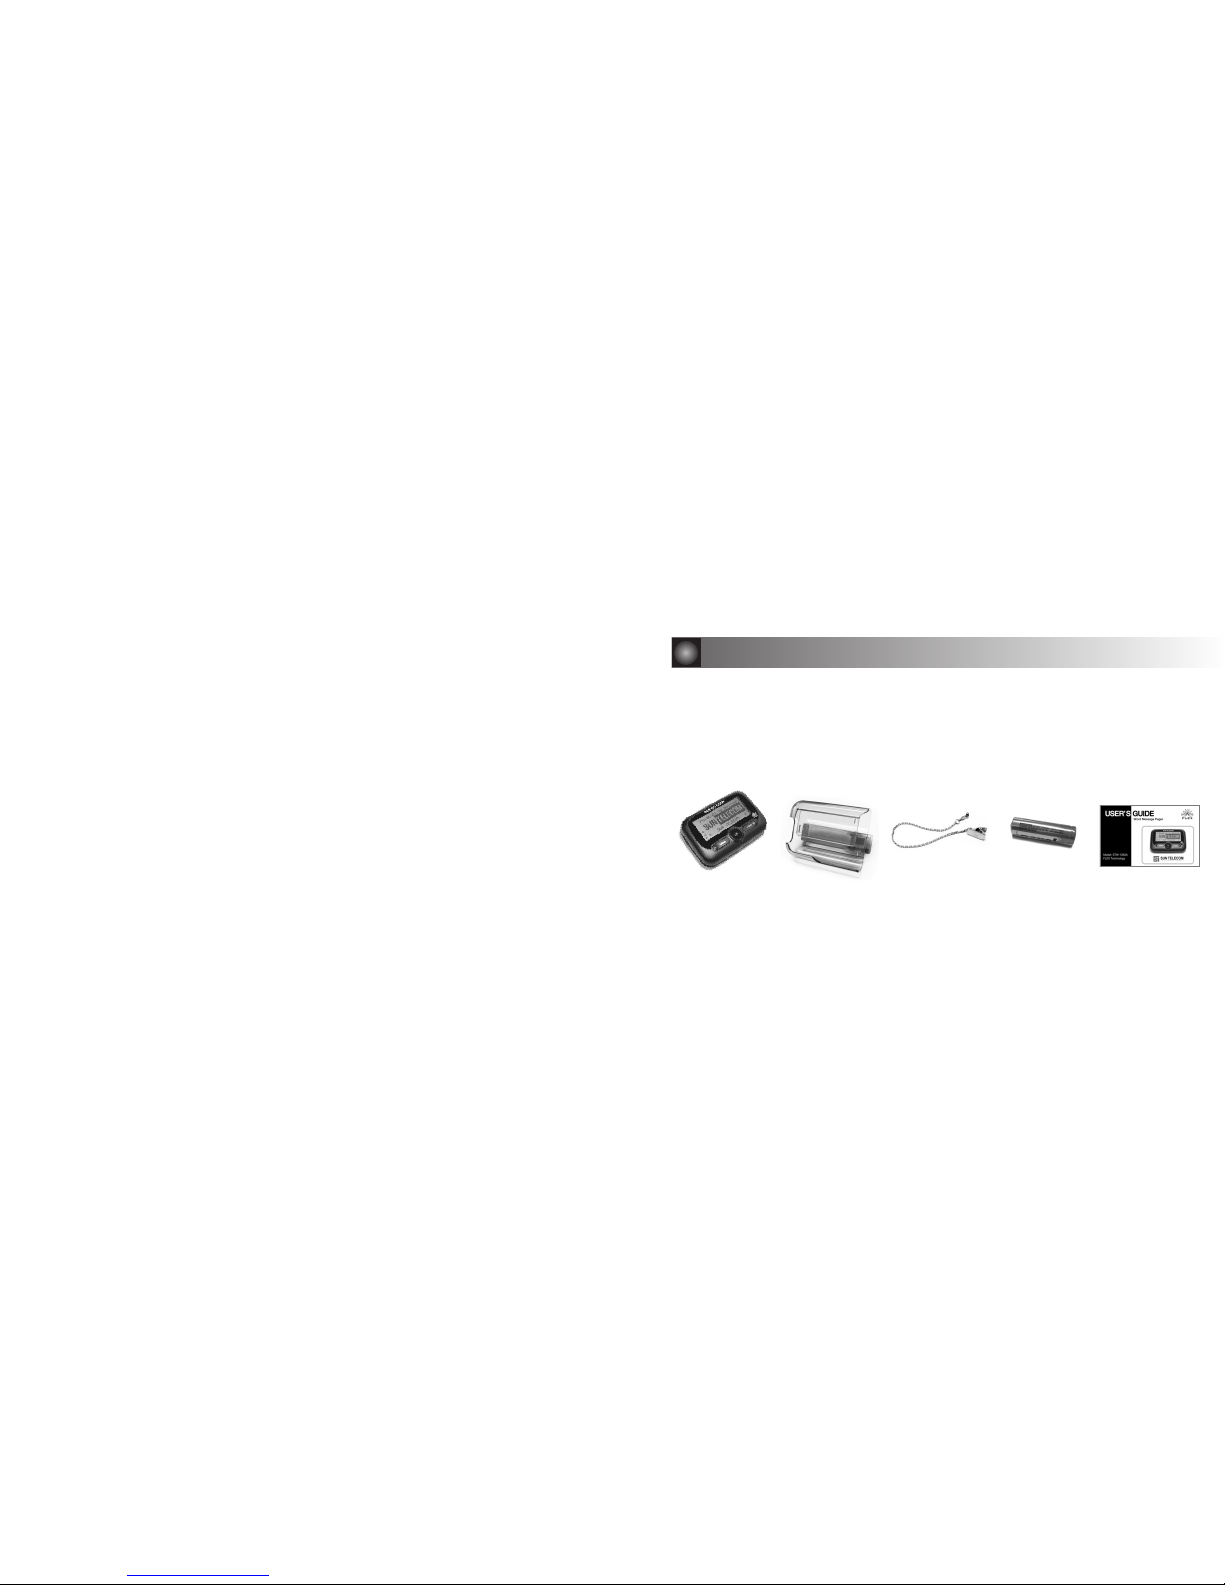
3.1 What’s included in the package ?
- Word Pager - Holster - Chain - 1 ‘AA’Alkaline Battery - User’s Guide
3. Getting Started
8
9
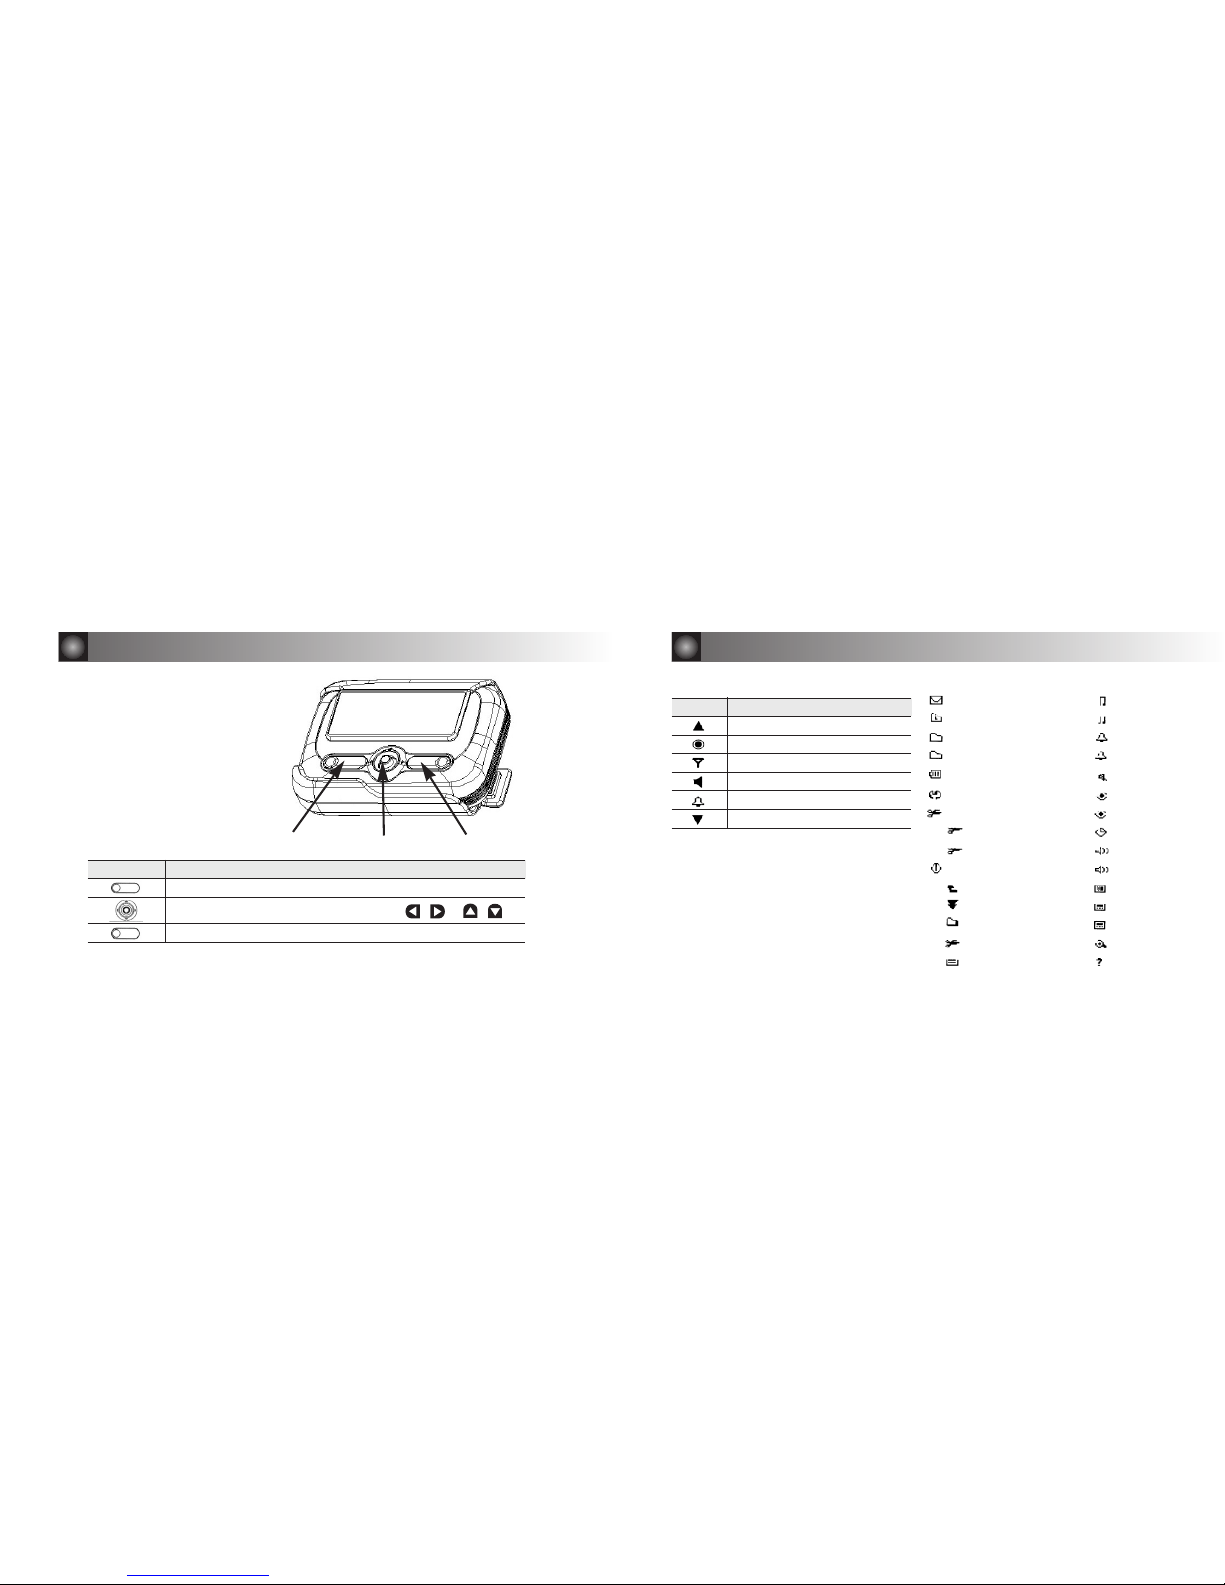
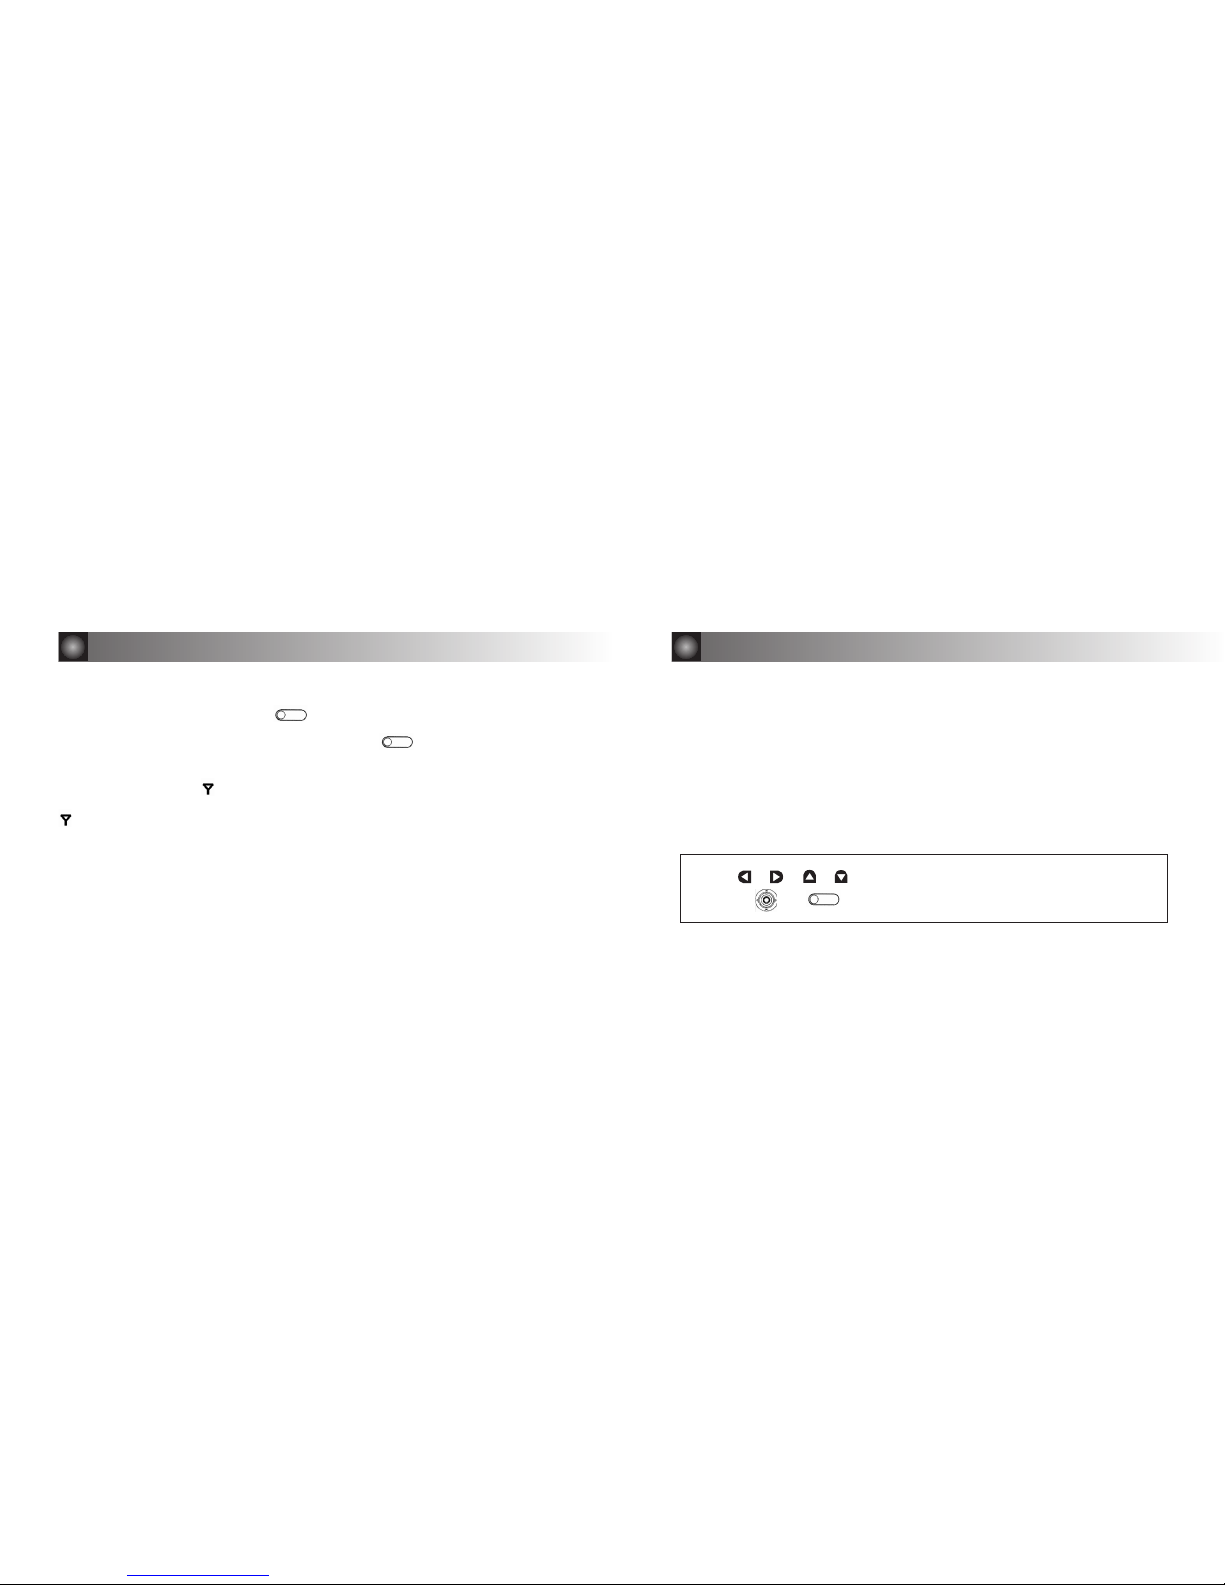
3.3 Indicator & Symbols
Button Description
Esc, Backlight
Directions(Left, Right, Up, Down), Enter
Enter
Left Button Joystick Right Button
InBox
News/Info InBox
Seved Folder 1
Seved Folder 2
Battery Level
Preferences
Delete Messages
Delete Read MSGs
Delete All MSGs
Power Off
Back/Escape
Next Message
Move to Folder
Delete Message
InBox in News
MailBox Alert
News/Info Alerts
Set Alarm1
Set Alarm2
Quiet Mode
Set Private Time
Set Auto On/Off
Set Time & Date
Key Click
Reminder Alert
Set Contrast
Set UI Style
Button Switch
Zoom In/Out
About
ICON Description
More Up
Power On Indicator
Out of Service Range Indicator
Audible Alert Indicator
Alarm Set Indicator
More Down
3.2 Outline & Control Buttons
3. Getting Started 3. Getting Started
3.4 Battery Information
Your pager use 1 ‘AA’alkaline battery. Check the battery gauge in the Vital Signs menu.
If is displayed to the down of the screen, the battery is low.
If is displayed, you cannot receive messages but you can still read unread messages.
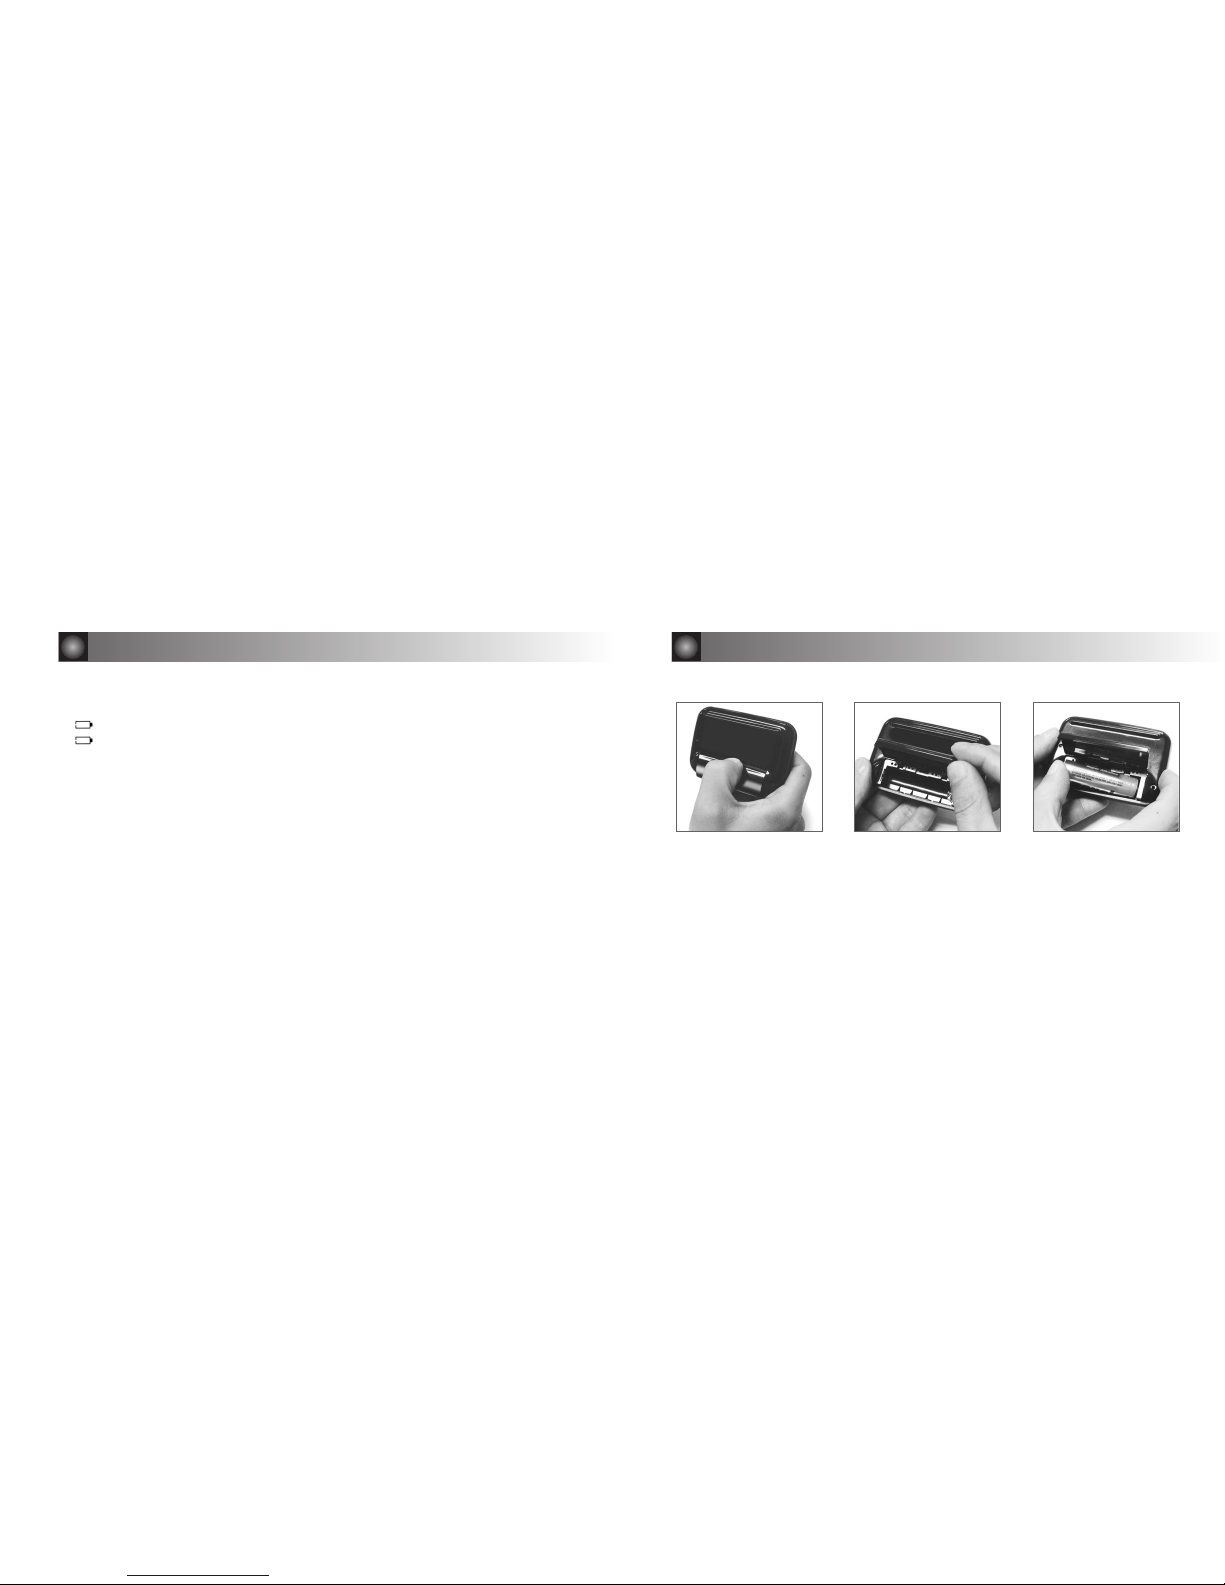
3.5 Installing/Replacing the Battery
1. Holding the pager face down. Push and slide the battery door.
Lift up the battery door to open.
2. Remove the old battery, noting the polarity.
3. Insert a new battery so the positive (+) and negative (-) polarity markings on the battery
match the polarity diagram near the battery compartment.
4. Replace the battery door cover.
10
3. Getting Started 3. Getting Started
CAUTION: Note the polarity markings (+) and (-).
Do not insert the battery backwards.
Push
11
3.8 Using the Main Menu
Use the Main menu for the following functions:
·Access InBox
·Access News/Info InBox
·Access Saved Folder A / Folder B
·Delete all read messages in the InBoxes
·Change the pager settings
·Display Battery Level
·Turn the pager off
13
Use , , , to highlight the desired feature/option, and then
press , or .
3. Getting Started
12
3.6 Backlighting
In low-light conditions, press and hold . to turn on the pager’s backlight.
The backlight remains illuminated until the pager times out and returns to the Standby
screen. To turn the backlight off manually, press and hold .
3.7 Out of Range Indicator
With this option enabled, is displayed whenever you are out of range of the paging
transmitter. Your pager can also alert you of this if this feature is enabled. The symbol
is no longer displayed when you return to your transmitting area.
3. Getting Started

3.10 Turning On Your Pager
①
Press key to turn your pager on. The pager emits a 4-second power-up alert,
and displays the Status screen.
②
Press , , , , to display the Main menu.
·If you do not select a menu item, the pager goes into standby mode.
·If you have one or more unread messages, number of messages displays
on the right side of each Inbox icon.
3.11 Turning Off Your Pager
You should turn off your pager to save battery power.
15
Press To Display Then Press
or Power Off
or Yes
3. Getting Started
14
3.9 Main Menu

17
The previous message or The next message
Press To Display Then Press
, or to read text.
4.2 Scrolling Between Messages
While reading a message, you can quickly display another one.
4.3 Working with the Message Options Menu
You can access the Message Options Menu from any of the InBox, Saved Folder A/B available.
Review the following sections for more information on each of the message options in the
menu :
Move to Folder A, Move to Folder B, or Delete Message.
InBox, Saved Folder A/B
Desired message
Desired option from the
Message Options Menu
Press To Display Then Press
4. Messages
or
or
or
or
16
InBox or News/Info InBox
Desired message
Message text line-by-line or Message text
page-by-page.
If there is additional text, ▲ and ▼ will be
displayed on the left side of the screen.
Press To Display Then Press
to display list of messages.
4.1 Reading Messages
Note : If preset, the time and date that the message was received will be displayed at the end of
each message.
Note : After you read your message, the last line of the screen is a link to the Message Options
menu. For specific information about this menu, please see “Working with the Message
Options Menu”
or
or
4. Messages
or
or
or

19
4.6 Deleting Read Messages with Main Menu
4.7 Deleting All Messages with Main Menu
Delete Messages
Delete All MSGs
Press To Display Then Press
Delete Messages
Delete All MSGs
Press To Display Then Press
4. Messages
or
or
18
4.4 Deleting Messages
The delete option deletes the current or highlighted message.
4.5 Moving a Message to Folder A or Folder B
Message Options menu
Delete Message
Press To Display Then Press
Highlight the message in its original InBox
Move to Folder A or Move to Folder B
Press To Display Then Press
4. Messages
or
or
or

21
6.1 Setting the Quiet Mode
6. Preferences
20
5.1 Using Your News/Info InBox
When your pager receives information service messages, it goes to the News/Info InBox.
To read the messages in this inbox, refer to “Reading Messages”. You can move within the list
and delete them.
5.2 Saved Folder A, Saved Folder B
Use it to save personal messages or News/Info messages and protect them from the Delete
Messages option and from automatic deletion when memory is full. In the can preview, read, or
delete the messages.
5. Message Boxes & Folder
When it’s set to ON, Quiet Mode temporarily changes all audible alerts to vibrate alerts.
Tum the mode off to reinstate the audible alerts.
Preferences
Quiet Mode
On or Off to save.
Press To Display Then Press
Note: When you turn on the Quiet Mode, “ Quiet Mode”will display at the bottom of the screen
.
or
or
or

23
6.3 Selecting the InBox and the News/Info Alert Type
6.4 Selecting the Tone of InBox Alert and News/Info Alert
Preferences
InBox Alert or News/Info Alert
Desired Alert Type
(Vibrate, Silent, Tone, or Vibrate and Tone) to save
Press To Display Then Press
6. Preferences
Preferences
InBox Alert
or News/Info Alert
Tone
Desired Tone (1 to 14) to save
Press To Display Then Press
or
or
or
or
or
or
or
22
6.2 Setting the Time and Date
Preferences
Set Time & Date
Desired hour (1 to 12, or 1 to 24)
Desired minutes (0 to 59)
Desired AM or PM
Desired month
Desired day
Desired year to save.
Press To Display Then Press
6. Preferences
or
or
or
or
or
or
or
or
or
or
or
or
or

24
6. Preferences
6.5 Setting the Reminder Alert
When the setting is ON, the pager will generate alerts when there are unread personal messages
6.6 Setting the LCD Contrast
Contrast adjust the darkness of the letters displayed.
Preferences
Reminder Alert
On or Off to save.
Press To Display Then Press
25
Preferences
Set Contrast
Increasing
or Decreasing of contrast value to save.
Press To Display Then Press
6.7 Setting the Key Click
When this feature is turned ON in audible mode, a “key click”will sound whenever a button is pressed.
6.8 Setting the Key Click
The alarm can be set for a specific time and date, or it can be used as a daily alarm.
When an alarm is set, is displayed to the left side of screen. Press any key to silence an alarm.
Preferences
Key Click
On or Off to save.
Press To Display Then Press
Preferences
Set Alarm1 or Set Alarm2
Desired Type (Disable, One Time, Every Day, or Weekly)
Time to save.
See “Setting the Time and Date “for more information on setting the time and date.
Press To Display Then Press
or
or
or
or
or
or
or
or
or
or
or
or
or
or
6. Preferences
or

6.9 Setting the Auto On/Off
Preferences
Set Auto On/Off
Enable (On or Off)
Time (Off Time & On Time)
to save.
Press To Display Then Press
26
See “Setting the Time and Date “for more information on setting the time and date.
27
6.10 Setting the Private Time
Private Time mode lets you specify a time period while the pager operates without an audible or vibrate alert.
Preferences
Set Private Time
Enable (On or Off)
Time(From Time & To Time)
to save.
Press To Display Then Press
To set the On time (When it starts) and the Off time (when it end), see “Setting the Time and Date”.
6.11 Setting the UI Style
Preferences
Set UI Style
ICON
to save.
Press To Display Then Press
or
or
or
or
or
or
or
or
or
or
or
6.12 Setting the Button Switch
Preferences
Button Switch
On or Off
to save.
Press To Display Then Press
or
or
or
6. Preferences 6. Preferences

7. Limited Warranty
This warranty applies exclusively to Sun Telecom products purchased for use
within the United States, Canada and Mexico. Sun Telecom International's
warranty is extended solely to its original customers (i.e. -paging carriers,
communications companies, agents, resellers, retail merchants, etc.) but NOT to
the end-users.
This warranty is the only one offered by Sun Telecom International for its products,
and it sets forth all of Sun Telecom International's responsibilities regarding sold
product. There are no other express warranties.
This service complies with part 15 of the FCC rules and regulations. Operation is
subject to the condition that this device does not cause harmful interference.
2928
6.13 Setting the Zoom In/Out
Preferences
Zoom In/Out
In or Out
to save.
Press To Display Then Press
6. Preferences
6.14 About
Perferences
About
to view.
Press To Display Then Press
or
or
or
or
or

7. Limited Warranty
LIMITATIONS:
Implied warranties, including those of fitness for a particular purpose and
merchantability, are limited to one (1) year from the date of delivery. Sun Telecom
International will not pay for loss of time, inconvenience, loss of use of the Sun
Telecom International product, or property damage caused by the product or its
failure to work, or any other incidental or consequential damages. Some states
do not allow limitations on how long an implied warranty lasts or the exclusion of
incidental or consequential damages, so the above exclusions or limitations may
not apply to all parties.
31
WHAT IS COVERED:
Any defect in materials or workmanship.
LENGTH OF COVERAGE:
One (1) year from date of delivery to its original customers.
REMEDIES:
Sun Telecom International (at its option) may repair or replace the defective unit. If
the unit is repaired, Sun Telecom International may use new or reconditioned
replacement parts. If the unit is replaced, Sun Telecom International may replace
it with a new or reconditioned unit of the same or similar design. The repair or
replacement will be under warranty for a period of forty-five (45) days (or the
remainder of the original one-year warranty period, whichever is longer).
30
7. Limited Warranty

include the name of the Sun Telecom International customer, street address,
telephone number, and proof of the original date of purchase along with a
description of the operating problem.
After the product is serviced or replaced, the product will be shipped (at Sun
Telecom International's expense) to the street address provided via ground
delivery (unless another method is utilized by the customer when shipping the
product to the warranty service center and is explicitly specified as the method
for return delivery). Repair or replacement of the Sun Telecom International
product is the customer's exclusive remedy.
CONDITIONS FOR WARRANTY SERVICE/REPLACEMENT:
To obtain warranty service for a Sun Telecom International product, the customer
must provide proof of the date of purchase. Within thirty (30) days of the date of
delivery, return the defective unit to Sun Telecom International's corporate
headquarters for immediate repair/replacement. After thirty (30) days from the
date of delivery, contact the corporate headquarters for the address of an
authorized warranty service center. In either case, if the customer is required to
ship the product, all shipping costs must be prepaid at the customer's expense.
It is strongly recommended that the customer retain all original packing materials
in the event that shipping is required. When shipping the product, be sure to
32
7. Limited Warranty
33
7. Limited Warranty

CONDITIONS NOT COVERED BY THIS WARRANTY:
This warranty does not cover defects resulting from accidents, damage while in
transit to an authorized warranty service center, alterations, unauthorized
repairs/modifications, failure to follow instructions, misuse (including broken
housings and displays), fire, flood, and acts of God. If the Sun Telecom
International product is not covered under the conditions of this warranty, contact
Sun Telecom International's corporate headquarters for repair/replacement
options (and their corresponding charges).
Sun Telecom International (at its option) may repair the product (using new or
reconditioned parts) or replace the product with a new or reconditioned unit of
the same or similar design. The repair or replacement will be warranted for ninety
(90) days.
34
STATE LAW RIGHTS:
This warranty gives the customer specific legal rights, however the customer
may have other rights depending on the state in which the company is located.
CONTACT INFORMATION:
For questions/comments regarding the terms and conditions of this warranty
Contact: Sun Telecom International, Inc. www.suntelecom.com
7. Limited Warranty 7. Limited Warranty
35
 Loading...