

Page 1

FL6 HOVERCOVER
™
ASSEMBLY & INSTALLATION MANUAL
F
FORM NO.
690177
REV.
READ CAREFULLY.
KEEP INSTRUCTIONS
PAGE 1 OF 17
Page 2

TABLE OF CONTENTS
TOOLS RECOMMENDED..........................................................................
DISCLAIMER OF LIABILITY...................................................................
ASSEMBLY INSTRUCTIONS....................................................................
HEIGHT ADJUSTMENT.............................................................................
IMPORTANT SAFETY INSTRUCTIONS.................................................
MAINTENANCE...........................................................................................
STANDARD WARRANTY...........................................................................
TOOLS RECOMMENDED
3/8"
5/16"
9/16"
3/8"
9/16"
1/2"
2
2
3-14
15
16
16
17
TIGHTEN
DISCLAIMER OF LIABILITY
DO NOT OVER
TIGHTEN
IF YOU ARE NOT AN AUTHORIZED SUNSTREAM DEALER AND ARE NOT A
REASONABLLY SKILLED MECHANIC, PLEASE CONTACT SUNSTREAM SO
WE CAN REFER YOU TO A LOCAL DEALER WHO CAN SKILLFULLY AND
SAFELY PERFORM THE ASSEMBLY AND INSTALLATION OF YOUR SUNSTREAM PRODUCT. IT IS THE POTENTIAL INSTALLER AND/OR
ASSEMBLER'S RESPONSIBILITY TO DETERMINE WHETHER HE OR SHE
HAS THE NECESSARY SKILLS, KNOWLEDGE AND TOOLS TO PROPERLY
AND SAFELY ASSEMBLE AND/OR INSTALL THE SUNSTREAM PRODUCT
DESCRIBED HEREIN. IMPROPER ASSEMBLY AND/OR INSTALLATION
MAY CAUSE THE LIFT TO FUNCTION IMPROPERLY OR NOT TO FUNCTION.
IMPROPER ASSEMBLY AND/OR INSTALLATION MAY ADDITIONALLY
CAUSE A RISK TO PERSONAL SAFETY OR PROPERTY. IF THE ASSEMBLER
OR INSTALLER IS CONFUSED OR HAS QUESTIONS OR CONCERNS ABOUT
A PARTICULAR ASSEMBLY OR INSTALLATION, HE OR SHE SHOULD CONTACT SUNSTREAM BY TELEPHONE AT (253) 395-0500 OR (888) 786-5438 BEFORE PROCEEDING FURTHER. THE INFORMATION CONTAINED IN THESE
INSTRUCTIONS, EXCEPT THE STATED WARRANTY, DOES NOT CONSTITUTE A GUARANTEE OF ANY KIND.
F
FORM NO.
690177
REV.
PAGE 2 OF 17
Page 3
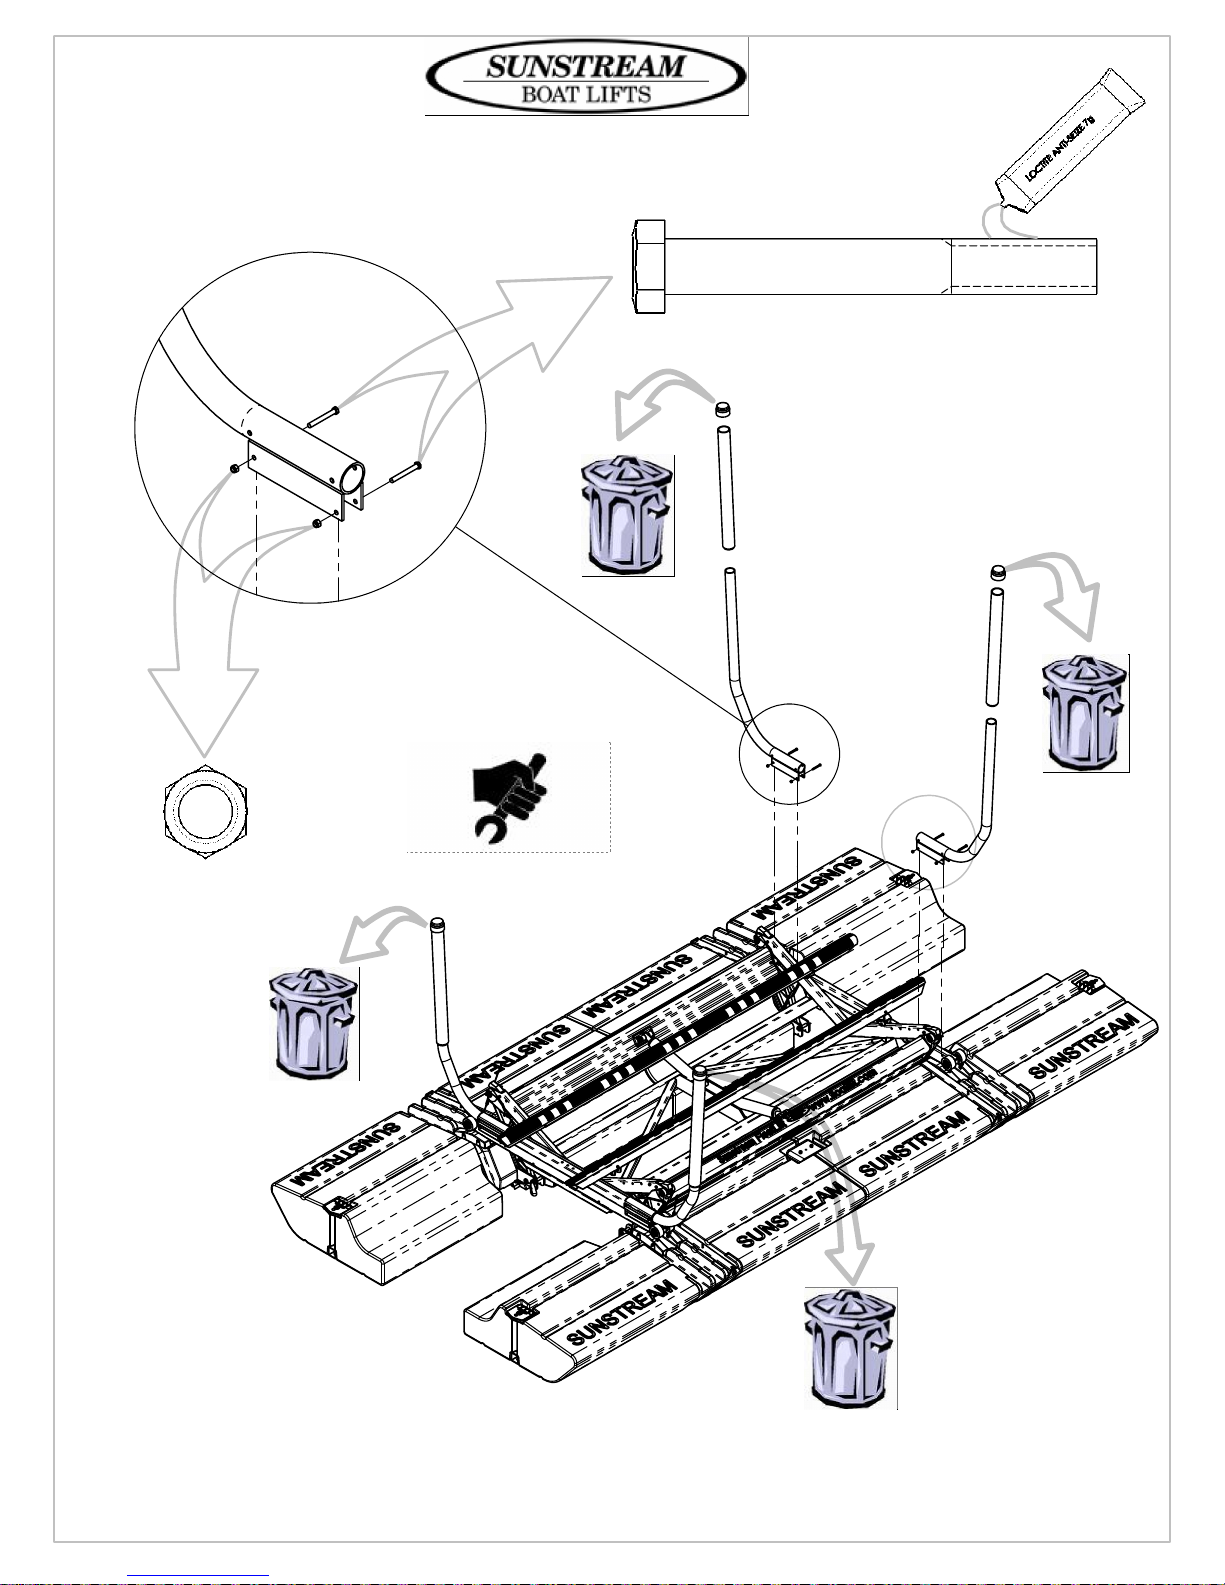
1
2X
4X
BOLT, .375-16 X 3.00, HEX, SS
11-061200-16
GUIDE ON
WELDMENT
NUT, .375-16, NYLOCK, SS
12-060000-22
!CAUTION!
ONLY SKILLED INDIVIDUALS WITH PROPER TOOLS SHOULD ASSEMBLE THE HOVERCOVER. IMPROPER ASSEMBLY
MAY LEAD TO PRODUCT FAILURE, SUBSTANTIAL PROPERTY DAMAGE AND/OR PERSONAL INJURY AND VOID THE
WARRANTY.
F
FORM NO.
690177
REV.
PAGE 3 OF 17
Page 4
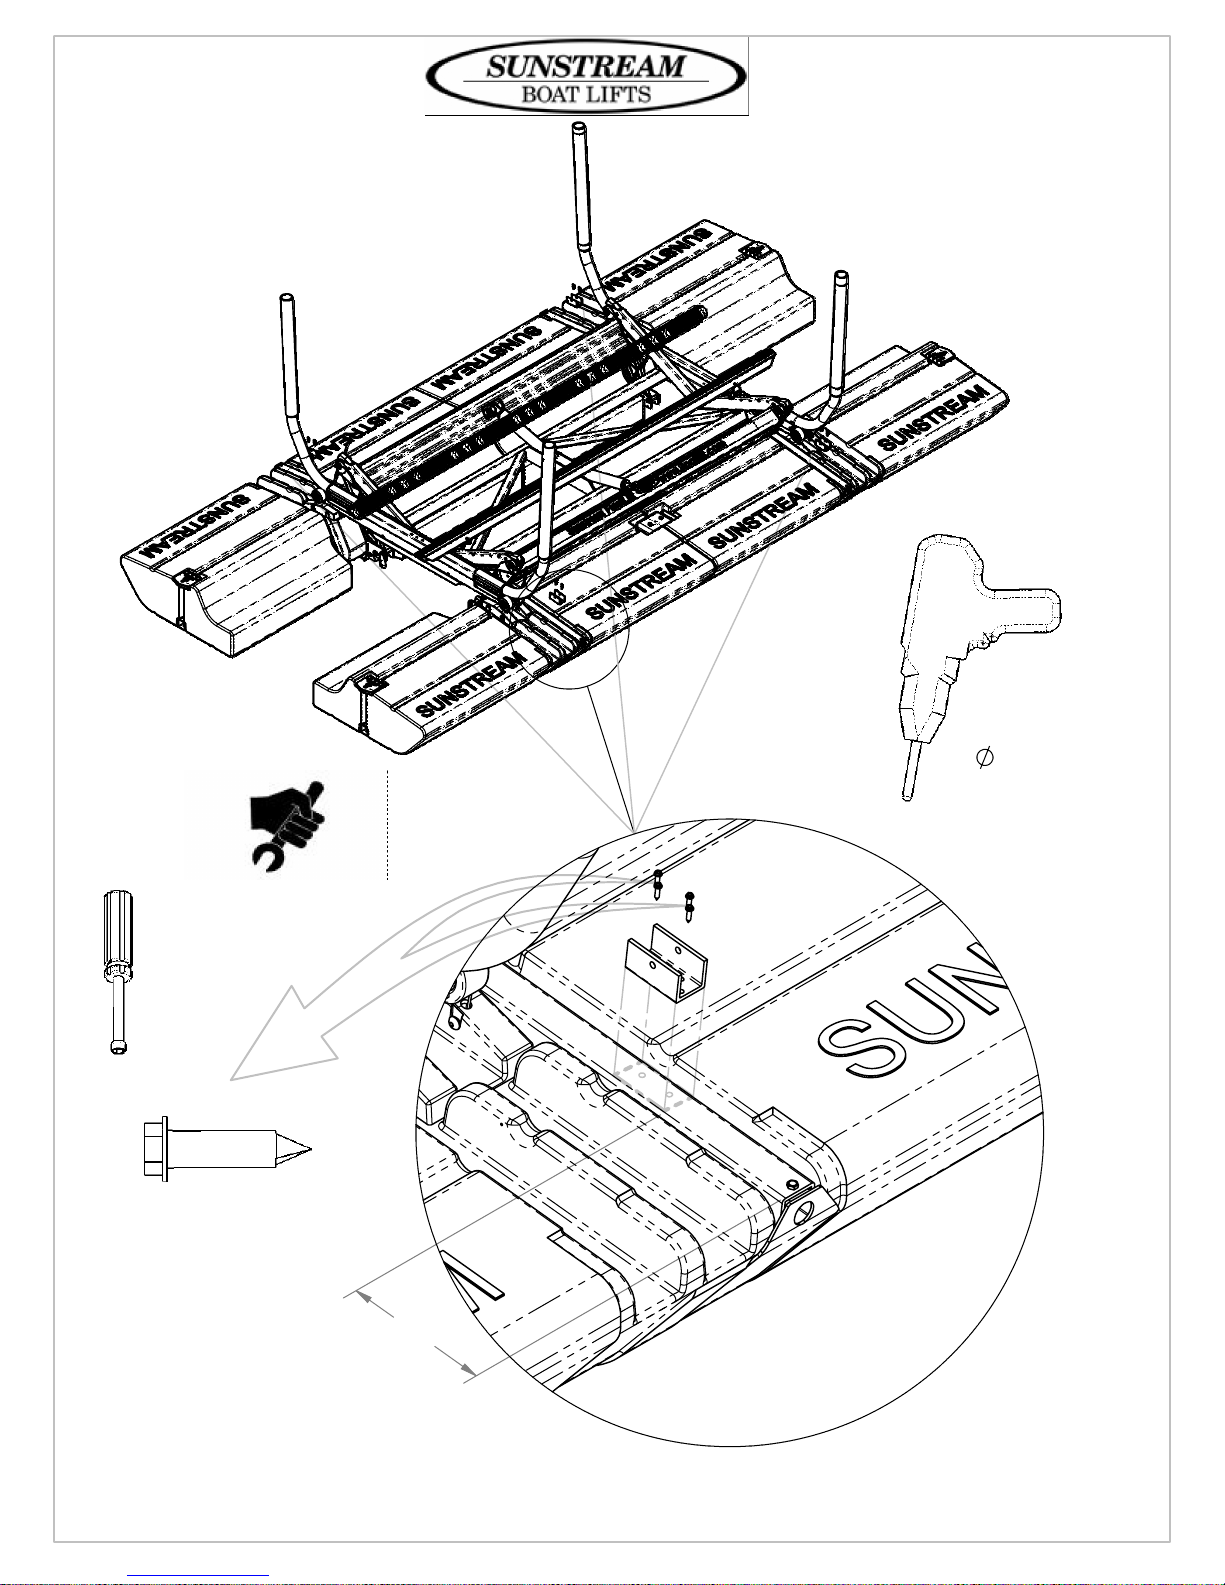
2
16X
SELF DRILLING SCREW
#14-1, HEX WASH, SS
11-000401-93
.187"
(3/16")
9.50
4X
F
FORM NO.
690177
REV.
PAGE 4 OF 17
Page 5
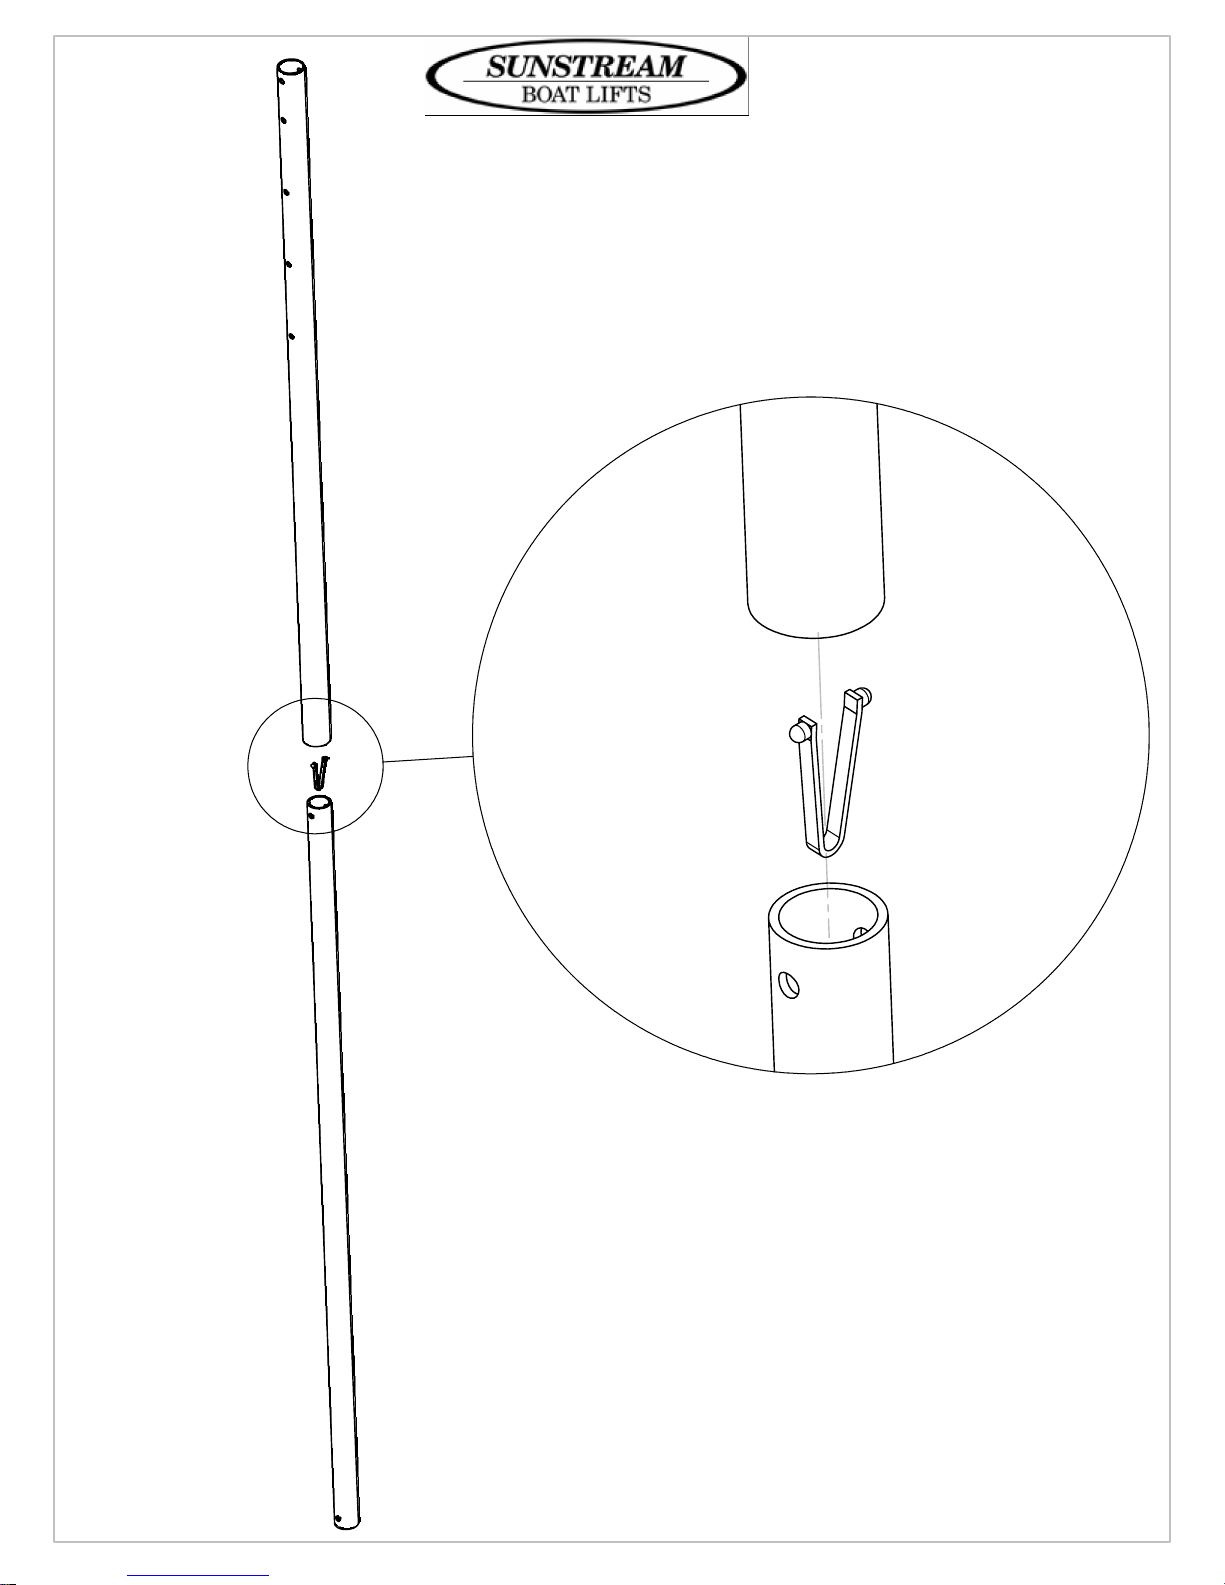
3
OUTER LINKAGE TUBE
44-000011-38
INNER LINKAGE TUBE
44-000011-37
SNAP BUTTON
15-000001-83
4X
F
FORM NO.
690177
REV.
PAGE 5 OF 17
Page 6

4
PIPE, PVC, RBC OUTER GUIDE
44-000011-55
4X
PIPE, PVC, RBC INNER GUIDE
44-000011-54
F
FORM NO.
690177
REV.
PAGE 6 OF 17
Page 7
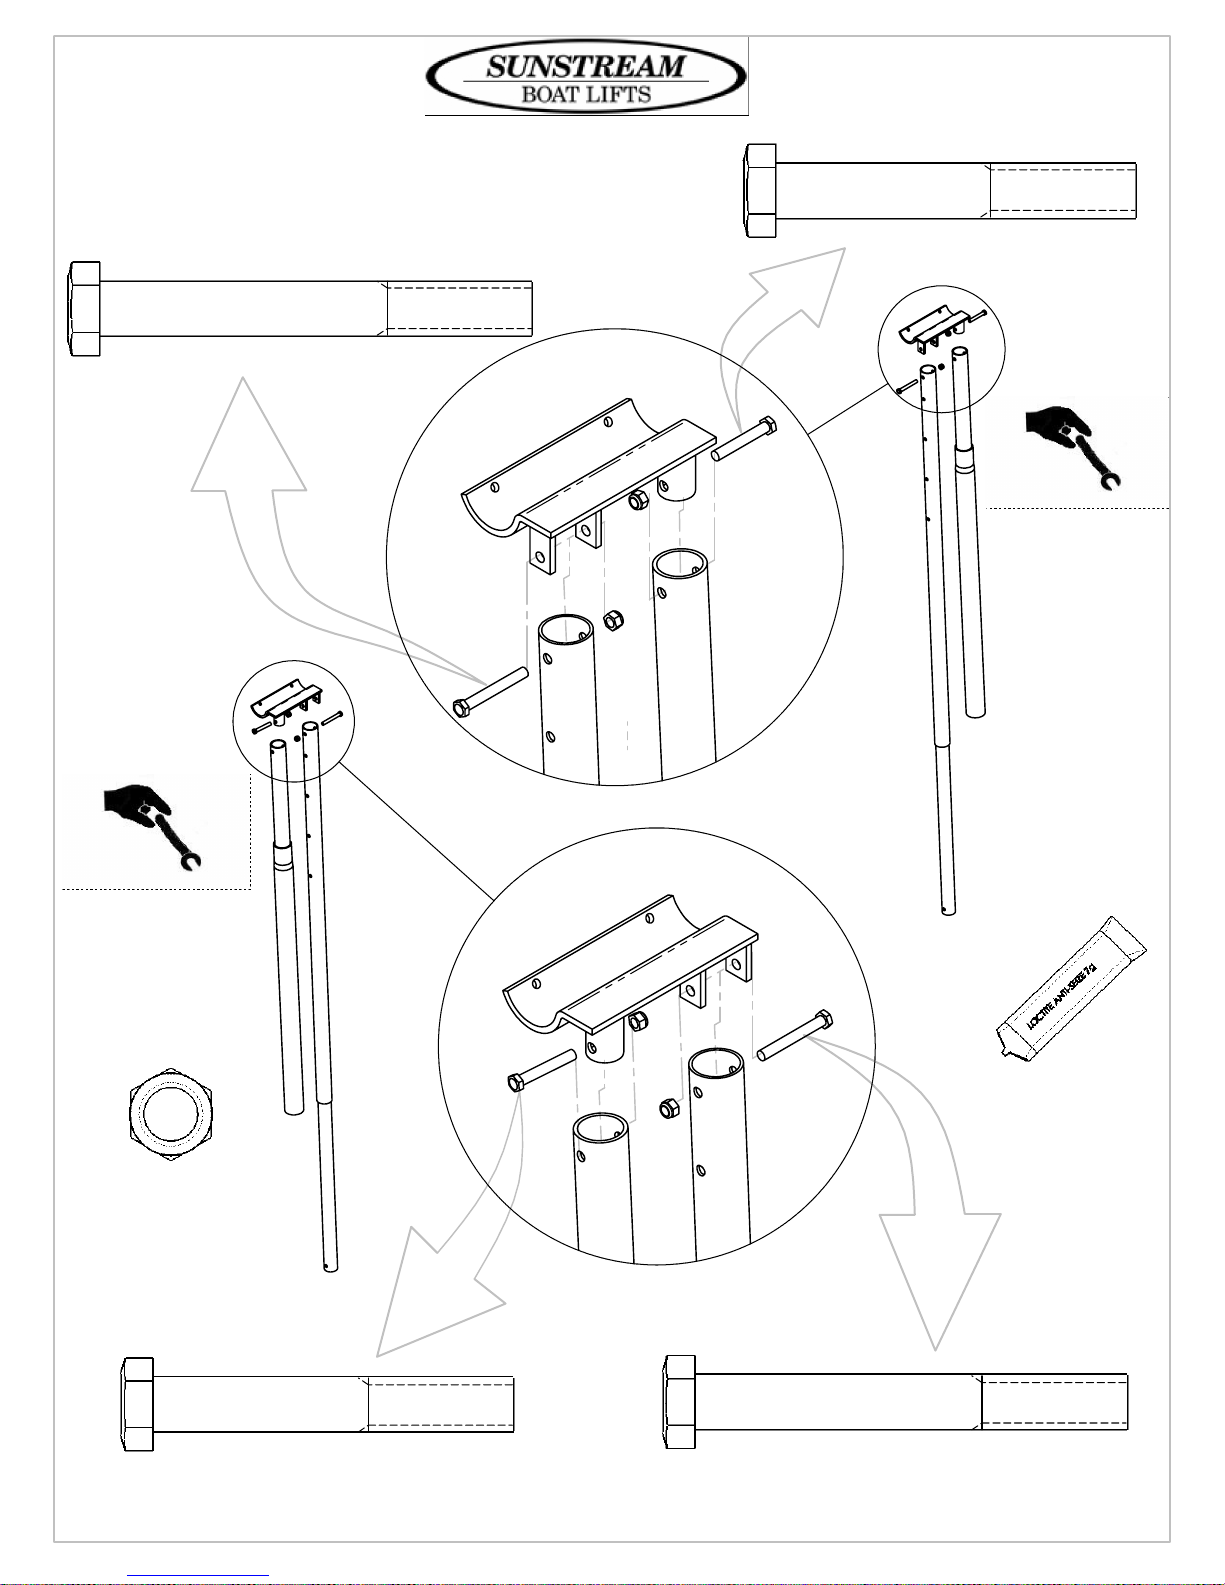
5
BOLT, .375-16 X 3.00, HEX, SS
11-061200-16
IMPORTANT:
ENSURE FRAME
BRACKET CAN PIVOT.
BOLT, .375-16 X 2.50, HEX, SS
11-061001-92
8X
NUT, .375-16
NYLOCK SS
12-060000-22
2X
FRAME BRACKET
RIGHT
2X
FRAME BRACKET
LEFT
BOLT, .375-16 X 2.50, HEX, SS
11-061001-92
F
FORM NO.
690177
REV.
BOLT, .375-16 X 3.00, HEX, SS
11-061200-16
PAGE 7 OF 17
Page 8
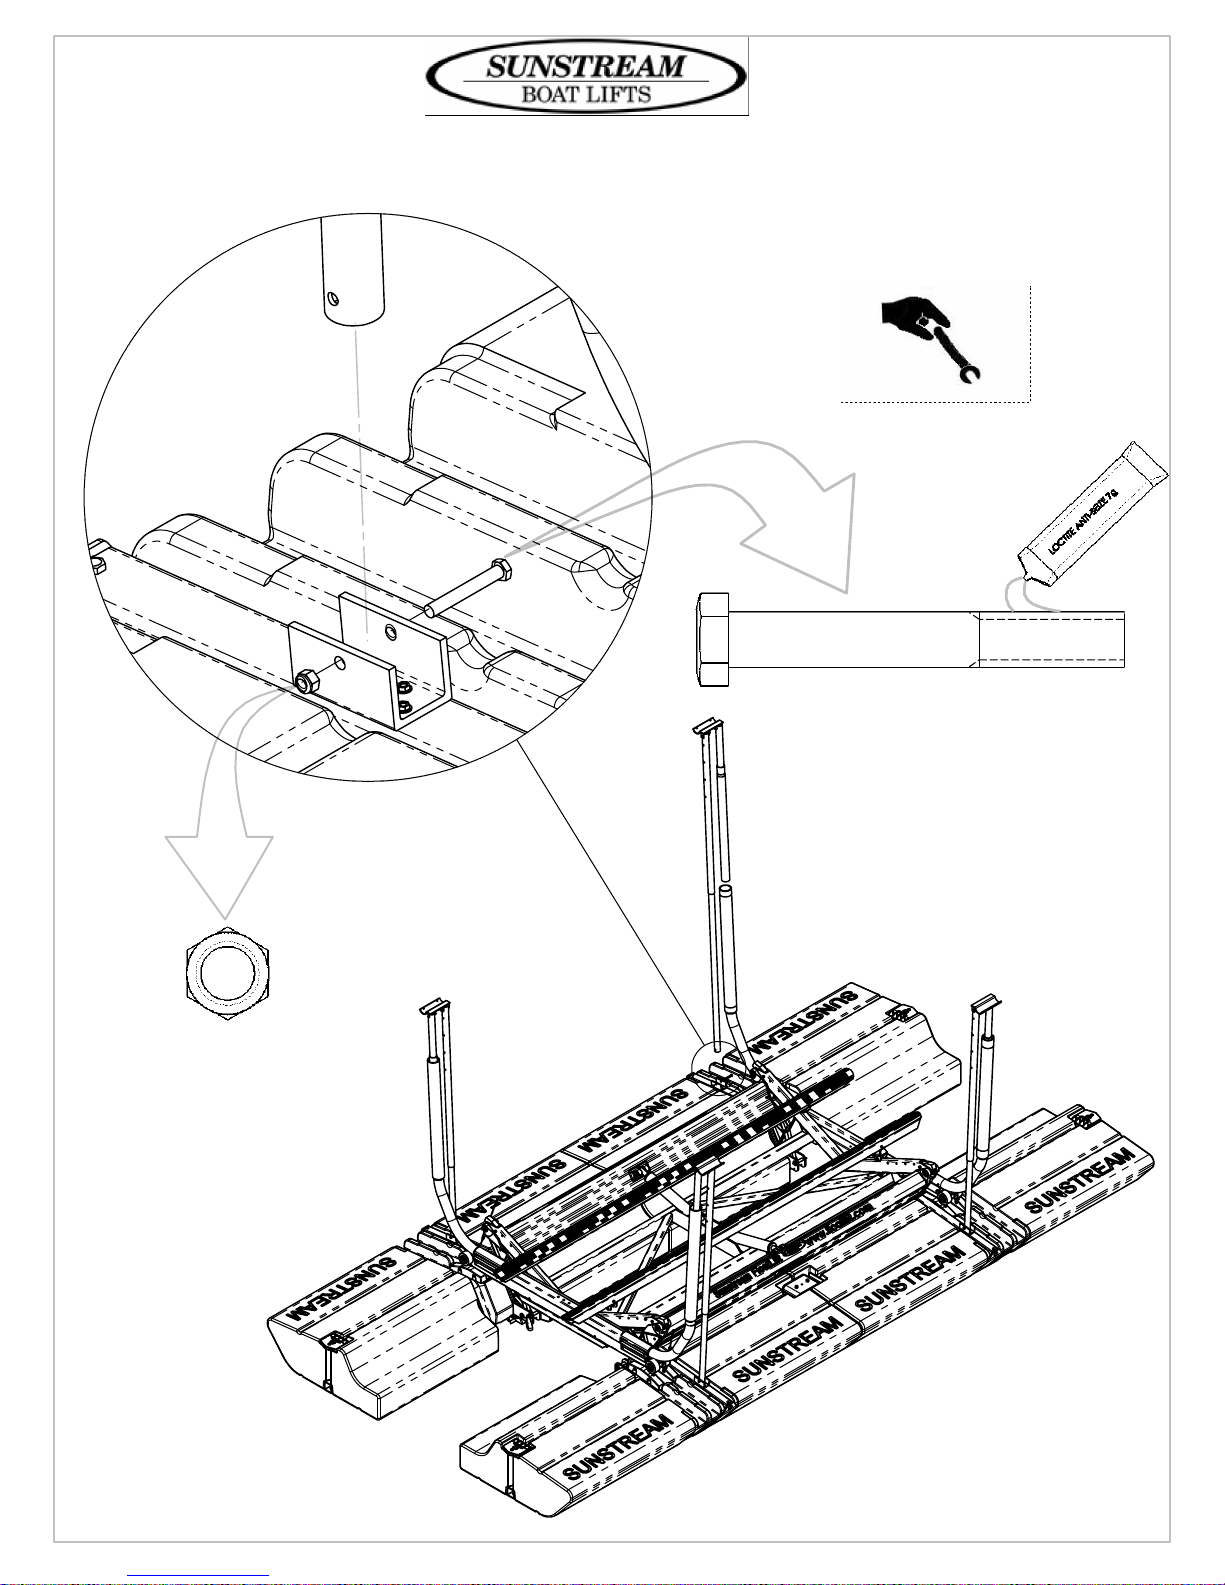
6
BOLT, .375-16 X 2.75, HEX, SS
11-061100-15
NUT, .375-16, NYLOCK, SS
12-060000-22
4X
F
FORM NO.
690177
REV.
PAGE 8 OF 17
Page 9
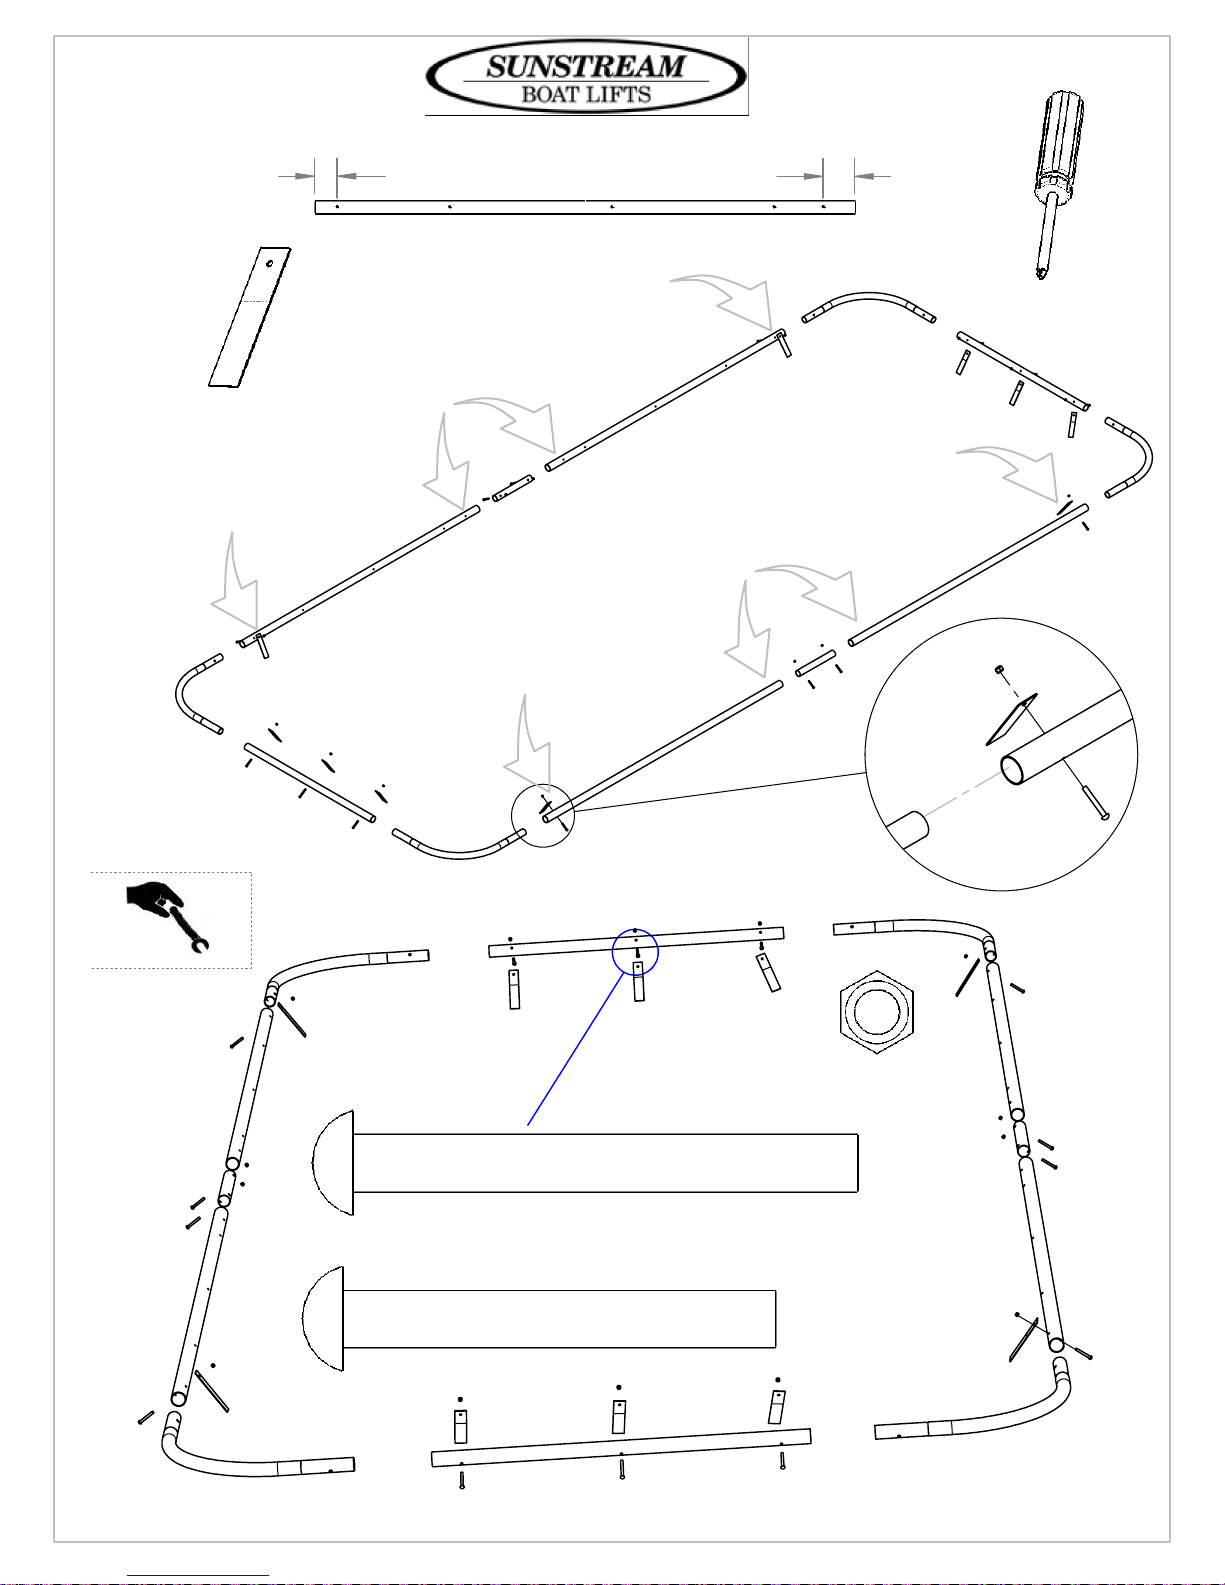
7
14X
VELCRO STRAP W/ GROMMET
69-000001-00
5"
5.00
7.00
5"
7"
5"
7"
5"
MACHINE SCREW, 5/16 X 3.5, ROUND HEAD SLOTTED
MACHINE SCREW, .3125-18 X 3, ROUND HEAD SLOTTED
F
FORM NO.
690177
REV.
14X
NUT, 0.3125, NYLOCK, SS
12-050000-62
USE TO SECURE RAFTER STRAP
11-051401-90
11-051201-91
PAGE 9 OF 17
Page 10
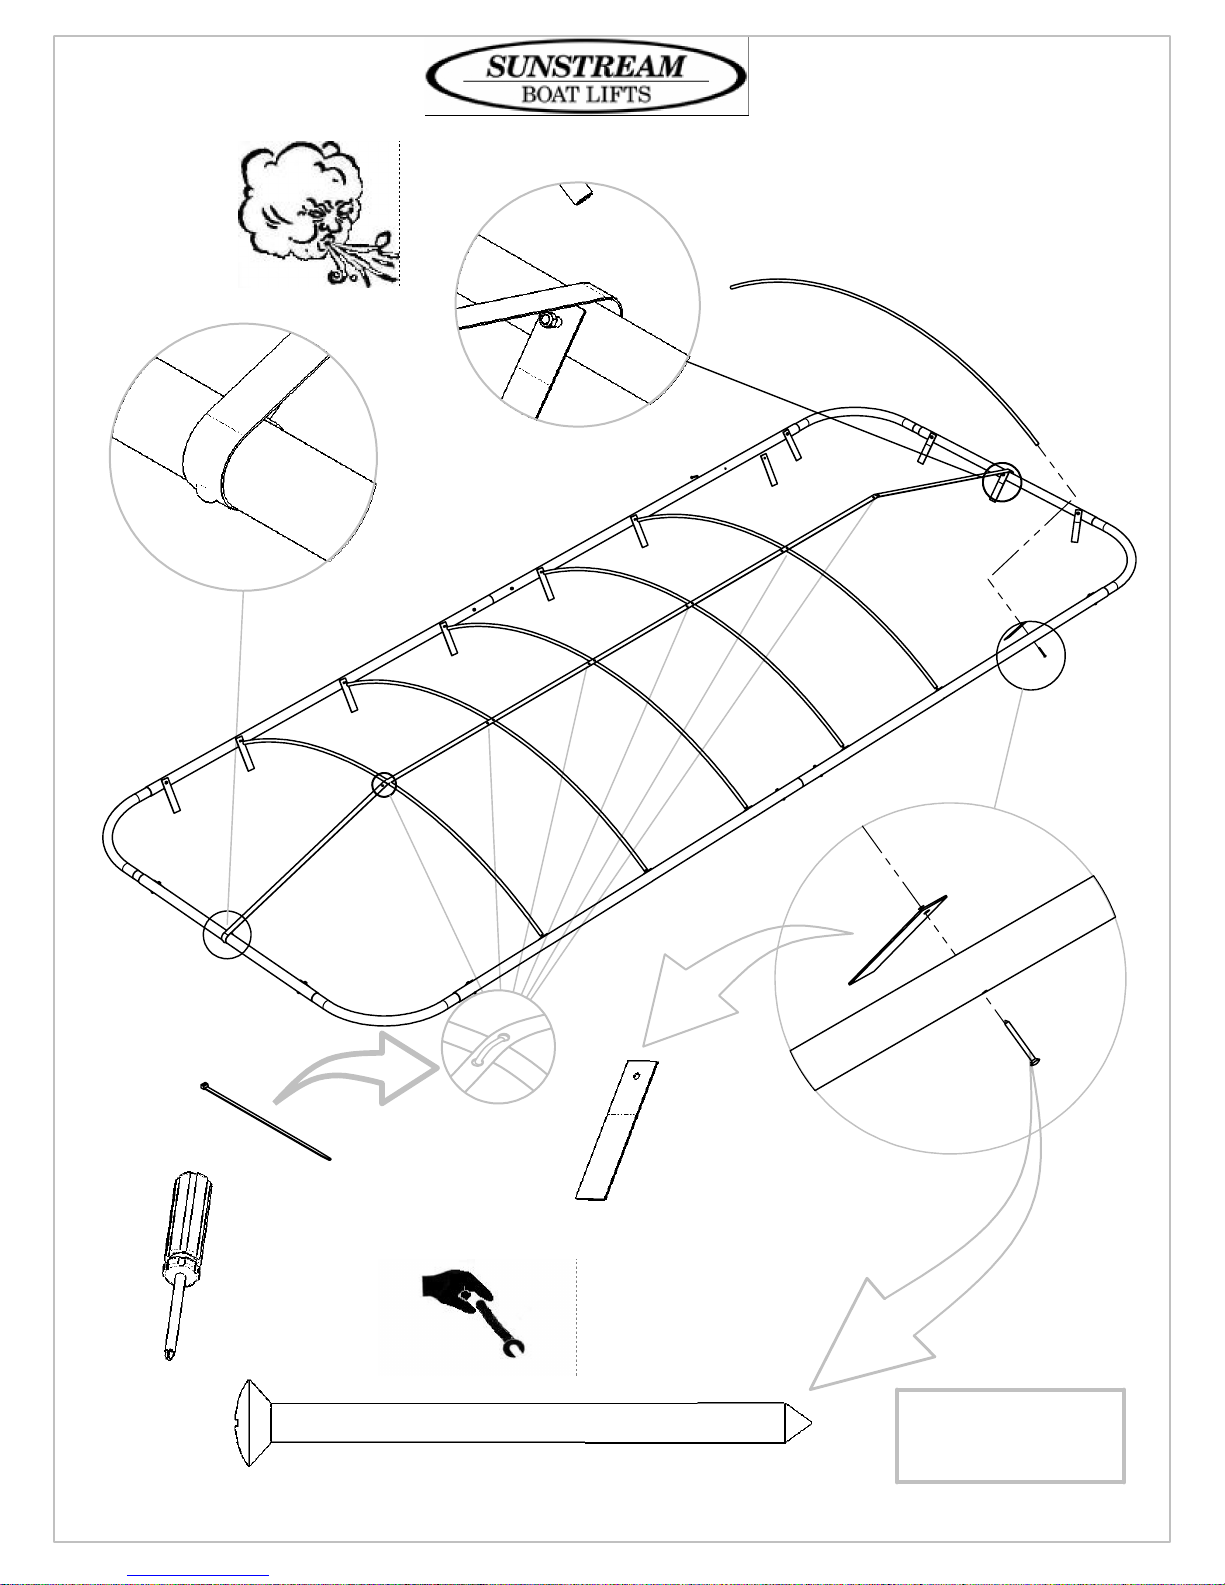
8
6X
HOVERCOVER RAFTER
ASSEMBLY
94-000008-14
6X
12X
SELF THREADING SCREW, #14-10 X 4", OVAL HEAD, SS
F
FORM NO.
690177
REV.
12X
VELCRO STRAP W/ GROMMET
69-000001-00
RECOMMENDED
USE Loctite 262
11-041602-40
PAGE 10 OF 17
Page 11
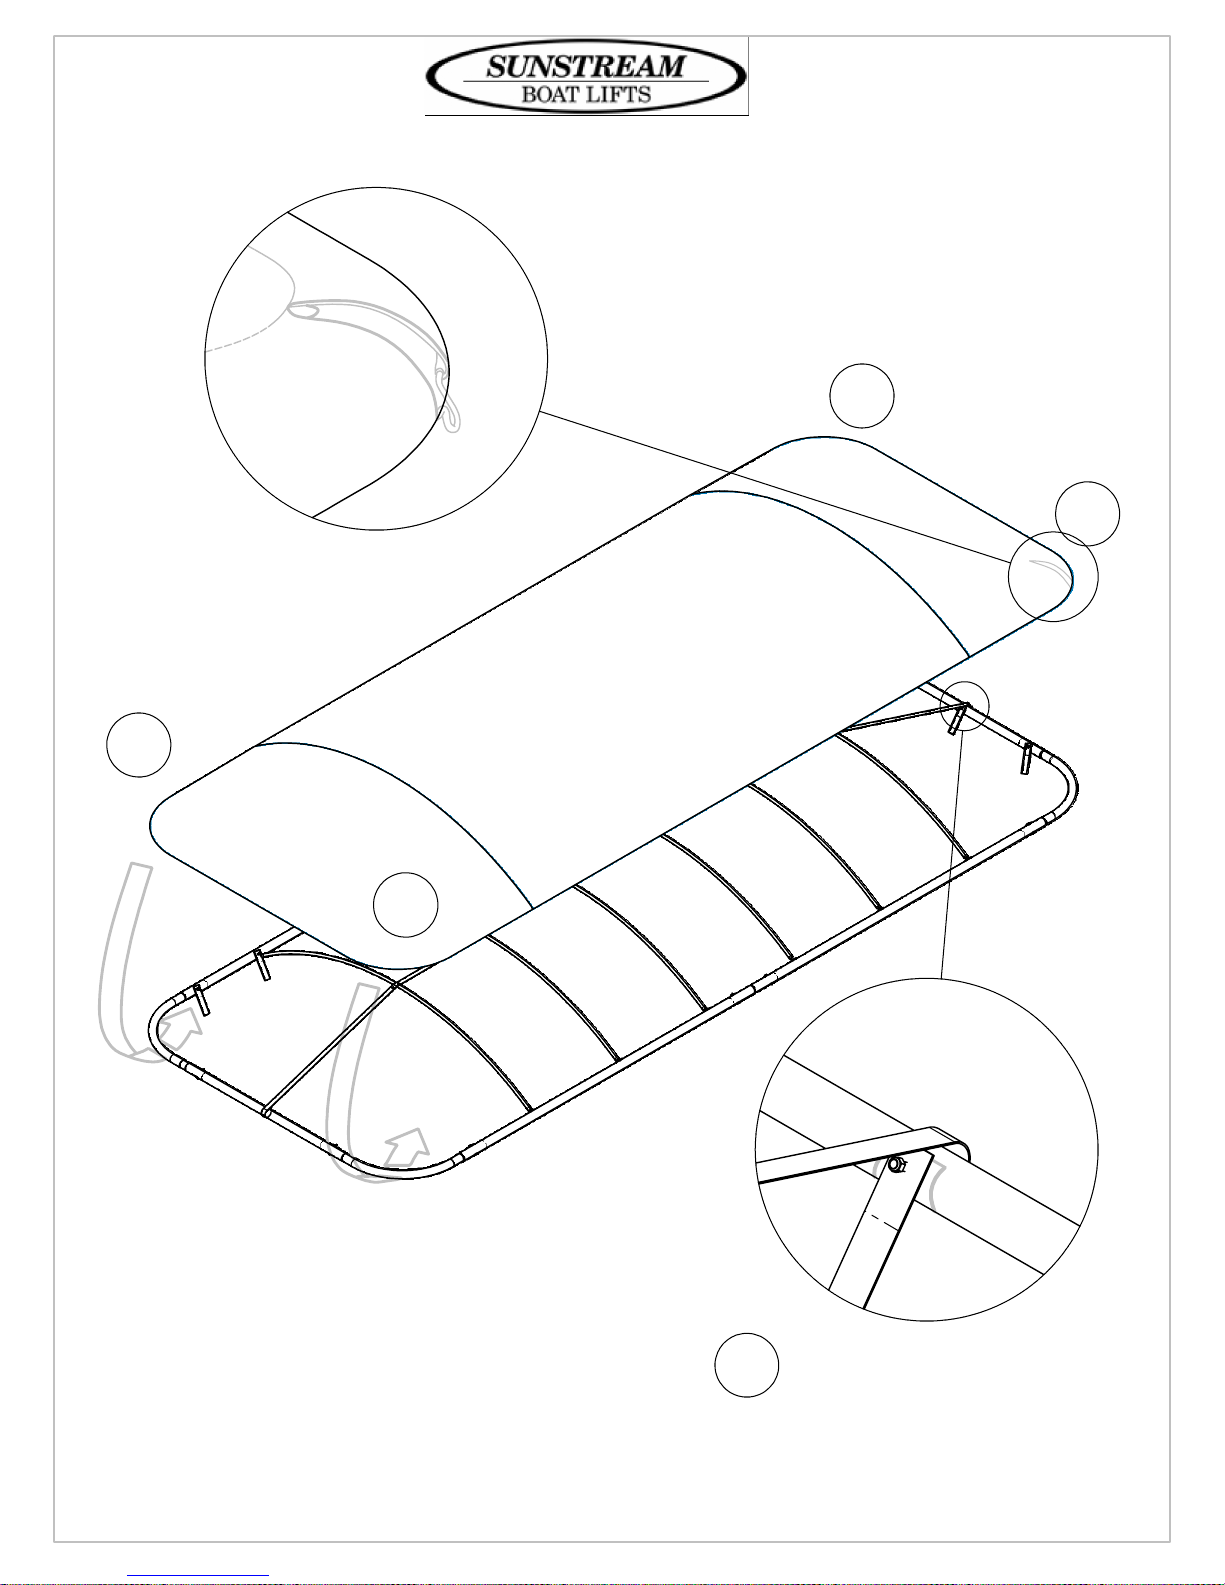
9
3
4
1
2
F
FORM NO.
690177
REV.
5
PAGE 11 OF 17
Page 12
10
2X
F
FORM NO.
690177
REV.
2
22X
1
PAGE 12 OF 17
Page 13
11
F
FORM NO.
690177
REV.
PAGE 13 OF 17
Page 14
12
NUT, NYLOCK,
5/16 X 3
12-050000-62
MACHINE SCREW, 5/16 X 3
11-051401-90
2
8X
1
Ø.312"
(5/16")
F
FORM NO.
690177
REV.
PAGE 14 OF 17
Page 15
HEIGHT ADJUSTMENT
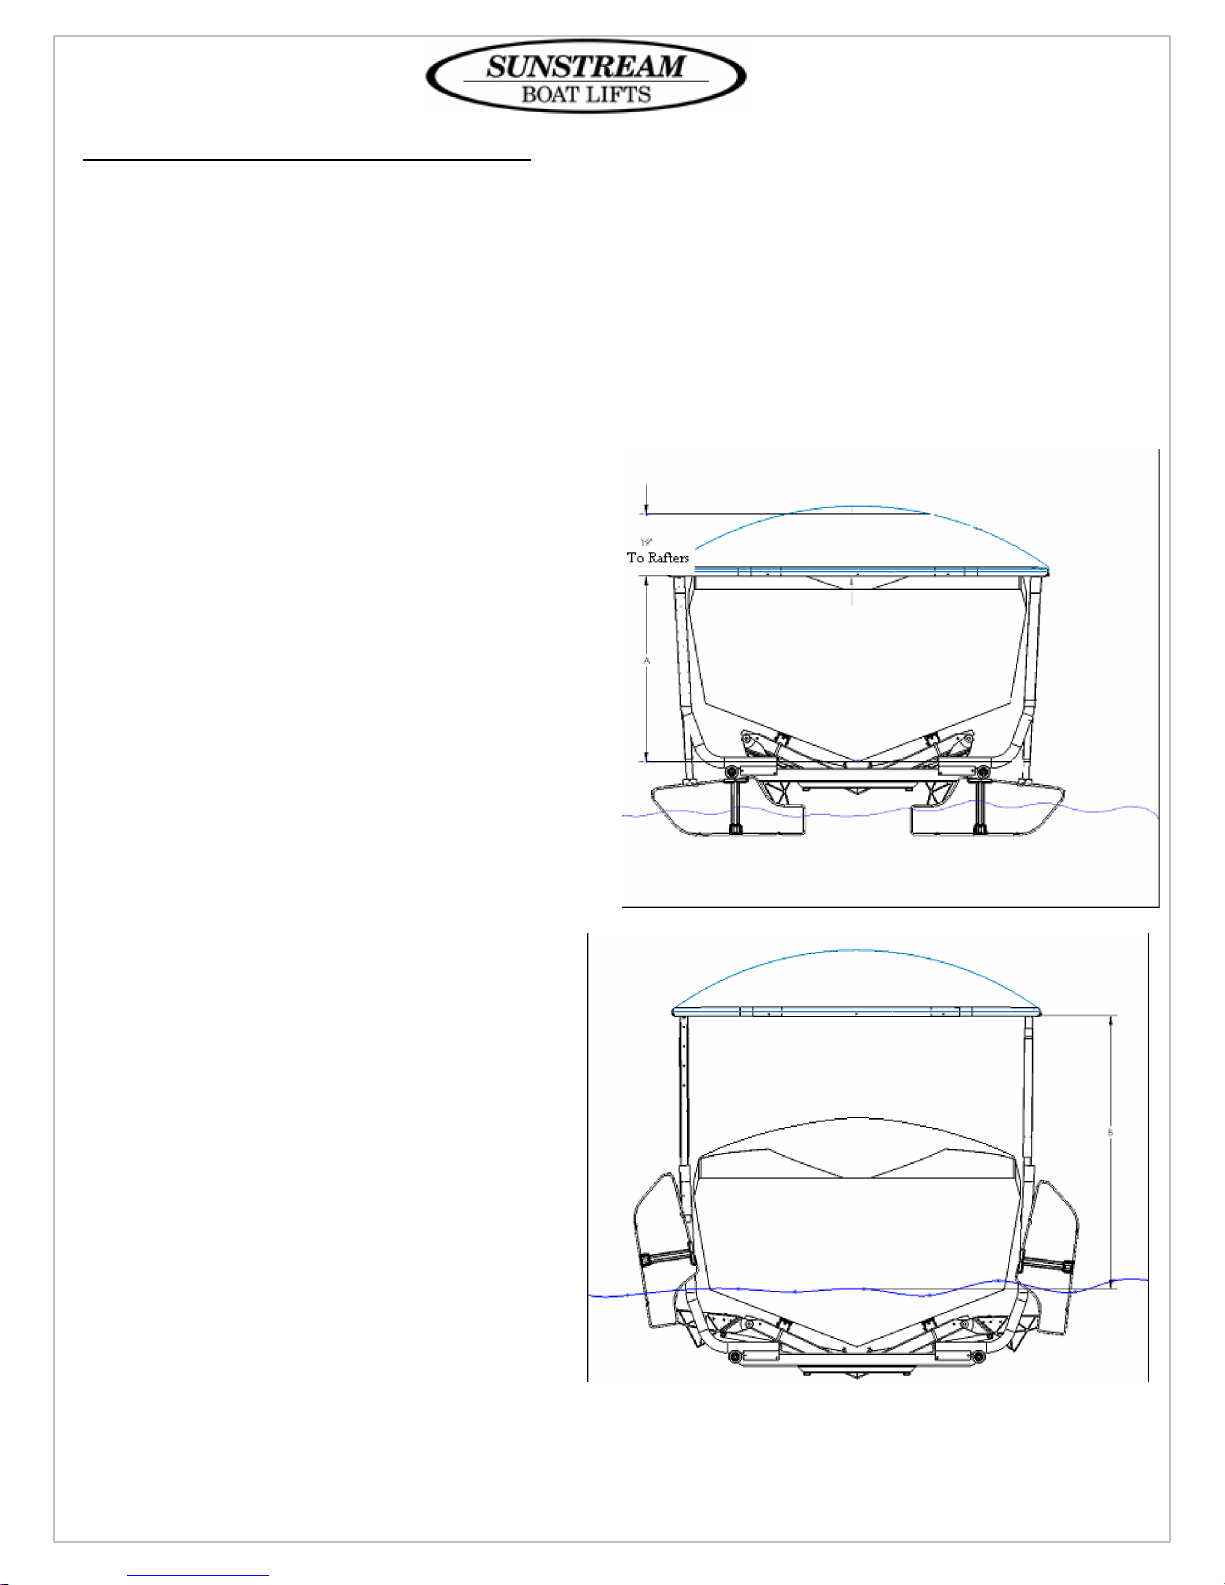
Height of the HoverCover is adjusted with the Telescoping Linkages. The HoverCover
has four preset positions incrementing every six inches. Figures below show the height
clearances for the HoverCover.
Dimension “A” is the distance between the bottom of the boat and the frame of the HoverCover when the lift is in the up position.
Dimension “B” is the distance between the water and the HoverCover frame when the lift
is in the down position. The HoverCover can be set to the following range of heights
shown below.
A
MAXIMUM HEIGHT - 73"/185cm
MINIMUM HEIGHT** - 55"/140cm
B
MAXIMUM HEIGHT - 102"/259cm
MINIMUM HEIGHT** - 84"/213cm
MAXIMUM BOAT HEIGHT***
102"/221cm
** Maximum and minimum heights are calculated from a boat model with a 21-degree dead-rise hull
***Assumes curved windshield. Actual height will be determined by shape of boat.
F
FORM NO.
690177
REV.
PAGE 15 OF 17
Page 16
IMPORTANT SAFETY INSTRUCTIONS
If you have any questions, please call your dealer, or Sunstream at (888)786-5438
Save These Instructions
Your safety and the safety of others is very important. Proper use of the information in this manual will
help avoid potential hazards that could cause damage to property and/or personal injury. It is not possible,
however, to identify and warn users of all hazards associated with the assembly, installation, operation, and
maintenance of the FloatLift. You must use your own good judgment.
Failure to comply with the following rules may result in severe injury and/or death and damage
to property.
1. Refer to your FloatLift™ owner’s manual to review safety specifications for your FloatLift.
2. The HoverCover moves from a raised position to a lowered position relative to your boat. In
the lowered position, the HoverCover is meant to provide a close fit to your watercraft. Be
aware of people in the boat and the risk of the HoverCover contacting them.
3. Be sure the HoverCover’s height range is properly adjusted for your watercraft to avoid
damage to boat windshields or other high reaching fixtures.
4. Avoid putting your hands or other body parts on the HoverCover’s moving parts while the
HoverCover operates. Do not let children or others contact the HoverCover’s moving parts
while it operates.
5. Be aware of environmental forces while using the HoverCover. Strong winds may cause the
cover to become unstable. Excessive wave action may cause the cause the cover to become
unstable. Remove the fabric cover in the case of predicted extreme weather.
6. The HoverCover is a lightweight structure that is NOT designed to hold body weight. DO
NOT hang from the HoverCover.
7. Always leave the HoverCover in the retracked, gravity lock lift position to prevent damage
caused by wind and waves.
MAINTENANCE
1. Sunstream recommends an annual inspection by your Sunstream dealer.
2. Refer to your FloatLift™ owner’s manual to review maintenance requirements for your FloatLift.
3. Check telescoping PVC guides for binding and add light lubrication as needed. If binding continues,
wrap duct tape around base of outer PVC Guide.
4. Check Velcro connections from time to time to ensure a continued tight fit.
5. Report evidence of excessive wear and tear to your Sunstream dealer or to Sunstream.
6. Remove canopy cover before snowfall.
7. Remove canopy cover if winds exceed 30 mph for a prolonged period of time.
8. Do not allow water to collect on the canopy fabric. Re-tighten tightening cords and/or adjust rafters
to avoid such water collection.
9. Remove your canopy top for off-season storage or if boat is not on lift for an extended period of time.
10. Tighten nuts and bolts as needed.
F
FORM NO.
690177
REV.
PAGE 16 OF 17
Page 17
F
FORM NO.
690177
REV.
PAGE 17 OF 17
 Loading...