


www.InfraredSaunaCanada.ca www.InfraredSaunaUS.com
1 - 888 262 4477
Assembly Manual

www.InfraredSaunaCanada.ca www.InfraredSaunaUS.com
1 - 888 262 4477
Prepare & Position the Sauna Floor
If you are assembling your sauna on a hard surface floor it is recommended
that you apply the included adhesive felt to the bottom of the sauna floor.
It is important that the sauna floor is level. Checking with a large level
is recommended. If the floor is not level, shimming or other remedies
should be applied before assembling the sauna.
Place the sauna floor in the desired location. It is necessary to position the
floor out from your walls for assembly and move the sauna following
assembly.
www.InfraredSaunaCanada.ca www.InfraredSaunaUS.com
1 - 888 262 4477
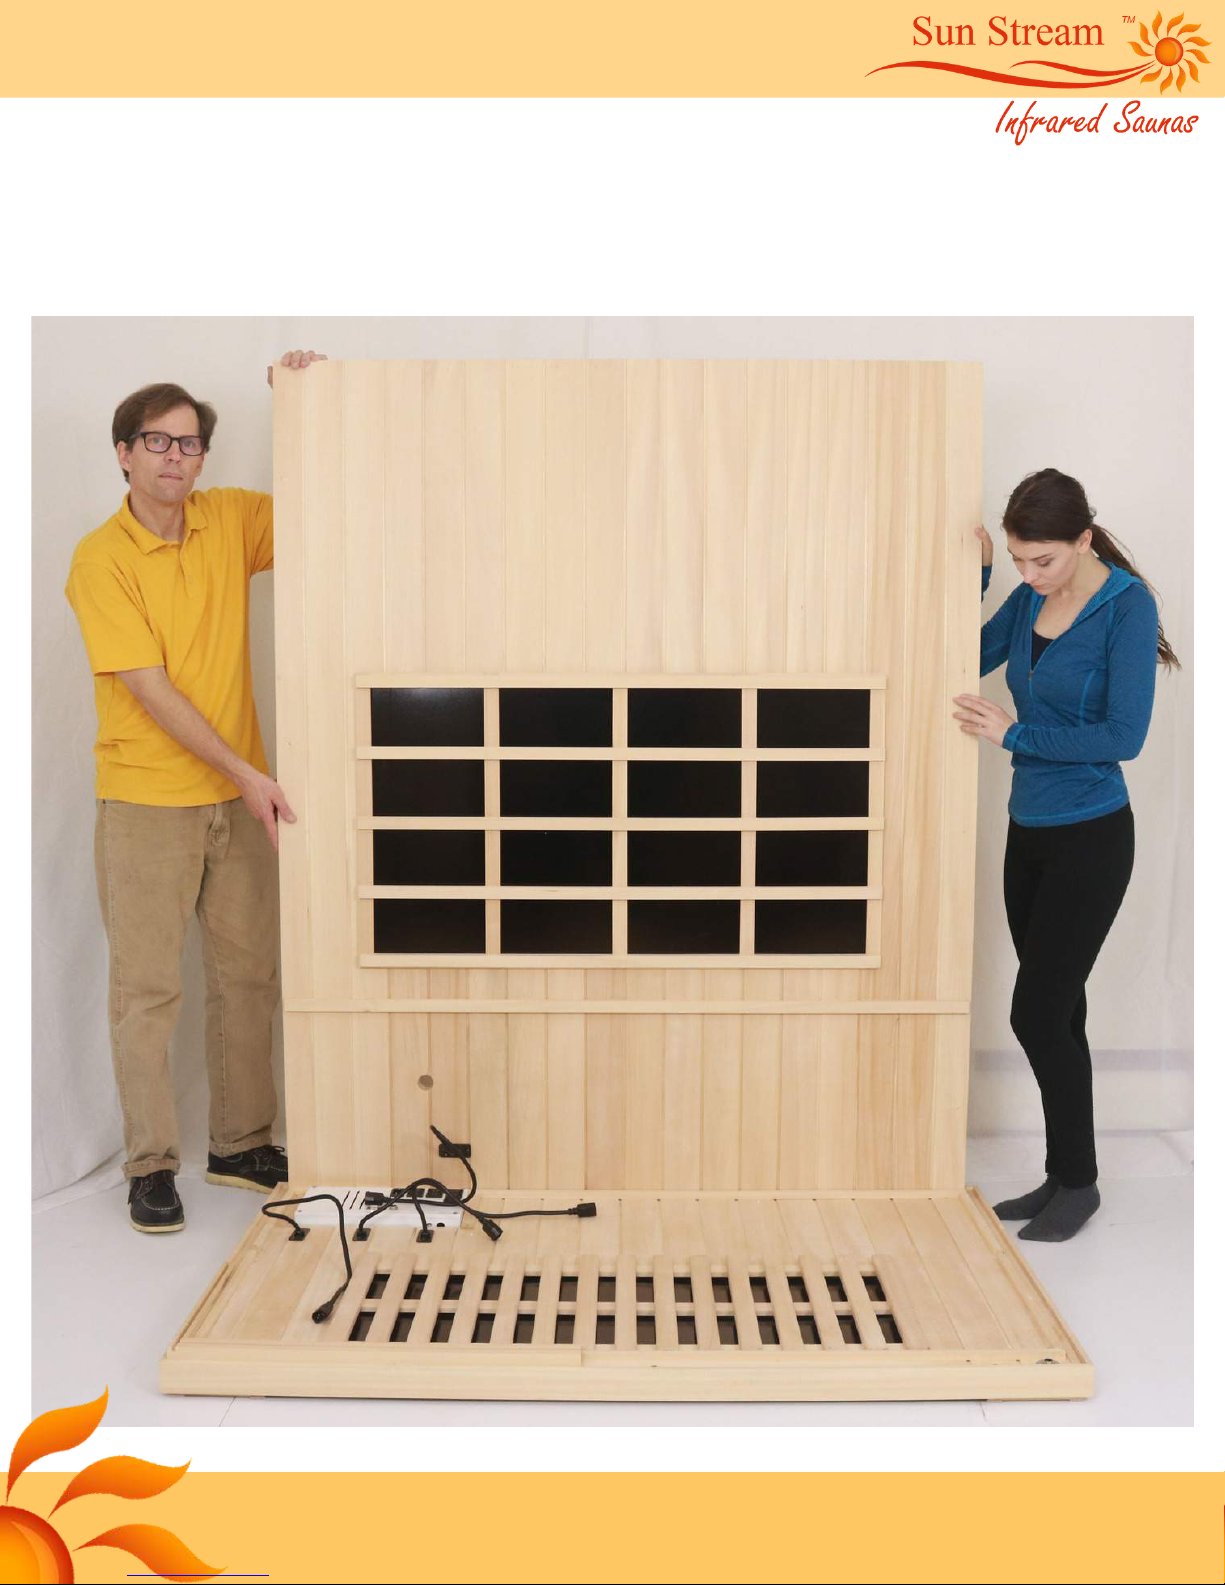
Position the Back Wall
Lift the back wall into position carefully lowering the bottom of the wall into
the channel on the floor base.

www.InfraredSaunaCanada.ca www.InfraredSaunaUS.com
1 - 888 262 4477
Position Right Side Wall
Lift the Right side wall into position wedging the bottom of the wall into
the channel in the floor base.

www.InfraredSaunaCanada.ca www.InfraredSaunaUS.com
1 - 888 262 4477
Connect Side & Back Wall
Cinch the two walls together
by applying pressure on the
outside of the side wall with
your knee
Slide the side wall upward
approx. 3/4” while holding
the back wall down
It is helpful if a second person applies pressure against the opposite edge of
the back wall. This will help ensure that the two walls remain in contact and
the fasteners connect.
The 2 sets of fasteners for the walls will
connect when the side wall is raised
sufficiently.
Slide the side wall down while
continuing to cinch the two walls
together.

www.InfraredSaunaCanada.ca www.InfraredSaunaUS.com
1 - 888 262 4477
Repeat procedure for the second side wall
Check to ensure that both sets of
fasteners have connected by looking
at the corner inside of the sauna. It is
possible to connect one set of
fasteners and miss the other. If there
is an obvious gap in the corner
between the two walls the fasteners
have not connected and the raising
and lowering procedure will need to
be repeated.

Position the Front Wall
Lift the front wall into position carefully lowering the bottom of the wall into the
channel on the floor base. Prop up one end of the front wall to enable
connection of the door heater electrical lead.
Ensure that the door heater electrical is
protruding from bottom of front wall frame
A bit of plastic wrap can serve to hold the
connector out slightly.
www.InfraredSaunaCanada.ca www.InfraredSaunaUS.com
1 - 888 262 4477

www.InfraredSaunaCanada.ca www.InfraredSaunaUS.com
1 - 888 262 4477
Connect door heater electrical
lead to the floor base.
Ensure hat the threaded cuff is
fully screwed onto the floor
base connector.
It is recommended to drill 1/8" hole
through the top of side wall and a 1/16"
pilot hole through in to the front wall
edge.
Drill hole:
1/4"-5/16" from the top edge and 1/2" in
from the front edge of side wall
Secure side wall to front wall with screw.
Roof will cover screw in next step.
Side Wall
Roof

www.InfraredSaunaCanada.ca www.InfraredSaunaUS.com
1 - 888 262 4477
Install the Sauna Roof
Lift the roof up and over top of
the sauna walls. If you are
installing the sauna in a
restrictive space and are unable
to walk down the sides of the
saunas, it may be necessary for
one person to go inside the
sauna.
Hook the right side corners of
the roof over the walls then
lower the roof toward the left of
the sauna.
Prepare to install the sauna roof
Fish the plastic electrical connector
out from inside the roof before lifting
the roof. If the connector can not be
fished out it may be necessary to
remove access panel on top of roof.

www.InfraredSaunaCanada.ca www.InfraredSaunaUS.com
1 - 888 262 4477
Connect Roof Wires
Before lowering the roof, connect the 12 V power supply wires.
This is easiest accomplished with one person holding the weight of the roof while
the other snaps together connectors and then feeds the connector up into roof.
Side Wall Glass
Install side wall glass panel.
Glass etching is intended to
face inward.
Lower Roof into Position
It may be necessary to push on the inside or outside of the side and back wall to
enable to roof to drop into position.

www.InfraredSaunaCanada.ca www.InfraredSaunaUS.com
1 - 888 262 4477
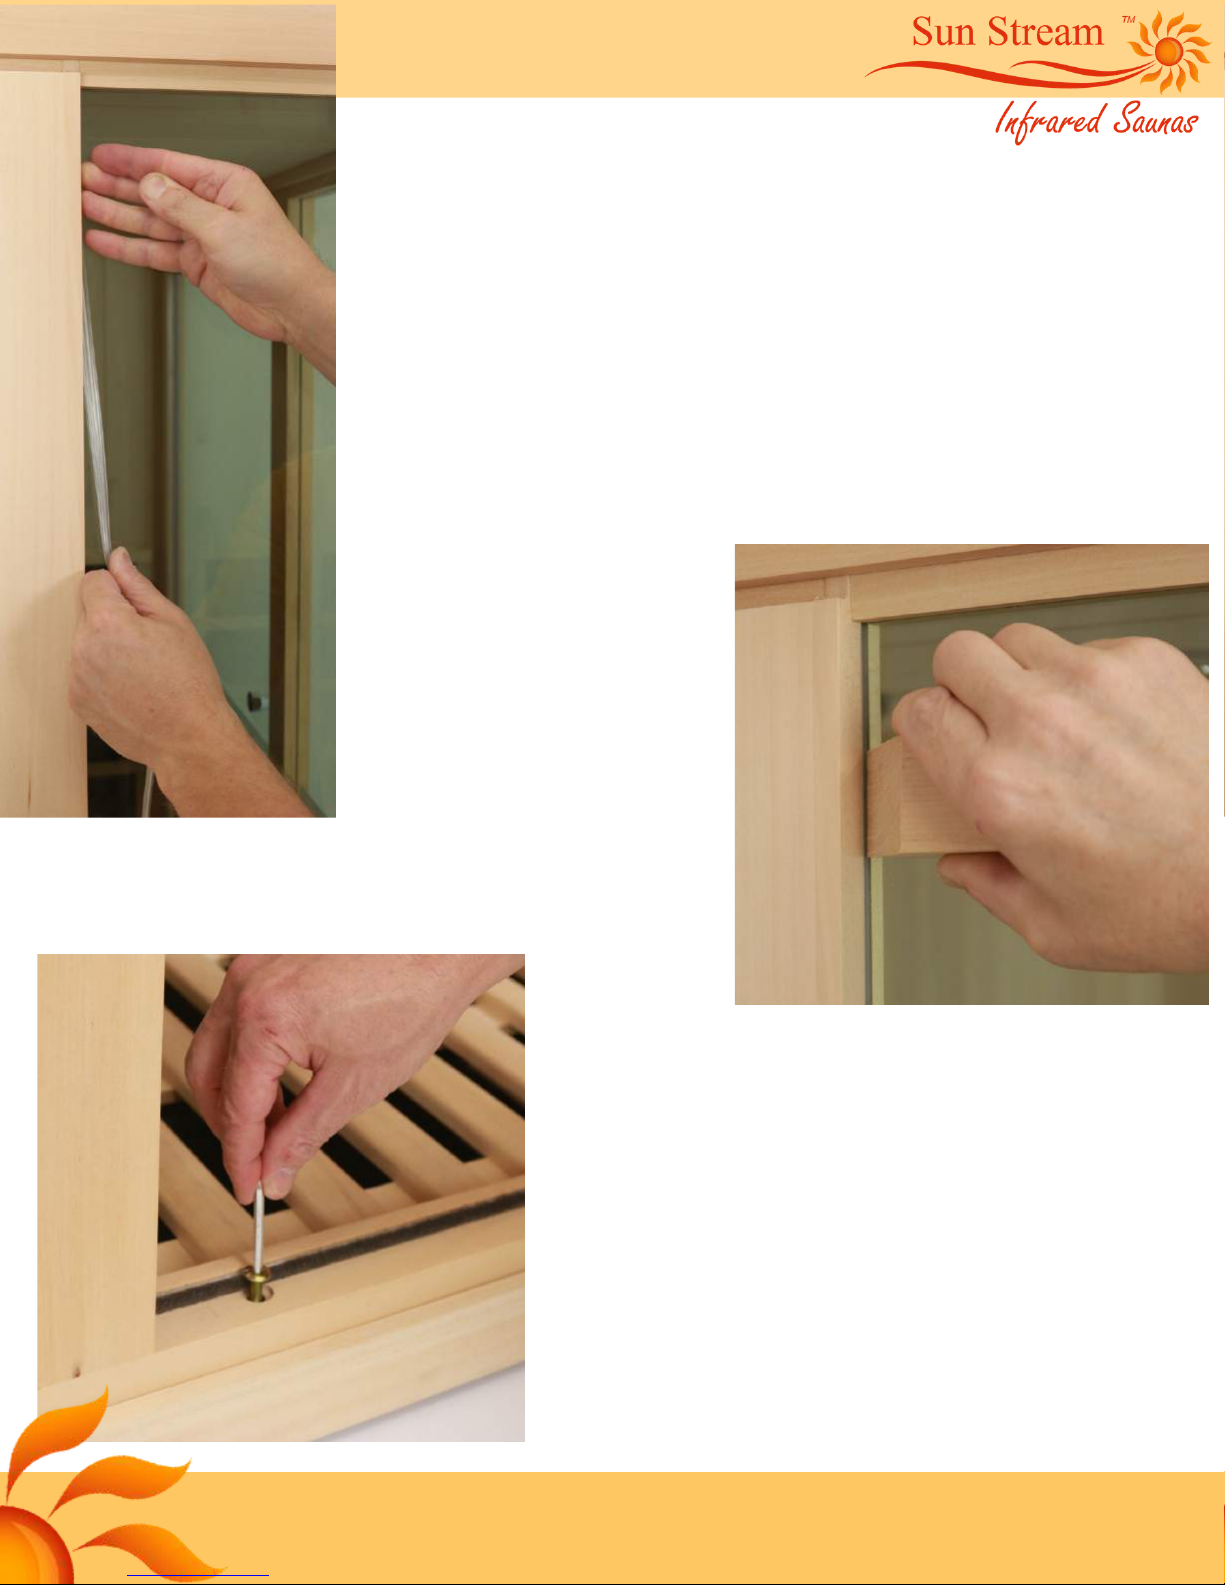
IMPORTANT
For temporary purposes,
insert a foot or two of the
flexible plastic strip on the
inside of the side wall glass
panel. This will hold the glass
panel in place and assist in
following assembly steps.

www.InfraredSaunaCanada.ca www.InfraredSaunaUS.com
1 - 888 262 4477
Install front glass panel
Carefully insert the bottom edge of
the glass panel into the slot in wood
frame. The glass panel must be
positioned so that the heater panel
is fitting inside of the side wall glass
panel.
The top edge of the front glass panel
does not yet fit into the roof slot

www.InfraredSaunaCanada.ca www.InfraredSaunaUS.com
1 - 888 262 4477
Carefully lift the roof
upward, about 1/2", enough to
tilt the front glass into position
Lower the roof so that the front glass
panel fits into the slot.

www.InfraredSaunaCanada.ca www.InfraredSaunaUS.com
1 - 888 262 4477
Intall Corner Seal
Firmly press the corner seal on to the
edge of the front glass panel
Remove temporary plastic
glazing strip from the inside of
side glass panel
www.InfraredSaunaCanada.ca www.InfraredSaunaUS.com
1 - 888 262 4477
Firmly press flexible glazing strip into wood
channels along the outside of the glass panels.
It may not be necessary to use the flexible
glazing for the full length of sides, tops and
bottoms of the two glass panels. Use the glazing
strip where it fits into the channel along side
glass using only moderate pressure.
Small wooden block
(included) can be used
to fully press the glazing
strip into channel
Install 4 furniture bolts through top
and bottom of door frame using
the allan key (included)
www.InfraredSaunaCanada.ca www.InfraredSaunaUS.com
1 - 888 262 4477
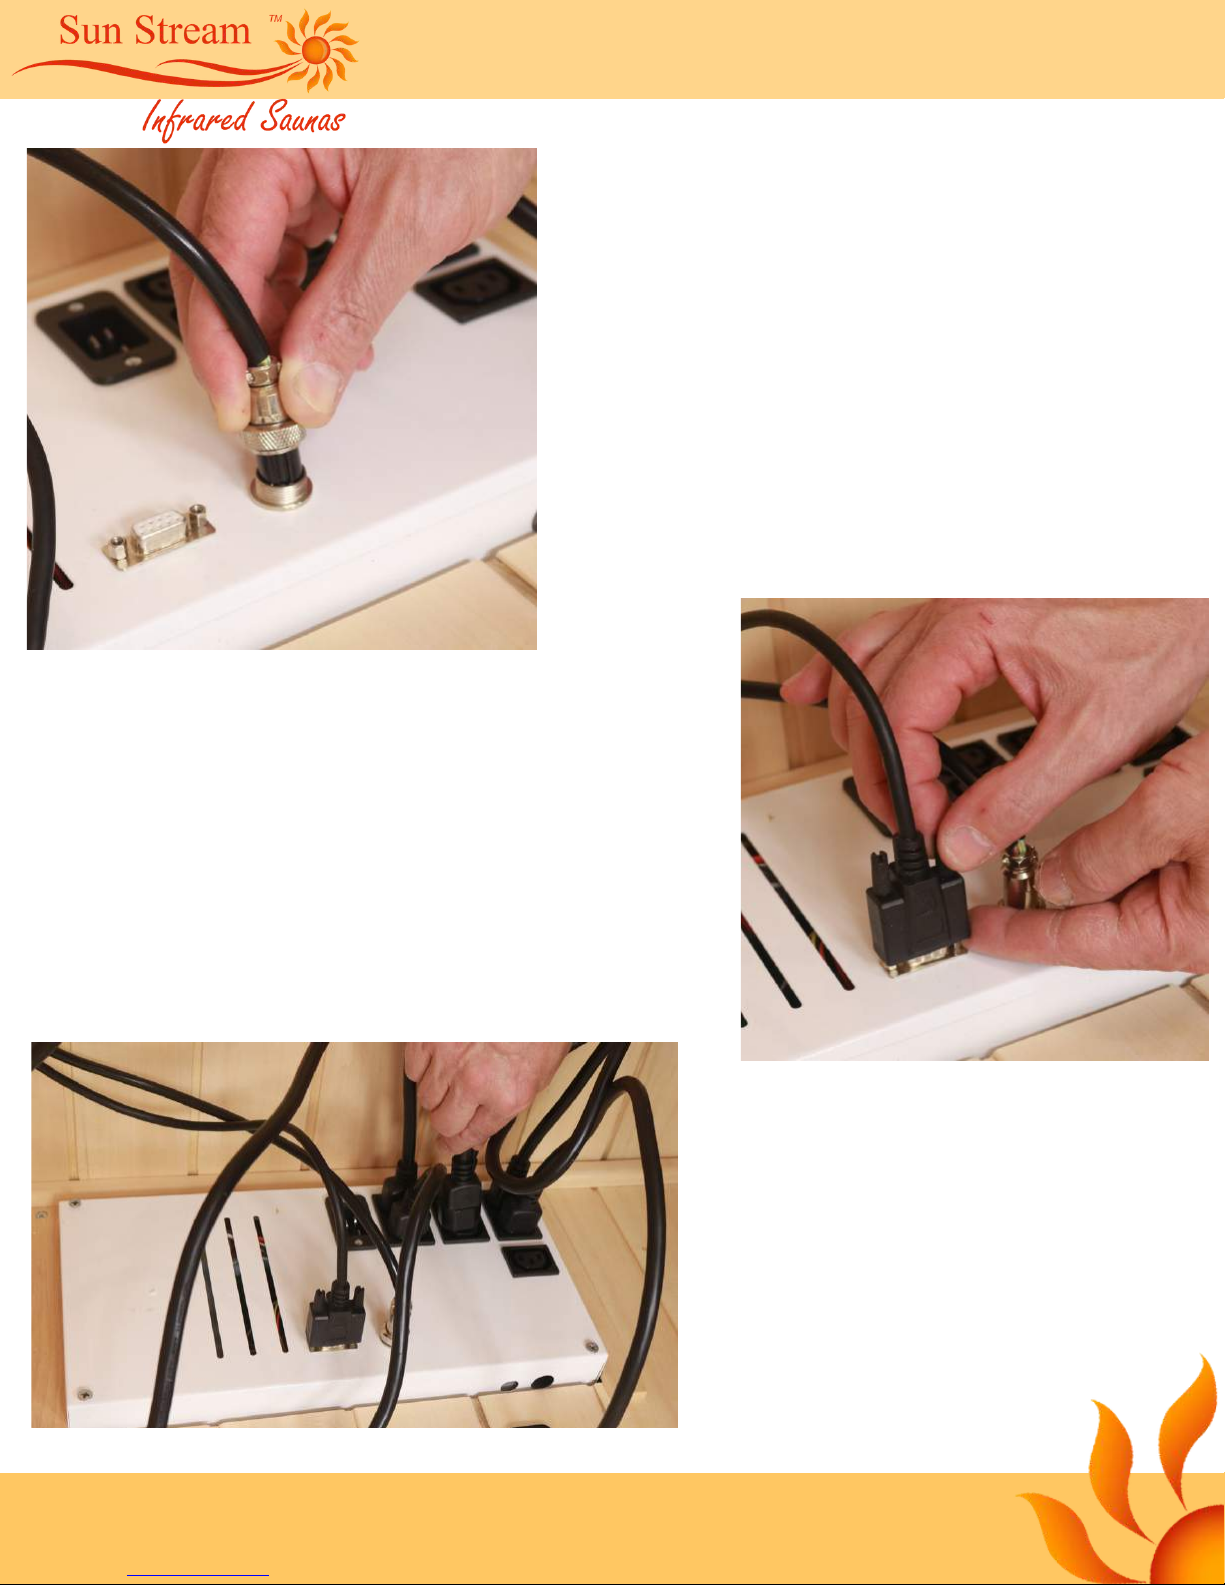
Connect the circular connector to
power supply box. Align the groove
in connector to properly insert.
Thread the cuff of connector on fully
Attach the 'D-Sub'
computer style connector
as shown
Plug in all heater leads to
receptacles in the power
supply box.
Electrical Connections Inside of Sauna

www.InfraredSaunaCanada.ca www.InfraredSaunaUS.com
1 - 888 262 4477
Feed the main power supply cord in through the hole in back wall and insert in
power supply box. Do NOT plug power cord into your wall outlet until all
electrical connections are finished inside of the sauna.
Connect circular connectors for the 2 front wall heaters.
Thread the cuff of connectors on fully. When all connections are made
inside of the sauna, plug the sauna's main power cord into wall outlet.

www.InfraredSaunaCanada.ca www.InfraredSaunaUS.com
1 - 888 262 4477
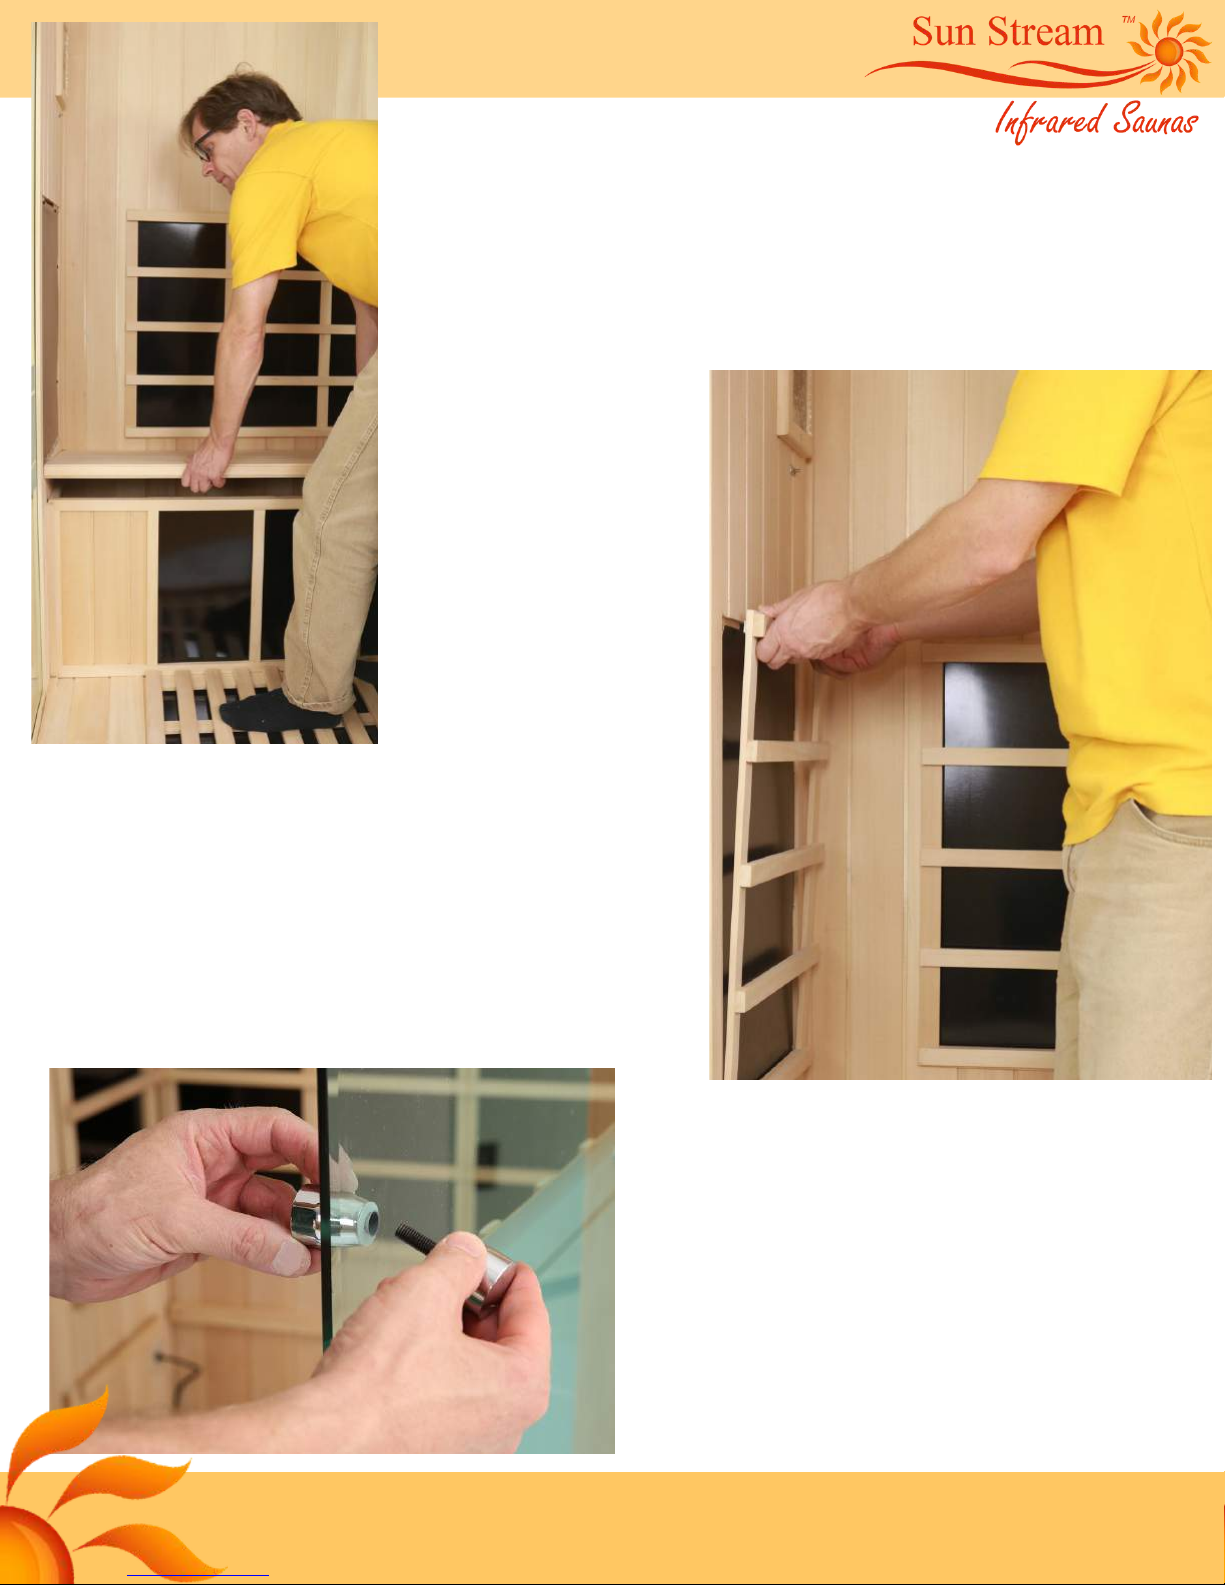
Remove Side Wall Heater Guards
The wooden lattice work in front of the
heaters is referred to as the heater guard.
These are held on with strong magnets.
It is necessary to remove the heater guards
from the two side walls in order to install the
leg heater and the sauna bench.
Leg Heater
Install the leg heater by lowering it into the
brackets mounted on the side walls.
Plug leg heater into the power
supply box in floor.
www.InfraredSaunaCanada.ca www.InfraredSaunaUS.com
1 - 888 262 4477
Install Bench
The bench in your new sauna is
reversible. Choose whichever side
appeals to you to face upward.
Reinstall the side wall
heater guards
Install the door handle

www.InfraredSaunaCanada.ca www.InfraredSaunaUS.com
1 - 888 262 4477
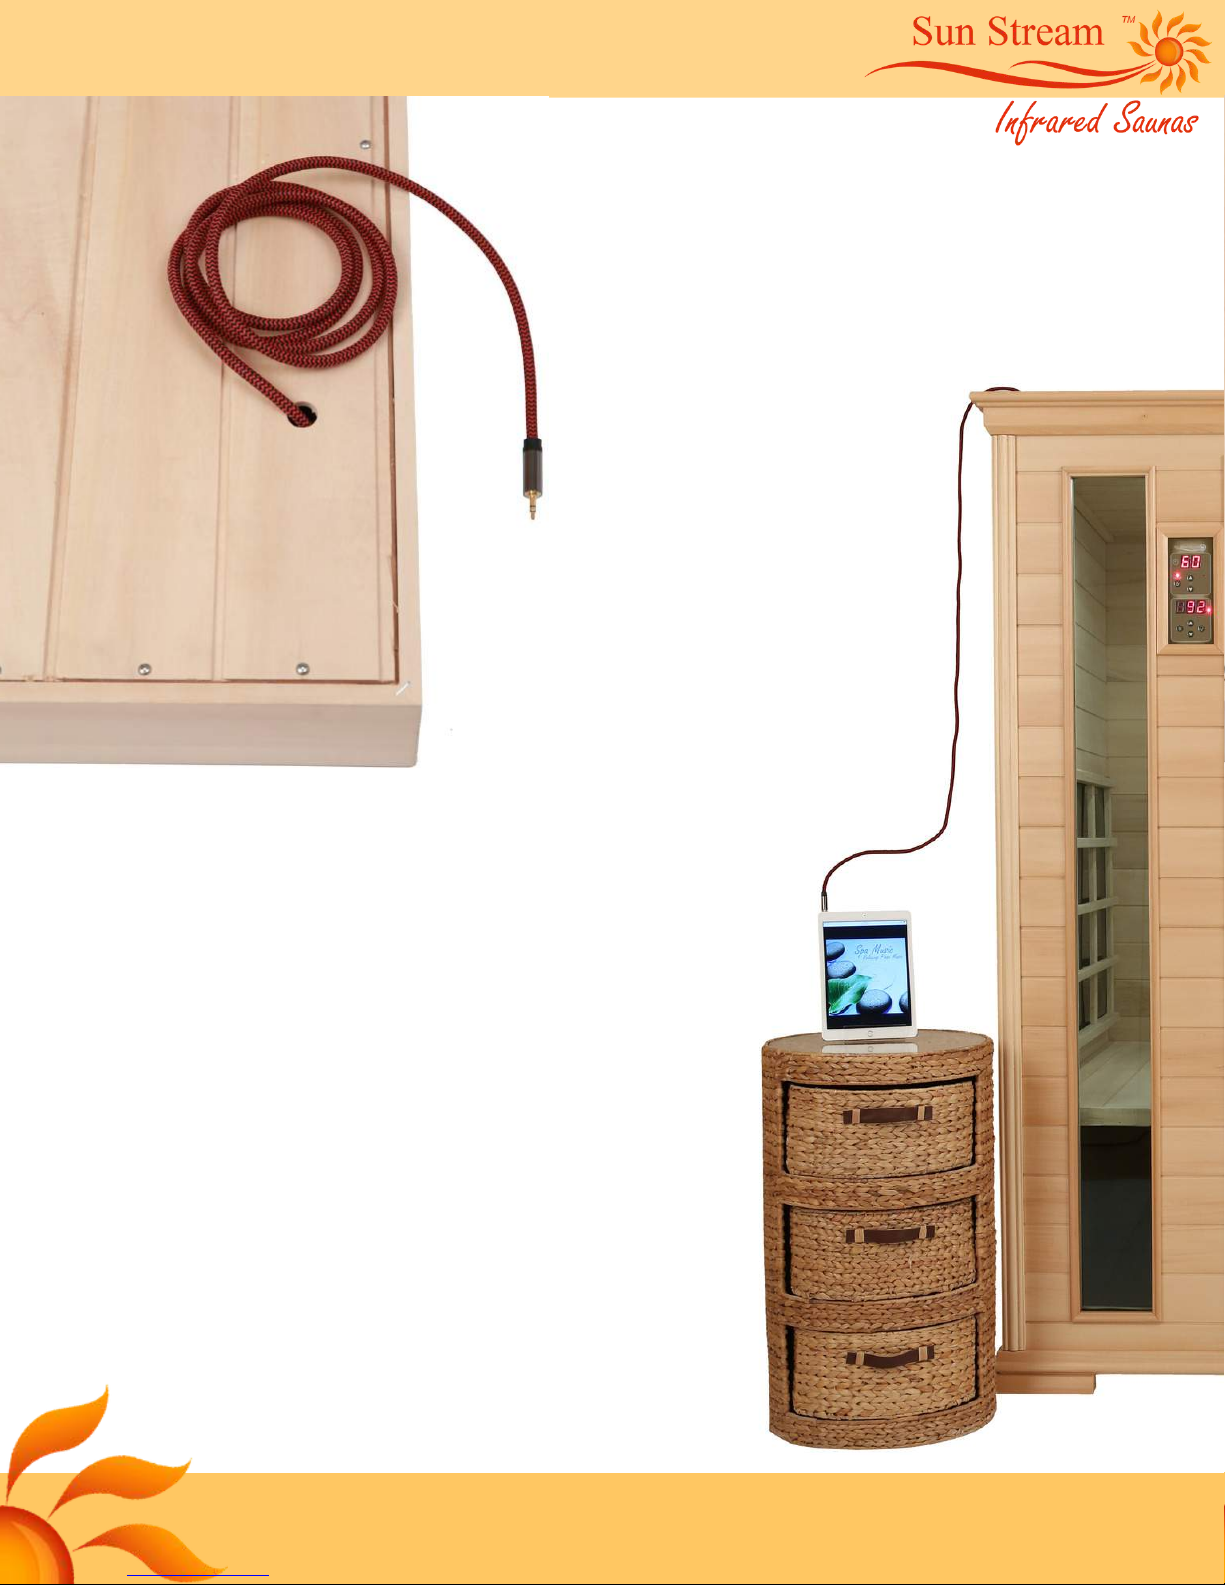
Audio System
Music can be piped to the
speakers in the sauna two
different ways, either wireless
via the Bluetooth receiver or by
directly connecting your device
(smart phone, tablet, laptop etc.)
with a 3.5mm male to
male audio cord (Red audio cord
pictured NOT included).
1. Bluetooth Mode
Search for and pair your device's Bluetooth to the 'BT speaker'.
2. Direct Connect Mode:
Remove access panel from
roof by unscrewing wood
screws.Connect your device to
the saunas' speakers via
your device's headphone jack
by inserting 3.5 mm audio cord
into the BTcircuit board as
shown. Connecting an audio
cord will disable the
Bluetooth.
www.InfraredSaunaCanada.ca www.InfraredSaunaUS.com
1 - 888 262 4477
Reinstall the roof panels and feed your
audio cord through the hole in roof.

www.InfraredSaunaCanada.ca www.InfraredSaunaUS.com
1 - 888 262 4477
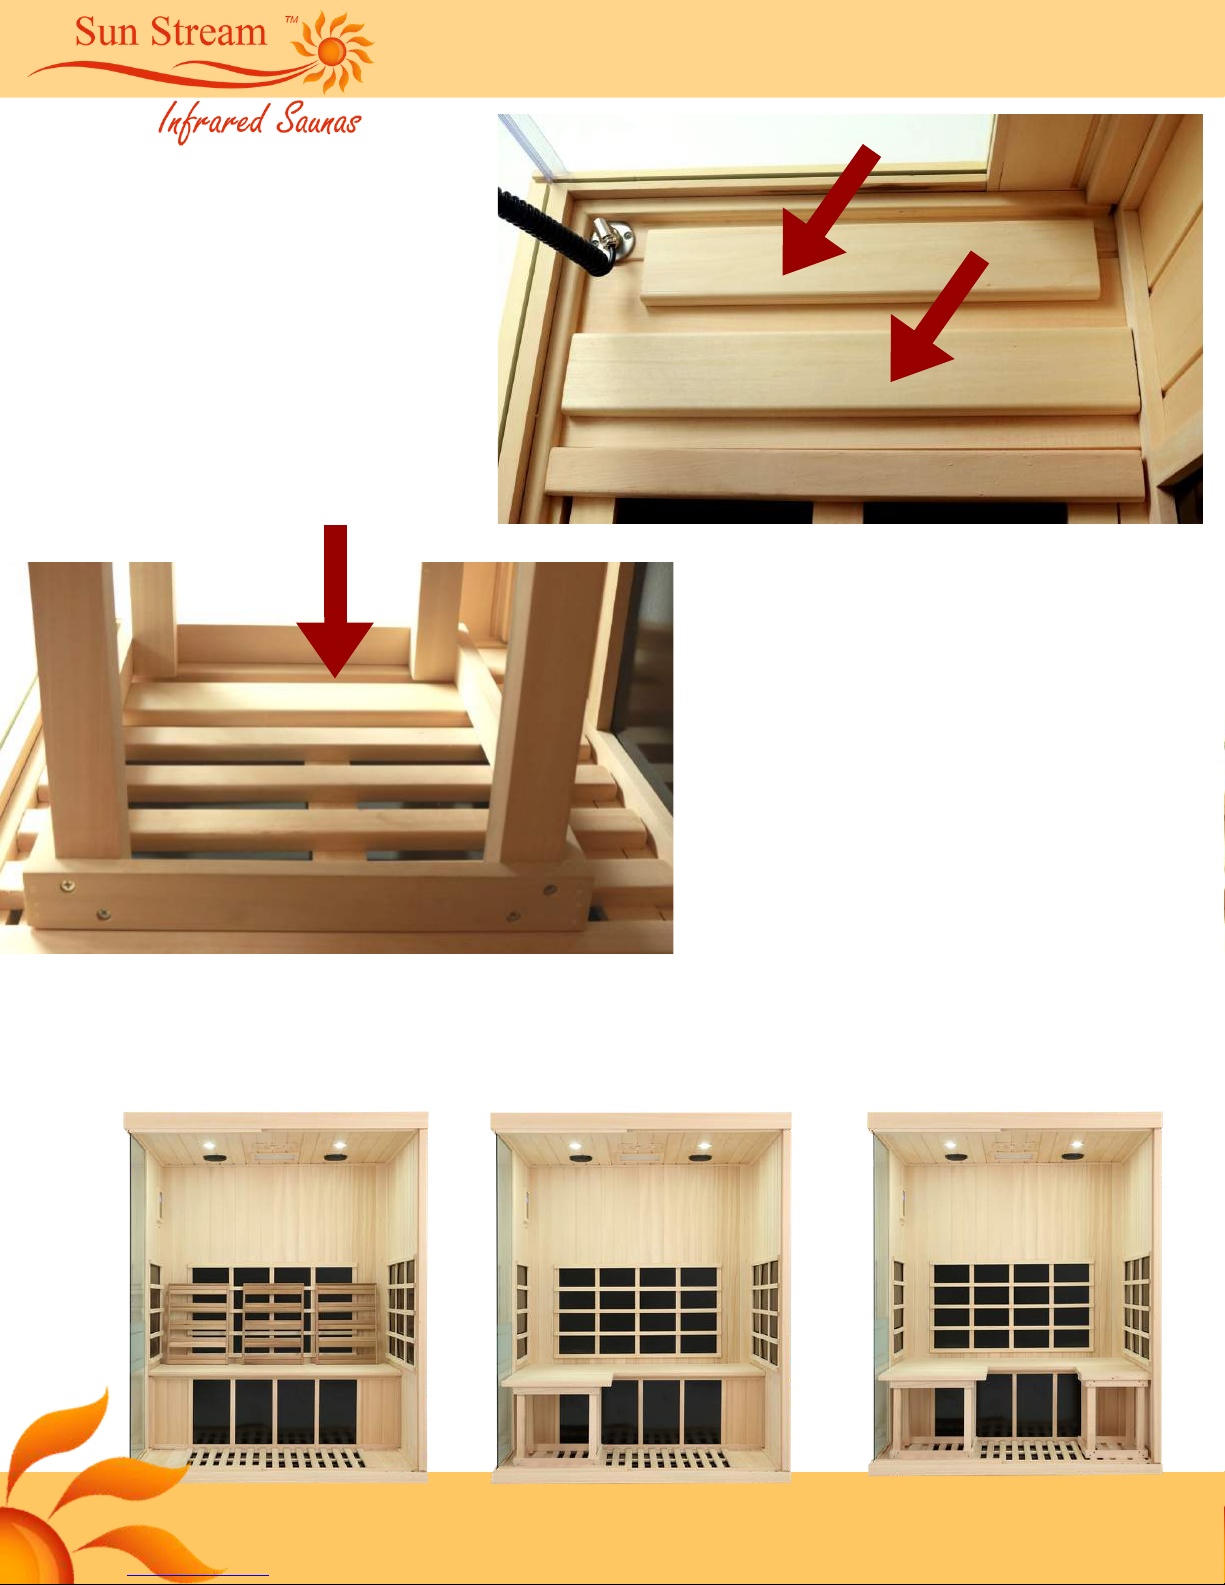
Movable Bench Assembly
Connect bench legs to the
inside corners of the
frames using supplied
wood screws.
Ensure that the legs' ends are flush
with the bottom edge of the frames
Attach the leg assembly to the
bottom of the bench surface.
Choose which surface of the
bench you prefer to be the top
and bottom.
www.InfraredSaunaCanada.ca www.InfraredSaunaUS.com
1 - 888 262 4477
Choose to use either one, or two or none of the benches
Wooden slats are
necessary to support the
movable benches
Place additional wood slats
on the floor, in the front
corners of the sauna . Place
the slats in whichever corner
you choose to use the
movable benches.

www.InfraredSaunaCanada.ca www.InfraredSaunaUS.com
1 - 888 262 4477
Chromatherapy Lighting
The color LED light panel is controlled by the remote
control and is NOT connected to the sauna wall controller.

www.InfraredSaunaCanada.ca www.InfraredSaunaUS.com
1 - 888 262 4477
Care and Maintenance
It is advisable that you always sit on towels when using your sauna to
minimize any sweat stains on the wood surfaces.
Following use, wipe wood with damp cloth of any sweat that soaks
through your towels etc. to minimize staining of the wood.
The carbon panel heaters in your Sun Stream sauna can be gently
wiped of any sweat, dust etc. A damp cloth is usually all that is needed
to clean the heater surfaces.
Floor Heater Cleaning
It is common for sweat to drip through the floor grate and onto the floor
heater surface
Gently wipe the floor heater after use of any sweat that has dripped
down through the floor grate. A damp cloth is usually adequate.
Do NOT scrub the floor heater or other heaters with excessive
pressure.
For accumulated dirt and sweat, if necessary, use a bit of dish soap or
gentle cleaner on the heaters.

www.InfraredSaunaCanada.ca www.InfraredSaunaUS.com
1 - 888 262 4477
Control Panel

www.InfraredSaunaCanada.ca www.InfraredSaunaUS.com
1 - 888 262 4477
Interior Control Panel
Temperature Sensor
FRAGILE
DO NOT TOUCH

www.InfraredSaunaCanada.ca www.InfraredSaunaUS.com
1 - 888 262 4477
Connecting the sauna to your house power supply
When the sauna is plugged into you wall outlet the red Power Indicator light on the control
panel will be on.
The Bluetooth audio receiver on the roof will make a beeping noise its indicator light will turn
on.
ON/OFF for Heaters
Push the POWER button to turn the sauna heaters ON. The various displays will come on.
The sauna heaters will remain ON until the timer runs down to 00.
The sauna heaters can be turned OFF at any time by pushing the POWER button.
Timer Adjustment
The default time is 60 minutes. Press + or - to change the Timer setting.
The maximum setting is 60 minutes.
The minimum setting is 5 minutes.
Pre Heat
Sun Stream Infrared Saunas are typically used by preheating the sauna for 20-30 minutes.
Thermostat Adjustment
Press + or - to change the Thermostat setting.
Increase Thermostat Setting: Press the + button to increase the temperature by 1 degree C
increments.
The maximum setting is 65 C.
Decrease Thermostat Setting: Press the - button to decrease the temperature by 1 degree C
increments.
The minimum setting is 25 C.

www.InfraredSaunaCanada.ca www.InfraredSaunaUS.com
1 - 888 262 4477
Thermometer /Thermostat Display
When the POWER button is turned ON the digital display will show the Thermometer reading.
Anytime the + and - buttons are pushed the Thermostat setting display will show.
After setting the thermostat the display will return to displaying Thermometer reading.
Temperature Control
When the interior air temperature is below the Thermostat set temperature, the heaters will
remain ON.
When the interior temperature is higher than the Thermostat set temperature, the power to the
heaters will be turned OFF. The heater panels will begin to cool down, air temperature and
Infrared levels will slowly drop until the Thermostat is activated and the power to the heaters
will be turned back on.
AII (Adjustable Infrared Intensity)
The Intensity button on the control panel will adjust the Infrared intensity much like a dimmer
switch for a household light. Press the Intensity button to select 100%, 75% or 50 % levels of
Infrared intensity for different purposes and individual needs.

www.InfraredSaunaCanada.ca www.InfraredSaunaUS.com
1 - 888 262 4477
Enjoy your new
Sun Stream Evolve Infrared Sauna !
 Loading...