

SunSpan Form S-IOM-26B 210060
S-Series (Single-Stage)
S2S-Series (2-Stage)
GAS-FIRED HIGH-INTENSITY INFRA-RED HEATERS
INSTRUCTIONS APPLY TO:
o Installation o Operation o Maintenance
WARNING
Improper installation, adjustment, alteration,
service or maintenance can cause property
damage, injury or death. Read the installation,
operating, and service/maintenance instructions
thoroughly before installing or servicing this
equipment.
WARNING
Gas-fired appliances are not designed for use in
hazardous atmospheres containing flammable
vapors or combustible dust, or atmospheres
containing chlorinated or halogenated
hydrocarbons.
FOR YOUR SAFETY
The use and storage of gasoline or other flammable
vapors and liquids in the vicinity of this appliance is
hazardous.
FOR YOUR SAFETY
If you smell gas:
1. Open windows.
2. Do not touch electrical switches.
3. Extinguish any open flame.
4. Immediately call your gas supplier.
5. If gas supplier cannot be reached, call fire
department.
FOR INDOOR INSTALLATION ONLY.
NOT FOR RESIDENTIAL USE.
These heaters must NOT be used in the
following applications:
• Enclosed swimming pool areas.
• Areas with contaminated atmospheres.
• Areas requiring explosion-proof equipment.
• Process heating applications.
HAZARD INTENSITY LEVELS
• DANGER: Failure to comply will result in severe
personal injury or death and property damage.
• WARNING: Failure to comply could result in
severe personal injury or death and/or property
damage.
• CAUTION: Failure to comply could result in minor
personal injury and/or property damage.
CONTENTS
Section Page
1. General Information and Installation Codes.…..2
2. Canadian Codes………………………………….3
3. Unpacking…………………….………..………....4
4. Restrictions……………………………..………...4
5. Basic Dimensions……..…………………………4
6. Clearance to Combustibles……………………..5
7. Mounting Considerations………………...….…..6
8. Ventilation Requirements………………………..7
9. Gas Supply………………………………………..7
10. Electrical Supply………………………………….8
11. Installation………….…………………………….10
12. Ignition, Operation and Shutdown...……...……12
13. Gas Pressure and Gas Conversion..…...…..…16
14. Maintenance……………………..…….…………16
15. Accessories…………………………..………..…17
16. Replacement Parts…………………………..…..17
17. Troubleshooting………………………………….18
ATTENTION
Mount a copy of these instructions adjacent to the
heater and retain a copy for future reference.
Page 2
1. GENERAL INFORMATION AND INSTALLATION CODES
WARNING
• These infrared heaters are the unvented type. Products of combustion generated are released into the space
being heated. When operating heaters, air for ventilation MUST be provided as per the Ventilation
Requirements section.
GENERAL INFORMATION
• These heaters are CSA International Designed Certified and manufactured in compliance with the Standard for Gas-
Fired High-Intensity Infrared Heaters, ANSI Z83.19 / CSA 2.35-latest edition, approved by the American National
Standards Institute (ANSI) and the Canadian Standards Association (CSA) for indoor installation only.
• These heaters are approved for commercial and industrial installation only.
• These heaters MUST be installed and serviced ONLY by trained and qualified gas installation and service
personnel. The installing contractor must be familiar with all the various requirements and is responsible for
installing each heater in compliance with these instructions and all applicable codes of all authorities having
jurisdiction, local, state, provincial and national.
• These heaters should not be installed in buildings with uninsulated metal roof decks. Uninsulated metal roof decks will
cause condensation of water vapor (contained in the heater flue gas) on the inside of the building. Metal roof decks
must be insulated using built-up insulation and roofing on the exterior or, inside insulation that is not permeable to
water vapor. Interior insulation that is permeable to water vapor must be completely sealed with a vapor barrier.
HIGH ALTITUDE
• These heaters are manufactured for use at the specific altitude range stated on the heater serial plate. Do not install
heater if it is not rated for the correct altitude. Contact factory if in doubt.
LOCAL APPROVALS
• Single-stage heaters have been granted local approval by New York City (MEA 418-86-E).
• Single-stage heaters have been granted CE approval.
INSTALLATION CODES
• The installation must conform with local building codes or, in the absence of local codes, with the National Fuel Gas
Code ANSI Z223.1 / NFPA 54-latest edition, or the Natural Gas and Propane Installation Code, CSA B149.1.
• In locations used for the storage of combustible materials, signs shall be posted to specify the maximum permissible
stacking height to maintain required clearances from the heater to the combustibles.
• Natural or mechanical means shall be provided to supply and exhaust [combustion and ventilation air at a rate of] at
least [4 CFM per 1000 BTUH] 4 ft3/min/1000 Btu/hr (0.38m3/min/kW) input of installed heaters.
• Exhaust openings for removing flue products shall be above the level of the heaters.
• If an external electrical source is utilized, the heater, when installed, must be electrically grounded in accordance with
the National Electric Code, ANSI / NFPA 70-latest edition.
• All NFPA publications are available from the National Fire Protection Association, Batterymarch Park, Quincy,
Massachusetts, MA 02269 USA.
AIRCRAFT HANGARS
• These overhead heaters are suitable for use in aircraft hangars when installed in accordance with the Standard for
Aircraft Hangars, NFPA 409-latest edition, and are so marked.
• In aircraft storage and servicing areas, heaters shall be installed at least 3 m (10 ft) above the upper surface of wings
or of the engine enclosures of the highest aircraft that might be housed in the hangar. The measurement shall be
made from the wing or engine enclosure, whichever is higher from the floor, to the bottom of the heater.
• In shops, offices, and other sections of the aircraft hangars communicating with the aircraft storage or servicing areas,
the bottom of the heaters shall be installed not less than 2.4 m (8 ft) above the floor.
• In all hangars, suspended or elevated heaters shall be located in spaces where they shall not be subject to injury by
aircraft, cranes, movable scaffolding, or other objects. Provisions shall be made to ensure accessibility to suspended
heaters for recurrent maintenance purposes.
REPAIR GARAGES
• These overhead heaters are suitable for use in repair garages when installed in accordance with the Standard for
Motor Fuel Dispensing Facilities and Repair Garages, NFPA 30A-latest edition (formerly Standard for Repair Garages,
NFPA 88B), and are so marked.
• Heat producing appliances using gas or oil fuel listed for use in garages shall be permitted to be installed in lubrication
rooms, service rooms, or fuel dispensing areas where Class I liquids are dispensed or transferred, provided the
equipment is installed at least 2.4m (8 ft) above the floor.
PARKING STRUCTURES
• These overhead heaters are suitable for use in parking structures when installed in accordance with the Standard for
Parking Structures, NFPA 88A-latest edition, and are so marked.
• All flames associated with heating equipment shall be located a minimum of 500 mm (18 in.) below the floor-ceiling
assembly or 500 mm (18 in.) above the floor.
WARNING
• An overhead heater should be installed so that the minimum clearances marked on the heater will be
maintained from vehicles parked below the heater. (ANSI Z83.19, section 1.25.3.d.)
Page 3
2. CANADIAN CODES
• The information on this page applies specifically to installations in Canada.
INSTALLATION CODES
• These heaters are CSA International Designed Certified and manufactured in compliance with the Standard for Gas-
Fired High-Intensity Infrared Heaters, CAN/CSA 2.35-latest edition, approved by the Canadian Standards Association
(CSA), for indoor installation only.
• The installation must conform with local building codes or, in the absence of local codes, with the current Canadian
Natural Gas and Propane Installation Code, CAN/CSA B149.1-latest edition. Canadian authorities having jurisdiction
should be consulted, before installations are made, to verify local codes and installation procedures.
• The heater shall be protected against physical damage.
• The heater shall not be installed in any location where a flammable vapour, combustible dust or fibres, or an explosive
mixture is present.
• The heater shall not be installed in a residential or care or detention occupancy building.
• The heater shall be provided with mechanical ventilation for combustion and ventilation air
(1) that is so located that products of combustion from each heater are effectively removed outdoors;
(2) that has a ventilation volume of at least [3 CFM per 1000 BTUH] 300 cfm (142 dm3/s) for each 100 000 Btuh
(30kW) input or fraction there of; and
(3) is sufficient to maintain the level of carbon dioxide at less than 5000 ppm measured 6 ft (2m) above the work
area.
• The heater shall have the ventilation system so interlocked that any reduction of the volume of airflow required in the
above note for a heater or group of heaters will cause the shutdown of that heater or group of heaters.
• The heater shall not be installed in an exit passageway or stairway within 8 ft (2.5m) measured horizontally from an exit
door.
• The heater shall be provided with clearance from combustible materials as certified and indicated on the heater.
• If an external electrical source is utilized, the heater, when installed, must be electrically grounded in accordance with
the Canadian Electric Code, CAN/CSA C22.1-latest edition.
AIRCRAFT HANGARS
• These overhead heaters are suitable for use in aircraft hangars when installed in accordance with the Canadian
Natural Gas and Propane Installation Code, CAN/CSA B149.1-latest edition.
• A heater located in an aircraft storage or servicing area shall be installed so that no portion of an aircraft that can
occupy the area that is within the clearance to combustible material, as marked on the heater rating plate.
• When an infrared heater is installed in either a repair or shop area that communicates with an aircraft hangar, the
minimum clearance from the floor to the infrared heater shall be 8 ft (2.4m).
• An infrared heater shall not be located in an area of an aircraft hangar where it can be subjected to physical damage by
aircraft, cranes, movable scaffolding, or other objects.
GARAGES
• These overhead heaters are suitable for use in garages when installed in accordance with the Canadian Natural Gas
and Propane Installation Code, CAN/CSA B149.1-latest edition.
• The minimum clearance from the radiant face of the infrared heater to the upper surface of the highest vehicle shall not
be less than the certified clearance from combustible material as indicated on the heater [installed in a garage or a car
wash]. Provision shall be made to maintain these minimum specified clearances by an interlock that shuts off the gas
supply until the required clearances have been re-established, a protective bar, or a device that provides a warning
when the clearances are not being maintained.
• Where an infrared heater is installed in a garage and the clearance from combustible material cannot be maintained
when the vehicle is raised on a hoist, an electrical interlock shall be provided to shut off the burner and prevent its
operation until the required clearance has been re-established.
WARNING
• An overhead heater should be installed so that the minimum clearances marked on the heater will be
maintained from vehicles parked below the heater. (CAN/CSA 2.35, section 1.25.3.d.)
Page 4
Note: Four (4) mounting holes .375”
(9.5mm)
diameter for balanced suspension are located by dimensions B x 13.000”
3. UNPACKING
• This heater is completely assembled, 100% factory tested, inspected prior to shipment, and ready for installation.
• Review the transportation company's bill of lading and/or freight bill. Observe and confirm the number of packages
received agrees with the quantity indicated on the documents. If there is any disagreement or any part of the shipment
is visibly damaged, note the nature and extent of it on the documents. If damage is discovered after delivery, leave the
damaged material in the original shipping container(s) and immediately call the transportation company and request for
an inspection to be made.
4. RESTRICTIONS
• Use for process heating applications VOIDS the warranty and CSA design certification.
• These heaters are RESTRICTED from use for the following applications, which will also VOID the warranty and
CSA design certification.
WARRANTY VOID IF UNIT IS…
• Used in atmospheres containing flammable vapors or atmospheres containing chlorinated or halogenated
hydrocarbons or atmospheres containing explosive dusts.
• Installed without proper clearance to combustible materials or in a location where the heater controls can be subjected
to ambient temperatures above 150°F (66°C) or below -40°F (-40°C).
• Installed at angles not approved for the model.
• Installed for other than space heating applications.
• Installed for residential use. (HEATER IS NOT FOR RESIDENTIAL USE.)
• Installed outdoors.
• Installed in enclosed swimming pool areas.
• Altered. Units are completely factory assembled and tested.
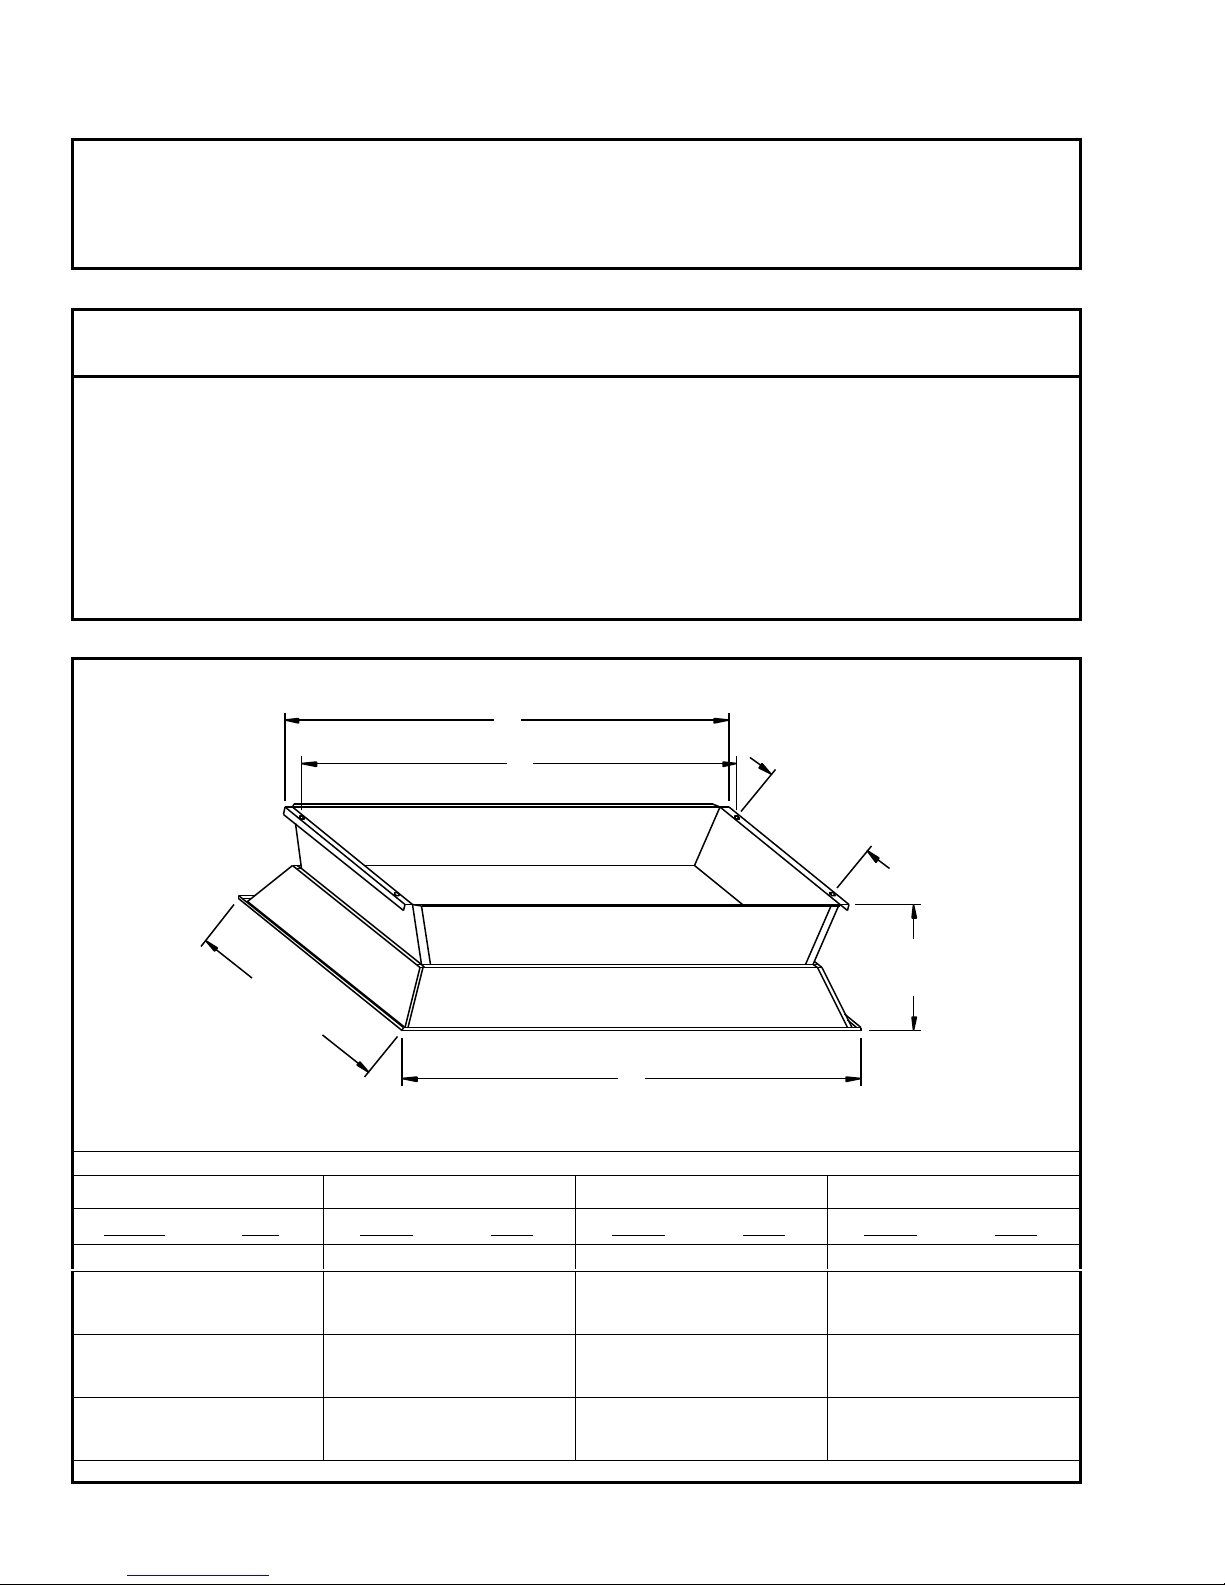
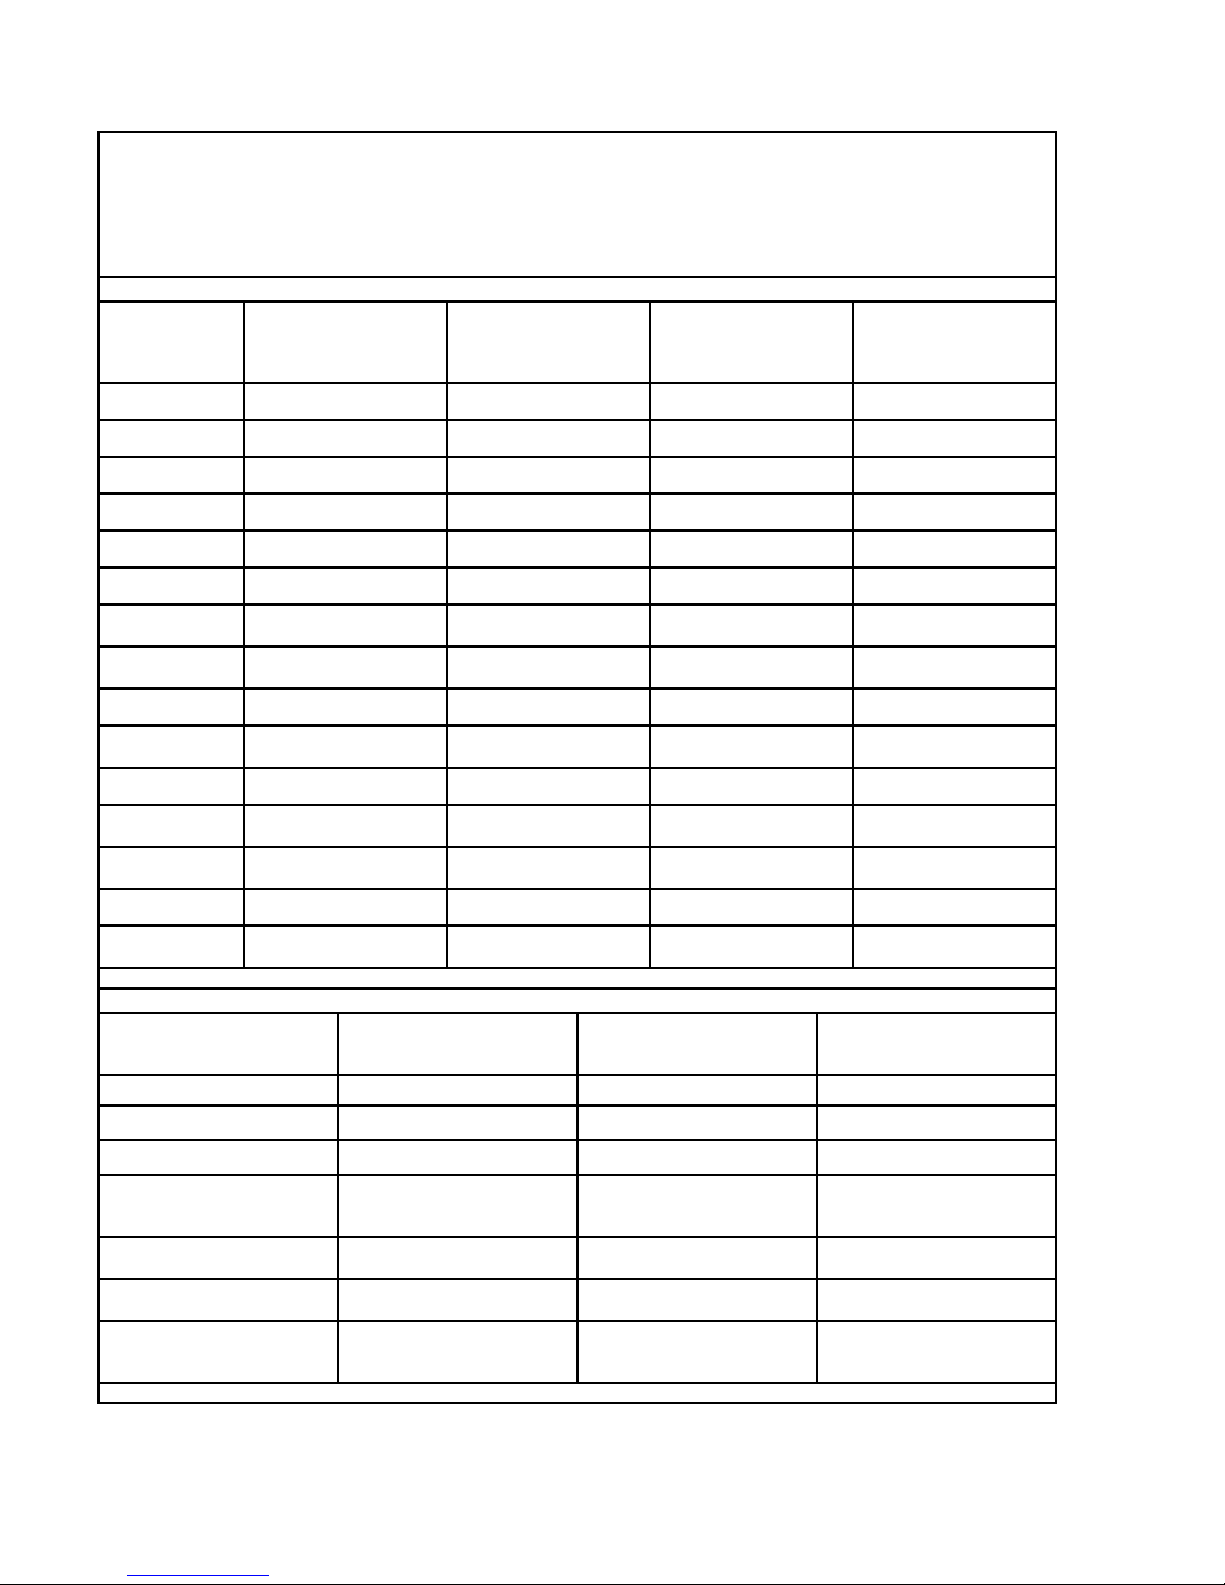
5. BASIC DIMENSIONS
FIGURE 1 – LENGTHS, WIDTH AND HEIGHT
A
B
13.000"
(330mm)
8.500"
23.719"
(216mm)
(603mm)
C
(330mm).
LEGEND
MODEL A B C
MBTUH (kW) inches (mm) inches (mm) inches (mm)
30 – 60 (9-18) 15.312 (389) 14.625 (372) 16.625 (422)
70 – 100
*90/45
*100/50
110 – 160N
*120/80
*150/100
160L – 200
*160/80
*200/100
* = 2-stage models, L = LP/propane gas, N = Natural gas
(21-29)
*(26/13)
*(29/15)
(32-47N)
*(35/23)
*(44/29)
(47L-59)
*(47/23)
*(59/29)
23.938 (608) 23.250 (591) 25.250 (641)
32.563 (827) 31.875 (810) 33.875 (860)
41.188 (1046) 40.500 (1029) 42.500 (1080)

Page 5
6. CLEARANCE TO COMBUSTIBLES
WARNING
• Single or multi-heater placement must be such that continuous operation of the heater or heaters will not
cause combustible materials or materials in storage to attain a temperature in excess of 150°F (66°C).
• Under no circumstances should this heater be installed in a combustible atmosphere or in a location where the
heater controls can be subjected to ambient temperature in excess of 150°F (66°C).
• These heaters MUST be mounted with minimum clearances between the combustion surface and combustible
materials. See Table 1, Clearance to Combustibles Requirements and Figure 2, Clearance to Combustibles Diagrams.
TABLE 1. CLEARANCE TO COMBUSTIBLES REQUIREMENTS
NATURAL GAS MODELS
MBTUH = 1000 Btu/hour
PROPANE GAS MODELS
MBTUH = 1000 Btu/hour
CLEARANCE TO COMBUSTIBLES inches (cm) inches (cm) inches (cm) inches (cm) inches (cm)
SIDE OF HEATER (A) 30 (76) 36 (91) 46 (117) 48 (122) 48 (122)
BACK OF HEATER (B) 30 (76) 30 (76) 33 (84) 33 (84) 33 (84)
TOP OF HEATER (C):
- Mounting Angle 5-29° (C) 60 (152) 62 (157) 64 (163) 68 (173) 68 (173)
- Mounting Angle 30° ONLY (C) 48 (122) 50 (127) 58 (147) 68 (173) 68 (173)
- w/ Optional Heat Deflector 5-30° (C) 34 (86) 38 (97) na na na
BELOW HEATER (D):
- Standard Reflector (D) 80 (203) 105 (267) 125 (318) 140 (356) 140 (356)
- w/ Optional Parabolic Reflector (D) 110 (279) 135 (343) 165 (419) 180 (457) 180 (457)
NATURAL GAS MODELS
(Kilowatts)
PROPANE GAS MODELS
(Kilowatts)
Notes: 1 = 30 and 35 MBTUH (9 and 10kW) models not available in Canada; 2 = 60 MBTUH (18kW) models require wire
grid in Canada; 3 = See Table 4, Allowable Mounting Angles, in the Installation section. na = Not available. (A), (B), (C),
and (D) refer to Figure 2, Clearance to Combustibles Diagrams. * = 2-stage models.
FIGURE 2 – CLEARANCE TO COMBUSTIBLES DIAGRAMS
3D VIEW 30 – 60 MBTUH (9-18KW) ALL MODELS STACKING HEIGHT
1,2
30–60
70–100
*100/50
50 70–90
*90/45
1,2
(9-18)
(21-29)
*(29/15)
(15) (21-26)
*(26/13)
3
3
3
3
3
3
3
3
110–150
*150/100
120
*120/80
(32-44)
*(44/29)
(35)
*(35/23)
3
160
3
160
*160/80
3
(47)
3
(47)
*(47/23)
175–200
*200/100
3
(51-59)
*(59/29)
3
C
C
A
B
A
D
E
D
LEGEND
Symbol Item Description
A Side of heater clearance to combustibles
B Back of heater clearance to combustibles
C Top of heater clearance to combustibles
D Below heater clearance to combustibles
E Mounting angle, see Table 4, Allowable Mounting Angle
H Maximum stacking height of combustible materials
M Mounting height
B
B
C
E
D
D
M
H
• In locations used for the storage of combustible materials, signs shall be posted to specify the maximum permissible
stacking height to maintain required clearances from the heater to combustibles. (ANSI Z233.1/NFPA 54)
• The stated clearance to combustibles represents a surface temperature of 90°F (50°C) above room temperature.
Building materials with low heat tolerance (such as plastic, vinyl siding, canvas, tri-ply, etc.) may be subject to
degradation at lower temperatures. It is the installer’s responsibility to assure that adjacent materials are protected
from degradation. (ANSI Z83.19)
• It is recommended more distance than the minimum clearance be maintained above the unit whether or not the
construction is combustible to reduce and/or eliminate hot spots and possible staining of painted ceiling surfaces.
• If the unit must be close to the roof or ceiling, interpose a non-combustible baffle (twice the size of the reflector)
between the unit and the roof or ceiling. Allow at least 2” (5cm) between the roof or ceiling and the non-combustible
baffle. Allow at least 12” (31cm) between the non-combustible baffle and the top of the heater.
Page 6
*(26/13)
*(29/15)
*(35/23)
*(44/29)
*(47/23)
*(59/29)
7. MOUNTING CONSIDERATIONS
• These heaters shall be installed with clearances from combustible material as specified in the Clearance to
Combustibles section.
• Heaters should also be located with respect to building construction and equipment so as to provide sufficient
clearance and accessibility for servicing and cleaning.
• See Table 2, Recommended Mounting Height. A mounting height lower than the recommended mounting height may
be used if personnel are not required to stay directly under the heater.
• See Table 3, Recommended Distance from a Wall for Heaters Mounted At 5°.
TABLE 2. RECOMMENDED MOUNTING HEIGHT
MODELS
MBTUH
30
With
Standard Reflector
AT 5°
(kW)
(9) 11.0 – 13.0 (3.4 - 4.0) 10.0 – 12.0 (3.0 - 3.7)
feet
(m)
With
Standard Reflector
AT 30º
feet
(m)
With Optional
Parabolic Reflector
AT 5°
feet
(m)
With Optional
Parabolic Reflector
AT 30º
feet
(m)
40
50
60
70
80
90
*90/45
100
*100/50
110
120
*120/80
130
150
*150/100
160
*160/80
175
200
*200/100
* = 2-stage models
(12) 12.0 – 14.5 (3.7 - 4.4) 11.5 – 13.5 (3.5 -4.1)
(15) 13.5 – 15.5 (4.1 - 4.7) 12.5 – 14.5 (3.8 - 4.4) 15.5 – 18.5 (4.7 - 5.6) 14.0 – 17.0 (4.3 - 5.2)
(18) 14.5 – 16.5 (4.4 - 5.0) 13.0 – 15.0 (4.0 - 4.6) 16.0 – 20.0 (4.9 - 6.1) 15.0 – 18.0 (4.6 - 5.5)
(21) 15.0 – 17.0 (4.6 - 5.2) 13.5 – 15.5 (4.1 - 4.7) 17.5 – 20.5 (5.3 - 6.2) 16.0 – 19.0 (4.9 - 5.8)
(23) 15.5 – 18.0 (4.7 - 5.5) 14.0 – 16.5 (4.3 - 5.0) 18.5 – 21.5 (5.6 - 6.6) 17.0 – 20.0 (5.2 - 6.1)
(27)
16.0 – 18.5 (4.9 - 5.6) 14.5 – 17.0 (4.4 - 5.2) 19.5 – 22.5 (5.9 - 6.9) 17.5 – 20.5 (5.3 - 6.2)
(29)
17.0 – 19.5 (5.2 - 5.9) 15.0 – 17.5 (4.6 - 5.3) 20.5 – 23.5 (6.2 - 7.2) 18.5 – 21.5 (5.6 - 6.6)
(32) 17.0 – 20.0 (5.2 - 6.1) 15.0 – 18.0 (4.6 - 5.5) 21.0 – 24.5 (6.4 - 7.5) 19.0 – 22.0 (5.8 - 6.7)
(35)
17.5 – 21.0 (5.3 - 6.4) 15.5 – 18.5 (4.7 - 5.6) 21.5 – 25.0 (6.6 - 7.6) 20.0 – 23.0 (6.1 - 7.0)
(38) 18.0 – 21.0 (5.5 - 6.4) 16.0 – 19.0 (4.9 - 5.8) 22.5 – 26.0 (6.9 - 7.9) 20.5 – 23.5 (6.2 - 7.2)
(44)
18.5 – 22.5 (5.6 - 6.9) 16.5 – 20.0 (5.0 - 6.1) 24.0 – 27.5 (7.3 - 8.4) 21.5 – 24.5 (6.6 - 7.5)
(47)
19.0 – 23.0 (5.8 - 7.0) 17.0 – 20.5 (5.2 - 6.2) 25.0 – 28.5 (7.7 - 8.7) 22.5 – 25.5 (6.9 - 7.8)
(51) 19.5 – 23.5 (5.9 - 7.2) 17.5 – 21.0 (5.3 - 6.4) 25.5 – 29.0 (7.8 - 8.8) 23.0 – 26.5 (7.0 - 8.1)
(59)
20.5 – 25.0 (6.2 - 7.6) 18.5 – 22.5 (5.6 - 6.9) 27.0 – 31.0 (8.2 - 9.4) 24.5 – 28.0 (7.5 - 8.5)
TABLE 3. RECOMMENDED DISTANCE FROM A WALL FOR HEATERS MOUNTED AT 5°
MBTUH
30 – 40
45 – 60
MODELS
With
Standard Reflector
(kW)
(9-12) 8 (2.4) 5 (1.5) 90 (27.4)
(13-18) 12 (3.7) 9 (2.7) 100 (30.5)
feet
(m)
With Optional
Parabolic Reflector
feet
(m)
Maximum Distance
Between Heater Rows
feet
(m)
70 – 75
80 – 100
*90/45
*100/50
110 – 125
*120/80
130 – 150
*150/100
160 – 200
*160/80
*200/100
* = 2-stage models
(21-22) 14 (4.3) 11 (3.4) 105 (32.0)
(23-29)
*(26/13)
*(29/14)
(32-37)
*(35/23)
(38-44)
*(44/29)
(47-59)
*(47/23)
*(59/29)
16 (4.9) 12 (3.7) 110 (33.5)
18 (5.5) 14 (4.3) 115 (35.1)
20 (6.1) 15 (4.6) 120 (36.6)
24 (7.3) 20 (6.1) 130 (39.6)

Page 7
8. VENTILATION REQUIREMENTS
WARNING
• Insufficient ventilation may result in health problems, carbon monoxide poisoning or death. Always vent
enclosed spaces and buildings according to national, state, provincial and local codes.
• Improper venting may result in asphyxiation, fire, explosion, injury or death.
• These heaters must be installed and serviced ONLY by trained and qualified gas installation and service personnel.
The installing contractor must be familiar with all the various requirements and is responsible for installing each heater
in compliance with all applicable local and national codes.
• These infrared heaters are the unvented type. Products of combustion generated are released into the space being
heated. Ventilation is required to dilute and remove the products of combustion and provide fresh air for efficient
combustion.
• Natural or mechanical means shall be provided to supply and exhaust [air at a rate of] at least [4 CFM per 1000 BUTH]
4 ft3/min/1000 Btu/hr (0.38m3/min/kW) input of installed heaters. (ANSI Z223.1/NFPA 54, section 10.18.)
• Exhaust openings for removing flue products shall be above the level of the heaters. (ANSI Z223.1/NFPA 54, section
10.18, Infrared Heaters.)
• Air for combustion, ventilation, and dilution of flue gases shall be obtained by application of one of several methods
described in the National Fuel Gas Code, ANSI Z223.1/NFPA 54, section 9.3, Air for Combustion and Ventilation.
• The ventilation technical information outlined in the current ASHRAE Handbooks should be observed when locating
vents.
• Local codes may permit the use of humidistat control to remove water vapor and products of combustion. Humidistat
settings will typically be in the 40-55% relative humidity range.
• For installations in Canada see the Canadian Codes section.
9. GAS SUPPLY
WARNING
• Do not install any gas piping above the heater or in heat zones.
• The gas supply piping shall NOT be used to support the heater.
• All components of a gas supply system must be leak tested prior to placing equipment into service.
• NEVER test for gas leaks with an open flame. Use non-corrosive leak detecting solution.
CAUTION
• Isolate heater from gas supply line during high-pressure leak testing of gas supply piping.
• All gas piping must be installed according to local codes and/or the National Fuel Gas Code, ANSI Z223.1 / NFPA 54-
latest edition. Use new clean pipe. Inspect and clean out any chips or debris before installing the pipe and fittings.
• Piping joint compound must be resistant to the action of liquefied petroleum (LP) gases.
• Piping must have a drip leg trap 6” (15 cm) long at the inlet connection. (C)
• A first stage pressure regulator is required when gas supply pressure exceeds 14” (35cm) water column (WC) . When
required, be sure this regulator is installed with the arrow indicating gas flow pointing in the proper direction. (E)
• An over-pressure protection device (OPD) may be required in certain jurisdictions.
• Install a 1/8” (3.2mm) National Pipe Thread (NPT) plugged tap, accessible for test gauge connection, immediately
upstream of the gas supply connection to the heater. (F)
• An agency approved flexible gas connector may only be used if permitted by local code. (G)
• Always use two wrenches when mating pipe connections to the heater. Excessive torque on the heater manifold may
misalign gas orifices leading to heater malfunction.
• Do not subject gas pressure regulators, flex connectors and gas cocks on the heater to test pressure over 14” (35cm)
water column (WC) while checking for piping leaks.
• All piping joints must be tested for gas leaks with a non-corrosive leak detecting solution.
• Purge all gas supply lines of air completely before attempting to ignite heater.
• See Figure 3, Gas Supply Piping Diagram for additional information about the above notes.
FIGURE 3 – GAS SUPPLY PIPING DIAGRAM
LEGEND
A
B
E
D
C
F
G
J
H
Symbol Item Description
A Main gas supply pipe line
B ½” (13mm) drop gas pipe line
C Drip leg 6” (15cm) long
D Gas cock (by others)
E First stage regulator required when gas pressure
exceeds 14” (35cm) water column (WC) (by others)
F Gas cock (component of flexible gas connector
assembly) with plugged pressure tap
G Flexible gas connector (if permitted)
H Heater gas valve with manifold pressure tap
J Heater gas manifold

Page 8
10. ELECTRICAL SUPPLY (1 OF 2)
WARNING
• If an external electrical source is utilized, the heater, when installed, must be electrically grounded in
accordance with the National Electric Code, ANSI/NFPA 70-latest edition, or the Canadian Electrical Code, CSA
C22.1-latest edition.
• Electrical supply lines shall NOT be used to support the heater.
• Do not run electrical wiring above the heater or in direct view of radiant heat.
GENERAL REQUIREMENTS FOR 120 VAC AND 24 VAC DIRECT SPARK IGNITION (DSI) MODELS
• The electrical supply wiring to the heaters using 120 VAC or 24 VAC must be installed in accordance with local
codes or the National Electric Code, ANSI/NFPA 70-latest edition.
• IMPORTANT! The electrical power supply MUST be properly grounded and properly polarized. The heater
controls are extremely polarity sensitive and the heater will cycle on and off erratically if the electrical supply
is not wired correctly. Have a qualified electrician check that the electrical supply circuit is properly grounded
and that the electrical supply polarity is correct.
• The following types of grounding are NOT permitted by code: grounding to building structures, grounding to
electrical conduit, grounding to gas pipelines or grounding to water pipelines.
• Electrical power supply takeoff must be connected to a circuit breaker or to a separately fused circuit with a disconnect.
• Neither thermostats, nor switches, nor field wiring are supplied as standard equipment. When thermostats are included
to control the temperature of the heated zone, they should be incorporated into the electrical circuit as shown in the
respective diagrams and be positioned per the thermostat manufacturer’s instructions.
• Important: In the event of an electrical fault after installation of the appliance, preliminary system checks are required
to be carried out, i.e. ground continuity, polarity and resistance to ground, by a trained and qualified electrician.
• Make electrical connection to the heater as described in the Installation section.
120 VAC DIRECT SPARK IGNITION (DSI) MODELS
• Electrical supply: 120 VAC - 60 Hz - 1 Phase.
• Maximum total heater current draw: 0.14 Amps.
• Total heater power consumed: 16.8 VA (16.8W).
• 3-wire field service required.
• Field wiring having a minimum temperature rating of at least 302oF (150oC) shall be used and supply circuit wiring shall
have a minimum size of 16 AWG (1.0mm2).
• Make connections as shown in Figure 4, 120 VAC DSI Heater Electrical Supply and Thermostat Wiring.
24 VAC DIRECT SPARK IGNITION (DSI) SINGLE-STAGE MODELS
• Electrical supply: 24 VAC - 60 Hz - 1 Phase.
• Maximum total heater current draw: 0.66 Amps.
• Total heater power consumed: 15.9 VA (15.9W).
• 2-wire field service required.
• Field wiring having a minimum temperature rating of at least 302oF (150oC) shall be used and supply circuit wiring shall
have a minimum size of 16 AWG (1.0mm2).
• Make connections as shown in Figure 5, 24 VAC DSI Single-Stage Heater Electrical Supply and Thermostat Wiring.
24 VAC DIRECT SPARK IGNITION (DSI) 2-STAGE MODELS
• Electrical supply: 24 VAC - 60 Hz - 1 Phase.
• Maximum total heater current draw: 0.96 Amps.
• Total heater power consumed: 23.1 VA (23.1W).
• 3-wire field service required to 2-stage thermostat. 4-wire thermostat cable required from thermostat to heater.
• Field wiring use 18/4 [18 AWG (0.8mm2)/4-conductor] solid class 2 thermostat cable having a minimum insulation
temperature of 140°F (60°C) between thermostat and heater. Maximum length is 125 feet (38m).
• Make connections as shown in Figure 6, 24 VAC DSI 2-Stage Heater Electrical Supply and Thermostat Wiring.

Page 9
• Field wiring having a minimum temperature rating of at least 140
o
F
(60oC)
shall be used and supply circuit wiring shall
10. ELECTRICAL SUPPLY (2 OF 2)
FIGURE 4 – 120 VAC DSI HEATER ELECTRICAL SUPPLY AND THERMOSTAT WIRING*
LEGEND
(+120) = 120 VAC Supply Voltage
(-) = Supply Neutral
GND = Earth Ground
MV* = Mechanical Ventilation*
VR* = Ventilation Relay*
SW* = Ventilation Interlock Switch*
(normally opened)
TS = Thermostat
H1 = Heater #1
H2 = Heater #2
GGS = Green Ground Screw
(inside control box)
W = White Wire – Neutral
BK = Black Wire – 120 VAC call for heat
LEGEND
(+24) = 24 VAC Supply Voltage
GND = Earth Ground
MV* = Mechanical Ventilation*
VR* = Ventilation Relay*
SW* = Ventilation Interlock Switch*
(normally opened)
TS = Thermostat
H1 = Heater #1
H2 = Heater #2
GGS = Green Ground Screw
(inside control box)
BL = Blue Wire – 24 VAC call for heat
LEGEND
(+24) = 24VAC Supply Voltage
(-) = Supply Neutral
GND = Earth Ground
MV* = Mechanical Ventilation*
R
VR* = Ventilation Relay*
SW* = Ventilation Interlock Switch*
(normally opened)
2ST = 2-Stage Thermostat
H1 = Heater #1
H2 = Heater #2
GGS = Green Ground Screw
(inside control box)
BL = Blue Wire – 24 VAC call for
LOW heat
R (on heater) = Red Wire – 24 VAC call for
HIGH heat
TS
MV*
VR* SW*
H1
GGS
W W
BK
H2
GGS
BK
(+120)
(-)
GND
• Field wiring having a minimum temperature rating of at least 302oF (150oC) shall be used and supply circuit wiring shall
have a minimum size of 16 AWG (1.0mm2).
• See common notes at the bottom of the page.
FIGURE 5 – 24 VAC DSI SINGLE-STAGE HEATER ELECTRICAL SUPPLY AND THERMOSTAT WIRING*
TS
VR*
MV*
H1
GGS
BL
SW*
H2
GGS
BL
(+24)
GND
• Field wiring having a minimum temperature rating of at least 302oF (150oC) shall be used and supply circuit wiring shall
have a minimum size of 16 AWG (1.0mm2).
• See common notes at the bottom of the page.
FIGURE 6 – 24 VAC DSI 2-STAGE HEATER ELECTRICAL SUPPLY AND THERMOSTAT WIRING*
(+24)
(-)
GND
MV*
VR*
SW*
2ST
W2
R
W1
C
G
H1
GGS
BL
R
H2
GGS
BL
have a minimum size of 18 AWG (0.8mm2).
• Use 18/4 solid class 2 thermostat cable between heater and thermostat with a maximum length of 125 feet (38m).
• See common notes at the bottom of the page.
COMMON NOTES FOR FIGURES 4, 5 AND 6.
• * Mechanical ventilation interlock required when all combustion air is provided by a mechanical air supply system.
• #10 ring terminal required for ground service conductor (by others) to attach to green ground screw on heater.
• The heater control is extremely polarity sensitive and the heater will cycle on and off erratically if the electrical supply is
not wired correctly. Have a qualified electrician check that the electrical supply circuit is properly grounded and that the
electrical supply polarity is correct.
• All components purchased separately. All wiring provided by others.

Page 10
11. INSTALLATION (1 OF 2)
• Before installing heater, check the supporting structure to determine it has sufficient load carrying capacity to support
the weight.
• The heater shall be supported independent of gas and electric supply lines.
• Hangers and brackets shall be of noncombustible material.
• The heater should be supported by chains or drop rods or brackets fixed to vertical surfaces, which have been
previously installed.
• The specified clearance to combustible materials must be maintained. See Clearance to Combustibles section.
• Heaters mounting angle must be within the range allowed as listed in Table 4, Allowable Mounting Angles.
TABLE 4. ALLOWABLE MOUNTING ANGLES
SINGLE-STAGE HEATERS *2-STAGE HEATERS
MODEL
MBTUH (kW) lbs. (kg)
30 – 60 (9-18) 24 (11) 5° – 30° *90/45 *(26/13) 42 (19) 5° – 30°
70 – 100 (21-29) 34 (16) 5° – 30° *100/50 *(29/15) 42 (19) 5° – 30°
110 – 150 (32-44) 44 (20) 5° – 30° *120/80 *(35/23) 53 (23) 5° – 30°
160 (47) 56 (26) 5° – 30° *150/100 *(44/29) 53 (23) 5° – 30°
175 – 200 (51-59) 56 (26) 5° – 30° *160/80 *(47/23) 66 (30) 5° – 30°
• DO NOT ANGLE HEATERS MORE THAN 30°.
• These heaters may be mounted rigidly with 3/8” (10mm) all thread rigid mount hangers or they may be suspended with
chain and S-hooks. Local codes may require rigid mounting.
• Check local codes for mounting requirements and permission to use flexible gas connectors. It is recommended that
either the gas connection piping or the mounting be flexible to prevent fatigue failure of the gas connection from
vibration or thermal expansion.
• For proper operation, the heater must be level, whether horizontal or angle mounted. When angle mounted, all models
must be installed with the gas manifold located on the low end. See Figure 7, Typical Heater Mounting, Chain or Rigid.
NET
WEIGHT
ALLOWABLE
MOUNTING
ANGLE RANGE
MODEL
MBTUH (kW) lbs. (kg)
*200/100 *(59/29) 66 (30) 5° – 30°
FIGURE 7 – TYPICAL HEATER MOUNTING, CHAIN OR RIGID
NET
WEIGHT
ALLOWABLE
MOUNTING
ANGLE RANGE
• Overhead structure and field connections must be
adequate to support heater weight.
• Gas and electrical supply lines must not cross over top
A
B
C
E
F
D
• Under no circumstances should either the gas or electrical supply lines to the unit be used to provide support
in suspension. Do not run any gas or electric lines above or below the heater or near the path of the flue
products.
• Heaters located in an aircraft hangar or near overhead doors should be rigidly mounted to prevent swinging. The
installer is responsible for the type of suspension used for the heater.
• If permissible by local code, it is recommended that these heaters be suspended with chain and S-hooks, See Figure 8,
Chain Hanging Arrangement. Chain with 200# (91kg) working load (1/0 Tenso) is recommended. S-hooks must be a
minimum of ¼” (6.3mm) diameter wire (Chicago Hardware #5 or equal) and must be crimped closed after installation.
• See Figure 9, Optional Heater Mounting [30 – 60 MBTUH (9-18kW) Models Only] for a mounting option limited to
models with only one burner.
of heater or in the path of flue products.
LEGEND
Symbol Item Description
A 3/8” (10mm) all thread rigid mount (used in
aircraft hangars or where draft conditions may be
expected)
B 1/0 Tenso chain mounting
C S-hooks: ¼” (6.3mm) diameter wire (Crimp all S-
hooks closed.)
D Mounting angle, see Table 4, Allowable
Mounting Angles
E Heater gas manifold must be horizontal along the
low side of the heater when angle mounting
F Heater gas valve

Page 11
11. INSTALLATION (2 OF 2)
FIGURE 8 – CHAIN HANGING ARRANGEMENT
SIDE VIEW INSTRUCTIONS FOR USING OPTIONAL CHAIN KITS
A
D
C
B
E
FIGURE 9 – OPTIONAL HEATER MOUNTING [30 – 60 MBTUH (9-18kW) MODELS ONLY]
AB
C
• The heater should be raised and suspended in accordance with the preceding instructions in this section.
• Connect heater to the gas supply in accordance with the Gas Supply section.
• The heater controls are extremely polarity sensitive and will not operate properly if the electrical supply is not wired
correctly.
• Connect heater to the electrical supply in accordance with the following instructions.
1. Securely attach long chains to overhead building structure with S-hooks (A).
2. Attach the other end of the long chains to the back of the heater with S-hooks
(B).
3. Attach one end of the 11” (28cm) short chains to the front of the heater with Shooks (C).
4. Attach the other end of the short chains to the long chains with S-hook (D) by
placing the S-hooks (D) in a loop of the long chain.
5. Check heater mounting angle (E). Adjust heater mounting angle (E) by moving
S-hooks (D) of the short chain along the length of the long chain.
6. Check to make sure heater is level.
7. Crimp all S-hooks closed (A, B, C and D).
LEGEND
Symbol Item Description
A S-hook of long chain connected to overhead building structure
mounting hardware
A – B 55” (140cm) long chain with S-hooks attached to each end
B S-hook of long chain connected to back of heater
C S-hook of short chain connected to front of heater
C – D 11” (28cm) short chain with S-hooks attached to each end
D S-hook of short chain connected to a link of the long chain
E Mounting Angle, see Table 4, Allowable Mounting Angles
• 30 – 60 MBTUH (9-18kW) models ONLY have the option of mounting with the
gas manifold (A) angled upward. ONLY in this case, the gas valve (B) MUST be
toward the high side.
LEGEND
Symbol Item Description
A Gas Manifold
B Gas Valve
C Mounting Angle, see Table 4, Allowable Mounting Angles
120VAC DIRECT SPARK IGNITION (DSI) MODELS
• Connect the electrical supply wiring as specified in the Electrical Supply section to the heater wiring shown in figures in
the Ignition and Operation section. Connect incoming thermostat wires to the heater as follows:
• Green wire with #10 ring terminal (ground) - to the heater’s green ground screw inside the control box.
• White wire (neutral) - to the heater’s white wire at the control box.
• Black wire (120 VAC from thermostat) - to the heater’s black wire at the control box.
24VAC SINGLE-STAGE DIRECT SPARK IGNITION (DSI) MODELS
• Connect the electrical supply wiring as specified in the Electrical Supply section to the heater wiring shown in figures in
the Ignition and Operation section. Connect incoming thermostat wires to the heater as follows:
• Green wire with #10 ring terminal (ground) - to the heater’s green ground screw inside the control box.
• Blue wire (24 VAC from thermostat) - to the heater’s blue wire at the control box.
24VAC 2-STAGE DIRECT SPARK IGNITION (DSI) MODELS
• Connect the electrical supply wiring as specified in the Electrical Supply section to the heater wiring shown in figures in
the Ignition and Operation section. Connect incoming thermostat wires to the heater as follows:
• Green wire with #10 ring terminal (ground) - to the heater’s green ground screw inside the control box.
• White wire with #10 ring terminal (neutral) - to the heater’s green ground screw inside the control box.
• Blue wire (24 VAC low-heat ) - to the heater’s blue wire at the control box.
• Red wire (24 VAC high-heat ) - to the heater’s red wire at the control box.

Page 12
12. IGNITION, OPERATION AND SHUTDOWN (1 OF 4)
LIGHTING INSTRUCTIONS FOR ALL 120 VAC AND 24 VAC DIRECT SPARK IGNITION (DSI) MODELS
Some heater models may have an ON / OFF knob on the Combination Gas Valve (CGV).
1. Set gas cock (by others) to OFF position.
2. Turn electrical supply OFF.
3. Wait at least five (5) minutes.
4. Set thermostat above room temperature.
5. Set gas cock (by others) to ON position.
6. Turn electrical supply ON.
7. Set thermostat at desired temperature.
8. If heater does not light, repeat steps 1-7.
IMPORTANT: The 120 VAC and 24 VAC control systems cannot determine the presence of flame if they are not
electrically grounded to the burner; they will lockout and shut off. These controls are extremely polarity sensitive.
Proper grounding and proper electrical polarity are essential to the operation of these heaters.
SEQUENCE OF OPERATION FOR ALL 120 VAC AND 24 VAC DIRECT SPARK IGNITION (DSI) MODELS
1. Thermostat calls for heat. (2-stage models: low-heat or high-heat operation is determined by setpoints of the
thermostat. Refer to thermostat manufacturers’ instructions.)
2. Power is applied to the Ignition Detection Control (IDC). 15 seconds after power is applied, a spark is developed at
the electrodes and the Combination Gas Valve (CGV) opens for a 15-second trial-for-ignition period.
3. Burner ignites; a small DC electrical current begins flowing from sensing electrode through flame to ground.
4. IDC senses current, turns OFF spark, gas continues to flow through the CGV. (Sparking may continue for the full 15
seconds before stopping.)
5. Should the burner fail to light or flame is not detected during the first trial-for-ignition period, the CGV is de-energized
and the IDC starts the 15-second inter-purge sequence before another ignition trial. After 15 seconds, the IDC begins
two (2) more ignition trials. If the burner fails to light after the third trial, the IDC will de-energize the CGV and go into
lockout mode.
6. On flame outage at the sensing electrode, the IDC responds and begins sparking within 0.8 seconds. A 15-second
trial-for-ignition period begins to re-light the burner. If flame is re-established, normal operation resumes. (Sparking
may continue for the full 15 seconds before stopping.) Should the burner fail to light or flame is not detected during the
first trial-for-ignition period, the CGV is de-energized and the IDC starts the 15-second inter-purge sequence before
another ignition trial. After 15 seconds, the IDC begins two (2) more ignition trials. If the burner fails to light after the
third trial, the IDC will de-energize the CGV and go into lockout mode.
7. For lockout recovery, reset the thermostat below the ambient temperature or disconnect electrical power supply for 5
seconds.
• See Figure 10, 120 VAC Direct Spark Ignition Electrical Connection Diagram, for heater wiring.
• See Figure 11, 24 VAC Single-Stage Direct Spark Ignition Electrical Connection Diagram, for heater wiring.
• See Figure 12, 24 VAC 2-Stage Direct Spark Ignition Electrical Connection Diagram, for heater wiring.
LIGHTING INSTRUCTIONS FOR MILLIVOLT MANUAL IGNITION MODELS
1. Set thermostat below room temperature.
2. Wait five (5) minutes.
3. Turn gas valve to PILOT position.
4. Depress gas valve knob and light pilot burner while holding down the gas valve knob for one (1) minute or until pilot
flame remains lighted when knob is released.
5. Turn gas valve knob counter-clockwise to ON position.
6. Set thermostat to desired temperature.
7. If heater does not light, repeat steps 1-6.
SEQUENCE OF OPERATION FOR MILLIVOLT MANUAL IGNITION MODELS
1. Pilot is manually ignited with gas valve knob depressed in PILOT position and held until millivolt generator is heated
sufficiently to keep pilot flame going (approximately 1 minute).
2. Knob is turned to ON position.
3. On call for heat, thermostat will complete circuit to gas valve as needed. Heater will ignite from standing pilot flame.
4. On pilot outage, millivolt generator will cool and interrupt circuit to gas valve. Both main and pilot gas are turned OFF
automatically.
• See Figure 13, Millivolt Manual Ignition Electrical Connection Diagram, for heater wiring.
SHUTDOWN
• To shutdown the heater for a week or less, switch off the electrical supply to the heater.
• To shutdown the heater for more than one week, switch off the electrical supply to the heater and turn off the gas
supply at the gas isolation valve.

12. IGNITION, OPERATION AND SHUTDOWN (2 OF 4)
•
If any of the original wire as supplied with the appliance must be replaced, it must be replaced with wiring material having a
FIGURE 10 – 120 VAC DIRECT SPARK IGNITION ELECTRICAL CONNECTION DIAGRAM
120 VAC – 60 Hz – 1 Phase
Heater Maximum Current Draw = 0.14 Amps.
Total Heater Power Consumed = 16.8 VA
Page 13
CGV
FS
*BK(2)/R(2)
W(3)
Y
WN WN
IDC
W(2)
Y
W(1)
(-)
WNB
R(1)
W(1)
WNB
(+120)
BK(1)
BK(1)
W(2)
R(1)
GND
• Control is polarity sensitive.
• Others to provide and install #10 ring terminal required for ground service conductor to attach to green ground screw on heater.
• See Electrical Supply section for detailed information on electrical supply and thermostatic control.
GGS
G
G
SE
O
O
temperature rating of at least 302°F (150°C) and a minimum size of 16 AWG (1.0mm2).
LEGEND
Function Symbol Item Description Connecting Wire Color
Electrical Supply /
Thermostatic Control
Wiring
Ground GGS Green Ground Screw Inside Control Box Green (with Ring Terminal)
Ignition Detection Control
Spark Electrode SE Spark Electrode Orange
Flame Sensor FS Flame Sensor Yellow
Combination Gas Valve
(+120) 120 VAC Supply (by others) Black
(-) Common / Neutral (by others) White
GND Ground (by others) Green (with Ring Terminal by others)
- - - - Wiring (by others)
WNB Wire Nut (by others)
WN Wire Nut
IDC Ignition Detection Control
O Ignition Cable to Spark Electrode Orange
Y Flame Sensor Input Yellow
W(1) Common / Neutral Input White
BK(1) 120 VAC Supply Input Black
W(2) Neutral to Combination Gas Valve White
R(1) 120 VAC to Combination Gas Valve Red
G Ground Green (with Ring Terminal)
CGV Combination Gas Valve
*BK(2)/R(2) 120 VAC to Combination Gas Valve Black (1 & 2-burner)/Red (3 & 4-burner)
W(3) Neutral to Combination Gas Valve White

Page 14
12. IGNITION, OPERATION AND SHUTDOWN (3 OF 4)
FIGURE 11 – 24 VAC SINGLE-STAGE DIRECT SPARK IGNITION ELECTRICAL CONNECTION DIAGRAM
Heater Maximum Current Draw = 0.66 Amps.
24 VAC – 60 Hz – 1 Phase
Total Heater Power Consumed = 15.9 VA
Control is polarity sensitive.
R(2)
CGV
G(3)
FS
Y
SE
O
WN
R(1)
WN
G(2)
IDC
Y
BL
GGS
G(1)
G(1)
G(2)
BL
O
GND
WNB
(+24)
R(1)
• Others to provide and install #10 ring terminal required for ground service conductor to attach to green ground screw
on heater.
• See Electrical Supply section for detailed information on electrical supply and thermostatic control.
• If any of the original wire as supplied with the appliance must be replaced, it must be replaced with wiring material
having a temperature rating of at least 302°F (150°C) and a minimum size of 16 AWG (1.0mm2).
LEGEND
Function Symbol Item Description Connecting Wire Color
Thermostatic Control
Wiring
Ground GGS Green Ground Screw Inside Control Box Green (with Ring Terminal)
Ignition Detection Control
Spark Electrode SE Spark Electrode Orange
Flame Sensor FS Flame Sensor Yellow
Combination Gas Valve
(+24) 24 VAC Supply (by others) BlueElectrical Supply /
GND Ground (by others) Green (with Ring Terminal by others)
- - - - Wiring (by others)
WNB Wire Nut (by others)
WN Wire Nut
IDC Ignition Detection Control
O Ignition Cable to Spark Electrode Orange
Y Flame Sensor Input Yellow
G(1) Ground Green (with Ring Terminal)
G(2) Ground to Combination Gas Valve Green
BL 24 VAC Supply Input Blue
R(1) 24 VAC to Combination Gas Valve Red
CGV Combination Gas Valve
R(2) 24 VAC to Combination Gas Valve Red
G(3) Ground to Combination Gas Valve Green

12. IGNITION, OPERATION AND SHUTDOWN (4 OF 4)
•
FIGURE 12 – 24 VAC 2-STAGE DIRECT SPARK IGNITION ELECTRICAL CONNECTION DIAGRAM
24 VAC – 60 Hz – 1 Phase
Maximum Current Draw = 0.96 Amps.
HHV
G(4)
CGV
G(4)
FS
Total Power Consumed = 23.1 VA
SE
Control is polarity sensitive.
Page 15
WNB
R(3)
WN
R(2)
G(3)
WN
Y
O
• Others to provide and install
(+24H)
(-)
GND
(+24L)
WNB
R(1)
GGS
G(1) G(1)
BL
G(2)
IDC
Y
O
G(2)
BL
R(1)
#10 ring terminals required for
ground service conductor and
for common/neutral service
conductor to attach to green
ground screw on heater.
• See Electrical Supply section for detailed information on electrical supply and thermostatic control.
If any of the original wire as supplied with the appliance must be replaced, it must be replaced with wiring material
having a temperature rating of at least 302°F (150°C) and a minimum size of 16 AWG (1.0mm2).
LEGEND
Function Symbol Item Description Connecting Wire Color
Electrical Supply /
Thermostatic Control
(+24H) 24 VAC High Heat Supply (by others) Red
(+24L) 24 VAC Low Heat Supply (by others) Blue
(-) Common / Neutral (by others) White (with Ring Terminal by others)
GND Ground (by others) Green (with Ring Terminal by others)
Wiring
- - - - Wiring (by others)
WNB Wire Nut (by others)
WN Wire Nut
Ground GGS Green Ground Screw Inside Control Box Green (with Ring Terminal)
Ignition Detection Control
IDC Ignition Detection Control
O Ignition Cable to Spark Electrode Orange
Y Flame Sensor Input Yellow
G(1) Ground Green (with Ring Terminal)
G(2) Ground to Combination Gas Valve Green
BL 24 VAC Low Heat Supply Input Blue
R(1) 24 VAC to Combination Gas Valve Red
Spark Electrode SE Spark Electrode Orange
Flame Sensor FS Flame Sensor Yellow
Combination Gas Valve
CGV Combination Gas Valve
R(2) 24 VAC to Combination Gas Valve Red
G(3) Ground to Combination Gas Valve Green
High Heat Gas Valve
HHV High Heat Valve
R(3) 24 VAC to High Heat Valve Red
G(4) Ground to High Heat Valve Green (with Ring Terminal)
FIGURE 13 – MILLIVOLT MANUAL IGNITION ELECTRICAL CONNECTION DIAGRAM
TOP OF GAS VALVE
C
LEGEND
Symbol Item Description
A
A Wires on heater to millivolt generator
B Wires from thermostat (Thermostat included with
B
heater) (Wiring by others - - - -)
C Gas flow direction

Page 16
13. GAS PRESSURE AND GAS CONVERSION
GAS PRESSURE
• Whether the heater is on or off, the main gas supply line pressure must be limited to 14 inches (35cm) of water
column (WC) (1/2 PSI). If the gas supply line pressure can go above 14” WC (35cm WC) at any time, a separate
positive lockup high-pressure regulator must be used. Always check local codes for gas venting requirements for highpressure regulators. High-pressure regulators will NOT turn off the flow of gas.
• The minimum gas supply line pressure measured at the inlet pressure tap of the heater regulator must, in no case, be
lower than 7” WC (18cm WC) for natural gas and 11” WC (28cm WC) for LP/propane gas when this heater and ALL
other gas burning equipment are operating at maximum capacity.
• Use a water or red oil manometer when checking gas pressures. DO NOT USE A DIAL GAUGE.
• See Table 5, Gas Pressure Requirements.
TABLE 5. GAS PRESSURE REQUIREMENTS
TYPE
OF
GAS
Natural 7 inches (18cm) 14 inches (35cm) 6 inches (15cm)
LP/Propane 11 inches (28cm) 14 inches (35cm) 10 inches (25cm)
• Gas pressure measurement equivalents are: 14” WC ≅ 1/2 PSI ≅ 35cm WC ≅ 35mbar ≅ 3.5kPa.
• Natural gas models are orificed for gas with a gross calorific value of 1000 BTU/cubic foot (37MJ/m3).
• LP/Propane gas models are orificed for gas with a gross calorific value of 2500 BTU/cubic foot (93MJ/m3).
GAS CONVERSION
• It is feasible to convert the type of gas or BTUH (kW) rating of a heater after it is has been installed. Identify the model
number and serial number of the heater. Consult factory for proper instructions and parts. Use of parts other than
those provided by the factory voids the warranty and the CSA Design Certification.
Minimum Maximum
SUPPLY PRESSURE
Water Column (WC)
MANIFOLD PRESSURE AT
TAP IN VALVE
Water Column (WC)
14. MAINTENANCE
• Annual maintenance should be performed as follows:
ANNUAL MAINTENANCE
1. Disconnect all power sources related to the installation and close the gas supply valve at the heater.
2. With compressed air of 20 PSI (140kPa) or less, blow off all accumulated dust and dirt.
3. Blow air over the ceramic tile (avoiding gasket material between tile) and alternately into the venturi several times in
succession. Do not damage gasket material between ceramic tiles. Damaging gasket material between tiles could
lead to burner flashback.
CAUTION
• Always wear protective goggles when cleaning heaters with compressed air.
• See Figure 14, General Heater Diagram, for the location of major components of the heater.
• See Figure 15, Direct Spark Electrode Installed, for the electrode’s orientation to and correct distance from the burner
assembly’s ceramic tile surface.
FIGURE 14 – GENERAL HEATER DIAGRAM
E
D
C
B
A
F
G
FIGURE 15 – DIRECT SPARK ELECTRODE INSTALLED
LEGEND
Symbol Item Description
A Gas manifold
B Gas orifice
C Venturi
D Optional heat deflector
E Heater flue exhaust path
F Ceramic tile surface
G Standard reflector assembly
B
A
C
LEGEND
Symbol Item Description
A Electrode
B Burner
C Proper installation results in 0.219” +/- 0.032”
(5.6mm +/- 0.8mm) clearance from ceramic tile
surface to the sparking tips of the electrode.

Page 17
15. ACCESSORIES
WARNING
• The safe application and use of the supplied equipment is responsibility of the installer, user, owner and employer. The
application of this equipment can vary greatly. For most applications and use there are available diversified product
models and optional safety accessories. This equipment may be sold with or without safety accessories. The diversity
of applications for this heater precludes the establishing or warranting the efficacy of safe operating conditions which
may result from its’ use. The installer, user, owner, employer must determine the specific safety requirements. The
specific safety requirements will vary depending on the location and operating procedures. Therefore, appropriate
safety accessories can only be supplied upon receipt of an order specifying them.
• The accessories listed below may be obtained from the factory. Use of some accessories may change clearance to
combustibles. See Table 1. Clearance to Combustibles Requirements.
ACCESSORIES
• OPERATING CONTROLS. Thermostats for automatic heater operation. 2-stage, programmable, night setback, line
voltage, low voltage and weather resistant thermostats available.
• FLEX CONNECTORS. Standard stainless steel or weather resistant connectors for gas supply.
• CHAIN SETS. Factory approved pre-cut chain pre-assembled with S-hooks or uncut chain with S-hooks.
• HEAT DEFLECTORS. Heat deflectors are available for heater models 30 – 100 MBTUH (9-29kW) to permit reduced
clearance to combustibles above the heater. See Table 1, Clearance to Combustibles Requirements.
• WIRE GRIDS. Wire grids improve heater radiant efficiency and improve heater performance in drafty areas.
• PARABOLIC REFLECTORS. Parabolic reflectors increase the intensity of the infrared pattern below the heater while
decreasing the scope of heating coverage. Parabolic reflectors increase clearance to combustibles below the heater.
See Table 1, Clearance to Combustibles Requirements.
• PROTECTIVE SCREENS. Screens protect the ceramic tile from damage caused by the impact of foreign objects.
Available for all models with standard or parabolic reflectors.
16. REPLACEMENT PARTS
• The following is a list of replacement parts that may be required during the life of the heater. If it is necessary to
replace those parts or other parts, please contact the manufacturer at the address noted on the back cover of this
manual. Provide the serial and model numbers from the heater serial plate to assure proper parts are ordered.
PARTS
• Combination Gas Valve
• Ignition Detection Control
• Spark Electrode
• Burner (Ceramic Tile Burner Assembly)
BURNER REPLACEMENT
• A burner (Ceramic Tile Burner Assembly) can be replaced easily without taking the heater down from its mounted
location. See Figure 16, Burner Replacement.
FIGURE 16 – BURNER REPLACEMENT
B
A
1
BURNER REMOVAL INSTRUCTIONS
Step (1). Remove screw (A) and slide burner (B) backward.
Step (2). Pull burner (B) up and outward.
Reverse the procedure to re-install burner.
2
LEGEND
Symbol Item Description
A Screw
B Burner (Ceramic Tile Burner Assembly)

Page 18
17. TROUBLESHOOTING (1 OF 2)
SYMPTOM POSSIBLE CAUSE CORRECTIVE ACTION
Gas Odor 1. Gas pipe joints loose 1. Check joints with non-corrosive leak detection
fluid, tighten as needed
New Installation
of heaters not
working
Electrical circuit
closed but heater
not working.
(For specific
control systems
see Ignition and
Operation
section)
Direct spark fails
to ignite main
burner(s)
Unit cycles on
and off,
erratic operation
No pilot
Pilot goes out on
100% shut-off
when hold-down
button is released
Pilot burning,
no gas to main
burner(s)
1. Heaters not isolated during high
pressure leak testing of gas lines
2. All gas lines not completely bled of air 2. Disconnect flex hose at each heater until gas is
3. Gas supply regulator reversed 3. Remove and install properly
4. Electrical supply line voltage & neutral
polarity reversed
1. Gas supply valves not opened 1. Open all manual gas supply valvesNo gas
2. Gas supply regulator sticking 2. Replace gas supply regulator
1. Gas supply lacking caused control
system lockout
2. Line fuse blown or tripped circuit
breaker
3. Electrical power short 3. Trace and correct short
4. Wiring disconnected 4. Repair, see wiring diagram in Ignition section
5. No electrical earth ground 5. Provide electrical earth ground
6. Electrical supply line voltage & neutral
polarity reversed
7. Exhaust fan interlock (if used) is
defective
1. Combination gas valve not in the ON
position
2. Electrode wire loose 2. Reconnect wire
3. Electrode wire broken or frayed 3. Replace electrode
4. Electrode ceramic cracked 4. Replace electrode
5. Electrode improperly located 5. Relocate to correct position
6. Gas valve fails to open when power
applied
7. Supply/manifold gas pressure too low 7. See rating plate on heater and adjust pressure(s)
8. Ignition detection control defective 8. Replace ignition detection control
1. Drafty condition 1. Shield heater / thermostat from drafts
2. Flame sensor wire loose or damaged 2. Replace wire harness to ignition detection control
3. No electrical earth ground 3. Provide electrical earth ground
4. Electrical supply line voltage & neutral
polarity reversed
5. Heat on pilot flame sensor insufficient 5. Clean pilot, check pilot orifice and alignment
1. Gas line contains air 1. Purge air from gas line
2. Pilot line, orifice, or passage blocked 2. Check and clean per Maintenance section
3. Pilot solenoid valve inoperative 3. Replace combination gas valve
1. Heat on pilot flame sensor insufficient 1. Clean pilot, check pilot orifice and alignment
2. Pilot flame sensor location improper 2. Correct position with respect to pilot
3. Manifold gas pressure low 3. See rating plate on heater and adjust pressure
4. Poor contact at valve end of sensing
element
5. Pilot flame sensor defective 5. Replace pilot flame sensor
6. Pilot interrupter in combination gas
valve defective
1. Thermostat or manual switch open 1. Raise the thermostat setting or close switch
2. Manual valve closed on combination
gas valve
3. No power to solenoid in combination
gas valve
4. Heat on pilot flame sensor insufficient 4. Clean pilot, check pilot orifice and alignment
5. Pilot flame sensor defective 5. Replace sensor
6. Combination gas valve defective 6. Replace combination gas valve
1. Replace combination gas valves on each heater
present. Connect flex hose and leak test
4. Correct electrical supply polarity
1. Verify all gas supply valves are open. Purge air
from gas supply line. Turn thermostat off – wait 5
minutes, then reset thermostat
2. Replace line fuse or reset breaker
6. Correct electrical supply polarity
7. Replace interlock
1. Turn combination gas valve to ON position
6. Replace combination gas valve
4. Correct electrical supply polarity
4. Ensure clean and proper contact
6. Replace combination gas valve
2. Turn valve to “ON” position
3. Check power supply and furnish proper voltage

17. TROUBLESHOOTING (2 OF 2)
SYMPTOM POSSIBLE CAUSE CORRECTIVE ACTION
Heater will not
turn off
Controls
overheating
Burning of gas
inside burner
(flash-back)
Carbon formation
on ceramic
surface or burner
ceramic surface
Low ceramic
surface
temperature
2-Stage transition
from low-heat to
high-heat does
not happen
2-Stage transition
from high-heat to
low-heat does not
happen
1. Thermostat defective 1. Replace thermostat
1. Heater mounted incorrectly 1. See Mounting and Suspending sections
1. Heater mounted incorrectly 1. See Mounting and Suspending sections
2. Gas leaking from: manifold, control
assembly, or pilot joints causing gas
ignition at orifice
3. Ceramic tile(s) cracked or separating 3. Replace burner
4. Drafts excessive 4. Shield from drafts or relocate heater
1. Gas supplied is wrong type 1. Check rating plate for type of gas required
2. Venturi obstructed (by spider web) 2. Clean with a bottle brush
3. Pilot depositing carbon 3. Clean pilot and check pilot orifice
4. Supply/manifold gas pressure too low 4. See rating plate on heater and adjust pressure(s)
5. Main gas orifice(s) misaligned 5. Consult sales agent or factory
1. Foreign matter behind the ceramic
surface
2. Foreign matter inside burner assembly 2. Replace burner assembly
1. Venturi obstructed (by spider web) 1. Clean with a bottle brush
2. Foreign matter in venturi 2. See Maintenance section
3. Orifice partially blocked 3. See Maintenance section
4. Supply gas pressure low 4. Adjust supply regulator to 7” WC (18cm WC) for
5. Manifold gas pressure low 5. Adjust heater regulator to 6” WC (15cm WC) for
6. Manifold misaligned from excessive
torque applied on pipe at installation
7. Flue gases not adequately ventilated 7. See Ventilation Requirements section
8. Gas supply piping too small 8. Increase supply pressure or replace piping
1. Ambient temperature is still in low-heat
zone of thermostat
2. Thermostat defective 2. Replace thermostat
3. High-heat valve not opening 3. Replace high-heat valve
1. Ambient temperature has not reached
low-heat zone of thermostat
2. Thermostat defective 2. Replace thermostat
3. High-heat valve not closing 3. Replace high-heat valve
2. Check joints with non-corrosive leak detection
fluid, tighten as needed
1. See Maintenance sectionDark spots on
natural gas, or 11” WC (28cm WC) for propane
natural gas, or 10” WC (25cm WC) for propane
6. Replace manifold
1. Check thermostat manufacturers’ instructions
1. Allow time for ambient temperature to reach lowheat zone of thermostat. Check thermostat
manufacturers’ instructions
Page 19

FOR SERVICE OR REPAIR, FOLLOW THESE STEPS IN ORDER:
FIRST: Record the following information
Model No.: _____________________________________________________
Unit Serial No.: __________________________________________________
Date of Installation: _______________________________________________
SECOND: Contact the Installer
Name _________________________________________________________
Address _______________________________________________________
_______________________________________________________________
Phone _________________________________________________________
THIRD: Contact the Nearest Distributor
Name _________________________________________________________
Address _______________________________________________________
_______________________________________________________________
Phone _________________________________________________________
All rights reserved. No part of this work covered by the copyrights herein may be
reproduced or copied by any means: graphic, electronic or mechanical, including
photocopying, recording, taping, information storage and retrieval systems without written
permission.
Copyright © 2012 SunSpan
P.O. Box 80217, Rochester MI 48308-0217
Toll Free: 1-866-664-3824
FAX: (248) 651-0357
E-mail: sales@sunspanheaters.com
Website: www.sunspanheaters.com
 Loading...