

Page 1
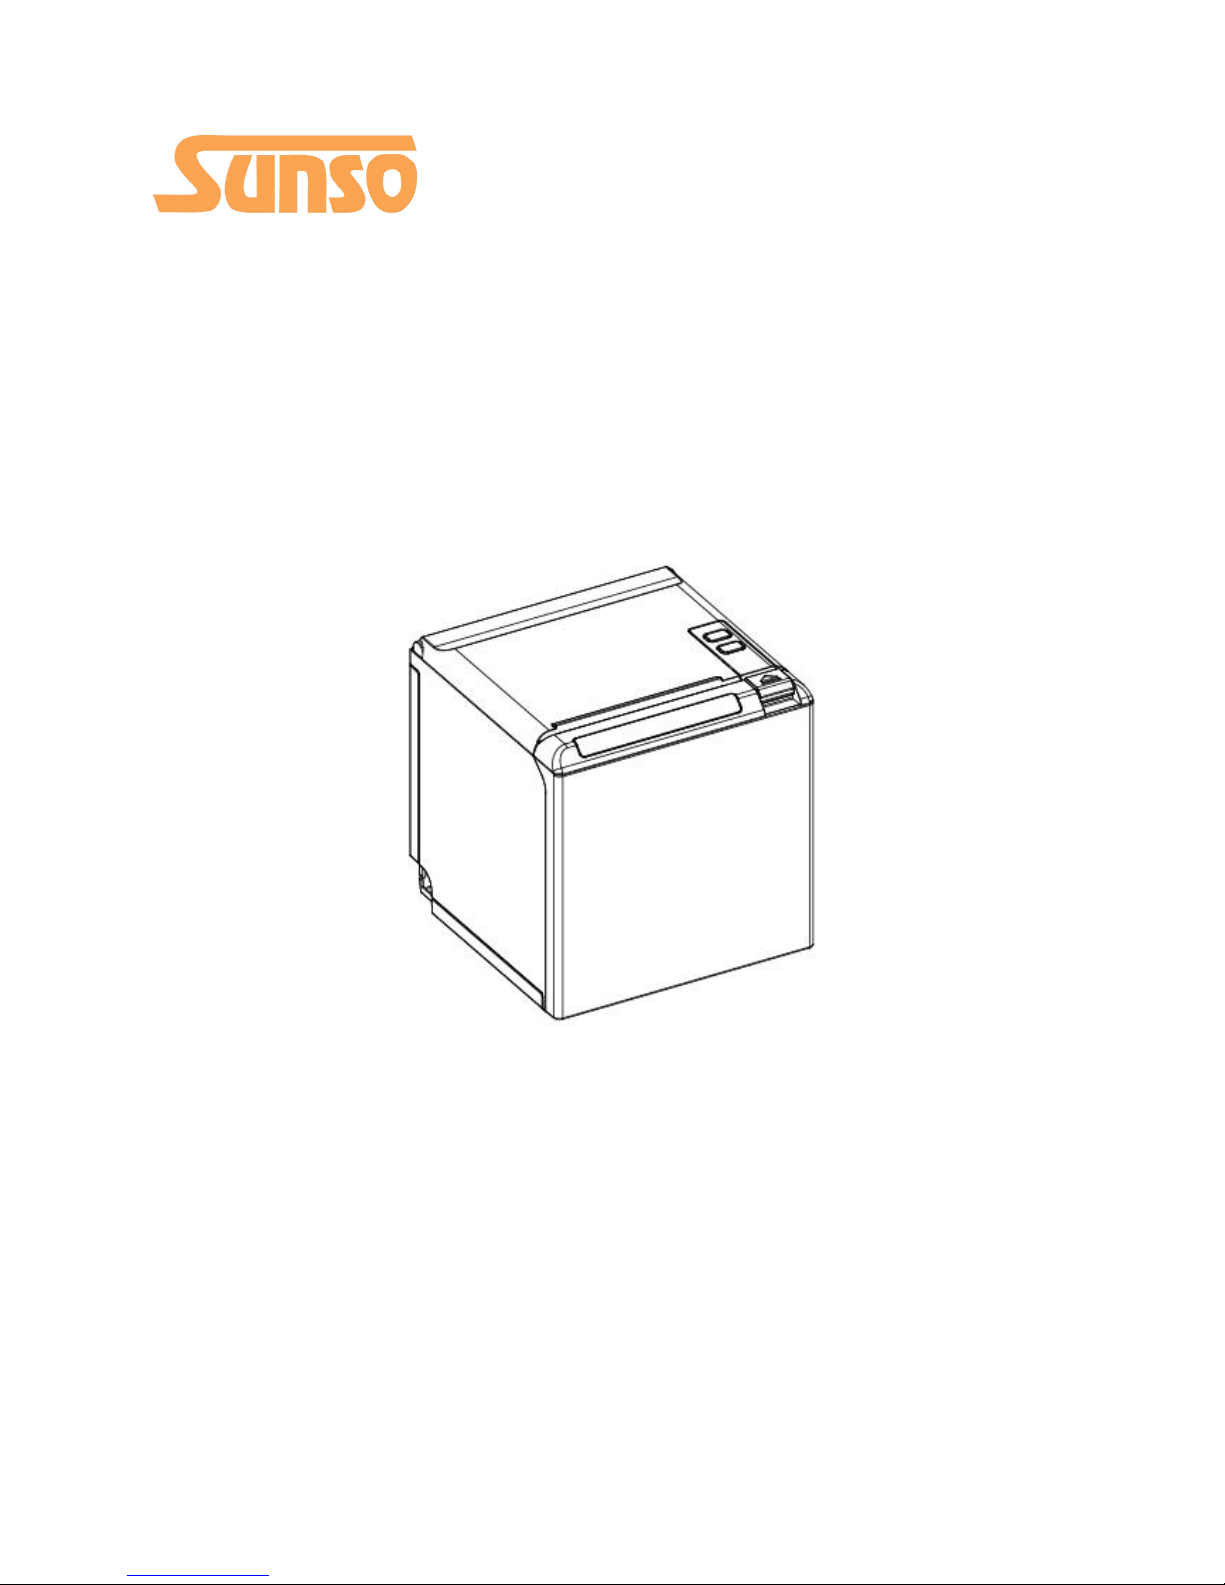
Desktop POS Printer
WTP-800
User Manual
Page 2

WTP-800 User Manual
2
REVISION RECORDS
REV.
DATE
DESCRIPTION
Drawn
Checked
Approved
1.0
2017.07.13
1.First edition
He Shiying
Yang Kaiqu
Lin Yang
Page 3

WTP-800 User Manual
3
Content
Statement
...............................................................................................................................................
1
Important Safety Instructions
.................................................................................................................
2
1 OVERVIEW
...........................................................................................................................................
4
1.1 Introductions
............................................................................................................................
4
1.2 The Main Features
....................................................................................................................
4
2 GETTING STARTED
...............................................................................................................................
5
2.1 Packing List
...............................................................................................................................
5
2.2 Appearance and Components
..................................................................................................
6
3 SPECIFICATION
.....................................................................................................................................
7
3.1 Printer Specification
.................................................................................................................
7
3.2 Printing Media Specification
....................................................................................................
9
3.2.1 Continuous Thermal Paper Specification
......................................................................
9
3.2.2 Notices
...........................................................................................................................
9
3.3 Printing and Cutting Position
..................................................................................................
10
3.3.1 Printing position
..........................................................................................................
10
3.3.2 Cutting Position
...........................................................................................................
10
4 INSTALLATION AND USAGE
................................................................................................................
11
4.1 Media Loading
........................................................................................................................
11
4.1.1 Paper Confirmation
.....................................................................................................
11
4.1.2 Paper Installation (Upward Paper-out Direction)
........................................................
11
4.1.2 Paper Installation (Forward Paper-out Direction)
.......................................................
13
4.2 LED Indication and Beeper
.....................................................................................................
15
4.3 Power Connection
..................................................................................................................
16
4.4 Interface Cable Connection
....................................................................................................
17
4.5 Cash Drawer Connection
........................................................................................................
17
4.6 Print Test
.................................................................................................................................
18
4.6.1 Print Self-Test
...............................................................................................................
18
4.6.2 Printing of Windows Driver Program
..........................................................................
18
5 INTERFACES
........................................................................................................................................
19
5.1 USB
.........................................................................................................................................
19
5.2 Serial Interface
........................................................................................................................
19
5.3 Ethernet Interface
..................................................................................................................
20
5.4 Cash Drawer Interface
............................................................................................................
20
5.5 Power Supply Interface
..........................................................................................................
21
6 TROUBLESHOOTING
..........................................................................................................................
22
6.1 Printer Not Working
...............................................................................................................
22
6.2 LED Indicator and Beeper
.......................................................................................................
22
6.3 Troubles Occur During Printing
..............................................................................................
22
6.4 Problems Emerge During The Paper Cutting
.........................................................................
23
6.5 Removing Jammed Paper
.......................................................................................................
23
7 PRINTER CLEANING AND MAINTENANCE
.........................................................................................
24
7.1 Cleaning Head
.........................................................................................................................
24
7.2 Cleaning Sensors, Roller and/or Paper Path
...........................................................................
24
Page 4

WTP-800 User Manual
1
Statement
This manual content may be altered without permission, and our company reserves the rights to
make changes without notice in technology, spare parts, hardware and software of the products. If
more information is needed about the products, please contact our company. Without any written
permission from the company, any section of this manual is prohibited to be copied or transferred
in any form.
Copyright
This manual is printed in 2017, the copyright belongs to our company.
Printed in China.
1.0 Version.
Warnings
This must be complied with in order to avoid any damage to the human body and to the
equipment.
This is showing the important information and tips for the printer operating.
Note
Due to continuous update of product, please take in kind of real machine, such as accessories,
programs etc.
Page 5

WTP-800 User Manual
2
Important Safety Instructions
1. Safety Warning
Warnings: The print head will become very hot during printing; avoid contact with the print
head after printing has finished.
Warnings: Do not touch the printer head and connector in case static damage the printer
head.
2. Instructions
Carefully read the installation and operating instructions provided with the printer before starting
up your printer.
1) Place the printer on a flat and stable surface.
2) Leave enough space around printer for operation and maintenance.
3) Do not place the printer on or near a heat source.
4) Do not use the printer near water. Never spill liquid into the printer.
5) Do not expose the printer to high temperatures, direct sunlight or dust.
6) Protect the printer from shock, impact and vibration.
7) Be certain the power source is within the voltage rating and frequency listed for the printer.
8) Switch off the printer power supply when won’t use it for a long time.
9) Do not place the power cord where it can be stepped on. If the power cord becomes
damaged or frayed, replace it immediately.
10) To ensure the print quality and reliability, you are suggested to use the recommended paper
or the same quality paper.
11) Please switch off the power supply when connect/disconnect all the ports or it will cause
damage to the printer control circuit.
12) Never carry out maintenance or repair work yourself. Always contact a qualified service
technician.
13) Keep this User Manual in a place which is easily accessible at all times.
3.Other Precautions
The copyright for this user manual and various other manuals is property of our company. Any
copying or conversion into electronic form and saving of this material without the express written
permission is strictly prohibited. Use of the information contained in this manual is not subject to
any patent liability. This manual has been prepared with utmost care and attention to detail but
may contain certain errors and/or omissions. Our company is not legally liable for any damages
resulting from the use of the information in this manual. Our company and its affiliates are not
legally liable (United States excluded) for any damages, loss, costs, and/or expenses that result from
the breakdown, malfunction, and/or misuse of the product due to violation or neglect of the
operation and maintenance information and instructions provided by our company, as well as from
the unauthorized alteration, repair, and/or modification of the product by the user and/or third
party. We are not legally liable for any damages and/or issues resulting from the use of options
and/or parts that are not authentic or authorized products.
Page 6

WTP-800 User Manual
3
4.WEEE (Waste Electrical and Electric Equipment)
This mark shown on the product or its literature indicates that the corresponding item
should not be discarded at the end of its working life with other household waste. To
prevent possible harm to the environment or human health from uncontrolled waste
disposal, please separate marked items from other types of waste and recycle them
responsibly to promote the sustained reuse of material resources. Household users
should contact either the retailer where they purchased this product, or their local government
office for details of where and how they can conduct environmentally safe recycling of such items.
Commercial users should contact their suppliers and check the terms and conditions of purchase
contracts. This product should not be combined with other commercial waste for disposal.
Caution: This is a Class A product. In a domestic environment this product may cause radio
interference in which the user may be required to take adequate measures.
Page 7

WTP-800 User Manual
4
1 OVERVIEW
1.1 Introductions
WTP-800 is a thermal receipt printer, featured by high print quality, high print speed, high stability,
etc. It can be used in commercial POS system, food industry and occasions which need real-time
field print receipts.
WTP-800 can connect with other equipment through serial, USB and Ethernet interfaces. And the
printer drivers are available for the WINDOWS XP/WINDOWS 7/WINDOWS 8/WINDOWS 10/Linux
operating system.
1.2 The Main Features
1) Low noise
2) High print speed
3) Easy paper loading
4) Support page mode printing
5) Compatible with various width paper
6) Cash drawer interface
7) Communication interfaces optional
Page 8

WTP-800 User Manual
5
2 GETTING STARTED
2.1 Packing List
After receiving your printer, please check for possible shipping damage:
1. Inspect the outside of both the box and the printer for possible damage.
2. Check whether you have received the following accessories together with the printer, if there is
any items missing, please contact your local dealer.
Note: The Power adapter and power cord vary by local and region.
Page 9
WTP-800 User Manual
6
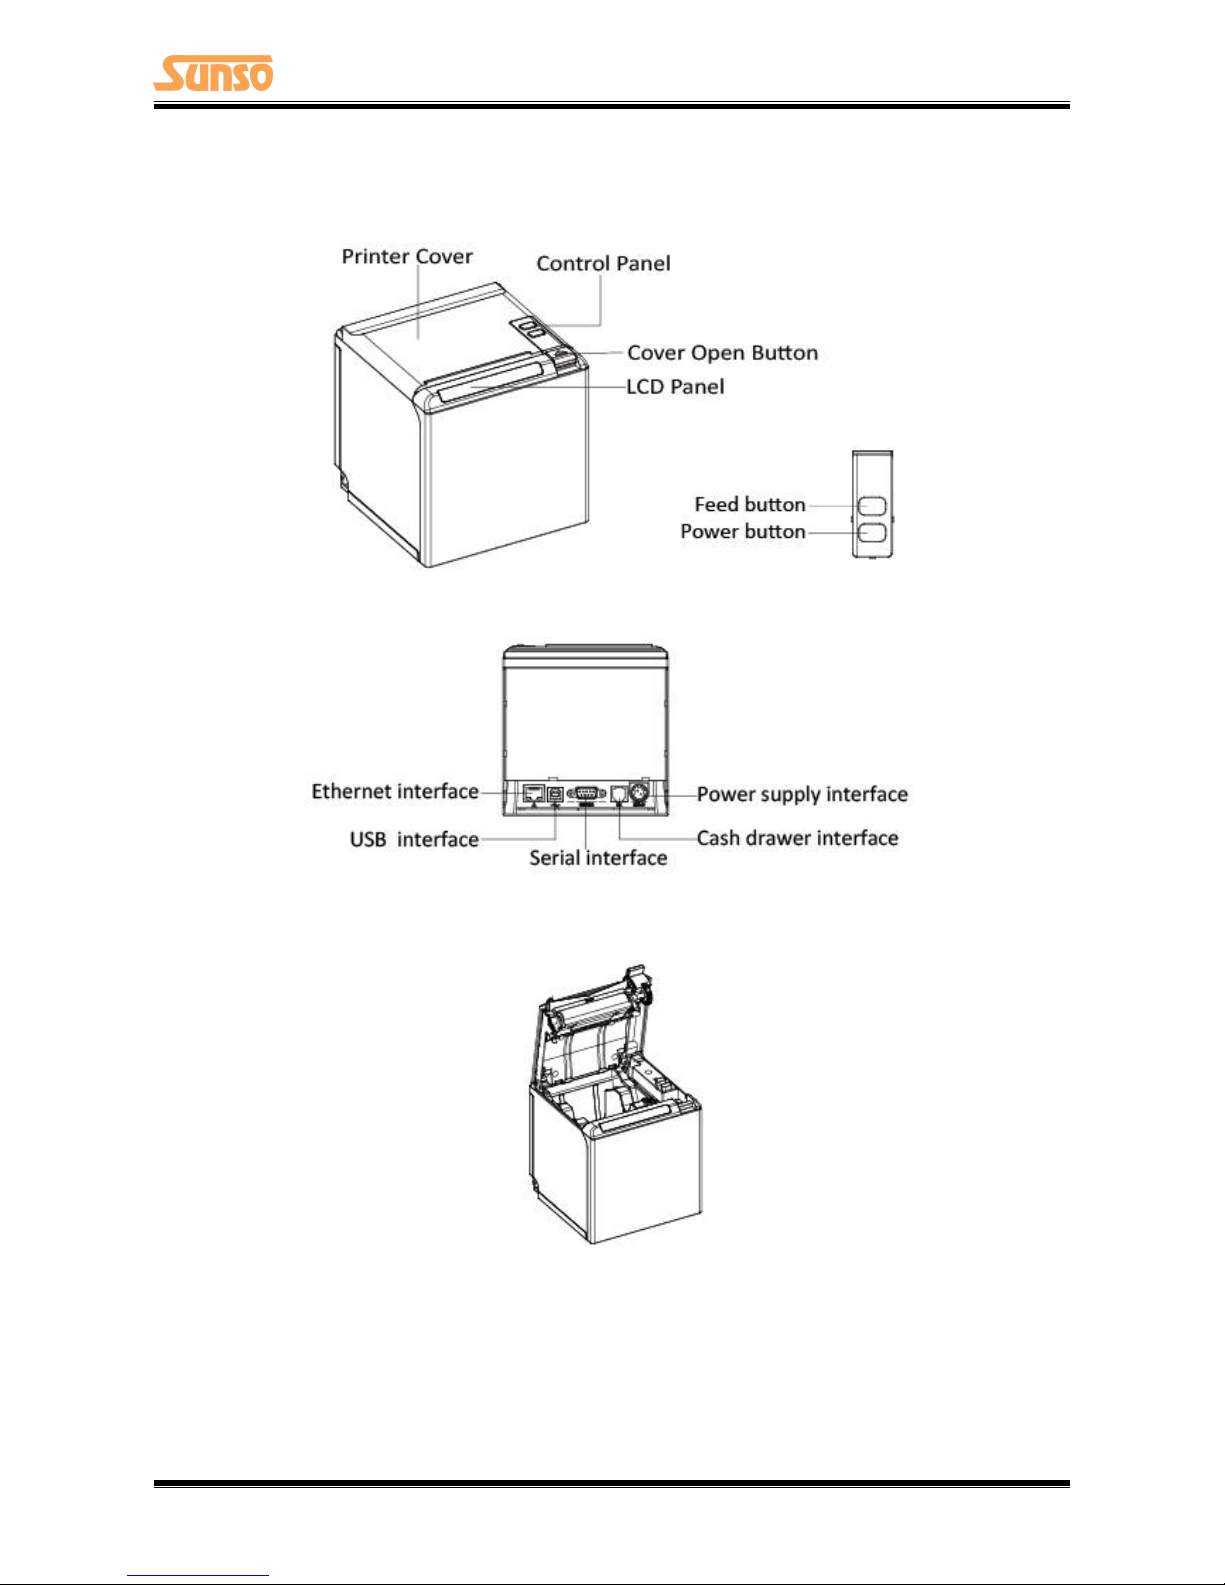
2.2 Appearance and Components
Front
Rear
Inside
Page 10
WTP-800 User Manual
7
3 SPECIFICATION
3.1 Printer Specification
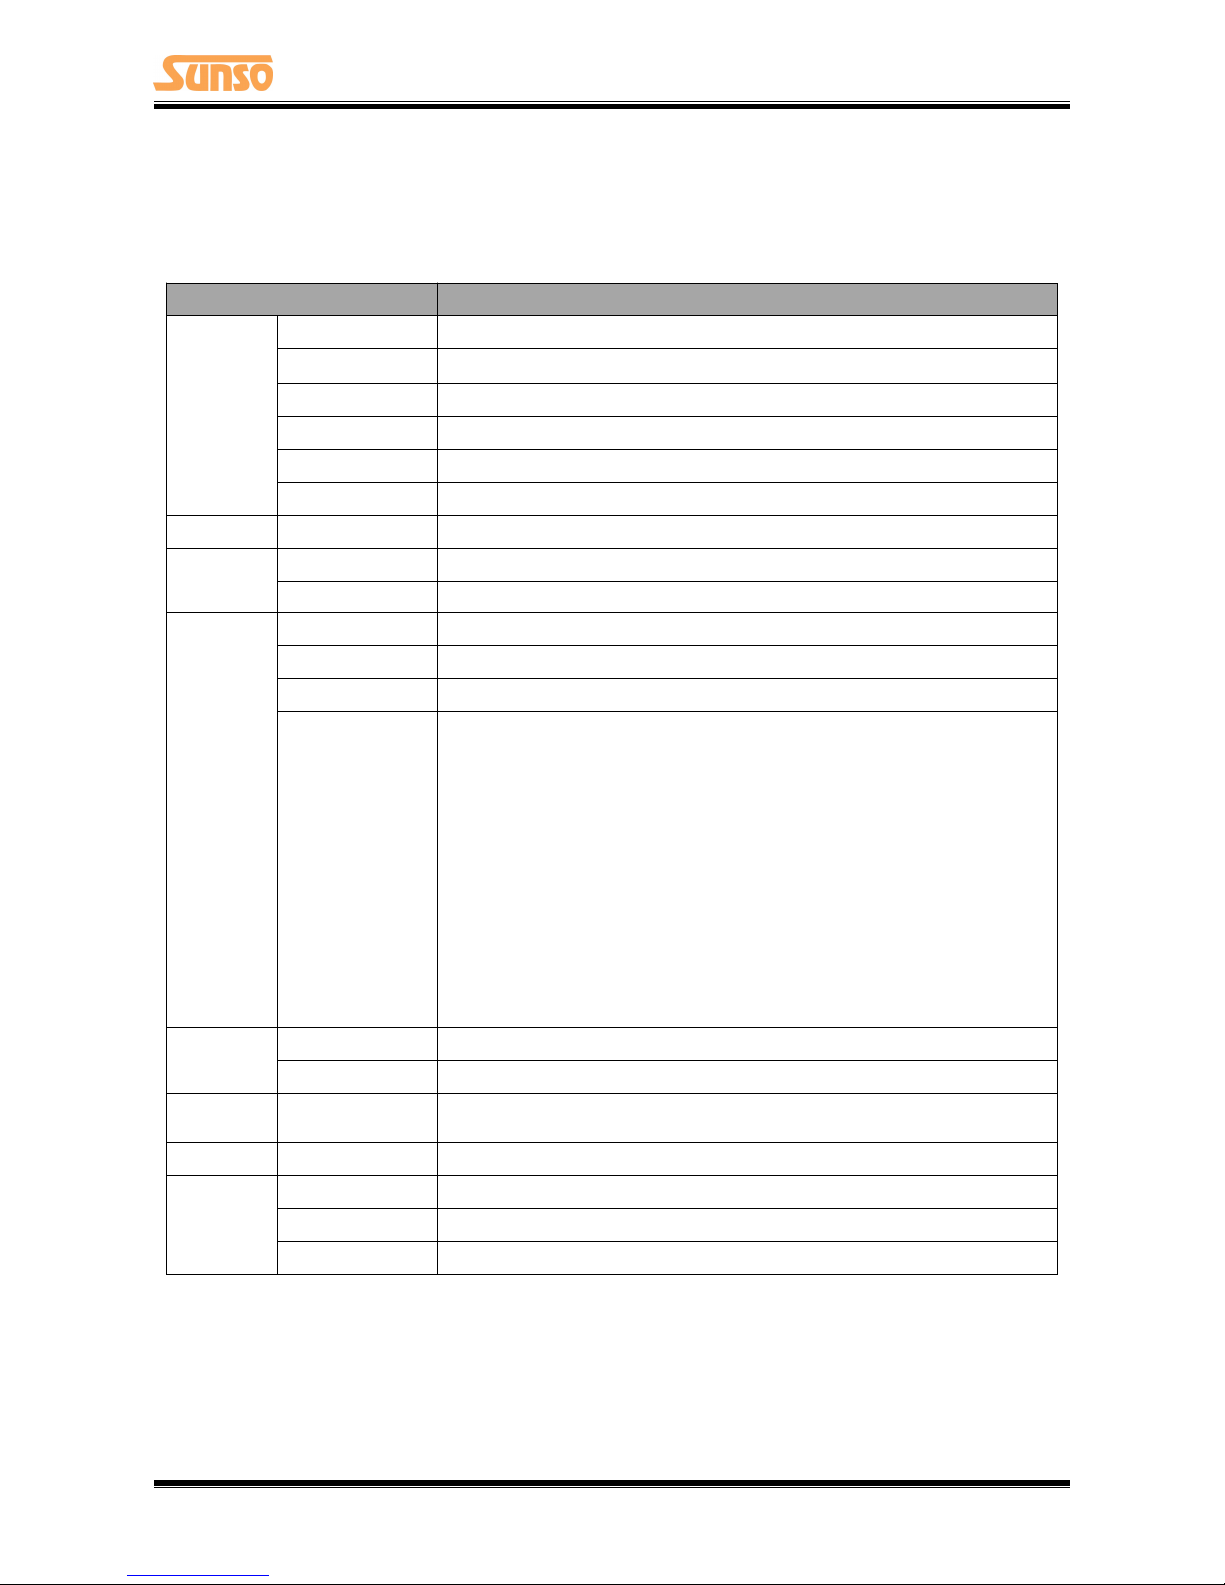
Table3-1 General Specification
(1/2)
Item
Parameter
Printing
Parameter
Printing Method
Direct thermal line printing
Resolution
203dpi,8dots/mm
Printing Width
72mm
Print Speed
260mm/s
Interface
USB, Serial, Ethernet, Cash drawer
Print density
Adjustable from level 1 to level 4
Page Mode
Support
Memory
RAM
4Mbyte
Flash
4Mbyte
Fonts
Chinese
GBK 24×24
Alphanumeric
ASCⅡ9×17,12×24.
User-defined
Support
Code page
Optional international character sets:
PC437(std.Europe), Katakana,
PC850(Multilingual), PC860(Portuguese), PC863(Canadian), PC865(Nordic),
PC857(Turkish), PC737(Greek), ISO08859-7(Greek), WPC1252,
PC866(Cyrillic #2), PC852(Latin 2), PC858(Euro), KU42(Thai), TIS11(Thai),
TIS18(Thai), PC720(Arabic), WPC775(Baltic Rim), PC855(Cyrillic),
PC862(Hebrew), PC864(Arabic), ISO8859-2(Latin2), ISO8859-15(Latin9),
WPC1250(Latin 2), WPC1251(Cyrillic), WPC1253(Greek),
WPC1254(Turkish), WPC1255(Hebrew), WPC1256(Arabic),
WPC1257(Baltic Rim), WPC1258(Vietnamese), MIK(Cyrillic),
PC755(Latin 2), Iran, Iran II, Latvian, ISO-8859-1(WestEur),
ISO-8859-3(Latin 3), ISO-8859-4(Baltic), ISO-8859-5(Cyrillic),
ISO-8859-6(Arabic), ISO-8859-8(Hebrew), ISO-8859-9(Turkish), PC856,
PC3848(ABICOMP), MONGOLIAN, VISCII
Barcode
1D
UPC-A, UPC-E, EAN8, EAN13, CODE39, ITF, CODEBAR, CODE128
2D
PDF417, QR code, (DataMatrix, Maxicode and Aztec) for optional
Graphics
Support varied density bitmap as and download bitmap printing
Max size of each bitmap is 40K, the total size of bitmap is 256k.
Detection
Sensors
Paper out detection, Cover open detection
LED
Indicator
Power LED
Blue LED
Paper LED
Orange LED
Error LED
Red LED
Page 11
WTP-800 User Manual
8
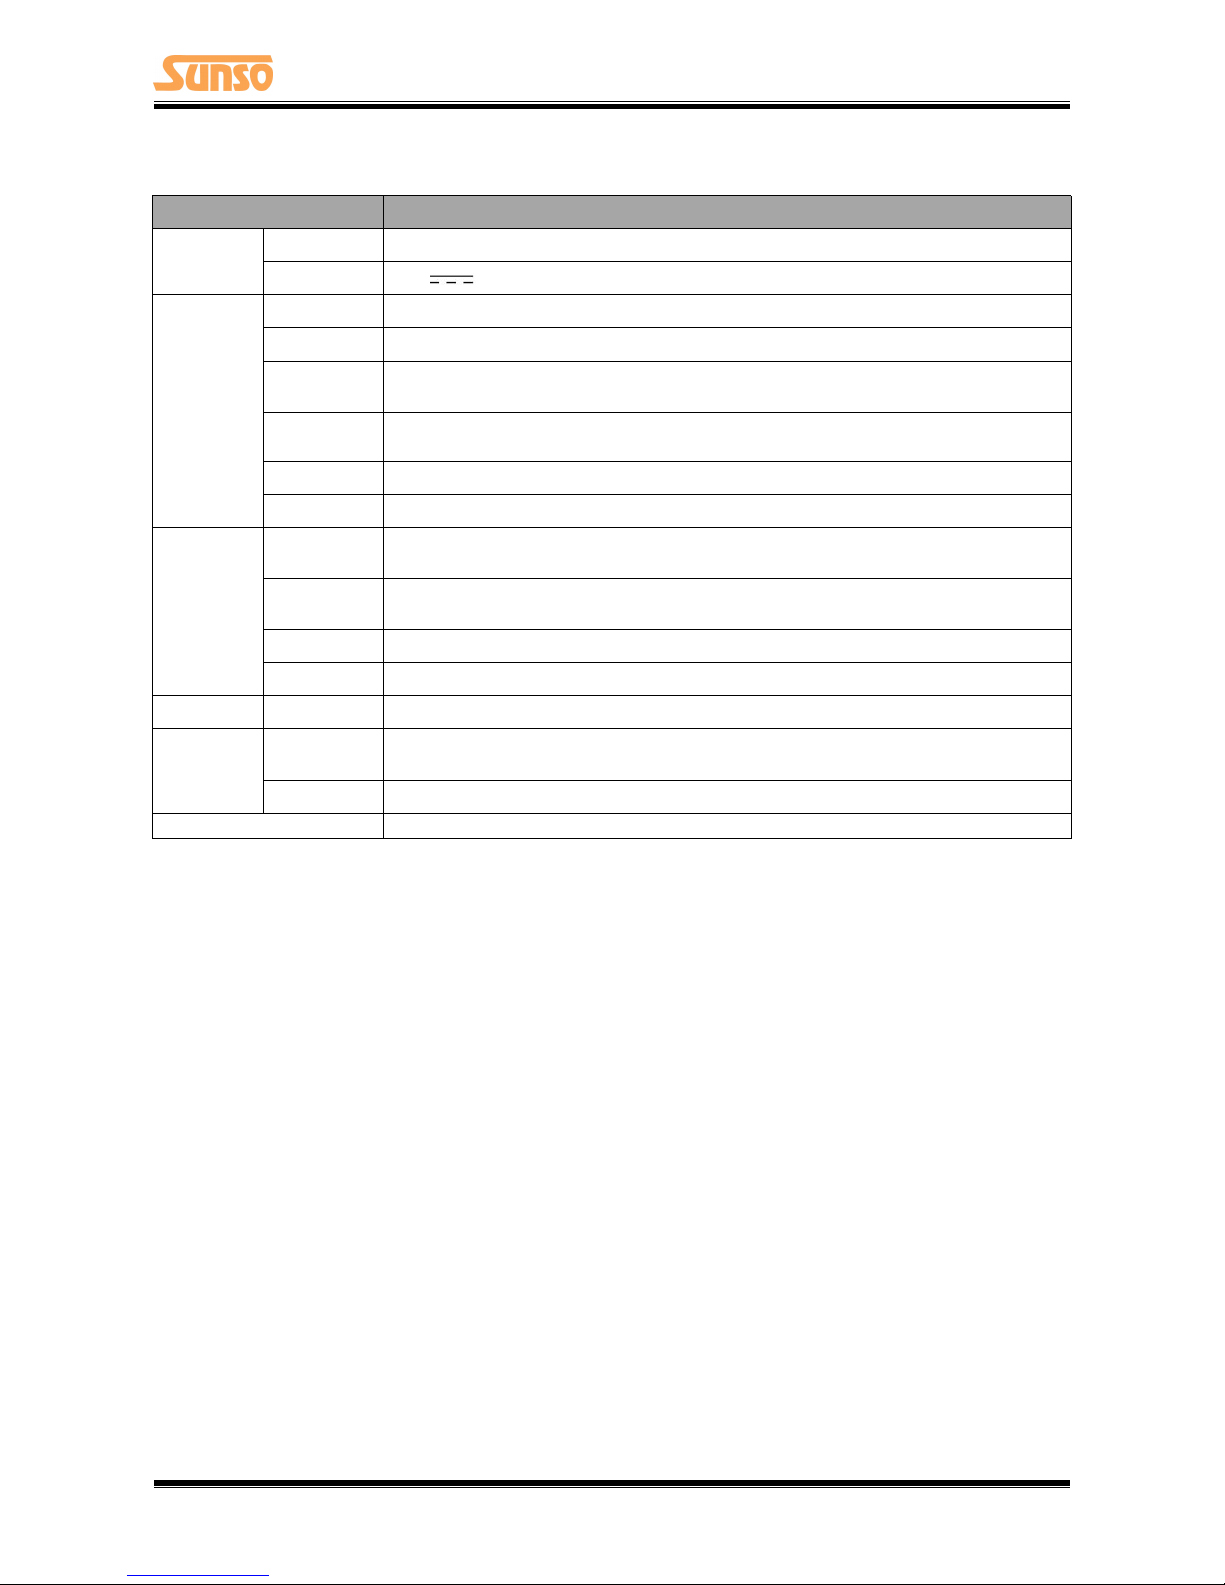
Table3-1 General Specification(Continued)
(2/2)
Item
Parameter
Power
Supply
Input
AC100V-240V
Output
24V 2.5A
Paper
Paper type
Specified Thermal Paper
Paper width
0
1
58
mm/
0
1
80
mm
Paper
thickness
0.056~0.13mm
Roll paper
diameter
Max. OD ф83mm
Paper load
Easy-loading structure of forward open cover or upward open cover
Paper cut
Partial cut or full cut
Physical
Spec.
Operating
condition
0℃~40℃,20%~85%RH
Storage
condition
-20℃~70℃,5%~95%RH
Dimensions
137.3(L)*132(W)*130.5(H)mm
Weight
1.33kg
Command
ESC/POS
Software
Driver
Windows2000/XP/Vista/Win7/Win8/Win10/POSReady/Linux CUPS/OPOS/
JavaPOS
SDK
WinCE, Win Mobile, Android, iOS
Agency Approvals
FCC,CE
Page 12

WTP-800 User Manual
9
3.2 Printing Media Specification
3.2.1 Continuous Thermal Paper Specification
Paper Type : Specified Thermal Paper
Paper Width :
0
1
58
mm/
0
1
80
mm
Paper Outer Diameter : Max. 83 mm
Paper Thickness : 0.056 ~ 0.13m
Paper Type
Manufacturer
FD210,PD150R,PD160R
OJI Paper CO.,LTD.
3.2.2 Notices
Notes:
Please use the recommended thermal paper or same quality paper, otherwise it will influence
the printing quality and decrease the thermal printer head life;
Don’t stick the paper on the roll paper mandril;
If the thermal paper is polluted by chemical or oil, the thermal paper heat sensibility decreases,
which will influence the printing quality;
Don’t use finger nail or hard articles to touch the surface of thermal paper, otherwise it will
cause color fading;
When the environment temperature is higher than 70°C, the thermal paper color will fade, so
pay attention to the influence of temperature, humidity and sunlight.
Page 13
WTP-800 User Manual
10
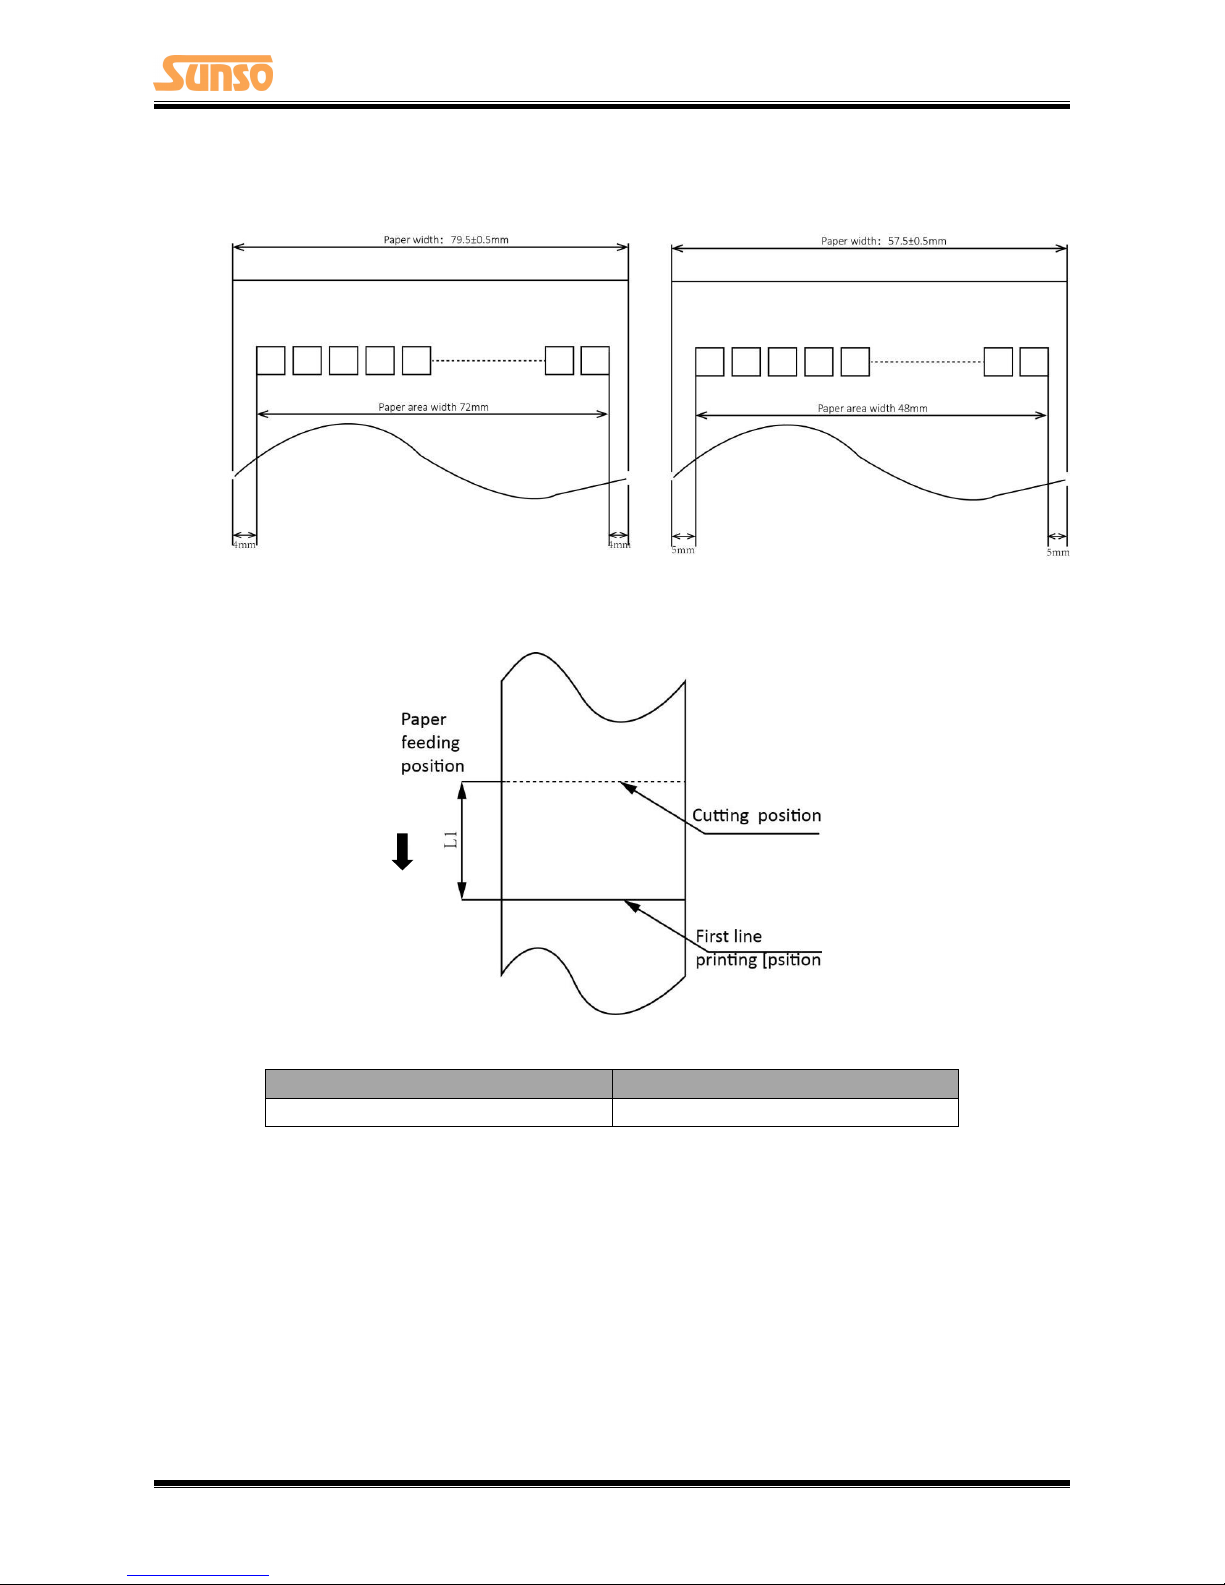
3.3 Printing and Cutting Position
3.3.1 Printing position
0
1 -
80
mm Print Paper
0
1 -
58
mm Print Paper
3.3.2 Cutting Position
Type
Paper Cutting Position(L1)
WTP-800
11.6mm
Page 14
WTP-800 User Manual
11
4 INSTALLATION AND USAGE
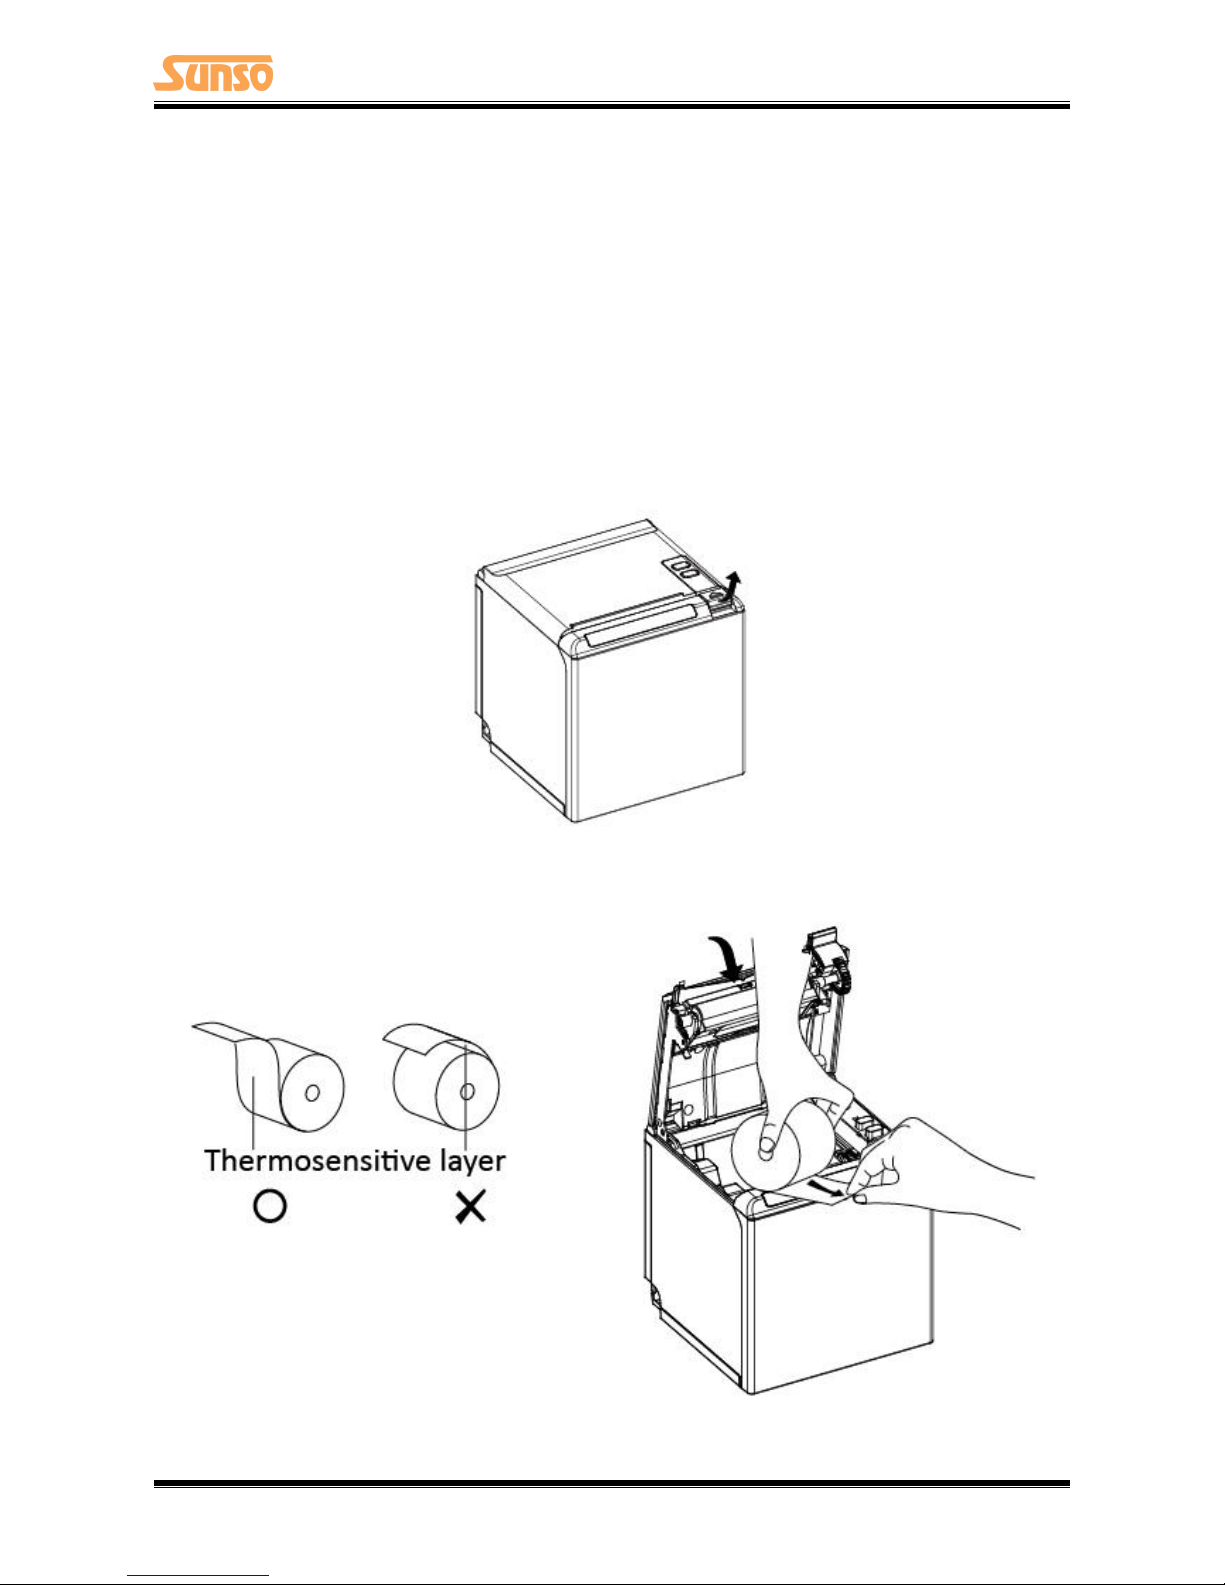
4.1 Media Loading
4.1.1 Paper Confirmation
1) When using 80mm(width) roll paper, take down the paper guide of both sides.
2) When using 58mm(width) roll paper, insert the paper guide to each side.
Note: Roll paper should be placed in the middle.
4.1.2 Paper Installation (Upward Paper-out Direction)
1. Pull the cover open button to open the printer cover.
2. Remove the used roll paper core, if any.
3. In the correct direction of the roll paper, insert the paper.
Page 15
WTP-800 User Manual
12
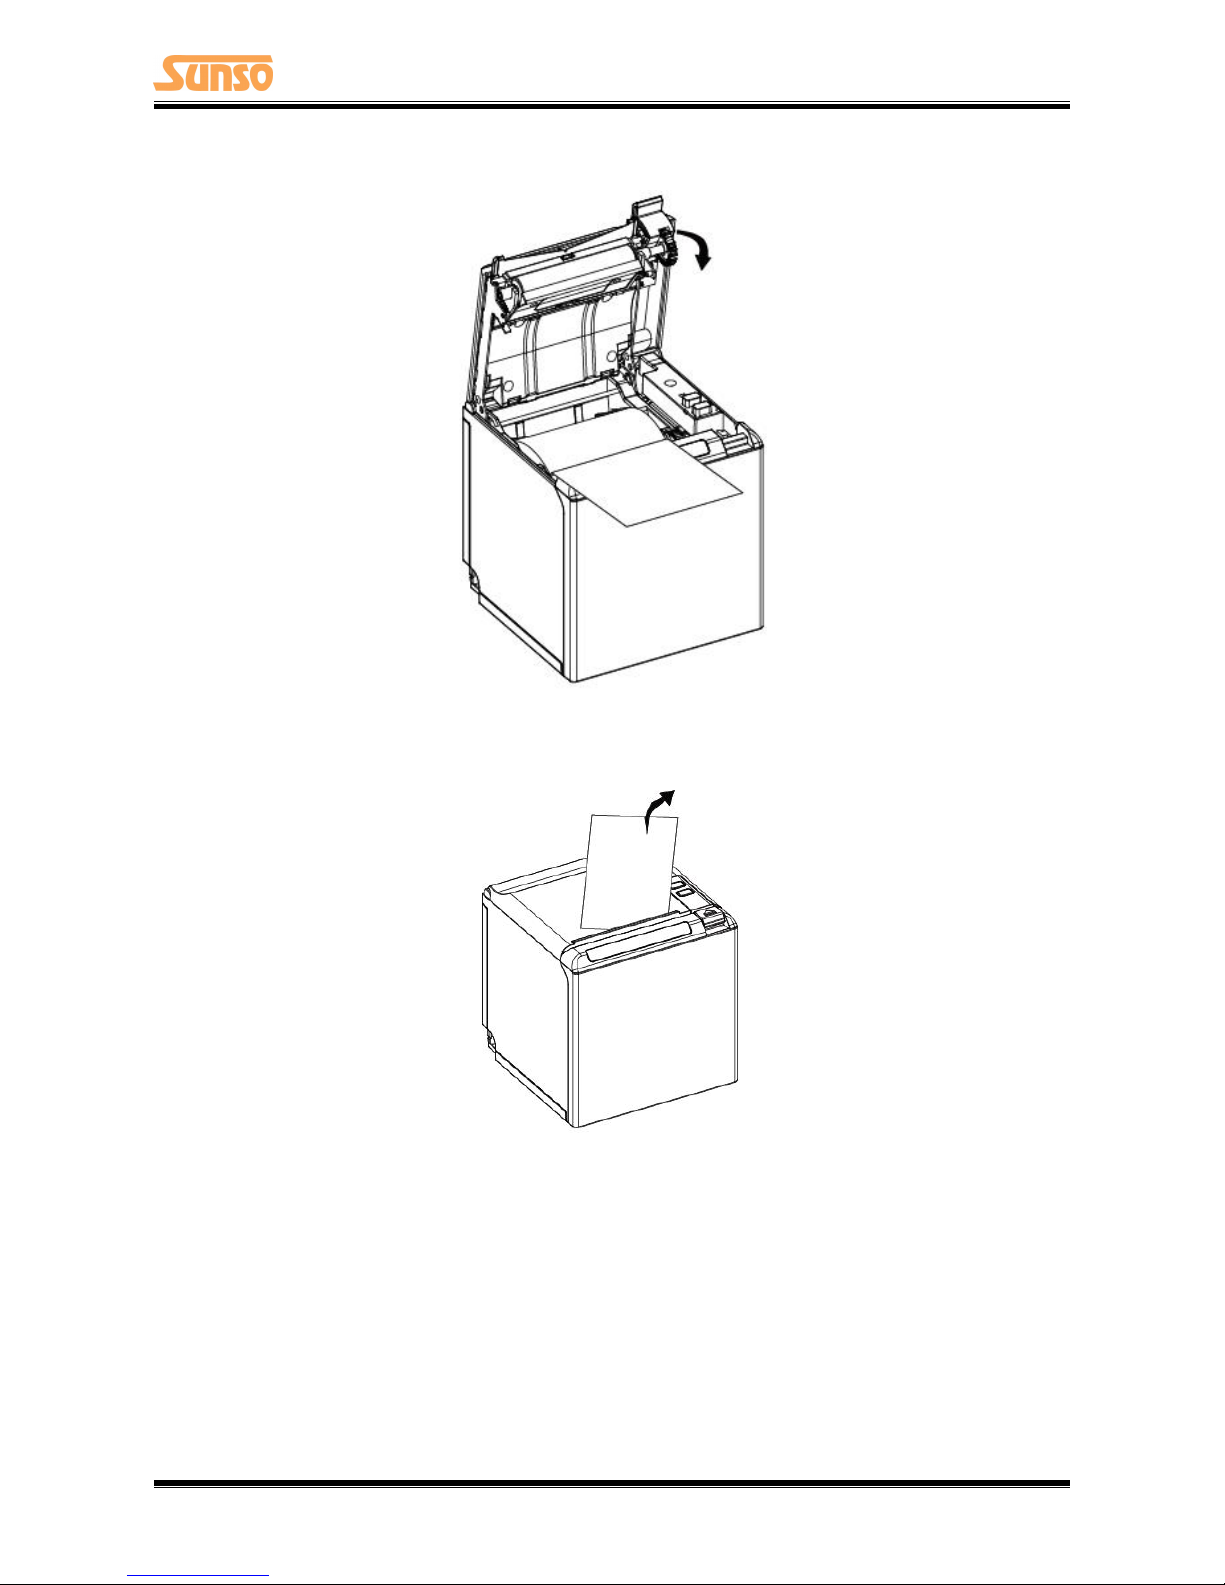
4. Pull out some roll paper, and close the printer cover.
5. Tear the extra paper in the direction of printer.
Page 16
WTP-800 User Manual
13
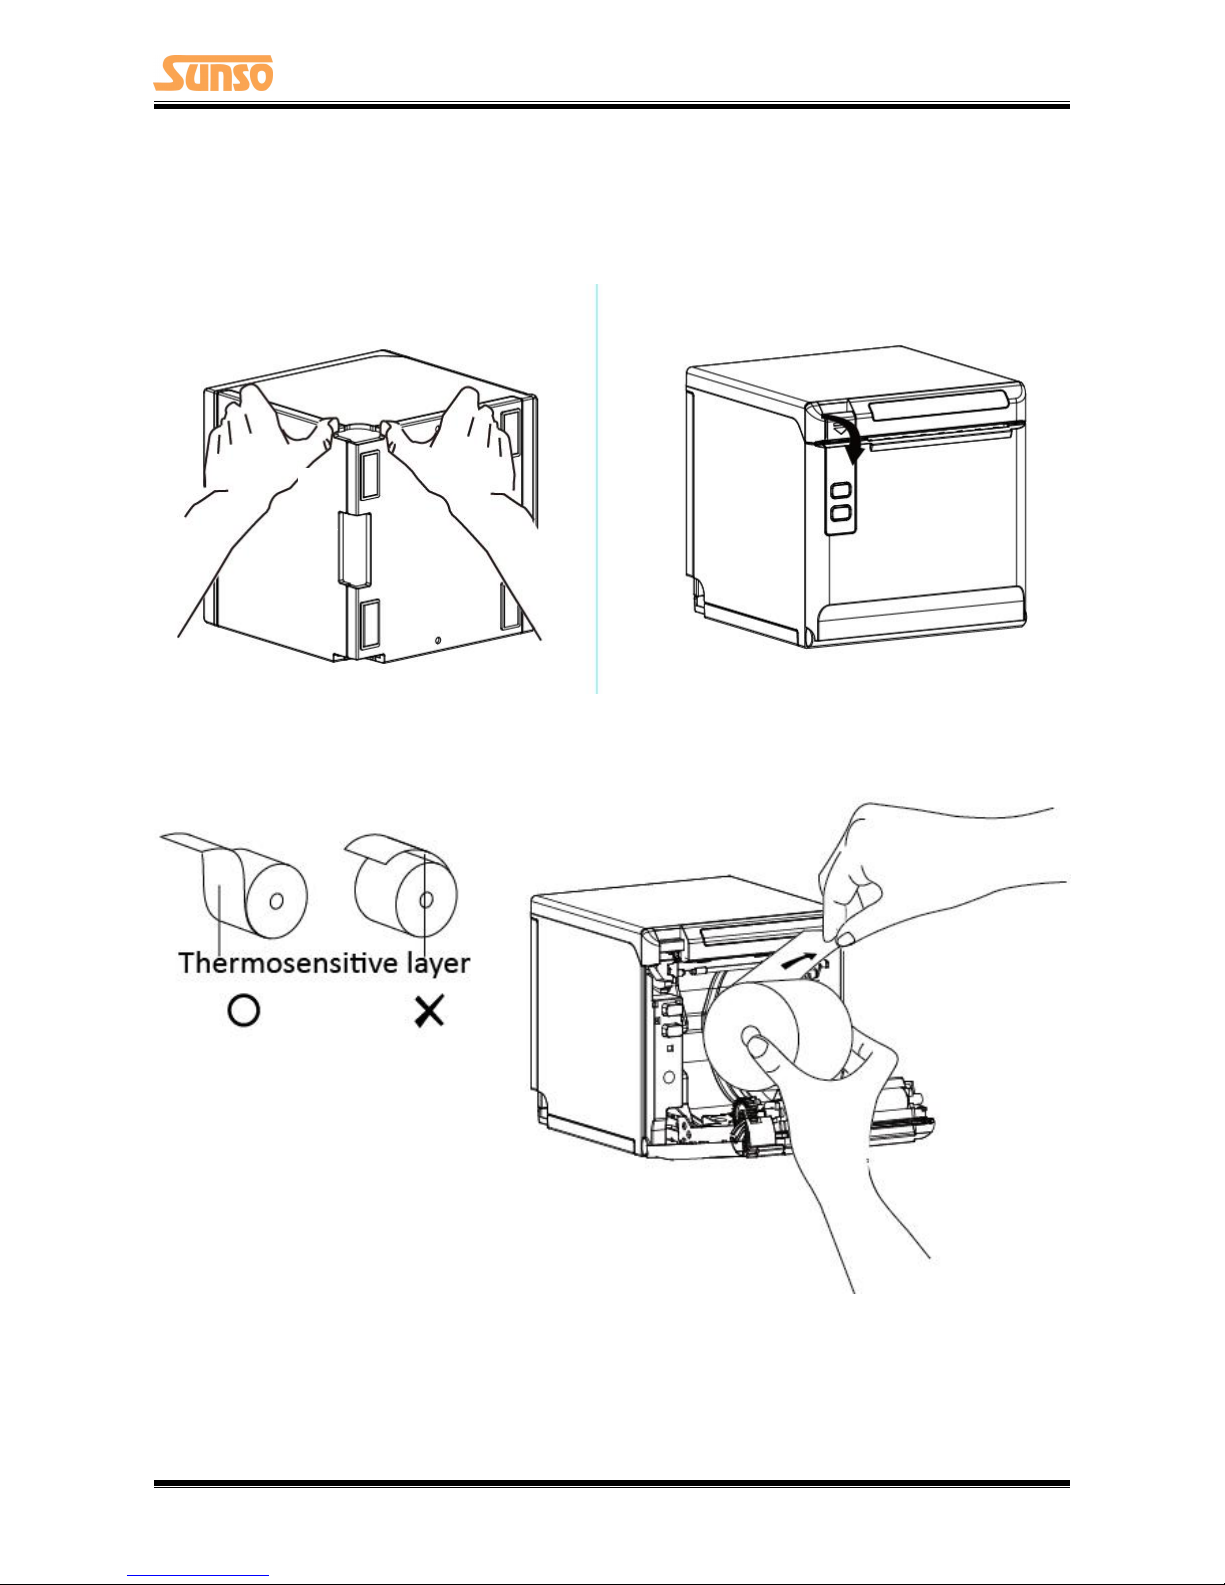
4.1.2 Paper Installation (Forward Paper-out Direction)
1. Remove the bottom cover and rear cover, after removing, the location of these two covers can
be swapped and re-installed, as below showed. Remove the used roll paper core, if any.
2.In the correct direction of the roll paper,insert the paper.
Page 17
WTP-800 User Manual
14
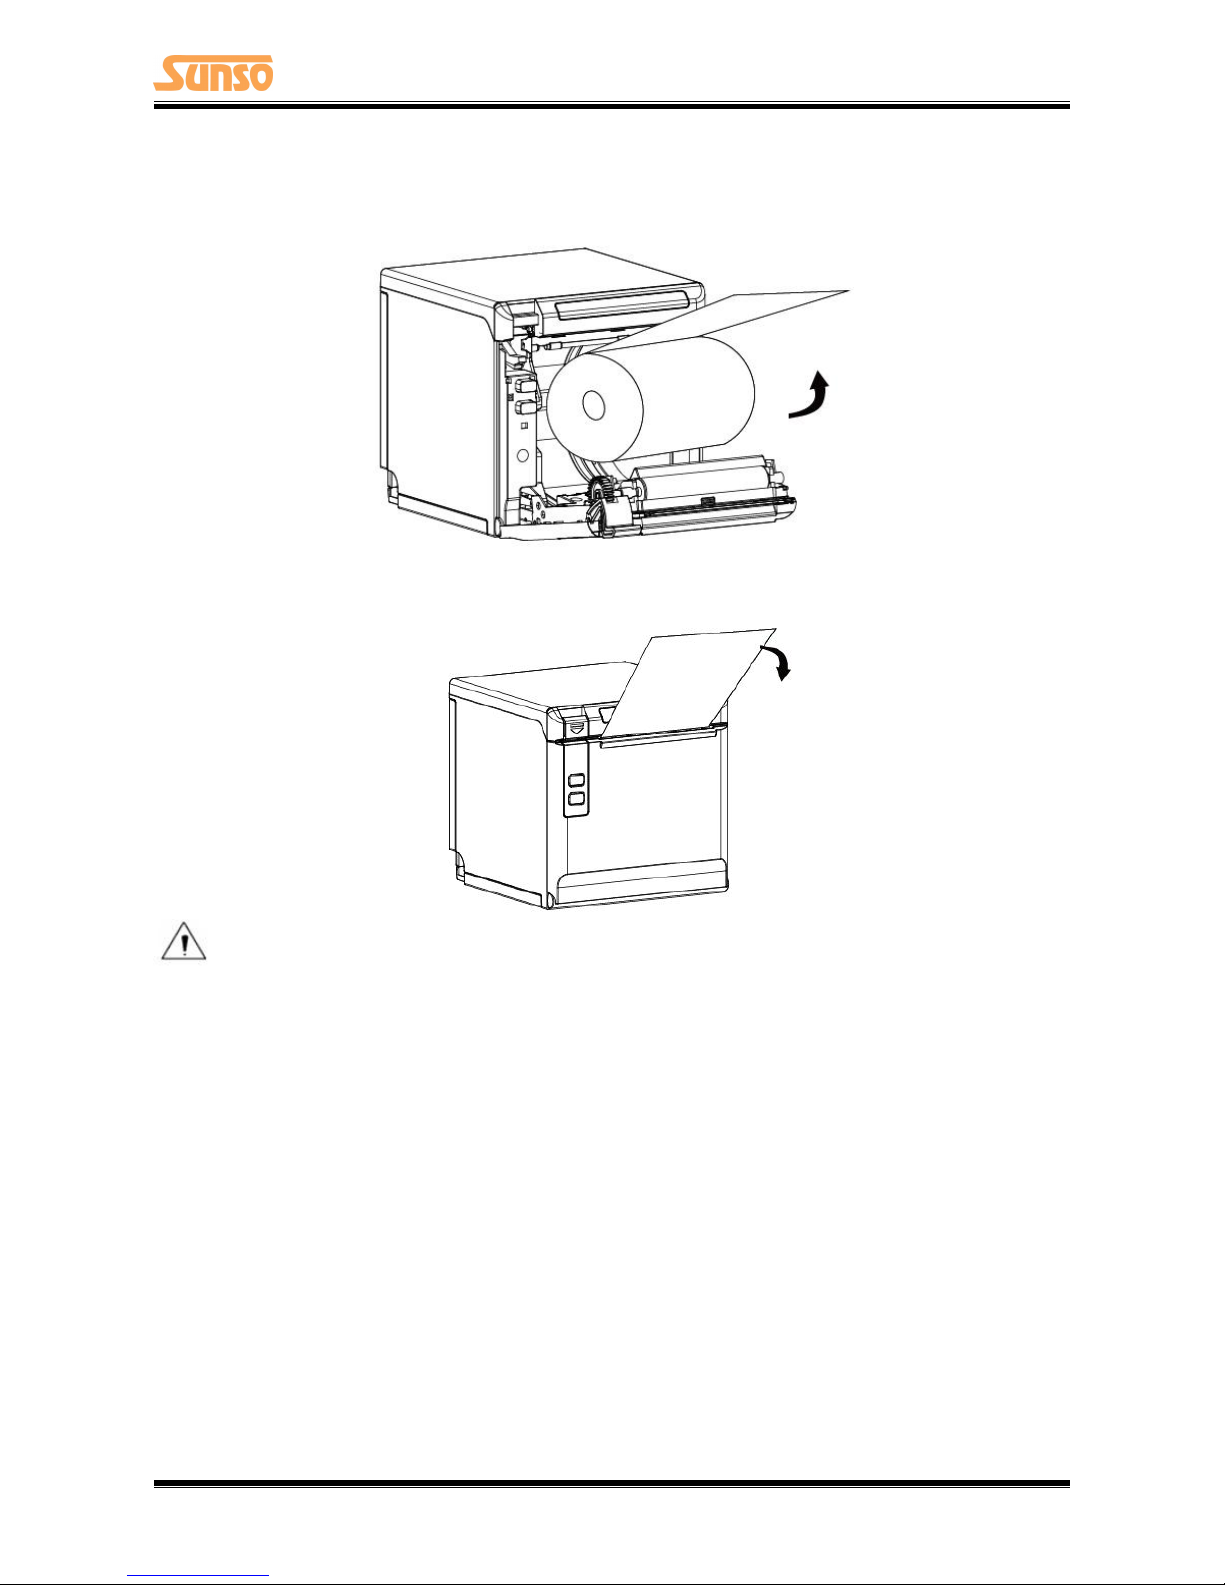
3. Pull out some roll paper, and close the printer cover.
4. Tear the extra paper in the direction of printer.
Notes
:
► According to the paper size to adjust the paper guide;
► Make sure the paper inside is at tight status, or it will issue paper or other obstacle.
Page 18
WTP-800 User Manual
15
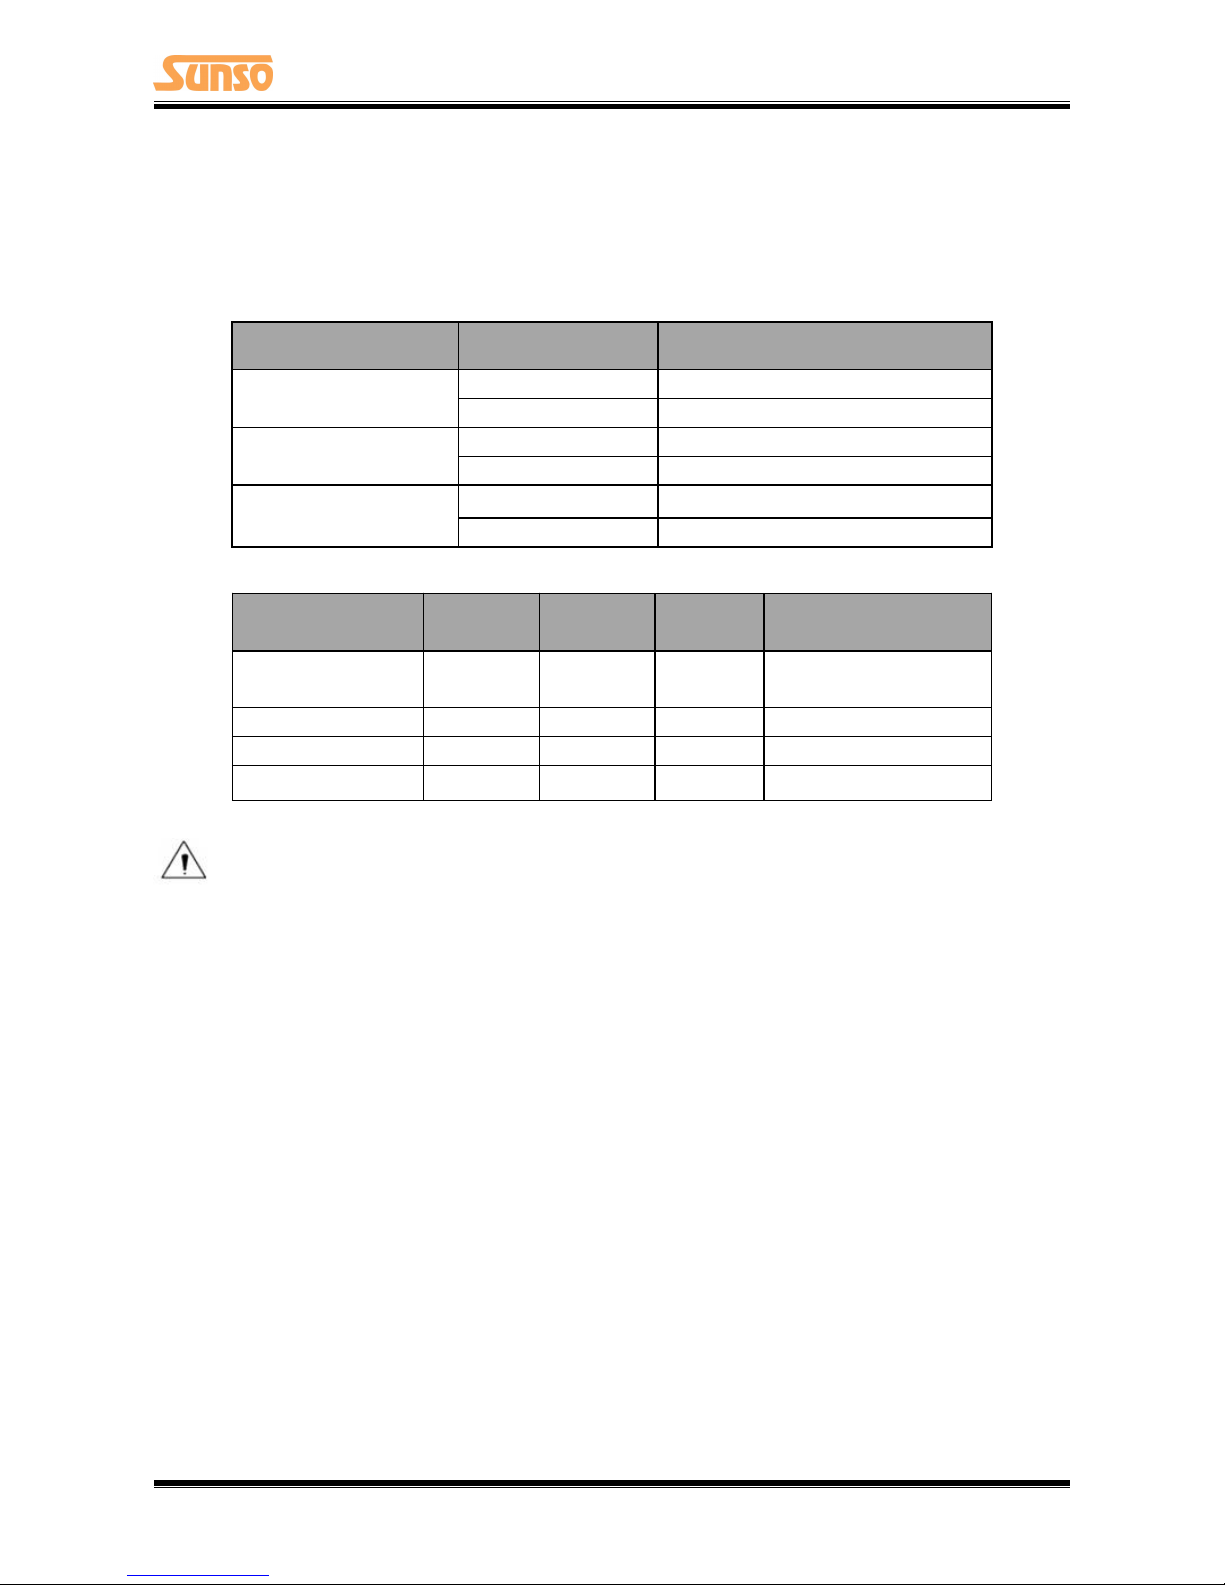
4.2 LED Indication and Beeper
Function specification of indicated light and beeper.
Name
Status
Specification
POWER
LED
(Blue)
ON
The printer work well
OFF
The printer does not work
ERROR
LED
(Red)
Flashing
The printer in an error state
OFF
The printer in an normal state
PAPER
LED
(Orange)
ON
The printer in paper end state
OFF
The printer in an normal state
Notes:
The printer use a thermistor to detect the temperature of the print head. If the temperature of print
head is more than 65° C, printer will send a warning. If the temperature of print head is more than
80° C, printer will stop working until the temperature is less then 60° C.
Description
POWER
L
ED
ERROR
L
ED
PAPER
LED
Beeper
Open the cover of
printer
ONONON
“Beep, Beep—, Beep”
Full of paper
ON
OFF
OFF
Silent
No paper
ONONON
“Beep Beep Beep”.
Cutter jam
ON
Flash
OFF
”Beep—,Beep—”
Page 19
WTP-800 User Manual
16
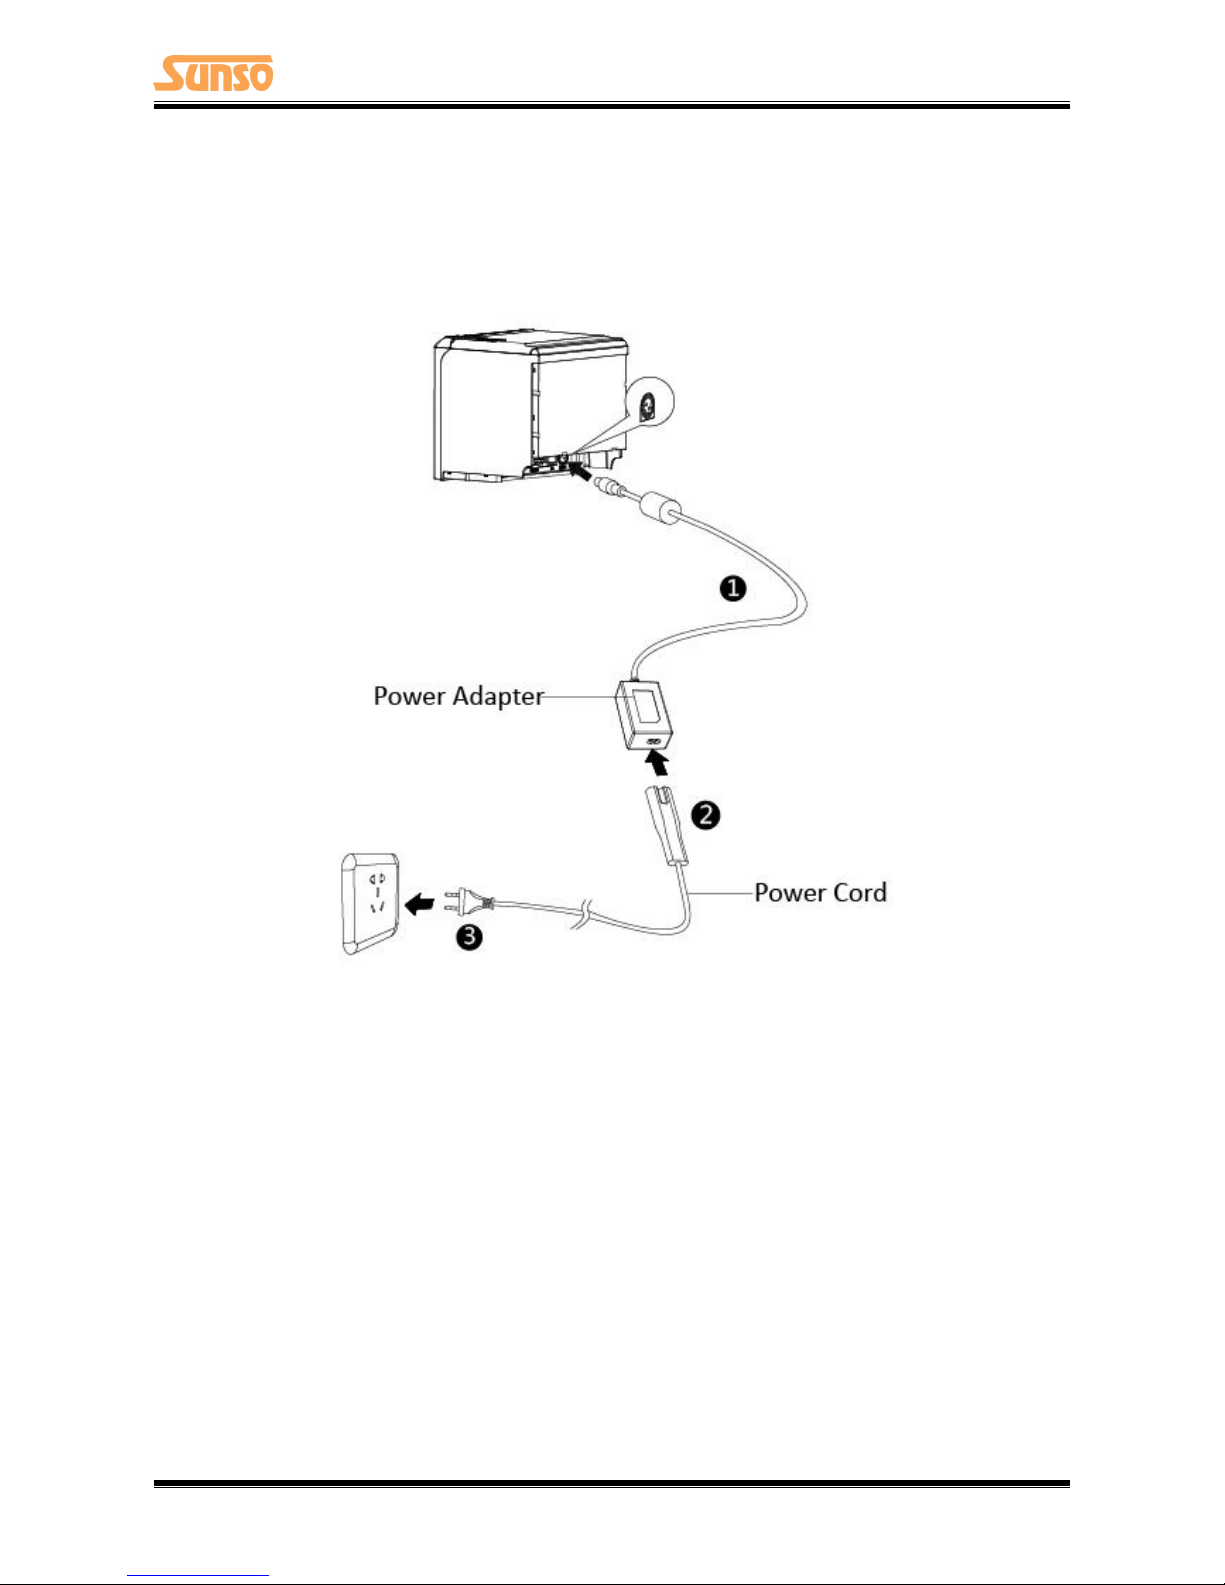
4.3 Power Connection
1) Put the cable plug of power adapter facing up at flat side, insert the rear of the printer power
connector;
2) Turn the power adapter input power;
3) Pay attention about disconnecting or connect the Power adapter at right method, or likely to
cause damage.
Note: The Power adapter and power cord vary by local and region.
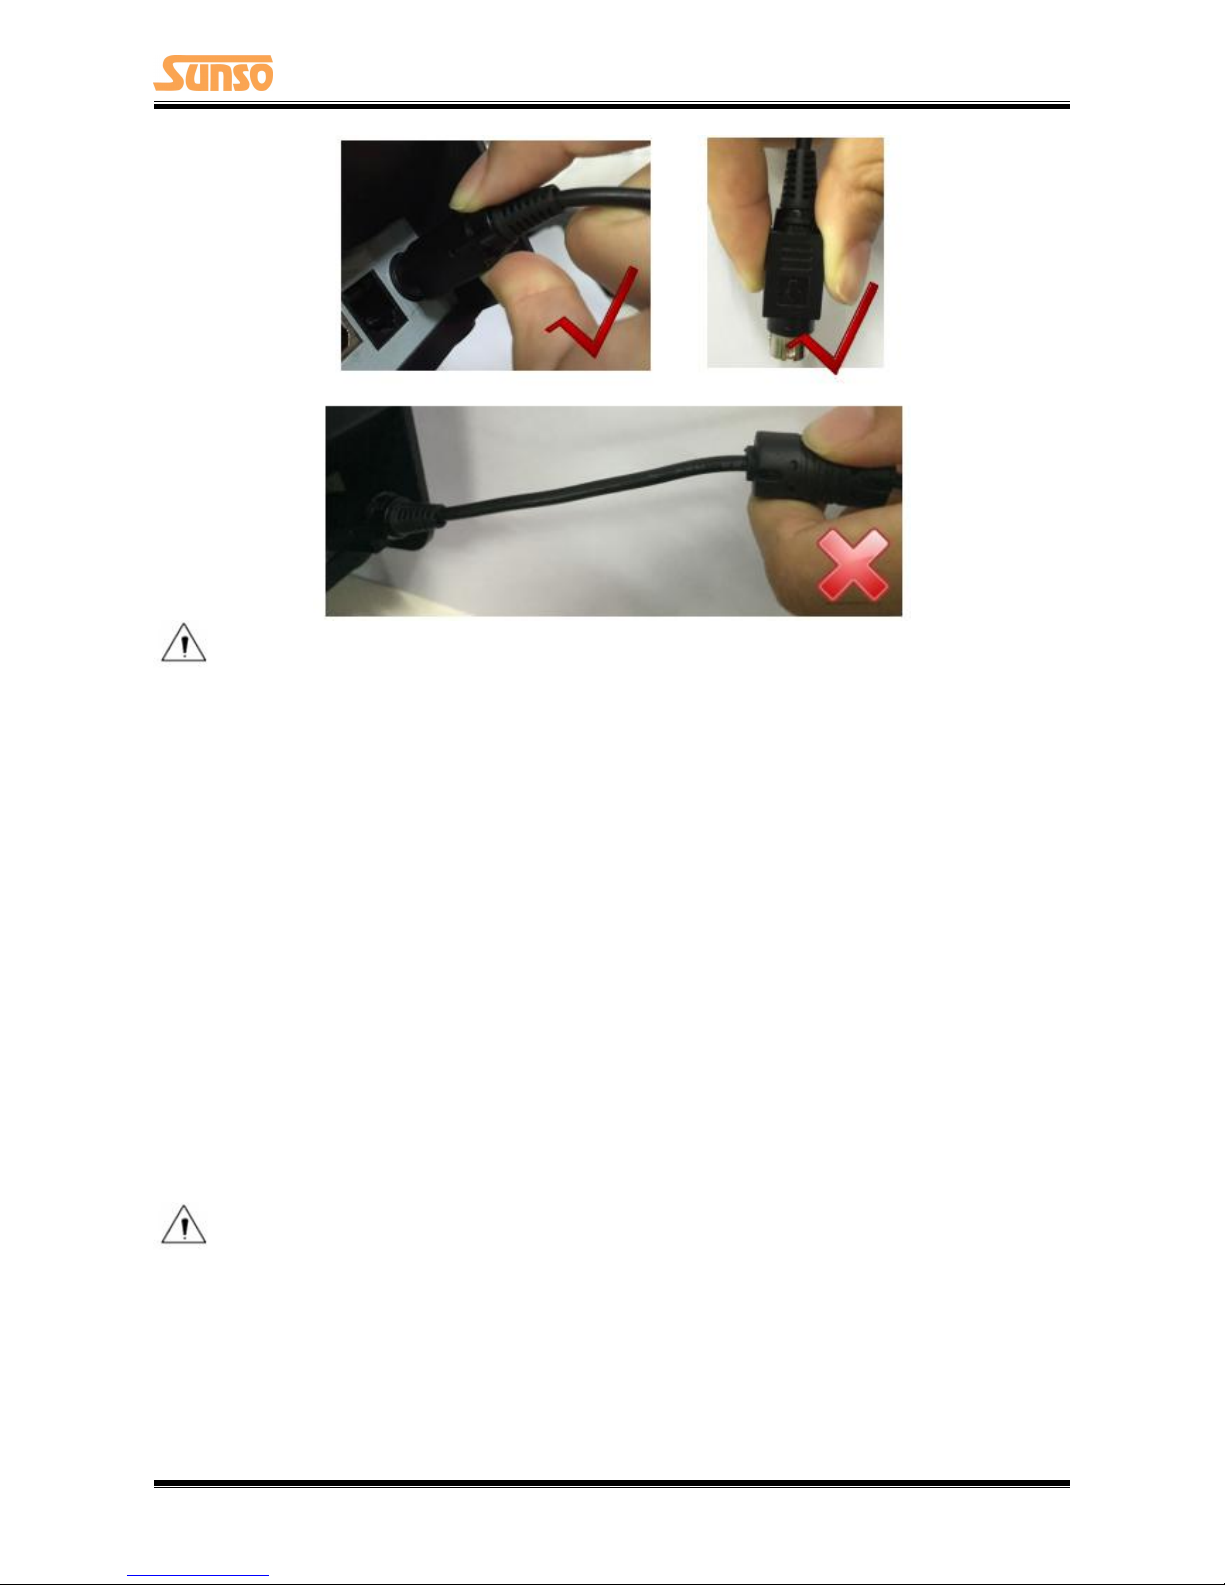
When pull out the adapter, please pinch the shell of power adapter and pull the switch up, when
the switch is fully opened then pull out the power adapter.
Don’t put forth your strength to pull the plug by squeeze at any of place of power adapter. Because,
it is more difficult to pull it out and easy to damage the cable.
Page 20
WTP-800 User Manual
17
Notes:
► Please only use the power adapter recommended by supplied or equivalent products;
► When disconnecting the power adapter plug, handheld plug connector housing, to avoid the
pulling on the cable in force;
► Avoid drag the power adapter cable, otherwise it will damage the cables, causing fire and shock;
► Avoid put power adapter around a heating device, otherwise the cable may melt, causing fire
and shock;
►
If you do not use the printer in a long time, disconnect the power supply of printer power
adapter.
4.4 Interface Cable Connection
1) Make sure the printer's power switch is turned off;
2) Put the interface cable into the matched interface and fixed with screws (or spring) on the plug;
3) Connect the other end of the interface cable to the host.
4.5 Cash Drawer Connection
1) Make sure the printer's power switch is turned off;
2) Connect the cash drawer cable into the cash drawer interface on the rear side of the printer.
Warning:
Cash drawer interface can only be connected to a voltage of 24V cash drawer device (can’t connect
to the phone line, etc.)
Page 21

WTP-800 User Manual
18
4.6 Print Test
4.6.1 Print Self-Test
The self-test checks the printer’s current settings, status and whether the printer has any problem.
1.Make sure the power is connecting and paper is loading properly.
2.Make sure the printer is off and top cover closes properly.
3.Pressing the paper feed button and power button simultaneously turns the printer on. The printer
is ready to receive data as soon as it completes the self-test.
4.6.2 Printing of Windows Driver Program
1. Install the Windows Driver program. (Please refer to the Windows Driver Manual)
2. Please set the “Interface” as the type you use.
3. Use the Windows Driver Program to print out the “Print Test Page”.
Page 22
WTP-800 User Manual
19
5 INTERFACES
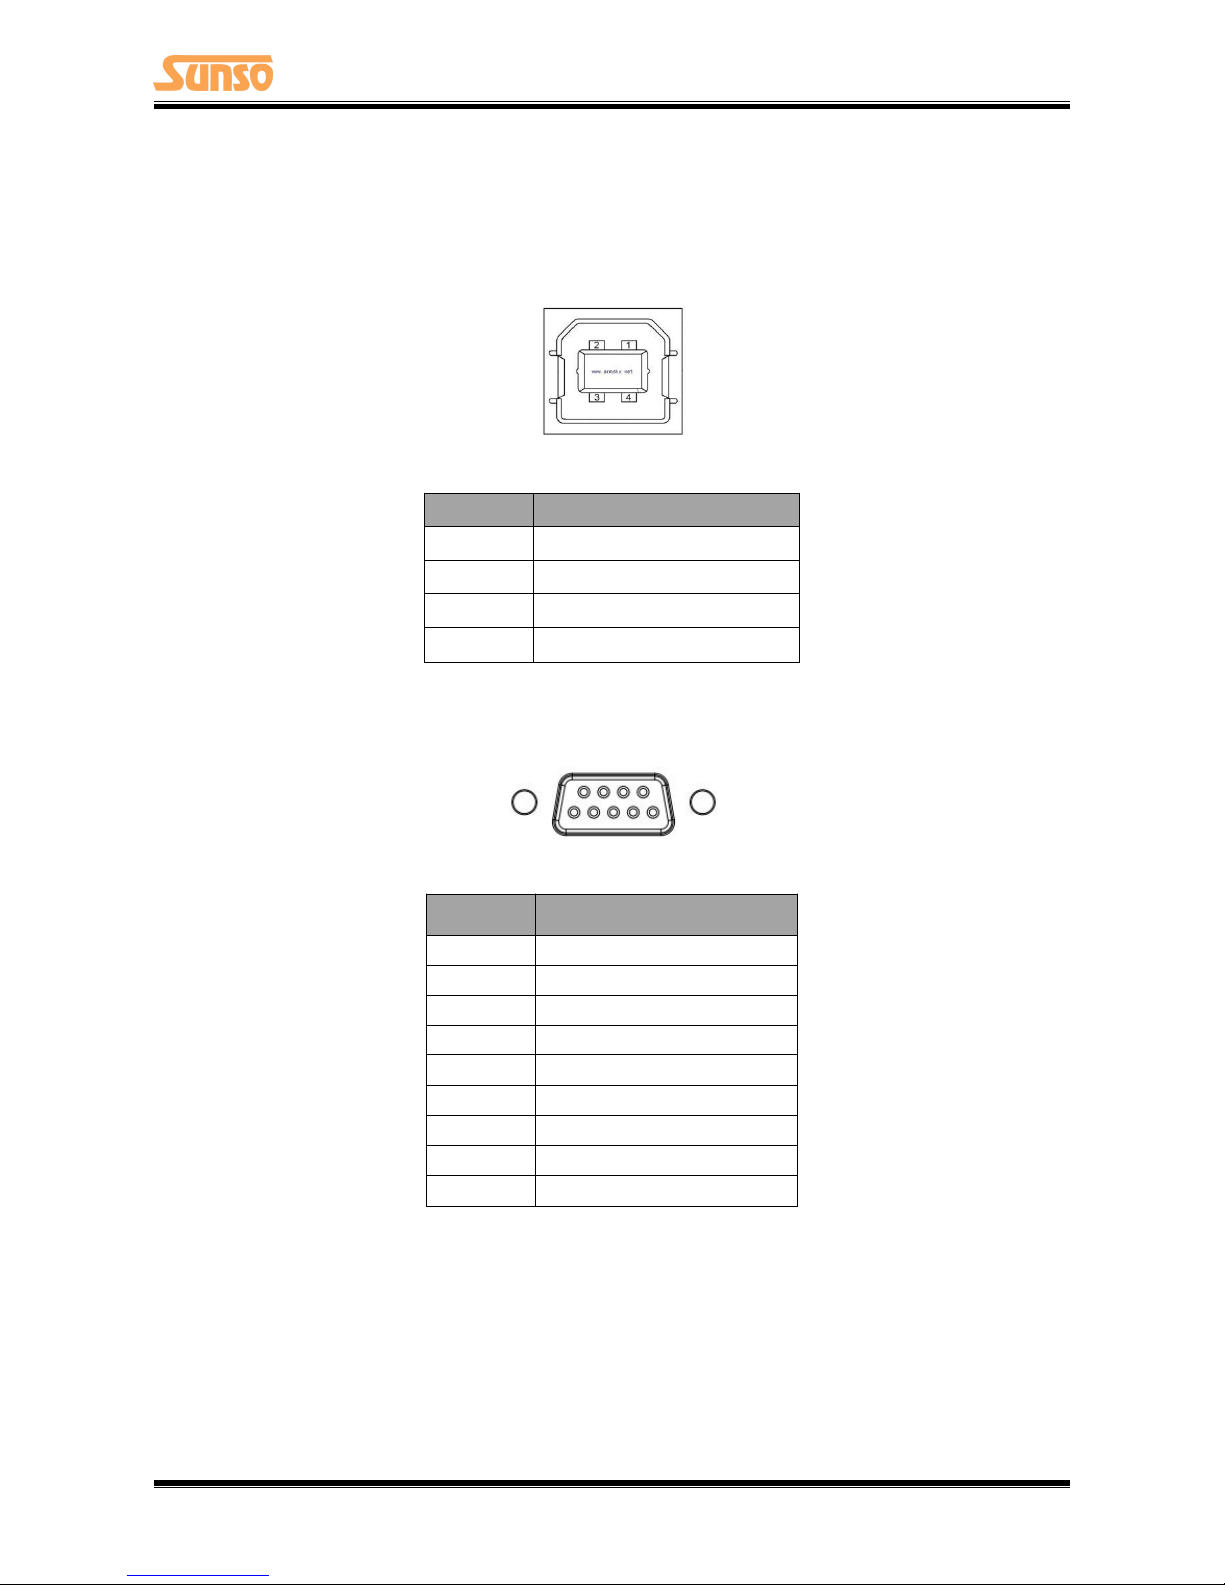
WTP-800 supports cash drawer interface and many other various communicate interfaces, such as
Serial interface, USB interface, Ethernet interface.
5.1 USB
Figure 5-1
PIN
SIGNAL NAME
1
VBUS
2
D-
3
D+
4
GND
5.2 Serial Interface
Figure 5-2
PIN
SIGNAL NAME
1
-
2
TXD
3
RXD
4
-
5
GND
6
RTS
7
CTS
8
RTS
9
-
Page 23
WTP-800 User Manual
20
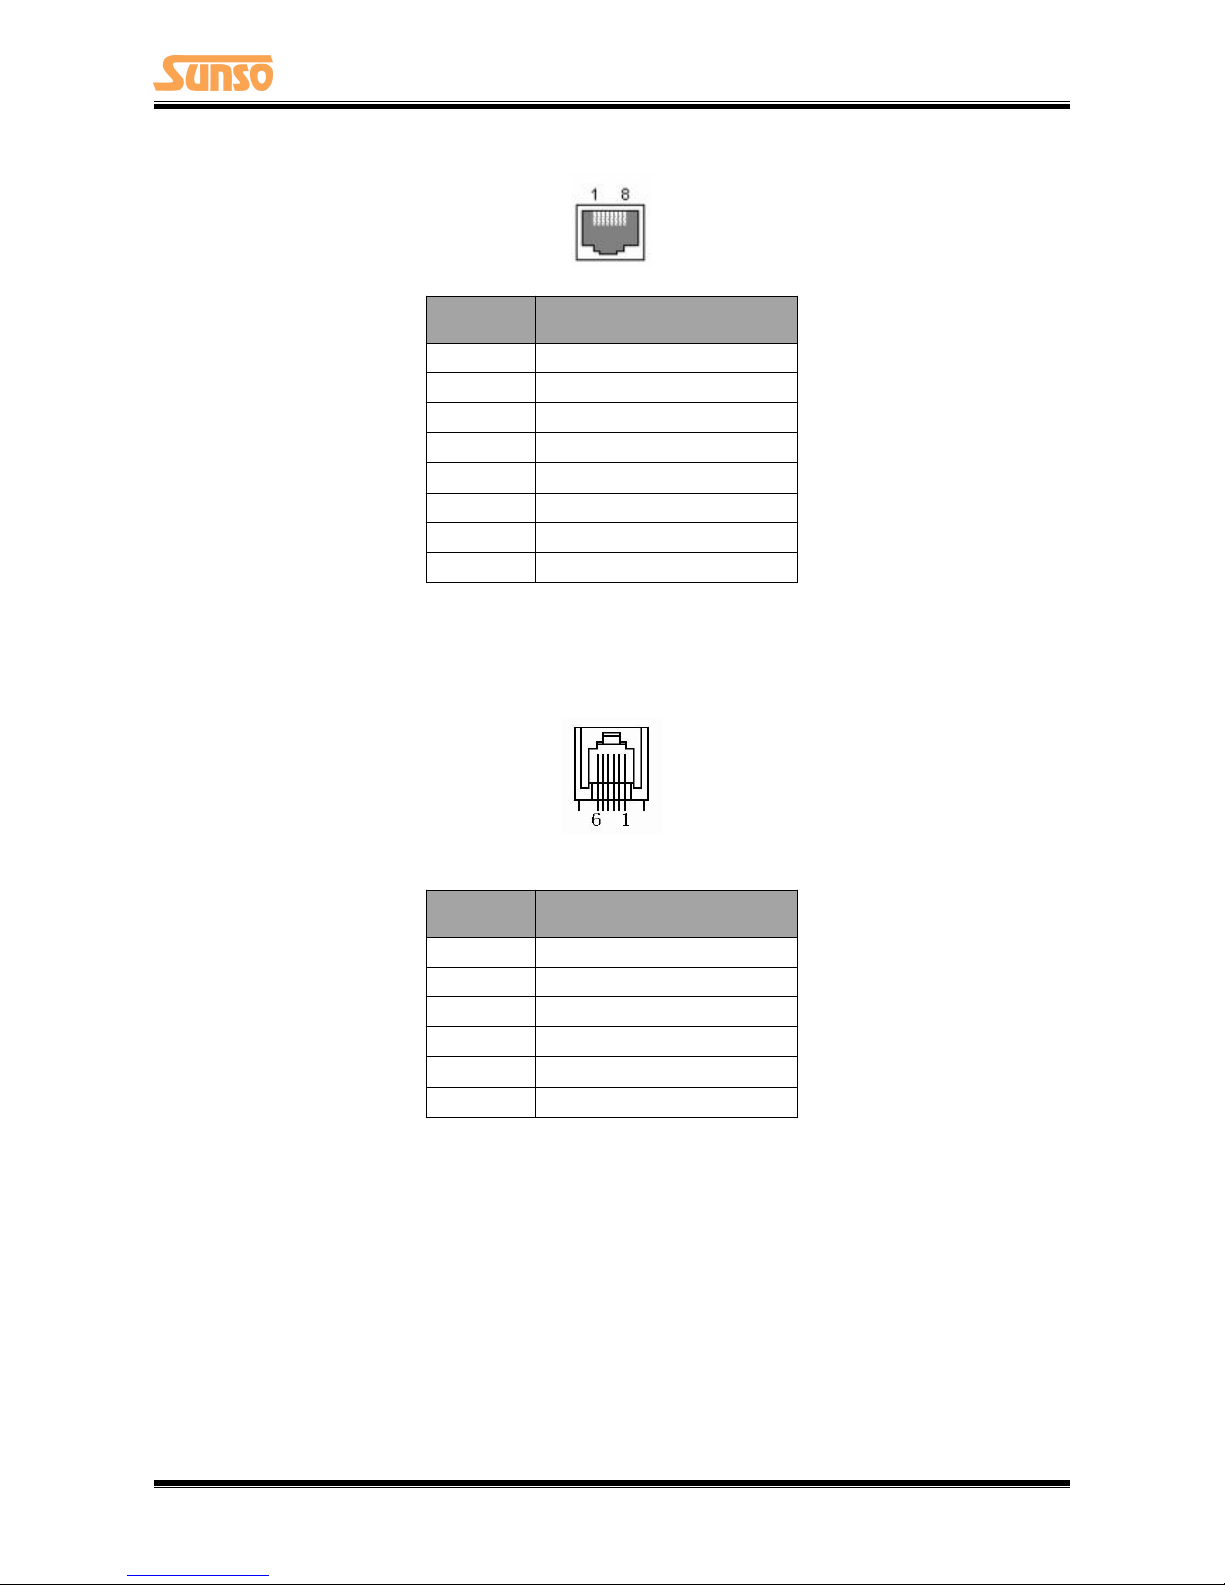
5.3 Ethernet Interface
PIN NO.
Signal Name
1
TX+
2
TX-
3
RX+
4
-
5
-
6
RX-
7
-
8
-
NOTE: Ethernet interface can only be connected to an has been isolated SELV such interface of end device.
5.4 Cash Drawer Interface
Figure 5-4
PIN NO.
Signal Name
1
FG
2
Drawer 1
3
DRSW
4
VDR
5
Drawer 2
6
GND
Electrical characteristics
Driving voltage
:
DC 24 V
Driving current:Maximum 0.8 A ( In 510 ms)
Drawer check signal:“L” = 0~0.5 V “H” = 3~5 V
Page 24

WTP-800 User Manual
21
5.5 Power Supply Interface
Figure 5-5
PIN No.
Signal Name
1
+24V
2
GND
3
N.C
SHELL
F.G
Printer end-Unetop DC-002 or similar products, user end-Unetop DC-002 or similar products.
Page 25
WTP-800 User Manual
22
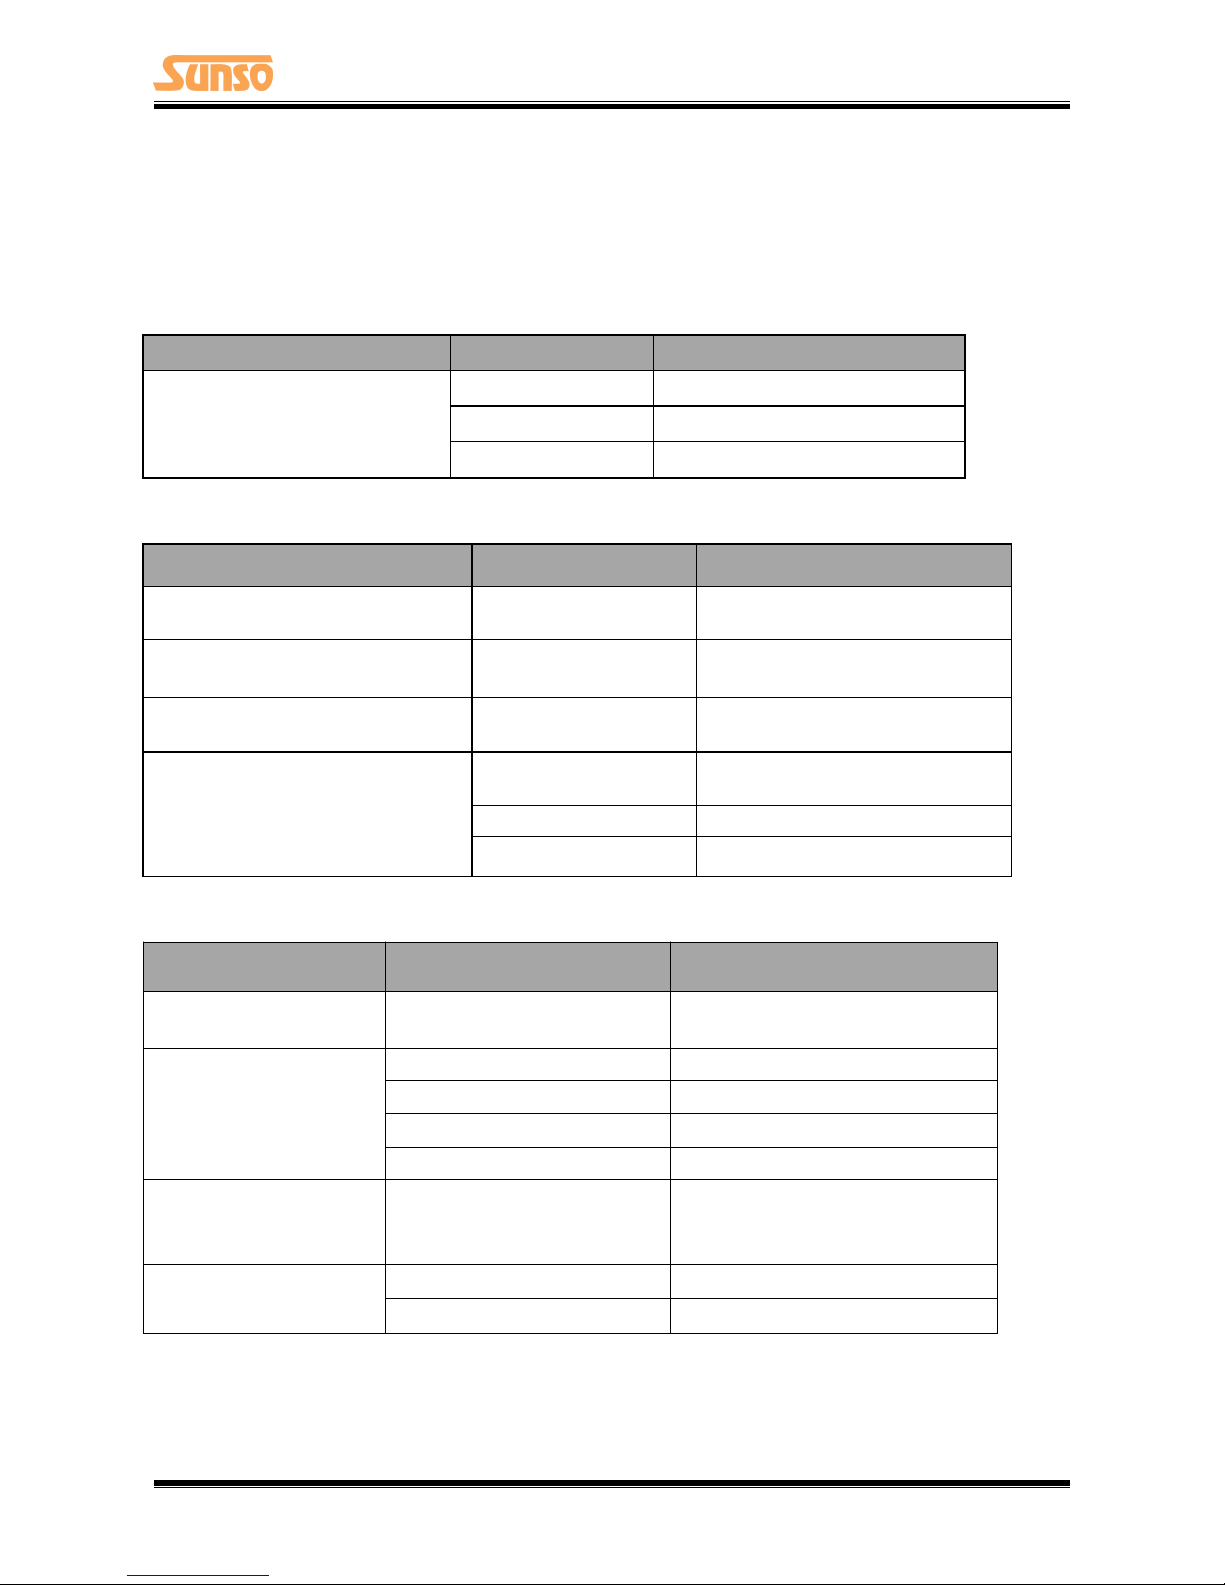
6 TROUBLESHOOTING
Your printer is very reliable, but occasionally problems may occur. This chapter provides information
on some common problems you may encounter and how to solve them. If you encounter problems
that you can not resolve, contact your dealer for assistance.
6.1 Printer Not Working
Problem Description
Probable Reason
Solution
LED not light, printer not working
Printer no power
Connecting the power supply
Printer not on
Turn on the printer
Circuit board broken
Contact with the dealer
6.2 LED Indicator and Beeper
Problem Description
Probable Reason
Solution
Paper LED always on
Paper near end
The roll paper is near end, the
printer can work normally
Error LED always on and beeper
alarms
Printer Cover open
Close the printer cover
Paper LED and Error LED always on
and beeper alarms
Paper end
Reload the roll paper
Error LED blinks and beeper alarms
Thermal print head
overheated
Turn the printer off and resume
when it cools
Overvoltage
Print with specified voltage
Low-voltage
Print with specified voltage
6.3 Troubles Occur During Printing
Problem Description
Probable Reason
Solution
Coloured stripe in the
paper
Paper near end
Reinstall the roll paper
Blurred printing or spot
Incorrect roll paper installation
Check if the roll paper is installed
Unqualified roll paper
Use recommended thermal roll paper
Dirty thermal head or print roller
Clean the thermal head or print roller
Low print density
Increase the print density level
Paper Jam
Paper strike
Open the printer cover, check the
paper path and remove jammed
paper
Vertical print words missing
Dirty thermal head or print roller
Clean the thermal head or print roller
Thermal head damaged
Contact your dealer for assistance
NOTE: The density of setting, please refer to "Utility Tool Manual"
Page 26

WTP-800 User Manual
23
6.4 Problems Emerge During The Paper Cutting
Problem Description
Probable Reason
Resolution
Cutter jam, the
movable cutter
cannot back
Cutter abrasion,
insufficient cutting
Replace the cutter
Worm gear and worm
wheel abrasion
Replace the worm gear and worm wheel
Motor burnt
Replace the motor
Paper scraps
Clean the paper scraps on the transmission system
Insufficient cutting
Cutter edge abrasion,
paper too thick
Replace the cutter
Paper jam
Thermal printer head
over heat
Reduce the density of printing
Driving too fast
Reduce the printer speed to the limit of thermal
printer head
Wrong paper feeding
position
Put the paper parallel with the paper mount and
insert into the space between platen roller and the
thermal printer head.
NOTE: The density of setting, please refer to "Utility Tool Manual"
6.5 Removing Jammed Paper
Warning:Do not touch the thermal print head because it becomes very hot after printing.
If the printer cover can be opened, operate it according to the next steps.
1)Turn off the printer and pull open cover button.
2)Remove jammed paper, reinstall the roll, and close the printer cover.
Page 27

WTP-800 User Manual
24
7 PRINTER CLEANING AND MAINTENANCE
Print quality might be degraded by dust, foreign substance, adhesive substance, or other pollution
materials stuck in the printer head or inside the printer.
When dirty, clean the print head as follows:
※ CAUTION
Make sure to turn off the printer prior to cleaning.
As the print head gets hot during printing, intending to clean the print head, turn the printer off
and wait approximately 2~3 minute before commencement.
When cleaning the print head, take care not to touch the heated portion of the print head.
Print Head is susceptible to damage from static electricity, etc.
Take care not to allow the print head become scratched and/or damaged in any way.
7.1 Cleaning Head
1) Open the Printer Cover and then use the cleaning pen to clean the head in the direction from
the center of the head to the edges.
2) After cleaning the head, do not use the printer until the alcohol used for cleaning evaporates
completely (1~2 min) and the printer has completely dried.
7.2 Cleaning Sensors, Roller and/or Paper Path
1) Open the printer cover and then remove the paper.
2) Remove any dust or foreign substance using dry cloth or cotton swab.
3) Soak the cloth or cotton swab in alcohol for medical use and use it to remove adhesive foreign
substances or other pollution materials.
4) After cleaning the parts, do not use the printer until the alcohol evaporates completely (1~2 min)
and the printer has completely dried.
※ Clean the parts whenever print quality or paper detection degraded.
 Loading...