

Page 1
The Working
Commodore
64
012345 678 901 2345 676901 23*+5678 901 .23456 /8V 01 _ 3456
;^ 5 & m | i2 3 456 789 012*5 6 7 M 0
I 'm a m
■
1
_
M W M W I
01 23 45 6r S9 m 23 ^ ^ 8 9 0 1 2 34 5™S 40
01_ 34567890 12 345 678 90123 456 7890
’01 23456 78901 234 56789 012 34567 890 12345 678 90: 234 5678 9123456 78'7 lt 2'3‘+ 567 890 123 4567870
01 23 456 78901 234 567 89 012 345 67890 123 45678 901 23456 789 12345 6 76 912 34567 890 123 456 7890
01 234 56789 01234 56 789 0}234 56 789 01 234 5A789 012 34 567 891 23456 789 12345 678 90123 456 7890
01 23 456 78 90123 456 78 901 234 56789 012 34567 890 12345 678 91234 567 891 23456 789 01234 567 890
01 23 456 78 90123 45678 90 123 45 678 90123 456 78901 234 56789 123 456 78 912 345 67890 123 45678 90
01 23 456 7^ 90123 456 78 901 234 56789 012 34567 890 12345 678 91234 567 891 23456 789 01234 567 890
01 23 456 78 90123 45678 90 123 45 678 90123 456 78901 234 56789 123 456 78 812 345 67890 123 45678 90
01 23 456 78 90123 456 78 901 234 56789 012 34567 890 12345 678 91234 567 891 23456 789 01234 567 890
01 23 456 78 90123 45^78 90 123 45 678 90123 456 78901 234 56789 123 456 78 912 345 67890 123 45678 90
01 23 456 78 90123 456 78 901 234 56789 012 34567 890 12345 678 91234 567 891 23456 789 01234 567 890
01 23 456 78 90123 45678 90 123 45678 901 23456 789 01234 567 89123 456 789 12345 6 789 012 345 678 90
S l 23 456 789 012 345 678 901 234-567 89012 345 678 90123 456 78912345 678 912 34 567 890 1 *.’345678 90
01 23 456 78 90123 45678 90 123 45 678 90123 456 78901 234 56789 123 456 78 912 345 67890 123 45678 90
01 23 456 78 90123 45678 901 23456 789 01234 567 89012 345 67891 234 567 89 123 456 78901 234 56789 0
01 23 456 78 90123 45678 90 123 45 678 90123 456 78901 234 56789 123 456 78 912 345 67890 123 45678 90
01 23 456 78 90123 456 78 901 234 56789 012 34567 890 12345 678 91234 567 891 23456 789 01234 567 890
01 23 456 78 90123 45678 90 123 45 678 90123 456 78901 234 56789 123 456 78 912 345 67890 123 45678 90
01 23 456 78 90123 45678 901 23456 789 01234 567 89012 345 67891 234 567 89 123 456 78901 234 56789 0
01 23 456 78 90123 456 78901 234 56789012 345 67890 123 45678 912 34567 891 23456 789 012 34 567 890
01 23 456 78 90123 45678 901 23456 789 01234 567 89012 345 67891 234 567 89 123 456 78901 234 56789 0
01 23 456 78 90123 456 78901 234 56789012 345 67890 123 45678 912 34567 891 23456 789 012 34 567 890
01 23 456 78 90123 456 78 901 234 56789 012 34567 890 12345 678 91234 567 891 23456 789 01234 567 890
01 23 456 78 90123 456 78 901 234 56789 012 34567 890 12345 678 91234 567 891 23456 789 01234 567 890
01 23 456 78 90123 456 78 901 234 56789 012 34567 890 12345 678 91234 567 891 23456 789 01234 567 890
?0 12345 67890 12 345 678 90 123 456 78901 234 56789 012 34567 891 23456 789 123 45678 901 23 456 789 r
70 1234567890123 45678901 234 56789012 345 67890 123 456 78912 345 67891234 567 890 1
701234 5,67 89012345678 901 23456789012345,6 789 012 345 678 912 345 67891
701234 5678901 234 567 890 123 456 789 012 3.45678901234567891
701234567890123 456789012 345678 901
7012345678901
701 2345678901
701
701
2*456 78901 23456 78 912 34 56789 12 345 67 890;2345 67 890
Lawrence
2 5 l§ S ^f W 2 3 ? 5 ™ 8W 2 3 ^TC 7 ™ 1 ™ 345,i 7890
34 56 789 123 45678 412 34567 890 12345 678 90
Page 2

Page 3
The Working
Commodore
64
A library of practical
subroutines and programs
David Lawrence
Page 4

Published by:
Sunshine Books (An imprint of Scot Press Ltd.)
Hobhouse Court,
19 Whitcomb Street,
London WC2 7HF
Copyright © David Lawrence
First published February 1983
Reprinted July 1983
Reprinted September 1983
Reprinted October 1983
All rights reserved. No part of this publication may be reproduced,
stored in a retrieval system, or transmitted in any form or by any
means, electronic, mechanical, photocopying, recording and/or
otherwise, without the prior written permission o f the Publishers.
ISBN 0 946408 02 5
Cover designed by
Three’s Company.
Photograph o f the Commodore 64
kindly supplied by Commodore UK.
Typeset and printed in England by
Commercial Colour Press, London E7.
2
Page 5
CONTENTS
Page
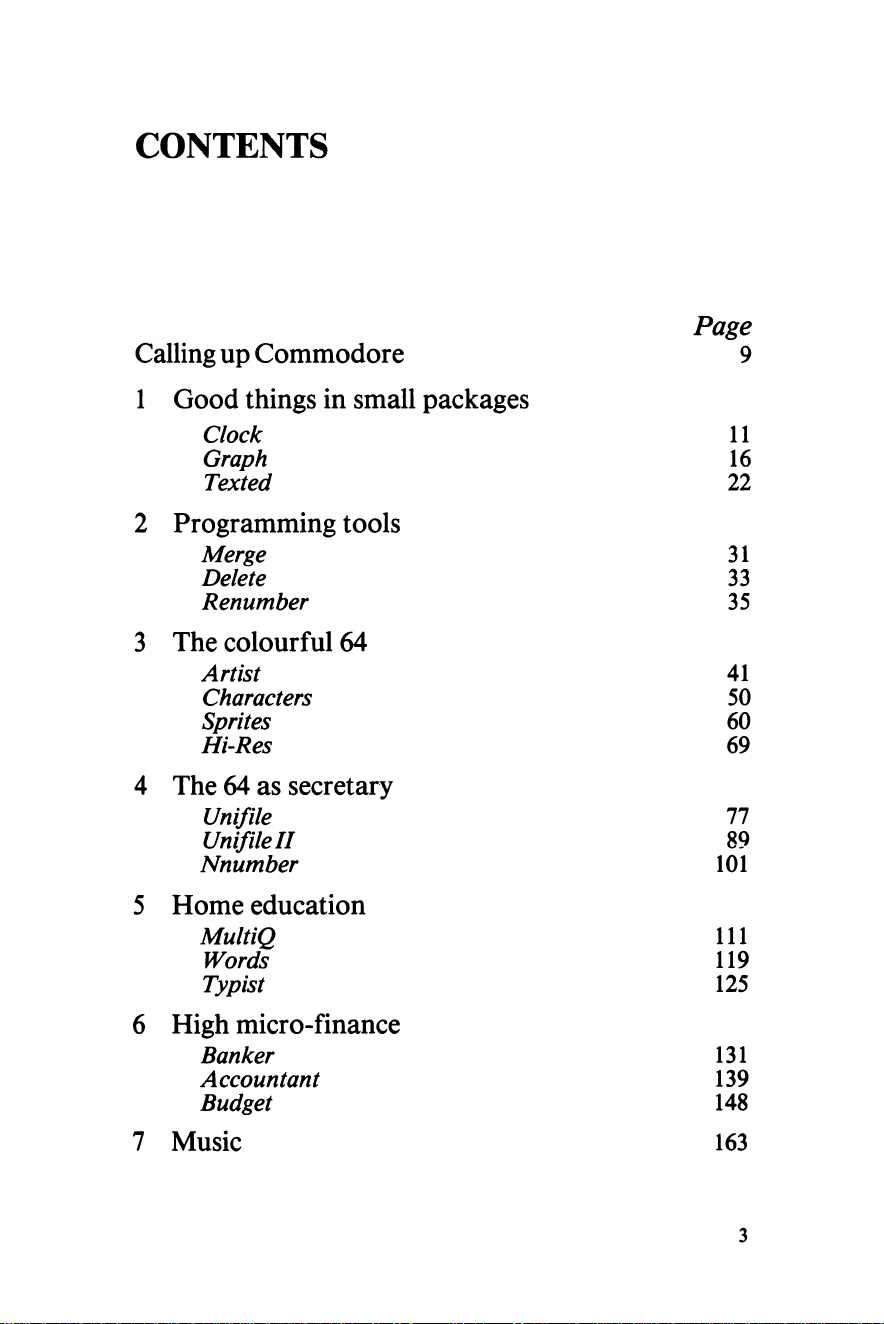
Calling up Commodore 9
1
Good things in small packages
Clock
Graph
Texted
2
Programming tools
Merge 31
Delete 33
Renumber 35
3 The colourful 64
Artist
Characters 50
Sprites 60
Hi-Res 69
11
16
22
41
4
The 64 as secretary
Unifile
Unifile II 89
Nnumber 101
Home education
5
MultiQ
Words
Typist
High micro-finance
6
Banker 131
Accountant
Budget
7
Music
77
111
119
125
139
148
163
3
Page 6

Page 7
Contents in detail
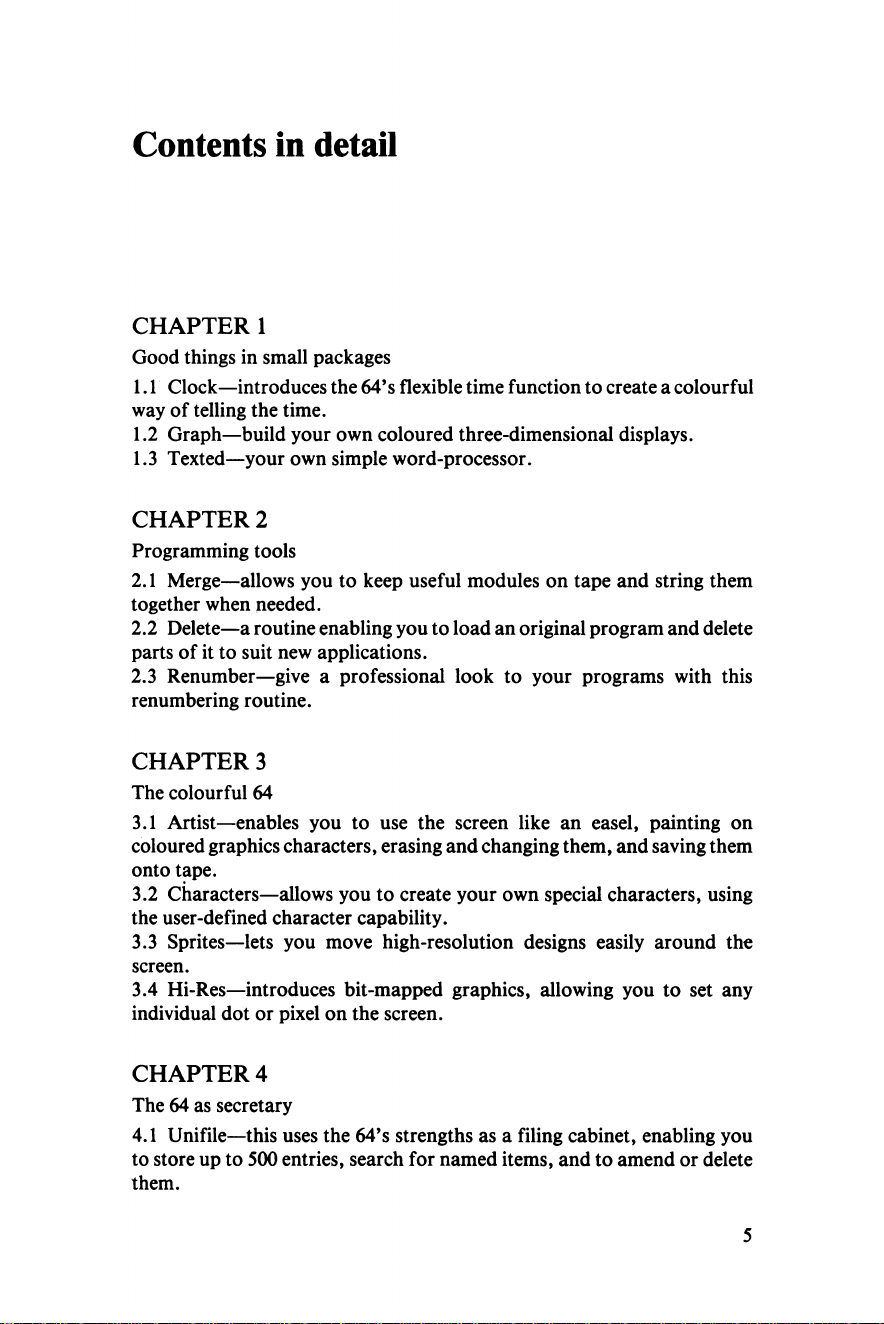
CHAPTER 1
Good things in small packages
1.1 Clock—introduces the 64’s flexible time function to create a colourful
way of telling the time.
1.2 Graph—build your own coloured three-dimensional displays.
1.3 Texted—your own simple word-processor.
CHAPTER 2
Programming tools
2.1 Merge—allows you to keep useful modules on tape and string them
together when needed.
2.2 Delete—a routine enabling you to load an original program and delete
parts of it to suit new applications.
2.3 Renumber—give a professional look to your programs with this
renumbering routine.
CHAPTER 3
The colourful 64
3.1 Artist—enables you to use the screen like an easel, painting on
coloured graphics characters, erasing and changing them, and saving them
onto tape.
3.2 Characters—allows you to create your own special characters, using
the user-defined character capability.
3.3 Sprites—lets you move high-resolution designs easily around the
screen.
3.4 Hi-Res—introduces bit-mapped graphics, allowing you to set any
individual dot or pixel on the screen.
CHAPTER 4
The 64 as secretary
4.1 Unifile—this uses the 64’s strengths as a filing cabinet, enabling you
to store up to 500 entries, search for named items, and to amend or delete
them.
5
Page 8
The Working Commodore 64
4.2 Unifile II—similar to the previous program, this tackles less
structured files and introduces the multiple search routine.
4.3 Nnumber—this copes with numeric data when you need to store
names of items along with a unit of quantity.
CHAPTER 5
Home education
5.1 Multiq—this program explains how to enter a series of questions and
answers which form the basis for multiple choice tests.
5.2 Words—similar to Multiq, here the questions take the form of
pictures.
5.3 Typist—improve your touch-typing with this short, neat program.
CHAPTER 6
High micro-finance
6.1 Banker—allows you to present your financial transactions in the form
of a neat bank statement.
6.2 Accountant—a simple way of keeping track of your accounts.
6.3 Budget—a powerful and flexible tool allowing you to plan your
finances over a 12-month period.
CHAPTER 7
Music
The 64 has no less than three sound synthesisers. This program explains
how to develop your own music and embellish other programs in this book.
6
Page 9
PROGRAM NOTES
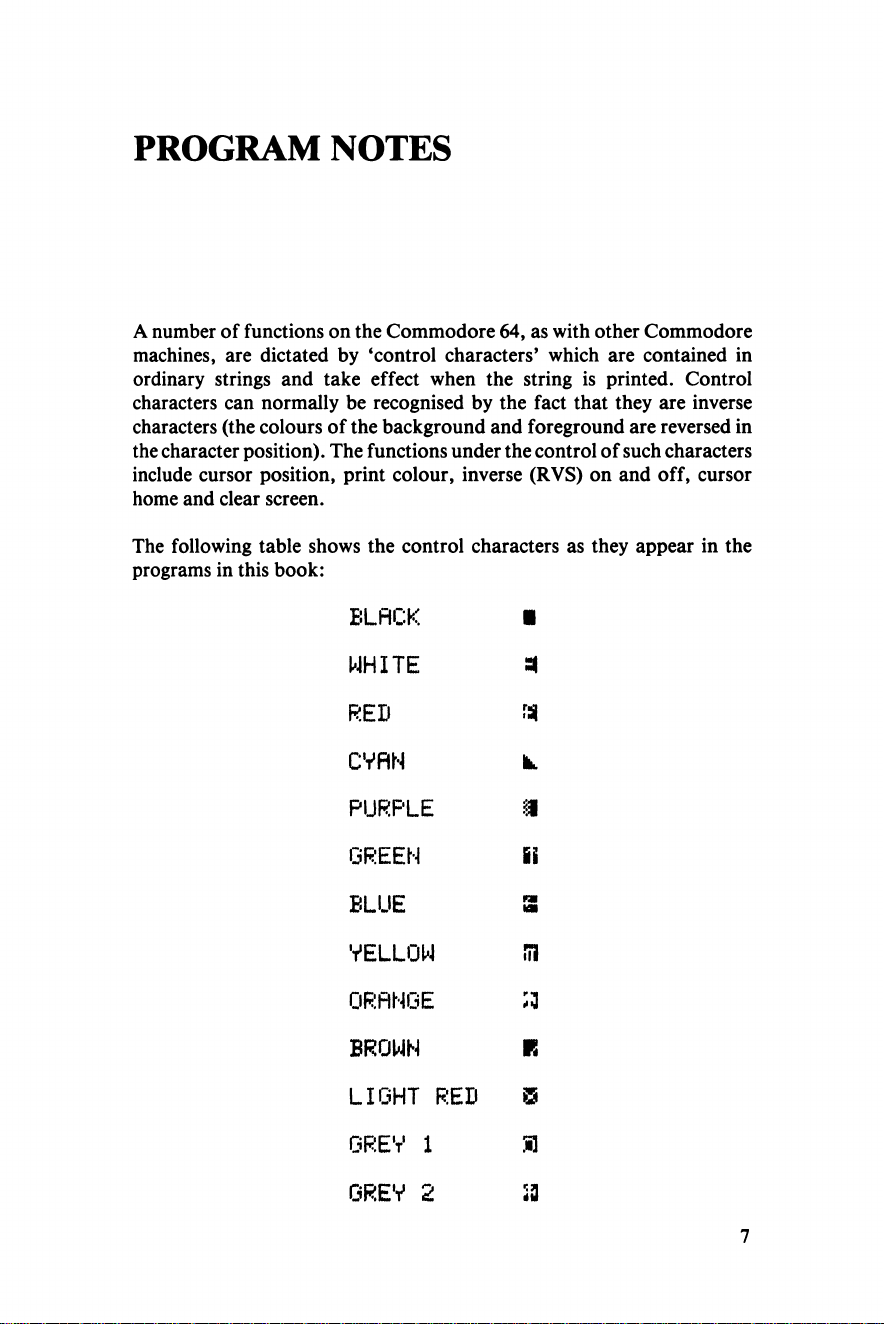
A number of functions on the Commodore 64, as with other Commodore
machines, are dictated by ‘control characters’ which are contained in
ordinary strings and take effect when the string is printed. Control
characters can normally be recognised by the fact that they are inverse
characters (the colours of the background and foreground are reversed in
the character position). The functions under the control of such characters
include cursor position, print colour, inverse (RVS) on and off, cursor
home and clear screen.
The following table shows the control characters as they appear in the
programs in this book:
BLACK ■
WHITE 4
RED »)
CYAN k
PURPLE m
GREEN ii
BLUE 3
YELLOW !il
ORANGE ;a
BROWN IS
LIGHT RED ffl
GREY 1 fl
GREY 2 »
7
Page 10
The Working Commodore 64
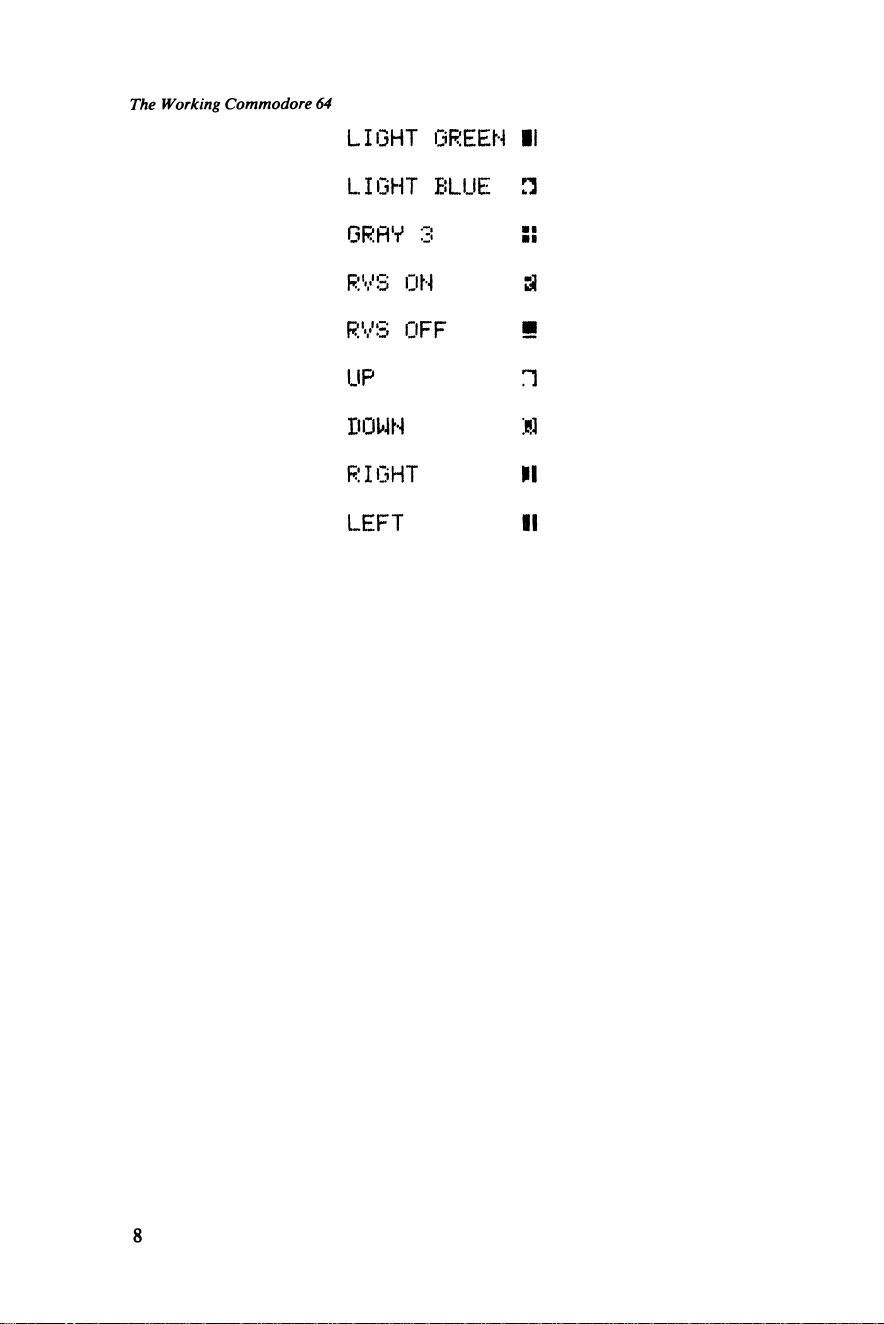
LIGHT GREEN II
LIGHT BLUE H
g r a y 3 ::
RVS ON a
RVS OFF a
up n
DOWN M
RIGHT PI
LEFT II
8
Page 11
Calling up Commodore
This book, and the series of which it forms a part, was undertaken to try
and fill what seemed to be a yawning gap in the provision of books for
home micro-owners. That gap was the absence of works aimed at fulfilling
the dream that I think almost every owner has, that the new machine will
not simply be a toy, not even an educational introduction to the silicon age,
but a tool, taking over all kinds of tasks and opening up all kinds of
possibilities. The majority of books consist either of trivia or assume too
great a desire—perhaps even the capacity—to experiment.
I wanted to write a book based on a solid collection of programs that
would be worth having—programs that would handle such areas as data
storage, finance, graphics, music, household management and education.
Discussion of programming techniques would arise out of the programs
themselves rather than as part of a curriculum of ‘things that should be
learned’. I hope that you will find the book that has emerged from that
desire a useful one, not only as a way of learning new programming
techniques, but also as a collection of programs in itself, all of them tested
by an independent assessor for errors and offering a wide range of
applications that might only have been open to those prepared to buy
expensive commercial software or already able to write substantial
programs to fit their own needs.
In addition to the programs in this book you have the parts of the
programs—not as silly as it sounds for the programs in the book are written
in ‘modular’ form. That is to say they are made up of clearly identifiable
functional units which, as you come to understand them, can be lifted out
and employed for your own purposes. Each module is commented upon
fully where it covers new ground and instructions are given for testing the
programs as the modules are entered.
In using this book, though you will find that there are sections where
general issues are discussed, it is not a book to be read but to be used. The
relevance of the comments and advice will only be apparent when you have
taken the plunge and and begun the task of entering what appear at first to
be dauntingly long and complex programs. Here, the modular approach
will help to prevent programs becoming unredeemable tangles of errors, so
do test modules as suggested, especially in the early stages.
In the end however, the success or failure of the book must be judged on
whether it helps you to enjoy your 64. It is very much a ‘64 book’, for while
the general structure of the book is based upon its two predecessors in this
9
Page 12
Calling up Commodore
series, the programs were adapted and new programs added to take
account of the 64’s extraordinary abilities. While writing a book such as
this is hard work, I have nevertheless enjoyed the polish that the 64 has
given to programs that on less capable machines might have been far less
exciting. In using these programs you won’t have to work quite as
hard—but the end product will be just as exciting.
Finally, no introduction to a book such as this could end without
expressing profound thanks to Commodore UK for all the facilities they
have made available and not least to Steve Beats at Commodore’s UK
headquarters, for his patience in answering the idiotic questions that
opened up the 64 for me.
10
Page 13
CHAPTER 1
Good things in small packages
The programs in this book are intended to be put to work on a variety of
important applications. Because many of the applications are complex, so
are many of the programs. That should not be taken to mean that useful
programs cannot be compressed into a small space. As an introduction to
the approach adopted, this chapter presents three relatively short
programs that are anything but toys.
1.1 CLOCK
This program provides quite a pleasant introduction to some of the 64’s
abilities—it’s easy to enter, fun to leave running on the family TV and it
makes good use of the 64*s flexible string and screen handling.
The program is exactly what it says, a clock, but you won’t see a circle
and hands appear when it is run. The 64 clock uses two lines sweeping
across the screen, left to right for the minutes and downwards for the
hours, dividing the screen into different colour areas. All of this is only
possible because the 64 has a flexible time function which can be set and
read in a straightforward way from within the program.
Clock: Table of Variables
CS
DT$
H
M
M1$,M2$
SS
TI$
MODULE 1.1.1
Address of the start of colour memory
Formatted adaptation of TI$
Hour value adjusted into screen units
Minute value adjusted into screen units
Two-colour strings displaying hour and minute values
Address of the start of the screen
A system variable containing the time by the internal
clock
11 y U W R E M tt *45 45 4** 4: $ $ $ 4- $ 4 4 4 4- 45 45 45 $ $ 4 45 4: $ 4 45 5t5 45
11010 REM INITIALISE TIME AND DISPLAY
11020
11030 POKE 5 3 2 8 0 , POKE 53281,1
11040 INPUT "riSKPLEASE INPUT THE HOUR (0
1-1 2 > : " : H$
11
Page 14
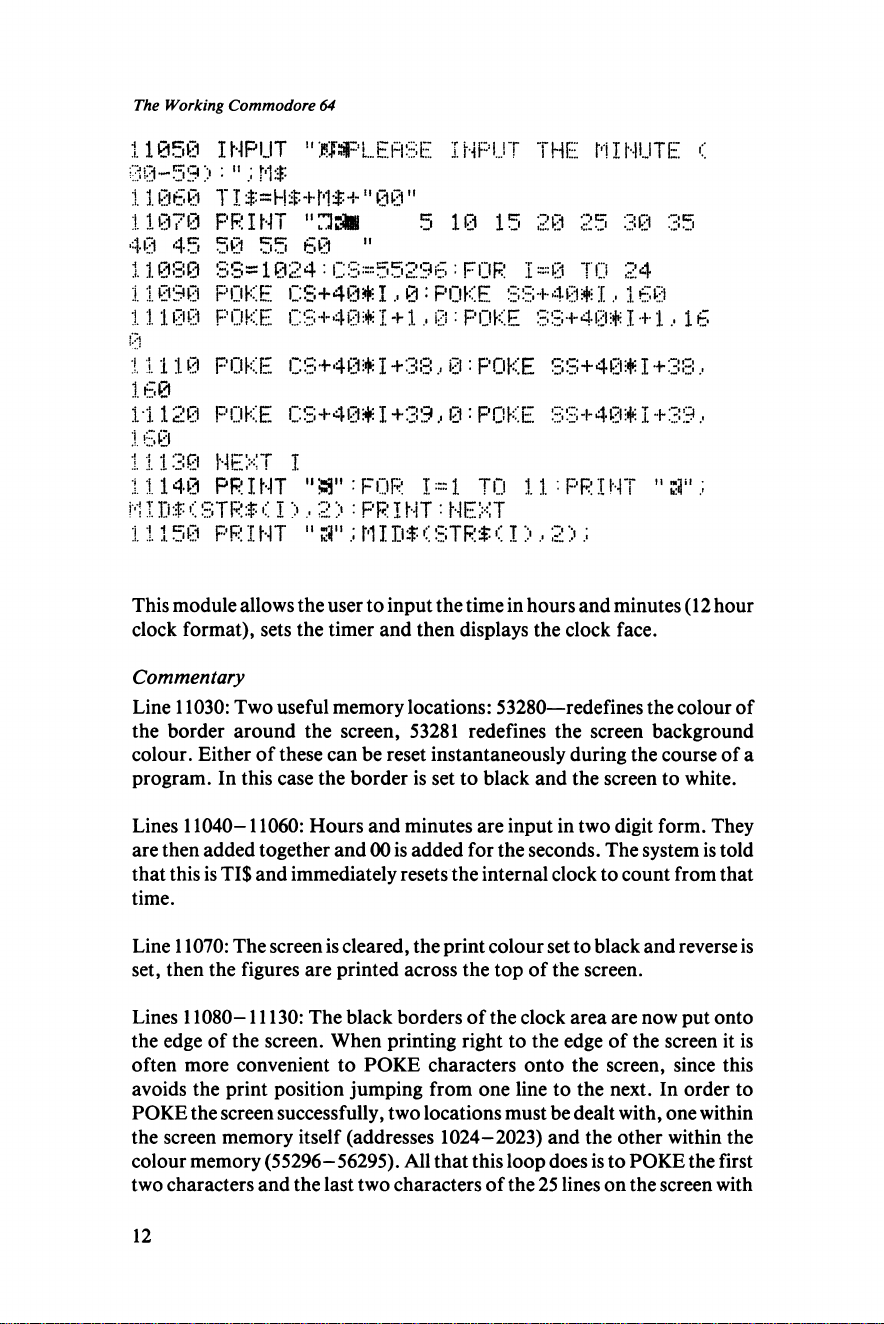
The Working Commodore 64
1.1050 INPUT "KFSPLEfiSE INPUT THE HI MUTE C
80-59) : " M$
11060 TI$=H$+M$+"00"
11070 PRINT " M l 5 10 15 20 25 80 35
40 45 50 55 60 "
11080 88= 102 4:CS= 552 96:FOR 1=8 TO 24
11090 POKE CS+40* 1 ,0 : POKE 88+40*1,160
11108 POKE 08+ 40* I+1,0:POKE 88+ 40*I+1,16
0
11110 POKE 08 +40*I+38,0:POKE 88+40 *I+38,
160
11120 POKE 08+40* I +39,0: POKE 88+40* I +39 ,
:! 60
11130 NEXT I
11140 PR I NT " S3" : FOR I = 1 TO 11: PR I NT " S";
MIM - <STR$ < I>.. 2> : PR IN T:NEXT
1 1150 PR I NT " a" ; MI D$ < STR$ ( I > , 2 ')
This module allows the user to input the time in hours and minutes (12 hour
clock format), sets the timer and then displays the clock face.
Commentary
Line 11030: Two useful memory locations: 53280—redefines the colour of
the border around the screen, 53281 redefines the screen background
colour. Either of these can be reset instantaneously during the course of a
program. In this case the border is set to black and the screen to white.
Lines 11040-11060: Hours and minutes are input in two digit form. They
are then added together and 00 is added for the seconds. The system is told
that this is TI$ and immediately resets the internal clock to count from that
time.
Line 11070: The screen is cleared, the print colour set to black and reverse is
set, then the figures are printed across the top of the screen.
Lines 11080-11130: The black borders of the clock area are now put onto
the edge of the screen. When printing right to the edge of the screen it is
often more convenient to POKE characters onto the screen, since this
avoids the print position jumping from one line to the next. In order to
POKE the screen successfully, two locations must be dealt with, one within
the screen memory itself (addresses 1024-2023) and the other within the
colour memory (55296-56295). All that this loop does is to POKE the first
two characters and the last two characters of the 25 lines on the screen with
12
Page 15
Chapter 1 Good things in small packages
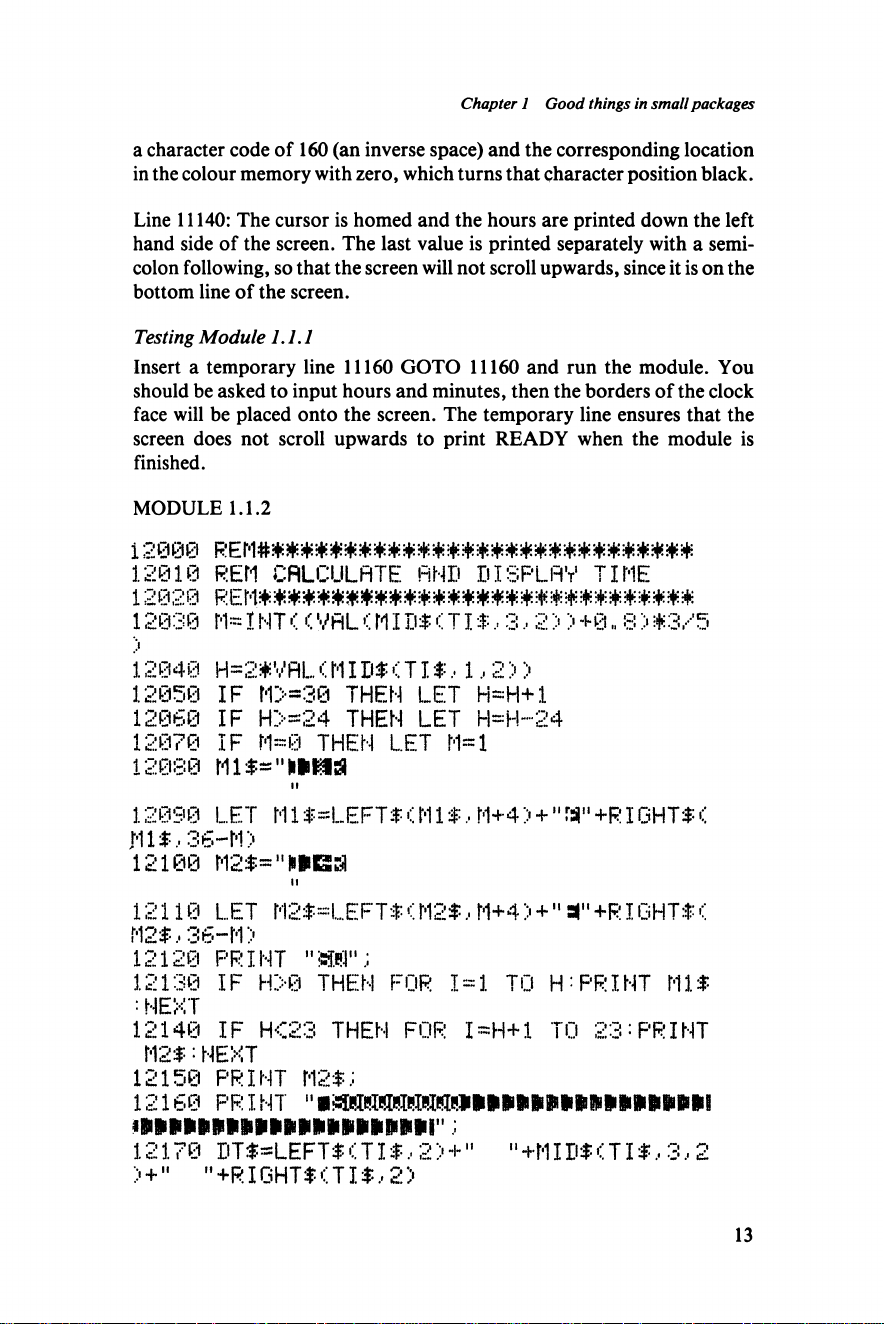
a character code of 160 (an inverse space) and the corresponding location
in the colour memory with zero, which turns that character position black.
Line 11140: The cursor is homed and the hours are printed down the left
hand side of the screen. The last value is printed separately with a semi
colon following, so that the screen will not scroll upwards, since it is on the
bottom line of the screen.
Testing Module 1.1.1
Insert a temporary line 11160 GOTO 11160 and run the module. You
should be asked to input hours and minutes, then the borders of the clock
face will be placed onto the screen. The temporary line ensures that the
screen does not scroll upwards to print READY when the module is
finished.
MODULE 1.1.2
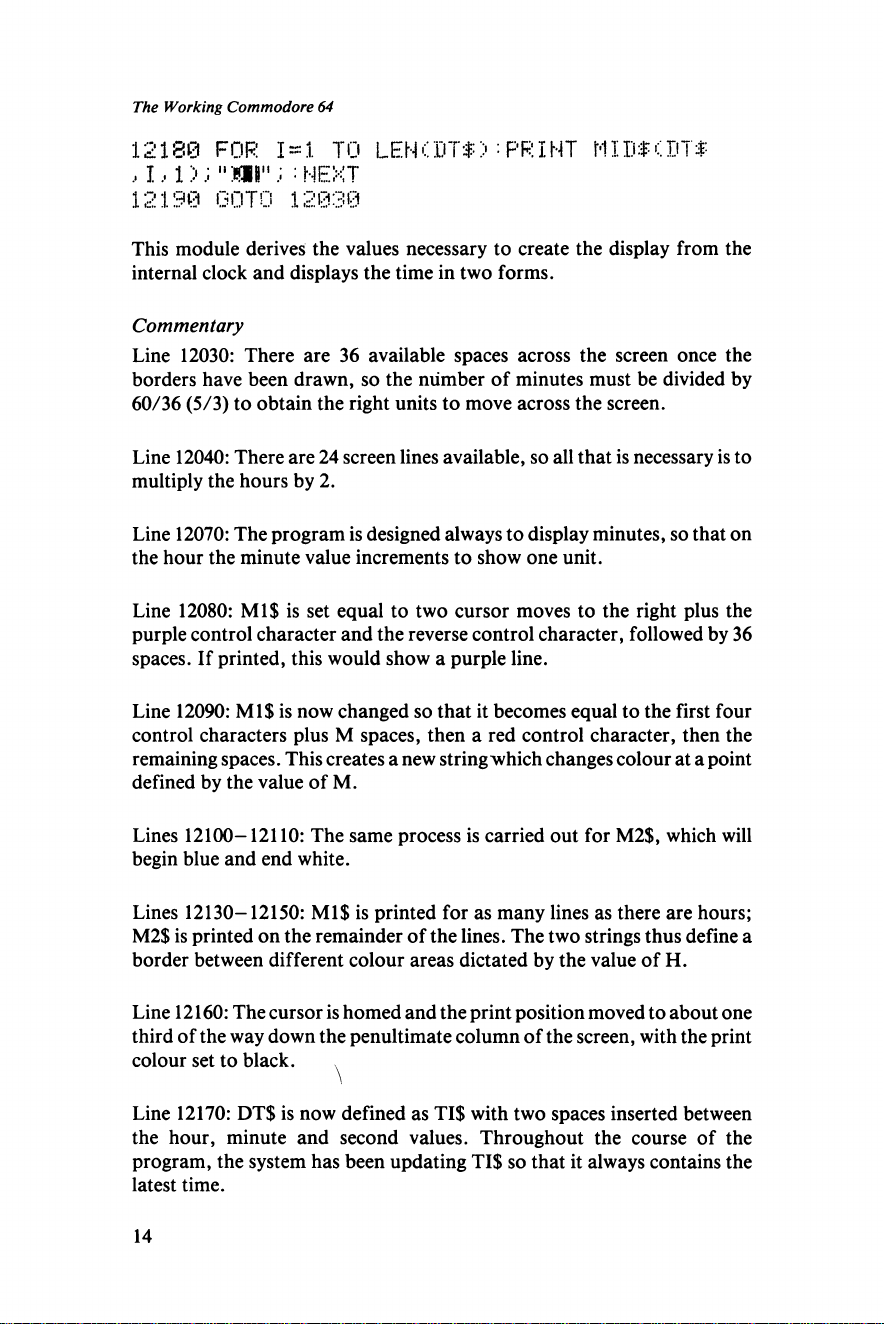
i 2000 R E M * * ****** * * * * * * * * * * * * * * * * * * * * * *
12010 REM CALCULATE AND DISPLAY TIME
12020 R E m m m m m M m w M m w M M M M *
12030 M~ I NT < < VAL < MI D$ < TI $, 3,2 > ) + 8 8 > *3/5
12040 H=2*VAL < MID$< TI$,1,2 >)
12050 IF M>=30 THEN LET H=H+1
12060 IF H>=24 THEN LET H=H-~24
12070 IF M~0 THEN LET M=1
12080 Mi$-"w*as
12090 LET M 1 $=LEFT-f < M 1 $, M+4> + " W' +RIGHT$ <
J11SG36-M)
12100 M2$="H«5SI
II
12110 LET M2$ =LEFT#(M2$ ,M+4 > + " +RIGHT$<
M2$,36-M >
12120 PRINT "SW";
12138 IF H>0 THEN FOR 1=1 TO H:PRINT Ml$
: NEXT
12148 IF H<23 THEN FOR I=H+1 TO 2 3 :PRINT
:NFVT
12150 PRINT M2$;
12160 p r i n t 11
12170 DT $=LEFT$ i TI $ .• 2 > +" "+MIDf CTIf, 3,2
> + " "+RIGHT$CTJ.$,2>
13
Page 16
The Working Commodore 64
12180 FOR 1 = 1 TO LENCDT$) • PRINT MIDGET*
,i,i);"Ml"; :next
12190 GOTO 12030
This module derives the values necessary to create the display from the
internal clock and displays the time in two forms.
Commentary
Line 12030: There are 36 available spaces across the screen once the
borders have been drawn, so the number of minutes must be divided by
60/36 (5/3) to obtain the right units to move across the screen.
Line 12040: There are 24 screen lines available, so all that is necessary is to
multiply the hours by 2.
Line 12070: The program is designed always to display minutes, so that on
the hour the minute value increments to show one unit.
Line 12080: Ml$ is set equal to two cursor moves to the right plus the
purple control character and the reverse control character, followed by 36
spaces. If printed, this would show a purple line.
Line 12090: Ml$ is now changed so that it becomes equal to the first four
control characters plus M spaces, then a red control character, then the
remaining spaces. This creates a new string which changes colour at a point
defined by the value of M.
Lines 12100-12110: The same process is carried out for M2$, which will
begin blue and end white.
Lines 12130-12150: Ml$ is printed for as many lines as there are hours;
M2$ is printed on the remainder of the lines. The two strings thus define a
border between different colour areas dictated by the value of H.
Line 12160: The cursor is homed and the print position moved to about one
third of the way down the penultimate column of the screen, with the print
colour set to black. ^
Line 12170: DT$ is now defined as TI$ with two spaces inserted between
the hour, minute and second values. Throughout the course of the
program, the system has been updating TI$ so that it always contains the
latest time.
14
Page 17
Chapter 1 Good things in small packages
Line 12180: DT$ is printed down the right hand side of the sc^en. The
method used is to print one character at a time, then move the cursor down
and back.
Testing Module 1.1.2
Your clock should now be ready to run, with four different rectangles of
colour marking the lines for hours and minutes. The time is displayed
digitally on the right-hand side of the screen.
Having said what it should do, almost inevitably there will be errors in
what you have entered. If not here, then in later programs. From the kind
of queries that come to me it seems that many micro-owners find it very
difficult to know how to begin to deal with such errors and perhaps a few
basic guidelines might be of help:
1) Make the most of the help available to you. If there is an error message,
make sure you take account of it, noting the line where the error occurs and
the type of error.
2) Don’t run the program again to see if it will work a second time. If it does
work then you are in a worse state than you started since you have lost the
chance of running down the error for the present.
3) Use the direct mode (commands entered directly from the key board
rather than program lines) to print out the values of all the variables in lines
that appear to have an error. A ludicrous value will often give you the clue
as to what is going wrong. An awful lot of almost indetectable errors result
from the simple misspelling of a variable name, substituting 1 for I for
instance.
4) Follow the program through in your head or on paper, using simple
values so that you can see exactly what it should be doing at each point.
5) Don’t be too hasty in making an alteration until you are sure that it is the
only one you want to make. Once you enter a change to a line, all your data
disappears and with it your chance to make further checks without running
the program again.
6) Save your program regularly as you discover errors and/or add new
lines. Many errors in final programs result from changes which were
entered into a program but never finally recorded on tape. All my
programs commence with the following 3 lines:
1 GOTO 3
2 SAVE ‘XXXX’:STOP
3 REM
These three lines allow programs to be saved with the command ‘GOTO
2’ (provided ‘XXXX’ is replaced with the program name. One incidental
side-benefit is that I can always start my programs with GOTO 1 rather
than having to remember the first line number of the main program.
15
Page 18
The Working Commodore 64
Everybody makes mistakes in designing and entering programs, the
difference is whether they learn to cope with their mistakes competently.
Summary
Whether you like the clock is something only you can say. Personally I
find it quite attractive. Regardless of the clock, however, the techniques of
slicing up strings and of POKEing the screen and colour memory
contained within the program will come in useful in a wide variety of
programs, so it is worth entering the program and ensuring that you
understand how it functions.
1.2 GRAPH
If you want to understand this program you can do no better than to look
at the box in which your 64 arrived. There you will find a colourful
three-dimensional bar chart—this program is an attempt to reproduce the
prbgram that generated the chart. I say attempt, because on successfully
reproducing the chart on the box I discovered that the data it was given to
work on had been carefully chosen to hide the limitations of the tightly
packed bars. Other data led to the graphics characters making up the bars
knocking holes in neighbouring bars, making the whole thing a great deal
less attractive than the box display.
This program, then, is a compromise, producing a less packed display
but one which will work on any set of data and still look as good—so good,
in fact, that when you have completed entering it, it is the kind of program
to call the family in to impress them with your wizardry.
Colourful and practical, the displays produced will no doubt find many
applications. In addition the program provides a simple introduction to
the subject of saving data on tape and later reloading it.
Graph: Table of Variables
COS
Three-character string used to decide colour of different
bars on the graph
F$
F1$,F3$
F2$
HH(2,6)
NB
ND
NH$
NV$(2)
Formatting string of right cursor characters
Formatting strings of down cursor characters
Temporary string derived from F$
Array holding data for graph
Number of banks in front of each other (1-3)
Number of columns along the horizontal axis (1-6)
Name for horizontal axis
Names for each separate bank
TT$
16
Page 19
Chapter 1 Good things in small packages
Temporary string used to format printing of vertical axis
names
UV Number to be represented by each unit on the vertical axis
MODULE 1.2.1
11010 REM ACCEPT DATA
11020 rem******************************
11030 POKE 53231,15: INPUT "ZfcMDO VOU WIS
H TO LOAD FROM TAPE CV/N) : " ; 9:$
11040 IF Q$="V" THEN 12420
11050 PRINT "Zf cJ ii ii MM iiU SW jRRPH "
11060 PRINT "EtoTHERE ARE 19 UNITS ON THE
VERT ICALLV„"
11070 PRINT "MBINPUT NUMBER TO BE REPRES
ENTED BV EACH"
11080 INPUT "UNIT:";UV
11090 INPUT "MjaHAME FOR HORIZONTAL AXIS"
NH$
11100 PRINT "ISttYOU CAN HAVE ONE TO SIX
COLUMNS."
11110 INPUT "38HOW MANY WOULD VOU LIKE:";
ND
11120 PRINT "MMHYOU CAN HAVE ONE TO THRE
E BANKS."
11138 INPUT "SHOW MANY WOULD YOU LIKE.:";
NB
11140 FOR I=@ TO NB-1
11150 PRINT "MHNflME FOR VERTICAL AXIS";I
+1 ; :INPUT NV$(I) :NEXT I
11168 DIM H H< 2■6>
11170 PRINT :FOR 1=0 TO NB-1
11180 FOR ,J=1 TO ND
11190 PRINT "m NPUT BAN K";I+1;" VAL UE";J
; ": : INPUT T
11200 IF I NT <T/UV>> 19 THEN PRINT "Wv'ALUE
T00 HI OH.":GOTO 11190
11210 H H<I,J)= T ;NEXT J,I
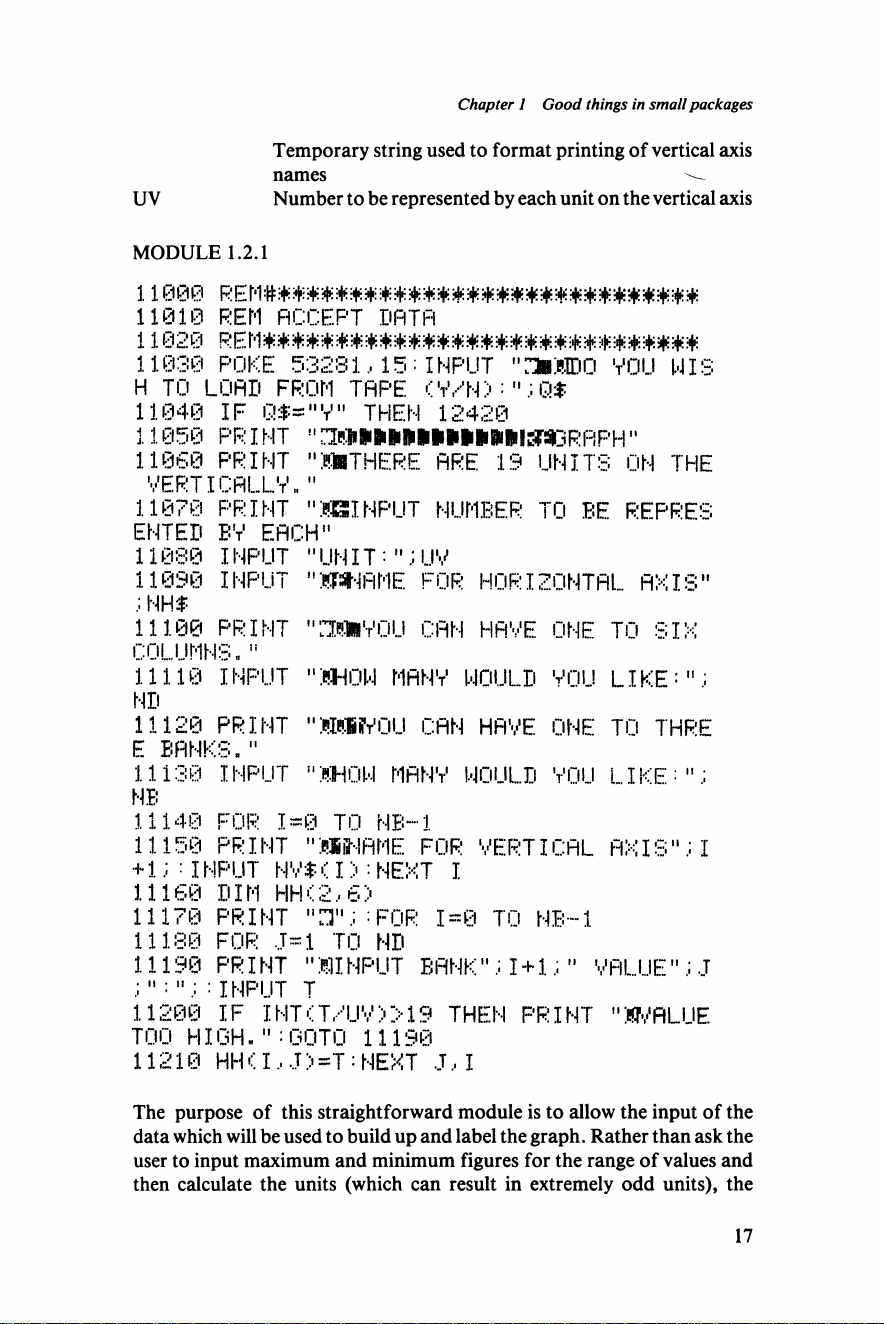
The purpose of this straightforward module is to allow the input of the
data which will be used to build up and label the graph. Rather than ask the
user to input maximum and minimum figures for the range of values and
then calculate the units (which can result in extremely odd units), the
17
Page 20
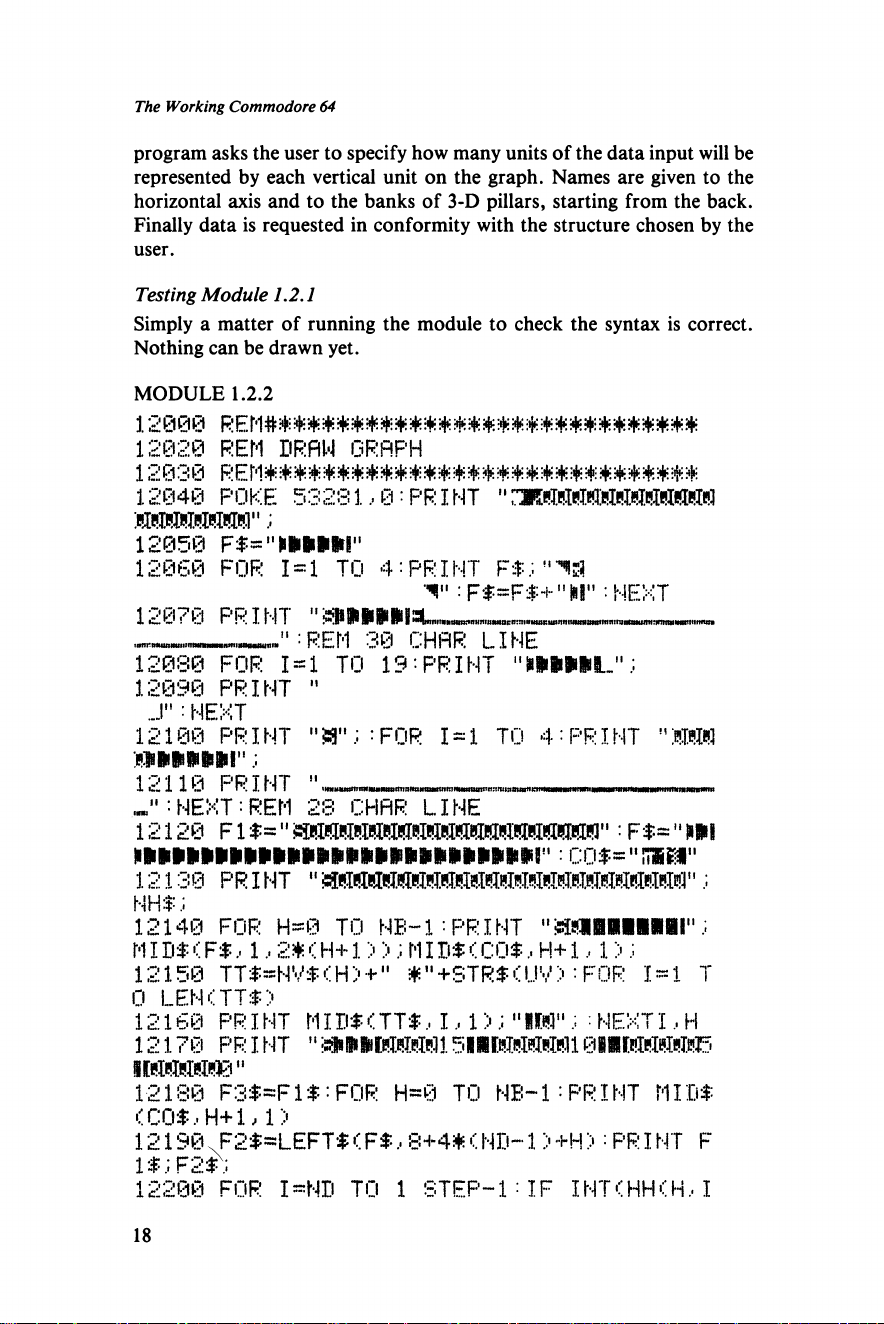
The Working Commodore 64
program asks the user to specify how many units of the data input will be
represented by each vertical unit on the graph. Names are given to the
horizontal axis and to the banks of 3-D pillars, starting from the back.
Finally data is requested in conformity with the structure chosen by the
user.
Testing Module 1.2.1
Simply a matter of running the module to check the syntax is correct.
Nothing can be drawn yet.
MODULE 1.2.2
12000 REM######*####*##*####*#*##*##***
12020 REM DRAW GRAPH
12030 REM#*#**#*#**********#*****#*****
12040 POKE 53281,0 : PR I NT "
WtiMBMeiMtil"
12050
12060 FOR 1=1 TO 4=PRINT F$ ;"^3
T' :Ff*Ff+"M" •NEXT
12078 PRINT
—_____ ___
.":REM 30 CHAR LINE
__
___________________
12080 FOR 1 = 1 TO 19:PRINT
12090 PRINT "
J" ■NEXT
12180 PRINT "53"; :F0R 1 = 1 TO 4 : PRINT "WSW
:e!»ftftK* ir;
12110 PRINT "
__
___
_______
___________
_______
_
NEXT=REM 28 CHAR LIN E
12120 FIf= " = F f= "»»I
: c of=nnira"
12130 PRINT "SSBMiJcMilMBlCliSMiillcMilMfiMRMtlMfiM";
NH f;
12140 FOR H=0 TO N B-1 : PR I NT " ci?liBill0ln;
m i m < f $ , 1,2* ( h+1 > >; m i nf (co$ .• h+ 1,1 >;
12150 TTf= NVf(.H > + " #"+STRf<UV> : FOR 1 = 1 T
0 LEN ( TTf )
12160 PR I NT MI Ilf- CTTf ,1,1 >; " IW "; : NEXT I , H
12170 PR I NT "5*i»KM(!Ml 0IIDMHMM5
IKWWWWB"
12180 F3f =F1 $;FOR H*0 TO N B -1 :PRINT MIDf
(COf,H+1,1>
12190 F2f=LEFTf<Ff,8+4*(N B-1)+H >•PRINT F
If ;F2r;
12280 FOR I =NH TO 1 ST EP-1=IF I NT (. HH < H , I
18
Page 21
Chapter 1 Good things in small packages
>/jjV;j=0 THEN 12276
12210 FOR J=1 TO I HI < HH < H .• I ) XUV > +H
12228 IF I NT < HH< H .■ I > /UV) =9 THEN 12270
12230 IF ,T=1 THEN PRINT "RS T ';MIDT<CO$,
H+l, 1) : ,!i i r j f lili1'
12240 IF J> 1 THEN PRINT " ! ® ■ n i H I " ;
12245 REM CHARS ARE " !„ . S U . 19. II. If
12250 NEXT J
12260 PRINT " m T
12270 PRINT:F2*=LEFT$(F2T,LEW<F2$>-4
PR
INT F1$;F2$;:NEXT I
12280 Flf=Fl$+"M"
12290 F 2 T=!.... EFT $ < F$, 9+4* (ND~ 1 >) : PR I NT
;F2$;
12380 NEXT H
12310 FOR 1=1 TO N B •PRINT F3$;
12320 F2 $=LEFT$ (FT ,9+4* U ~ 1> >:PRINT F 2$ ;
; FOR J =1 TO NB
12330 IF J>1 OR HHC2. I — 1 >~0 THEN PRINT i!
US'I^II!" ‘
12340 PRINT "MM ";:NEXT J,I
12350 GET flf;IF " THEN 12350
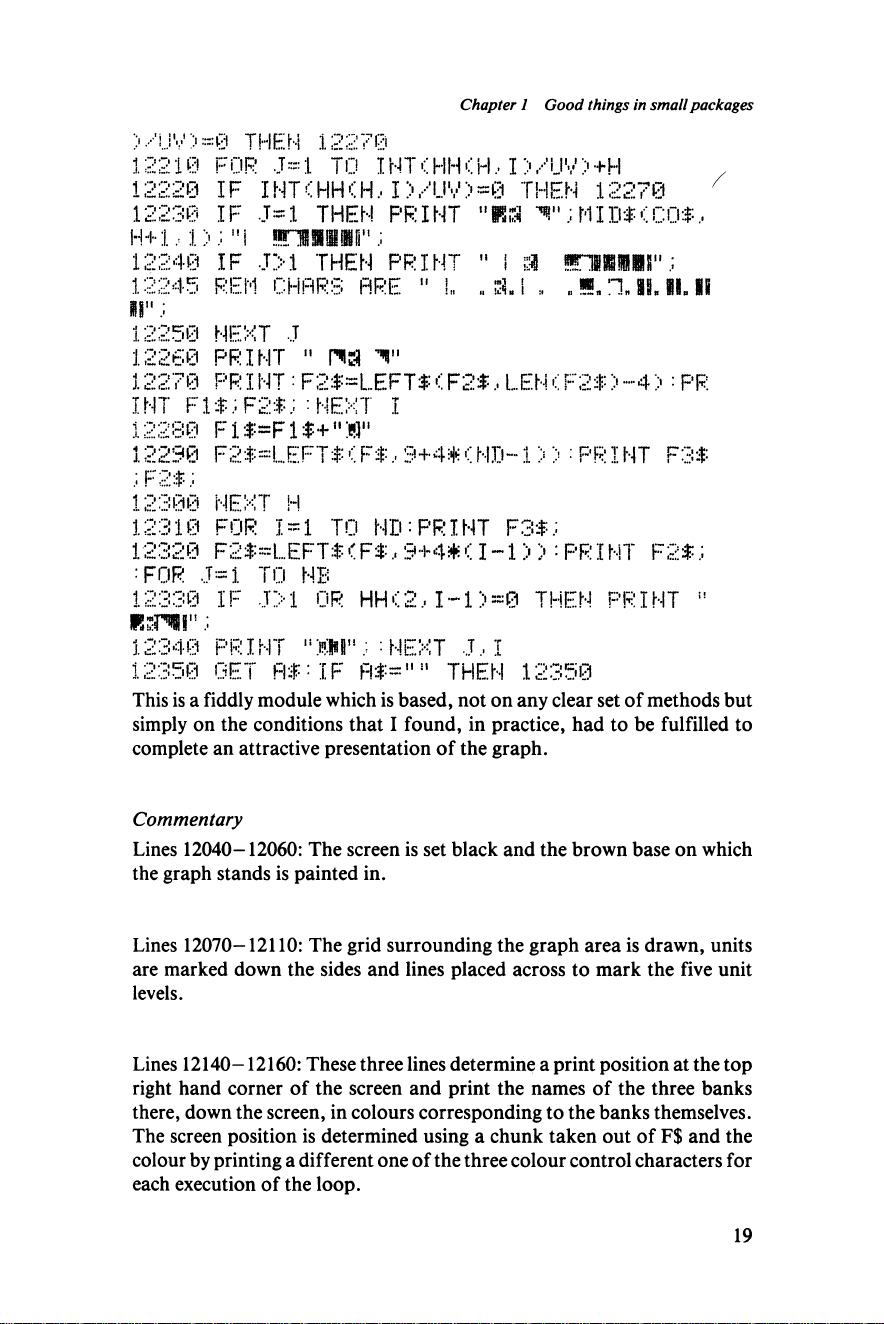
This is a fiddly module which is based, not on any clear set of methods but
simply on the conditions that I found, in practice, had to be fulfilled to
complete an attractive presentation of the graph.
3$
Commentary
Lines 12040-12060: The screen is set black and the brown base on which
the graph stands is painted in.
Lines 12070-12110: The grid surrounding the graph area is drawn, units
are marked down the sides and lines placed across to mark the five unit
levels.
Lines 12140-12160: These three lines determine a print position at the top
right hand corner of the screen and print the names of the three banks
there, down the screen, in colours corresponding to the banks themselves.
The screen position is determined using a chunk taken out of F$ and the
colour by printing a different one of the three colour control characters for
each execution of the loop.
19
Page 22
The Working Commodore 64
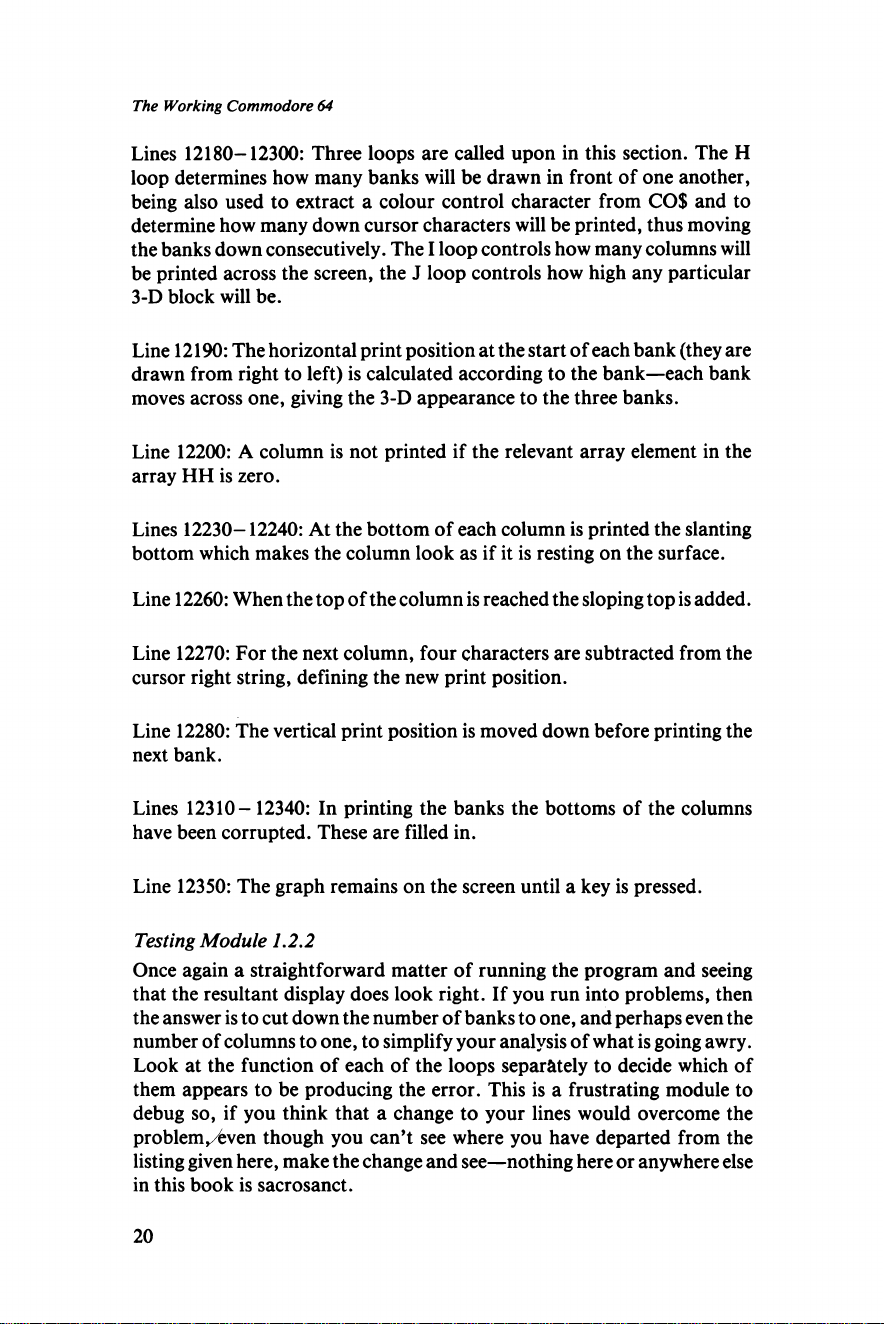
Lines 12180-12300: Three loops are called upon in this section. The H
loop determines how many banks will be drawn in front of one another,
being also used to extract a colour control character from COS and to
determine how many down cursor characters will be printed, thus moving
the banks down consecutively. The I loop controls how many columns will
be printed across the screen, the J loop controls how high any particular
3-D block will be.
Line 12190: The horizontal print position at the start of each bank (they are
drawn from right to left) is calculated according to the bank—each bank
moves across one, giving the 3-D appearance to the three banks.
Line 12200: A column is not printed if the relevant array element in the
array HH is zero.
Lines 12230-12240: At the bottom of each column is printed the slanting
bottom which makes the column look as if it is resting on the surface.
Line 12260: When the top of the column is reached the sloping top is added.
Line 12270: For the next column, four characters are subtracted from the
cursor right string, defining the new print position.
Line 12280: The vertical print position is moved down before printing the
next bank.
Lines 12310- 12340: In printing the banks the bottoms of the columns
have been corrupted. These are filled in.
Line 12350: The graph remains on the screen until a key is pressed.
Testing Module 1.2.2
Once again a straightforward matter of running the program and seeing
that the resultant display does look right. If you run into problems, then
the answer is to cut down the number of banks to one, and perhaps even the
number of columns to one, to simplify your analysis of what is going awry.
Look at the function of each of the loops separately to decide which of
them appears to be producing the error. This is a frustrating module to
debug so, if you think that a change to your lines would overcome the
problem^ven though you can’t see where you have departed from the
listing given here, make the change and see—nothing here or anywhere else
in this book is sacrosanct.
20
Page 23
Chapter 1 Good things in small packages
MODULE 1.2.3
1.2360 INPUT "nflaCCiO YOU WISH TO SAVE DATA
(V/TO :";Q$:IF Q$="N" THEN END
12370 INPUT ".'((POSITION TAPE CORRECTLY, T
HEN EPETURNS— " Q$ : R$=CHR$ < 13 )
12380 OPEN 1,1,1,"GRAPH"
12390 PRINT #1,NB ;R $;N D ;R$ ;NH $;R f ;UV
12400 FOR I=0 TO NB-1 :PRINT#1,N V$ (I>:FOR
•J=0 TO ND = PR I NT# 1, HH (I, J ) : NEXT J , I
124.1.0 CLOSE 1: END
12420 INPUT " IM POS IT IO N TAPE CORRECTLY
THEN ^RETURNS— ";Q$ = DIM N V$ <2 >,H H (2,6 >
12430 OPEN 1,1,0,"GRAPH"
12440 INPUT# 1, N B , ND , N H$ , IJV
12450 FOR 1=0 TO NB-1 :1 NPUT# 1, NVf( I) ’• FOR
J=0 TO N D :INPUT#1,HH (I,J ):NEXT J ,I
12460 C L 0 S E 1 : G 0 T0 12000
12470 GOTO 12470
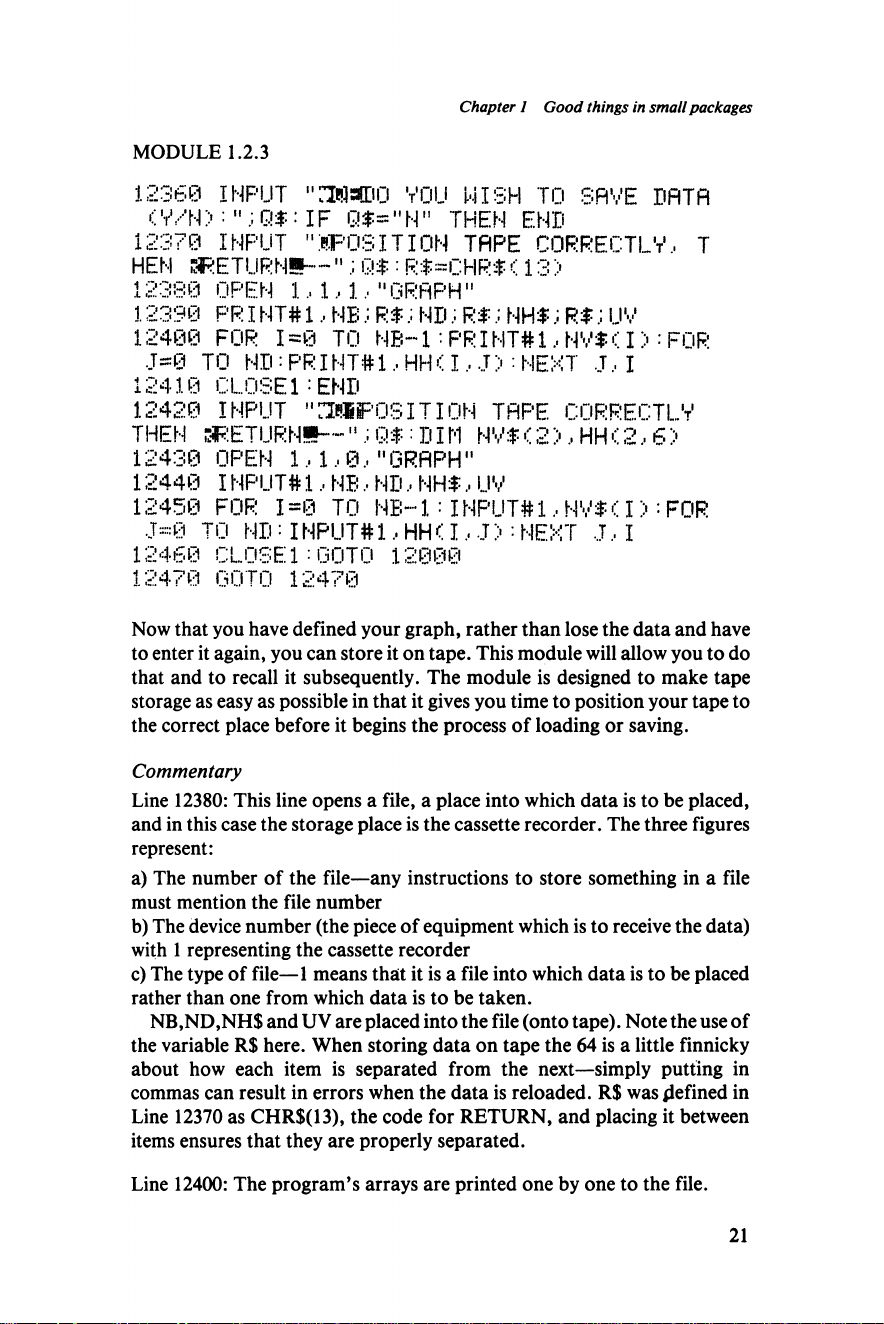
Now that you have defined your graph, rather than lose the data and have
to enter it again, you can store it on tape. This module will allow you to do
that and to recall it subsequently. The module is designed to make tape
storage as easy as possible in that it gives you time to position your tape to
the correct place before it begins the process of loading or saving.
Commentary
Line 12380: This line opens a file, a place into which data is to be placed,
and in this case the storage place is the cassette recorder. The three figures
represent:
a) The number of the file—any instructions to store something in a file
must mention the file number
b) The device number (the piece of equipment which is to receive the data)
with 1 representing the cassette recorder
c) The type of file—1 means that it is a file into which data is to be placed
rather than one from which data is to be taken.
NB,ND,NH$ and UV are placed into the file (onto tape). Note the use of
the variable R$ here. When storing data on tape the 64 is a little finnicky
about how each item is separated from the next—simply putting in
commas can result in errors when the data is reloaded. R$ was defined in
Line 12370 as CHR$(13), the code for RETURN, and placing it between
items ensures that they are properly separated.
Line 12400: The program’s arrays are printed one by one to the file.
21
Page 24
The Working Commodore 64
Line 12410: When you have finished with a file for the time being it must be
CLOSEd. Failure to do this will result in an error the next time you try to
OPEN a file of the same number.
Line 12420: This is the part of the module which loads back data into the
64. The only difference between the specifications for the two types is that
this one has a file type of 0, which means a file from which data will be
taken.
Lines 12440- 12450: Data which Was printed into the file is now recalled.
The safest way to build up your loading routine is to edit the line numbers
of the SAVE routine and change the PRINT commands to INPUT. That
way you know that the routine will pick up the data in exactly the same
order as it was stored. If the data is picked up in the wrong order, not only
will it make nonsense of your program but an error may result in the
program stopping.
Testing Module 1.2.3
The simple test for this module is whether you can input data to the
program, save it on tape and then reload it.
Summary
This program is a tribute to the quality of the 64’s graphics set and screen
handling. Once you have entered it you begin to see that it is not at all such a
difficult thing to use loops and simple calculations to draw shapes and
apparently solid objects at controlled places on the screen and that such
displays are one of the most effective ways of getting the facts across that
you will ever find.
1.3 TEXTED
The final program in this chapter is an attempt to provide some of the
simpler functions of a word processor in a relatively short and
uncomplicated program. The program is, of course, no match for a
professionally written machine-code based word processor, nor would it
be the tool I would choose for writing a book like this one, if only because
Commodore UK were kind enough to provide me with a copy of their
excellent Easyscript program for the purpose. Nevertheless the program
works and I would and have chosen it in preference to a typewriter for
many purposes because of the flexibility it provides in entering and editing
text before it is finally output onto paper. Of course, if you don’t possess a
printer, then you will need to rush out and buy one to get the most out of the
program.
22
Page 25
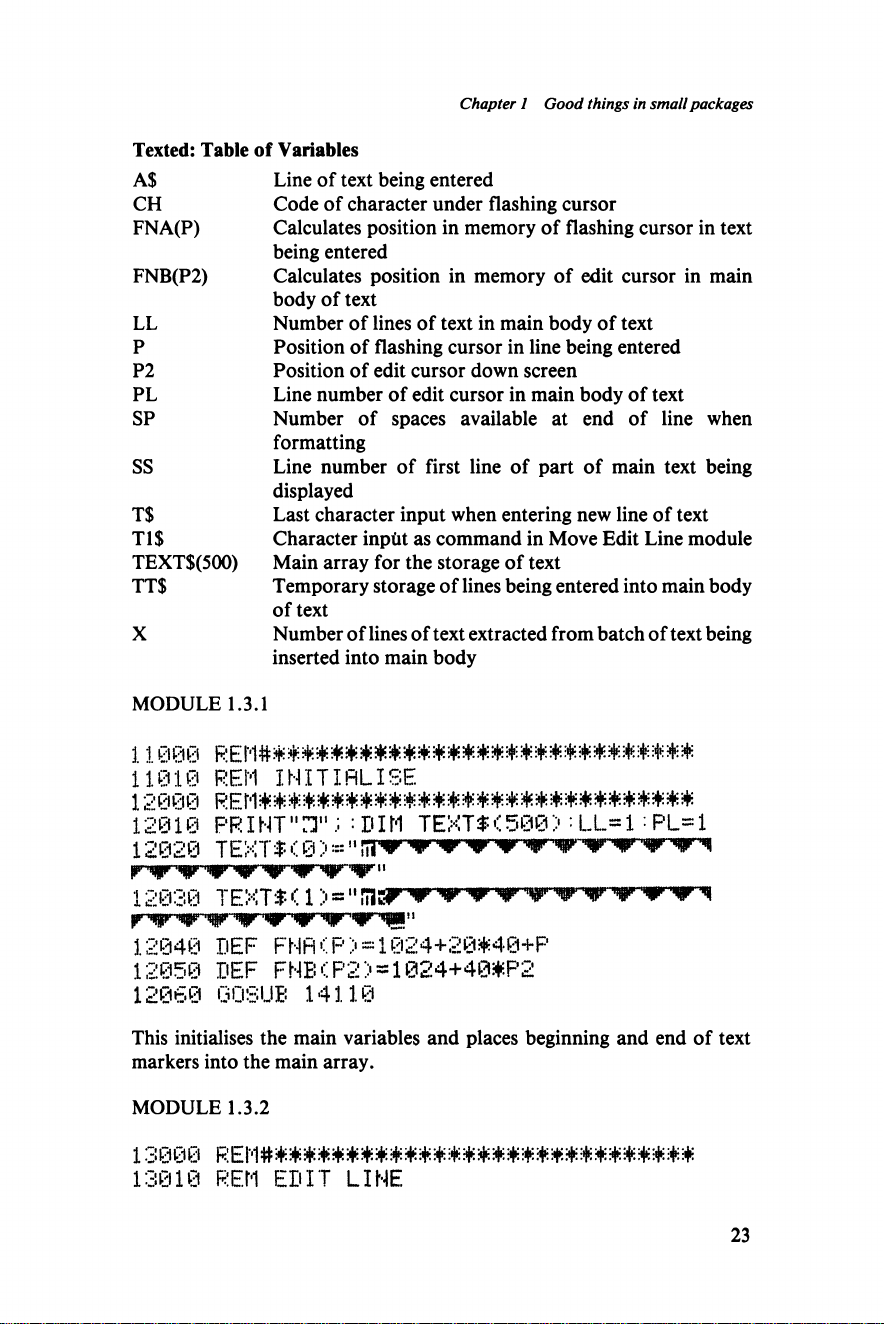
Texted: Table of Variables
A$
CH
FNA(P)
FNB(P2)
LL
P
P2
PL
SP
SS
T$
Tl$
TEXT$(500)
TT$
Line of text being entered
Code of character under flashing cursor
Calculates position in memory of flashing cursor in text
being entered
Calculates position in memory of edit cursor in main
body of text
Number of lines of text in main body of text
Position of flashing cursor in line being entered
Position of edit cursor down screen
Line number of edit cursor in main body of text
Number of spaces available at end of line when
formatting
Line number of first line of part of main text being
displayed
Last character input when entering new line of text
Character inpht as command in Move Edit Line module
Main array for the storage of text
Temporary storage of lines being entered into main body
of text
Number of lines of text extracted from batch of text being
inserted into main body
Chapter 1 Good things in small packages
MODULE 1.3.1
31088 REM#*#***#####*#####**#*##*##*#*#
11010 REM INITIALISE
1 i?080 REM#*,#**#*####*#*#**##*####**#9|6**
12010 PRI NT" IT ; :DIM TEXT$< 580 >•LL =1•PL=1
12820 TEXT$ (0 >=: " nr
12030
t e x t $< i >=*• ms?
M
12040 DEF FNfl<P>*1024+20#40+P
12850 DEF FNBCP2)*1024+40#P2
12060 GOSUE 14110
This initialises the main variables and places beginning and end of text
markers into the main array.
MODULE 1.3.2
13000
13010 REM EDIT LI HE
23
Page 26
The Working Commodore 64
13020 REM#*#***#*##****#**##*#*#**#***#
13030 AT=" "
13040 F -0 : PR I NT " 11
.: AT
13050 CH=P EEK(FN R(P )>:POKE 54272+FNfi(P >,
14 : POKE FHfl (P > .■ 160
1306© FOR TT=1 TO 5:NEXT T T ;POKE FNR(P),
CH
13070 GET T T • IF TT-~"" THEN GOTO 13050
13080 IF TT=CHRT< 13> O.R LEhKAT>=81 THEN
GOSUB 14000:GOTO 13050
13090 IF TT="T" THEN GOSUB 15000:POKE PN
B (PL--SS >, 62: GOTO 13040
13109 IF TT="4-M AND P O @ THEN 1.3040
13110 IF TT="+-" flNDP=0 THEN P=LEN<fl$>-l =
GOTO 13150
13120 IF P>0 AND TT=CHRT<20> THEN AT=LEF
TT A T , P--1 > +M I DT < A T, P + 1 > : P=P -5.: GOTO 1.315@
13130 IF TT=CHRTi20> THEN 13050
13140 IF T $ 0 ,,"ANDT$0"ll" AND T $ 0 " M" TH
EN AT=LEFTT<AT ,P > +TT+MIDT < AT ,P+ 1>:p=p+1
1.3150 PR I NT " A T : I
F TT =" II" AND P>0 THEN P*P-1
13160 IF TT="M" AND F'<LEN<AT>-1 THEN P=P
+ 1
13170 GOTO 3.3050
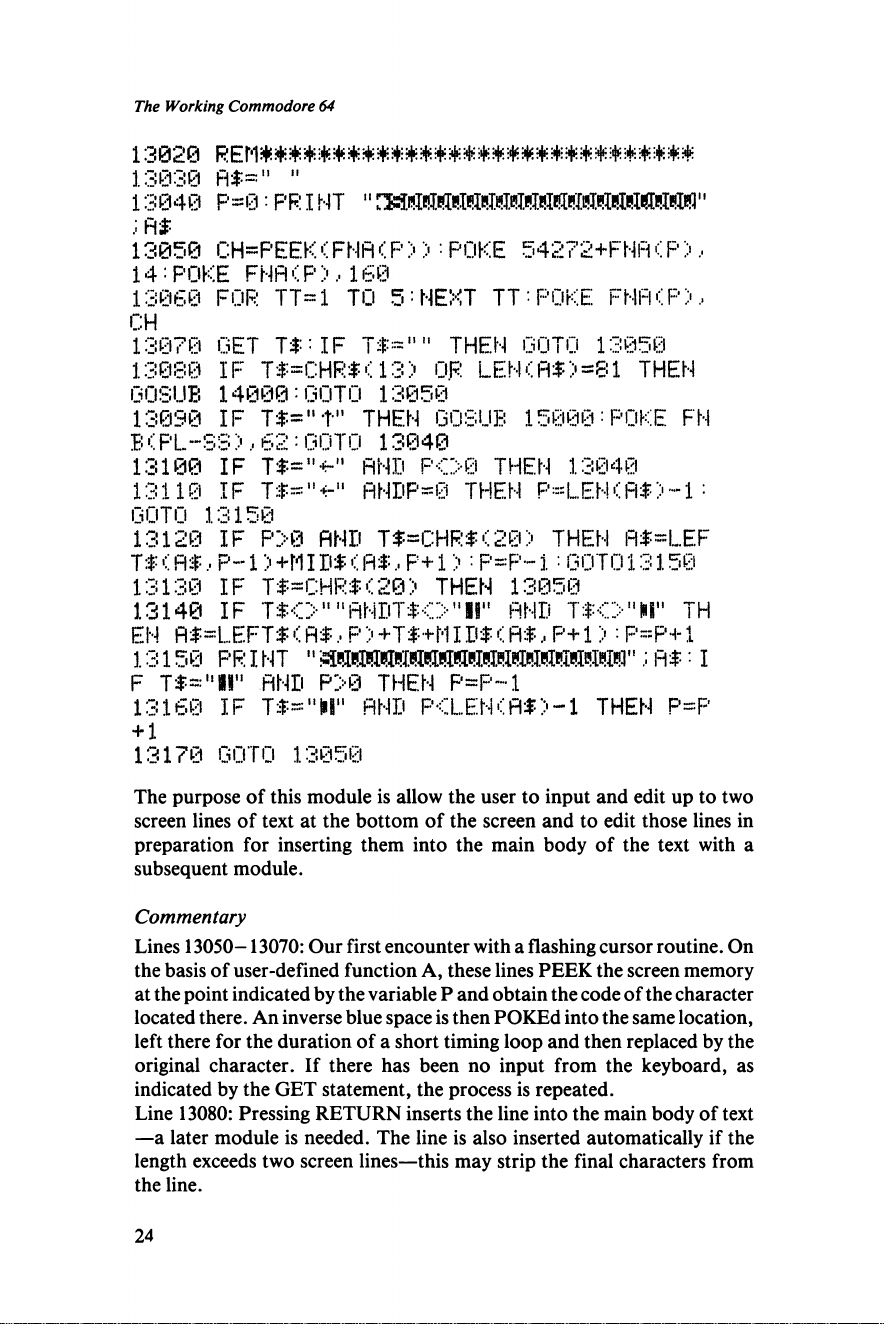
The purpose of this module is allow the user to input and edit up to two
screen lines of text at the bottom of the screen and to edit those lines in
preparation for inserting them into the main body of the text with a
subsequent module.
Commentary
Lines 13050-13070: Our first encounter with a flashing cursor routine. On
the basis of user-defined function A, these lines PEEK the screen memory
at the point indicated by the variable P and obtain the code of the character
located there. An inverse blue space is then POKEd into the same location,
left there for the duration of a short timing loop and then replaced by the
original character. If there has been no input from the keyboard, as
indicated by the GET statement, the process is repeated.
Line 13080: Pressing RETURN inserts the line into the main body of text
—a later module is needed. The line is also inserted automatically if the
length exceeds two screen lines—this may strip the final characters from
the line.
24
Page 27
Chapter 1 Good things in small packages
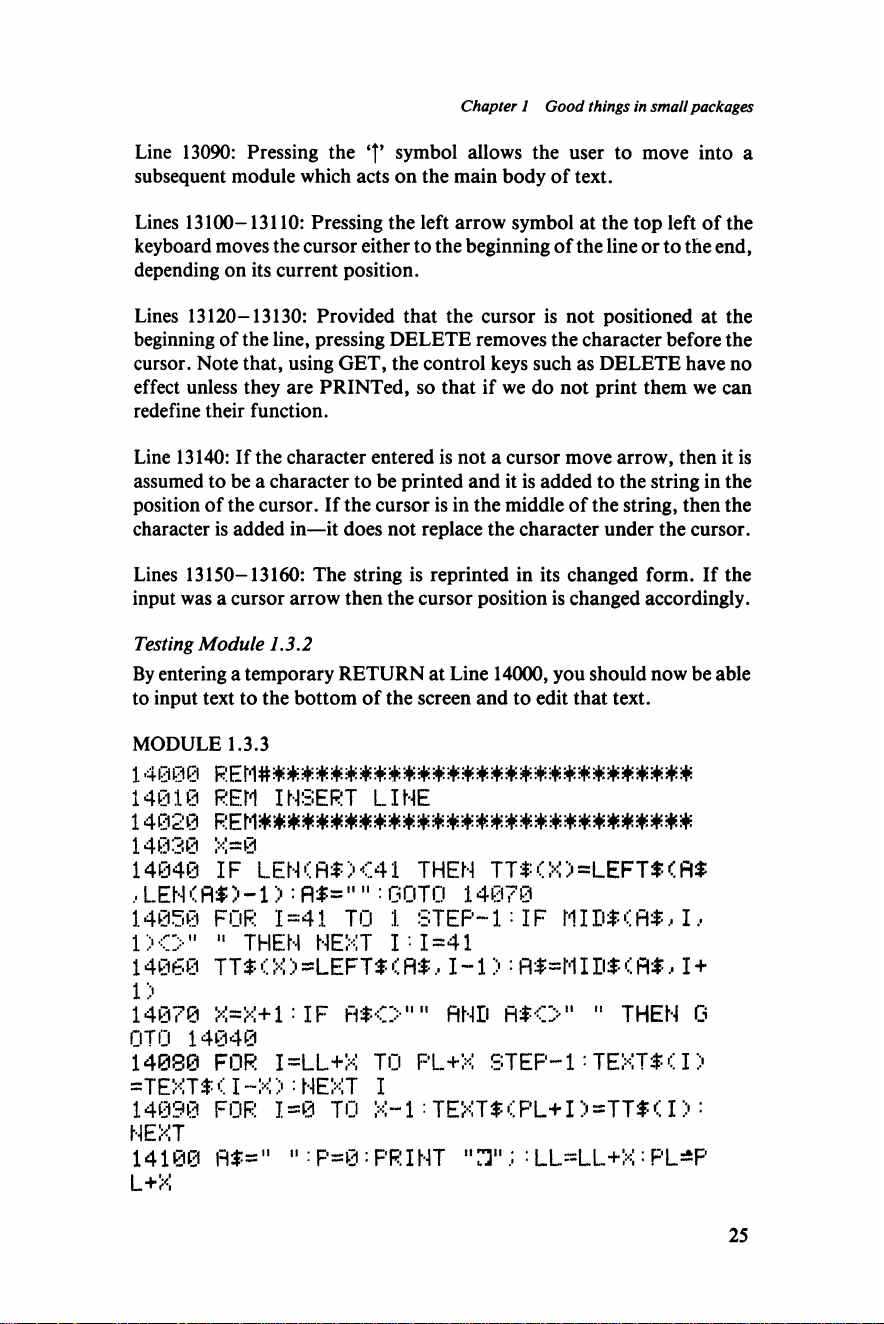
Line 13090: Pressing the symbol allows the user to move into a
subsequent module which acts on the main body of text.
Lines 13100-13110: Pressing the left arrow symbol at the top left of the
keyboard moves the cursor either to the beginning of the line or to the end,
depending on its current position.
Lines 13120-13130: Provided that the cursor is not positioned at the
beginning of the line, pressing DELETE removes the character before the
cursor. Note that, using GET, the control keys such as DELETE have no
effect unless they are PRINTed, so that if we do not print them we can
redefine their function.
Line 13140: If the character entered is not a cursor move arrow, then it is
assumed to be a character to be printed and it is added to the string in the
position of the cursor. If the cursor is in the middle of the string, then the
character is added in—it does not replace the character under the cursor.
Lines 13150-13160: The string is reprinted in its changed form. If the
input was a cursor arrow then the cursor position is changed accordingly.
Testing Module 1.3.2
By entering a temporary RETURN at Line 14000, you should now be able
to input text to the bottom of the screen and to edit that text.
MODULE 1.3.3
14000 REM#*###########**#*#############
14010 REM INSERT LINE
14020 REM******************************
14030 X-0
14040 IF LEN<fl$X41 THEN TT$<X)=LEFT$<R$
,LEN<)-1> =fl*="":GOTO 14070
14050 FOR 1=41 TO 1 ST EP-1=IF MID$<fl$, I .•
1)0 " " THEN NEXT I 1=41
14060 TT$ <X > =LEFT$<fl$,I ■-1> =fl$*MID$<A*. I +
1)
14070 X= X+ 1: IF fifO"" AND R I O " " THEN G
0T0 14040
14030 FOR I=LL+X TO PL+X STEP-1=TEXT#<I>
=TEXTT<I-X):NEXT I
14090 FOR 1=0 TO X-l : TEXT $ < P L+1) =TT $ <. I > :
NEXT
14100 A $=" ":P = 0:PRINT " I T ;:LL=LL+X = PL-P
L+X
25
Page 28
The Working Commodore 64
14119 SS=PL“7 -IF* LL-PL<8 THEN 85=11-15
14120 PR I NT " 1'; ;
"SSU.; : IF S8-C0 THEN SS=6
14130 FOR I=SS TO SS+15:PR IN T " l il " ; TEXT$<
I >; : IF LEN < TEXT $ (. I >) <40 THEN PR I NT
14140 IF I — F‘L~ 1 THEN PRINT CHRf<62>
14150 NEXT I : PRI N T "SSi
":RETURN
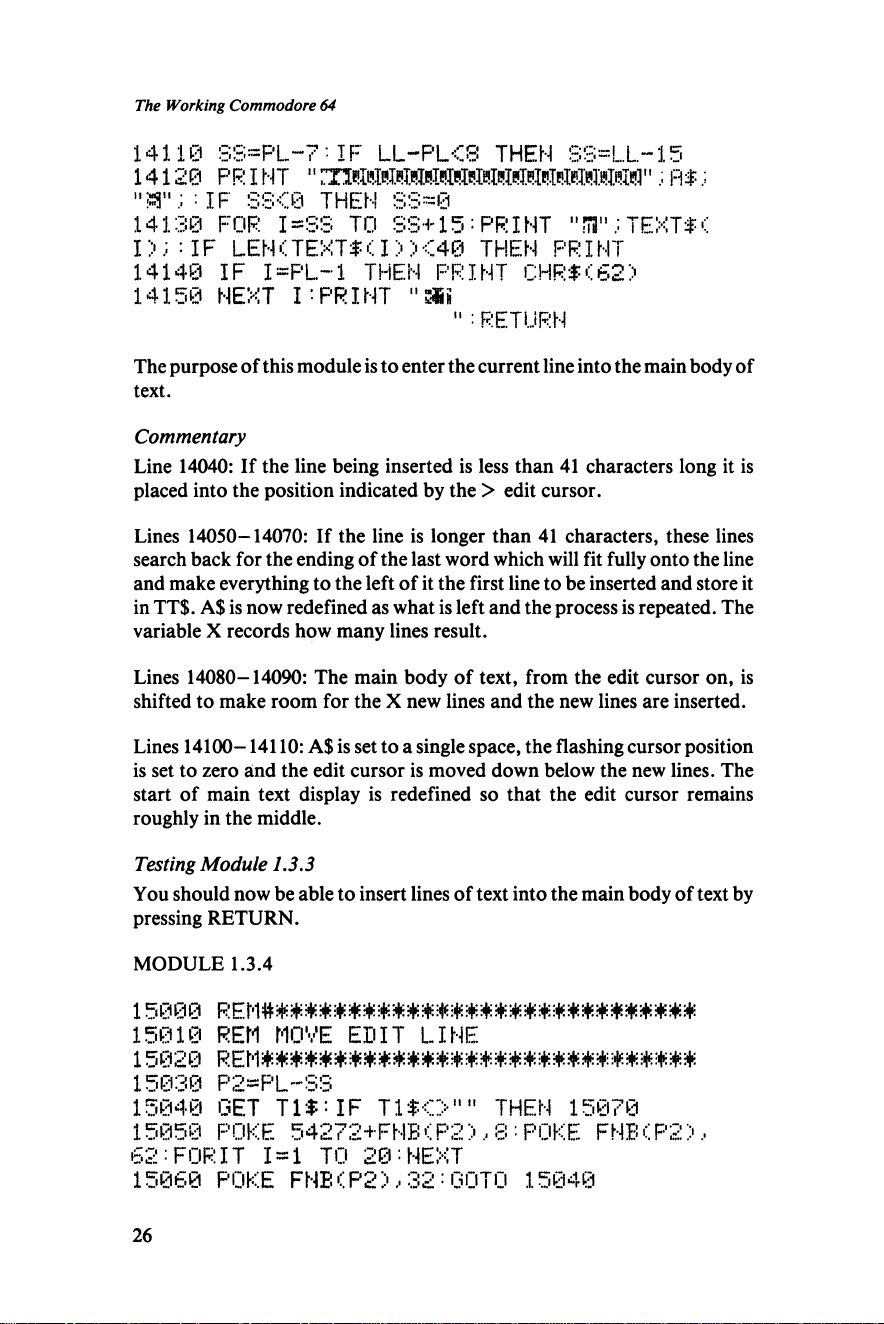
The purpose of this module is to enter the current line into the main body of
text.
Commentary
Line 14040: If the line being inserted is less than 41 characters long it is
placed into the position indicated by the > edit cursor.
Lines 14050-14070: If the line is longer than 41 characters, these lines
search back for the ending of the last word which will fit fully onto the line
and make everything to the left of it the first line to be inserted and store it
in TT$. A$ is now redefined as what is left and the process is repeated. The
variable X records how many lines result.
Lines 14080-14090: The main body of text, from the edit cursor on, is
shifted to make room for the X new lines and the new lines are inserted.
Lines 14100-14110: A$ is set to a single space, the flashing cursor position
is set to zero and the edit cursor is moved down below the new lines. The
start of main text display is redefined so that the edit cursor remains
roughly in the middle.
Testing Module 1.3.3
You should now be able to insert lines of text into the main body of text by
pressing RETURN.
MODULE 1.3.4
15000 REM######*##*###*#####*##########
15010 REM MOVE EDIT LINE
15020 REM******************************
15030 P2=F’L-SS
15040 GET T1$ : IF T 1$<>" " THEN 15070
15050 POKE 542 72+FNB< P2 >,8 :POKE FN B< P2 >,
>52: FOR IT I = i JO 20: NEXT
15060 POKE FNB(P2>,32:GOTO 15040
26
Page 29
Chapter 1 Good things in small packages
15079 PL«PL+ 11 $ -" 71") +10# < T 1 $==" U ") : IF PL.
•Cl THEN PL= 1
15080 PL=PL-CT 1,*="M" >-10#CT.1 $="E " > : IF PL
>1.1. THEN PL=LL
15090 IF Tl$=CHRf--::i3> THEN RETURN
15100 IF PL==>LL OR T 1T O C H R T <20> THEN 15
120
15110 LL =LL-1: FOR I =PL TO L L : TEXT$ < I > ~-TE
XT■$ < I +1 > : NEXT •• TEXTS < LL+1) *""
15120 IF PLCLL FIND T1$«"C" THEN Fl$=TEXT$
< F'L > + " " : RETURN
15130 IF T1$="P" THEN GOSUE 17000
15140 IF Tlf="S" THEN GOSUE 18000
15150 IF T1T~"F" THEN GOSUE 16000
15168 GOSUE 14110:GOTO 15830
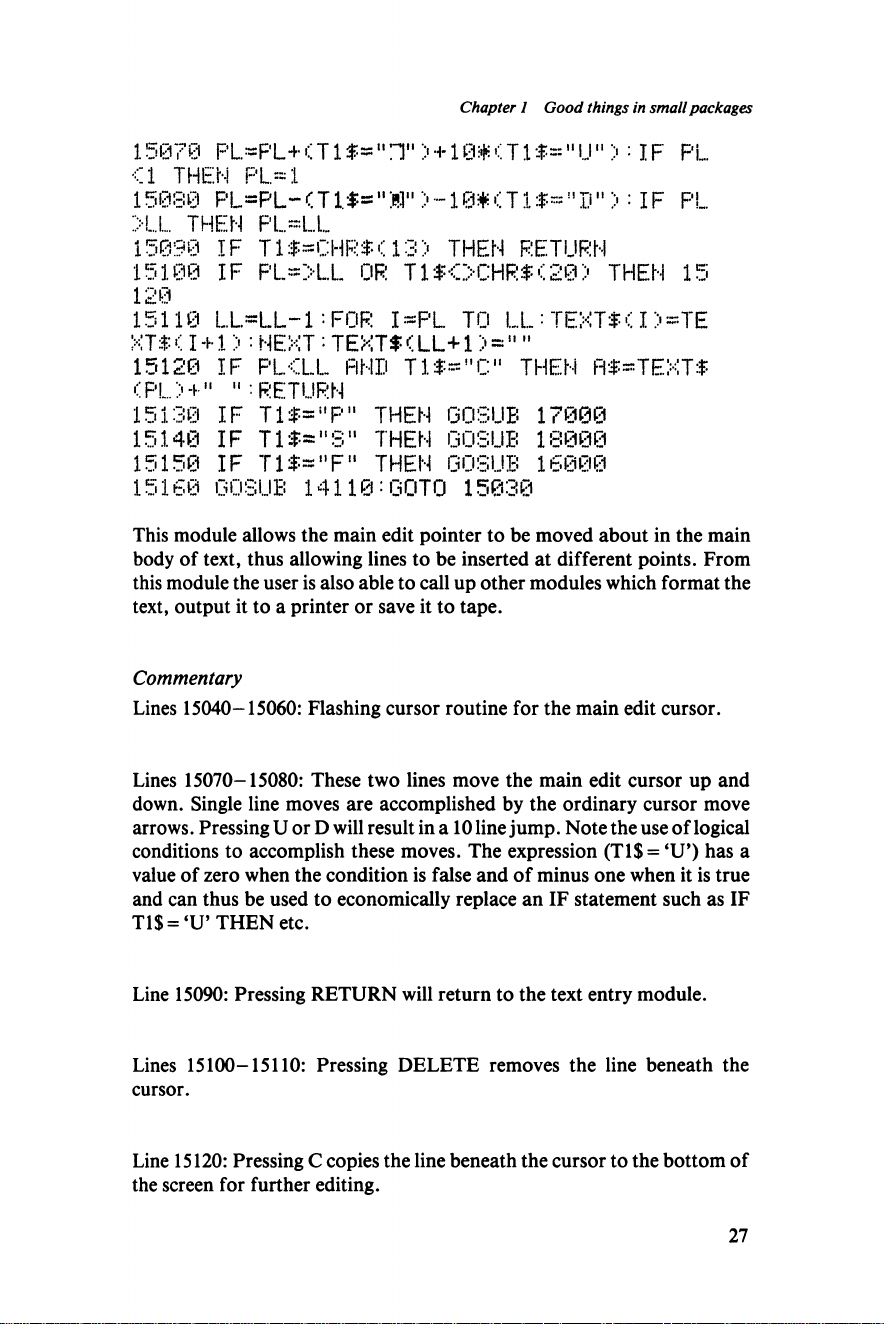
This module allows the main edit pointer to be moved about in the main
body of text, thus allowing lines to be inserted at different points. From
this module the user is also able to call up other modules which format the
text, output it to a printer or save it to tape.
Commentary
Lines 15040-15060: Flashing cursor routine for the main edit cursor.
Lines 15070-15080: These two lines move the main edit cursor up and
down. Single line moves are accomplished by the ordinary cursor move
arrows. Pressing U or D will result in a 10 line jump. Note the use of logical
conditions to accomplish these moves. The expression (Tl$ = ‘U’) has a
value of zero when the condition is false and of minus one when it is true
and can thus be used to economically replace an IF statement such as IF
T1$ = ‘U’ THEN etc.
Line 15090: Pressing RETURN will return to the text entry module.
Lines 15100-15110: Pressing DELETE removes the line beneath the
cursor.
Line 15120: Pressing C copies the line beneath the cursor to the bottom of
the screen for further editing.
27
Page 30
The Working Commodore 64
Testing Module 1.3.4
You should now be able to move the main edit cursor, to delete lines and to
copy them back to the bottom of the screen.
MODULE 1.3.5
16000 REM######################**###*##
16010 REM FORMAT LINE
16020 REM******************************
16030 FOR 1 = 1 TO L L~ 2 : IF TEXT#< I > = "" OR
T EX T $ a + l) = "" THEM 16120
16040 SF-40-LEN < TEXT # < I >) : FOR ,T=1 TO LEN
( TEXT#( I + 1) )
16050 IF MI D#<TEXT# (1 + 1 >, J , 1 !:■ O " " THEM
MEXT J:J=..T-1
16060 IF SF'CJ OR J= LEM(TEXT# ( I +1 ') THEM
16090
16070 TEXT# <I)=T EXT#(I> +" "+LEFT#< TEXT #(
I + l > , ,T-1>
16080 TEXT# <1 + 1>=MID# <TEXT# <I +1>,J+ 1>:GO
TO 16040
16090 IF LEM<TEXT #<I +1 >) =>SF’ THEM 16120
16100 TEXT# < I > =TEXT# ( I > + ,! " +TEXT# (I + l>
16110 FOR J= I +1 TO ILL TEXT# (J>=TEXT#<J+l
: MEXT J : LL =LL- 1 : PL= PL-1: GOTO 16040
16120 MEXT I •• RETURN
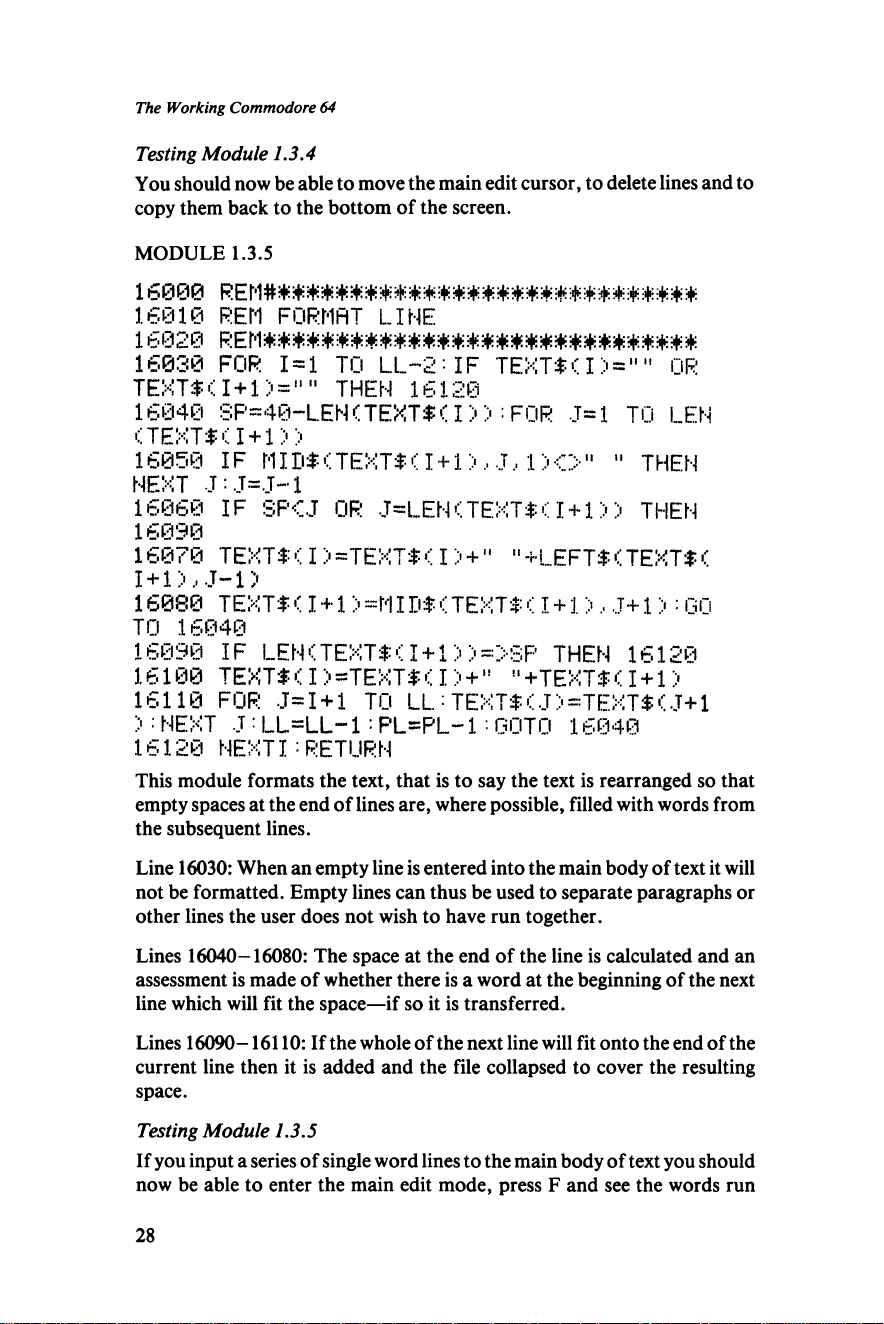
This module formats the text, that is to say the text is rearranged so that
empty spaces at the end of lines are, where possible, filled with words from
the subsequent lines.
Line 16030: When an empty line is entered into the main body of text it will
not be formatted. Empty lines can thus be used to separate paragraphs or
other lines the user does not wish to have run together.
Lines 16040-16080: The space at the end of the line is calculated and an
assessment is made of whether there is a word at the beginning of the next
line which will fit the space—if so it is transferred.
Lines 16090-16110: If the whole of the next line will fit onto the end of the
current line then it is added and the file collapsed to cover the resulting
space.
Testing Module 1.3.5
If you input a series of single word lines to the main body of text you should
now be able to enter the main edit mode, press F and see the words run
28
Page 31
Chapter 1 Good things in small packages
together into continuous lines. You can also insert short lines into the
middle of the main text and then reformat it.
MODULE 1.3.6
17000 REM#####*#####*###############*##
17010 REM OUTPUT TO PRINTER
17020 REM#####*########################
17030 OPEN 1 .• 4 : X~ 1
17040 IF X=LL THEN 17100
17050 IF TEXTS<X > ="" THEN PRINT#!, X-X
•4-1: GOTO 17040
17060 PRINT#1,TEXTS(X >;" ";
17070 IF X +1-LL THEN 17100
17080 PR I NT# 1, TEXTS < X+1 > : IF TEXTS < X +1) =
" THEN PRINT#1,""
17090 X =X +2:G0T0 17040
17100 PR I NT# 1, "" : CLOSE 1 = RETURN
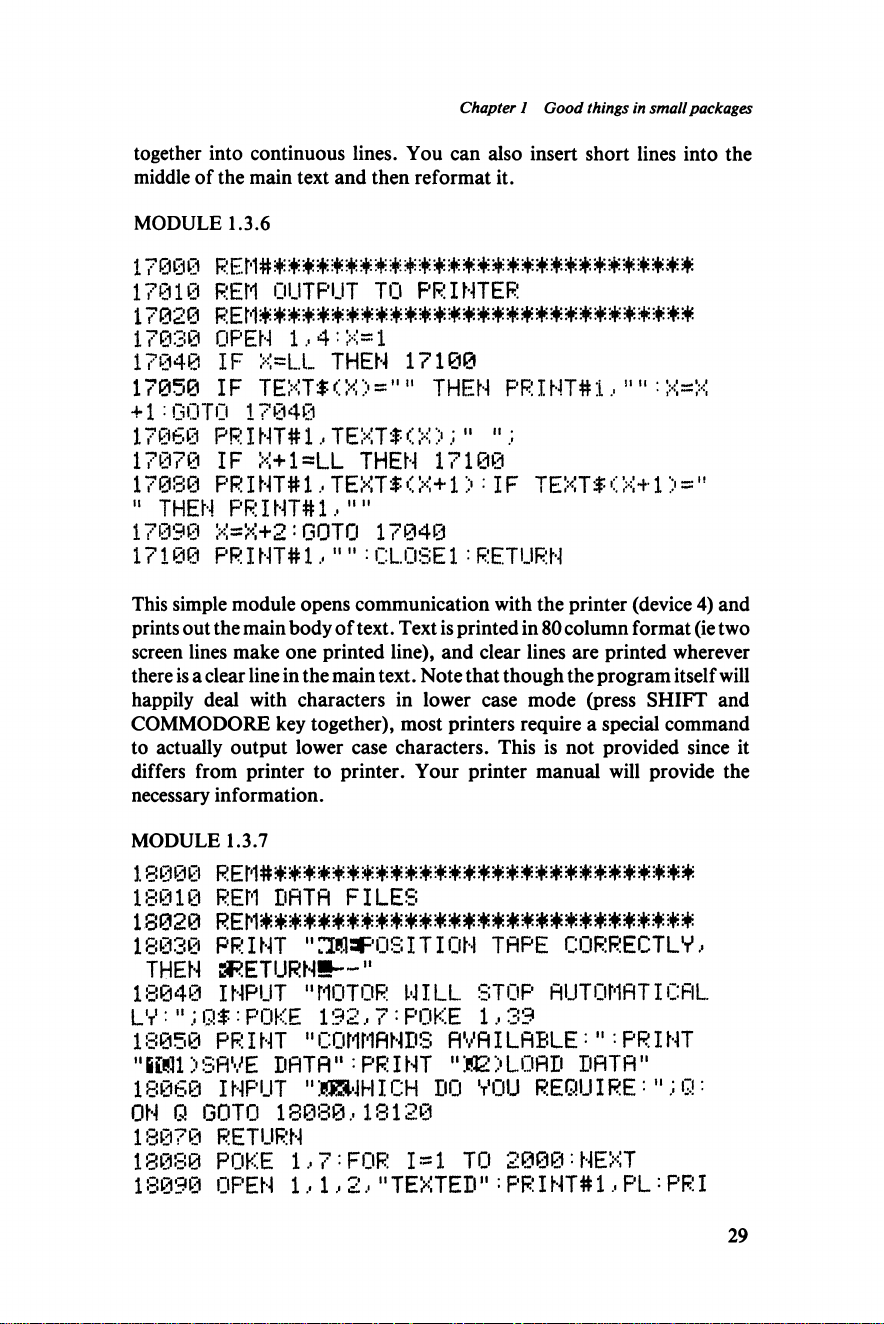
This simple module opens communication with the printer (device 4) and
prints out the main body of text. T ext is printed in 80 column format (ie two
screen lines make one printed line), and clear lines are printed wherever
there is a clear line in the main text. Note that though the program itself will
happily deal with characters in lower case mode (press SHIFT and
COMMODORE key together), most printers require a special command
to actually output lower case characters. This is not provided since it
differs from printer to printer. Your printer manual will provide the
necessary information.
MODULE 1.3.7
1 8000
18010 REM DATA FILES
18020 REM******************************
18030 PRINT "misFOSITION TAPE CORRECTLY,
THEN ^RETURNS— "
18040 INPUT "MOTOR WILL STOP AUTOMATICAL
LV ; " Q$ : POKE 192,7: POKE 1,39
18050 PR I NT " COMMANDS AVAILABLE • " '• PR I NT
"i WD SA VE DATA" : PRINT "M2)LOAD DATA"
18060 INPUT "MBWHICH DO YOU RE QU IR EQ :
ON Q GOTO 18080,18120
18070 RETURN
18080 POKE 1,7:FOR i=i TO 2 00 0 :NEXT
18090 OPEN 1,1,2,"TEXTED":PR INT# 1,PL = PRI
29
Page 32
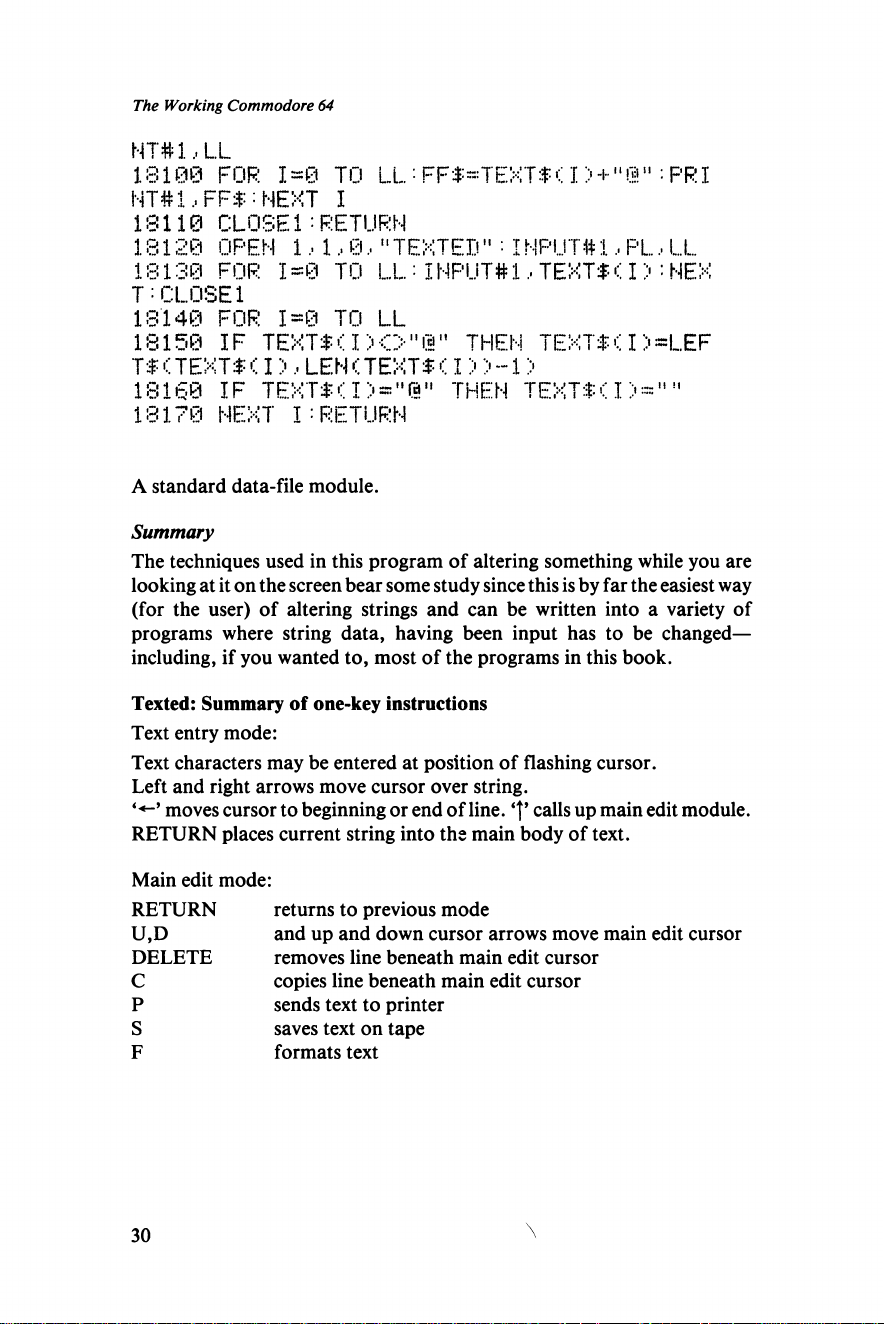
The Working Commodore 64
NT# 1, L.L
13100 FOR I=0 TO L L •FFT"TEXT$( I> + "@ ":PRI
NT# i.. FFT : NEXT I
18110 C LOSE 1:RETURN
18120 OPEN 1,1,@ ,"TEXTE D"•INPUT#1,P L,LL
18130 FOR I*0 TO L L :INPUT#1,TEXTT(I):NEX
T = CLOSE 1
18140 FOR 1=0 TO LL
18150 IF T E X T $ a X > ,,@" THEN TEXTTCI)=LEF
Tf <TEXT ■$ (. I , LEN < TEXT $ < I > > •-1 >
18160 IF TEXT*(I ::• = "(?!" THEN TEXTTCI "
18170 NEXT I :RETURN
A standard data-file module.
Summary
The techniques used in this program of altering something while you are
looking at it on the screen bear some study since this is by far the easiest way
(for the user) of altering strings and can be written into a variety of
programs where string data, having been input has to be changed—
including, if you wanted to, most of the programs in this book.
Texted: Summary of one-key instructions
Text entry mode:
Text characters may be entered at position of flashing cursor.
Left and right arrows move cursor over string.
*•*-’ moves cursor to beginning or end of line. calls up main edit module.
RETURN places current string into the main body of text.
Main edit mode:
RETURN
U,D
DELETE
C
P
S
F
30
returns to previous mode
and up and down cursor arrows move main edit cursor
removes line beneath main edit cursor
copies line beneath main edit cursor
sends text to printer
saves text on tape
formats text
Page 33
/
CHAPTER 2
Programming Tools
Having been introduced to some of the 64’s capabilities we now depart
from the normal format of the book for a brief space to present three
tightly packed programs which will provide you with essential tools
enabling you to merge separate programs together,renumber them and
delete whole sections with ease. The programs are densely packed for the
simple reason that, using the Merge routine, they are intended to be strung
together and then added to the end of existing programs without taking up
too much memory space. When you have finished merging in extra sections
to your program and renumbering it, the Delete routine will happily delete
itself and its two companions!
2.1 MERGE
This program, together with the other two presented in this short chapter,
is a must for those who intend to take modular programming seriously.
Using this tiny program hours of work can be saved by keeping useful
modules on tape and simply stringing them together with the press of a tape
recorder button. In presenting the program I am indebted to Steve Beats of
Commodore UK, who suggested to me the basic idea from which it was
developed.
There are no modules in the program—at eight lines it would hardly be
worth it and yet a program such as this will make modular programming
come alive for you.
What the program does is to pick up another program, or section of a
program from tape and to enter it into the 64 without danger of losing what
is already there—unless the line numbers coincide, in which case the first
program will be overwritten.
MODULE 2.1.1
63990 PRINT "IT;
63991 OPEN 1,1,0,"TEST"
63992 POKE 184,1-POKE 185,96'POKE 186,1•
POKE 152,1:PRINT 'TM"
63994 GET# 1 , PRINT fl$; :IF ST THEN 6399
9
31
Page 34
The Working Commodore 64
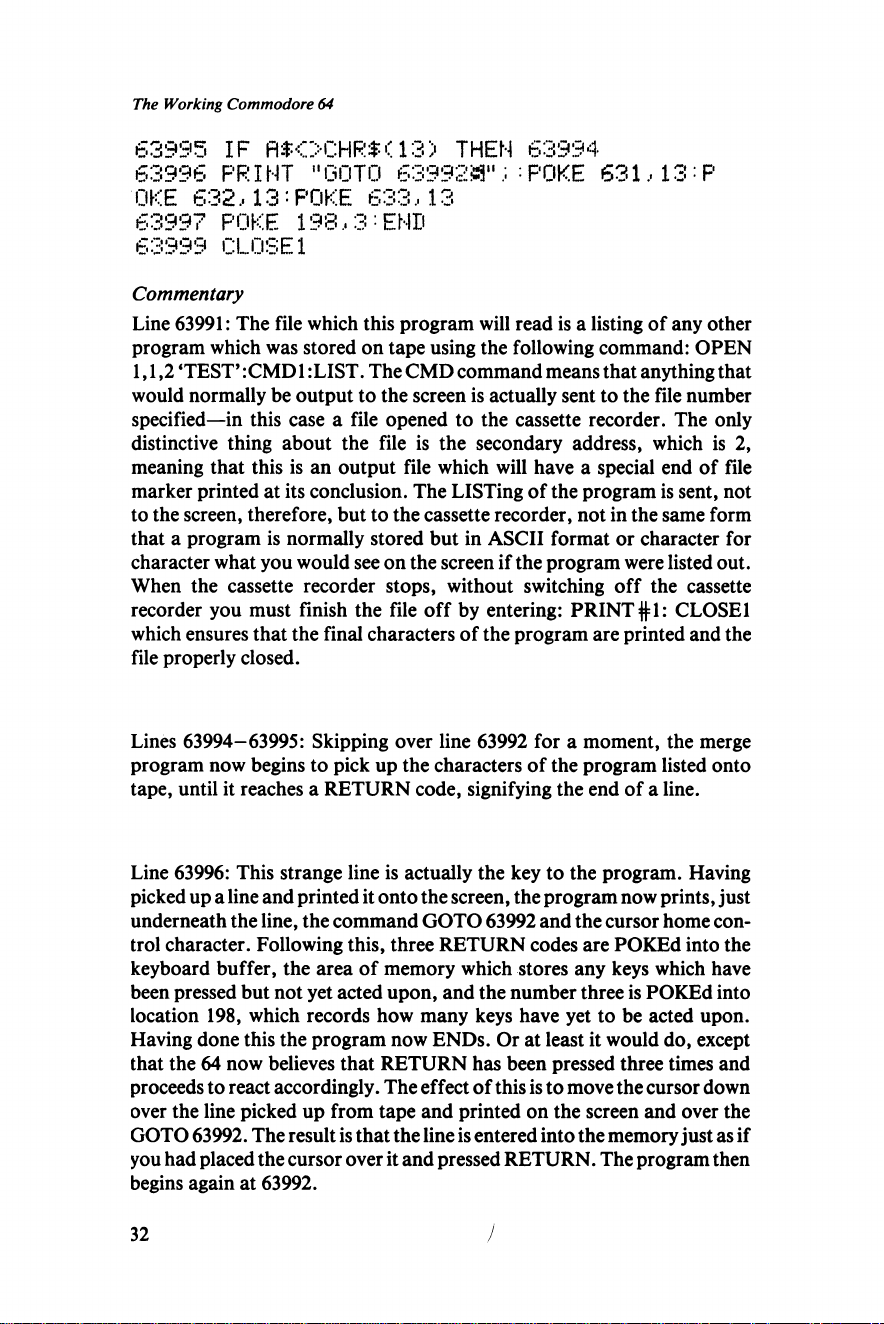
63995 IF R$OCHR$( 13> THEN 63994
63996 PRINT "GOTO 6399255" ; • POKE 631,13 :R
OKE 632,13:POKE 633,13
63997 POKE 198,3:END
63999 CLOSE1
Commentary
Line 63991: The file which this program will read is a listing of any other
program which was stored on tape using the following command: OPEN
1,1,2 ‘TEST’:CMD1:LIST. The CMD command means that anything that
would normally be output to the screen is actually sent to the file number
specified—in this case a file opened to the cassette recorder. The only
distinctive thing about the file is the secondary address, which is 2,
meaning that this is an output file which will have a special end of file
marker printed at its conclusion. The LISTing of the program is sent, not
to the screen, therefore, but to the cassette recorder, not in the same form
that a program is normally stored but in ASCII format or character for
character what you would see on the screen if the program were listed out.
When the cassette recorder stops, without switching off the cassette
recorder you must finish the file off by entering: PRINT #1: CLOSE 1
which ensures that the final characters of the program are printed and the
file properly closed.
Lines 63994-63995: Skipping over line 63992 for a moment, the merge
program now begins to pick up the characters of the program listed onto
tape, until it reaches a RETURN code, signifying the end of a line.
Line 63996: This strange line is actually the key to the program. Having
picked up a line and printed it onto the screen, the program now prints, just
underneath the line, the command GOTO 63992 and the cursor home con
trol character. Following this, three RETURN codes are POKEd into the
keyboard buffer, the area of memory which stores any keys which have
been pressed but not yet acted upon, and the number three is POKEd into
location 198, which records how many keys have yet to be acted upon.
Having done this the program now ENDs. Or at least it would do, except
that the 64 now believes that RETURN has been pressed three times and
proceeds to react accordingly. The effect of this is to move the cursor down
over the line picked up from tape and printed on the screen and over the
GOTO 63992. The result is that the line is entered into the memory just as if
you had placed the cursor over it and pressed RETURN. The program then
begins again at 63992.
32
/
Page 35
Chapter 2 Programming Tools
Line 63992: This line of mysterious POKE commands is there to overcome
a basic problem—whenever a new line is entered to a program, all existing
files are CLOSEd. When the first line of the new program is entered, the
file to the cassette recorder is closed and any instructions to GET from it
will result in an error. The file cannot be re-opened with a Basic command
because we are already past the file header, which would tell the 64 that a
file has been found on the tape. What the POKEs do is cheat a little and tell
the 64 that file number one, with a secondary address of zero, is open to the
cassette recorder. The second line can now be picked up, and so on ad
infinitum.
Eventually the program encounters the end of file marker which means
that the listing is complete and then the second part of line 63994 (IF ST
THEN 63999) detects this and jumps to the last line. Normally the program
will stop with the error message OUT OF DATA. This means the merge has
been a success.
In actual use this program is by no means fast. It alternates between the
blank screen of tape-loading and flashes of lines at the top of the screen. It
needs a good tape, since a tape with dropouts may well crash the whole
thing. But given a little care this is a program you will come back to time
and time again—try it and see.
2.2 DELETE
When developing programs which use similar modules to programs you
have previously entered, a useful ability is to be able to load the original
program and delete only those parts that are not needed for the new
application. This 12 line routine will allow you to do just that.
The routine is based upon the extremely clear and simple way in which
program listings are set out in the memory of Commodore computers.
Each program line in the memory begins with two link bytes of memory
which specify the start address in memory of the next line. This is followed
by two bytes which record the actual line number. What this routine does is
to scan along the line numbers between a start number specified by the user
and a finish number also user specified. When the address of the final line
to be deleted is found, the program simply sets the next line address in the
first line to be deleted to point to the line after the last line to be deleted. The
effect of this is to produce a single line stretching from the beginning of the
first line to be deleted to the end of the last. Deletion can now be
accomplished by merely deleting the first line—all the others go with it.
MODULE 2.2.1
63700 INPUT "FIRSTLINE TO BE DELETED•";D
1
63710 INPUT "LAST LINE TO BE DELETED: " ; D
9
33
Page 36
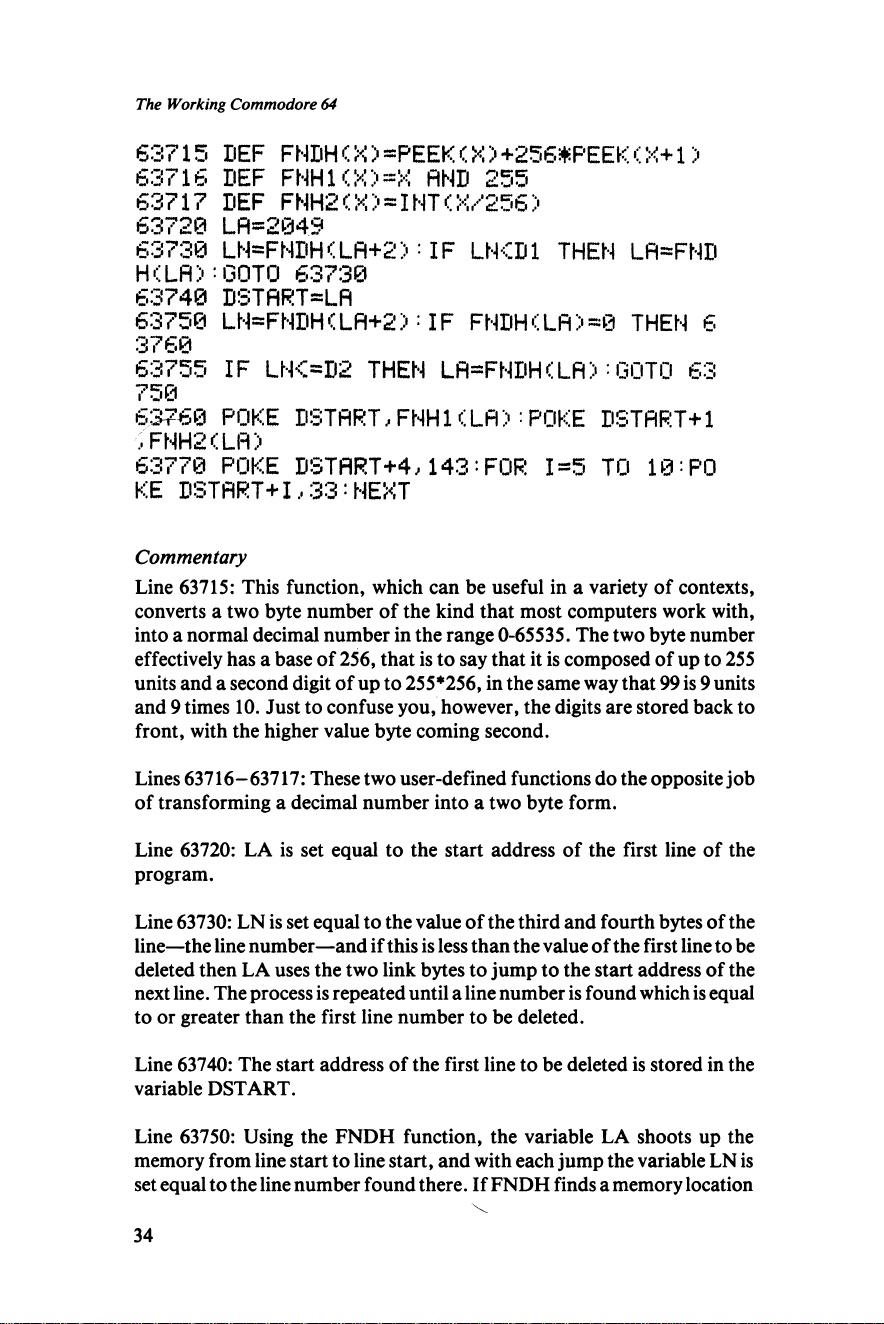
The Working Commodore 64
63715 BEF FNDHC X > =PEEK<X >+2 56#PEEK(X +1)
63716 BEF FNH1<X)=X flNB 255
63717 BEF FNH2<X)*INT<X/'256)
63720 Lfl»2049
63730 LN=FNBH<Lfl+2>:IF LNCBl THEN LR-FNB
H(LH):GOTO 63730
63740 BSTflRT=Lfl
63750 LN=FNBH(Lfl+2):IF FNBH<Lfl>=0 THEN 6
3760
63755 IF L N O B 2 THEN Lfl-FNDHCLfl) :GOTO 63
750
6:3760 POKE DSTflRT,FMH1 <Lfl> - POKE DSTflRT+1
.. FNH2 < Lfl >
63770 POKE DSTflRT+4,1 43 :FOR 1*5 TO 10:PO
KE DSTART + 1.. 33 : NEXT
Commentary
Line 63715: This function, which can be useful in a variety of contexts,
converts a two byte number of the kind that most computers work with,
into a normal decimal number in the range 0-65535. The two byte number
effectively has a base of 256, that is to say that it is composed of up to 255
units and a second digit of up to 255*256, in the same way that 99 is 9 units
and 9 times 10. Just to confuse you, however, the digits are stored back to
front, with the higher value byte coming second.
Lines 63716-63717: These two user-defined functions do the opposite job
of transforming a decimal number into a two byte form.
Line 63720: LA is set equal to the start address of the first line of the
program.
Line 63730: LN is set equal to the value of the third and fourth bytes of the
line—the line number—and if this is less than the value of the first line to be
deleted then LA uses the two link bytes to jump to the start address of the
next line. The process is repeated until a line number is found which is equal
to or greater than the first line number to be deleted.
Line 63740: The start address of the first line to be deleted is stored in the
variable DSTART.
Line 63750: Using the FNDH function, the variable LA shoots up the
memory from line start to line start, and with each jump the variable LN is
set equal to the line number found there. If FNDH finds a memory location
34
Page 37
Chapter 2 Programming Tools
with zero init, where there should be a pair of link bytes, it has reached the
end of the program.
Line 63755: Each time a new line number is found, it is compared with the
number of the last line to be deleted. If the last line has not been reached,
the next jump is made.
Line 63760: If the program has reached this point, it has found the last line
to be deleted and into the two link bytes at DSTART it POKEs the address
of the line after the last line to be deleted.
Line 63770: The first character of the new single line block to be deleted is
made into a REM statment and a series of exclamation marks are POKEd
in after the REM to mark the line to delete.
The routine has now finished its job and all that remains is to enter the
number of the line marked and press RETURN—the whole block, from a
few lines to a complete program, will disappear.
In practice, this routine is best used with the merge routine in the
previous section of this chapter (load the merge routine and either add this
one or merge it), since this will allow the routine to be added to existing
programs from which you wish to extract some lines while discarding
others. It takes only moments to run and can save a lot of key pounding!
2.3 RENUMBER
One thing that everyone wants to do is to have neatly numbered programs
—somehow it makes all the difference between something that looks
professional and something which appears downright sloppy. Using the
relatively short program presented here, you can renumber to your heart’s
content, though it isn’t what you’d call fast and it does impose a simple
limitation on the range of program lines.
The program will renumber any program, including GOTOs, GOSUBs,
ON...GOTOs and GOSUBs and line numbers following IF...THEN.
What it will not do is relocate the program in the memory, so it cannot add
digits to a GOTO (etc.) or subtract digits, for to do so means moving the
whole of the program that follows the altered address. It is not that that is
impossible, or even particularly difficult, it is simply that to be at all
practical it must be done in machine code, which is outside the scope of this
book.
It is because of that limitation that all the programs in this book, which
were renumbered using this routine (where line numbers are irregular it is
because changes were made late in the process), begin at 11000, thus
ensuring that all line numbers have five digits.
35
Page 38
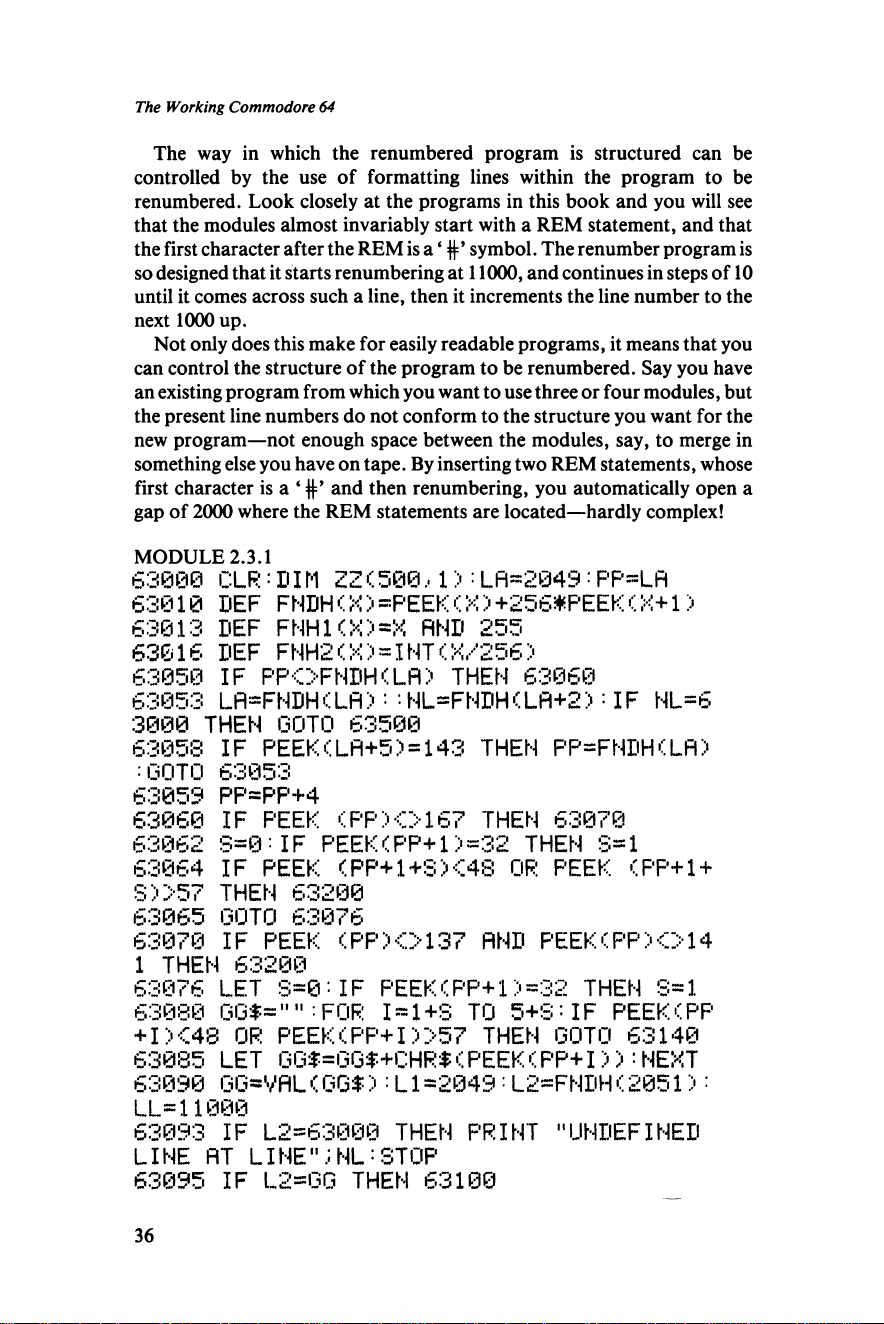
The Working Commodore 64
The way in which the renumbered program is structured can be
controlled by the use of formatting lines within the program to be
renumbered. Look closely at the programs in this book and you will see
that the modules almost invariably start with a REM statement, and that
the first character after the REM is a ‘ ft’ symbol. The renumber program is
so designed that it starts renumbering at 11000, and continues in steps of 10
until it comes across such a line, then it increments the line number to the
next 1000 up.
Not only does this make for easily readable programs, it means that you
can control the structure of the program to be renumbered. Say you have
an existing program from which you want to use three or four modules, but
the present line numbers do not conform to the structure you want for the
new program—not enough space between the modules, say, to merge in
something else you have on tape. By inserting two REM statements, whose
first character is a 4 ft’ and then renumbering, you automatically open a
gap of 2000 where the REM statements are located—hardly complex!
MODULE 2.3.1
63000 C LR :DIM ZZ <500,1> =L A-2 049 :PP=L A
63010 DEF FN DH<X >=PEEK<X >+256#PEEK< X+1>
63013 DEF FHH1(X>~X AND 255
63016 DEF F N H 2 X > = INT < X/256 >
63050 IF P P O F H D H <Lfl> THEN 63060
63053 Lfl=FNDHCLA> : •NL=FMDH<LA+2> '• IF NL=6
3000 THEN GOTO 63500
63058 IF PEEK<Lfl+5> = 143 THEN FP=FNDH<LA>
:GOTO 63053
63058 PpaRP+4
63060 IF PEEK < PP > 01 6 7 THEN 63070
63062 S =0•IF PEEKXPP+1 >=32 THEN S=1
63064 IF PEEK <PP+1+S><48 OR PEEK (PP+1 +
S > >57 THEN 63200
63065 GOTO 63076
63070 IF PEEK CPP X0 1 37 AND PEEK(PP> 0 1 4
1 THEN 63200
63076 LET 8 =0:IF PEEKXPP+1>=32 THEN 8=1
63080 GG$=" " : FOR 1 = 1+8 TO 5+S'- IF PEEKXPP
+ 1 X48 OR PEEK C PP+1 > >57 THEN GOTO 63140
63085 LET GG*=GG$+CHR$ < PEEK. < PP+1 > >: NEXT
63090 GG=VAL<GG$>:L 1=2049:L2=FNDH<2051>:
LL =11000
63093 IF L2=63000 THEN PRINT "UNDEFINED
LINE AT LINE";NL=STOP
63095 IF L2=GG THEN 63100
36
Page 39
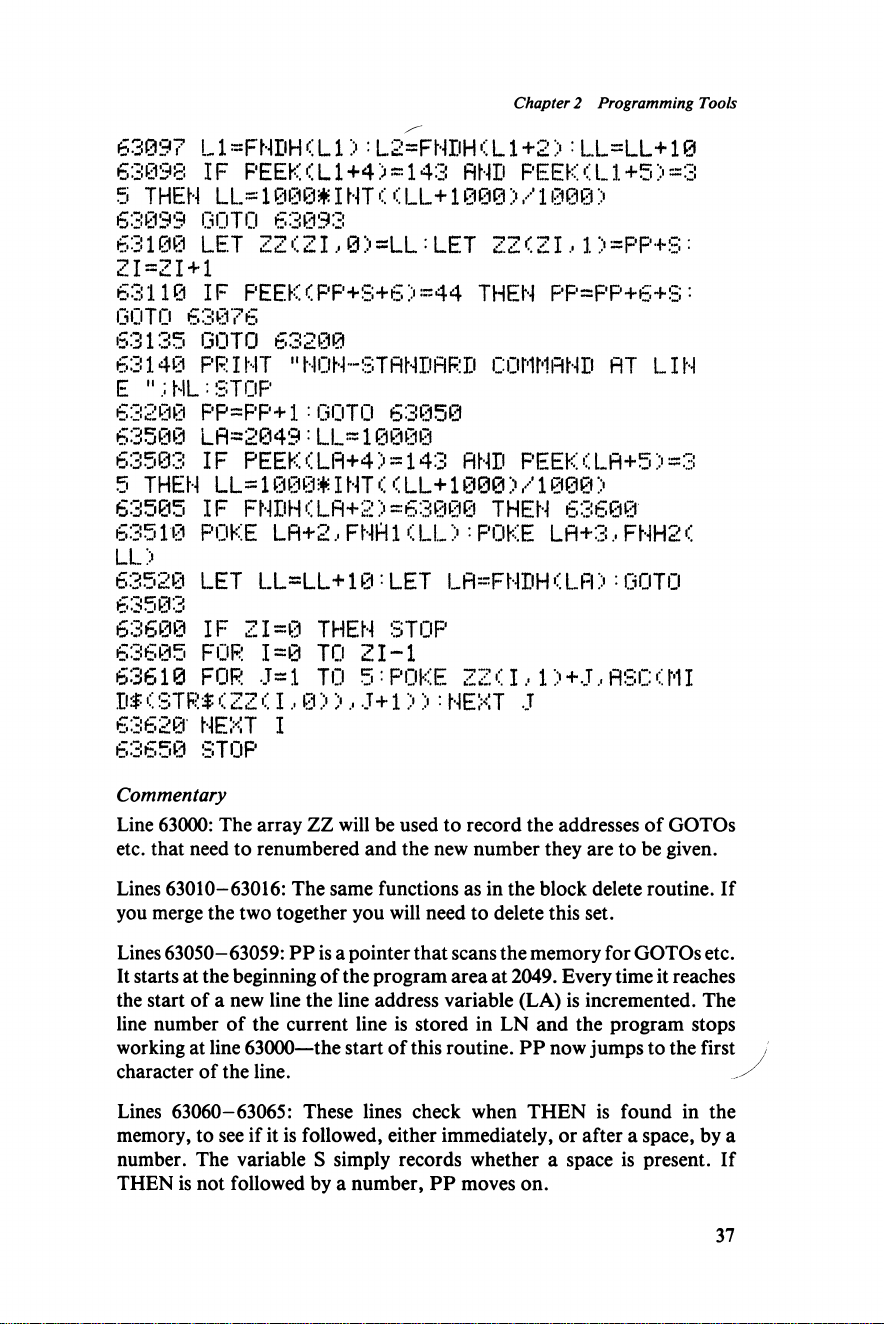
Chapter 2 Programming Tools
63097 L 1 =FNDH ( L 1 > : L2=FNHH ( L 1 +2 >: L.L=LL+10
63098 IF PEEK(LI+4>=143 AND PEEK(LI+5>=3
5 THEN LL =1000#INT((L L+1@00 >/1000 >
63099 GOTO 63093
63100 LET ZZ (ZI.. 0>=LL : LET Z Z(Z I, 1 >=PP+S =
ZI=ZI+1
63110 IF PEEK (F‘P+S +6> =44 THEN PP=PP+6+S '■
GOTO 63876
63135 GOTO 63200
63140 PRINT "NON-STANDARD COMMAND AT LIN
E ";N L :STOP
632O0 P P=PP +l:GOTO 63950
63500 LA =20 49:L L= 10000
63503 IF PEEK(LA+4> = 143 AND PEEK(LA+5>=3
5 THEN LL =1000#INT((L L+1000 >/1@00 >
63505 IF FNDHCLA+2)=63900 THEN 63600
63510 POKE L A+2 , FN H1 (LL > '• POKE LA+3 , FNH2 (
LL>
63520 LET L.L=LL+10: LET LA=FNDH(LFl>'• GOTO
63503
63600 IF ZI=0 THEN STOP
63605 FOR 1=0 TO ZI-1
63610 FOR J=.l TO 5: POKE ZZ( 1,1 >+.J, ASC(MI
D$(STR$(Z Z(1,0 > >,J +1> >:NEXT J
63620 NENT I
63650 STOP
Commentary
Line 63000: The array ZZ will be used to record the addresses of GOTOs
etc. that need to renumbered and the new number they are to be given.
Lines 63010- 63016: The same functions as in the block delete routine. If
you merge the two together you will need to delete this set.
Lines 63050-63059: PP is a pointer that scans the memory for GOTOs etc.
It starts at the beginning of the program area at 2049. Every time it reaches
the start of a new line the line address variable (LA) is incremented. The
line number of the current line is stored in LN and the program stops
working at line 63000—the start of this routine. PP now jumps to the first /
character of the line.
Lines 63060-63065: These lines check when THEN is found in the
memory, to see if it is followed, either immediately, or after a space, by a
number. The variable S simply records whether a space is present. If
THEN is not followed by a number, PP moves on.
37
Page 40
The Working Commodore 64
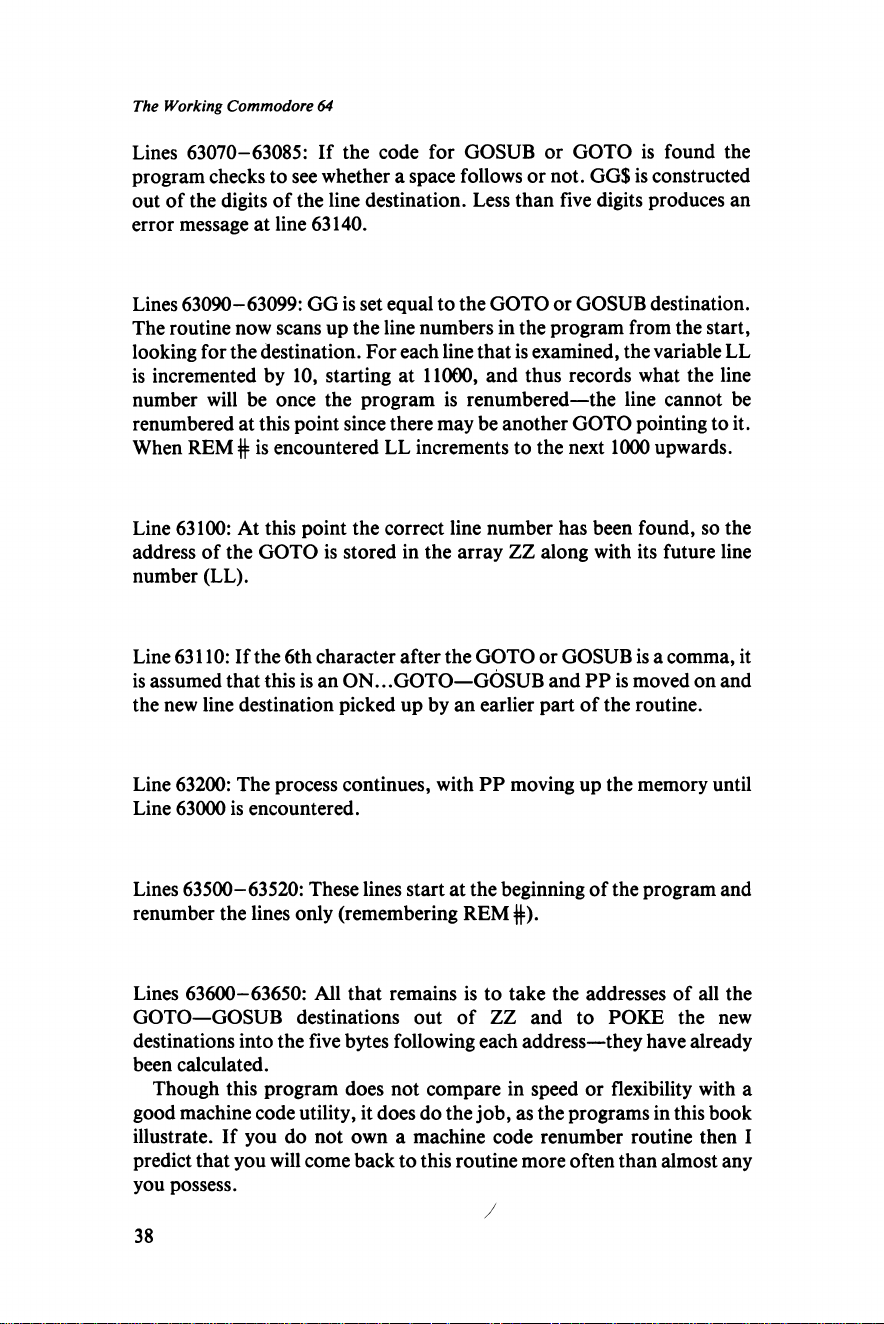
Lines 63070-63085: If the code for GOSUB or GOTO is found the
program checks to see whether a space follows or not. GG$ is constructed
out of the digits of the line destination. Less than five digits produces an
error message at line 63140.
Lines 63090-63099: GG is set equal to the GOTO or GOSUB destination.
The routine now scans up the line numbers in the program from the start,
looking for the destination. For each line that is examined, the variable LL
is incremented by 10, starting at 11000, and thus records what the line
number will be once the program is renumbered—the line cannot be
renumbered at this point since there may be another GOTO pointing to it.
When REM ft is encountered LL increments to the next 1000 upwards.
Line 63100: At this point the correct line number has been found, so the
address of the GOTO is stored in the array ZZ along with its future line
number (LL).
Line 63110: If the 6th character after the GOTO or GOSUB is a comma, it
is assumed that this is an ON...GOTO—GOSUB and PP is moved on and
the new line destination picked up by an earlier part of the routine.
Line 63200: The process continues, with PP moving up the memory until
Line 63000 is encountered.
Lines 63500-63520: These lines start at the beginning of the program and
renumber the lines only (remembering REM ft).
Lines 63600-63650: All that remains is to take the addresses of all the
GOTO—GOSUB destinations out of ZZ and to POKE the new
destinations into the five bytes following each address—they have already
been calculated.
Though this program does not compare in speed or flexibility with a
good machine code utility, it does do the job, as the programs in this book
illustrate. If you do not own a machine code renumber routine then I
predict that you will come back to this routine more often than almost any
you possess.
/
38
Page 41
Chapter 2 Programming Tools
When merged with the two previous utilities, with all three isolated from
each other by STOP statements, you will have built for yourself a powerful
three function tool which will make your programming more pleasant and
your programs more presentable.
39
Page 42

Page 43
CHAPTER 3
The Colourful 64
The Commodore 64 provides an almost bewildering array of graphics
capabilities. The shapes and colours that it can display are enough to cover
almost any imaginable need and certainly enough to keep the amateur
artist occupied for a lifetime. In this chapter you will find four graphics
programs which will allow you to explore the world of the graphics
character set, user-defined characters, sprites and bit-mapped graphics. A
mere four programs are by no means the last word in what the 64 can
achieve so the programs are designed as tools, whose object is to allow you
to feed into your later programs all the colourful features that will lift them
out of the ordinary run.
3.1 ARTIST
Few home micros have a graphics character set as useful as that of
Commodore machines. Using the combinations of characters available
from the keyboard it is very difficult to think of anything that could not be
drawn in some shape or fashion. This is extremely useful when livening up
the output of the most mundane programs, especially when combined with
the 64’s excellent colour capabilities.
One limitation to all of this is in the creative process of actually
developing graphics displays. Of course, this can be done purely with print
statements in a program, but getting the print statements exactly right,
with a variety of colour commands, reverse commands and so forth, with
each line having to be defined separately can be an extremely tedious
process. What is really needed is a way of using the screen rather like an
easel, painting on graphics characters in a variety of colours, erasing,
changing at will and then, for the sake of posterity or at least for the sake of
other programs which could use the design created, saving the design onto
tape. All of this the current program sets out to do.
Along the way you will pick up a fair amount of information about how
to manipulate the screen and colour memory, together with useful memory
locations for controlling such characteristics as print colour.
Artist: Table of Variables
CC The current cursor position
CO(3) Co-ordinates of two corners of design to be saved
41
Page 44
The Working Commodore 64
D3$,D4$
MODE
CT
CU
Dl$
D2$
PC
PP
PT
Temporary storage of cursor position
Current cursor colour
Values of characters in design to be saved
Colour values of characters to be saved
Temporary copies of Dl$ and D2$
Defines which of a variety of colour characteristics is
being addressed
The colour of the character in position PP
The original contents of the current cursor location
Location in memory of the two corners held in array CO
MODULE 3.1.1
11010 REM VARIABLES
Hardly fair to call this a module, but its presence does mean that if you
decide to develop the program further, there is a proper area set aside for
the necessary variables. The string actually defined is a standard-data file
separator.
MODULE 3.1.2
12010 REM CURSOR,MOVE,PRINT
1207O IF A $=" " THEN 12040
12080 IF C O 1983 AND THEN 12848
12090 IF 00*2023 AND A$="M" THEN 12040
12108 IF 00=1024 AND A$="ir THEN 12848
12118 IF CCC1864 AND A $ = " T THEN 12848
12128 IF A$ =,,n" OR A$*,,M" OR A# -,llB|n OR
*="11" THEN PRINT A*.;: GOTO 12848
12138 IF A*=CHR$ (. 133> THEN M0BE=1
12148 IF A*=CHR$<137> THEN M0BE-2
42
Page 45
\
Chapter 3 The Colourful 64
12160 IF <M0DE=1 OR MODE=2 OR MODE-3) AN
B AT*"*-" THEM MODE=MODE+.5 :GOTO 12040
12170 IF AT=C HRT< 135) THEN INV=(INV=0)
12180 IF RT=C HRT(133) THEM MODE-6
12190 IF AT=CHRT<136) THEM MODE*?
12200 IF RT=CHRT(140) THEM M0DE*8
12210 IF MODE* 1 AMD AT>="1" AMD AT<>"8"
THEM POKE CC+542 72,VA L(A t) -1:GOT0 12040
12220 IFMODE=l.5ANDRT>=" 1" AMD AT<="8" T
HEN POKE CC+54272,8+VAL(AT)~1:GOTO 12040
12230 IF MODE-2 AMD RT>*"1" HMD AT O " 8"
THEM POKE 53281,VA L(AT)-1:GOTO 12040
12240 IF MODE-2.5 AMD AT>="1" AMD A T O " 8
" THEN POKE 53281,8+VA L(A $ )-1 O30T0 12040
12250 IF MODE-3 AND flT>*"l" AMD AT<="8"
THEN POKE 646, VAL (At-) ~ 1 : GOTO 12040
12260 IF M0DE *3.5 AMD AT>="1" AMD AT<="8
" THEM POKE 646,8+VAL(AT )-1:GOTO 12040
12270 IF M 0 D E O 6 OR (AT O" R" AMD A TO" D "
AMD ATO " S" ) THEN 12320
12280 IF AT="R" THEM GOSUB 13000
12290 IF AT="D" THEM GOSUB 13060
12300 IF AT*"S'1 THEM GOSUB 14000
12310 C C= CT :GOTO 12040
12320 IF M0DE=8 AMD AT>="1" AMD A$<="8"
THEM CU*VAL (A T) •-1 : GOT0 12040
12330 IF IMV*-1 THEM PRINT "3";
12346 PRINT AT;;
12350 GOTO 12040
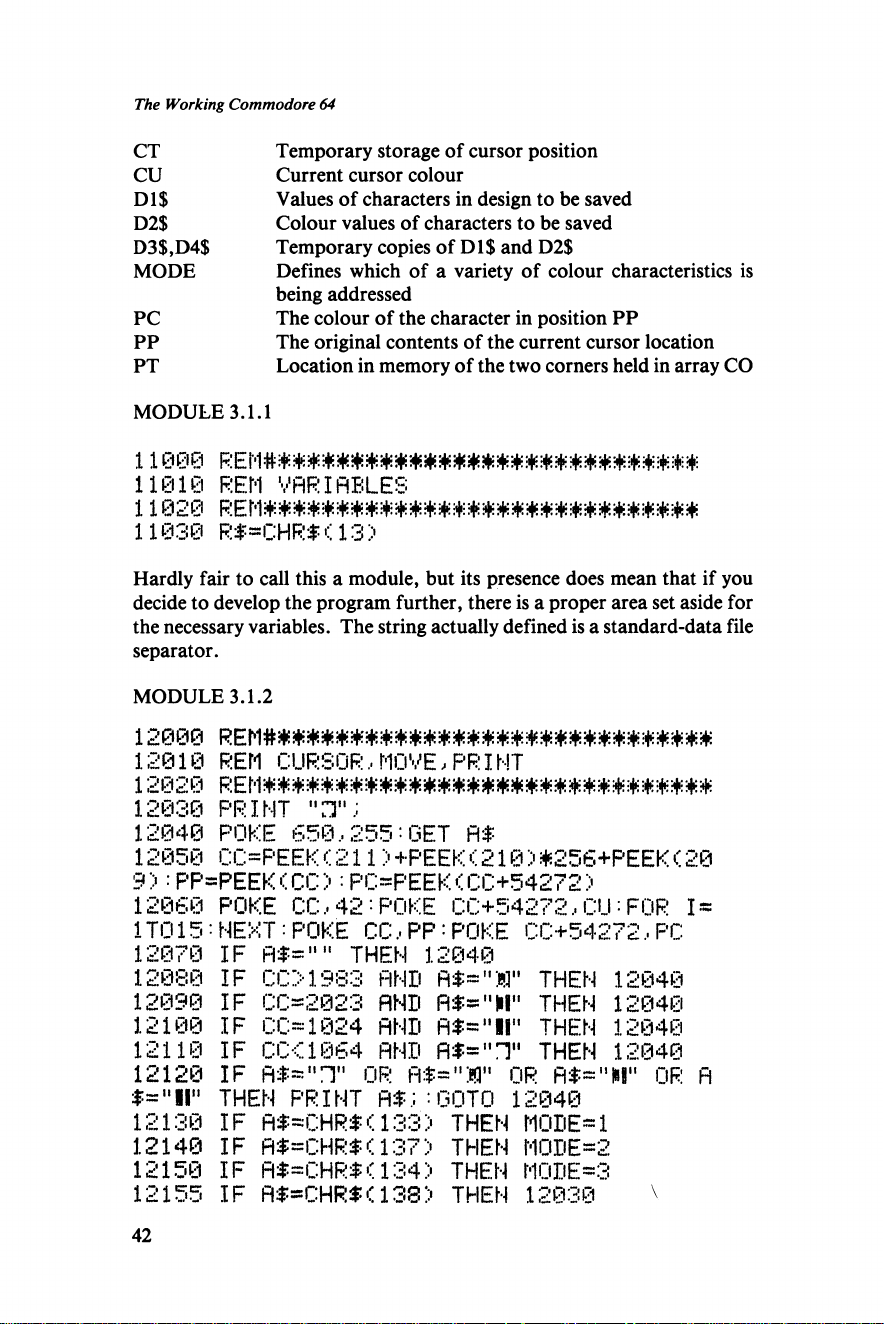
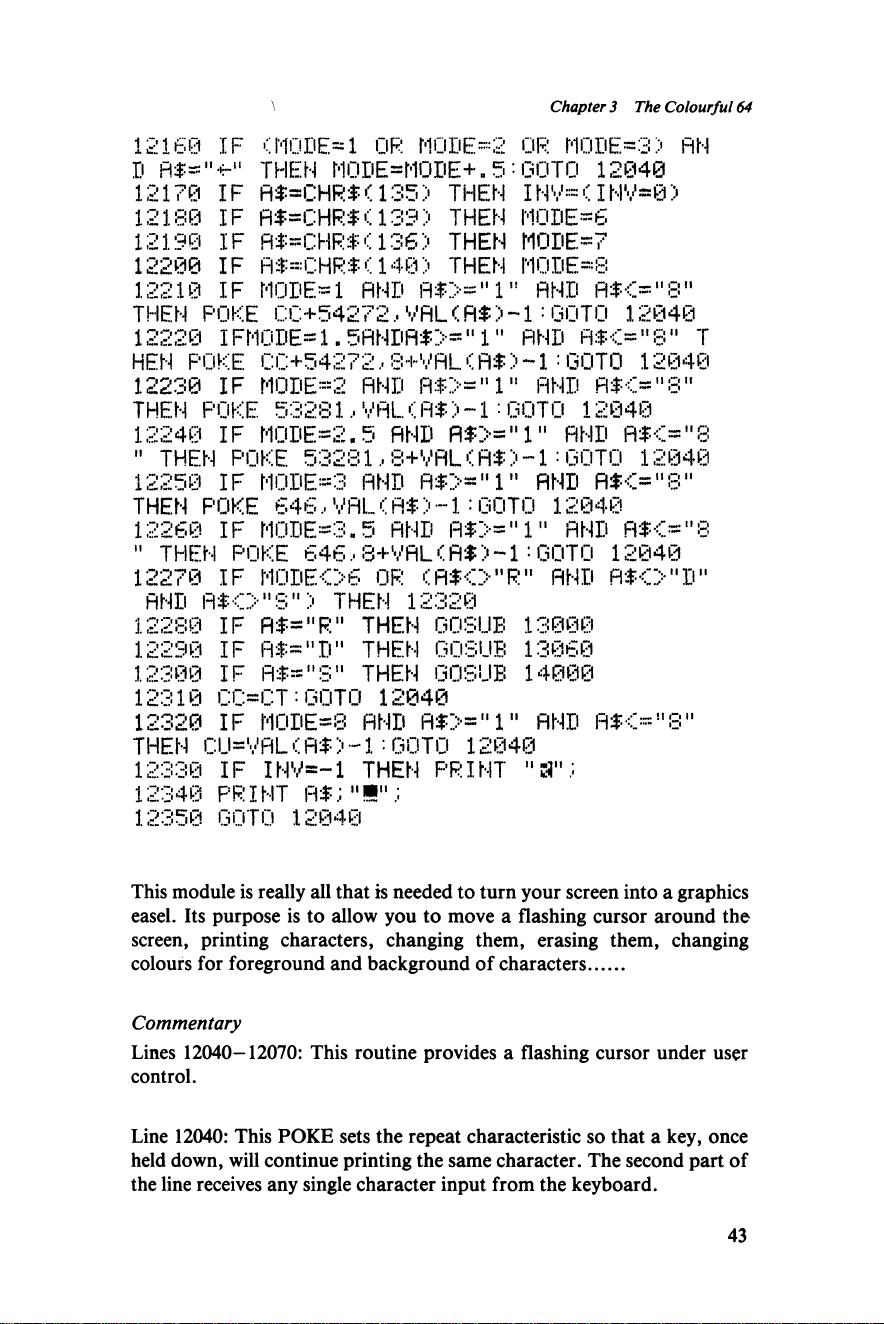
This module is really all that is needed to turn your screen into a graphics
easel. Its purpose is to allow you to move a flashing cursor around the
screen, printing characters, changing them, erasing them, changing
colours for foreground and background of characters
Commentary
Lines 12040-12070: This routine provides a flashing cursor under user
control.
Line 12040: This POKE sets the repeat characteristic so that a key, once
held down, will continue printing the same character. The second part of
the line receives any single character input from the keyboard.
.......
43
Page 46
The Working Commodore 64
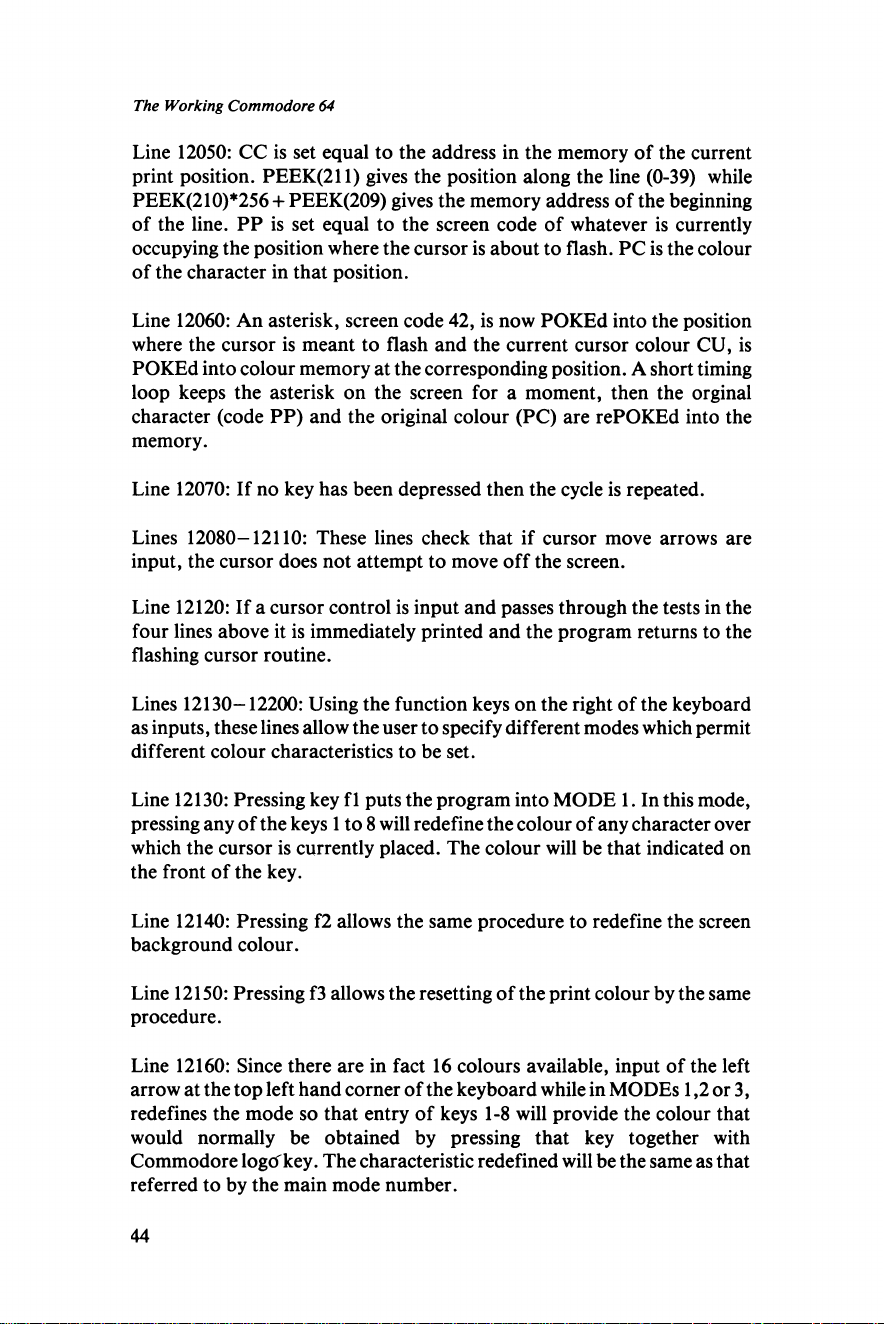
Line 12050: CC is set equal to the address in the memory of the current
print position. PEEK(211) gives the position along the line (0-39) while
PEEK(210)*256 + PEEK(209) gives the memory address of the beginning
of the line. PP is set equal to the screen code of whatever is currently
occupying the position where the cursor is about to flash. PC is the colour
of the character in that position.
Line 12060: An asterisk, screen code 42, is now POKEd into the position
where the cursor is meant to flash and the current cursor colour CU, is
POKEd into colour memory at the corresponding position. A short timing
loop keeps the asterisk on the screen for a moment, then the orginal
character (code PP) and the original colour (PC) are rePOKEd into the
memory.
Line 12070: If no key has been depressed then the cycle is repeated.
Lines 12080-12110: These lines check that if cursor move arrows are
input, the cursor does not attempt to move off the screen.
Line 12120: If a cursor control is input and passes through the tests in the
four lines above it is immediately printed and the program returns to the
flashing cursor routine.
Lines 12130-12200: Using the function keys on the right of the keyboard
as inputs, these lines allow the user to specify different modes which permit
different colour characteristics to be set.
Line 12130: Pressing key f 1 puts the program into MODE 1. In this mode,
pressing any of the keys 1 to 8 will redefine the colour of any character over
which the cursor is currently placed. The colour will be that indicated on
the front of the key.
Line 12140: Pressing f2 allows the same procedure to redefine the screen
background colour.
Line 12150: Pressing f3 allows the resetting of the print colour by the same
procedure.
Line 12160: Since there are in fact 16 colours available, input of the left
arrow at the top left hand corner of the keyboard while in MODEs 1,2 or 3,
redefines the mode so that entry of keys 1-8 will provide the colour that
would normally be obtained by pressing that key together with
Commodore logcf key. The characteristic redefined will be the same as that
referred to by the main mode number.
44
Page 47
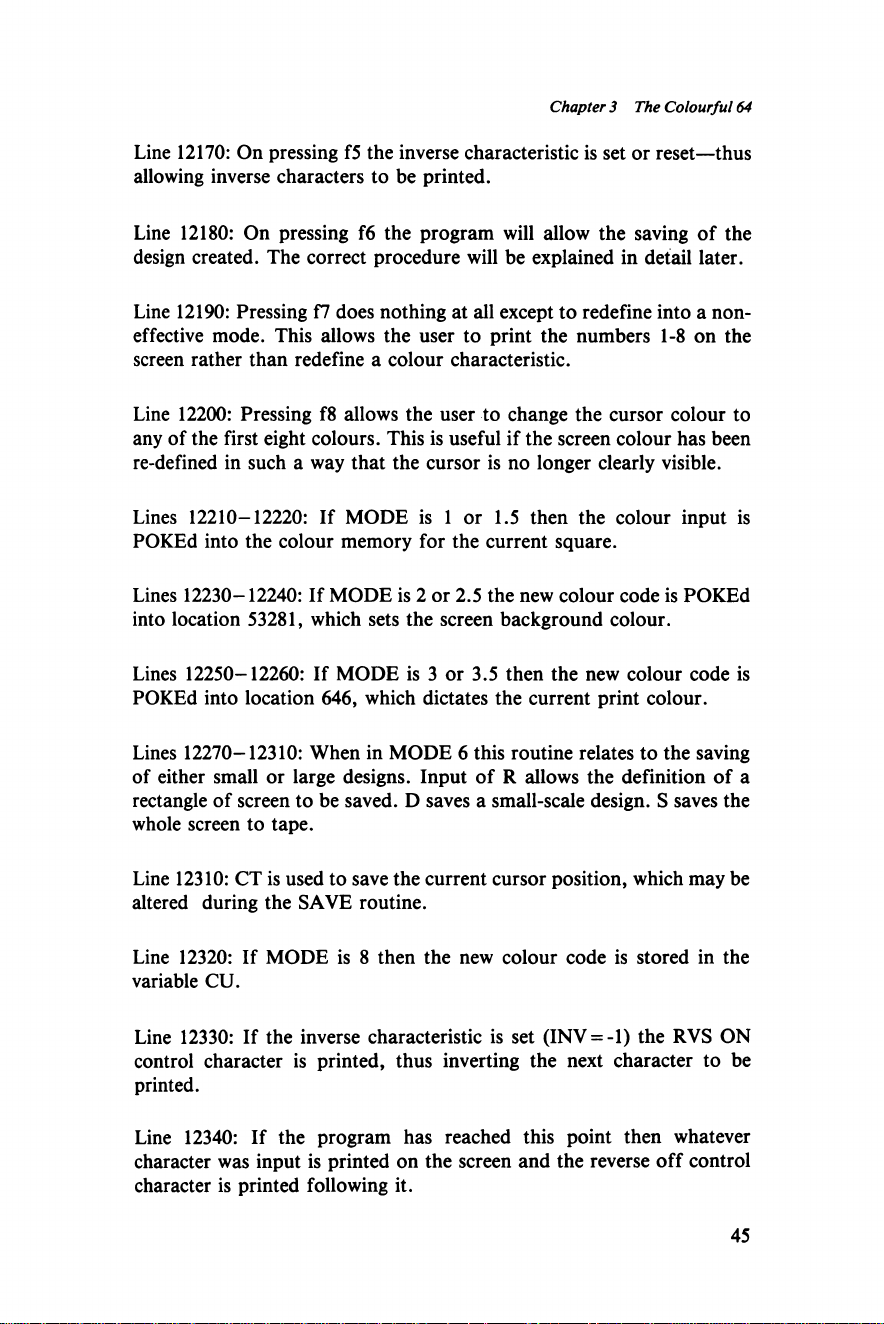
Chapter 3 The Colourful 64
Line 12170: On pressing f5 the inverse characteristic is set or reset—thus
allowing inverse characters to be printed.
Line 12180: On pressing f6 the program will allow the saving of the
design created. The correct procedure will be explained in detail later.
Line 12190: Pressing f7 does nothing at all except to redefine into a non-
effective mode. This allows the user to print the numbers 1-8 on the
screen rather than redefine a colour characteristic.
Line 12200: Pressing f8 allows the user to change the cursor colour to
any of the first eight colours. This is useful if the screen colour has been
re-defined in such a way that the cursor is no longer clearly visible.
Lines 12210-12220: If MODE is 1 or 1.5 then the colour input is
POKEd into the colour memory for the current square.
Lines 12230-12240: If MODE is 2 or 2.5 the new colour code is POKEd
into location 53281, which sets the screen background colour.
Lines 12250-12260: If MODE is 3 or 3.5 then the new colour code is
POKEd into location 646, which dictates the current print colour.
Lines 12270-12310: When in MODE 6 this routine relates to the saving
of either small or large designs. Input of R allows the definition of a
rectangle of screen to be saved. D saves a small-scale design. S saves the
whole screen to tape.
Line 12310: CT is used to save the current cursor position, which may be
altered during the SAVE routine.
Line 12320: If MODE is 8 then the new colour code is stored in the
variable CU.
Line 12330: If the inverse characteristic is set (INV = -1) the RVS ON
control character is printed, thus inverting the next character to be
printed.
Line 12340: If the program has reached this point then whatever
character was input is printed on the screen and the reverse off control
character is printed following it.
45
Page 48
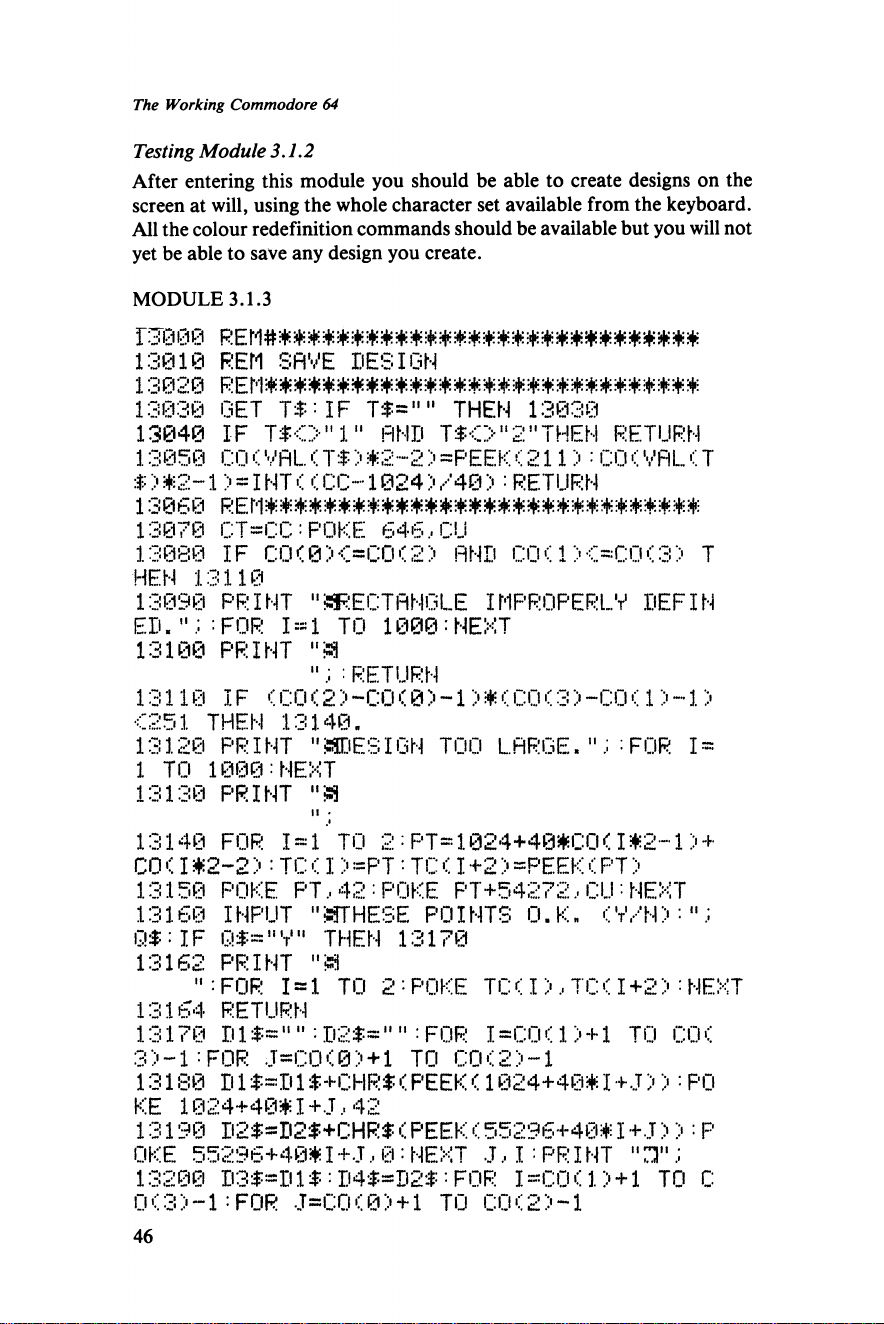
The Working Commodore 64
Testing Module 3.1.2
After entering this module you should be able to create designs on the
screen at will, using the whole character set available from the keyboard.
All the colour redefinition commands should be available but you will not
yet be able to save any design you create.
MODULE 3.1.3
13000 REM#*####################*#######
13010 REM SAVE DESIGN
13020 REM##############################
13030 GET T$ :IF T$="" THEN 13030
13040 IF T$<>"1" AND T$<>"2"THEN RETURN
13850 CO < VflL < T$ ) *2-2 > =F'EEK <211) : CO < VAL_ < T
$> *2~1 > = INT < < C C- 1024 >/ 48 ):RETURN
13060 REM#*#*#*##**#*#########*##*#*#*#
13070 CT =C C: POKE 646.. CU
13080 IF C CK 0X =C O< 2) AND CO < 1 O C O <3> T
HEN 13110
13090 PRINT "SRECTANGLE IMPROPERLY DEFIN
ED . " : FOR I = 1 TO 1000: NEXT
13100 PRINT "a
";:RETURN
13110 IF < CO < 2 > -CO < 0 > -1 * < CO < 3) -CO < 1 -1 >
<251 THEN 13140.
13120 PRINT "SIDESIGN TOO LARGE.";=FOR 1 =
1 TO 1000:NEXT
13130 PRINT "S3
li '
13140 FOR I = 1'TO 2;PT=1024+40#CO<1*2-1> +
CO < I *2-2 > : TC < I :• =PT •• TC < I +2 > =PEEK < PT >
13150 POKE P T , 42 : POKE PT+54272 .• CU ■ NEXT
13160 INPUT "S3THESE POINTS O.K. <V/N>:";
Q f :IF Q$="V" THEN 13170
13162 PRINT "3
":FOR 1 = 1 TO 2'•POKE TC <I>,TC <I+2 >:NEXT
13164 RETURN
13170 Dl $="" ;D2$="" :FOR I=C0<1>+1 TO CCK
3 > -1: FOR J=CO < 0 :■ +1 TO CO < 2 -1
13180 D 1$= D1$ +CHR$< PEEK <1824+40*I+J >)=PO
KE 1024+40*I+J .42
13190 D2$=D2$+CHR$< PEEK < 55296+48*I+J > >:P
OKE 55296+40* I + J , 0 : NEXT J , I = PR I NT " 21" ;
13200 D3f=Dl|:: D4f-=D2$: FOR I=C0C1> + 1 TO C
0<3>-1:FOR J =CO<0> +1 TO C O<2)-l
46
Page 49
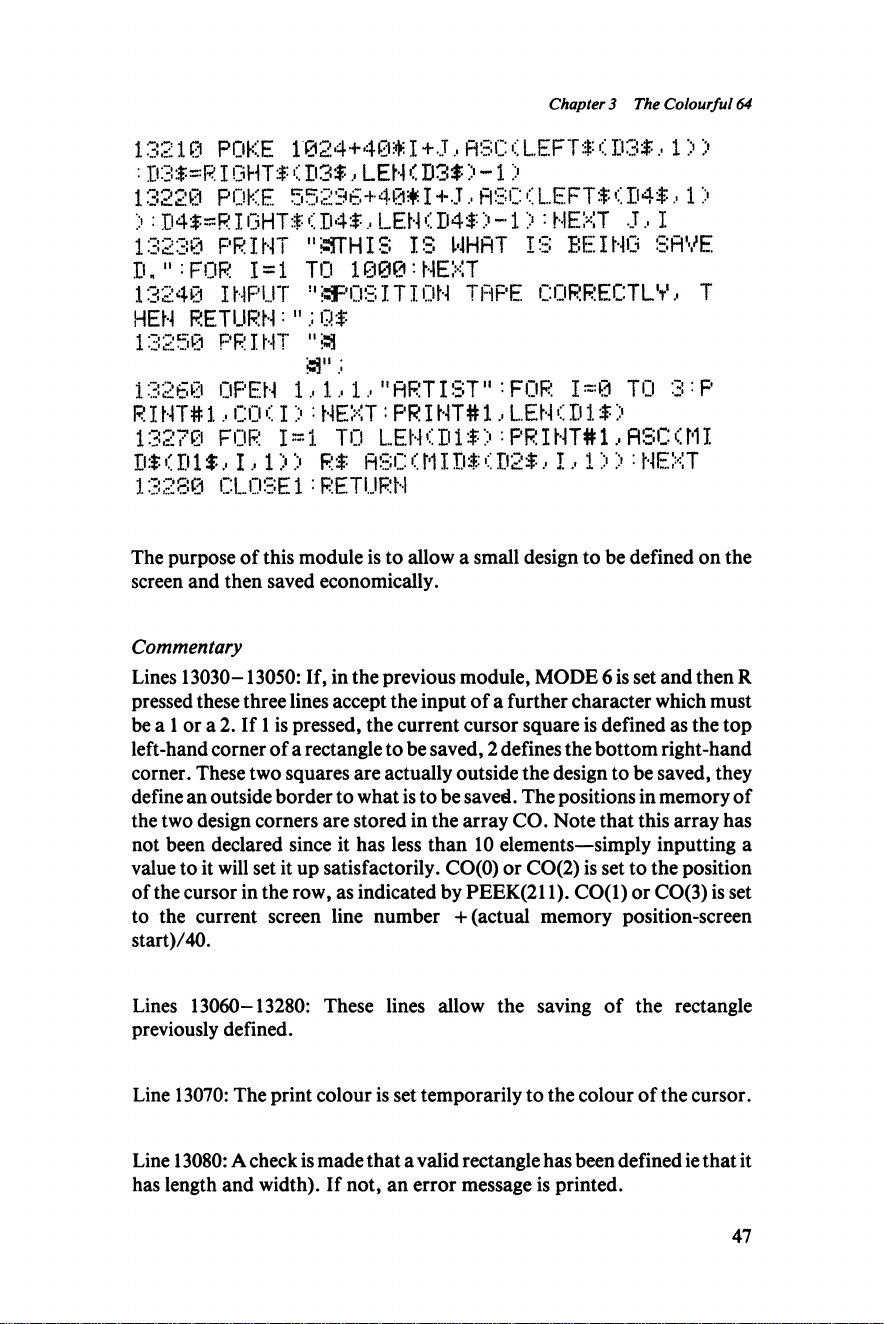
Chapter 3 The Colourful 64
13210 POKE 1024+40*I+J ,fiSC<LE FT$<B3$ ,1>)
B3$=R I GHTf < D3$ , LEN < D3$ ) -1 )
13220 POKE 55236+40*I+J ,flSC< L EFT$(D 4$,1)
>: D4$«R IGHT$ < D4 $, LEN (D4$ > -• 1): NEXT J , I
13230 PRINT "STHIS IS WHAT IS BEING SAVE
B." :FOR 1=1 TO 1000:NEXT
13240 INPUT 11 IMPOSITION TAPE CORRECTLY.• T
HEN RE TU RN•";Q$
13250 PRINT "3
13260 OPEN l’, 1, 1, "ARTIST" ’-FOR I^:0 TO 3^P
RI NT# 1, CO ( I • NEXT : PR I NT# 1, LEN C D1 $ >
13270 FOR I = j. TO LEN (D i $ > • PR I NT# 1, flSC C MI
I, i::0 R$ flSC (MI Ii$ (. D2$ .• I .• 1 > > : NEXT
13280 CLOSE1-RETURN
The purpose of this module is to allow a small design to be defined on the
screen and then saved economically.
Commentary
Lines 13030-13050: If, in the previous module, MODE 6 is set and then R
pressed these three lines accept the input of a further character which must
be a 1 or a 2. If 1 is pressed, the current cursor square is defined as the top
left-hand corner of a rectangle to be saved, 2 defines the bottom right-hand
corner. These two squares are actually outside the design to be saved, they
define an outside border to what is to be saved. The positions in memory of
the two design corners are stored in the array CO. Note that this array has
not been declared since it has less than 10 elements—simply inputting a
value to it will set it up satisfactorily. CO(0) or CO(2) is set to the position
of the cursor in the row, as indicated by PEEK(211). CO(l) or CO(3) is set
to the current screen line number + (actual memory position-screen
start)/40.
Lines 13060-13280: These lines allow the saving of the rectangle
previously defined.
Line 13070: The print colour is set temporarily to the colour of the cursor.
Line 13080: A check is made that a valid rectangle has been defined ie that it
has length and width). If not, an error message is printed.
47
Page 50
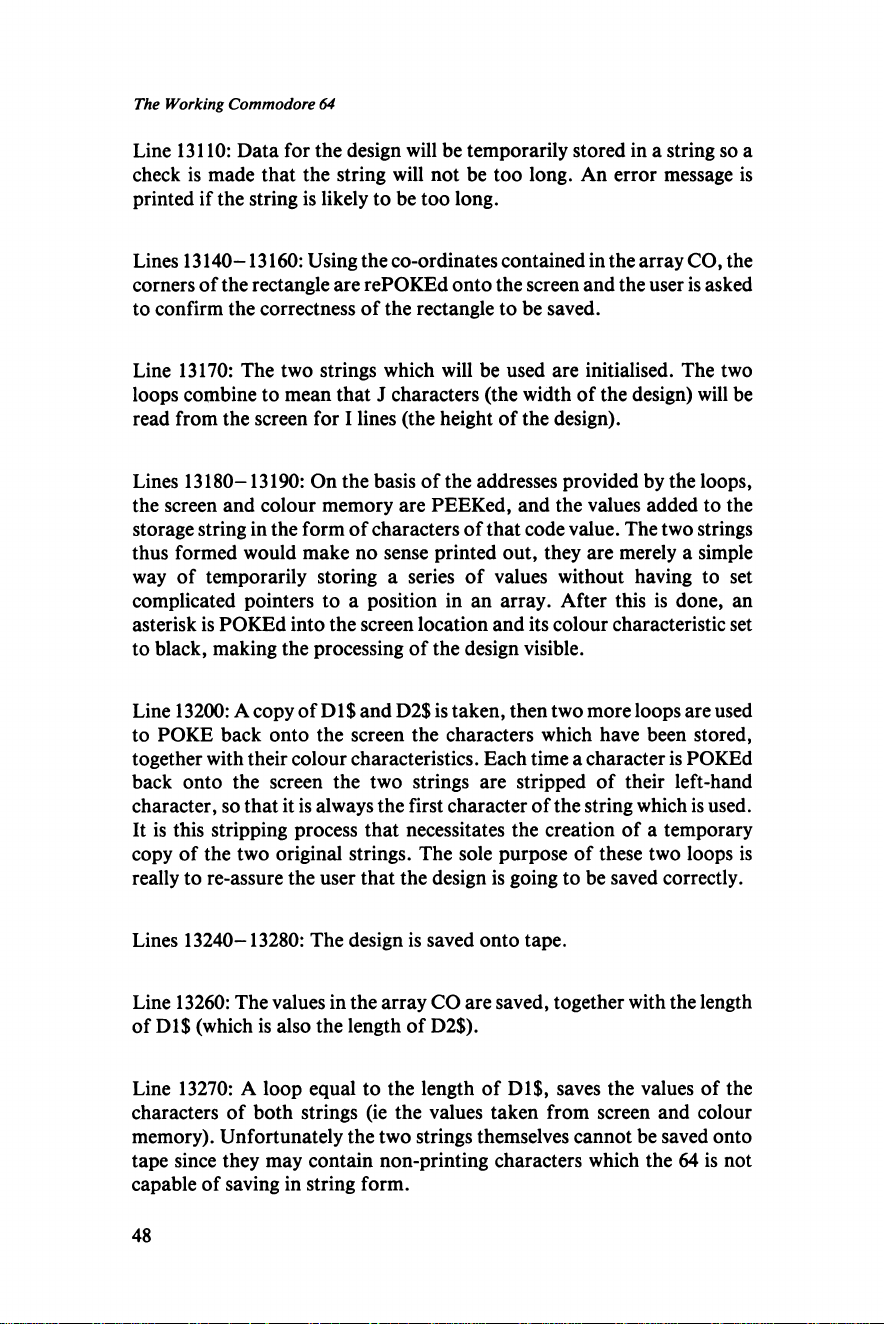
The Working Commodore 64
Line 13110: Data for the design will be temporarily stored in a string so a
check is made that the string will not be too long. An error message is
printed if the string is likely to be too long.
Lines 13140-13160: Using the co-ordinates contained in the array CO, the
corners of the rectangle are rePOKEd onto the screen and the user is asked
to confirm the correctness of the rectangle to be saved.
Line 13170: The two strings which will be used are initialised. The two
loops combine to mean that J characters (the width of the design) will be
read from the screen for I lines (the height of the design).
Lines 13180-13190: On the basis of the addresses provided by the loops,
the screen and colour memory are PEEKed, and the values added to the
storage string in the form of characters of that code value. The two strings
thus formed would make no sense printed out, they are merely a simple
way of temporarily storing a series of values without having to set
complicated pointers to a position in an array. After this is done, an
asterisk is POKEd into the screen location and its colour characteristic set
to black, making the processing of the design visible.
Line 13200: A copy of Dl$ and D2$ is taken, then two more loops are used
to POKE back onto the screen the characters which have been stored,
together with their colour characteristics. Each time a character is POKEd
back onto the screen the two strings are stripped of their left-hand
character, so that it is always the first character of the string which is used.
It is this stripping process that necessitates the creation of a temporary
copy of the two original strings. The sole purpose of these two loops is
really to re-assure the user that the design is going to be saved correctly.
Lines 13240-13280: The design is saved onto tape.
Line 13260: The values in the array CO are saved, together with the length
of Dl$ (which is also the length of D2$).
Line 13270: A loop equal to the length of Dl$, saves the values of the
characters of both strings (ie the values taken from screen and colour
memory). Unfortunately the two strings themselves cannot be saved onto
tape since they may contain non-printing characters which the 64 is not
capable of saving in string form.
48
Page 51
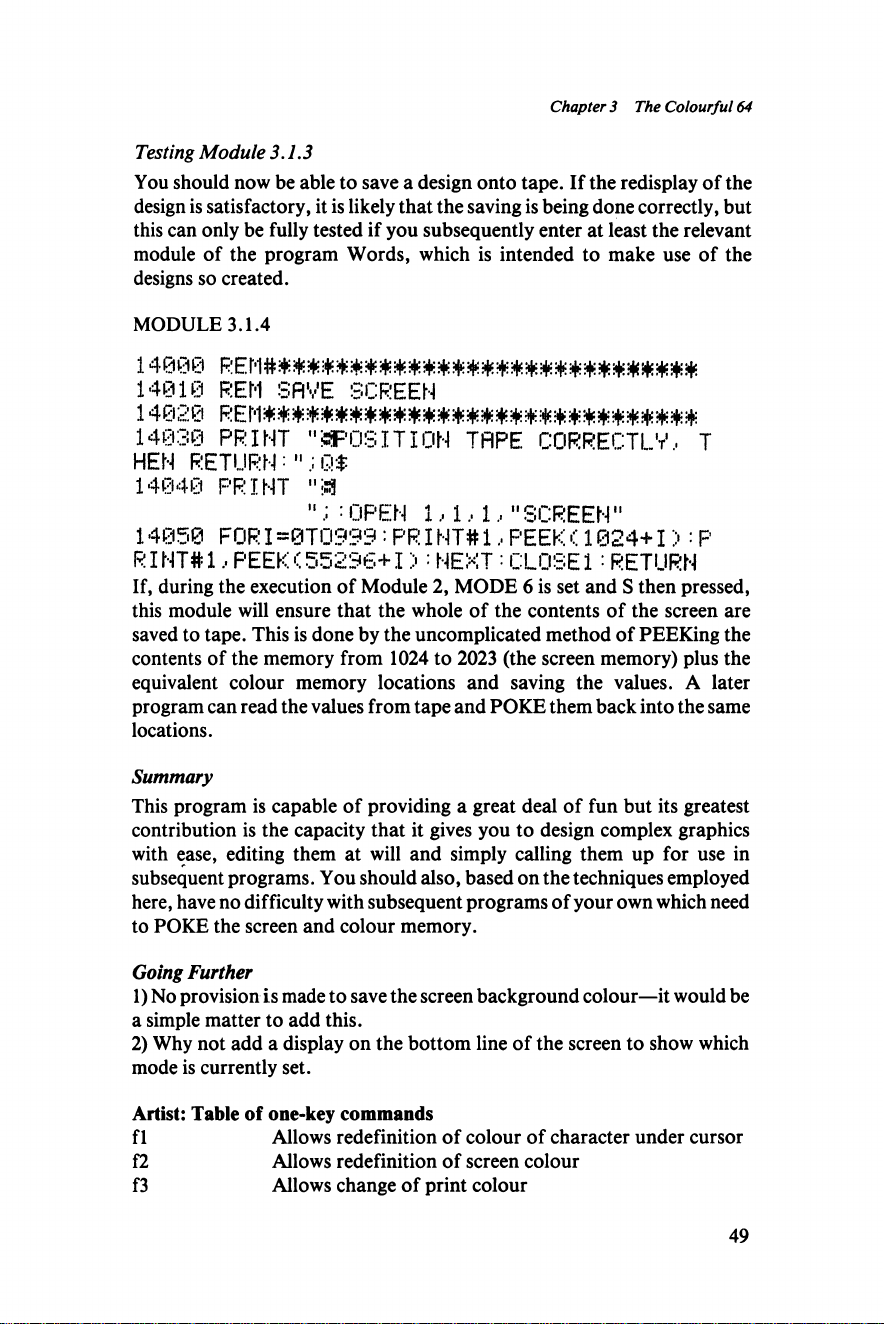
Chapter 3 The Colourful 64
Testing Module 3.1.3
You should now be able to save a design onto tape. If the redisplay of the
design is satisfactory, it is likely that the saving is being done correctly, but
this can only be fully tested if you subsequently enter at least the relevant
module of the program Words, which is intended to make use of the
designs so created.
MODULE 3.1.4
14000 REM******************************
14010 REM SAVE SCREEN
14020 REM#**#**^:^#*##**^*^**:^*'******
14830 PRINT "^POSITION TAPE CORRECTLY. T
HEN RETURN ="Q$
14040 PRINT "SI
:OPEN 1.-1, 1, "SCREEN"
14050 FOR IS0TO 999:PRIN T#1,PEEK <1024+1> : P
RINT#1,PEEK<55296+I) :NEXT =CLO SE1:RETURN
If, during the execution of Module 2, MODE 6 is set and S then pressed,
this module will ensure that the whole of the contents of the screen are
saved to tape. This is done by the uncomplicated method of PEEKing the
contents of the memory from 1024 to 2023 (the screen memory) plus the
equivalent colour memory locations and saving the values. A later
program can read the values from tape and POKE them back into the same
locations.
Summary
This program is capable of providing a great deal of fun but its greatest
contribution is the capacity that it gives you to design complex graphics
with ease, editing them at will and simply calling them up for use in
subsequent programs. You should also, based on the techniques employed
here, have no difficulty with subsequent programs of your own which need
to POKE the screen and colour memory.
Going Further
1) No provision is made to save the screen background colour—it would be
a simple matter to add this.
2) Why not add a display on the bottom line of the screen to show which
mode is currently set.
Artist: Table of one-key commands
f 1 Allows redefinition of colour of character under cursor
f2 Allows redefinition of screen colour
f3 Allows change of print colour
49
Page 52
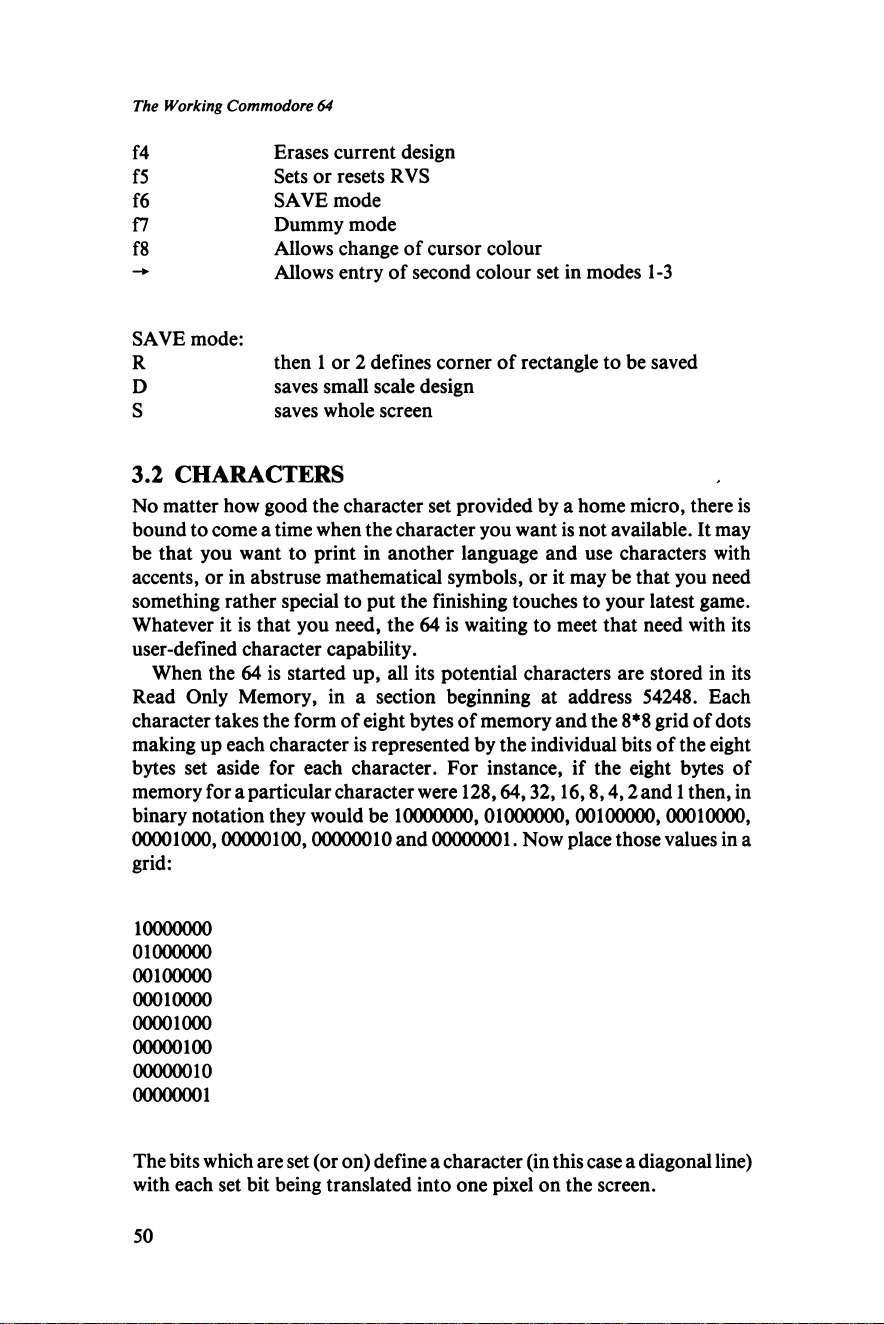
The Working Commodore 64
f4 Erases current design
f5 Sets or resets RVS
f6 SAVE mode
f7 Dummy mode
f8 Allows change of cursor colour
-*• Allows entry of second colour set in modes 1-3
SAVE mode:
R then 1 or 2 defines corner of rectangle to be saved
D saves small scale design
S saves whole screen
3.2 CHARACTERS
No matter how good the character set provided by a home micro, there is
bound to come a time when the character you want is not available. It may
be that you want to print in another language and use characters with
accents, or in abstruse mathematical symbols, or it may be that you need
something rather special to put the finishing touches to your latest game.
Whatever it is that you need, the 64 is waiting to meet that need with its
user-defined character capability.
When the 64 is started up, all its potential characters are stored in its
Read Only Memory, in a section beginning at address 54248. Each
character takes the form of eight bytes of memory and the 8*8 grid of dots
making up each character is represented by the individual bits of the eight
bytes set aside for each character. For instance, if the eight bytes of
memory for a particular character were 128,64,32,16,8,4,2 and 1 then, in
binary notation they would be 10000000,01000000,00100000,00010000,
00001000,00000100,00000010 and 00000001. Now place those values in a
grid:
10000000
01000000
00100000
00010000
00001000
00000100
00000010
00000001
The bits which are set (or on) define a character (in this case a diagonal line)
with each set bit being translated into one pixel on the screen.
50
Page 53
Chapter 3 The Colourful 64
That’s all very well but since the character data is stored in Read Only
Memory, it cannot be changed—it is permanently set when the ROM chip
is manufactured. Fortunately the 64 provides a neat way around the
problem but to understand it we first have to examine the method by which
the video display is generated.
All the tasks relating to the video screen on the 64 are handled by a
separate chip, the 6567 Video Interface Chip (or VIC II chip). This
workhorse handles both the screen itself and the characters which are to be
placed onto the screen, defining an area of memory in which the screen
information will be stored and another it will draw upon for character
data.
Contrary to what you might expect, the VIC II does not draw its
character data from the ROM at address 53248. The reason for this is that
the VIC II is only capable of perceiving 16K of memory at one time, so with
the screen memory in its normal position at 1024-2023 in the memory,
character data must be drawn from somewhere between 0 and 16383 in the
memory. To achieve this, the operating system cheats a little and makes the
VIC II believe that there is copy of the character set data located at
4096-6143. Whenever the VIC II looks at that memory area it detects the
character set data, despite the fact that in actual fact that area of memory
will probably be filled with a Basic program.
This may seem a little abstruse but it is of vital importance since it means
that, rather than looking for its character data in the ROM, which cannot
be altered, the VIC II looks for the data in Random Access Memory
(RAM), that is to say memory that the user can get at and alter. Of course
it’s not quite that simple. We have already noted that when the VIC II looks
at the memory area from 4096 onwards, it is not actually those addresses
that it sees but an image of the character data in the ROM. Fortunately, this
is a feature of only two blocks of memory within the 16K block, 4096-6143
and 6144-8193. If the VIC II is instructed to seek its character data from
any of the other 2K blocks within the total 16K, then it will not see the ROM
image but will take the data which is actually in memory and treat it as if it
were the character set.
The question now becomes, which block shall we specify? The first one
available is 2048-4095 but this has the slight drawback that it is where the
Basic program starts and POKEing it with new character data will crash the
program. We could use the blocks at 8192, 10240,12288 or 14336, but
unfortunately this would mean that we would have to limit the area
available to the Basic program quite drastically since otherwise there
would be a danger that a large program would overwrite the area used for
characters. The solution adopted here is to move the whole area that the
VIC II chip addresses further up into the memory.
You will remember that the VIC II is capable of seeing a 16K chunk of
memory at one time, however it is not fussy which 16K block it sees. There
51
Page 54
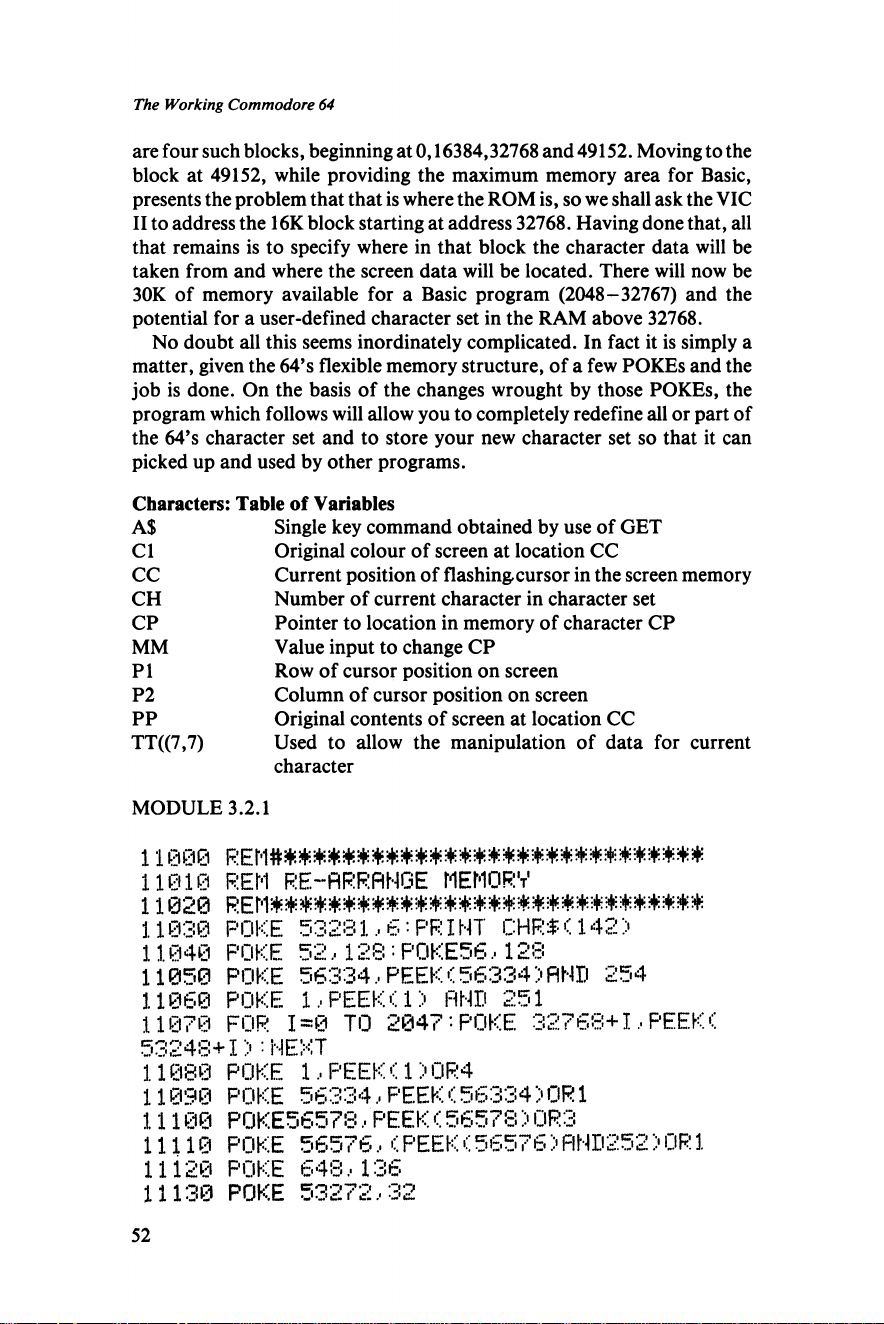
The Working Commodore 64
are four such blocks, beginning at 0,16384,32768 and 49152. Moving to the
block at 49152, while providing the maximum memory area for Basic,
presents the problem that that is where the ROM is, so we shall ask the VIC
II to address the 16K block starting at address 32768. Having done that, all
that remains is to specify where in that block the character data will be
taken from and where the screen data will be located. There will now be
30K of memory available for a Basic program (2048-32767) and the
potential for a user-defined character set in the RAM above 32768.
No doubt all this seems inordinately complicated. In fact it is simply a
matter, given the 64’s flexible memory structure, of a few POKEs and the
job is done. On the basis of the changes wrought by those POKEs, the
program which follows will allow you to completely redefine all or part of
the 64’s character set and to store your new character set so that it can
picked up and used by other programs.
Characters: Table of Variables
A$ Single key command obtained by use of GET
Cl Original colour of screen at location CC
CC Current position of flashing, cursor in the screen memory
CH Number of current character in character set
CP Pointer to location in memory of character CP
MM Value input to change CP
P 1 Row of cursor position on screen
P2 Column of cursor position on screen
PP Original contents of screen at location CC
TT((7,7) Used to allow the manipulation of data for current
character
MODULE 3.2.1
11010 REM RE-ARRANGE MEMORY
11020 REM'**#'**#***-*^^-**#**##**.***'*^****
11@30 POKE 53281,6:PRINT CH R$<142>
11040 POKE 52,128 = P0K E56,128
11050 POKE 56334,PEEK < 56334 > AND 254
11060 POKE 1,PEEKCl> AND 251
11070 FOR 1=0 TO 2047:POKE 32768+1,PEEK<
53248+1):NEXT
11080 POKE 1, PEEK < 1') 0R4
11090 POKE 56334,PEEK < 56334 >OR1
11100 PQKE56578,PEEK <56578 > 0R3
11110 POKE 56576,<PEEK < 56576 > AND252 > OR1
11120 POKE 648.. 136
11130 POKE 53272,32
52
Page 55
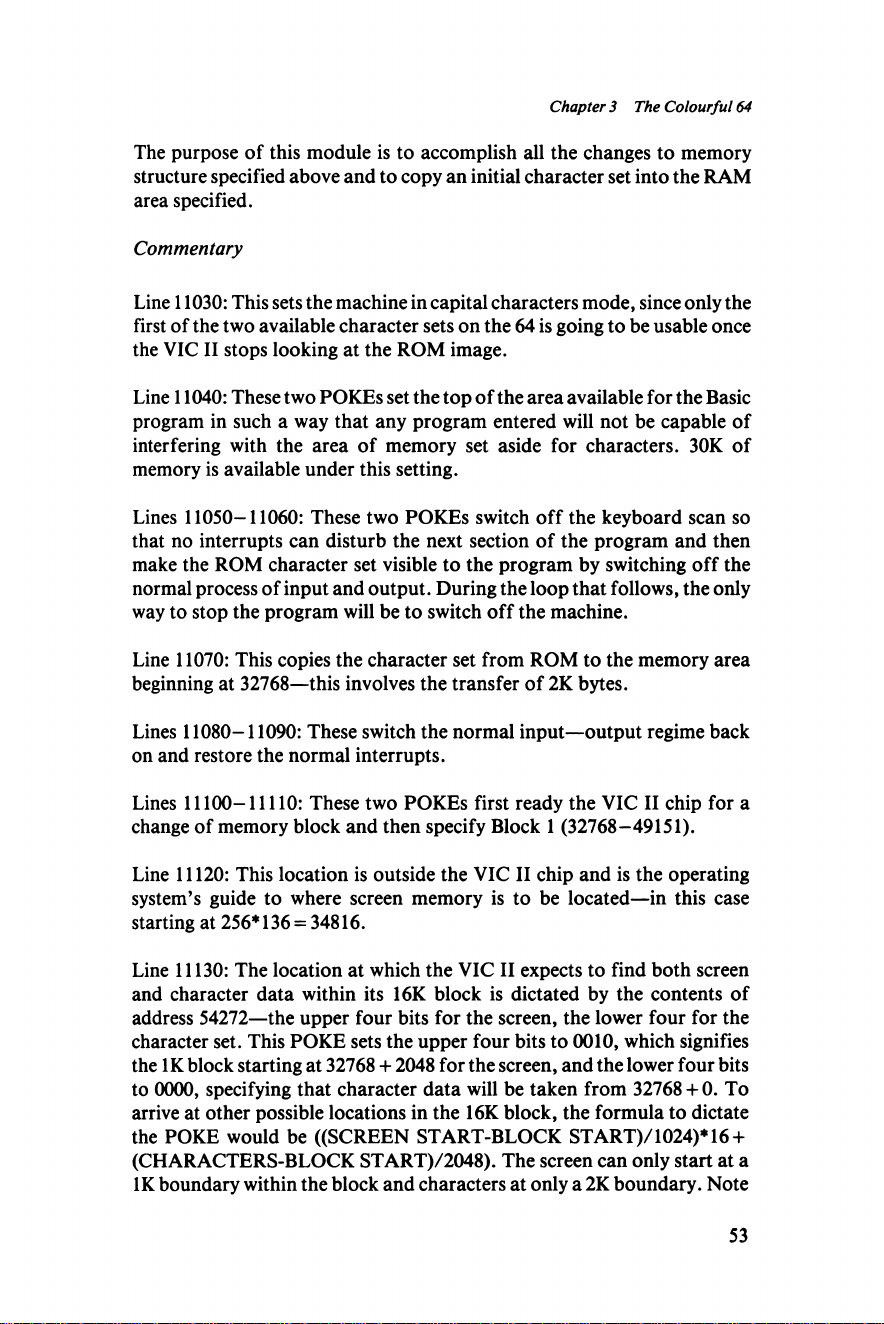
Chapter 3 The Colourful 64
The purpose of this module is to accomplish all the changes to memory
structure specified above and to copy an initial character set into the RAM
area specified.
Commentary
Line 11030: This sets the machine in capital characters mode, since only the
first of the two available character sets on the 64 is going to be usable once
the VIC II stops looking at the ROM image.
Line 11040: These two POKEs set the top of the area available for the Basic
program in such a way that any program entered will not be capable of
interfering with the area of memory set aside for characters. 30K of
memory is available under this setting.
Lines 11050-11060: These two POKEs switch off the keyboard scan so
that no interrupts can disturb the next section of the program and then
make the ROM character set visible to the program by switching off the
normal process of input and output. During the loop that follows, the only
way to stop the program will be to switch off the machine.
Line 11070: This copies the character set from ROM to the memory area
beginning at 32768—this involves the transfer of 2K bytes.
Lines 11080-11090: These switch the normal input—output regime back
on and restore the normal interrupts.
Lines 11100-11110: These two POKEs first ready the VIC II chip for a
change of memory block and then specify Block 1 (32768-49151).
Line 11120: This location is outside the VIC II chip and is the operating
system’s guide to where screen memory is to be located—in this case
starting at 256*136 = 34816.
Line 11130: The location at which the VIC II expects to find both screen
and character data within its 16K block is dictated by the contents of
address 54272—the upper four bits for the screen, the lower four for the
character set. This POKE sets the upper four bits to 0010, which signifies
the IK block starting at 32768 + 2048 for the screen, and the lower four bits
to 0000, specifying that character data will be taken from 32768 + 0. To
arrive at other possible locations in the 16K block, the formula to dictate
the POKE would be ((SCREEN START-BLOCK START)/1024)*16 +
(CHARACTERS-BLOCK START)/2048). The screen can only start at a
IK boundary within the block and characters at only a 2K boundary. Note
53
Page 56
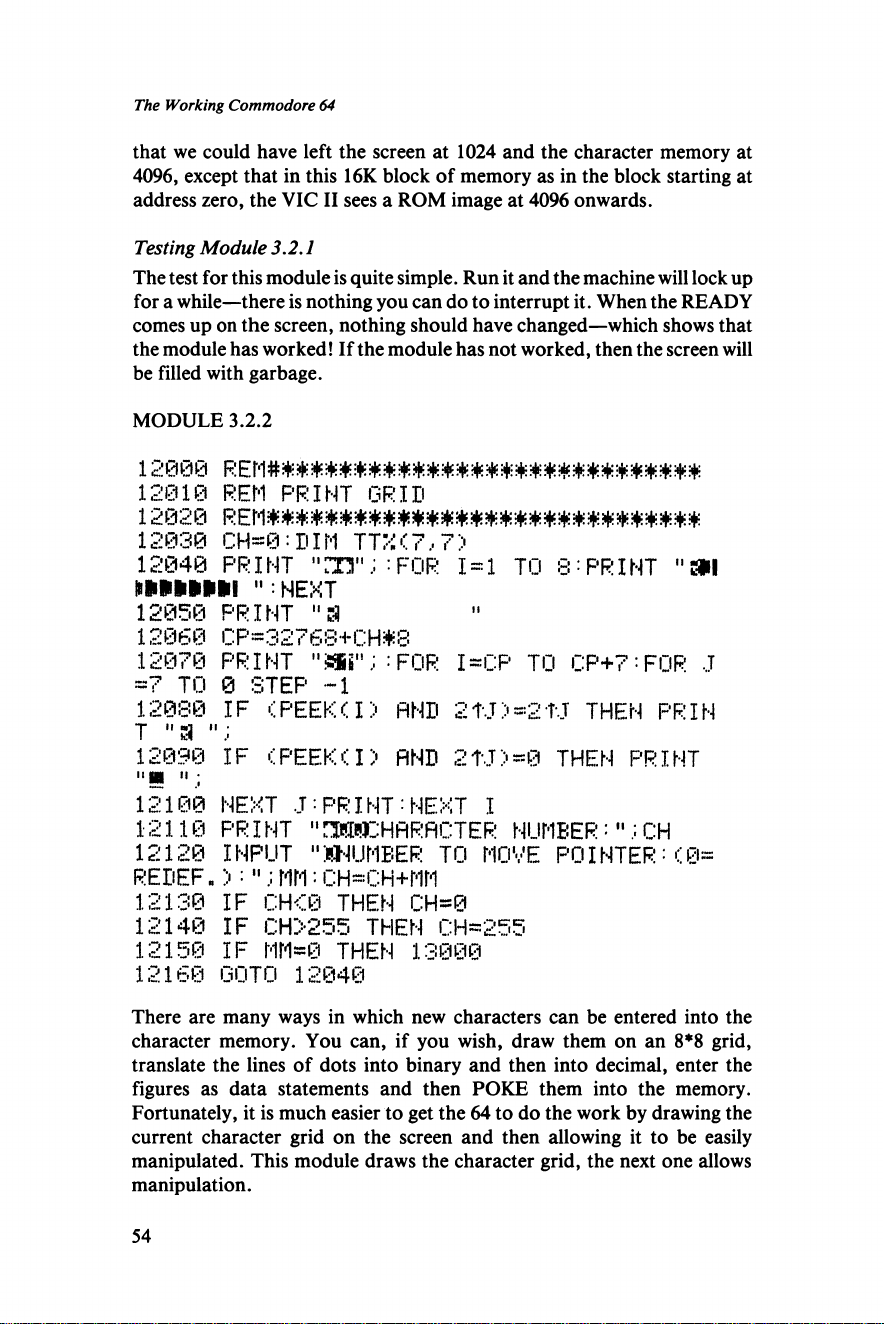
The Working Commodore 64
that we could have left the screen at 1024 and the character memory at
4096, except that in this 16K block of memory as in the block starting at
address zero, the VIC II sees a ROM image at 4096 onwards.
Testing Module 3.2.1
The test for this module is quite simple. Run it and the machine will lock up
for a while—there is nothing you can do to interrupt it. When the READY
comes up on the screen, nothing should have changed—which shows that
the module has worked! If the module has not worked, then the screen will
be filled with garbage.
MODULE 3.2.2
1 2 0 10
12 0 20
REM PRINT GRID
12030 CH-0: DIM TT’i <7,7 >
12040 PRINT "m";: FOR 1 = 1 TO 8: PR I NT "»l
>1111111 "N EXT
12050 PRINT "S
12060 CP=32768+CH*8
12070 PRINT "Mi";:FOR i~cp TO CP+7=F0R J
=7 TO 0 STEP -1
12080 IF ( PEEK (I > AND 2tJ>=2f.T THEN PR IN
t " a " '•
12090 IF (PEEK(I) AND 2TJ>=0 THEN PRINT
12100 NEXT J :PRINT:NEXT I
12110 PRINT "rMiPCHARACTER NUMBER: ";CH
12120 INPUT "HNUMBER TO MOVE POINTER:(0=
REDEF.) : " MM: CH=CH+MM
12130 IF CH<0 THEN CH=0
12140 IF CH>255 THEN CH=255
12150 IF MM=0 THEN 13000
12160 GOTO 12040
There are many ways in which new characters can be entered into the
character memory. You can, if you wish, draw them on an 8*8 grid,
translate the lines of dots into binary and then into decimal, enter the
figures as data statements and then POKE them into the memory.
Fortunately, it is much easier to get the 64 to do the work by drawing the
current character grid on the screen and then allowing it to be easily
manipulated. This module draws the character grid, the next one allows
manipulation.
54
Page 57
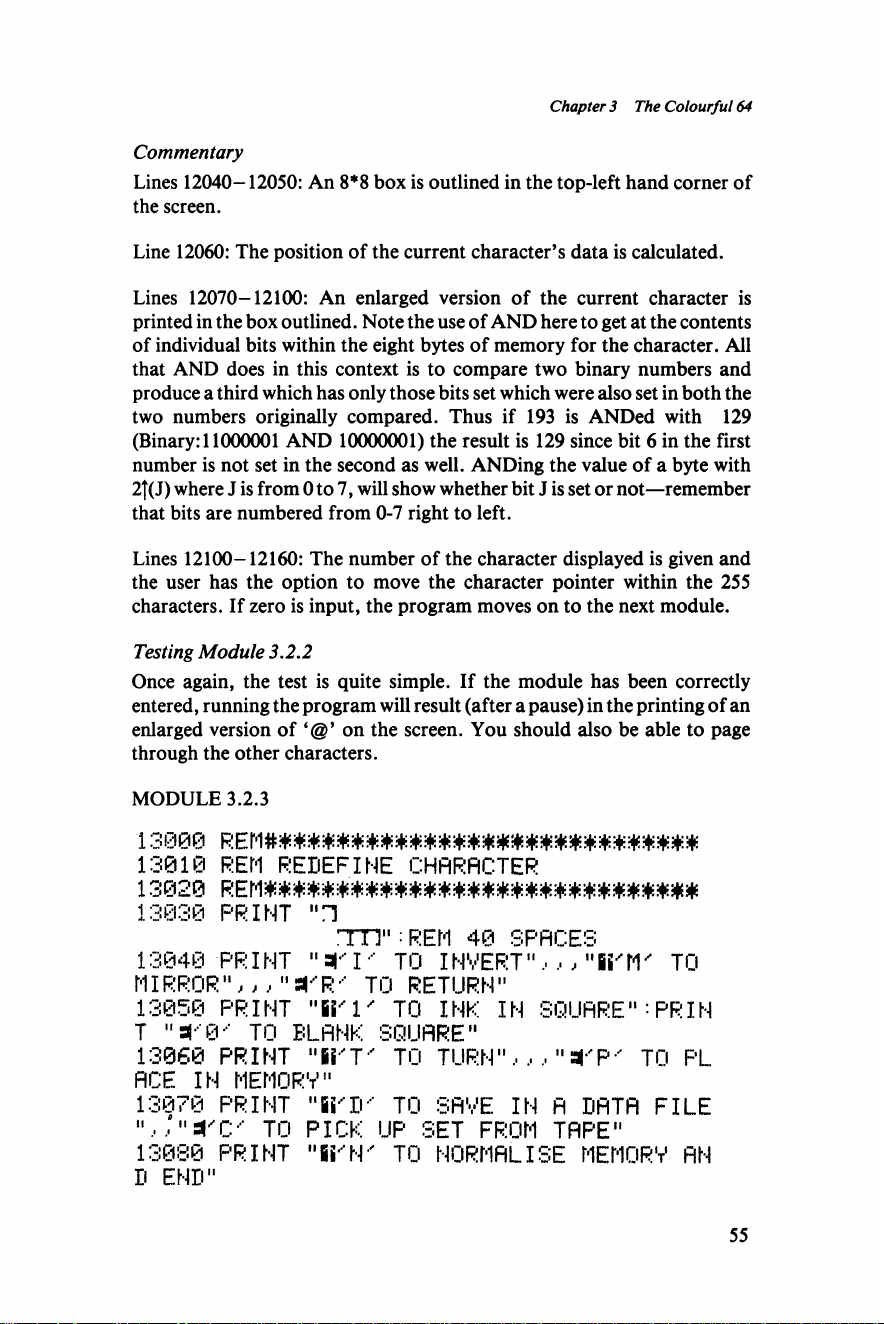
Chapter 3 The Colourful 64
Commentary
Lines 12040-12050: An 8*8 box is outlined in the top-left hand corner of
the screen.
Line 12060: The position of the current character’s data is calculated.
Lines 12070-12100: An enlarged version of the current character is
printed in the box outlined. Note the use of AND here to get at the contents
of individual bits within the eight bytes of memory for the character. All
that AND does in this context is to compare two binary numbers and
produce a third which has only those bits set which were also set in both the
two numbers originally compared. Thus if 193 is ANDed with 129
(Binary: 11000001 AND 10000001) the result is 129 since bit 6 in the first
number is not set in the second as well. ANDing the value of a byte with
2|(J) where J is from Oto 7, will show whether bit J is set or not—remember
that bits are numbered from 0-7 right to left.
Lines 12100-12160: The number of the character displayed is given and
the user has the option to move the character pointer within the 255
characters. If zero is input, the program moves on to the next module.
Testing Module 3.2.2
Once again, the test is quite simple. If the module has been correctly
entered, running the program will result (after a pause) in the printing of an
enlarged version of on the screen. You should also be able to page
through the other characters.
MODULE 3.2.3
13000
13010 REM REDEFINE CHARACTER
13020 r e n *****#**#*#***********m m m m
13030 PRINT "Tl
!T O ":REM 40 SPACES
13040 PRINT "ari -' TO INVERT", ,, "ii'W TO
MIRROR" ,, ," STR"- TO RETURN"
13050 PRINT "IV TO INK IN SQUARE"-PRIN
T " ■(' 0 ’ TO BLANK SQUARE"
13060 PRINT "ii'T' TO TURN",, , "aTP' TO PL
ACE IN MEMORY"
13070 PRINT "ii*-D- TO SAVE IN A DATA FILE
"srC-' TO PICK UP SET FROM TAPE"
13080 PRINT " W \ Y TO NORMALISE MEMORY AN
D END"
55
Page 58
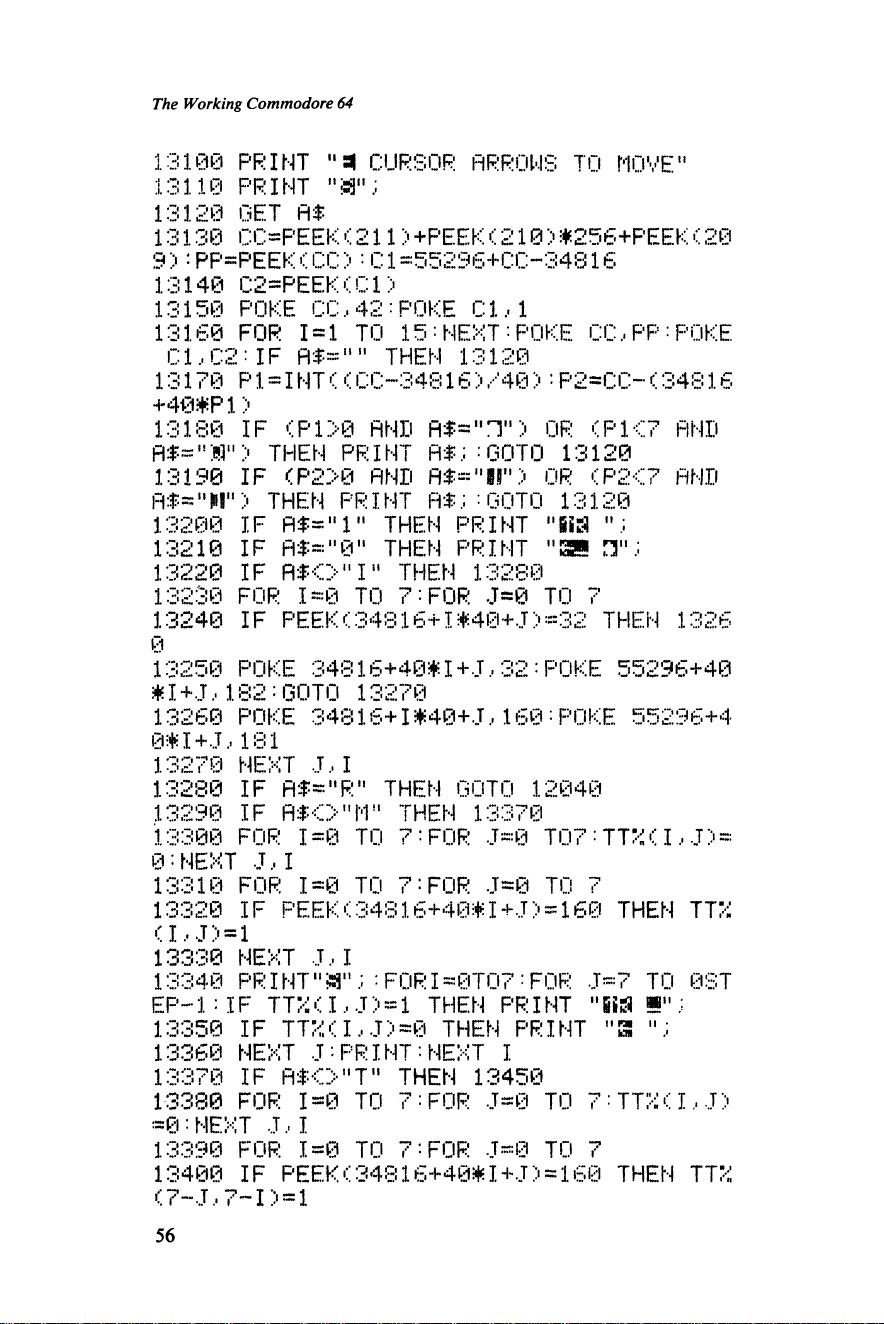
The Working Commodore 64
13100 PRINT 11 a CURSOR ARROWS TO MOVE"
13110 PRINT "H";
13120 GET A$
13130 CC-P EEK( 211)+PEE K(210> *256+PEEK (20
9 ) : PP=PEEK(CC> : C 1 =55296+CC-34816
13140 C2=PE EK(C 1>
13150 POKE CC,42:POKE Cl.. 1
13160 FOR 1=1 TO 15:NEXT:POKE CC,pp:POKE
C1,C2:IF fl$=,,n THEN 13120
13170 P 1 = I NT < < CC--34816) /40 >: P2=CC- (34816
+40#P1)
13180 IF <P1>0 AND A*="T'> OR (PI<7 AND
R$=";r> THEN PRINT A$;:GOTO 13120
13190 IF (P2>0 AND fl$="H") OR (P2<7 AND
A$="M") THEN PRINT A T :GOTO 13120
13200 IF A$=" 1" THEN PRINT "iiS
13210 IF A$="0" THEN PRINT "BB ;
13220 IF AT O ' 11 “ THEN 13280
13230 FOR 1=0 TO 7 :FOR J=0 TO 7
13240 IF PE EK(34816+1 if40+J > =32 THEN 1326
0
13250 POKE 34816+40#I+ J .32:POKE 55296+40
*I+J.. 182: GOTO 13270
13260 POKE 34816+ I#40+J, 160:POKE 55296+4
0 '■¥ I+J 181
13270 NEXT J.i I
13280 IF A$="R" THEN GOTO 12040
13290 IF R I O "M " THEN 13370
13300 FOR 1=0 TO 7: FOR J=0 T07 ; TTX( I .■ J} =
0 :NEXT J,I
13310 FOR 1=0 TO 7 :F0R J=0 TO 7
13320 IF P EE K(34816+40#I+J )=160 THEN TTX
(I,J)=l
13330 NEXT J,I
13340 PRINT"ST;:FORI=0TO7:FOR J=7 TO GST
EP-1 : IF TTX(I.. J> = 1 THEN PRINT "SiSJ i" ;
13350 IF TTX(I.. J> =0 THEN PRINT "3 " j
13360 NEXT J:PRINT:NEXT I.
13370 IF A $ O uT" THEN 13450
13380 FOR 1=0 TO 7: FOR J=0 TO 7 : TTX( I . T:<
= 0 :NEXT J,I
13390 FOR 1=0 TO 7:FOR J=0 TO 7
13400 IF PEEK (34816+40*1+J)=160 THEN TTX
(7~J,7~I>=1
56
Page 59
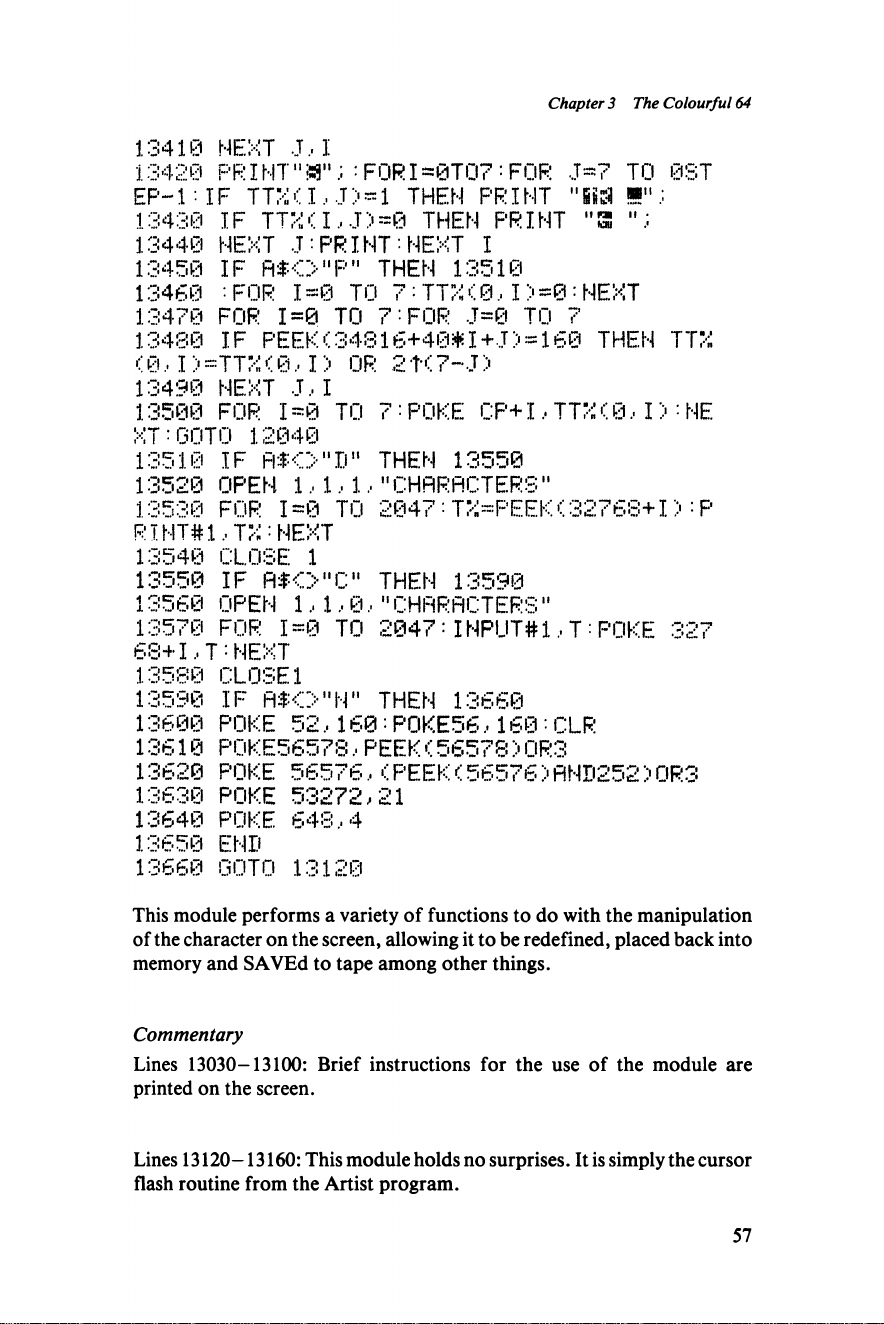
Chapter 3 The Colourful 64
13410 NEXT ,T,I
13420 F:'R I N T11 S3" 1 : FOR I-0TO7 : FOR ,T=7 TO 0ST
EF'-l '• IF TTX<I .■ J >= 1 THEN PRINT "lid 1" ;
13430 IF TTV<I, ,T>=U THEN PRINT "3
13440 NEXT J :P RI NT :NEXT I
13450 IF A $0" P " THEN 13510
13460 :FOR 1=0 TO 7:TTX<0,I>=0=NEXT
13470 FOR 1=0 TO 7:FOR J=0 TO 7
13480 IF PEE K<.34816+40#I + J ) = 160 THEN TTX
(0,1 > =TTX < 0,1) OR 2 t< 7-J
13490 NEXT J,I
13500 FOR 1=0 TO 7: POKE CP+1 .• TTX < 0 .■ I > : NE
XT:GOTO 12040
13510 IF A $ 0" B " THEN 13550
13520 OPEN 1,1.. 1, "CHARACTERS"
13530 FOR 1=0 TO 20 47 : TX=PEEK.<32768+I.) : P
RINT#1, TA:NEXT
13540 CLOSE 1
13550 IF A$<>"C" THEN 13590
13560 OPEN 1,1,0,"CHARACTERS"
13570 FOR 1=0 TO 2047:INPUT#1,T :POKE 327
68+I,T-NEXT
13580 CLOSE1
13590 IF A$0"H" THEN 13660
13600 POKE 52,160:P0KE56,160:CLP
13610 P0KE56578,PEEK <56578 > 0R3
13620 POKE 56576,(PEEK < 56576 > AND252)0R3
13630 POKE 53272,21
13640 PUKE 648,4
13650 END
13660 G0TO 13120
This module performs a variety of functions to do with the manipulation
of the character on the screen, allowing it to be redefined, placed back into
memory and SAVEd to tape among other things.
Commentary
Lines 13030-13100: Brief instructions for the use of the module are
printed on the screen.
Lines 13120-13160: This module holds no surprises. It is simply the cursor
flash routine from the Artist program.
57
Page 60
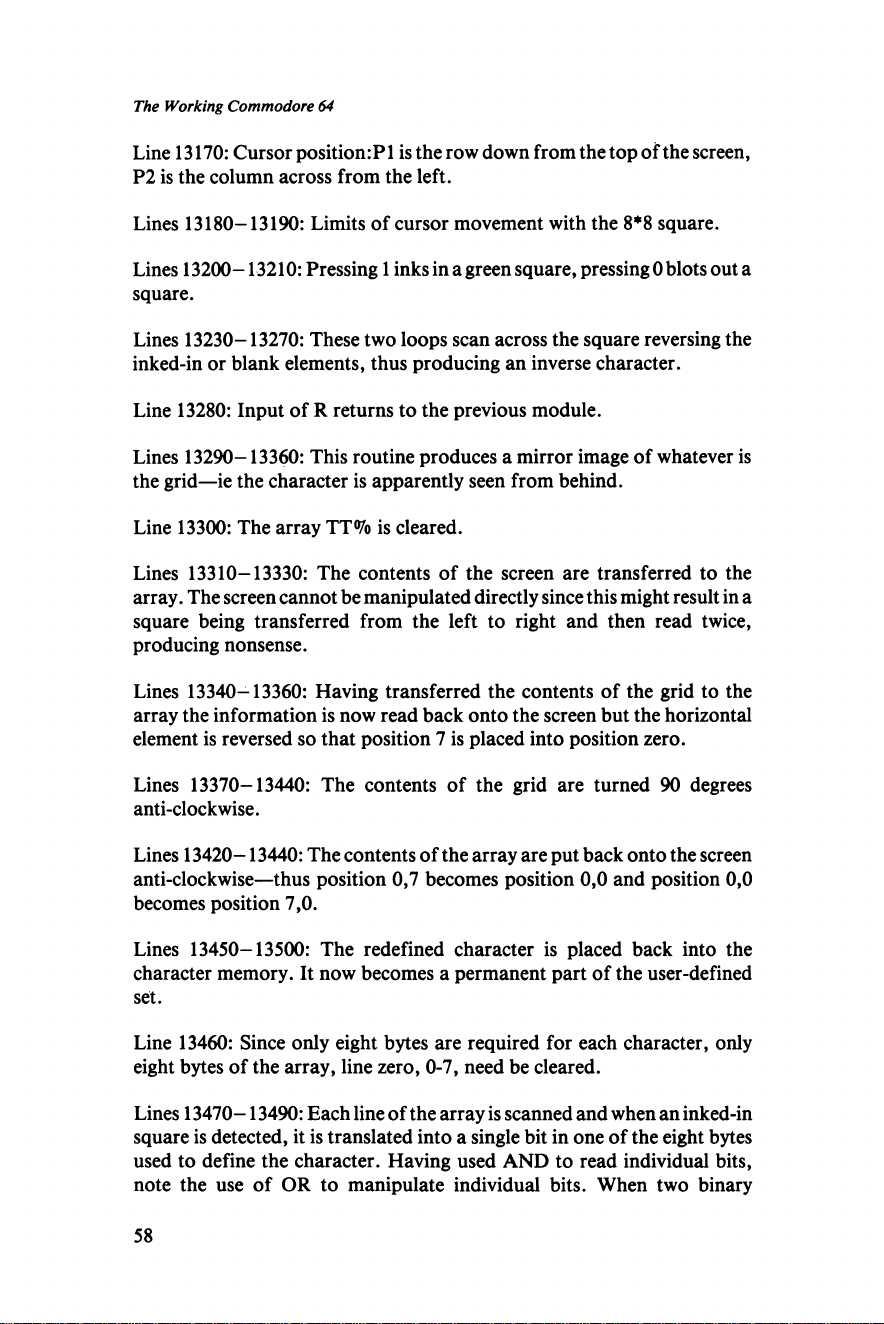
The Working Commodore 64
Line 13170: Cursor positional is the row down from the top ofthe screen,
P2 is the column across from the left.
Lines 13180-13190: Limits of cursor movement with the 8*8 square.
Lines 13200-13210: Pressing 1 inks in a green square, pressing 0 blots out a
square.
Lines 13230-13270: These two loops scan across the square reversing the
inked-in or blank elements, thus producing an inverse character.
Line 13280: Input of R returns to the previous module.
Lines 13290-13360: This routine produces a mirror image of whatever is
the grid—ie the character is apparently seen from behind.
Line 13300: The array TT°/o is cleared.
Lines 13310-13330: The contents of the screen are transferred to the
array. The screen cannot be manipulated directly since this might result in a
square being transferred from the left to right and then read twice,
producing nonsense.
Lines 13340-13360: Having transferred the contents of the grid to the
array the information is now read back onto the screen but the horizontal
element is reversed so that position 7 is placed into position zero.
Lines 13370-13440: The contents of the grid are turned 90 degrees
anti-clockwise.
Lines 13420-13440: The contents of the array are put back onto the screen
anti-clockwise—thus position 0,7 becomes position 0,0 and position 0,0
becomes position 7,0.
Lines 13450-13500: The redefined character is placed back into the
character memory. It now becomes a permanent part of the user-defined
set.
Line 13460: Since only eight bytes are required for each character, only
eight bytes of the array, line zero, 0-7, need be cleared.
Lines 13470-13490: Each line of the array is scanned and when an inked-in
square is detected, it is translated into a single bit in one of the eight bytes
used to define the character. Having used AND to read individual bits,
note the use of OR to manipulate individual bits. When two binary
58
Page 61
Chapter 3 The Colourful 64
numbers are ORed, all the bits which are set in either (or both) are set in the
resulting number. Thus to OR a number with 2j(J), where J is from 0 to 7
means that bit J will be turned on, regardless of whether it was on or off
before.
Line 13500: The eight bytes of the array are placed into the memory at the
position previously occupied by the character which has been redefined.
Lines 13510-13540: The area of memory starting at 32768 is stored onto
tape in the form of integer numbers.
Lines 13550-13560: A previously stored character set can be picked up
from tape for further manipulation. NB This is also an example of how
your new character set can be picked up by another program for
subsequent use.
Lines 13590-13650: If the program is terminated, the memory must be
reset to its original condition—unless you wish to go on using your new
character set with another program you are going to load. Failure to reset
the memory would mean that subsequent programs will be deprived of 8K
of memory and forced to use the redefined character set.
Line 13600: Basic is reset to its full potential size.
Lines 13610-13620: The bank of memory addressed by the VIC II is reset
to 3 (0-16383).
Lines 13630-13640: The screen is reset to start at 1024 (its normal
position) and the character memory reset to 4096 onwards.
Testing Module 3.2.3
Since this is a long module with a variety of functions, it is suggested that
you test each function as it is entered. Note that if a particular function is
faulty and you have entered changes to a line, there is no need to RUN the
program from the start. Simply GOTO 12000 since the character set, which
is above the Basic area, and the memory structure are undisturbed by the
entry of new lines. If all is well, the functions described in the commentary
will be available.
Summary
This is, as you will discover, an extremely enjoyable program to use, purely
for its own sake but its real power comes in what it can do in livening up the
output of your other programs. Because it does not actually relocate Basic,
only limits the space available, new programs can be loaded into the
59
Page 62
The Working Commodore 64
machine to make use of the redefined character set. If the machine has been
switched off since the character set was redefined, or the memory
normalised, all that needs to be done is to add the first module to the front
of subsequent programs (minus lines 11050-11090) and then to load the
redefined character set from tape using the routine at 13560-13580. But
do remember that if you redefine the letter A as a space invader character
then every A output by the program, even in the program listing, will be
redefined. For the sake of legibility it’s usually better to stick to redefining
the graphics characters!
Quite apart from the general usefulness of the program, however, you
have also been introduced to some of the possibilities opened up by the 64’s
flexible memory structure and the techniques necessary to make the most
of what is available. If you want to look further into memory manipulation
you will need to get hold of a copy of the Programmers Reference Manual
—with this program under your belt you should have no difficulty
understanding and applying what you find there.
Going Further
1) One simple addition to the program would be a routine to allow the
position of two characters to be swapped, or for a redefined character to be
placed at another location in the character set.
2) Making up a whole new character set with this program would be
extremely time consuming. Why not try adding some block manipulation
commands which would allow you to invert, turn, mirror etc. a whole set
of characters between specified limits. Program listings look extremely
interesting with all the letters upside-down!
3,3 SPRITES
With the Characters program entered we have prepared the way for an
examination of one of the features of the 64 that other micro-owners can
only dream of—sprites. With the advent of the 64, gone are the days when
only machine code programmers could make high-resolution designs move
smoothly and easily around the screen with an eerie realism. In the field of
games especially, sprites represent a revolution in affordable micros.
In essence, a sprite is very little different from the user-defined
characters we have been experimenting with. A great deal of technical
imagination and competence has gone into the creation of the sprite
facility, but when it comes to the user’s part, a sprite is just a larger
character which can be more flexibly moved around the screen.
Like the characters of the normal character set, sprites are defined by a
series of bytes stored in RAM. Instead of an 8*8 grid, however, sprites use a
grid which is 24 dots across by 21 down. Clearly this cannot be defined by
the 64 bits present in eight bytes. In fact, each row of a sprite is defined by
60
Page 63
Chapter 3 The Colourful 64
three bytes (24 bits) and, since there are 21 rows, it takes a total of 63 bytes
to define a sprite. Sprite data can be stored at any secure place within the
16K block of memory addressed by the VIC II. Within this block, up to
eight sprites can be defined at any one time but many more sprite designs
can be held in reserve, if necessary, for instant activation
The main locations in memory which control the use of sprites are as
follows:
a) 2040-2047: These eight locations are the sprite pointers. Their function
is to indicate where in the 16K block the data for any particular sprite is to
taken from. Since sprites are stored in blocks of 64 bytes (though they only
use 63), the 256 values that can be POKEd into each pointer allow them to
cover the whole of the 16K block. Thus, the data for sprite 2 will be taken
from the memory at 64*PEEK(2042).
b) 53269: The sprite enable register. A sprite is only visible when the
corresponding bit in this register is set.
c) 53248-53264: The sprite position registers. These work in pairs from
53248 to 53263, defining the X and Y co-ordinates of the top left-hand
corner of the sprite grid on the screen. However, since the screen is actually
wider (320 pixels) than the maximum value storable in a single byte (255),
one bit at location 53264 is used to remember whether the position of each
sprite on the X axis is more than 255. This gives a total of 512 possible
positions on the X axis and 256 on the Y axis.
d) 53287-53294:The sprite colour registers. Each sprite can take on any of
the 64’s 16 colours, simply by POKEing the correct value into the appro
priate register. There are in fact more locations than this which are relevant
but these will do to be going on with.
The final issue to be decided is where to put the sprite data. If you only want
three sprites, then a practical place is the Cassette Input—Output buffer
which is located from 828 to 1019 (obviously you can’t load or save data
while the sprites are located there). If you want more sprites than that then
you must set aside an area of memory for them, exactly the same situation
as with user-defined characters. For the sake of variety, for our
sprite-defining program we shall adopt a different solution to that offered
for the Characters program. What we shall do is shift the start of the Basic
program from 2048 to 4096, thus leaving ourselves 2K of memory in which
to store up to 32 separate sets of sprite data. This is convenient in that it
involves absolutely no shifting around of the video memory
structure—what it will involve, however, is a resetting of the Basic start
address before the program is loaded.
Having done that, the program, like the character generator, will allow
the definition and manipulation of the sprite grids and the option of saving
them to tape for use by later programs. The simplest way to enter this
program is to first load Characters and adapt that program.
61
Page 64
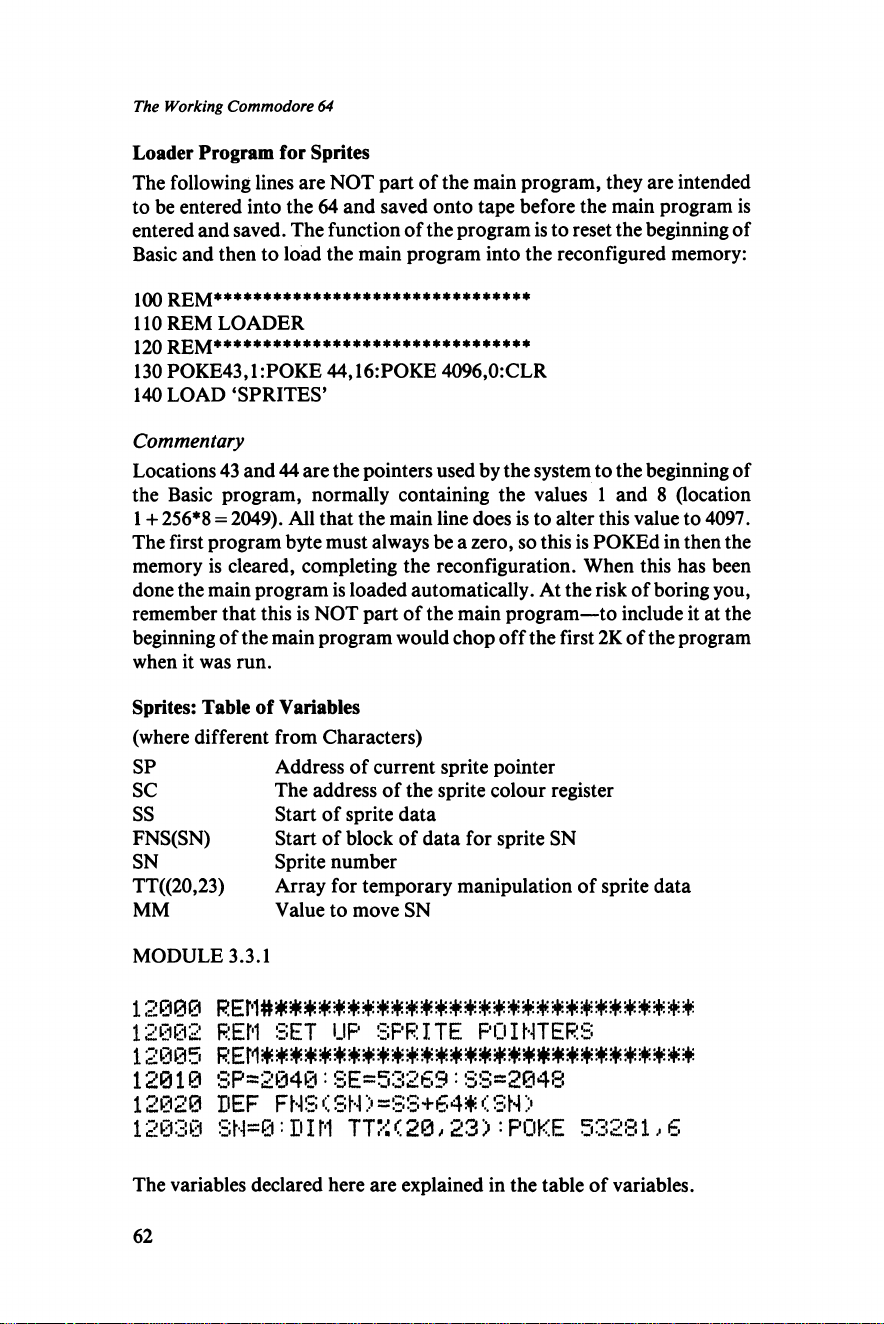
The Working Commodore 64
Loader Program for Sprites
The following lines are NOT part of the main program, they are intended
to be entered into the 64 and saved onto tape before the main program is
entered and saved. The function of the program is to reset the beginning of
Basic and then to load the main program into the reconfigured memory:
100 Re m ********************************
110 REM LOADER
120 r e m ********************************
130 POKE43,1 :POKE 44,16:POKE 4096,0:CLR
140 LOAD ‘SPRITES’
Commentary
Locations 43 and 44 are the pointers used by the system to the beginning of
the Basic program, normally containing the values 1 and 8 Oocation
1 + 256*8 = 2049). All that the main line does is to alter this value to 4097.
The first program byte must always be a zero, so this is POKEd in then the
memory is cleared, completing the reconfiguration. When this has been
done the main program is loaded automatically. At the risk of boring you,
remember that this is NOT part of the main program—to include it at the
beginning of the main program would chop off the first 2K of the program
when it was run.
Sprites: Table of Variables
(where different from Characters)
SP
SC
SS
FNS(SN)
SN
TT((20,23)
MM
MODULE 3.3.1
Address of current sprite pointer
The address of the sprite colour register
Start of sprite data
Start of block of data for sprite SN
Sprite number
Array for temporary manipulation of sprite data
Value to move SN
12000
12002
REM SET UP SPRITE POINTERS
12005
12010
12020
12030
The variables declared here are explained in the table of variables.
62
SP-2040:SE=53269:SS=2048
DEF FNS<SN >=SS+64* <SN >
SN=0: DIM TT'i < 2 0 ,23 > : POKE 53281,6
Page 65
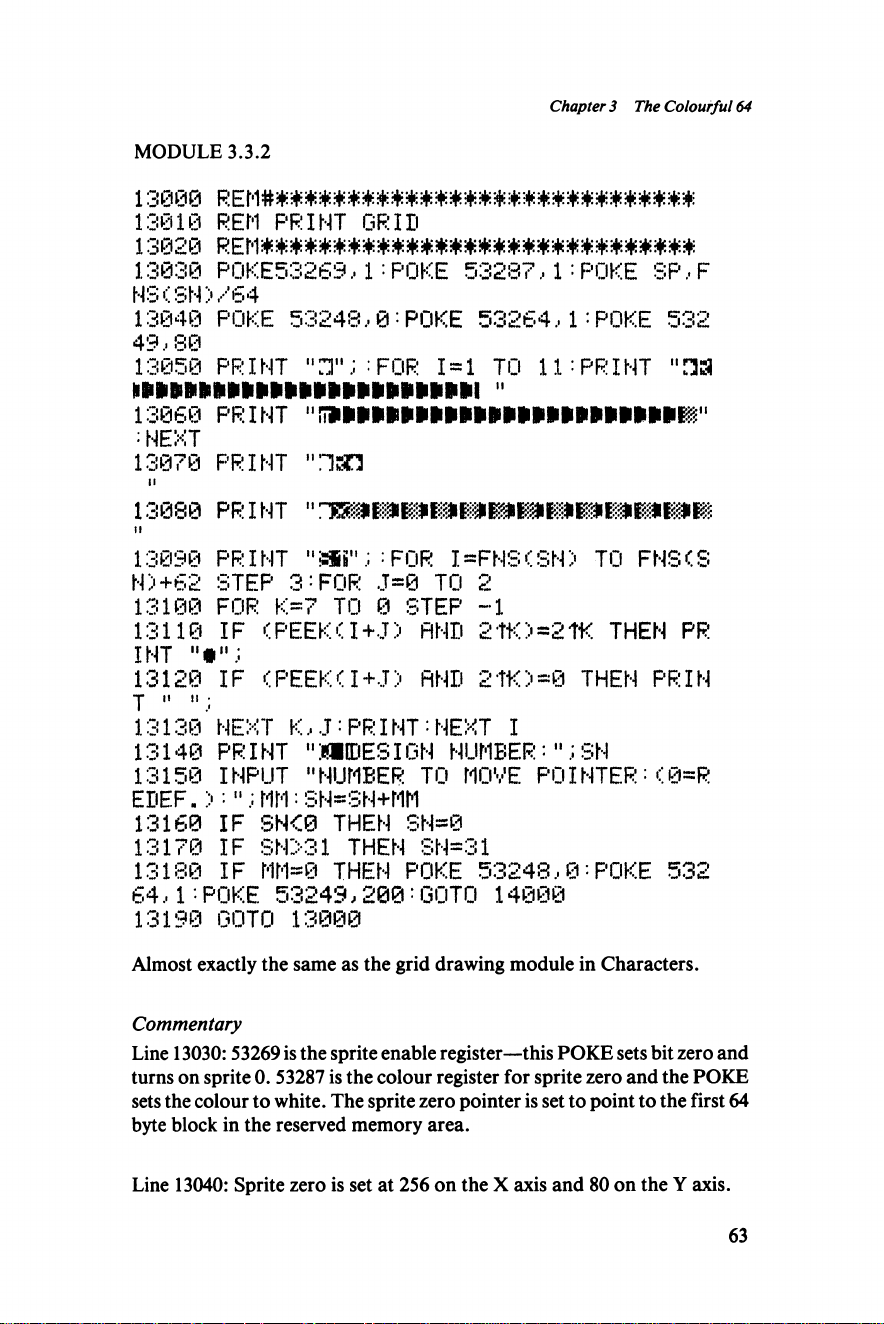
Chapter 3 The Colourful 64
MODULE 3.3.2
13008 REM######**#########**###########
13010 REM PRINT GRID
13030 P0KE53 263.• 1 :POKE 53287,1:POKE SP,F
NS(SN>/64
13040 POKE 53248,0:POKE 53264,1:POKE 532
43,80
13050 PRINT FOR 1 = 1 TO 1 1: PRINT "HSI
13860 p r i n t
: NEXT
13070 PRINT "TOT
13080 PRINT
13030 PRINT "5ii"; : FOR I.=FNS(SN> TO FNSCS
N>+62 STEP 3:FOR J=8 TO 2
13100 FOR K=7 TO 0 STEP -1
13110 IF (PEEK< I +J) FIND 2tK)=21K THEN PR
I NT
13120 IF
T "
13138 NEXT K,J:PRINT:NEXT 1
13140 PRINT "J® [DESIGN NUMBER: ";SN
13150 INPUT "NUMBER TO MOVE POINTER:<0=R
EHEF.>:";MM:SN=SN+MM
13160 IF SN<0 THEN SN=0
13170 IF SN>31 THEN SN=31
13180 IF MM=0 THEN POKE 53248,0:POKE 532
64,1•POKE 53249,200:GOTO 14000
13190 GOTO 13000
(PEEK(I+J) AND 2'110=0 THEN PR IN
Almost exactly the same as the grid drawing module in Characters.
Commentary
Line 13030:53269 is the sprite enable register—this POKE sets bit zero and
turns on sprite 0.53287 is the colour register for sprite zero and the POKE
sets the colour to white. The sprite zero pointer is set to point to the first 64
byte block in the reserved memory area.
Line 13040: Sprite zero is set at 256 on the X axis and 80 on the Y axis.
63
Page 66
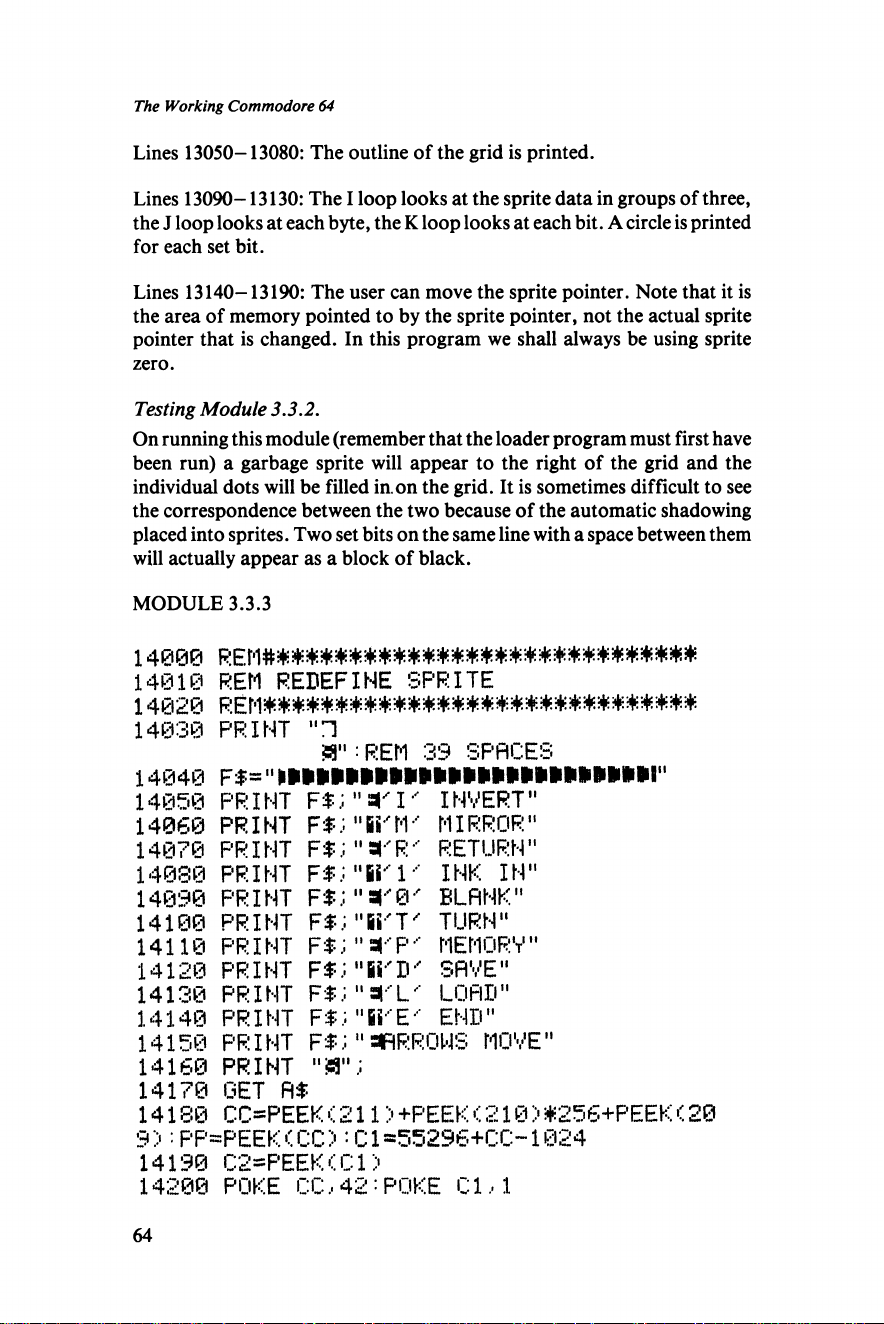
The Working Commodore 64
Lines 13050-13080: The outline of the grid is printed.
Lines 13090-13130: The I loop looks at the sprite data in groups of three,
the J loop looks at each byte, the K loop looks at each bit. A circle is printed
for each set bit.
Lines 13140-13190: The user can move the sprite pointer. Note that it is
the area of memory pointed to by the sprite pointer, not the actual sprite
pointer that is changed. In this program we shall always be using sprite
zero.
Testing Module 3.3.2.
On running this module (remember that the loader program must first have
been run) a garbage sprite will appear to the right of the grid and the
individual dots will be filled in.on the grid. It is sometimes difficult to see
the correspondence between the two because of the automatic shadowing
placed into sprites. Two set bits on the same line with a space between them
will actually appear as a block of black.
MODULE 3.3.3
14000 REM###*##*#*###*###*###*####*##*#
14010 REM REDEFINE SPRITE
14020
14030
14040
14050
14060
14070
14080
14090
14100
14110
14120
14130
14140
14150
14160
14170
PRINT "H
3":REM 39 SPACES
f i= "
PRINT F$;"sri' INVERT"
PRINT F$;"Si'M' MIRROR"
PRINT F$;"*'R' RETURN"
PRINT F*; "Si-1- INK IN"
PRINT FtJ"sr0' BLANK"
PRINT F#;"ii'T' TURN"
PRINT F$;"SC-P-' MEMORY"
PRINT F#;"ii'D' SAVE"
PRINT F$; " * ' L ' LOAD"
PRINT F$; "ii-E " END"
p r i n t f $;" s or ro ws m o v e "
PRINT " a " ;
GET A$
14180 CC=PEEK<211> +PEEK <21@> #256+PEEK<20
9):PP=PEEK<CC>:C1»55296+CC-1024
14190 C2-PEEK(C1>
14208 POKE CC,42:POKE a,i
64
Page 67
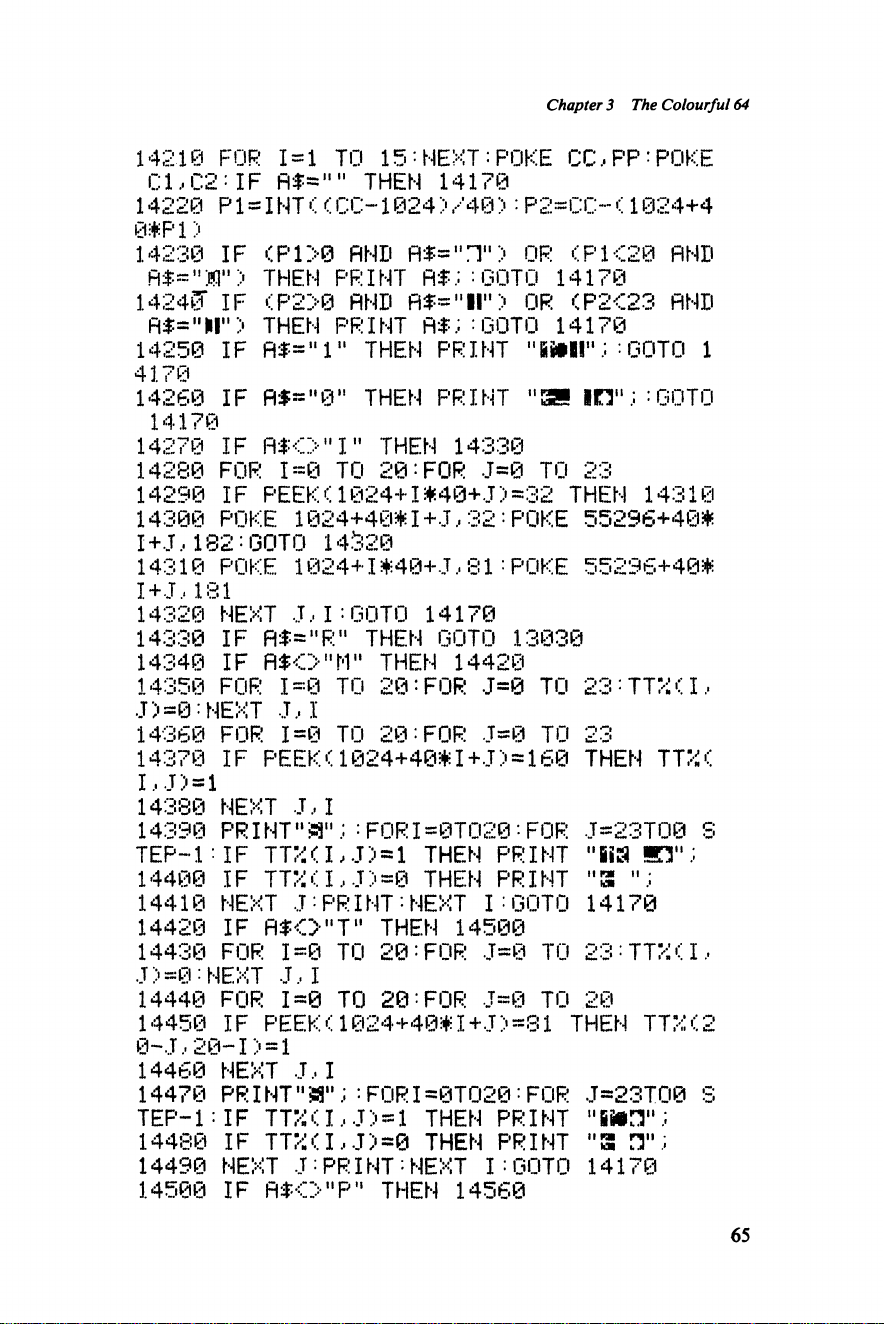
Chapter 3 The Colourful 64
14210 FOR 1=1 TO 15:NEXT:POKE CC,PP:POKE
C1 .■ C2:1F A$="" THEN 14178
14220 P1 = INT <<CC-1024)/40 >:P2=CC-<1024+4
0#P 1 >
14238 IF CP1>0 AND fl$="T,> OR <P1<20 AND
THEN PRINT A$;=GOTO 14170
1424(5" IF (P2>0 AND fi$="H"> OR <P2<23 AND
A$="M"> THEN PRINT fit;: GOTO 14170
14250 IF A$=" 1" THEN PRINT "fiiiir; : GOTO 1
4170
14260 IF A$="0" THEN PRINT "3S in";:GOTO
14170
14270 IF fl$0"I" THEN 14330
14280 FOR 1=8 TO 20:FOR J=8 TO 23
14290 IF PEEK< 1024+1#40+J') =32 THEN 14318
14300 POKE 1024+40* I + J.. 32: POKE 55296+404;
I+J,182:GOTO 14328
14318 POKE 1024+1#40+J.'81:POKE 55296+40#
I+J.' 181
14320 NEXT J,I:GOTO 14170
14330 IF A*="R" THEN GOTO 13030
14340 IF A$<>"M" THEN 14428
14350 FOR 1=8 TO 20:FOR J=0 TO 23:TTX<I,
J)=0:NEXT J,I
14360 FOR 1=0 TO 20:FOR J=0 TO 23
14370 IF PEEK<. 1024+40#I + J> = 160 THEN TTXC
I,J)=l
14380 NEXT J,I
14390 P R IN T "3 ";:FORI=0TO20-FOR J=23T08 S
T E P -l:IF TT?i<I,J) = l THEN PRINT "iia E l" ;
14400 IF TTXCI.,J>=0 THEN PRINT " 3
14410 NEXT J : PR I NT '• NEXT I : GOTO 14170
14420 IF fl$ 0 " T " THEN 14500
14430 FOR 1=0 TO 2 0:FOR J=0 TO 2 3:TT X(I,
J > =0;NEXT J , I
14440 FOR 1=0 TO 20:FOR J=0 TO 20
14450 IF PEEK<1024+40#I+J> =81 THEN TTXC2
0~J, 20-1 > = 1
14460 NEXT J,I
14470 PR I NT " 38"; : FOP I =0TO20: FOR J=23TO0 S
TEF’-l: IF TT%U,J> = 1 THEN PRINT "iStH";
14480 IF T TX(I .. J ) =0 THEN PRINT
14498 NEXT J:PRINT:NEXT I:GOTO 14170
14500 IF fl$0"P" THEN 14560
IT ;
65
Page 68
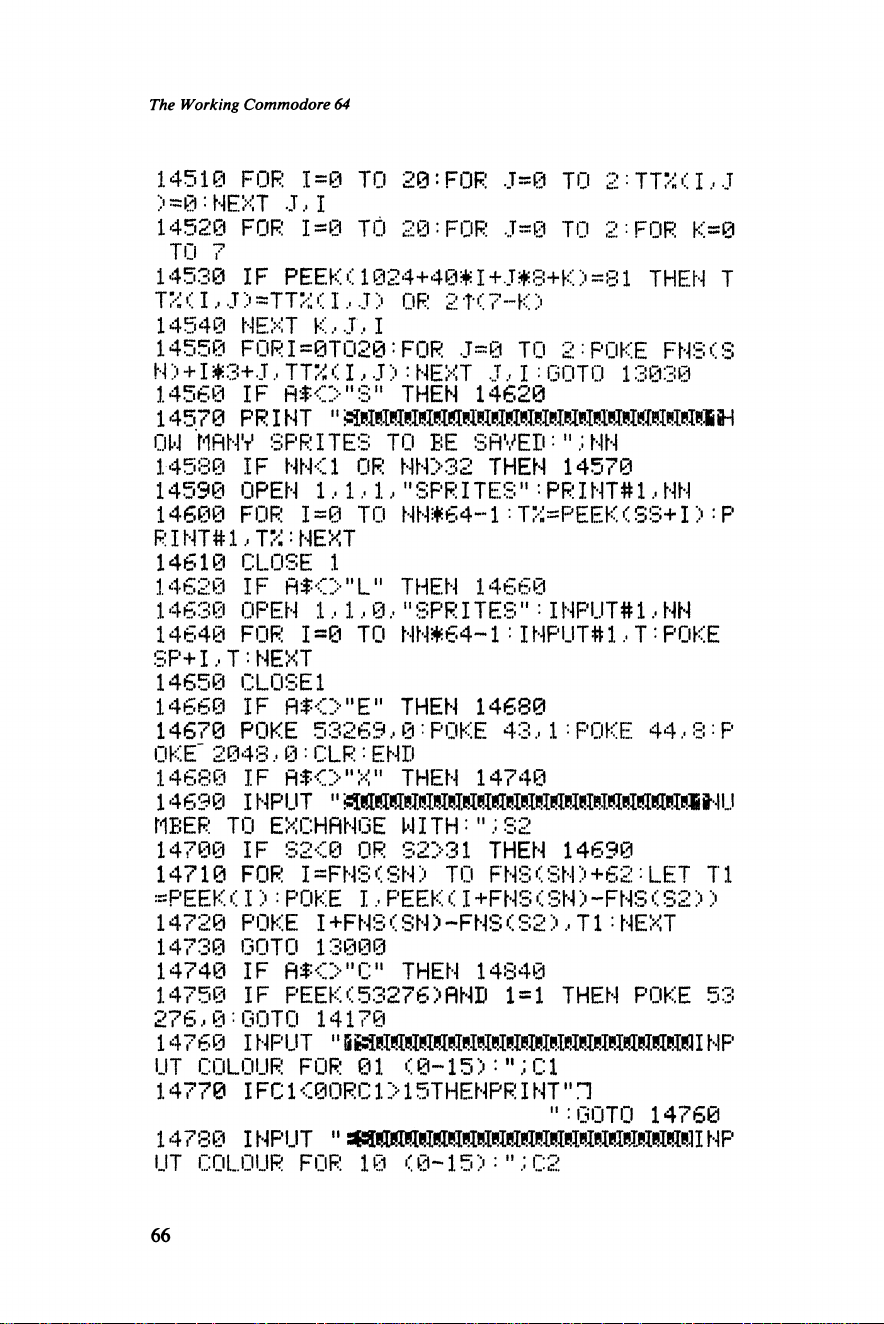
The Working Commodore 64
14510 FOR 1=0 TO 20: FOR J=0 TO 2 : TTX< I, J
) = 0 :NEXT J,I
14520 FOR 1=0 TO 20:FOR J=0 TO 2:FOR K=0
TO 7
14530 IF P EE K<1024+40*I+J#8+K>=81 THEN T
J'/. < I, J ) *TTX < I, J > OR 2 f < 7-K )
14540 NEXT K,J,I
14550 FORI=0TO20:FOR J=0 TO 2:POKE FNS(S
N) + 1 *3+J, TTX < I, J ): NEXT J, I : GOTO 13030
14560 IF fl$<>"S" THEN 14620
14570 PRINT
OW MflNV SPRITES TO BE SHVEDNN
14580 IF NN<1 OR NN>32 THEN 14570
14590 OPEN 1,1,1,"SPRITES":PRINT#1,NN
14600 FOR 1=0 TO NN*64--1 : TX=PEEK<SS+I>: P
RINT#1,TX:NEXT
14610 CLOSE 1
14620 IF fl I O T " THEN 14660
14630 OPEN 1 , 1, 0, " SPRITES" :INPUT#1, NN
14640 FOR 1=0 TO NN*64~1: INPUT#1 ,T:POKE
S P+ I, T: NEXT
14650 CLOSE1
14660 IF A $ 0 "E " THEN 14680
14670 POKE 53269,0:POKE 43,1:POKE 44,8:P
OKE" 2048,0 : CLR : END
14680 IF A$<>"X " THEN 14740
14690 i n p u t " i m m m m m m i m m m m a m w j
MBER TO EXCHANGE WITH:";S2
14700 IF S2C0 OR S2> 31 THEN 14690
14710 FOR I = FNS < SN ) TO FNS(SN)+62 ; LET T1
=PEEK. I >: POKE I, PEEK < I+FNS C SN >-FNS (S2 > >
14720 POKE I+FNS<SN )-FNS C S 2),T 1:NEXT
14730 GOTO 13000
14740 IF R $ O hC" THEN 14840
14750 IF PE EK<53276)AND 1=1 THEN POKE 53
276,U :UUTO 14170
14760 I NPUT " S I f f I N P
UT COLOUR FOR @1 <0-15):".:Cl
14770 IFC1<0ORC1>15THENP RINT"l
":GOTO 14760
14780 INPUT " NP
UT COLOUR FOR 16 <6-15):";C2
66
Page 69
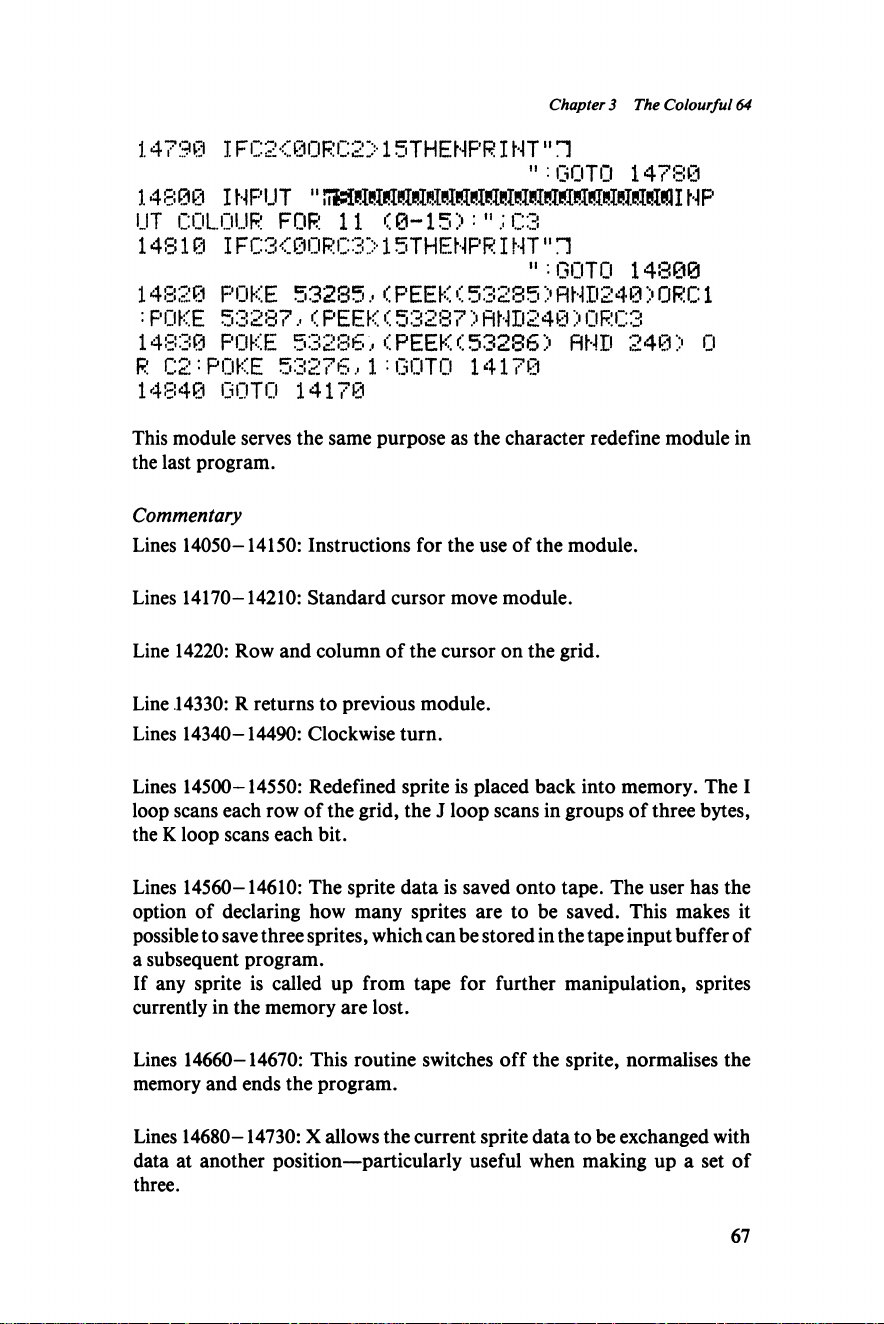
Chapter 3 The Colourful 64
14790 IFC2<80RC2>15THENPRINT"1
":GOTO 14788
14800 INPUT "ITMWBMBliMflMflMliMilMillBiBiBMilMfPIHP
UT COLOUR FOR 11 <0-15):";C3
14810 IFC3<0ORC3>15THENPRINT"1
’"•GOTO 14800
14820
: POKE
14830
POKE 53285,(PEEK(53285 >RND240> ORC1
53287,<PEEK <53287)RND240)0RC3
POKE 53286,(PEEK(53286) AND 240) 0
R C2:POKE 53276,1:GOTO 14170
14840 GOTO 14170
This module serves the same purpose as the character redefine module in
the last program.
Commentary
Lines 14050-14150: Instructions for the use of the module.
Lines 14170-14210: Standard cursor move module.
Line 14220: Row and column of the cursor on the grid.
Line .14330: R returns to previous module.
Lines 14340-14490: Clockwise turn.
Lines 14500-14550: Redefined sprite is placed back into memory. The I
loop scans each row of the grid, the J loop scans in groups of three bytes,
the K loop scans each bit.
Lines 14560-14610: The sprite data is saved onto tape. The user has the
option of declaring how many sprites are to be saved. This makes it
possible to save three sprites, which can be stored in the tape input buffer of
a subsequent program.
If any sprite is called up from tape for further manipulation, sprites
currently in the memory are lost.
Lines 14660-14670: This routine switches off the sprite, normalises the
memory and ends the program.
Lines 14680-14730: X allows the current sprite data to be exchanged with
data at another position—particularly useful when making up a set of
three.
67
Page 70
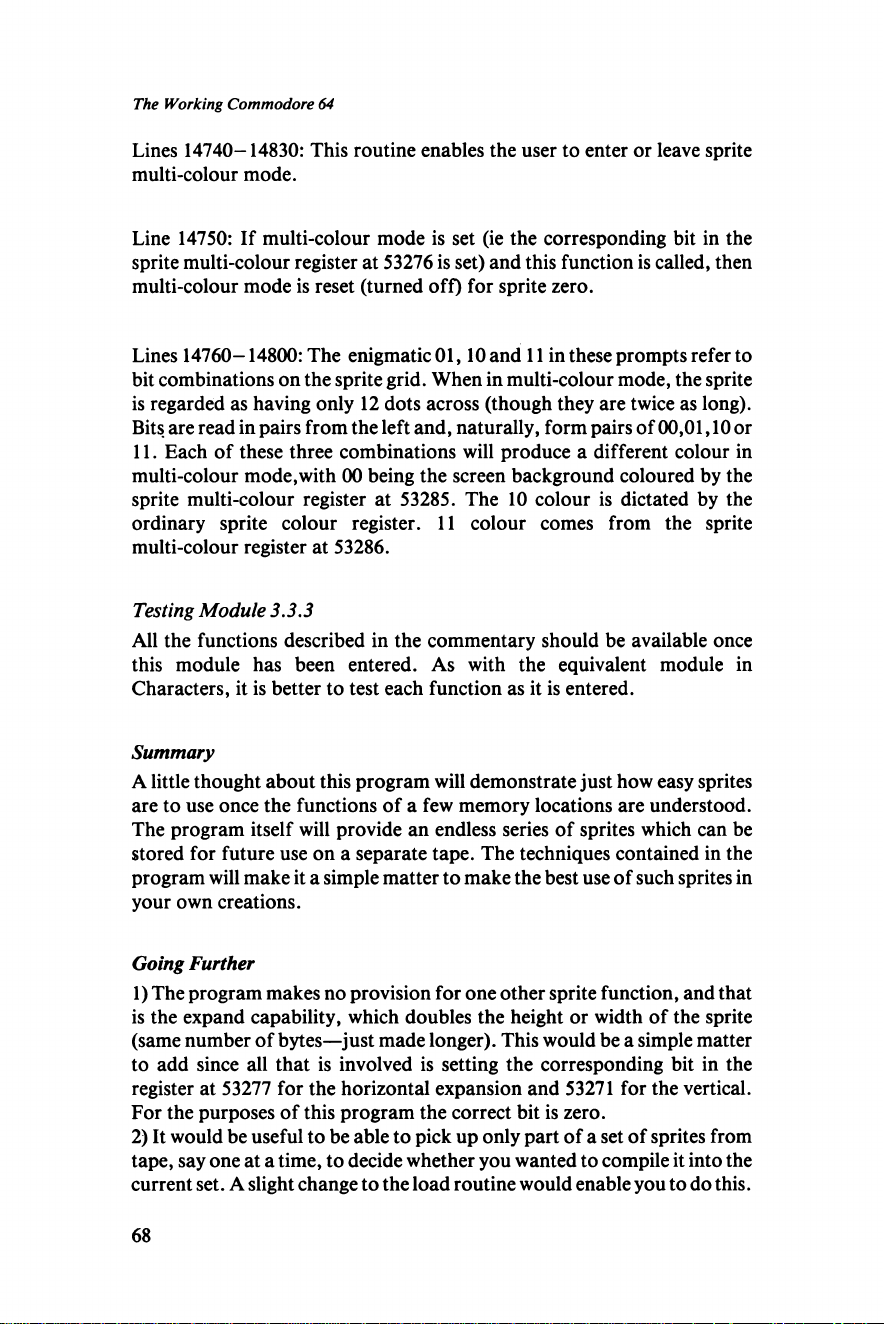
The Working Commodore 64
Lines 14740-14830: This routine enables the user to enter or leave sprite
multi-colour mode.
Line 14750: If multi-colour mode is set (ie the corresponding bit in the
sprite multi-colour register at 53276 is set) and this function is called, then
multi-colour mode is reset (turned off) for sprite zero.
Lines 14760-14800: The enigmatic 01,10 and 11 in these prompts refer to
bit combinations on the sprite grid. When in multi-colour mode, the sprite
is regarded as having only 12 dots across (though they are twice as long).
Bits are read in pairs from the left and, naturally, form pairs of 00,01,10 or
11. Each of these three combinations will produce a different colour in
multi-colour mode,with 00 being the screen background coloured by the
sprite multi-colour register at 53285. The 10 colour is dictated by the
ordinary sprite colour register. 11 colour comes from the sprite
multi-colour register at 53286.
Testing Module 3.3,3
All the functions described in the commentary should be available once
this module has been entered. As with the equivalent module in
Characters, it is better to test each function as it is entered.
Summary
A little thought about this program will demonstrate just how easy sprites
are to use once the functions of a few memory locations are understood.
The program itself will provide an endless series of sprites which can be
stored for future use on a separate tape. The techniques contained in the
program will make it a simple matter to make the best use of such sprites in
your own creations.
Going Further
1) The program makes no provision for one other sprite function, and that
is the expand capability, which doubles the height or width of the sprite
(same number of bytes—just made longer). This would be a simple matter
to add since all that is involved is setting the corresponding bit in the
register at 53277 for the horizontal expansion and 53271 for the vertical.
For the purposes of this program the correct bit is zero.
2) It would be useful to be able to pick up only part of a set of sprites from
tape, say one at a time, to decide whether you wanted to compile it into the
current set. A slight change to the load routine would enable you to do this.
68
Page 71
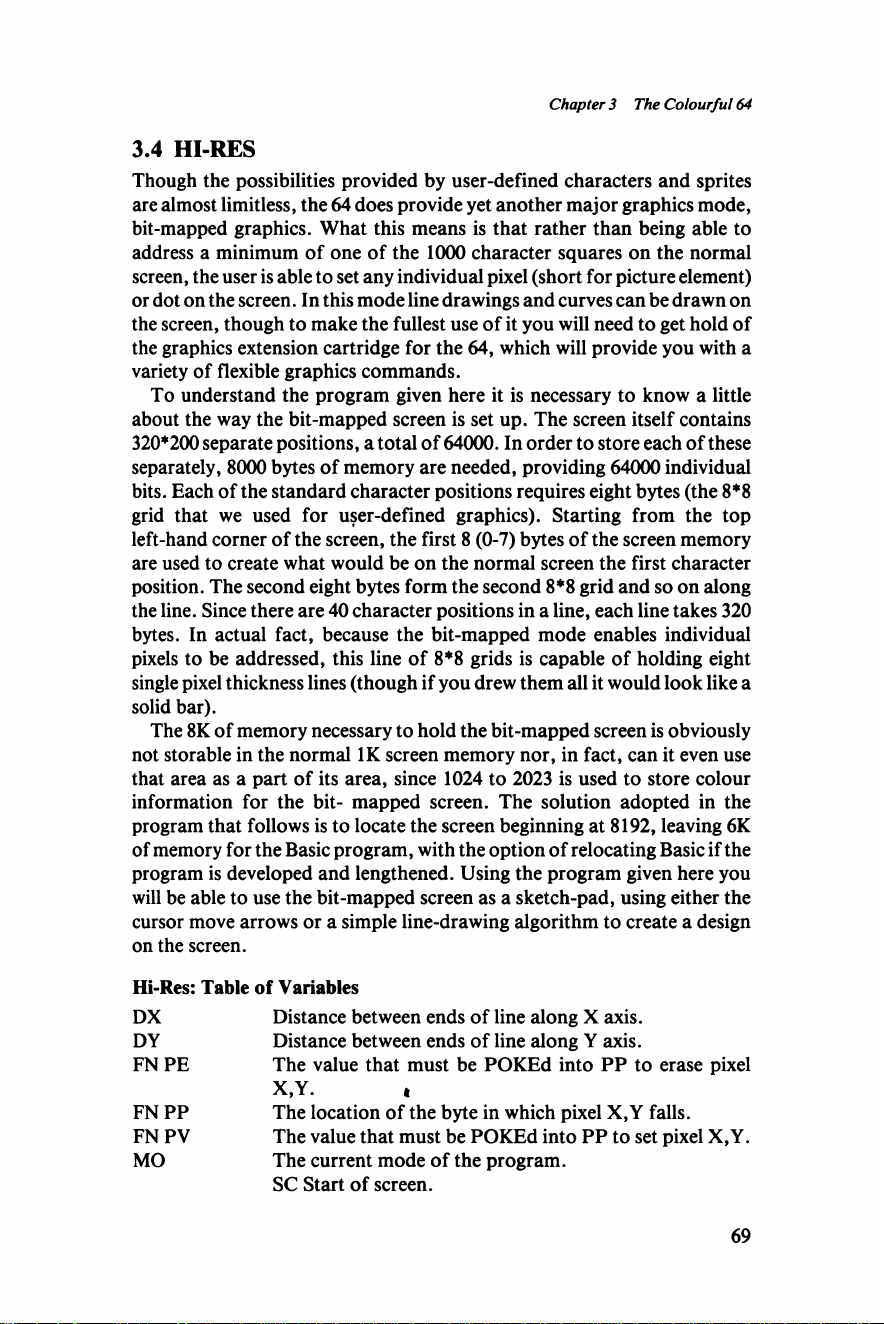
Chapter 3 The Colourful 64
3.4 HI RES
Though the possibilities provided by user-defined characters and sprites
are almost limitless, the 64 does provide yet another major graphics mode,
bit-mapped graphics. What this means is that rather than being able to
address a minimum of one of the 1000 character squares on the normal
screen, the user is able to set any individual pixel (short for picture element)
or dot on the screen. In this mode line drawings and curves can be drawn on
the screen, though to make the fullest use of it you will need to get hold of
the graphics extension cartridge for the 64, which will provide you with a
variety of flexible graphics commands.
To understand the program given here it is necessary to know a little
about the way the bit-mapped screen is set up. The screen itself contains
320*200 separate positions, a total of 64000. In order to store each of these
separately, 8000 bytes of memory are needed, providing 64000 individual
bits. Each of the standard character positions requires eight bytes (the 8*8
grid that we used for user-defined graphics). Starting from the top
left-hand corner of the screen, the first 8 (0-7) bytes of the screen memory
are used to create what would be on the normal screen the first character
position. The second eight bytes form the second 8*8 grid and so on along
the line. Since there are 40 character positions in a line, each line takes 320
bytes. In actual fact, because the bit-mapped mode enables individual
pixels to be addressed, this line of 8*8 grids is capable of holding eight
single pixel thickness lines (though if you drew them all it would look like a
solid bar).
The 8K of memory necessary to hold the bit-mapped screen is obviously
not storable in the normal IK screen memory nor, in fact, can it even use
that area as a part of its area, since 1024 to 2023 is used to store colour
information for the bit- mapped screen. The solution adopted in the
program that follows is to locate the screen beginning at 8192, leaving 6K
of memory for the Basic program, with the option of relocating Basic if the
program is developed and lengthened. Using the program given here you
will be able to use the bit-mapped screen as a sketch-pad, using either the
cursor move arrows or a simple line-drawing algorithm to create a design
on the screen.
Hi-Res: Table of Variables
DX Distance between ends of line along X axis.
DY Distance between ends of line along Y axis.
FN PE The value that must be POKEd into PP to erase pixel
X,Y. t
FN PP The location of the byte in which pixel X,Y falls.
FN PV The value that must be POKEd into PP to set pixel X,Y.
MO The current mode of the program.
SC Start of screen.
69
Page 72
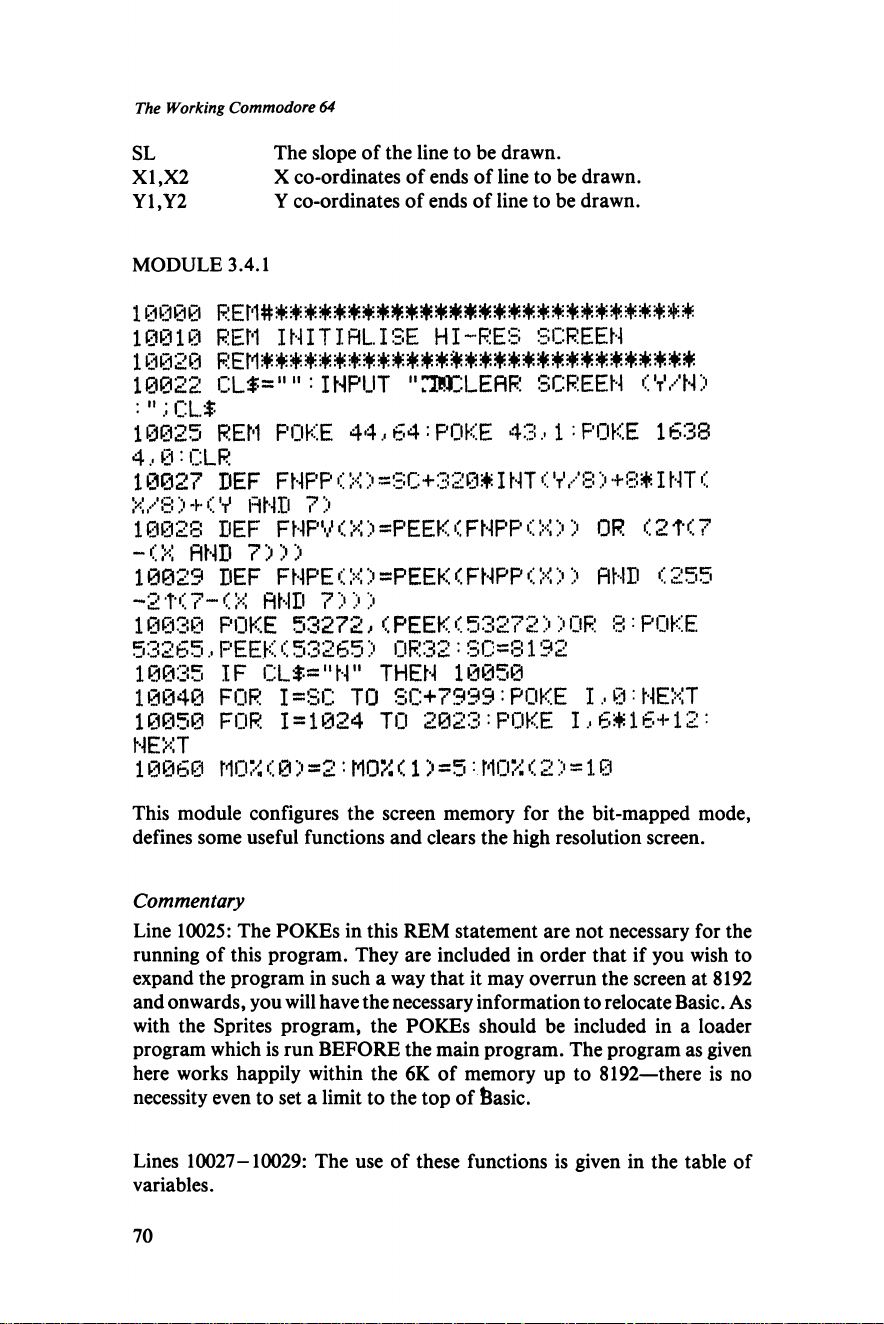
The Working Commodore 64
SL
XI, X2
Y1.Y2
MODULE 3.4.1
The slope of the line to be drawn.
X co-ordinates of ends of line to be drawn.
Y co-ordinates of ends of line to be drawn.
10010 REM INITIALISE HI-RES SCREEN
10 02 0 R E M * * * ** * ** * ** * ** * * * * * ** * ** * * * * * *
10022 CLf="":INPUT "SWCLERR SCREEN CV/N)
:";CL$
10025 REM POKE 44,64:POKE 43,1:POKE 1638
4,0: CLP.
10027 DEF FNPP < X > =SC+320* I NT < V/8 ) +8* I NT <
X/8)+(V AND 7)
10028 DEF FNPV (X > =PEEK >' FNPP < X ) > OR <2T(7
-CX AND 7>>::<
10029 DEF FNPEOO=PEEK<FNPPOO> AND <255
-2 T< 7 - (X AND 7 > > >
10030 POKE 53272,< PEEK < 53272)> OR 8 :POKE
53265,PEEK < 53265 > 0R32:SC=8192
10035 IF CL$="N" THEN 10050
10040 FOR I=3C TO SC+7999:POKE 1,0:NEXT
10050 FOR 1=1024 TO 2023:POKE 1,6*16+12:
This module configures the screen memory for the bit-mapped mode,
defines some useful functions and clears the high resolution screen.
Commentary
Line 10025: The POKEs in this REM statement are not necessary for the
running of this program. They are included in order that if you wish to
expand the program in such a way that it may overrun the screen at 8192
and onwards, you will have the necessary information to relocate Basic. As
with the Sprites program, the POKEs should be included in a loader
program which is run BEFORE the main program. The program as given
here works happily within the 6K of memory up to 8192—there is no
necessity even to set a limit to the top of basic.
Lines 10027-10029: The use of these functions is given in the table of
variables.
70
Page 73
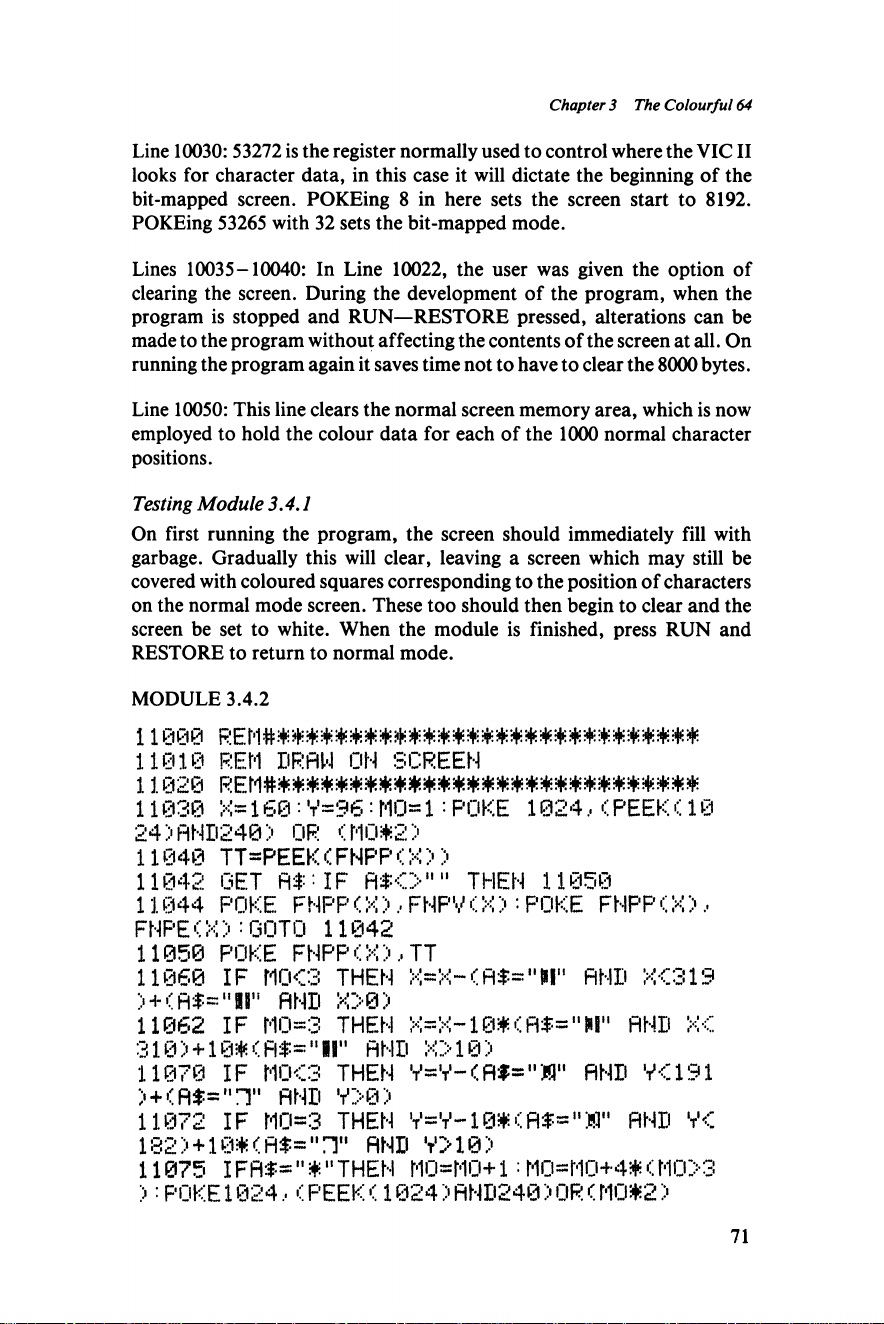
Chapter 3 The Colourful 64
Line 10030:53272 is the register normally used to control where the VIC II
looks for character data, in this case it will dictate the beginning of the
bit-mapped screen. POKEing 8 in here sets the screen start to 8192.
POKEing 53265 with 32 sets the bit-mapped mode.
Lines 10035-10040: In Line 10022, the user was given the option of
clearing the screen. During the development of the program, when the
program is stopped and RUN—RESTORE pressed, alterations can be
made to the program without affecting the contents of the screen at all. On
running the program again it saves time not to have to clear the 8000 bytes.
Line 10050: This line clears the normal screen memory area, which is now
employed to hold the colour data for each of the 1000 normal character
positions.
Testing Module 3.4.1
On first running the program, the screen should immediately fill with
garbage. Gradually this will clear, leaving a screen which may still be
covered with coloured squares corresponding to the position of characters
on the normal mode screen. These too should then begin to clear and the
screen be set to white. When the module is finished, press RUN and
RESTORE to return to normal mode.
MODULE 3.4.2
11000
11010 REM DRAW ON SCREEN
11020 REM#*#####**##*#*##*##*##*#*#####
11030 X* 160 •• Y=96: M0* 1: POKE 1024, < PEEK < 10
24>RND240> OR M0$2
11040 TT*PEEK<FNPP<X>>
11042 GET AT : IF fl$0"" THEN 11050
11044 POKE FNPP < X > .■ FNF'V (X > : POKE FNPP (X > .•
FNF'EOO : GOTO 11042
11050 POKE FNPP < X >.. TT
11060 IF MOO THEN X*X-<fl$*"M" AND X019
) + (fl$*"ll" AND X>0>
11062 IF M0*3 THEN X*X-10#<fl$*"M" AND XC
310>+10#<R$*"H" AND X>10>
11070 IF MOO THEN Y*Y-<fl»*"M" AND YC191
)+<A$="nH AND Y>0)
11072 IF M0=3 THEN Y*Y-10#<A$*"M" AND Y<
182> + 10*(A$=,,n" AND V>10>
11075 IFAT*"#"THEN M0*M0+1:M0*M0+4#(M0>3
>: POKE 1024, PEEK (1024 ) AND240 > OR < M0#2 >
71
Page 74
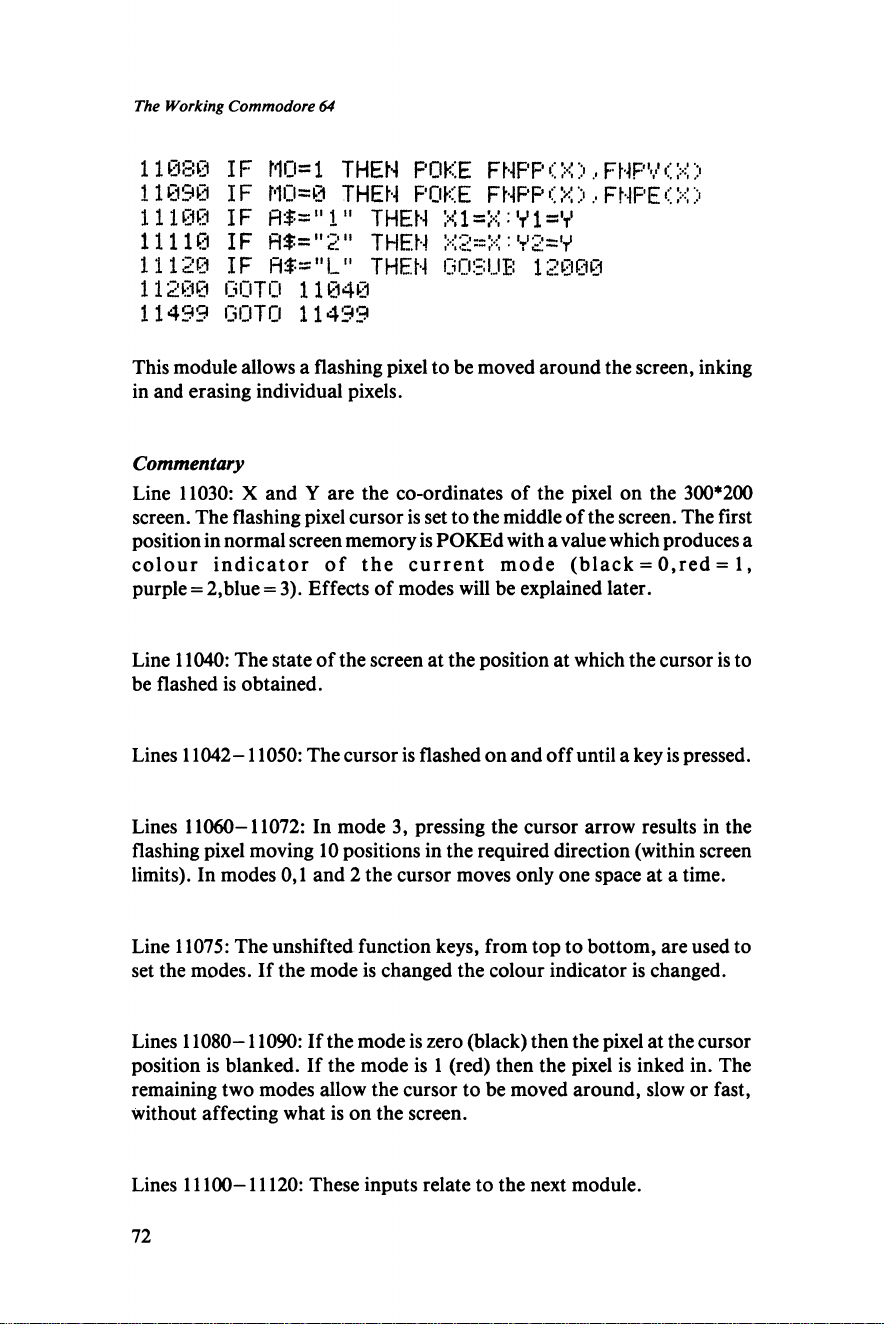
The Working Commodore 64
11080 IF M0=1 THEN POKE FNPPCX),FNPVOO
11090 IF 110=0 THEN POKE FNPP(X>, FNPE<X>
11100 IF THEN X1=X: V1=V
11110 IF fl$=,,2,‘ THEN X2=X: V2=V
11120 IF fl$«"L" THEN GOSUB 12000
11200 GOTO 11040
11499 GOTO 11499
This module allows a flashing pixel to be moved around the screen, inking
in and erasing individual pixels.
Commentary
Line 11030: X and Y are the co-ordinates of the pixel on the 300*200
screen. The flashing pixel cursor is set to the middle of the screen. The first
position in normal screen memory is POKEd with a value which produces a
colour indicato r of the current m ode (black = 0,red = 1,
purple = 2,blue = 3). Effects of modes will be explained later.
Line 11040: The state of the screen at the position at which the cursor is to
be flashed is obtained.
Lines 11042-11050: The cursor is flashed on and off until a key is pressed.
Lines 11060-11072: In mode 3, pressing the cursor arrow results in the
flashing pixel moving 10 positions in the required direction (within screen
limits). In modes 0,1 and 2 the cursor moves only one space at a time.
Line 11075: The unshifted function keys, from top to bottom, are used to
set the modes. If the mode is changed the colour indicator is changed.
Lines 11080-11090: If the mode is zero (black) then the pixel at the cursor
position is blanked. If the mode is 1 (red) then the pixel is inked in. The
remaining two modes allow the cursor to be moved around, slow or fast,
without affecting what is on the screen.
Lines 11100-11120: These inputs relate to the next module.
72
Page 75
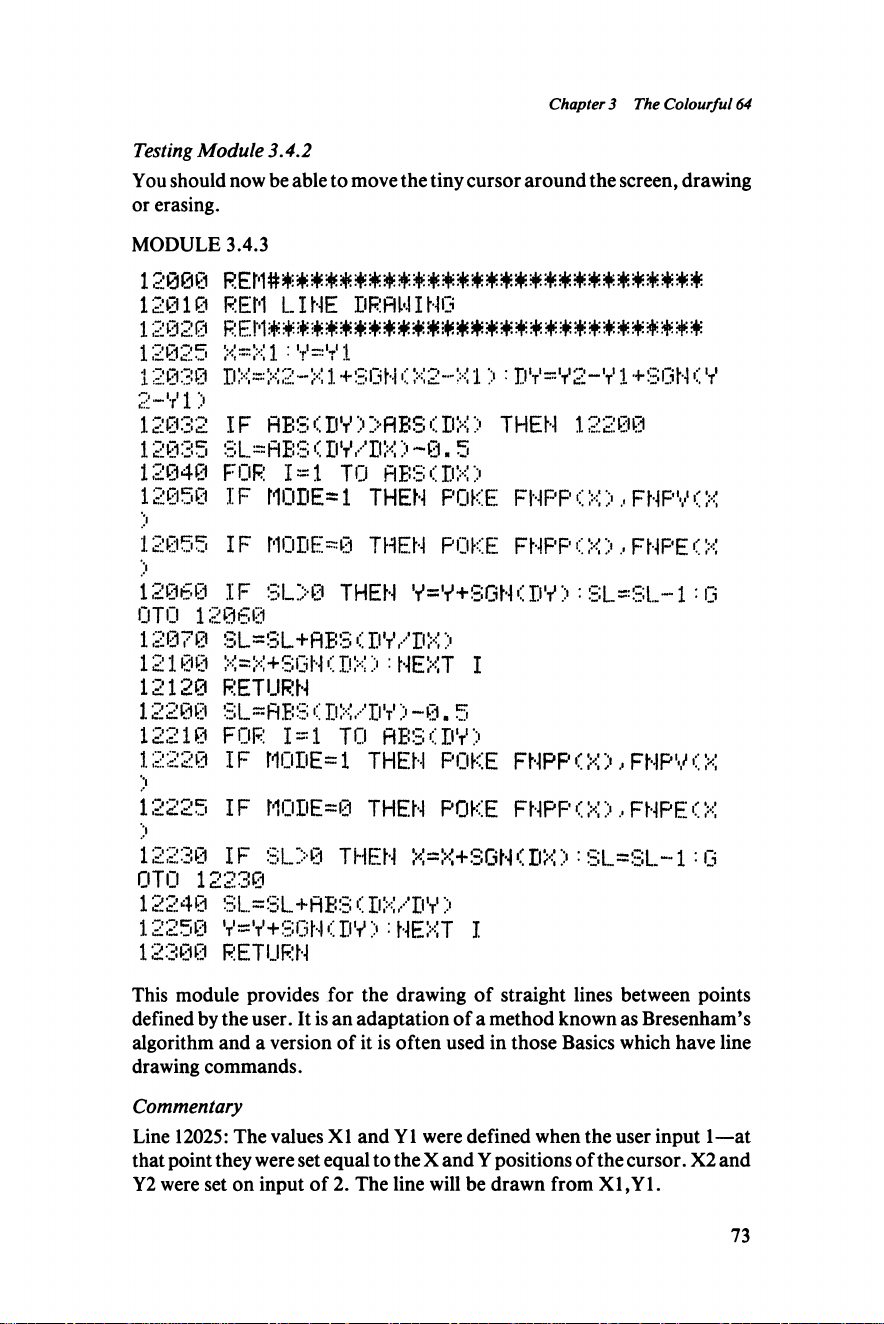
Chapter 3 The Colourful 64
Testing Module 3.4.2
You should now be able to move the tiny cursor around the screen, drawing
or erasing.
MODULE 3.4.3
12000
12010
12020
12025
12030
2-V 1 >
12032
12035
12040
12050
'l
12055
REM LINE DRAWING
r e m w m w m w m m m m w w m m m m m
x=x 1 : y= Vl
DX*X 2-X1+SGNCX2-X1>:DV=V 2-V1+SGN<V
IF ABS<D Y»A BS< DX> THEN 12200
SL==ABS DV/DX) ~0 .5
FOR 1 = 1 TO ABS<DX>
IF MODE* 1 THEN POKE FNPF'OO ,FNPV<X
IF MODE*0 THEM POKE F NPP(X ) FMP E<X
12060 IF SL>@ THEM V*V+SGN<DV>:SL=SL-1:G
0T0 12860
12870 SL*SL+RBS<DV/DX)
12100 X^X+SGMCDX):NEXT I
12120 RETURN
12200 SL*RBS(DX/DV>-0.5
12210 FOR 1=1 TO RBSi DV)
12220 IF M0DE*1 THEN POKE FNPF'<X>, FNPV<X
12225 IF M0DE*@ THEN POKE FNPP<X’> .• FNPE<.X
12230 IF SL>0 THEN X*X+SGN<DX) = SL*SL~1'-G
0T0 12230
12240 SL-SL+RBS<DX/DV>
12250 V=V+3GH<DV>:NEXT I
12300 RETURN
This module provides for the drawing of straight lines between points
defined by the user. It is an adaptation of a method known as Bresenham’s
algorithm and a version of it is often used in those Basics which have line
drawing commands.
Commentary
Line 12025: The values XI and Y1 were defined when the user input 1—at
that point they were set equal to the X and Y positions of the cursor. X2 and
Y2 were set on input of 2. The line will be drawn from X1,Y1.
73
Page 76
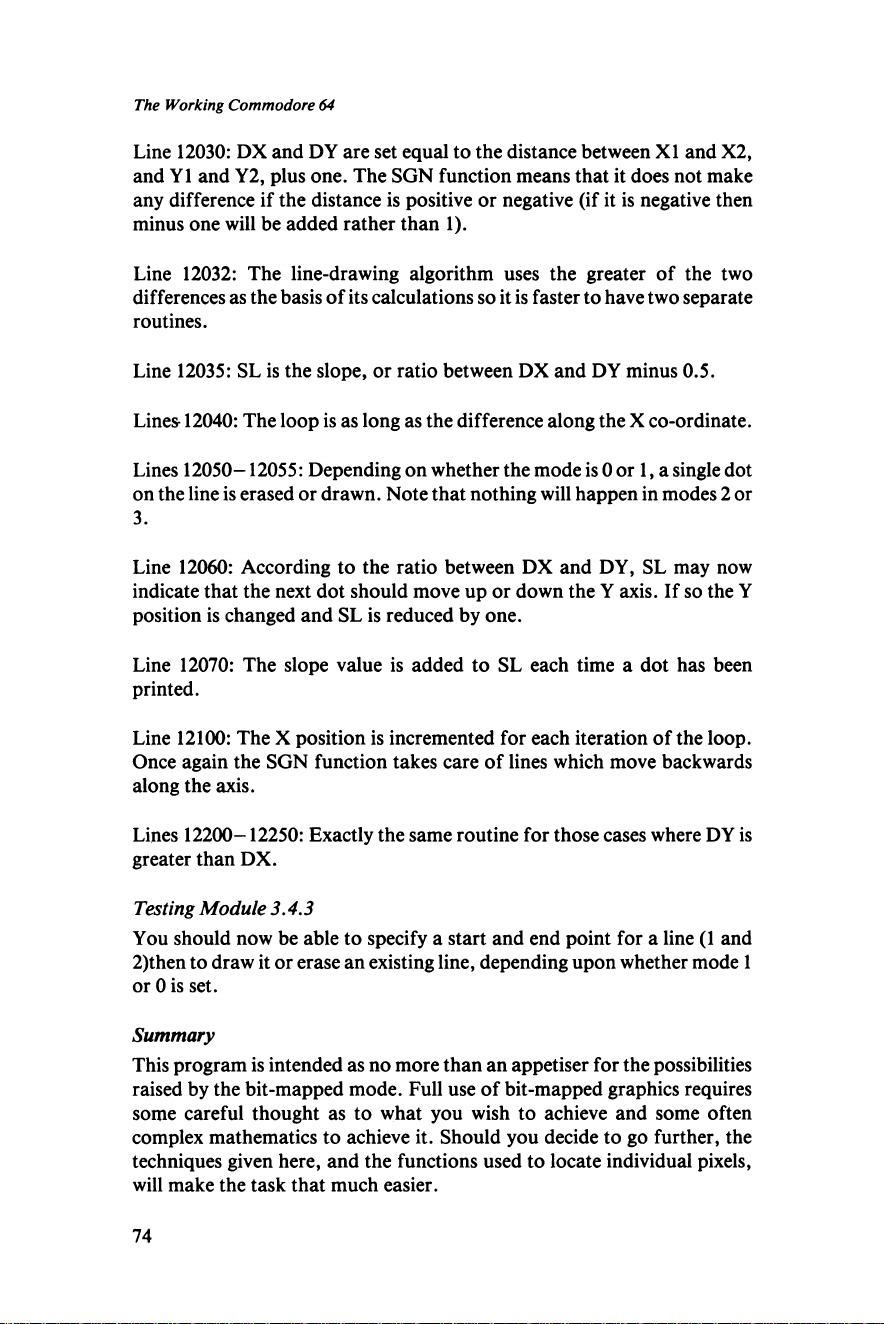
The Working Commodore 64
Line 12030: DX and DY are set equal to the distance between XI and X2,
and Y1 and Y2, plus one. The SGN function means that it does not make
any difference if the distance is positive or negative (if it is negative then
minus one will be added rather than 1).
Line 12032: The line-drawing algorithm uses the greater of the two
differences as the basis of its calculations so it is faster to have two separate
routines.
Line 12035: SL is the slope, or ratio between DX and DY minus 0.5.
Lines 12040: The loop is as long as the difference along the X co-ordinate.
Lines 12050-12055: Depending on whether the mode is 0 or 1, a single dot
on the line is erased or drawn. Note that nothing will happen in modes 2 or
3.
Line 12060: According to the ratio between DX and DY, SL may now
indicate that the next dot should move up or down the Y axis. If so the Y
position is changed and SL is reduced by one.
Line 12070: The slope value is added to SL each time a dot has been
printed.
Line 12100: The X position is incremented for each iteration of the loop.
Once again the SGN function takes care of lines which move backwards
along the axis.
Lines 12200-12250: Exactly the same routine for those cases where DY is
greater than DX.
Testing Module 3.4.3
You should now be able to specify a start and end point for a line (1 and
2)then to draw it or erase an existing line, depending upon whether mode 1
or 0 is set.
Summary
This program is intended as no more than an appetiser for the possibilities
raised by the bit-mapped mode. Full use of bit-mapped graphics requires
some careful thought as to what you wish to achieve and some often
complex mathematics to achieve it. Should you decide to go further, the
techniques given here, and the functions used to locate individual pixels,
will make the task that much easier.
74
Page 77
Chapter 3 The Colourful 64
Going further
1) Why not add a facility allowing the saving of a screen of graphics onto
tape—you’ll need a fairly long tape but the routine would be simple
enough.
2) Computer graphics books provide a number of algorithms which allow
the drawing of circles and arcs. Why not add a module to the end of the
program to achieve this—the main drawback will be lack of speed.
75
Page 78

Page 79
CHAPTER 4
The 64 as Secretary
Sooner or later, most micro-owners realise that their new digital friend
really comes into its own when it is storing information, processing it and
presenting it in a variety of ways that would be laborious in the extreme if
done manually. They then begin the task of writing simple programs which
will store their friends’ names and addresses or catalogue their record
collection. They may end up with half a dozen programs, each limited to a
single use, and yet each program employing much the same methods.
In this chapter we begin a section of more substantial programs by
examining how a single program can be written to satisfy a wide variety of
filing needs without the constant need for rewriting every time a new
application comes along.
4.1 UNIFILE
The first program is called Unifile and, in the form presented here, it is
capable of storing up to 500 entries, as well as allowing the user to search
through them for named items, to amend entries and to delete them. Quite
apart from the wide applications of such a program, I hope that the simple
act of entering it and understanding the methods used will provide you with
a host of ideas for further applications.
Unifile: Table of Variables
IN
AVo(499,X-l)
A$(499)
B$(X-1)
FF
IT
PO
PP
R$
Flag indicator used to show whether the program has
been initialised.
Records the length of individual items in each entry.
Main file array.
Holds names of item types for each entry.
Flag indicator used to determine whether a user search
has been successful.
Number of entries in file so far.
Used in binary search to indicate number of search
samples necessary.
Pointer to start position of current item to be printed
from an entry.
Separator for use in saving data on tape.
77
Page 80
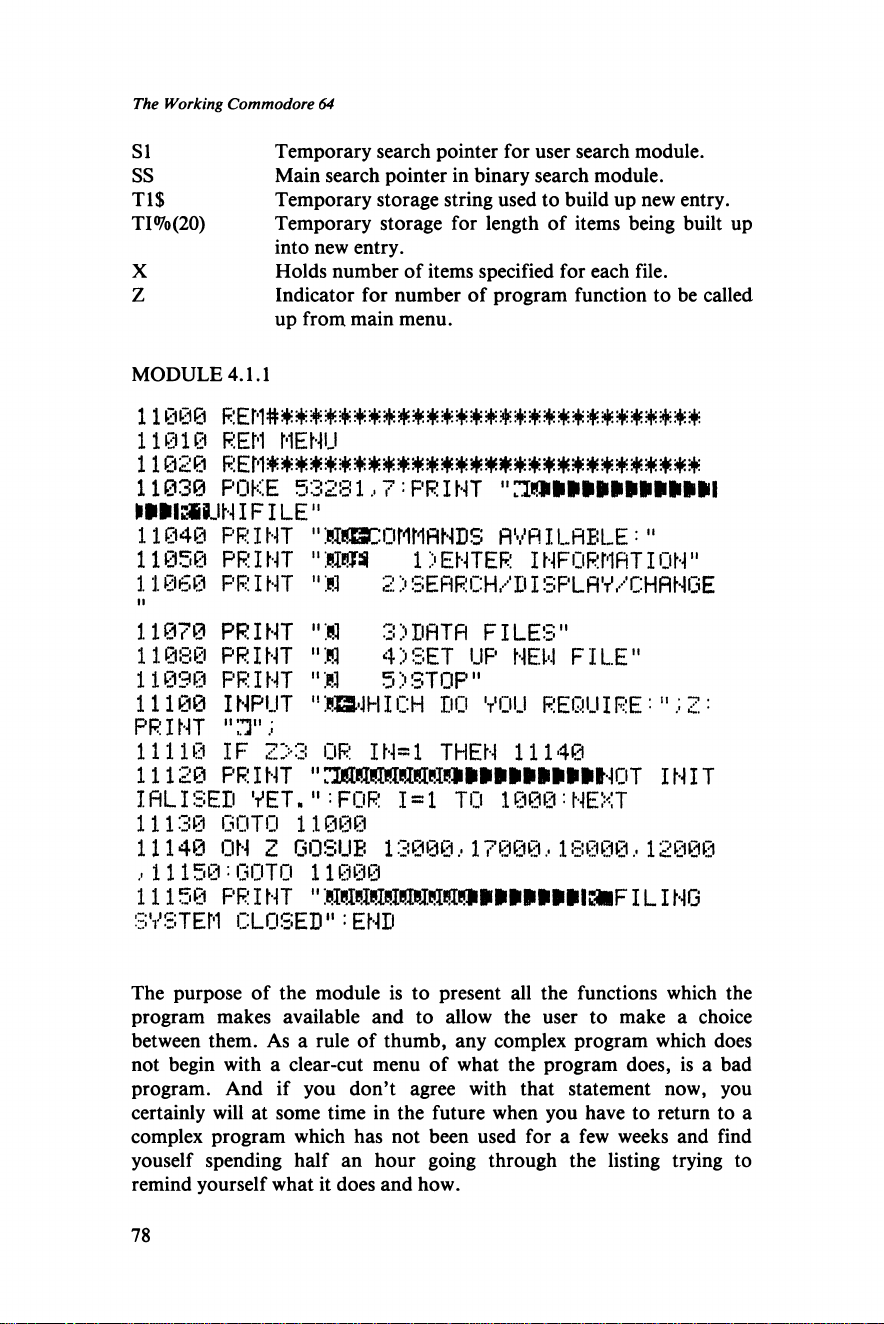
The Working Commodore 64
SI
SS
Tl$
TI%(20)
X
z
MODULE 4.1.1
11 0 00 R E M # * * ; m * * ; m * ;m ! m ; m * ; m * * * * *
Temporary search pointer for user search module.
Main search pointer in binary search module.
Temporary storage string used to build up new entry.
Temporary storage for length of items being built up
into new entry.
Holds number of items specified for each file.
Indicator for number of program function to be called
up from main menu.
11010 REM MENU
1 1 0 20
11030 POKE 53281,?: PR I NT "
WHSWUNIFILE"
11040 PRINT "MWBCOMMflNDS AVAILABLE:"
11050 PRINT
11060 PRINT
11070 PRINT "M
11080 PRINT "M
11090 PRINT "M
11100 INPUT
" K m 1>ENTER INFORMATION"
"M 2 >SEARCH/DISPLAV/CHANGE
3) DATA FILES"
4) SET UP NEW FILE"
5>STOP"
'MBJHICH DO VOU REQUIRE:"
PRINT
11110 IF 2>3 OR IN=1 THEN 11140
11120 PRINT " INIT
IALISED VET.":FOR 1=1 TO 1000:NEXT
11130 GOTO 11000
11140 ON Z GOSUB 13000,17000,18000,12000
,11150:GOTO 11000
11150 PR I NT " ILING
SYSTEM CLOSED":END
The purpose of the module is to present all the functions which the
program makes available and to allow the user to make a choice
between them. As a rule of thumb, any complex program which does
not begin with a clear-cut menu of what the program does, is a bad
program. And if you don’t agree with that statement now, you
certainly will at some time in the future when you have to return to a
complex program which has not been used for a few weeks and find
youself spending half an hour going through the listing trying to
remind yourself what it does and how.
78
Page 81
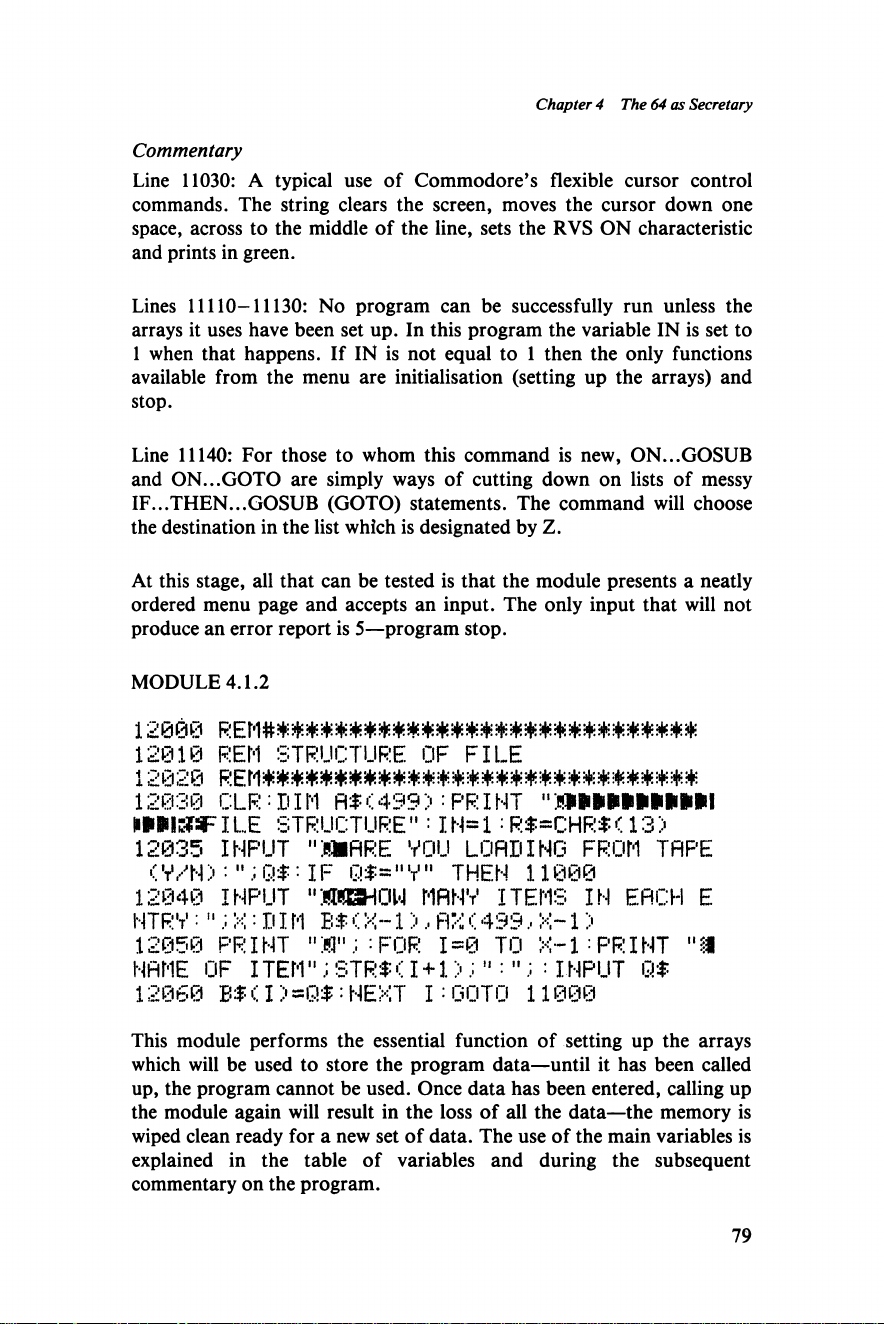
Chapter 4 The 64 as Secretary
Commentary
Line 11030: A typical use of Commodore’s flexible cursor control
commands. The string clears the screen, moves the cursor down one
space, across to the middle of the line, sets the RVS ON characteristic
and prints in green.
Lines 11110-11130: No program can be successfully run unless the
arrays it uses have been set up. In this program the variable IN is set to
1 when that happens. If IN is not equal to 1 then the only functions
available from the menu are initialisation (setting up the arrays) and
stop.
Line 11140: For those to whom this command is new, ON...GOSUB
and ON...GOTO are simply ways of cutting down on lists of messy
IF...THEN...GOSUB (GOTO) statements. The command will choose
the destination in the list which is designated by Z.
At this stage, all that can be tested is that the module presents a neatly
ordered menu page and accepts an input. The only input that will not
produce an error report is 5—program stop.
MODULE 4.1.2
12010 REM STRUCTURE OF FILE
12020 r e m m m m m m m m m m m m m m m m
12030 CLR : DIM fl$< 4 3 9 PRINT ")»»»»»i»»»il
WVISHFILE STRUCTURE M : I N= 1 : R$=CHR$ ( 13 >
12035 INPUT "WARE V0U LORDING FROM TAPE
<V/N>:";Q$:IF Q$="V" THEN 11000
12040 INPUT "MMBHOW MflNV ITEMS IN EACH E
NTRV:n;X-DIM B$ < X-1>,AX < 499,X-1>
12050 PRINT n:«n;-F0R 1=0 TO X-l : PRINT "I
NAME OF ITEM";STR$CI+1>;M•";•INPUT Q$
12060 E$(I> :NEXT I:GOTO 11000
This module performs the essential function of setting up the arrays
which will be used to store the program data—until it has been called
up, the program cannot be used. Once data has been entered, calling up
the module again will result in the loss of all the data—the memory is
wiped clean ready for a new set of data. The use of the main variables is
explained in the table of variables and during the subsequent
commentary on the program.
79
Page 82
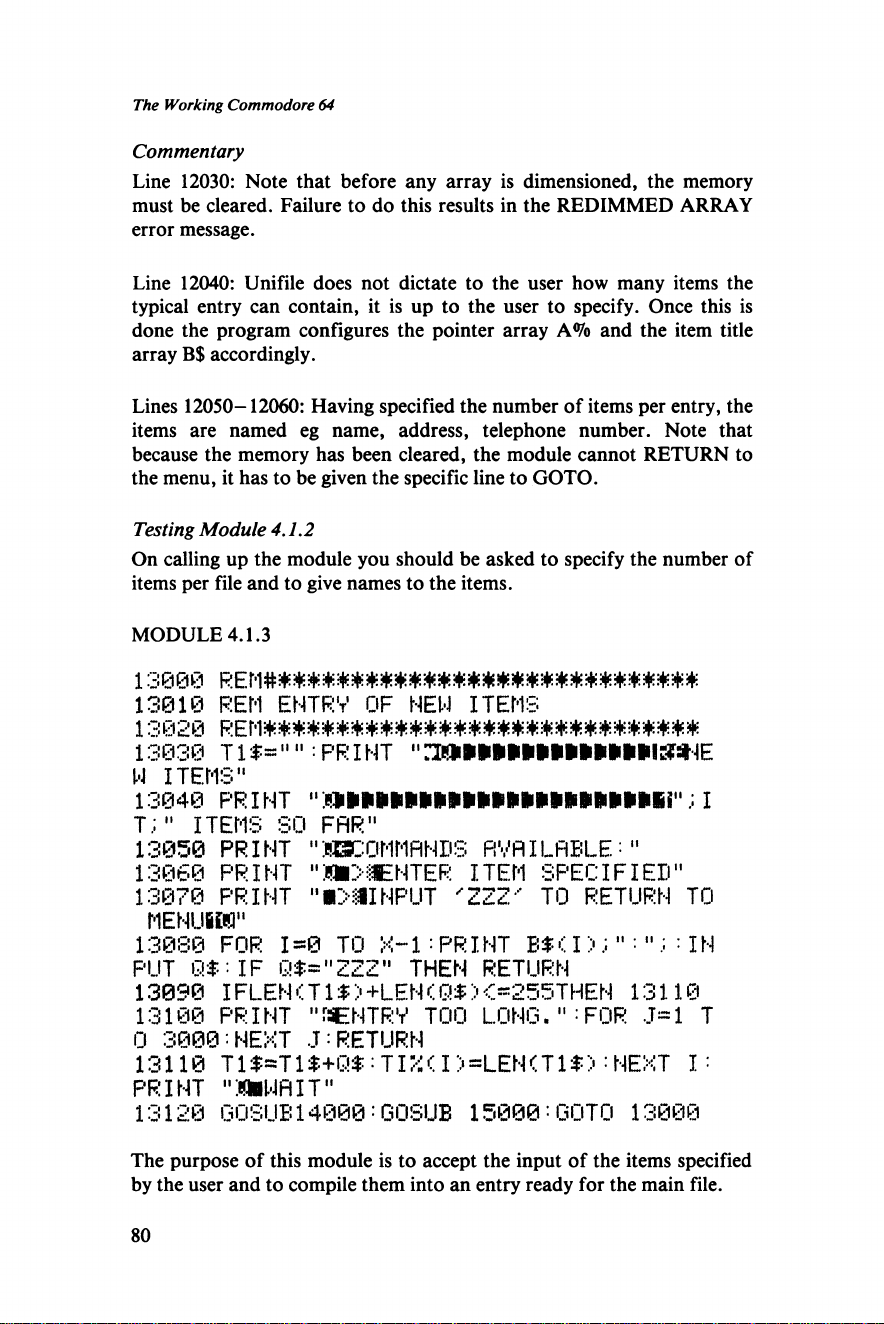
The Working Commodore 64
Commentary
Line 12030: Note that before any array is dimensioned, the memory
must be cleared. Failure to do this results in the REDIMMED ARRAY
error message.
Line 12040: Unifile does not dictate to the user how many items the
typical entry can contain, it is up to the user to specify. Once this is
done the program configures the pointer array A% and the item title
array B$ accordingly.
Lines 12050-12060: Having specified the number of items per entry, the
items are named eg name, address, telephone number. Note that
because the memory has been cleared, the module cannot RETURN to
the menu, it has to be given the specific line to GOTO.
Testing Module 4.1.2
On calling up the module you should be asked to specify the number of
items per file and to give names to the items.
MODULE 4.1.3
13000 REM******************************
13010 REM EMTRV OF MEW ITEMS
13020 REM**###*#######*#*##*######**#*#
13030 T1 $=1111: PR I NT 113t!»»»m»»iii»»l!?:HE
W ITEMS"
13040 print " ; I
T.:" ITEMS SO FAR"
13050 PRINT "WSCOMMflNDS AVAILABLE:"
13060 PRINT "XH>§ENTER ITEM SPECIFIEH"
13070 PRINT "■TTIIHPUT 'ZZZ' TO RETURN TO
MENUBUP"
13080 FOR 1=0 TO X-l : PRINT B$(I > ; IN
PUT Q$-IF Q$="ZZZ" THEN RETURN
13090 IFLEN-r.T 1 $> +LEN<Q$)0255THEN 13110
13100 PRINT "GENTRY TOO LONG.F OR J=1 T
0 3000:NEXT J:RETURN
13110 T1$=T1$+Q$:TIX(I> =LEN<T1$>:NEXT I:
PRINT n:«iWAIT"
13128 GQSUB14000:G0SUB 15000:GOT0 13000
The purpose of this module is to accept the input of the items specified
by the user and to compile them into an entry ready for the main file.
80
Page 83
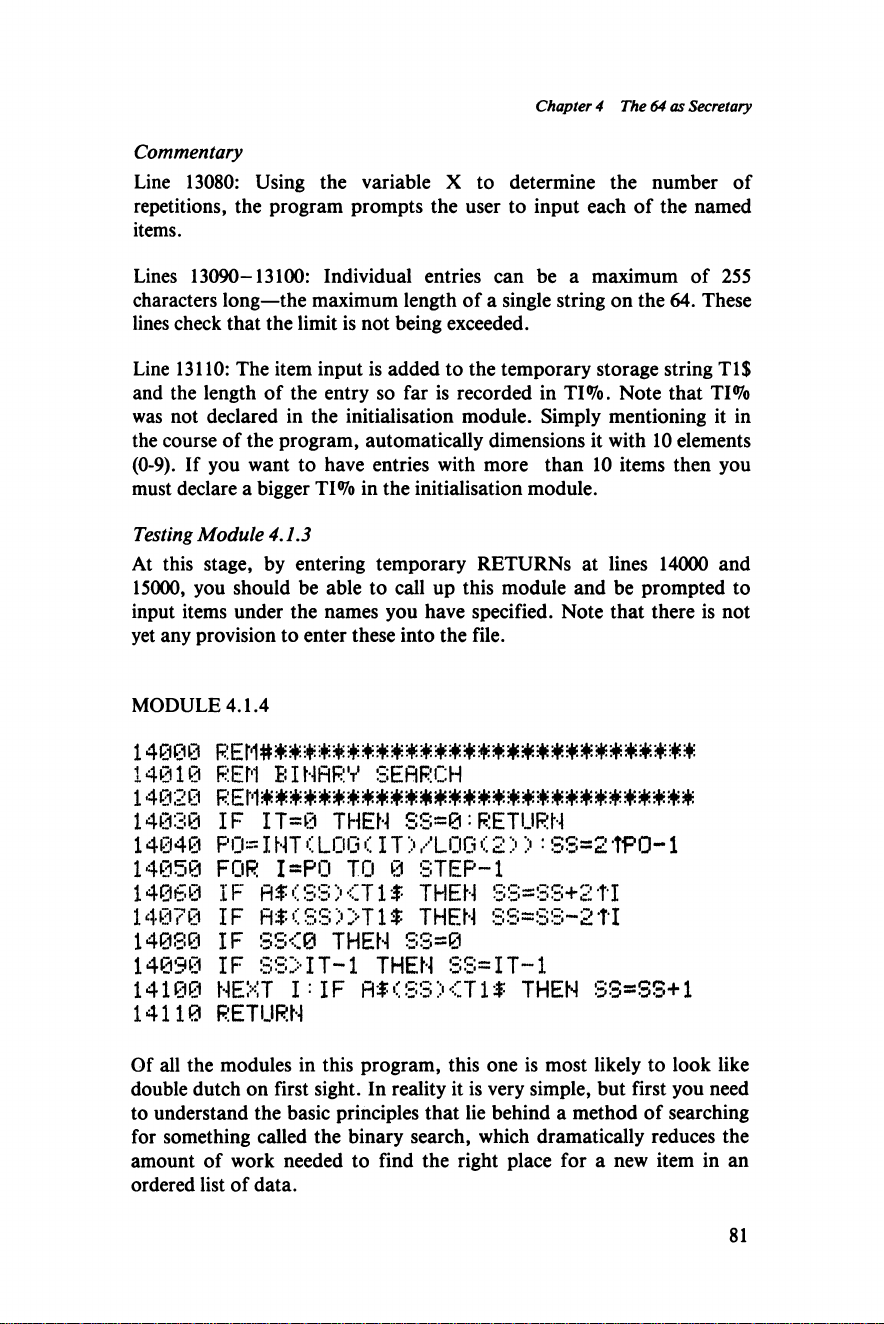
Chapter 4 The 64 as Secretary
Commentary
Line 13080: Using the variable X to determine the number of
repetitions, the program prompts the user to input each of the named
items.
Lines 13090-13100: Individual entries can be a maximum of 255
characters long—the maximum length of a single string on the 64. These
lines check that the limit is not being exceeded.
Line 13110: The item input is added to the temporary storage string Tl$
and the length of the entry so far is recorded in TI%. Note that TI%
was not declared in the initialisation module. Simply mentioning it in
the course of the program, automatically dimensions it with 10 elements
(0-9). If you want to have entries with more than 10 items then you
must declare a bigger TI% in the initialisation module.
Testing Module 4.1.3
At this stage, by entering temporary RETURNS at lines 14000 and
15000, you should be able to call up this module and be prompted to
input items under the names you have specified. Note that there is not
yet any provision to enter these into the file.
MODULE 4.1.4
14000
14 01 0
REM BINARY SEARCH
14020
14030
14040
14050
14060
14070
14080
14090
14100
14110
Of all the modules in this program, this one is most likely to look like
double dutch on first sight. In reality it is very simple, but first you need
to understand the basic principles that lie behind a method of searching
for something called the binary search, which dramatically reduces the
amount of work needed to find the right place for a new item in an
ordered list of data.
IF IT=0 THEN SS=0=RETURN
P0= I NT LOG < IT > /LOG C 2 >) : SS=2 TP0-1
FOR I«PQ TO 0 STEP-1
IF A$<SSXT1$ THEN SS=SS+2tI
IF fl$<SS»Tl$ THEN SS=SS-2TI
IF SS<0 THEN SS=0
IF SS>IT-1 THEN SS-IT-1
NEXT I:IF fl$<S5><Tl$ THEN SS*SS+1
RETURN
81
Page 84
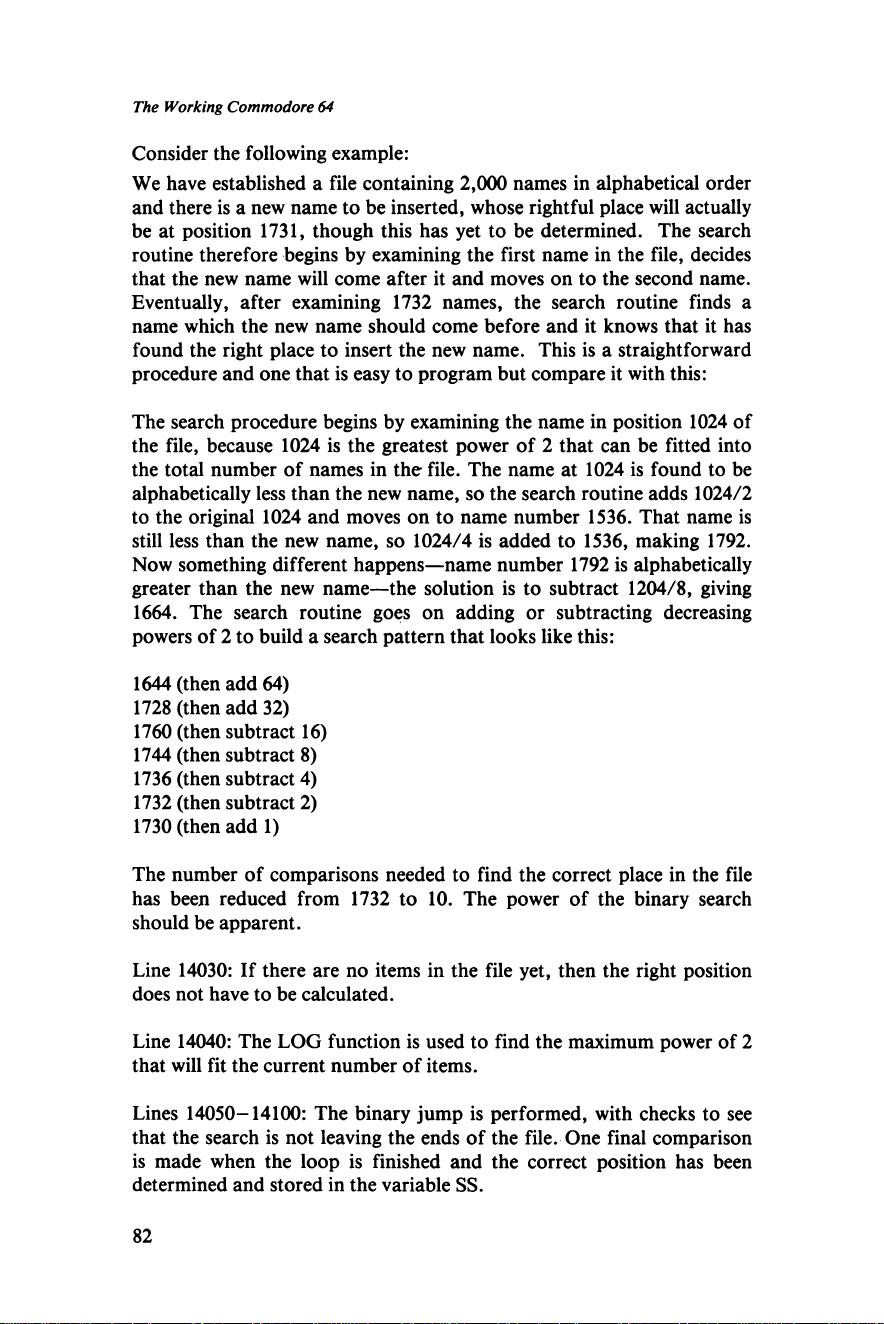
The Working Commodore 64
Consider the following example:
We have established a file containing 2,000 names in alphabetical order
and there is a new name to be inserted, whose rightful place will actually
be at position 1731, though this has yet to be determined. The search
routine therefore begins by examining the first name in the file, decides
that the new name will come after it and moves on to the second name.
Eventually, after examining 1732 names, the search routine finds a
name which the new name should come before and it knows that it has
found the right place to insert the new name. This is a straightforward
procedure and one that is easy to program but compare it with this:
The search procedure begins by examining the name in position 1024 of
the file, because 1024 is the greatest power of 2 that can be fitted into
the total number of names in the file. The name at 1024 is found to be
alphabetically less than the new name, so the search routine adds 1024/2
to the original 1024 and moves on to name number 1536. That name is
still less than the new name, so 1024/4 is added to 1536, making 1792.
Now something different happens—name number 1792 is alphabetically
greater than the new name—the solution is to subtract 1204/8, giving
1664. The search routine goes on adding or subtracting decreasing
powers of 2 to build a search pattern that looks like this:
1644 (then add 64)
1728 (then add 32)
1760 (then subtract 16)
1744 (then subtract 8)
1736 (then subtract 4)
1732 (then subtract 2)
1730 (then add 1)
The number of comparisons needed to find the correct place in the file
has been reduced from 1732 to 10. The power of the binary search
should be apparent.
Line 14030: If there are no items in the file yet, then the right position
does not have to be calculated.
Line 14040: The LOG function is used to find the maximum power of 2
that will fit the current number of items.
Lines 14050-14100: The binary jump is performed, with checks to see
that the search is not leaving the ends of the file. One final comparison
is made when the loop is finished and the correct position has been
determined and stored in the variable SS.
82
Page 85
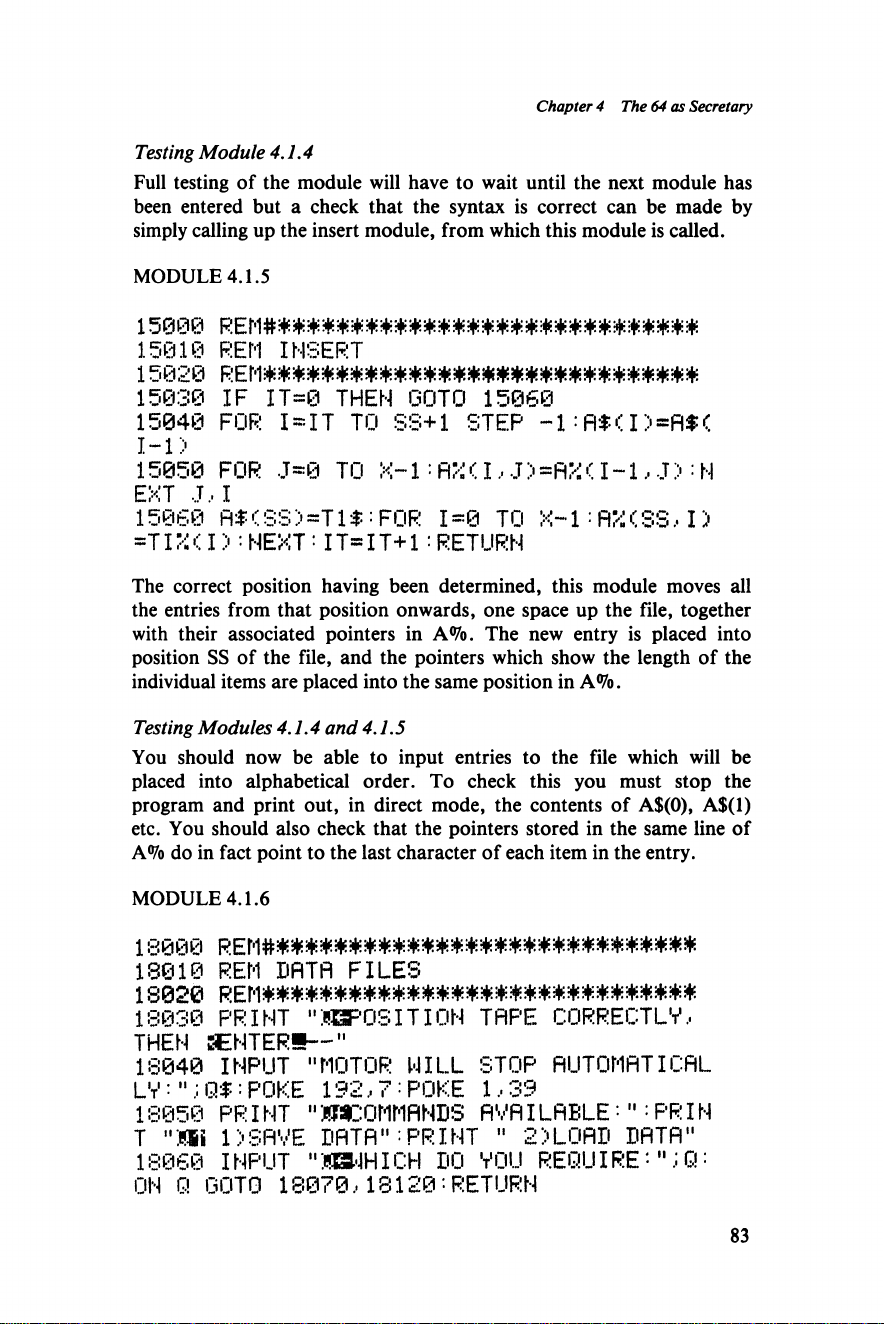
Chapter 4 The 64 as Secretary
Testing Module 4.1.4
Full testing of the module will have to wait until the next module has
been entered but a check that the syntax is correct can be made by
simply calling up the insert module, from which this module is called.
MODULE 4.1.5
15 000 * * * * * * * *
15010 REM INSERT
15020 $ B W * * * * * * * * * * . * * m M M % % * * * * * M M .
15030 IF IT=0 THEN GOTO 15060
15040 FOR I~IT TO SS+1 STEP -1:A$(I>=A$(
I-l>
15050 FOR J~0 TO X-1:RX(I,J)=AX(1-1,J>:N
EXT J,I
15060 A$(SS>=T1$ : FOR 1=0 TO X-l: AX(S3, I)
=TIX<I>:NEXT =IT=IT+1:RETURN
The correct position having been determined, this module moves all
the entries from that position onwards, one space up the file, together
with their associated pointers in A%. The new entry is placed into
position SS of the file, and the pointers which show the length of the
individual items are placed into the same position in A%.
Testing Modules 4.1.4 and 4.1.5
You should now be able to input entries to the file which will be
placed into alphabetical order. To check this you must stop the
program and print out, in direct mode, the contents of A$(0), A$(l)
etc. You should also check that the pointers stored in the same line of
A% do in fact point to the last character of each item in the entry.
MODULE 4.1.6
18000
18010 REM BATA FILES
18 02 0
18030 PRINT "DEPOSITION TAPE CORRECTLY,
THEN SENTER1— "
18040 INPUT "MOTOR WILL STOP AUTOMATICflL
LV : " Q$ : POKE 192,7 : POKE 1,39
18050 PRINT "^COMMANDS AVAILABLE•":PRIN
T "Mi 1>SAVE DATA":PRINT " 2)LOAD DATA"
18060 INPUT "M5WHICH DO VOU REQUIRE:"iQ:
ON R GOTO 18070,18120’RETURN
83
Page 86
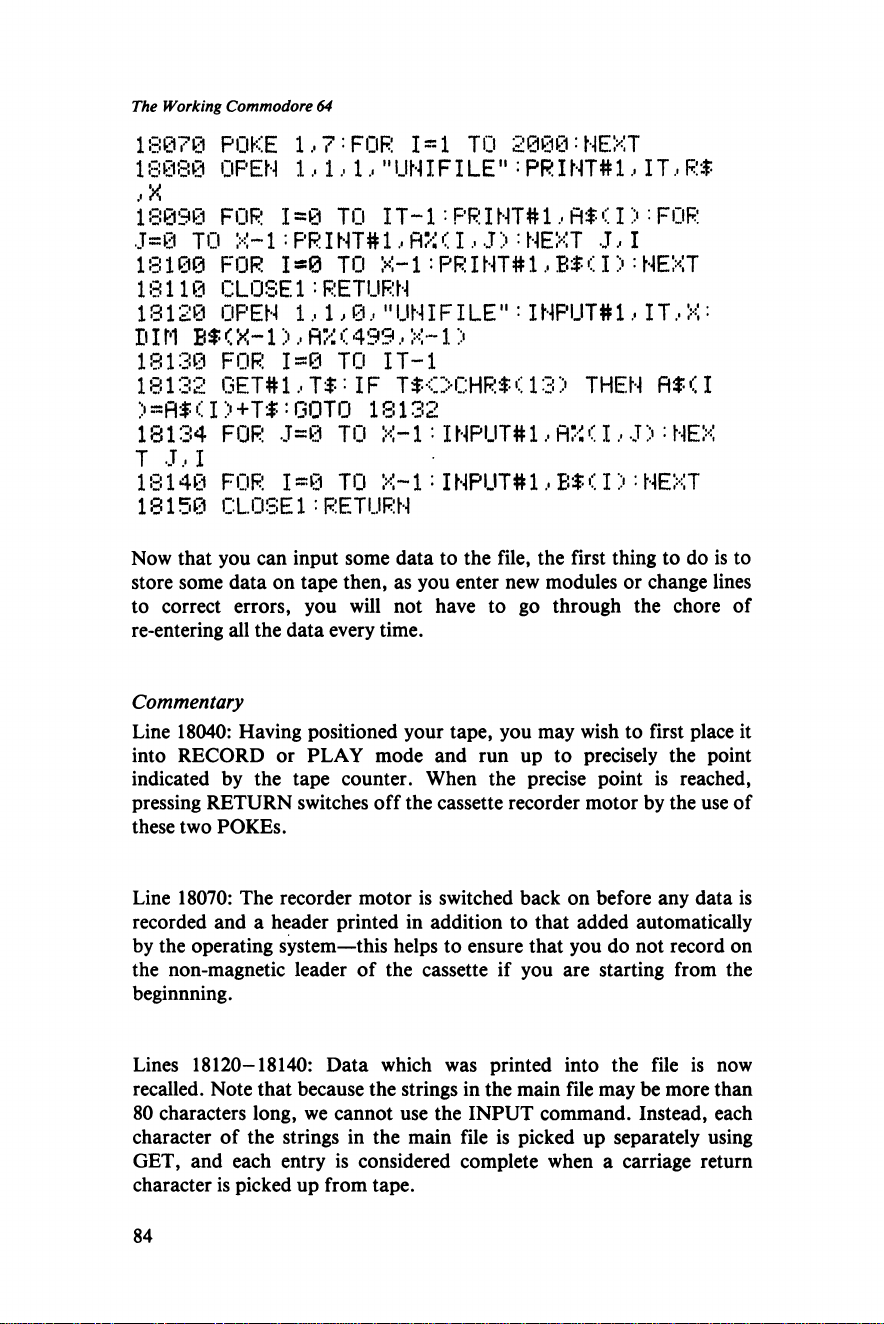
The Working Commodore 64
18070 POKE 1,7:FOR 1=1 TO 2000:NEXT
18080 OPEN 1,1,1,"UNIFILE":PRINT#1,IT,R$
* X
18890 FOR 1=0 TO IT-1:PRINT#1,fl$Cl>:FOR
,T=0 TO X-1 : PR I NT# 1, H‘; (I, J >: NEXT J, I
18100 FOR 1*0 TO X-1:PRINT#1,B$ CI>:NEXT
18110 CLOSE1:RETURN
8120 OPEN 1,1,0,"UNIFILE":INPUT#1,IT,X:
1
DIM Ef < X-1 >, FIX < 499, X-1 >
18130 FOR 1=0 TO IT-1
18132 GET#1, T f: IF T$OCHR$<13) THEN R$<I
::'=fl$a>+T$ :g o t o 10132
18134 FOR J=0 TO X-l•IHPUTttl, I,J):NEX
T J,I
18140 FOR 1=0 TO X-l:INPUT#1,B$<I>:NEXT
18150 CLOSE1:RETURN
Now that you can input some data to the file, the first thing to do is to
store some data on tape then, as you enter new modules or change lines
to correct errors, you will not have to go through the chore of
re-entering all the data every time.
Commentary
Line 18040: Having positioned your tape, you may wish to first place it
into RECORD or PLAY mode and run up to precisely the point
indicated by the tape counter. When the precise point is reached,
pressing RETURN switches off the cassette recorder motor by the use of
these two POKEs.
Line 18070: The recorder motor is switched back on before any data is
recorded and a header printed in addition to that added automatically
by the operating system—this helps to ensure that you do not record on
the non-magnetic leader of the cassette if you are starting from the
beginnning.
Lines 18120-18140: Data which was printed into the file is now
recalled. Note that because the strings in the main file may be more than
80 characters long, we cannot use the INPUT command. Instead, each
character of the strings in the main file is picked up separately using
GET, and each entry is considered complete when a carriage return
character is picked up from tape.
84
Page 87
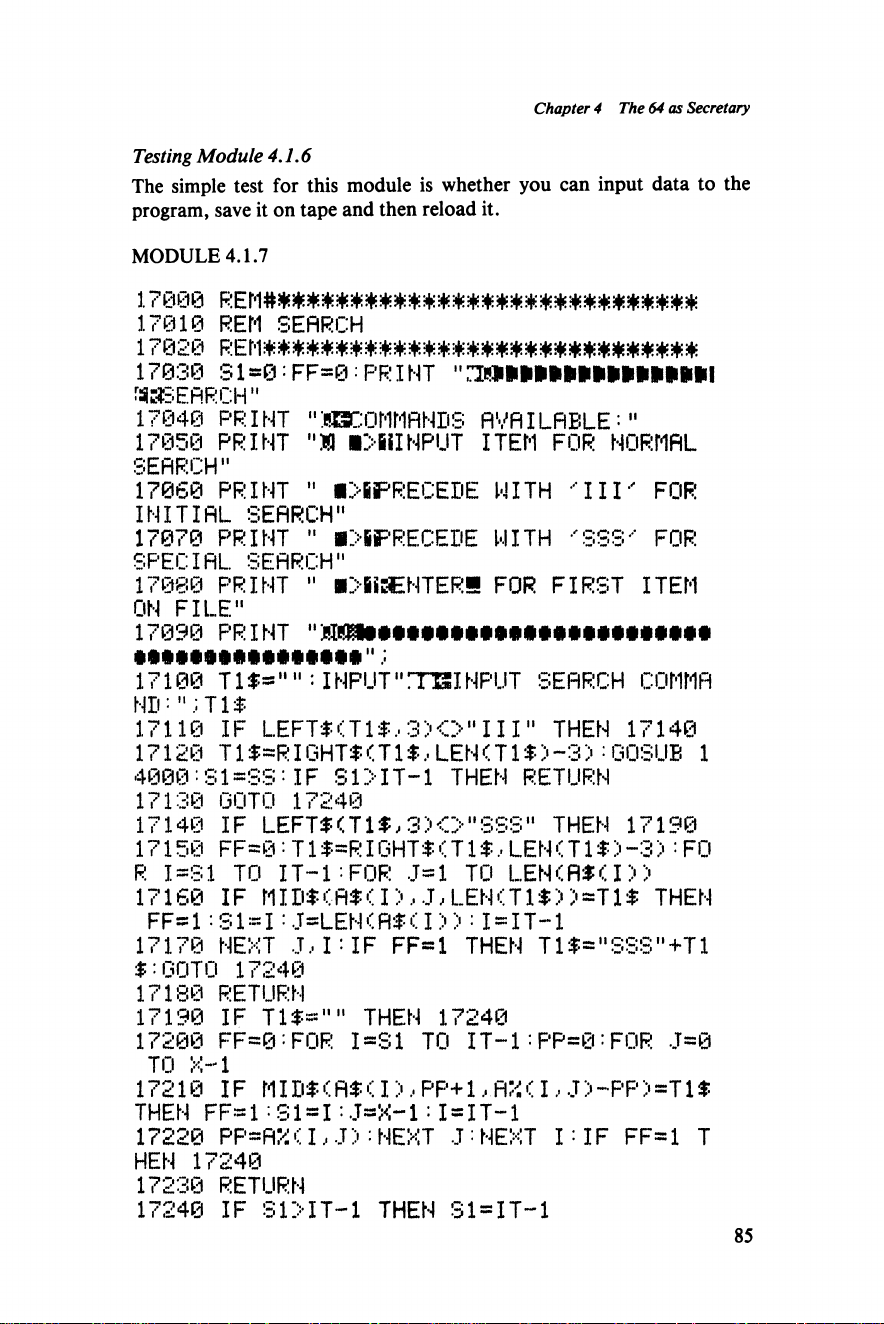
Chapter 4 The 64 as Secretary
Testing Module 4.1.6
The simple test for this module is whether you can input data to the
program, save it on tape and then reload it.
MODULE 4.1.7
17000
17010 REM SEARCH
17020 REN*** * * * *
17030 31 = 0 : f f =0 : pr i nt "
I
BWSEflRCH"
17040 PRINT "KSDOMMANDS AVAILABLE:"
17050 PRINT "H ■>fiiINPUT ITEM FOR NORMAL
SEARCH"
17060 PRINT " «>BPRECEBE WITH 'III' FOR
INITIAL SEARCH"
17070 PRINT " i>SPRECEBE WITH 'SSS' FOR
SPECIAL SEARCH"
17080 PRINT " l>ii3ENTER8 FOR FIRST ITEM
ON FILE"
17090 PRINT "
AAAAAAAAAAAAAAAA 11
17100 TI fI NPUT'TTBINPUT SEARCH COMMA
ND:";T1$
17110 IF LEFT $ (T1 f .• 3 > O "III" THEN 17140
17120 T1$=RIGHT$<T1$,LEN<T1$>-3>:GOSUB 1
4000:S1=SS:IF S1>IT—1 THEN RETURN
17130 GOTO 17240
17140 IF LEFT $(T1$ j 3)O "SSS" THEN 17190
17150 FF=0:T1$ =RIGHT$<T1$,LEN < T1$>-3>:FO
R I=S1 TO IT-1:FOR J=1 TO LEN<A*<I>>
17160 IF MIm ( . m < I >, -J, LEN<T1 $> ) =T 1 $ THEN
FF=1:S1 = I:J=LEN<Af <I)>:I = IT“1
17170 NEXT J,I'IF FF=1 THEN T1$="SSS"+T1
$:GOTO 17240
17180 RETURN
17190 IF Tl$="" THEN 17240
17200 FF=@ '• FOR 1=81 TO IT-1 : PP=0 : FOR ,T=0
TO X-l
17210 IF MID$<A$•: I >, PP+1 *KA(I, J>~PP>=T1$
THEN FF=1 31=1:J=X-1:I=IT-1
17220 PP=AX(I.. J): NEXT J : NEXT I: IF FF=1 T
HEN 17240
17230 RETURN
17240 IF S1>IT-1 THEN S1=IT-1
85
Page 88
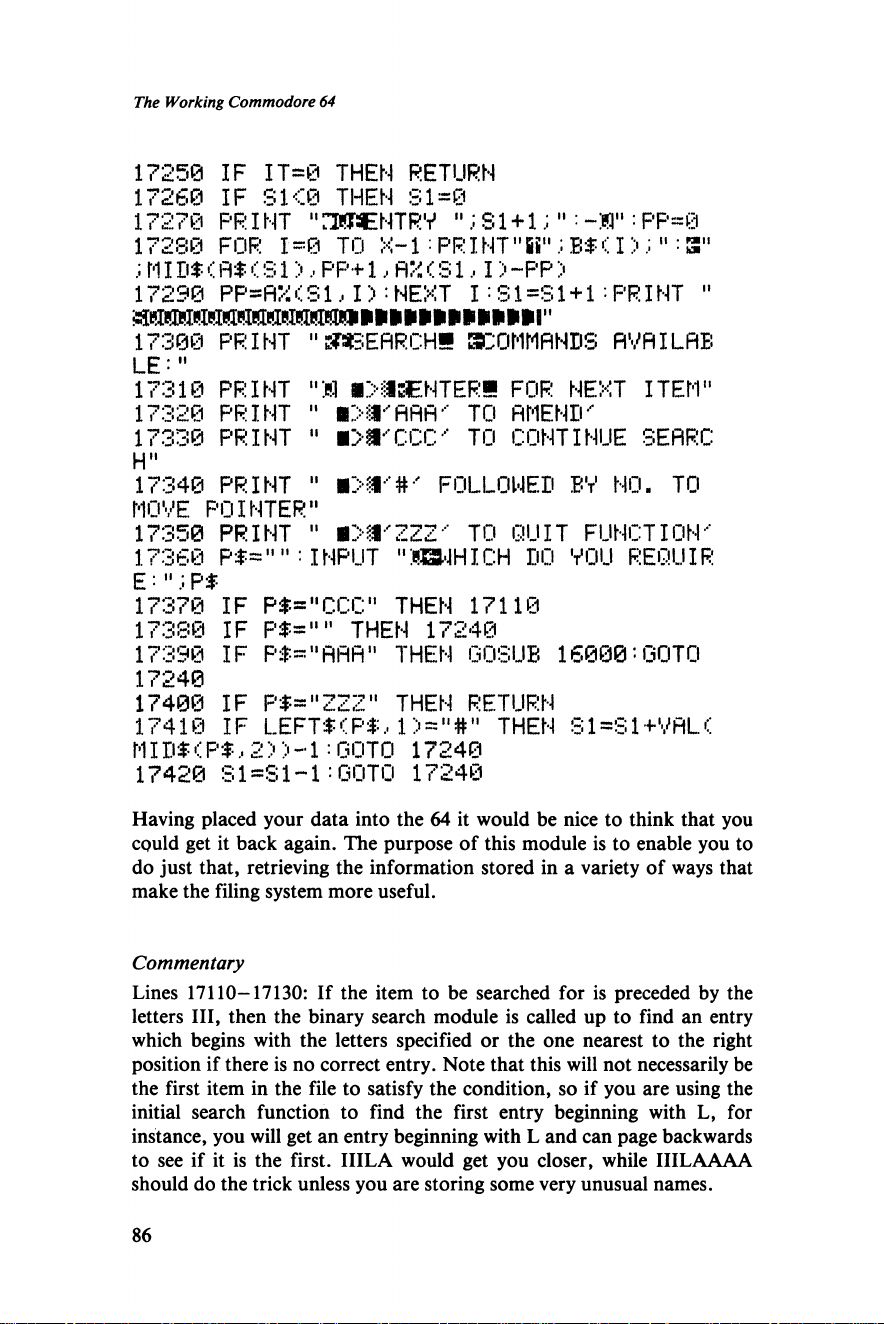
The Working Commodore 64
17250 IF IT=0 THEN RETURN
17260 IF S1<0 THEN 31=0
17270 PRINT "nKPSENTRV ”; 31 + 1;11: -M": PP=0
17280 FOR 1=0 TO X-l: PR I NT "Si"; B$ CI >; " : 3"
;MID$(m <S1>,PP+1,flX(S1,1>-PP >
17290 PP=fl?i < S1, I > : NEXT 1:31=31 + 1: PR I NT "
m m m m m i m m m W n n n W '
17300 PRINT "SWSEflRCHS BCOMMANDS RVflILHB
LE: "
17310 PRINT "M i>aaENTERH FOR NEXT ITEM"
17320 PRINT " ■>:!•-flflfi-' TO AMEND'
17330 PRINT " ■>!•'• CCC- TO CONTINUE SERRC
H"
17348 PRINT " ■>*'#' FOLLOWED BV NO. TO
MOVE POINTER"
17350 PRINT " BM'ZZZ' TO QUIT FUNCTION'
17360 PT="" : INPUT "JfBWHICH DO VOU REQUIR
E: " P $
17370 IF P*»"CCC" THEN 17110
17380 IF P$="" THEN 17240
17390 IF Pt="flFlfl" THEN GOSUB 16000: GOTO
17240
17400 IF P$="ZZZ" THEN RETURN
17410 IF LEFT$(P$, 1 THEN Sl*Sl+VflL<
MID$<P$,2 > >-1:GOTO 17240
17420 S1=81-1:GOTO 17240
Having placed your data into the 64 it would be nice to think that you
could get it back again. The purpose of this module is to enable you to
do just that, retrieving the information stored in a variety of ways that
make the filing system more useful.
Commentary
Lines 17110—17130: If the item to be searched for is preceded by the
letters III, then the binary search module is called up to find an entry
which begins with the letters specified or the one nearest to the right
position if there is no correct entry. Note that this will not necessarily be
the first item in the file to satisfy the condition, so if you are using the
initial search function to find the first entry beginning with L, for
instance, you will get an entry beginning with L and can page backwards
to see if it is the first. IIILA would get you closer, while IIILAAAA
should do the trick unless you are storing some very unusual names.
86
Page 89
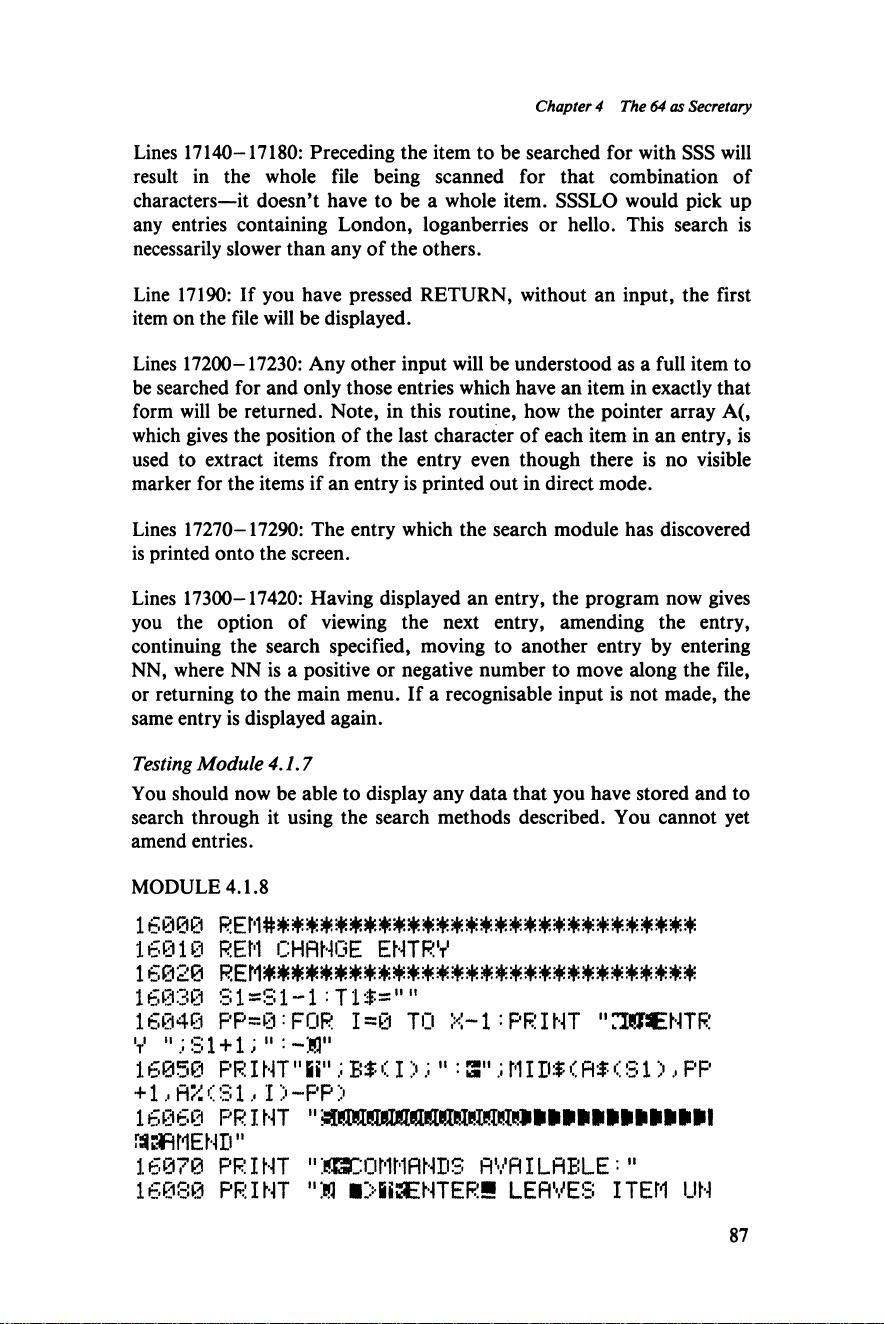
Chapter 4 The 64 as Secretary
Lines 17140-17180: Preceding the item to be searched for with SSS will
result in the whole file being scanned for that combination of
characters—it doesn’t have to be a whole item. SSSLO would pick up
any entries containing London, loganberries or hello. This search is
necessarily slower than any of the others.
Line 17190: If you have pressed RETURN, without an input, the first
item on the file will be displayed.
Lines 17200-17230: Any other input will be understood as a full item to
be searched for and only those entries which have an item in exactly that
form will be returned. Note, in this routine, how the pointer array A(,
which gives the position of the last character of each item in an entry, is
used to extract items from the entry even though there is no visible
marker for the items if an entry is printed out in direct mode.
Lines 17270-17290: The entry which the search module has discovered
is printed onto the screen.
Lines 17300-17420: Having displayed an entry, the program now gives
you the option of viewing the next entry, amending the entry,
continuing the search specified, moving to another entry by entering
NN, where NN is a positive or negative number to move along the file,
or returning to the main menu. If a recognisable input is not made, the
same entry is displayed again.
Testing Module 4.1.7
You should now be able to display any data that you have stored and to
search through it using the search methods described. You cannot yet
amend entries.
MODULE 4.1.8
16 00 0 R E M # # ## # ## # # # # # ## # # ## # # ## # ## # # ## #
16010 REM CHANGE ENTRV
16020 REM##*#*#*######*###*############
16030 Sl*Sl-l:Tl*=,,n
16040 PP=0: FOR 1=0 TO X-l : PRINT "HWSENTR
V n ;Sl + l; M
16050 PR I NT" iin; B$ < I >; " : 3 M; MI D$ < fl$ < S1 >, PP
+1 • fl"« ( A1 . I !« —F‘p ‘i
16060 ' PR I NT 11 »Bi»li»»li|i|i»i|i»l
SaAMEND"
16070 PRINT "MSDOMMANDS AVAILABLE:"
16080 PRINT "M i>Si3ENTER5 LEAVES ITEM UN
87
Page 90
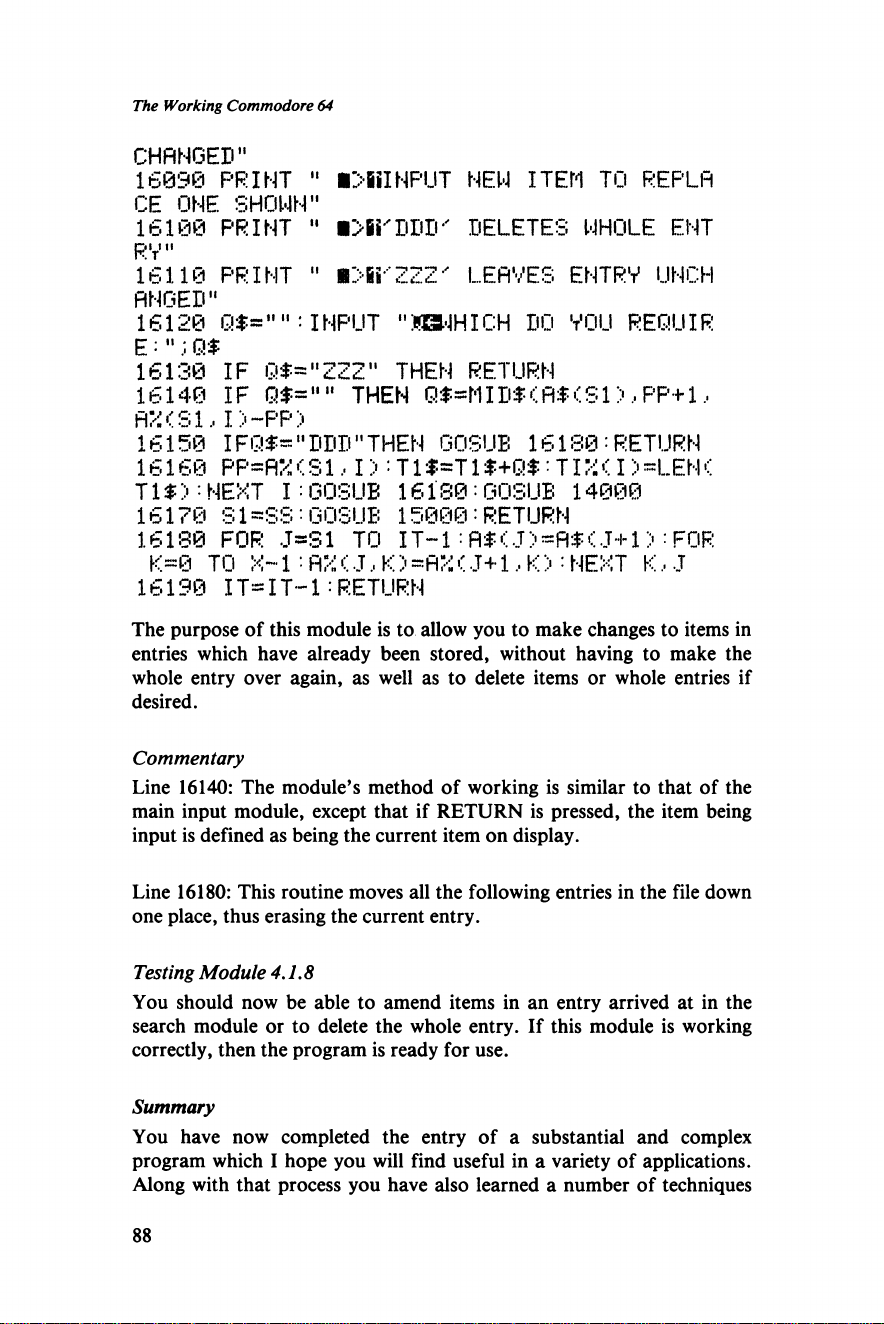
The Working Commodore 64
CHANGED"
16099 PRINT " ■>BiINP!JT NEW ITEM TO REPLA
CE ONE SHOWN"
16100 PRINT " ■Xi'DDD' DELETES WHOLE ENT
RV"
16110 PRINT " «>Bi-"ZZ 2' LEAVES ENTRY UNCH
ANGED"
16120 Q$="" ; INPUT "SEUHICH DO VOU REQUIR
E : " Q$
16130 IF Q*="ZZZ" THEN RETURN
16140 IF Q$="" THEN Q$*MID$<fl$(Sl>,PP+l,
AX<S1,I>~PP>
16150 IFQ$="DDD"THEN GOSUE 16180:RETURN
16160 PP=AX < SI, I) : T 1 $=T 1 $+Q$ • TI' i < I> =LEN <
T 1$ >:NEXT I :GOSUB 16180 = GOSUE 14000
16170 S 1= S S:GOSUE 15000:RETURN
16180 FOR J*S1 TO IT-1 : flf- < J ) =A$ <. J+ 1 > : FOR
K-0 TO X- 1 •• AX (J , K ) =AX < J+ 1, K > : NEXT K , J
16190 IT— IT— 1:RETURN
The purpose of this module is to allow you to make changes to items in
entries which have already been stored, without having to make the
whole entry over again, as well as to delete items or whole entries if
desired.
Commentary
Line 16140: The module’s method of working is similar to that of the
main input module, except that if RETURN is pressed, the item being
input is defined as being the current item on display.
Line 16180: This routine moves all the following entries in the file down
one place, thus erasing the current entry.
Testing Module 4.1.8
You should now be able to amend items in an entry arrived at in the
search module or to delete the whole entry. If this module is working
correctly, then the program is ready for use.
Summary
You have now completed the entry of a substantial and complex
program which I hope you will find useful in a variety of applications.
Along with that process you have also learned a number of techniques
88
Page 91
Chapter 4 The 64 as Secretary
which will stand you in good stead whenever you decide on ambitious
programs of your own to store and process non-numeric data.
More importantly, however, if you have taken the trouble to
understand what you have been entering, tracing through the functions
of the individual lines, as well as the overall functions of the modules,
you will have gained confidence that substantial and complex programs
are not always as awesome as they are made out to be. Using a modular
approach, which breaks down the program into a series of manageable
tasks, applications like this one can be developed by anyone who is
prepared to invest a little time (and a little hair).
Going Further
1) If you have a printer then you will want to add some
provision for outputting entries or groups of entries onto
paper. The easiest way to do this would be to add another
command to the second part of the Search Module.
2) One interesting challenge would be to see whether you
could give the program the ability to deal with numeric
data as well as non-numeric. This would involve setting
up a numeric array with 500 elements, with provision to
input values to it and perhaps some search commands
along the lines of ‘find any entries which hold a value of
greater than X \ There are quite a large range of
applications where the ability to store one or more
numeric items would be an advantage.
4.2 UNIFILE II-DATABASE
After entering Unifile and debugging it, the last thing that you may
want to face is a variation on the same theme. If so, feel free to skip this
program for the present and move on to greener pastures. At some
stage, however, you will want to come back to this program to solve at
least some of the problems that Unifile is not designed to cope with.
Unifile is fine for files which have a regular structure, and many do.
Equally, there are a large number of applications where you simply do
not know in advance how many items there are going to be in a
particular entry. You may, for instance, want to catalogue your books.
You could set up the original Unifile program to request author and
title, but with probably many more than one book by most authors,
tagging the author’s name onto every individual title is going to be a
considerable waste of space.
Unifile II is designed to cope with such less structured files. It is more
flexible than Unifile in that you can go on adding items to an entry as
long as you like within the overall limit of 255 characters and can
specify a more complex form of search which will seek out any entries
89
Page 92
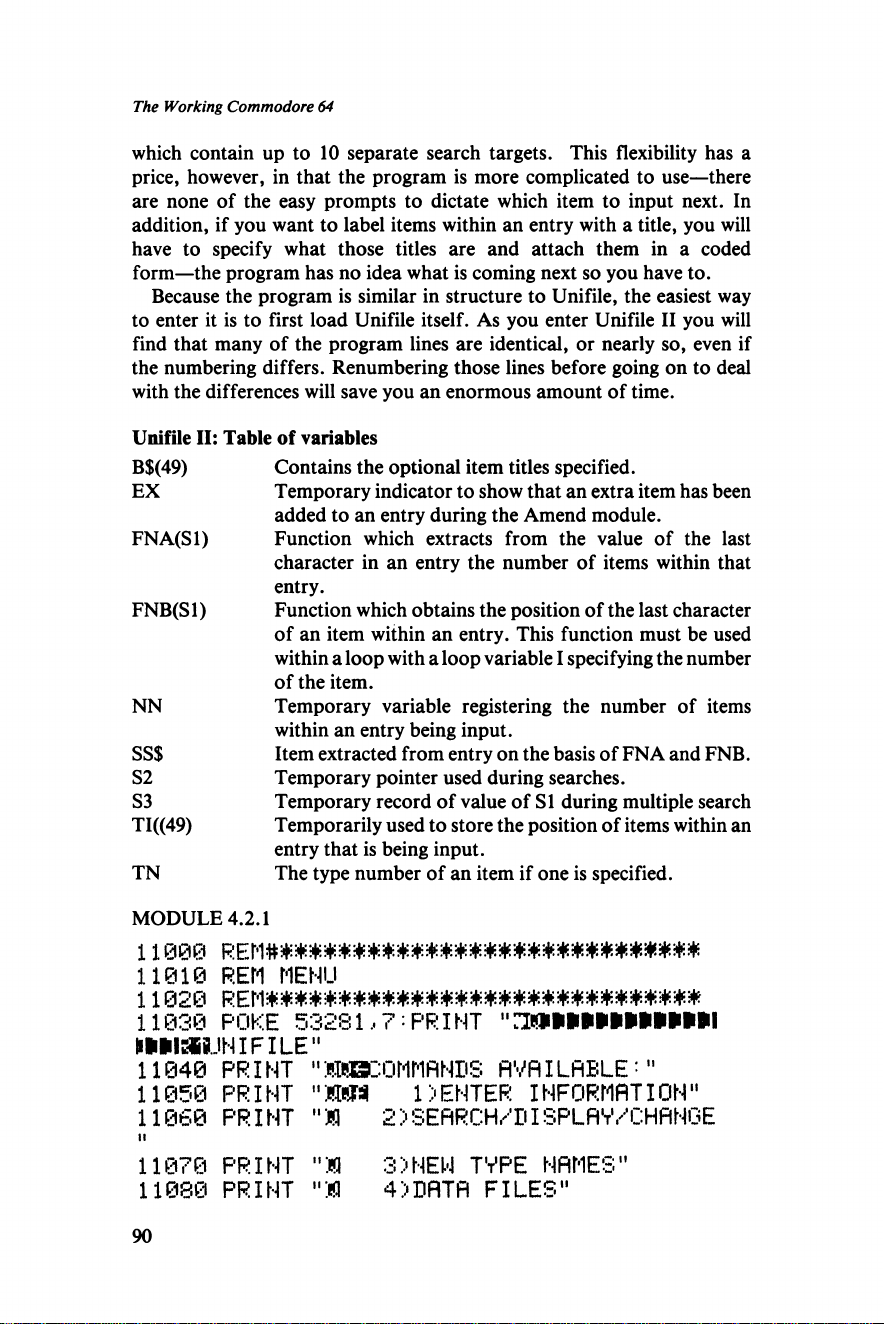
The Working Commodore 64
which contain up to 10 separate search targets. This flexibility has a
price, however, in that the program is more complicated to use—there
are none of the easy prompts to dictate which item to input next. In
addition, if you want to label items within an entry with a title, you will
have to specify what those titles are and attach them in a coded
form—the program has no idea what is coming next so you have to.
Because the program is similar in structure to Unifile, the easiest way
to enter it is to first load Unifile itself. As you enter Unifile II you will
find that many of the program lines are identical, or nearly so, even if
the numbering differs. Renumbering those lines before going on to deal
with the differences will save you an enormous amount of time.
Unifile II: Table of variables
B$(49)
EX
FNA(Sl)
FNB(Sl)
NN
SS$
52
53
TI((49)
TN
Contains the optional item titles specified.
Temporary indicator to show that an extra item has been
added to an entry during the Amend module.
Function which extracts from the value of the last
character in an entry the number of items within that
entry.
Function which obtains the position of the last character
of an item within an entry. This function must be used
within a loop with a loop variable I specifying the number
of the item.
Temporary variable registering the number of items
within an entry being input.
Item extracted from entry on the basis of FNA and FNB.
Temporary pointer used during searches.
Temporary record of value of SI during multiple search
Temporarily used to store the position of items within an
entry that is being input.
The type number of an item if one is specified.
MODULE 4.2.1
11010 REM MENU
11020
11030 POKE 53281,7 :PRINT
PiUSSUNIFILE11
11040 PRINT n:«?®::0MriflNriS AVAILABLE'n
11050 PRINT "Kim 1)ENTER INFORMATION"
11060 PRINT "M 2>SEARCH/DISPLAV/CHANGE
H
11070 PRINT "M 3)HEW TVPE NAMES"
11080 PRINT "M 4)DATA FILES"
90
Page 93
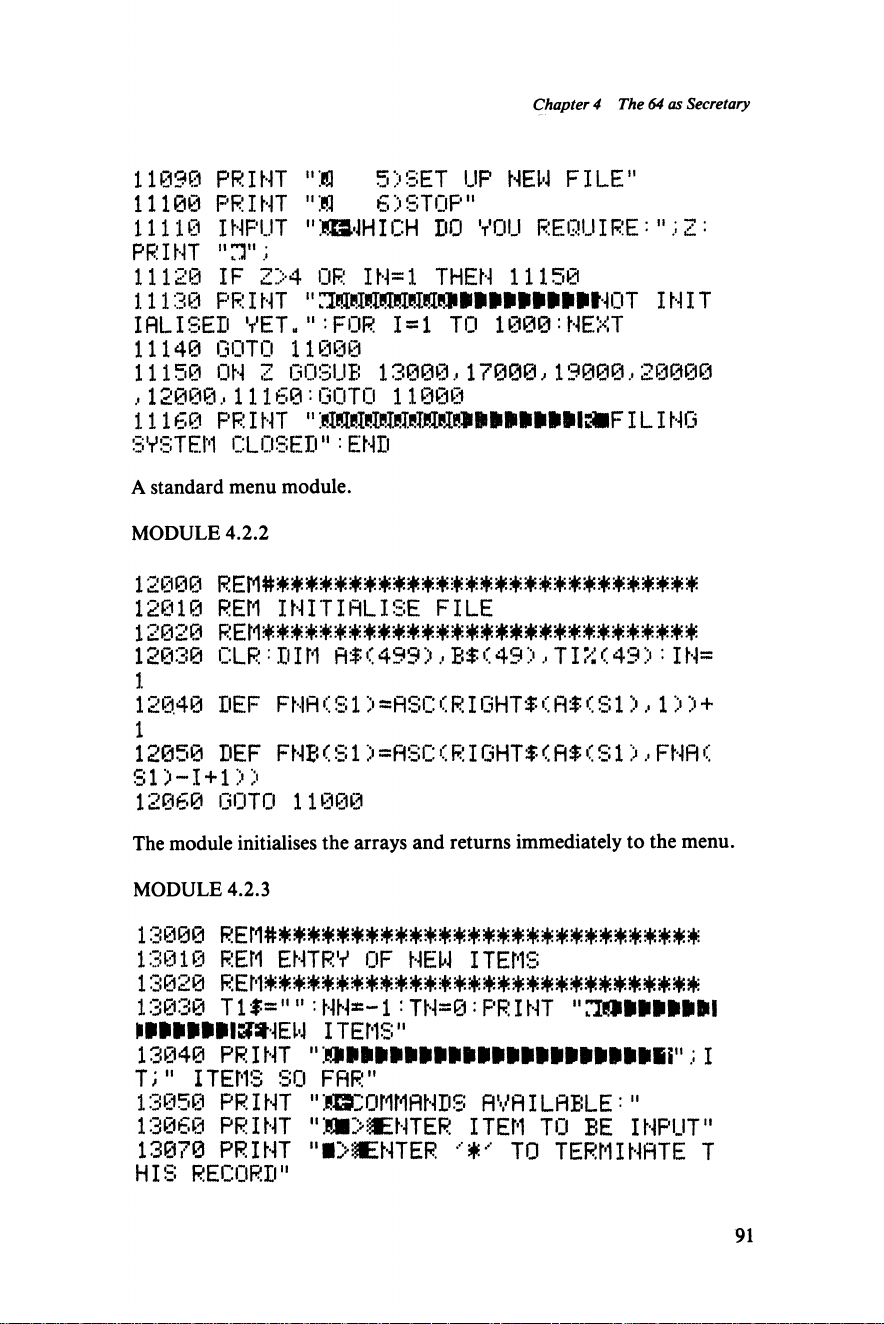
Chapter 4 The 64 as Secretary
11090 PRINT "M 5)SET UP HEW FILE"
11100 PRINT "W 6)STOP"
11110 INPUT "SS-1HICH DO VOU REQUIRE =";Z :
PRINT
11120 IF Z>4 OR IN=1 THEN 11150
11130 PRINT " ^Pl(!MW«!!MPlii»»i»»illtTJT I NIT
IALISED VET.":FOR 1=1 TO 1000:NEXT
11140 GOTO 11000
11150 ON Z GOSUB 13000,17000,19000,20000
.12000,11160:GOTO 11000
11160 PR I NT " ILING
SYSTEM CLOSED":END
A standard menu module.
MODULE 4.2.2
12000 Rl
12010 REM INITIALISE FILE
12020
12038 CLR : DIM fl$ < 499 >, B$ < 49 ) , TIV. < 49 >: I N=
1
12040 DEF FNfl(S1> =ASC(RIGHT$<A$(Sl>,1)) +
1
12050 DEF FNB<S1)=RSC(RIGHT$<R$(S1>,FNfl <
SD-I + l))
12060 GOTO 11000
The module initialises the arrays and returns immediately to the menu.
MODULE 4.2.3
13000 r e m # *#^ ^ ** * - *# ^ *#* # ^* * # mx* m * * .
13010 REM ENTRY OF NEW ITEMS
13020
13030 T1 $ -"" : NN=-1: TN=0: PR I NT "
l»imilff»JEM ITEMS"
13040 print "'.liHikiiiiikiiiiiiiPiiiiiii"; i
T;" ITEMS SO FAR"
13050 PRINT "WaCOMMRNDS AVAILABLE:"
13060 PRINT " W I N T E R ITEM TO BE INPUT"
13070 PRINT "B>3ENTER TO TERMINATE T
HIS RECORD"
91
Page 94
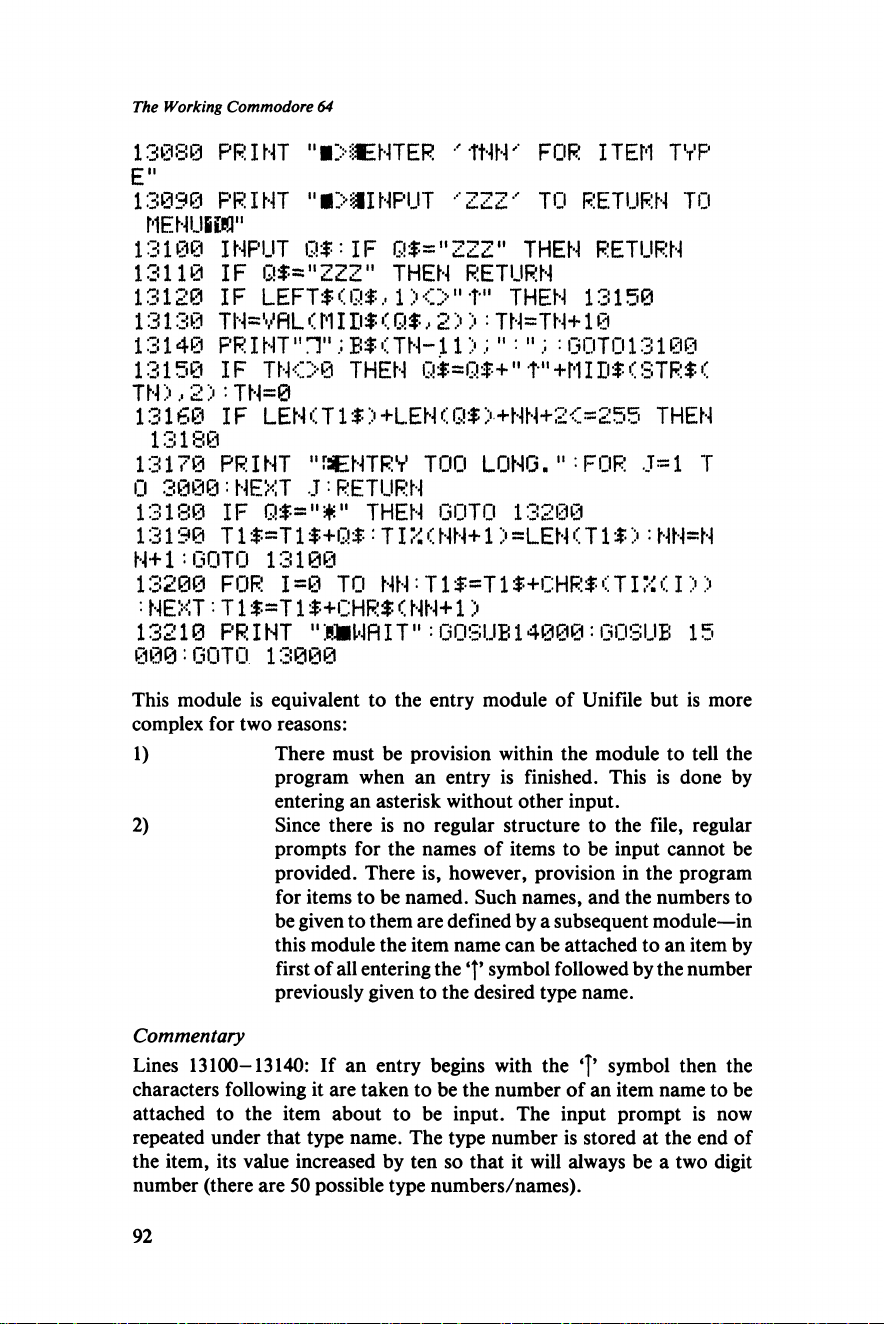
The Working Commodore 64
13080 PRINT "■>CENTER 'TNN' FOR ITEM TVP
E"
13090 PRINT "B>aiNPUT 'ZZZ' TO RETURN TO
MENUiBT
13100 INPUT Q$:IF Q$="ZZZ" THEN RETURN
13110 IF Q$*"ZZZ" THEN RETURN
13120 IF LEFT$ < Q$.. 1 ><>" T" THEN 13150
13130 TN-v'flL<MID*<Q$,2> ): TN=TN+10
13140 PRINT"H";B$<TN-11>;":"; =GOTO1310O
13150 IF TNO0 THEN Q$=Q$+"T,,+Min$(STR$(
TN),2):TN=0
13160 IF LEH<T1*> +LEN(Q$>+NN+2<>255 THEN
13180
13170 PRINT "MENTRV TOO LONG.":FOR J=1 T
0 3000: NEXT ,T: RETURN
13180 IF 0*="*" THEN GOTO 13200
13190 T1$=T 1 $+Q$ : T17. ( NN+1 > =LEN ( T1 $ > : NN=N
N+l:GOTO 13100
13200 FOR 1=0 TO NN '• T1 $=T 1 $+CHR$ <. TIV. CI))
•• NEXT •• T1 $=T 1 $+CHR* C NN+1)
13210 PRINT "MiWflIT";GOSUB14000:GOSUB 15
000:GOTO 13000
This module is equivalent to the entry module of Unifile but is more
complex for two reasons:
1) There must be provision within the module to tell the
program when an entry is finished. This is done by
entering an asterisk without other input.
2) Since there is no regular structure to the file, regular
prompts for the names of items to be input cannot be
provided. There is, however, provision in the program
for items to be named. Such names, and the numbers to
be given to them are defined by a subsequent module—in
this module the item name can be attached to an item by
first of all entering the symbol followed by the number
previously given to the desired type name.
Commentary
Lines 13100-13140: If an entry begins with the ‘J’ symbol then the
characters following it are taken to be the number of an item name to be
attached to the item about to be input. The input prompt is now
repeated under that type name. The type number is stored at the end of
the item, its value increased by ten so that it will always be a two digit
number (there are 50 possible type numbers/names).
92
Page 95
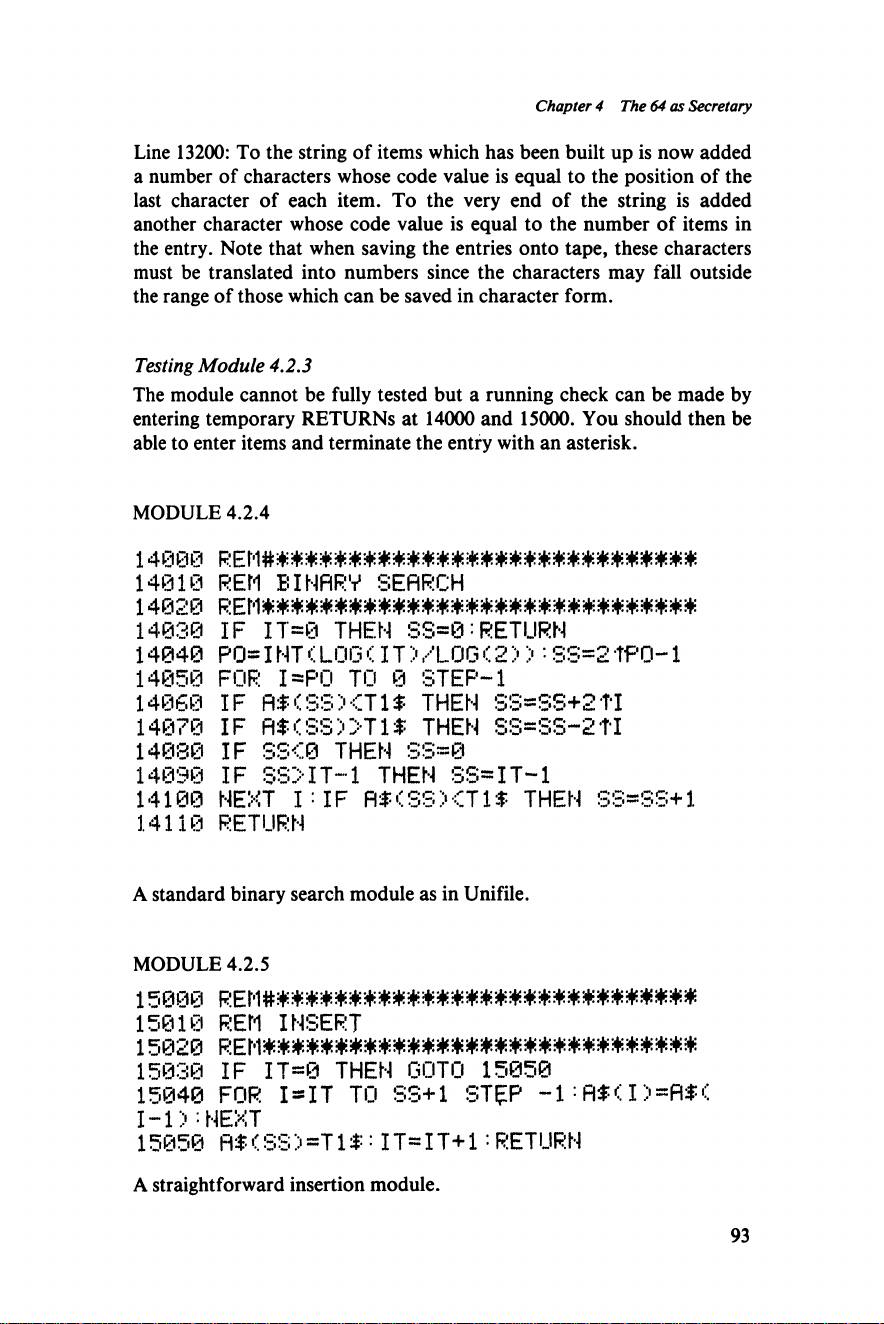
Chapter 4 The 64 as Secretary
Line 13200: To the string of items which has been built up is now added
a number of characters whose code value is equal to the position of the
last character of each item. To the very end of the string is added
another character whose code value is equal to the number of items in
the entry. Note that when saving the entries onto tape, these characters
must be translated into numbers since the characters may fall outside
the range of those which can be saved in character form.
Testing Module 4.2.3
The module cannot be fully tested but a running check can be made by
entering temporary RETURNS at 14000 and 15000. You should then be
able to enter items and terminate the entry with an asterisk.
MODULE 4.2.4
14080
14010
R E M # # # # # # ## # # ## # # ## # ## # # ## # # #* # # #
REM BINARY SEARCH
14020
14038
14040
14050
14060
14078
14080
14090
14100
14110
A standard binary search module as in Unifile.
MODULE 4.2.5
IF IT=0 THEN SS=0:RETURN
P0= I NT C LOG <: IT ) /LOG C 2 > > • SS=2 TP0-1
FOR I*P0 TO 0 STEP-1
IF At CSS X T It THEN SS=SS+2TI
IF A tC S S XT l t THEN SS=SS-2TI
IF SSC0 THEN SS=0
IF SS>IT-1 THEN SS=IT-1
NEXT I :IF A tC S SXT I t THEN SS=SS+1
RETURN
15000
15010
REM
INSERT
15020
15038 IF IT=0 THEN GOTO 15050
15040 FOR I*IT TO SS+1 STEP -l '-AtCI)
I-1 >:NEXT
15050 At C SS )=T 11 :1T=IT+1:RETURN
A straightforward insertion module.
93
Page 96
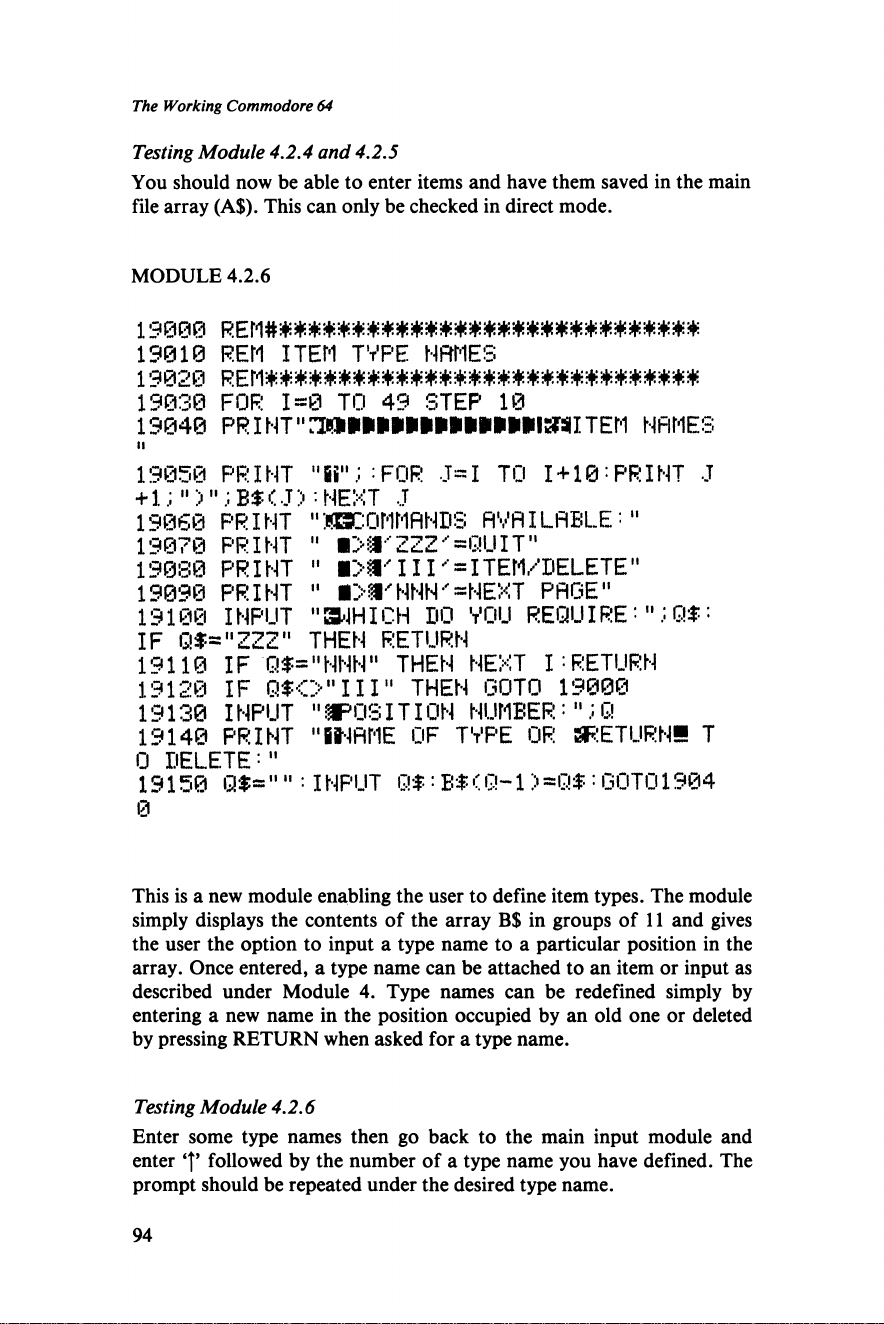
The Working Commodore 64
Testing Module 4.2.4 and 4.2.5
You should now be able to enter items and have them saved in the main
file array (A$). This can only be checked in direct mode.
MODULE 4.2.6
19000 R E m m m m m w m m m m m m m m m m
19010 REM ITEM TYPE NAMES
19030 FOR 1=0 TO 49 STEP 10
19040 PRINTll3M»*i»»»*»»»*»»*ISniTEM NAMES
II
19050 PRINT "ii";:F0R J=I TO 1 + 10:PRINT J
+ 1.;" >"; B$<J>: NEXT J
19060 PRINT "MBCOMMANDS AVAILABLE:"
19070 PRINT " Z2Z' =QUIT"
19080 PRINT " IIIITEM/DELETE"
19090 PRINT " «>SI'NNN'=NEXT PAGE"
19100 INPUT "8WHICH DO VOU REQUIRE:"; Q$:
IF Q$="ZZZ" THEN RETURN
19110 IF Q$="NNN" THEN NEXT I:RETURN
19120 IF Q$<>"III" THEN GOTO 19000
19130 INPUT "^POSITION NUMBER:";q
19140 PRINT "itlAME OF TVPE OR SRETURNH T
0 DELETE:"
19150 Q$="":INPUT Q$:B$(Q-1> = Q$:GOTO1904
0
This is a new module enabling the user to define item types. The module
simply displays the contents of the array B$ in groups of 11 and gives
the user the option to input a type name to a particular position in the
array. Once entered, a type name can be attached to an item or input as
described under Module 4. Type names can be redefined simply by
entering a new name in the position occupied by an old one or deleted
by pressing RETURN when asked for a type name.
Testing Module 4.2.6
Enter some type names then go back to the main input module and
enter followed by the number of a type name you have defined. The
prompt should be repeated under the desired type name.
94
Page 97
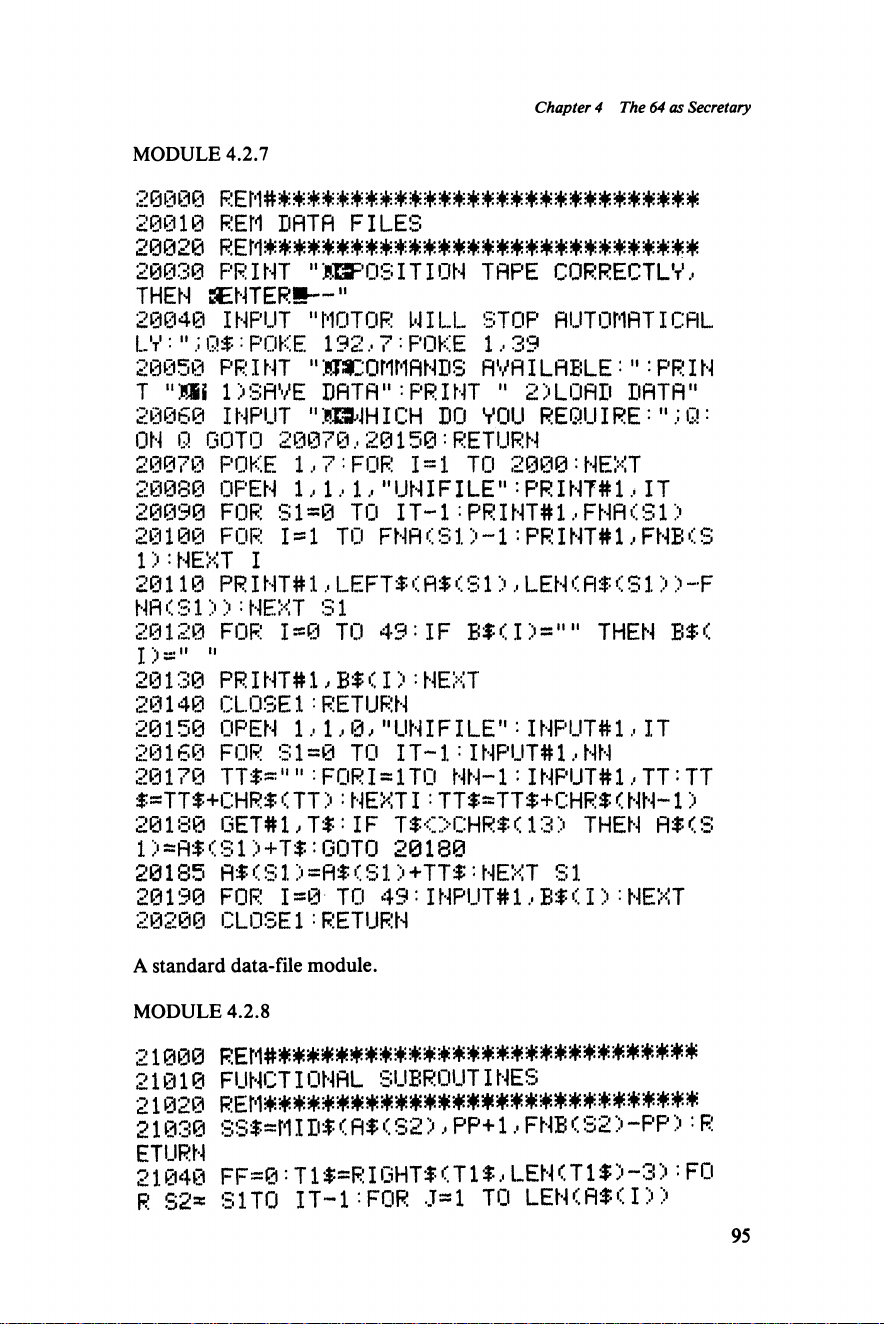
Chapter 4 The 64 as Secretary
MODULE 4.2.7
20 0 00 REM #***«*««*** * * *i(E***3|(* * *****3K*« *
20010 REM BATA FILES
20030 PRINT "MSPOSITION TAPE CORRECTLY,
THEN SENTERS— "
20040 INPUT “MOTOR WILL STOP AUTOMAT ICFIL
LV:";Q*:POKE 192,7 = POKE 1,39
20050 PRINT "^COMMANDS AVAILABLE:":PRIN
T um 1)SAVE DATA":PRINT " 2>LORD DATA"
20060 INPUT "MEWHICH DO YOU R E Q U I R E Q =
ON Q GOTO 20070,20150:RETURN
20070 POKE 1,7:FOR i = i JO 2000:NEXT
20080 OPEN 1,1,1,"UNIFILE":PRINT#1,IT
20090 FOR S1=0 TO IT—1:PRINT#1,FNA(S1>
20100 FOR 1 = 1 TO FNA0B1>-1: PRINT# 1,FNB-::S
1>:NEXT I
20110 PR I NT# 1, LEFT* < A$ < S 1 > , LEN R$ < S 1 > > -F
NR (SI>'):NEXT SI
20120 FOR 1=0 TO 49 :IF B* <I)="M THEN B$<
I ) = " "
20130 PRINT#1,B$ <1> =NEXT
20140 CLO SE1:RETURN
28150 OPEN 1,1,0,"UNIFILE":INPUT#1,IT
20160 FOR S 1=0 TO IT-1:INPUT#1,NN
20170 T Tf="":FORI=1TO N N- 1:INPUT#1,T T :TT
$=TT $+CHRfiTT > :N EX TI :TTt=TT$+CHR$(NN -1>
20180 GET# 1,T $ : IF T $O CH R$ <1 3> THEN A$<S
1> =A$<S 1> + T $:GOTO 20180
20185 A *<S1)=A$ <S 1> + T T$ :NEXT S 1
20190 FOR 1=9 TO 49: 1NPUT#1,Bf <I):NEXT
20200 CLOSE1:RETURN
A standard data-file module.
MODULE 4.2.8
21000
21010 FUNCTIONAL SUBROUTINES
21020
21030 SS$=M I Ii$ < A$ < S2 >, PP +1, FNB C S2 ) -PP) : R
ETURN
21040 FF=0:T1$=RIGHT$<T1$,LEN < T1$)-3):FO
R S2* SITO IT-1:FOR J=1 TO LEN<A$<I)>
95
Page 98
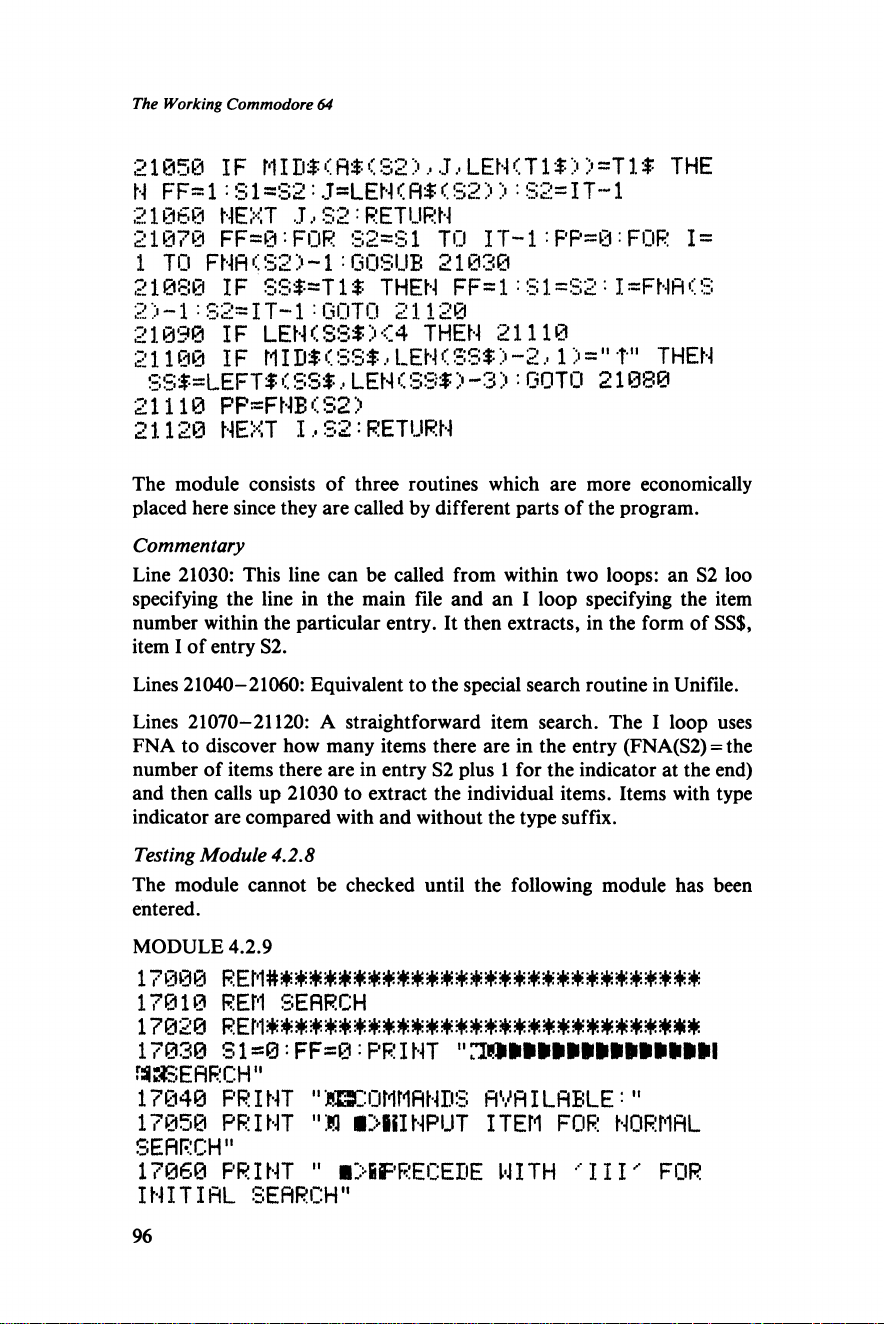
The Working Commodore 64
21050 IF MIn$(m <S2>, J, LENCT1 $> > =T 1 $ THE
N FF=1-SI=S2:J=LEN(fl$(S2>):S2=IT-1
21060 NEXT J , S2: RETURN
21070 FF=0•FOR S2=S1 TO IT-1:PP=0:FOR 1=
1 TO FNfl <: S2 > -1 '■ GOSUB 21030
21080 IF SS$-T1$ THEN FF=1:S1=S2•I*FNFKS
2> -1:82= IT-1 :GOTO 21120
21090 IF LEN<SS*X4 THEN 21110
21100 IF MID#1'SS$,LEN<SS$>-2,1) = " T" THEN
SS$=LEFT$(SS$, LENCS 3 * )-3) '■ GOTO 21080
21110 PP=FNB<S2>
21120 NEXT I,S2:RETURN
The module consists of three routines which are more economically
placed here since they are called by different parts of the program.
Commentary
Line 21030: This line can be called from within two loops: an S2 loo
specifying the line in the main file and an I loop specifying the item
number within the particular entry. It then extracts, in the form of SS$,
item I of entry S2.
Lines 21040-21060: Equivalent to the special search routine in Unifile.
Lines 21070-21120: A straightforward item search. The I loop uses
FNA to discover how many items there are in the entry (FNA(S2) = the
number of items there are in entry S2 plus 1 for the indicator at the end)
and then calls up 21030 to extract the individual items. Items with type
indicator are compared with and without the type suffix.
Testing Module 4.2.8
The module cannot be checked until the following module has been
entered.
MODULE 4.2.9
17010 REM SEARCH
17020 re m$******
17030 S1 =0: FF=8 : PR I NT 11
S E A R C H "
17040 PRINT "JPESC0MMANDS AVAILABLE • "
17050 PRINT "W ■>iiINPUT ITEM FOR NORMAL
SEARCH"
17060 PRINT " l>fiF'RECEIiE WITH ' I I I ' FOR
INITIAL SEARCH"
96
Page 99
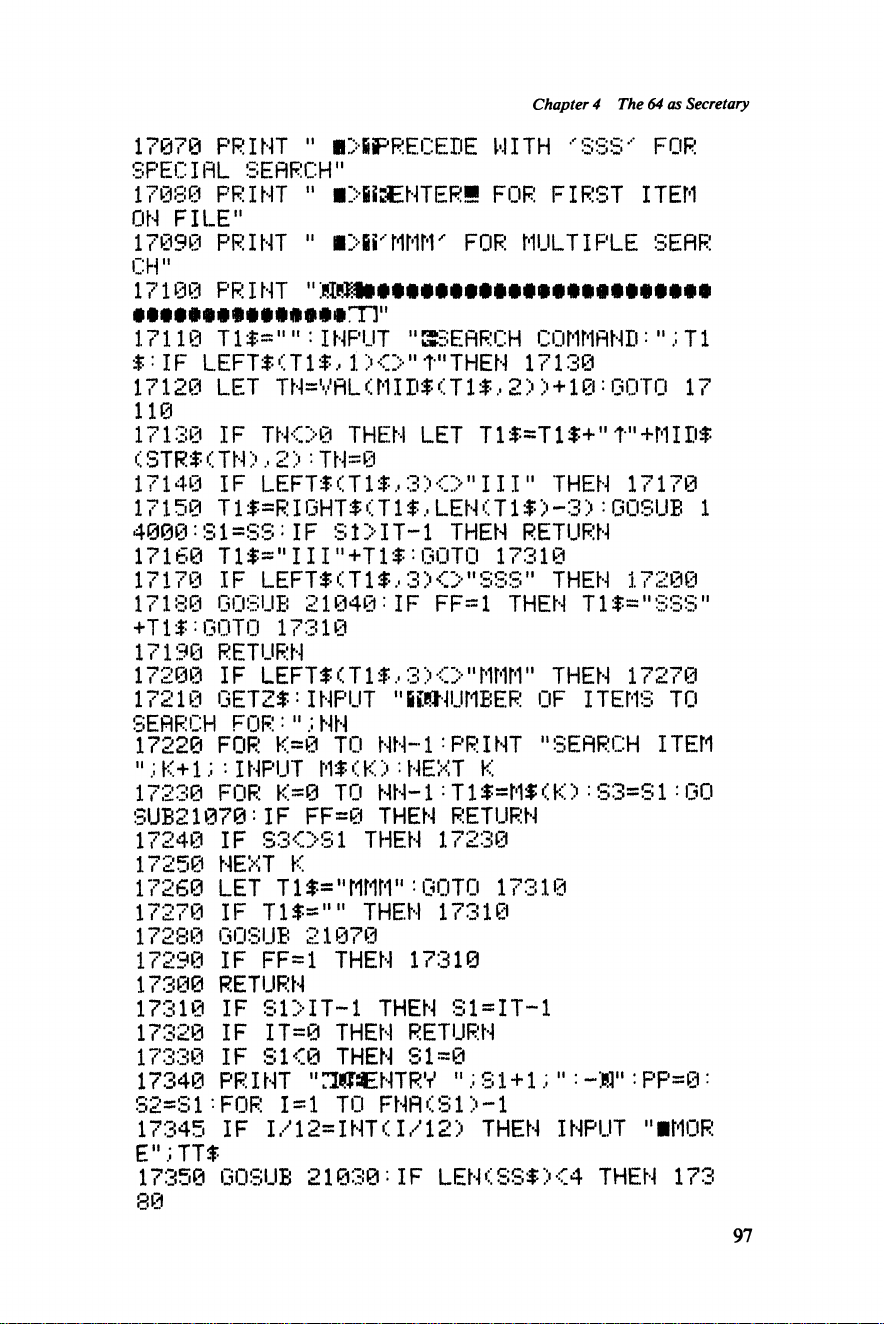
Chapter 4 The 64 as Secretary
17070 PRINT " i>iFRECEDE WITH 'SSS' FOR
SPECIAL SEARCH"
17080 PRINT " iMISENTERB FOR FIRST ITEM
ON FILE"
17090 PRINT " Oii'MMM' FOR MULTIPLE SEAR
CH"
17100 PRINT
17110 Tl#= "" INPUT " ESSE ARCH COMMAND = "; T 1
I - IF L E F T # T 1 $, 1 ;■ O " V 'THEN 17130
17120 LET TN=VA L(MID #<T 1 #, 2)> + 10-GOTO 17
110
17130 IF T N O 0 THEN LET T1#=T1#+" f"+HIH#
<5TR#(TN>,2> ■TN~0
17140 IF LEFT# C T 1 # .• 3>O " I I I" THEN 17170
17150 T 1#=RIGHT# <T1#,LE N(T 1*>-3>:GOSUB 1
4000:S 1= S S:IF S 1>IT-1 THEN RETURN
17160 T l#="III"+T1# :GOTO 17318
17170 IF LEFT#<T 1 # .■ 3>O "S SS" THEN 17200
17180 GOSUB 21840: IF FF=1 THEN T1#="SSS"
+T1 #:GOT0 17318
17190 RETURN
17200 IF LEFT#<T 1 #.• 3><>"M MM" THEN 17270
17210 GETZ#: INPUT " SL U MB E R OF ITEMS TO
c;EfiRf‘H FfiR : 11 i HN
17220 FOR K=0 TO N N- 1=PRINT "SEARCH ITEM
";K+1;:INPUT M# < K >:NEXT K
17230 FOR K=0 TO N N- 1 :T 1#-M #<K ):S 3= S 1:GO
SUB21 070:IF FF=8 THEN RETURN
17240 IF S 3 0 S 1 THEN 17230
17250 NEXT K
17260 LET T1#="MMM":GOTO 17318
17270 IF Tl#="" THEN 17310
17288 GOSUB 21078
17298 IF FF=1 THEN 17310
17308 RETURN
17318 IF S 1>IT~1 THEN S1=IT-1
17320 IF IT=0 THEN RETURN
17330 IF S K 0 THEN S1=0
17340 PR I NT " n W C NTR V "; S 1 + 1 " : -W" : P P= 0 :
52*31:FOR 1=1 TO FNACSl>-l
17345 IF I/12=INT<1/12) THEN INPUT "iMOR
E"TT#
17358 GOSUB 21030 -IF LEN < SS # X4 THEN 173
80
97
Page 100
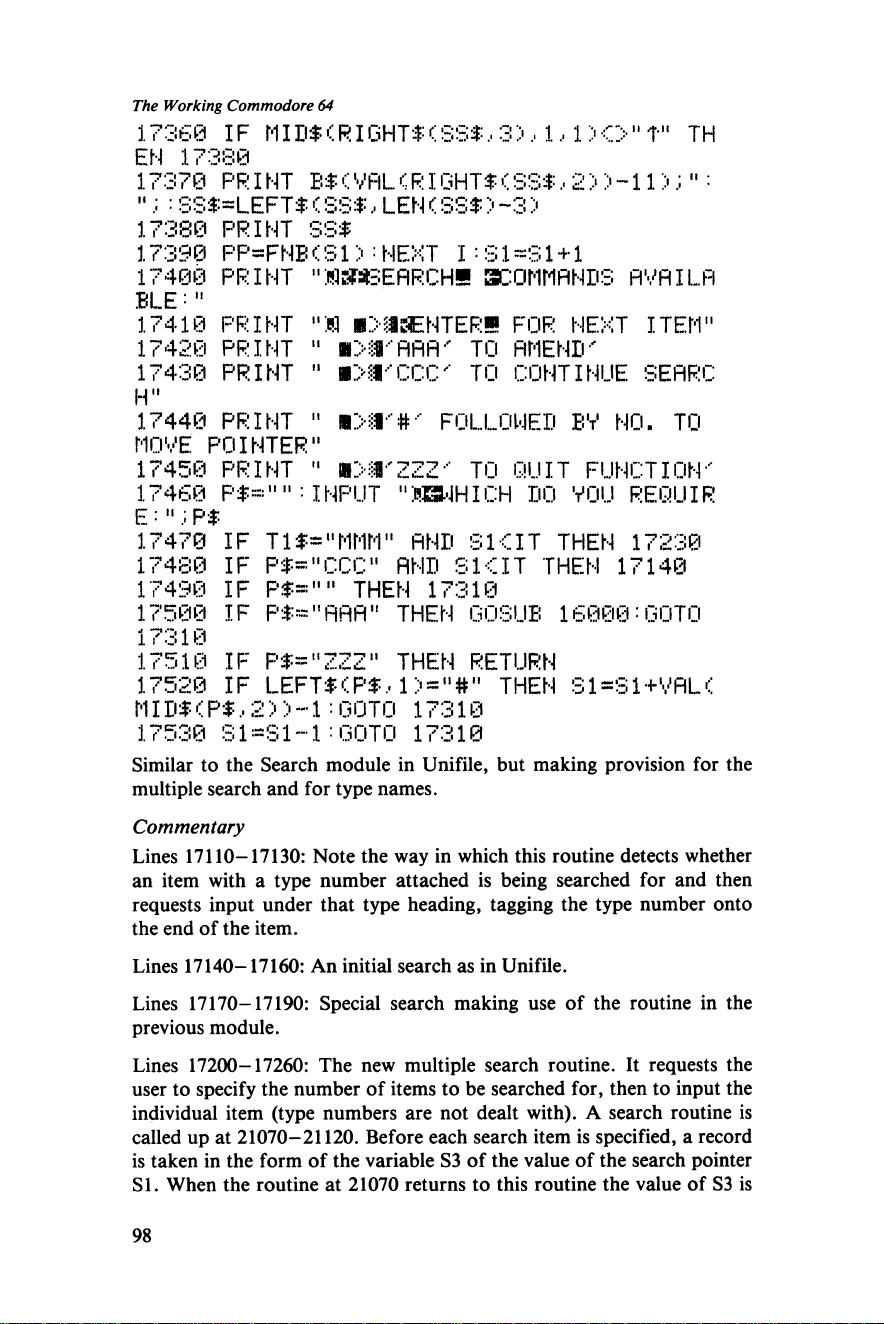
The Working Commodore 64
173 60 IF MID $(R I GH T$ < SS$, 3>, 1, 1 ) O " t" TH
EH 17 380
17370 PR I NT B$ CVFlL < RI GHT $ < SS$ .■ 2 )) -11 >; " :
"; : SS$=LEFT* ( SS*, LEN (SS$) -3 >
17380 PRINT SS$
17390 PF'=FNB < S1 > = NEXT I -SI =S 1 +1
17400 PRINT "MSWSEflRCHS SCOMMANDS AVAILA
BLE =11
17410 PRINT "ffl i>lSENTERS FOR NEXT ITEM"
17420 PRINT " ■>:£-■ AAA' TO AMEND-'
17430 PRINT " i>fTCCCx TO CONTINUE SEARC
H11
17440 PRINT " FOLLOWED BV NO. TO
MOVE POINTER"
174 50 PR I N T " «>:I'ZZZ-' TO QU I T FUN C T I O N "
174 60 P $="" : INP UT "H WHIC H D O YOU R E QUI R
E : " ; P$
17470 IF T1 $="MMM" AND SKIT THEN 17230
17480 IF P$*"CCC" AND SKIT THEN 17140
17490 IF P $ ~ u " THEN 17310
17500 IF P$="ARA'‘ THEN GOSUB 16000: GOTO
17310
17510 IF P$="ZZZ" THEN RETURN
17520 IF LEFT*<P$, 1 THEN S1=S1+VAL(
MI D$ (P$, 2 > > -1 •• GOTO 17310
17530 Sl-Sl-l:GOTO 17310
Similar to the Search module in Unifile, but making provision for the
multiple search and for type names.
Commentary
Lines 17110-17130: Note the way in which this routine detects whether
an item with a type number attached is being searched for and then
requests input under that type heading, tagging the type number onto
the end of the item.
Lines 17140-17160: An initial search as in Unifile.
Lines 17170-17190: Special search making use of the routine in the
previous module.
Lines 17200-17260: The new multiple search routine. It requests the
user to specify the number of items to be searched for, then to input the
individual item (type numbers are not dealt with). A search routine is
called up at 21070-21120. Before each search item is specified, a record
is taken in the form of the variable S3 of the value of the search pointer
SI. When the routine at 21070 returns to this routine the value of S3 is
98
 Loading...