

sunsei SolarCharger 4000, SolarCharger 6000, SolarCharger 8000 Operating Instructions Manual
Page 1
SOLARCHARGER
PRODUCT DESCRIPTION
SolarCharger 4000:
1 Sunsei™ Solar Module 4A, 16.5V (65W)
1 Power cable, AWG12 gauge, 10 feet
4 Standard stainless steel “S” mount brackets,
with accessories
SolarCharger 6000:
1 Sunsei™ Solar Module 6A, 16.5V (100W)
1 Power cable, AW G12 gauge, 10 feet
4 Standard stainless steel “S” mount brackets,
with accessories
SolarCharger 8000:
1 Sunsei™ Solar Module 8A, 16.5V (130W)
1 Power cable, AWG12 gauge, 10 feet
6 Standard stainless steel “S” mount brackets,
with accessories
4000/6000/8000
Operating Instructions
Important Note:
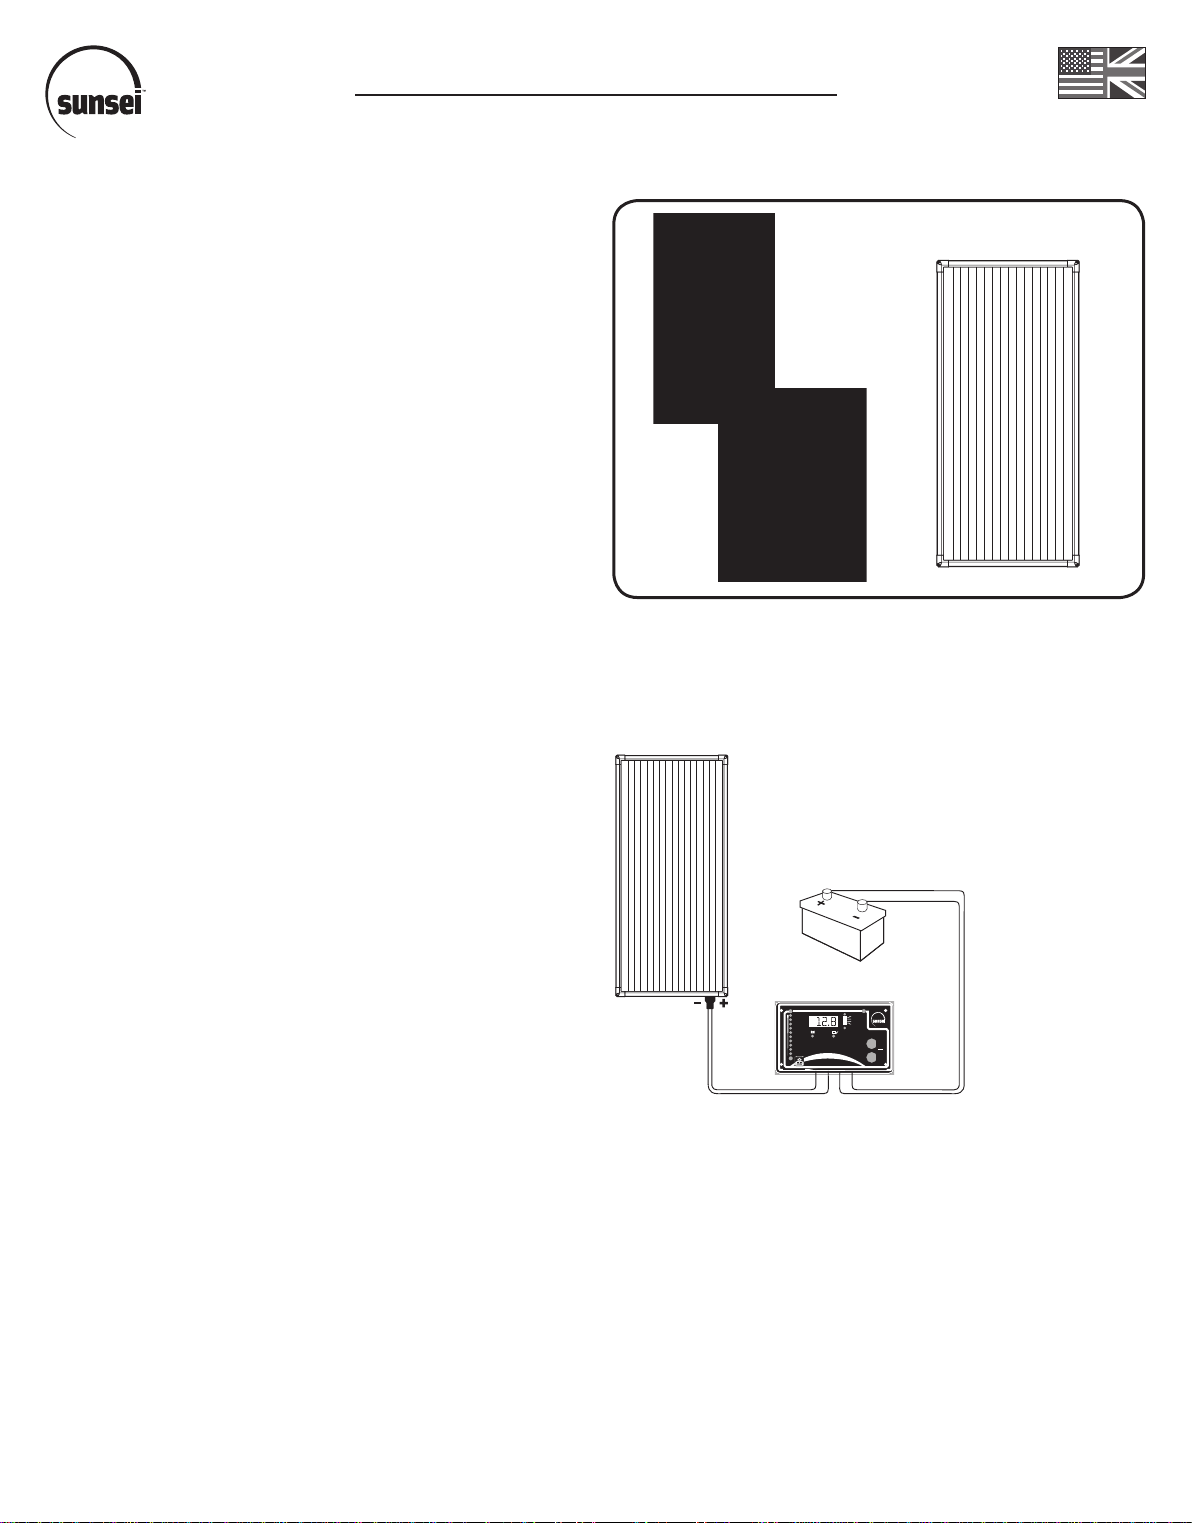
Controller with the SolarCharger 4000/6000/8000 to protect
your battery from overcharging and optimize the charging
process.
“S” mount brackets
SolarCharger
Power cable
It is essential to use a Sunsei™ Charge
IMPORTANT!
Please read the instructions before operating.
• When working around batteries and other electrical equip
ment, please observe industry standard and manufacturer’s
safety procedures.
• Install solar charger in low light conditions to reduce the risk
of electrical sparking.
• Make connections in a well-ventilated area free from
ammable gases or vapors.
• For 12V systems, ALL connections should be in PARALLEL:
Positive (+) to Positive (+), Negative (-) to Negative (-).
• DO NOT attempt to recharge NON-RECHARGEABLE
batteries.
• Always CONNECT the charge controller to the battery FIRST.
• When disconnecting your solar panel DISCONNECT the
battery LAST.
• Do not connect the solar panel directly to the battery
without using a Sunsei™ Charge Controller.
• Fuse wires extending from the battery to protect against
battery short circuits.
-
Sunsei™ Charge Controllers
(available for purchase separately):
Charge Controller
DIGITAL SOLAR POWER C ONTRO LLER / CHA RGER
CC10000:
CC20000D
B
A
mo
T
c
.r
T
a
E
l
os
R
i
Y
e
s
nus
.w
w
w
Two-step charging, overcharge protection; used in
BATTERY VOLTAGE
ARRAY CURRENT
CHARGE SET-POINT
BATTERY VOLTAGE
GOOD
(BAR-GRAPH OFF)
CHARGING
CHARGED
OK
W
LO
VERY LOW
icpsolar.com
www.
BATTERY AND
ARRAY FUSE
ON BACK
UNIT MAY
BE WARM
DURING
OPERATION
systems up to 10A capacity (150W).
CC20000D:
Overcharge protection; used in systems up to
20A capacity (300W) with digital LCD for voltage and current
outputs & LED battery condition indicator.
CC25000:
Two-step charging, overcharge protection; used
in systems up to 25A capacity (390W) with battery voltage
indicator and reverse polarity protection.
If the vendor from whom you have purchased this solar
panel does not carry Sunsei™ Charge Controllers, please visit
www.sunseisolar.com
for a dealer near you.
Page 2

SOLARCHARGER
Operating Instructions
4000/6000/8000
INStallatIoN
Step 1: poSItIoNINg
Select a location where your solar panels will get maximum
daily sunshine exposure avoiding any shade. This may be on
the roof or exterior walls of homes, cabins, RVs, etc. Ideally,
try to have your panel facing perpendicular to the strong
midday sun, between 10AM and 2PM.
Step 2: MouNtINg
Choose a solid and supportive mounting surface, capable of
withstanding all expected loads, including the weight of the
solar panel as well as those imposed by wind and snow.
FIg. 1 -
screws and bolts provided. Use at least one bracket on every
side of the panel.
FIg. 2 -
Tighten screws to secure brackets to frame.
FIg. 3 FIg. 4 - Using screws provided, secure solar panel to surface
selected in step 1.
Attach “S” mount brackets to solar panel frame using
Position brackets on frame by sliding along track.
Connect power cable to solar panel connector.
1. 2.
Step 3: MultI-paNel CoNNeCtIoN
If you have more than one SolarCharger 4000/6000/8000
panel, simply connect the Plug’n’Play® corner of one panel to
the next using the quick-connect cable (SKU#10222, available
for purchase separately). Observe steps 1 and 2 when mount
ing additional panels.
Step 4: Charge CoNtroller to Battery
CoNNeCtIoN
Place the charge controller in a cool, dry and well ventilated
area that can be easily accessible, usually around the bat
tery compartment or in the cabin area. Connect the charge
controller’s output or BATTERY+ Negative (black or -) connec
tion to the Negative (-) terminal of the battery. Next, connect
the controller’s output or BATTERY Positive connection (red
or +) to the Positive (+) terminal of the battery.
WarNINg! reVerSe CoNNeCtIoN to the Battery
IS a FIre haZarD. It May DaMage your Solar
Battery Charger. pleaSe oBSerVe proper
polarIty. CoNSult your SuNSeI™ Charge
CoNtroller INStruCtIoN MaNual.
Step 5: Charge CoNtroller to paNel
CoNNeCtIoN
First, connect the power cable to the charge controller’s input
or “Solar Panel / Array” connection. Start by connecting the
black negative (-) wire of the power cable to the charge
controller’s Negative (-) connection. Then, connect the red
positive (+) wire of the power cable to the positive (+) con
nection of the controller. Second, plug in the quick-connect
side of the cable to your solar panel’s quick connect port.
-
-
-
-
3. 4.
NOTE: For more details on the charge controller operation,
consult the controller instructions included with your Sunsei™
charge controller (available separately).
NOTE: Remove yellow wire protector caps prior to connecting
to a Sunsei™ charge controller.
Page 3

trouBleShootINg
If your SolarCharger 4000/6000/8000 panel does not seem
to be performing properly, start by addressing the following
points:
1. Inspect connections for any sign of corrosion or loose
wires. All connections for a 12V system should be in parallel,
meaning positive (+) to positive (+), negative (-) to negative (-).
2. Test the panel’s open circuit voltage (Voc). To reduce risk
of sparking, cover the panel before disconnecting it from the
battery. Using a well-calibrated voltmeter, measure the open
circuit voltage (Voc) across the positive (+) and negative (-)
o-ring terminals. You should measure between 19V to 24V DC
under FULL sunny conditions.
3. Test the panel’s output current between it and the battery.
Connect the panel’s negative wire to the battery and insert a
DC amp meter with sufcient rating for the expected panel
output between the positive wire of the panel and the posi
tive post of the battery. You should get a reading close to the
panel’s peak operating current, depending on sunlight condi
tions.
4. Verify the condition of the battery. Over time, a battery will
lose its ability to recharge, especially after repeated heavy
cycles of charge and deep discharge. Contact your battery’s
manufacturer for more detailed guidelines on battery testing.
5. Make sure your system is properly sized for your power
needs. Please refer to the Application Chart for a guideline of
what can be powered by your SolarCharger 4000/6000/8000
panel. If additional assistance is required for sizing your
system, please contact our Technical Support Department at
FreQueNtly aSKeD QueStIoNS (FaQ)
Q1: Can I connect my SolarCharger 4000/6000/8000 solar
panels together WITHOUT the panel-to-panel connector
cable?
No. The panel-to-panel connector cables are designed
a:
specically for Sunsei™ SolarCharger panels. Without them,
you risk a poor or inversed connection.
.
-
-
Q2: What type of batteries can I recharge?
You can recharge all types of 12V batteries including
a:
lead-acid automotive batteries, deep cycle (traction type)
batteries, gel-cell batteries, and heavy-duty (stationary type)
batteries. When using the SolarCharger 4000/6000/8000 to
run appliances on a regular basis, we recommend the use of
deep cycle marine batteries, which are designed to withstand
frequent charge and discharge cycles.
Q3: How long will it take my SolarCharger 4000/6000/8000 to
recharge a dead battery?
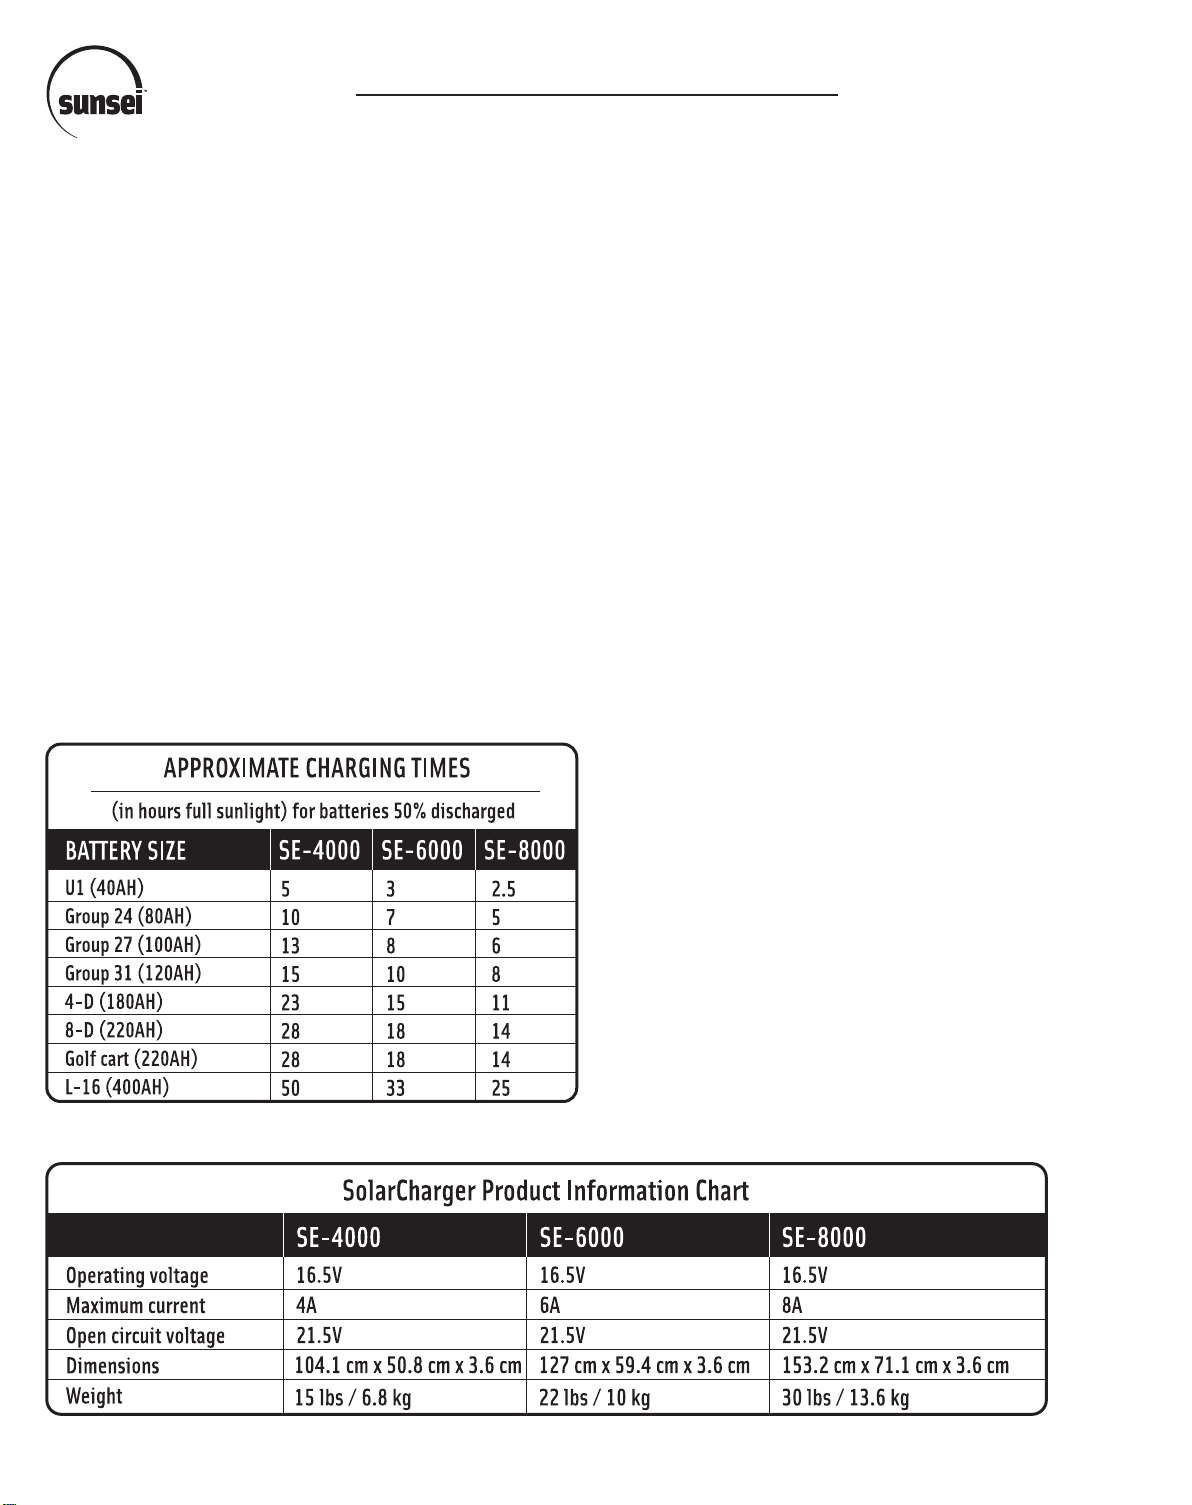
Please refer to the Approximate Charging Times chart.
a:
Q4: Can I charge more that one battery at the same time
using the SolarCharger 4000/6000/8000?
Yes, the charge can be applied to a bank of batteries.
a:
When attached to a bank of two or more batteries, the total
power input will be divided into that number of batteries.
The higher the number of batteries, the longer it will take to
recharge the battery bank.
Q5: Can the SolarCharger 4000/6000/8000 drain my battery
at night?
Once a Sunsei™ Charge Controller is installed, there is no
a:
danger of reverse current so you can leave your SolarCharger
installed overnight.
Q6: Without a Sunsei™ Charge Controller, can the
SolarCharger 4000/6000/8000 overcharge my battery?
Yes, that is why it is important to install a charge
a:
controller between the solar panel and the battery.
connect the charger directly to the battery.
Q7: Can I run my 110V appliances using my SolarCharger
4000/6000/8000 panels?
Not directly. But it is possible to run your 110V appliances
a:
with the use of an inverter (purchased separately) that will
change the battery’s 12V (DC) output into 110V (AC) power.
Q8: Can I extend my wiring?
Yes. You can extend the wiring of 8A (135W) or less solar
a:
panels using AWG12 within 20 feet. For longer distances or
higher currents, higher gauge wire with a smaller AWG
number can be used.
Do not
Page 4
SOLARCHARGER
Operating Instructions
4000/6000/8000
FreQueNtly aSKeD QueStIoNS (FaQ)
Q9: Can my SolarCharger 4000/6000/8000 be left outdoors
without protective covering?
Yes. The SolarCharger 4000/6000/8000 panels have been
a:
weatherproofed and can be mounted outdoors, with the
Sunsei™ charge controller kept indoors.
Should I disconnect my SolarCharger 4000/6000/8000
Q10:
from the battery when I start my vehicle’s engine or while
recharging with an auxiliary power source?
No. It is safe to leave your SolarCharger 4000/6000/8000
a:
panels connected to your vehicle’s battery when starting the
engine or when charging through an auxiliary power source.
The charger will not be damaged nor will it interfere with
on-board electronics.
WarraNty
ICP Solar Technologies grants the original purchaser of the
Sunsei™ SolarCharger 4000/6000/8000 a 20-year warranty
on the power output and a 2-year warranty on the materials of the module. ICP guarantees that the unit will produce
a minimum 80% of its original minimum power rating for the
Warranty Period from the purchase date. ICP warrants the
module to be free from defects in materials and workmanship
under normal applications, installation, use and service conditions for the Warranty Period from the purchase date. ICP will,
at its option, either repair or replace the product if it becomes
inoperable due to a defect in material or labor during the
Warranty Period. This warranty does not cover installation
or costs derived thereof. ICP shall not be responsible for any
costs due to removal, shipment, re-installation or any other
loss due to warranty servicing. The maximum liability to ICP
under this warranty shall not exceed the purchase price of this
module. This warranty does not cover any module that has
been damaged by misuse, neglect, improper installation or
acts of God, including lightning, oods, earthquakes, re and
high winds. This warranty does not cover accessories included
with the product. This warranty does not cover product that
is broken after purchase. ICP shall not be responsible for any
damage to persons or property caused by improper installation, misuse or improper handling of this product. Some
states do not allow exclusion or limitation of accidental or
consequential losses so the exclusions may not apply to the
purchase. This warranty gives you specic legal rights and you
may have other rights, which vary from one state (or province) to another. Please note that ICP will not accept returns
without prior authorization. The original proof of purchase is
required for warranty validation.
Warranty for accessories: A 2-year warranty is given on
accessories such as, but not limited to, cables included with
the product. The warranty applies from the original purchase
date.
 Loading...