

SR-P-01 3D SCANNER
USER MANUAL
V 0.0.1
SUNRUY TECHNOLOGIES CO.,LTD.

1
1. Introduction
1.1 What includes
3D scanner: 1pc
Drive and software disk: 1pc
1.2 Features
VGA(640*480): 30fps, QVGA(320*240): 60fps
USB 2.0
Size: about 18*3.5*5cm
Output color models available
Visual angel: horizontal 58º,vertical 45º,across corners 70º
Max. Power: Less than 2.5W
Scanning distance: 0.4-3m

2
2. Software installation
2.1 Installation
1、Install 3D scanning driver
Install the right drivers based on your computer: Win 32 or Win64.
2. Install software
A. Double click “Skanect-1.5.0-win64.exe” to install original program. And tick all
plug-in units to install in your computer. Please do not run the program after installation
finished.
B. Copy the file” Skanect.exe” in the folder of “Patches”, then paste in software
install directory : C/Program Files/Skanect.1.5/bin, and replace the exist file.
C. Replace the file” Skanect.ini” (in the file “Patches” ) to your directory:
\Users\YourUserName\AppData\Roaming\ManCTL.
Note: If not sure the exact path of this file, please search in C , and then find the
location of the file “ Skanect.ini”, and replace the file by “ Skanect.ini” in the folder of
“ Patches”.
D. Finish and connect the scanner to your computer by USB.
3
3 Operation
3.1 Scanning operation
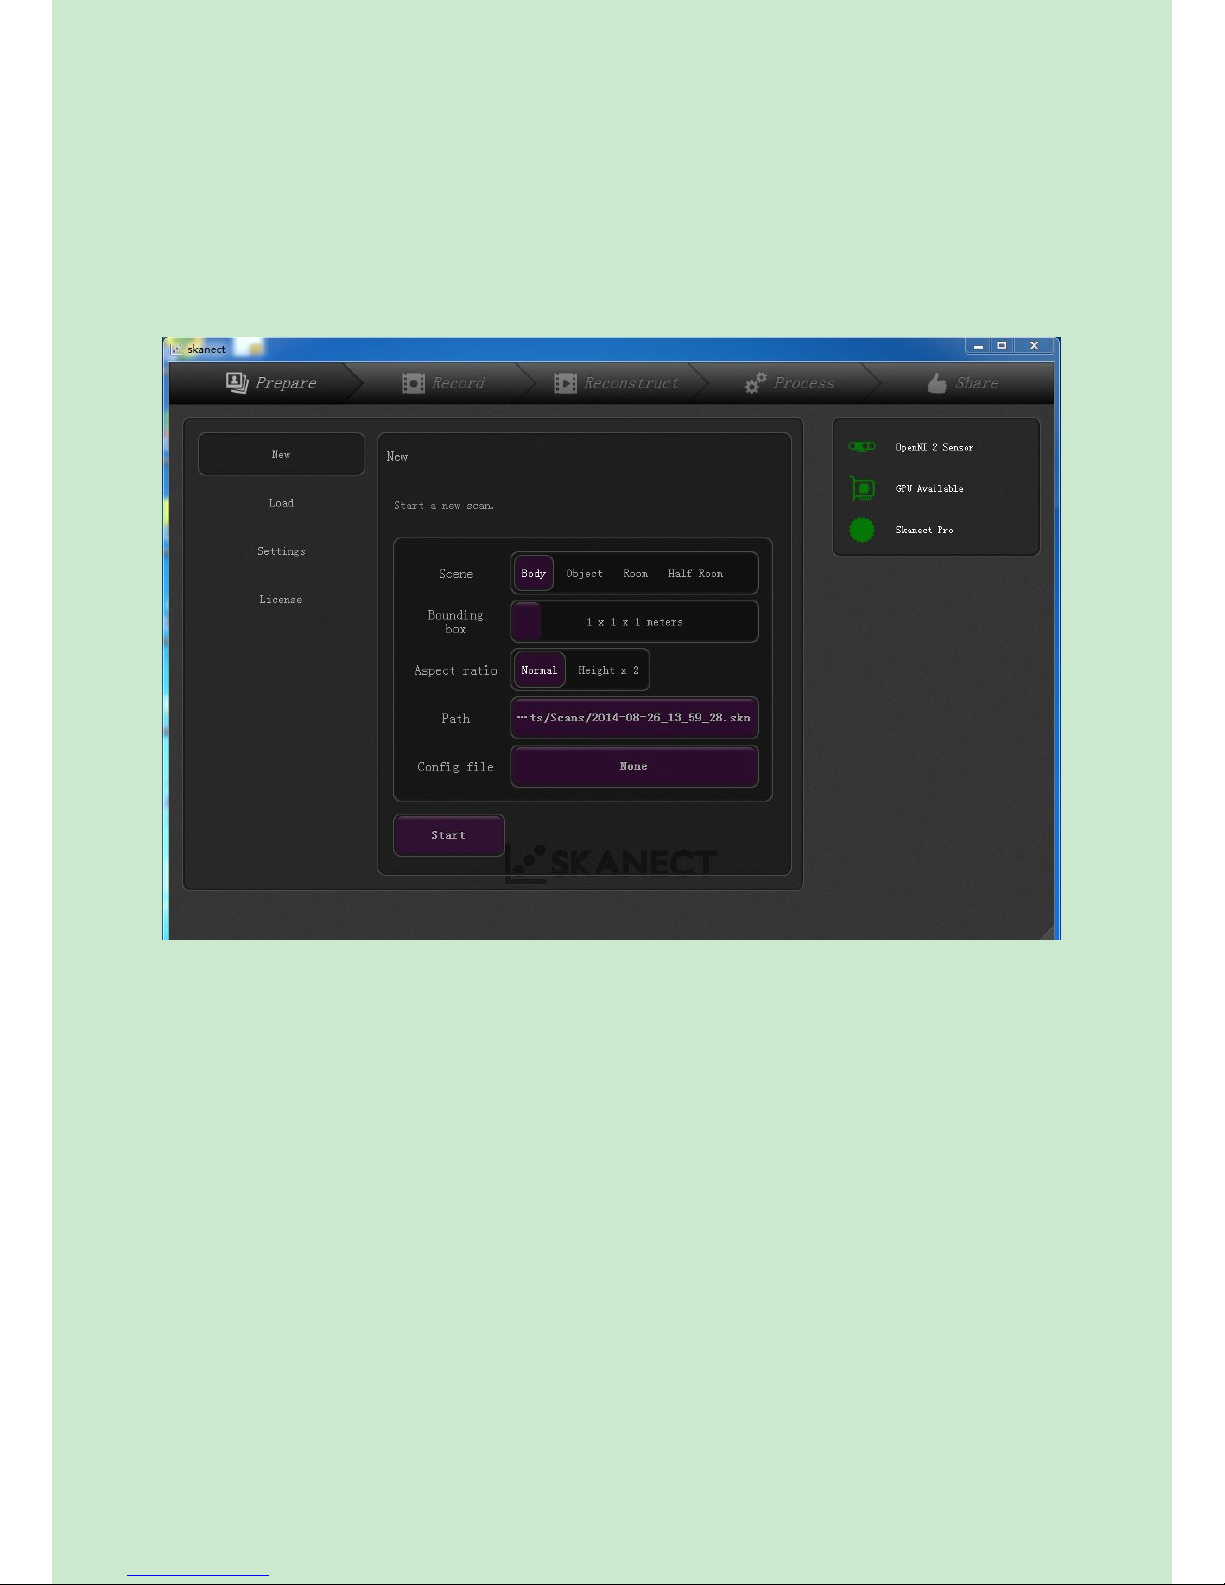
1、Connect Scanner to your computer by USB, run Skanect.exe, then show as below:
Prepare: settings before scan
Record: Start and stop scanning
Reconstruct: reconstruction and repair after scanning
Process: processing after scanning and reconstruction
Share: export scanning file and share to other equipments
In the right up corner:
OpenNI 2 Sensor : the small icon in green means scanner connected normally. If in red,
means the scanner not connected with your computer.
GPU Available: Only shows green when your display card is NVIDIA and the version is
CUDA2.0 up. The scanner can runs normally even it shows red. The time for rendering (or
recording) will be faster if showing in green.
Skanect Pro: Logo for Skanect professional version.
New: Select the right Scene and bounding box according to the object you want to scan.In
bounding box, you can choose 1x1x1meter for half body, and choose 2x2x2meter for full
body scanning.
Other setting need not change.

4
Setting:
Recording feedback: Choose GPU if available. If not, choose CPU.
Feedback Quality: select the one you need.
Offline Recording: recommend choose Key Frames
Track Loss Detection: recommend choose On
Log File: Open Log File
Remember to click “Save” after setting.

5
3.2. Start scanning preparation
a. Click it to start scanning.
b. Count down time before start scanning.
c. If choose None, you need to stop scan manually. Or you can set the time for scanning.
d. Real scene window
e. Recognize object scene window
f. Model after scanning
g. Delete scanning . You must delete the model if you think it is not good and want to start
a new scanning.
h. Scanning preview.
Preview rotate: press the mouse left key, and move to any direction you want.
Preview scale: press the mouse left key, and move front and backward
Preview move: press the mouse middle key, and move to any direction you want
i. Click to reset orientation
Note: The scanning distance must be more than 60cm and less than 4meters. And
guarantee there is no other things disturbing scanning.
a
b
cde
f
g
h
i

6
3.3 Starting scanning
Tips: 1. How to get a good scan model?
The best way is to use rotating table and lifting table.
Put the target object or person standing on the rotating table, while the scanner fixed
on the lifting table. The scanner will scan the object one time after the rotating table rotate
one circle slowly. Then lift or down the scanner and continue scanning. Normally, you need
scan three times (up, middle and down) for complete body portrait scanning.
During scanning, when the part became white (not green or red), that means the
scanning object offset the original location. You need to move back the original location or
resume a new scan.
Stop Scanning
Green part: scan and rendering finished.
Red part: scan finished, but render not finished
Scan object
or body
Rotating table
scanner
Lifting table

7
2. Do not wearing glasses during scanning.
3. You can scan more times until get the satisfied model.
4. Keep the circumstance clean, without other small articles
3.4 Reconstruct
You can start reconstruct when you get the satisfied model.
Select the right processor and fidelity, then click “ Run” . It will start reconstruct the model.
You can click “ Run” in “Reset” to disregard the interferents. Your need wait for some time
for this reconstruction.
These keys are using to adjust the bounding box edge. Please
guarantee the scanning object must located within the box.

8
3.5 Process
Click “Process” after reconstruct is finished.
1. Mesh
Reset : Revoke the mesh process.
(e.g. When over watertight make the model not real, you can click Reset to clear)

9
Watertight: Normally choose Low for smoothing. Then click “Run”
2. Geometry
Simplify: It will reduce the faces of model, make the file smaller but down the precision.

10
Fill Holes: Fill holes and repair surfaces. Select the right one for Strategy, and Low for
Smoothing. After fill holes, the scanned models became a solid model.
Move and Crop: Rotate and translate. Rotate the model centered on every axises.

11
Remove Parts: Remove parts smaller than a percentage of the biggest model part. You
can set the parameter according to your needs.
Color:
Colorize: The model will show in color if you click “On” in “Inpaint Colorless.
Remove Color: remove the parts with color.
Remove Colorless: remove the parts without color.

12
3.6 Share
You can export the model when the process finish.
Lcocal: save to the computer in Skn file.
Export Model: Export model in Ply, Obj or STL file. (Recommend to export in OBJ file,
thus the model can be edit in other softwares.)
Web and 3D print: seldom use.
 Loading...