

Sunrise System SRS 320 User Manual

Sunrise System Light Box
www.morningsunrise.com
Sunrise System - the natural, stress free way to wake up
SRS 320
R
3
2
In This Guide
Introduction 3
Product features 3 - 4
Important safety information 4
Sunrise System LCD display layout 4
Setting up the Sunrise System 320 5 - 8
Buttons 5
Programming table 9
Troubleshooting tips / Customer Support 9 - 10
Warranty, compliance and technical specifications 10
French user guide 11
Spanish user guide 21
German user guide 30
Sunrise System 320
Introduction
Thank you for purchasing the Sunrise System 320 Light Box, this is the only light box which
includes a Sunrise System Dawn Simulator. In addition to the benefits of up to 10,000 Lux from
the bright LED panel, you will now be able to enjoy the health and relaxation benefits of a Sunrise
System Dawn Simulator which is one of the most natural and stress free ways of waking, year
round. The Sunrise System can be set to imperceptibly simulate a sunrise and sunset.The sunrise
brightens the room gradually, gently waking the sleeper and the sunset slowly dims the room,
helping the user to relax and ease into a restful and natural sleep.
The Sunrise System 320 has a panel of bright LEDs therefore the light emitted, when the product
is at medium and full brightness, may be helpful for some people who experience the symptoms
of Seasonal Affective Disorder (SAD). A digital timer allows the user to set the Sunrise System to
emit light at a selected brightness for 10 - 90 minutes in 10 minute steps. Use at a distance of at
least 1 metre (3 feet), it is not necessary to face the light.
To enjoy the full benefits of your SRS 320 please read this guide carefully, particularly the safety
information on page 4. If you do have initial queries, try the troubleshooting information at the
end of the guide. This product is energy efficient and only uses 10 watts of electricity when the
light is set to maximum brightness.The SRS 320 can be set to meet your own individual lifestyle
requirements so take the time to look at the full list of features which begin below.
Product Features
• Bright LED portable light box - up to 10,000 Lux
• Sunrise: simulates a sunrise over a period of 15, 30, 45, 60, 75 or 90 minutes.
Set to suit your preference.
• Sunset: simulates a sunset over a period of 15, 30, 45, 60, 75 or 90 minutes.
Set to suit your preference.
• All functions of the Sunrise System 320 are indicated on the large backlit LCD display to
clearly show the function being altered.
• Timer - when using the SRS 320 as a room light box, the user can specify how long the light
is on and at what brightness, from 10 - 90 minutes in 10 minute steps.
WARNING To reduce the risk of fire or electric shock, do not expose this appliance to rain or moisture.
CAUTION* Use of controls or adjustments or performance of procedures other than those specified may
result in hazardous radiation exposure.
M
M
MM
MM
!
!
CAUTION
RISK OF ELECTRIC SHOCK
DO NOT OPEN
CAUTION - TO REDUCE THE RISK OF ELECTRIC SHOCK, DO NOT
REMOVE COVER (OR BACK). NO USER-SERVICING TAKE
PRODUCT TO QUALIFIED SERVICE PERSONNEL
The exclamation mark within an equilateral triangle is intended to aler t the user to the presence of important
operating and maintenance (servicing) instructions in the literature accompanying the product.
* A Caution Marking is located on the bottom
of this appliance.
IMPORTANT SAFETY INSTRUCTIONS
1. Read these instructions.
2. Keep these instructions.
3. Heed all Warnings.
4. Follow all instructions.
5. Do not use this apparatus near water.
6. Clean only with a damp cloth.
7. Do not block any of the ventilation openings. Install in accordance with the manufacturers instructions.
8. Do not place near any heat sources such as radiators, heaters, stoves or other apparatus (including
amplifiers) that produce heat.
9. Do not disregard the safety purpose of the polarized or grounding - type plug. A polarized plug has two
blades with one wider than the other. A grounding type plug has two blades and a third grounding prong.
The wide blade or the third prong is provided for your safety. If the provided plug does not fit into your
outlet, consult an electrician for replacement of the obsolete outlet.
10. Protect the power cord from being walked upon or pinched, particularly at plugs, convenience receptacles
and the point where they exit from the apparatus.
11. Only use attachments / accessories specified by the manufacturer.
12. Unplug the apparatus during lightning storms or when unused for long periods of time.
13. Refer all servicing to qualified service personnel. Servicing is required when the apparatus has been
damaged in any way, such as power supply cord or plug damage, liquid has been spilled or objects have
fallen into the apparatus, the apparatus has been exposed to rain or moisture, the apparatus does not
The lightning flash with arrowhead symbol, within an equilateral triangle, is intended to alert the user to the
presence of uninsulated ‘dangerous voltage’ within the product’s enclosure that may be of sufficient magnitude
to constitute a risk of electric to persons.
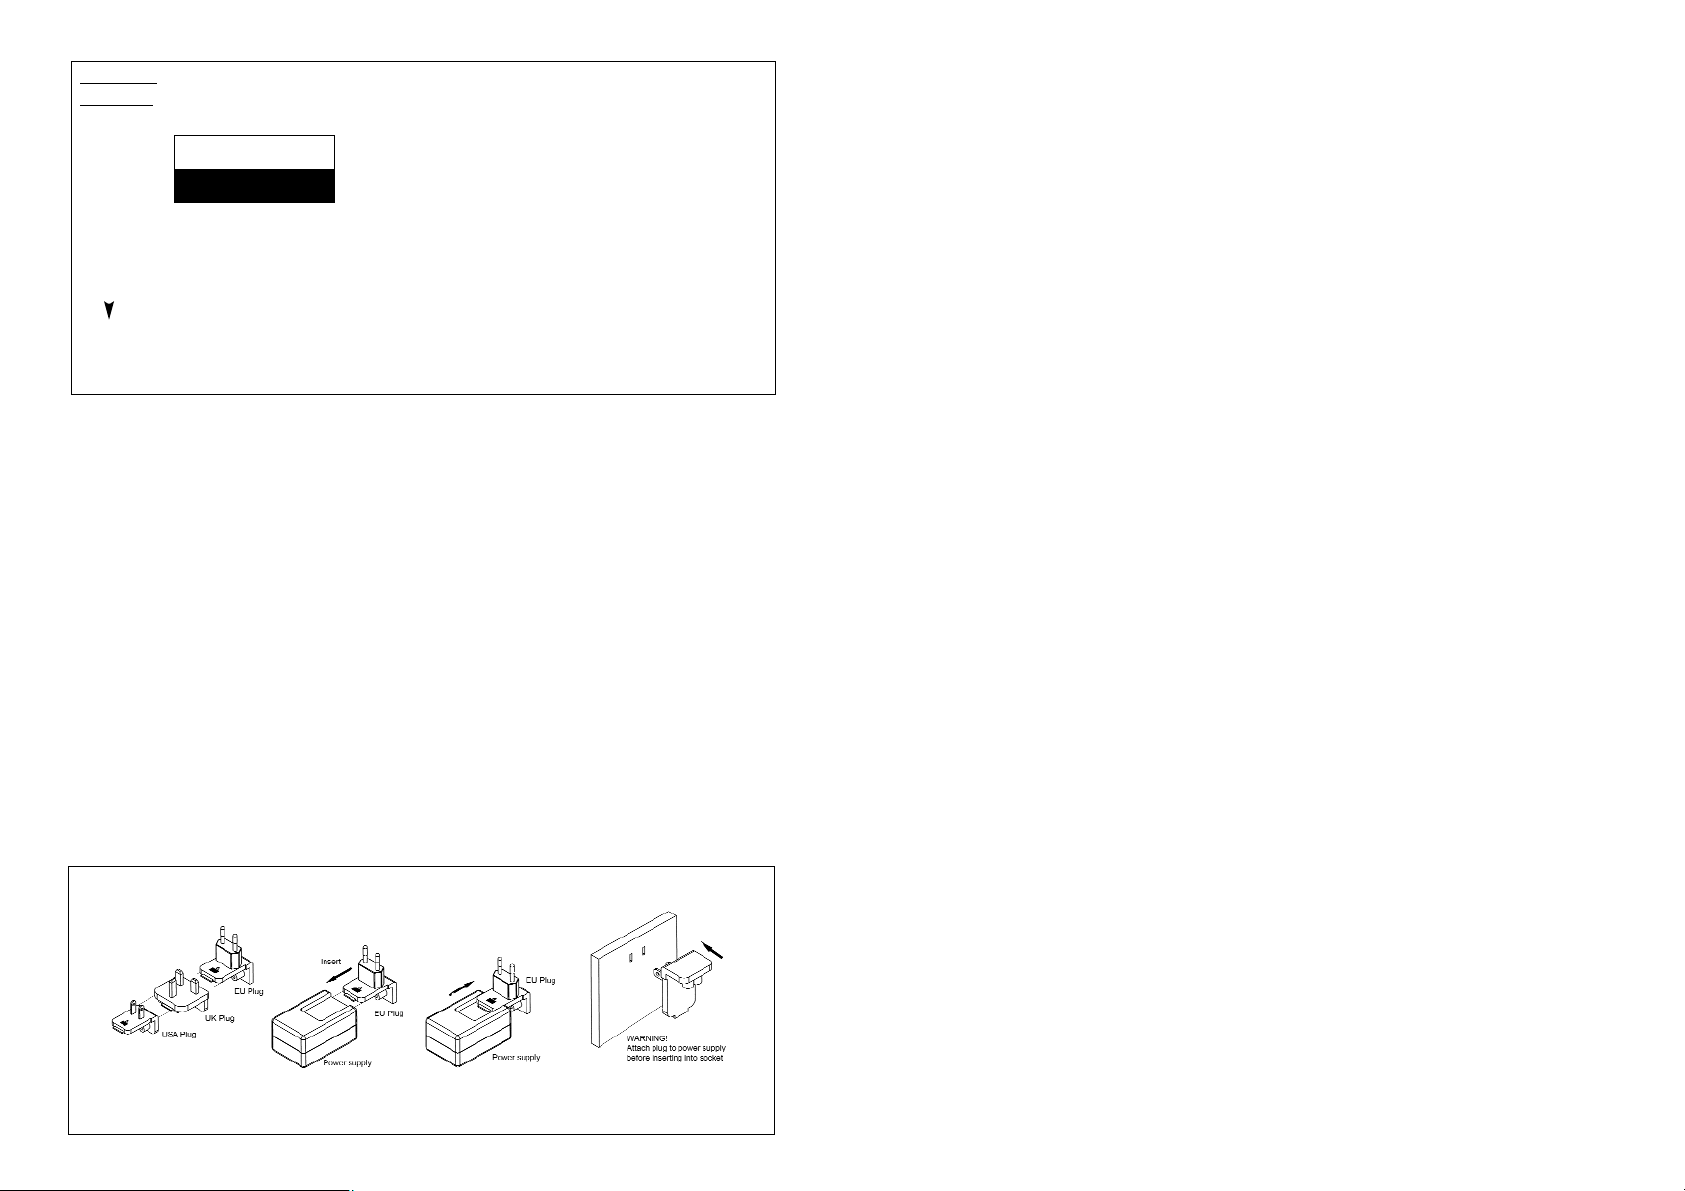
Assembling the Power Supply
1. Select the correct plug
for your location
2. Insert correct plug into
power supply
3. Insert power supply with
correct plug into socket
5
Power Supply
Insert the power supply single pin cable into the back of the Sunrise System 320 and assemble the
correct mains plug for your country into the power supply (black box). See page 2.
Setting Up the Sunrise System 320
The first time the SRS 320 is switched on, the time will flash ON and OFF; the time shown will be
13:00 or (1PM), indicating that the time is not set. Please Note:
When altering the settings ensure
the ALARM clock symbol is not visible as you cannot enter SETUP MODE to alter the settings with
the ALARM ON.The SRS 320 will come out of SETUP MODE automatically if no button is pressed
for 12 seconds or if you press the zZ (SNOOZE) button.
BUTTONS
The SRS 320 has 6 buttons, each button has a unique function as described below:
Menu Button (M)
This button is used to enter and scroll through the SETUP Mode programming menu.
Timer Button (T)
This button sets the timer mode. Press repeatedly for the desired duration from 10 - 90 minutes.
Plus (+) and Minus (-) Buttons
These buttons are used to set the level of the light box and in SETUP mode these buttons adjust
the selected option.
zZ Snooze Button
When the SRS 320 is in NORMAL mode (Alarm Off) this button will switch the light either ON or
OFF gently. This can be used at night to quickly illuminate the room. If the light is already on,
pressing zZ (SNOOZE) will switch the lamp off gently.
Snooze Button and SUNRISE
During a SUNRISE, pressing the zZ (SNOOZE) button will switch the light off and the sunrise time
will then start again for the remaining sunrise period e.g. if the sunrise duration is set for 30 minutes
and the zZ (SNOOZE) button is pressed after only 8 minutes, the light will switch off and then
SUNRISE over the remaining 22 minutes.
Snooze Button and ALARM mode
If the SRS 320 is in ALARM mode, the alarm is sounding and the light is on, the zZ SNOOZE
button activates the SNOOZE mode. When the ALARM sounds and the light is at full brightness
press the zZ SNOOZE button momentarily and the buzzer will stop.The light will go off. After 9
minutes the SUNRISE process will begin again.To exit zZ SNOOZE mode simply press the ALARM
button and SNOOZE mode will be de-activated.
Please Note:
If the buzzer is switched off it will not sound in Alarm Mode.
Alarm Button
This button activates or de-activates the Alarm and Sunset.When the ALARM button is pressed the
current alarm time and ALARM ON will show for approximately 2 seconds before reverting back
to the
present time / date display. The ALARM clock symbol will be illuminated.
If this button is
pressed again the alarm will be de-activated, the display will show
ALARM OFF for 2 seconds and
the alarm clock symbol will disappear. If the alarm button is pressed to switch the alarm off and the
light is illuminated, the light will remain on at its current brightness level unless dimmed manually.
Please Note:
1) If SECURITY mode is enabled (house symbol) it will not be possible to activate the alarm.
• A night light feature has also been included and the night light is user adjustable.
• A security feature which randomly turns the light full on and off between the times of
7:00pm and 9:00am can be set to operate when you are away from home.
• 12 or 24 hour clock display - you choose.
• The audible alarm can be disabled if you prefer to wake to the sunrise feature without buzzer.
• Power fail backup is provided on all functions for short power cuts to the home electricity
supply or if the Sunrise System is inadvertently disconnected for a short time.
• Full seven day alarm is provided to allow the user to set different times (if desired) on the alarm
for different days of the week.The factory programmed time for all seven days is 07:00am.
• Easy to read text display shows time and date.
• The day of the week and Leap years are automatically calculated.
• Option to select a language (English, Finnish, French, German, Spanish and Swedish).
• LCD contrast and backlight adjustment, including completely off.
• Energy efficient - uses only 10 watts of electricity when the light is on maximum.
IMPORTANT Safety Instructions
• NEVER immerse the product or power supply in water
• Do NOT connect any other power supply to the Sunrise System 320
• NOT for use with small children
• AVOID close or prolonged use of light boxes. Use for short periods at a distance of at least
1 metre (3 feet) away.
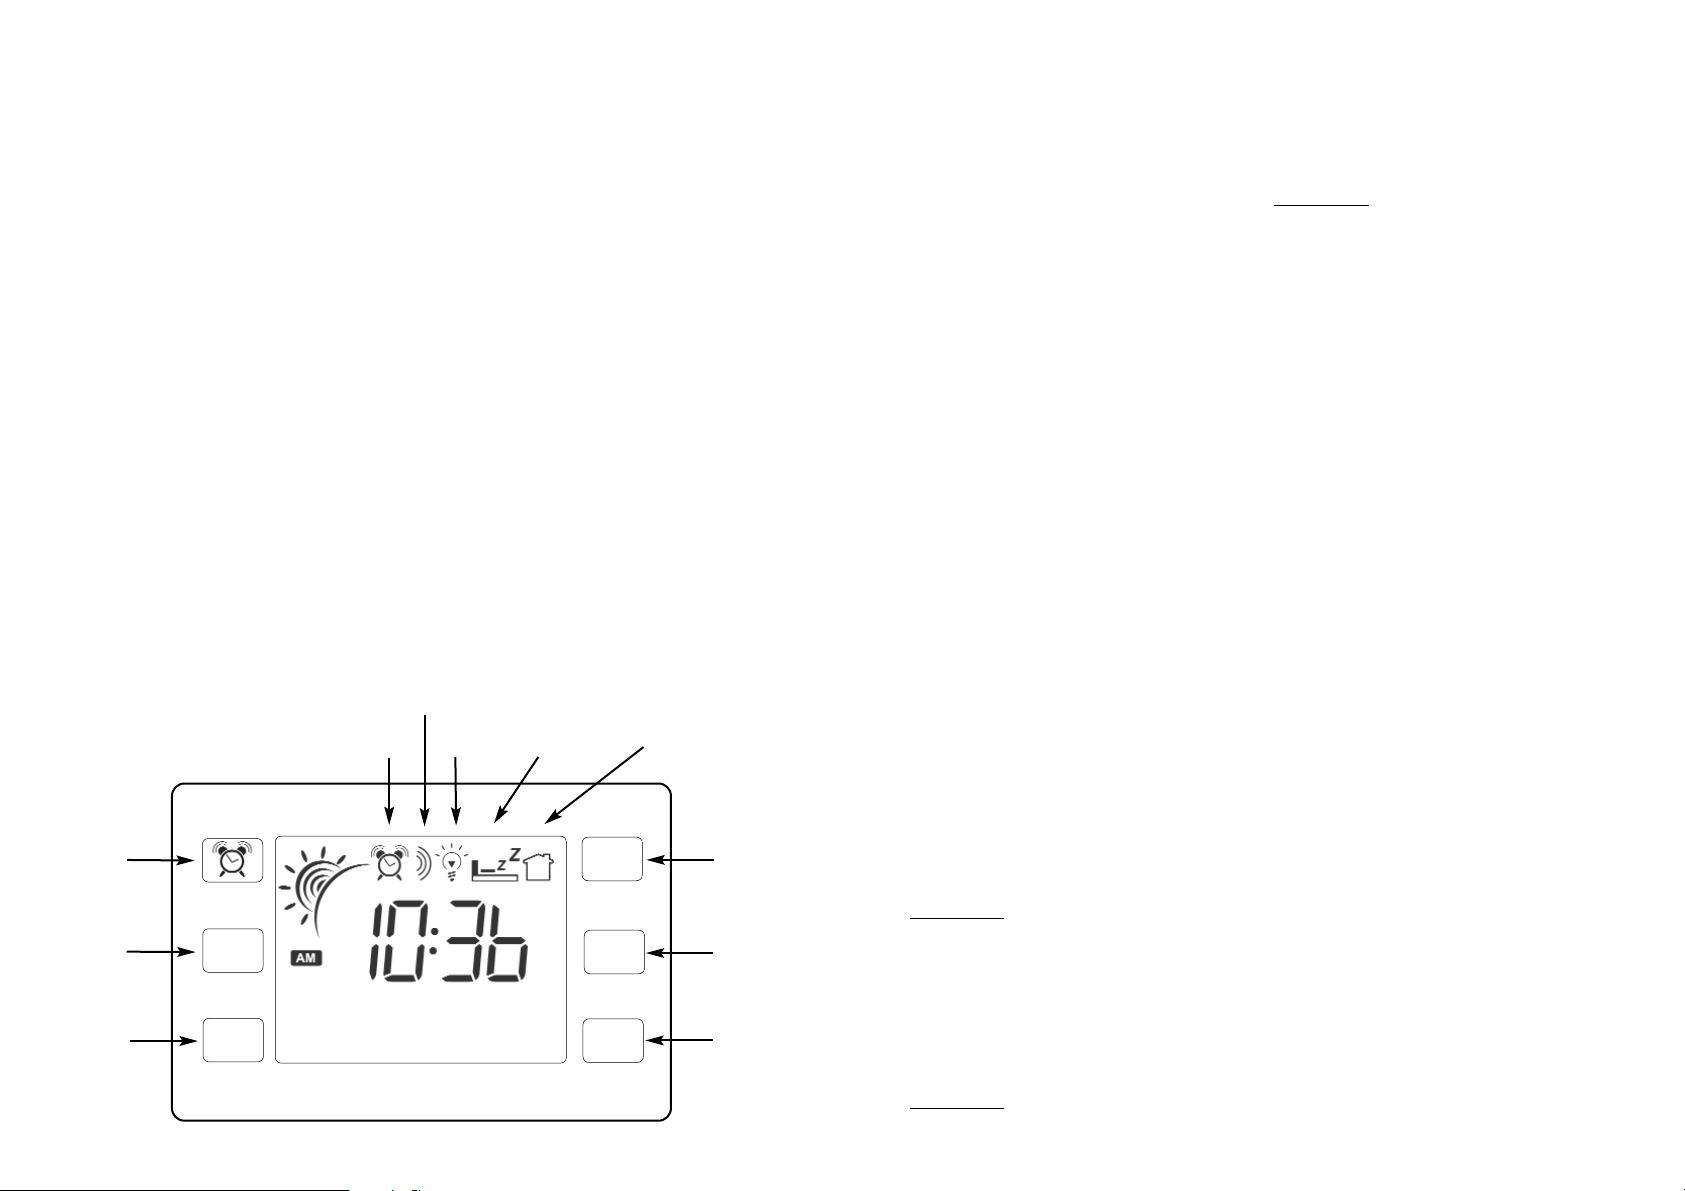
Sunrise System 320 LCD Display Layout
4
alarm
button
alarm on
sounder on
nightlight on
snooze on
security on
+ button
manual light
& function
control
- button
manual light
& function
control
snooze
timer
button
menu
button
+
-
z
z
T
M
01 / 01 / 2014

2) If the ALARMis on, some features will become locked out (not in use).
3) If the ALARM has begun to activate. Pressing the Alarm Button once will cancel the alarm for
that day.The light can be switched off by pressing the SNOOZE button. Press Alarm Button
again to switch the alarm off completely, so it does not activate the following day.
4) If the ALARM time is reached (light on) buzzer on and no button is pressed for 60 minutes the
unit will automatically switch the ALARMoff for that day.
Setting the Language
Press the MENU (M) button until the display
shows ENGLISH or the selected language. Press the +
(PLUS) or - (MINUS) button to change the language setting.There are six possible languages to
choose from - English, Finnish, French, German, Spanish and Swedish.
Press MENU (M) to continue or
press zZ (SNOOZE) to exit the menu.
Setting the Time
Press the MENU (M) button until the display shows CLOCK 12 or CLOCK 24, the present time
will also be displayed in 12 or 24 hour format. You can now adjust the time by using the + (PLUS)
or - (MINUS) button. If you press and hold these buttons the time will fast reverse or fast forward.
The clock will start when you next press MENU (M) button or exit the menu. Press the ALARM
button to change from 12 or 24 hour clock. Press the MENU (M) button to continue or press zZ
(SNOOZE) to exit the menu.
Setting the Alarm Time
Press the MENU (M) button until the display shows MONDAY, the alarm time for the day shown
will also be displayed.You can now adjust the alarm time by using the + (PLUS) or - (MINUS)
button. If you press and hold these buttons the alarm time will fast reverse or fast forward. Repeat
this process for each day of the week. Pressing the MENU (M) button will advance to the next day.
Once all 7 days are complete, press the MENU(M) button to continue or press zZ (SNOOZE) to
exit the menu.
Setting the Alarm Sound
Press the MENU (M) button until the display shows SOUND ON or SOUND OFF. Press the +
(PLUS) or - (MINUS) button to switch the alarm sound ON or OFF. When OFF is selected and
the ALARM is set the SRS320 will simulate a SUNRISE of the light without sound. When set to
ON the SRS 320 will simulate a SUNRISE and the sounder will beep when the alarm time is
reached. Many users are gently woken by the SUNRISE and prefer to switch the alarm sound to
OFF. Press the MENU (M)button to continue or press zZ (SNOOZE) to exit the menu.
Setting the Sunrise Duration
Press the MENU (M) button until the display shows SUNRISE, the SUNRISE duration (in minutes)
will also be displayed. Press the + (PLUS) or - (MINUS) buttons to change the SUNRISE duration,
select from 0 (off),15, 30, 45, 60, 75 or 90 minutes.The SUNRISE duration is the length of time it
will take for the light to reach maximum brightness from OFF to coincide with the alarm time.
Therefore, if the Sunrise time is set to 15 minutes and the alarm time is set for 07:00 the light will
start illuminating at 06:45 and reach full brightness at 07:00am. When the alarm sound is set to
ON, the buzzer will start when the light is at maximum (07:00 in the example above). Press the
MENU (M) button to continue or press zZ (SNOOZE) to exit the menu.
Setting the Sunset Duration
Press the MENU (M) button until the display shows SUNSET, the sunset duration (in minutes) will
also be displayed. Press the + (PLUS) or - (MINUS) buttons to change the SUNSET duration,
7
6
select from 15, 30, 45, 60, 75 or 90 minutes.The SUNSET duration is the length of time it will take
to gently dim the light down from maximum brightness to fully off. SUNSET is initiated when the
alarm is activated and the light is on. If the light is already off then the Sunset will not occur. Press
the MENU (M) button to continue or press zZ (SNOOZE) to exit the menu. If 0 is selected the
sunset feature is disabled.
Setting the LCD Backlight
Press the MENU (M) button until the display shows BACKLIGHT and a number (backlight mode)
0 to 4 will also be displayed. Press the + (PLUS) or - (MINUS) buttons to change the backlight
setting, there are five possible choices:
0 - Backlight is always off
1 - Backlight is always lit dimly
2 - Backlight is always lit brightly
3 - Backlight illuminates at full brightness for 5 seconds at any button press, after this time the
backlight will go off
4 - Backlight illuminates at full brightness for 5 seconds at any button press, after this time the
backlight will be dimly lit
Press the MENU (M) button to continue or press zZ (SNOOZE) to exit the menu.
Setting the Calendar
At any time when setting the calendar, pressing the ALARM button will change the date display
format.There are two possible settings to choose from, make sure you have selected the correct
format for your geographical location:
31/12/2014 (DD/MM/YYYY)
12/31/2014 (MM/DD/YYYY)
Setting the Calendar Year
Press the MENU (M) button until the display shows YEAR, after 2 seconds the current date will be
displayed with the selected option flashing. Press the + (PLUS) or - (MINUS) button to adjust the
year. Press the MENU (M) button to continue or press zZ (SNOOZE) to exit the menu.
Setting the Calendar Month
Press the MENU (M) button until the display shows MONTH, after 2 seconds the current date
will be displayed with the selected option flashing. Press the + (PLUS) or - (MINUS) button to
adjust the month. Press the MENU (M) button to continue or press zZ (SNOOZE) to exit.
Setting the Calendar Date
Press the MENU (M) button until the display shows DATE, after 2 seconds the current date will
be displayed with the selected option flashing. Press the + (PLUS) or - (MINUS) button to adjust
the date. Press the MENU (M) button to continue or press zZ (SNOOZE) to exit the menu.
Setting the LCD contrast
Press the MENU (M) button until the display shows CONTRAST, a number (contrast level) 1 to
16 will also be displayed. Press the + (PLUS) or - (MINUS) button to adjust the contrast setting,
there are 16 settings to choose from: 0 = faint to 16 = dark. Press the MENU(M) button to
continue or press zZ (SNOOZE) to exit the menu.
Setting the Security Mode
Please Note:
If SECURITY feature is enabled some features will become locked out (not in use).
Press the MENU (M) button until the display shows SECURITY ON or SECURITY OFF. Press the

9
The Programming Table below provides a useful summary of the Sunrise System Light Box set
up process.
Programming Table
No of Presses Result
of MENU button (First setting is the Default)
1 LANGUAGE
2 CLOCK SET
3 MONDAY ALARM TIME
4 TUESDAY ALARM TIME
5 WEDNESDAY ALARM TIME
6 THURSDAY ALARM TIME
7 FRIDAY ALARM TIME
8 SATURDAY ALARM TIME
9 SUNDAY ALARM TIME
10 ALARM SOUND ON or ALARMSOUND OFF
11 SUNRISE 0,15, 30, 45, 60, 75, 90
12 SUNSET 15, 30, 45, 60, 75, 90
13 BACK LIGHT (0, 1, 2, 3 or 4)
14 CALENDAR YEAR
15 CALENDAR MONTH
16 CALENDAR DATE
17 CONTRAST (1 - 16)
18 SECURITY (ON / OFF)
19 NIGHT LIGHT (ON / OFF)
20 NIGHT LIGHT LEVEL*
20 or 21 Reverts to Normal Operation (Idle Mode)
* Only available if NIGHT LIGHT is set to On.
Troubleshooting Tips
How do I generate a Sunrise?
The Sunrise works in conjunction with the alarm time, first set the alarm time (see page 6 & 7),
then choose the desired Sunrise duration from the menu (e.g set to 15 min). Activate the alarm by
pressing the alarm button (top left).The Sunrise will start 15 minutes before the alarm time and
the light will be at full brightness after 15 minutes.
How do I generate a Sunset?
Press the + (PLUS) button until the light is set to the desired brightness level.To activate the
Sunset just press the alarm button.The light will slowly dim and switch off. The default is 15
minutes. If you want to change the duration of Sunset or Sunrise see details on page 6 and 7.
How do I switch my Sunrise System 320 off after a sunrise?
Press the ALARM button ONCE to switch the alarm off for that day, then press the zZ SNOOZE
button to turn the light off. If you press the ALARM button twice the alarm will be off completely.
+ (PLUS) or - (MINUS) button to change the setting.The SECURITY (house) symbol will be
displayed when the SECURITY mode is enabled to remind you that this feature is activated.
When the SECURITY mode is enabled the SRS 320 will switch the light on and off at random
times between 19:00 (7.00pm) and 09:00 (9.00am).The SECURITY mode will light your home at
random times giving the impression to unwelcome ‘visitors’ that the home is occupied.
Press the MENU (M) button to continue or press zZ (SNOOZE) to exit the menu.
Setting the Night Light On or Off
Press the MENU (M) button until the display shows N-LIGHT ON or N-LIGHT OFF. A light
symbol will be visible on the display to remind you that night light mode is on.This feature is used
in conjunction with the NIGHT LIGHT level setting. Press the + (PLUS) or - (MINUS) button to
change the setting. Press the MENU (M) button to continue or press zZ (SNOOZE) to exit.
Setting the Night Light Level
Please Note:
This setting is only available if the NIGHTLIGHT is set to ON.
Any variation in the tone of the LEDs when dimmed is normal.
The night light feature enables you to configure the SRS320 to dim the light down to a user
defined level when the alarm is activated. Press the MENU (M) button until the display shows
NIGHT LEVEL, the light will also illuminate at the set night light level. Press the + (PLUS) or (MINUS) button to adjust the desired light level. Press the MENU (M) button to exit the menu.
Using as a Reading Light
Please Note:
If SECURITY mode is enabled this feature is unavailable.
The reading light level can be adjusted by pressing the + (PLUS) or - (MINUS) button, the light
box can be switched to full brightness or instantly off by pressing the zZ (SNOOZE) button. The
display will show LAMP ON or LAMP OFF for 2 seconds.
Using the Timer
The timer is used with the lightbox function. Ensure the Alarm and Security Mode are OFF. Press
the TIMER (T) button.The display will show the timer value i.e. 10.00 (minutes), press the timer
button again to increase the timer value up to 90 minutes. The lightbox will come on and the
timer will count down. Press the zZ SNOOZE button to cancel the timer.
Operating Mode Button Functionality
Button Idle Mode
MENU (M) Enter programming (Set Up) Menu
Alarm Alarm On or Off
+ Light +
- Light zZ (SNOOZE) Light On or Off / Snooze
Timer Set Timer Value
Button Programming (Set Up) Menu Mode
MENU (M) Advance to the next Menu option (see programming table overleaf)
ALARM Change Time and Date display format
+ Increase selection / Night Light +
- Decrease selection / Night Light zZ (SNOOZE) Exit Set Up Menu
Timer No Action
8

11
Technical Specifications
Sunrise System Compliance
RoHS and WEEE compliant.
Technical Specifications
General: For use worldwide
Dimensions: 125mm (width) x 265mm (height) x 95mm (depth)
x 85mm (top depth)
Power supply: 100 - 240V AC 50 - 60HZ
CE marked. Complied with EMC (2006/C 314/05) and Low Voltage Directives (2006/C
208101)
In demonstration of conformance with the Essential Requirements for Safety and Electro-magnetic
Compatibility covered by the above directive, the product meets the following standards:
Safety EN 60335-2-3 :2002/A1:2004
Electro Magnetic EN 61000-6-2 :2005
Compatibility EN 61000-6-3 :2001/A11
10
How do I cancel the timer?
Press any other button apart from Timer i.e. zZ SNOOZE.
I cannot activate the alarm by pressing the alarm button and the alarm
symbol doesn’t appear?
Ensure the Security Mode is switched Off. Is the Security Mode ‘house’ symbol displayed?
The Alarm and Sunset cannot be activated when Security Mode is switched On.
Can the unit be reset to the factory default settings?
Yes. First unplug the SRS 320 from the mains supply and wait for 10 seconds, after this plug the
SRS 320 back into the mains supply and wait until the display shows SRS 320. Next, momentarily
press the MENU (M) button. If the reset is successful the display will show VERSION and a number.
Dimming the Light Box
When the Light Box is dimmed to a low level a variation in the tone or colour of the individual
LEDs is normal.
Sunrise System Support
You can contact the Sunrise System team and find out more about the benefits of using a Sunrise
System by visiting our website: www.morningsunrise.com
You will also find a Q&A section on our website and information about the full range of Sunrise
System products.
Warranty
Gullwing Ltd. warrants to the end user that this product will be free from defects in materials and
workmanship in the course of normal use for a period of one year from the date of purchase of
new Sunrise System. Gullwing Ltd. does not accept liability for improper or unintended use of the
product.This warranty does not cover damage caused by misuse, modification, accident, fair wear
and tear or use of incorrect power cable/supply. Should you have a problem with your Sunrise
System, please get in touch with your retailer or contact Sunrise System customer ser vice via our
website.
ATTENTION
Pour réduire les risques d'incendie ou d'électrocution, ne pas exposer cet appareil à la pluie ou
à l'humidité.
A
TTENTION*
L'utilisation de contrôles, de réglages ou de performance de procédure autre que ceux
appropriés peut résulter en une exposition dangereuse à des radiations.
M
M
MM
MM
!
!
ATTENTION
RISQUE D'ELECTROCUTION
NE PAS OUVRIR
ATTENTION : POUR REDUIRE LE RISQUE D'ELECTROCUTION,
NE PAS ENLEVER LE COUVERCLE (OU L'ARRIERE).PAS DE
REPARATION POSSIBLE PAR L'UTILISATEUR
Le point d'exclamation dans un triangle équilatéral est destiné à avertir l'utilisateur de la
présence d'importantes consignes d'utilisation et d'entretien (réparation) dans la notice
d'utilisation qui accompagne le produit.
* Un signe Attention est situé sous
cet appareil.
CONSIGNES DE SECURITE IMPORTANTES
1. Lire ces consignes.
2. Garder ces consignes.
3. Observer tous les avertissements.
4. Suivre toutes les consignes.
5. Ne pas utiliser cet appareil près d'une source d'eau.
6. Ne nettoyer qu'avec un tissu humide.
7. Ne pas obstruer les ouvertures d'aération. Installer selon les consignes du constructeur.
8. Ne pas placer près de sources de chaleur telles que les radiateurs, les registres de chaleur, les poêles ou
autres appareils (dont les amplificateurs) qui émettent de la chaleur.
9. Ne pas mépriser le caractère sécuritaire de la prise détrompée ou de mise à la terre. Une prise
détrompée présente deux broches, dont une plus large que l'autre. Une prise normale dispose de deux
broches cylindriques. Le dispositif de terre est contenu dans le réceptacle. En effet, la prise femelle dispose
également d'une broche cylindrique, appelée prise de terre. La broche, présente sur la prise murale, est
une marque de sécurité. Si la prise mâle fournie ne correspond pas à la prise femelle, consulter un élec
tricien pour qu'il remplace la prise femelle obsolète.
10. Faire en sorte que personne ne marche ou ne pince le câble électrique, en particulier au niveau des prises
et du point de sortie de l'appareil.
11. N'utiliser que les attaches / accessoires indiqués par le constructeur.
12. Débrancher l'appareil lors d'orages ou lorsqu'il est inutilisé pendant longtemps.
13. S'adresser à un réparateur compétent en cas de besoin. La réparation n'est nécessaire que si l'appareil a
été endommagé, par exemple, si le câble d'alimentation ou la prise sont endommagés, si un liquide s'est
répandu dans l'appareil ou si des objets lui sont tombés dessus, si l'appareil a été exposé à la pluie ou à
l'humidité, ou encore si l'appareil ne fonctionne pas normalement ou est tombé.
Le symbole avec un éclair terminé d'une flèche dans un triangle équilatéral est destiné à avertir
l'utilisateur de la présence d'une "source de tension dangereuse" non isolée, dans le boîtier du
produit, qui peut être d'une intensité suffisante à constituer un risque d'électrocution.
Réveil lumineux Sunrise System
SRS 320 – le seul réveil lumineux avec un simulateur d'aube Sunrise System
R
13
• Minuterie: lors de l'utilisation du SRS 320 comme réveil lumineux, l'utilisateur peut choisir la
durée de fonctionnement de la lumière, entre10 et 90 minutes par plusieurs étapes de 10
minutes.
• Le réveil lumineux inclut la fonction veilleuse, qui est entièrement personnalisable par
l'utilisateur.
• Quand la fonction Sécurité est active, le réveil lumineux s'allume et s'éteint à intervalles
irréguliers entre 19:00 et 9:00 si la maison est vide.
• Affichage 12 heures ou 24 heures : au choix.
• Si la fonction aube sans sonnerie est le mode de réveil sélectionné, l'alarme sonore peut être
désactivée.
• La sauvegarde en cas de coupure de courant est intégrée à toutes les fonctions pour les
brèves coupures de courant du réseau domestique ou si le Sunrise System est
accidentellement débranché pendant un court instant.
• Le simulateur dispose d'une alarme sept jours pour permettre à l'utilisateur de programmer
divers horaires (si besoin est) selon les jours de la semaine. L'heure de l'alarme programmée
par l'usine pour les sept jours de la semaine est 07:00.
• L'affichage textuel facile à lire montre également l'heure et la date.
• Les jours de la semaine et les années bissextiles sont calculés automatiquement.
• Choix de la langue (anglais, finlandais, français, allemand, espagnol et suédois).
• Réglage de la lumière et du contraste de l'écran LCD et possibilité de l'éteindre
complètement.
• Basse consommation: l'appareil ne consomme que 10 watts lorsque la lumière est à son
intensité maximum.
Consignes de sécurité IMPORTANTES
• Ne JAMAIS immerger le produit ou son alimentation dans l'eau.
• Ne brancher AUCUN autre câble d'alimentation au Sunrise System 320.
• Ne PAS laisser à la portée des enfants.
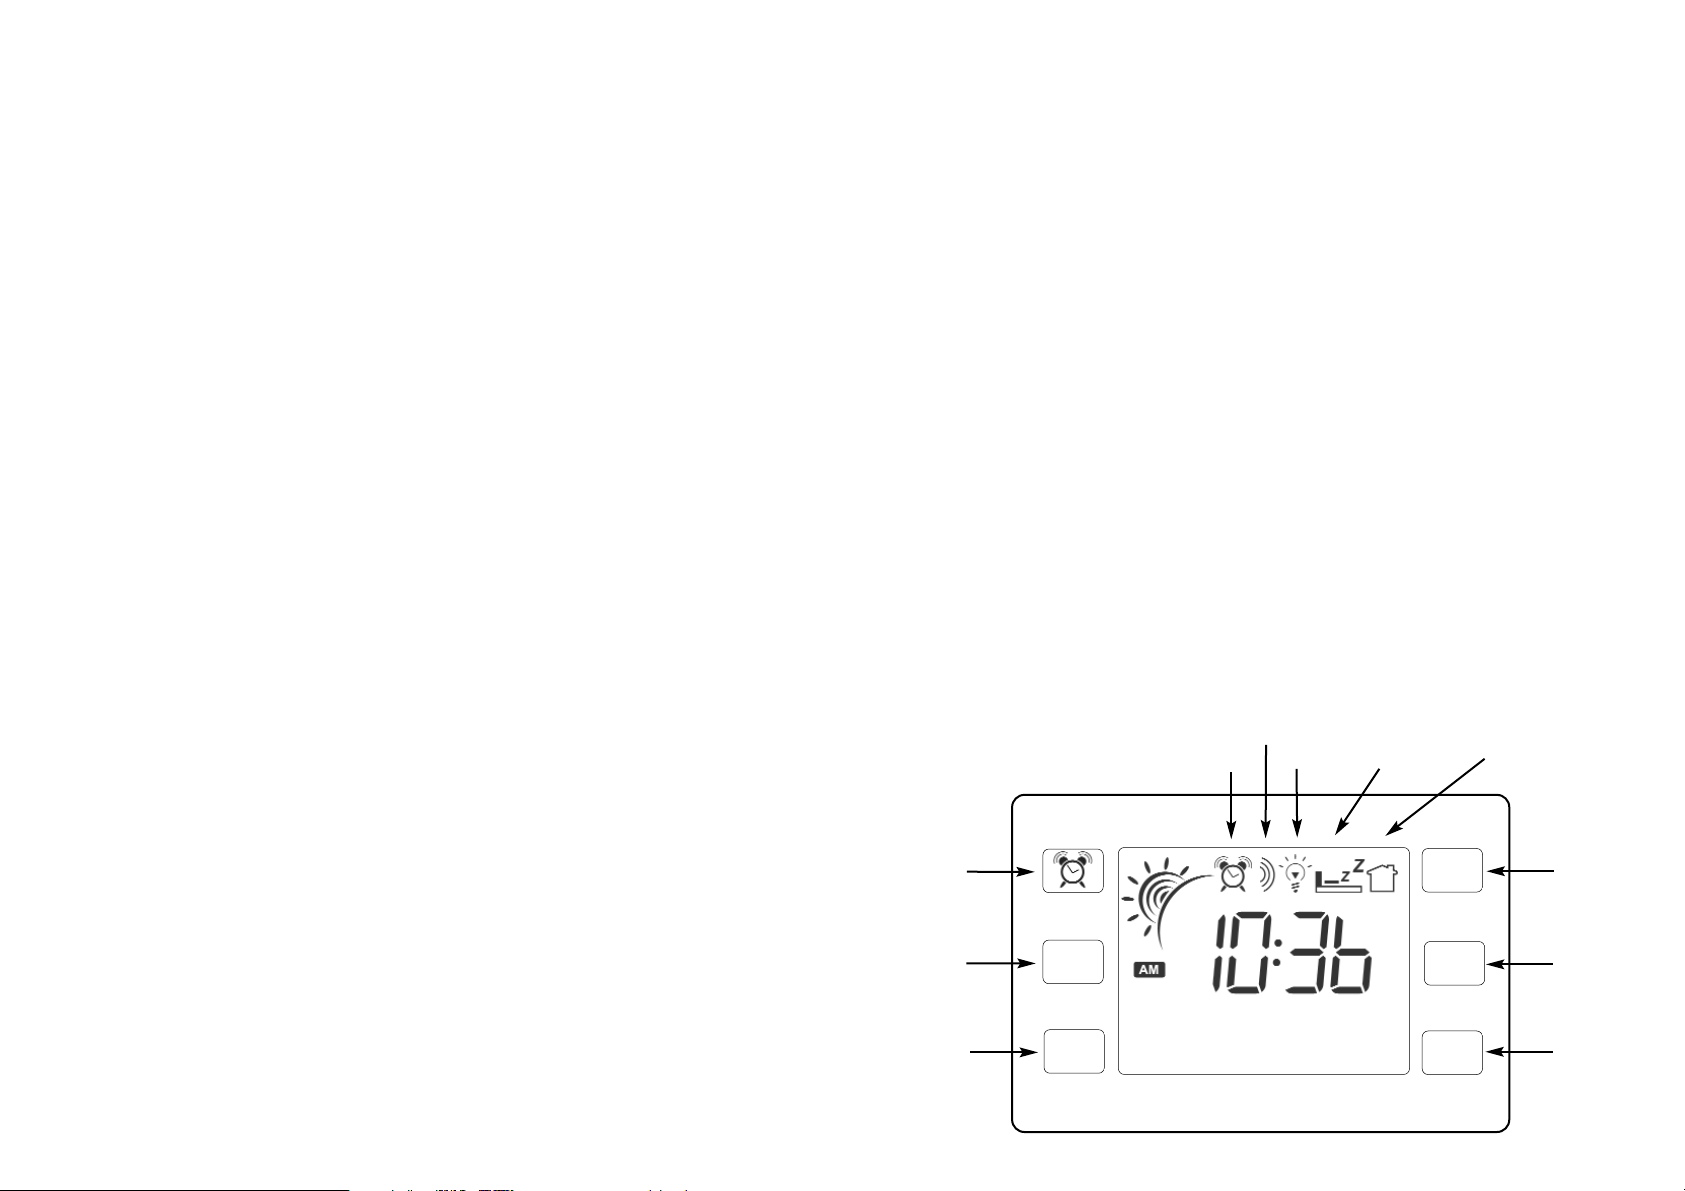
Schéma de l'écran LCD du réveil lumineux Sunrise System
bouton
alarm
+ bouton
- bouton
snooze
bouton
minuterie
bouton
menu
+
-
z
z
T
M
01 / 01 / 2014
12
Contenu de la notice d’utilisation
Introduction 12
Caractéristiques du produit 12 - 13
Informations de sécurité importantes 13
Schéma de l'écran LCD du Sunrise System 13
Mise en marche du Sunrise System 320 14 - 18
Boutons 14
Tableau de programmation 18
Conseils de dépannage 19
Support et garantie 19
Conformité et spécifications techniques 20
Réveil lumineux Sunrise System
Introduction
Merci d'avoir acheté le réveil lumineux Sunrise System 320. C'est le seul réveil lumineux qui
comprend un simulateur d'aube Sunrise System. En plus du bien que procurent les 10,000 Lux du
panneau de LED éclatantes, le simulateur d'aube Sunrise System participe à la bonne santé et
diminue l'état de stress. En effet, ce système est l'un des modes de réveil le plus naturel et doux.
Le Sunrise System peut être programmé pour recréer de façon imperceptible l'aube et le
crépuscule. L'aube éclaire peu à peu la pièce, tout en réveillant doucement la personne endormie.
Le crépuscule, quand à lui, assombrit progressivement la chambre pour aider l'utilisateur à se
détendre et à se laisser emporter dans un sommeil naturel et reposant.
Le réveil lumineux Sunrise System 320 dispose d'un panneau de LED éclatantes. C'est pourquoi la
lumière, à moyenne ou forte intensité, peut par ticiper à la réduction des symptômes de la
dépression saisonnière. Une minuterie numérique permet à l'utilisateur de régler le réveil
lumineux Sunrise System afin qu'il émette de la lumière à l'intensité de son choix pendant 10 à 90
minutes par étapes de 10 minutes. Pour bénéficier de tous les avantages du SRS 320, lire cette
notice d'utilisation attentivement, en particulier les informations sur la sécurité à la page 13. En cas
de petites difficultés, consulter les informations de dépannage à la fin de cette notice. Ce réveil
lumineux est un produit à basse consommation d'énergie. En effet, il ne consomme que 10 watts
lorsque la lumière est à son intensité maximum. Le réveil lumineux Sunrise System peut s'adapter
à n'importe quel style de vie. C'est pourquoi il faut prendre le temps de lire la liste complète des
caractéristiques.
Caractéristiques du produit
• Réveil lumineux portable avec LED éclatantes: jusqu'à 10 000 Lux.
• Aube : recrée l'aube sur une durée de 0 (éteint), 15, 30, 45, 60, 75 ou 90 minutes.
Régler selon les préférences.
• Crépuscule : recrée le crépuscule sur une durée de 15, 30, 45, 60, 75 ou 90 minutes.
Régler selon les préférences.
• Toutes les fonctions du Sunrise System 320 sont indiquées sur le grand écran LCD rétroé
clairé pour afficher clairement la fonction en cours de modification.
son on
veilleuse on
snooze on
securité on
alarme on
 Loading...