

Sunrise spas 670 S, 770 EZ, 770 S, 780 S, 770 SR Owner's Manual
...
SPA OWNER’S MANUAL
http://www.sunrisespas.com
OM-SRULTIMATE-19
IMPORTANT SAFETY INSTRUCTIONS
READ & FOLLOW ALL INSTRUCTIONS
SAVE THESE INSTRUCTIONS
Pour voir ou imprimer ce document en Français, veuillez visiter:

2
Sunrise Spas 2019 Ultimate Collection Owner’s Manual
INDEX
Table of Contents
BRAND CONFIGURATION TABLE ............................................................................................................................... 3
SAFETY SIGN ............................................................................................................................................................................. 4
CONDITIONS OF WARRANTY AND CONSUMER OBLIGATIONS ......................................................... 5
YOUR PERSONAL SPA DATA ......................................................................................................................................... 6
IMPORTANT SAFETY INSTRUCTIONS .................................................................................................................... 7
READ AND FOLLOW ALL INSTRUCTIONS ............................................................................................................. 8
SAVE THESE INSTRUCTIONS ........................................................................................................................................ 8
INSTALLATION INSTRUCTIONS ................................................................................................................................... 9
ELECTRICAL CONNECTION GENERAL INFORMATION ........................................................................... 11
NORTH AMERICAN (60HZ) MODELS ..................................................................................................................... 12
230 VOLT SUPPLY CONNECTION ........................................................................................................................... 13
WHAT’S INSIDE YOUR SPA ............................................................................................................................................ 16
WHAT’S UNDER YOUR SPA (THE EQUIPMENT) ............................................................................................ 19
START-UP .................................................................................................................................................................................... 20
REMOVAL AND INSTALLATION OF THE CLICK CHANGE CLADDING INSERTS ................... 26
SPATOUCH 2 ICON DRIVEN USER GUIDE ........................................................................................................ 28
ACCESSING FILTER CARTRIDGES .......................................................................................................................... 56
MAINTENANCE ....................................................................................................................................................................... 57
FILTER SYSTEM...................................................................................................................................................................... 59
DRAINING YOUR SPA ........................................................................................................................................................ 60
WINTERIZING YOUR SPA ................................................................................................................................................ 61
TROUBLESHOOTING YOUR SPA .............................................................................................................................. 63
WATER TREATMENT GUIDE ......................................................................................................................................... 69
DOC: OM-SRULTIMATE-19

Sunrise Spas 2019 Ultimate Collection Owner’s Manual
3
Line
Model
Frame/Bottom
Filter
Keypad User Guide
BRAND CONFIGURATION TABLE
Ultimate
Collection
U1 Polysteel/Formed XL PLUS SpaTouch 2
CONGRATULATIONS ON THE PURCHASE OF YOUR NEW SPA
We have tried to compile a complete, easy to understand manual all about your spa and its' maintenance. Years of
research and development have gone into producing the superior quality product you have purchased. Your spa is
made from the highest quality material and latest technology available today. Pride and meticulous attention to detail
have resulted in the spa you have chosen. With proper care, your spa will provide many years of comfort and pleasure.
Please take a few minutes now to read all of the instructions before you install your spa. This owner's manual will help
you understand your spa, so you will get the most from your investment. For service and advice, do not hesitate to call
your authorized dealer. Your questions will be welcomed by friendly and knowledgeable staff.
May you have as much pleasure and enjoyment using your new spa, as we had making it for you.
We understand there are many choices in the marketplace when you are
considering adding a s pa t o your home, so thank you for choos ing a spa by Leisure
Manufacturing Inc. Enjoy!
DOC: OM-SRULTIMATE-19
4
Sunrise Spas 2019 Ultimate Collection Owner’s Manual
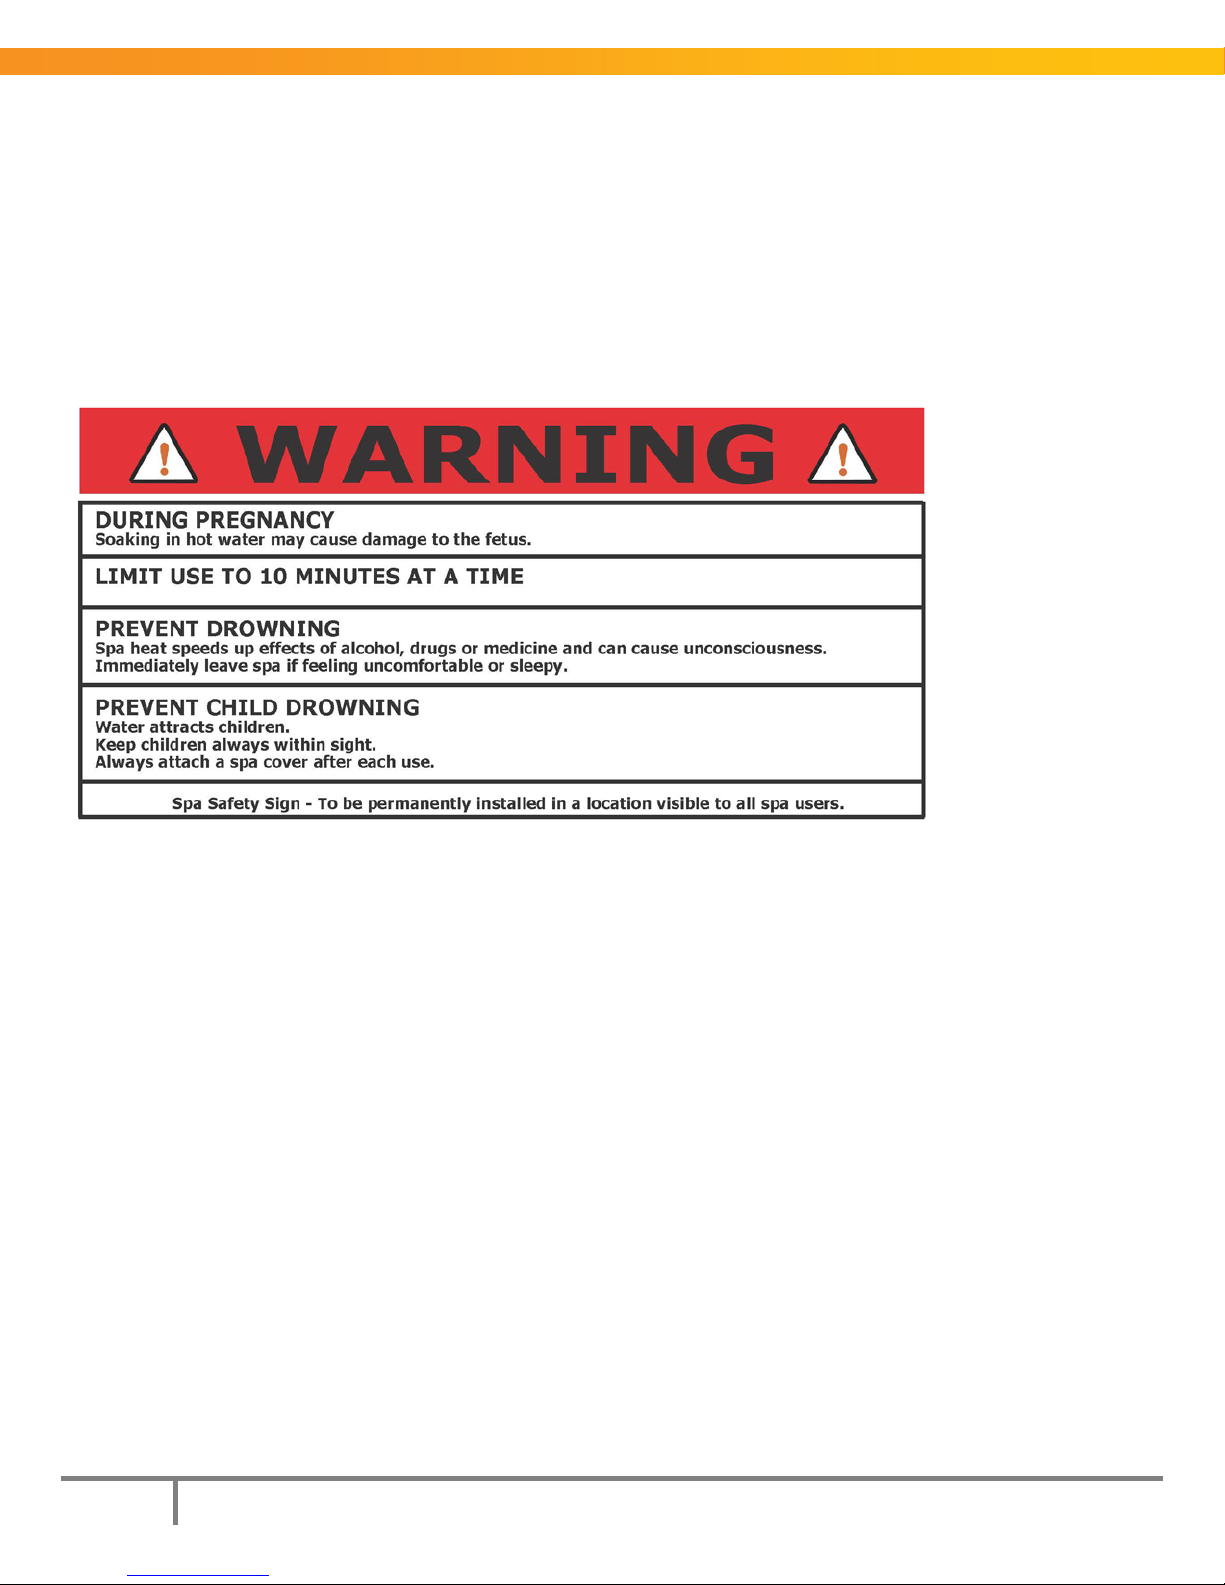
SAFETY SIGN
IMPORTANT NOTICE: SAFETY SIGN
Enclosed with this Owner’s Manual is a Safety Sign. This sign must be permanently installed in a location that is visible
to all spa users. It is the spa owner’s responsibility to remind all users about safe spa use, particularly occasional users
of the spa, who may not be aware of the various health and safety issues.
To obtain additional or replacement copies of the safety sign, contact your dealer.
ATTENTION: SPA OWNER
In the immediate vicinity of the spa, a sign must be posted stating the following:
1) The spa’s address
2) Location of the nearest telephone with posted emergency numbers
3) Nearest available police department, fire department and ambulance/rescue unit
DOC: OM-SRULTIMATE-19

Sunrise Spas 2019 Ultimate Collection Owner’s Manual
5
As a new spa owner, you have specific obligations in regards to the installation and safe use of this spa. Failure to do
so may result in a loss of warranty coverage not to mention personal injury to those using this spa.
CONDITIONS OF WARRANTY AND CONSUMER
OBLIGATIONS
Inspect the spa upon its arrival for damage. If you are being made aware of this for the first time, your
spa may not have been delivered in its original factory packaging. If this is the case, please take time to
inspect your spa and report any damage or missing items to your dealer.
1) Install the spa both physically and electrically, in accordance with any local codes.
2) Provide suitable access to all sides of the spa. Any custom built enclosure, either above or below a deck
surface, must be able to be removed with relative ease.
3) Provide sufficient work area around the spa’s perimeter especially the side the spa’s equipment is located on.
4) Regularly check operation of the spa in regard to filtration, jet pump operation and the heating system.
5) Report any concern to the dealer. Any problem that arises towards the end of particular warranty coverage
should be documented and reported to the dealer
6) Maintain the water’s chemical balance and clean/replace the system’s cartridge filter(s) as instructed by the
dealer and/or Leisure Manufacturing Inc.
7) Drain and refill the spa on a regular basis as instructed by the dealer and/or Leisure Manufacturing Inc.
8) Winterize and store the spa and its’ components in accordance with the manufacturer’s printed instructions.
9) Care for and maintain the spa cabinet, hard cover and acrylic surface as outlined in these instructions.
10) Ask your dealer to record the spa’s serial number on your bill of sale.
11) Provide a copy of your bill of sale, if requested by the dealer or Leisure Manufacturing Inc.
DOC: OM-SRULTIMATE-19
6
Sunrise Spas 2019 Ultimate Collection Owner’s Manual
Model Year
Model Name/Number
Spa Serial#
Jet Pump(s) Size (HP, SPL, Watts etc.)
Heater size (kw)
Filter Cartridge (Model Number/Size)
Topside Control/Keypad
Spa Pack Model #
Spa Pack Serial #
Dealer Name
Date of Purchase
We strongly recommend that you attach your bill of sale to this manual after installation is complete. Keep it in a
safe place for future reference. You may also wish to attach any notes you have made about the dealer delivery,
dealer start up demo or any other notes that may be of benefit in the future.
YOUR PERSONAL SPA DATA
Before you begin the installation of your new spa please take a few minutes to fill out the details of your spa. This
information will become invaluable later should you have a question for your dealer or should you need to make a
warranty claim. Ask your dealer to assist you in recording this information.
DOC: OM-SRULTIMATE-19

Sunrise Spas 2019 Ultimate Collection Owner’s Manual
7
DANGER:
DANGER:
DANGER:
DANGER:
WARNING:
IMPORTANT SAFETY INSTRUCTIONS
WARNINGS
children. To avoid accidents, ensure that children cannot use this spa unless they are supervised at all times.
pump. Should the need arise to replace the suction fittings or the pump, be sure that the flow rates are compatible.
Never operate spa if the suction fittings are broken or missing. Never replace a suction fitting with one rated less than
the flow rate marked on the original suction fitting.
installed within 5 feet of metal surfaces if each metal surface is permanently connected by a minimum 8 AWG
(8.4mm
within 5 feet (1.5m) of a spa.
Risk of Accidental Drowning. Extreme caution must be exercised to prevent unauthorized access by
Risk of Injury. The suction fittings in this spa are sized to match the specific water flow created by the
Risk of Electric Shock. Install at least 5 feet (1.5m) from all metal surfaces. As an alternative, a spa may be
2
) solid copper conductor to the wire connector on the terminal box that is provided for this purpose.
Risk of Electric Shock. Do not permit any electrical appliance, such as a light, telephone, radio, or television,
To reduce the risk of injury:
a) The water in a spa should never exceed 40°C (104°F). Water temperatures between 38°C (100°F) and 40°C
are considered safe for a healthy adult. Lower water temperatures are recommended for young children and
when spa use exceeds 10 minutes.
b) Since excessive water temperatures have a high potential for causing fetal damage during the early months of
pregnancy, pregnant or possibly pregnant women should limit spa water temperatures to 38°C (100°F).
c) Before entering a spa, the user should measure the water temperature since the tolerance of water
temperature-regulating devices varies.
d) The use of alcohol, drugs, or medication before or during spa use may lead to unconsciousness with the
possibility of drowning.
e) Obese persons and persons with a history of heart disease, low or high blood pressure, circulatory system
problems or diabetes should consult a physician before using a spa.
f) Persons using medication should consult a physician before using a spa since some medication may induce
drowsiness while other medication may affect heart rate, blood pressure, and circulation.
CAUTION:
Maintain water chemistry in accordance with the manufacturer's instructions.
DOC: OM-SRULTIMATE-19

8
Sunrise Spas 2019 Ultimate Collection Owner’s Manual
DO NOT connect your spa to an extension cord.
READ AND FOLLOW ALL INSTRUCTIONS
When using this equipment, basic safety precautions should always be followed. Including the following:
a) A green coloured terminal or a terminal marked G, GR, Ground, Grounding or the international grounding
symbol is located inside the supply terminal box or compartment. To reduce the risk of electric shock, this
terminal must be connected to the grounding means provided in the electric supply service panel with a
continuous copper wire equivalent in size to the circuit conductors supplying this equipment.
b) At least two lugs marked "BONDING LUGS" are provided on the external surface or on the inside of the
supply terminal box or compartment. To reduce the risk of electric shock, connect the local common bonding
grid in area of the hot tub or spa to these terminals with an insulated or bare copper conductor not smaller
than No.6 AWG.
c) All field-installed metal components such as rails, ladders, drains or other similar hardware within 3m (10ft) of
the spa or hot tub shall be bonded to the equipment grounding bus with copper conductors not smaller than
No.6 AWG.
SAVE THESE INSTRUCTIONS
IMPORTANT SAFETY INSTRUCTIONS
Hyperthermia
Prolonged immersion in hot water may induce hyperthermia. Hyperthermia occurs when the internal temperature of
the body reaches a level several degrees above the normal body temperature of 37°C (98°F). The symptoms of
hyperthermia include drowsiness, lethargy, and an increase in the internal temperature of the body. The effects of
hyperthermia include:
• Unawareness of impending hazard
• Failure to perceive heat
• Failure to recognize the need to exit spa
• Physical inability to exit spa
• Fetal damage in pregnant women
• Unconsciousness and danger of drowning
The use of alcohol, drugs or medication can significantly
increase the risk of fetal hyperthermia.
DOC: OM-SRULTIMATE-19
WARNING:
Sunrise Spas 2019 Ultimate Collection Owner’s Manual
9
INSTALLATION INSTRUCTIONS
Remember, your new spa is a powerful piece of electrical and plumbing equipment. You owe it to yourself, your family
and your friends to install it correctly and safely. Before attempting to hook-up or use your spa, please read the
following instructions.
ATTENTION:
This spa is intended for outdoor use, however it can be installed indoors
when precautions are taken to ensure the spa is installed and located
in such a manner that any water that could leak, splash or be released as humidity
will drain away harmlessly.
POSITIONING OF YOUR SPA - CONSIDERATIONS
Your spa is completely self-contained. Therefore, you can situate it just about anywhere; on a patio, in or on a deck, in
a basement or sunroom. It comes completely pre-plumbed and water tested from the factory. Never lift or carry the spa
by the plumbing. Damage could occur which would not be covered under warranty.
You should take into account the following when selecting prospective spa sites in order to maximize enjoyment.
To avoid any personal injury or damage to your spa, have 4-5 people ready to assist you to move the spa to its' final
location. Use a moving dolly and/or straps to more evenly distribute the spa's weight. Never lift or carry the spa by its'
plumbing.
SITE CONSIDERATIONS
Local codes Local building, property and electrical codes may affect your installation.
Delivery access to location
Vegetation in spa area Trees, bushes, flowers etc. can all add to spa maintenance.
Spa location relative to buildings
Fences, tree lines
Spa step out location
Spa Direction View when using a lounger & ease of access for servicing.
Downspouts and natural
drainage of land
Gates, overhangs, fences, gas meters, and AC units may become obstructions.
You may need to access from a neighbour's yard or employ a crane.
The location could add to your spa maintenance (removing snow from cover) and
increase operating costs.
More privacy during use and serves as a wind break but may also add more
maintenance.
Any surface that is slippery when wet could be dangerous for bathers both
entering and exiting the spa.
These may flood the spa area, damage spa or create a safety hazard to bathers.
Outside water supply and
draining location
Optional accessories These may take up added space that you must plan for (cover remover/holder).
You will need a place to safely drain the spa and a way to refill it easily.
DOC: OM-SRULTIMATE-19

10
Sunrise Spas 2019 Ultimate Collection Owner’s Manual
Damage caused by improper spa installation will void factory warranty.
Do NOT locate your spa in a low run-off area since melting snow or rain can cause pump and equipment damage.
WATER SHOULD ALWAYS DRAIN AWAY FROM THE SPA.
SPA SUPPORT
Whatever the support is, it must be:
a) A continuous, level surface, above grade, capable of handling 80 lbs. per sq. ft. that will not be compromised by
changes in the water table or water sitting in the area.
b) Such that the weight of the spa, water and bathers is not supported by the spa lip.
c) In full contact with the bottom of the spa
ACCEPTABLE SPA SUPPORT BASES
Concrete Pad 4" to 6" thick with provision for run off
Patio Stones, Pavers etc. Levelled with proper preparation of the earth
Wooden Deck Floor Incl. centre support uprights in concrete and joists spaced 12" on centre
Engineered Plastic Spa Pad Following pad manufacturer's instructions
Unacceptable Spa support bases include crushed gravel, stone dust, bare earth, platform built directly onto earth.
See next page for dimensions that can be used to determine the proper location of submerged conduits in concrete
slab installations. All dimensions are made from the outside of the spa's frame with the access panels removed.
DOC: OM-SRULTIMATE-19

Sunrise Spas 2019 Ultimate Collection Owner’s Manual
11
ELECTRICAL CONNECTION GENERAL
INFORMATION
A. LOCATING A CONDUIT WITHIN A CONCRETE PAD
If your intent is to bring a conduit and power wires up under the spa we suggest that it
enter the spa cavity in the front, left corner; 10-12” (25.4cm – 30.5cm) Dimension A
in from the left and 10-12” (25.4cm – 30.5cm) Dimension B up from the front. See A
& B on the diagram below. This location will allow you to stay clear of spa pumps and
other equipment while giving you a short and easy access to the left side of the spa
pack, where the electrical entry hole and terminal block are located.
B. SUPPLY CABLE ENTRY INTO SPA EQUIPMENT AREA
• You may enter the spa cavity at any other point around spa provided you have reviewed the location and
determined there is no interference. You may also decide to enter at an adjoining wall (depending on the
positioning of the spa) and route a conduit along the spa kicker. Ask your electrician for his/her advice in
these matters.
• In all cases the best side for entry of the supply cable is the side to your left when you are standing at the
equipment panel.
• Right side entry is possible; however, this may involve additional supply cable, parts and time.
Included with your spa Owner’s Manual is a black electrical bulkhead fitting.
• Hole size required: 41mm (1 5/8”)
• This fitting is designed to accept 1” electrical conduit on both sides. It may also be used with electrical strain
relief fittings.
• The corner to the right of the equipment and keypad is already in use for the spa drain.
• The other corners of the spa have a bottom flat spot where a hole can be drilled and the electrical bulkhead
fitting installed. Pick one of the other 3 corners that works best for your electrician to route cable or conduit
into the underside of the spa. We suggest you look at how the drain was installed and then drill a small pilot
hole before committing to a large holesaw.
DOC: OM-SRULTIMATE-19

12
Sunrise Spas 2019 Ultimate Collection Owner’s Manual
THIS IS NOT A CONDITION THAT IS COVERED UNDER THE
SPA PACK MANUFACTURER’S WARRANTY OR
LEISURE MANUFACTURING’S COMPREHENSIVE SPA WARRANTY.
NORTH AMERICAN (60HZ) MODELS
Please note the following important information:
When using this electrical equipment, basic safety instructions should be followed, including the following:
Read and Follow ALL Directions
1) Electrical installation must be carried out by a qualified electrician strictly in accordance with local governing
codes.
2) A terminal marked "ground" is located within the control box. To reduce the risk of electric shock this terminal
must be connected to the grounding means provided in the electric supply service panel with a continuous
copper wire equivalent in size to the circuit conductors supplying the equipment.
3) At least two lugs marked "bonding lugs" are provided on the external surface of the control box. To reduce the
risk of electric shock connect the local common bonding grid in the area of the hot tub or spa to these
terminals with an insulated or bare copper conductor not smaller than No. 6 AWG.
4) All field installed metal components such as rails, ladders, drains or other similar hardware within 3m (10 ft.) of
the spa or hot tub shall be bonded to the equipment grounding bus with copper conductors not smaller than
No. 6 AWG.
5) Test the ground fault circuit interrupter before each use of the spa.
6) Before servicing any electrical components of the system make sure that the power supply is switched off.
ATTENTION: ELECTRICIAN & SPA OWNER
PICO FUSE
Balboa Spa packs contain a special fuse, referred to a “Pico fuse”.
This special fuse is designed to open (burn out) if:
a) There is any problem with how the electrical supply is connected
b) There is a power surge to the spa pack
This fuse is not replaceable and the entire spa pack is considered destroyed.
WARNING!
DOC: OM-SRULTIMATE-19
Sunrise Spas 2019 Ultimate Collection Owner’s Manual
13
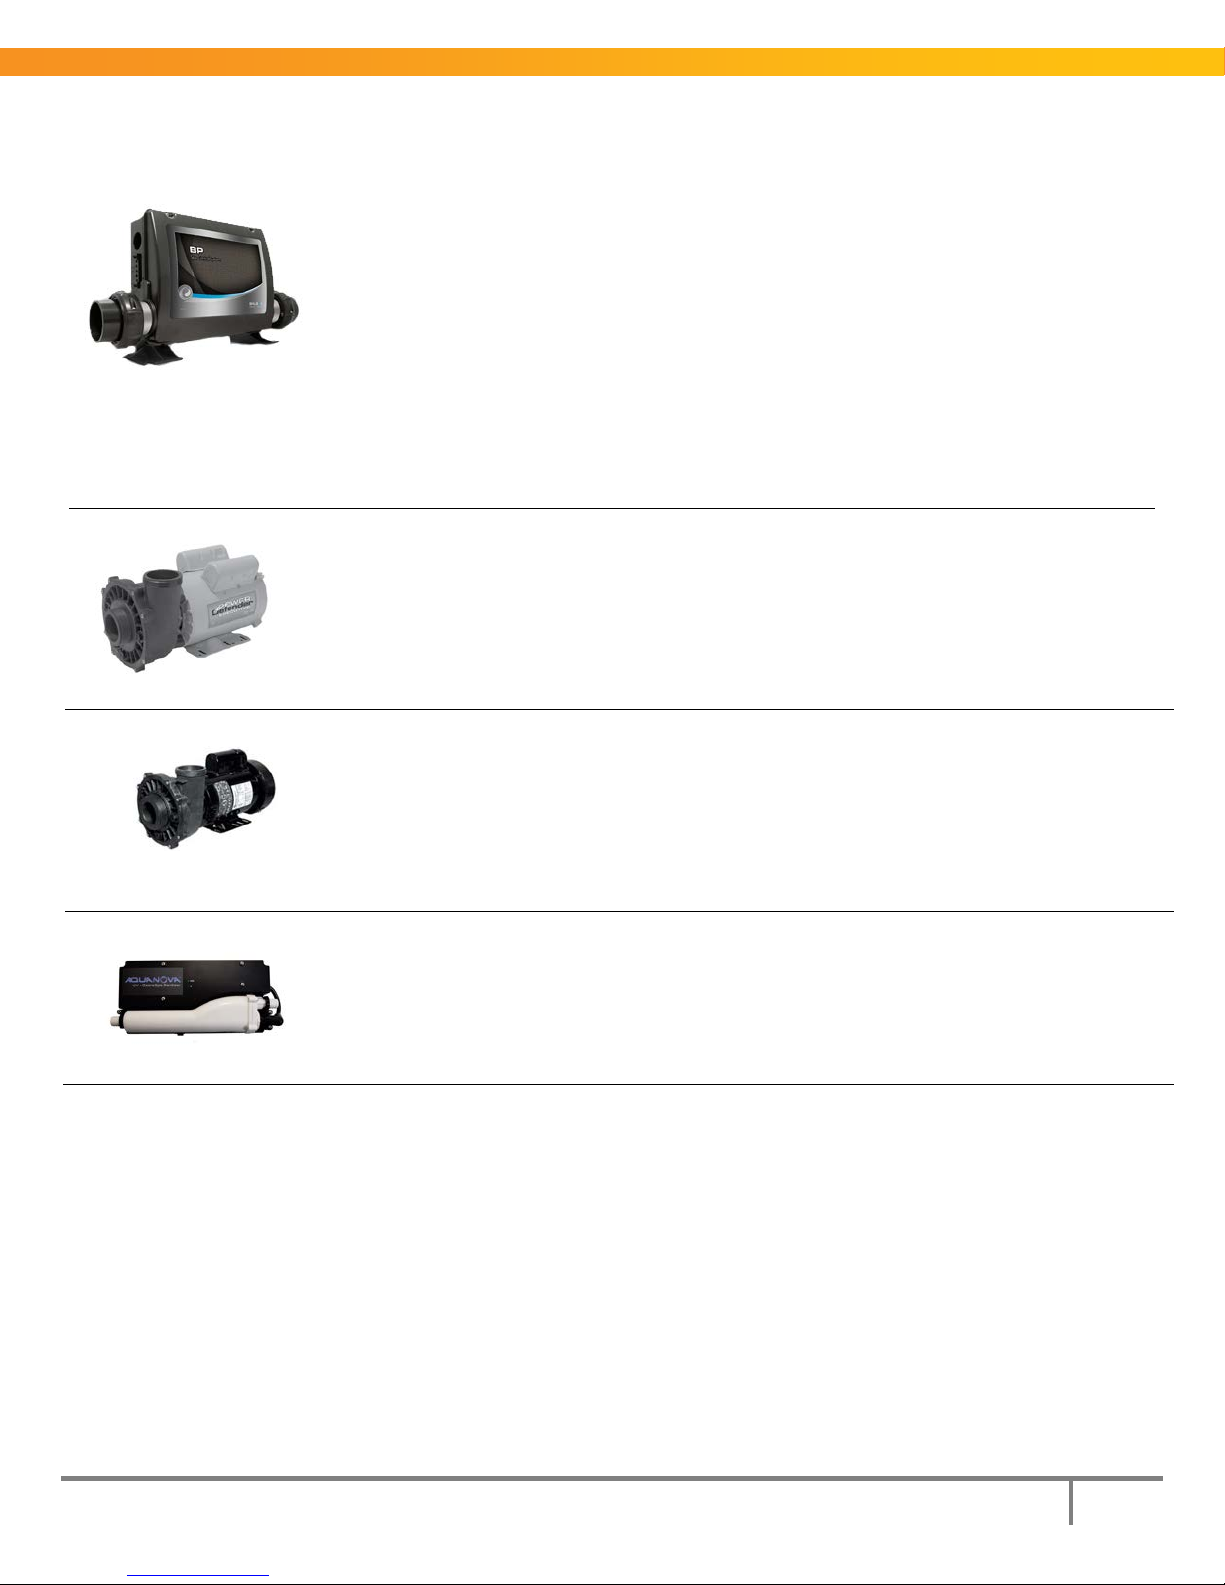
BP SERIES SPA PACK
Power Requirements
Power Up Screen
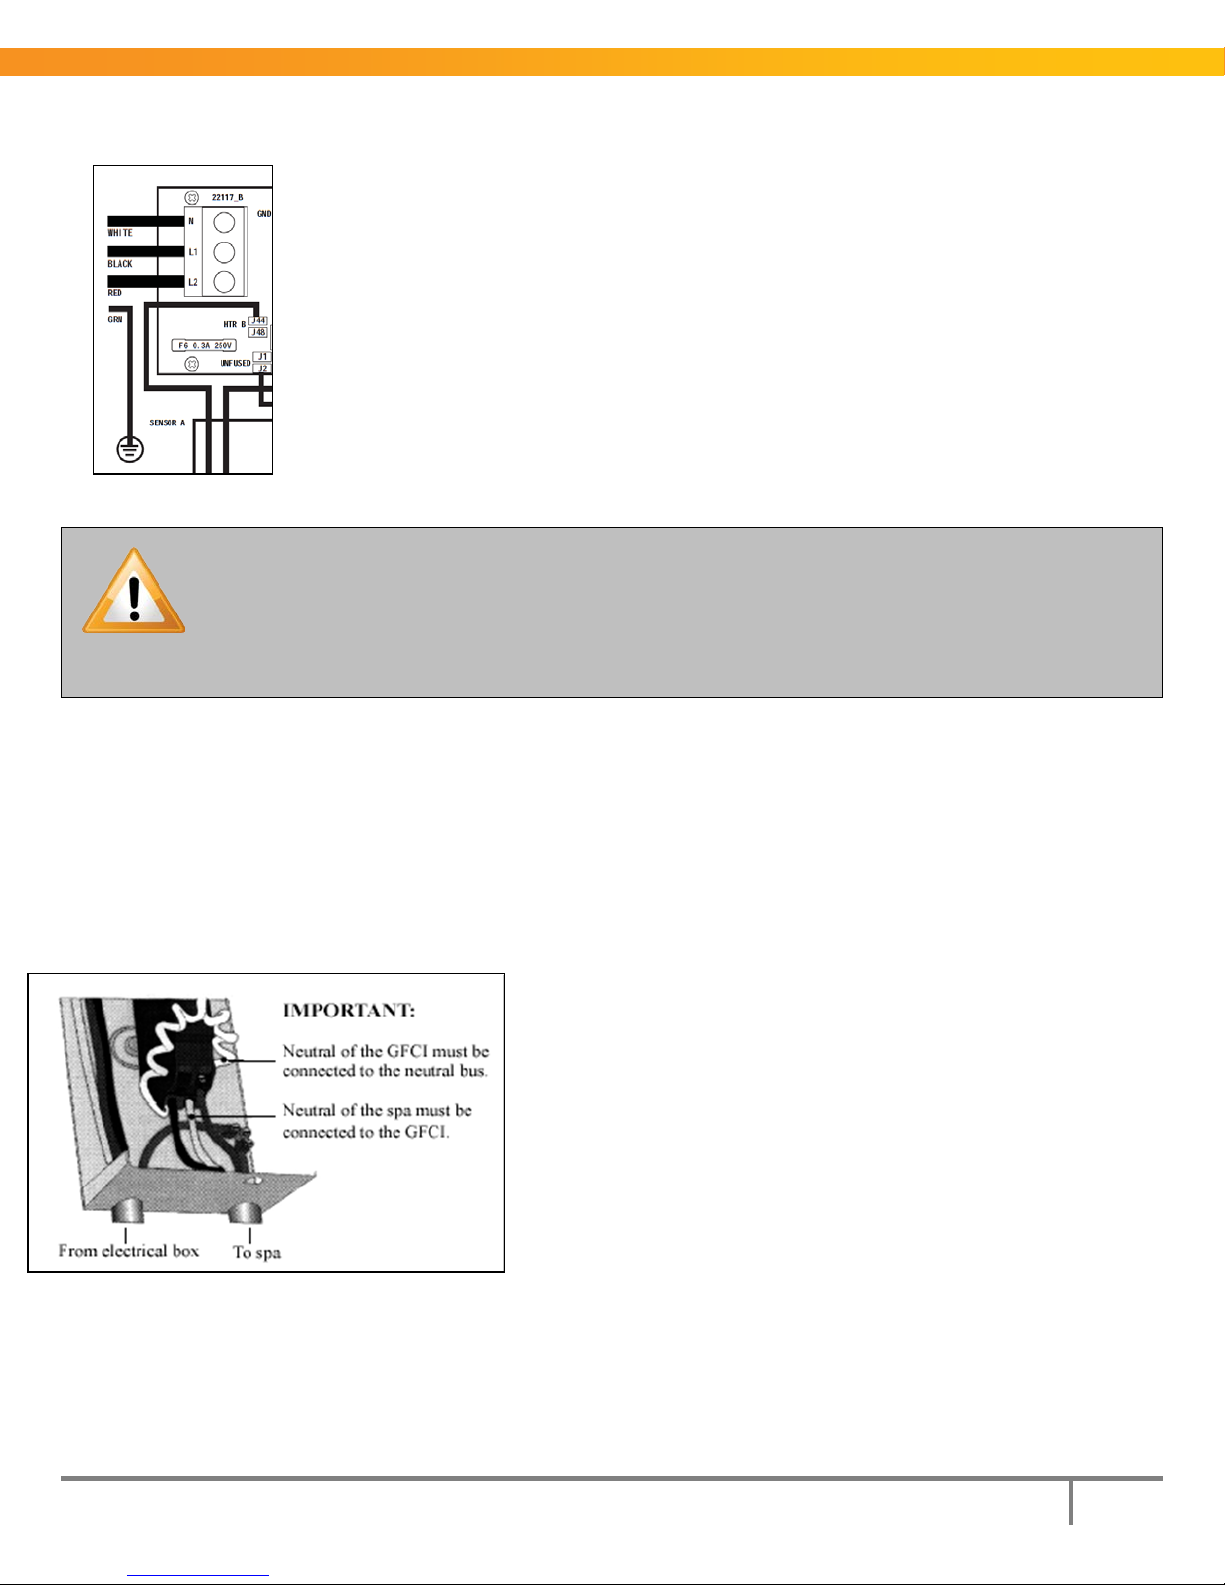
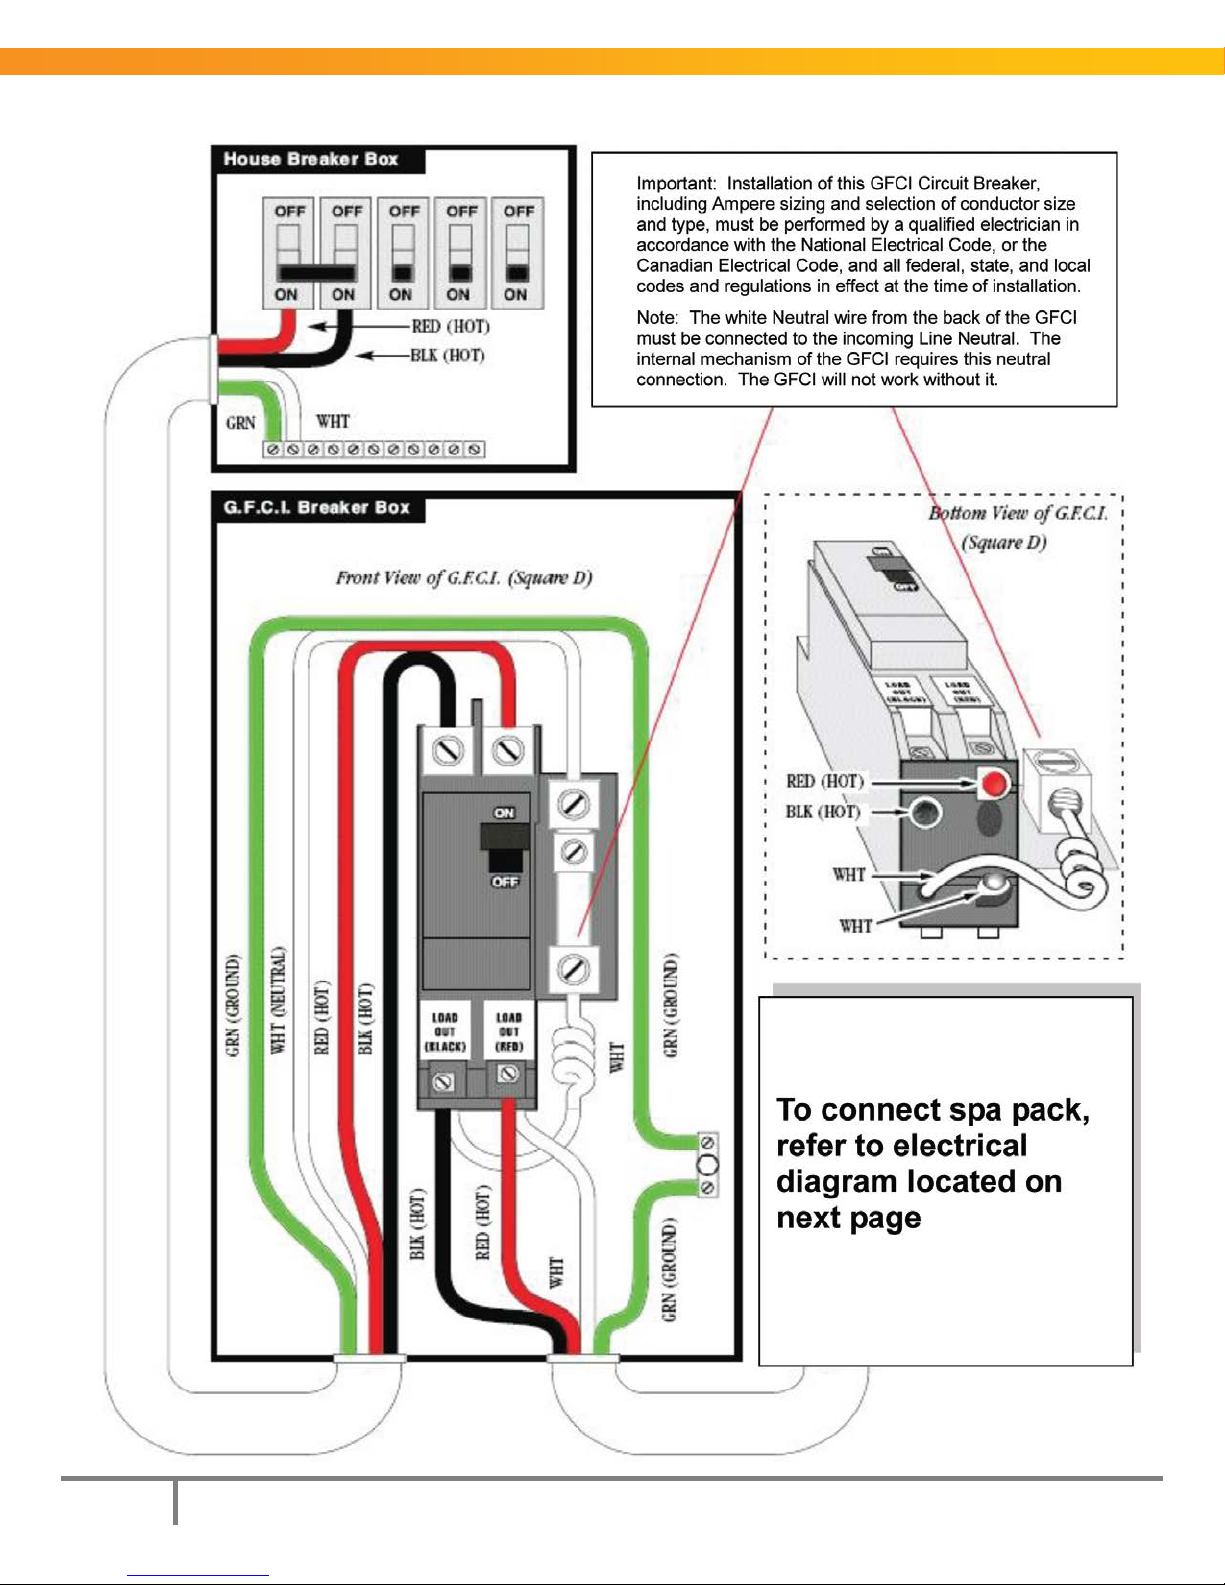
230 VOLT SUPPLY CONNECTION
240VAC, 60Hz, Class A GFCI-protected service
4 wires (Hot-Line 1, Hot-Line 2, Neutral, Ground)
For current requirements & breaker rating see nameplate on spa.
Each time the system powers up, a series of numbers is displayed. After the start-up
sequence of numbers, the system will enter Priming Mode. Next, refer to the User Guide
for your keypad at the back of
Electrical installation must be carried out by a qualified electrician strictly in
accordance with local governing codes.
Use only Class A Ground Fault Circuit Interrupter.
TYPICAL NORTH AMERICAN GFCI
this manual.
CAUTION:
Several different models of GFCIs are
available on the market.
Note that our illustrations are generic.
DOC: OM-SRULTIMATE-19
14
Sunrise Spas 2019 Ultimate Collection Owner’s Manual
DOC: OM-SRULTIMATE-19

Sunrise Spas 2019 Ultimate Collection Owner’s Manual
15
Amp rating of spa
Supply Wire type and size
Over Current
Protection (amps)
More than
To
60C copper, AWG
75C copper, AWG
20
24
10
10
30
24
28 8 10
35
28
32 8 8
40
32
36 6 8
45
Note:
SPECIAL NOTE: DISCONNECT SWITCH
SPECIAL NOTE: EMERGENCY SWITCH
Wire Size and Over Current Protection (Canada/US)
16 20 10 10 25
36 40 6 8 50
40 48 4 6 60
If your GFCI trips immediately on start-up or during the opening use of the spa, DO NOT USE THE SPA and
take precautions to ensure that no one uses the spa, while you contact your dealer/electrician. GFCI trips on newly
installed spas are predominantly caused by mis-wired GFCIs.
This unit must be connected to a disconnect that de-energizes power to the entire unit for servicing, maintenance or
the like. The disconnect switch, with marked "OFF" position, must be located within sight from the equipment and at
least 5ft. (1.52m) from the inside walls of the spa.
This unit is intended for use in a single family dwelling. When used in locations other than a single family dwelling, a
clearly labelled emergency switch, readily accessible to the occupants and at least 5ft. (1.52m) away from the unit,
shall be provided as part of the installation.
DOC: OM-SRULTIMATE-19
16
Sunrise Spas 2019 Ultimate Collection Owner’s Manual
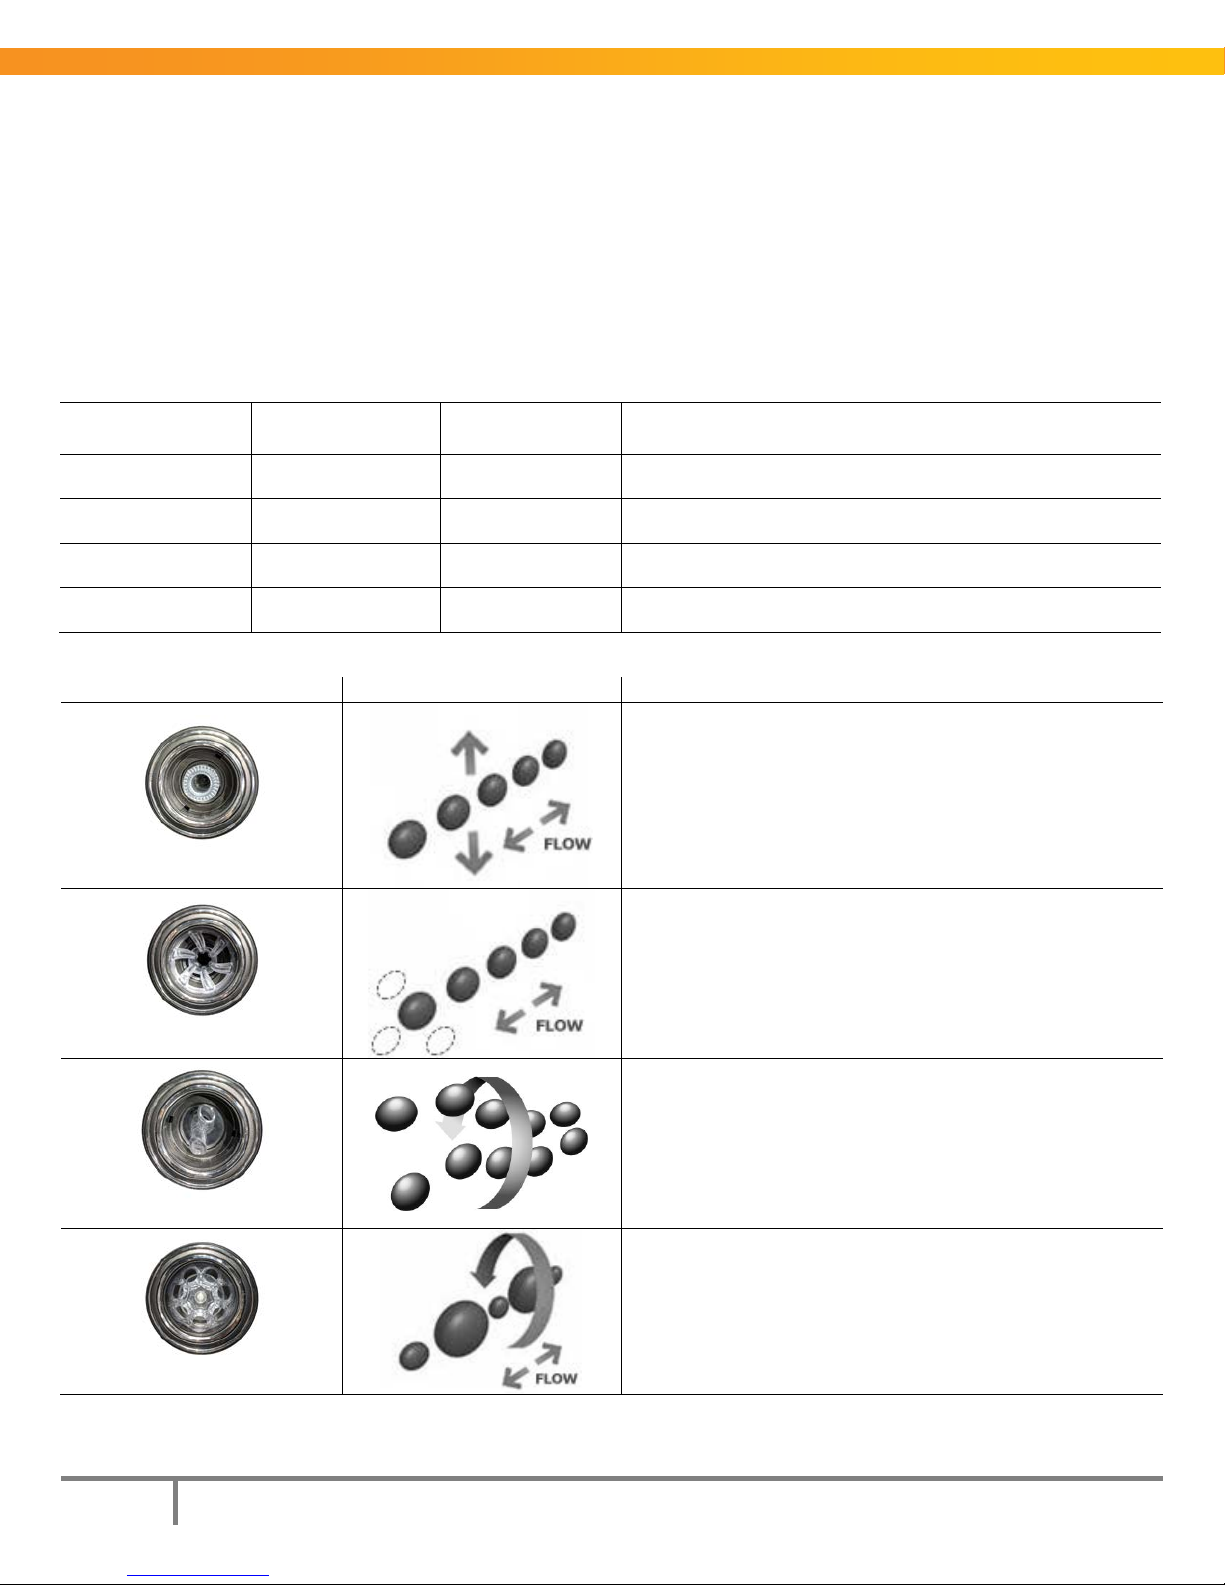
Jet Type
Size
Adjustable Flow
Where it is most often used
Nozzle Type
Hydrotherapy Effect
Description
Directional
Rifled
Twin Roto
Massage
WHAT’S INSIDE YOUR SPA
HYDROTHERAPY JETS
A variety of jet sizes and internal styles are used in unique seating patterns to achieve superior hydrotherapy in
individual spa models. Therefore, not every jet described or pictured below is in every model. Not all jet internal styles
are available in all jet sizes.
To adjust the water volume, simply turn the jet face clockwise to the off position or counter clockwise to the maximum
position. If you move too hard to maximum you will release the internal from the jet body.
Cluster 2 ¼” (56mm) Yes Palm jets, loungers, seat backs, calves, neck collars
Mini 3 5/16” (84mm) Yes Seat backs, footwells, loungers
Poly
Power 5 ¼” (133mm) Yes Seat backs, footwells, loungers
4 ⅜” (105mm)
Yes Seat backs, footwells, loungers
A steady volume adjustable stream of water with
adjustable nozzle direction
A volume adjustable stream of water that gives the feel
of a rotating stream of water without moving parts.
A volume adjustable jet with a fixed split nozzle that uses
the water flow to deliver dual streams of water in a
rotating pattern.
A volume adjustable stream of water that rotates. The
combination of the moving inner mechanism and front
face gives an ever changing pattern to the massage.
DOC: OM-SRULTIMATE-19
Sunrise Spas 2019 Ultimate Collection Owner’s Manual
17
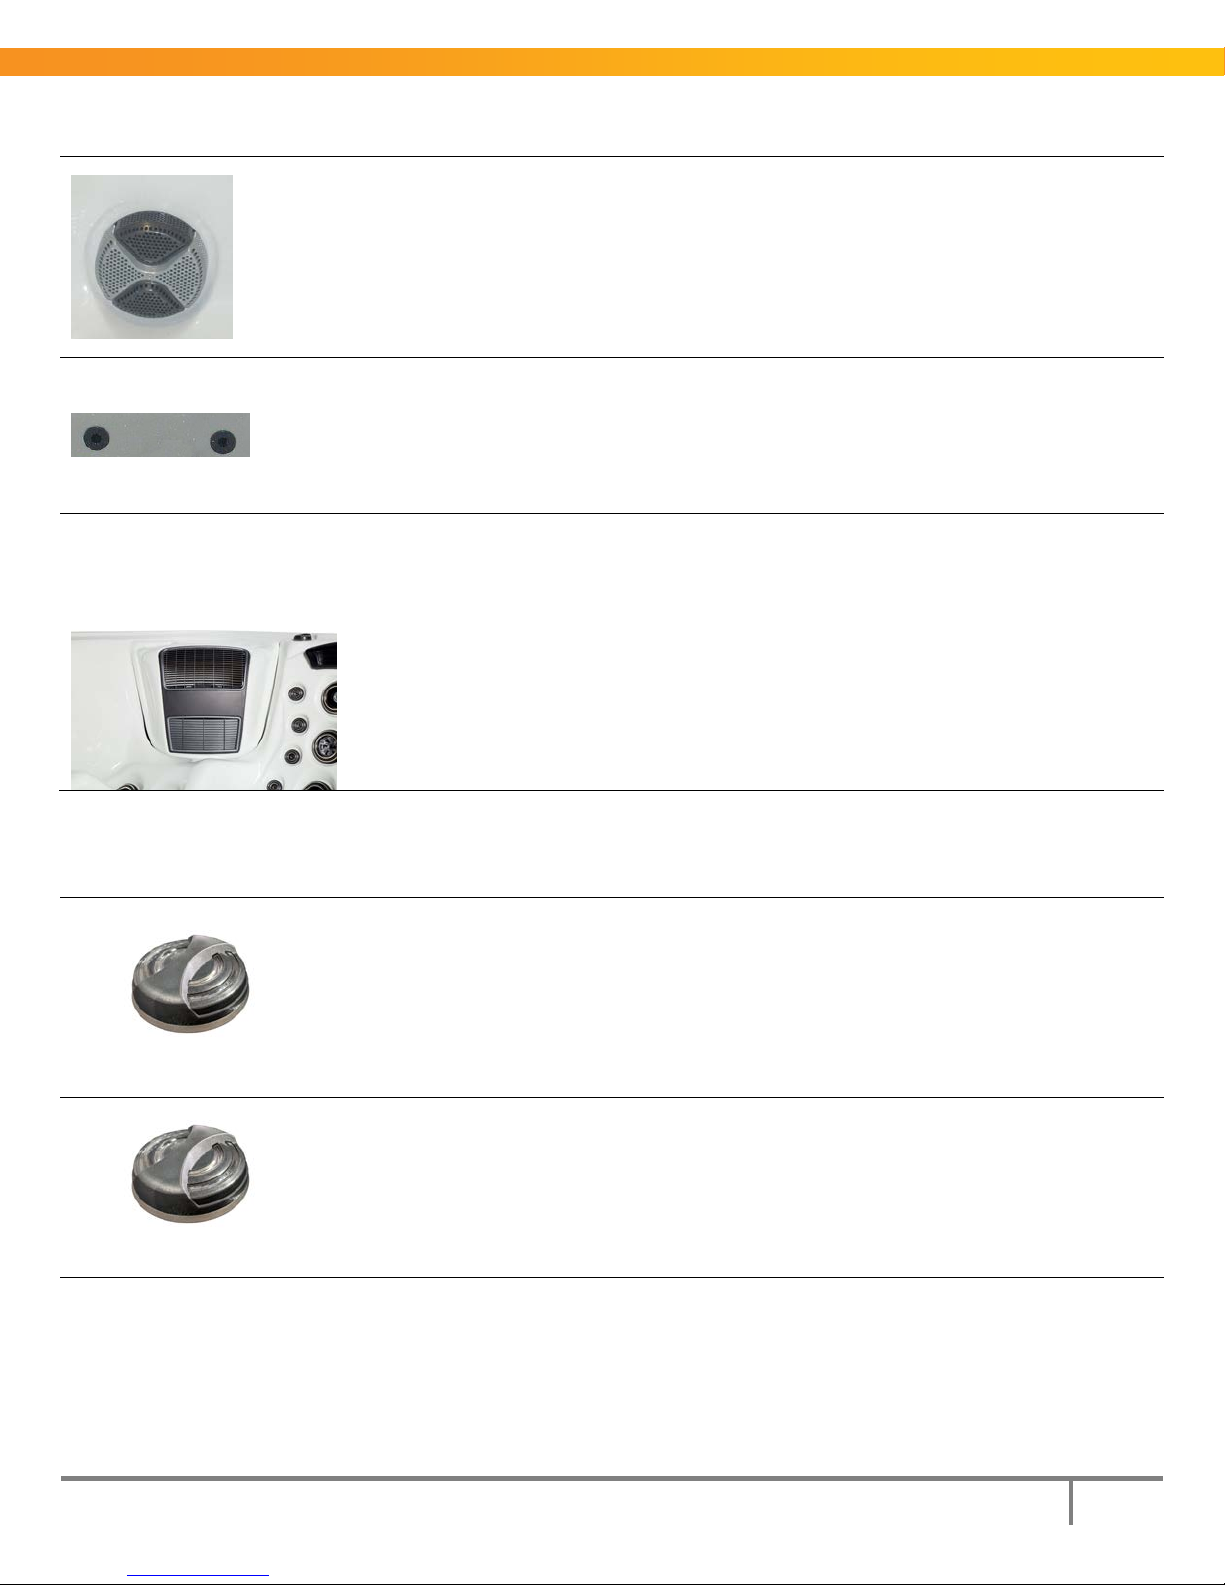
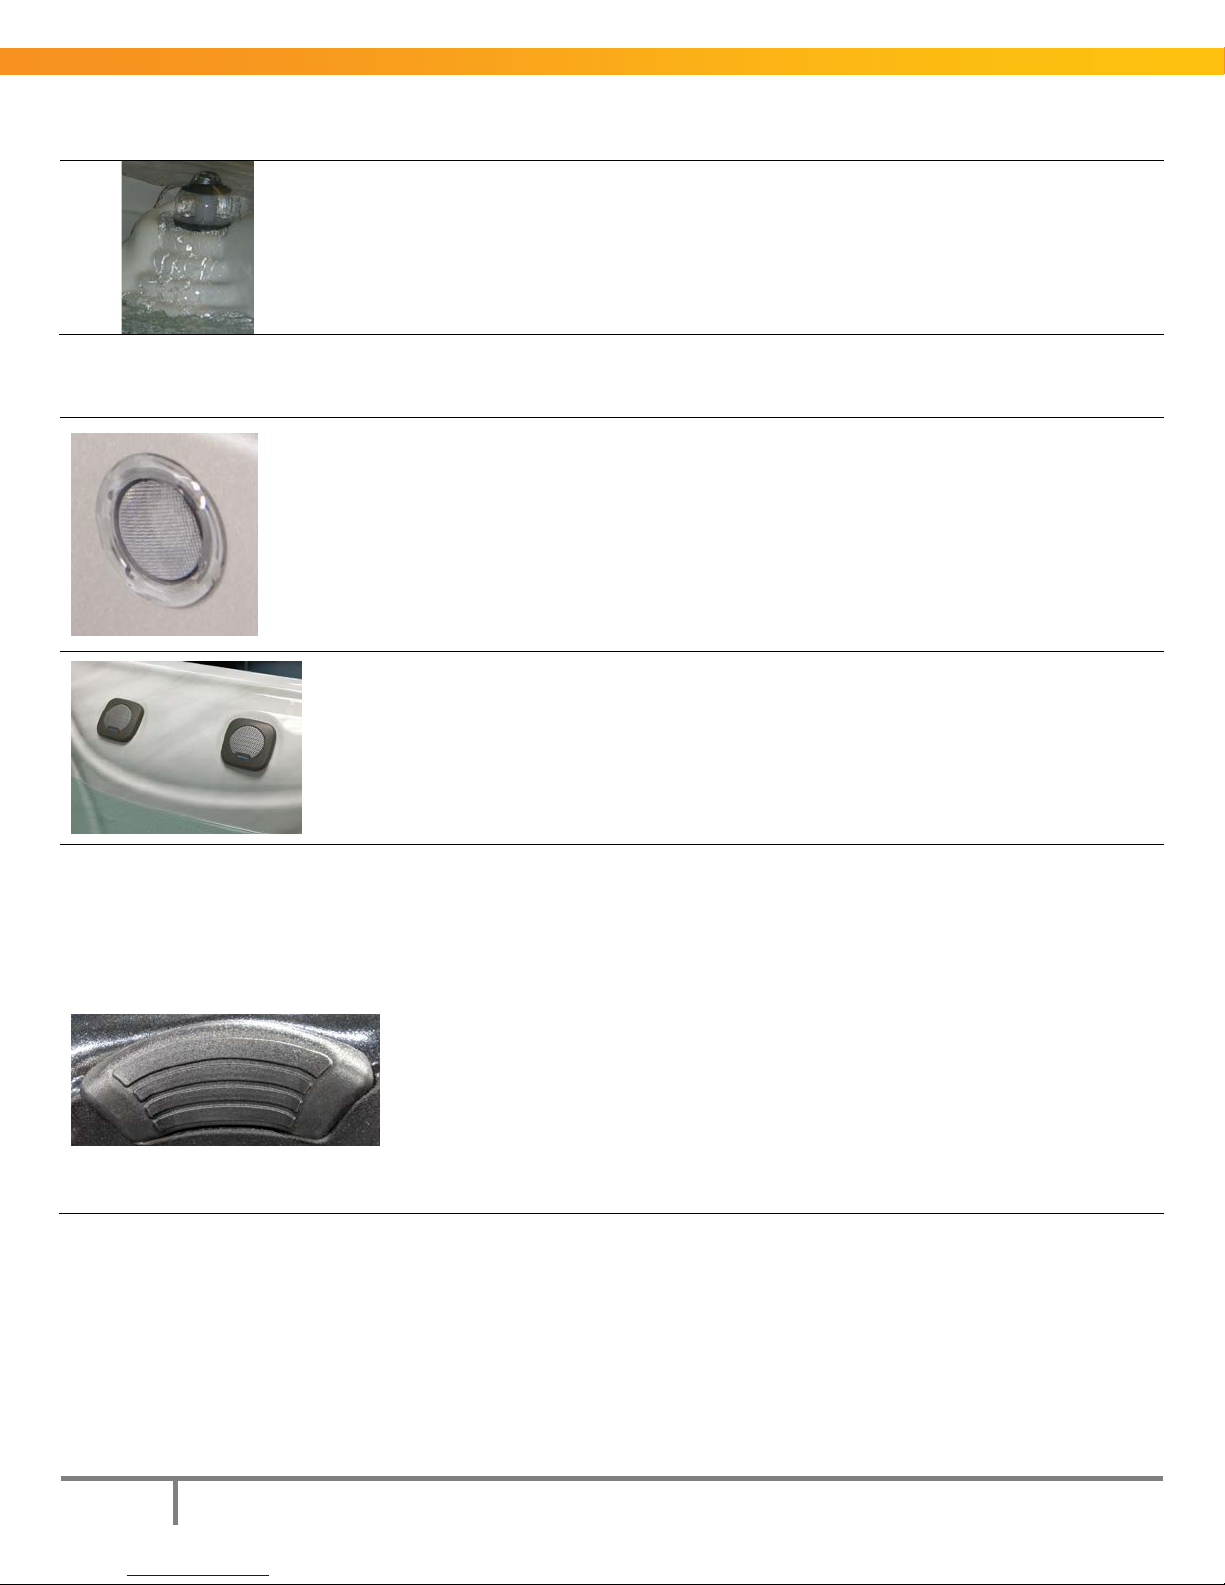
Suctions
All suctions in our spas are VBG compliant for your safety.
Ozone/AquaNova Returns
Skimmer/Filter
Air Controls
On/off Water Valve
XL Plus
OTHER INTERNAL FITTINGS
These multi-holed, anti-vortex fittings in the footwell provide the intake water for the pump(s). A
powerful suction is produced here when the jet pumps are turned on. On systems with a
circulation pump, the bypass suction fitting (smaller than regular suction), may have little to no
suction on it, since the circulation pump has a lower flow than the jet pump and the suction is
only active as the filter(s) become clogged.
These special thru wall fittings return water to your spa that has passed through the ozone or
AquaNova system. If you do not have either ozone or AquaNova on your spa, these fittings will
not be present.
This is the housing for your cartridge filter(s) and provides skimming action to remove surface debris. Some models
have a removable basket from which debris can be dumped.
DECK CONTROLS
Located on the deck of the spa, these valves control the amount of air being mixed with
the water stream at each jet. The minimum to maximum movement is approximately ¼
turn or on/off for toggle type. More air will increase the massage effect from the jet.
Proper air draw is achieved when the jet pump is operating on high speed, particularly if
the pump is a 2-speed pump.
This positive seal valve is used to turn the water feature on/off. Adjust it as needed to
achieve the best effect from the water feature.
DOC: OM-SRULTIMATE-19
18
Sunrise Spas 2019 Ultimate Collection Owner’s Manual
WATER FEATURES
LED Pop Up Water Feature (AQUA BUBBLER)
LED Spa Light
Aqua-Coustic Audio System
Head Cushions
MISCELLANEOUS
When the waterfall valve is opened this water feature pops-up and a mini geyser of water
comes out of the top. It then cascades over the top “shade” & forms the geyser effect.
Used to trickle water over built in terraces in the spa shell.
This clear or slightly bluish fitting is usually in the vertical surface of the spa steps. It is
controlled by a designated switch on the keypad. It serves as a safety feature; lighting the
spa's contours for those entering or exiting the spa.
1” Mid-High range, compact, waterproof speakers
The head cushions you will find in our spas are designed to add comfort to your spa experience. Rest you head as you
sit back and enjoy the hydrotherapy jets soothing your back and shoulders. You'll find all our head cushions functional
and comfortable.
DOC: OM-SRULTIMATE-19
Sunrise Spas 2019 Ultimate Collection Owner’s Manual
19
free standing spa pack
horizontal heater
Power Saver Pump
2-Speed Jet Pump
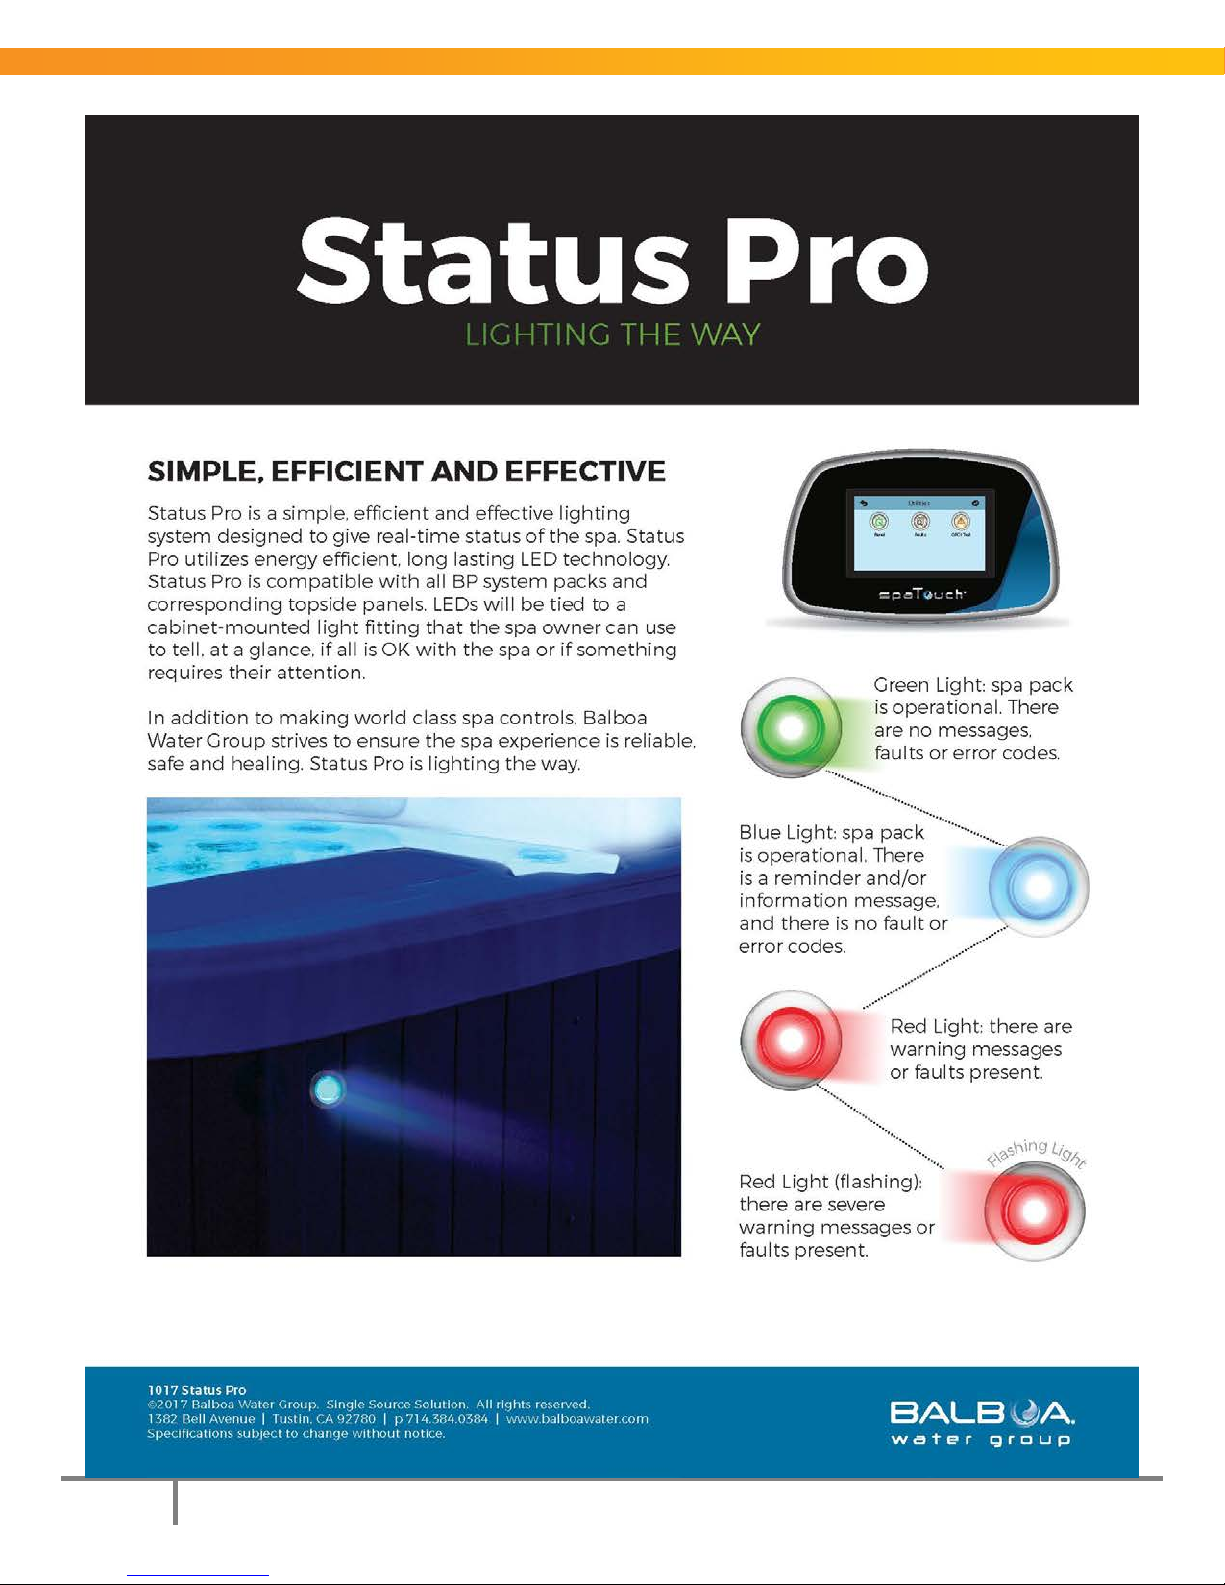
03/UV Sanitizer (AquaNova)
WHAT’S UNDER YOUR SPA (THE EQUIPMENT)
The spa's control pack, circulation pump, heater, drain connection and ozonator may be
accessed by removing the cabinet panel along the control side of the spa. Removing the
panel(s) to the right or left of the spa's main access panel will allow access to the jet
pumps, blower and any other optional equipment. On some models, all equipment is
accessible from the main access panel.
The
board) for the pump(s) blower, light, keypad etc., as well as the heat regulating system. The spa pack is also where the
electrical supply connections are made. The
This 2 pole/6 pole pump is designed to provide superior hydrotherapy on high speed while
saving energy on low speed (heating & filtering speed). Its low speed amp draw of only 1A
makes it quiet yet it filters as well if not better than a dedicated circulation pump.
houses the receptacles and switching apparatus (circuit
is attached to the bottom of the spa pack.
A high performance 2-speed jet pump provides the power to operate the various
hydrotherapy jets in the spa, at the optimum level.. Some models may have a 2
pump to properly power the jets. Gate valves in the plumbing lines allow easy servicing of the
heater. Safety clips on the valve shafts keep the valves open during use.
This unit creates both ozone and UV in perfect synergy to sanitize the spa water. Ozone
introduced into the unit’s chamber reacts with the UV light to create hydrogen free radicals
for advanced oxidization potential (AOP). This results in only oxygen bubbles emerging from
the dual return fittings.
nd
or 3rd jet
DOC: OM-SRULTIMATE-19
20
Sunrise Spas 2019 Ultimate Collection Owner’s Manual
START-UP
HOW YOUR SPA WORKS
Circulating, Heating and Filtering
Low speed of a 2 speed pump (depending on model).
Immersion heating element within a stainless steel heater barrel.
Filter System
Multi-cartridge system that is accessible from inside the spa.
Your spa may be equipped with a split filter system. Two cartridges on jet pump 1 and the others on the remaining
pumps. The clean-up cycle of the spa pack turns pump 1 on 30 minutes after you have shut it off or it times out. It will
run for 30 minutes to help clean up the spa. This clean-up cycle is adjustable in 30 minute increments up to 4 hours.
Hydrotherapy
A combination of up to three (3) single or 2-speed jet pumps provides a gentle, low-speed therapy or intense, highspeed therapy. The jets have directional nozzles, multiple directional nozzles, fixed nozzles or rotating nozzles. Most of
the jets have the ability to have the water volume adjusted to your therapy needs.
Multi-Level Hydrotherapy – U1
The U1 has 3 jet pumps. Pump 3 is dedicated to the lounger jets and Pump 1 & Pump 2 are uniquely plumbed to
provide multi-level therapy to the rest of the jets in the spa.
Pump 3 is dedicated to the lounger jets. It is a 2-speed pump, so you have both low and high-speed therapy choices.
Back jets have a dedicated air control. Thigh, calf and foot jets have a separate air control. Adjust the amount of air as
desired. Each of the jets in the lounger has volume control by simply moving the jet face clockwise/counter clockwise.
Adjust the flow volume as desired along with the air control setting and pump speed to get the desired hydrotherapy
effect.
DOC: OM-SRULTIMATE-19
Sunrise Spas 2019 Ultimate Collection Owner’s Manual
21
Pump 1 is dedicated to a group of lower body jets as shown on the drawing. This pump is also a 2-speed pump, so
choose low or high speed as desired. There are 2 strategically placed air controls to help you adjust the air intake of
these jets. Just like the lounger jets, each jet on pump 1 can be volume adjusted.
Pump 2 is dedicated to the rest of the jets in the spa as shown on the drawing. Once again, there are strategically
placed air controls to adjust the air intake of the jets and each jet can be volume adjusted.
Pump 1 and 2 in Combination
By choosing pump speed, jet volume and setting of air controls, the user can create multiple levels of hydrotherapy.
Each seat in the spa except for the lounger has jets that are on pump 1 and pump 2.
DOC: OM-SRULTIMATE-19

22
Sunrise Spas 2019 Ultimate Collection Owner’s Manual
Light Sequence
Deck Controls
Air controls mix air with the water stream coming out of the jet. A diverter valve is used on some models to dedicate
pump flow to specific groups of jets or share it amongst several jets. Models with the waterfall feature have a control
valve to turn the waterfall on/off.
A digital topside control panel allows you to activate the pumps, blower and light plus set the temperature that you
want the water to be. The topside display also shows error messages and tells you if any special spa pack features are
operating, including protection against overheating and freeze-up.
Lighting
Your spa is equipped with a multi-LED spa light allowing you to enjoy the effects of a colour changing LED light
system. LED lights around the perimeter of the spa create a special effect of colour changing lights.
LED Light Operation
Your spa may be equipped with an LED light system consisting of perimeter lights, lighted water feature(s), lighted jets
and a thru wall underwater spa light, depending on the spa model and options. The system is controlled using the
LIGHT key on the topside control panel. The spa pack is factory set/programmed for simple on/off spa light operation.
Note that not all colours are available on all LED systems.
Operation: To move from setting to setting simply turn the LIGHT key on/off.
If the light is turned OFF for more than 5 seconds, the sequence automatically restarts at the last colour shown.
The System uses a special MZ controller that has a unique colour sequence.
Colour Wheel (Slow fade from colour to colour)
Green
Aqua
Magenta
Blue
Red
Colour Jump (A fast change from colour to colour)
DOC: OM-SRULTIMATE-19

Sunrise Spas 2019 Ultimate Collection Owner’s Manual
23
DOC: OM-SRULTIMATE-19
24
Sunrise Spas 2019 Ultimate Collection Owner’s Manual
DOC: OM-SRULTIMATE-19

Sunrise Spas 2019 Ultimate Collection Owner’s Manual
25
IMPORTANT:
Now, read about the keypad operation, user settings, system defaults, automatic functions and display messages
included in this manual (see User Guide in the Index).
Take a few minutes to try the various keys and features on your new spa.
Always view the temperature display before entering the water. For your own personal safety, do not enter when the
temperature exceeds the maximum set point of 40°C (104°F).
FILLING YOUR SPA
Okay, your new spa has been connected to the power and you have a basic understanding of how the equipment
works and what the jets can do for you. We know you are anxious to fill the spa and get it started, but please read this
section carefully before you fill your spa.
1) Make certain that the breaker or fuse(s) that supplies your spa equipment is off.
2) Wash the spa surface thoroughly with warm water and a soft cloth only to remove any construction or
transportation debris.
3) Check that the drain connection is closed.
4) Check that the unions on the spa pack and pump(s) are tight. They can loosen during transportation.
5) Remove the filter cartridges. Open waterfall/water feature ON/OFF valve before filling. Refer to graphics on
valve handle or simply turn counter clockwise to open.
6) Begin filling the spa with a standard garden hose. Fill by inserting hose into filter body, in the case of a lilypad
style filter, or by positioning hose into a cartridge mount located in the filter well. Do not fill your spa with soft
water (consult dealer). If possible, your source fill water temperature should not be less than 70°F (21°C). Do
Not operate the spa with low water levels. A level 4" over the bottom of the skimmer mouth is recommended.
Maximum initial water level should be 6” below the spa lip. Adjust as needed based on number of bathers
using the spa. Consider adding an overflow to your spa if you are regularly having enough bathers in the spa to
significantly raise the water level such that damage to equipment may occur.
7) Increase the fill pressure slowly to prevent surface damage by a jerking hose.
8) Visually check all lines for leaks and correct immediately. If you cannot stop the leak simply by tightening a
union or resetting an "O" ring or gasket, contact your dealer immediately.
9) Turn on the main power at your electrical panel.
10) The topside control panel will initialize and begin its’ start-up procedure. Then the system will start the
circulation pump(or low speed pump) and the heater.
11) Re-install the filter cartridges.
Once you feel comfortable with the operation of your spa's controls, set the temperature to the desired level
(100°F/38°C is an excellent starting point). Close the air controls and cover the spa with your hard cover. Heat up
times will vary based on volume of water in the spa, but you can generally expect 6-8 hours to reach maximum
temperature. Spas running on 120VAC will have a longer initial heat-up time.
DOC: OM-SRULTIMATE-19
26
Sunrise Spas 2019 Ultimate Collection Owner’s Manual
Note:
REMOVAL AND INSTALLATION OF THE CLICK
CHANGE CLADDING INSERTS
Whether you are removing a cladding section to replace a damaged one or taking off all of them to replace with a new
look, follow this procedure to avoid damaging inserts.
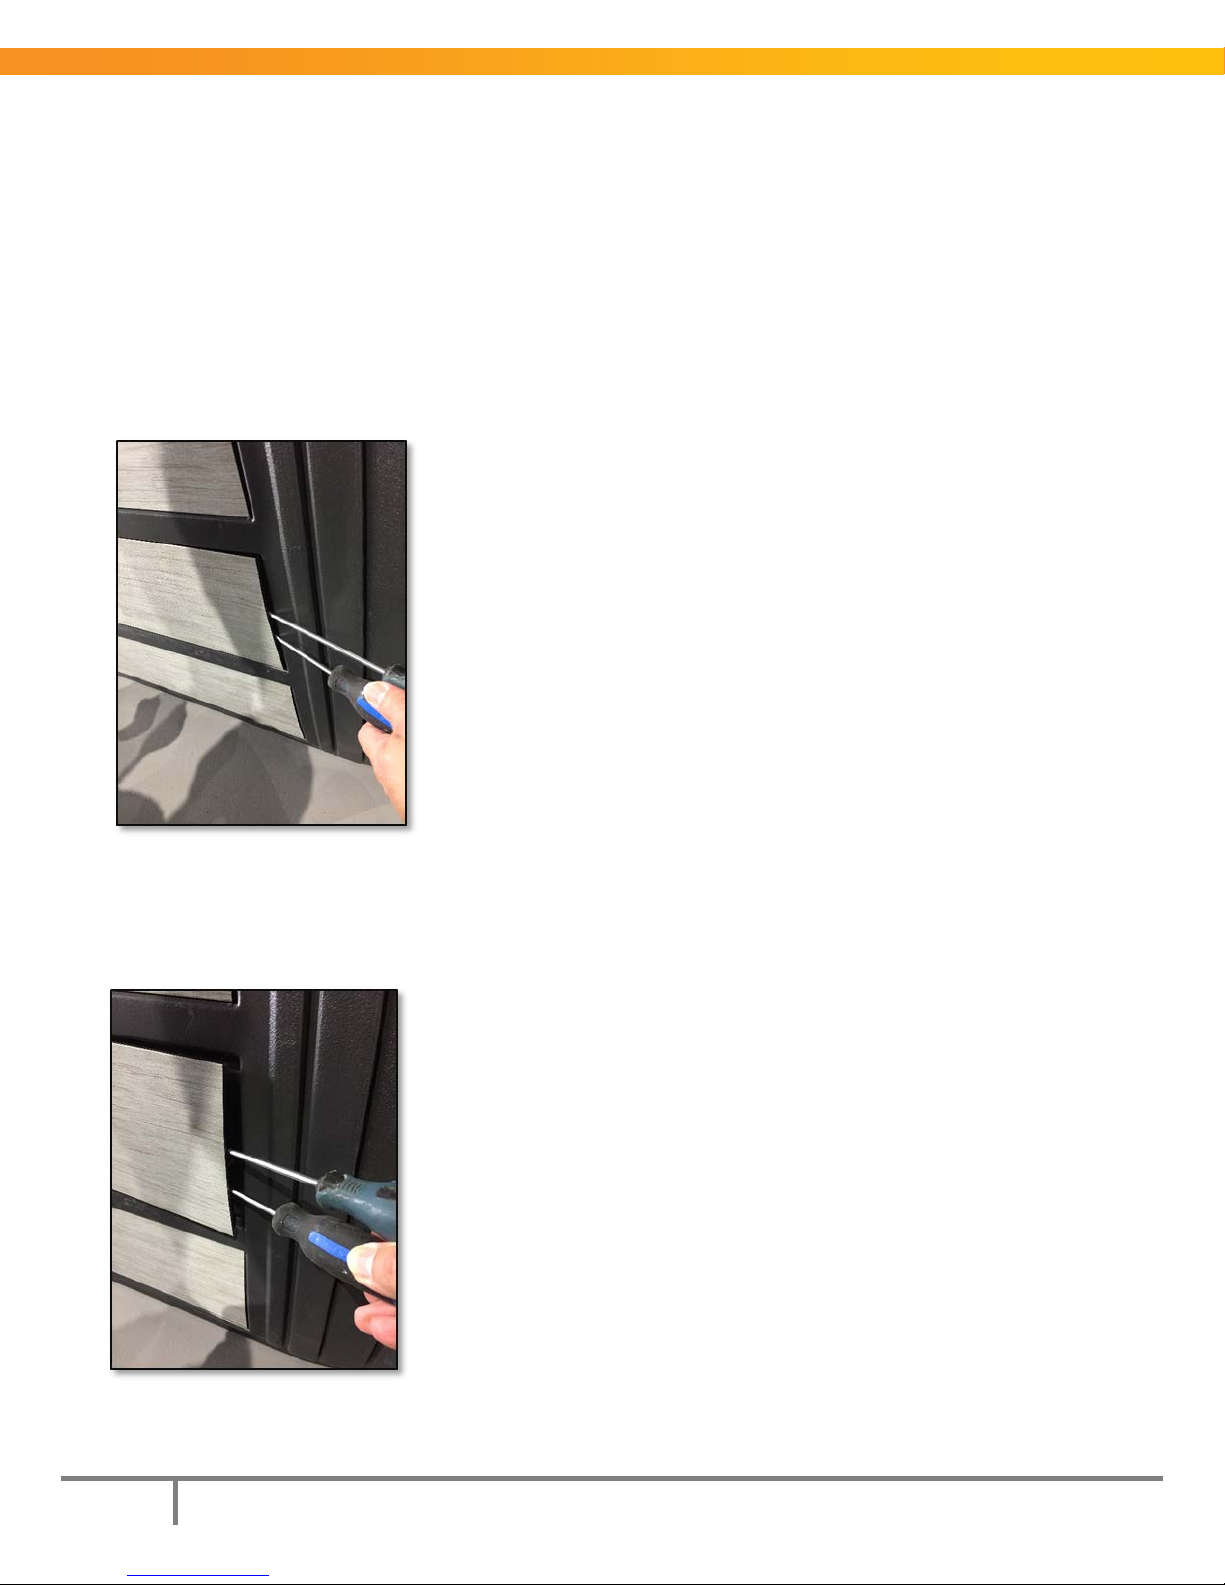
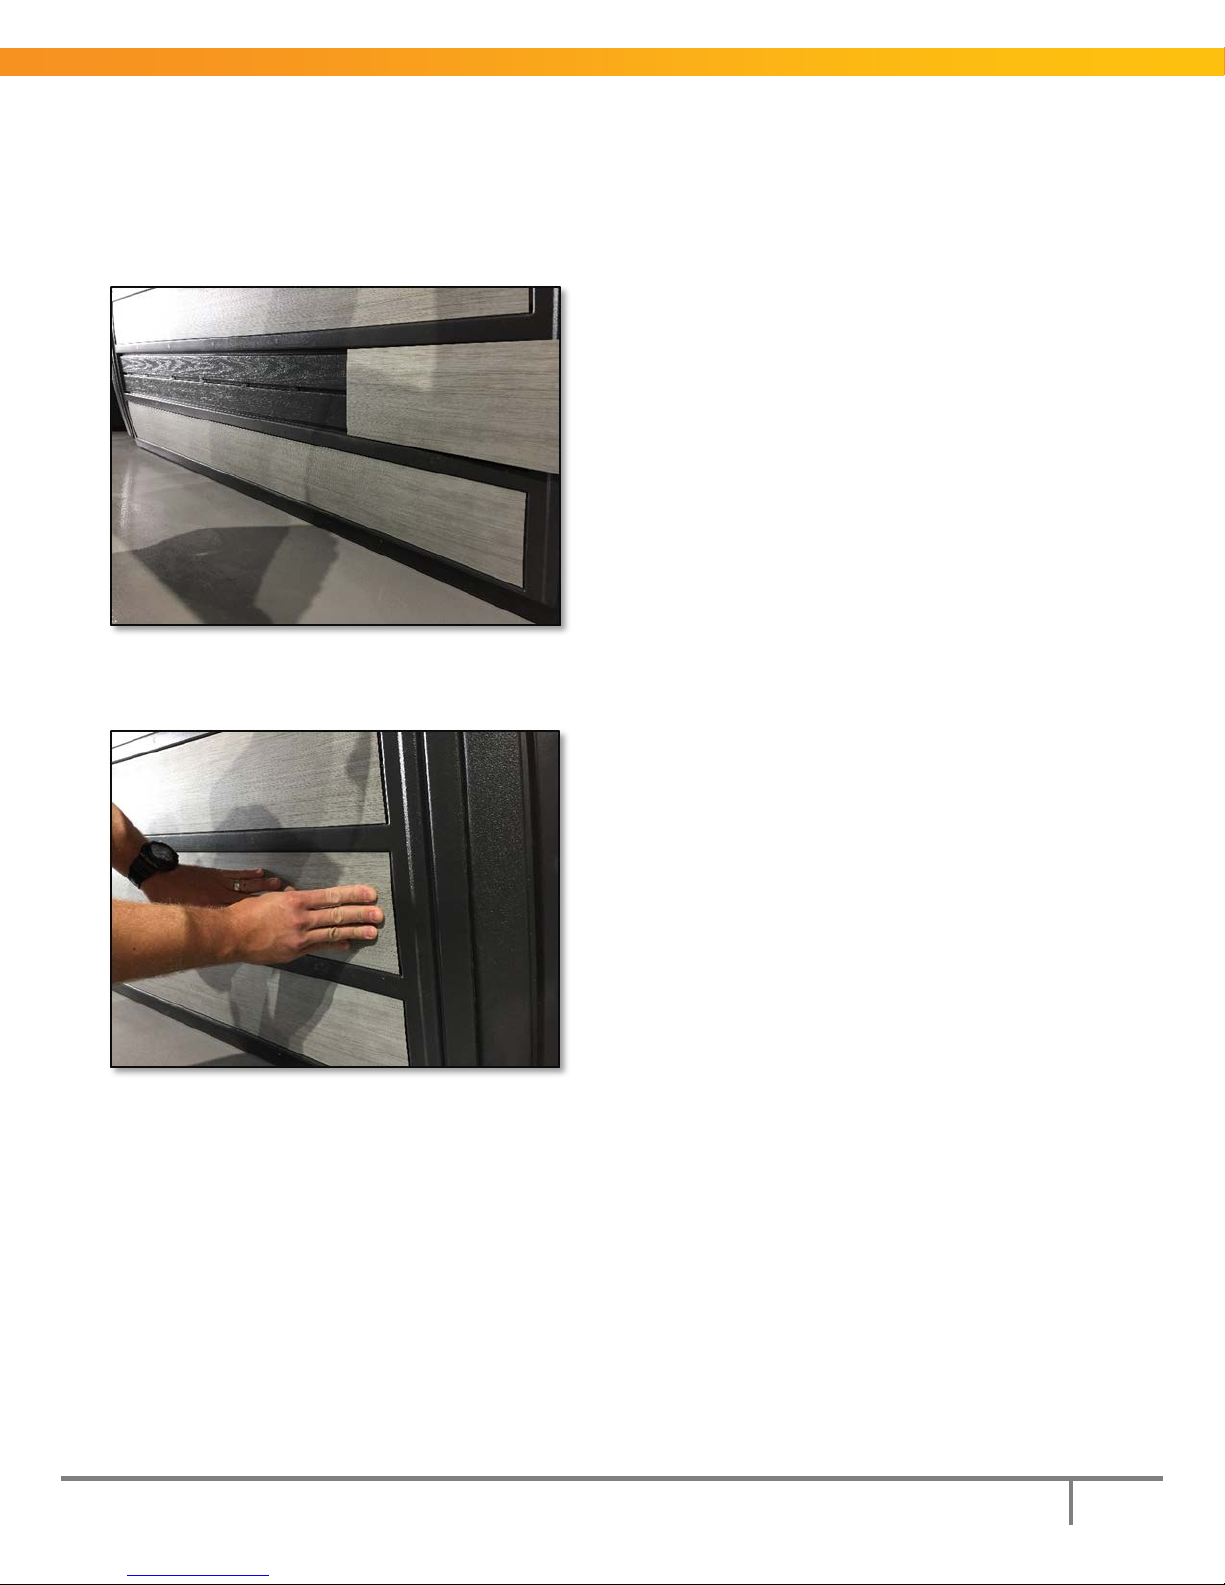
Removal
1) Use 2 flat head screwdrivers
2) Insert 1 screwdriver above the centerline of the insert to be removed and the other below the centerline of the
insert
3) Slide each screwdriver inward to wedge the insert away from the panel
4) Applying equal force to each screwdriver pull the screwdriver handles outward away from the panel. This will
disengage the first section of the retention clip on the insert from the panel
Applying unequal force will result in cracking or chipping the insert.
5) Grab the exposed insert edge firmly with your hand and slide the insert out of the panel
6)
Repeat for each of the inserts you wish to remove
DOC: OM-SRULTIMATE-19
Sunrise Spas 2019 Ultimate Collection Owner’s Manual
27
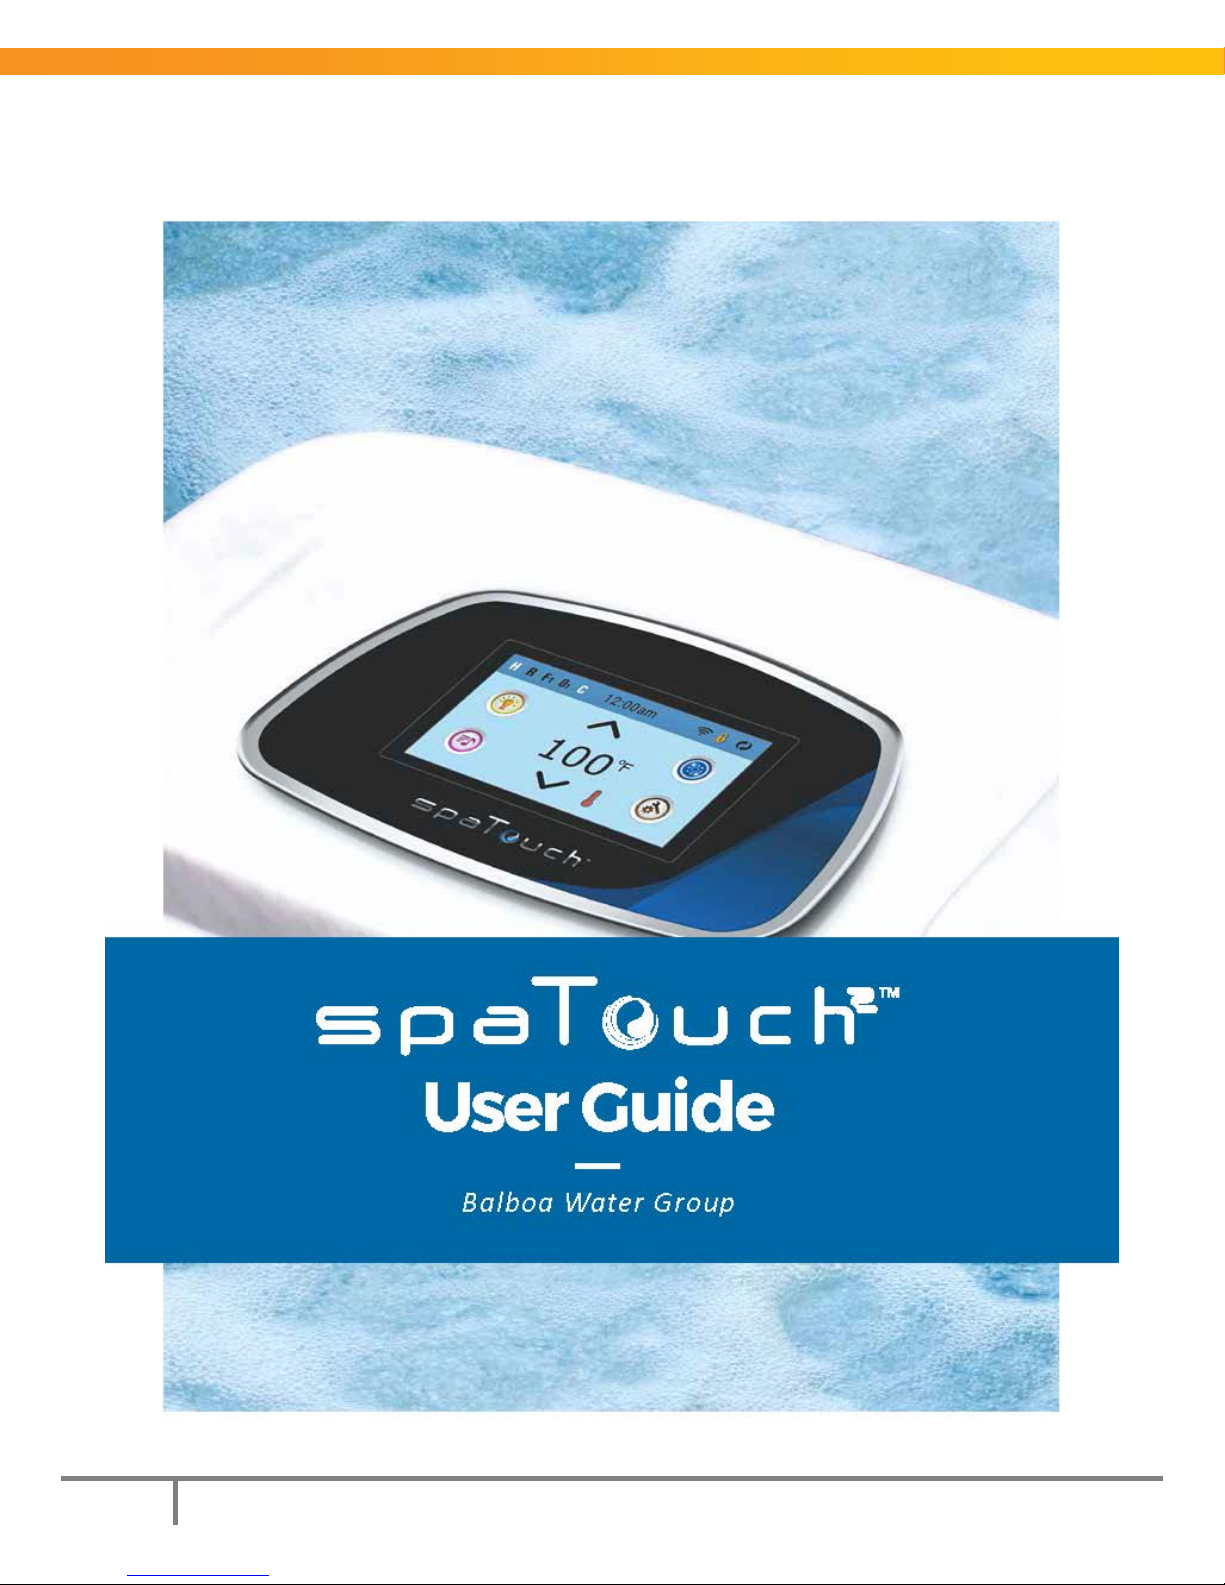
Installation
1) Start at the end and begin lining up the insert with the trace in the panel
2) Slide the insert into the trace until you have the insert fully seated in one end of the trace. This could be right
or left depending on where you started
3) Lock the end of the insert into the trace by using your fingers and pushing with moderate force until you hear
a “click” indicating that the retaining clip on the insert has locked into the trace in the panel
DOC: OM-SRULTIMATE-19
28
Sunrise Spas 2019 Ultimate Collection Owner’s Manual
SPATOUCH 2 ICON DRIVEN USER GUIDE
DOC: OM-SRULTIMATE-19
Sunrise Spas 2019 Ultimate Collection Owner’s Manual
29
DOC: OM-SRULTIMATE-19

30
Sunrise Spas 2019 Ultimate Collection Owner’s Manual
DOC: OM-SRULTIMATE-19
 Loading...