

Page 1

sunrise surf & talk verbindungen einrichten
sunrise surf & talk
User Manual
Page 2

2
Welcome!
sunrise surf & talk: surf the Internet, send and receive e-mails- and make phone calls also without
a fi xed network connection.
It’s the new way of communicating. Suitable for anyone who wants to make calls and have cheap access to the
Internet without a fi xed network connection. From home or wherever you have access to the mobile network.
Speed
With mobile broadband from sunrise, surf the Internet with your PC or laptop at speeds up to six times that of
ISDN.
Flexibility
The sunrise surf & talk box gives you the capability to set up Internet access quickly and easily in the most varied
locations – at home, in your offi ce or on the road. Even mobile project teams can quickly and simply create the accustomed network environment in any location. If UMTS is not available, EDGE is selected automatically. If EDGE is
not available, the unit automatically selects GPRS.
Networking
The sunrise surf & talk box is confi gured to enable you to take advantage of Internet access via a LAN or WLAN
with multiple devices simultaneously (laptop, PDA or PC). It is possible, furthermore, to exchange data between
connected devices. You can, for example, synchronize the e-mail on your laptop and your PC, simply and securely
– regardless of whether you are using a LAN or a WLAN. The sunrise surf & talk box is already set up. All connected computers are linked together in a network and can access among each other the fi les and printers available in
the network.
Security
The sunrise surf & talk box offers comprehensive security measures. The integrated fi rewall protects you against
attacks from the Internet. And the sunrise surf & talk box offers comprehensive protection capabilities for WLAN
networks. WEP, WPA1+2 encryption are available to you. This gives you fl exibility in deciding which type of
protection is right for you (the support for each depends on your computer‘s WLAN interface).
Simple installation
The sunrise surf & talk box is installed in a few steps. You can start surfi ng and talking in no time. Insert the SIM
card for sunrise surf & talk, connect the wall power supply and enter the PIN for the sunrise surf & talk SIM card.
Check the mobile broadband reception quality. Six luminescent bars indicate very good reception. If necessary,
change the location of the sunrise surf & talk box to improve the quality of reception. There is now nothing left to
stand between you and your surfi ng enjoyment.
sunrise surf & talk
Page 3

3
Flexible confi guration
The administrative interface is the central coordinating point from which to confi gure your sunrise surf & talk box.
To access the administrative interface, all you need is a browser on your computer. It is not necessary to install any
additional software. You can log in comfortably through the protected administrative interface and change the
security settings for a WLAN or an IP address. A context-sensitive help function provides you with support through
every step in the confi guration. Should you make a mistake during confi guration, you can restore the sunrise
surf & talk box to its factory defaults at any time.
Everything in one unit
The sunrise surf & talk box is a genuine multi-talent. In a single unit it unites a WLAN access point, a router or
bridge, a fi rewall, a DHCP server a mobile broadband modem and a telephone connection, despite dimensions of
no more than 18.5 x 4.9 x 10 cm. Power consumption is correspondingly low at 5 W. As a result, there is nothing to
stand in the way of long-term use of the sunrise surf & talk box.
sunrise surf & talk
Page 4

4
Table of Contents.
Your sunrise surf & talk box. 6
Safety instructions 6
Included in delivery 6
LCD display 7
Control options and connections 7
Instructions for use 8
First Steps. 10
Setting up connections. 14
Setting up a WLAN connection 14
Setting up a LAN connection 21
Basics of administration. 25
Logging in and logging out 25
Changing your password 26
Changing the PIN of the SIM card for sunrise surf & talk 26
Unlocking the SIM card for sunrise surf & talk 27
Setting the time and date 27
Confi guring automatic disconnection 28
Confi guring your APN (Access Point Name) 29
Disconnecting from the Internet 29
Restarting the sunrise surf & talk box 30
Restore factory settings (reset) 30
Switching the SIM card for sunrise surf & talk 31
Conducting the self-test 32
Updating fi rmware 32
Telephone. 33
Using the telephone 34
Managing SMS messages. 40
sunrise surf & talk
Page 5

5
Security settings in detail. 42
Basic fi rewall protection 42
Additional protection through encryption 43
Pro settings. 47
Changing a static IP address 47
Confi guring the DHCP server 47
Confi guring dynamic DNS 48
Confi guring port forwarding 49
Selecting a WLAN channel 49
Adjusting the WLAN output power 50
Diagnostic tools. 51
Status of the sunrise surf & talk box 51
Ping diagnosis 52
Troubleshooting – Administration interface. 53
Glossary. 56
Specifi cations/Technical data. 58
Range of applications 58
Features 58
sunrise surf & talk
Page 6

6
Your sunrise surf & talk box.
Safety instructions.
To avoid hurting yourself or doing damage to the electronic device, please keep the following tips in mind when
installing and using the sunrise surf & talk box.
• The sunrise surf & talk box is a mobile electronic device, and is only intended for use in heated, dry, and dust-
free spaces. The device may not be mounted or placed in a location subject to direct sunlight or the effects of
heat. The air slots and openings in the device are for ventilation purposes. These openings must not be covered
or obstructed.
• The device must not come into contact with any liquids, as this can lead to electric shock or short circuit, and
can cause irreparable damage to the device.
• Do not open the case of your sunrise surf & talk box. If the case is opened by unauthorized persons, or inexpert
repairs are attempted, all warranty agreements become null and void. Furthermore, such actions are dangerous
for users and can lead to damage to the device.
• The device should not be exposed to fi re or other heat sources, and it should not be used in locations with a
potentially explosive atmosphere.
• The device should not be installed during a thunderstorm, and should remain unplugged during installation
procedures.
• The electronic interference produced by the device may affect the electronic systems and navigational systems
in airplanes, and for this reason, the use of this device on board aircraft is prohibited by law in most countries.
• Do not operate the device near medical equipment without prior permission.
Included in delivery.
The carton with the sunrise surf & talk box includes
• 1 sunrise surf & talk box
• 1 power supply cord with connecting cable for attaching to the power supply
• 1 Fast Ethernet 10/100 BaseT network cable
• 2 screws and rawlplugs for mounting the device on a wall
• 1 CD ROM with user’s manual and log-in information for the sunrise surf & talk box administration interface
• 1 Quick Start guide
• 4 rubber feet
sunrise surf & talk Your sunrise surf & talk box
Page 7

7
LCD display.
1. Barometer – shows the current weather situation: sunny, overcast and rainy
2. Current time – displayed in 24-hour format
3. Current date in the format: DD.MM.YYYY
4. Status indicator for the local network connection to the computer:
WLAN or LAN
5. Status indicator for the availability and type of network: U, E or G
(U=UMTS, E=EDGE or G=GPRS)
6. Display of the current outgoing or incoming telephone number
7. Display indicates an SMS message has been received
8. Bar indicator for the signal quality of the network in use (U, E or G).
The more bars displayed, the better the signal quality.
A blacked-in box indicates that the function/option is active.
9. Voice mailbox
10. Call diversion
Control options and connections.
LAN connection
The LAN connection is used to connect the sunrise surf & talk box to a PC or laptop by means of a network cable.
Menu option 4 in the LCD display shows the type of connection between your sunrise surf & talk box and the PC or
laptop connected to it. If both devices are switched on, the box for LAN should be blacked-in.
Power supply
To connect the device to the electrical grid, insert the smaller end of the power cable into this connector.
Telephone connection
Here you can connect your telephone. If you wish to have a telephone connected to the device, you can attach it
here.
sunrise surf & talk Your sunrise surf & talk box
1
2
3
4
5
6
8
7109
Page 8
8
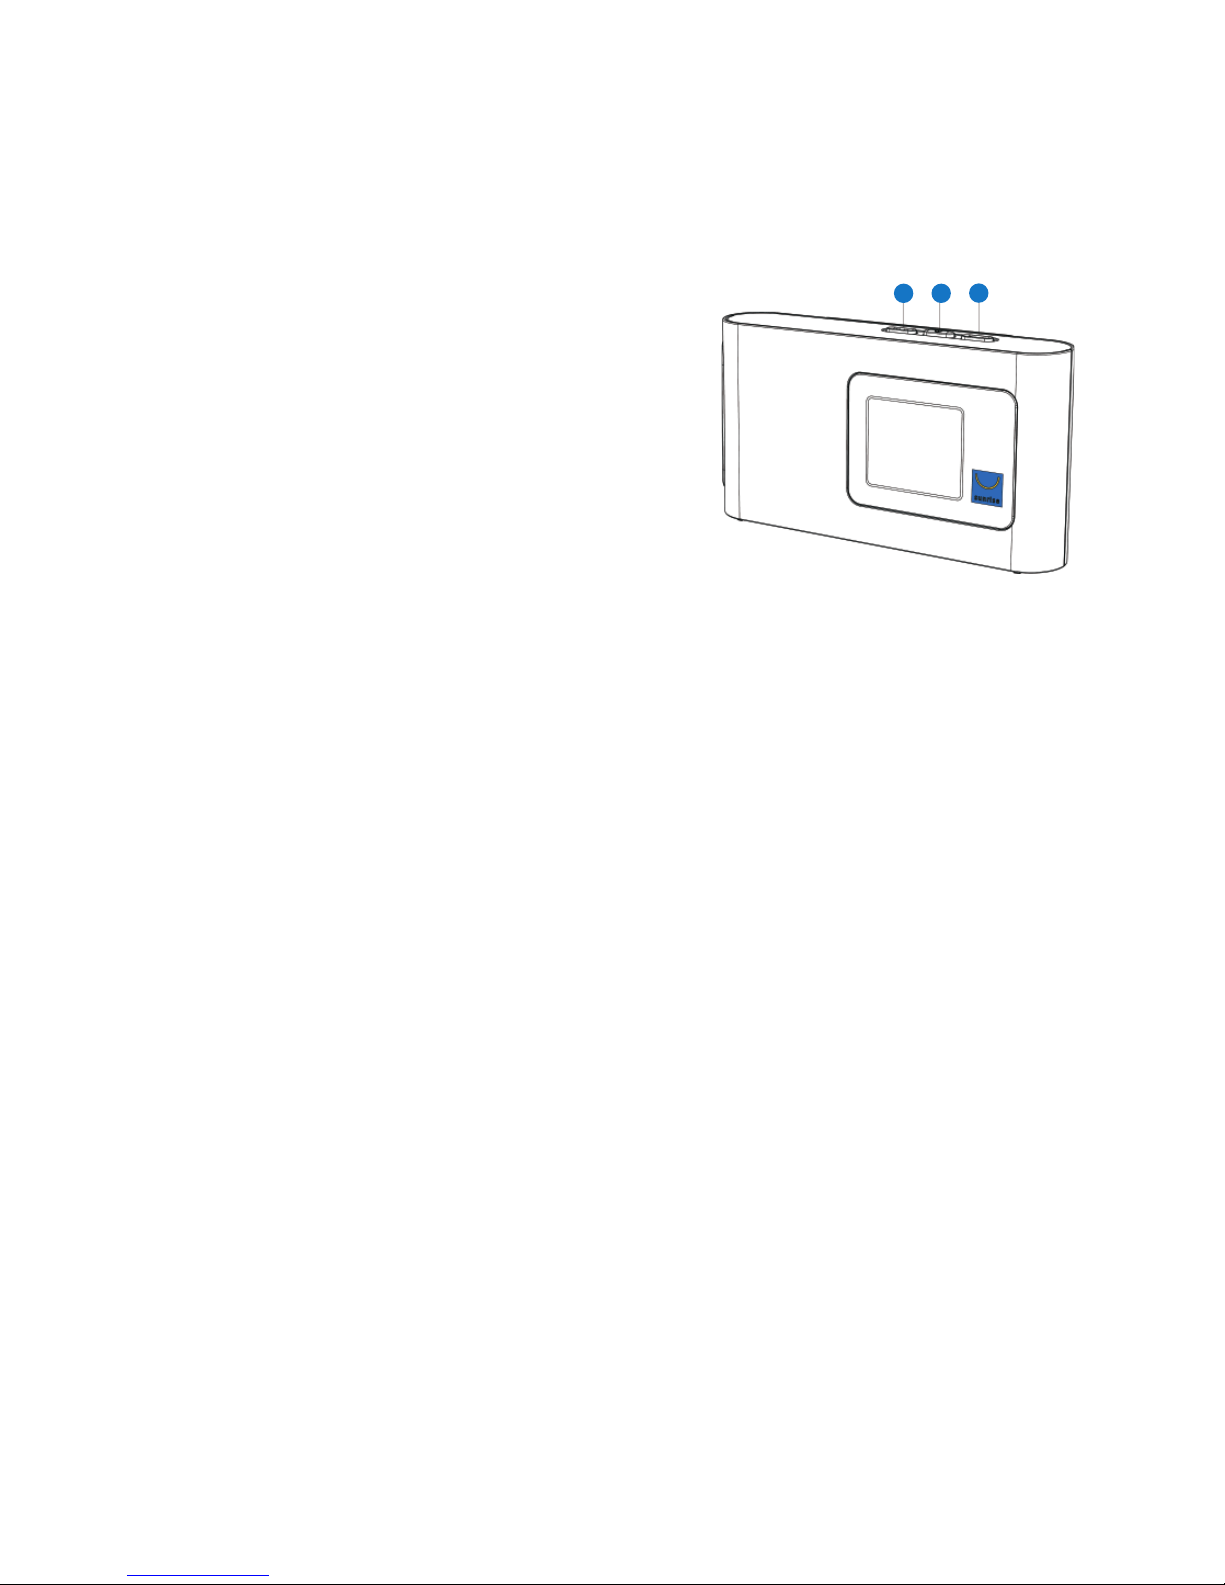
Reset button
The reset button is located in the small hole on the left of the
telephone jack, when looking at the sunrise surf & talk box from
above. Depending upon how long you press the reset button,
you can initiate the following actions:
• Restart the sunrise surf & talk box
• Restore the factory settings, also see Restore factory settings
(RESET), p. 30.
Buttons
1. This button is used to adjust the brightness of the display.
2. This button switches the device on and off.
3. This button is used to manually connect to a mobile network.
Instructions for use.
Wiring
The sunrise surf & talk box cables can be easily lengthened, if required. You can purchase cable in the lengths you
need at a computer or electronics store. Keep the following tips in mind, however, when attaching cables.
• If you wish to connect your computer directly to the sunrise surf & talk box, without using a switch or hub, be
sure to use a crossover Ethernet 10/100 BaseT cable with STP («shielded twisted pairs»).
• If you wish to attach your computer to the sunrise surf & talk box via a switch or hub, be sure to use a standard
Ethernet 10/100 BaseT cable with STP.
• The cable should be a maximum of 100 m long.
Wireless Local Area Network (WLAN)
The two WLAN standards used today, 802.11b and 802.11g, were developed by the Institute of Electrical and
Electronic Engineers (IEEE). Using the 802.11b technology, a transfer rate of up to 11 Mbit/s can be obtained,
while the 802.11g standard allows transfer speeds of up to 54 Mbit/s.
The sunrise surf & talk box supports both standards. With a WLAN adapter based on one of the two standards, you
can connect to the sunrise surf & talk box. The range of the WLAN depends a lot on the WLAN adapter used, as
well as structural considerations of the location of the network. WLAN devices of different standards can be used
simultaneously to set up connections with the sunrise surf & talk box.
The sunrise surf & talk box is equipped with an internal WLAN antenna, which is not visible from the outside of the
case.
sunrise surf & talk Your sunrise surf & talk box
1 2
3
Page 9

9
Administration interface
The administration interface of the sunrise surf & talk box can be accessed either through the log-in link on the CD
ROM, or with an Internet browser. The browser has to support JavaScript and CSS (e.g., Microsoft Internet Explorer
version 5.5 or higher, or Mozilla Firefox).
Note: Please make sure that JavaScript is activated in your browser program.
DHCP server
The sunrise surf & talk box is equipped with its own DHCP server. The server is activated by default when it ships
from the factory. Each computer connected to the device is issued an IP address by the DHCP server.
This means that you can assign fi xed IP addresses to computers connected to the sunrise surf & talk box, directly
within their network settings. The following IP addresses are reserved, and may not be used:
• 192.168.0.1
• 192.168.0.10 up to 192.168.0.200
Note: Please keep in mind that when you change an IP address, you no longer have the ability to access the
user interface using the log-in link on the CD ROM.
Note: If you use the sunrise surf & talk box in a network, no other DHCP server must be active in the network.
sunrise surf & talk Your sunrise surf & talk box
Page 10

10
First steps.
Set up the sunrise surf & talk box at a suitable location, one that meets the following criteria:
• The site should be dry and free of dust, and must not be exposed to direct sunlight.
• If you want to connect the device with your computer via network cable, keep in mind that the maximum cable
length is 100 m, and situate the device near your computer.
• If you wish to establish a wireless WLAN connection from one or more computers to the sunrise surf & talk box,
set up the device in a central location in your offi ce or at home, in a spot with good mobile broadband coverage.
• Be sure to allow for suffi cient distance from any possible sources of interference or disturbance such as microwave ovens or electronic devices with large metal cases.
• On the bottom of the sunrise surf & talk box there are recesses into which you can place the rubber feet (included). They will help protect your furniture from being scratched.
• To mount the sunrise surf & talk box to the wall, use the drilling diagram included for this purpose. You can fi nd
the diagram at the end of this manual.
Step 1 – Insert the SIM card for sunrise surf & talk.
The SIM card is inserted in the same way as with your mobile phone: the SIM compartment is on the underside of
the box, on the bottom of the device. Slide the sunrise SIM card into the compartment all the way, until it clicks into
place. Important: The sunrise surf & talk box will not work without a SIM card for sunrise surf & talk.
Note: If the sunrise surf & talk SIM card is inserted improperly or is defective, the following text will be displayed after Step 3 has been completed: “Error SIM card”. In such an event, disconnect the device from the power
supply and re-insert the sunrise surf & talk SIM card into the device, as shown in the diagram. If this still doesn’t
solve the problem, your sunrise surf & talk SIM card may be defective.
Step 2 – Set up the sunrise surf & talk box
If possible, place the sunrise surf & talk box close to a window, as the reception is best there.
Note: If the message “No network” appears on the display after you’ve completed Step 3, you should choose
another location to set up the device.
sunrise surf & talk First steps
Page 11

11
Step 3 – Connect to power supply.
Be sure to use the original sunrise surf & talk box power cord. Other power cords may damage or destroy the device. If other power cords are used, sunrise does not assume responsibility for damages. First insert the small connector in the upper round slot in the sunrise surf & talk box, and then insert the larger connector in the power outlet.
The device generally takes between 60–90 seconds to start up. The “Welcome” picture from the sunrise surf & talk
box will appear, along with the message “Please wait...”.
After the warm-up phase, you will see the message “Network search”. If a “Connection failure” message appears
on the display, unplug the power plug, wait 20 seconds, and plug the power cord back in. Repeat this process until
you are requested to enter a PIN number. If this has already occurred, the start screen will appear on the display.
The connection bars on the right edge of the display show the quality of the connection.
Note: Please note that the type of connection is shown at the bottom of the display, “WLAN” on the left or
“LAN” in the middle. The available network is shown on the bottom right ((U=UMTS, E=EDGE, G=GPRS).
Step 4a – Connect your PC/laptop to the sunrise surf & talk box.
There are two ways of connecting the sunrise surf & talk box to your PC or laptop: either using WLAN (wireless) or
with the enclosed network cable (LAN).
Note: You need not shut down your computer in order to attach the network cable.
Step 4b – Attach telephone.
If desired, you can use the telephone in “stand alone” function, for example if you do not have a computer. Before
you can use the telephone functions of the sunrise surf & talk box, you must activate the SIM card for sunrise surf
& talk by entering the PIN. The PIN is saved in the sunrise surf & talk box. If you switch the sunrise surf & talk SIM
card, you have to enter the PIN for the new sunrise surf & talk SIM card.After you connect a telephone to the sunrise surf & talk box and enter the PIN, you can make and receive calls immediately.
1. Pick up your receiver.
The SIM card card for sunrise surf & talk is not yet activated. On the sunrise surf & talk box display, the following message appears: “Please enter PIN”. You will hear the dial tone, and an additional signal tone.
2. Press the button, enter your PIN and confi rm by pressing the button.
If the PIN you entered is correct, you will hear a confi rmation tone.
If the PIN you entered is incorrect, you will hear a warning tone and the following message will appear on the
display: “Incorrect PIN. X attempts remaining”.
3. Make a call or put the receiver back down.
sunrise surf & talk First steps
Page 12

12sunrise surf & talk First steps
Step 5 – Register the network with Windows.
You can fi nd more detailed information in the chapter «Setting up connections», p. 14.
Note: The fi rst steps for Mac OS users are not described in this manual. Mac OS users should consult their
Apple manual, or contact Apple directly.
Step 6 – Connect to the Internet.
When getting started, you will need the PIN for the sunrise surf & talk SIM card that you inserted into the device.
The PIN can be found in the enclosed SIM letter.
Note: The PIN is saved in the sunrise surf & talk box. After a SIM card for sunrise surf & talk has been
changed, you will have to enter the new PIN for the new SIM card.
1. Log on to the administration interface of the sunrise surf & talk box. To do this, choose the «Security Wizard»
option from the main page of the CD ROM.
2. When prompted, enter «admin» as the user name and «admin» as the password. Press OK.
3. Step 1 of the Security Wizard: Activate the SIM card card for sunrise surf & talk. In the two fi elds PIN and Con-
fi rm PIN, enter the PIN supplied with the SIM card for sunrise surf & talk, shipped with the sunrise surf & talk
box. Click on Continue.
Note: The SIM card for sunrise surf & talk automatically chooses the fastest available network connection wit-
hout any input from the user.
4. Step 2 of the Security Wizard:
Access Point
The APN (Access Point Name) is a term with which you can specify your provider. The pre-set value here should
be correct for use in the sunrise network.
Activate mobile broadband
If you have activated mobile broadband, the device will automatically connect to the mobile broadband network
when you attempt to set up a connection to the Internet. (Variation: If you attempt to set up an outgoing connection from a client computer and have activated mobile broadband, the sunrise surf & talk box will automatically
set up the connection.)
Disconnect when inactive
If you don’t use a mobile broadband connection for a set length of time once this connection has been
established, the connection will be aborted automatically to save costs.
5. Step 3 of the Security Wizard:
It is essential that you activate encryption for your network. Otherwise, unexpected costs may arise. An unen-
cryptd access point allows other individuals to access your network from outside your premises, and to surf at
your cost.
Page 13

13sunrise surf & talk First steps
SSID
The SSID (Service Set Identifi er) is a network identifi cation code used by the device in a wireless network. You
can choose this code on your computer, in order to connect with the device.
SSID transmissions
Normally, the device sends out its SSID to client computers to show availability. You can stop these transmissions, however, to further increase security. In this case, you have to enter the SSID manually at each client
computer.
WLAN encryption
To prevent unauthorized outside individuals from connecting to your device and using it or monitoring your data
traffi c, you should defi nitely encrypt your WLAN connection. The most secure methods of encryption, are, in
order of security: WPA 1+2, WEP 128 Bit, WEP 64 Bit. You should choose the most secure method that is supported by your computer. The most up-to-date versions of Windows and Mac OS both support WPA 1+2.
WLAN encryption code
If you decide to encrypt your WLAN, you have to choose an encryption code. With the WPA encryption methods, you can choose either a password or a hexadecimal character code. The WEP encryption methods require
a hexadecimal code with a length of 26 characters (128 bit) or 10 characters (64 bit).
Note: To guarantee the highest degree of security, the WPA 1+2 encryption method should be activated.
Furthermore, we would like to remind you that an unencrypted connection can lead to high costs for you,
since an outside individual can use your network: «Your neighbor surfs at your cost».
For more detailed information, see chapter Setting up connections, p.14.
6. Step 4 of the Security Wizard:
Security level
The security level allows you to choose a pre-set security confi guration. In particular, these confi gurations affect which type of data traffi c is allowed by the device, e.g. www or FTP services, e-mail, etc. If you require a
detailed confi guration of the security settings, you can modify one of the basic settings selected here at a later
time, in the «Security» menu.
Your sunrise surf & talk box is now confi gured. To exit the administration interface, you can either close the browser
or enter a URL of your choice in the address line of your browser, thus proceeding into the wide domain of the
Internet.
• The Internet connection is terminated automatically if it is inactive for a longer period of time.
• You can view the mobile broadband connection status in the Status menu, in the tab, mobile broadband.
Page 14

14
Setting up connections.
You can connect your PC/laptop to the sunrise surf & talk box using WLAN (wireless) or with a network cable. In
this section you will fi nd the following directions:
• Microsoft Windows XP: Setting up WLAN connection on page 14
• Microsoft Windows 2000: Setting up WLAN connection on page 18
• Microsoft Windows XP: Setting up LAN connection on page 21
• Microsoft Windows 2000: Setting up LAN connection on page 23
If you use an operating system other than Microsoft Windows XP (Service Pack 2) or Microsoft Windows 2000,
please read the user documentation from the respective manufacturer.
Setting up a WLAN connection.
In order to connect the sunrise surf & talk box using WLAN, the PC/laptop to be connected must support the
WLAN standard IEEE 802.11b or IEEE 802.11g. If your PC/laptop does not support any of these standards, you
can use an external WLAN adapter (e.g. on USB basis) or an internal WLAN board.
Microsoft Windows XP: Setting up a WLAN connection.
In order to be able to use a WLAN connection between your PC/laptop and the sunrise surf & talk box, the following steps are necessary:
1. Confi gure a WLAN connection
2. Establish a WLAN connection
3. Deactivate any proxy server
4. Confi gure encryption for the sunrise surf & talk box
5. Confi gure encryption for your PC/laptop
Note: The following describes how to set up a WLAN connection, as an example, for the WLAN adapter «Intel®
PRO/Wireless 2200BG Network Connection». If you use a different WLAN adapter or a WLAN card, please
read the user documentation of the respective manufacturer.
sunrise surf & talk Setting up connections
Page 15

15
Step 1 – Confi gure WLAN connection.
1. Start your PC/laptop.
2. Click on the START button in the taskbar of your PC and choose Settings > Network Connections.
The Network Connections dialogue is opened.
3. Right click on Wireless Network Connection and select Properties in the context menu.
The Wireless Network Connection Properties dialogue is opened.
4. Make sure that on the General tab the Internet protocol (TCP/IP) box is checked.
5. Highlight Internet protocol (TCP/IP) and click on the Properties button.
The Internet protocol (TCP/IP) Properties dialogue is opened.
6. Check the Obtain an IP address automatically option fi eld on the General tab and click on the OK button.
7. In the Wireless Network Connection Properties dialogue, click on the OK button.
You will be asked, if necessary, to restart your computer.
Step 2 – Establish WLAN connection
1. Click on the START button of the taskbar of your computer and select Settings > Network Connections. Der
The Network Connections dialogue is opened.
2. Right-click on
Wireless Network Connection and select Display available wireless networks from the
context menu.
The Wireless Network Connection dialogue is opened.
3. Mark the «sunrise surf & talk box» wireless network and click on the Connect button.
It takes about ten seconds for the connection between your PC/laptop and the sunrise surf & talk box to be
established.
sunrise surf & talk Setting up connections
Page 16

16
Step 3 – Deactivate proxy server
If you use a proxy server for access to the Internet, deactivate it.
Note: As an example, the following describes the procedure for Microsoft Internet Explorer. If you use a different
browser, please read the appropriate user documentation.
1. Start Internet Explorer.
2. Select Tools > Internet Options.
The Internet Options dialogue is opened.
3. Click on the Connections tab.
4. Click on the LAN Settings button in the Local Area Network (LAN) Settings area.
The Local Area Network (LAN) Settings dialogue is opened.
5. Uncheck the following boxes:
• Automatically detect settings
• Use a proxy server for your LAN
6. In order to save this confi guration, click on the OK button.
7. Close the Internet Options dialogue by clicking on the OK button.
Step 4 – Confi gure encryption for the sunrise surf & talk box
Please make sure that encryption is activated since otherwise additional costs could arise under certain
circumstances. An uncoded access makes it possible for someone from the outside who accesses your
network to surf at your expense.
Note: WPA encryption is preferable to WEP encryption. For this reason, confi guration of WPA encryption is
described below as an example.
1. Log in to the administration interface of sunrise surf & talk box (see Logging in and logging out, pg. 25).
2. Click on Encryption in the Security menu.
3. Select WPA1+2 from the Encryption mechanism selection list.
4. Check the Pass phrase option fi eld in the WPA Settings area.
5. Enter any string into the Key fi eld.
The string serves to dynamically produce the WPA key.
Please note! Please make a note of the string entered. You will need it in the next step for the confi guration of
your PC/laptop.
6. Click on the OK button.
The encryption is now activated for the sunrise surf & talk box, but not yet for your computer. This is why the
WLAN connection between the devices is interrupted. It is possible your browser will display the message «The
document contains no data.»
sunrise surf & talk Setting up connections
Page 17

17
Step 5 – Confi gure encryption for your computer
1. Click on the START button of the taskbar of your computer and select Settings > Network Connections.
The Network Connections dialogue is opened.
2. Right-click on Wireless Network Connection and select Properties from the context menu.
The Wireless Network Connection Properties dialogue is opened.
3. Click on the Wireless Networks tab.
4. Mark «sunrise surf & talk box» in the Preferred Networks area and click on the Properties button.
The sunrise surf & talk box Properties dialogue is opened.
5. Carry out the following settings in this dialogue:
• Select «WPA-PSK» in the Network Authentication selection list.
• Select «AES» in the Data Encryption selection list.
• Enter the string that you chose in the previous step for encryption the sunrise surf & talk box into the Network
Key and Confi rm Network Key fi elds.
6. Click on the OK button.
7. In the Wireless Network Connection Properties dialogue, click on the Close button.
The encryption is now activated for the sunrise surf & talk box and for your computer. The WLAN connection is
automatically established between the devices.
You can now continue with Step 6 – Connect to the Internet (page 12).
sunrise surf & talk Setting up connections
Page 18

18
Microsoft Windows 2000: Setting up a WLAN connection.
In order to be able to use a WLAN connection between your PC/Laptop and the sunrise surf & talk box, the following steps are required:
1. Confi gure a WLAN connection
2. Establish a WLAN connection
3. Deactivate any proxy server
4. Confi gure encryption for the sunrise surf & talk box
5. Confi gure encryption for your PC/Laptop
Note: The following describes the setting up of a WLAN connection, as an example, for the WLAN adapter
«D-Link AirPremier AG DWL-AG530 Wireless PCI Adapter». If you use a different WLAN adapter or a WLAN
card, please read the user documentation of the respective manufacturer also.
Step 1 – Confi gure WLAN connection
1. Click on the START button of the taskbar of your computer and select Settings > Network and Dial-up
Connections.
The Network and Dial-up Connections dialogue is opened.
2. Right-click on the Local Area Connection of your WLAN card or your WLAN adapter and select
Properties from the context menu.
The Local Area Connection Properties dialogue is opened.
3. Make sure that on the General tab the box for Internet Protocol (TCP/IP) is checked.
4. Highlight Internet Protocol (TCP/IP) and click on the Properties button.
The Internet Protocol (TCP/IP) Properties dialogue is opened.
5. On the General tab, click on the Obtain an IP address automatically option fi eld and then click on the OK
button.
6. In order to save the confi guration, click on the OK button in the Local Area Connection Properties dialogue.
You will be asked, if necessary, to restart your computer.
Step 2 – Establish WLAN connection
1. Start your PC/laptop.
2. Double-click on the D-Link AirPremier symbol in the taskbar of your computer.
The D-Link AirPremier AG Utility dialogue is opened.
3. Click on the Confi guration menu
4. Enter the SSID of the sunrise surf & talk box in the SSID fi eld.
The SSID is registered as «sunrise surf & talk box» from the factory.
5. Click on the Save button.
6. Click on the Environment Overview menu.
sunrise surf & talk Setting up connections
Page 19

19sunrise surf & talk Setting up connections
7. Highlight «sunrise surf & talk box» in the Profi le area and click on the Connect button.
You will be asked, if necessary, to restart your computer.
Step 3 – Deactivate proxy server
1. Make sure that on the General tab the box for Internet Protocol (TCP/IP) is checked.
2. Highlight Internet protocol (TCP/IP) and click on the Properties button.
The Internet Protocol (TCP/IP) Properties dialogue is opened.
3. On the General tab, click on the Obtain an IP address automatically option fi eld and then click on the OK
button.
4. In order to save the confi guration, click on the OK button in the Local Area Connection Properties dialogue.
You will be asked, if necessary, to restart your computer.
Step 4 – Confi gure encryption for the sunrise surf & talk box
Please make sure that encryption is activated since otherwise additional costs could arise under certain circumstances. An uncoded access makes it possible for someone from the outside who accesses your network to surf at
your expense.
Note: WPA encryption is preferable to WEP encryption. For this reason, confi guration of WPA encryption is
described below as an example.
1. Log in to the administration interface of sunrise surf & talk box (see Logging in and logging out, pg. 25).
2. Click on Encryption in the Security menu.
3. Select WPA1+2 from the Encryption mechanism selection list.
4. Activate the Pass phrase option fi eld in the WPA Settings area.
5. Enter any string into the Key fi eld.
The string serves to dynamically produce the WPA key.
Please note! Please make a note of the string entered. You will need it in the next step for the confi guration of
your PC/laptop.
6. Click on the OK button.
The coding is now activated for the sunrise surf & talk box, but not yet for your computer. This is why the WLAN
connection between the devices is interrupted. It is possible your browser will display the message «The document contains no data.»
Page 20

20
Step 5 – Confi gure coding for your PC/laptop
1. Double-click on the D-Link AirPremier symbol in the taskbar of your computer.
The D-Link AirPremier AG Utility dialogue is opened.
2. Click on the Environment Overview menu.
3. Highlight «sunrise surf & talk box» in the Profi le area and click on the Properties button.
The Confi guration dialogue is opened.
4. Carry out the following settings in this dialogue:
• Select «WPA-PSK» in the Authentication selection list.
• Select «TKIP» in the Coding selection list.
5. Click on the Authentication Confi guration button.
The Expanded Security Settings dialogue is opened.
6. Enter the string that you chose in the previous step for coding the sunrise surf & talk box in the WPA Access
Code fi eld, and then click on the OK button.
7. In order to save this confi guration, click on the OK button in the Confi guration dialogue.
The encryption is now activated for the sunrise surf & talk box and for your computer. You can establish a WLAN
connection between the two devices.
8. Click on the Connect button.
In the Link Info menu it will be displayed whether or not the connection set-up was successful.
You can now continue with Step 6 – Connect to the Internet, page 12
sunrise surf & talk Setting up connections
Page 21

21
Setting up a LAN connection.
In order to establish a LAN connection between your PC/laptop and the sunrise surf & talk box, you fi rst have to
connect them with a network cable (Ethernet cable). Depending on how you would like to connect your computer
with the sunrise surf & talk box, you will need different network cables.
• If you connect your computer directly – without a switch or hub – to the sunrise surf & talk box, you should use
a cross-link network cable 10/100 BaseT with STP (shielded twisted pair).
• If you operate the sunrise surf & talk box over a switch or hub, you should use a 10/100 BaseT network cable,
wired 1:1 and with STP.
Note: If you use a LAN connection for the connection between your computer and the sunrise surf & talk box,
you can deactivate the WLAN interface of the sunrise surf & talk box. This is recommended for security reasons.
To do this, log in to the administration interface of sunrise surf & talk box (see Logging in and logging out,
pg. 25). Then select the Connection tab in the WLAN menu and click on the Off option fi eld next to the WLAN
interface.
Microsoft Windows XP: Setting up a LAN connection.
In order to be able to use a LAN connection between your PC/laptop and the sunrise surf & talk box, the following
steps are required:
1. Connect network cable
2. Confi gure LAN connection
3. Deactivate any proxy server
Step 1 – Connect network cable
1. Insert the network cable into the appropriate port on your computer.
2. Insert the other end of the cable into the jack marked LAN on the sunrise surf & talk box.
Step 2 – Confi gure LAN connection
1. Click on the START button of the taskbar of your computer and select Settings > Network Connections.
The Network Connections dialogue is opened.
2. Right-click on LAN Connection and select Properties from the context menu.
The Local Area Connection Properties dialogue is opened.
3. Make sure that on the General tab the box for Internet Protocol (TCP/IP) is checked.
4. Highlight Internet protocol (TCP/IP) and click on the Properties button.
The Internet Protocol (TCP/IP) Properties dialogue is opened.
sunrise surf & talk Setting up connections
Page 22

22
5. On the General tab, click on the Obtain an IP address automatically option fi eld and then click on the OK
button.
6. In the Local Area Connection Properties dialogue, click on the Close button.
You will be asked, if necessary, to restart your computer.
Step 3 – Deactivate proxy server
If you use a proxy server to access the Internet, deactivate it.
Note: As an example, the following describes the procedure for Microsoft Internet Explorer. If you use a different
browser, please read the appropriate user documentation.
1. Start Internet Explorer.
2. Select Tools > Internet Options.
The Internet Options dialogue is opened.
3. Click on the Connections tab.
4. Click on the LAN Settings button in the Local Area Network (LAN) Settings area.
The Local Area Network (LAN) Settings dialogue is opened.
5. Deactivate the following box:
• Automatically detect settings
• Use a proxy server for your LAN.
6. In order to save this confi guration, click on the OK button.
7. Close the Internet Options dialogue by clicking on the OK button.
Now you can continue with Step 6 – Connect to the Internet, pg. 12.
sunrise surf & talk Setting up connections
Page 23

23
Microsoft Windows 2000: Setting up a LAN connection.
In order to be able to use a LAN connection between your PC/laptop and the sunrise surf & talk box, the following
steps are required:
1. Connect network cable
2. Confi gure LAN connection
3. Deactivate any proxy server
Step 1 – Connect network cable
1. Insert the network cable into the appropriate port on your computer.
2. Insert the other end of the cable into the jack marked LAN on the sunrise surf & talk box.
Step 2 – Confi gure LAN connection
1. Click on the START button of the taskbar of your computer and select Settings > Network and Dial-up Con-
nections.
2. Right-click on LAN Connection and select Properties from the context menu.
3. Make sure that on the General tab the box for Internet Protocol (TCP/IP) is checked.
4. Highlight Internet protocol (TCP/IP) and click on the Properties button.
The Internet Protocol (TCP/IP) Properties dialogue is opened.
5. On the General tab, click on the Obtain an IP address automatically option fi eld and then click on the OK
button.
6. In order to save the confi guration, click on the OK button in the Local Area Connection Properties dialogue.
You will be asked, if necessary, to restart your computer.
Step 3 – Deactivate proxy server
If you use a proxy server for access to the Internet, deactivate it.
Note: The following describes the procedure for Microsoft Internet Explorer. If you use a different browser, please read the appropriate user documentation.
1. Start Internet Explorer.
2. Select Tools > Internet Options.
The Internet Options dialogue is opened.
3. Click on the Connections tab.
4. Click on the LAN Settings button in the Local Area Network (LAN) Settings area.
The Local Area Network (LAN) Settings dialogue is opened.
sunrise surf & talk Setting up connections
Page 24

24
5. Deactivate the following box:
• Automatically detect settings
• Use a proxy server for your LAN.
6. In order to save this confi guration, click on the OK button.
7. Close the Internet Options dialogue by clicking on the OK button.
Now you can continue with Step 6 – Connect to the Internet, pg. 12.
sunrise surf & talk Setting up connections
Page 25

25
Basics of Administration.
The sunrise surf & talk box is confi gured and administered in the administration interface. No installation is required
on your PC/laptop in order to be able to work with the administration interface. You only need a browser.
Logging in and Logging out.
This is how you log in to the administration interface of the sunrise surf & talk box
1. Start your browser.
2. Enter http://192.168.0.1 into the address line of the browser and confi rm the entry with ENTER. You can also
use the link “sunrise surf & talk box Login” on the CD-ROM.
Note: If you have already allocated a different IP address to the sunrise surf & talk box, please enter this address
(see Prof-Settings: Changing a static fi xed IP address, pg. 47).
3. Enter your user name and your password.
Both the user name and password are set as «admin» as default factory settings. The user name cannot be
changed.
4. Click on the OK button.
When you fi rst log in to the administration interface, you will be required to change your password.
5. Enter your new password into the New password and Confi rm new password fi elds.
6. Click on the OK button.
Note: Your password may not contain more than 50 characters. Please note that a distinction is made between
upper and lower case letters in the password. Therefore, for the sunrise surf & talk box, «password» and «Password» are different passwords.
7. Log in with the user name «admin» and your new password.
This is how you log out of the administration interface of the sunrise surf & talk box
To leave the administration interface, simply close your browser.
sunrise surf & talk Basics of Administration
Page 26

26
Changing your password.
The sunrise surf & talk box is delivered from the factory with the standard password «admin» for access to the administration interface. In order to prevent any unauthorized access to the device, you should change this password.
For security reasons, it is also to be recommended that you change the password at regular intervals.
This is how you change your password
1. Log in to the administration interface of sunrise surf & talk box (see Logging in and logging out, pg. 25).
2. Click on the password menu.
3. Enter your current password into the old password fi eld.
4. Enter your new password into the New password and Confi rm new password fi elds.
Choose your new password carefully. The password should contain letters, numbers and special characters. It
may be no longer than 50 characters.
5. Click on the OK button.
6. To leave the administration interface, simply close your browser.
Note: If you have forgotten your changed password, reset the sunrise surf & talk box to the factory settings (see
Restore factory settings, pg. 30). Then the password will again be «admin».
Changing the PIN of the SIM card for sunrise surf & talk.
The sunrise surf & talk box offers you the opportunity to change the PIN of the SIM card used for sunrise surf &
talk. This makes sense for security reasons.
This is how you change the PIN of the SIM card for sunrise surf & talk
1. Log in to the administration interface of sunrise surf & talk box (see Logging in and logging out, pg. 25).
2. Click on the Change PIN tab in the UMTS/GPRS menu.
3. Enter the current PIN into the PIN fi eld.
4. Enter your new PIN into the New PIN and Confi rm new PIN fi elds. The PIN can be any combination of numbers
of your choosing.
sunrise surf & talk Basics of Administration
Page 27

27
5. Click on the OK button.
The PIN is securely stored in the sunrise surf & talk box. You have to enter the PIN again after the following ac-
tions:
• The SIM card inserted for sunrise surf & talk was exchanged.
• You have changed the PIN of the SIM card inserted for sunrise surf & talk.
• You have installed a new fi rmware.
• The sunrise surf & talk box was reset to the factory settings.
6. To leave the administration interface, simply close your browser.
Unlocking the SIM card for sunrise surf & talk.
If you enter the PIN for the SIM card for sunrise surf & talk incorrectly three times, the SIM card will be blocked. You
can release this block by entering the PUK (Personal Unblocking Key).
This is how you unblock the SIM card for sunrise surf & talk
1. Log in to the administration interface of sunrise surf & talk box (see Logging in and logging out, pg. 25).
2. Click on the Enter PUK tab in the UMTS/GPRS menu.
3. Enter the PUK of the SIM card for sunrise surf & talk in the PUK and Confi rm PUK fi elds.
4. Enter your new PIN into the New PIN and Confi rm new PIN fi elds. The PIN can be any combination of numbers
of your choosing.
5. Click on the OK button.
6. To leave the administration interface, simply close your browser.
Setting the time and date.
The sunrise surf & talk box stores the current time and the current date. You can set the time and date manually or
synchronize it with the help of the Network Time Protocol (NTP).
This is how you set the time and date manually
1. Log in to the administration interface of sunrise surf & talk box (see Logging in and logging out, pg. 25).
2. Click on the Time tab in the Tools menu.
3. Enter the corresponding data in the Time and Date fi elds.
4. Click on the Set time/date manually button.
5. To leave the administration interface, simply close your browser.
sunrise surf & talk Basics of Administration
Page 28

28
This is how you synchronize the time and date with the help of NTP
1. Log in to the administration interface of sunrise surf & talk box (see Logging in and logging out, pg. 25).
2. Click on the Time tab in the Tools menu.
3. Enter the desired NTP server in the NTP Server fi eld.
4. Click on the Change confi guration button.
5. Click on the Request time button.
A connection with the Internet will be automatically established.
6. To leave the administration interface, simply close your browser.
Confi guring automatic disconnection.
The sunrise surf & talk box is confi gured from the factory so that connection to the Internet via sunrise mobile
broadband is automatically aborted when your session has been inactive for 480 minutes. The session is inactive
when, for example, during this time no access to webpages has occurred or no data traffi c has taken place.
As soon as activity again takes place, the connection will be automatically re-established.
Note: If you use programs on your PC/laptop that automatically establish a connection with the Internet in the
background, data traffi c will occur and the connection will not be disconnected. Additional costs could accrue
due to this. Therefore, it is to be recommended that you deactivate the mobile broadband interface when not
using the Internet (see Disconnecting from the Internet, pg. 29). This way it will also not be possible for programs in the background to establish a connection to the Internet.
This is how you confi gure automatic disconnection
1. Log in to the administration interface of sunrise surf & talk box (see Logging in and logging out, pg. 25).
2. Click on the Connection tab in the UMTS/GPRS menu.
3. In the Disconnect after fi eld, enter after how much time (in minutes) of inactivity the connection should be auto-
matically disconnected.
A maximum of 999 minutes can be entered.
4. Click on the OK button.
5. To exit the administration interface, simply close your browser.
Re-establishing the connection automatically
The sunrise surf & talk box is confi gured from the factory so that Internet connection is automatically established
via mobile broadband with the corresponding activity from your computer (e.g. by calling up a webpage in your
browser).
sunrise surf & talk Basics of Administration
Page 29

29
Confi guring the APN (Access Point Name)
You have access to the Internet via the APN of the sunrise surf & talk box. You can freely confi gure the APN.
This is how you confi gure the APN
1. Log in to the administration interface of sunrise surf & talk box (see Logging in and logging out, pg. 25).
2. Click on the APN tab in the UMTS/GPRS menu.
3. Enter the designation for the new access point name in the UMTS/GPRS APN (for sunrise: internet) fi eld.
4. Click on the OK button.
5. To leave the administration interface, simply close your browser.
Disconnecting from the Internet.
This is how you disconnect the connection to the Internet
1. Log in to the administration interface of sunrise surf & talk box (see Logging in and logging out, pg. 25).
2. Click on the Connection tab in the UMTS/GPRS menu.
3. Click the option fi eld Off for UMTS/GPRS interface.
4. Click on the OK button.
5. To leave the administration interface, simply close your browser.
Note: In the Disconnect after fi eld, you can enter a length of time (in minutes) after which the connection to the
Internet is automatically disconnected due to inactivity.
sunrise surf & talk Basics of Administration
Page 30

30
Restarting the sunrise surf & talk box.
This is how you restart the sunrise surf & talk box
1. Log in to the administration interface of sunrise surf & talk box (see Logging in and logging out, pg. 25).
2. Click on the Restart tab in the Tools menu.
3. Click on the Restart button.
4. Confi rm the following security query by clicking on the OK button.
Restarting the sunrise surf & talk box takes about 60-90 seconds. When you reopen the administration
interface, you will have to log in again with your user name and your password.
Note: You can also restart the sunrise surf & talk box on the device itself by pushing the reset button (see below
Restore factory settings). Please note that this will cause all user-defi ned settings to be lost (e.g. a changed
password). Then the password will again be «admin».
Restore factory settings (reset).
You can reset the sunrise surf & talk box to the factory settings. Doing this will erase all user-defi ned settings,
including the password changed for the administration interface. Then the password will again be «admin».
The reset function can be activated either via the administration interface or directly on the device by pressing
the reset button.
This is how you execute a reset via the administration interface
1. Log in to the administration interface of sunrise surf & talk box (see Logging in and logging out, pg. 25).
2. Click on the Reset tab in the Tools menu.
3. Click on the Reset button.
4. Confi rm the following security query by clicking on the OK button.
Any settings you made for the sunrise surf & talk box will be deleted. Afterwards, the device will automatically
be restarted.
This is how you execute a reset on the device
In order to execute the reset, you will need a sharp object, e.g. a paperclip.
1. Carefully guide the pointed object into the small hole above the telephone connection; there you will fi nd the
reset button.
2. Keep the pointed object pressed on the reset button for at least four seconds.
3. Let go of the reset button again.
The sunrise surf & talk box restarts. This process lasts about 60-90 seconds.
sunrise surf & talk Basics of Administration
Page 31

31
Switching the SIM card for sunrise surf & talk.
Step 1 – Removing the old SIM card for sunrise surf & talk
1. If necessary, disconnect the Internet connection (i.e. the connection to the mobile broadband network from
sunrise).
2. In order not to damage the sunrise surf & talk box while changing the SIM card for sunrise surf & talk, pull the
power cable not only out of the wall outlet but also out of the device.
3. Carefully move the sliding cover of the SIM card insert on the base of the device to the right.
The SIM card for sunrise surf & talk will release itself from the holder.
4. Remove the SIM card for sunrise surf & talk.
Step 2 – Inserting and enabling the new SIM card for sunrise surf & talk
1. Insert the new SIM card for sunrise surf & talk. Insert the SIM card for sunrise surf & talk into the compartment.
The contacts should face upwards, the SIM card for sunrise surf & talk must click into place.
Once the sunrise surf & talk SIM card for is fully inserted, the sliding cover returns to its original position.
2. Connect the smaller plug of the power supply to the upper round entrance to the sunrise surf & talk box.
3. Connect the power supply of the sunrise surf & talk box to the power outlet.
4. Log in to the administration interface of sunrise surf & talk box (see Logging in and logging out, pg. 25).
5. Click on the Enter PIN tab in the UMTS/GPRS menu.
6. Enter the PIN of the newly inserted SIM card for sunrise surf & talk in the PIN and Confi rm PIN fi elds.
7. Click on the OK button.
8. To leave the administration interface, simply close your browser.
sunrise surf & talk Basics of Administration
Page 32

32
Conducting the self-test.
The sunrise surf & talk box will conduct a self-test, if desired. This test checks the major hardware and software
components of the device. If problems are found, they are then described in the administration interface.
This is how you conduct the self-test of the sunrise surf & talk box
1. Log in to the administration interface of sunrise surf & talk box (see Logging in and logging out, pg. 25).
2. Click on the Firmware tab in the Status menu.
Under Self-test of the sunrise surf & talk box you will fi nd a list of problems found and the affected system
components. In addition, an error code will be displayed to describe an internal system condition. This information will help Technical Support to solve your problem.
3. To leave the administration interface, simply close your browser.
Updating fi rmware.
Firmware updates for the sunrise surf & talk box are provided by sunrise. You can download the updates at www.
sunrise.ch/surfandtalk
Note: When installing a fi rmware update, the sunrise surf & talk box is reset to factory settings. All user-defi ned
settings (e.g. a changed password) are then lost. Then the password will again be «admin».
This is how you update the fi rmware
1. Start your browser.
2. Enter www.sunrise.ch/surfandtalk into the address line of your browser and confi rm the entry with ENTER.
3. Search for available updates using the search function of this website.
4. Download the update fi le and store it on your PC/laptop.
5. Log in to the administration interface of sunrise surf & talk box (see Logging in and logging out, pg. 25).
6. Click on the Firmware tab in the Tools menu.
7. Select the update fi le you would like to download using the Browse button.
You can also manually enter the fi le path into this fi eld.
Please note! The installation of the fi rmware update is a sensitive process. Make sure that the update fi le was
completely downloaded and is not damaged. Furthermore, it is important that the sunrise surf & talk box is not
turned off during the update.
8. Click on the Start button and wait until the installation of the fi rmware update is completed.
The sunrise surf & talk box will restart.
sunrise surf & talk Basics of Administration
Page 33

33
Phoning.
The SIM card for sunrise surf & talk
For the telephone functions, the sunrise surf & talk box requires the use of a sunrise surf & talk SIM card. If you
wish to use the telephone functions, you must fi rst activate the SIM card by entering your PIN. The PIN will be
stored in the sunrise surf & talk box. If you replace the SIM card, you must enter the PIN for the new card when you
insert it.
Note: The stored PIN for the sunrise surf & talk box SIM card will remain stored in the sunrise surf & talk box
until a new PIN is entered. The PIN remains stored in the sunrise surf & talk box even if there is a power interruption.
Activating the SIM card for sunrise surf & talk
1. Lift the telephone handset.
«Please enter PIN number» will appear on the display, and you will hear a dial tone with an additional beep.
2. Press the # key, enter your PIN, and confi rm your entry with the # key.
If the PIN you enter is correct, you will hear a confi rmation tone, and on the display you will see the time, the
date, and the network reception bar.
If the PIN you enter is incorrect, you will hear a warning tone, and the message «Incorrect PIN number.
X attempts remaining» will appear on the display.
3. Replace the handset.
If you enter the wrong PIN for the SIM card three times, the SIM card will be blocked for your protection. You can
remove this block by entering your PUK (Personal Unblocking Key). You received this number together with your
copy of the service agreement.
Unblocking the SIM card for sunrise surf & talk
1. Lift the telephone handset.
2. Press the # key, enter your PUK, and confi rm your entry with the key.
If the PUK you enter is correct, you will hear a confi rmation tone, and on the display you will see the time, the
date, and the network reception bar.
If the PUK you enter is incorrect, you will hear a warning tone, and the message “Incorrect PUK number. X at-
tempts remaining” will appear on the display.
Replace the handset.
Note: If you enter the wrong PUK ten times, the PUK will be blocked.
sunrise surf & talk Phoning
Page 34

34
Changing the PIN for the sunrise surf & talk SIM card
Note: The PIN for the sunrise surf & talk SIM card can be changed only through the administrative interface of
your sunrise surf & talk box.
1. Lift the telephone handset and wait for the dial tone.
2. Enter the key sequence # 9 9 # .
3. Enter the old PIN.
4. Press the
key.
5. Enter the new PIN.
This may be any four- to eight-digit number of your choice.
6. Press the
key.
7. To confi rm the new PIN, enter it once more.
8. Press the # key and wait for the confi rmation signal.
9. Replace the handset.
Using the telephone.
As soon as a telephone has been connected to the sunrise surf & talk box and the PIN has been entered, you may
begin making calls. This section explains how to use the various telephone functions.
Note: The telephone connected to the sunrise surf & talk box must support the DTMF (Dual Tone Multi-Frequency) dialset.
Calling.
Making a call
1. Lift the telephone handset.
The unit will test the strength of the GSM signal. The signal strength is indicated by a connection bar on the
display. If the connection is good, you will hear a dial tone.
2. Enter in the usual way the telephone number you wish to call. After three seconds a connection will be established (there are technical reasons for this delay).
Emergency calls
You can make emergency calls even if the sunrise surf & talk SIM card is blocked or has not been installed. The
sunrise surf & talk box supports the standardized GSM emergency number, 112.
sunrise surf & talk Phoning
Page 35

35
Call Forwarding.
You can have all of your calls forwarded automatically to another line of your choice, either immediately (CF-unconditional), after 20 seconds (CF-20), if your line is busy (CF-busy), or if your sunrise surf & talk box is turned off
(CF-unit off). The destination number you enter to activate call forwarding must not be a blocked number.
Activating call forwarding
1. Lift the telephone handset and wait for the dial tone.
2. Enter the key sequence for the desired type of call forwarding.
Call forwarding type Key sequence for activation
CF-unconditional
2 1
CF-20
6 1
CF-busy
8 7
CF-unit off
6 2
3. Enter the destination number.
4. Press the # key and wait for the confi rmation tone.
5. Replace the handset.
Note: If CF-unconditional has been activated on your line, you will hear a special dial tone.
The CF-20 and CF-busy versions can be activated simultaneously, each different destination numbers for each.
CF-unconditional has priority over the other three versions and cannot be overwritten by any of them. If CF-un-
conditional has been activated and you wish to enable another type of CF, you must fi rst deactivate CF-uncon-
ditional or deactivate all CF, then enable the new CF.
sunrise surf & talk Phoning
Page 36

36
Deactivating call forwarding
1. Lift the telephone handset and wait for the dial tone.
2. Enter the key sequence for the call forwarding setting you wish to delete.
Call forwarding type Key sequence for deactivation
CF-unconditional
# 2 1 #
CF-20
# 6 1 #
CF-busy
# 8 7 #
CF-unit off
# 6 2 #
deactivate all CF
# 2 2 #
3. Wait for the confi rmation tone.
4. Replace the handset.
Call waiting, fl ash function.
The call waiting function enables others to reach you even while you are on the phone. The fl ash function provides
various means for holding conversations on two lines at once.
Note:
If you wish to use this function, your telephone must have the R key (fl ash key with a hook fl ash function and a
fl ash time between 170 and 310 ms).
On older phones that have no R key, use the off hook key.
Activating call waiting
1. Lift the telephone handset and wait for the dial tone.
2. Enter the key sequence 4 3 # and wait for the confi rmation tone.
3. Replace the handset.
Deactivating call waiting
1. Lift the telephone handset and wait for the dial tone.
2. Enter the key sequence # 4 3 # and wait for the confi rmation tone.
3. Replace the handset.
sunrise surf & talk Phoning
Page 37

37
Terminating the original call
1. You hear the call waiting tone during a call.
2. If you wish to accept the incoming call, you have 30 seconds in which to terminate the fi rst call by replacing the
handset.
3. After the telephone rings, lift the handset again.
Rejecting the incoming call
1. You hear the call waiting tone during a call.
2. If you do not wish to accept the incoming call, enter the key sequence R 0 . The call holding tone will not be
heard during the remainder of the existing call.
Holding
Putting an existing call on hold to accept a second call
1. You hear the call waiting tone during a call.
2. If you wish to accept the second call, you have 30 seconds in which to press the
R
key (hook fl ash function).
3. Press the 2 key.
The fi rst connection remains on hold (inactive). The second connection is accepted (active).
Alternating
Switching back and forth between two calls
1. Press the R key and wait for the dial tone.
2. Press the 2 key.
The fi rst connection is now active again. The second connection is on hold.
Flash function
Establishing another connection during a call
1. Press the
R
key and wait for the dial tone.
2. Enter the number you wish to call.
The fi rst connection is now inactive. The second connection is established.
Note: The dialing process can be terminated by pressing the
R
key repeatedly.
sunrise surf & talk Phoning
Page 38

38
Selectively terminating a call
1. Press the R key and wait for the dial tone.
2. Press the 1 key.
The active connection is terminated.
Note: To remind you of a connection that is still active, a ring signal will sound after you replace the handset (up
to three times, for a maximum of 15 seconds).
Three-way conference calling.
After you have already established one connection, you would like to accept a second, incoming call and bring the
caller into the conversation. If you wish to use this function, your telephone must have the R key.
Note: The telephone’s
R
key must support a hook fl ash function and have a fl ash time between 170 and
310 ms. On older phones that have no key, use the off hook key.
Establishing an additional connection
1. Press the R key and wait for the dial tone.
2. Enter the number you wish to call.
The fi rst connection is now inactive. The second connection has been activated.
or
Bring the incoming caller into the conversation
1. You hear the call waiting tone.
2. If you wish to accept the second call, you have 30 seconds in which to press the R key (hook fl ash function).
3. Press the 2 key.
The fi rst connection is on hold (inactive). The second connection is accepted (active).
sunrise surf & talk Phoning
Page 39

39
Interconnecting
1. Press the R key and wait for the dial tone.
2. Press the 3 key.
All parties are now connected.
Terminating
You can terminate the conference by replacing the handset.
Caller identifi cation.
Incoming calls
You can see the caller‘s number on the sunrise surf & talk box display. This feature works only if display of the caller’s number has not been blocked by the caller.
Outgoing calls
Your own number will also appear on the display of the party you are calling. If the party you are calling does not immediately accept your call, that party can call you back later simply by pressing a button, as your number will remain
stored in that party‘s call list. You can also block display of your own number, for an individual call or for all calls.
Changing the settings for caller identifi cation
1. Lift the telephone handset and wait for the dial tone.
2. Enter one of the following key sequences.
Caller identifi cation Key sequence
Deactivate
3 1 3 1
Activate
3 3
3. Replace the handset.
Blocking caller identifi cation for a single call
1. Lift the telephone handset and wait for the dial tone.
2. Enter the key sequence 3 1 # .
3. Enter the number you are calling.
Your number will not be displayed to the party you are calling.
4. Make your call in the usual manner.
5. Replace the handset.
The call display block will be deactivated automatically when you hang up.
sunrise surf & talk Phoning
Page 40

40
Managing SMS messages.
The sunrise surf & talk box contains an SMS management interface that enables you to:
• get an overview of the SMS messages that you have sent and received
• use an editor form to send SMS messages
• use an address book form to record and store destination numbers
SMS menu
1. Log in to the sunrise surf & talk box’s administrative interface (see Logging in and logging out, p.25).
2. Select the SMS menu.
Here you will see on various tabs information concerning individual aspects of SMS management.
«SMS Mailbox» tab
Here you will fi nd a comprehensive overview of all your SMS messages, including those just received, those
already received and those yet to be transmitted.
«Write SMS» tab
With this form-based editor you can write SMS messages and enter the addressee’s telephone number in the form
fi eld at the top. To transmit, press the «Send SMS» button.
«Number Directory» tab
Here you can enter telephone numbers and the names of those they belong to in a telephone list:
1. In the empty form fi eld in the «Name» column enter the name of your contact.
2. In the empty form fi eld in the «Number» column enter your contact’s number.
3. Press the «Add» button.
To delete an entry, select it with the appropriate radio button and press «Delete.»
To change an entry, select it with the appropriate radio button, press «Change» and then proceed as described
under points 1 – 3.
Note: Only numbers from 0 – 9 may appear in the “Number” column; special characters (e.g., !§&=#*+@ etc.)
will result in error messages.
sunrise surf & talk Managing SMS messages
Page 41

41sunrise surf & talk Managing SMS messages
You can also write an SMS directly to a person listed in your number directory.
Select the desired contact person by the appropriate radio button and press the «Send SMS» button. The telephone number will be transferred automatically into the »Number» form fi eld on the «Write SMS» tab.
Note: It is possible to transmit an SMS to more than one address, but a comma or semicolon must be inserted
between the individual telephone numbers.
Example: 0761234567;0761234567;0761234567
Page 42

42
Security settings in detail.
Basic fi rewall protection.
Note: These basic security settings do not guarantee the security of the connection between the sunrise surf
& talk box and your PC or laptop. This is true especially if you are using a WLAN connection (see Additional
protection through encryption, p. 43).
The sunrise surf & talk box is equipped with a fi rewall and confi gured by the manufacturer in such a way as to ensure that your data are protected from the moment your PC or laptop is connected. It will prevent access from the
Internet to the sunrise surf & talk box and, consequently, to your PC or laptop.
The sunrise surf & talk box fi rewall can be disabled if necessary (from the menu choose Security, then the Firewall
tab). Please note that this will also disable port forwarding. Port forwarding is defi ned within the system by fi rewall
rules.
Network Address Translation (NAT)
The sunrise surf & talk box supports NAT. NAT refers to the process of uncoupling a public IP address from a
private IP address range. Using NAT, all of the PCs or laptops in your network can share a single public IP address.
This IP address is assigned to your sunrise surf & talk box via the sunrise mobile broadband network. It is the only
IP address visible to third parties outside your network (such as on the Internet).
The local IP addresses, which are assigned to the computers in your network by the sunrise surf & talk box‘s DHCP
server, remain private and inaccessible from the Internet. In this way you are protected from external attacks.
Firewall rules
The sunrise surf & talk box fi rewall operates according to certain rules. The rules determine the incoming and
outgoing fl ow of data. The fi rewall’s basic confi guration blocks unauthorized incoming data connections from the Internet while allowing outgoing data connections to the Internet. This confi guration enables you to navigate websites
freely.
Denial of service attacks (DoS)
DoS attacks fl ood your network with more requests than it can process. Although such attacks cannot damage the
PCs or laptops in your network, DoS attacks can slow down your network processes or bring them to a halt. The
sunrise surf & talk box blocks such attacks automatically. You do not need to set up fi rewall rules for incoming data
traffi c.
Restricting outgoing services
The fi rewall has been confi gured by the manufacturer to allow all outgoing services. You may, however, specify that
only certain outgoing services are to be enabled. User of your network will then be unable to use services that have
not been specifi ed.
sunrise surf & talk Security settings in detail
Page 43

43
To restrict outgoing services:
1. Log in to the sunrise surf & talk box’s administrative interface (see Logging in and logging out p.25).
2. Select the Firewall tab in the Security menu.
3. Next to Services, enable the Allow following outgoing services option.
4. Click the Add Service button.
5. In the Name, Type, Start Port and End Port fi elds describe the service you wish to enable.
6. Click the Save button.
7. In the same way, add to the list any other services you may wish to enable.
8. Click the OK button.
9. To leave the administrative interface, close your browser.
Additional protection through encryption.
Regardless of whether you are using a LAN connection or a WLAN connection, your data are transmitted via computer networks as plain text if they have not been encrypted. Anyone with access to your network would be able
to read and manipulate the data. You can reduce this security risk to a minimum by using encryption software. This
automatically converts your data to an unreadable form.
The sunrise surf & talk box supports two types of encryption for WLAN connections:
• WEP (Wired Equivalent Privacy), see the following section, p. 43
• WPA (Wi-Fi Protected Access), see WPA encryption, p. 44
The sunrise surf & talk box also offers the following options for increasing your WLAN access security:
• Change the SSID, see Changing the SSID, p. 45
• Disable SSID transmission, see Disabling SSID transmission, p. 45
• Access control through MAC addresses, see Using address fi lters to control access, p. 46
WEP encryption
WEP encryption works by generating a key that is made known to every user on the network and is used to encrypt
and decrypt data. To maintain the effectiveness of WEP, your encryption code should be changed on a regular
basis.
How to confi gure WEP encryption
1. Log in to the sunrise surf & talk box’s administrative interface (see Logging in and logging out, p.25).
2. Select the Encryption tab in the Security menu.
3. Select the WEP 128 entry from the Encryption Mechanism list.
This is the highest security level for WEP, which ensures a maximum level of secure encryption.
4. Enter any string of characters in the Pass phrase fi eld.
The pass phrase is used to automatically generate the WEP key. The character string you enter should contain
no more than 26 characters and must not include spaces.
sunrise surf & talk Security settings in detail
Page 44

44
5. Click the Generate Key button.
Your pass phrase will be converted to hexadecimal form. The length of the key generated will vary according to
the level of security.
• WEP 64: 10 characters
• WEP 128: 26 characters
6. Make a note of the key that is generated and click the OK button. The WLAN connection to the sunrise
surf & talk box will be closed. In the list of available wireless network connections, you will see that the network
is already displayed as a WEP encrypted wireless network.
7. Reconnect your PC or laptop via the WLAN and enter in the key that was generated.
WPA encryption
WPA encryption protects your network from unauthorized access. It works similarly to WEP encryption, but with
dynamic, changing keys.
Note: If your PC or laptop supports WPA encryption (e.g., WPA1.x, WPA2.0), it is preferable to WEP encryption.
If you do not know for certain which standards your PC or laptop supports, contact your computer‘s manufacturer.
How to confi gure WPA encryption
1. Log in to the sunrise surf & talk box’s administrative interface (see Logging in and logging out, p.25).
2. Select the Encryption tab in the Security menu.
You may choose between WPA1+2. WPA2 is generally the preferred choice.
3. Enter any sequence of characters in the Key fi eld.
4. Click the OK button.
The WLAN connection to the sunrise surf & talk box will be closed.
In the list of available wireless network connections, you will see that the network is already displayed as a WPA
encrypted wireless network.
5. Reconnect your PC or laptop via the WLAN and enter into your PC or laptop the key that was generated.
sunrise surf & talk Security settings in detail
Page 45

45
Changing the SSID
The SSID (Service Set Identifi er) is the sunrise surf & talk box’s WLAN network identifi er. The SSID set by the
manufacturer is “sunrise surf & talk box”.
You should change the SSID in order to prevent confusion with other sunrise surf & talk boxes in your vicinity,
which may be using the same SSID. By changing the SSID you will avoid becoming connected inadvertently with a
neighboring sunrise surf & talk box.
How to change the SSID
1. Log in to the sunrise surf & talk box’s administrative interface (see Logging in and logging out, p.25).
2. Select the Connection tab in the WLAN menu.
3. Enter the desired identifi er in the SSID fi eld.
The SSID may contain no more than 32 characters. It may contain both letters and numbers. An SSID is casesensitive.
4. Make a note of the SSID and click the OK button.
The WLAN connection to the sunrise surf & talk box will be closed.
The new SSID is displayed in the list of available wireless network connections.
5. Reconnect your PC or laptop via the WLAN.
Disabling SSID transmission
By default the sunrise surf & talk box transmits the SSID. This makes it easier to locate the WLAN network on your
computer and to connect the two. Transmission of the SSID can be disabled, however, if you know the sunrise surf
& talk box SSID and do not want it to be visible to other users.
Note: Disable SSID transmission only after you have already successfully established a connection between the
sunrise surf & talk box and your computer. Disabling should be carried out only as the last step.
How to disable SSID transmission
1. Log in to the sunrise surf & talk box’s administrative interface (see Logging in and logging out, p.25).
2. Select the Connection tab in the WLAN menu.
3. Next to SSID transmission enable the Off option.
4. Click the OK button.
5. This may close the WLAN connection to the sunrise surf & talk box. If that is the case, enter the SSID known to
you in the SSID fi eld.
sunrise surf & talk Security settings in detail
Page 46

46
Using address fi lters to control access
Every PC or laptop connected to the sunrise surf & talk box via a WLAN or LAN has a globally unique MAC (Media
Access Control) address. This address is assigned by the device‘s manufacturer. You can control which devices
have access to your sunrise surf & talk box’s WLAN network by adding the MAC addresses of those devices to
fi lter lists.
To create the fi lter lists, you need the MAC addresses of the connected computers. These usually appear on a label
on the device itself or directly on the built-in WLAN card. If there is any doubt, contact the manufacturer of your PC
or laptop.
How to control access using fi lter lists
1. Create the fi lter lists. To do this, log in to the sunrise surf & talk box’s administrative interface (see Logging in
and logging out, p.25).
2. Select the WLAN Address Filter tab in the Security menu.
3. In the Add Address fi eld, enter the MAC address of the computer you wish to allow or deny access to.
4. Depending on whether you wish to allow or deny the computer access, enable the Allowed or Blocked option
next to the To Filter List option.
5. Click the Add button.
The MAC address will be added to the appropriate fi lter list.
6. Follow these steps if you wish to add any other MAC addresses to the fi lter lists.
7. Specify which fi lter list is to be used. Next to Active Filter List, enable the desired option:
• Off: If you enable this option, MAC addresses will not be checked. There will be no restrictions on access.
• Allowed Addresses: If you enable this option, only those computers will be allowed access whose MAC
addresses appear in the Allowed Addresses fi lter list.
• Blocked addresses: If you enable this option, those computers will be denied access whose MAC addresses
appear in the Blocked Addresses fi lter list.
8. Click the OK button.
sunrise surf & talk Security settings in detail
Page 47

47
Pro settings.
This section and the confi guration options it describes are intended for network administrators.
Changing a static IP address.
You can change the static IP address of the sunrise surf & talk box, which is used for access over a LAN or WLAN.
The manufacturer has set the IP address to 192.168.0.1.
How to change the static IP address
1. Log in to the sunrise surf & talk box’s administrative interface (see Logging in and logging out, p.25).
2. Select the IP Address menu.
3. Next to Address, enable the Static option.
4. Enter the desired confi gurations in the IP Address, IP Subnet Mask and IP Broadcast Address fi elds.
5. Click the OK button.
Because the IP address has changed, the connection to the administrative interface will be interrupted.
If you wish to access the administrative interface at a later time, enter the changed IP address in the address
fi eld of your browser.
6. To leave the administrative interface, close your browser.
Note: Keep in mind that changing the static IP address automatically changes the IP address range of the DHCP
server. This happens so that IP address confl icts are avoided.
Confi guring the DHCP server.
The sunrise surf & talk box contains an integrated DHCP server. This server dynamically assigns an IP address to
the computers connected to your network. The manufacturer has set the IP address range of the DHCP server to
addresses from 192.168.01.10 to 192.168.0.200.
You can change or disable the DHCP server’s IP address range. You can also confi gure the DHCP server in such a
way that certain computers connected to the sunrise surf & talk box will always be assigned the same IP addresses. This is useful, for example, if you wish to access the computer through its IP address.
How to change the IP address range of the DHCP server
1. Log in to the sunrise surf & talk box’s administrative interface (see Logging in and logging out, p. 25).
2. Select the Address Range tab in the DHCP Server menu.
sunrise surf & talk Pro settings
Page 48

48
3. Enter the desired IP addresses in the IP Address Range fi elds.
4. Click the OK button.
The connection to the sunrise surf & talk box’s administrative interface will be interrupted.
5. Reenter the IP address in your browser’s address fi eld.
How to assign static IP addresses through the DHCP server
1. Log in to the sunrise surf & talk box’s administrative interface (see Logging in and logging out, p.25).
2. Select the Static Addresses tab in the DHCP Server menu.
3. Click the Add button.
4. In the MAC Address fi eld, enter the MAC address of the computer connected to the sunrise surf & talk box and
to which you would like to assign a static IP address.
5. In the IP Address fi eld, enter the last digits of the IP address that you wish to assign to the computer.
The fi rst part of the IP address that you are assigning is predetermined by the IP address of the sunrise surf &
talk box, as the IP addresses must come from the same address range.
6. Click the Save Address button.
You can change an assigned static IP address. Mark the entry you wish to change in the list and click the Edit
button. To delete an assigned IP address, mark the appropriate entry in the list and click the Delete button.
7. To leave the administrative interface, close your browser.
Confi guring dynamic DNS.
Note: To use the DynDNS.org service, you will need a user account at www.dyndns.org.
With the sunrise surf & talk box you can confi gure the DynDNS.org service. You can select a domain name, and
DynDNS.org will assign this name to the dynamic mobile broadband-IP address that was assigned to you by the
sunrise mobile broadband network. This will make it possible for requests from the Internet to be directed to your
dynamic mobile broadband IP address. This IP address is automatically reported to DynDNS.org every time a
mobile broadband connection is set up and, therefore, every time the sunrise surf & talk box is restarted.
sunrise surf & talk Pro settings
Page 49

49
How to confi gure dynamic DNS
1. Log in to the sunrise surf & talk box’s administrative interface (see Logging in and logging out, p. 25).
2. Select the DynDNS tab in the Tools menu.
3. Enter your data in the Domain Name, Login and Password fi elds.
4. Click the Save button.
5. To leave the administrative interface, close your browser.
Confi guring port forwarding.
You can specify a service that you wish to be forwarded from the Internet to a computer within your local area
network.
Note: Port forwarding is possible only when the surf & talk box fi rewall is enabled.
How to confi gure port forwarding
1. Log in to the sunrise surf & talk box’s administrative interface (see Logging in and logging out, p. 25).
2. Select the Port Forwarding tab in the Security menu.
3. Click the Add Service button.
4. Enter your data into the fi elds.
5. Click the Save button.
6. To leave the administrative interface, close your browser.
Selecting a WLAN channel.
You can select a WLAN channel and thereby determine on which WLAN frequency the sunrise surf & talk box will
transmit and receive. Selecting a channel with a good transmission quality improves the connection speed between the sunrise surf & talk box and the PCs or laptops connected through the WLAN.
How to select a WLAN channel
1. Log in to the sunrise surf & talk box’s administrative interface (see Logging in and logging out, p.25).
2. Select the Channel Selection tab in the WLAN menu.
3. If you would like the sunrise surf & talk box to select the channel with the best transmission quality automatically,
click the Implement button.
The automatic channel selection function checks the quality of all available channels one by one; this process
lasts roughly twelve seconds. It may happen occasionally that the connection between the PC or laptop and the
sunrise surf & talk box is interrupted. If this should occur, simply reestablish the connection.
If you wish to specify the channel yourself, select the desired entry from the Channel Selection list.
4. Click the OK button.
sunrise surf & talk Pro settings
Page 50

50
5. To leave the administrative interface, close your browser.
Adjusting the WLAN output power.
By adjusting the WLAN output power, you can change the range of your WLAN network.
How to adjust the WLAN output power
1. Log in to the sunrise surf & talk box’s administrative interface (see Logging in and logging out, p.25).
2. Select the Output Power tab in the WLAN menu.
3. Select the desired value from the Output Power list.
100% represents full WLAN output power, 0% represents minimal WLAN output power. The WLAN interface
transmits even at 0%, even though at very low power. If you do not wish to use the WLAN interface, disable the
interface on the Connection tab in the WLAN menu.
4. To leave the administrative interface, close your browser.
sunrise surf & talk Pro settings
Page 51

51
Diagnostic Tools.
The sunrise surf & talk box includes a number of diagnostic tools you can use to check the status of the device and
the Internet connection.
Status of the sunrise surf & talk box.
Here’s how to check the status of the sunrise surf & talk box:
1. Log on to the administration user interface of the sunrise surf & talk box (see Logging in and logging out, p. 25).
2. Select the Status menu.
This menu displays information on individual aspects of the sunrise surf & talk box in various tabs.
UMTS/GPRS tab
Here you can fi nd information on the mobile broadband status of the sunrise surf & talk box.
Access Point tab
Here you can fi nd information on the WLAN access point of the sunrise surf & talk box.
DHCP Server tab
Here you can fi nd information on the sunrise surf & talk box DHCP server, and on MAC and IP addresses of the
PCs or laptops connected.
Security tab
Here you can fi nd information on WEP and WPA encoding of the WLAN connection.
Firmware tab
Here you can fi nd information on the fi rmware installed on the sunrise surf & talk box. In addition, the results of the
device self-test is displayed in this tab.
sunrise surf & talk Diagnostic Tools
Page 52

52sunrise surf & talk Diagnostic Tools
Ping diagnosis.
You can use ping diagnosis to determine whether your sunrise surf & talk box is connected to the Internet.
Here’s how to do a ping test:
1. Log on to the administration user interface of the sunrise surf & talk box (see Logging in and logging out, p. 25).
2. Choose the Diagnose tab from the Tools menu.
3. Enter a URL in the Ping Target fi eld (e.g., www.google.ch).
4. Click on the Do Ping Test button.
A message is displayed to let you know whether the ping test was successful or not.
Page 53

53
Troubleshooting – Administration interface.
The measures listed in this section may help if you have problems accessing the administration interface of the
sunrise surf & talk box.
Note: The following procedures apply to Microsoft Windows XP (Service Pack 2). If you use a different operating system, please consult the user documentation provided by the manufacturer.
What to do if you forget the IP address of the sunrise surf & talk box:
1. Start your browser.
2. Enter the URL http://192.168.0.1 into the address line of your browser and press ENTER.
This is the factory default IP address of the sunrise surf & talk box.
If your browser displays an error message after a brief period of time, this IP address is no longer valid, because
it was changed in the Administration interface.
3. If you have forgotten the new IP address, you can restore factory settings (see Restore factory settings
(RESET), p. 30).
What to do if you forget your password:
If you forget your password for the administration interface, you have to restore the sunrise surf & talk box to
the original factory settings. The exact process is described in the section entitled Restore factory settings
(RESET), p. 30.
Delete temporary Internet fi les:
1. Start Microsoft Internet Explorer.
2. Select Tools > Internet Options.
The Internet Options menu opens up.
3. Click on the General tab, then on the button Delete Files.
The Delete Files menu opens up.
4. Check the selection box for Delete all offl ine content and confi rm the deletion by clicking the OK button.
5. Close the Internet Options menu by clicking the OK button.
sunrise surf & talk Troubleshooting – Administration interface
Page 54

54
Activate JavaScript in your browser:
1. Start Microsoft Internet Explorer.
2. Select Tools > Internet Options.
The Internet Options menu will open up.
3. Select the Security settings tab.
4. Click on the Internet symbol and then on the button Custom level.
5. Scroll down to the heading Active Scripting, and select Enable, then press the OK button.
6. Close the Internet Options menu by clicking the OK button.
Confi gure your computer to allow dynamic IP addresses:
1. Click on the START button in the Windows taskbar, and select the option Settings > Network connections.
2. Right-click on the Local Area Connection option, and select Properties from the context menu.
3. Make sure that the box Internet Protocol (TCP/IP) is activated in the General tab.
4. Click on Internet Protocol (TCP/IP) and then on the button Properties.
5. Activate the following options in the General tab:
• Obtain an IP address automatically
• Obtain DNS server address automatically
6. To save the confi guration, click on the OK button.
You may be requested to restart your computer.
Determine the IP address of your computer:
1. Click on the START button in the Windows taskbar, and select the option Programs > Accessories >
Command Prompt.
2. Enter «ipconfi g» in the window, and confi rm by pressing ENTER.
The IP address displayed has to be within the range of 192.168.0.10 to 192.168.0.200, or within the IP address
range you set (see Confi gure DHCP Server, p. 47).
3. If this is not the case, restart your computer and the sunrise surf & talk box.
sunrise surf & talk Troubleshooting – Administration interface
Page 55

55
Check that the WLAN card is correctly installed in your computer:
1. Click on the START button in the Windows task bar, and select the option Settings > Control Panel.
The Control Panel. menu will open up.
2. Double click on the System symbol.
The System Properties menu will open up.
3. Select the Hardware tab.
4. Click on the Device Manager button.
The Device Manager menu will open up.
5. Select the Network Adapters entry.
6. Double click on the entry for your WLAN or Wi-Fi card.
Your WLAN or Wi-Fi card is correctly installed if the message «The device is functional» is displayed in the Device Status fi eld.
7. Click on the OK button.
sunrise surf & talk Troubleshooting – Administration interface
Page 56

56
Glossary.
802.11g
802.11g is a standard for the wireless transmission of data with a data transfer speed of 54 mbit/s. The standard
802.11g is compatible with the standard 802.11b.
DHCP Server
DHCP is the abbreviation for Dynamic Host Confi guration Protocol. The DHCP server sets an IP address range in
which IP addresses can be assigned for attached devices (so-called DHCP clients).
DNS Server
DNS is the abbreviation for Domain Name Service. The DNS server steers the assignment of IP addresses to the
appropriate domain names in the Internet.
Dynamic DNS
Dynamic DNS is the abbreviation for Dynamic Domain Name Service. This service controls the assignment of dynamic IP addresses to fi xed domain names.
EDGE
EDGE is the abbreviation for Enhanced Data Rates for GSM Evolution. This mobile phone technology acts as an
bolt-on-enhancement to GSM with a transmission rate of up to 200 Kbit/s.
Firewall
The fi rewall controls data traffi c between a private network and a public network (i.e., the Internet). It protects the
private network from unauthorized access attempts and attacks from the Internet.
Firmware
Firmware is the operating software of the sunrise surf & talk box.
GPRS
GPRS is an abbreviation for General Packet Radio Service. The GPRS standard extends the GSM standard in
mobile networks to support packet-oriented data transfer at a speed of up to 53.6 Kbit/s.
HTTP
HTTP is an abbreviation for Hypertext Transfer Protocol. This protocol regulates the transfer of data within networks.
It is mainly used to load web sites and other data from the Internet into a browser program.
IP address
An IP address is assigned to every device connected to the Internet (e.g., PC or laptop), and is unique and recognizable worldwide.
sunrise surf & talk Glossary
Page 57

57
LAN
LAN is an abbreviation for Local Area Network. A LAN is a small network of computers connected to the Internet.
MAC address
MAC is an abbreviation for Media Access Control. MAC addresses are unique and unchangeable addresses for
network cards (i.e., LAN or WLAN cards), assigned by the manufacturer.
NAT
NAT is an abbreviation for Network Address Translation. This is a method of converting private IP addresses from a
LAN to public IP addresses in the Internet.
Port
A port is part of an address in network protocols used to assign data packets to the proper protocols.
Port Forwarding
Port forwarding is a method of mapping ports to IP addresses in NAT networks.
SSID
SSID is an abbreviation for Service Set Identifi er. This is a network identifi er in WLAN networks used to identify
WLAN Access Points.
UMTS
UMTS is an abbreviation for Universal Mobile Telecommunications System. This new mobile standard allows data
transfer at a high bandwidth.
WEP
WEP is an abbreviation for Wireless Equivalent Privacy. This is an encoding method on WLAN networks.
WLAN/Wi-Fi
WLAN is an abbreviation for Wireless Local Area Network; Wi-Fi stands for Wireless Fidelity. Both terms refer to
the standard for wireless data transfer.
WPA
WPA is an abbreviation for Wi-Fi Protected Access. This is an encoding method on WLAN networks.
sunrise surf & talk Glossary
Page 58

58
Specifi cations / Technical data.
Range of applications
• Complete solution for the private sphere, ideal for households without DSL service
• In the business world for VPN-secured access to email and intranets – for entire teams, even during travel.
• In the public realm for quickly establishing a temporary infrastructure – for trade fairs, festivals and other events.
• In the infrastructure domain, as a fall-back, “over the air” solution for DSL and ISDN
Features.
• Internet access through UMTS/EDGE/GPRS (HSDPA)
• Telephone function through GSM mobile telephony
• A single SIM card for sunrise surf & talk for both Internet and telephone
• Security through an integrated fi rewall
• WLAN encryption (WEP and WPA1+2)
• Multiple access for up to 253 users
• Access through WLAN and Ethernet
• Administration with PIN/PUK management
• SMS function: transmission, reception, forwarding
• Automatic system diagnosis (watchdog)
• Factory default fallback for hardware and software reset
• Router with unlimited VPN passthrough
• High system and continuous operation security
• Large WLAN range
• Low energy consumption
• Suitable for stationary and mobile use
Frequency bands
UMTS: 2100 MHz
GSM/GPRS: 900/1800 MHz
GSM/GPRS (USA): 850/1900 MHz
WLAN: 802.11b/g, 2.4 GHz
sunrise surf & talk Specifi cations / Technical data
Page 59

59
Data rates
HSDPA: up to 1.8 Mbit/s
UMTS: up to 384 Kbit/s
EDGE: up to 200 Kbit/s
GPRS: up to 53,6 Kbit/s
WLAN: up to 54 Mbit/s (802.11b/g)
Security
WLAN: WEP 64/128, WPA 1+2, 802.11x/EAP, MAC access control lists
Router: Firewall, stateful packet inspection, NAT, port forwarding
System: automatic self-diagnosis (watchdog), factory default fallback for hardware and software reset
Telephone
Make and receive calls
Calling Line ID Presentation (CLIP)
Router
DHCP server
DynDNS client
VPN passthrough unlimited
Ethernet/USB/WLAN bridge
Antennas
UMTS/GSM: external, frequency range: 850 to 2100 MHz
WLAN: internal, frequency range: 2400 to 2500 MHz
Administration
Confi guration and status messages via browser and LCD display
Update capability
Firmware update via software upload
Compatibility
Independent of the operating system used (e.g., Microsoft, Apple, Linux)
Runs with all current browsers (e.g., Microsoft Internet Explorer, Netscape, Mozilla Firefox, Apple Safari)
Connection
Ethernet 10/100 BaseT via RJ45 jack
Analog telephone via RJ11 jack
Network connection
WLAN or with network cable
VPN compatible
Always on, network re-connect
sunrise surf & talk Specifi cations / Technical data
Page 60

60
Short Message Service (SMS)
Sending/receiving/forwarding/address book via a browser or with a software client
Operating environment
Operating temperature: 0 to 40 degrees Celsius
Humidity: 10% to 70%
System requirements
Ethernet 10/100 BaseT port or 802.11b/g WLAN
Browser TCP/IP protocol stack
Housing
Dimensions: 18,5 x 4,9 x 10 cm
Weight: 350 g
Design
Attractive polycarbonate housing in various versions
Suitable for desktop or wall mounting
Status indicators
Reception strength via LCD display
Device condition via LCD display
Energy requirements
Operating voltage 220-230 V/50 Hz
Maximum power consumption: 6 W
Average power consumption: 4.5 W
Supported standards
Europe CE
FCC Part 15 Class B
GCF type approval
PTCRB type approval
WiFi © certifi ed WLAN module
sunrise surf & talk Specifi cations / Technical data
 Loading...