

Page 1

User
Instruction
Manual &
Warranty
Quickie XTR
SUPPLIER:
THIS MANUAL MUST BE GIVEN TO THE RIDER OF THIS
WHEELCHAIR.
RIDER:
BEFORE USING THIS WHEELCHAIR READ THIS ENTIRE
MANUAL AND SAVE FOR FUTURE REFERENCE
Page 2

930379 Rev. A
3
930379 Rev. A
1. INTRODUCTION
SUNRISE LISTENS
Thank you for choosing a Quickie wheelchair. We want to hear your questions or
comments about this manual, the safety and reliability of your chair, and the service you receive from your supplier. Please feel free to write or call us at the
address and telephone number below:
Sunrise Home Healthcare Group
Mobility Products Division
Customer Service Department
7477 East Dry Creek Parkway
Longmont, CO 80503
(303) 218-4500
Let us know your address. This will allow us to keep you up to date with information about safety,new products and options to increase your use and enjoyment of
this wheelchair.
FOR ANSWERS TO YOUR QUESTIONS
Your authorized supplier knows your wheelchair best, and can answer most of
your questions about chair safety, use and maintenance. For future reference, fill
in the following:
Supplier:______________________________________________________________________________
Address: ______________________________________________________________________________
______________________________________________________________________________________
Telephone: ____________________________________________________________________________
Serial #: _____________________________________ Date/Purchased: ________________________
Page 3

4
5
930379 Rev. A
930379 Rev. A
II. TABLE OF CONTENTS
1. INTRODUCTION .............................................................................. 3
a. Sunrise Listens ...................................................................................... 3
11. TABLE OF CONTENTS .................................................................. 4
III. YOUR CHAIR AND ITS PARTS ................................................ 6
IV. NOTICE - READ BEFORE USE .................................................. 8
a. Choose the Right Chair & Safety Option ...................................... 8
b. Review this Manual Often ................................................................ 8
c. Warnings ................................................................................................ 8
V. GENERAL WARNINGS.................................................................... 9
a. Weight Limit ........................................................................................ 9
b. Weight Training .................................................................................... 9
c. Getting to Know Your Chair ............................................................ 9
d. To Reduce The Risk of an Accident ................................................ 9
e. Safety Checklist .................................................................................. 10
f. Changes & Adjustments .................................................................... 10
g. Environmental Conditions ................................................................ 10
h. Terrain .................................................................................................... 11
i. Street Use ............................................................................................ 11
j. Motor Vehicle Safety .......................................................................... 11
k. When You Need Help ........................................................................ 12
VI. WARNINGS: FALLS & TIP-OVERS .......................................... 13
a. Center of Balance .............................................................................. 13
b. Dressing or Changing Clothes ........................................................ 13
c. Wheelies .............................................................................................. 14
d. Obstacles .............................................................................................. 14
e. Reaching or Leaning .......................................................................... 15
f. Moving Backward ................................................................................ 16
g. Ramps, Slopes & Side Hills ................................................................ 16
h. Transfers ................................................................................................ 17
i. Curbs & Steps ...................................................................................... 18
j. Stairs ...................................................................................................... 18
k. Escalators .............................................................................................. 18
VII. WARNINGS: FOR SAFE USE ...................................................... 19
a. Learning to do a “Wheelie” ............................................................ 19
b. Descending a Curb or Single Step .................................................. 19
c. Climbing a Curb or Single Step ...................................................... 20
d. Climbing Stairs .................................................................................... 20
e. Descending Stairs ................................................................................ 20
f. Maintenance .......................................................................................... 21
VIII. WARNINGS: COMPONENTS & OPTIONS ........................ 22
a. Anti-Tip Tubes ...................................................................................... 22
b. Armrests .............................................................................................. 22
c. Cushion & Sling Seats ........................................................................ 22
II. TABLE OF CONTENTS
d. Fasteners .............................................................................................. 23
e. Footrests ................................................................................................ 23
f. Pneumatic Tires .................................................................................. 23
g. Positioning Belts .................................................................................. 24
h. Power Drive ........................................................................................ 24
i. Push Handles ........................................................................................ 24
j. Quick-Release Axles .......................................................................... 25
k. Rear Wheels ........................................................................................ 25
l. Rear Wheel Locks .............................................................................. 25
m.Modified Seat Systems ...................................................................... 26
n. Upholstery Fabric .............................................................................. 26
IX. CHAIR BASICS .................................................................................. 27
a. To Mount & Remove Rear Wheels ................................................ 27
X. SET-UP AND ADJUSTMENTS .................................................... 28
a. Wheels .................................................................................................. 28
b. Armrests .............................................................................................. 28
c. Folding Backrest .................................................................................. 28
d. Back-Angle Adjustment ...................................................................... 28
e. Seat Sling ................................................................................................ 29
f. Cushion (Optional) .............................................................................. 29
g. Rear Axle ................................................................................................ 29
h. Caster .................................................................................................... 31
i. Caster Assembly .................................................................................. 31
j. Caster Housing .................................................................................... 32
k. Footrest Height .................................................................................... 32
l. Wheel Locks ........................................................................................ 33
m.Anti-tip Tubes (Optional).................................................................... 34
n. Armrest .................................................................................................. 34
o. RockShox .............................................................................................. 34
p. Check-Out ............................................................................................ 35
XI. TROUBLESHOOTING .................................................................... 36
X11. MAINTENANCE ................................................................................ 37
a. Introduction .......................................................................................... 37
b. Maintenance Chart .............................................................................. 37
c. Maintenance Tips .................................................................................. 38
d. Cleaning .................................................................................................. 38
e. Storage Tips .......................................................................................... 38
XIII. SUNRISE LIMITED WARRANTY .............................................. 39
Page 4
6
7
930379 Rev. A
930379 Rev. A
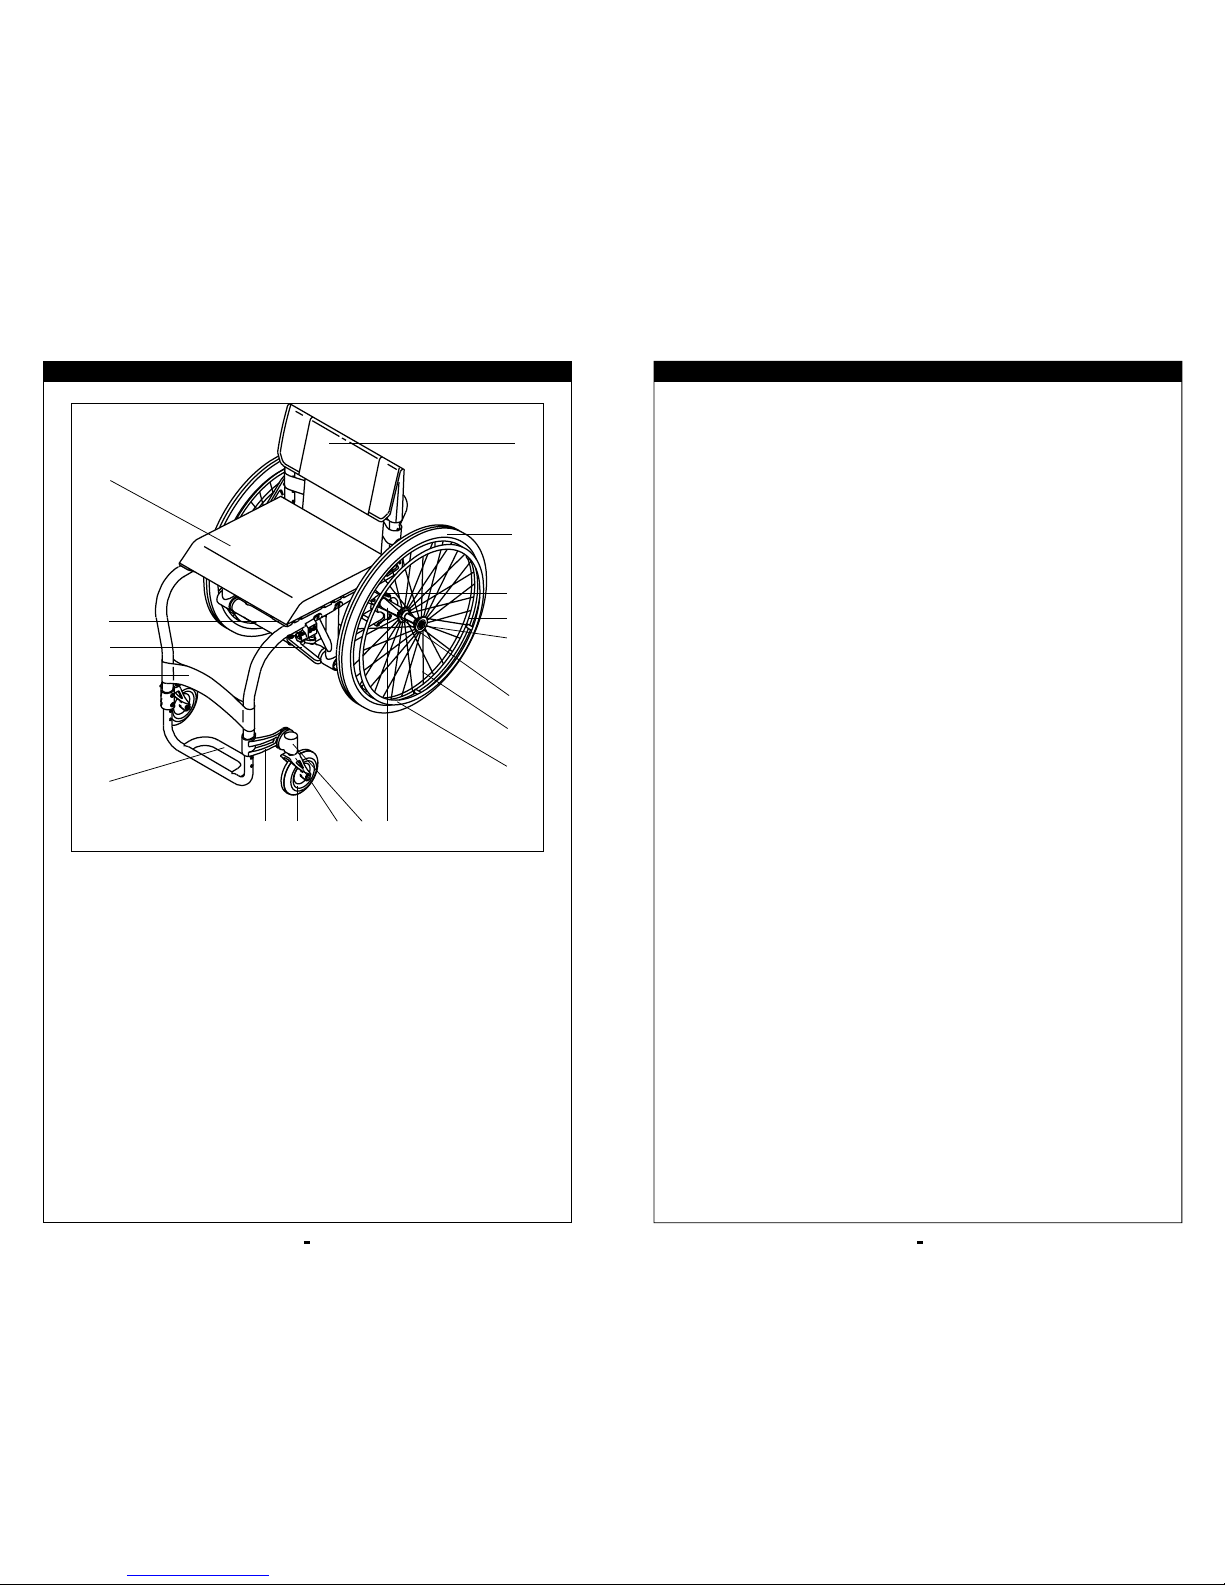
III. YOUR CHAIR AND ITS PARTS
1. Backrest
2. Tire
3. Seat cushion
4. Seat sling (not shown)
5. High-mount scissor wheel lock
6. Leg strap
7. Caster leg
8. Footrest
9. Handrim
10. Spokes
11. Rear wheel hub
12. Quick-release axle
13. Wheel rim
14. Axle clamp
15. Caster housing
16. Fork
17. Caster wheel
18. Camber tube (not visible)
Quickie XTR Wheelchair
3
Weight
21.5 lbs. with steel rear axles
Adjustments
3” fork
2” wheelbase width adjustment
2 1/2” horizontal axle adjustment
Rear wheel camber adjustment
Color
Blue, black,red, midnight purple, teal,
forest green, yellow, blue green, pearl
pink, lavender, burgundy, candy teal,
candy razzberry, candy purple
Custom splatter - black, purple chase,
teal chase
Chair Parts
Std - black
Frame Dimensions
Frame width: Std 14”-20”
(seat width 1/2” narrower)
Sling depth: 14”-18”
Opt - Cushion: 2”
Backrest
Folding-adjustable height & angle:
11”-14”, 12”-16”, 16”-20”
Backrest options: side guard,
adjustable upholstery
Footrest
Rigid - adjustable
Impact guards - Neoprene
Casters
Std - 5” low-profile polyurethane
Opt - 3” micros
Armrests
Opt - padded Swing-Away
Height adjustable
Axle Bracket
Standard - Adjustable Bracket
Camber - 0
o,4o,8o
Axles
Std - stainless steel
Opt - titanium, quad-release axle nuts
Anti-tip Tubes
Rear anti-tip tubes,
Standard Rear Wheels
Std - spoke
Quickie Performance
Wheels
Opt - heat-treated tennis
Opt - mag wheels
Tire Size
Std - 24”
Opt - 26”
Tire Types
Std - pneumatic
Opt - airless insert
Kevlar (24” only),high-pressure
clinchers (24”,26” only).
latex-tubular (24”, 26” only),
turbo tread (24”, 26” only)
knobbie tire (24” only)
Hand Rims
Std - aluminum
Opt - plastic-coated,
Projections
Opt - vertical, oblique - 8, 12
Wheel Locks
Std - high-scissor
Opt - high-push, high-pull, 6” ext
handles, 9” ext handles, grade aids
All features may not be available with
some chair setups or in conjunction
with another chair feature. Please
consult your authorized supplier for
more information.
III. YOUR CHAIR AND ITS PARTS
6
8
4
7
17
16
15
5
18
1
2
14
13
12
11
10
9
Page 5
8
9
930379 Rev. A
930379 Rev. A
IV. NOTICE—READ BEFORE USE
V. GENERAL WARNINGS
A. WEIGHT LIMIT
NEVER exceed the weight limit of 250 pounds (113.6 kilograms), for combined
weight of rider and items carried. If you do exceed the limit, damage to your
chair, a fall,tip-over or loss of control may occur and cause severe injury to the
rider or others.
B. WEIGHT TRAINING
NEVER use this chair for weight training if total weight (rider plus equipment) exceeds 250 pounds. If you do exceed the limit, damage to your chair,
a fall, tip-over or loss of control may occur and cause severe injury to the
rider or others.
C. GETTING TO KNOW YOUR CHAIR
Every wheelchair is different.Take the time to learn the feel of this chair
before you begin riding. Start slowly, with easy, smooth strokes. If you are used
to a different chair, you may use too much force and tip over. If you use too
much force, damage to your chair, a fall, tip-over or loss of control may occur
and cause severe injury to the rider or others.
D. TO REDUCE THE RISK OF AN ACCIDENT
1. BEFORE riding, you should be trained in the safe use of this chair by your
health care advisor.
2. Practice bending, reaching and transfers until you know the limit of your
ability. Have someone help you until you know what can cause a fall or
tip-over and how to avoid doing so.
3. Be aware that you must develop your own methods for safe use best
suited to your level of function and ability.
4. NEVER tr y a new maneuver on your own until you are sure you can
do it safely.
5. Get to know the areas where you plan to use your chair. Look for
hazards and learn how to avoid them.
6. Use anti-tip tubes unless you are a skilled rider of this chair and are sure
you are not at risk to tip over.
If you fail to heed these warnings damage to your chair, a fall, tip-over or loss of
control may occur and cause severe injury to the rider or others.
A. CHOOSE THE RIGHT CHAIR & SAFETY OPTIONS
Sunrise provides a choice of many wheelchair styles to meet the needs of the
wheelchair rider. However, final selection of the type of wheelchair, options and
adjustments rests solely with you and your health care advisor. Choosing the
best chair and set-up for your safety depends on such things as:
1. Your disability, strength, balance and coordination.
2. The types of hazards you must overcome in daily use (where you live and
work, and other places you are likely to use your chair).
3. The need for options for your safety and comfort (such as anti-tip tubes,
positioning belts, or special seating systems).
B. REVIEW THIS MANUAL OFTEN
Before using this chair you, and each person who may assist you, should
read this entire manual and make sure to follow all instructions. Review the
warnings often, until they are second nature to you.
C. WARNINGS
The word “WARNING” refers to a hazard or unsafe practice that may
cause severe injury or death to you or to other persons.The “Warnings”
are in three main sections, as follows:
1. V — GENERAL WARNINGS
Here you will find a safety checklist and a summary of risks you need to be
aware of before you ride this chair.
2. VI — WARNINGS — FALLS & TIP-OVERS
Here you will learn how to avoid a fall or tip-over while you perform daily
activities in your chair.
3. VII — WARNINGS — FOR SAFE USE
Here you will learn about practices for the safe use of your chair
4. VIII — WARNINGS — COMPONENTS & OPTIONS
Here you will learn about the components of your chair and options you can
select for safety. Consult your authorized supplier and your health care advisor
to help you choose the best set-up and options for safe use.
Note: Where they apply, you will also find “Warnings” in other sections of this manual.
Heed all warnings in this section. If you fail to do so a fall, tip-over or loss of control may
occur and cause severe injury to the rider or others.
Page 6
10
11
930379 Rev. A
930379 Rev. A
V. GENERAL WARNINGS
H. TERRAIN
1. Your chair is designed for use on firm, even surfaces such as concrete,
asphalt and indoor floors and carpeting.
2. Do not operate your chair in sand, loose soil or over rough terrain.
This may damage wheels or axles, or loosen fasteners of your chair.
If you fail to heed these warnings damage to your chair, a fall, tip-over or loss of
control may occur and cause severe injury to the rider or others.
I. STREET USE
In most states, wheelchairs are not legal for use on public roads. Be alert to the
danger of motor vehicles on roads or in parking lots.
1. At night, or when lighting is poor, use reflective tape on your chair
and clothing.
2. Due to your low position, it may be hard for drivers to see you. Make eye
contact with drivers before you go forward.When in doubt, yield until you are
sure it is safe.
If you fail to heed these warnings damage to your chair, a fall, tip-over or loss of
control may occur and cause severe injury to the rider or others.
J. MOTOR VEHICLE SAFETY
Quickie wheelchairs do not meet federal standards for motor vehicle seating.
1. NEVER let anyone sit in this chair while in a moving vehicle.
a. ALWAYS move the rider to an approved vehicle seat.
b. ALWAYS secure the rider with proper motor vehicle restraints.
2. In an accident or sudden stop the rider may be thrown from the chair.
Wheelchair seat belts will not prevent this, and further injury may result
from the belts or straps.
3. NEVER transport this chair in the front seat of a vehicle. It may shift and
interfere with the driver.
4. ALWAYS secure this chair so that it cannot roll or shift.
5. Do not use any chair that has been involved in a motor vehicle accident.
If you fail to heed these warnings damage to your chair, a fall, tip-over or loss of
control may occur and cause severe injury to the rider or others.
E. SAFETY CHECKLIST
Before Each Use Of Your Chair :
1. Make sure the chair rolls easily and that all parts work smoothly. Check
for noise, vibration,or a change in ease of use. (They may indicate low tire
pressure, loose fasteners, or damage to your chair).
2. Repair any problem.Your authorized supplier can help you find and correct the problem.
3. Check to see that both quick-release rear axles are locked.When locked,
the axle button will “pop out” fully. If not locked, the wheel may come off
and cause you to fall.
4. If your chair has anti-tip tubes, lock them in place.
Note: See “Anti-Tip Tubes” (Section VIII) for times you should not use them.
If you fail to heed these warnings damage to your chair, a fall, tip-over or loss
of control may occur and cause severe injury to the rider or others.
F. CHANGES & ADJUSTMENTS
1. If you modify or adjust this chair, it may increase the risk of a tip-over UNLESS
you make other changes as well.
2. Consult your authorized supplier BEFORE you modify or adjust your chair.
3. We recommend that you use anti-tip tubes until you adapt to the change, and
are sure you are not at risk to tip over.
4. Unauthorized modifications or use of parts not supplied or approved by Sunrise
may change the chair structure.This will void the warranty and may cause a
safety hazard.
If you fail to heed these warnings damage to your chair, a fall, tip-over or loss of
control may occur and cause severe injury to the rider or others.
G. ENVIRONMENTAL CONDITIONS
1. Use extra care if you must ride your chair on a wet or slick surface. If you are
in doubt, ask for help.
2. Contact with water or excess moisture may cause your chair to rust or
corrode.This could cause your chair to fail.
a. Do not use your chair in a shower, pool or other body of water. The chair
tubing and parts are not water-tight and may rust or corrode from the inside.
b. Avoid excess moisture (for example, do not leave your chair in a damp
bathroom while taking a shower).
c. Dry your chair as soon as you can if it gets wet, or if you use water to
clean it.
If you fail to heed these warnings damage to your chair, a fall, tip-over or loss of
control may occur and cause severe injury to the rider or others.
V. GENERAL WARNINGS
Page 7
12
13
930379 Rev. A
930379 Rev. A
V. GENERAL WARNINGS
K. WHEN YOU NEED HELP
For The Rider:
Make sure that each person who helps you reads and follows all warnings and
instructions that apply.
For Attendants:
1. Work with the rider’s doctor, nurse or therapist to learn safe methods
best suited to your abilities and those of the rider.
2. Tell the rider what you plan to do, and explain what you expect the rider
to do.This will put the rider at ease and reduce the risk of an accident.
3. Make sure the chair has push handles.They provide secure points for
you to hold the rear of the chair to prevent a fall or tip-over. Check to
make sure push handle grips will not rotate or slip off.
4. To prevent injury to your back, use good posture and proper body
mechanics.When you lift or support the rider or tilt the chair, bend your
knees slightly and keep your back as upright and straight as you can.
5. Remind the rider to lean back when you tilt the chair backward.
6. When you descend a curb or single step, slowly lower the chair in one
easy movement. Do not let the chair drop the last few inches to the
ground.This may damage the chair or injure the rider.
7. To avoid tripping, unlock and rotate anti-tip tubes up, out of the way.
ALWAYS lock the rear wheels and lock anti-tip tubes in place if you
must leave the rider alone, even for a moment.This will reduce the risk
of a tip over or loss of control of the chair.
If you fail to heed these warnings damage to your chair, a fall, tip-over or loss
of control may occur and cause severe injury to the rider or others.
VI. WARNINGS: FALLS & TIP-OVERS
A. CENTER OF BALANCE
The point where this chair will tip forward, back, or to the side depends on its
center of balance and stability. How your chair is set up, the options you select
and the changes you make may affect the risk of a fall or tip-over.
1. The Most Important Adjustments Are:
a. The position of the rear wheels.The more you move the rear wheels
forward, the more likely your chair will tip over backward.
2. The Center Of Balance Is Also Affected By:
a. A change in the set-up of your chair, including:
• The distance between the rear wheels.
• The amount of rear wheel camber.
• The seat height and seat angle.
• Backrest angle.
b. A change in your body position, posture or weight distribution.
c. Riding your chair on a ramp or slope.
d. The use of a back pack or other options, and the amount of added weight.
3. To Reduce The Risk Of An Accident:
a. Consult your doctor, nurse or therapist to find out what axle and
caster position is best for you.
b. Consult your authorized supplier BEFORE you modify or adjust this
chair. Be aware that you may need to make other changes to correct
the center of balance.
c. Have someone help you until you know the balance points of your
chair and how to avoid a tip-over.
d. Use anti-tip tubes.
If you fail to heed these warnings damage to your chair, a fall, tip-over or loss
of control may occur and cause severe injury to the rider or others.
B. DRESSING OR CHANGING CLOTHES
Your weight may shift if you dress or change clothes while seated in this chair.
To reduce the risk of a fall or tip-over:
1. Rotate the front casters until they are as far forward as possible.
This makes the chair more stable.
2. Lock anti-tip tubes in place. (If your chair does not have anti-tip tubes,
back it up against a wall and lock both rear wheels).
If you fail to heed these warnings damage to your chair, a fall, tip-over or loss of
control may occur and cause severe injury to the rider or others.
Page 8
14
15
930379 Rev. A
930379 Rev. A
VI. WARNINGS: FALLS & TIP-OVERS
C. WHEELIES
Doing a “wheelie” means: balancing on the rear wheels of your chair, while
the front casters are in the air. It is dangerous to do a "wheelie" as a fall or
tip-over may occur. However, if you do it safely, a “wheelie” can help you
overcome curbs and obstacles.
1. Consult your doctor, nurse or therapist to find out if you are a good
candidate to learn to do a “wheelie.”
2. Do not attempt a “wheelie” UNLESS you are a skilled rider of this chair,
or you have help.
Note: See p. 19 for steps to learn to do a “wheelie.”
If you fail to heed these warnings damage to your chair, a fall, tip-over or loss of
control may occur and cause severe injury to the rider or others.
D. OBSTACLES
Obstacles and road hazards (such as potholes and broken pavement) can
damage your chair and may cause a fall, tip-over or loss of control.
To avoid these risks:
1. Keep a lookout for danger – scan the area well ahead of your chair
as you ride.
2. Make sure the floor areas where you live and work are level and
free of obstacles.
3. Remove or cover threshold strips between rooms.
4. Install a ramp at entry or exit doors. Make sure there is not a drop off at
the bottom of the ramp.
5. To Help Correct Your Center Of Balance:
a. Lean your upper body FORWARD slightly as you go UP over an obstacle.
b. Press your upper body BACKWARD as you go DOWN from a higher
to a lower level.
6. If your chair has anti-tip tubes, lock them in place before you go UP
over an obstacle.
7. Keep both of your hands on the handrims as you go over an obstacle.
8. Never push or pull on an object (such as furniture or a doorjamb) to
propel your chair.
If you fail to heed these warnings damage to your chair, a fall, tip-over or loss of
control may occur and cause severe injury to the rider or others.
VI. WARNINGS: FALLS & TIP-OVERS
E. REACHING OR LEANING
If you reach or lean it will affect the center of balance of your chair.This may
cause you to fall or tip over. When in doubt, ask for help or use a device to
extend your reach.
1. NEVER reach or lean if you must shift your weight sideways or rise up
off the seat.
2. NEVER reach or lean if you must move forward in your seat to do so.
Always keep your buttocks in contact with the backrest.
3. NEVER reach with both hands (you may not be able to catch yourself
to prevent a fall if the chair tips).
4. NEVER reach or lean to the rear unless your chair has anti-tip tubes
locked in place.
5. DO NOT reach or lean over the top of the seat back.This may damage
one or both backrest tubes and cause you to fall.
6. If You Must Reach Or Lean:
a. Do not lock the rear wheels.This creates a tip point and makes a fall
or tip-over more likely.
b. Do not put pressure on the footrests.
Note: Leaning forward puts pressure on the footrests and may cause the chair to tip if
you lean too far.
c. Move your chair as close as you can to the object you wish to reach.
d. Do not try to pick up an object from the floor by reaching down
between your knees.You are less likely to tip if you reach to the side
of your chair.
e. Rotate the front casters until they are as far forward as possible. This
makes the chair more stable.
Note: To do this: Move your chair past the object you want to reach, then back up
alongside it. Backing up will rotate the casters forward.
f. Firmly grasp a rear wheel or an armrest with one hand.This will help
to prevent a fall if the chair tips.
If you fail to heed these warnings damage to your chair, a fall, tip-over or loss of control
may occur and cause severe injury to the rider or others.
Page 9
16
17
930379 Rev. A
930379 Rev. A
VI. WARNINGS: FALLS & TIP-OVERS
F. MOVING BACKWARD
Use extra care when you move your chair backward.Your chair is most stable
when you propel yourself forward.You may lose control or tip over if one of
the rear wheels hits an object and stops rolling.
1. Propel your chair slowly and smoothly.
2. If your chair has anti-tip tubes, make sure to lock them in place.
3. Stop often and check to be sure your path is clear.
If you fail to heed these warnings damage to your chair, a fall, tip-over or loss of
control may occur and cause severe injury to the rider or others.
G. RAMPS, SLOPES & SIDE HILLS
Riding on a slope, which includes a ramp or side hill, will change the center of
balance of your chair. Your chair is less stable when it is at an angle. Anti-tip tubes
may not prevent a fall or tip-over.
1. Do not use your chair on a slope steeper than 10%. (A 10% slope means: one
foot in elevation for every ten feet of slope length.)
2. Always go as straight up and as straight down as you can. (Do not “cut the
corner” on a slope or ramp.)
3. Do not turn or change direction on a slope.
4. Always stay in the CENTER of the ramp. Make sure ramp is wide enough that
you are not at risk that a wheel may fall over the edge.
5. Do not stop on a steep slope. If you stop, you may lose control of your chair.
6. NEVER use rear wheel locks to try to slow or stop your chair. This is likely
to cause your chair to veer out of control.
7. Beware Of:
a. Wet or slippery surfaces.
b. A change in grade on a slope (or a lip, bump or depression).These may
cause a fall or tip-over.
c. A drop-off at the bottom of a slope. A drop-off of as small as 3/4 inch can
stop a front caster and cause the chair to tip forward.
8. To Reduce The Risk Of A Fall Or Tip-Over:
a. Lean or press your body UPHILL.This will help adjust for the change in the
center of balance caused by the slope or side hill.
b. Keep pressure on the handrims to control your speed on a down slope.
If you go too fast you may lose control.
c. Ask for help any time you are in doubt.
VI. WARNINGS: FALLS & TIP-OVERS
9. Ramps At Home & Work - For your safety, ramps at home and work must
meet all legal requirements for your area.We recommend:
a. Width.At least four feet wide.
b. Guardrails.To reduce the risk of a fall, sides of ramp must have guardrails
(or raised borders at least three inches high).
c. Slope. Not more than a 10% grade.
d. Surface. Flat and even, with a thin carpet or other non-skid material.
(Make sure there is no lip, bump or depression.)
e. Bracing. Ramp must be STURDY.You may need bracing so ramp does not
“bow” when you ride on it.
f. Avoid A Drop Off.You may need a section at the top or bottom to smooth
out the transition.
If you fail to heed these warnings damage to your chair, a fall, tip-over or loss of
control may occur and cause severe injury to the rider or others.
H. TRANSFER
It is dangerous to transfer on your own. It requires good balance and agility.
Be aware that there is a point during every transfer when the wheelchair seat
is not below you.To Avoid A Fall:
1. Work with your health care advisor to learn safe methods.
a. Learn how to position your body and how to support yourself during
a transfer.
b. Have someone help you until you know how to do a safe transfer on
your own.
2. Lock the rear wheels before you transfer. This keeps the rear wheels
from rolling.
Note: This will NOT keep your chair from sliding away from you or tipping.
3. Make sure to keep pneumatic tires properly inflated. Low tire pressure
may allow the rear wheel locks to slip.
4. Move your chair as close as you can to the seat you are transferring to.
If possible, use a transfer board.
5. Rotate the front casters until they are as far forward as possible.
6. If you can, remove or swing footrests out of the way.
a. Make sure your feet do not catch in the space between the footrests.
b. Avoid putting weight on the footrests as this may cause the chair to tip.
7. Make sure armrests are out of the way and do not interfere.
8. Transfer as far back onto the seat surface as you can.This will reduce the
risk that the chair will tip or move away from you.
If you fail to heed these warnings damage to your chair, a fall, tip-over or loss of
control may occur and cause severe injury to the rider or others.
Page 10
18
19
930379 Rev. A
930379 Rev. A
VI. WARNINGS: FALLS & TIP-OVERS
I. CURBS & STEPS
1. Each person who helps you should read and follow the warnings
“For Safe Use” (Section VII).
2. Do not try to climb or descend a curb or step alone UNLESS you
are a skilled rider of this chair and:
a. You can safely do a “wheelie”; and
b. You are sure you have the strength and balance to do so.
3. Unlock and rotate anti-tip tubes up, out of the way, so they do
not interfere.
4. Do not try to climb a high curb or step (more than 4 inches high)
UNLESS you have help. Doing so may cause your chair to exceed its
balance point and tip over.
5. Go straight up and straight down a curb or step. If you climb or descend
at an angle, a fall or tip-over is likely.
6. Be aware that the impact of dropping down from a curb or step can
damage your chair or loosen fasteners.
If you fail to heed these warnings damage to your chair, a fall, tip-over or loss of
control may occur and cause severe injury to the rider or others.
J. STAIRS
1. NEVER use this chair on stairs UNLESS you have someone to help you.
Doing so is likely to cause a fall or tip-over.
2. Persons who help you should read and follow the warnings
“For Attendants” (p. 12), and the “For Safe Use” (Section VII).
If you fail to heed these warnings damage to your chair, a fall, tip-over or loss of
control may occur and cause severe injury to the rider or others.
K. ESCALATORS
NEVER use this chair on an escalator, even with an attendant. If you do, a fall
or tip-over is likely.
If you fail to heed these warnings damage to your chair, a fall, tip-over or loss of
control may occur and cause severe injury to the rider or others.
Before you assist a rider, be sure to read the warnings “For Attendants” (p. 12)
and follow all instructions that apply. Be aware that you will need to learn safe
methods best suited to your abilities.
A. LEARNING TO DO A “WHEELIE”
Follow these steps to help the rider learn to do a “wheelie”:
1. Read and follow the warnings for “WHEELIES.” (See p. 14)
2. Stand at the rear of the chair.You must be able to move with the chair to
prevent a tip-over.
3. Keep your hands BENEATH the push handles, ready to catch the rider if the
chair tips back.
4. When you are ready, have the rider place his or her hands on the forward part
of the handrims.
5. Have the rider make a quick BACKWARD movement of the rear wheels,
quickly followed by a hard FORWARD thrust. (This will tilt the chair up on the
balance point of the rear wheels.)
6. Have the rider make small movements of the handrims to stay in balance.
If you fail to heed these warnings damage to your chair, a fall, tip-over or loss of
control may occur and cause severe injury to the rider or others.
B. DESCENDING A CURB OR SINGLE STEP
Follow these steps to help a rider descend a curb or single step going BACKWARD:
1. Stay at the rear of the chair.
2. Several feet before your reach the edge of the curb or step, turn the chair
around and pull it backward.
3. While looking over your shoulder, carefully step back until you are off the curb
or stair and standing on the lower level.
4. Pull the chair toward you until the rear wheels reach the edge of the curb or
step.Then allow the rear wheels to slowly roll down onto the lower level.
5. When the rear wheels are safely on the lower level, tilt the chair back to its
balance point.This will lift the front casters off the curb or step.
6. Keep the chair in balance and take small steps backward. Turn the chair around
and gently lower front casters to the ground.
If you fail to heed these warnings damage to your chair, a fall, tip-over or loss of
control may occur and cause severe injury to the rider or others.
VII. WARNINGS: FOR SAFE USE
Page 11
20
21
930379 Rev. A
930379 Rev. A
VII. WARNINGS: FOR SAFE USE
C. CLIMBING A CURB OR SINGLE STEP
Follow these steps to help the rider climb a curb or single step going FORWARD:
1. Stay behind the chair.
2. Face the curb and tilt the chair up on the rear wheels so that the front casters
clear the curb or step.
3. Move forward, placing the front casters on the upper level as soon as you are
sure they are past the edge.
4. Continue forward until the rear wheels contact the face of the curb or step.
Lift and roll the rear wheels to the upper level.
If you fail to heed these warnings damage to your chair, a fall, tip-over or loss of
control may occur and cause severe injury to the rider or others.
D. CLIMBING STAIRS
1. Use at least two attendants to move a chair and rider up stairs.
2. Move the chair and rider BACKWARD up the stairs.
3. The person at the rear is in control. He or she tilts the chair back to its
balance point.
4. A second attendant at the front firmly grasps a non-detachable part of the
front frame and lifts the chair up and over one stair at a time.
5. The attendants move to the next stair up.Repeat for each stair,until you reach
the landing.
If you fail to heed these warnings damage to your chair, a fall, tip-over or loss of
control may occur and cause severe injury to the rider or others.
E. DESCENDING STAIRS
1. Use at least two attendants to move a chair and rider down stairs.
2. Move the chair and rider FORWARD down the stairs.
3. The person at the rear is in control. He or she tilts the chair to the balance
point of the rear wheels and rolls it to the edge of the top step.
4. A second attendant stands on the third step from the top and grasps the chair
frame. He or she lowers the chair one step at a time by letting the rear wheels
roll over the stair edge.
5. The attendants move to the next stair down. Repeat for each stair, until you
reach the landing.
If you fail to heed these warnings damage to your chair, a fall, tip-over or loss of
control may occur and cause severe injury to the rider or others.
VII. WARNINGS: FOR SAFE USE
F. MAINTENANCE
1. Inspect and maintain this chair strictly per chart.
2. If you detect a problem, make sure to service or repair the chair before use.
3. At least once a year, have a complete inspection, safety check and service of
your chair made by an authorized supplier.
If you fail to heed these warnings damage to your chair, a fall, tip-over or loss of
control may occur and cause severe injury to the rider or others. For additional
maintenance information see Section XII: Maintenance.
Page 12
22
23
930379 Rev. A
930379 Rev. A
A. ANTI-TIP TUBES (Optional)
Anti-tip tubes can help keep your chair from tipping over backward in most
normal conditions.
1. Sunrise Recommends Use Of Anti-Tip Tubes:
a. UNLESS you are a skilled rider of this chair and are sure you are not at
risk to tip over.
b. Each time you modify or adjust your chair. The change may make it easier
to tip backward. Use anti-tip tubes until you adapt to the change, and are
sure you are not at risk to tip over.
2. When locked in place (in the “down” position) anti-tip tubes should be
BETWEEN 1 1/2 to 2 inches off the ground.
a. If set too HIGH, they may not prevent a tip-over.
b. If set too LOW, they may “hang up” on obstacles you can expect in normal
use. If this occurs, you may fall or your chair may tip over.
3. Keep Anti-Tip Tubes Locked In Place UNLESS:
a. You have an attendant; or
b. You have to climb or descend a curb, or overcome an obstacle, and can
safely do so without them. At these times, make sure anti-tip tubes are up,
out of the way.
If you fail to heed these warnings damage to your chair, a fall, tip-over or loss of
control may occur and cause severe injury to the rider or others.
B. ARMRESTS
Armrests detach and will not bear the weight of this chair.
1. NEVER lift this chair by its armrests.They may come loose or break.
2. Lift this chair only by non-detachable parts of the main frame.
If you fail to heed these warnings damage to your chair, a fall, tip-over or loss of
control may occur and cause severe injury to the rider or others.
C. CUSHIONS & SLING SEATS
1. Quickie sling seats and standard foam cushions are not designed for the relief
of pressure.
2. If you suffer from pressure sores, or if you are at risk that they will occur,you
may need a special seat system or a device to control your posture. Consult
your doctor, nurse or therapist to find out if you need such a device for your
well-being.
If you fail to heed these warnings damage to your chair, a fall, tip-over or loss of
control may occur and cause severe injury to the rider or others.
VIII. WARNINGS: COMPONENTS & OPTIONS VIII. WARNINGS: COMPONENTS & OPTIONS
D. FASTENERS
Many of the screws, bolts and nuts on this chair are special high-strength fasteners.
Use of improper fasteners may cause your chair to fail.
1. ONLY use fasteners provided by an authorized supplier (or ones of the same
type and strength, as indicated by the markings on the heads).
2. Over- or under-tightened fasteners may fail or cause damage to chair parts.
3. If bolts or screws become loose, tighten them as soon as you can.If you fail to
heed these warnings damage to your chair, a fall, tip-over or loss of control
may occur and cause severe injury to the rider or others.
If you fail to heed these warnings damage to your chair, a fall, tip-over or loss of
control may occur and cause severe injury to the rider or others.
E. FOOTRESTS
1. At the lowest point, footrests should be AT LEAST .5" off the ground. If set
too LOW, they may “hang up” on obstacles you can expect to find in normal
use.This may cause the chair to stop suddenly and tip forward.
2. To Avoid A Trip Or Fall When You Transfer :
a. Make sure your feet do not “hang up” or get caught in the space between
the footrests.
b. Avoid putting weight on the footrests, as the chair may tip forward.
3. NEVER lift this chair by the footrests. Footrests detach and will not bear the weight
of this chair. Lift this chair only by non-detachable parts of the main frame.
If you fail to heed these warnings damage to your chair, a fall, tip-over or loss of
control may occur and cause severe injury to the rider or others.
F. PNEUMATIC TIRES
Proper inflation extends the life of your tires and makes your chair easier to use.
1. Do not use this chair if any of the tires is under- or over-inflated. Check weekly for proper inflation level, as listed on the tire sidewall.
2. Low pressure in a rear tire may cause the wheel lock on that side to slip and
allow the wheel to turn when you do not expect it.
3. Low pressure in any of the tires may cause the chair to veer to one side and
result in a loss of control.
4. Over-inflated tires may burst.
If you fail to heed these warnings damage to your chair, a fall, tip-over or loss of
control may occur and cause severe injury to the rider or others.
Page 13
24
25
930379 Rev. A
930379 Rev. A
VIII. WARNINGS: COMPONENTS & OPTIONS
G. POSITIONING BELTS (Optional)
Use positioning belts ONLY to help support the rider’s posture. Improper use of
these belts may cause severe injury to or death of the rider.
1. Make sure the rider does not slide down in the wheelchair seat. If this occurs, the
rider may suffer chest compression or suffocate due to pressure from the belts.
2. The belts must be snug, but must not be so tight that they interfere with breathing.You should be able to slide your open hand, flat, between the belt and the
rider.
3. A pelvic wedge or a similar device can help keep the rider from sliding down in
the seat. Consult with the rider’s doctor, nurse or therapist to find out if the
rider needs such a device.
4. Use positioning belts only with a rider who can cooperate. Make sure the rider
can easily remove the belts in an emergency.
5. NEVER Use Positioning Belts:
a. As a patient restraint. A restraint requires a doctor’s order.
b. On a rider who is comatose or agitated.
c. As a motor vehicle restraint. In an accident or sudden stop the rider may be
thrown from the chair. Wheelchair seat belts will not prevent this, and fur-
ther injury may result from the belts or straps.
If you fail to heed these warnings damage to your chair, a fall, tip-over or loss of
control may occur and cause severe injury to the rider or others.
H. POWER DRIVE
Do not install a power drive on any Quickie wheelchair. If you do:
1. It will affect the center of balance of your chair and may cause a fall or tip-over.
2. It will alter the frame and void the warranty.
If you fail to heed these warnings damage to your chair, a fall, tip-over or loss of
control may occur and cause severe injury to the rider or others.
I. PUSH HANDLES (Optional)
When you have a attendant, make sure that this chair has push handles.
1. Push handles provide secure points for an attendant to hold the rear of this
chair, to prevent a fall or tip-over. Make sure to use push handles when you have
an attendant.
2. Check to make sure push handle grips will not rotate or slip off.
If you fail to heed these warnings damage to your chair, a fall, tip-over or loss of
control may occur and cause severe injury to the rider or others.
VIII. WARNINGS: COMPONENTS & OPTIONS
J. QUICK-RELEASE AXLES
1. Do not use this chair UNLESS you are sure that both quick-release rear axles are
locked. An unlocked axle may come off during use and cause a fall.
2. An axle is not locked until the quick-release button pops out fully.
An unlocked axle may come off during use, resulting in a fall, tip-over or loss of
control and cause severe injury to the rider or others.
If you fail to heed these warnings damage to your chair, a fall, tip-over or loss of control may occur and cause severe injury to the rider or others.
K. REAR WHEELS
A change in set-up of the rear wheels will affect the center of balance of your chair.
1. The farther you move the rear axles FORWARD, the more likely it is that your
chair will tip over backward.
2. Consult your doctor, nurse or therapist to find the best rear axle set-up for your
chair. Do not change the set-up UNLESS you are sure you are not at risk to tip
over.
3. Adjust the rear wheel locks after you make any change to the rear axles.
a. If you fail to do so, the locks may not work.
b. Make sure lock arms embed in tires at least 1/8 inch when locked.
If you fail to heed these warnings damage to your chair, a fall, tip-over or loss of control may occur and cause severe injury to the rider or others.
L. REAR WHEEL LOCKS
Rear wheel locks are NOT designed to slow or stop a moving wheelchair. Use the only
to keep the rear wheels from rolling when your chair is at a complete stop.
1. NEVER use rear wheel locks to try to slow or stop your chair when it is
moving. Doing so may cause you to veer out of control.
2. To keep the rear wheels from rolling, always set both rear wheel locks when you
transfer to or from your chair.
3. Low pressure in a rear tire may cause the wheel lock on that side to slip and may
allow the wheel to turn when you do not expect it.
4. Make sure lock arms embed in tires at least 3/8 inch when locked. If you fail to do
so, the locks may not work.
If you fail to heed these warnings damage to your chair, a fall, tip-over or loss of control may occur and cause severe injury to the rider or others.
Page 14
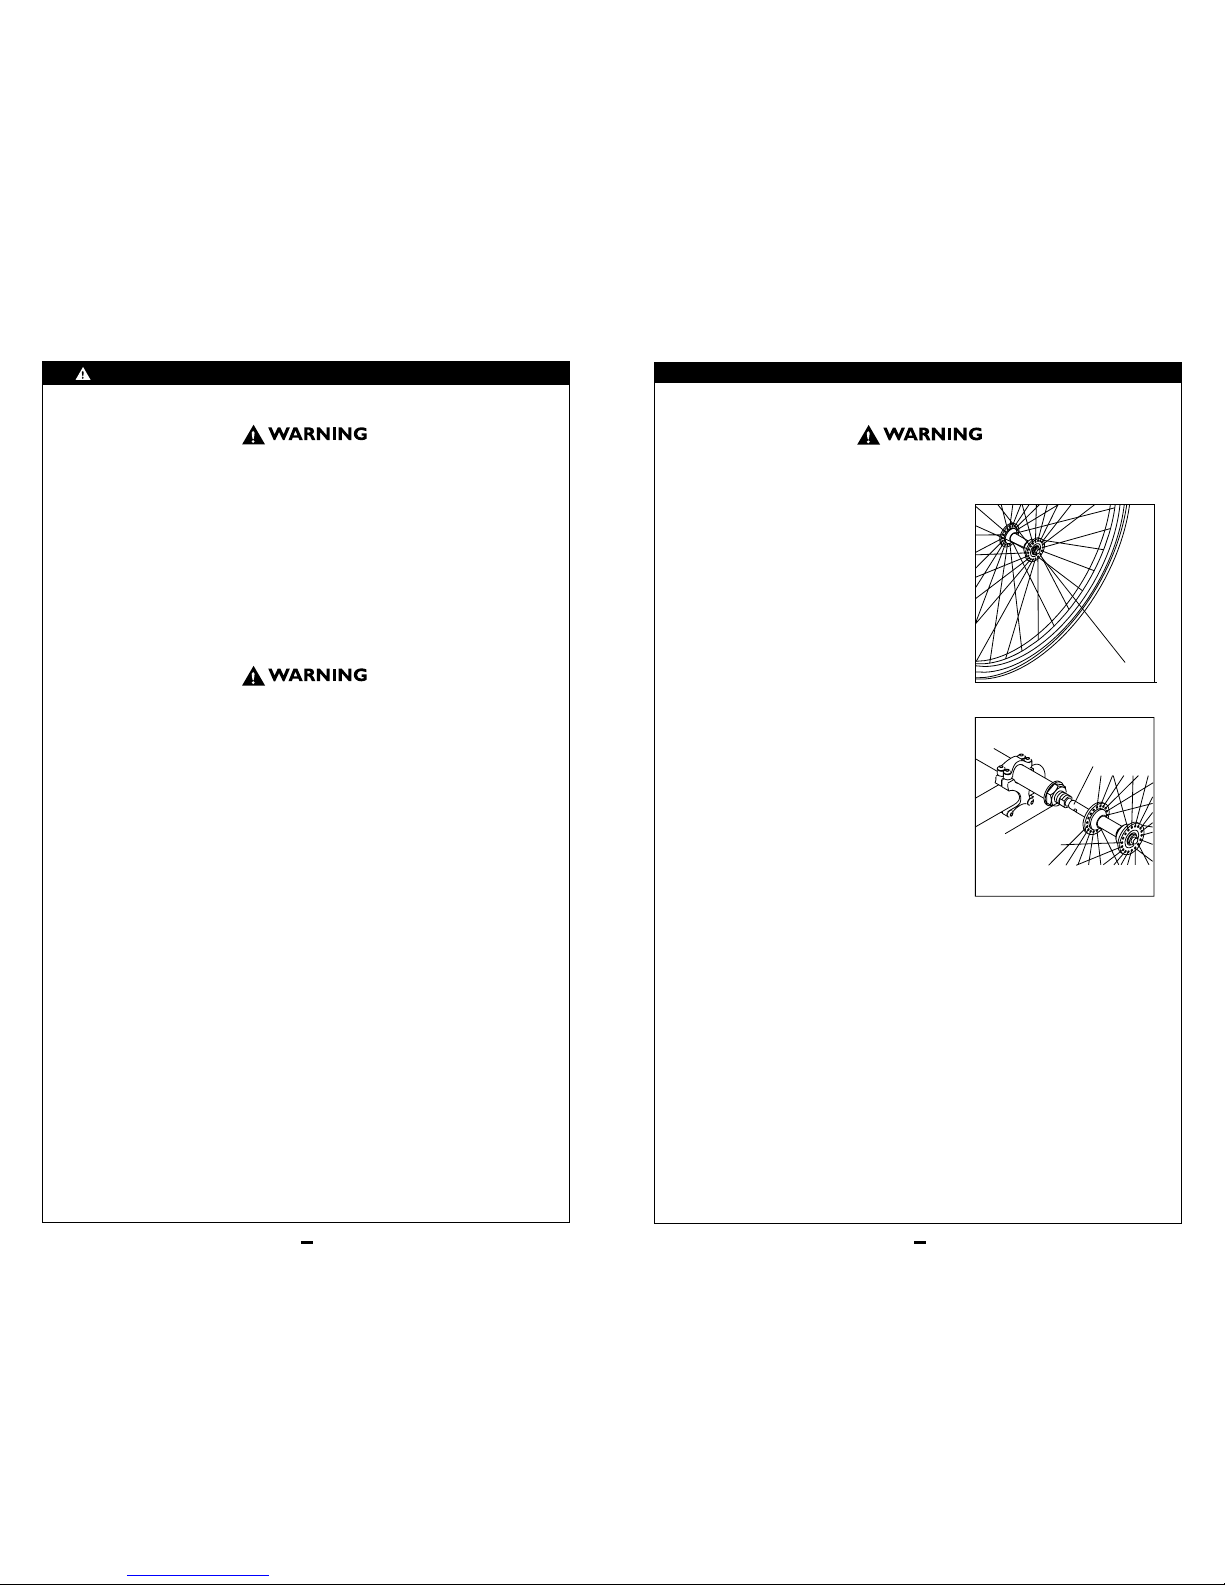
A.TO MOUNT & REMOVE REAR WHEELS (Optional)
Do not use this chair UNLESS you are sure both quick-release axles are locked. An unlocked
axle may come off during use and cause a fall.
IX. CHAIR BASICS
Note: Axle is not locked until:
a. The quick-release button pops out
fully. (Fig.A)
b. The ball bearings are fully visible on
the outside of the sleeve.
1. To Install Wheel:
a. Depress quick-release button (1) fully.
This will release tension on ball bear-
ings at other end.
b. Insert axle through hub of rear wheel.
c. Keep pressure on button (1) as you
slide axle (2) into axle sleeve (3).
d. Release button to lock axle in sleeve.
Adjust axle if it does not lock.
e. Repeat steps on other side.
2. To Remove Wheel:
a. Depress quick-release button (1) fully.
b. Remove wheel by sliding axle (2) out
of axle sleeve (3).
c. Repeat steps on other side.
1. Quick-Release Button
3
2
Figure A
26
27
930379 Rev. A
930379 Rev. A
VIII. WARNINGS: COMPONENTS & OPTIONS
M. MODIFIED SEAT SYSTEMS
Use of a seat system not approved by Sunrise may alter the center of balance of
this chair.This may cause the chair to tip over.
1. Do not change the seat system of your chair UNLESS you consult your
authorized supplier first.
2. Use of a seat system not approved by Sunrise may affect the folding mechanism
of this chair.
3. Use of a seating system not provided by Sunrise is prohibited for transit use.
If you fail to heed these warnings damage to your chair, a fall, tip-over or loss of
control may occur and cause severe injury to the rider or others.
N. UPHOLSTERY FABRIC
1. Replace worn or torn fabric of seat and seat back as soon as you can. If you
fail to do so, the seat may fail.
2. Sling fabric will weaken with age and use. Look for fraying or thin spots, or
stretching of fabrics at rivet holes.
3. “Dropping down” into your chair will weaken fabric and result in the need to
inspect and replace the seat more often.
4. Be aware that laundering or excess moisture will reduce flame retardation of
the fabric.
If you fail to heed these warnings damage to your chair, a fall, tip-over or loss of
control may occur and cause severe injury to the rider or others.
Figure B
Page 15
28
29
930379 Rev. A
930379 Rev. A
E. SEAT SLING
1. Adjustment
Remove the screws retaining the left side
seat sling. Readjust VELCRO
®
-style material to increase the tension in the seat
sling. Replace screws. If there is any difficulty in reattaching the screws, try using a
probe to help line up the holes.
F. CUSHION (Optional)
1. Installation
Place cushion on seat sling with VELCRO
®
side down. The beveled edge of the cushion
should be in front. Press firmly into place.
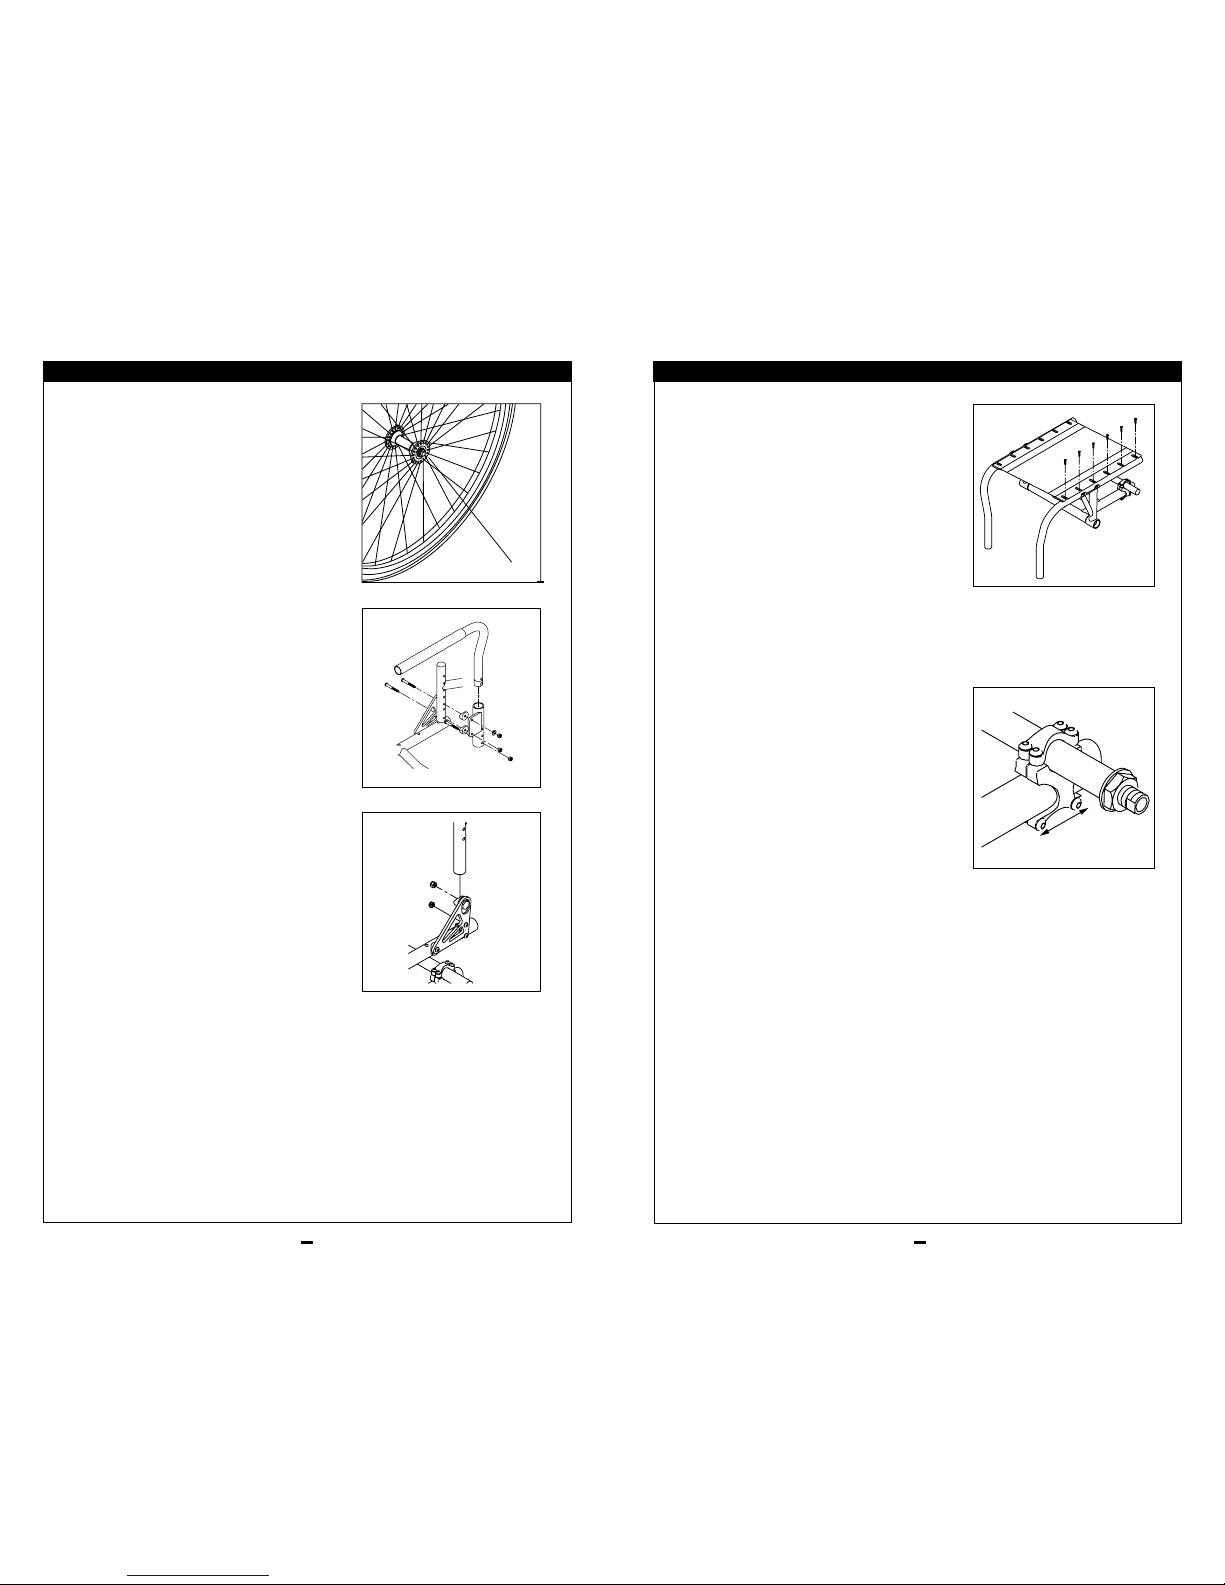
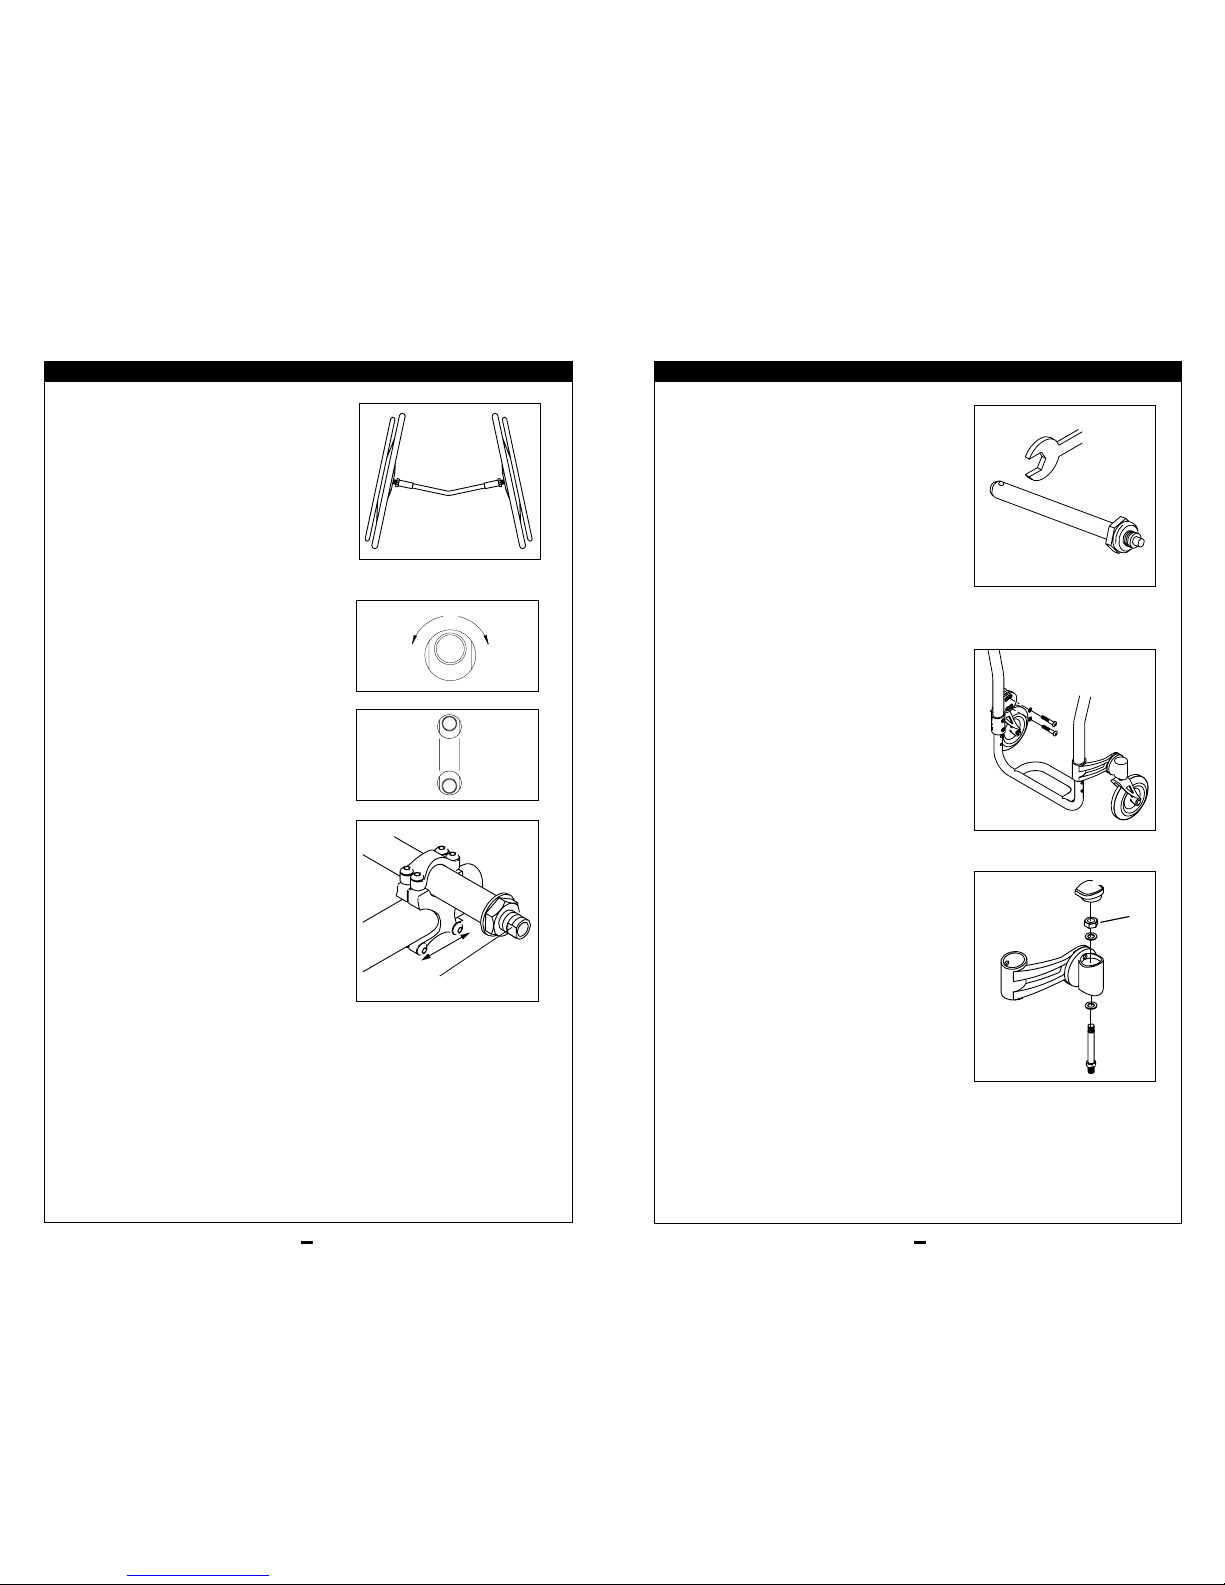
G. REAR AXLE
The most important adjustment on your
Quickie wheelchair is the position of the
rear axle. The center of gravity, wheel
camber and wheelbase are all determined
by the axle adjustment.
Note: Use a torque setting of 100 in.-lbs.
when adjusting rear axle.
1. Center of Gravity
Moving the center of gravity to the front
will lighten the force required to turn the
chair. The further back the axle and
clamp, the more stable the chair becomes.
The center of gravity is adjusted by moving
the rear axle and clamp forward or backward on the frame. Moving the axle and
clamp forward will increase your turning
speed and lighten the front end.
Important Note: Changing the center of gravity
increases the risk of a fall or tip over. Be very
careful to assure the chair will not tip over back-
wards when tilted.
X. SET UP & ADJUSTMENT
Note: Setting the wheelchair on a flat surface,
such as a workbench or table, helps make these
procedures easier.
Note on Torque Settings: A torque setting is
the optimum tightening which should be made on a
particular fastener. A Torque wrench which mea-
sures in. -lbs should be used when tightening fas-
teners on Quickie wheelchairs. Unless otherwise
noted, use a torque setting of 60. in.-lbs. when set-
ting-up this wheelchair.
A.WHEELS
Depress the quick-release button on the
axle. Slide into the axle sleeve until it locks.
B. ARMRESTS (Optional)
1. Padded Swing-Away
Swing-away, removable armrests are
installed by sliding armrest into receiver
on rear frame tubes.
C. FOLDING BACKREST
To install backrest, remove the nut, plastic
saddle and bolt on the backrest hinge
plate. Place the backrest on the chair and
reinstall. Backrest bolts should be tightened to a snug position while still allowing
free backrest movement
D. BACK-ANGLE ADJUSTMENT
Turn the eccentric bolt on the backrest
hinge plate to increase or decrease the
back angle by 8
o.
. The adjustment on each
side must be exactly equal.
X. SET UP & ADJUSTMENT
1. Quick-Release Button
Page 16
30
31
930379 Rev. A
930379 Rev. A
5. Rear Wheel Axle Sleeve Adjustment
Tight axle sleeves should be maintained for
proper performance of the wheelchair.
To adjust the axle you will need a 3/4”
wrench to turn the outside axle nuts. You
will also need a 1/2” wrench to lodge the
ball bearings, on the opposite end of the
axle, and prevent the axle from turning.
Turn the outside axle nut counter clockwise to tighten. There should only be zero
to ten thousandths of an inch (.010) of play.
H.CASTER
1. Angle Adjustment
Note: setting the wheelchair on a flat surface table
or a workbench, helps make these procedures easier.
Note on Torque Setting:A torque setting is the
optimum tightening which should be made on a
particular fastener.A torque wrench which mea-
sures in./lbs. Should be used when tightening fas-
teners on Quickie wheelchairs. Unless otherwise
noted, use a torque setting of 60 in.-lbs. When set-
ting up this wheelchair.
I. CASTER ASSEMBLY
I. Installation
a. Insert caster stem into caster housing
and place washers on stem.
b. Place nut on caster stem and tighten
until all play is removed;then loosen
(A) approximately 1/8 turn, while still
allowing for free rotation.
c. Place dust cover on caster housing and
tap into place with a soft mallet.
X. SET UP & ADJUSTMENT
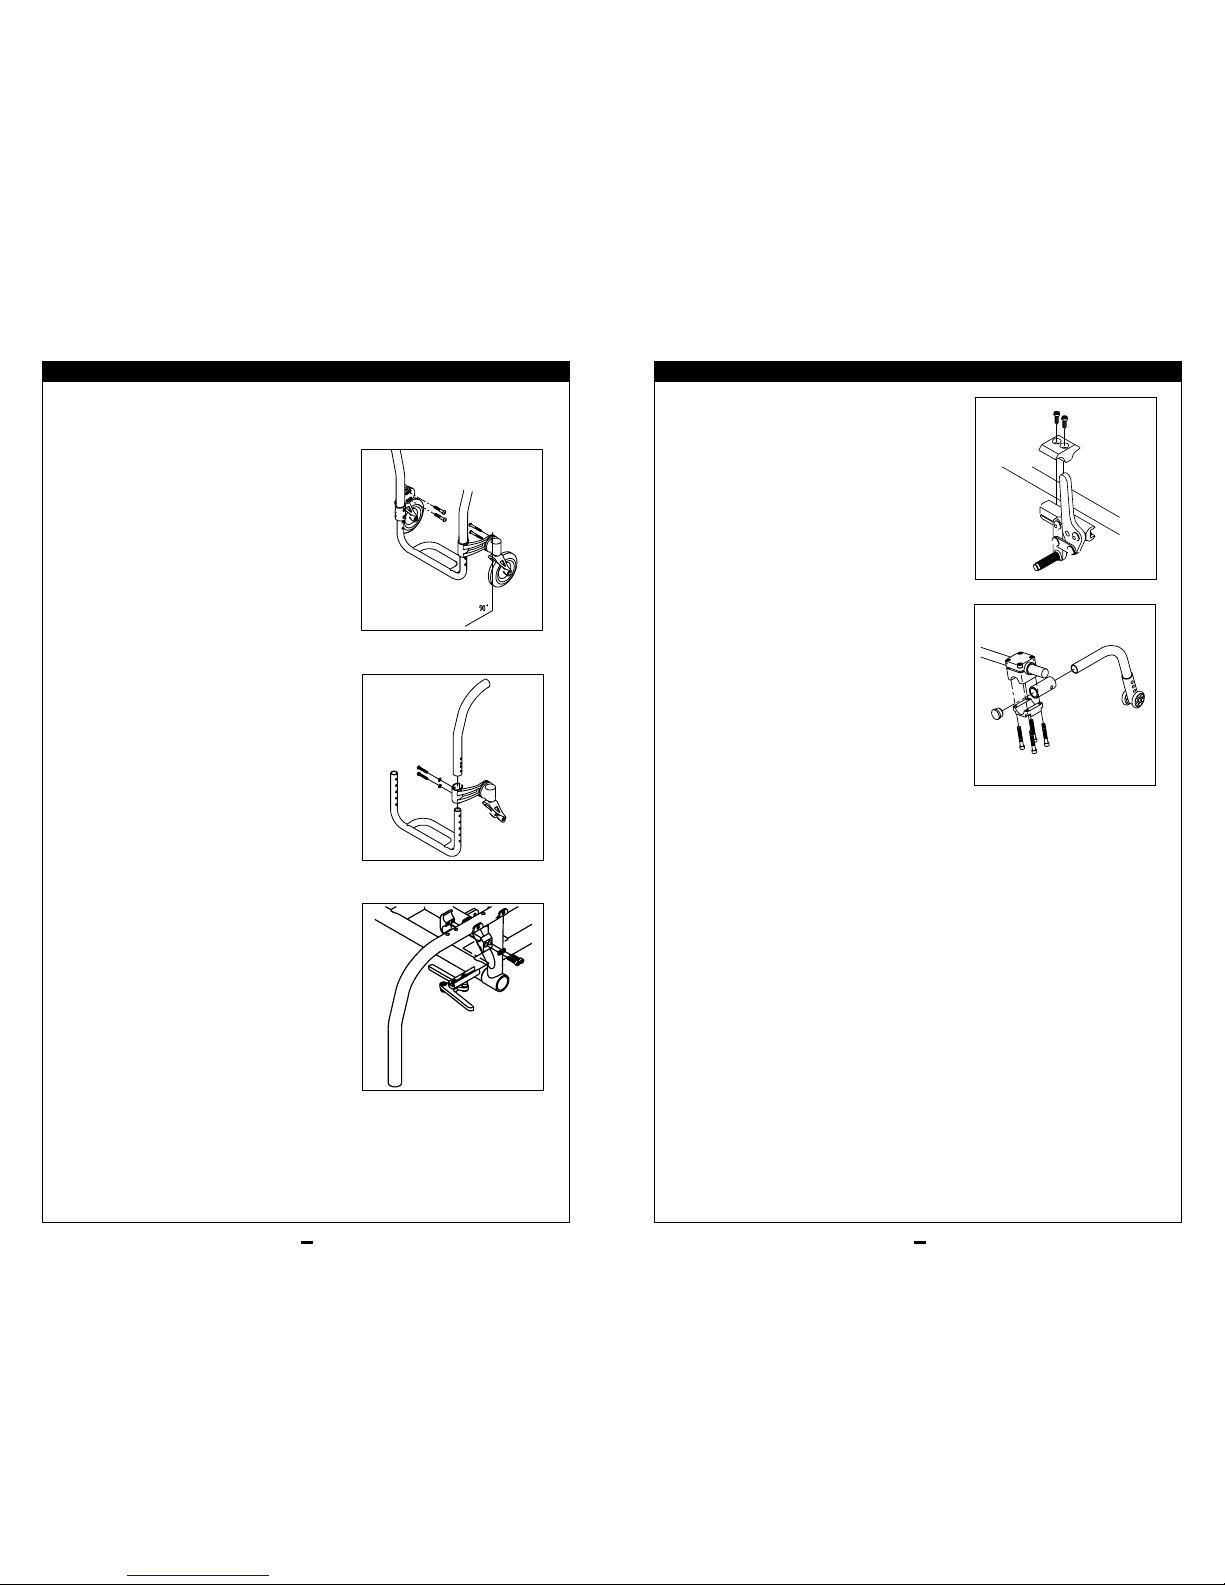
2. Wheel Camber
The wheel camber adjustment provides
greater side-to-side stability due to the
increased width and angle of the wheelbase.
The wheel camber adjustment also allows
for quicker turning and greater access to
the top of the handrims.
Wheel camber is determined by the axle
tube. Tubes are available from your authorized supplier in 0º, 4º and 8º angles.
3. Toe-in or Toe-out
Toe-in and Toe-out are terms that relate to
how well the rear wheels of the chair are
aligned.This will affect how well the chair
will roll. Drag or resistance occurs in a
wheelchair when the rear wheels are not
properly aligned.
Toe-in or toe-out can be slightly adjusted
by rotating both eccentric axle sleeves
equally,fore or aft.
4. Wheelbase Width Adjustment
Adjusting the wheelbase width allows the
rider the option to move the wheels closer or further away from the hips. It also
compensates for camber adjustment and
gives the proper wheel spacing to maximize pushing efficiency.
Adjust the wheelbase width by loosening
the nut and repositioning the axle sleeve (A)
into its corresponding hole. Retighten nuts.
X. SET UP & ADJUSTMENT
Front of Chair
Adds
Toe In
Removes
Toe In
A
Std. Position
Orient Sleeves
with Wrench
Flats Vertical
2
o
Camber
Position
Eccentric Axle Sleeve
A
Page 17
32
33
930379 Rev. A
930379 Rev. A
clamp. Using a 3/16” Allen wrench, turn one
of the screws counter-clockwise one-quarter turn. Repeat the same process with the
second of the two screws. Alternately
loosen the screws (two turns each) until
both screws are removed. Slide clamp
toward the rear wheel until the wheel lock
is embedded into the tire to prevent wheel
movement, when in the locked position.
Tighten screws.
M. ANTI-TIP TUBES (Optional)
Sunrise Medical recommends anti-tip tubes
for all wheelchairs.
Use torque setting of 100 in./lbs. when
setting-up anti-tip tubes.
1. Inserting Anti-tip Tubes Into Receiver
a. Press the rear anti-tip release lever on
the anti-tip tube so that both release
pins are drawn inside.
b. Insert the tube into the anti-tip receiver.
c. Turn the anti-tip tube down until
release pin is through the receiver
mounting hole.
d. Insert second anti-tip tube the same way.
2. Adjusting Anti-tip Receiver
a. Remove anti-tip tubes from anti-tip
receivers.
b. Remove button head bolt from anti-tip
tube receiver.
c. Reposition bracket to desired height.
d. Reinsert button-head bolt and tighten.
e. Repeat with second anti-tip tube receiv-
er. Both brackets should be at exactly
the same height.
3. Adjusting Anti-Tip Tube Wheel
The anti-tip wheels may have to be raised
or lowered to achieve proper clearance of
1 1/2” to 2”.
Press the anti-tip wheel release button
so that both release pins are drawn inside.
Raise or lower to one of the three predrilled
X. SET UP & ADJUSTMENT
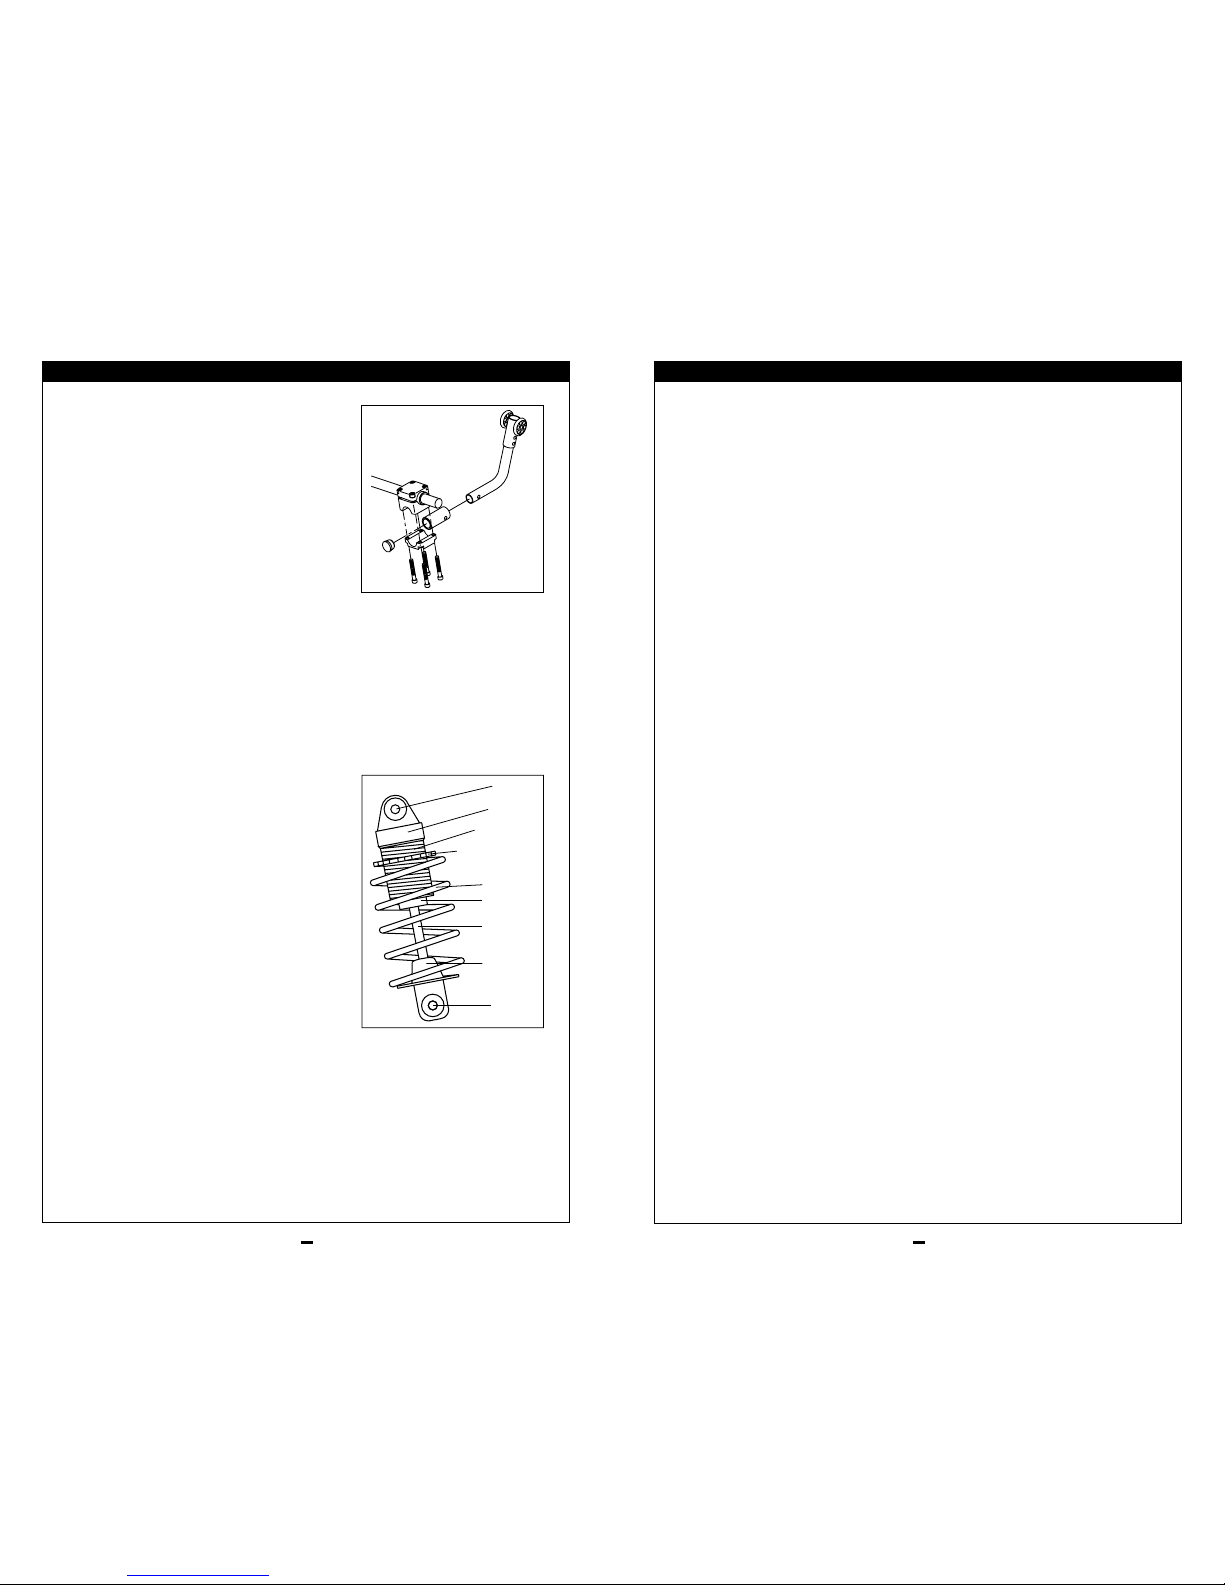
J. CASTER HOUSING
1. Adjustment
a. Loosen the two caster housing screws,
that secure the caster housing.
b. Place a large right triangle against the
table surface and the front surface of
the caster housing.
c. This will align the caster stem rotational
axis perpendicular to the floor surface.
d. When the alignment is satisfactory,
retighten the two screws.
K. FOOTREST HEIGHT
Note: Use a torque setting of 100 in.-lbs. when
adjusting footrest height.
1. Height Adjustment
a. Remove both button head cap screws
form each of the caster legs.
b. Readjust footrest to desired position.
c. Align holes in side frame bushing and
caster leg.
d. Reinstall button head cap screws.
e. Tighten.
L. WHEEL LOCKS
XTR wheelchairs are shipped with one-oftwo types of high-mount wheel locks.
Wheel locks are installed at the factory
unless you have requested otherwise.
Note: Use a torque setting of 100 in./lbs when
setting-up wheel locks.
1. High-Mount Scissor Wheel Locks:
Loosen the screws on the top of each
clamp. Slide assembly toward rear wheel
until clamp embeds into tire to prevent
wheel movement, when in locked position.
Adjust angle position. Tighten screws.
Note: Clamp and wheel lock may need to be
rotated to clear frame tubing.
2. High-Mount Push-to-Lock or Pull-toLock Wheel Locks
Loosen the screws on the top of each
X. SET UP & ADJUSTMENT
Page 18
35
X. SET UP & ADJUSTMENT
930379 Rev. A
34
930379 Rev. A
X. SET UP & ADJUSTMENT
holes. Release button. Adjust the second antitip tube wheel the same way. Both wheels
should be exactly the same height.
4. Turning Anti-Tip Tubes Up
Turn anti-tip tubes when being pushed by
attendant, overcoming obstacles or climbing
curbs. Press the rear anti-tip tube release
lever. Hold lever in and turn anti-tip tube up.
Release the lever and repeat with second antitip tube. Remember to return anti-tip tubes
to down position after completing maneuver.
N.ARMREST
1. Padded Swing-Away
Swing-away armrests can be detached or
will swing away to allow lateral transfers.
They are height adjustable (2”) by moving
bolts up or down in predrilled holes on
armrest bracket.
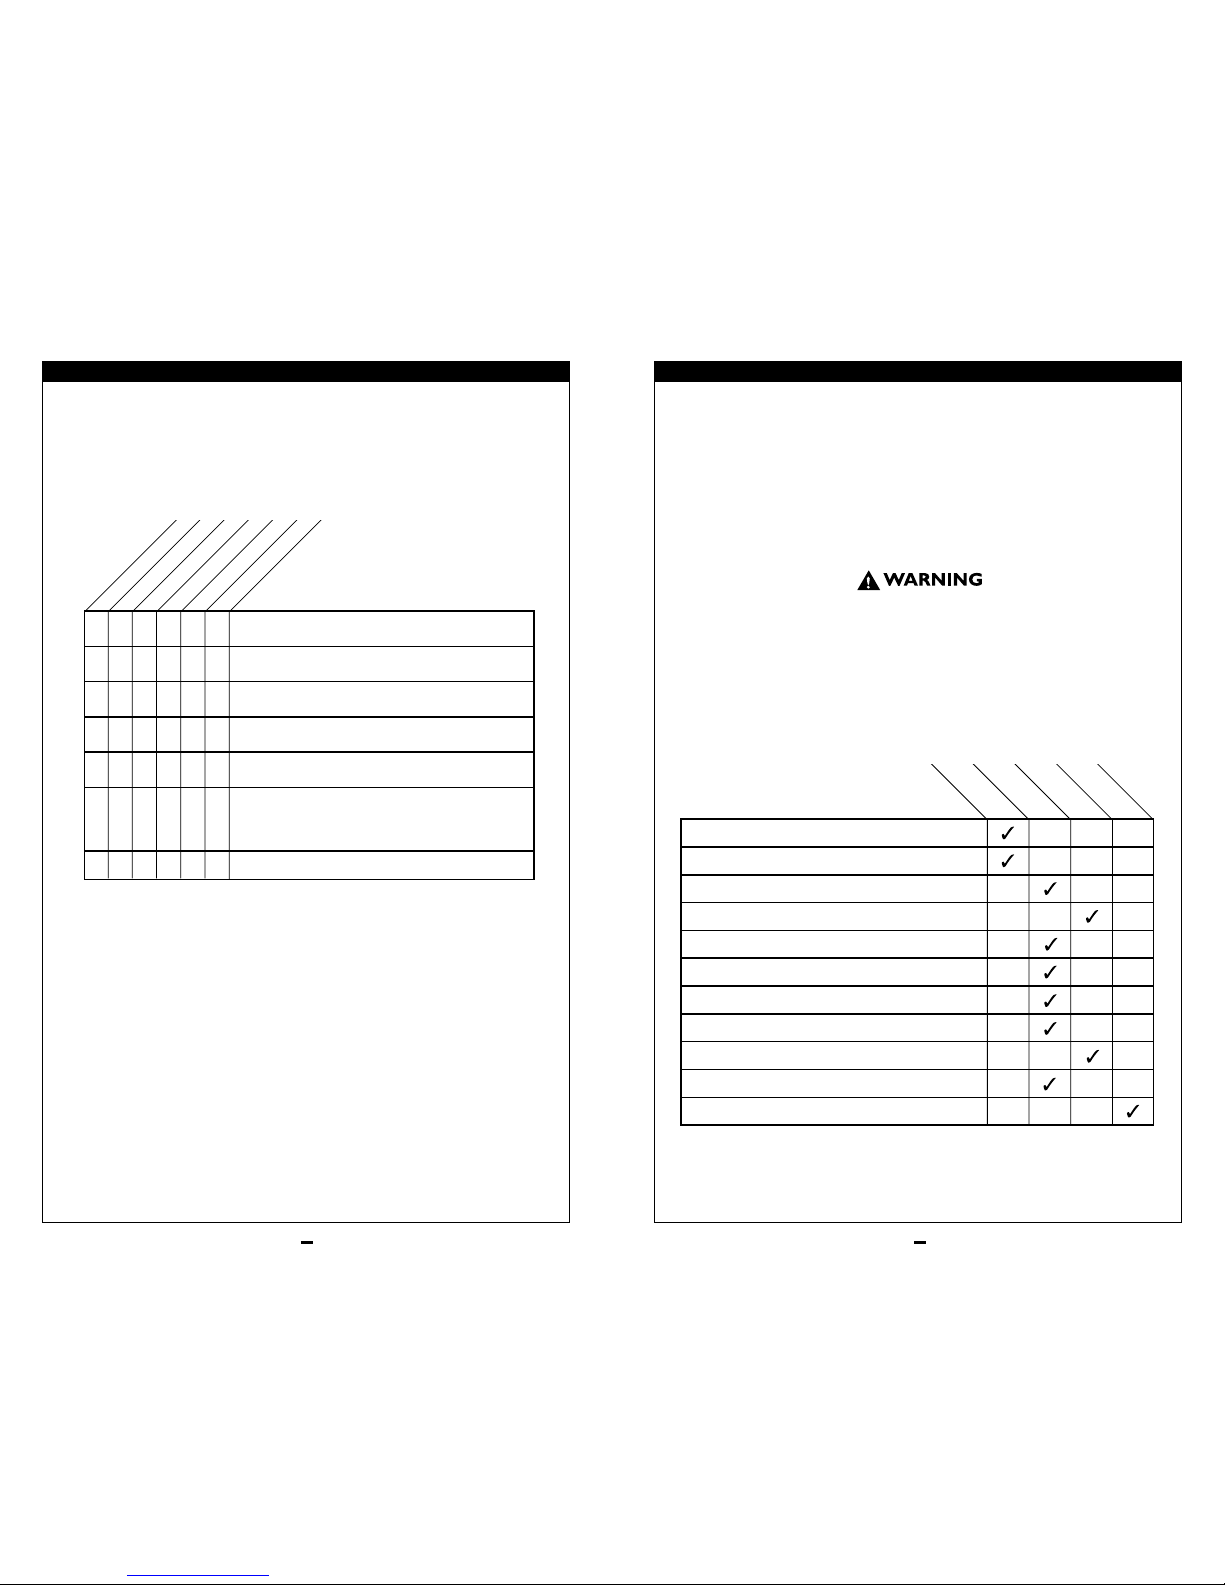
O. ROCKSHOX
• Tuned to perform in conjunction with
Quickie XTR
• Adjustable spring pre-load
CONSUMER SAFETY INFORMATION
It’s dangerous not to read these
instructions. So if you use our stuff,
don’t be a dummy—read the
Instructions!
1. If the shock ever loses oil or if it makes
sounds of excessive topping out, stop use
immediately and have the shock inspected
by a dealer or call RockShox. Continued use
with the shock in either of these conditions
could result in loss of control with possible
serious and/or fatal injuries.
2. Always use genuine RockShox parts. Use of
after-market replacement parts voids the
warranty and could cause structural failure
to the shock. Structural failure could result
in loss of control with possible serious and
/or fatal injuries
Body eye
Reservoir
Body threads
Spring preloaded
adjuster ring
Coil spring
Seal head
Shock shaft
Bottom out
bumber
Shaft eye
Tuning Your Shock
By matching the proper spring rate and damping adjustment RockShox Deluxe
shocks can be tuned to your weight.
When tuning suspension, always make one change at a time and write it down.
This takes patience, but allows you to understand how each change affects
your ride. Keeping a record lets you know what changes you have tried that
work and suggests what changes you might try.
Maintenance
RockShox Deluxe shock line are designed for high performance.To insure this,
we recommend keeping the shaft area,seal cover and bottom out bumper as
clean as possible. It is also recommended that the shock be overhauled by a
qualified mechanic with proper tools once a year.
Over time, the oil inside the shock will degrade and the shock will start to
loose damping.The shock will compress and rebound too fast when damping
loss is significant.This indicates the shock needs to be serviced.This ser vice
should only be performed by a dealer.
General Upkeep
Washing Your Deluxe Shock: Clean your shock with mild soap and a
toothbrush. Keep the shaft and body eye bushings cleaned and greased.
IMPORTANT: NEVER USE A HIGH-POWERED WASHER FOR
CLEANING THE SHOCK!
Oil Change Intervals: We recommend that the oil be changed in your shock
annually. However, if you ride in extreme conditions the oil should be changed
more often than once a year.
Oil Leaks: One hundred percent serviceable. Contact you dealer or
RockShox direct to have your shock serviced.
P. CHECK-OUT
After the wheelchair is assembled and adjusted, it should roll smoothly and
easily. All accessories should also perform smoothly. If you have any problems,
follow these procedures:
a. Review assembly and adjustment sections to make sure chair was
properly prepared.
b. Review trouble shooting guide.
c. If your problem persists, contact your authorized supplier. If you still have a
problem after contacting your authorized supplier, contact Sunrise customer
service. See the introduction page for details on how to contact your autho-
rized supplier or Sunrise customer service.
Page 19
36
37
930379 Rev. A
930379 Rev. A
XII. MAINTENANCE
A. INTRODUCTION
1. Proper maintenance will improve performance and extend the useful life
of your chair.
2. Clean your chair regularly. This will help you find loose or worn parts and
make your chair easier to use.
3. Repair or replace loose, worn,bent or damaged parts before using
this chair.
4. To protect your investment, have all major maintenance and repair work
done by your authorized supplier.
If you fail to heed these warnings your chair may fail and cause severe injury to
the rider or others.
1. Inspect and maintain this chair strictly per chart.
2. If you detect a problem, make sure to service or repair the chair
before use.
3. At least once a year,have a complete inspection, safety check and service of your
chair made by an authorized supplier.
B. MAINTENANCE CHART
Tire inflation level
Wheel locks
All fasteners for wear and tightness
Armrests
Axle and axle sleeves
Wheels, tires and spokes
Casters
Anti-tip tubes
Frame
Upholstery
Service by Authorized Supplier
CHECK...
Annually
6 Months
3 Months
Weekly
You will need to adjust your chair from time to time for best performance (especially if you alter the original settings). This chart gives you a first solution, then a
second and a third if needed. You may need to look farther to find the best solution for a specific problem.
Note: To keep track of your progress, make only ONE change at a time.
Left Turn In Chair
Right Turn In Chair
Looseness In Chair
Sluggish Turning
Squeaks And Rattles
Caster Flutter
Make sure tire pressure is correct and equal in both rear tires and
front caster tires, if pneumatic.
Make sure all nuts and bolts are snug.
Make sure all spokes and nipples are tight on radial spoke wheels.
Use Tri-Flow Lubricant (Teflon®-based) between all modular frame
connections and parts.
Check for proper caster housing adjustment. See instructions for
caster plate adjustment.
SYMPTOMS
SOLUTIONS
✓✓✓✓
✓✓ ✓ ✓
✓✓✓
✓✓
✓
✓
Make sure both front casters touch the ground simultaneously. If
they do not, add the proper spacers between the bottom bearing of
the caster plate and fork stem nut until they do. Make sure you
check for this problem on a flat surface.
✓✓
✓
Refer to eccentric sleeve adjustment.
✓✓✓
XI. TROUBLESHOOTING
Page 20

38
39
930379 Rev. A
930379 Rev. A
XIII. SUNRISE LIMITED WARRANTY
A. FOR LIFETIME
Sunrise warrants the frame and quick-release axles of this wheelchair against
defects in materials and workmanship for the life of the original purchaser.
The expected life of this frame is five years.
B. FOR TWO (2) YEARS
We warrant all Sunrise-made parts and components of this wheelchair against
defects in materials and workmanship for two years from the date of first
consumer purchase.
C. LIMITATIONS
1. We do not warrant:
a. Tires and tubes, upholstery,armrests and push-handle grips.
b. Damage from neglect, misuse, or from improper installation or repair.
c. Damage from exceeding weight limit of 250 pounds.
2. This warranty is VOID if the original chair serial number tag is removed
or altered.
3. This warranty applies in the USA only. Check with your supplier to find
out if international warranties apply.
D. WHAT WE WILL DO
1. Our sole liability is to repair or replace covered parts.This is the exclusive
remedy for consequential damages.
E. WHAT YOU MUST DO
1. Obtain from us, while this warranty is in effect, prior approval for return
or repair of covered parts.
2. Return the wheelchair or part(s), freight pre-paid, to Sunrise Mobility
Products Division at: 2842 Business Park Avenue, Fresno, CA 93727-1328.
3. Pay the cost of labor to repair, remove or install parts.
F. NOTICE TO CONSUMER
1. If allowed by law, this warranty is in place of any other warranty (written
or oral, express or implied, including a warranty of merchantability, or
fitness for a particular purpose).
2. This warranty gives you certain legal rights.You may also have other rights
that vary from state to state.
Record your serial number here for future reference:
________________________
XII. MAINTENANCE
C. MAINTENANCE TIPS
1. Axles & Axle Sleeves
Check axles and axle sleeves every six months to make sure they are tight.
Loose sleeves will damage the camber tube and will affect performance.
2. Tire Air Pressure
Check air pressure in pneumatic tires at least ONCE A WEEK. The wheel
locks will not grip properly if you fail to maintain the air pressure shown on
tire sidewall.
D. CLEANING
1. Paint Finish
a. Clean the paint finish with mild soap at least once a month.
b. Protect the paint with a coat of non-abrasive auto wax every three
months.
2. Axles and Moving Parts
a. Clean around axles and moving parts WEEKLY with a slightly damp
(not wet) cloth.
b. Wipe off or blow away any fluff, dust, or dirt on axles or moving parts.
Note: You do not need to grease or oil the chair.
3. Upholstery
a. Hand-wash (machine washing may damage fabric).
b. Drip-dry only. DO NOT machine dry as heat will damage fabric.
E. STORAGE TIPS
1. Store your chair in a clean, dr y area. If you fail to do so, parts may rust
or corrode.
2. Before using your chair, make sure it is in proper working order. Inspect
and service all items on the "Maintenance Chart." (See p. 37)
3. If stored for more than three months, have your chair inspected by an
authorized supplier before use.
Page 21

Sunrise Home Healthcare Group
Mobility Products Division
7477 East Dry Creek Parkway • Longmont, Colorado • 80503 USA
(303) 218-4500 or (800) 456-8165
in Canada (800) 263-3390
© 1998, Sunrise Medical 5.98
930379 Rev. A
 Loading...