

Sunrise Global 13-05020, 13-05024 User Manual

OWNER’S MANUAL
CANADIAN STANDARDS
MINI-SPLIT HEAT PUMP (SEER 16)
12,000 BTU
12,000 BTU COOLING
13,000 BTU HEATING
Before using this air conditioner, please read the following instructions carefully and keep
this manual along with your proof of purchase in a safe place for future reference.
MODELS: 13-05020 / 13-05024
00228-16/01/07
© Copyright, Sunrise Tradex Corp., 2007

Safety precautions . . . . . . . . . . . . . . . . . . . . . . . . . . . . . . . . . . . . . . . . .2
Air conditioner diagram . . . . . . . . . . . . . . . . . . . . . . . . . . . . . . . . . . . . .3
Remote control . . . . . . . . . . . . . . . . . . . . . . . . . . . . . . . . . . . . . . . . . . .4
Remote control operation . . . . . . . . . . . . . . . . . . . . . . . . . . . . . . . . .5-6
Safety notes . . . . . . . . . . . . . . . . . . . . . . . . . . . . . . . . . . . . . . . . . . . . . .7
Maintenance . . . . . . . . . . . . . . . . . . . . . . . . . . . . . . . . . . . . . . . . . . . .8-9
Troubleshooting . . . . . . . . . . . . . . . . . . . . . . . . . . . . . . . . . . . . . . . .10-11
Technical specifications . . . . . . . . . . . . . . . . . . . . . . . . . . . . . . . . . . . .12
Installation setup diagram . . . . . . . . . . . . . . . . . . . . . . . . . . . . . . . . . .13
Installation location . . . . . . . . . . . . . . . . . . . . . . . . . . . . . . . . . . . . . . .14
Installation instructions . . . . . . . . . . . . . . . . . . . . . . . . . . . . . . . . . .15-19
Electrical wiring - indoor unit . . . . . . . . . . . . . . . . . . . . . . . . . . . . . .16-17
Electrical wiring - outdoor unit . . . . . . . . . . . . . . . . . . . . . . . . . . . . . . .18
Air purging and leakage test . . . . . . . . . . . . . . . . . . . . . . . . . . . . . . .20
Test operation . . . . . . . . . . . . . . . . . . . . . . . . . . . . . . . . . . . . . . . . . . . .21
Important notice . . . . . . . . . . . . . . . . . . . . . . . . . . . . . . . . . . . . . . . . . .22
Warranty . . . . . . . . . . . . . . . . . . . . . . . . . . . . . . . . . . . . . . . . . . . . . . .23
Thank you for choosing this GREE mini-split heat pump, please keep this
owner’s manual with proof of purchase for reference.
CONTENTS

2
SAFETY PRECAUTIONS
Legend of symbols used in this manual :
Not to do. Be sure to follow instructions.
Grounding is necessary.
Feature of the appliance
(not a defect).
Pay attention.
Warning: Incorrect handling may cause
serious hazards and/or injuries.
Only to the attention of
electricians or technicians :
To eliminate risks of short
circuits and fire hazards, do
not unplug the air conditioner
or switch off the circuit breaker
when unit is running.
Always check the power
supply cord or wire for signs of
damages before installing and
using the air conditioner. If the
power cord is damaged,
contact SUNRISE TRADEX
Customer Service.
Always close the air
conditioner before cutting the
power off when there is a
malfunction of the unit.
Do not operate the unit with
wet hands or spray water or
other liquid inside the unit.
Do not place any foreign
objects on the outdoor unit.
Make sure the air conditioner is
well grounded according to local
electricity codes and that the work
is done by a qualified and certified
electrician or technician.
To eliminate risks of electric
shocks and fire hazards, do
not attempt to repair the air
conditioner by yourself.
Do not put any combustion
appliance in the direct path of
the unit airflow ; it could affect
the combustion efficiency.
Never insert fingers, foreign
objects or anything to
obstruct the air inlet and
outlet grilles of both inside
and outside units.
Warn children.
Do not expose skin or eyes
directly to cool air over a
long period of time.
Keep clean and in good
working order the power
supply circuit breaker or plug.
To eliminate risks of electric
shocks or fire hazards, make
sure the power supply cord is
correctly plugged in.
Use 110-120V~60Hz power
supply only.
Disconnecting switch
3
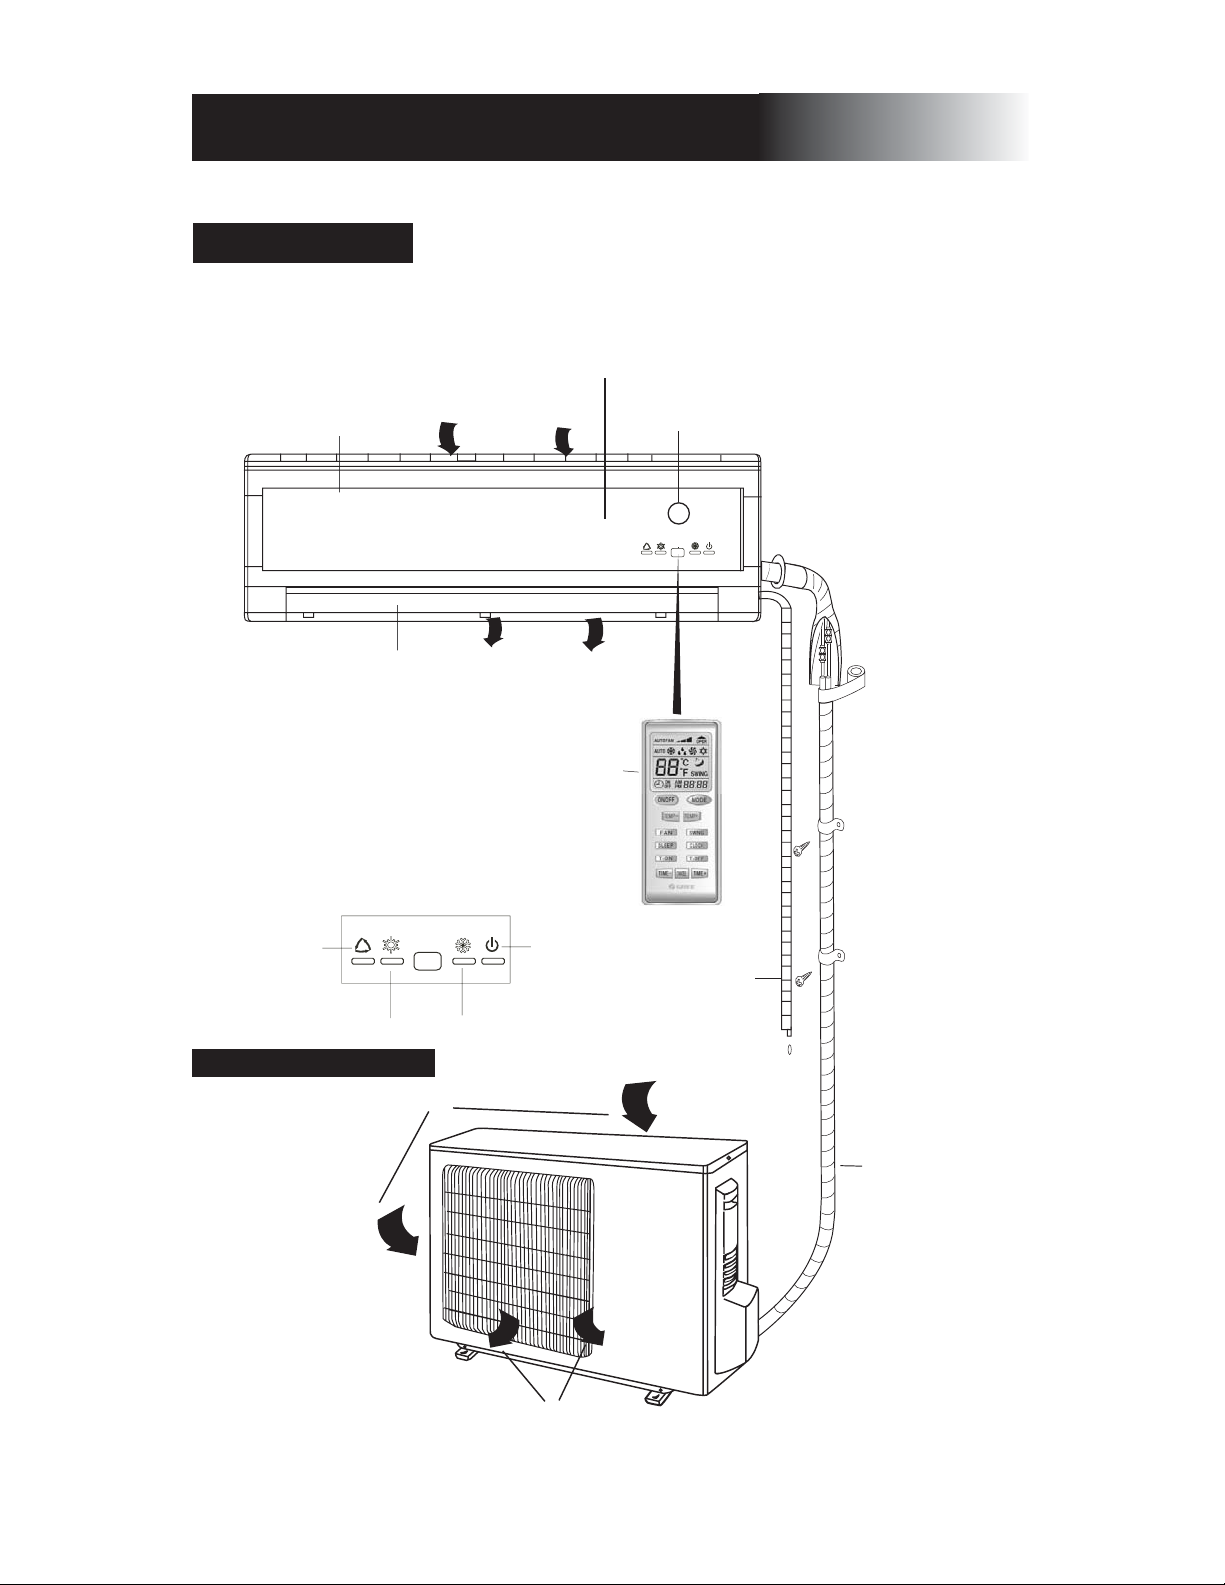
AIR CONDITIONER DIAGRAM
INDOOR UNIT
Air in
Display
Surface panel
Front case
Air outLouvers
Remote control
Drain hose
Air in
Heating Cooling
Auto Power/Run
Air out
Actual model may differ from the diagram
Suction and
liquid refrigerant piping
and wiring
OUTDOOR UNIT

4
REMOTE CONTROL
NOTE :
• Don’t mix new with used
batteries or batteries of
different types.
• If you are not using the
remote control for a long
period of time, remove the
batteries to eliminate
potential battery leakage.
• The remote control should
be kept at least 1 m or
more away from the TV
set or any other electric or
electronic appliances.
• Make sure there is nothing
blocking the signal from
the remote control to the
inside unit.
• Do not drop or throw the
remote control.
• Do not leave the remote
control in a location
exposed to direct sunlight
or near a heat source.
• Do not spray any liquid or
immerse the remote
control.
2 AAA - 1.5V BATTERIES POWER THE REMOTE CONTROL.
• Do not use rechargeable batteries
How to insert the batteries
1. Following the arrows (see Figure), remove the battery cover.
2. Insert the 2 batteries, making sure that the terminals (+/-) are
correctly fitted. Put the cover back into position.
3. Using the tip of a pen or any other sharp object, press on the
ACL key.
4. Reinstall the cover.
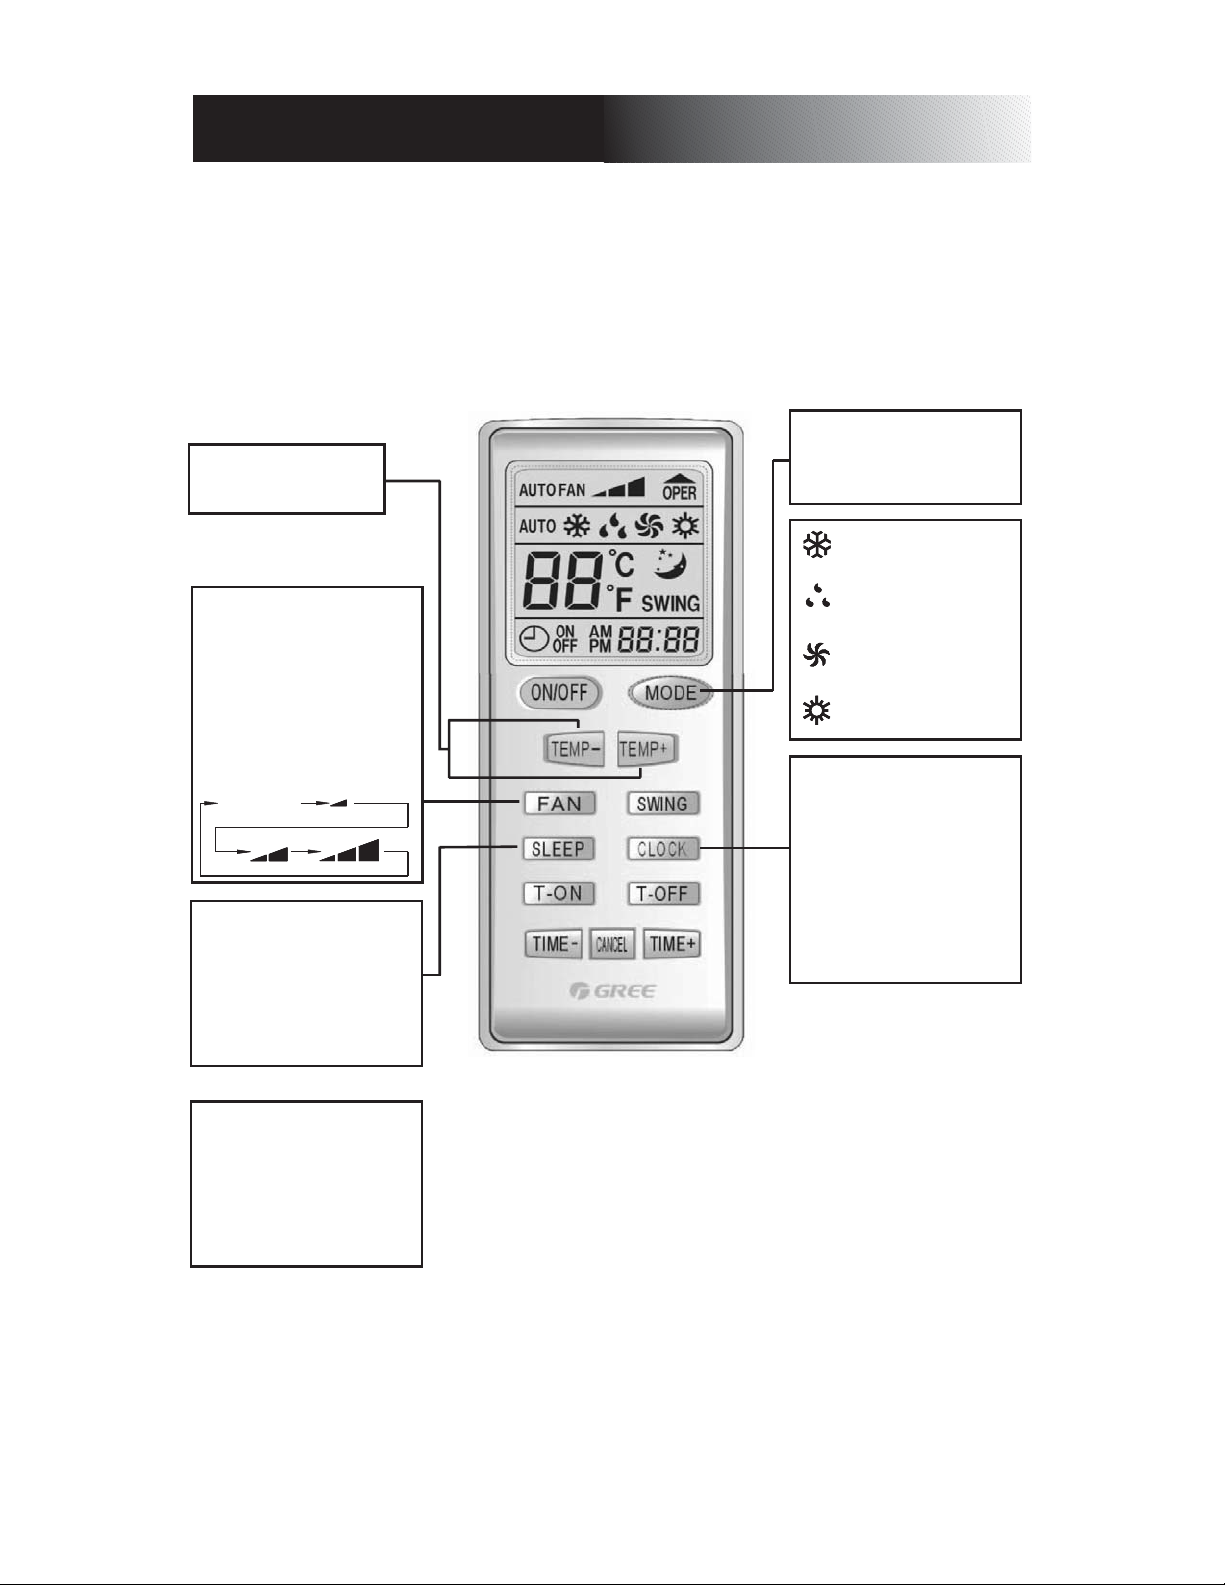
Two buttons to set the
temperature
When unit is running under
AUTO, COOL, FAN, HEAT,
press this button to select
the fan speed. AUTO mode,
LOW fan, MED fan, HIGH
fan. In DEHUMIDIFYING
mode the fan speed is set
to LOW and cannot be
changed.
Press this button to select
the operation mode desired.
AUTO,COOLING,DEHUMIDIFYING, FAN, HEAT
Press clock button once.
Clock icon then is flashing.
You have approx.
7 seconds to set the clock.
With clock icon still flashing,
press the TIME- button to
decrease the time and the
TIME+ button to increase.
To confirm the hour set,
press the CLOCK button.
Under COOL,DRY,HEAT
mode, press the button
once to start the SLEEP
fonction. Press the button
once again, to stop the
function (Available on some
models only)
Mode and temperature
appearing on your remote
control will also show in the
round LCD display on the
unit (right side of the front
panel).
5
REMOTE CONTROL OPERATION
MPORTANT:
Some functions on this remote control are not available on models sold in Canada. The usage and
operation of these functions are therefore not detailed in this manual.
NOTE:
• Make sure that there is no obstruction between the remote and the inside unit.
• Do not drop or throw the remote control
• Do not place the remote control near hot places or exposed to sunlight
AUTO FAN
COOL mode
DRY mode
FAN mode
HEAT mode

6
REMOTE CONTROL OPERATION
LIQUID CRYSTAL
DISPLAY
Show all set functions.
ON/OFF
Press this key to turn the
unit on or off.
Press on SWING to start
the automatic oscillation of
the louvers. Press again to
cancel or stop oscillation.
Press T-OFF to stop the air
conditioner at a desired
time. Once pressed, OFF
and clock icon will flash.
With the TIME- and TIME +
button, set the desired stop
of the unit.To confirm time,
press T-OFF once again.
Press CANCEL to cancel
all TIMER settings.
Press T-ON to start the air
conditioner at a desired
time.
Once pressed, ON and
clock icon will flash. With
the TIME- and TIME +
button, set the desired
start up of the unit.
To confirm time, press
T-ON once again.
TIME+ TIME- Button
Function instruction please
refer to T-ON button, T-OFF
button, CLOCK button.
Mode and temperature
appearing on your remote
control will also show in the
round LCD display on the
unit (right side of the front
panel).

7
SAFETY NOTES
Always set the most adequate temperature.
It is recommend to set the temperature
about 5°C cooler than the outside
temperature to reduce energy costs.
Keep doors and windows closed when the
air conditioner is running, otherwise it could
affect the air conditioner cooling efficiency.
Do not splash water or other liquid on the
air conditioner to prevent risks of electric
shocks or unit malfunction.
Do not use the air conditioner for other purposes than what it is designed for (such as
drying clothes, preserving foods, etc.).
The air conditioner must be properly
grounded. Do not connect the ground to
gas or water pipes, lightning rods, lighting
poles or telephone/cable lines.
Do not leave animals or plants exposed
directly to the coolling airflow for long
periods of time.
Louver of left/right
direction
• The airflow direction can be moved
upward or downward when unit is
running.
• Make sure that the air outlet grills and
intake vents are free from obstructions.
WARNING
To eliminate risks of vibrations and damage
to the compressor, make sure the air
conditioner is properly connected and
powered with 115 V / 1 ph / 60 Hz.
Unit working temperature range:
Do not operate unit if outside temperature
is below -5°C or above 43°C or you could
damage the compressor and void the
warranty.
Louver of upward/
downward direction
 Loading...