

Sunrise Forest Air 13-04595 Owner's Manual
LAUNAM
S
’
R
ENWO
RENOITIDN
O
C RIA WODNIW
7
0/10/10-42200
siht peeK .renoitidnoc ria siht gnisu erofeb launam s’renwo gniwollof eht daer esaelP
.ecnerefer erutuf rof ecalp efas a ni esahcrup fo foorp r
uoy
htiw gnola launam
70
02 ,.pro
C xedarT esirnuS ,thgirypo
C
©
RE
E
YT
IC
A
PA
C GN
IL
OOC .ON
L
E
D
OM
7.01
UTB 000,51 59540-31

2
TABLE OF CONTENTS
USE........................................................................3
SAFETY NOTES ......................................................3
INSTALLATION
Accessories and hardware ................................ 4
Tools needed .................................................... 4
Unpacking the air conditioner ............................5
Electrical specifications ......................................5
Window requirements ...................................... 6
Preliminary instructions ......................................7
Window mounting ....................................8-9-10
UNIT OPERATION
LED display control panel .............................. 11
Cooling...................................................... ....12
Fan only .................................................... ....12
Energy Saver mode..........................................13
Sleep mode ........ ............................................13
Setting the timer ..............................................13
Filter cleaning warning light..............................13
Remote Control .................................... 14-15-16
AIR VENT AND AIR DIRECTION CONTROLS..........17
MAINTENANCE
Cleaning the filter ................................... ........18
Cleaning the housing........................................18
Storage................................................... ........18
NOISE AND VIBRATION ................................. ....18
TROUBLESHOOTING ............................................19
TECHNICAL SPECIFICATIONS ................................20
CUSTOMER SERVICE INFORMATION ....................20
WARRANTY..........................................................21

WARNING
Please read the following owner’s manual before using this air conditioner. This manual is not a
contract and should be used as a reference guide only. We reserve the right to make technical
changes at all times without prior notice.
USE
Thank you for purchasing this Window Air Conditioner. This unit is designed to improve indoor
living and working comfort by providing cooling and ventilation with minimal installation. Please
refer to the Room Cooling Chart at the end of this manual for the room size to cool vs the capacity
of your new air conditioner.
SAFETY NOTES
When using this window air conditioner, or any other electric appliance, always follow these basic
safety precautions. Not doing so could result in injuries, electrical shocks or fire.
1. The unit must be connected to a grounded (three prongs) power supply properly rated. For
your safety, this unit is grounded through the power cord plug when connected to a grounded
wall outlet.
2. Do not alter the power cord nor the plug end by removing the ground prong.
3. It is recommended not to use an adapter plug or extension cord.
4. Do not plug the unit in a damaged electrical receptacle.
5. Do not connect the unit to an outlet that is being used for other electrical appliances.
6. Before unplugging the unit, always turn it off. Always unplug the unit before cleaning or
servicing. When unplugging the unit, never pull on the power cord - always grip the plug.
7. Do not start or stop the unit by plugging in or pulling out the power cord.
8. Always check the power cord for signs of damage before use. If the power cord is damaged,
contact SUNRISE TRADEX Customer Service (see end of this manual).
9. Do not install or use the unit in the following places:
• near a heat source;
• an area with possible gas leakage or in an explosive atmosphere ;
• near a bath, shower enclosure, swimming pool, or any other steamy and wet areas ;
• in a greenhouse.
10. Do not apply insecticides or any other flammable products on the unit.
11. Do not operate with wet hands or spray water or other liquid on the unit, nor immerse the
appliance.
12. This unit is not intended for the use of children and close supervision is necessary when it is
operating near children.
13. Never insert fingers, foreign objects, or anything to obstruct the air inlet and outlet grills.
Warn children.
14. Never operate with an outside protective cover in place or other objects blocking the outside
airflow.
15. For a maximum efficiency, do not block inside airflow with curtains, blinds, furniture or else.
16. Do not expose skin or eyes directly to cool air over a long period of time.
17. Ensure that all parts and accessories are correctly fitted before turning on the unit.
18. If an abnormal odour or smoke comes out of the unit, immediately unplug the unit and contact
SUNRISE TRADEX Customer Service (see end of this manual).
19. Do not place a plant or allow a pet to be exposed directly to the unit cool airflow.
20. Do not put any combustion appliance in the direct path of the unit airflow ; it could affect the
combustion efficiency.
3
INSTALLATION
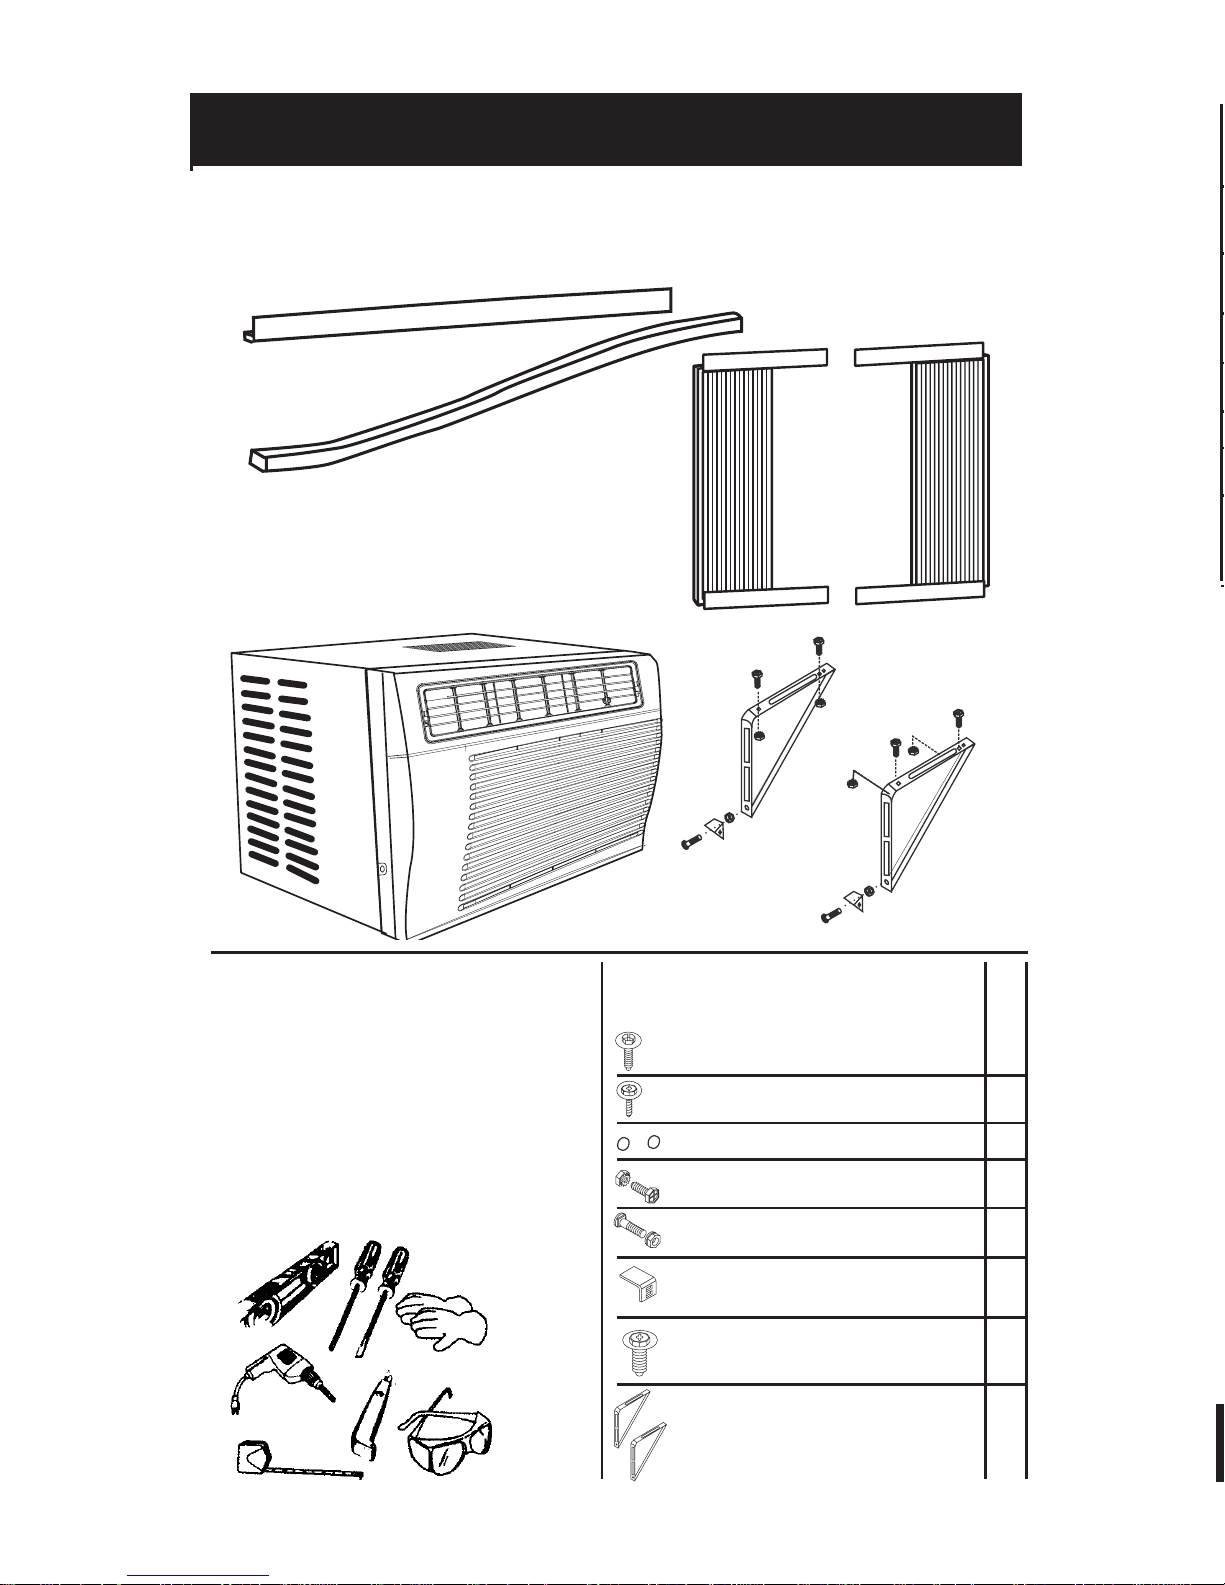
ACCESSORIES (MAY DIFFER FROM ILLUSTRATIONS)
Before beginning installation, make sure to have close at hand all the tools you will need (listed below) and
that all accessories and hardware parts provided with your air conditioner (as shown) are included.
Top mounting rail and laterals (3 in total)
Foam gasket
Right
expandable
panel
Tools needed
• Level
• Gloves
• Flat blade and Phillips screwdrivers
• Utility knife
• Drill
• Safety glasses
• Tape measure
• Pencil
Air
conditioner
Left
expandable
panel
Support brackets
2
3
2
4
2
2
10
2
Hardware included
Washer head locking screw for window
panels
3/4” hex-head screw
Safety lock
1/2” flat head bolt and locknut
3/4” flat head bolt and locknut
Sill angle bracket
Long hex-head locking screw for top
angle, side retainer 5/16” long
Support brackets
2
3
2
4
2
2
10
2
4

IMPORTANT NOTICE :
Do not pierce the bottom of the air conditioner. Excess water is accumulated to cool down the
temperature of the condenser (outdoor part). It is normal to hear the condenser blade hit
water accumulated in the bottom of the unit. Not respecting this notice will automatically void
the warranty of the unit.
NOTE : DRAWINGS OF THE AIR CONDITIONER AND ACCESSORIES MAY DIFFER FROM THE PRODUCTS.
UNPACKING THE AIR CONDITIONER
• Remove the air conditioner from the packing carton. It is recommended to keep the
carton and packing material for storage or transportation of the unit. If you decide to
dispose of the packing material, recycling where possible.
• Do not forget to remove the top rail from the bottom of the packing carton.
• Remove tape and glue residue from surface before turning on the air conditioner. Rub a
small amount of liquid dish soap over the glue residue with your fingers. Wipe with warm
water and dry.
• Do not use sharp instruments, rubbing alcohol, flammable fluids, or abrasive cleaners to
remove tape or glue. These products can damage the surface of your air conditioner.
• Handle the air conditioner with care. We recommend that 2 persons move and install this
air conditioner.
ELECTRICAL SPECIFICATIONS
• The electrical ratings for your air conditioner are listed on the rating plate of the unit.
• The air conditioner power cord ends with a LCDI grounded plug (Leakage Current
Detection and Interruption). This device will circuit trip the power source if the nominal current
leakage between the cord shield and either load conductor exceeds a predetermined
value. The cord will remain out of power until the device is manually reset. This device
protects against electric shock and reduces fire risks in the power cord or combustible
material nearb
y.
INSTALLATION
LCDI TEST
1. Plug the power cord into a grounded outlet.
2. Press on the TEST button - circuit should trip, cutting off power to the unit
and the RESET button pops out.
3. Press on the RESET button to restore power (some models may have a pilot
light going on when power is restored).
Note : If the reset fails, this means that an abnormal current leakage has
been detected. Do not use the air conditioner and/or attempt to reset the
LCDI plug. Immediately contact SUNRISE TRADEX Customer Service (see end of this book).
WARNING !
1. DO NOT PRESS the TEST button while the air conditioner is operating.
2. The TEST and RESET buttons should not be used as ON and OFF switches.
3. The cord and the plug are not built to protect external loads or supply circuits.
4. The LCDI cord and plug are intended for indoor use only.
5. The power cord and plug must be connected into a properly rated grounded outlet. If you
do not have a grounded outlet available, contact a qualified electrician to have a
grounded outlet properly installed.
6. Do not alter the power supply plug by removing the ground.
7. Do not connect to an outlet used by other appliances ; ideally use on a single outlet circuit.
ATTENTION !
1. NE PAS FAIRE de test lorsque l’appareil est en marche.
2. Ne pas utiliser les boutons TEST/RESET comme interrupteurs MARCHE/ARRÊT.
3. Le cordon d’alimentation et la fiche ne sont pas conçcus pour protéger des charges ou
4. Le cordon et la fiche doivent être utilisés à l’intérieur seulement.
5. Le cordon et la fiche polarisée doivent être branchés dans une prise de courant nominale
6.
7. Ne branchez pas le climatiseur dans une prise utilisée par d’autres appareils ; idéalement,
5

6
INSTALLATION
1. These instructions and installation parts are for a standard double-hung window. It can be
installed with our without the expandable panels.
Make sure the opening is large enough for the unit size .
Modify accordingly for other types of window.
2.
The unit must be installed within 122 cm (48”) of a wall grounded outlet.
3. All supporting parts must be fixed to solid wood, masonry or metal.
4. Clear out the area where the unit is installed ; air inlets and outlets must be free at all times.
The rear of the unit must be outdoors, not inside a building, a garage or other closed area.
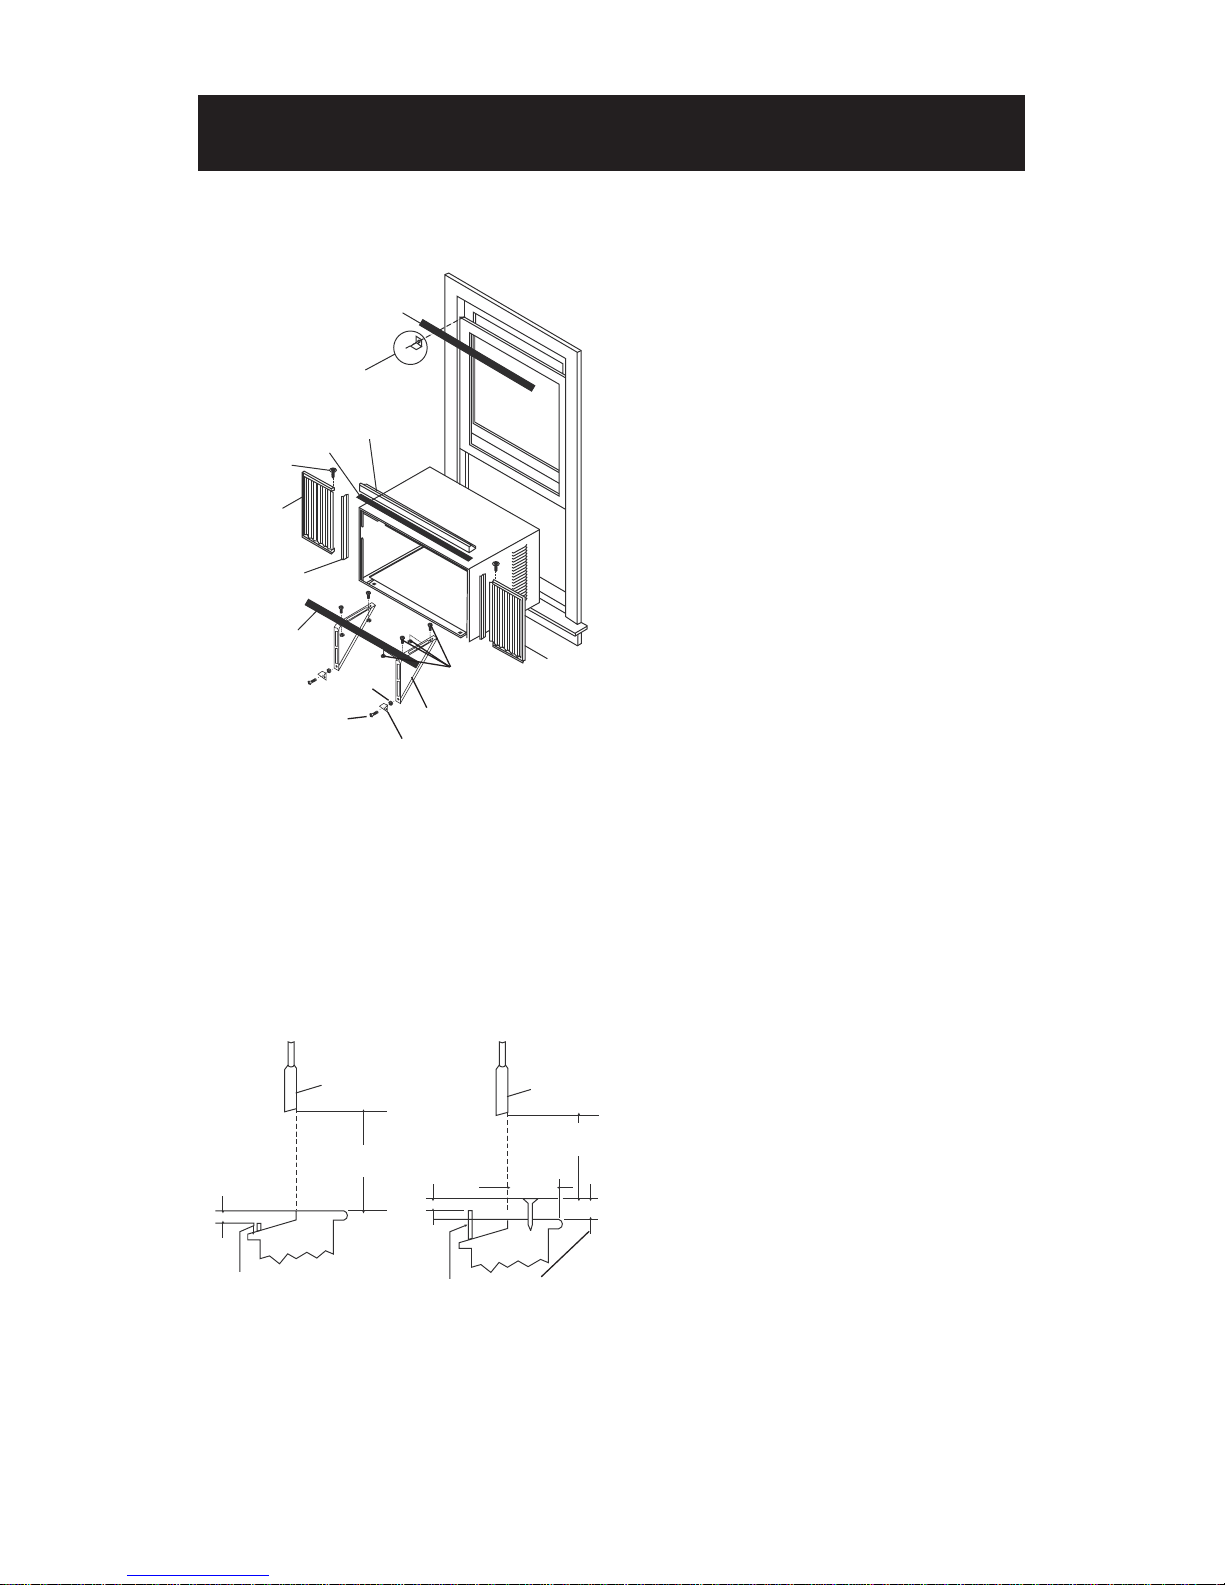
IMPORTANT : If the air conditioner is blocked by the storm window, remove the storm window.
If it is not possible, to make sure the unit will drain properly, fix a piece of wood to the stool in
order to allow the air conditioner to tilt toward outside (Fig. B).
Size of the window piece :
Width - minimum 3,8 cm (1-1/2”) ;
Length - long enough to fit inside the window frame ;
Thickness - thick enough to allow for proper pitch to rear ; place a
piece of wood on stool to make it 1.3 cm (1/2”) higher than the top
of the storm window frame.
• Make sure that the drain holes of the storm window frame are not
blocked by caulking or painting.
Sash
1
1
⁄2 “
min.
Storm window
frame or other
obstruction
Variable
board
thickness
Figure B
WINDOW REQUIREMENTS
Épaisseur
du bois
variable
Bord extérieur
de la fenêtre ou
obstruction.
Vis de blocage
Traverse latérale
INSTALLATION INSTRUCTIONS
Please read ALL instructions before installing. Two persons are recommend to install this product.
If a new electrical outlet is required, have the outlet installed by a qualified electrician before
installing unit.
Fig.1
Fig.2
PRELIMINARY INSTRUCTIONS
Do the following before starting to install unit.
See illustrations below.
Check dimensions of your unit to determine
model type:
Unit height: 18 5/8’’ 17 5/8’’
Unit width: 26 1/2’’ 23 1/2’’
Minimun
window opening: 19’’ 18 1/2’’
Minimum
window width: 31’’ 26 1/2’’
Maximum
window width: 43’’ 40 1/2’’
1. Check window opening size.
The mounting parts furnished with this air conditioner are made for installation in a wooden sill
double-hung window. The standard parts are for
window dimensions listed above. Open sash to a
minimum of 19” (48.3 cm). See Fig.1.
2. Check condition of window.
All wood parts of window must be in good shape
and able to firmly hold the needed screws. If not,
make repairs before installing unit.
3. Check your storm windows.
If your storm window frame does not allow the
clearance required, correct by adding a piece of
wood as shown in Fig. 2, or by removing storm
window while room air conditioner is being
installed.
4. Check for anything that could block
air flow.
Check area outside of window for things such as
shrubs, trees, or awnings. Inside, be sure
furniture, drapes, or blinds will not stop proper
air flow.
5. Check the available electrical service.
Power supply must be the same as that shown on
the unit serial nameplate. Power cord is 48”
long. Be sure you have an outlet near.
6. Carefully unpack air conditioner.
Remove allpacking material. Protect floor or
carpet from damage. Two people should be used
to move and install unit.
Window sash seal
Safety lock and
3/4” long hex
head screw
Top angle
Foam
gasket
Seal-bottom
rail to unit
1/2” long screw
and locknuts
locknuts
3/4” long flat
head bolt
Sill angle bracket
Board thickness
as required,
along entire stool.
Fasten with two
nails or screws.
Stool window
frame or other
obstruction
Stool window
frame or other
obstruction
1/2” min.
1/2” min.1/2” min.
19” min.
19” min.
Sash
Sash
Window
support bracket
Frame
assembly
(right)
Washer head
locking screw
Frame
assembly
(left)
Side retainer
7
 Loading...