


1-Port Parallel Server
User Manual
Ver. 1.00
All brand names and trademarks are properties of their
Respective owners.

MN5000000040 Page 2
Features and Benefits
Allow multiple users to share a IEEE 1284 parallel device over
the network from any networked computer
Live Server status monitoring via both web browser and
application software
LEDs indicate for Power status and Ethernet connection
Supports MDI/MDIX auto crossover function (Auto-MDIX)
Supports DHCP, configures IP Address automatically
System Requirements
Windows® 2000, XP, Vista
Package Contents
1 x 1- Port Parallel Server
1 x User Manual
1 x Installation CD
1 x Power Adapter
Note: Contents may vary depending on market/region.
MN5000000040 Page 3
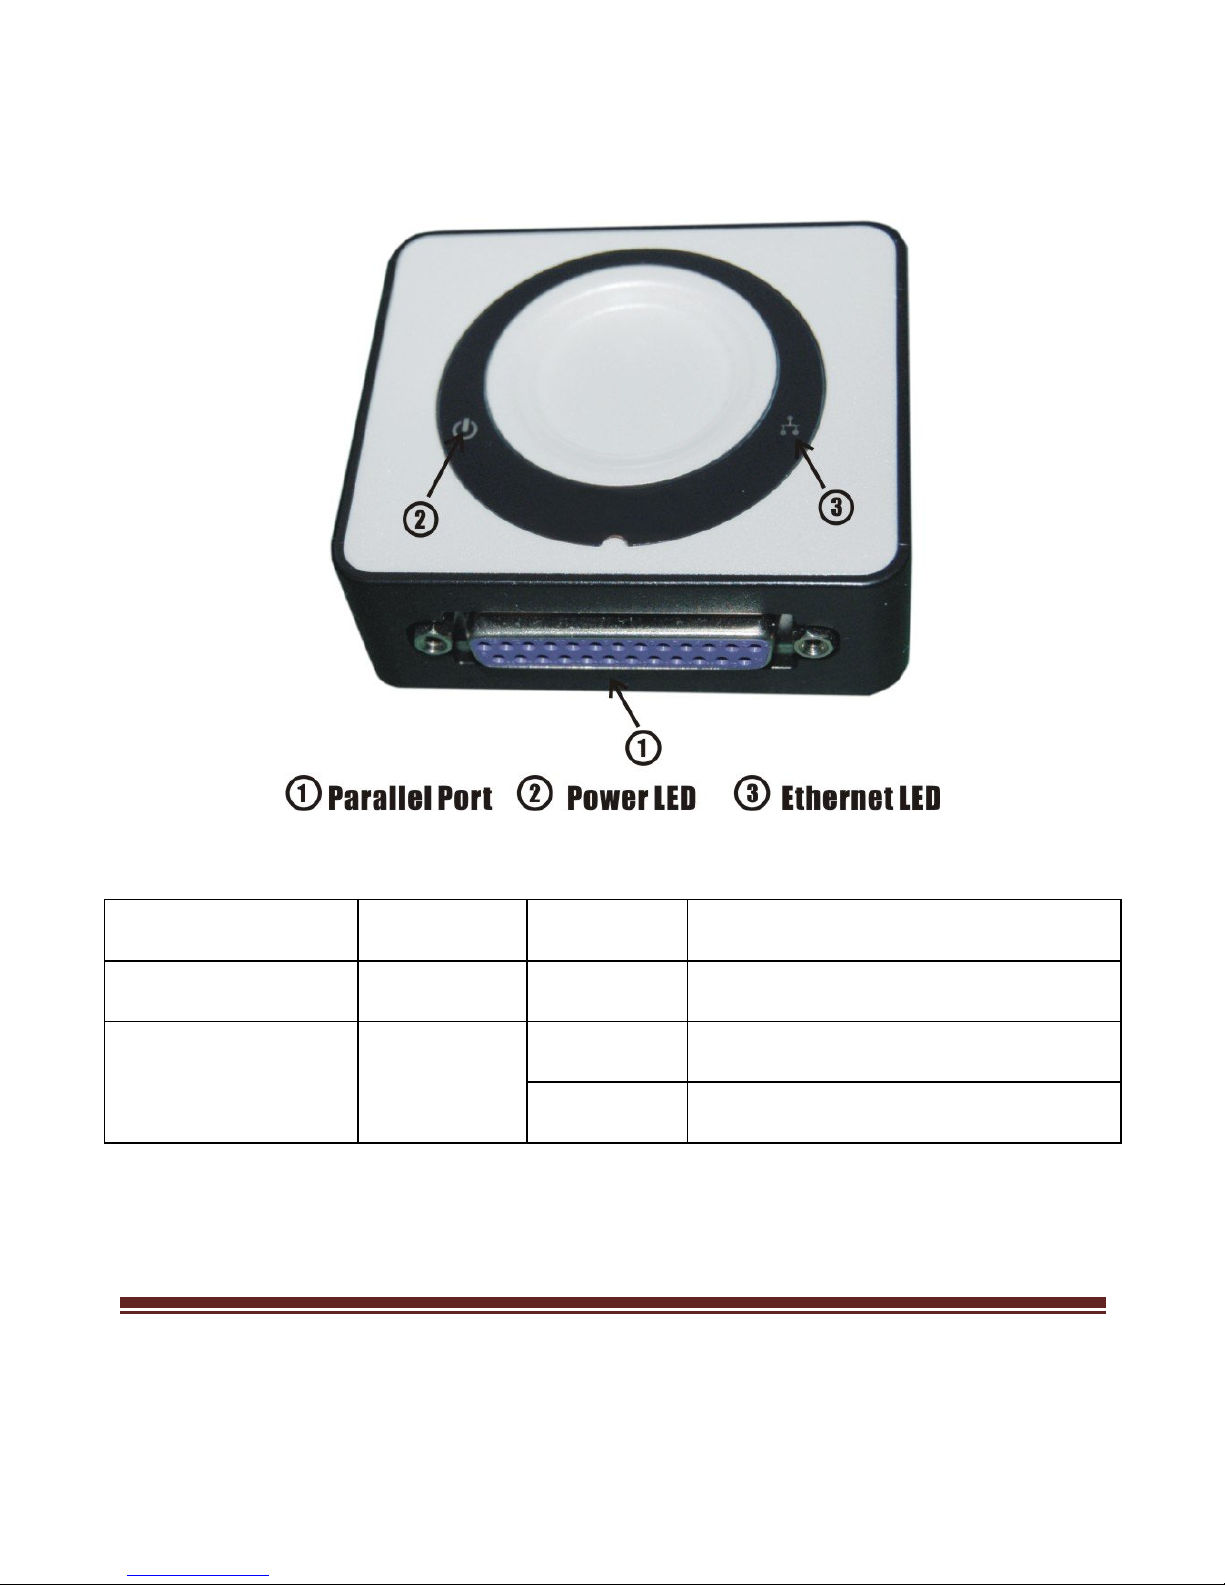
Hardware Description
Front Panel View
LED Color Status Description
Power LED GREEN ON Power ON
Ethernet LED GREEN
ON A valid connection
BLINK Sending/Receiving Packets

MN5000000040 Page 4
Rear Panel View
Note: To reset the Parallel Server, locate the reset button (hole) on
the real panel of the unit. With the Parallel Server powered on, use a
paperclip to hold the button down for 10 seconds. Release the button
and the Parallel Server will go through its reboot process. Wait about
30 seconds to access the Parallel Server.
Installing the Parallel Server Hardware
Note: DO NOT connect your parallel device to the Parallel Server until

MN5000000040 Page 5
you have finished installing the Parallel Server hardware and
software!!! The next section,
Using Your Parallel Device Over Your
Network
, will guide you through the process of connecting and using
your parallel device with the Parallel Server.
1. First connect an Ethernet cable to the Parallel Server’s Ethernet
port. Once the Ethernet cable is connected, connect the other end
of the cable to your network.
2. Connect the included power supply to the Parallel Server’s power
adapter port. Once the Parallel Server has power, you will notice
the Parallel Server’s power LED light turns on.
3. Parallel Server hardware installation is now complete. Please
proceed to the Parallel Server driver and client utility installation
instructions.
Installing the Parallel Server Driver
For Windows®2000, XP, Vista
1. Locate the installation CD folder “X:\Parallel Server\Driver” and
then double click “
NUDriver.exe” file to install the driver.
2. Follow the on-screen instructions to complete the installation.
3. Restart Windows.

MN5000000040 Page 6
Installing the Parallel Server Client Utility
1. Locate the installation CD folder “X:\Parallel Server\AP” and
then double click “
setup.exe” file to install the client utility.
2. Follow the on-screen instructions to complete the installation.
Using Your Parallel Device Over Your Network
1. Before using the Parallel Server, connect your parallel device to
the parallel port on the Parallel Server.
2. Once your parallel device is connected to the Parallel Server, open
the Parallel Server client utility. The Parallel Server client utility is
located in your
Start menu Programs Peripheral Server
Peripheral Server.
3. Select the Parallel Port underneath the “Parallel Server… ” in
the client utility and click
Connect button at the bottom.
For more information, please read the “Parallel Server
Client Utility.pdf” document in the installation CD.
Web Management Interface
1. To access web management interface in the Parallel Server utility,
select the Parallel Server on the list, and click on the
Config

MN5000000040 Page 7
button.
2. The left panel of the web management interface provides a list of
different options to choose from.
Device Status: Displays which computer Parallel Server is
connected to.
Network: You can change the network settings according to your
network specifications. If you would like to give the Parallel Server a
static IP address, you will need to Disable DHCP in the DHCP Setting
menu. Once DHCP is disabled, enter the desired IP address on the “IP
Address
”field along with the “Subnet Mask”and click the “Submit”

MN5000000040 Page 8
button to reboot the Parallel Server. Please note that if the Parallel
Server has set password, you will need to enter it into the “
Password”
field box.
Reset Device: The Reset Device window will allow you to reboot the
Parallel Server. Please note that if the Parallel Server has set password,
you will need to enter it into the “
Password”field box.

MN5000000040 Page 9
Factory Default: The Factory window will allow you to restore the
Parallel Server to factory default. Please note that if the Parallel Server
has set password, you will need to enter it into the “
Password” field
box.

MN5000000040 Page 10
Firmware Update: The firmware update window will allow you to
upload the latest firmware on the Parallel Server. Click “
Browse” to
specify the firmware location on your PC. Once the location path of the
firmware has been set, click “
Submit” to begin the update. Please note
that if the Parallel Server has set password, you will need to enter it
into the “
Password” field box.
Password Change: You can add or change an existing password on
the Parallel Server in this window. By default the Parallel Server does
not come with password.

MN5000000040 Page 11
 Loading...