

Page 1
Z-Wave Dim Remote Control
09.ZV 900 1K12Z 4.0 4772
Safety & Warni ng s
• This devi ce c ontai ns a b utton lit hi um batt er y th at shal l be s tored and d is posed p ro perly.
• DO NOT ex po se the de vi ce to moist ur e.
Important: R ea d All I ns tr uc ti on s Pr io r to I ns ta ll at io n
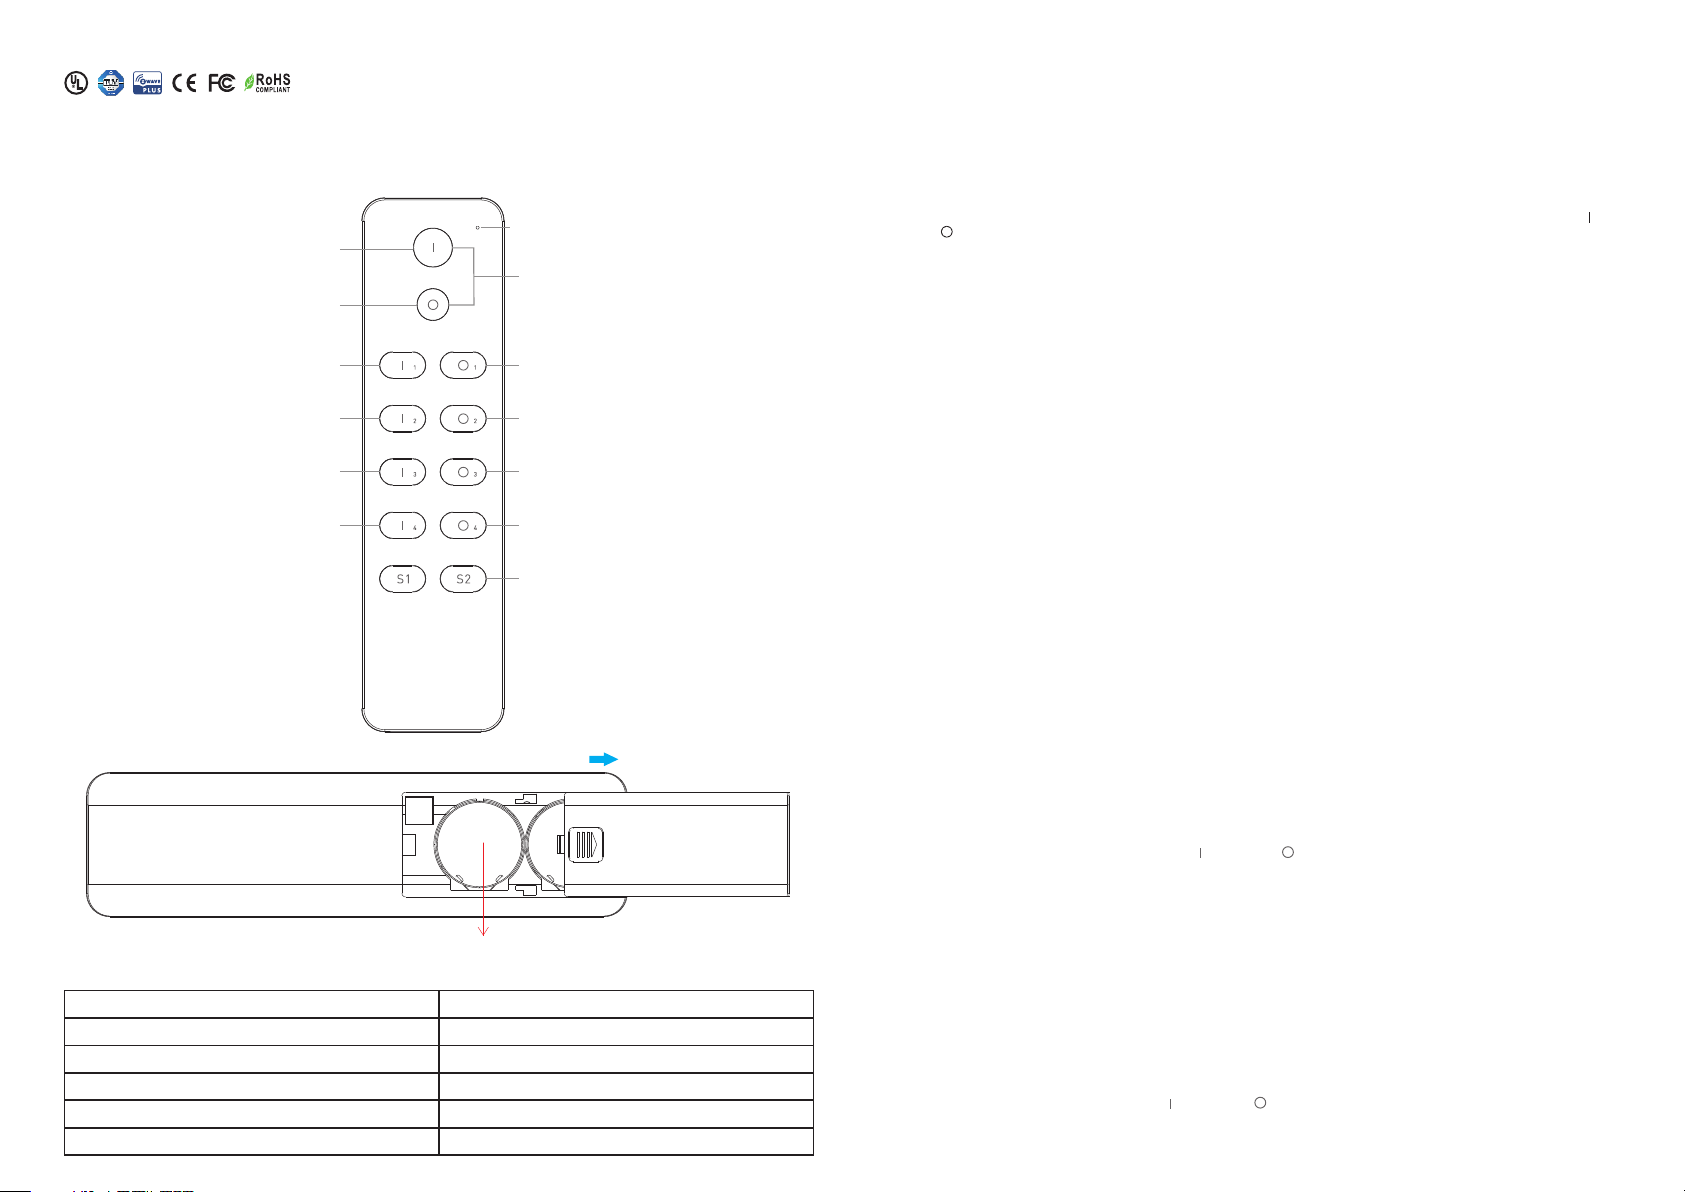
Function introduction
Click to turn ON all groups
Click to turn OFF all groups
Group 2: Click to turn ON, press and hold
down to increase light intensity
Group 3 Group 3
Group 4 Group 4
Group 5 Group 5
Front side
Note:Before the first use, please remove the protective film on the batteries.
Back side
Product Data
Z-Wave Frequ en cy
Power Sup pl y
Operati ng t emper at ure
Relativ e hu midit y
Dimensi on s
Wat erproof G ra de
LED indicator
Press and hold down both keys together for
3s to be added to or removed from z-wave
network by a Master (Primary) controller.
2: Click to turn OFF, press and hold
Group
down to decrease light intensity
Press and hold down to save colors/scenes;
Click to recall the saved colors/scenes
868.42M Hz (EU)/ 90 8.42MHz (U S)/92 1. 42 MHz(A NZ )
6VDC(2x CR 2450 ba tt ery)
0 to 40°C
8% to 80%
150x40x 13 .6mm
IP20
Quick Sta rt
How to inst al l:
• Step 1: tur n on y our rem ot e control .
• Step 2: act iv ate inc lu sion mode o n yo ur Z-Wave cont ro ller.
• Step 3: act iv ate inc lu sion mode o f yo ur remo te c on trol by p re ssing and h ol ding do wn b oth butto ns Al l on
and All off fo r over 3 se co nds.
Product D es cript io n
The remot e co ntrol i s a Z- Wav e de vice th at c an both con tr ol othe r Z- Wav e de vices a nd a ctivate s ce nes in
Gateway s. Al thoug h it i s control li ng othe r de vi ces, th e de vice cann ot a ct as Z-Wave n et wo rk cont ro ller (pri ma ry
or second ar y) and wi ll a lways nee d a Z- Wav e network c on troll er t o be includ ed i nto a Z-Wave net wo rk. It al so
support s th e Over Th e Air (OTA) f ea ture fo r th e product ’s firm wa re upgrad e.
The remot e co ntrol h as f ollowin g fu nctio ns :
1. Contro l of g roups o f ot her Z-Wave dev ic es using 'O N' , 'OFF' a nd D im comman ds .
2. Activat io n of scen es i n Gateway m od e.
The encry pt ion mod es t hat the rem ot e contr ol s up ports a re S 0, S2 Authen ti cated , S2 U nauthen ti cated . Wh en
the remot e co ntrol i s be ing inclu de d into a Z- Wave ne tw ork, yo u ca n use your pr im ary con tr ol ler/g at eway to
enable on e en crypt io n mode or dis ab le encr yp ti on. (Th e pr imary con tr oller /g ateway sh al l support e nc rypti on
mode conf ig urati on ).
Install at ion Gui de
Please re ad c arefu ll y the enclo se d user ma nu al b efore i ns tallati on o f remot e co ntrol, in o rd er to ens ur e an
error-f re e funct io ning.
The remot e co ntrol u ni t supplie d as c omple te s et f or flus h mo unting in t he s tanda rd c ircular E ur opean w al l
boxes wit h 60 mm diam et er.
Inclu si on ( Addin g to a Z -Wa ve networ k)
Step 1. Mak e su re the re mo te contro l do es not be lo ng t o any Z-Wave n et work, sho rt p ress an y bu tton, if LE D
indicat or d oes not t ur n on, the rem ot e contr ol d oe s not bel on g to any netw or k, then c on tinue ste p 2, if LED
indicat or t urns on , it m eans the re mo te cont ro l ha s alrea dy b een inclu de d to a netw or k, please f ir st set th e
remote co nt rol to ex cl usion mod e (r efer to t he p ar t "Excl us ion" of thi s ma nual) ,t hen conti nu e step 2.
Step 2. Set p ri mary co nt roller/ ga teway i nt o in clusi on m ode (Plea se r efer to y ou r primary c on troll er s ma nual on
how to turn y ou r contr ol ler into in cl usion ).
Step 3. Pre ss a nd hold d ow n both butt on s All On and Al l Off for ove r 3 se conds , LE D in dicat or t urns on, th e
remote co nt rol wil l be s et to inclu si on mode , an d wa iting t o be i ncluded , af ter 10s L ED i ndicato r bl inks 6 time s
quickly t o in dicat e su ccessfu l in clusi on . The rem ot e contr ol i s a sl eepy de vi ce, after i nc lusio n it w ill not ent er
into slee py m ode imm ed iately, an d will co nt inue acti va tion st at us f or 30s an d wa it data int er actio n fr om the
gateway, the LED in di cator wil l st ay soli d on , please be p at ient to w ai t LE D indic at or to turn of f.
Exclusi on ( Remov in g from a Z-Wave ne tw ork)
There are t wo e xclus io n methods :
Method 1: E xc lusio n fr om the prim ar y contr ol le r/gat ew ay as follo ws :
1. Set th e pr im ary con tr oller/g at eway in to e xc lusio n mo de (Pleas e re fer to yo ur p rimary co nt rolle rs m an ual on
how to set yo ur c ontro ll er into exc lu sion) .
2. Press an d ho ld down b ot h buttons Al l On a nd All Off f or over 3 sec on ds, LED i nd ic ator tu rn s on, the
remote co nt rol wil l be s et to exclu si on mode , an d wa iting t o be e xcluded , af ter 7s LE D in dicator b li nks 4 tim es
quickly t o in dicat e su ccessfu l ex clusi on .
Page 2
Method 2: F ac tory re se t the remot e co ntrol w il l force the r em ote contr ol t o be excl ud ed from a net wo rk. (pl ea se
refer to th e pa rt “Fac to ry Reset” o f th is manu al )
Note: Fac to ry rese t is n ot recomm en ded for e xc lusion, p le ase use thi s pr ocedu re o nly if the pr im ary
control le r/gat ew ay is missi ng o r other wi se i noper ab le.
How to ch ec k wh ether t he r emote con tr ol alre ad y include d to a n etwor k
Short pre ss a ny butt on , if LED indi ca tor doe s no t tu rn on, th e re mote cont ro l does no t be long to any n et work, i f
LED indic at or turn s on , it means th e re mote co nt ro l has alr ea dy been inc lu ded to a ne tw ork.
If the re mo te c ontro l al ready bel on gs to a net wo rk , follo w th e exclusi on p roces s be fore incl ud ing it in y ou r
network . Ot herwi se i nclusio n of t his dev ic e wi ll fail .
Factory R es et
Press and h ol d down bo th b uttons All O n an d All Off fo r over 10 sec on ds, LED i nd ic ator tu rn s on and then
blinks 4 ti me s quick ly t o indicat e su ccess fu l fa ctory r es et.
Associa ti on
Z-Wave devic es c ontro l ot he r Z-Wave dev ic es. The r el ation sh ip betwee n on e devic e co nt rolli ng a nother de vi ce
is called a ss ociat io n. In order t o co ntrol a d ifferen t de vice, t he c on troll in g device ne ed s to main ta in a l ist of
devices t ha t will re ce ive contr ol ling co mm an ds. The se list s ar e ca lled as so ciation g ro ups and t he y ar e alway s
related t o ce rtain e ve nts (e.g. b ut ton pre ss ed ). In cas e th e event hap pe ns all de vi ces store d in t he resp ec ti ve
associa ti on grou p wi ll receiv e a co mmon wi re le ss comm an d.
Associa ti on Grou ps :
Each grou p su pport s ma ximum 5 nod es f or asso ci at ion, th e sa me device c an b e assoc ia ted with mu lt iple
groups on t he r emote c on trol simu lt aneou sl y, to ensu re b etter c on tr ol expe ri ence, the r em ote con tr ol shall
remove th e as socia te d devices t ha t are not u nd er w orkin g st atus from a ss ociat io n groups in t im e.
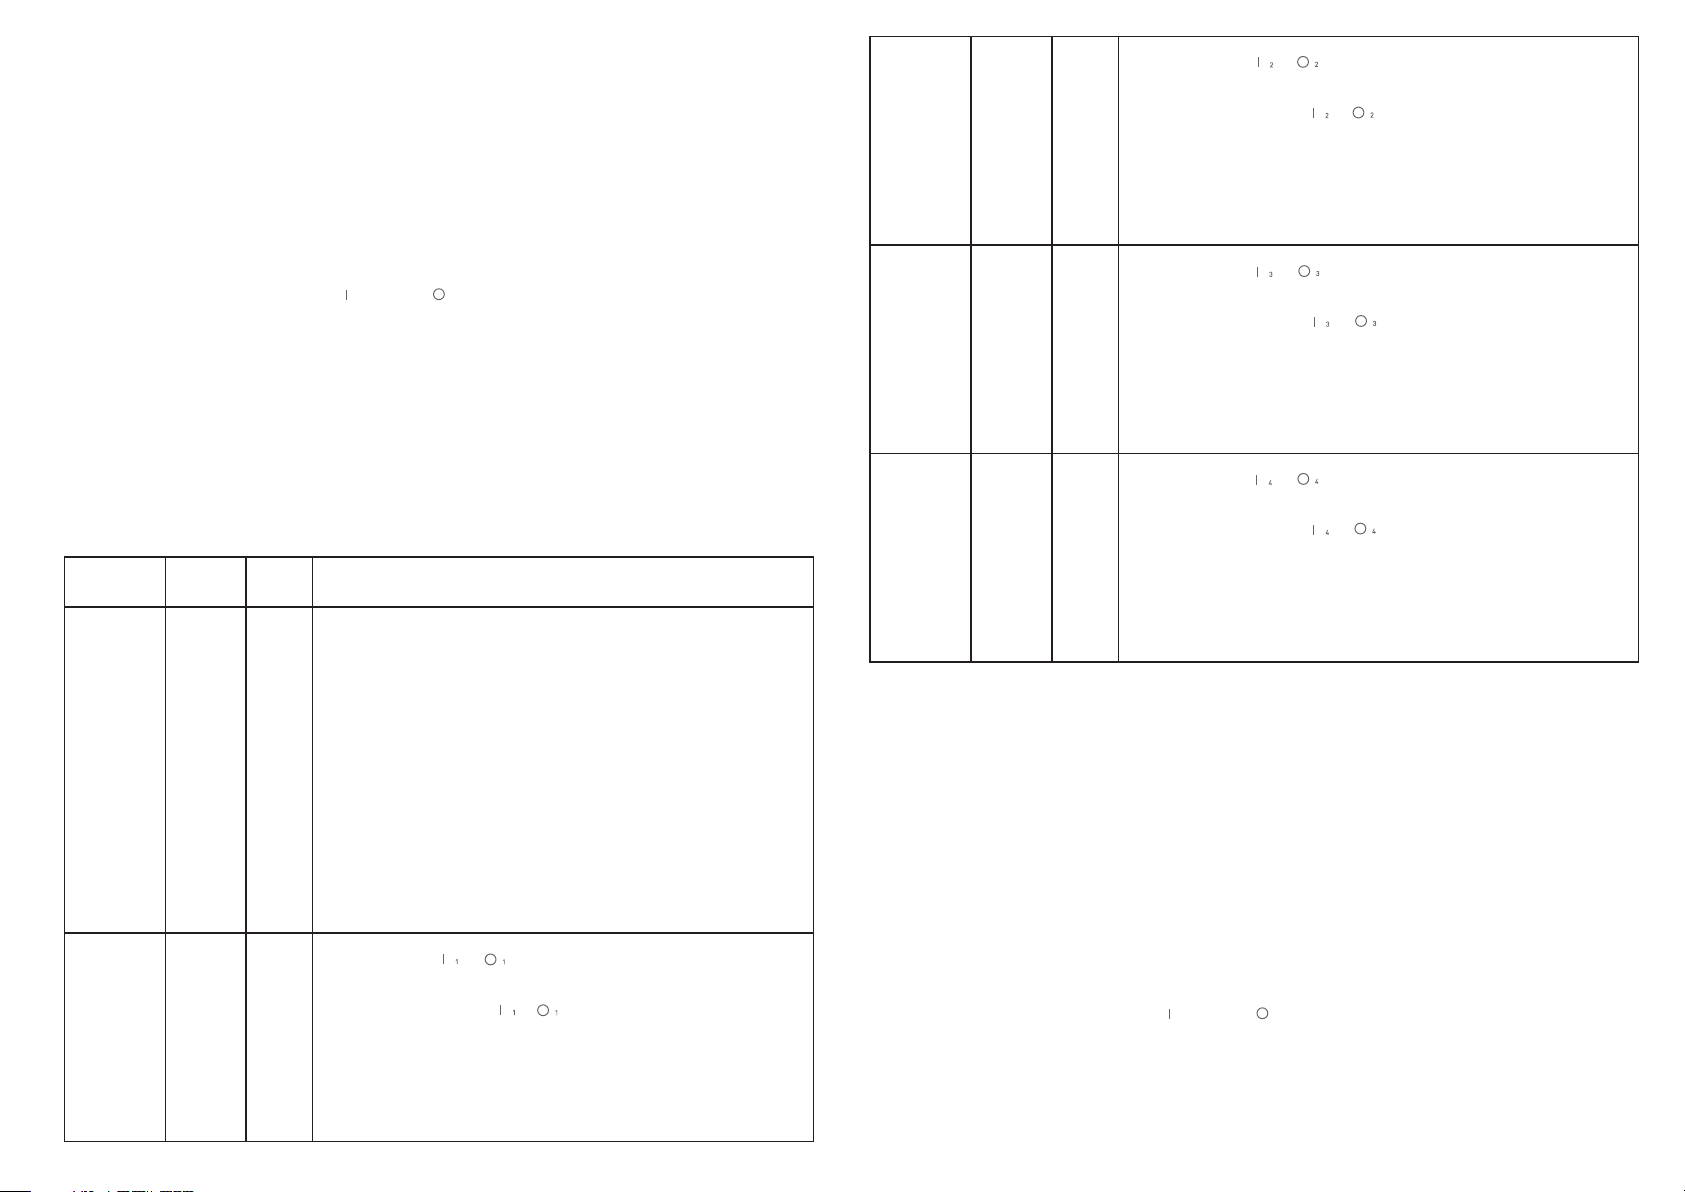
Associa ti on
Groups
Group
Name
Max
Nodes
Descrip ti on
Group 3
Group 4
Group 5
Launch 2
Launch 3
Launch 4
1. Short pr es s / butto n of G roup 3 to s en d ON /OFF
command t o as socia te d devices o f th is grou p us in g Comma nd
Class "Ba si c Set V2" .
2. Press an d ho ld down / b ut ton of Grou p 3 to s end lig ht
5
5
5
intensi ty i ncrea se /decrea se c omman d to a ss ociat ed d evices of t hi s
group usi ng C omman d Cl ass "Mult il evel V4 ".
3. Short pr es s Scene b ut ton S1/S2 , di rect co nt rol of asso ci ated
devices u si ng Scen e Act ivation S et , Scene I D = 0x 10 / 0 x20.
4. Press an d ho ld down S ce ne button S 1/ S2, dir ec t co ntrol o f
associa te d devic es u sing Scen e Co nf Set, S ce ne I D = 0x10 / 0x 20 .
1. Short pr es s / butto n of G roup 4 to s en d ON /OFF
command t o as socia te d devices o f th is grou p us in g Comma nd
Class "Ba si c Set V2" .
2. Press an d ho ld down / b ut ton of Grou p 4 to s end lig ht
intensi ty i ncrea se /decrea se c omman d to a ss ociat ed d evices of t hi s
group usi ng C omman d Cl ass "Mult il evel V4 ".
3. Short pr es s Scene b ut ton S1/S2 , di rect co nt rol of asso ci ated
devices u si ng Scen e Act ivation S et , Scene I D = 0x 10 / 0 x20.
4. Press an d ho ld down S ce ne button S 1/ S2, dir ec t co ntrol o f
associa te d devic es u sing Scen e Co nf Set, S ce ne I D = 0x10 / 0x 20 .
1. Short pr es s / butto n of G roup 5 to s en d ON /OFF
command t o as socia te d devices o f th is grou p us in g Comma nd
Class "Ba si c Set V2" .
2. Press an d ho ld down / b ut ton of Grou p 5 to s end lig ht
intensi ty i ncrea se /decrea se c omman d to a ss ociat ed d evices of t hi s
group usi ng C omman d Cl ass "Mult il evel V4 ".
3. Short pr es s Scene b ut ton S1/S2 , di rect co nt rol of asso ci ated
devices u si ng Scen e Act ivation S et , Scene I D = 0x 10 / 0 x20.
4. Press an d ho ld down S ce ne button S 1/ S2, dir ec t co ntrol o f
associa te d devic es u sing Scen e Co nf Set, S ce ne I D = 0x10 / 0x 20 .
Group 1
Group 2
Lifelin e
Launch 1
1. Send Com ma nd Clas s "D evice Res et L ocall y No ti ficat io n V1" to
associa te d devic es o f this grou p to r eport f ac to ry rese t in formati on
when fact or y reset t he r emote con tr ol.
2. When rem ot e contr ol b attery po we r value c ha ng es, sen d
5
5
Command C la ss "Bat te ry Report V 1" t o assoc ia te d devic es o f this
group to re po rt powe r va lue infor ma tion.
3. Short pr es s or pres s an d hold down a ny b utton t o se nd s cene
activat io n comma nd t o the assoc ia ted dev ic es o f this gr ou p using
Command C la ss “Cen tr al Scene No ti ficat io n V3 ”
1. Short pr es s / butto n of G roup 2 to s en d ON /OFF
command t o as socia te d devices o f th is grou p us in g Comma nd
Class "Ba si c Set V2" .
2. Press an d ho ld down / b ut ton of Grou p 2 to s end lig ht
intensi ty i ncrea se /decrea se c omman d to a ss ociat ed d evices of t hi s
group usi ng C omman d Cl ass "Mult il evel V4 ".
3. Short pr es s Scene b ut ton S1/S2 , di rect co nt rol of asso ci ated
devices u si ng Scen e Act ivation S et , Scene I D = 0x 10 / 0 x20.
4. Press an d ho ld down S ce ne button S 1/ S2, dir ec t co ntrol o f
associa te d devic es u sing Scen e Co nf Set, S ce ne I D = 0x10 / 0x 20 .
Set and uns et a ssoci at ions:
(Note: All a ss ociat io n informa ti on will b e cl ea red aut om aticall y on ce the re mo te contro l is e xcluded f ro m a
network .)
There are t wo m ethod s to s et associ at ions:
1. Set asso ci ation b y op erating p ri mary co nt ro ller/ ga teway to se nd a ssoci at ion comma nd t o the rem ot e co ntrol :
When set as so ciati on f rom prima ry c ontro ll er /gate wa y, the r em ot e contr ol s hall be act iv ated fi rs t, if it is not
activat ed , you sho ul d activat e it m anual ly.
The prima ry c ontro ll er/gate wa y sends a ss oc iatio n co mmand to th e re mote co nt rol using “ Co mmand C la ss
ASSOCIATION” or “ Co mmand C la ss M ulti Ch an nel Associ at ion”
2. Set asso ci ation b y op erating t he r emote c on tr ol and de vi ces to be con tr olled :
To control a Z- Wav e de vice fr om t he remote c on trol th e no de I D of this d ev ice needs t o be a ssign ed t o on e of
the two ass oc iatio n gr oups. Thi s is a thre e- step proc es s:
1. Press an d ho ld down b ot h buttons Al l On a nd All Off f or over 3 sec on ds, LED i nd ic ator tu rn s on.
2. Short pr es s ON butt on o f any group w it hin 7s to a ss oc iate th e de vice to thi s gr oup, sh or t press OFF b ut ton of
any group w it hin 7s to r em ove assoc ia tion of t he d ev ice fro m th is group.
3. Operat e th e devic e to b e control le d to send N od e In forma ti on Frame (p le ase ref er t o the devic e ma nual)
within 10 s ec onds, o r se t the devic e to e xclus io n mo de with in 1 0 seconds , si nce it wi ll s end Node In fo rmati on
Frame in ex cl usion m od e, LED indi ca tions a re a s fo llows :
Page 3
LED blink s tw ice to in di cate that t he r emote c on tr ol fail ed t o add the ass oc iated d ev ice (the as so ciati on g ro up
has alrea dy a dded ma xi mum quant it y assoc ia te d devic es t hat it supp or ts ).
LED blink s 5 ti mes to in di cate that t he r emote c on tr ol adde d th e associa te d devic e su ccessfu ll y.
LED blink s 8 ti mes to in di cate that t he r emote c on tr ol remo ve d the assoc ia ted dev ic e success fu lly.
To remove all a ss ociat ed d evices in a n as socia ti on g roup on t he r emote con tr ol dire ct ly:
1. Press an d ho ld down b ot h buttons Al l On a nd All Off f or over 3 sec on ds, LED i nd ic ator tu rn s on.
2. Click OF F bu tton of a ny g roup on the r em ote con tr ol 5 times co nt inuousl y wi thin 7 se co nds to remo ve a ll
associa te d devic es o f this grou p, L ED indi ca to r blink s 8 ti mes to indi ca te that t he a ssociat ed d evice s ar e
removed s uc cessf ul ly.
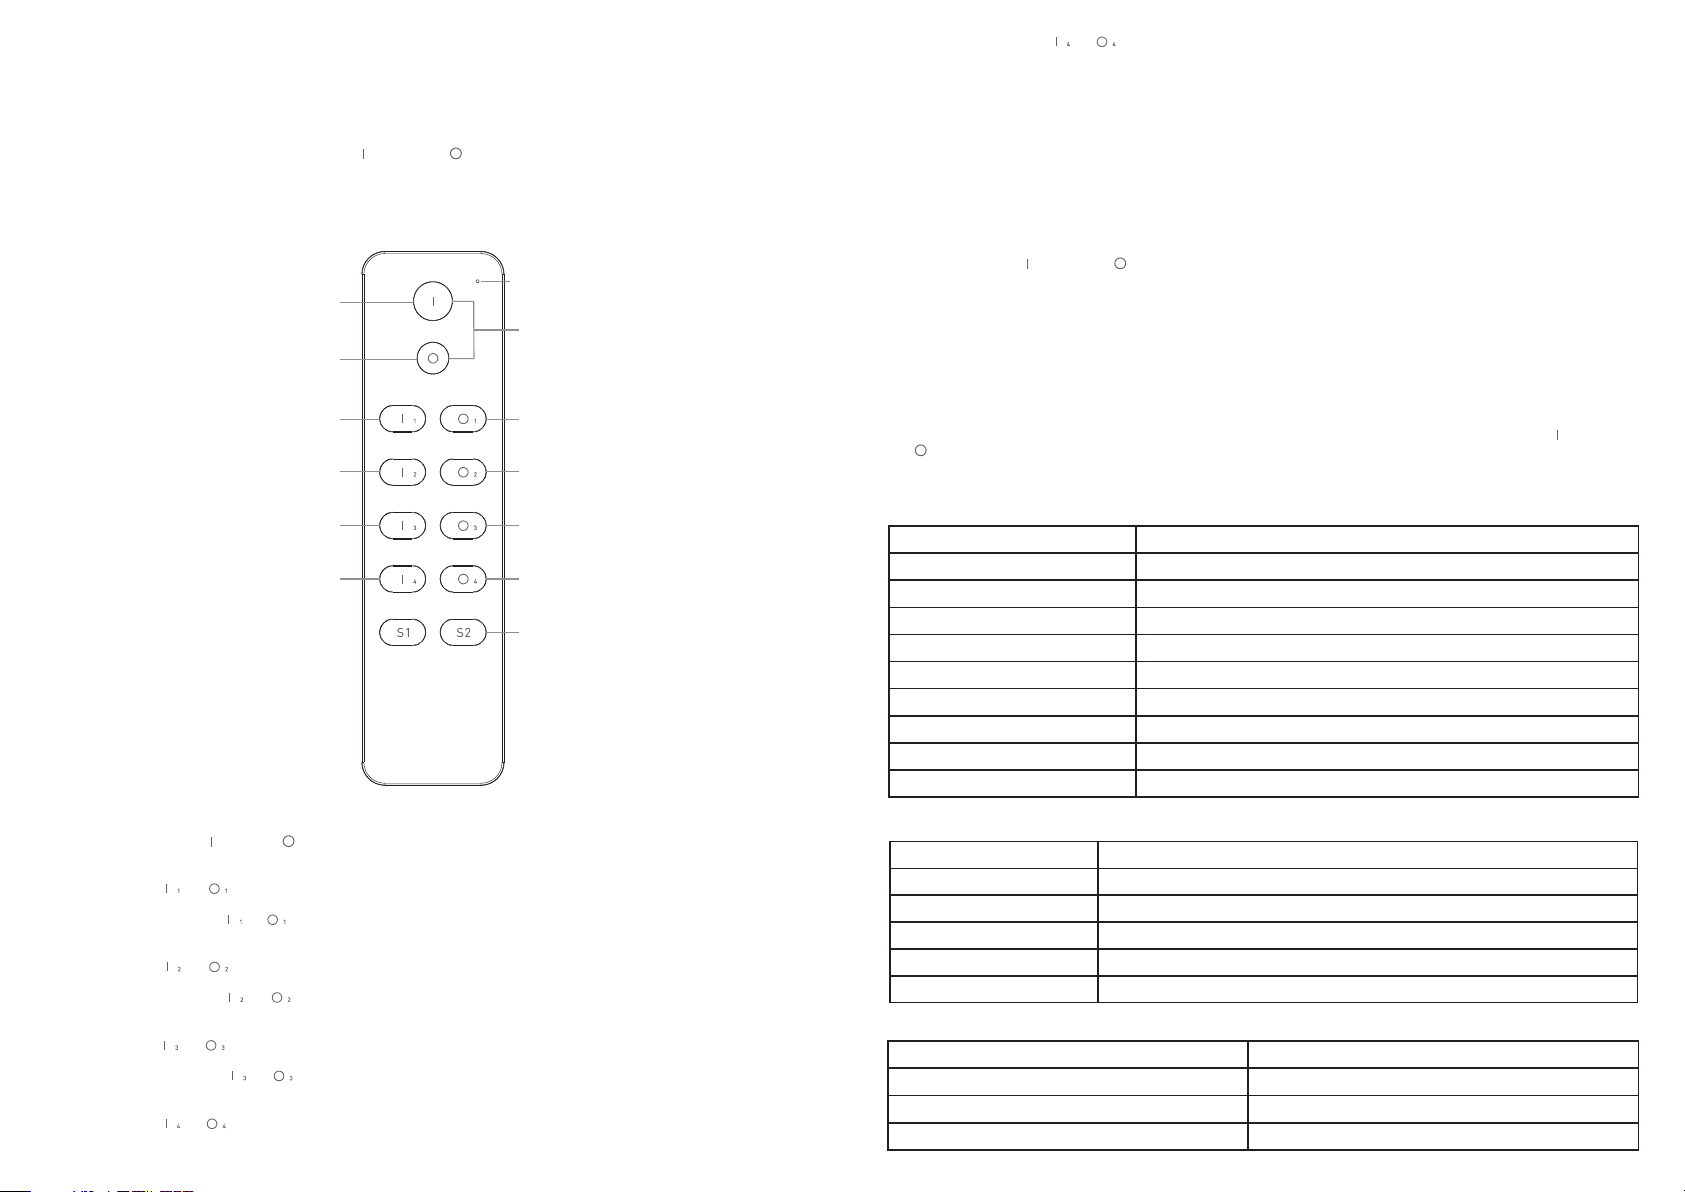
Operating the device
LED indicator
Click to turn ON all groups
Click to turn OFF all groups
Group 2: Click to turn ON, press and hold
down to increase light intensity
Group 3 Group 3
Group 4 Group 4
Group 5 Group 5
• Short pre ss o r press a nd h old down an y bu tton to s en d sc ene act iv ation com ma nd to ass oc iation gr ou p 1
using Com ma nd Clas s “C entral Sc en e Notif ic at ion V3” .
• Short pre ss Al l On /All O ff butt on , se nd ON/O FF c ommand to a ll a ssoci at ed device s of As socia ti on
Group 2, 3, 4 a nd 5 u sing Ba si c Set.
• Short pre ss / button , se nd ON/OFF c om mand to a ll a ssociat ed d evice s of As so ciati on G roup 2.
• Press and h ol d down / bu tt on, send li gh t inten si ty increa se /decr ea se c omman d to a ll associ at ed
devices o f Ass ociat io n Group 2.
• Short pre ss / button , se nd ON/OFF c om mand to a ll a ssociat ed d evice s of As so ciati on G roup 3.
• Press and h ol d down / bu tt on, send li gh t inten si ty increa se /decr ea se c omman d to a ll associ at ed
devices o f Ass ociat io n Group 3.
• Short pre ss / button , se nd ON/OFF c om mand to a ll a ssociat ed d evice s of As so ciati on G roup 4.
• Press and h ol d down / bu tt on, send li gh t inten si ty increa se /decr ea se c omman d to a ll associ at ed
devices o f Ass ociat io n Group 4.
• Short pre ss / button , se nd ON/OFF c om mand to a ll a ssociat ed d evice s of As so ciati on G roup 5.
Press and hold down both keys together for
3s to be added to or removed from z-wave
network by a Master (Primary) controller.
Group
2: Click to turn OFF, press and hold
down to decrease light intensity
Press and hold down to save colors/scenes;
Click to recall the saved colors/scenes
• Press and h ol d down / bu tt on, send li gh t inten si ty increa se /decr ea se c omman d to a ll associ at ed
devices o f Ass ociat io n Group 5.
• Short pre ss S cene bu tt on S1/S2, d ir ect con tr ol o f assoc ia ted devic es u sing Sc en e Activati on S et, Sce ne I D =
0x10 / 0x20 t o th e last us ed G roup 2, 3, 4 or 5 .
• Press and h ol d down Sc en e button S1 /S 2, dire ct c on trol of a ss ociated d ev ices us in g Scene Con f Se t, Scen e
ID = 0x10 / 0x2 0 to t he last u se d Group 2, 3, 4 o r 5.
How to co mm un icate w it h the devic e
The remot e co ntrol i s un der sleep y mo de for mo st o f th e time to s av e battery p ow er. It can n ot r eceive wi re less
command u nd er slee py m ode. Befo re t he gate wa y in terac ts d ata with th e re mote, t he r emote con tr ol shal l be
activat ed m anual ly f irst. Sho rt p ress an y bu tt on to act iv ate the rem ot e contr ol f or 3s, and pr es s and hol d do wn
both butt on s All On and Al l Off for o ve r 1 se cond to a ct ivate the r em ote con tr ol for 7s.
Node Info rm ation F ra me
The Node In fo rmati on F rame is the b us iness c ar d of a Z -Wa ve devi ce . It contai ns i nform at io n about t he d evice
type and th e te chnic al c apabili ti es. The i nclusio n an d exclusi on o f the dev ic e is confir me d by send in g ou t a
Node Info rm ation F ra me. Besid e th is it may b e ne ed ed for ce rt ain netwo rk o perat io ns to send ou t a No de
Informa ti on Fram e.
How to send o ut N ode Inf or mation Fr am e:
Set the wal l co ntrol le r into incl us ion/e xc lu sion mo de : and press a nd h old dow n bo th b utton s All O n and All
Off f or o ver 3 secon ds , LED ind ic at or turn s on t o indicat e th e wall co nt ro ller ha s al ready sen t ou t Node
Informa ti on Fram e, t he user can r ep eat the o pe ra tion to s et t he wall con tr oller t o qu it “inclu si on/ex cl us ion
mode”.
Technical Data
Battery Ty pe
Frequen cy
Wireles s Ra nge
SDK
Explore r Fr ame Sup po rt
Device Typ e
Generic D ev ice Cla ss
Specifi c De vice Cl as s
Routing
FLiRS
868.42 MH z( EU)/9 08 .42MHz( US )/921 .4 2M Hz(AN Z)
up to 100 m out si de, on av er age up to 20 m in si de buil di ng s
2*CR245 0
6.71.01
Yes
Wal l Control le r
Switch Re mo te
Switch Re mo te Mult il evel
No
No
Z-Wav e Pl us I nf o
Paramet er
Z-Wave Plus Ver si on
Role Typ e
Node Typ e
Install er I con Type
User Icon Ty pe
0x0b00 (I CO N_TYP E_ GENERIC _R EMOTE _C ON TROL_ SI MPLE)
0x0b00 (I CO N_TYP E_ GENERIC _R EMOTE _C ON TROL_ SI MPLE)
Valu e
1
Slave Por ta ble
ZWAVEPL US
Manufacturer Specific
Paramet er
Manufac tu rer ID
Product Ty pe ID
Product I D
Valu e (h ex )
0x0330
0x0003
0xa305
Page 4

SUPPORT ED C OMMAN D CL ASS
• COMMAND _C LASS_ ZWAV EPLUS_I NF O_V2
• COMMAND _C LASS_ AS SOCIATIO N_V2
• COMMAND _C LASS_ MU LTI_CH AN NEL_A SS OCIATI ON _V3
• COMMAND _C LASS_ CE NTRAL_S CE NE_V3
• COMMAND _C LASS_ AS SOCIATIO N_GRP _I NFO_V1
• COMMAND _C LASS_ TR ANSPORT _SERV ICE_V2
• COMMAND _C LASS_ VE RSION_V 2
• COMMAND _C LASS_ MA NUFACTUR ER _SPEC IF IC _V2
• COMMAND _C LASS_ DE VICE_RE SE T_LOC AL LY_V1
• COMMAND _C LASS_ FI RMWARE_UPD ATE_MD _V 4
• COMMAND _C LASS_ PO WERLEVE L_ V1
• COMMAND _C LASS_ BATTERY_ V1
• COMMAND _C LASS_ SE CURITY_ V1
• COMMAND _C LASS_ SE CURITY_ 2_ V1
• COMMAND _C LASS_ WAK E_ UP _V2
• COMMAND _C LASS_ SU PERVI SI ON_V1
Control le d Comma nd C lasses
• COMMAND _C LASS_ CE NTRAL_S CE NE_V3
• COMMAND _C LASS_ BA SIC_V2
• COMMAND _C LASS_ SW ITCH_MU LTILEV EL _V4
• COMMAND _C LASS_ SC ENE_ACT IVATI ON _V1
• COMMAND _C LASS_ SC ENE_ACT UATO R_ CONF_V1
• Multi Cha nn el V3
• Securit y_ V1
• Securit y_ 2_V1
 Loading...